- Standard toilet dimensions and minimum toilet size
- The procedure for attaching the tank to the toilet with your own hands
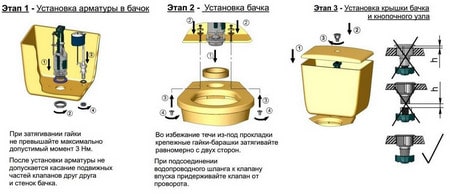
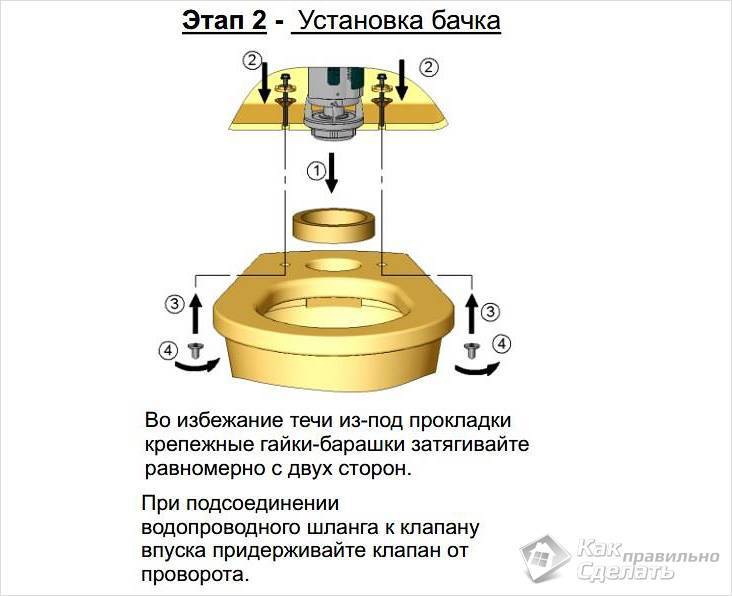
- Technology for installing a new tank
- Removing and installing the tank on the compact ↑
- Dismantling the old device
- Fixing a new tank ↑
- Building requirements
- Compact mounting
- Installing a toilet bowl on cement
- Types of drain tank
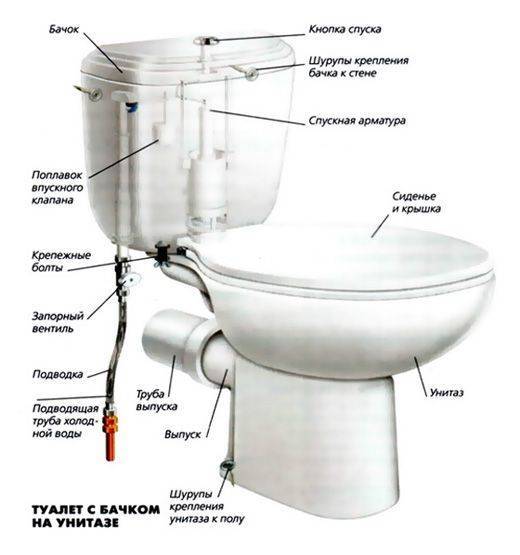
- Internal arrangement and principle of operation of the structure
Standard toilet dimensions and minimum toilet size
GOST 30493-96 normalizes the dimensions of only toilet bowls with a shelf. There are still those that are installed in wagons, but we do not need them. The standard dimensions of a toilet bowl with a shelf are prescribed for two options: with a one-piece cast and with an attached one. The second model is used in a set with mounted / wall-mounted cisterns or without them at all. There are also standard sizes of a children's toilet bowl. They (children's) go without a shelf. All dimensions are shown in the table. And to understand what we are talking about, we look at the drawings.
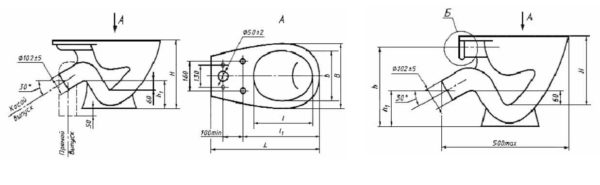
Drawing of a toilet bowl with a one-piece molded shelf and an oblique outlet from GOST
| Toilet design | H | h | h1 | l | l1 | L (depth or length) | b | B (width at widest point) |
|---|---|---|---|---|---|---|---|---|
| With one-piece molded shelf for cistern installation (Compact) | 150 | 330 | 435 | not less than 605 (maybe 575 mm) | 260 | 340 and 360 | ||
| Without shelf (mounted tank) | 370 and 400 | 320 and 350 | 460 | |||||
| Children's | 335 | 285 | 130 | 280 | 380 | 405 | 210 | 290 |
So, the standard size of a toilet bowl with a shelf (usually called "Compact"):
- Length - L - 605 mm. This is taking into account the fact that the model is compact with a ledge for installing a tank. Separately, it is written that shorter models up to 575 mm long can be produced.
- Width - B - also two standard values: 340 and 360 mm.
The height of the toilets is not standardized, but usually within 370-390 mm. So, according to the standard, the narrowest toilet bowl is 340 mm, and the shortest “compact with shelf and oblique drain” model is 575 mm. Based on these values and the minimum allowable distances from the previous paragraph, we can determine minimum toilet dimensions for the installation of such a model. Let's start by calculating the width: 340mm + 2*250mm = 840mm. That is, the distance between the walls cannot be less than 84 cm. Better, of course, more.
And the length of the toilet should be 575 mm + 600 mm = 1175 mm. But this is without taking into account the fact that it is also necessary to lay the sewer pipe and somehow connect the drain. We will allocate another 20 cm for this. In total, we get that the minimum length of the toilet room is 1175 mm + 200 mm = 1375 mm. In meters it is 1.375 m.

Standard dimensions of a toilet bowl without a shelf (with a hanging cistern) from GOST
The standard dimensions of a toilet bowl with a wall-mounted cistern are significantly smaller: length / depth 460 mm, width 360 mm and 340 mm. That is, the room can be shorter. Its minimum depth is 1060 mm - this is only for a comfortable installation of the bowl, but you still need to connect the pipes, so let's add another 20 cm. In total, we get that to install a toilet with a wall-mounted cistern, the room must be at least 126 * 84 cm. if your room is longer, you can push the miracle of plumbing back, and make a cabinet with shelves behind the toilet and / or above it.
The procedure for attaching the tank to the toilet with your own hands
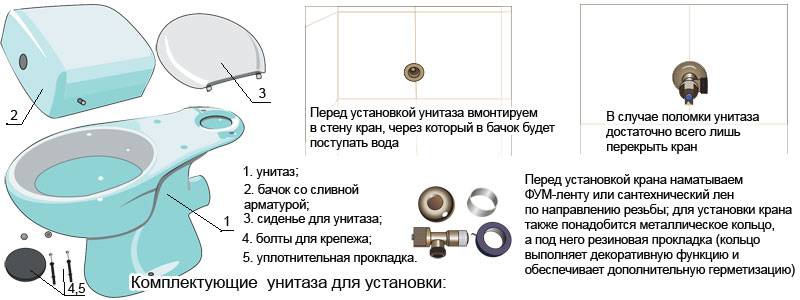
When all the preparatory work is left behind, and the inside is fully assembled, you can start installing the tank. Toilet bowls have different designs and are mounted in different ways. But since the most common model is a compact toilet bowl, we will consider it using its example. Installation consists of a series of sequential steps.
For this work, you need very few tools, and you don’t even need a partner.
- We place the internal reinforcement in the tank and fix it.
- We put the sealant on the shelf. If the fixing bolts are properly tightened, the water drain hole will be hermetically sealed with a gasket. But it is better to use silicone sealant.
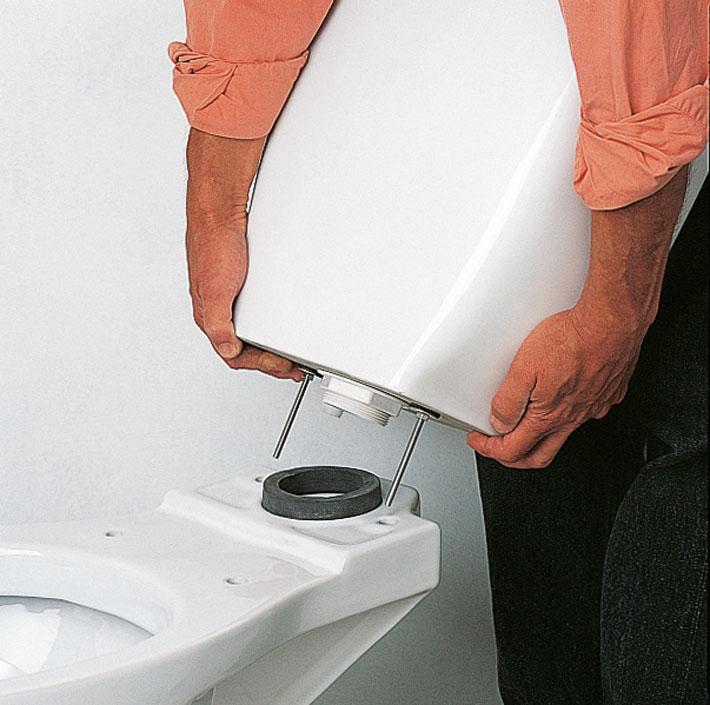
- We put the tank so that the gasket is directly under the drain. Holes for fasteners in the toilet bowl and tank must be strictly opposite each other.
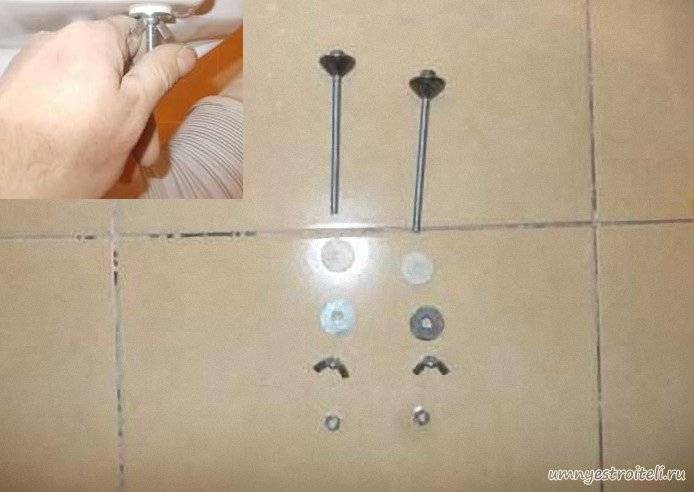
- We put washers in the form of cones on the bolts, as well as rubber gaskets. The conical part of the gaskets should look down. After passing them through two holes, we put on a second set of washers and gaskets and tighten the nuts.
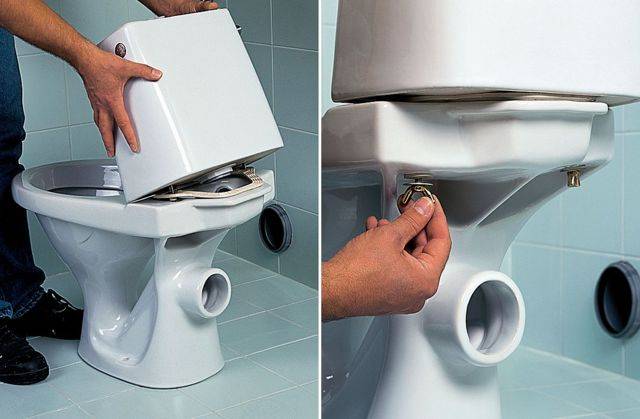
Hand strength is clearly not enough to properly tighten the nuts. There are no keys here. A socket wrench is put on the bolt head, and so that the bolt does not scroll from below, we hold the nut with an open-end wrench.


Do not apply excessive force when tightening the bolts. The more pressure on the gasket, the shorter its life will be. Yes, and the ceramics of the tank may well crack from the pressure of the bolts.
Now you need to align the tank relative to the horizontal and vertical.We check its position in terms of level and, if necessary, tighten or, conversely, loosen the mounting bolts.
As soon as all the work is left behind, we hide the bolts under plastic nozzles. If there are none, then we apply a lubricant to them that protects against corrosion. We check whether we have installed all the fittings inside, set it up. Now you can close the tank with a lid, and install a button on it to reset the water.
Now you can connect the supply pipe and the intake valve. A flexible hose will help us here, most importantly, do not forget to check if there are gaskets in it. To enhance the sealing, we use tow or sealing tape.

Sealant for this case is not recommended. After all, there is no guarantee that there will be no need to replace the hose.
We check how tight the trigger mechanism is and whether it works correctly. To do this, you need to supply water to the tank.
If, after checking, no leaks were found either at the laying site or at the joints, it means that the task was completed successfully and a test drain can be done. After that, we additionally check for possible water leaks. Now everything is finally ready and the toilet can be used.
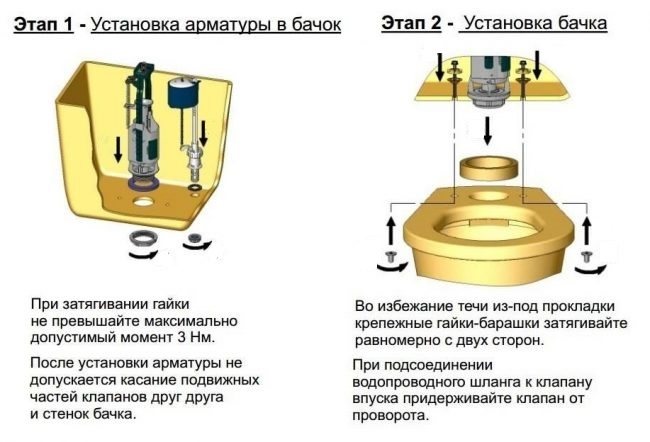
Technology for installing a new tank
First of all, it is necessary to assemble and install all internal fittings.
Now you need to fix the tank. Once it is secured, you can replace the cover and release button that connects to the exhaust valve.
In fact, there is nothing complicated. But! If in your life you have never had to deal with such problems, it would be useful to contact a specialist. This will save time and nerves. When the master is working, watch him. And then next time, do it on your own.
Removing and installing the tank on the compact ↑
Unfortunately, there is no general standard that allows you to freely install any tank on each compact bowl. If instead of the damaged one it was not possible to find a unit of the same model, you will have to look for a similar one. Moreover, there is no guarantee that it will be possible to find a suitable one in terms of the location of the mounts and the shape of the site. First of all, you should refer to the products of the same manufacturer, unless, of course, it is known which company produced the closet. But still, the probability of finding a replacement for a standard (not designer) device is quite high. For domestic products, released recently, there are no special problems. It is most convenient to remove a paper template from the site, where the necessary fixing, drain holes, and contours of the landing site would be applied. Armed with this template, start searching.


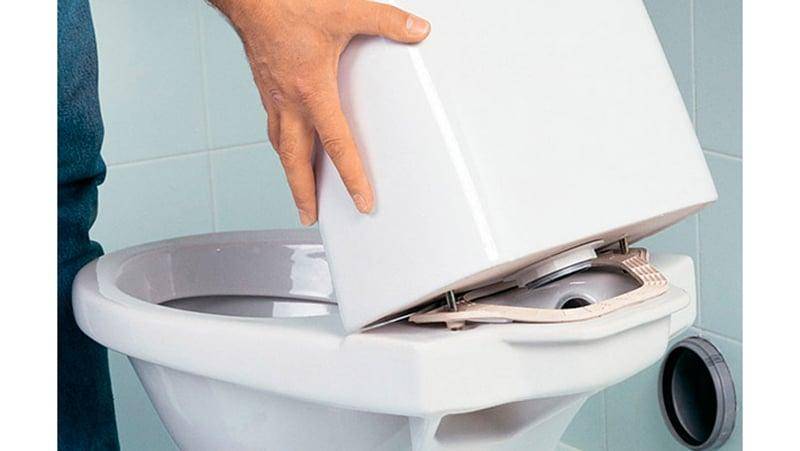

Bypassing other designs with attention, we will tell you how to install a compact, because it is precisely such a device that is available in most apartments.
Dismantling the old device
- Before disassembling the system, do not forget to turn off the water supply by shutting off the valve.
- We drain the water completely, disconnect the water hose.
- We unscrew the two fixing screws from the bottom of the support platform. They have wing heads, steel or plastic, no special tools are required. But in ancient domestic closets, fasteners were made of ordinary ferrous metal, and to our times it has come down in a corroded, completely “hardened” form. You can spray the threads with the wonderful WD fluid that every self-respecting motorist has. It did not help - you have to saw off the screw heads.
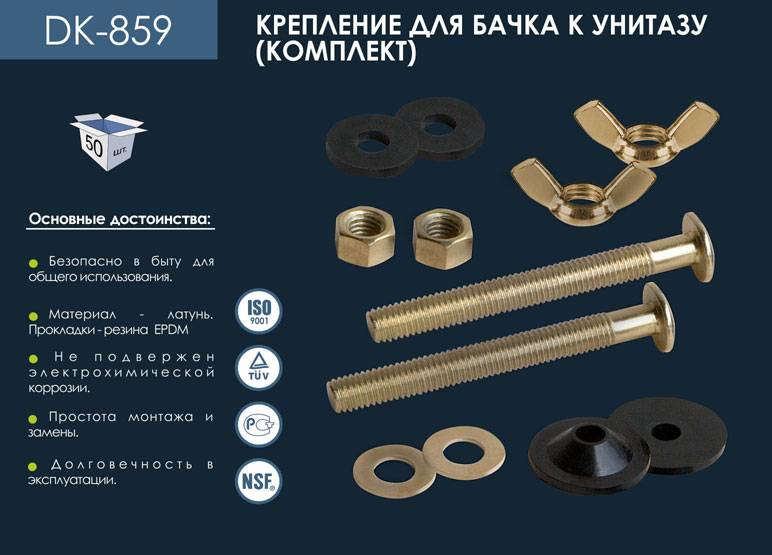
 Modern fasteners are galvanized and equipped with plastic or rubber gaskets
We remove the tank
Carefully, gradually shaking from side to side, if the sealing gum is “stuck”.
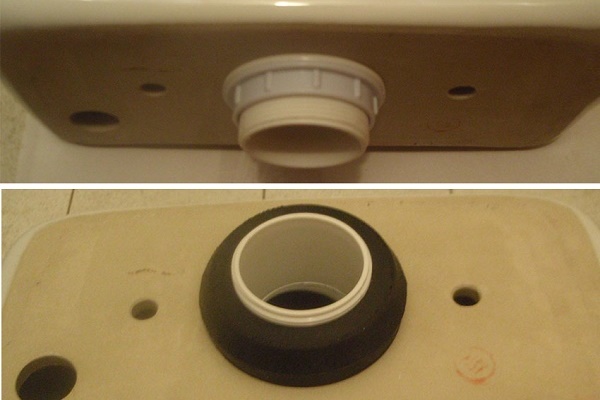
Discard the old seal. If the surface of the support pad is covered with limescale, rust, remove the dirt with an abrasive sponge (not sandpaper or a knife).
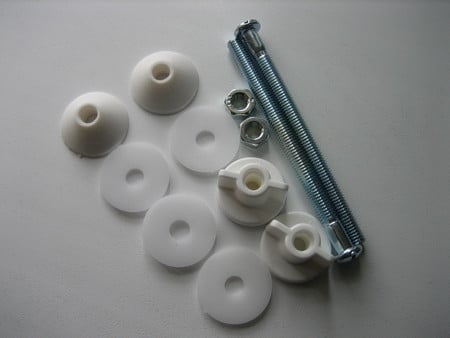
 Even if you do not change the whole thing, it is better to replace the old seal. For domestic plumbing, repair kits are available for sale
Fixing a new tank ↑
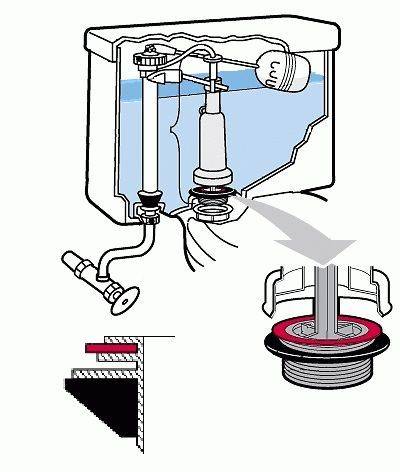
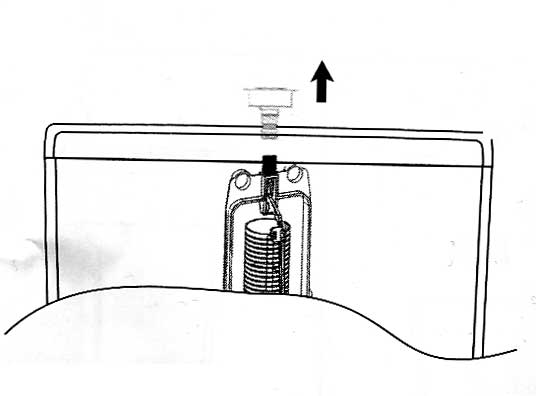
- We install an o-ring in the hole for draining the bowl, carefully install the tank, making sure that the rubber part does not warp.
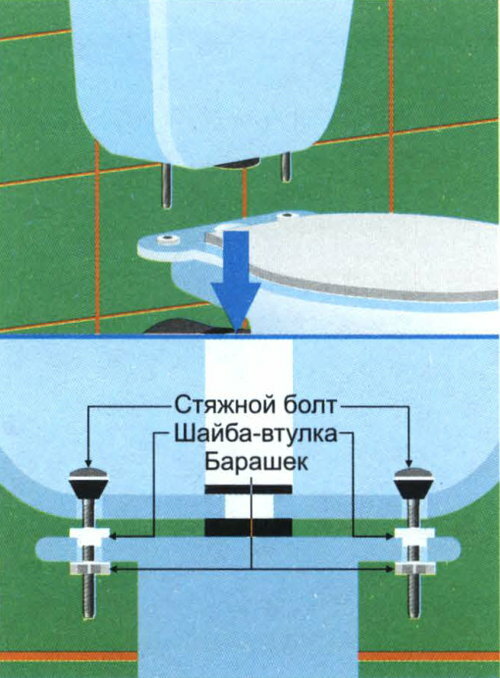
- We insert the bolts and wrap the lambs without pinching them, otherwise the faience may crack. In modern products, fasteners are made of plastic or, if they are steel, they are supplied with soft gaskets. If for some reason there are no gaskets, they should be cut out independently from a sheet of any elastic material (rubber, cork, etc.).
 Follow the instructions, tighten the fasteners evenly on both sides
- We assemble the drain fittings. We will not describe the process, since there are many systems. In any case, the kit contains instructions for assembly and operation, in accordance with it, you must act.
- We connect the water hose by sealing the connection with plumbing tow, FUM tape or sealant.
- We open the valve, if necessary, adjust the water level, focusing on the manufacturer's manual.
It is important to install the gasket between the tank and the bowl without distortion, do not pinch the bolts
In general, nothing complicated, you can repair and update the toilet bowl yourself.But if you don’t have time to mess with plumbing, you don’t have the necessary tools at home, you don’t know how and where to find spare parts, it’s better to entrust this work to specialists.
Building requirements
When designing a combined bathroom, the following SNiP standards should be taken into account:

Scheme of connecting plumbing in the bathroom.
- The minimum area of the combined bathroom, where the sink, toilet, bathtub and space for the washing machine are located, is 3.8 m².
- Before the bath or shower, there should be at least 70 cm of free space, the optimal value is 105-110 cm.
- there must be a free space of at least 60 cm in front of the toilet or bidet, and 40 cm on both sides on the sides of the longitudinal axis of the plumbing.
- The free space in front of the sink should be at least 70 cm, and if it is located in a niche - at least 95 cm.
- The distance between the sink and the wall must be at least 20 cm and between the toilet and the sink - at least 25 cm.
- The sink is installed at a height of more than 80 cm from the floor.
- The flush pipe that flushes the urinal should be at a 45 degree angle with the opening to the wall.
- The best option is to have a window in the bathroom, which provides natural light and ventilation. However, in the construction of modern high-rise buildings, such a design of a bathroom is extremely rare. The window is replaced by a forced ventilation device that removes the resulting condensate and odors from the bathroom.
- The bathroom is not allowed to be located above the kitchen and other living rooms. An exception to this rule are only two-level apartments, where it is allowed to place a toilet and bidet above the kitchen.
By fulfilling all these requirements, you can get a properly equipped bathroom.
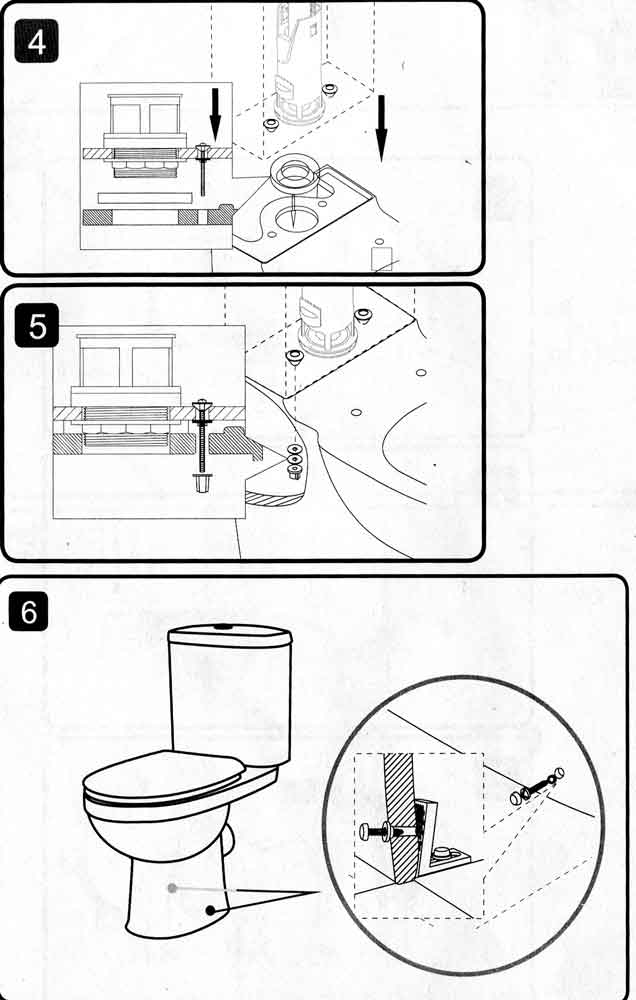
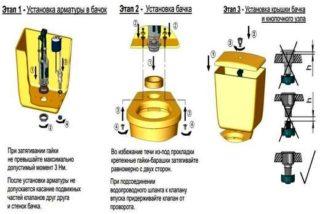
Compact mounting
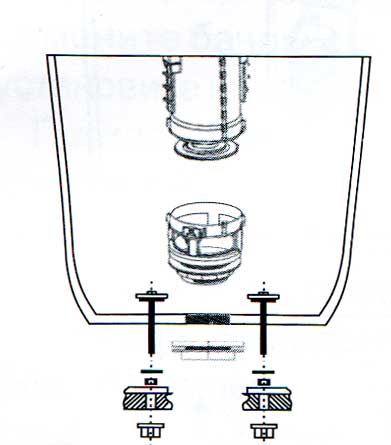
Scheme of assembly and flush tank.
- Check the level and prepare the floor for the installation of the toilet bowl, check the cold water supply, prepare the faucet and strainer. A faucet is needed so that in the event of a toilet failure, you can easily turn off the water. For installation and tightness of the connection, use the FUM tape and rubber gaskets.
- Connect the toilet bowl to the sewer pipe. The connection should not interfere with the outflow of water from the plumbing. The higher the release, the better the flush.
- Make a markup for attaching the base of the toilet. Marking is carried out through mounting holes for dowels.
- Separate the bowl from the sewer, take a puncher and drill holes for dowels or screws. The diameter of the drill should be the same as the diameter of the dowels.
- Install the bowl and screw it to the floor. To do this, use a set of dowels, bolts, caps and gaskets. For better stability of plumbing, you need to additionally coat under the base of the toilet bowl with tile or epoxy glue. The glue is applied with a spatula in the corners so that the layer thickness is not less than 5 mm.
- Check the settings of all water inlet and outlet mechanisms for compliance with the instructions. If there are any deviations, adjust them. The adjustment scheme and the corresponding recommendations are included in the technical documentation for the valve.
- Mount in the tank all the mechanisms for draining and supplying water.
- Correctly connect the flexible hose to the water intake valve in the tank.
- Insert the fastening elements into the openings of the tank. Place a rubber gasket to seal the connection between the bowl and bowl.Place the cistern on the shelf of the toilet bowl so that all the mounting bolts fit into the holes in the shelf.
- Tighten the fixing bolts until the connection is completely tight. Tighten the nuts alternately to avoid damage to the compact. Watch the gaskets and do not overtighten the fasteners.
- Assembling the seat shouldn't be too difficult. Install the seat and screw it to the bowl following the assembly instructions. Check the seat visually. It should not have swelling, roughness and bubbles.
- Connect the flexible hose to the water supply. Turn on the water and adjust the working level in the tank.
Installing a toilet bowl on cement
Mounting a plumbing module on cement is a more outdated method of fastening, which is now chosen much less frequently. In its main points, it resembles the above-described installation option for glue, but instead of modern mixtures and sealants, self-prepared cement mortar is used here.


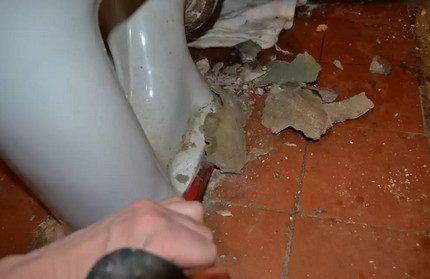
A toilet attached to the floor with cement looks less aesthetically pleasing. If you suddenly need to replace it, you will have to break not only the attachment area, but also the coating adjacent to it
To make the bathroom look more attractive in the future, a small recess is made in the place determined for installation, it is thoroughly cleaned of debris and dust, it is filled to the brim with the prepared solution, and the toilet bowl is placed on top, having previously moistened the edges of the sole with water.
Excess cement is carefully removed with a spatula and the structure is left to harden for a day. After the time has elapsed, they are connected to the sewerage system and water is supplied to fill the tank
Types of drain tank
Drain tanks differ from each other by installation methods and their technical characteristics.
If, after installation on a special ledge, the tank with the bowl are connected into a single structure and look like a single unit, then this drain tank model is called a compact.
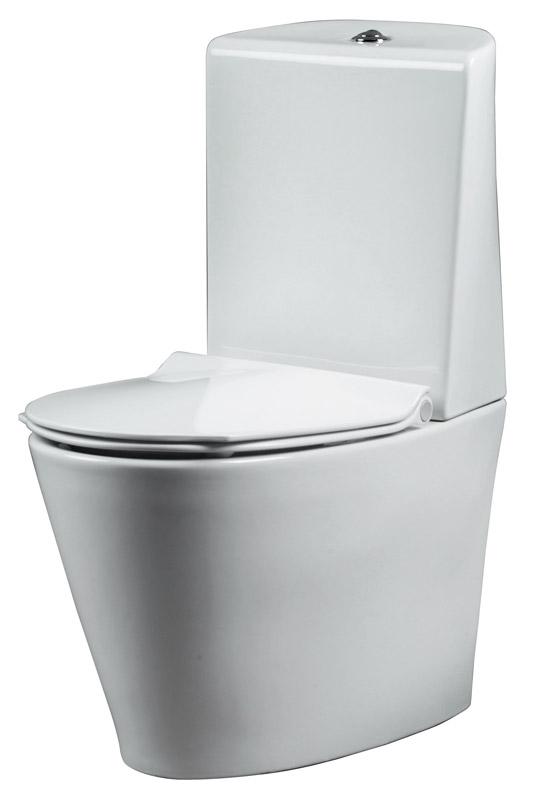
This model is a good option for a beginner as it is the easiest to assemble.
A built-in or hidden drain tank is installed in a wall niche. It goes in tandem with a wall-hung or floor-standing toilet. After installation is completed, it is decorated with a false wall. The main elements of the tank are mounted on the installation frame. If you choose to install a toilet cistern in this way, then you should tune in to a set of works: installing a frame, a cistern, installing a bowl, connecting communication pipes, creating a decor wall. For a quality installation of the structure, it is necessary to have skills in working with plumbing.
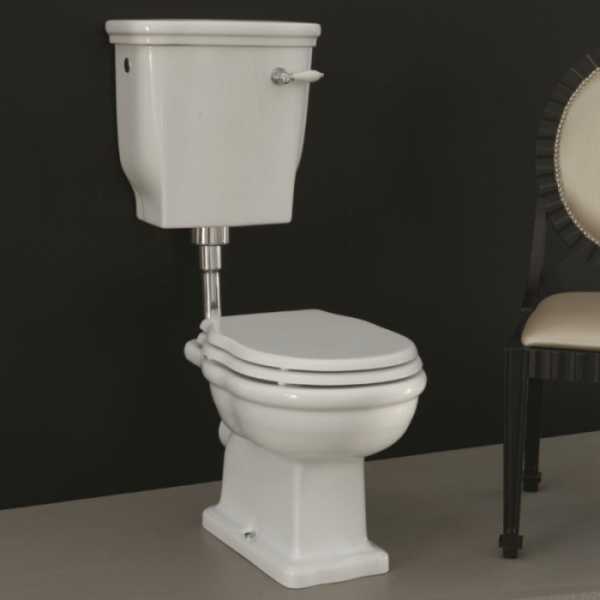
A tank on the wall, mounted separately from the bowl, and connected to it by a special bypass pipe, is an autonomous drain tank (or a hanging container). A modern design can be with a small pipe and then the existing filling of the tank is used, to drain the liquid - a lever or a drain button (in Soviet times it was a chain with a handle).
The compact tank is the most convenient to use - all the elements are assembled. Additionally, there is no need to look for something missing. For built-in and stand-alone capacity, you need to purchase additional parts.


Internal arrangement and principle of operation of the structure
If you understand the design features of the product, it becomes clear how to install a wall-mounted toilet.
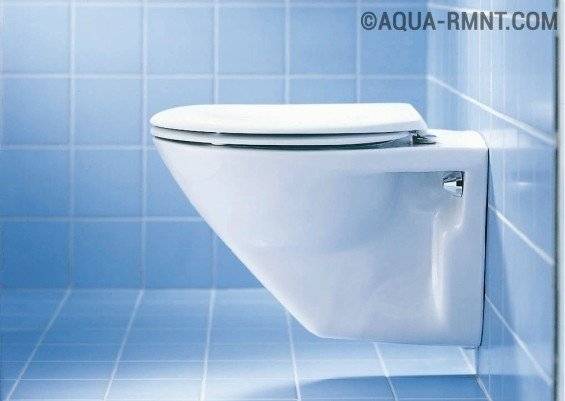
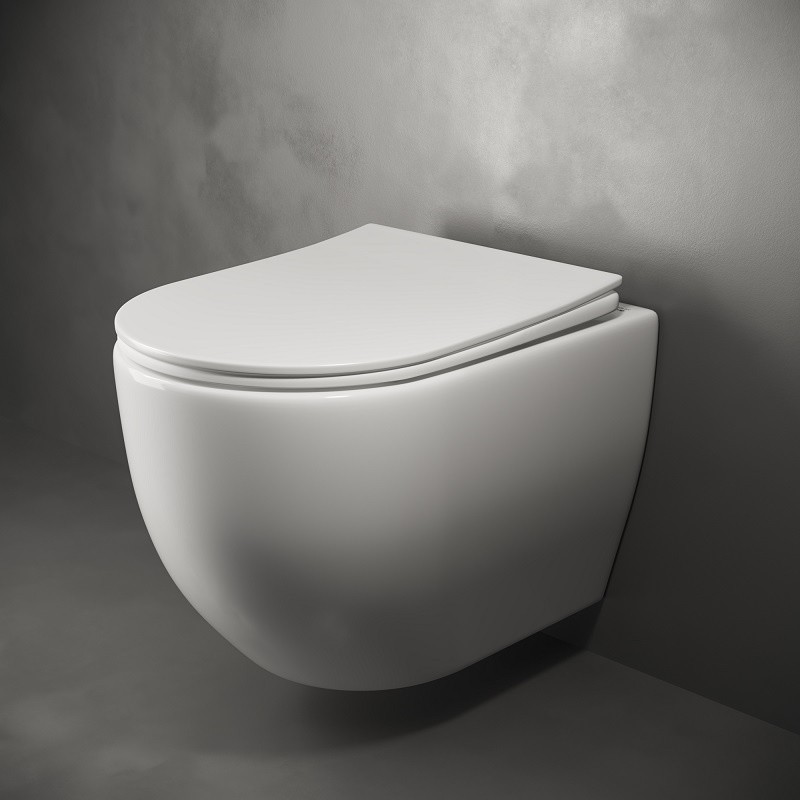
The design of the wall product is such that only the toilet bowl is a visible element
The first element is a strong steel frame, which is the basis to which the visible part of the structure is attached - the toilet bowl. It is with its installation that the installation of a hanging toilet begins. The frame is securely fixed to the wall, also fixed to the floor - as a result, it must withstand the weight of a heavy person.
Accordingly, it is unacceptable to mount this structure to weak walls (for example, drywall), since the wall simply cannot withstand it. The frame is equipped with a device that allows you to adjust the height (400-430 mm), on which the bowl of the product is mounted. It is suspended from the frame using special pins - this is the main fastening of the hanging toilet.
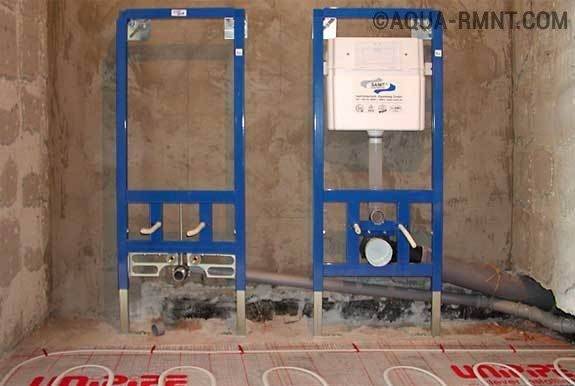
Often two are installed at the same time. installations - for the toilet and for bidet
The second element is hidden in the wall drain tank from plastic. Its shape differs from the traditional one, since the container must fit in a narrow structure. It is mounted in a steel frame and insulated with a special material that excludes the appearance of condensate - styrene. The front wall of the tank is equipped with a cutout for mounting a trigger button device. In case of repair, this cutout is also used. Almost all modern cisterns involve drain dosing: for example, the volume of drained water can be either 3 liters or 6 liters, depending on the purpose.
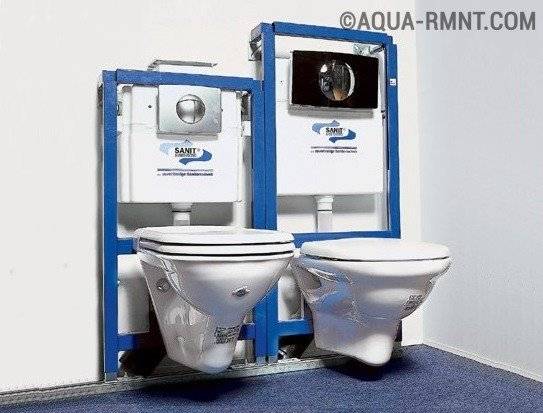
Cisterns of flat configuration are fixed inside the installation
The third element is the toilet bowl, the only visible and actively exploited part of the structure. Its shape is traditional, oval, although designer models come in both round and rectangular configurations.
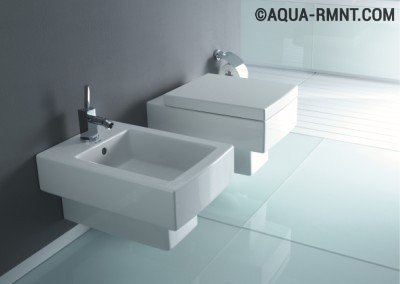
The toilet bowl can be rectangular or even round - it all depends on the imagination of the designer and the desire of the client.
There should be no problems with fasteners, since a set of necessary parts and tools and installation instructions are included with the product. Sometimes it is required to additionally purchase a Teflon tape, a polyethylene outlet, a flexible hose, and studs.