- Schemes and methods of connection
- Bottom installation
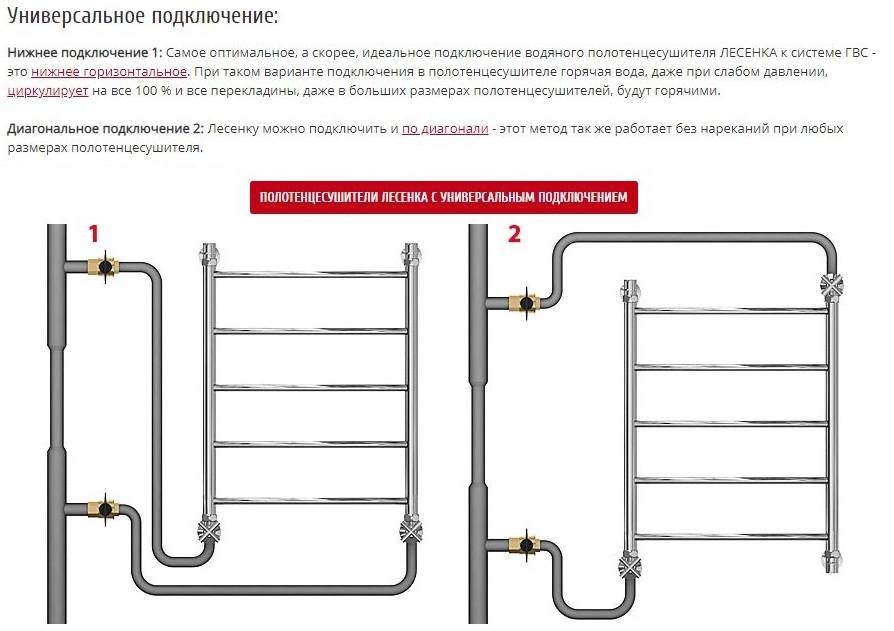
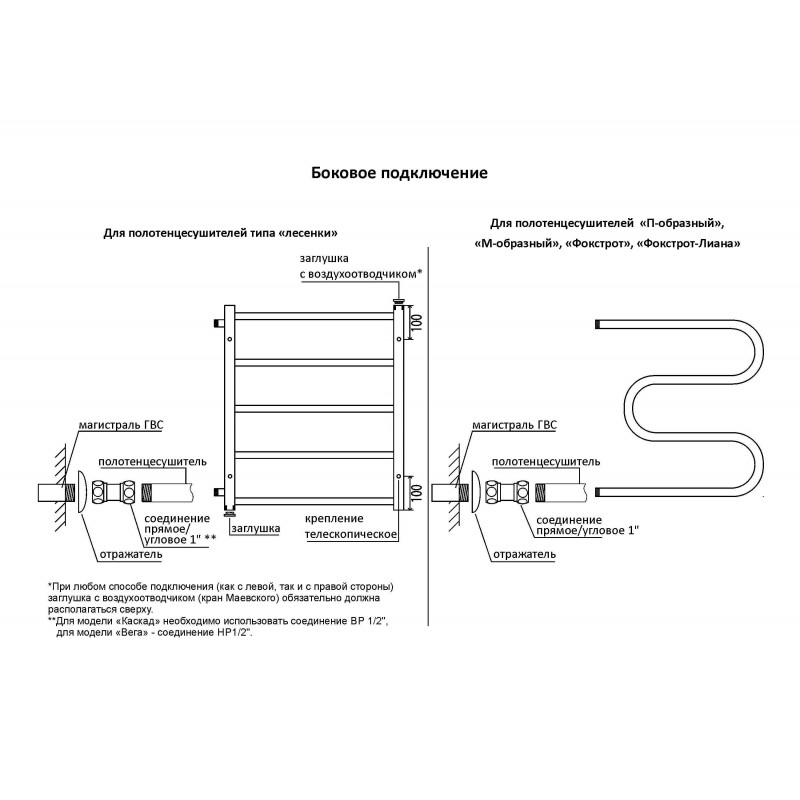
- Diagonal and side mounting
- How to calculate power?
- Options for technical solutions
- Towel dryer on a separate heating circuit
- Connecting the structure to the main heating circuit
- Hot water connection
- Methods and subtleties of mounting heated towel rails
- Detachable and telescopic brackets
- One-piece supports
- Fitting types
- Water device installation process
- Installation of an electric towel warmer
- Connection order
- Scheme 1
- Permissible options for the execution of scheme No. 1
- Connection diagram in an apartment building
- Towel dryer connection technology
- Materials and tools
- Stages of installation of a water heated towel rail
- Connecting an electric towel warmer
Schemes and methods of connection
Installation of a water-type heated towel rail can be carried out in three versions - bottom connection, diagonal and side insert. Each method has its own connection features and advantages.
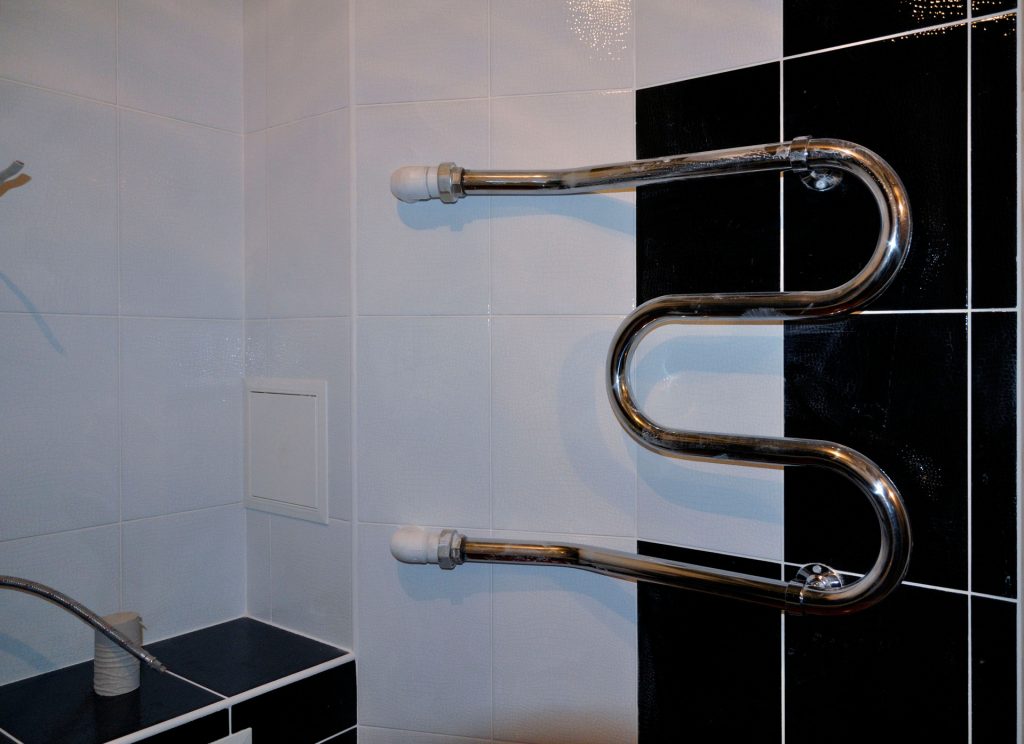
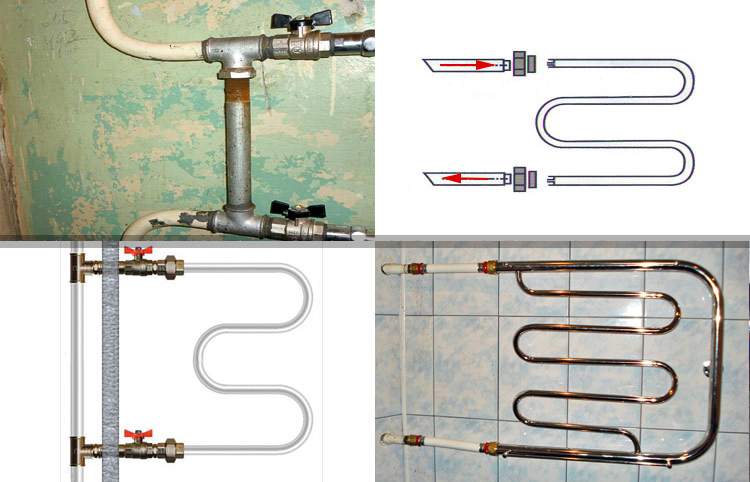
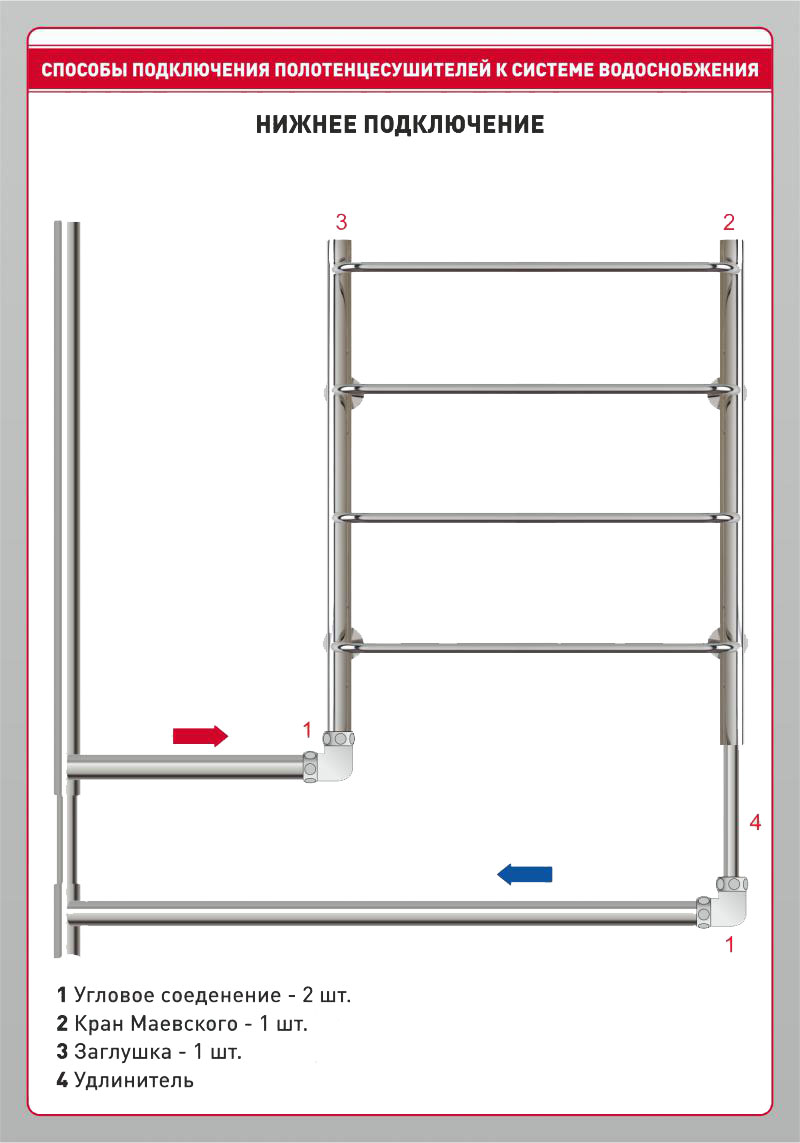
Bottom installation
The connection of the towel dryer from the bottom is mainly used in the installation of complex and large structures. For the effective operation of the device, a sufficiently large pressure of water in the system is required.
The advantages of the bottom connection include:
- functions regardless of the direction of water supply in the pipeline;
- allows you to hide the summed pipes without destroying the wall finish.
 Bottom connection of heated towel rail
The lower connection diagram requires the installation of a Mayevsky crane to bleed air from the system.
It is possible to carry out a high-quality installation of a heated towel rail in this way, subject to the following conditions:
- dryer for towels should be located above the lower outlet;
- the recommended slope of the outlet and inlet pipelines per meter is not less than 3 millimeters;
- the point of connection to the device must be above the upper outlet of the riser with a narrowed or offset bypass;
- to ensure good circulation, it is necessary to install a pipe diameter of more than 32 millimeters, a smaller section is allowed if the dryer is close to the riser.
There should be no protrusions and recesses on the horizontal stretch of the pipeline. Any irregularities are negatively convened in the process of circulation of the coolant.
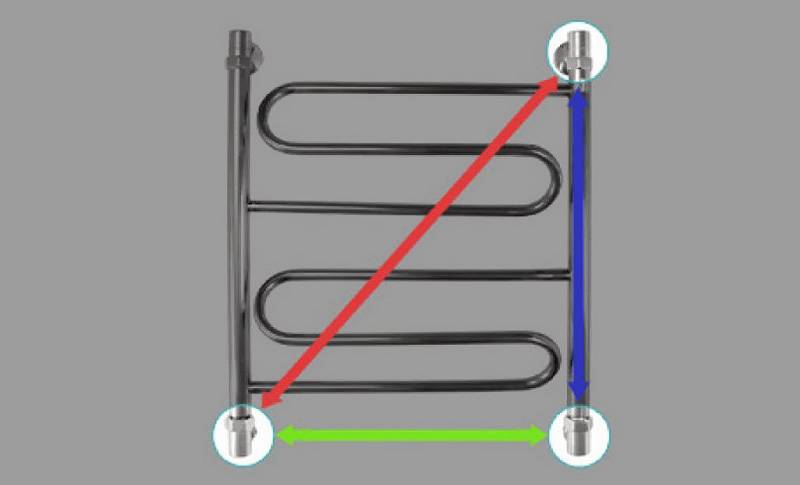
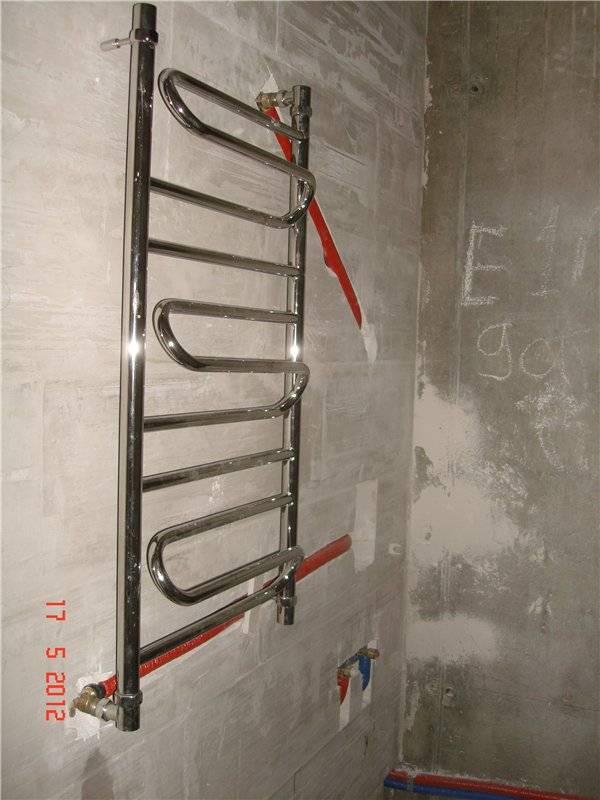
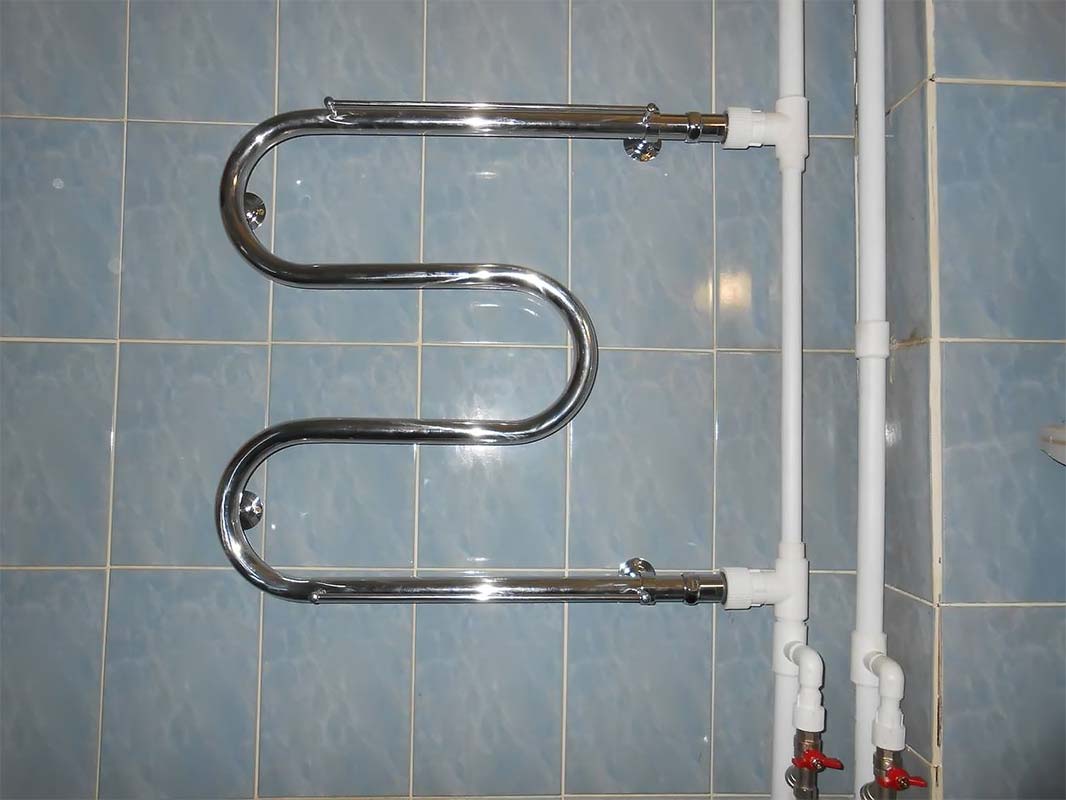
Diagonal and side mounting
Such connection options are more efficient. This is due to the fact that when the coolant enters the upper part of I and the cooled water leaves the bottom of the heated towel rail, a complete circulation of the liquid in the system is created.
The advantage of the side and diagonal connection of the towel dryer is:
- ensuring a good working process at any speed of water circulation in the pipeline;
- any direction of the coolant in the riser is allowed;
- after turning off the water, there is no need to bleed air from the dryer;
- possibility of installation at a remote distance from the riser.
For the qualitative functioning of such schemes, it is necessary to take into account:
- the lower point of connection to the heated towel rail must be higher than the outlet of the pipeline for the cooled coolant.And the top point of the device is below the outlet for water supply;
- the minimum slope of the pipes connected to the dryer is 3 millimeters per meter of supply;
- the use of pipes with a cross section of less than 32 mm is allowed with a small distance of the device to the riser;
- on the supply pipeline, any bends are excluded.
Diagonal and lateral connection of the heated towel rail
To improve the circulation of the water flow in the system for any connection scheme, it is recommended to insulate the supply pipes.
How to calculate power?
The heated towel rail is very expensive in terms of energy consumption, but at the same time it boasts a high heat transfer coefficient. Depending on the size and materials, what area can be heated by an electric heated towel rail. How to choose the right model?
To calculate how much energy it consumes per month, you need to carry out simple calculations: 100 W of energy is needed per 1 m2. This means that the power of a heated towel rail in a 4 m2 bathroom should be about 400-560 watts.
You can find out how much electricity the device consumes using the formula:
- ErI = Pnom x Ks *t, where: Рnom is the power of the device;
- Кс - demand coefficient, for an electric heated towel rail is 0.4;
- T is the operating time of the device.
The capacity of a bath towel warmer can be found in its data sheet. Working hours per day are determined individually.
After you have figured out the indicators for the day, you can calculate how much electric heated towel rail consumes electricity per month or per year, simply by multiplying the resulting number by the number of days.
As the name implies, the main consumer property that distinguishes a rotary electric heated towel rail is the ability to rotate the coil.The dryer can be rotated 180 degrees relative to the wall. Moreover, in different models this function is implemented in different ways: somewhere the entire heated towel rail rotates, and somewhere only its individual parts.
Swivel modifications are easy to use and indispensable in confined spaces, for example, if there is a niche behind the dryer, which this device closes. In addition, if the rotary structure has the possibility of independent rotation of the hotel sections, it is more convenient to dry several things at once.
Modern models are usually divided into three groups:
- water;
- electrical;
- combined.
The principle of operation of electric heated towel rails is based on heating a heating element, which transfers energy to a heat carrier, which heats the surface of the device. Electric models are filled with mineral oil or specially prepared oxygen-free water (metal rusting does not develop without oxygen). The latter option is less common.


Combined devices combine two circuits: for hot water supply and for electricity. Such devices are not very popular due to their high cost.
It is traditionally believed that a higher power of a heating appliance provides more comfort. This is not true. Bathrooms are usually small in size, and if you choose a heated towel rail that is too powerful, you may encounter the problem of unreasonably high room temperatures, which, in turn, will affect the amount of electricity bills.
The required power should be calculated based on the indicators recommended by SNiP 2.04.01.-85
In this case, always pay attention to the specific operating conditions and the purpose of the heated towel rail.
When buying a device, be sure to take into account the area of \u200b\u200bthe room. Too powerful a model will cause a lot of trouble in warm periods. If the power is not enough, a fungus may develop in the bathroom. There are simple formulas for calculating the power of household appliances. So, to maintain the temperature at 18 degrees for 1 sq.m. living space requires 100 watts of thermal energy. However, the bathroom is a room with high humidity, besides, after bathing, a person freezes much faster, so it is advisable to maintain a higher temperature - 25 degrees. In this case, 140 W / 1 sq.m.
We offer you to familiarize yourself with the Device of a flush tank with a lower water supply
If it is assumed that the device will not only dry towels, but also heat the bathroom, then the power calculation will look like this: the area of \u200b\u200bthe room should be multiplied by 140. The resulting value will become decisive when choosing a specific model.
For example, for a small bathroom of 3.4 sq.m. a device with a power of about 500 W (3.4x140 \u003d 476) is enough.
Usually, the more horizontal tubes, the more powerful the device, but this is not always the case. Before the final choice, you need to familiarize yourself with the technical documentation of each model you like and stop at the most suitable one in terms of parameters.
Options for technical solutions
Installation of a heated towel rail in a private house can be carried out in several ways - tie-in to the main heating system, installation on a separate circuit or connection to hot water supply. Each option has its own advantages and disadvantages.
Towel dryer on a separate heating circuit
This installation option is suitable for any model of water heated towel rails. The device is connected on a separate closed circuit together with the pumping group.
The advantage of using this installation method is:
- providing heating of the bathroom without the use of radiators;
- convenient use regardless of the season;
- the ability to install any design of a water heated towel rail, which allows you to implement any design solutions.
 Towel dryer on a separate heating circuit
The disadvantages of connecting a device for drying towels to a separate heating branch often include the complexity of installation work. To install the device, additional equipment is required, which includes a pump, a separate collector outlet and automation.
Connecting the structure to the main heating circuit
This method of connecting the heated towel rail to the heating system is less expensive. But for convenient use of the device, an additional installation of a temperature limiter is recommended. This is due to the strong heating of the coolant in the supply circuit, which often causes discomfort when touching the dryer with your hands.
The use of the option of connecting a heated towel rail to the main heating circuit has its advantages:
- the possibility of using the device as the main heating of the bathroom;
- low installation costs;
- application for any models with a liquid heat carrier.
The disadvantage of this installation is considered to be turning off the device for the summer period along with the heating system.
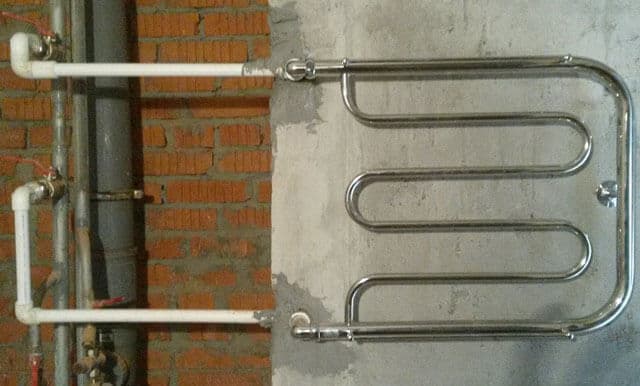
Hot water connection
This type of installation involves connecting a heated towel rail to a central hot water supply. The option is quite economical, since it does not require the installation of additional devices and is successfully used in apartments.
The advantages of this type of connection include:
- uninterrupted use with year-round supply of hot water;
- ease of installation work, no additional costs.
Connecting a heated towel rail to hot water has its drawbacks:
- for installation it is allowed to use only certain models of dryers made of stainless steel of a standard form;
- limited possibility of use as the main heating of the bathroom.
The power of dryer models that are designed to be connected to hot water supply is no more than 200 watts, so installation in a room without radiators or underfloor heating is impractical.
Methods and subtleties of mounting heated towel rails
From how correctly the installation of the coil is made, its functionality and service life depend. Mounting heated towel rails to the wall, if the device is of an electric type, is performed in two ways:
- hidden - the wires are hidden in the wall, under the finishing materials;
- open - the device is plugged into a power outlet.
SNiP standards establish rules for mounting electrical appliances in rooms with high humidity. The coil must be hung at a distance of at least 60 cm from water sources, whether it be a bath, shower, sink. The distance from the floor to the device must be at least 1.2 meters.


Points to consider when installing:
- The coil is a compensating loop, which is not recommended to be connected to a common heating system, water supply, so as not to disturb the correct operation of them.
- Heating is turned on only in the cold season, so it is recommended to connect the heated towel rail to the hot water supply system, which will ensure year-round operation of the device.
- Elements from different metals should not be used in the same design, this will lead to corrosion. Teflon gaskets installed at the points of contact between the parts will delimit them and help to avoid unpleasant consequences.
- For apartments, it is recommended to purchase products of domestic manufacturers, made in accordance with GOST, which will certainly fit the nozzles.
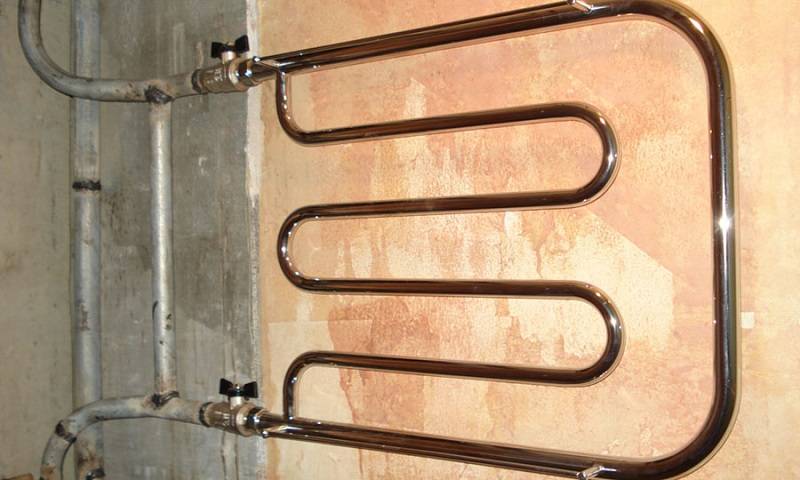
It will be necessary to dismantle the Soviet-style heated towel rail with part of the riser.
Water structures have several connection methods:
- diagonal;
- upper, lower;
- lateral.
Detachable and telescopic brackets

For the installation of heated towel rails, these are the most suitable fasteners that meet the requirements of GOST. The bracket is simple, the bracket is telescopic one-piece and many others can be purchased at hardware stores. The appearance of the product is a ring on a leg, which can be divided. The first part of the structure is screwed onto the outlet of the coil - no further actions are required with this element.
The leg is fixed to the wall by means of anchors, screws, self-tapping screws. Then you only need to connect both parts. Brackets are made of brass, and to improve performance, protect against external factors, increase their attractiveness, they are nickel and chrome plated.

Telescopic brackets not only fix the heated towel rail on the wall, but also allow you to adjust the gap between them. Good option to simplify the installation of devices - Detachable telescopic fasteners.
One-piece supports
These fasteners, like their detachable counterparts, consist of a ring and a leg. The difference is that both parts are soldered together, which causes inconvenience when mounting weighty structures. Non-detachable supports are rarely used.
Fitting types
Fittings - supporting elements made of steel, chrome-plated brass. This is part of the pipeline system, which is mounted on the inlets and outlets of hot water. They are selected according to the configuration of the device to be installed, the place of its installation, the requirements of the standards regarding the location of objects.

By design, fittings are:
- Bends are used to change the direction of hot and cold water outlets.
- The crosspieces are attached to the main pipes, giving two additional outlets for attaching appliances.
- Tees are installed on the main pipe, creating an additional outlet on it. They are used when installing the coil, if it was not there before.
- The angles allow you to rotate the outlet, inlet by 90 degrees.
- Collectors create an additional branch.
- Couplings are used to connect two pipes with the same diameter.
- Caps hermetically close pipes.
- The union is intended for a fastening of flexible hoses.
- Stubs are used to plug unnecessary leads.
- Reflectors protect connections from moisture, perform a decorative role.
- Plugs close unused outlets.
- Adapters are designed to connect two pipes with different diameters.
- Eccentrics compensate for the missing pipeline length.
- "American" - a detachable connection in the form of a union nut.
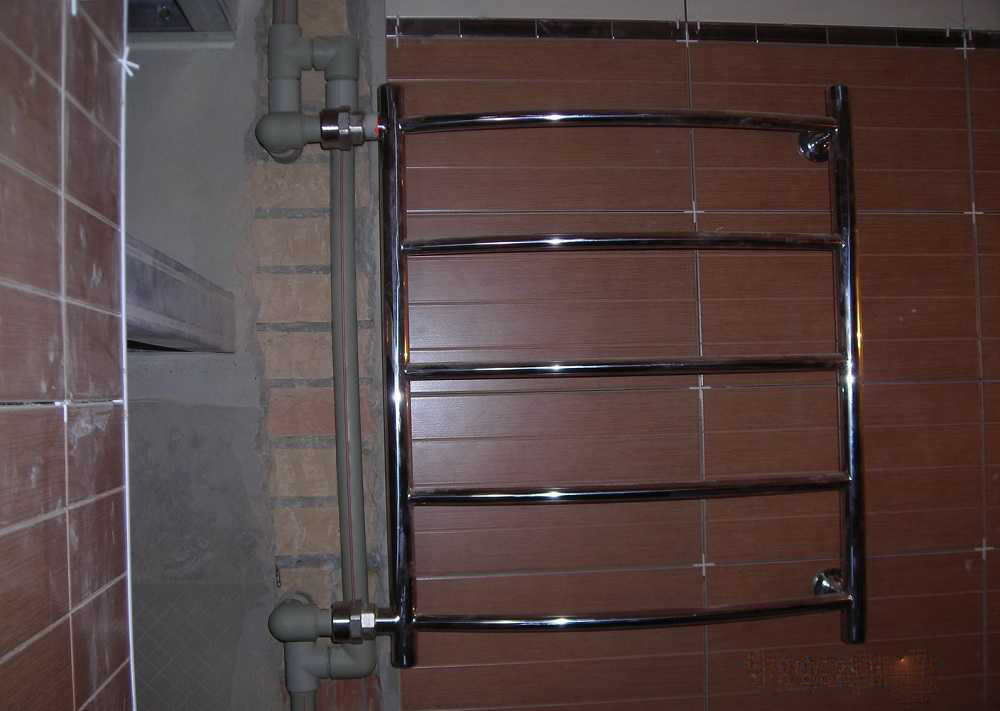
Water device installation process
First of all, it must be properly assembled
Further, it is important to follow the basic rules for installing a heated towel rail. Shut-off valves with detachable connections are installed on the piping
In the future, they will ensure the smooth replacement of the old model with a more modern one.

The assembled structure can be fixed anywhere in the bathroom. The main thing in this matter is to provide water supply pipes to it. The connection procedure includes:
Bypass installation using pipes and special tees. Here you will need an additional three valves. Two of them are installed at the top and bottom of the heated towel rail and one on the pipeline itself to stop the water supply.

With the help of special brackets, the structure is fixed to the wall. Next, the valves and bypass are connected using special bushings.
The final step will be filling the device with water from the central water supply system. To do this, open all three taps.


Installation of an electric towel warmer
Installing electrical equipment in a wet environment requires protective measures to be taken for safe use. This is a separate RCD, grounding and the installation height of the heated towel rail socket is at least 70 cm from the floor. The connection is made by installing the latter inside or outside the bathroom.
The electrical socket must be protected by a sealed housing and a cover with a rubber seal.It is permissible to place the device on a wall with a minimum load from moisture, but not bordering the street. This is due to the difference in temperatures, due to which the possibility of condensation in the seat is high.
The most reliable option is the laying of serviced communications in the body of the wall.

Concealed wiring with socket
To do this, form strobes and recesses for the outlet, through holes for bringing the latter out. Filling voids with plaster and finishing materials will protect the wiring from contact with moisture. Outdoor mounting with a high degree of insulation is also acceptable. The cable for installing a heated towel rail is placed at a height of more than 10 cm from the floor, so that later it leads to a short circuit.
Connection order
The cable, machine and socket are selected with a small margin of power relative to the connected equipment. So, for example, 1.8 kW is divided by 220 V, they get 8.2 A. The cable must be with a copper core with a cross section of at least 1 sq. mm. With regard to furniture, they withstand 750 mm, an angle - 300 mm, a floor - 200 mm.
Hanging heated towel rails are applied to the area allowed for installation, the position of the brackets is marked. Mounting holes are drilled and the equipment is fixed to the wall. Stationary floor models are fixed to the base in the same way. The next step is to connect to the power supply. The socket should be at a distance of 25-35 cm to the side of the appliance.
The correct location of the outlet for the dryer in the bathroom
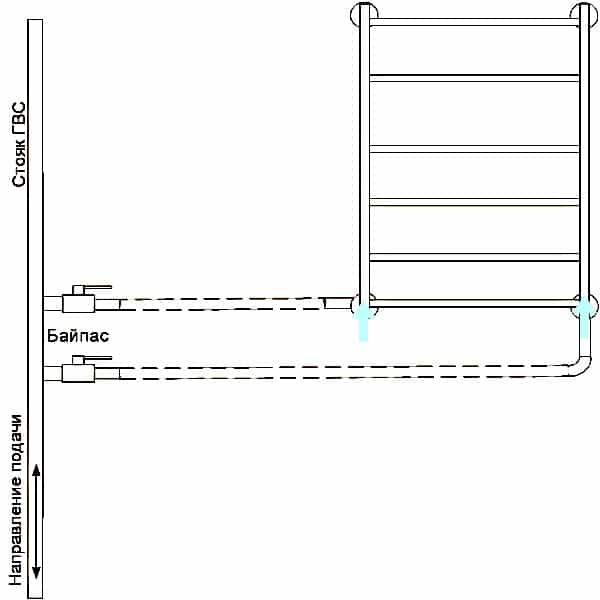
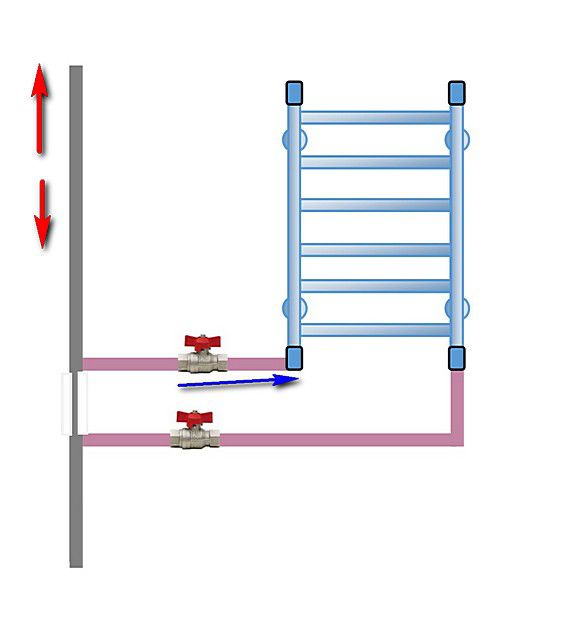
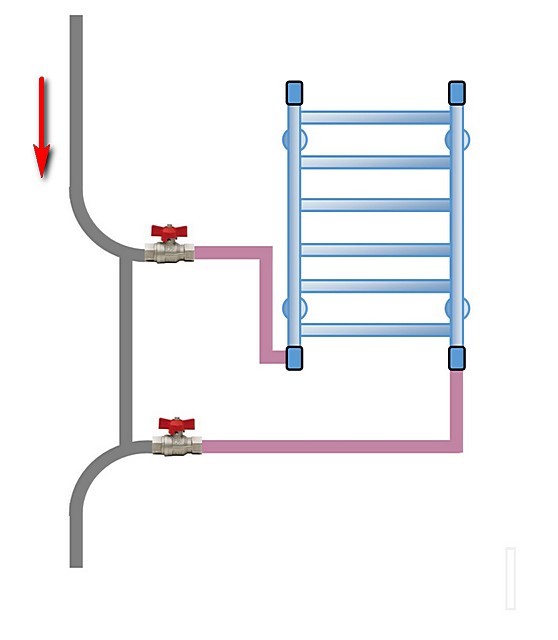
Scheme 1
(Side or diagonal connection, unconstricted unbiased bypass)
This scheme provides the supply of coolant to the upper part and the release of the cooled coolant back to the riser from below.Circulation through the heated towel rail is provided only by the gravitational pressure of the water cooling in it.
Ladder side connection, running on natural circulation, without constriction and without displacement of the bypass
Diagonal connection of the ladder, working on natural circulation, without constriction and without displacement of the bypass
The diagonal option for connecting a heated towel rail does not have any advantages over the side one.
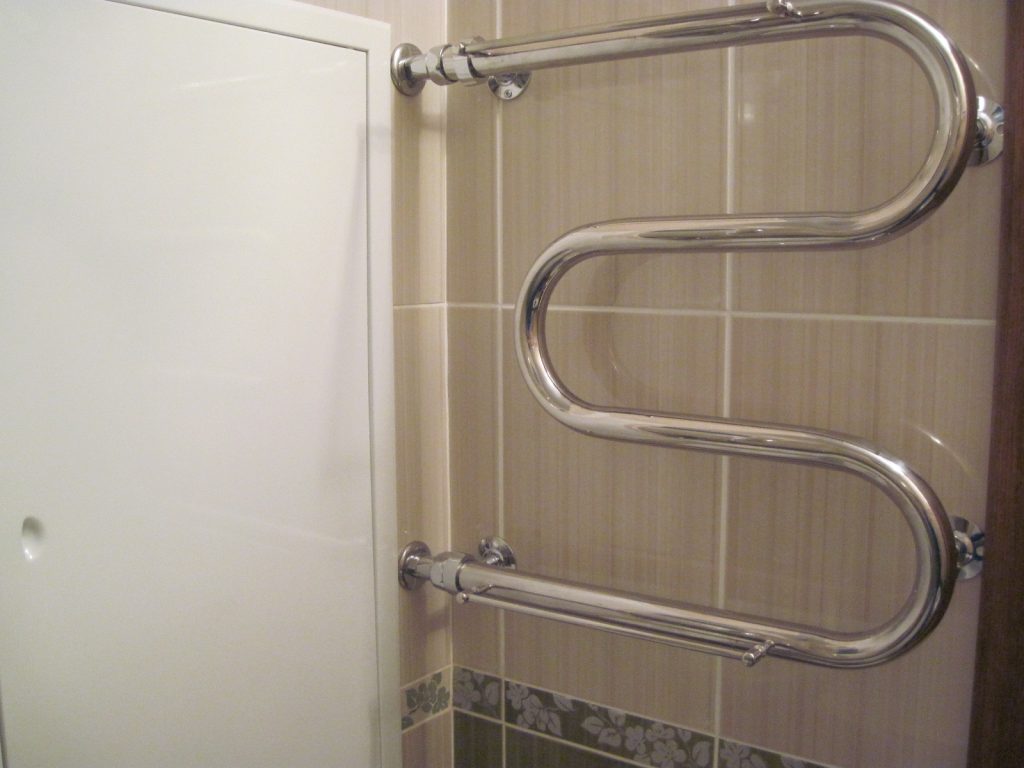
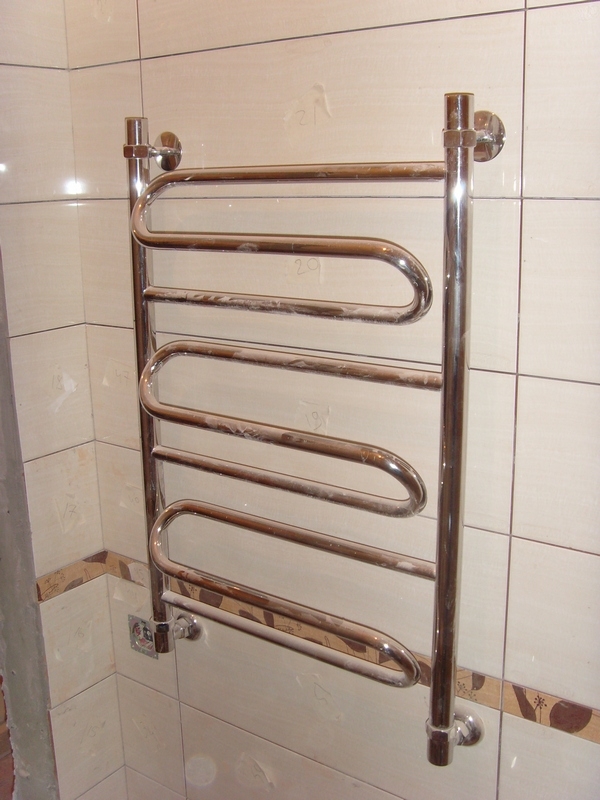
Lateral connection of the U/M-shaped heated towel rail, running on natural circulation, without constriction and without offset bypass
This wiring diagram is universal:
- Works with any direction of supply in the riser.
- Does not depend on the circulation rate in the riser.
- It is not required to bleed air from the heated towel rail after turning off the water.
- Distance from the riser - up to 4-5 meters.
Conditions for the scheme to work:
- The lower outlet of the riser must be below the bottom of the heated towel rail or on a par with it, and the upper outlet of the riser must be above the top of the appliance or on a par with it.
- With a bottom feed, there should definitely not be any narrowing between the taps. It will interfere with the operation of the heated towel rail up to complete inoperability! At the top feed, it is permissible to narrow the bypass by one step of the diameter of the riser (this option will be discussed in detail a little later), but it is not required for the operation of the device.
Connection according to this scheme with bottom feed in the riser is very critical to the quality of installation. Any narrowing between the taps, which, for example, occur when the polypropylene welding technology is violated, harms its work. These are nozzle overheating, exceeding the heating time of the pipe and fitting, pushing the pipe into the fitting with excessive force without depth control.Constrictions may occur when there is welded seams on the riser between branches or in the presence of displacements of the riser pipe relative to its axis between the branches.
Why does the narrowing/displacement between the taps at the bottom feed interfere with the operation of the heated towel rail? Because it creates an additional pressure drop due to the movement of water in the riser (at the lower outlet - more than at the top), which counteracts natural circulation, which pushes water back into the riser through the lower outlet.
Important note: since natural circulation is provided by cooling the water in the appliance, with this connection there will always be a temperature difference between the top and bottom of the heated towel rail. However, in a well-mounted device, it is only 3-4 ° C, which cannot be felt by hand - above a certain threshold, the temperature is perceived as “equally hot”. If the difference is greater, then either an error was made during installation, or the temperature was overestimated. hot water systems
Try to measure the temperature of the hot water in the system, as well as the temperature of the top and bottom of the heated towel rail
If the difference is greater, then either an installation error was made, or the temperature of the hot water supply system was overestimated. Try to measure the temperature of the hot water in the system, as well as the temperature of the top and bottom of the heated towel rail.


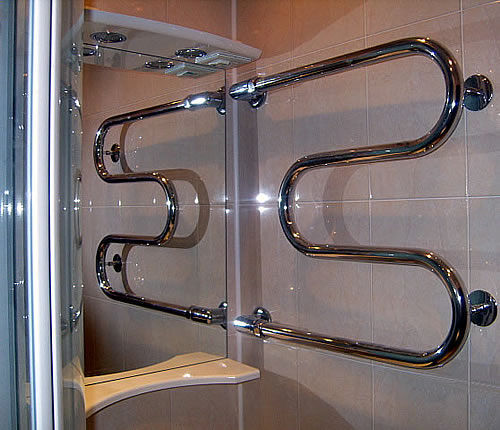
Permissible options for the execution of scheme No. 1
Lateral connection (correct example)
The entire heated towel rail is vertically placed strictly between the outlets, the correct slopes of the supply pipes are observed, and no working conditions are violated.
Lateral connection (example of a conditionally permissible design)
The heated towel rail is located above the top outlet. You will need to bleed air from the upper left corner of the instrument. An ordinary radiator will not allow this to be done without very inconvenient tricks (for example, loosening the union nut of the upper water outlet), air will stand above the dotted line, and the device will not work.
For the full operation of this option, it is mandatory to install an air valve strictly in the upper corner for water supply. Only a few models of heated towel rails allow you to do this, in particular, the Sunerzha brand of the “+” series (“Bohemia +”, “Galant +”, etc.).
The air valve in the opposite corner from the water connection point cannot bleed all the air out of the appliance!
Connection diagram in an apartment building
The purpose of building far from perfect "Khrushchev" was mainly ideological motives - in this way it was possible to achieve the resettlement of barracks and communal apartments. To heat the newly built residential areas, only centralized heating was used. As a rule, in the bathroom, the radiator was made combined with a heated towel rail. This approach had both strengths and weaknesses.
Advantages:
- The heated towel rail provided additional heat.
- It was turned on only for the winter, in parallel with heating. When heat came on, the device turned off.
Flaws:
- Cumbersome design.
- You had to pay extra to use it.
This scheme for connecting a heated towel rail to the heating system provided for the presence of an additional pipeline in the basement. As a result, the elevator and the garbage chute had to be sacrificed.
Two options were used for switching the heated towel rail to the heating circuit and placing it in the dwelling:
In separate bathrooms. In this case, the installation site was an adjacent wall between toilet and bathroom room. From the basement, the supply pipe was brought into the apartment on the ground floor. Further, having passed the entire entrance, through the apartment on the last 5th floor, she found herself in a neighboring apartment. Having followed through all the floors, the pipe descended back into the basement. Shut-off valves in the apartments were not used in any form: only the basement sections of the supply and return pipes were equipped with valves.
In adjacent bathrooms. Here the heated towel rail was placed on the wall near the washbasin.
It is important to understand that this connection method was considered the most difficult due to the inconvenience of the combined room.
The most common series of "Khrushchev", where heated towel rails were switched not with hot water supply, but with a heating system, are:
- 1-434С - years of construction 1958-1964.
- 1-434 - years of construction 1958-1967.
- 1-335 - years of construction 1963-1967.
Towel dryer connection technology
The process of installing a towel dryer depends on the type of device. Water heated towel rails require a special approach to connection. Connecting electrical devices is quite simple.
Materials and tools
Before connecting the heated towel rail, you must familiarize yourself with the connection diagram proposed by the manufacturer in the instructions. Also check the complete set of the purchased device.
To install the dryer, you will need the following tools and materials:
- construction level;
- pencil;
- roulette;
- a hammer;
- Adjustable wrench;
- screwdriver;
- soldering iron and knife for PVC pipes;
- Mayevsky's crane;
- two tees;
- clutch;
- fasteners, brackets;
- PVC pipes with a diameter of 32 mm;
- tow or sealing tape;
- fitting.
If a jumper is to be installed, two more ball valves should be purchased.
Stages of installation of a water heated towel rail
The towel dryer is most often connected to a hot water supply system. You can install the device yourself, following the selected connection diagram and step-by-step guide:
- shut off the water supply;
- mark with the help of the building level the areas of drying attachment on the wall surface, observing the required distance from the riser and the slope of the piping 5 - 10 millimeters;
- install and fix the heated towel rail;
- mount the jumper by installing tees and ball valves at the ends of the pipe;
- using angle and straight fittings, connect and adjust the direction of the coolant supply and return outlets;
- install Mayevsky's tap on the heated towel rail.
All connections are sealed with tow or special tape. Before supplying water to the system, as well as after starting the coolant, the tightness of the joints is checked.


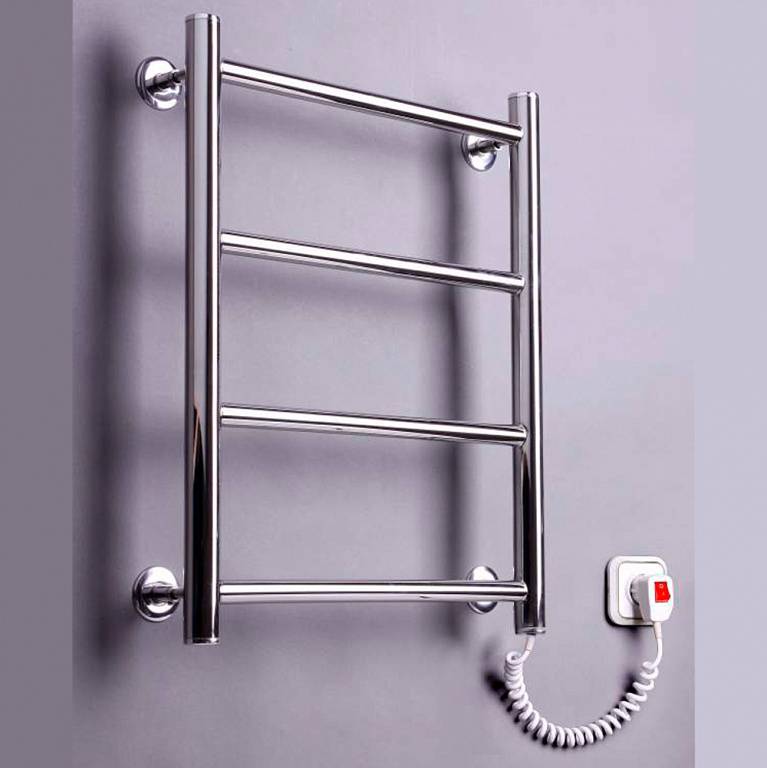
Connecting an electric towel warmer
This type of towel dryer can be installed in any room, regardless of the location of the hot or heating pipeline. The installation process of the device consists of fixing the structure in the selected location and connecting it to the network.
Properly connected electric towel warmer
The installation of an electric heated towel rail in a bathroom or in another room with high humidity is carried out taking into account the observance of safety standards:
- connection must be made through a three-core cable;
- grounding must be present;
- only hidden insulated wiring is allowed;
- RCD is required.
Requirements for the installation of heated towel rails with electric heating:
- distance from the floor - at least 20 centimeters;
- pieces of furniture should be placed in compliance with a distance of 75 centimeters;
- there should be a space of 30 centimeters between the wall and the dryer;
- distance from the bathroom and washbasin - at least 60 centimeters.
The outlet must be at a safe distance from the hot towel dryer surface.
Connecting a heated towel rail in a country house
To ensure the operation of the dryer for bath towels in a country house, various connection methods are used. If heating is carried out in the country house, then an excellent option would be an insert into the circuit of the heating system. But with such an installation, it should be borne in mind that the device will only function in the cold season.
If regular use of the heated towel rail is expected, then the electric design would be the best option. Such drying can be turned on and off as needed.
Connection of water devices in a country house is carried out according to standard schemes. Most often, when connected to a heating circuit, a side or diagonal tie-in is used.


