- 2 What are the requirements for installing gas water heaters in a private house
- 2.2 We install a column in a private house - video
- 3 How to install a column and who should do this work?
- Unit selection guidelines
- Tip #3: Be sure to follow the instructions carefully during installation.
- Props
- Fixing the unit to the wall
- Connection
- Testing
- Features of gas connection
- Installation algorithm
- The model is changing
- Change device and installation location
- First installation
- How to install a geyser correctly: installation algorithm
- Preparing Consumables
- Installation of equipment
- How to install a geyser
- What to bring with you
- We remove the old
- Direct installation
- The preparatory stage for the installation of a gas boiler (column)
- Installation of a geyser: features
2 What are the requirements for installing gas water heaters in a private house
A prerequisite for any potential user of a water heater is to know what are the requirements for a gas colony in a private house.
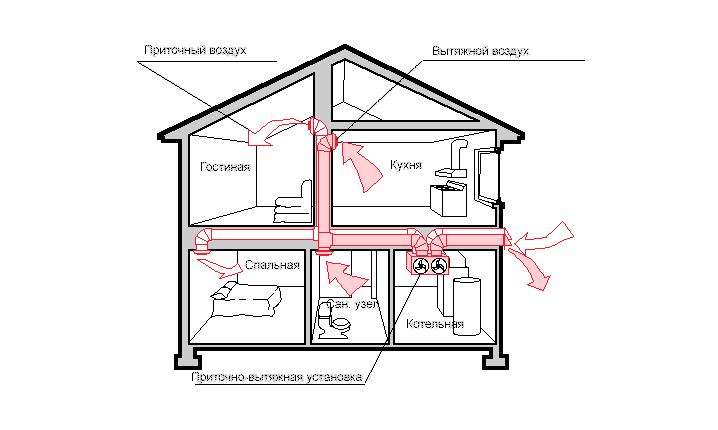
First of all, you need to know the snip gas water heaters for a private house, which sets the requirements for the room in which the water heater is planned to be installed: the minimum area is 15 square meters, the ceiling height is at least 2 meters, the presence of a window is at least 0.5 m 2, the presence of ventilation (or a hood for a gas water heater is installed in a private house), the water pressure is from 0.1 atm., the wall under the gas water heater must be made of brick or concrete, otherwise insulation with a special basalt cardboard is necessary.
In addition, the standards for installing a geyser in a private house are required to comply with the following parameters:
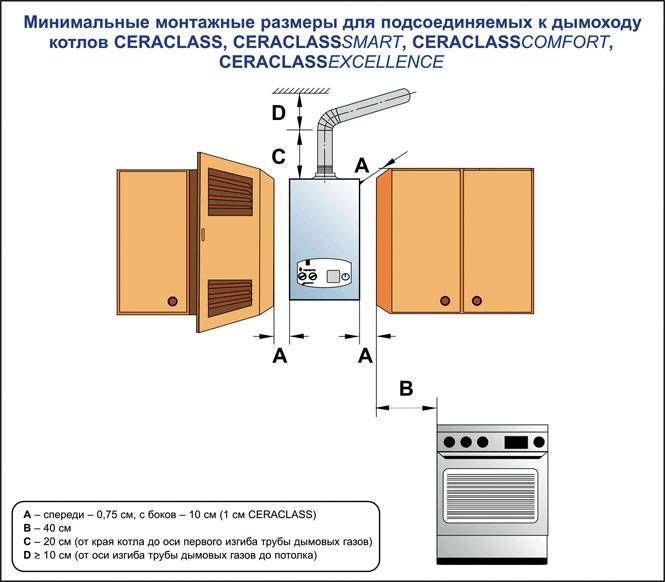
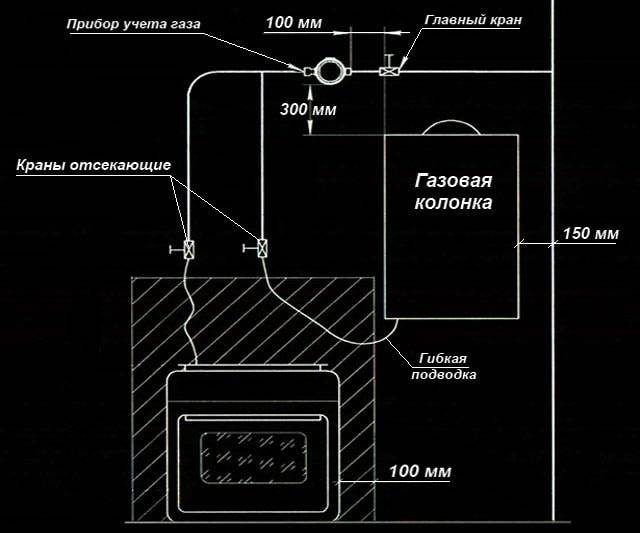
- There should be a margin of 60 cm in front of the front panel of the gas column;
- The distance from the water heater to the gas stove is at least 20 cm;
- The stopcock is mounted before the column is installed.
The rules for installing a geyser in a private house also regulate the procedure for legalizing the installation of a geyser. To obtain permission to install a water heater, you must obtain a project for your house and check the condition of the chimney (after which you receive an act), then the owner of a private house draws up an application for the conversion of his home.
You will also need those column passport, or its model (if the latter has not yet been purchased). After that, you can contact GORGAZ to carry out the tie-in.
You should know the subtleties at each stage of installing a geyser in a private house. This will be needed both for partial installation with your own hands, and for calculating all the nuances of the work. Experienced professionals share the following tips:
- If you decide to disguise the geyser in a snag cabinet, this is possible.But you should be aware that such a cabinet should not have a bottom, and the side walls should have high-quality insulation;
- If you hesitate in choosing between installing a chimney pipe, opt for corrugations made of laminated aluminum. Such a pipe is perfect for a private house, as it is easy to install, quite reliable and inexpensive, and inside it has steel pipes that prevent sagging;
- If you plan to mount a geyser instead of an old one that has become unusable, then it is best not to change the installation site. So you save time and some money;
- Remember that in case of unauthorized insertion into the gas pipeline and connection of the gas column, you will face administrative responsibility, in the form of a fine.
Paying attention to customer reviews, there is often a problem when the geyser freezes in a private house
Masters advise first of all to pay attention to the draft in the chimney
Most often, a malfunction in the form of reverse thrust is the cause of the failure of the water heater. The collection of gas column condensate in a private house may appear if an ash pan is not installed in the system, and condensate is already drained from it. Otherwise, this problem will occur every winter season.
2.2
We install a column in a private house - video
2016-09-27
Julia Chizhikova
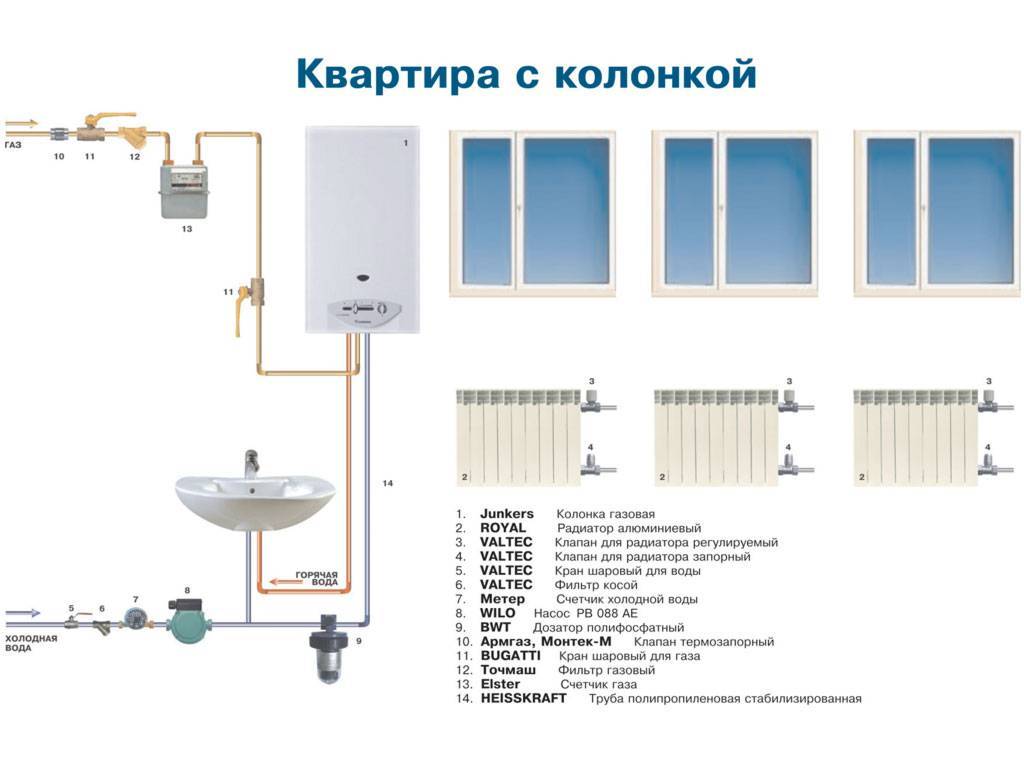
The presence of such an installation in a residential area is a reliable, popular, economical option for obtaining hot water of the required volume with a centralized gas supply or from a cylinder.
In addition to the specific information on the site, you can also study specific problems for other people on this topic who have already bought a gas water heater or instantaneous water heater and thus avoid them.You will find a regularly updated list of such problems and their solutions.
This is the least expensive and time consuming option. When replacing, there is no need to obtain a project. Before starting work on replacing an old water heater, it is necessary to obtain certified copies of the schemes, a plan for installing gas, water, and smoke systems from the Housing Office. The gas supply plan must indicate the location, technical parameters of the device.
After receiving the documents, you must write an application to Gorgaz with a request for permission to replace the old equipment with a new one, while maintaining its previous location, an application for permission to work on gas and water communications in your home.
3 How to install a column and who should do this work?
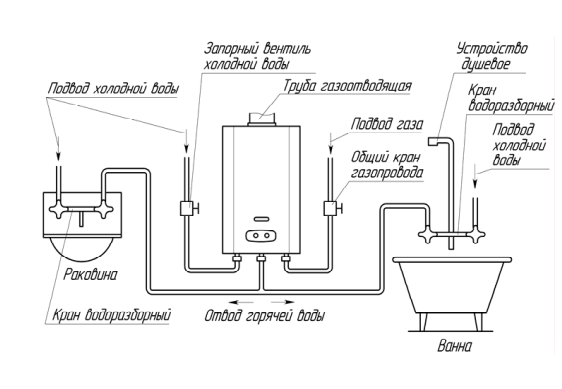
It is better to leave the connection of the column to the gas distribution system to the gas service, but the preliminary installation of the device (connection to the water supply and installation on the supporting surface) can be done with your own hands.
To do this, do the following:
- Drill a hole in the wall.
- Insert a coaxial chimney into it and fill the voids with non-combustible insulation (mineral wool).
- Line the wall under the hole with tiles.
- Fix the column on the lined area (over the tiles) using brackets on its body and dowels.
- Insert a tee into a cold water supply, screw a valve and a check valve onto the free end.
- Connect the non-return valve to the cold water inlet / connection on the dispenser body.
- Mark a collector with shut-off valves above the cold branch of the water supply - it will distribute the hot flow along the lines leading to the sources of consumption (faucets and mixers).
- Connect the manifold and the hot water connection/fitting on the dispenser body.
- Arrange lines from the manifold to taps and mixers.
After that, you can contact the gas service - the completion of work on connecting the column, which includes the first start-up of gas and water, is carried out by gas specialists.
Connection and first start-up of gas must be carried out by a gas specialist
Well, if you are not going to do something with your own hands, find a company with permission to install gas-consuming appliances and order the services of experienced specialists.
Unit selection guidelines
1. Which appliance suits you best: electric or gas.


2. Having calculated how much hot water you need, select the volume of the storage water heater or the flow capacity.
3. Decide on the installation location of the device for heating water: on the wall, above the sink or under it and select the desired model.
2016-12-30
Sergey Dyachenko
To figure out which is better - a boiler or a gas water heater, consider the pros and cons of both devices.
Advantages of the boiler:
- Ease of installation. For the installation of a storage water heater, it is not required to collect any documents and permits. No need for good ventilation and chimney.
- The ability to provide warm water to several points of water intake at once.
- Independence from the pressure in the water supply. Where the geyser does not turn on due to low pressure, the boiler will work properly.
- Noiselessness. For heating, a tubular electric heater is used, which does not make any sounds.
Disadvantages of storage water heaters:
- Long reheat time compared to columns.If the hot water in the tank runs out, you will have to wait from 30 minutes for the next portion to heat up (the reasons why hot water does not flow are described).
- Limited amount of water. If you choose the wrong volume, then there may not be enough water to meet the FGP needs of all residents.
- Dependence on electricity. If you turn off the light in the room, then the water will gradually cool down.
- Large dimensions. This can be a problem in small apartments with small bathrooms, where every square meter counts.
Scale accumulation. From time to time, the boiler requires cleaning from salt deposits. If you do not regularly perform preventive maintenance, then over time the water heats up more and more time.
In turn, geysers have the following advantages:
- Instant heating. When you open the tap in just a few seconds, the consumer receives hot water.
- Unlimited water. If there is water in the apartment, then the column can work constantly. The amount of water is not limited by the size of the tank.
- Small dimensions. New models are compact and do not take up much space in the kitchen.
- Independence from electricity. If the house turns off the light, the column will continue to work.
Disadvantages of gas water heaters:
- The need to collect additional documents during installation. Before you install a geyser, you must coordinate the project with utilities and obtain permission.
- The need for a quality chimney. For the operation of a gas water heater, it is necessary that the products of combustion go outside. This requires a chimney, the state of which will have to be monitored all the time.
If it clogs, then at best the protection will work and the flame will go out. If for some reason it does not work, there is a danger of carbon monoxide poisoning.
- Pressure dependency. If there is a weak pressure in the water supply system, the gas will not open and the column will not work. Modern models with the ability to adjust the pressure inside the device partially solve this problem.
Also, if two points of water intake are connected and water is turned on in the second one, the temperature in the first one will drop. This is not very convenient when the temperature of the water changes during the shower.
Impossibility of placement in the bathroom. Due to safety standards, gas flow heaters are not allowed to be installed in bathrooms.
To decide what to choose, it is important to consider the installation location. If you live in a private house that is heated by a boiler, it is advisable to purchase an indirect heating boiler, which will be the most profitable. Part of the heat that goes to heating will go to heating tap water
It is advisable to purchase a combined model that has an additional heating element in order to provide hot water in the summer
Part of the heat that goes to heating will go to heating tap water. It is advisable to purchase a combined model that has an additional heating element in order to provide hot water in the summer.


In an apartment where there is no gas meter and 1-2 people are registered, you need to install a gas water heater, which will be cheaper than a boiler due to a fixed payment for gas. An additional argument will be the small size of the apartment; a compact gas flow heater is better suited for Khrushchev.
If you have a nightly rate for electricity, get a boiler with a large tank capacity, because it will be most economical to turn it on at night and then use heated water during the day. Thermal insulation is installed between the body and the tank, due to which the cooling occurs very slowly.
Tip #3: Be sure to follow the instructions carefully during installation.
Once again, I remind you that although the installation of gas water heaters is quite feasible on your own, do not forget that you are dealing with gas, so any amateur performance should be excluded.
The instruction begins with the preparation of all the necessary equipment that will be needed to successfully complete the plan:
Props
| Name | Purpose |
| Plastic pipes or hoses | Connection of water supply and gas supply |
| Fitting | Connection of pipe fragments |
| Shut-off valves | Shutting off the water and gas supply |
| Magnetic and salt filters | Purification of incoming water |
| Corrugation | Chimney connection |
| Steel screws with plastic dowels | Attaching the speaker to the wall |
| Perforator | Making dowel holes |
| Pipe shears | Pipe cutting |
| Pipe soldering iron | Pipe soldering |
| adjustable wrench | Twisting threaded connections |
PVC pipes for water and gas differ in marking color
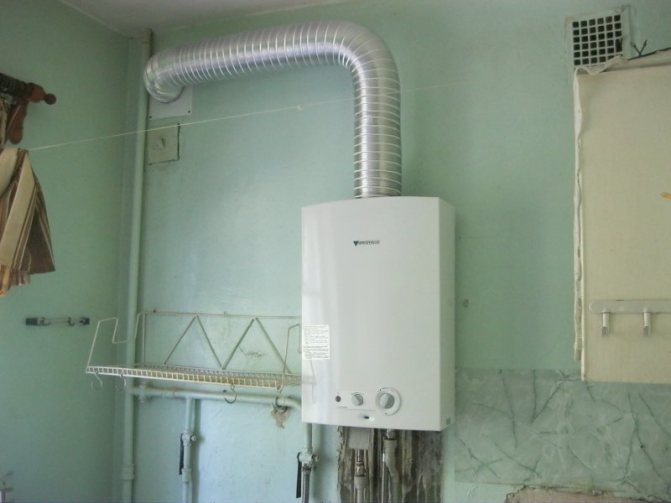
Fixing the unit to the wall
Before you install a geyser in a private house, be sure to arrange a chimney opening above its location. Ventilation output can be done both in the wall and in the ceiling, as it suits you.
Next, we proceed as follows:
- Mounting holes are clearly visible on the back of the device. We measure them and transfer the received data to the wall;
- We insert a drill with a victorious tip into the nose of the perforator and drill holes in the marked places;
Drilling a concrete wall with a hammer drill
- Now we twist the screws, in some cases it can be hooks, and hang a gas column on them with our own hands.
As you can see, so far everything is as easy as if you had to hang a shelf or a picture. But it's too early to relax, now it will be something a little more difficult.
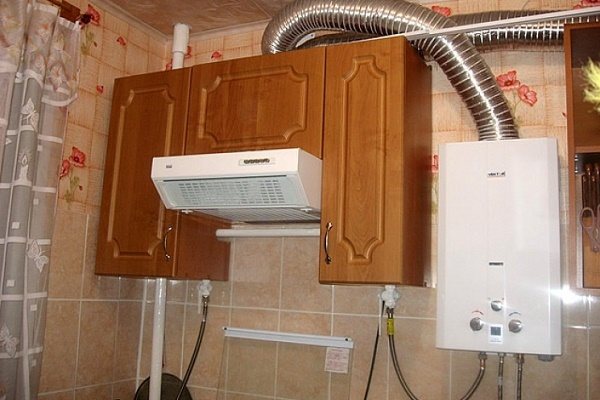
Connection
And now the device is already hanging in front of you, what's next?
- We cut a piece of corrugated pipe of the appropriate length and connect the outlet of the column to the chimney outlet. As a rule, the corrugation comes complete with the gas equipment itself, so complications should not be expected from this side either;
Photo of a corrugated pipe connecting a geyser to a chimney
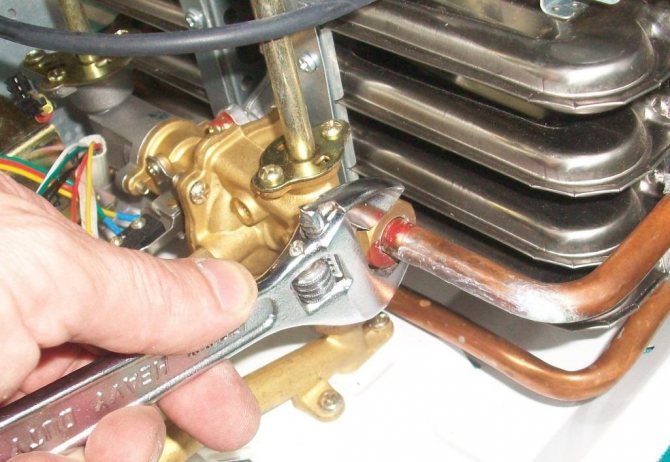
- We shut off the gas supply, cut off the gas pipe, if we are talking about a metal product, which will require a grinder, cut the thread and wind the tee, after wrapping the thread with a special fum-tape to enhance sealing;
Installed tee on the gas pipeline
- We connect the second end of the pipeline to the tee and a plastic outlet leading to the corresponding hole on the device to be installed, which is very convenient to do with a pipe soldering iron. Also, do not forget to use a fum-tape, and fasten the hose itself with clips to the wall so that it does not dangle from the canopy;
- Now we shut off the water supply, after which, similarly with the gas pipeline, we cut in the tee. Only in this case, before branching, we also install salt and magnetic filters. So you will significantly extend the life of the water heater;
- We connect the hose leading to the mixer to the outlet of the column.
An example of a completed connection
By the way, if you are only replacing old equipment with new, then you have already installed all the tees, and the task is simplified to a banal connection of pipes or hoses.
Testing
The first launch of the gas column is a kind of assessment of the work you have done, so it should also be done correctly:
- We knead the soap solution, with which we coat all the joints of the gas pipeline;
- We turn on the gas supply and very carefully inspect the threaded connections for the possibility of bubbles;
- If a gas leak is noticed somewhere, then it is necessary to immediately shut off the gas pipeline and redo the connection. If everything is fine, then open the water supply;
- We wait for some time until the liquid passes through the filters, and open the hot tap. Next, a click of a piezo should be heard, unless, of course, you forgot to put in the batteries, after which the burner will light up, and the desired liquid will flow from the mixer.
Gas column burner operation
Everything, you can take a bath, wash dishes and hands, well, in general, exploit the fruits of your labor.


Features of gas connection
When the geyser is mounted for the first time, then a gas pipe must be connected to it. Such work must be trusted to specialists, otherwise the sad consequences may make themselves felt in the near future. Therefore, it is necessary to draw up an application for the execution of a tie-in tee. After completing the work, a pipe is attached to it, leading to the location of the column.
If both the model and the position of the column are known in advance, then the pipe can be brought directly to this place. This method eliminates the use of flexible hoses
But you need to pay attention to the location of the gas valve - it should be located immediately before connecting the pipe to the column. When this option is preferable, then the apparatus is first mounted on the wall, and only then should the pipe be connected. Some laboriousness of the first method is not suitable for everyone, therefore it often makes sense to prefer a different option: in this case, the edge of the pipe should be located from the gas equipment at a distance 1.5 m, a gas valve is installed on it, then a flexible hose continues the "baton"
This method is more preferable if you want to do the installation yourself, and at a convenient time for you.
Some laboriousness of the first method is not suitable for everyone, therefore it often makes sense to prefer a different option: in this case, the edge of the pipe should be at a distance of 1.5 m from the gas equipment, a gas valve is installed on it, then the flexible hose continues the relay race. This method is more preferable if you want to do the installation yourself, and at a convenient time for you.
Installation algorithm
Installation of the gas column must be carried out by specialists
Documentation is regulated by the law on the supply of gas to the population. The list differs according to whether you are only changing the model, device, and location, or installing the equipment for the first time.
The model is changing
The column becomes obsolete over time and can be upgraded by replacing it with a more modern one.
- Buy a certified gas heater. which is allowed to be installed.
- Take certified copies of the schemes of the gas and water supply system from the housing office with a clearly marked place for installing the equipment.
- Then take the replacement application, provided that the installation site is preserved, to the gas service. there are also applications for the repair of water and gas mains at the site.
- The work will be done by the gas service, it will also give the Act on putting the equipment into operation, compliance with the requirements.
Change device and installation location
How to install a geyser video master class:
- You will need to change the scheme for supplying gas, water, air vent.
- Come to the fire department to take the Chimney Statement.
- Order a transfer project from GORGAZ or a private certified organization, get it.
- For an apartment building, you will need a redevelopment permit from the city administration.
- You must have an act, a project, a permit, a technical passport of the boiler or a column, a document on the ownership of the apartment in your hands. With these documents and the application, contact the gas service again.
- Specialists will install and connect the equipment, carry out the first start-up. Then they will seal the meter, issue the Commissioning Certificate.
- At the end, you should have certificates in your hands that confirm the safety from the fire inspection, technical supervision, and commissioning. Information about the transfer is additionally submitted to the BTI.
First installation
To install a gas column, you need to collect quite a lot of documents
If gas is not supplied to the house, a gas supply line will need to be built. This is an expensive process, and many private home owners prefer to make do with solid fuel boilers. For multi-apartment buildings, gas supply is carried out by the developer, the housing office, or is carried out by the owners in a clubbing.
In a small kitchen, placing a column is a little problematic, since any centimeter counts.
- Obtaining documentation includes consent to the supply of gas from distributors and conveyors, calculation of consumption, obtaining technical conditions, permission for land allocation for the gas pipeline.
- Designing consists of the conclusion of a project agreement, the collection and examination of documentation, coordination in the instances listed in the previous paragraph.
- Construction consists of construction and installation works and commissioning.
- At the end, an agreement on gas supply is concluded in GORGAZ or OBLGAZ.
Have you already chosen an espresso coffee maker for your home?
How to fix a leaking faucet, read here.
How to install a geyser correctly: installation algorithm
After the development and coordination of the column installation project, you can look for a contractor. Moreover, the main search criterion is the contractor's interest in the existence of a water heater connection project.
If there is such an interest, then you have a conscientious performer who is ready to be responsible for his work. If not, look for another.


And if the "executor" is ready to risk not only his reputation, but also your safety, then the conclusions about the competence of such a "specialist" are already obvious.
Preparing Consumables
After the performer is found, you will have to purchase an additional set of "consumable" materials, which will include:
- A galvanized pipe with a millimeter wall - it is used in the construction of a "chimney", so fittings with a very thin wall (tenths of a millimeter) will simply burn out under such conditions.
- Water purification and softening filter - using this unit, you can delay the procedure for cleaning the column from scale.Well, without a filter, the column will “clog” with scale in a couple of years.
- A fitting kit that includes tees, adapters, ball valves and couplings.
- A gas hose that connects a home gas pipeline valve and a column fitting.
- Dowels, liners, concrete drills - these components will be used up during the installation of the column on the supporting surface.
Having purchased all of the above components and parts, you can invite the master to the house.
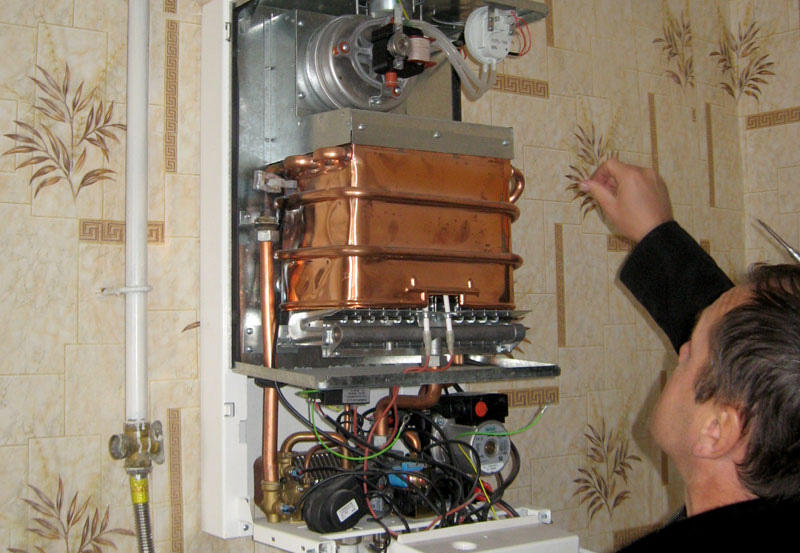
Installation of equipment
A typical column mounting algorithm is as follows:
Geyser installation diagram
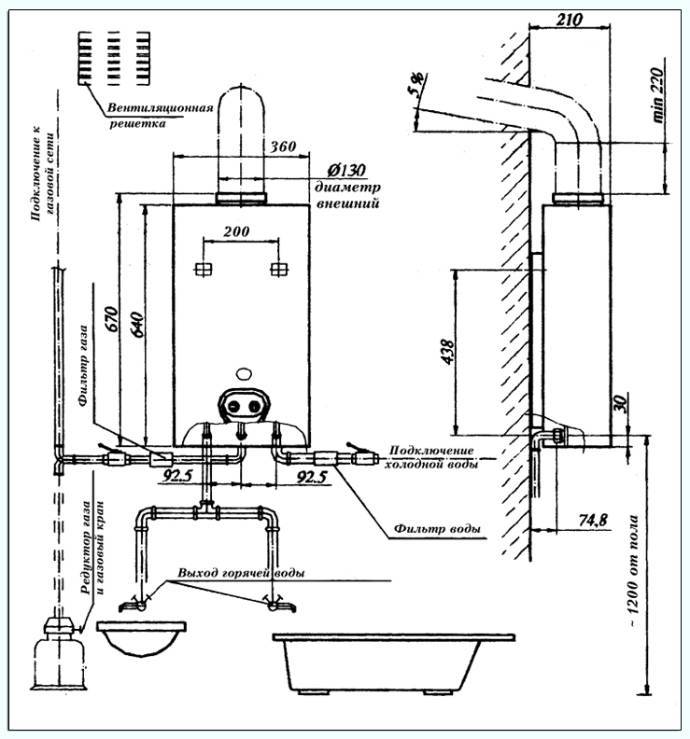
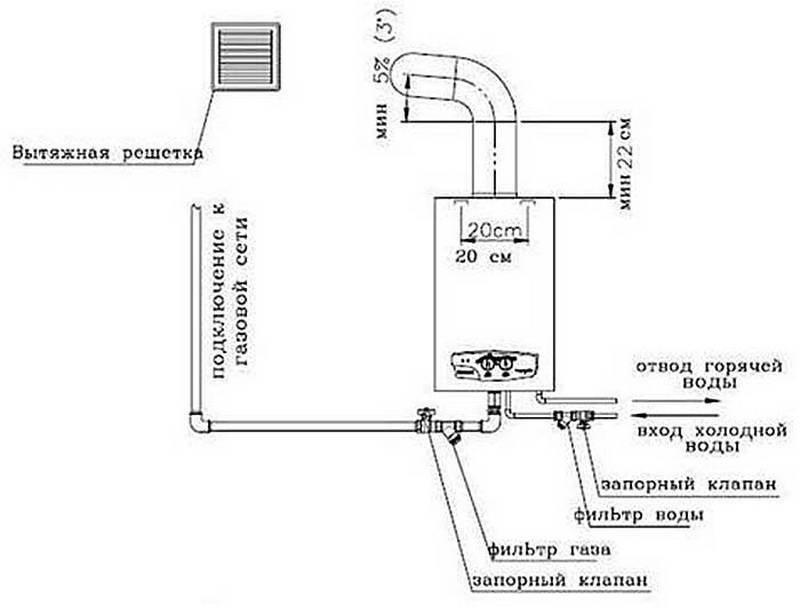
First, you should choose the location of the column on the supporting surface (wall). Moreover, this place should be removed from the stove by 10 centimeters (at least) and raised above the floor level to a height calculated as follows - the viewing window through which the working burner can be observed should be located at the level of the user's eyes.
Next, the column is attached to the wall with dowels driven into pre-drilled holes with installed liners.
A gas hose is connected to the fixed column, which is wound onto a separate fitting, the diameter of which differs from the dimensions of the "water" outlets.
The next step is the installation of the "cold water-column" line. It is implemented as follows: a separate line is drawn from the collector, ending at the inlet fitting of the column
Moreover, it is very important not to confuse the "receiving" branch with the "graduation". However, experienced craftsmen do not make such mistakes.
Next, you need to arrange an “exit” from the column by connecting the outlet fitting to the collector of the “hot” branch of the water supply.
At the very end, a galvanized chimney is put on the upper branch pipe of the column, fixing the draft sensor in a special place
The free end of the chimney is led into the kitchen exhaust duct using a special adapter.
The final stage - checking the operability of the column is carried out as follows: the valve on the branch pipe of the household gas pipeline is transferred to the "open" position; the connection of the gas hose and the column is checked with soapy foam (bubbles have gone - there is a leak); open the "hot" valve in the mixer. And if the column started up, and hot water came out of the tap, then everything was done correctly.
How to install a geyser
Self-installation is prohibited by the law of the Russian Federation, but since representatives of the gas service often remain elusive, we recommend that you mount the device yourself. Specialists should only be invited to connect the hose to the gas pipe and check all connections for leaks.
What to bring with you
First of all, prepare all the necessary materials and tools. You will need:
- new geyser;
- PVC pipes for water supply and metal-plastic pipes for gas;
- fitting;
- taps - gas and water (it is better to use ball valves);
- salt and magnetic filters;
- corrugation or galvanized pipe (if it comes with a column);
- Mayevsky's crane;
- a ring to make an entrance to the chimney;
- gas hose (its length depends on the distance between the pipe and the column);
- water hoses (also select the length depending on the distance);
- dowels and screws;
- gas key;
- pipe cutter;
- set of wrenches;
- drill;
- level;
- sealant, FUM tape and tow;
- soldering station for pipes.
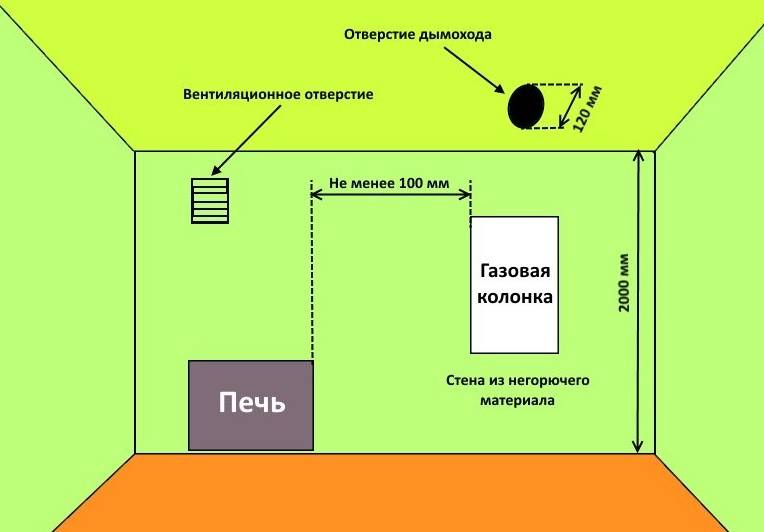
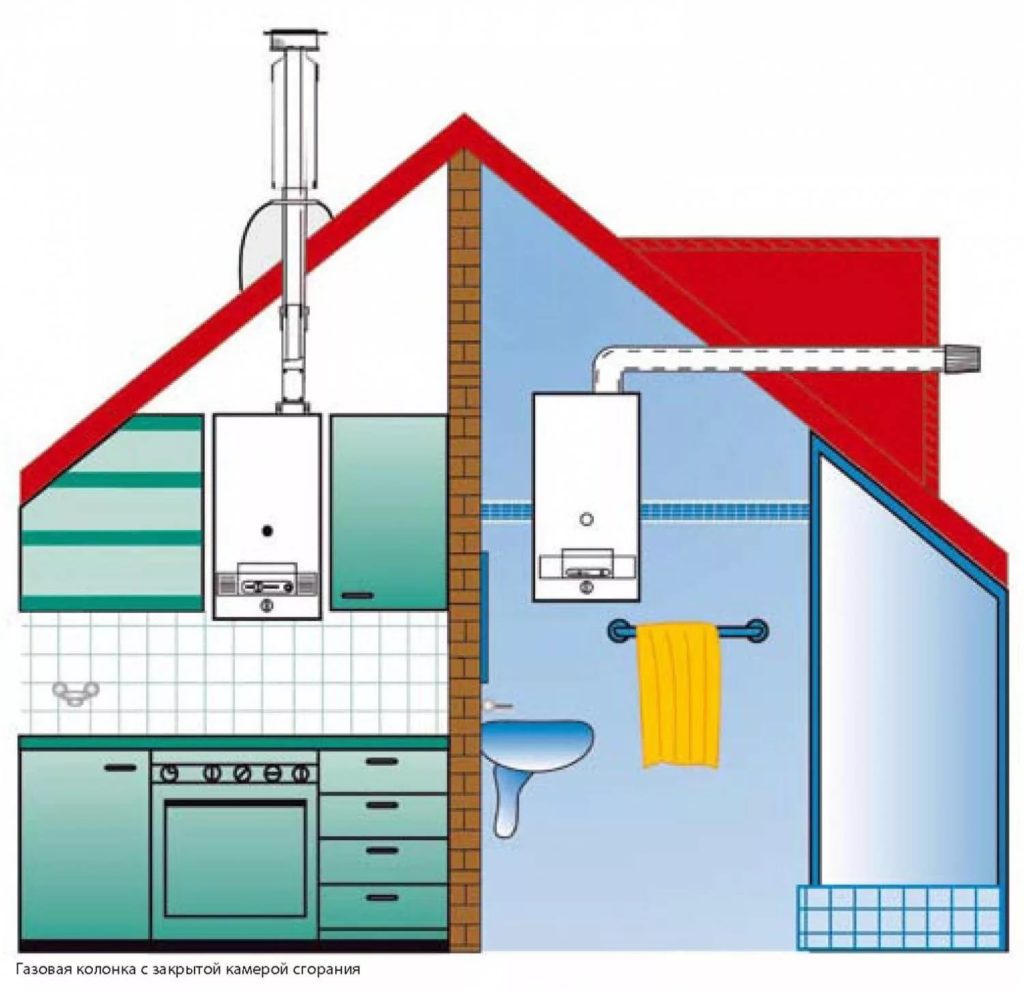
In the case of a private house, you may also need a metal (asbestos) pipe to remove smoke.Its diameter should not be less than 120 mm, and its height should be two meters or more.
We remove the old
This is an old geyser, the use of which is not safe. It is best to replace it with a modern analogue.
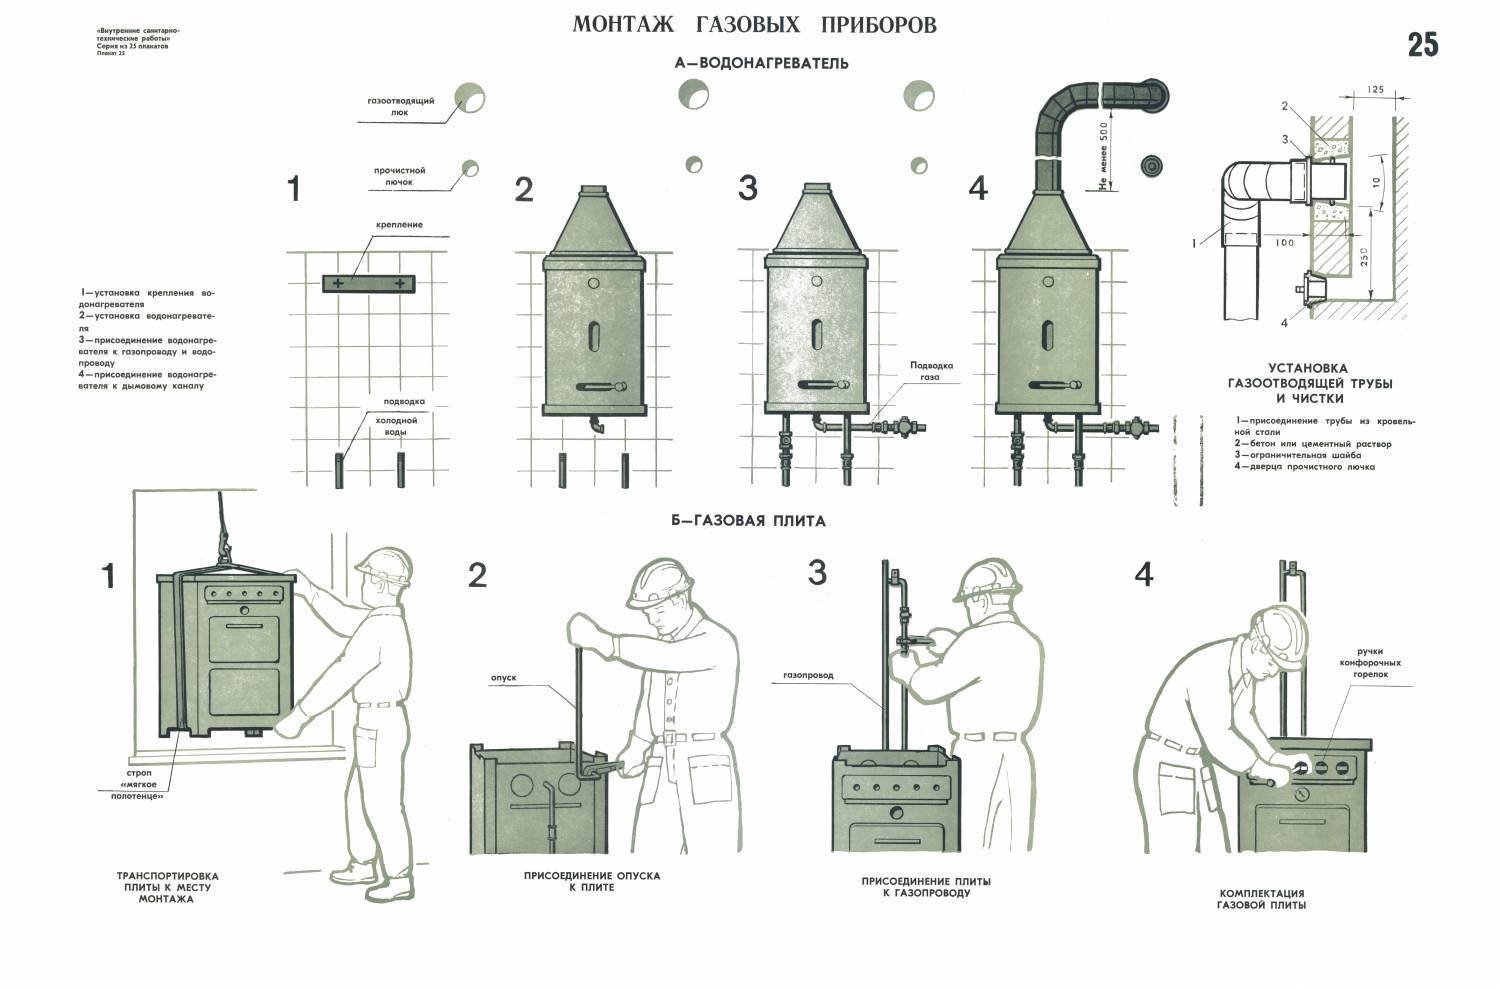
If you already had a water heater, then, first of all, you need to dismantle it. For this:
- Close all gas valves.
- Using a spanner, unscrew the fixing nut on the hose.
- Then remove the hose from the column. In the event that the hose is new and has no damage, then it can be used further. Otherwise, buy a new one.
- Now you can proceed to disconnect the device from the water supply. Turn off the water (if there is a faucet near the column, then it is enough to turn it off, otherwise you will have to block access to the water for the entire apartment).
- Remove the connecting pipe located at the outlet of the column and pull it out of the chimney.
- Dismantle the water heater by removing it from the mountings.
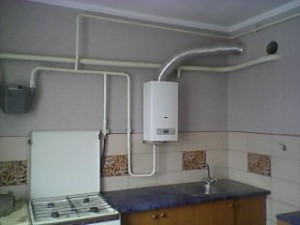
Direct installation
Installation of a gas water heater takes place in several stages. After choosing a place, you need to prepare all communications: plumbing, chimney and gas pipeline. All this should be in close proximity to the future column, so that after installing the latter, you only have to connect the hoses to the pipes.
To connect the gas to the geyser, be sure to call the specialists of the special service.
- So, the first step is to mark the place for the water heater. I hang it on a special bar that comes with the device. This is where you will need a drill, dowels and self-tapping screws. It is better to mark up with a level.
- We drill holes, drive in dowels, apply a bar and fasten it to the wall with self-tapping screws.
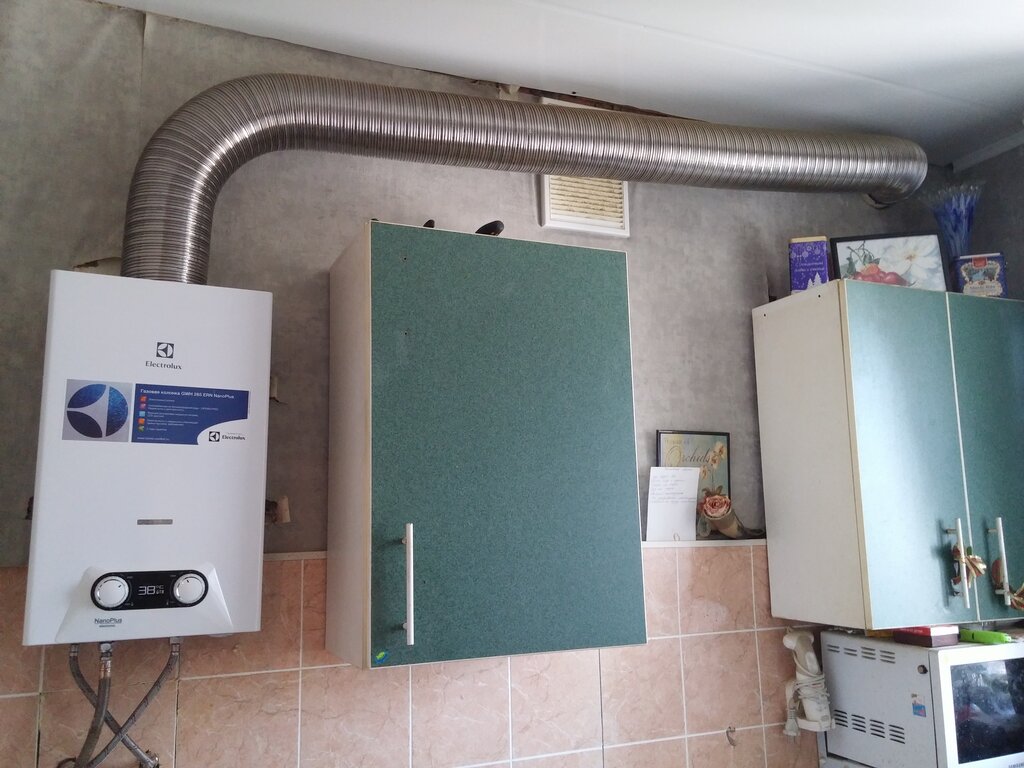
- The next step is to connect the water heater to the chimney.This is done using a corrugation or a metal pipe. Installing the latter is easy. The pipe must be put on the pipe (and the sleeve must also be tightened with a clamp) of the column. The other end is inserted into the chimney and covered with cement (possibly with asbestos). But do not forget that the horizontal section of the pipe cannot exceed 6 m and you cannot make more than 3 corrugation bends.
- Now you can proceed to connect the column to the water supply. As mentioned earlier, the installation of pipes and branching is best done in advance. In this case, it is not always a good option to tie into the nearest line (if the pressure in it is weak, cut directly into the main pipe going to the apartment). Be sure to install a tap on the new branch that goes to the water heater so that you can repair the column or replace it without turning off the water in the entire apartment or house. To carry out the pipeline, you will need metal-plastic pipes and a soldering iron, as well as a faucet, couplings.
- After finishing work with the hot and cold line piping, you just have to connect the hoses to the appropriate outlet and inlet to the column and to the pipes.
It looks like a chimney made of corrugations. The ring has a purely aesthetic value.
This completes your work. Connection to the gas pipe is carried out by specialists of the relevant service. A ball valve is also placed at the column inlet, all connections are sealed and then checked for leaks.
The preparatory stage for the installation of a gas boiler (column)
The order and sequence of actions will differ depending on:
- whether the house is a private property or it is a question of installing gas equipment in an apartment building;
- whether gas equipment has been previously installed or whether it is being installed for the first time;
- from what sources the operation of the water-heating gas boiler will be carried out: from pipeline natural gas or through the use of LNG (liquefied natural gas in cylinders).
Before starting work, you should contact the local gas service (if it is a private house) or the housing office (housing department, management company) - if we are talking about installing equipment in an MKD.
The purpose of the appeal is to obtain information about the availability of channels for connecting to pipeline natural gas, the capacity of the gas transmission network, the installation of a gas supply system inside the house, the presence and installation of a smoke exhaust system, the availability of water supply that can be used for heating and fire fighting purposes.
Having received or provided the necessary information, you will need to write an application to the city (village) gas service with a request to carry out work on the installation (primary) or replacement of previously existing gas equipment and work on laying / replacing gas and water mains.
The initial installation will be preceded by a much longer approval procedure.
Installation of a geyser: features
The installation of gas equipment, both in the apartments of an apartment building and in a private house, is regulated by Building Regulations and Rules 42-01-2002, Fire Safety Rules.
 Trust the installation of gas equipment should only be experienced professionals who have access to work of this degree of complexity
Installation of a geyser in an apartment involves:
- The use of galvanized pipes or stainless steel products for the installation of a chimney channel (at the same time, the pipe must have a thickness of 1 cm or more, and the channel itself must be installed at an angle of 2 degrees);
- The use of a meter pipe made of copper or stainless steel for the installation of an outlet pipe for hot water supply (the diameter of the pipe, in this case, must be at least 1.5 cm);
- The use of flexible hoses or metal pipes for gas and water supply with a diameter of at least 1.3 cm and a length of up to 250 cm;
- The presence on the new column of a shut-off valve that shuts off the gas supply (should have yellow handles and be located next to the gas equipment);
- Installation of check valves for water at 0.5 atm to prevent changes in the movement of the coolant in the system.
In addition, in order to avoid situations dangerous to human life and health, the supply of cold water to gas equipment should be carried out from the riser with a separate pipe through a mechanical filter.