- Work planning
- Sealing the junction of the bath and the wall
- Tips for further care
- Transport rules
- For cast iron structures
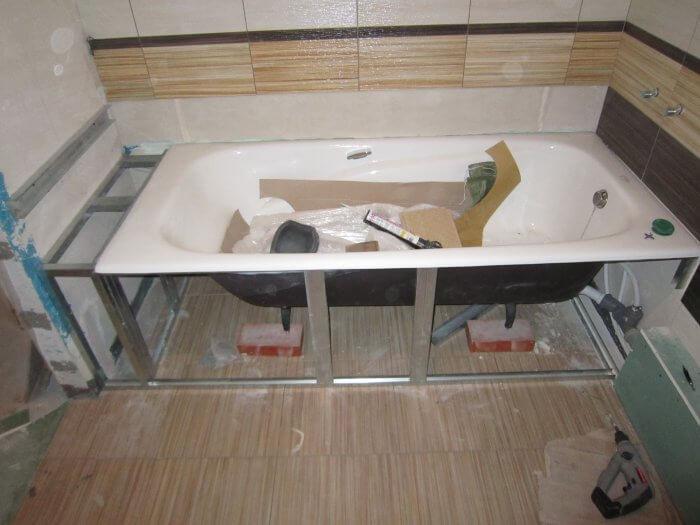
- Self-installation options for bathtubs
- Installation instructions for new plumbing
- Bath preparation
- Leveling a cast iron bath
- Connecting the bath to the sewer
- Connecting the siphon to the sewer
- Important nuances
- Methods for connecting a bathtub siphon to a sewer pipe
- Checking the drain-overflow system for leaks
- Preparatory work
- Do not forget about the grounding of the bath in the apartment!
Work planning
The installation of the bath takes place in several stages, some of them are common, while others are included depending on the material of manufacture of the equipment itself.
- Room preparation;
- Bath preparation;
- Assembly of the siphon group;
- Bathtub installation;
- Connection of drain fittings;
- Decorative design.
If the bath is metal, then the second item is omitted. The installation procedure itself is not complicated, but care is required when working with small parts. The main difficulty lies in connecting the siphon group.
There are two options for doing this
- Carry out the connection before installing the bath in its place. This is much easier, because access to the drain holes is not limited. And the process itself can be controlled visually.But during installation, extreme care will be required so as not to damage the installed fittings. Given that the bath is a large and heavy object, this is problematic.
- Install the bath in its place, align it. Only then connect the siphon group. The complexity of the process is seen in the fact that the work must be carried out by touch. It is impossible to see from both sides of the bath at once. But in return, the installer has the opportunity to handle the bathroom more freely.
We also recommend reading about PVC bathroom panels. This is an economical and quite aesthetic option for decorating the walls in the bathroom.
The second option seems to be more preferable. In the end, anyone can brush their teeth with their eyes closed, and the toothbrush does not get past the mouth. Therefore, we will focus on the second method.
For work on installing a bath, installers take 1500-2500 rubles. And work there, with a prepared base, no more than half an hour. Therefore, we recommend installing a bath with your own hands.
Sealing the junction of the bath and the wall
No matter how tightly you put the bathtub against the wall, the gap still remains. With acrylics, the problem is complicated by the fact that their sides in the middle bend a little inward. Therefore, simply sealing the gap with silicone will not work. Additional funds are needed.
The easiest way to fix the tape is that it is sold in rolls. One is enough for sealing from three sides. Shelf width 20 mm and 30 mm. The tape is rolled out along the edge of the bath, fixed to the silicone.
You can seal the joint between the acrylic bathtub and the wall with a special tape
There are also various corners for the bath. They are made of plastic, and the edges are rubberized so that the joint is tighter and the seams between the tiles do not flow. The profiles and shape of the corners are different.There are those that are mounted on top of the tile, there are those that run under it. And they can be of different shapes and colors.
Some types of corners for the junction of the bath and the wall
Regardless of the shape, they are installed in the same way: in the corners, the lower parts are cut at an angle of 45 °. The quality of the joint is checked. Then the surface of the wall, side and corner is degreased (preferably with alcohol), silicone is applied, on which the corner is installed. Everything is left for the time required for the polymerization of the sealant (indicated on the tube). After that, you can use the bathroom.
In the case of acrylic bathtubs, there is one caveat: before applying the sealant, they are filled with water, and in this state the composition is left to polymerize. Otherwise, when water is collected and the load on the sides increases, microcracks will appear on it, into which water will flow.
A few words about which sealant is better to use when sealing the junction of the bath and the wall. The best option is a sealant for aquariums. It is no less durable than plumbing, but it has some additives, thanks to which it does not get moldy, does not change color and does not bloom.


Tips for further care
The new bathtub is installed and pleases with its whiteness
Now it is important to ensure proper care in order to keep the original look longer.
- Each time after hygiene procedures, the surface should be washed with a soft sponge with the addition of a helium detergent. Abrasive cleaning powders and aggressive chemicals will have to be set aside.
- Wash off foam and dirt with running water from a watering can.
- It remains to wipe the enamel with a cotton or microfiber cloth, otherwise ugly traces of chlorine and calcium will remain from the drops of water after drying. In the future, they will lead to the destruction of the enamel.
Simple rules of care will help to avoid stains and scratches. The surface will no longer turn into a matte and porous, prone to dirt accumulation.
Transport rules
The first serious problem caused by the independent installation of a cast-iron washing tank is the significant weight of the product. Some large models weigh more than 150 kg, and in fact the bath must not only be delivered to the house, but also lifted to the floor, sometimes without using the elevator. Before installing a cast-iron bath, it is transported following the following recommendations:
- It will take 2 people to lift a cast-iron washing tank to the floor, since one worker will not cope with such a weight, and three will not turn around in tight flights of stairs.
- When transferring and lifting the bath to the floor, it is correct to carry it, orienting it with the drain hole against the direction of movement.
- The washing container is brought into the bathroom, placed vertically to give room for maneuvers for movers and plumbers.
- In order not to damage the threshold or doorway or scratch the bathtub, obstacles in the way of transportation are covered with soft material (foam rubber, cardboard, cloth).
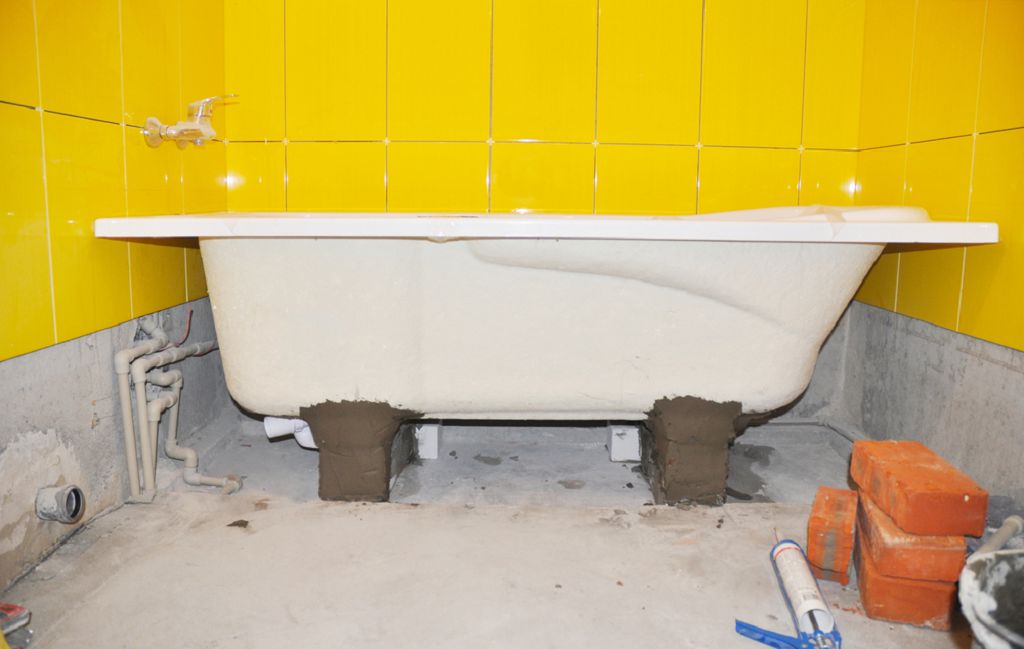
For cast iron structures
For a comfortable installation of a cast-iron bath, enlist the support of at least one assistant. Such products have an impressive weight, and it is quite difficult to manipulate them with one pair of hands.
We perform the work in the following order:
- First step. We bring the container into the bathroom. Here we need to turn the bathtub on its side so that the bottom of the product “looks” at the wall to which it will adjoin in the future.
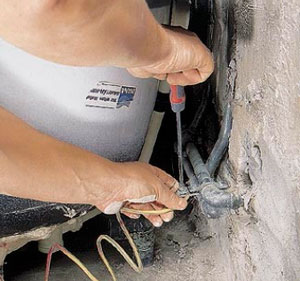
- Second step. We install a siphon.To prevent leaks, breaks and other troubles, be sure to use rubber gaskets. At the same stage, we perform the installation of the overflow.
- Third step. We mount 2 supports from one side of the tank.
- Fourth step. We turn the container upside down, placing it on the installed supports. On the other side, the bath will be supported by a temporary support.
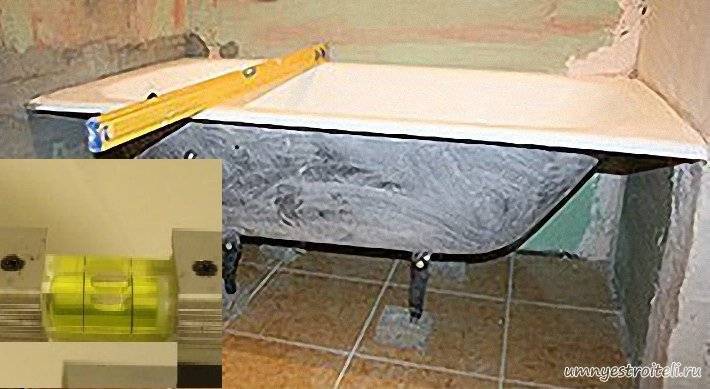
- Fifth step. We install all the remaining supports, be sure to check the horizontalness of the product with a level. We leave approximately a 3 mm gap between the wall and the sanitary ware.
- Sixth step. We connect the siphon to the outlet outlet, which, in turn, is located in the overflow pipe.
Learn more about how to properly install a cast-iron bathtub in the bathroom with your own hands, learn from this video material:
Self-installation options for bathtubs
Installing a bathtub without a master is a serious task. The ease of use of the product and its service life greatly depends on what it will stand on.
It is important to choose the right height, and for this the bath is installed on legs, a podium or a frame. Each option has its own characteristics and is suitable for different types of baths.
Installing a bathtub on legs
Many bathtub kits include standard legs that allow you to easily and quickly put the product. Depending on the material of manufacture of the product, the legs may have a different design. For example, in the case of plastic and acrylic models, the legs are not attached to the bath itself, but to the profiles on which the bath itself is placed.


To install the bath on legs, it is enough to bring it into the room, tip it over on its side and fix the supports, and then turn the bath over and place it in the planned place.Most often, cast-iron legs are placed on the legs, which have a large mass, rigid walls and are generally quite stable.
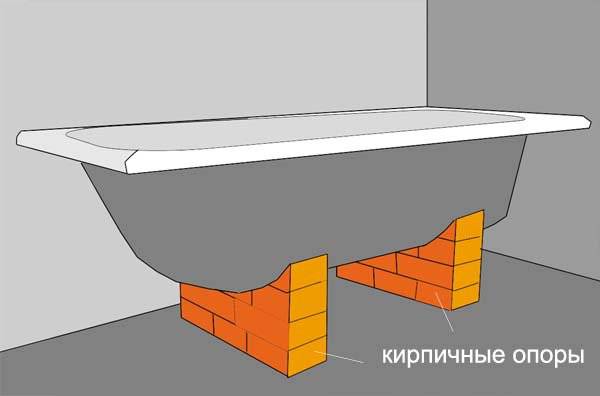
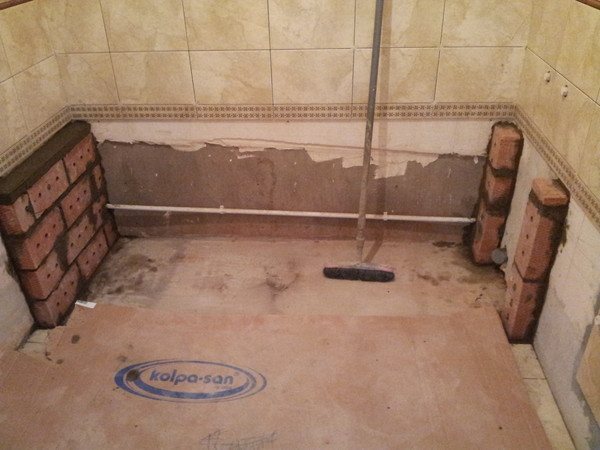
Podium installation
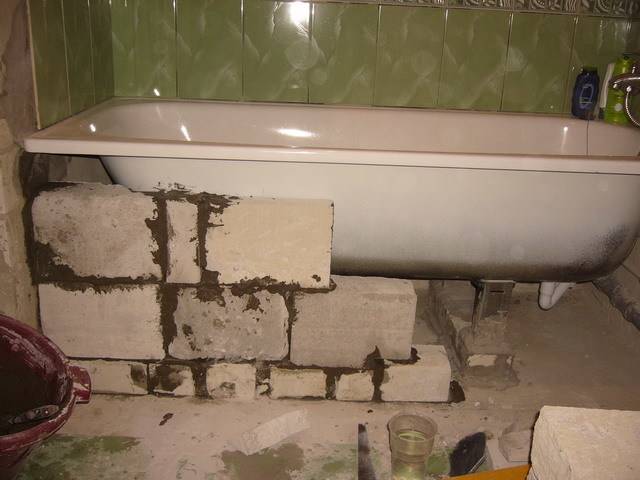
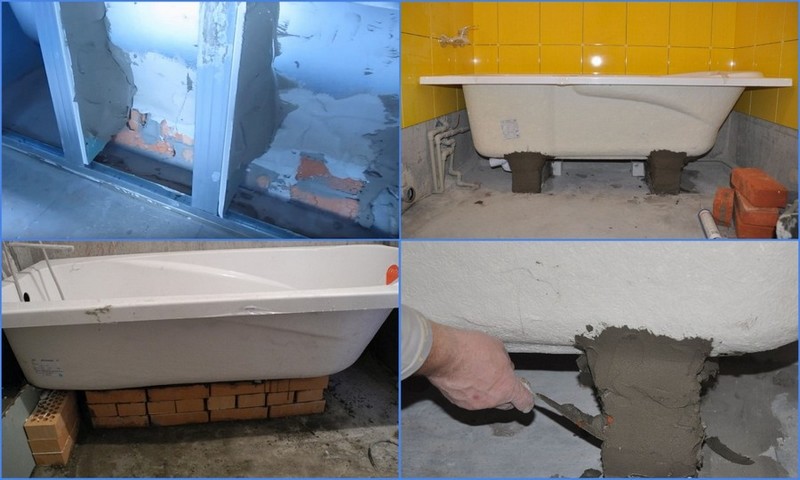
When the standard legs from the kit are not enough to stabilize the bathtub and support the bottom of the bowl when it is filled with water to the brim, you can create a brick podium without the help of a master. It is necessary to assemble a support that will repeat the shape of the bottom of the bath. It is better to use a solid brick that resists moisture and is not afraid of weight loads.
Steel bathtubs are usually installed on the podium, especially thin-walled ones. Under the influence of water or under the weight of a person, they can be deformed during operation, and this leads to peeling and cracks in the enamel coating.
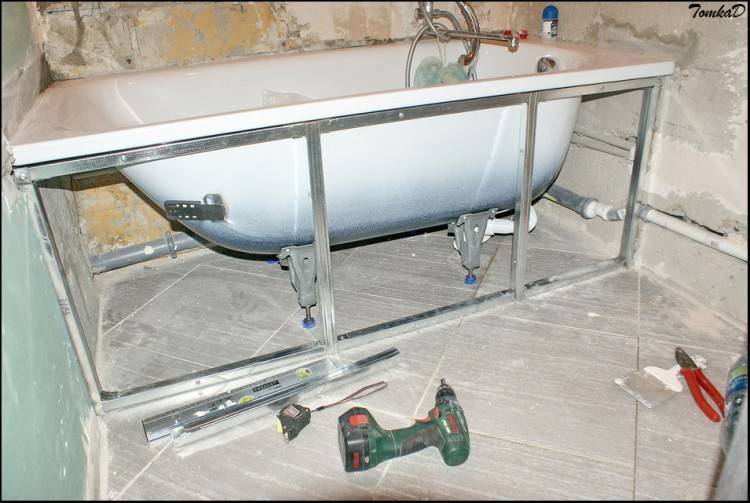
Installation of a bathtub on a frame
In order to avoid deformation of the bowl and strengthen the structure, it can be installed on a wooden or metal frame, along which the mass of water and a person will be evenly distributed. Acrylic and plastic models are traditionally placed on the frame, which are quite fragile (compared to cast iron), but large or corner steel bathtubs are also often installed on them.
We also note that most acrylic and plastic bathtubs are sold with a set of legs and a screen, which performs an exclusively decorative role.
Installation instructions for new plumbing
Do-it-yourself installation of a cast-iron bathroom has a certain scheme of actions:
| Bath site preparation | The floor covering needs to be leveled. For this purpose, a cement screed or leveling mortar is used. From above the laying of a rigid floor tile is made. After that, it is worth waiting a bit until the ceramics harden. Ceramic tiles are used only on the basis of personal wishes. |
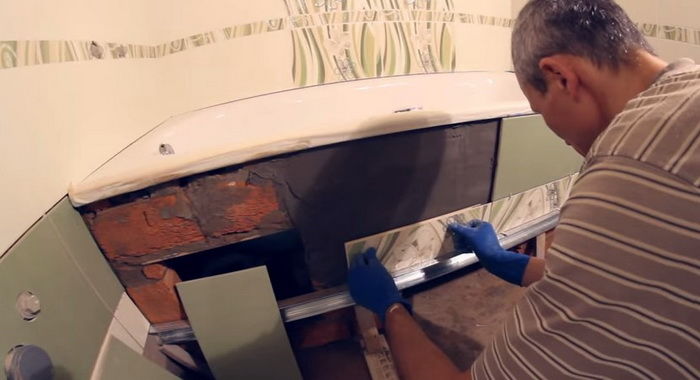
| Wall covering | If necessary and at will. The tile is laid along the entire wall or only along the height of the sides. In the first case, it will be much easier to replace plumbing in the future. The second is used to prevent water leakage and moisture ingress into the gap between the plumbing and the wall. |
| Installing a cast iron bath | Prior to this, it is necessary to take care of the withdrawal of the pipeline in order to connect the mixer, and to withdraw the sewer pipe. First, the bath should be put on its side and mark the level where the replaced product will stand. |
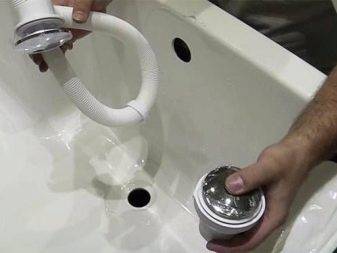
| Siphon installation | The drain must be protected with a rubber gasket. Using the rings, the floor shutter is attached. |
Advice! It is better to stop at the siphon-gate, which is equipped with a metal grate for draining. Plastic elements are not rigid enough, they can flex, do not stick tightly enough.
Bath preparation
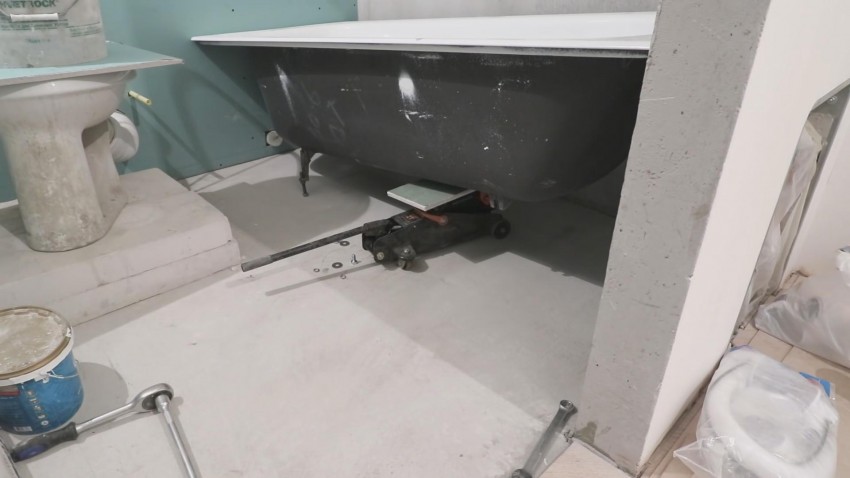
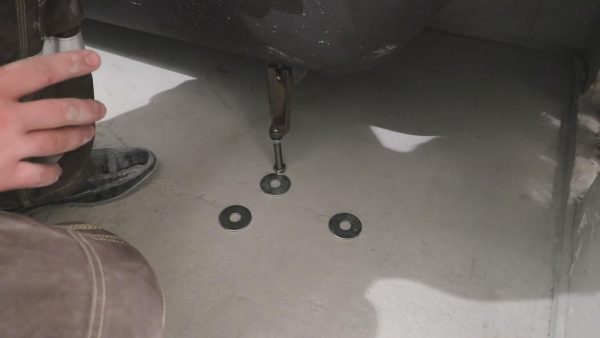
Wooden beams are laid on the floor of the room, the height of the structure must correspond to the height of the jack. Then the bath is laid on the base, the jack is brought under the bottom part (the heel is located at the center of gravity of the product). It is recommended to place a 10-15 mm thick rubber pad or board under the lifting arm of the jack. Then the cast iron product is raised to the planned height, while at the same time installing safety props (to prevent the structure from swinging).
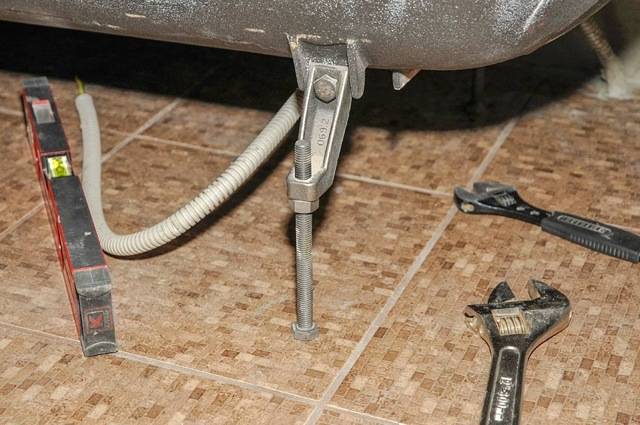
The condition and completeness of the metal supports, the ease of movement of the threaded elements are checked.Then the legs are mounted on a cast-iron body and fastened with a bolt and nut (there are schemes with a wedge), an adjustable element is provided in the design of the stand, which allows you to adjust the installation angle. The threaded rod is fixed in a predetermined position with a tightened lock nut.
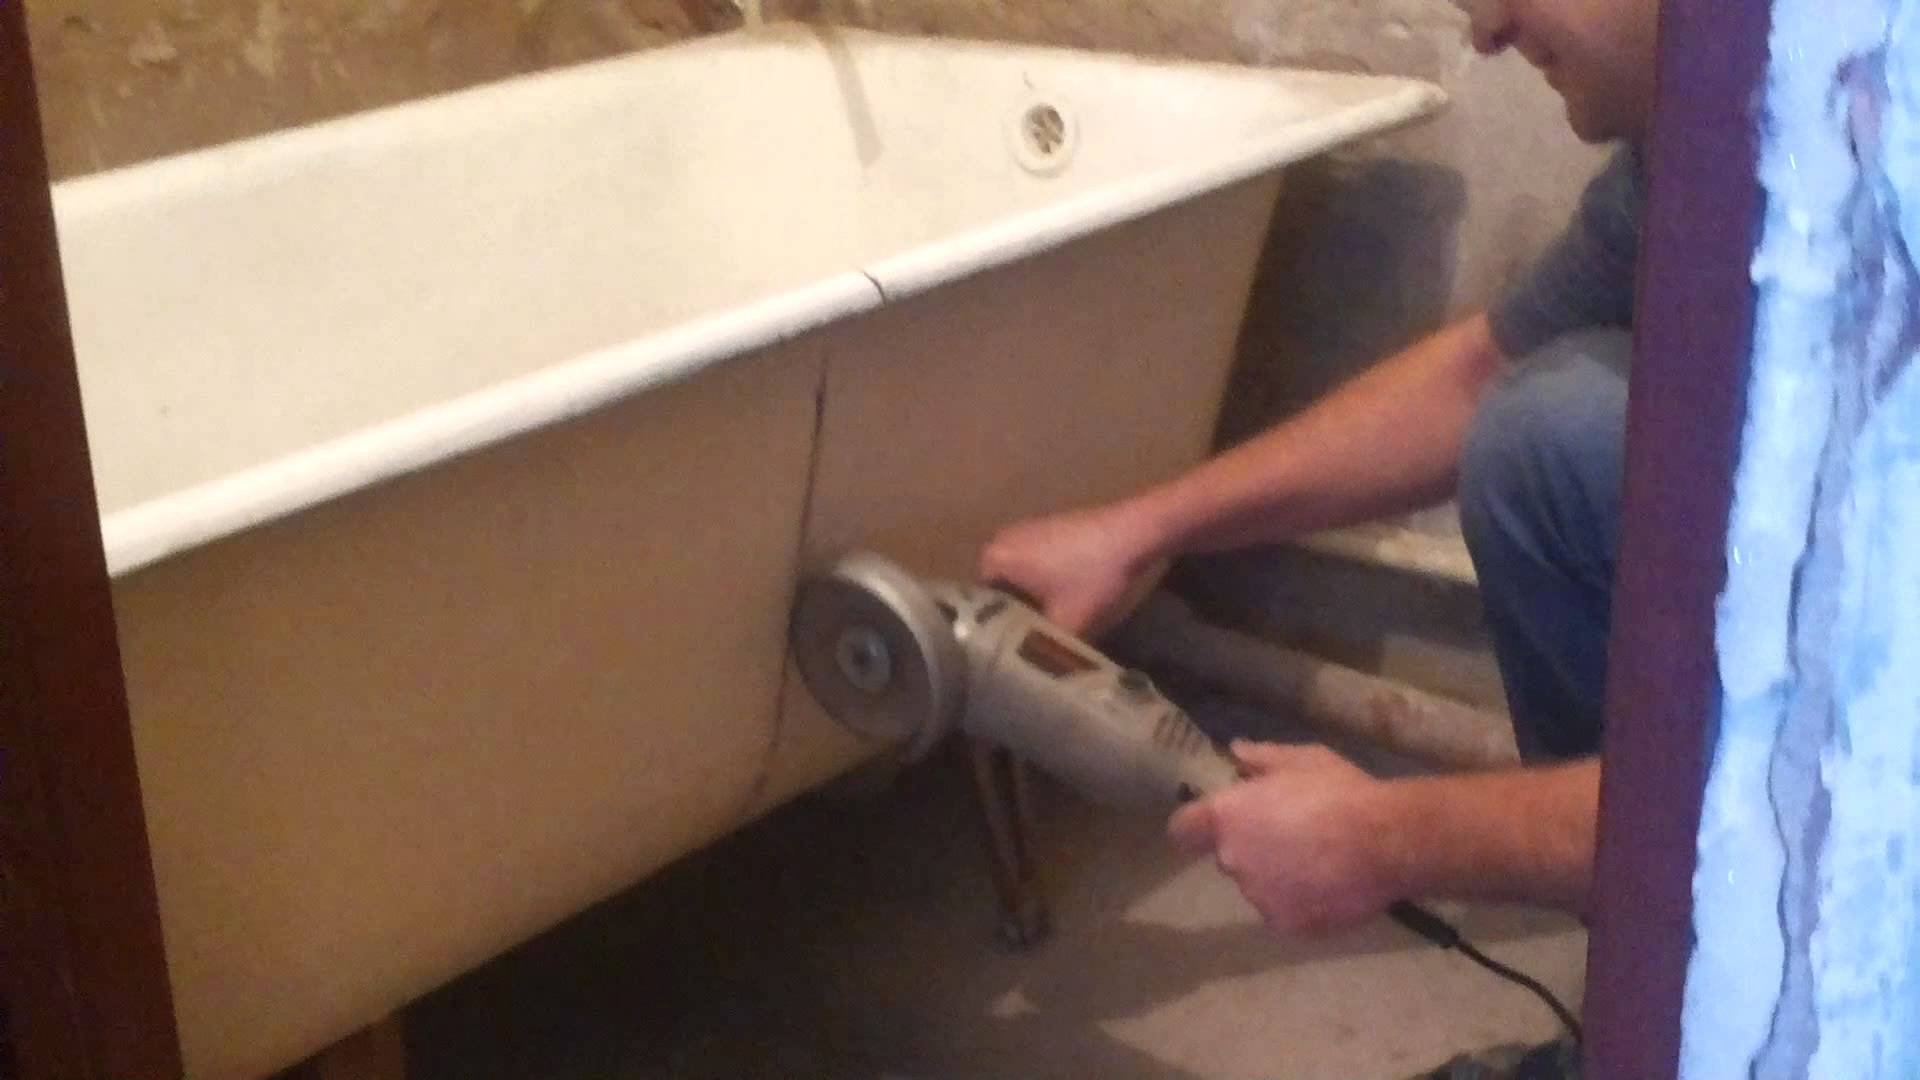
If the walls of the room are tiled, then the method of deepening the flanging of the bath into a groove cut in the tile is practiced. The height of the channel is determined based on the dimensions of the cast iron product with the legs installed, a diamond wheel is used for cutting. When making a groove yourself, you need to know how to work with a cutting tool. For cutting, they take a diamond disc, work is performed in a protective mask (due to fine dust)
When cutting grooves, it is important not to damage the water pipes and electrical wiring.
There is a combined solution in which a groove is cut on the side walls, and the lower plane of the long edge of the bath rests on a metal U-shaped profile for attaching drywall. The guide is screwed to the wall surface with screws. When arranging slots, you should check in advance the possibility of installing a drain. The siphon is placed under the bottom of the bath, if the gap is insufficient for installation, then the position of the guide for cutting the groove needs to be adjusted.
The process of installing a cast iron bath.
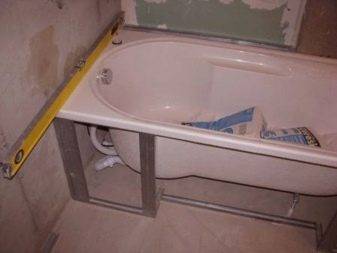
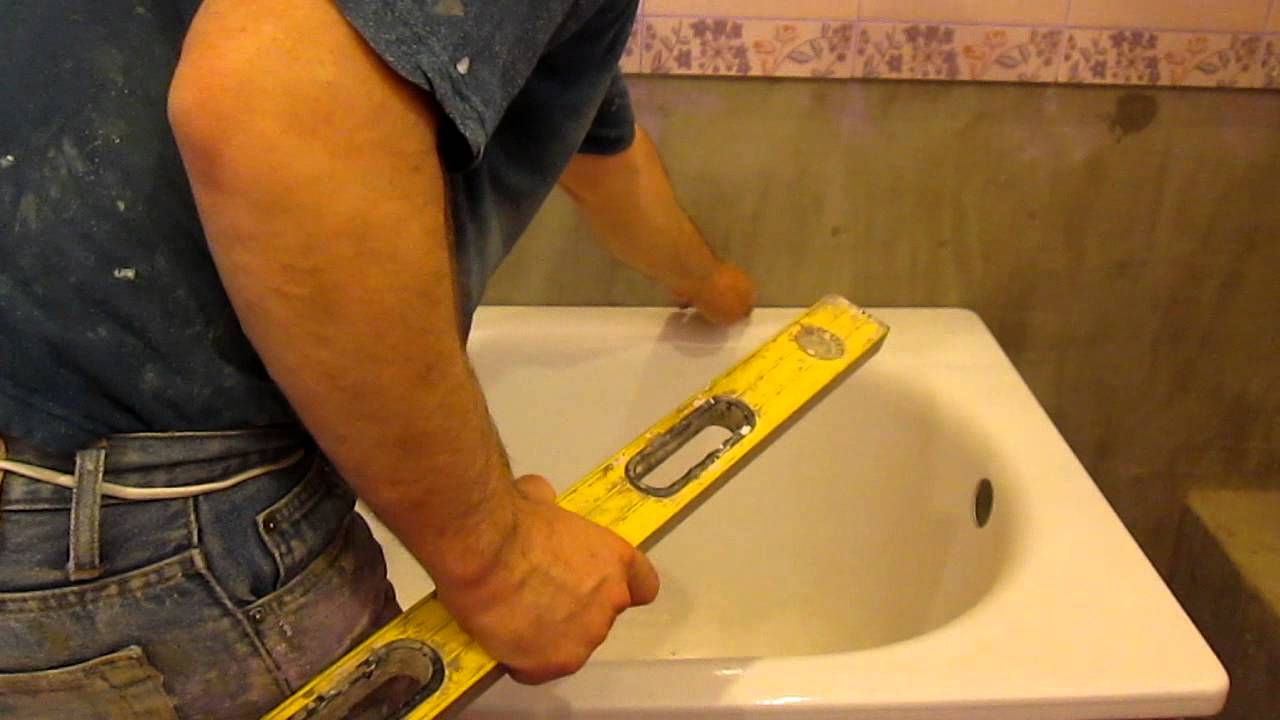
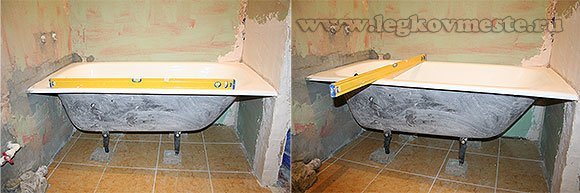
Leveling a cast iron bath
Alignment after installation is necessary, but even here difficulties can arise. The fact is that the edges of the bathroom are often uneven, due to the peculiarities of production. This is especially typical for models made in our country.


In such a situation, the tile that is laid out according to the level helps a lot. The edges of the bowl are aligned along it.
Irregularities in the floor are leveled with a concrete screed.
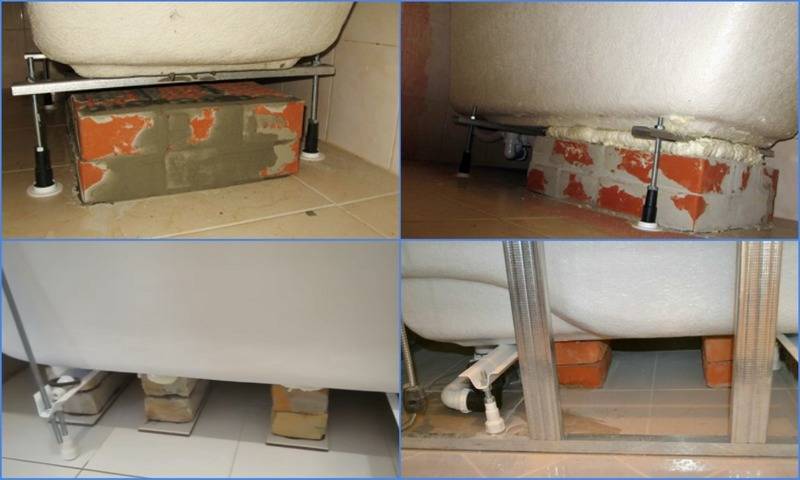
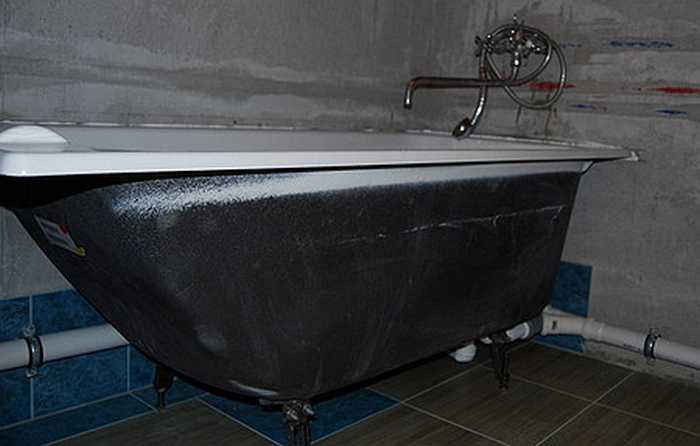
The bath itself is leveled at the building level with the help of metal plates and pieces of tiles that are placed under the legs. Some bathtubs come with adjustable feet.
Before installation, you should decide how to decorate the floor. If the bath will stand on legs, decorated with beautiful decorative overlays, the floor is tiled.
In the case when the bathtub is hidden from the side under a special screen, there is no need to cover the floor, because it will not be visible.
So, as you can see from the article, installing a bath with your own hands is a simple process that requires a minimum set of tools. With the help of the knowledge gained and the help of a partner, all the work can be done very quickly.
With proper and timely care, a cast-iron bath will retain its properties, providing a comfortable adoption of water procedures for a long time.
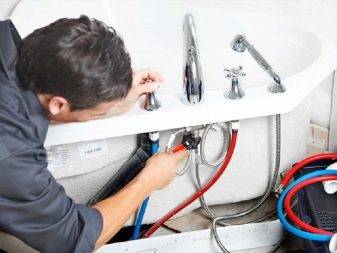
Connecting the bath to the sewer
Installation of the cast iron bath drain system is carried out in accordance with the instructions from the manufacturer. The main requirement for its installation is the use of rubber gaskets and seals to seal the junctions of the drain system with the bowl and sewer. Sometimes gaskets are replaced by sealant processing.
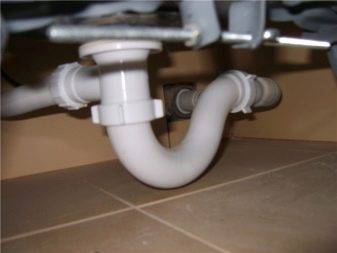
Connecting the siphon to the sewer
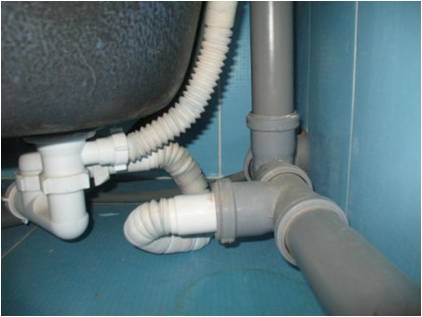
Connecting the cast iron model siphon to the sewer is carried out in two ways:
- through a corrugated pipe (it is complete with a siphon);
- through a smooth plastic pipe, which is designed for the installation of a sewer system. The length of the pipe is determined independently.This is a hard connection option.
If we compare which option will need to be replaced faster, then it will be a corrugation. On its surface, debris will accumulate faster and a cork will form, which will need to be cleaned. If an inspection hatch is mounted in the false wall, then replacement can be carried out quickly. At the same time, the corrugated siphon is connected to the sewerage system faster, since the pipe does not fit the desired size.
The drain of the waste liquid will pass qualitatively if the siphon elbow is 5 cm higher than the sewer pipe. The rate of water discharge depends on the diameter of the drain hole of the bath bowl.
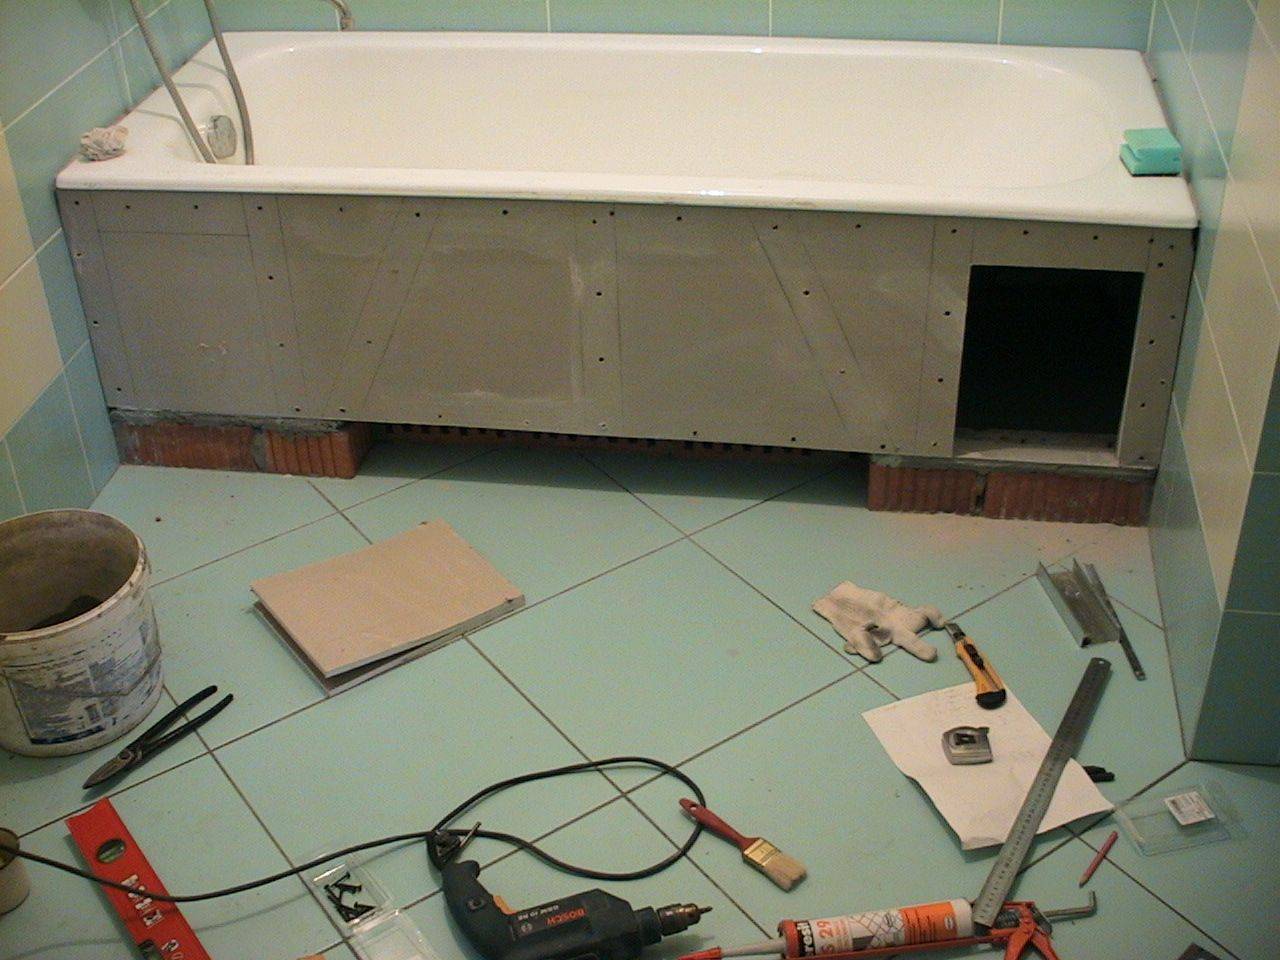
The system is still connected to the sewer pipe bathtub overflow. After carrying out all installation work, it is recommended to test for its tightness. If there is no leak anywhere, then the font is sheathed with a false wall.
Important nuances
During the installation of the bath, you should be extremely careful so that the product can fully perform the functions assigned to it and last as long as possible.
Pay attention to such points:
- the legs are mounted in such a way that the siphon outlet element (pipe) is installed without problems in the sewer pipe;
- the bath must be installed with a slope;
- be sure to take into account the parallelism of the sides relative to the floor.
The tightness of the junction of the bath and the sewer must be monitored. If you are going to start using a plumbing device, you should pour 10 liters of cold and hot water into the bath.


During the installation process of the bath, the main problems associated with the material from which the product is made should also be taken into account. Acrylic options have the following disadvantages
- When hot water is drawn in, the walls of the sanitary ware begin to “play”. This is due to the fact that the heated acrylic walls lose their original rigidity.
- Legs are another weak side of acrylic plumbing. Standard legs cannot boast of impressive stability. Even if you set everything to the ideal level, you still won’t be able to save the situation.
- The bottom of such a bath feels great with light loads, but it can sag a lot due to significant weight.
- When taking in water, a drumming effect occurs, caused by the thinness of the walls of the acrylic bath. Such a drawback is noticed in any baths, but in acrylic it is most pronounced.
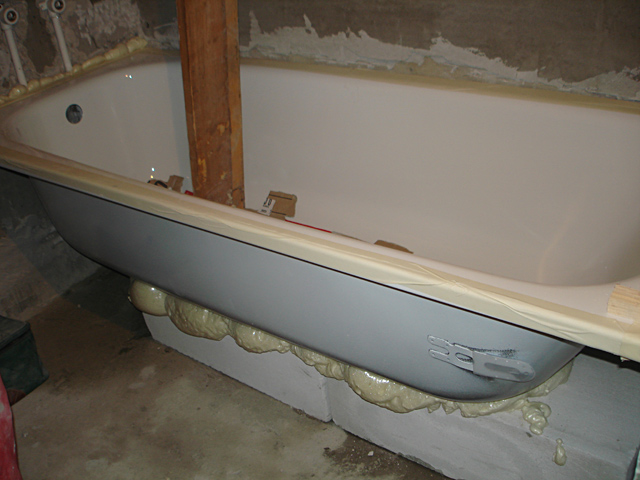
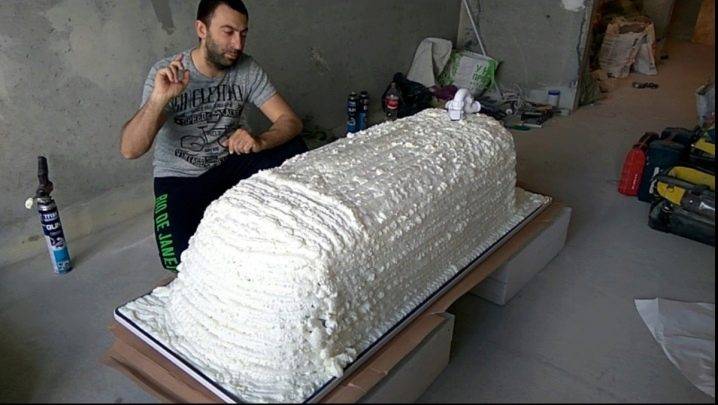
Foaming is carried out as follows:
- the bath is turned upside down, and cardboard or other protective material is placed under it (this insert is needed so that the acrylic surface is not scratched);
- the surface is cleaned of dust and dirt;
- foam is applied and residues are removed from the surface.
It is much more economical and more comfortable to use a foam gun, but if it is not available, you can limit yourself to a simple balloon.
Most of the products on the market are made of PVC or propylene, which are reliable, attractive and durable. The latter material is much more expensive, but the walls are smoother, which greatly reduces the likelihood of blockages.
The idea to purchase cheap models of drain fittings should be immediately abandoned. The fact is that budget models are non-separable, so they are unsuitable for repair.Already after a couple of months of operation, the rust seizes the bolt so strongly that it cannot be unscrewed.
Methods for connecting a bathtub siphon to a sewer pipe
There are two ways to connect a cast iron bath siphon to a sewer pipe:
- in the first case, a corrugated pipe is used, which is included in the kit;
- in the second case, a smooth plastic sewer pipe is used, which is adjusted to the desired dimensions on its own, obtaining a rigid connection.
Experienced plumbers prefer the second method, as smooth walls do not allow the pipe to become clogged with dirt and hair. On the corrugated walls, dirt settles faster, which interferes with the advancement of the drain and contributes to the occurrence of blockage.
Although a hatch is made to the drain system in the false panel, through which you can always replace the corrugated tube with a new part. Installation of a corrugated pipe is faster, as there is no need to adjust the size of the part.
To ensure a quick drain of water from the bath, it is necessary to ensure that when installing the product, the level of the siphon elbow is 50 mm higher than the pipe of the sewage system. Affects the speed of emptying the bowl from water and the diameter of the drain hole. Consider this fact when choosing a bath model.
Checking the drain-overflow system for leaks
After assembling the drain-overflow system and connecting it to the sewer pipe, it is necessary to test it by filling the bathtub with water up to the top hole. Place a newspaper or other paper under the siphon and pipes, on which the leaked water will be immediately visible.
When you hear the characteristic sound of water flowing through the overflow tube, you can turn off the water in the hose stretched to the bath from the nearest source of the water supply system. After that, open the cap and see how quickly the water leaves the bowl into the drain hole.


If all the water is gone, and the paper placed under the pipes remains dry, then you can consider the tests successful.
Feel free to proceed with the installation of a false plasterboard panel, which is subsequently finished with tiles in accordance with the design project.
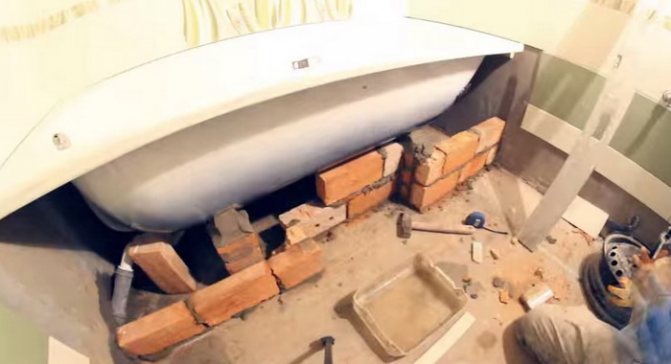
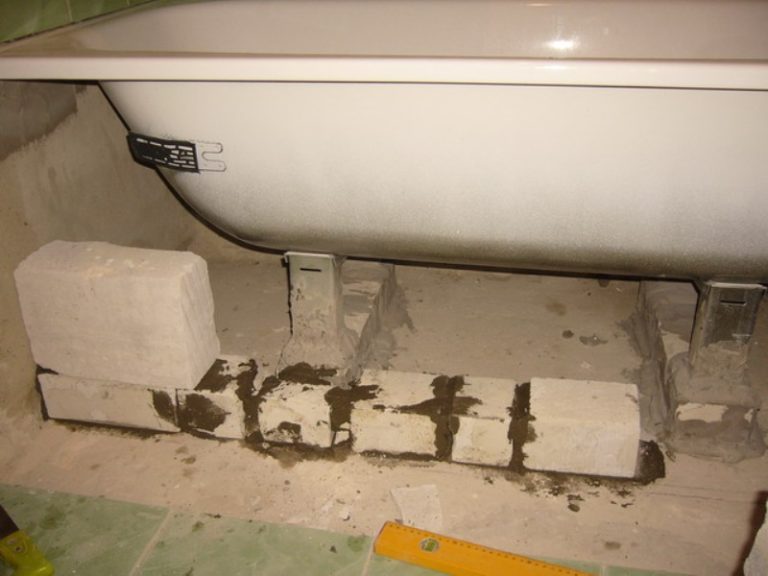
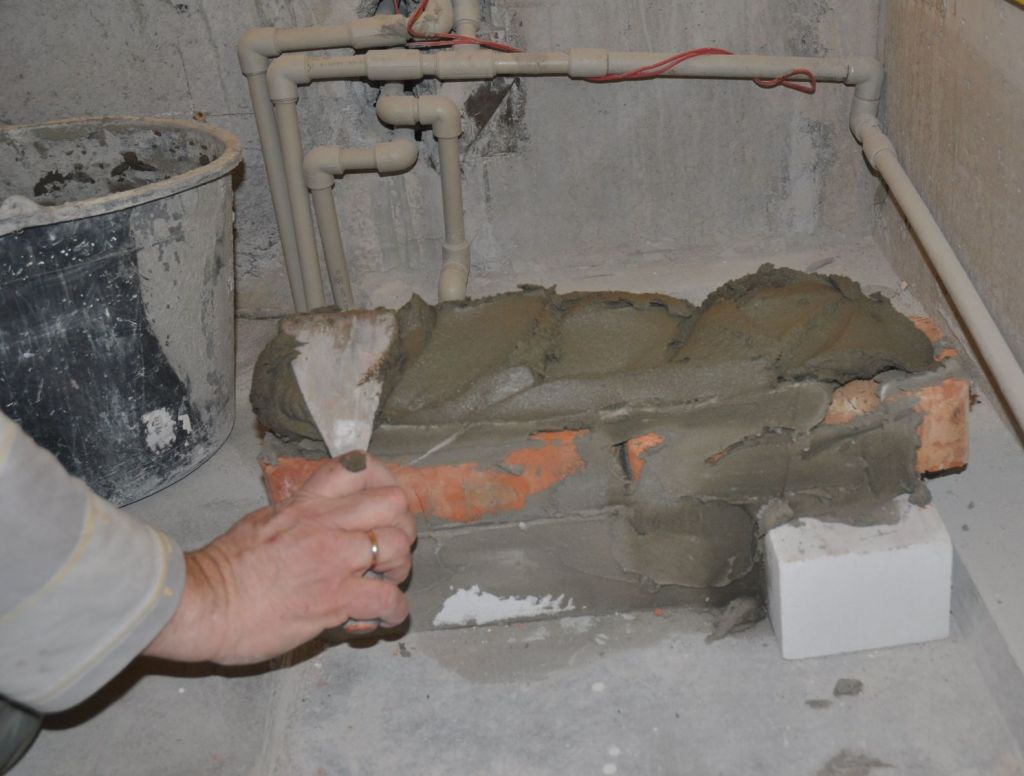
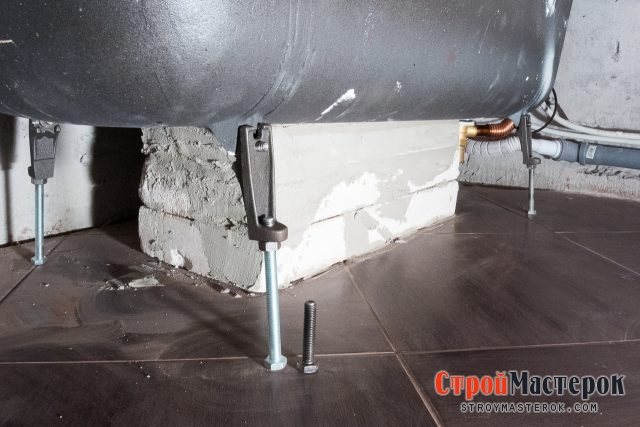
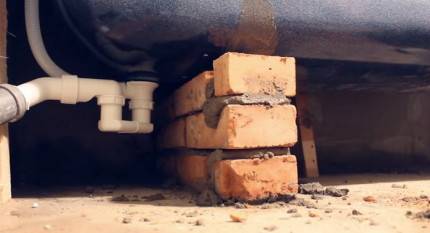 Installation of a cast-iron bath on bricks is carried out using a jack or improvised means, allowing the product to hang in the air
Preparatory work
Before proceeding directly to the installation of plumbing equipment, it is necessary to prepare the workspace. First you need to dismantle the old bath.
If necessary, we clean the floor and walls in the area where the bath will be installed from the remnants of building materials. We clean all surfaces from dirt and mold. After that, it is recommended to carry out treatment with a special antibacterial composition that prevents the formation of fungus and mold.
We sweep all the garbage from the floor and cover it with cellophane or old newspapers. The workplace is ready, you can start installing the bathtub on the legs.
Do not forget about the grounding of the bath in the apartment!
Grounding a cast iron bath - an important stage of installation, which is often overlooked.
 Today, a lot of electrical appliances are installed in the bathroom, which, in conditions of high humidity, are a source of serious danger to residents.
The bath is grounded by attaching a special conductor to it, which equalizes the electrical potentials.
For grounding, a rigid wire with PVC insulation and a cross section of at least 6 kV/mm is used. The cable must be long enough (at least 2 meters).
If you purchased a new cast iron bath, it is already equipped with a special jumper designed to attach the ground wire.
It is recommended to entrust the installation of grounding to a professional electrician, as your future safety depends on it.


