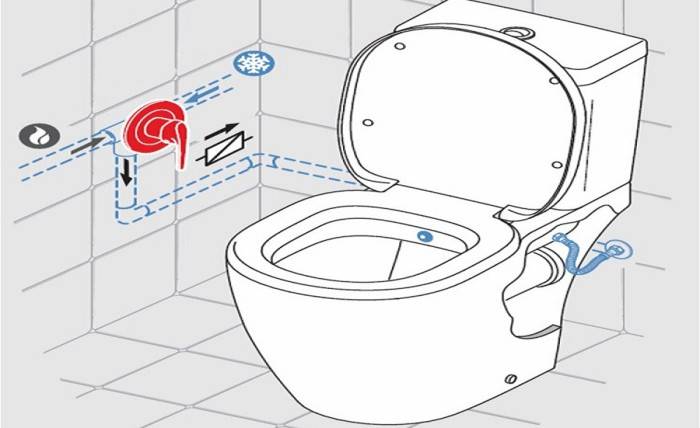
- Installation of a hidden hygienic shower
- wall shower
- Preparatory work before installation
- Bidet installation
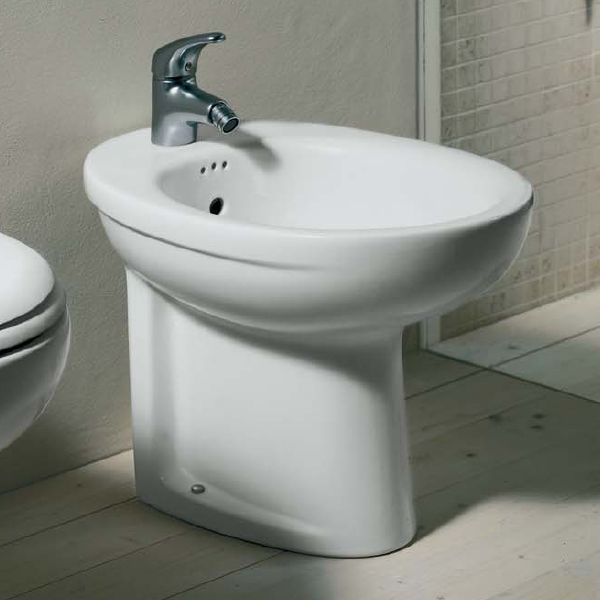
- Connecting a floor model
- Features of mounting the suspension system
- Device
- Bidet: how to make the right choice?
- Bidet in separate and adjacent bathrooms in the photo
- How to assemble, how to install and how to connect a floor bidet to water and sewer.
- How to assemble a bidet?
- How to install a floor standing bidet?
- Markup, parameters and installation of a bidet.
- Connecting a bidet to sewerage and water.
- Popular manufacturers and models
- Step-by-step installation of a hanging bidet
- Installation of a bidet without plumbing skills
- The last stage of the installation of the bidet
- Necessary tools and materials
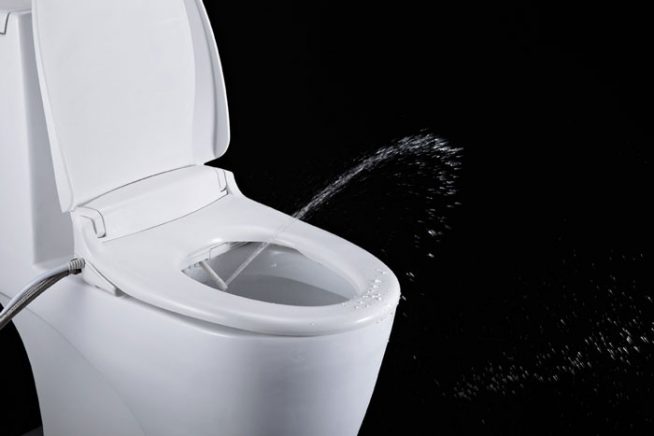
- The principle of operation and the device of the bidet
- Do-it-yourself installation of the floor version in the toilet. Diagram of how to properly connect to the sewer
Installation of a hidden hygienic shower
All the eyeliner goes into the walls, there are models with a pull cord, and there are with a hinged one. The holder can be fixed near the sink or toilet. Sometimes a hygienic shower is installed in the toilet with a thermostat. For hidden installation of this unit, you will need a shower connection diagram. Such an installation is very demanding and responsible, the more accurately all the rules for installing the product are followed, the longer the model will serve its owners.It is imperative to draw up a project according to which the product will be mounted.
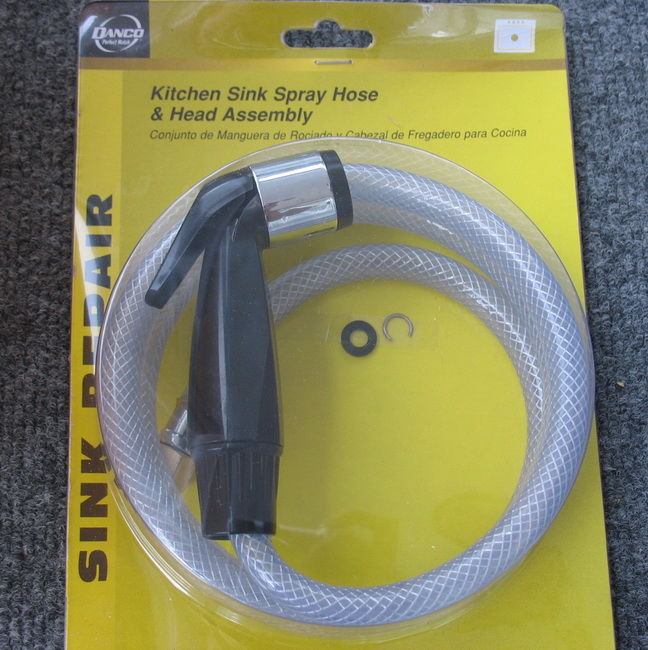
wall shower
More unpretentious installation, no special tools are required for its fastening, the device kit is extensive, it consists of:
- hose;
- watering cans;
- mounting plate;
- shower holder;
- do-it-yourself installation diagrams for a hygienic shower.
Mounting principle
One end of the hose is screwed to the mixer, and the other is attached to the sprayer and inserted into the wall holder.
The shower itself is made of stainless steel, the watering can is made of plastic, covered with chrome plating, the hose must be with metal inserts so that over time it does not bend and cause water to leak. The progress of the installation work will depend on the features of the purchased products; to install the shower, you will need the same tools as for other plumbing work.
Preparatory work before installation
If you decide to install a bidet at home or in another room, then the first thing, of course, is to study the range, compare various functions and, finally, make your choice. It is also worth considering the size of the room where the system will be installed, as well as the compliance of the model with the existing communications and the design of the bathroom as a whole.
After the choice is made, and the device is delivered, you can proceed with its installation.
Before installing a bidet with your own hands, you need to prepare the following tools:
- Set of wrenches;
- Screwdriver Set;
- Drill-hammer;
- Adjustable or gas key;
- Drills for concrete.
Since the bidet is a plumbing device, for its installation and connection it will be necessary to purchase the following materials:
- Silicone based sealant;
- Mounting tape;
- Waterproofing tow.
Before starting installation work, be sure to read the instructions that came with your device.
It is important to take into account all the nuances indicated in the instructions. Since otherwise, incorrect installation can lead to various breakdowns and leaks, which can lead to considerable financial costs.
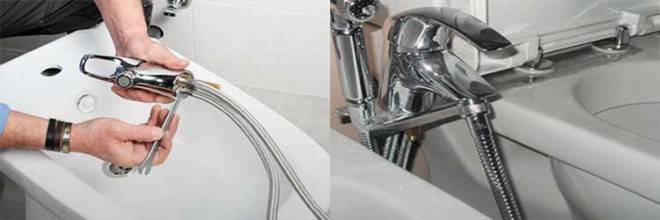
Bidet installation
To begin with, it is important to determine the installation location of the product and make sure that it meets the necessary criteria:
- Suitable for dimensions;
- Has access to the necessary communication systems;
- Provides secure attachment of the bidet.
The device is connected to both sewerage and water supply. Therefore, in the pipelines of these systems, it is necessary to perform a tie-in.
After that, you need to try on the product:
- We install the bidet in the desired position and place where it is planned to subsequently operate it;
- We check the conformity of the location of pipelines, hoses and their connection points;
- If necessary, we adjust the location of the product - we carefully check everything;
- When you are convinced that the device is located correctly, and all communications can be easily connected to the bowl, we mark the points for installation.
Further installation steps will depend on the selected model.
Connecting a floor model
Using the instructions provided above, we apply markings with the places where the bidet is attached to the floor of the room. Then the device itself is moved away, and holes are made in the appropriate places in the floor, corresponding in diameter to the size of the dowels that come with the toilet.
If the floor of the room is tiled, then the holes must be made with a pen drill. Otherwise, there is a high chance of damage to the flooring.
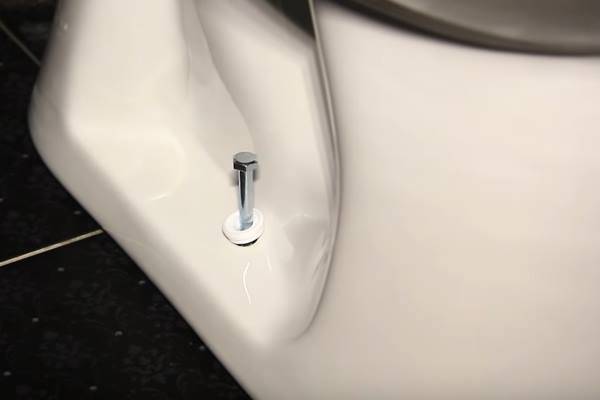
Dowels are installed in the finished holes. The bidet is placed in place of installation and fastened with bolts. Between the bolt and the holes in the bidet system, it is preferable to use rubber gaskets to avoid damage to the sanitary device cover.
The bolts should not be tightened too much, otherwise there is a high probability of overdoing and damaging the product. However, too weak fixation is unacceptable, as it can lead to tipping or shifting of the bidet during its operation. For additional fixation, it is permissible to use a sealant at the junction of the device and the floor.


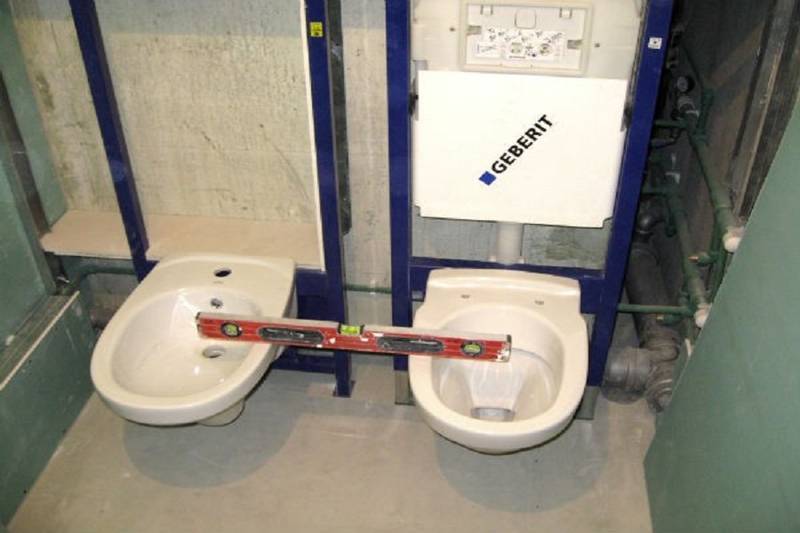
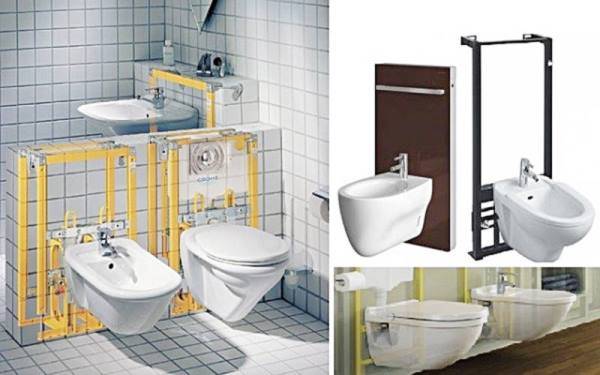
Features of mounting the suspension system
To install a bidet suspension system, it is important to start work with the installation of the installation, to which the device will subsequently be attached. First you need to create a small niche - it should be a little higher and deeper than the structure for which it is intended
If a niche is already provided in the room, you can use it
First you need to create a small niche - it should be a little higher and deeper than the structure for which it is intended. If a niche is already provided in the room, you can use it.
If for some reason it is not possible to create a niche in the room, the installation is simply installed against the wall, and then hidden behind a false panel.
The construction frame is delivered unassembled. Therefore, to begin with, it must be collected. At the same stage, as a rule, it is possible to adjust the height of the bowl level to the specific requirements of the future user.
The assembled finished installation is attached to the wall and to the floor. To do this, pre-marking is carried out and holes are made in the appropriate places.After that, the frame is applied to the markup and fixed with the appropriate tools in the correct position.
In the process of mounting the frame, it is imperative to use a level, otherwise skew is possible. Uneven installation can lead to incorrect operation of the bidet and its further failure.
After installing the frame and making sure that it is level, you can carry out the sheathing and hide the structure behind a beautiful facade. But, of course, the elements to which the bidet bowl will be attached will have to remain outside. These elements are usually studs, which are installed in the appropriate holes in the frame and are firmly attached to the wall.
Now you can proceed to install the bidet on the frame. In the place where the bowl is attached to the studs, rubber gaskets are usually placed, which help to avoid damage to the coating of the product. Sealant can be used as a replacement for rubber bands. It must be applied to the appropriate places and wait until it dries completely. But rubber gaskets are still considered more reliable in this case.
Now you can install the bowl. At the same time, it is fixed with clamping nuts.
Further installation steps are approximately the same for both floor and suspended systems. Therefore, we will consider them in the next section.
Device
Not all pipes on the building materials market are suitable for creating an autonomous water supply system. Therefore, when choosing them, first of all, you need to look at the markings. Water pipes have approximately the following designations - PPR-All-PN20, where
- "PPR" is an abbreviation, an abbreviated name for the material of the product, in the example it is polypropylene.
- "All" - an inner aluminum layer that protects the pipe structure from deformation.
- "PN20" is the wall thickness, it determines the maximum working pressure of the system, measured in MPa.
The choice of pipe diameter is based not so much on the diameter of the threaded inlet on the pump and the automated pressure control system, but on the expected volume of water consumption. For small private houses and cottages, pipes 25 mm in diameter are used as standard.
When selecting a pump, the following points should be considered:
If water from a well is used, a vibration unit cannot be used, it will damage the casing and filter element. Only a centrifugal pump is suitable.
The quality of the water from the well must meet the requirements of the pump. With a well “on the sand”, grains of sand will come across in the water, which will quickly lead to a breakdown of the unit
In this case, it is important to choose the right filter.
Dry run automatic. When choosing a pump, if the choice fell on a model without built-in protection against "dry running", you must additionally purchase automation for the appropriate purpose
Otherwise, in the absence of water that performs a cooling function for the motor, the pump will overheat and become unusable.
The next step is drilling a well. Due to the complexity and high labor intensity, this stage is best performed with the help of a specialized team with the necessary drilling equipment. Depending on the depth of water and the specifics of the soil, various types of drilling are used:
- auger;
- rotary;
- core.
The well is drilled until the aquifer is reached. Further, the process continues until a water-resistant rock is found.After that, a casing pipe with a filter at the end is inserted into the opening. It should be made of stainless steel and have a small cell. The cavity between the pipe and the bottom of the well is filled with fine gravel. The next step is to flush the well. Most often, this procedure is performed using a hand pump or submersible, lowered into the casing. Without this, the action of clean water can not be expected.
The caisson serves as protection for both the well and the equipment lowered into it. The life of the water supply system, as well as the convenience in servicing units immersed in the well, directly depend on its presence.
The caisson, depending on the material used, may be as follows:
- metal;
- cast from concrete;
- lined with concrete rings with a diameter of at least 1 meter;
- finished plastic.
The cast caisson has the most optimal qualities, the creation of which can take into account all the existing specifics of the well. Plastic caisson has low strength and needs to be reinforced. The metal look is subject to corrosion processes. Concrete rings are not very spacious and maintenance or repair work in such a caisson is very difficult. The depth of this structure is determined by the level of soil freezing in winter and the type of pumping equipment used.


For clarity, consider an example. If the depth of soil freezing is 1.2 meters, then the depth of the pipelines leading to the house is approximately 1.5 meters. Given that the location of the well head relative to the bottom of the caisson is from 20 to 30 cm, it is necessary to pour concrete about 100 mm thick with about 200 mm crushed stone.Thus, we can calculate the depth of the pit for the caisson: 1.5 + 0.3 + 0.3 = 2.1 meters. If a pumping station or automation is used, the caisson cannot be less than 2.4 meters deep. When arranging it, it is worth remembering that the upper part of the caisson should rise above ground level by at least 0.3 meters. In addition, a natural ventilation system is needed to prevent the accumulation of condensate in summer and frost in winter.
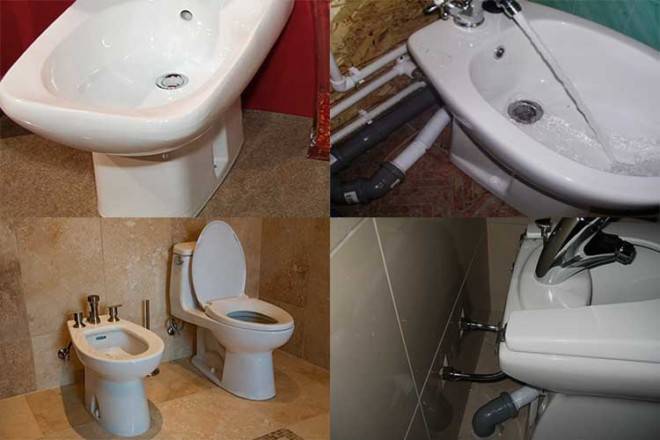
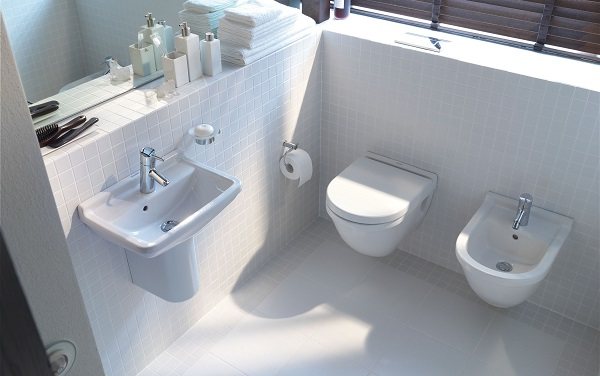
Bidet: how to make the right choice?
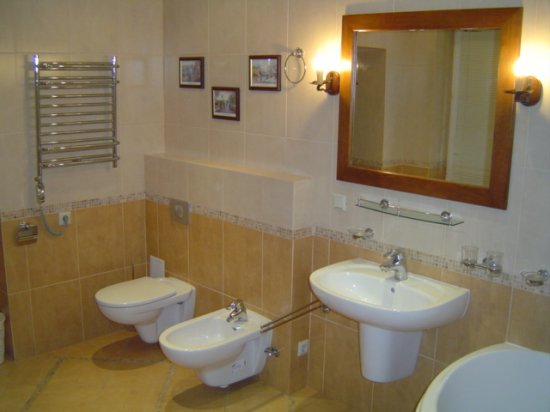 Bidet in composition with the rest of the plumbing
A bidet is by no means a new invention, it is relatively inexpensive, and its benefits are more than obvious. However, this segment of sanitary products in the domestic market is not in high demand. The fault is the modest size of the bathrooms, which for some reason do not pay due attention to the architects of housing construction. In addition, many quite rightly fear major repairs, and they are in no hurry to sacrifice the last free space in the bathroom for the sake of illusory comfort.
Bidet in separate and adjacent bathrooms in the photo
Meanwhile, the installation of a bidet can be called a capital event with a big stretch. As for the small bathrooms typical of apartment buildings, for such cases, more compact suspended models are much better suited than classic floor-standing ones.
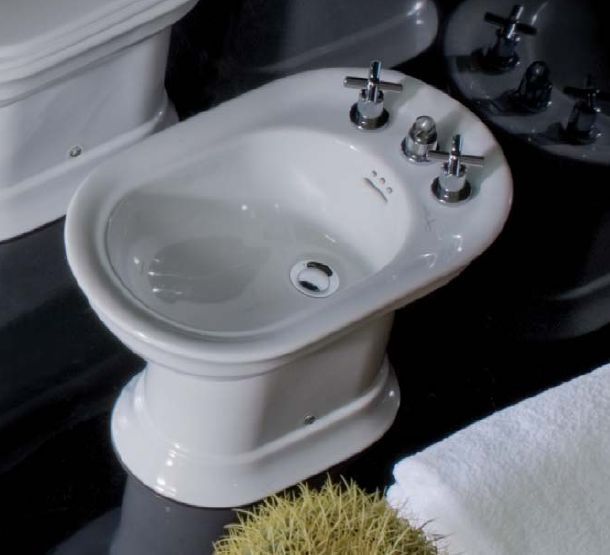
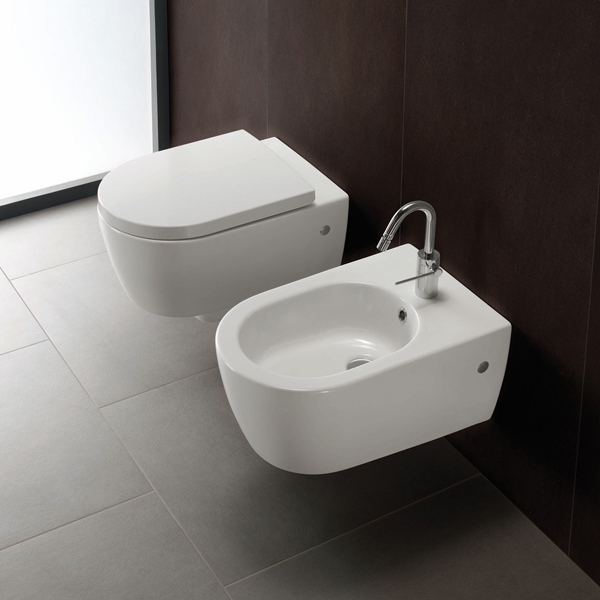 Hanging type bidet
Structurally, the bidet resembles a small bath or a low sink. This equipment is produced in three main modifications - with vertical, horizontal and oblique water outlet. Sometimes there are combined options - toilets equipped with a mixer with a retractable hose.
 Combined bidet
When choosing a bidet, it is necessary to take into account the position of the sewer socket - it must match the one in your apartment and ensure the most comfortable placement of equipment
Special attention should be paid to the mixer. Single-lever tap solutions are suitable for domestic water supply systems with a boiler
When supplying water from a city water supply, a pair of separate taps is required - for hot and cold water.
 Bidet with taps for hot and cold water
By the way, about taps: they can be located in the same way as on the washbasin, or they can work like a fountain.
 Bidet with floating tap
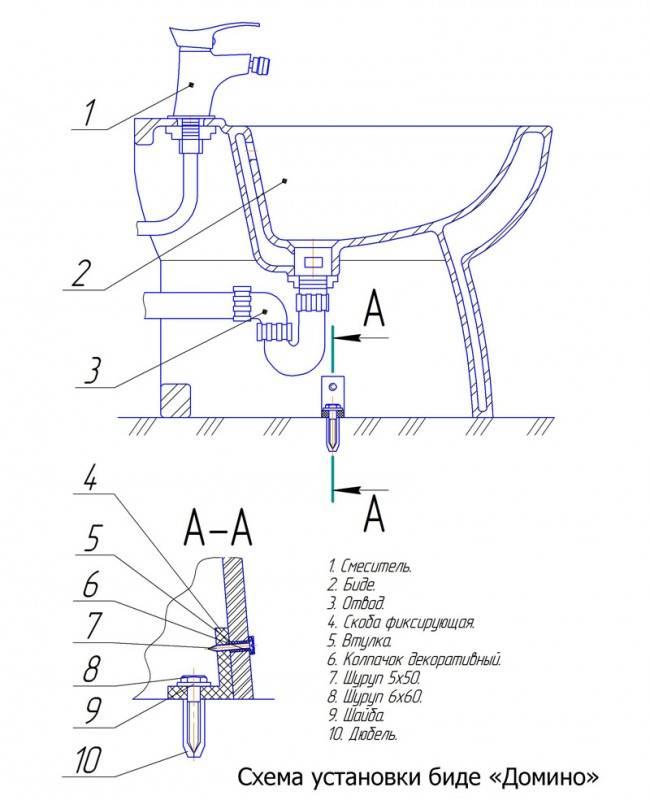
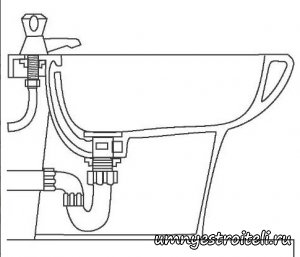
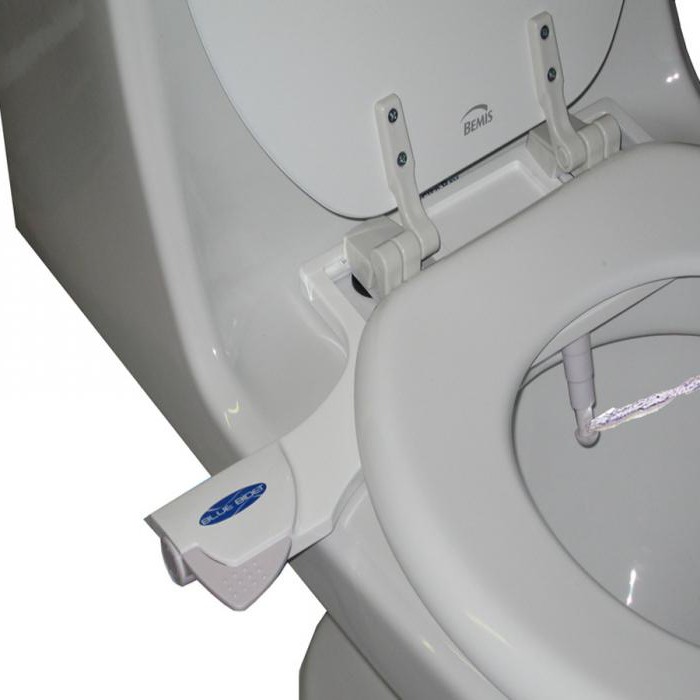
How to assemble, how to install and how to connect a floor bidet to water and sewer.
How to assemble a bidet?
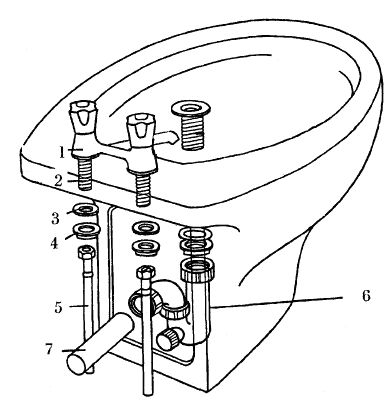
Before assembling a bidet, you need to know what it consists of and decide what type of floor bidet you have. Just a floor bidet is divided into two types - simple and complex. They are divided according to the type of assembly. One differs from the other in terms of configuration - on or off, automatic water drain valve. In the photo below I present to your eyes the assembly diagram of the bidet. What goes where, the equipment will be immediately clear, in two types of bidet. This scheme for assembling a floor bidet can be taken as a basis, but remember that your bidet may differ. So do not throw away the technical data sheet of the product. You will still need it.
How to assemble a bidet, light. scheme.
As you can see, assembling a bidet is nowhere easier and assembling it with your own hands is not as difficult as it seems in reality. Do not forget the place where the water drains, the siphon connections, coat with sealant, and all the nozzles wrap fum tape between each other.
How to install a floor standing bidet?
The floor bidet is installed because of the same principle by which the toilet is installed.I advise you to read! Just like a toilet, the floor bidet has two mounting holes on the soleplate, thanks to which it is fixed to the floor.
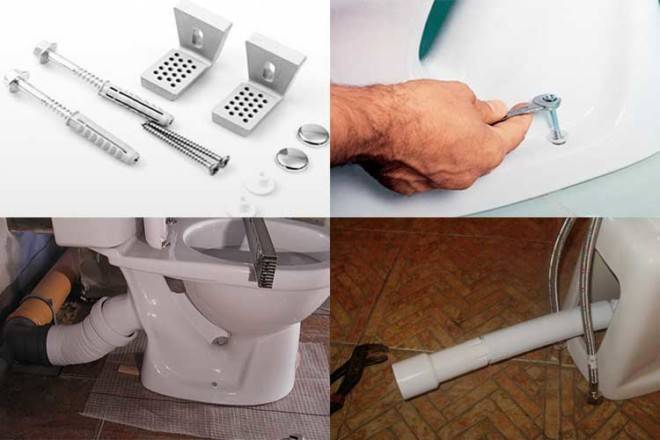
In order to install a bidet, we need a tool:
Perforator or drill;
Drill 10 for concrete or pen for tiles;
Marker or pencil. (A marker is better than a pencil, since the pencil is constantly being rubbed off the tile.)
The fitting for installing the bidet, which is included in the kit, will have to be replaced with a new one. The one that comes with the kit doesn't fit very well. When screwing a screw into a cork, the screw, having reached the middle of the cork, simply starts spinning with the cork. We buy a cork and a screw for ten, and not for 12, as it comes with the kit. I had the feeling that the standard screw is larger than the prescribed dimensions than the cork itself.
Markup, parameters and installation of a bidet.
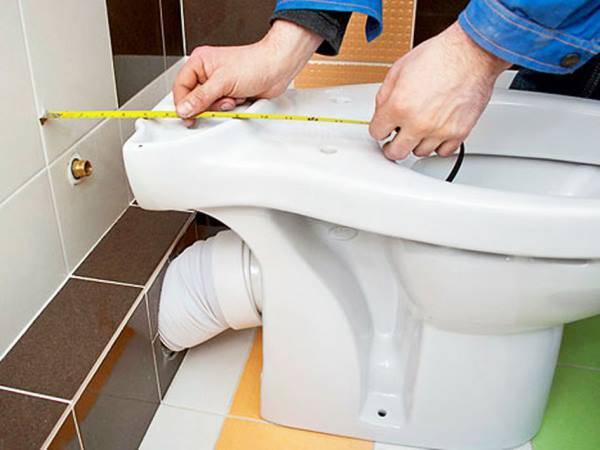
Before installing the bidet on the floor, we need to visually figure out where to put it. Of course, it will be easier to simply put the bidet bowl and move it until we get the result we need. But before you buy, and in principle, the average parameters of a bidet should be taken into account.


Having found the desired location of the bidet, it is worth using a marker to outline the contour of the bidet sole, as shown in the figure below, and put dots in the places of the intended fasteners.

After removing the bidet from its place and using a drill or pen on the tile, at the given marks, not including the blow, drill holes for installation. The tile will not drill quickly, so don't worry. Having drilled holes, we insert plugs into them, set the bidet to our given mark and boldly insert the fixing screws into the holes to press the bidet to the floor. We tighten the screws until the bidet stops swinging on the tile.Everything! This completes the bidet installation. It remains to connect the bidet to the sewer and water.
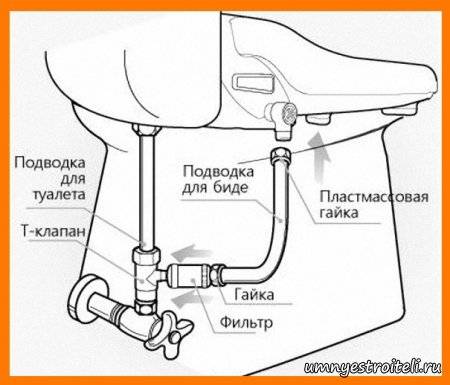
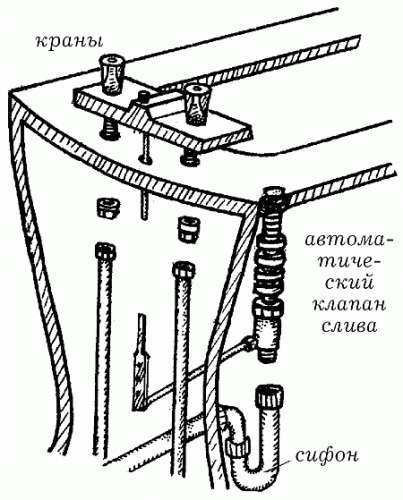
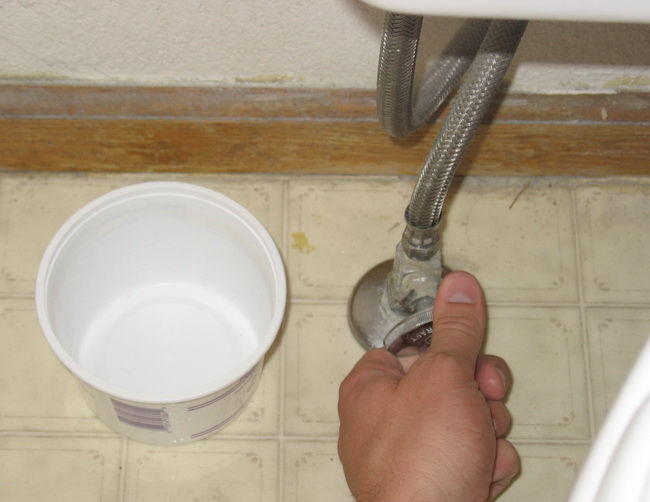
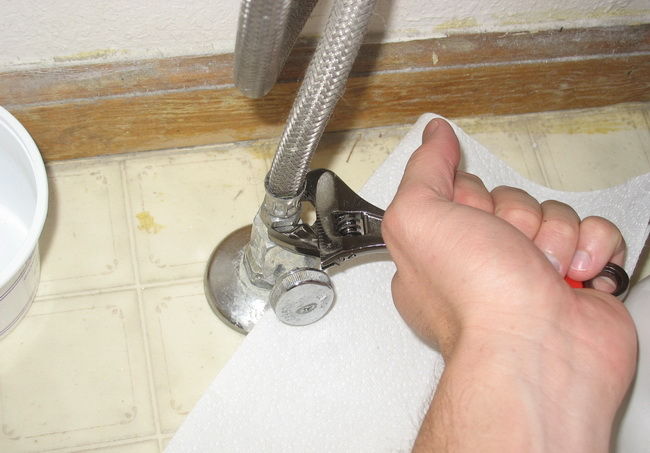
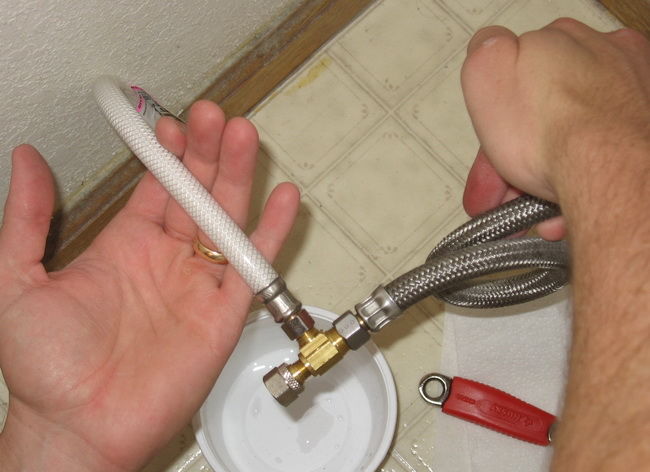
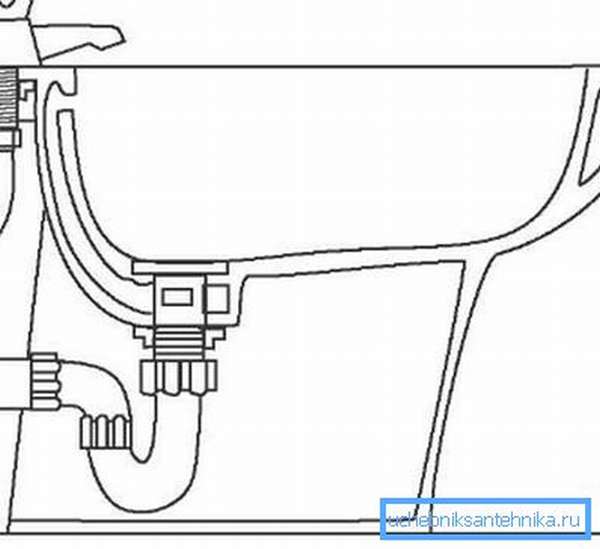
Connecting a bidet to sewerage and water.
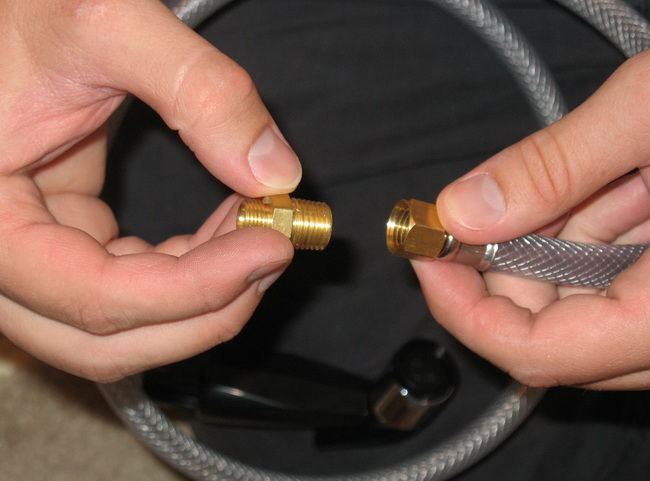
Rigid hoses are increasingly being used to connect the bidet to the sewer, but in order to simplify your work, you can also connect a corrugated hose to the sewer.
We simply fasten the mounting part of the corrugations, not forgetting to coat it with sealant, to the bidet drain, and insert the other side of the corrugations into the sewer outlet deeper and coat the joint with sealant. the sewer outlet should be 10 in diameter. For the sake of clarity, I am enclosing a diagram of the bidet connection to the sewer.
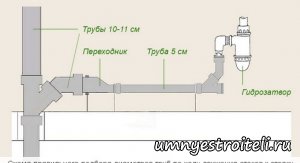
To connect water to a bidet, hot and cold, from the central water supply, you need to lay pipes of the appropriate diameter and simply twist one with the other. Not forgetting to wind fum on mom.
***The article was prepared by the site administration Construction from a to z. Enakievo-Donetsk*.
Popular manufacturers and models
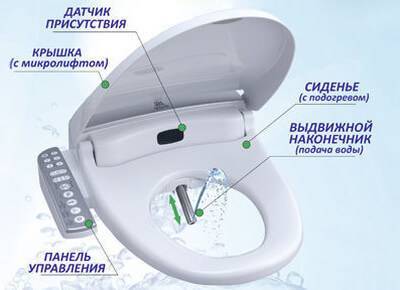
Model from the brand Izumi
The range of bidet covers for the toilet is very wide. The country of origin can be Italy, Spain, China, Japan, Korea.
Everyone first learned about the "smart" toilet from Japan. For example, the products of the Japanese company Izumi are distinguished by reliability and safety. They have an antibacterial coating and a switch in case of excess voltage in the mains.
Also, the Japanese company SATO managed to establish itself in the world market. They produce many models, mostly electronic. In addition to the standard set of functions, massage, water softening and more are also offered.
Panasonic bidet covers are made from environmentally friendly materials, which eliminates the occurrence of allergic reactions.
Nanobidet designs come from South Korea. Products of this brand have high strength, but are suitable mainly for plumbing of the same manufacturer. Distinctive is the MonteCarlo model, which is capable of performing 47 functions. The water is purified with silver ions when it is supplied.
It is impossible not to pay attention to the Swiss quality of Geberit caps. Their size is suitable for most toilets. The seat can withstand loads up to 150 kg. Significantly saves water consumption. But the cost of such a product is Swiss, about 600 euros.
When mentioning Spanish Roca bidet covers, one word comes to mind - functional. These models contain everything that can be useful when performing delicate procedures - from several levels of temperature and pressure to night mode with backlight.
Toilet bidet lid prices vary. It depends on the manufacturer and functionality.
Conventional bidet toilet attachments, made on a flexible hose, are probably produced by every company that manufactures plumbing, so their range is very diverse.
Step-by-step installation of a hanging bidet
Installation of a bidet with installation is carried out according to the same technology that is used for other suspended plumbing. In this case, the connection diagram of the hygienic device will differ from the floor models. It includes the following steps:
- Installing the installation system. First, in the wall on which the bowl will be attached, you need to make a small indentation. Its dimensions should be slightly smaller than the dimensions of the bowl.To the installation site, it is necessary to provide a sewerage and water pipes. The installation is then built. This must be done strictly according to the instructions. After installing the installation on the floor and on the wall of the bathroom, it is necessary to mark the future fastening and drill holes for the nuts. Then we proceed to fix the installation. To close the niche where the metal support system is installed, drywall, special decorative panels and other materials are used.
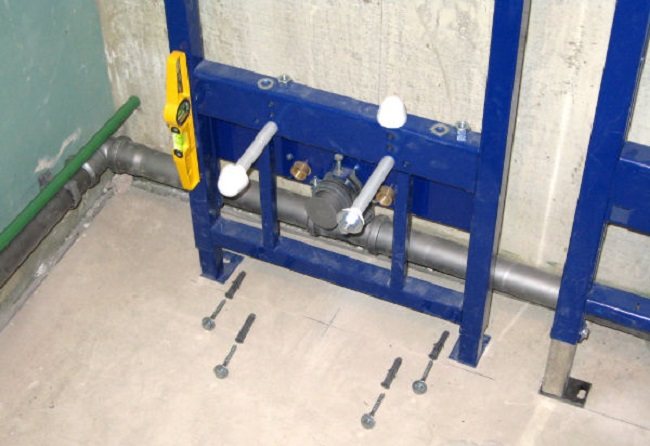
The next step involves attaching the bidet bowl. In the equipped mounting holes, the studs that hold the bowl are clamped. These studs are attached to the back wall. The installation kit includes a special gasket to protect the product from damage. If there is no gasket in the bidet kit, it can be replaced with silicone sealant. It is applied to the fasteners of the bowl, after which it is necessary to wait for the sealant to dry completely and fix the bowl with nuts.
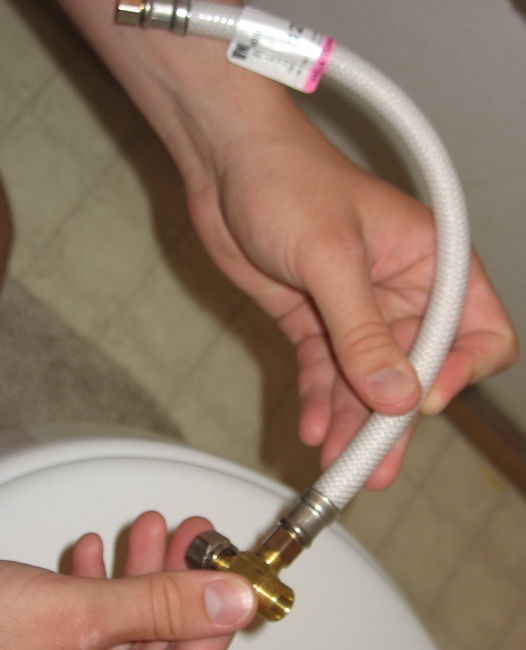
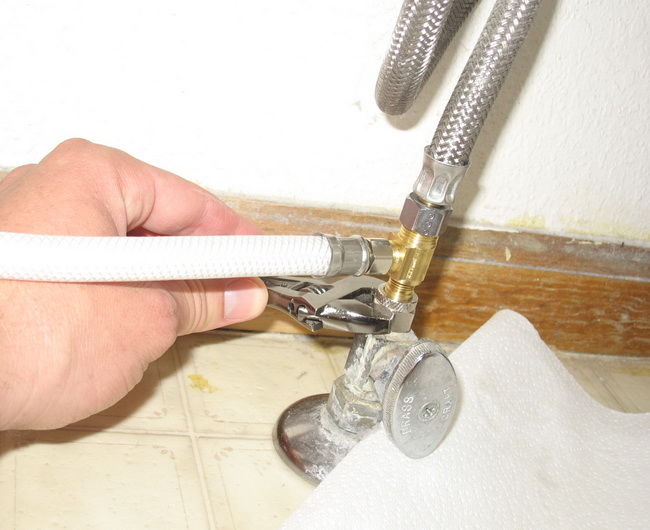
When the bowl is fixed, you need to perform connecting a bidet to a sewer and plumbing. The device manufacturer's instructions are also useful here. The essence of the installation work is that you need to initially install the mixer. It is better to use the built-in mixer model. The outputs / inputs of the hygienic device are connected to the communications with flexible hoses. You need to remember about the tightness of the connections. In the equipment package, you can find special gaskets. They are installed at the ends of the hoses.
As practice shows, the use of gaskets is not enough to avoid leakage during operation. Between the thread and the hose, you need to additionally wind the FUM tape. This solution will ensure maximum tightness of the connection.
The next step is to install the siphon. It is connected to the drain holes of the bowl. Rubber rings must be installed between the plumbing and the siphon to ensure tightness when draining water. The siphon outlet must be inserted into the sewer outlet, which must first be brought to the installation. With this method of mounting the siphon, it is always easy to replace the bowl or repair it without much difficulty.
Installation of a bidet without plumbing skills
Installing a bidet with your own hands does not require special skills and professional knowledge. Before starting installation, you need to choose high-quality equipment; for small rooms, a suspended type is suitable, and for large rooms, floor-mounted ones. Tools to get the job done:


- perforator with drills;
- adjustable pipe wrench;
- mounting tape for insulation;
- silicone sealant;
- screwdrivers, wrenches.
Connecting a bidet begins with reading the installation instructions for the product. Next, a water mixer is assembled, a rubber pipe is attached to it. After attaching the hose, we proceed to connect the mixer to the bidet. Sealed gaskets and rubber bands are used, after complete centering, the device is clamped with a wrench. All connections are treated with sealant, for greater reliability. The installation of the siphon in the bidet is carried out according to the principle of its installation in the sink. The funnel is mounted in the bidet hole, the gaskets are fixed with a special ring on the underside of the unit. The lower part of the siphon is connected to a corrugated pipe to the toilet drain.
Further, the installation of the bidet independently proceeds to the final stage. The product is installed in the selected place so that the length of the hoses is enough.Using a drill, we make small holes in order not to damage the tile; it is required to turn on the puncher at low speeds. We remove the dust with a vacuum cleaner and insert the plastic dowel into the hole. We fasten the bidet with bolts, be sure to fasten the rubber gaskets between the hole and the fasteners in order to avoid the slightest cracks. When the equipment is firmly installed, we check the connections to all communications. The corrugation of the siphon is attached to the drain pipe, and the hoses are connected to the water supply system.
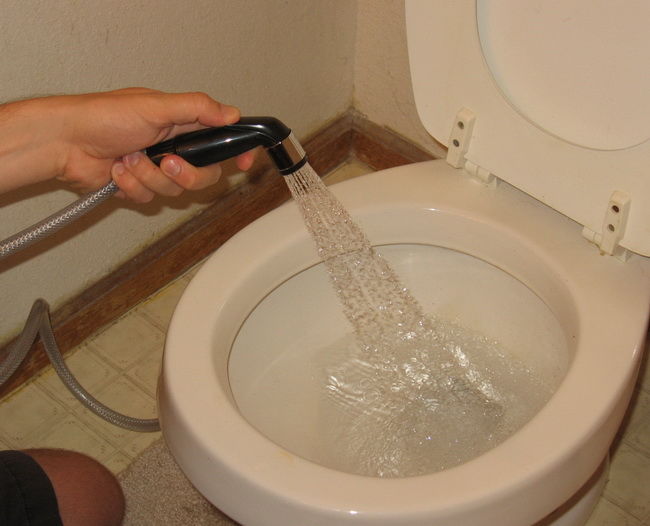
The last stage of the installation of the bidet
We check the operation of the device, the tightness of all connections. In the event of a water leak, all faults must be repaired immediately. This is how the bidet and toilet are installed. Let such compact and convenient hygiene items serve you for a long time and please you with their functionality.
There are other interesting ways to compactly install a toilet and bidet with a washing machine above the toilet.
Necessary tools and materials
So, in order for the installation of the bidet to be completed efficiently and as soon as possible, you need to prepare the following tools:
- drill or puncher with drills of the appropriate diameter;
- gas and adjustable wrenches;
- mounting tape or tow;
- screwdrivers and wrench;
- silicone sealant.

Before you install a bidet, you need to carefully study the instructions and fully comply with the recommendations of the manufacturers. It helps a lot to watch a video about installing a bidet, in which the most important points of work are correctly and concisely shown.
The installation of the toilet and bidet can be started immediately after all the necessary things are at hand.The main points will be listed below, detailing how to install a bidet yourself.
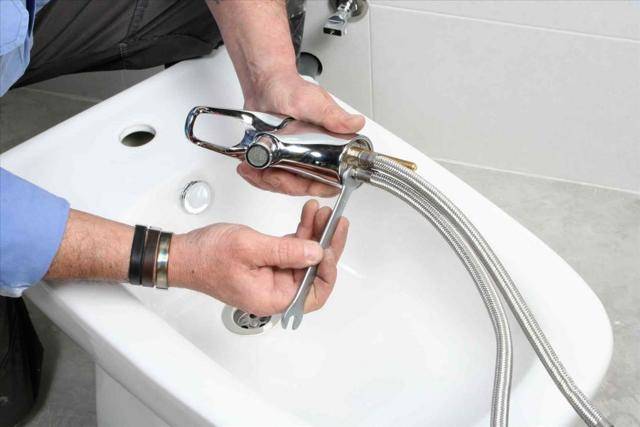
If the installation of the bidet is done by hand, then you should start by installing the mixer. Most often, a mixer with a floating head or with a hygienic shower is used for a bidet. In addition, copper tubes or flexible hoses are sold complete with such models. You can install them in the mixer without using special keys. It doesn't take much effort to get this job done. Otherwise, the rubber seals may be damaged.
After the mixer is fully assembled, it should be installed in a special hole, carefully securing it. All connections must be carefully treated with sealant. To perform this work, you can use the photo diagram of the bidet installation in our article.
You need to start with a drain funnel. After it is inserted into the appropriate hole, all seams should be sealed with transparent silicone sealant. Next, the assembly of the lower part of the siphon is performed. For this, the same transparent sealant is used. With its help, a corrugated hose is attached.
It is no secret that the installation of a hanging bidet, like the installation of a floor bidet, begins with marking the surface. It is worth noting that when installing a bidet, the dimensions must be carefully measured and fixed on the surface. In the event that we are talking about mounting on a wall, then you need to measure and calculate the required height in advance. After that, using a perforator, a hole should be made in the wall. In order not to damage the tile, you need to drill a hole at low speeds. A vacuum cleaner is used to clean the surface from dust.
Sometimes you need to perform a bidet installation. To do this, use the instructions. The installation, like the bidet, is attached to the surface with special bolts. After all work is completed, you can begin to install the bidet cover.
In conclusion, it should be noted that the installation of a bidet is comparable in terms of complexity to the installation of a sink. Therefore, if you follow all the necessary rules, you can perform this type of work.

The principle of operation and the device of the bidet
A bidet is a device that has existed for more than one century, and began to be in demand immediately after its enchanting appearance. There are several reasons why bidets are in such high demand all over the world, and it is not only the possibility of easy hygiene procedures.
Advantages:
Often, a bidet is used as a foot bath, which is especially important for those who have problems with the musculoskeletal system, as well as for children, the elderly, and will simply give pleasure even to those who do not have any health problems, since the bidet below the tub and has a water drain as opposed to a basin.
A bidet can save a lot of time and the number of bathroom cleansing that will be required each time you rinse your feet.
The bidet has a small size, which allows it to be placed even in the smallest bathrooms. It is especially important that there are bidet models that are combined with a toilet bowl and are equipped with a number of additional functions in the form of seat heating or blowing for drying.
Some even install a bidet exclusively as an element of luxury, which allows you to emphasize status and an idea of design, chic and style.
It is quite possible to install a bidet with your own hands, and for this you do not need to have certain skills, work experience, or even more education
It is enough just to follow the instructions, observing each subsequent point.
 Before installing a bidet, you should additionally familiarize yourself with the principle of its operation.
In order for a bidet to fully meet expectations when buying, you will need to fully calculate such points as parameters, functions, cost, quality, manufacturer, type and type of operation.
There is also a difference regarding how the water will be supplied. Namely, a fountain-like and descending variation. As additions, there may be a hairdryer, hydromassage, air deodorization. To install a bidet, you will need a screwdriver, wrench, adjustable wrench, perforator, tow, silicone sealant, mounting tape.


It is best to choose both a toilet bowl and a bidet from the same manufacturer and series, which will help maintain harmony in the interior. If the toilet has already been purchased, then you can take the label with the article number and choose a bidet to match the tone and look. The bidet and toilet should have the same type of connection, which will greatly simplify the installation task. Regardless of the type of model, it must have an automatic valve, which will make the operation of the bidet easier and safer.
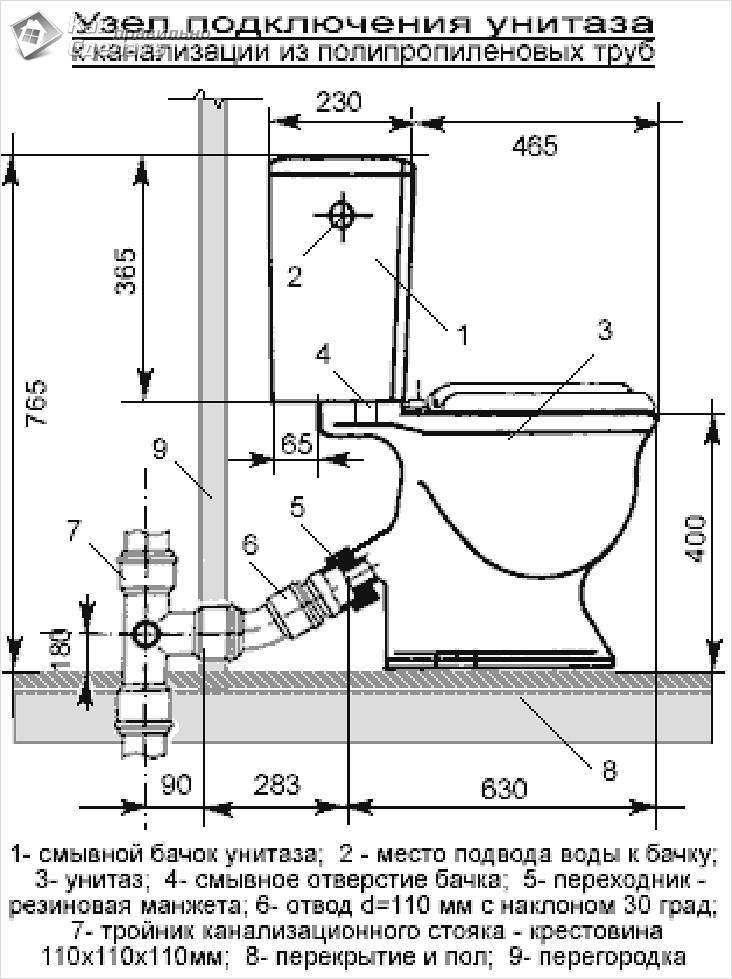
Do-it-yourself installation of the floor version in the toilet. Diagram of how to properly connect to the sewer
So, you have decided to install a floor version, you have chosen a certain model and purchased it, what's next?
Step one. Before direct installation of the product, you need to prepare the components, check the availability of all parts.Basic set of tools: ratchet with head, core, gun for silicone and silicone, Phillips and flat screwdriver, adjustable wrench, perforated drill, set of drills, tubular head for installing mixers, small adjustable wrench.
Attention! Often, a siphon and a mixer are not included in the kit, so you have to buy them yourself and in advance. The second step is to install the mixer and siphon. The first serves to regulate the water temperature, pressure and direction of the jet
The second regulates the flow of water and prevents the smell from the sewer from entering the toilet.
The first serves to regulate the water temperature, pressure and direction of the jet. The second regulates the flow of water and prevents the smell from the sewer from entering the toilet.
The second step is to install the mixer and siphon. The first serves to regulate the water temperature, pressure and direction of the jet. The second regulates the flow of water and prevents the smell from the sewer from entering the toilet.
Photo 1. A detailed diagram of the structure of the bidet, indicating all its components and details.
The mixer usually comes with studs, special tubes and gaskets, as well as other fasteners. Using them, and following the manufacturer's instructions, you need to assemble the faucet.
Reference! Do not overtighten the connections as this may damage the gaskets.
Then you need to insert the mixer into a special hole in the bidet bowl, fix it there with studs, you can also process the joints with sealant for greater reliability. It is better to check the alignment of the faucet well in order to avoid problems with the appearance of the installed bidet and the aiming of the water jets.
Next is the installation of the siphon: connect one end of the siphon to the neck from the inside, tightly and carefully tighten the connections, then pull the other end (outlet pipe) out from the back.
Step Three: Fixing to the floor. It is necessary to put the product in the intended place, check the length of the liner, mark the attachment points. Drill holes for fasteners on the floor. Remove debris and secure with rubber-sealed bolts and dowels.
Step four: connecting to the sewer
It is better to prepare the pipes in advance, it is important to make the wiring so that the hoses are attached as close as possible to the bidet - this improves the functionality of the entire system. Connect the hoses to the water supply, insert the outlet pipe into the sewer socket. After completion of work, check the operability by starting water
After completion of work, check the operability by starting water.


