- The device of the drainage system in the floor of the room
- Professional skills and features of our masters
- Siphon installation
- Types of mixers by design features
- Mixer with hose and watering can
- Sensory
- Thermostatic
- Faucet and siphon installation
- Preparing to connect
- How to choose a siphon
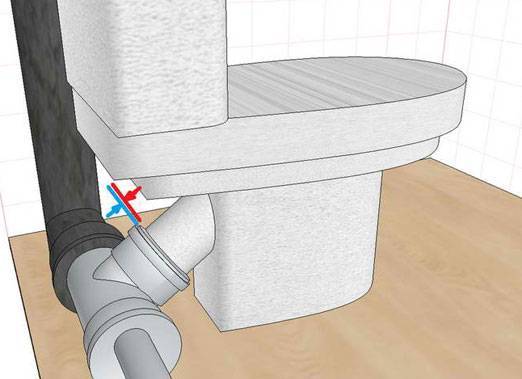
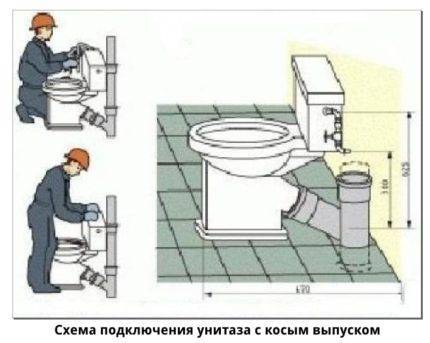
- Connecting the bathroom to the sewer
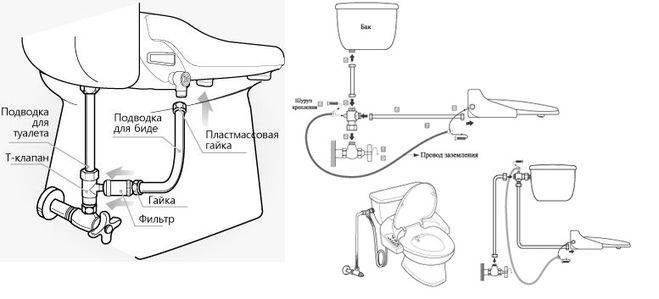
- Technology for connecting a floor bidet
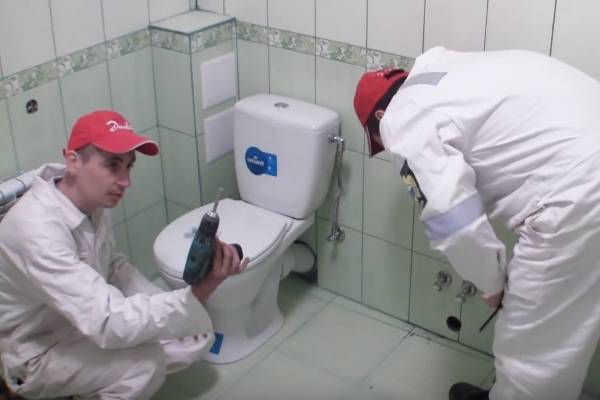
- Installation of a bidet without plumbing skills
- The last stage of the installation of the bidet
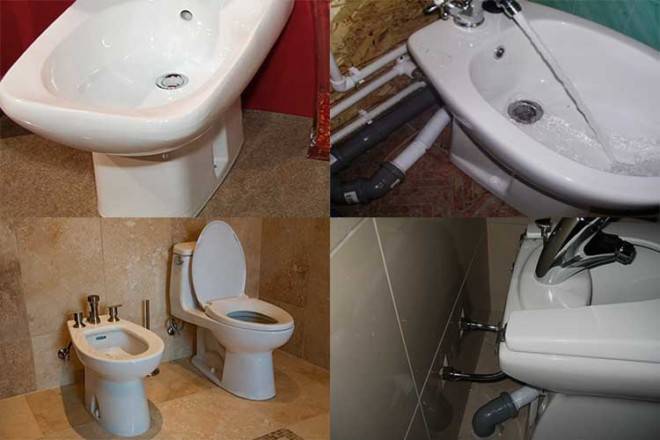
- What are bidets and their design features
- Features of installing a bidet
- Installing a bidet faucet
The device of the drainage system in the floor of the room
This procedure is not mandatory, however, the presence of such a hole in the floor often makes life easier. After all, it is able to prevent the flooding of neighbors from below with various kinds of leaks and gusts. And also the drain will be convenient when cleaning the toilet - after all, it will be possible to wash the room with a shower and just wait for it to dry.
Such drains are often provided in public places.
However, the scope of work for arranging such a drain hole is quite large:
- The floor must be cleaned to its concrete base;
- Then a layer of waterproofing is laid on the floor;
- A drain funnel with a siphon is installed and connected to the sewer;
- Sheets made of extruded polystyrene foam are laid out on the floor. Such sheets are lined with a ladder and a pipe extending from it. To do this, grooves of the desired size are cut out in the foam;
- A film is laid on top of the sheets, and then a screed. The thickness of the screed must ensure full coverage of the lower edge of the drain flange. In this case, it is necessary to organize a slope where water will flow;
- In the future, the floor is covered with roofing material;
- Install the top of the ladder;
- The final step is to lay decorative tiles on the floor.
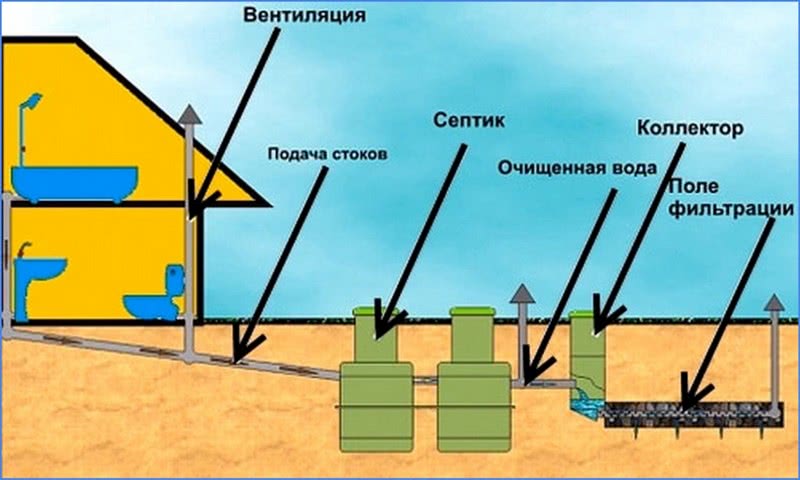
Everyone knows about the existence of a bidet, but not everyone uses this modern blessing of mankind. Recently, it has become popular to equip toilet rooms with sets of sanitary equipment, and if the room allows, then buy beautiful furniture and decor. Based on this, it does not hurt to know how to install a bidet - a universal hybrid of a toilet bowl and a sink, the tasks of which are very extensive and do not end with the description in the technical data sheet.
Professional skills and features of our masters
Knows and observes safety precautions, requirements of GOSTs and SNiPs.
Understands project documentation.
Carries out plumbing work of any complexity at facilities for various purposes.
Understands the structure and principle of operation of the communication systems with which he deals.
Understands the device and the principle of operation of the equipment with which he works.
He knows everything about the properties and characteristics of the materials he uses.
He knows and successfully applies in practice various methods of plumbing installation.
He works diligently, competently and efficiently.
This is interesting: How to use the old bath in the country - a selection of photos
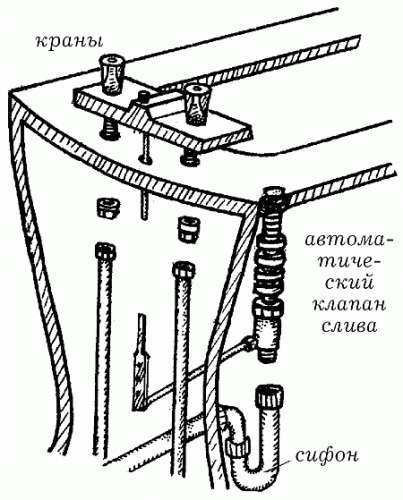
Siphon installation
The siphon serves to regulate the discharge of used water, but in addition it performs the function of a non-return pneumatic valve, due to which it does not penetrate into the atmosphere of the room sewer smell.
It should be remembered that high-quality bidet siphons are made of the same chrome-plated or nickel-plated brass or, at worst, high-strength polypropylene. There are models that can be cleaned when clogged without removing the entire structure. As for installation, it can be done openly, semi-openly, or hidden in the technical space of the bidet siphon bowl - the choice depends on the type of the latter, the method of its installation and the interior design of the bathroom.
 Installation of a bidet mixer
Unscrewing the nut mixer foot valve it is necessary to process its thread and the thread of the siphon head with sealant. Remember to do the same for all other connections if they are threaded. In a simple siphon, there are at least two of them - they frame the bend. When assembling, all gaskets should be carefully installed, after which the siphon head nut is tightened, and the direction of the drain pipe is adjusted so that it enters the sewer drain pipe as accurately as possible.
If you are installing a wall-mounted bidet, the siphon must be fixed to the installation. In the case of the floor model, this element can be additionally fixed with a sealant in the technical space of the bidet bowl.
 Hanging bidet installation
In some models of bidet siphons, a corrugation is used instead of a drain pipe that connects to the elbow outlet. This option is not practical, since the latter tends to clog and sag.


Types of mixers by design features
By design, there are several types:
- Thermostatic. With their help, it is easy to adjust the temperature and pressure of the jet.
- With a faucet. Connect to shower, sink or toilet.
- Touch. Can be operated even hands-free.
- Standard options with one or three openings for toggle water switches.
- Models with a hygienic shower. Suitable for small rooms, as they can be mounted on the wall near the toilet.
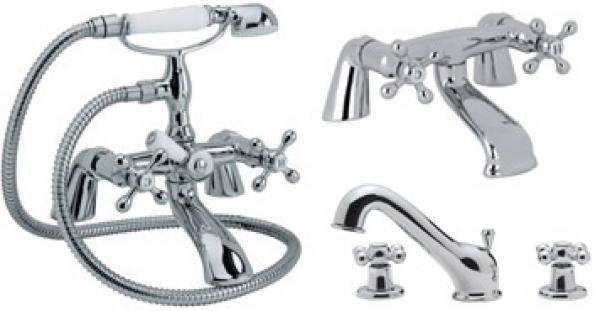
Photo 1. Bidet faucets come in different types depending on the design: touch, thermostatic, standard, with a faucet.
Standard models are similar to conventional kitchen appliances. The faucet is equipped with a fixed or movable faucet. Such models are the cheapest and most reliable.
Mixer with hose and watering can
- Wall-mounted design with hygienic shower. It takes up little space, but installation requires separate water supply pipes. It is advisable to install it during the repair of the premises.
- Retractable hose. The retractable faucet is built into the installed faucet on the shower toilet. The whole design takes up little space and is convenient to use.
Sensory
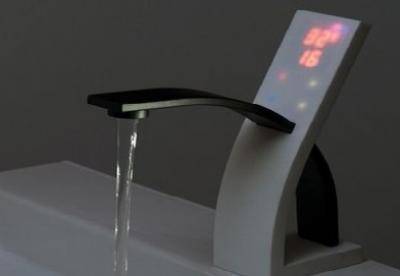
Sensor faucets are equipped with a special faucet with a photo sensor that reacts to ultraviolet radiation.
The sensor is triggered by the approaching heat of the human body and starts the water supply. It works with a lithium battery, which is included in the kit.
The settings for such models include:
- individual force of water pressure;
- the amount of outgoing fluid;
- preferred water temperature;
- sensor sensitivity zone (at what distance, when a person approaches, water begins to flow).
The touch model is the most convenient and economical.Of the negative qualities can be identified:
- High cost. The price of the touch type is 7-12% higher than usual.
- Battery change. Batteries are designed to last a long time, but batteries still need to be replaced.
Thermostatic
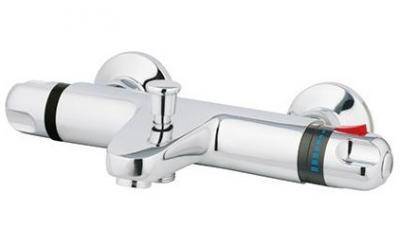
Able to "remember" and regulate the preferred water temperature. The temperature sensor eliminates the possibility of burns or hypothermia during hygiene procedures.
In addition, thermostatic models have the function of turning off the water in case of problems with the plumbing. A significant drawback is the high cost of purchase and repair.
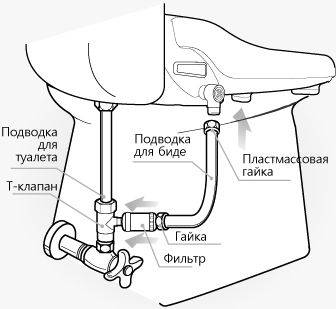
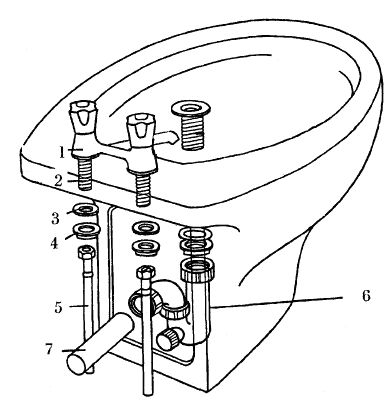
Faucet and siphon installation
There are three holes in the bidet bowl:
- to install the mixer;
- for connecting a siphon;
- to connect the overflow pipe.
The mixer is installed like this:
- A gasket is put on the studs on the bottom of it (usually supplied in the kit).
- Next, the mixer is installed in place, while the studs are passed into the holes intended for them in the bowl.
- Under the bowl, another gasket is put on the studs, and behind it is a metal washer.
- Nuts are screwed onto the studs and tightened with moderate force. If the design of the bidet does not allow you to freely operate with an open-end wrench, you should use an end wrench.
While the bidet is not fixed, you can screw a flexible hose to the mixer nozzles. There is already a gasket in the tubes, so it is not necessary to seal the connection with tow or FUM tape. The force with which the flexible hose nut is tightened must be moderate, otherwise the gasket may be damaged.
To ensure that the gasket is not damaged when tightening the nut, place a paronite gasket over the nut.
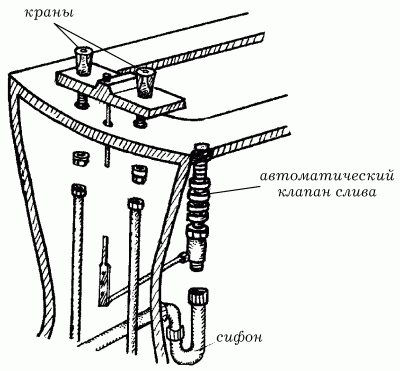
The siphon is not always supplied with the bidet.
If you have to purchase it separately, do not forget to pay attention to the presence of a branch pipe for connecting the overflow pipe
Siphon connection
Installation order:
- If the bidet comes with a bottom (drain) valve that must open simultaneously with the mixer, then you must first install it according to the instructions. Subsequently, the lever of this valve will need to be connected by a rod to the mixer. If there is no such valve, we install a drain grate on a gasket coated with silicone sealant. To fix it, a nut with a wedge-shaped ring is used.
- A siphon is connected to the bottom valve or grate.
- A corrugated outlet hose is connected to the outlet of the siphon using the nut on it.
- A grate designed for it is installed on a gasket in the overflow hole.
A corrugated hose is connected to the overflow grate with a nut, the second end of which is fixed on the overflow pipe of the siphon.
Preparing to connect
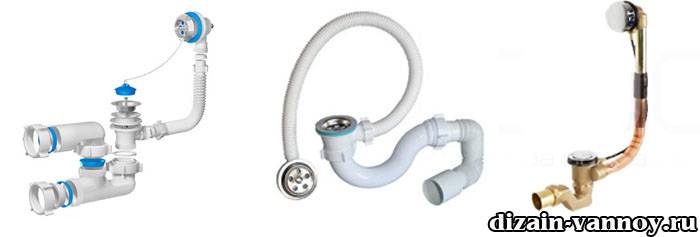
Before laying the sewer in the bathroom, you need to prepare all the structural elements in advance, guided by the advice of specialists described below. The main element for ensuring the drain is a siphon, which makes it possible to clean the system if the sewer in the bathroom is clogged. In order not to get confused in terms when buying this product, you need to remember that this device has two more names, “strapping” or “drain-overflow system" For bathroom.


How to choose a siphon
The drain pipe for the bathroom can be made of materials such as:
- copper;
- brass;
- cast iron;
- plastic;
- textolite.
When installing the sewer in the bathroom on your own, it is recommended to buy plastic products that do not provide for corrugated pipes and the design is rigid. Plastic is chosen because this type of material is easy to work with and does not require special tools, and plumbing in a metal or copper bathroom requires some experience.
When buying a siphon model for your bathroom, you need to consider a number of features:
installation of drain pipes in the bathroom can be carried out with two types of siphons. Universal type suitable for all bathtubs where the distance between drain and overflow does not exceed 57 cm
In bathrooms with other designs, it is necessary to purchase special siphons or they can be bundled with the bath itself from the manufacturer;
before you make a sewer in the bathroom and buy a siphon, pay attention to the thickness of the bathroom itself. On sale there are products that are designed for different wall thicknesses of the bathroom, but there are also universal models;
installation of sewerage in the bathroom almost always provides for the presence of additional consumers in the form of a washing machine. For these purposes, there are special siphons with several outlets for connecting drains of third-party household appliances.
For these purposes, there are special siphons with several outlets for connecting drains of third-party household appliances.
It is worth remembering that a siphon of any model and design needs regular maintenance, therefore, before hiding the sewer in the bathroom or when closing the bathroom with decorative panels, it is necessary to provide an inspection hole of sufficient size so that the sewer line in the bathroom is provided with free access.Usually in such cases, a removable panel or an opening door is provided in the place where the connection of the bath to the sewer is established.
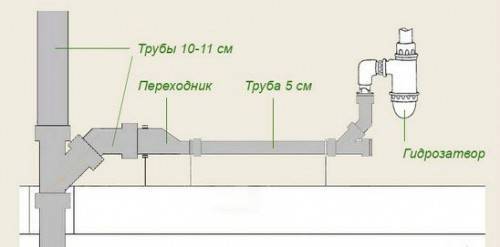
When installing a new bathroom, the required height must be observed to ensure free outflow. The sewerage device in the bathroom provides for a difference between the lowest point of the sewer pipe and the connection point of the siphon. This difference should be 10-20 cm for the normal functioning of the system. In the absence of such a difference, the sewerage wiring in the bathroom will be filled with water or the liquid will leave very slowly.
Connecting the bathroom to the sewer

Before assembling the sewer in the bathroom on our own, for ease of understanding, we break the whole process into main points in the form of step-by-step instructions. The installation procedure is as follows:
- laying sewer pipes in the bathroom begins with checking the configuration of all the elements involved;
- further, all elements of the siphon are assembled into one structure and a liquid sealant is used to ensure better sealing of the joints. Usually, the connection diagram of the bathroom to the sewer and detailed assembly instructions are contained in the attached documents to the bathroom and siphon, so that you can carry out the installation on your own;
after the siphon is fully assembled, a sewage system is installed in the bathroom, where one end of the siphon pipe is connected to bathroom drain, and the second with a receiving pipe of the sewage system;
at the last stage, the overflow pipe is connected
In this case, it is important to monitor the tightness of all rubber gaskets at the joints. The sewer pipe in the bathroom should not have stressed sections, this will lead to deformation and cracking of the plastic. You can see the video for this article on how to properly assemble and connect the siphon
How to properly assemble and connect the siphon can be viewed in the video for this article.
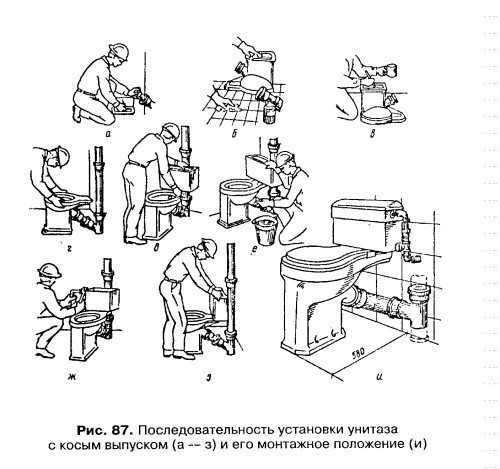
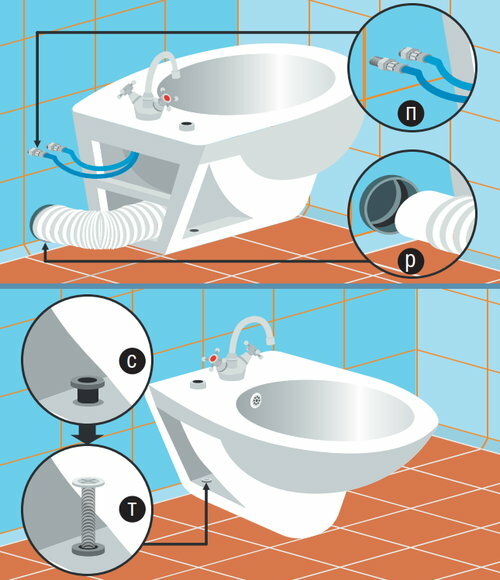
Technology for connecting a floor bidet
Connecting a bidet to the sewer is a task of medium complexity. But, strictly adhering to the installation technology, even a novice master who knows only the basic skills of repair work can perform it.
When choosing a place to place a bidet, take into account the availability of free access to pipes
The floor bidet is installed in the immediate vicinity of the toilet. The distance between the devices must be at least 70 cm.


The first thing to do before connecting the bidet to the sewer is to read the instructions attached to it and check the presence of all the components of the structure.
The bowl of the standard model is equipped with three holes: the top one is for installing a mixer, on the side inner board - for overflow, at the bottom - for direct draining into the sewer pipe. The drain valve is independent of the device configuration. It is fully automatic.
To connect a bidet to the sewer you will need:
- puncher with a set of drills;
- wrenches and wrenches;
- Screwdriver Set;
- mounting tape;
- waterproofing tow;
- silicone sealant;
- marker or pencil.
The connection diagram of the bidet to the sewer, attached to the instructions for the device, must be kept at hand at all stages of installation.
In most models, the faucet is not included with the bidet.It should be purchased in advance at the points of sale of sanitary equipment.

Installation of an external faucet involves fixing the device on the outside of the bidet through a special hole
The installation technology is in many ways similar to the installation procedure for a sink faucet.
procedure performed in several stages:
- Flexible hoses are fixed in the threaded sockets of the mixer.
- The mixer is installed on the outside of the bowl, tightening the nut from below.
- In place of the siphon, a drain valve is attached.
- Connect hot and cold water pipes.
- All mating elements are compressed.
When connecting models with internal filling bowls to the sewerage system, it should be taken into account that cold water must be supplied to the spout directly from the storage tank located on the back side. The hot water supply pipe must also be supplied independently.
To connect the bidet to the sewer, masters recommend using rigid hoses. But, to simplify the task, a corrugated pipe can also be brought to the sewer. The layout of sewer pipes is best done in such a way that the attachment points of the hoses are located directly behind the plumbing.
It is impossible to connect to the system without installing a siphon
Bidet siphons are different from their counterparts designed for sink and shower connections, a longer downpipe and a smoother knee bend. This solution allows you to create a water seal of a larger volume, ensuring uninterrupted operation of the system.
On sale there are also models equipped with several water seals. They are often used for hidden installation.If you need open installation, you can use siphons of both tubular and bottle type.
The technology for installing an open siphon includes the following steps:
- A drain grate is inserted into the drain hole, baited with a nut.
- On the reverse side of the neck, the receiving part of the siphon is installed, fixing the structure with mounting nuts.
- A siphon outlet is mounted to the overflow hole.
- The outlet end of the siphon, a corrugated pipe, is inserted deeper into the socket of the sewer system.
The diameter of the sewer outlet must be at least 100 mm
To connect equipment with upward water supply, it is better to invite specialists. Sanitaryware with internal filling of the bowl has a more complex configuration. Without knowing the intricacies of installation, it will be difficult for you to connect the bidet to the sewer without making mistakes.
Having completed all the stages of connecting the bidet to the sewer, it remains only to fix the plumbing.
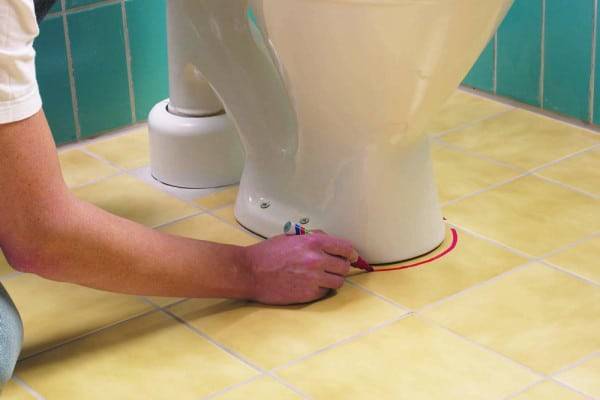
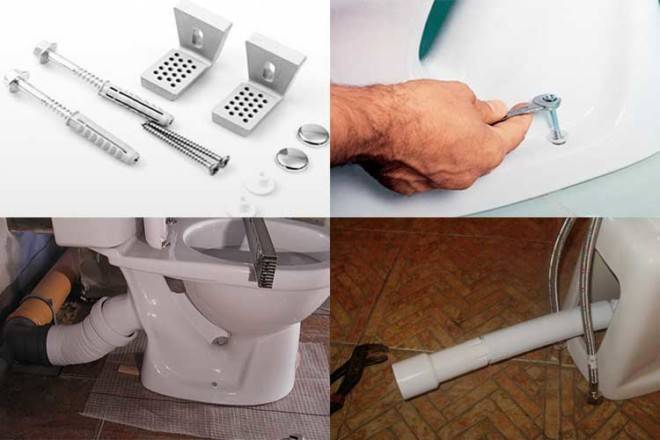
The floor bidet is mounted to the floor, fixing it with special fasteners for the toilet
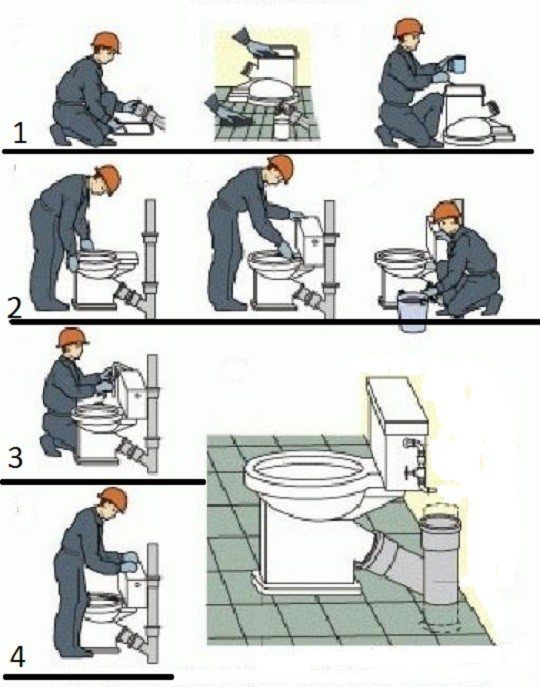
Sequencing:
- Install the device in the intended place, outlining the contour of the sole with a pencil.
- Holes are drilled according to the marks made with a puncher.
- Plugs are inserted into the holes, then the bidet is inserted at a given mark and the fixing screws are tightened, not forgetting to place rubber gaskets under them.
The installation and connection process is described in detail in the video:
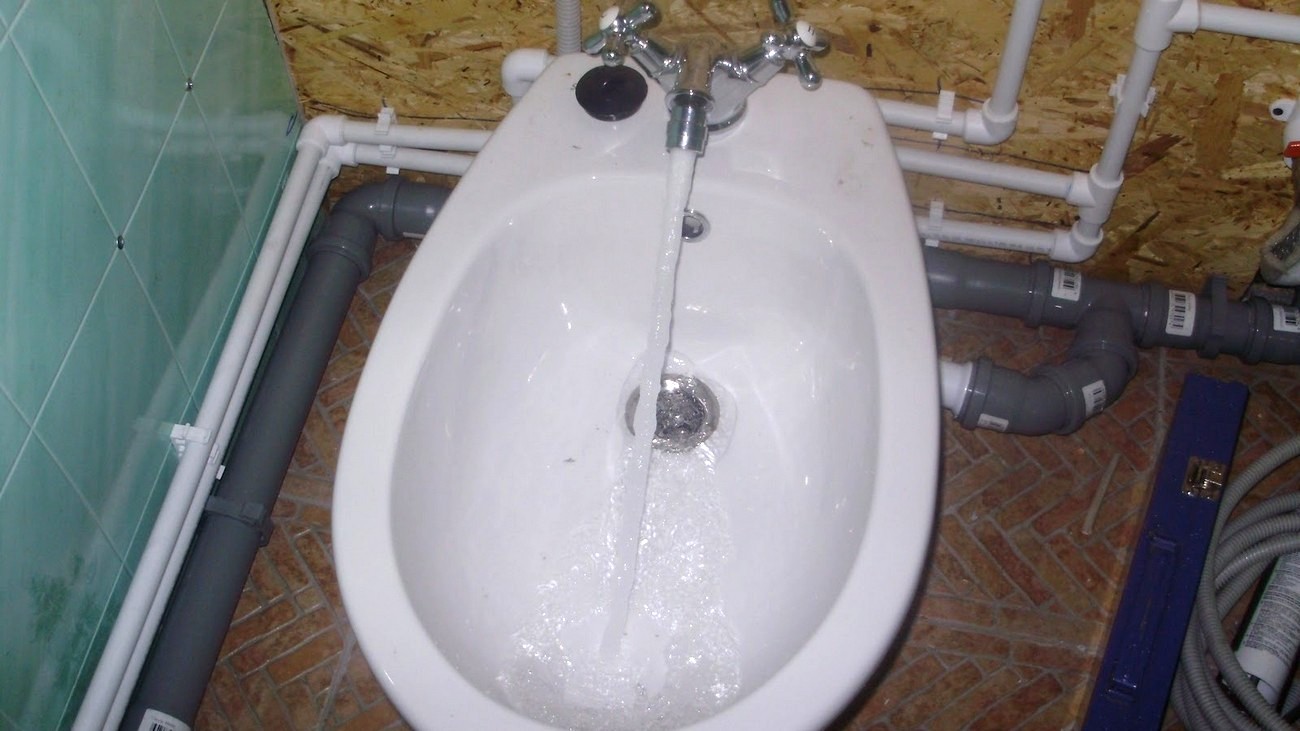
Having installed the structure, check the correctness of the connections and start the system. To make a test run, open the valves and observe: if the water pressure good and there are no leaks - the work is done correctly.


Installation of a bidet without plumbing skills
Installing a bidet with your own hands does not require special skills and professional knowledge. Before starting installation, you need to choose high-quality equipment; for small rooms, a suspended type is suitable, and for large rooms, floor-mounted ones. Tools to get the job done:
- perforator with drills;
- adjustable pipe wrench;
- mounting tape for insulation;
- silicone sealant;
- screwdrivers, wrenches.
Connecting a bidet begins with reading the installation instructions for the product. Next, a water mixer is assembled, a rubber pipe is attached to it. After attaching the hose, we proceed to connect the mixer to the bidet. Sealed gaskets and rubber bands are used, after complete centering, the device is clamped with a wrench. All connections are treated with sealant, for greater reliability. The installation of the siphon in the bidet is carried out according to the principle of its installation in the sink. The funnel is mounted in the bidet hole, the gaskets are fixed with a special ring on the underside of the unit. The lower part of the siphon is connected to a corrugated pipe to the toilet drain.
Further, the installation of the bidet independently proceeds to the final stage. The product is installed in the selected place so that the length of the hoses is enough. Using a drill, we make small holes in order not to damage the tile; it is required to turn on the puncher at low speeds. We remove the dust with a vacuum cleaner and insert the plastic dowel into the hole. We fasten the bidet with bolts, be sure to fasten the rubber gaskets between the hole and the fasteners in order to avoid the slightest cracks. When the equipment is firmly installed, we check the connections to all communications. The corrugation of the siphon is attached to the drain pipe, and the hoses are connected to the water supply system.
The last stage of the installation of the bidet
We check the operation of the device, the tightness of all connections. In the event of a water leak, all faults must be repaired immediately. This is how the bidet and toilet are installed. Let such compact and convenient hygiene items serve you for a long time and please you with their functionality.
There are other interesting ways to compactly install a toilet and bidet with a washing machine above the toilet.
What are bidets and their design features
A classic bidet is a device that looks like a mixture of a sink and a toilet bowl. It is located from the floor level at a height of about 0.4 meters. However, instead of a drain tank in the case of a bidet, a special tap is installed inside the bowl, to which cold and hot water are supplied. You can thus regulate the pressure of water and its temperature.
A bidet is a sanitary and hygienic device for washing the lower part of the body.
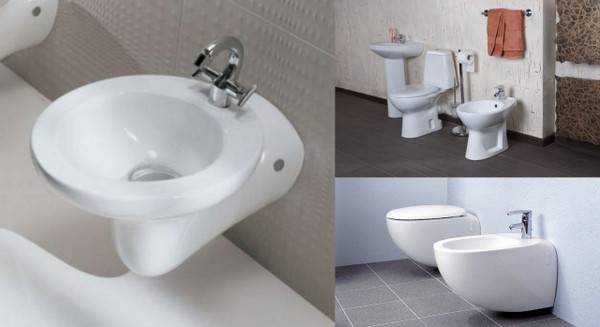
As in the case of the toilet, the bidet can be made in the form of:
- Floor mounted design;
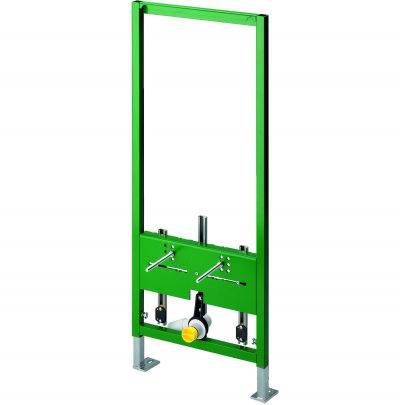
- Or hung on the wall - suspended structure.
These features impose their own requirements on the installation process of the bidet. If in its floor version the bidet can simply be installed on the floor, then the suspended one is fixed using an installation specially designed for this. The installation itself, as a rule, comes with the device. It successfully masks all plumbing fixtures that are connected to the wall. In addition, the bidet can also differ in the way the water supply is organized:
- Faucets located like a conventional sink;
- And taps with the so-called upward flow - in other words, a small fountain is formed.
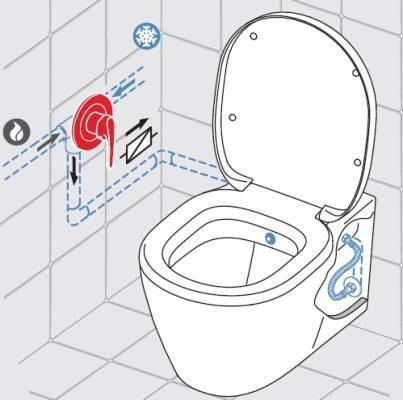
Heated (or cold) water in any case will move from the supply holes to the bypass of the bowl. Bidet faucets can be valve or lever. The choice here is up to the end user - who will be more comfortable using it. In addition, updraft bidets can be equipped with a special hygienic shower.
The mixer for greater ease of use can be equipped with a thermostat. So it will be much more convenient for the user to set a constant water temperature. Among the latest constructive innovations of the bidet, one can note such an interesting development as a bidet equipped with special photo sensors. They react to the approach of an object at a distance of about 30 centimeters and automatically turn on the water supply. In a word, there are quite a lot of options for a variety of models in the case of a bidet. Each consumer can choose exactly what he likes the most.
An updraft bidet that looks like a small fountain.
This is interesting: Why can't sit on the toilet
Features of installing a bidet
Bidet design
Before starting the installation of equipment, you need to understand its device. Externally bidet is like a standard toilet, and from a technical point of view - on a wall-hung washbasin. It connects to the sewer, but does not use a water tank - a faucet or fountain is built in instead.
There are floor and suspended models (installed on the floor and on the wall, respectively). When choosing, you need to take into account the features of the design.For example, the kit includes a two-valve mixer or a single-lever ball mixer, which is considered more convenient to use. The bidet spout is designed so that the jet is directed upwards at an angle, but in some models it is not provided at all.
Another point is design. The appearance is selected in accordance with the rest of the plumbing in the restroom. There are both retro-stylish modern models and high-tech devices on sale.
Also, when choosing, the dimensions of the device are taken into account. There should be free space around the bidet so as not to complicate the use of the bathroom.
Plumbing of such a plan is installed in the same way as a standard toilet. The only thing is that you need to connect hot and cold water to the pipes using the eyeliner.
The second option is a separate bidet. Outwardly, it is a toilet bowl, but the installation scheme is similar to a washbasin. The work is as follows:


- Plumbing is assembled, the siphon and mixer are connected to the bowl.
- A suitable place is selected for fixing the bidet (to the floor or wall - depends on the design).
- Water is led to the mixer.
- The siphon is connected to the sewer.
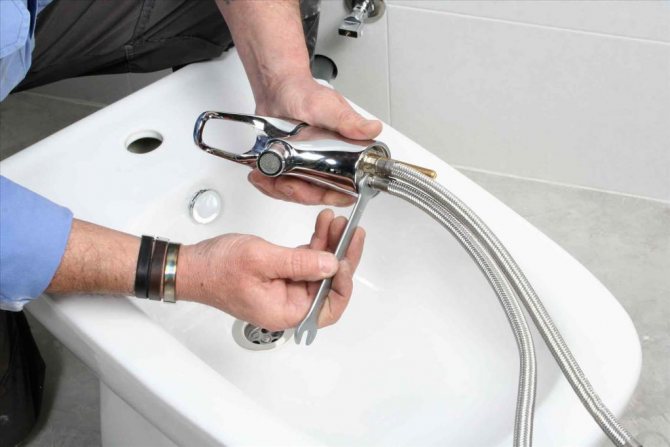
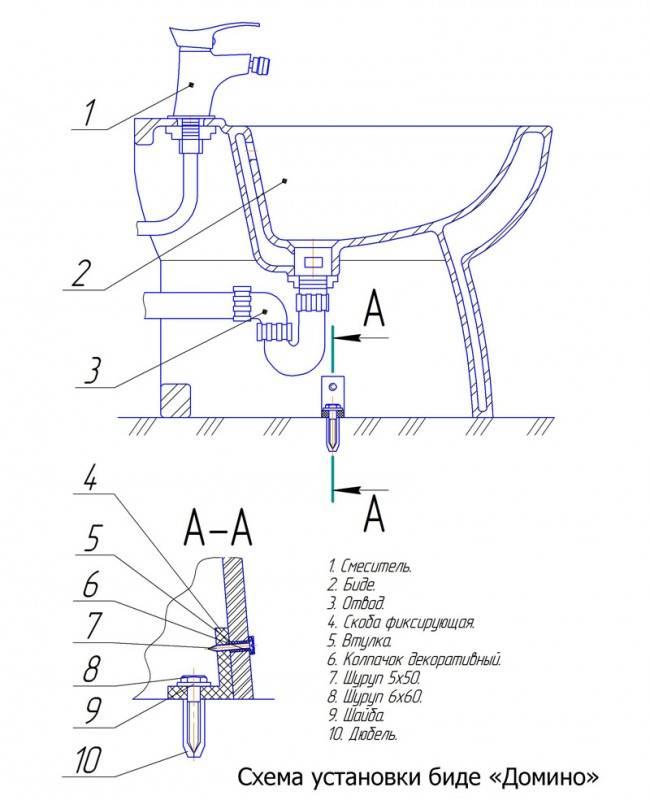
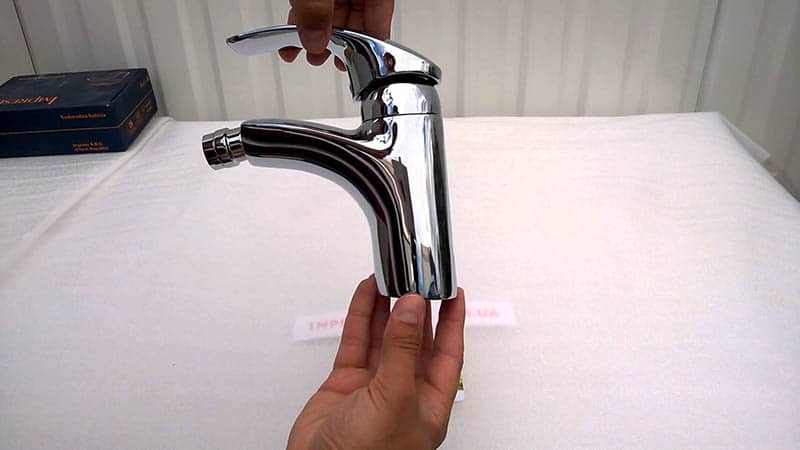
Installing a bidet faucet
Such a faucet, unlike its analogue for a washbasin, is equipped with a special floating head. The angle of rotation of this part is 360 degrees. It has a lever that opens and closes the drain from the back.
Allocate contactless, mixers with one lever and two-valve. In touch or non-contact models, a photocell is installed. Today, a wide range of high-quality mixers are on sale, which are safe and easy to use.
 Bidet mixer
With them, it is easy to adjust the desired water temperature, strength and direction of flow. Step-by-step installation instructions include the following steps:
- Collect all the elements of the mixer and install it in the hole of the flexible rubber hose. Tighten the parts should be effortless, because otherwise you can accidentally break the tightness of the fastener, and this, in turn, will lead to leakage.
- The faucet is attached to the bidet by hand. In this case, special studs for plumbing products and a flat screwdriver are used.
- After that level the position of the mixer. It must be placed strictly in the center and securely fastened with a wrench.
- In conclusion, it is necessary to additionally cover with sealant all areas of the connection of structural elements.