- How to attach to the wall?
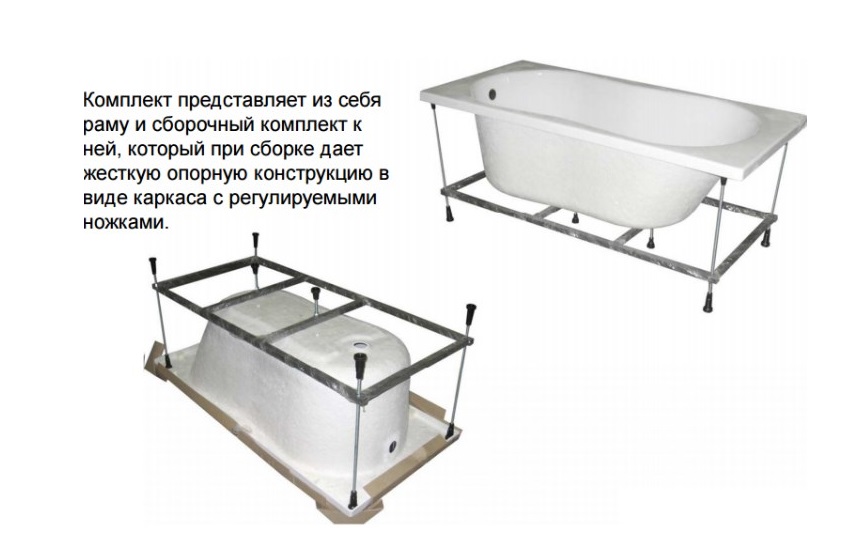
- Installing an acrylic bath on a frame
- We twist the frame
- Fixing the bathtub to the frame
- Screen mounting
- Preparation of tools and materials
- brick construction
- brick laying
- Waterproofing
- Facing
- Step-by-step instructions for installing an acrylic bathtub on a metal frame
- Installing an acrylic bath on bricks
- How to install a corner acrylic bathtub
- General recommendations for installing a bathtub
- Foam bath insulation
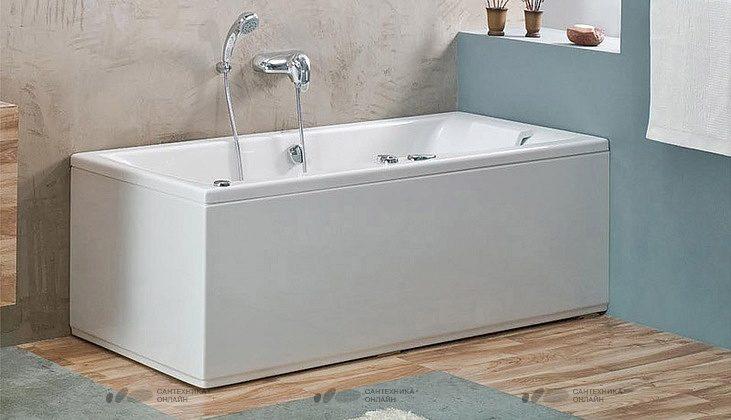
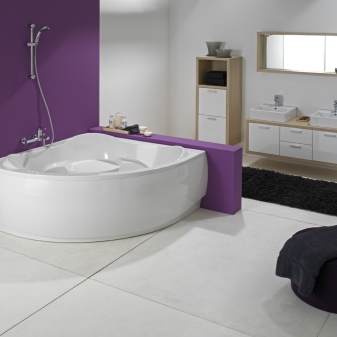
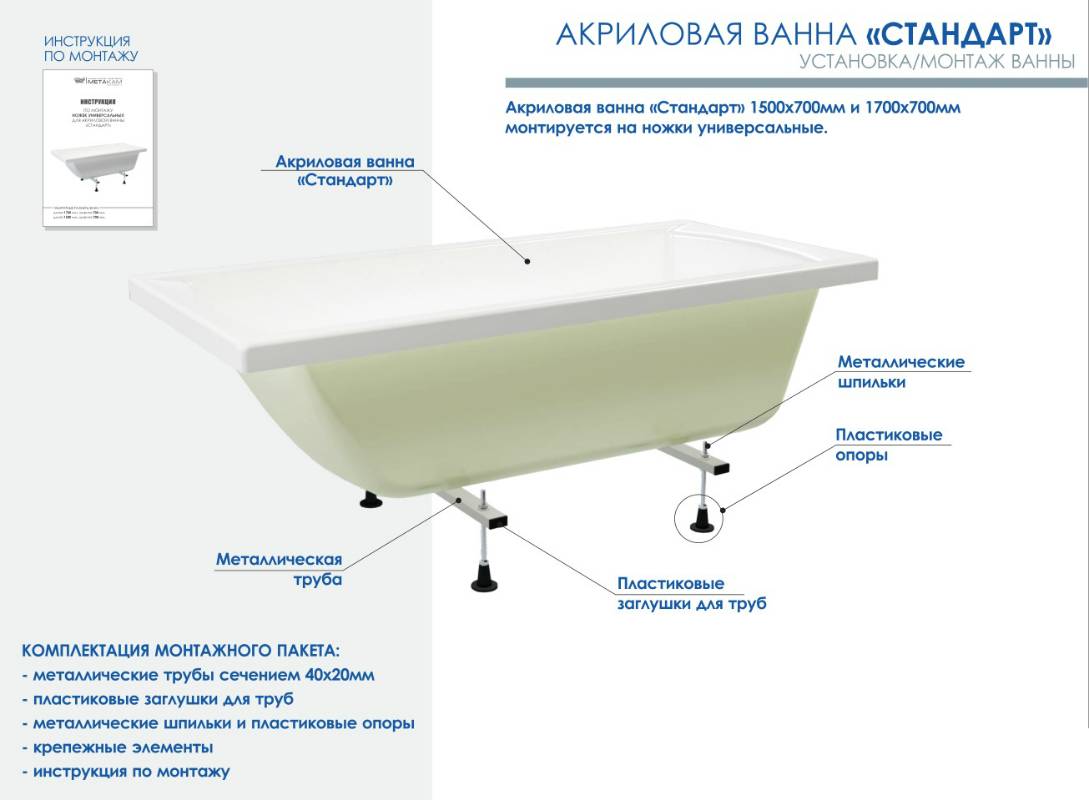
- Features of choosing a bath
- Screen types
- Sliding screens
- hinged screen
- blank screen
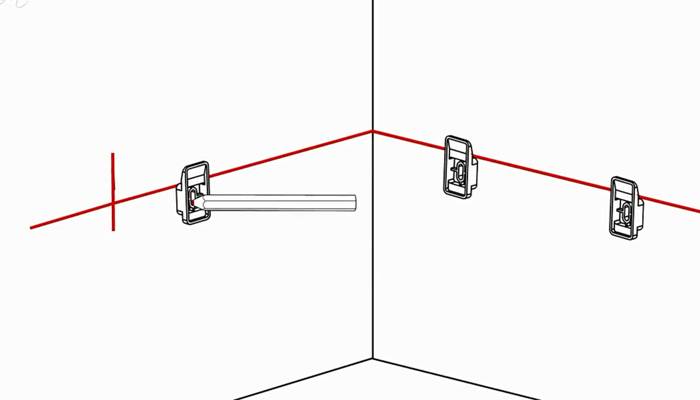
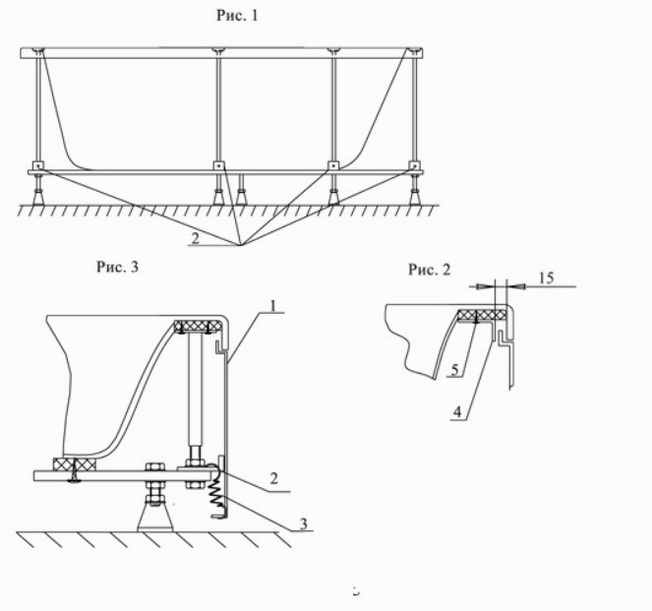
How to attach to the wall?
If your frame provides for additional stops for wall mounting, you must use the following instructions:
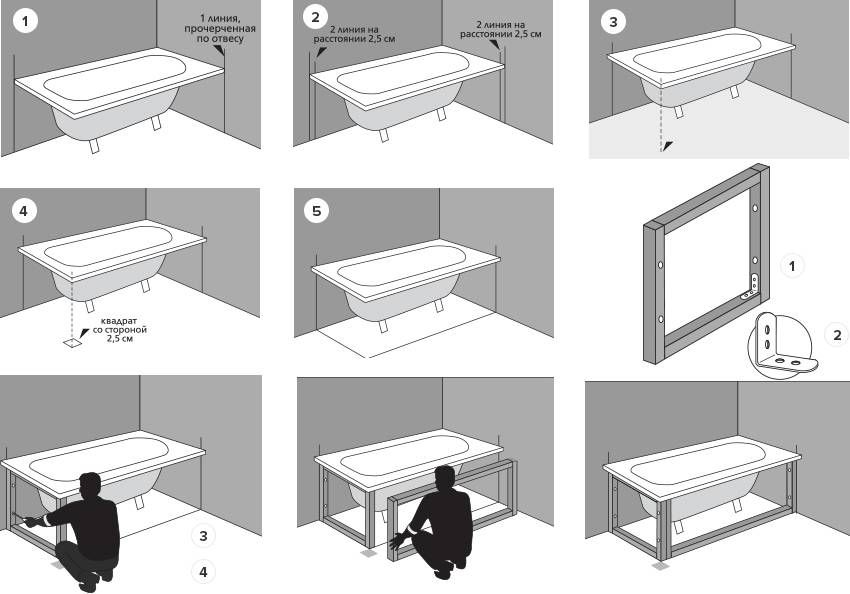
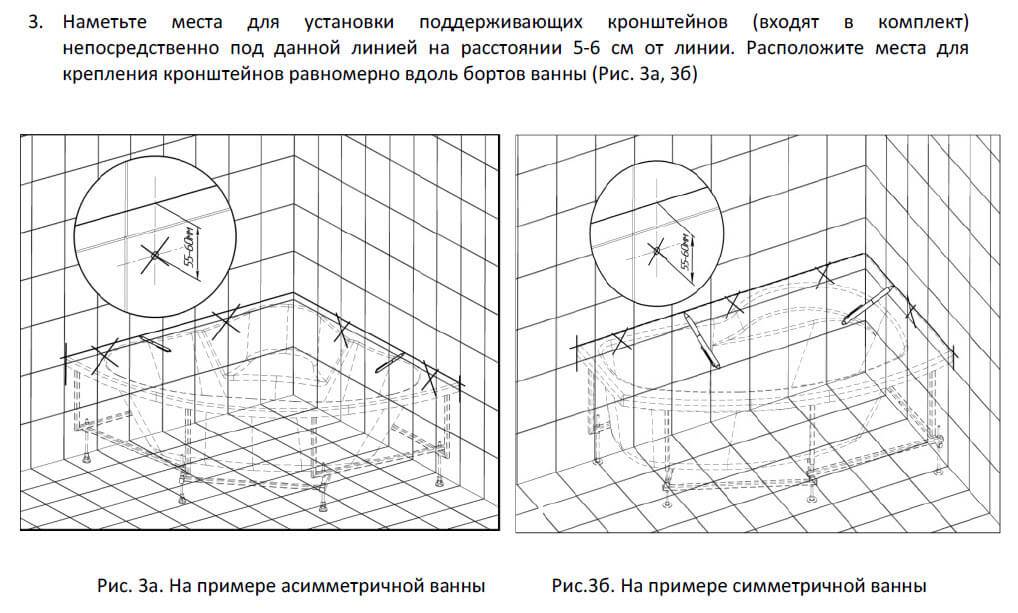
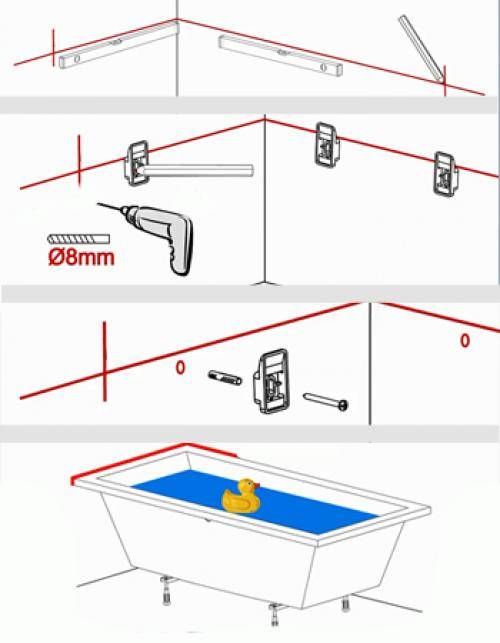
STEP 1. On the underside of the sides on the wall, we put marks with a marker.
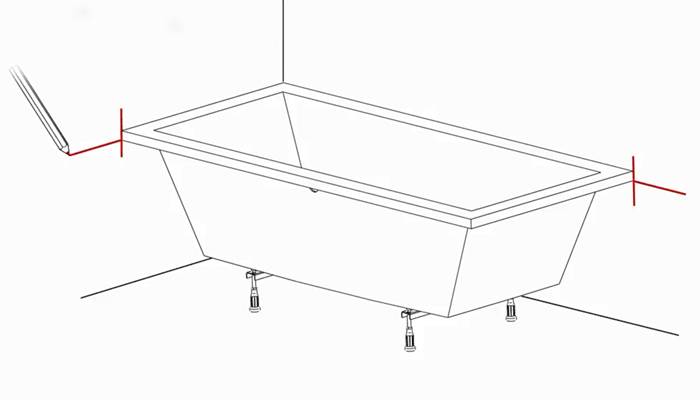
STEP 2. We remove the structure and, using a building level and a marker, draw a line for the side of the bathtub.
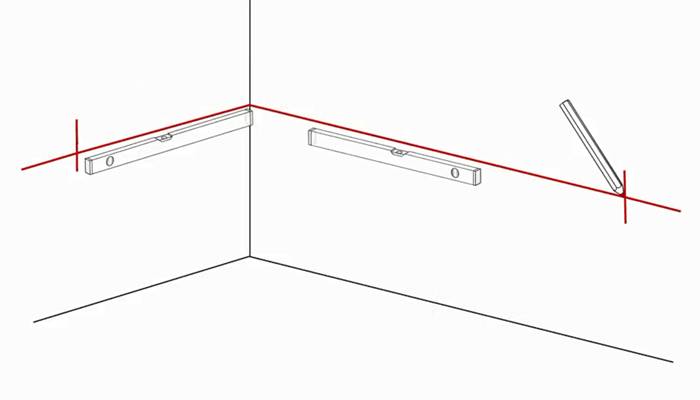
STEP 3. We apply the side supports, as shown in the figure, and mark the places for drilling.
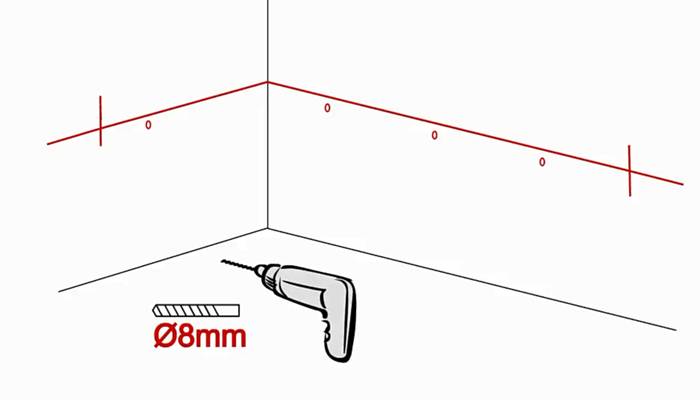
STEP 4. Using a puncher and an 8mm drill (depends on the size of the dowels, but is usually used  drill holes to the depth indicated in the instructions.
STEP 5. Fasten the side stops to the wall with dowels and self-tapping screws.
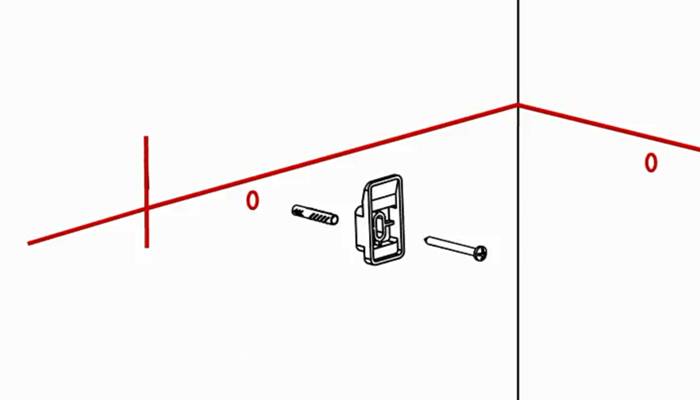
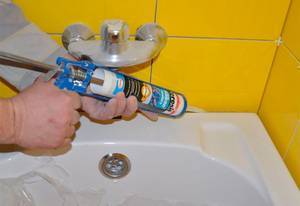
STEP 6. For the best fastening effect, we coat the places of support of the sides of the bathtub with sealant.
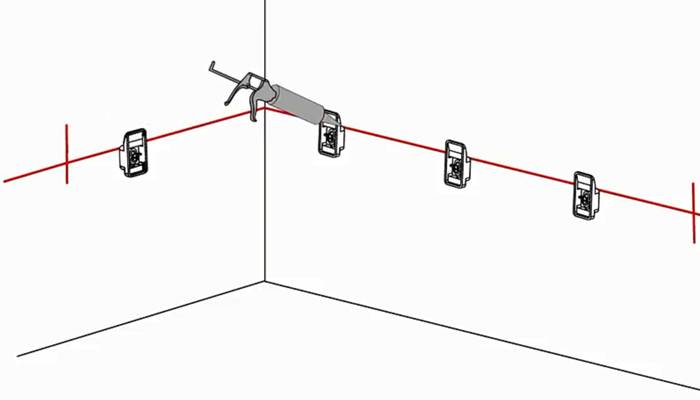
STEP 7.We put the bath together with the frame on the stops. We press well, fill it with water and coat the joint with the wall with sealant or close it with a corner.
Now you can deal with sewerage and screen installation.
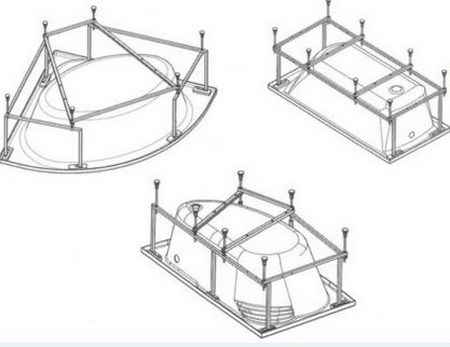
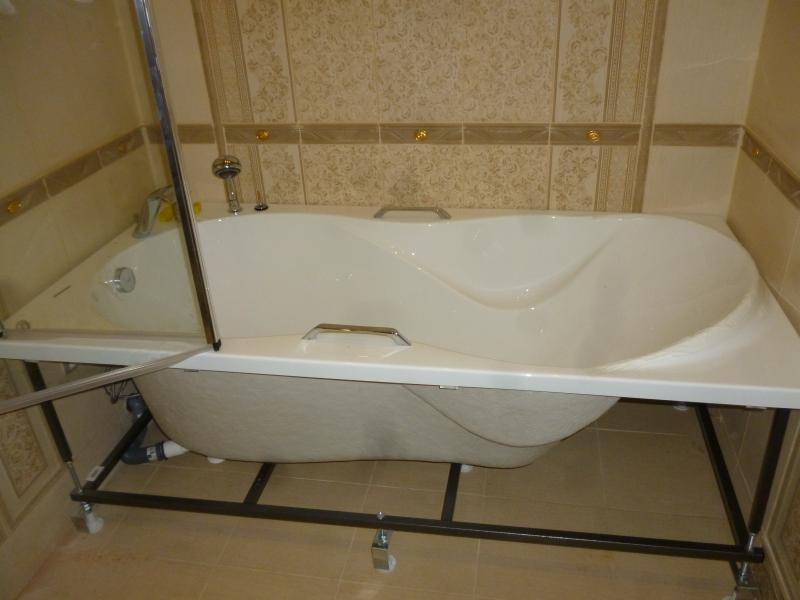
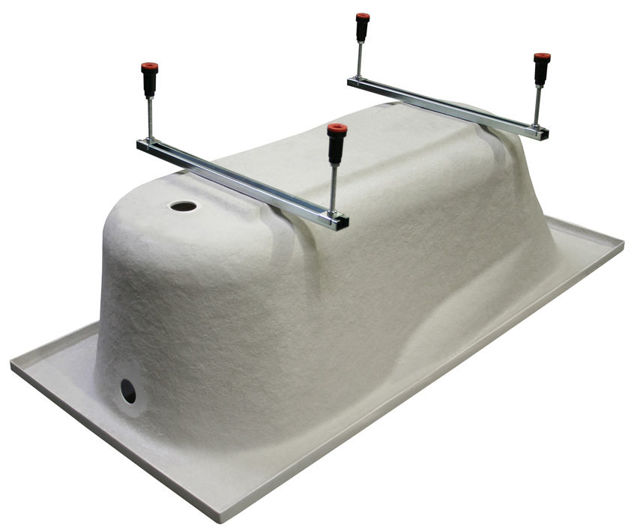
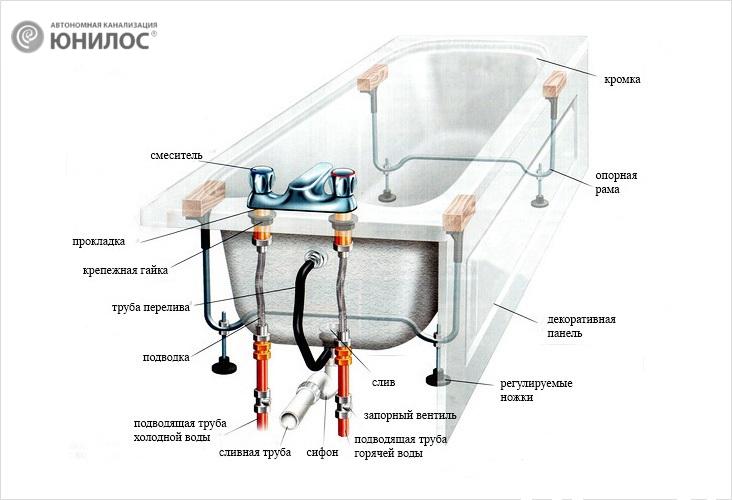
Installing an acrylic bath on a frame
For each bath, the frame is developed differently, therefore the assembly nuances are different for each case. Even for one company, for different models of the same form, the frames are different. They take into account the geometry of the bath, as well as the distribution of loads. Nevertheless, the order of work is general, as are some technical points.
An example of frames for acrylic bathtubs of various shapes
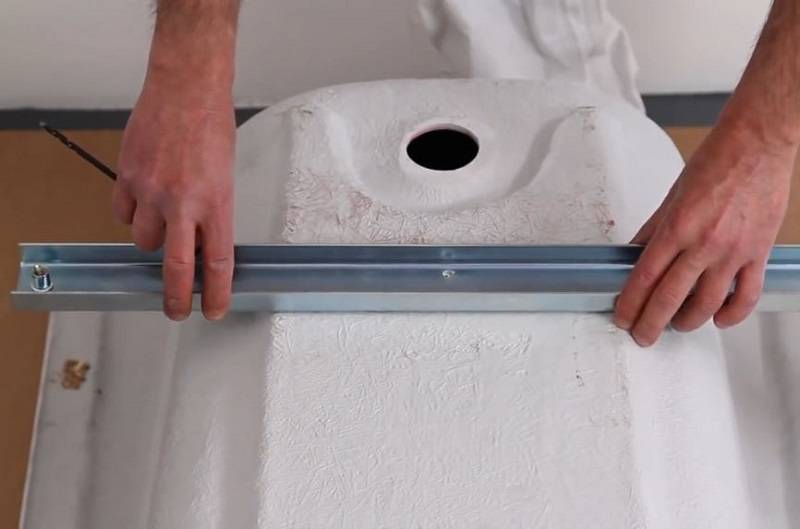
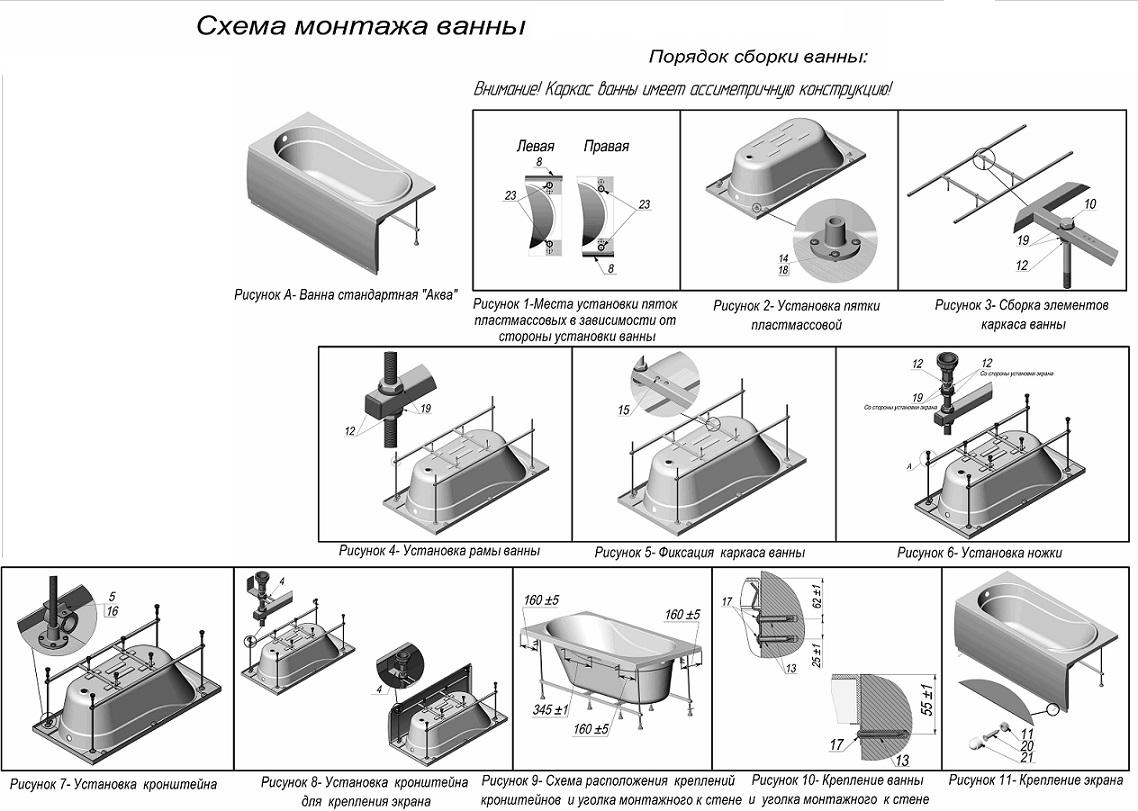
We twist the frame
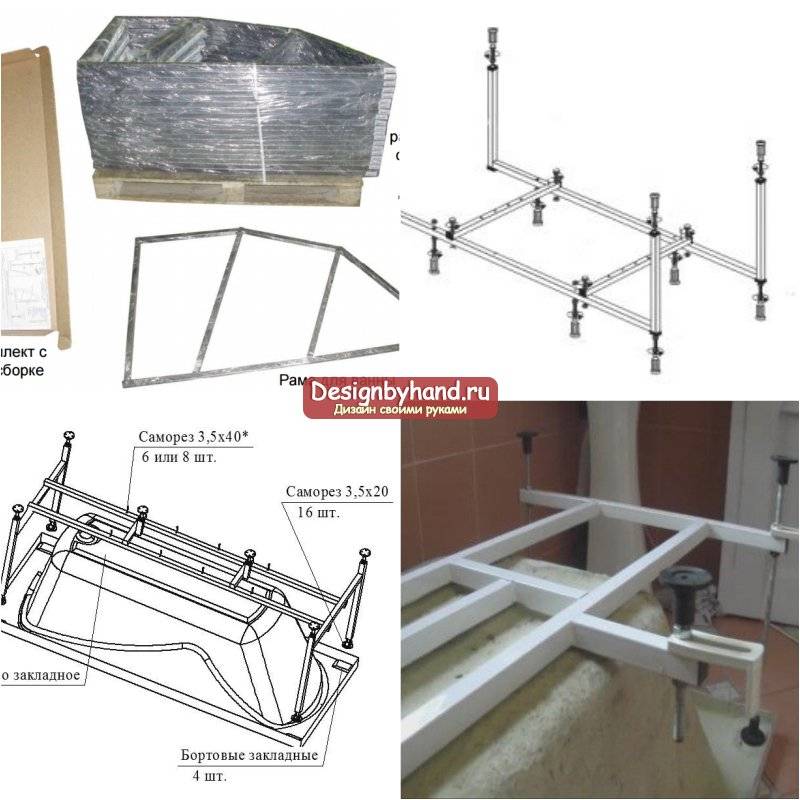
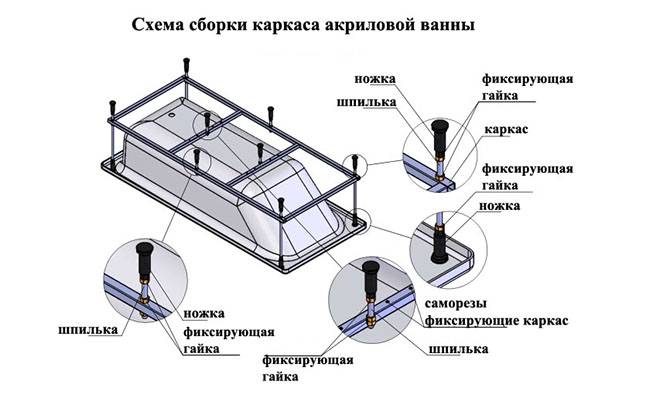
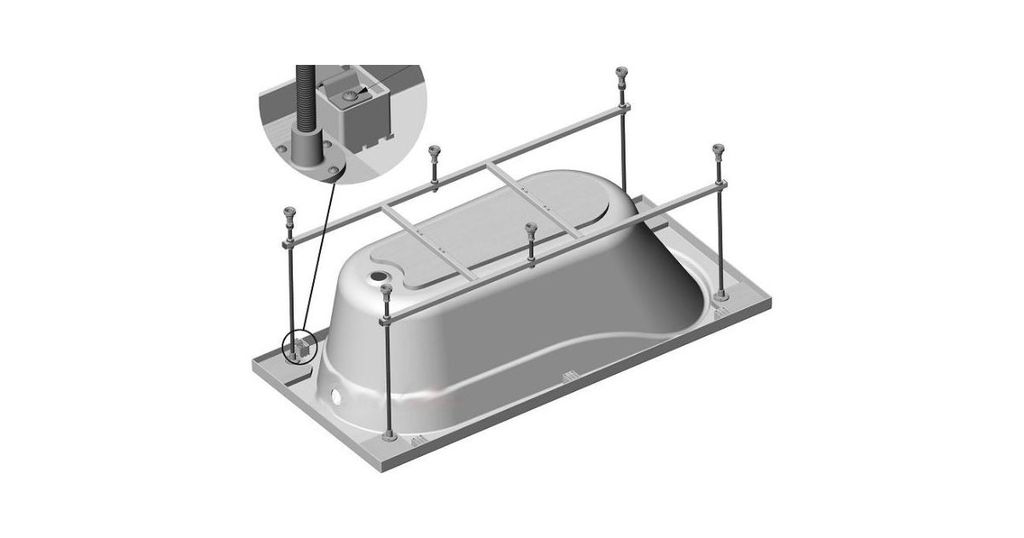
A frame is assembled on which the bottom rests. In some cases, it is welded and does not require assembly. The frame is laid on the bottom of the inverted tub until nothing is fixed. It is exposed exactly, as it must be attached.


-
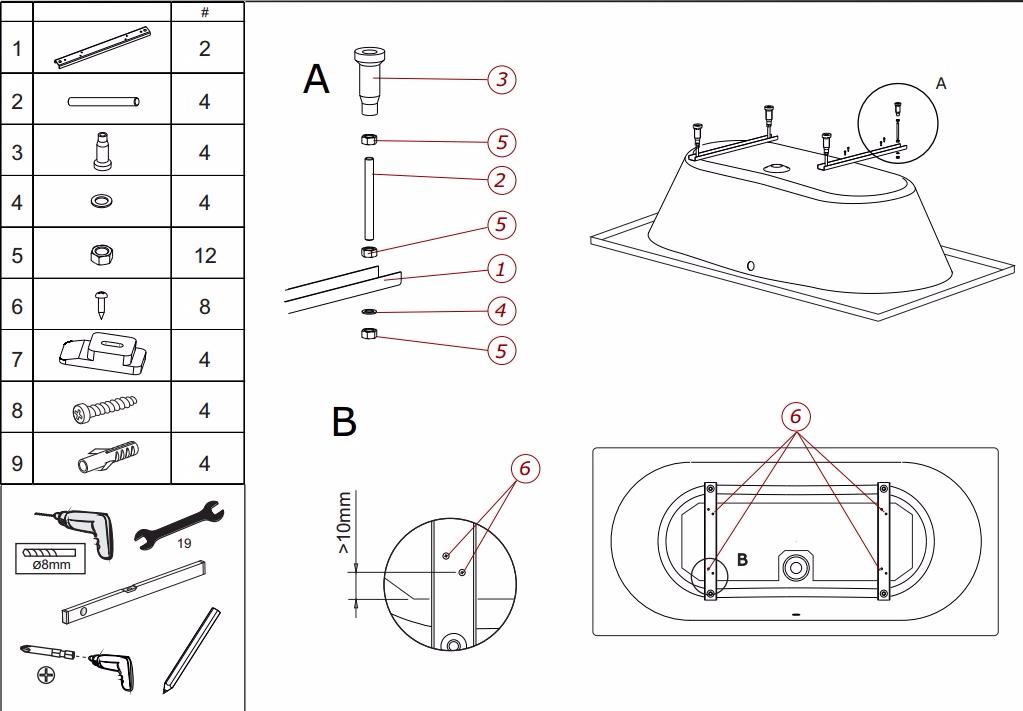
Washers with fasteners are installed on the racks. Racks are either profile pieces (square-section pipes) or metal rods with threads at both ends. They must be attached to the sides of the bath. Firms usually develop fasteners of their own form. The photo shows one of the options.
-
Racks are usually installed at the corners of the bath. In these places there are plates, there may be holes, or they may not be - you have to drill yourself. The number of racks depends on the shape of the bath, but not less than 4-5, and preferably 6-7 pieces. At first, the racks are simply assembled and placed in the places allotted to them (until we fix it).
-
The second side of the racks is connected to the frame supporting the bottom. A threaded nut is mounted in the end of the rack, we screw the screw into it, connecting the frame and the rack.
- After installing the racks, with the help of bolts align the position of the frame.It should be located strictly horizontally, and the bottom should lie on it tightly, without gaps.
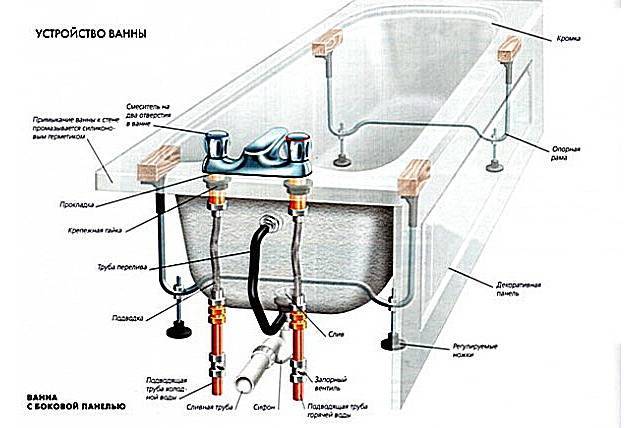
Fixing the bathtub to the frame
After the frame is level, it is screwed to the reinforced bottom of the acrylic bath. It is necessary to use self-tapping screws of the recommended length, which are included with the frame.
We fix the frame to the bottom
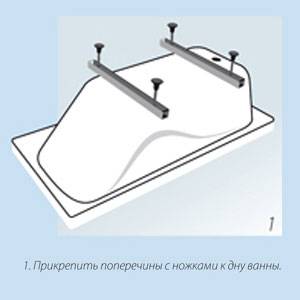
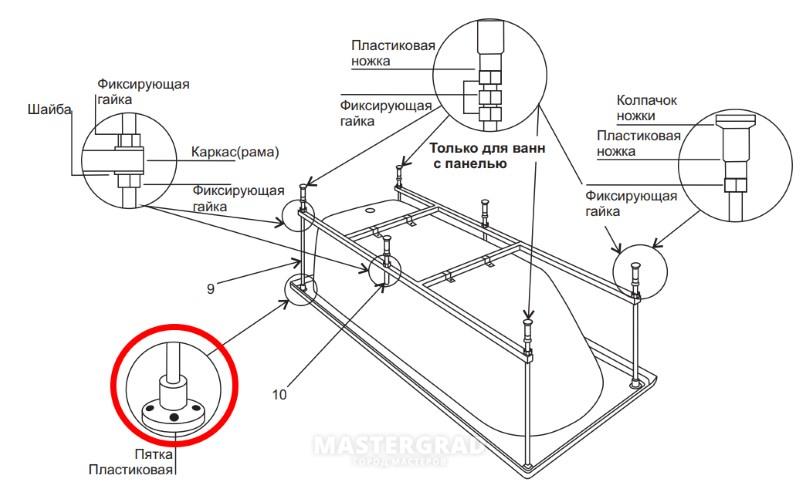
- The next step in installing an acrylic bath is to set up and fix the racks. They have already been adjusted in height, now you need to set them vertically (we control the building level on both sides or check the accuracy of the plumb line). The exposed racks are “sit down” on self-tapping screws. The length of the fasteners is indicated in the instructions for each bath, but usually they are less than those that fixed the bottom.
- Next, install the legs on the frame.
-
On the side where there is no screen, a nut is screwed onto the leg pin, after which they are inserted into the holes in the frame (hanging on this nut), fixed to the frame with another nut. The result is a height-adjustable design - by tightening the nuts, you can set the bath to the desired position.
-
The assembly of the legs from the side of the screen is different. The nut is screwed on, two large washers are installed, a stop for the screen (L-shaped plate) is inserted between them, the second nut is screwed. We received an emphasis for the screen adjustable in length and height. Then another nut is screwed on - the support nut - and the legs can be placed on the frame.
-
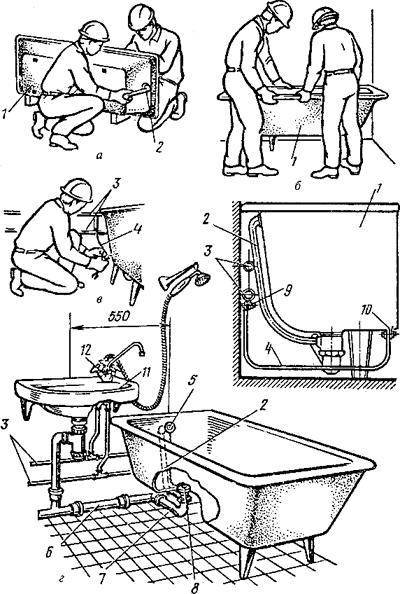
Screen mounting
It's not really anymore acrylic bath installation, but this stage is rarely dispensed with: we install the screen. If you bought this option, the kit comes with plates that will support it. They are placed along the edges and in the middle. After attaching the screen and adjusting the stops on the legs, fix them in the desired position.Then, on the bath and the screen, the places where the plates need to be fixed are marked, then holes are drilled for the fasteners and the screen is fixed.
We put the fasteners for the screen on the side
-
Next, you need to install fasteners for the acrylic bath to the walls. These are curved plates for which the sides cling. We move the bath installed and leveled to the wall, mark where the sides will be, put the plates so that their upper edge is 3-4 mm below the mark. They are fastened to dowels by drilling holes in the walls for them.
- During installation, the bathtub is put on the boards on the screwed plates. Having installed, we check whether it stands exactly, if necessary, adjust the height with the legs. Next, we connect the drain and the last stage - we fasten the screen to the plates installed on the side. At the bottom, it simply rests against the exposed plates. Acrylic bathtub installation completed.
Do-it-yourself installation of an acrylic bathtub is over
Next, it will be necessary to make the junction of the sides of the bathtub with the wall airtight, but more on that below, since this technology will be the same for any installation method.
Preparation of tools and materials
The process of installing an acrylic bathtub with your own hands requires the preparation of a place where the future object will be located, the necessary materials and tools
It is important to create a full-fledged working environment so that nothing interferes in the room, then the procedure will take place at an optimal pace and the quality of the repair will be at its best.
For full-fledged work on the installation of an acrylic bath, you must have with you:
- the product itself to be installed;
- materials for a specific type of fastening: legs, frame, bricks;
- a hammer;
- Bulgarian;
- perforator;
- silicone sealant;
- level;
- wrench;
- electrical tape or mounting tape;
- corrugated pipe;
- brackets with which the bath will be fixed to the floor or to the wall.

In order for the repair process to proceed correctly, it is important to do everything in a certain order:
- blocking the water supply;
- dismantling of the old bath;
- replacement of the old drain;
- sewer cleaning;
- installation of a new corrugation in the sewer socket;
- lubrication of the junction of the corrugation with the sewer;
- the process of leveling the floor for new equipment.
Once all the work is done, you can proceed with the installation of a new acrylic product.
brick construction
A brick and tile bath can successfully replace a standard bowl. The design can be made with your own hands, taking into account personal preferences, sizes and shapes. For its manufacture, silicate brick is used, which covers a layer of moisture-resistant concrete and ceramic tiles.


A brick bath has several advantages compared to standard models:
- the property owner can bring to life the most daring ideas to make a custom-sized bath, the design must fit perfectly into the design of any bathroom,
- the use of natural materials as raw materials (brick, concrete, ceramic tiles),
- the minimum cost of the product,
- low thermal conductivity of the material increases the cooling time of hot water in the font,
- the possibility of using various schemes, an interesting design of the washing container, unlike standard models.
brick laying
At the initial stage of work, it is necessary to lay the walls of the bathtub from red or silicate bricks.For reliable fastening of the elements, a moisture-resistant solution with the addition of an antiseptic is used. The compositions prevent the appearance of fungus and mold on the surface of the product during operation. For laying the walls you will need a trowel, a building level, a container, as well as a drill with a nozzle for mixing the mortar.
The work is done in the following order:
- Clean the surface of debris, remove the flooring in the bathroom.
- Connect the siphon with pipes, connect them to the sewer system.
- Spread the walls of the font to the required height, when performing installation work, use the building level.
- When doing bricklaying with your own hands, the seams between the individual elements are observed within 1–1.5 millimeters. Excess building mixture is removed before it hardens.
Waterproofing
One of the disadvantages of a brick is the possibility of its destruction under the influence of moisture, so the material must be protected from the harmful effects of water. In this regard, the masonry needs effective waterproofing. First, the walls of the bath are covered with a moisture-resistant solution, in the lower part of the structure, waterproofing is made with one of the following materials:
- roofing material or special membranes are cut into strips of the desired length (the panels are overlapped with a gap of 10 cm, the edges of the products are also installed on the sides of the bath),
- coating waterproofing based on bitumen is applied to the walls of the structure with a spatula or trowel in a thick uniform layer, the main disadvantage of the method is the long drying period of the solution:
- paint waterproofing has not gained popularity among users after a short period of operation, polymer or moisture-resistant bitumen emulsion is laid in 4-6 layers.
Facing
To give the structure an attractive appearance, the bathtub is finished with impact-resistant, moisture-resistant and durable material.
These qualities correspond to the following products:
- a small ceramic mosaic tile is used to finish the surfaces of products of complex geometric shapes - professionals should do the finishing of the bath, the work takes a lot of time,
- ceramic tiles of the selected color make it possible to simplify the process - products will have to be cut, there are certain difficulties when finishing curved structures,
- liquid acrylic dries for 5 days, allows you to add shine to the surface of the bath.
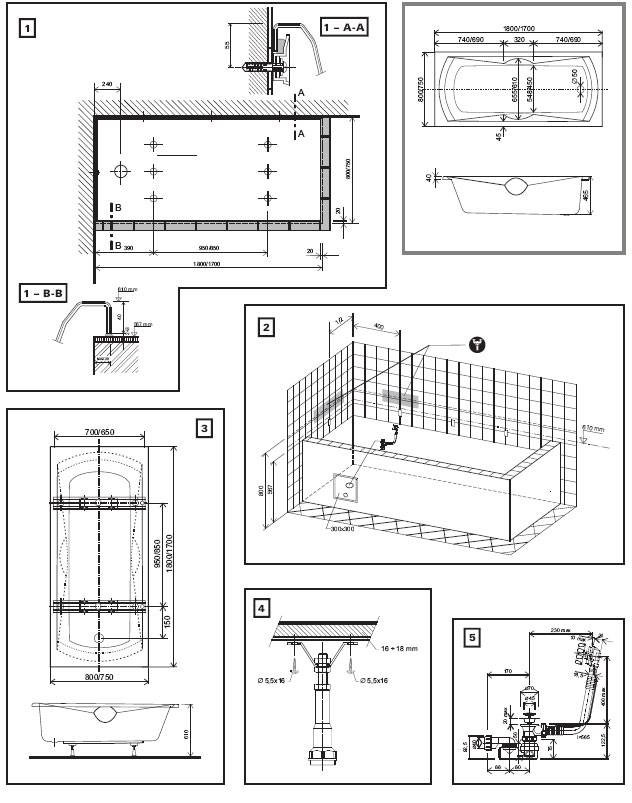
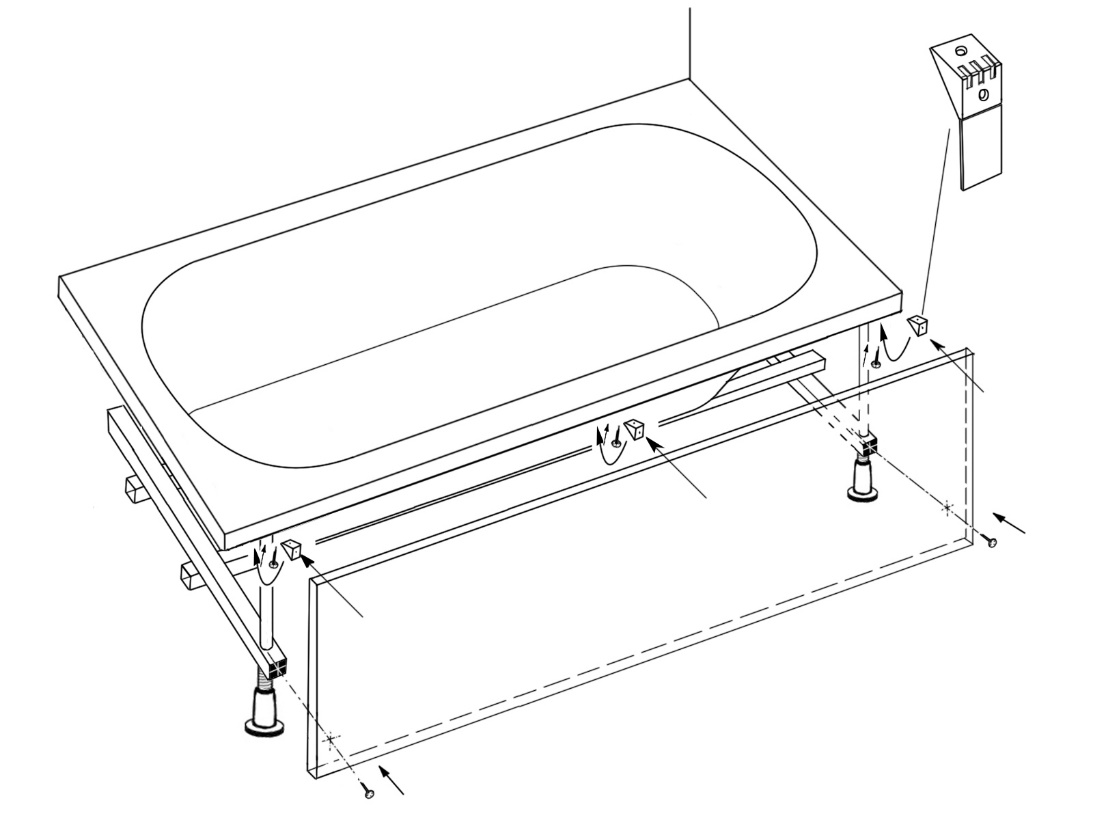
Step-by-step instructions for installing an acrylic bathtub on a metal frame
There is nothing complicated in installing an acrylic bath on a frame with your own hands. Having previously assembled the metal frame, you can proceed to attach it to the bath.
Stage one - markup:
- Turn the tub upside down and secure it well so it doesn't wobble. Thus, you will avoid the formation of chips and cracks on the acrylic surface of the bath.
- Carefully attach the assembled frame to the bottom of the bathroom and mark with a pencil the location of the holes for the mounting screws.
Try to draw as accurately as possible the longitudinal line of the bathroom and the axes perpendicular to it for subsequent fastening.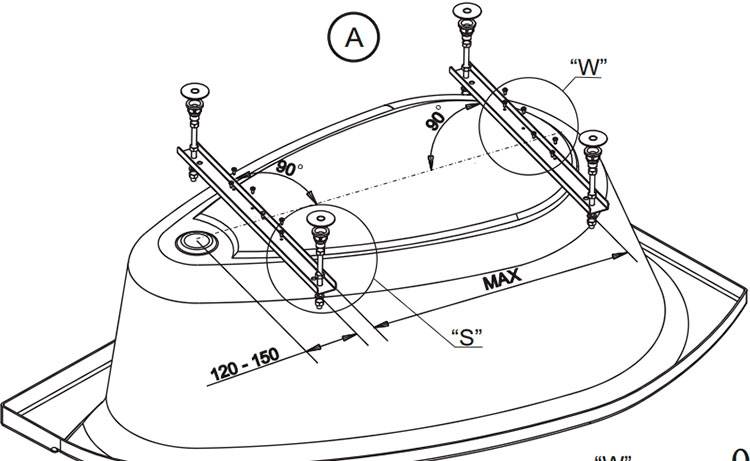
Stage two - drilling holes and attaching the frame to the bathroom:
- After all the markings have been made, holes are drilled exactly according to the marks in the bottom of the bathroom to a depth of 7-10 mm and a diameter of 3 mm.
- Next, we fasten the frame to the bath itself.
Stage three - installation of legs:
When the frame fittings are firmly screwed to the bathroom, you can proceed with the installation of the legs. To do this, with the help of locknuts, we fasten them to the armature. Then we align them in height.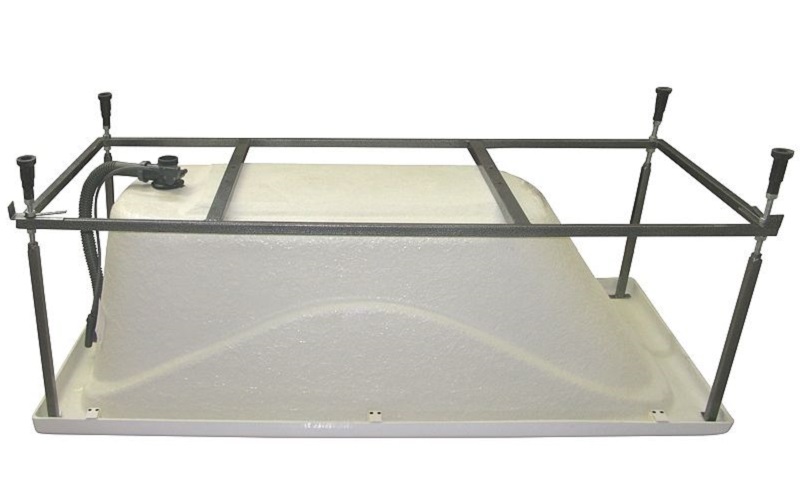


Stage four - bathroom installation:
We move the assembled bathtub with the frame to the installation site, put it on legs and move it close to the wall.
Next, I adjust the height of the legs to level the bath so that it stands firmly on the floor. Perfect alignment can be achieved using a liquid level.
With a pencil we mark the places where the edge of the edge of the bathroom and the wall come into contact. We move the bath to the side and install the fixing strips with an indent along the width of the bath side.
After the mounting strips are installed, we put the bath in place and connect the plumbing and sewage system to it.
Installing an acrylic bath on bricks
Installation of acrylic plumbing can be done on bricks. This option has been popular for many years, and you can implement it yourself. This technology, according to professionals, allows you to securely and quickly fix the acrylic bath at the required height. And in fact, the legs that come with it can be deformed after a few years of operation, and high-strength capital brick supports will last much longer and help maintain the integrity of the bath.

There is nothing difficult in the question of how to properly install an acrylic bathtub on bricks, you only need construction equipment, building materials and mortar. The main stage of work is preparation, including calculations and markup. It is necessary to calculate everything to the nearest millimeter even before buying a bath, taking into account its location and the places where water supply and sewerage are connected.
Having chosen a bathtub and having performed the necessary calculations, bring it in for marking in the room where it will be installed.
The maximum stability of the acrylic bathtub is achieved by laying the base of the back of 19 centimeters and the front - 17. This ratio is a necessary condition for ensuring normal water flow. However, some models offered by specialized shops already take into account this angle of inclination.
After laying, you can safely proceed to the stage of installation work. To increase the stability of the structure, you should use a sealant. For greater reliability and strength, the bathtub can be fixed to a metal profile installed with dowels and self-tapping screws, however, even without this step, the structure will be very durable.
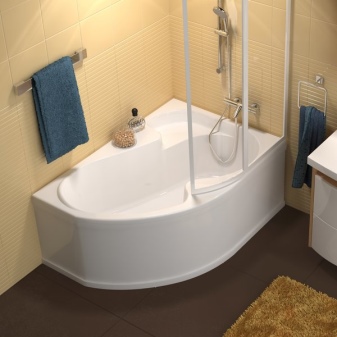
How to install a corner acrylic bathtub
The corner installation differs from the usual one only in the dimensions of the bathroom and the frame. The installation itself is not much different from installing a conventional bath and does not take more time. The corner bath will be more rigid, as they always come with a screen.
The only difficulty will be the preliminary alignment of the corner in which it will be installed. If the angle is slightly more or less than 90 degrees, then the bathtub will not fit snugly against the wall, which means that the mounting strips will soon become unusable and the walls of the acrylic bathtub will be damaged.
So, putting up an acrylic bathroom with your own hands is not so difficult. Light weight and detailed instructions will allow you to assemble it without a master in just an hour.
General recommendations for installing a bathtub
Before starting the installation of the bath, be sure to check the degree of the angle in which the rectangular or corner structure will stand. If there are no clear 90º, then the surface of the walls is leveled by plastering. Sometimes it is easier to beat off the wrongly laid old plaster, and then make a 90º correction.
If this condition is not met, then the right-rectangular design of the bath will become in this corner with gaps, which will require additional sealing of the cracks. This is not always effective in conditions of high humidity, and will not bring aesthetic balance to the design of the bathroom.


The installation of the bath is done after the final finish is laid on the tiled walls. After installing the bathtub with your own hands, the joint between the wall and the side is sealed with silicone or a special elastic adhesive tape is glued, which will seal the gap from water flowing along the back wall.
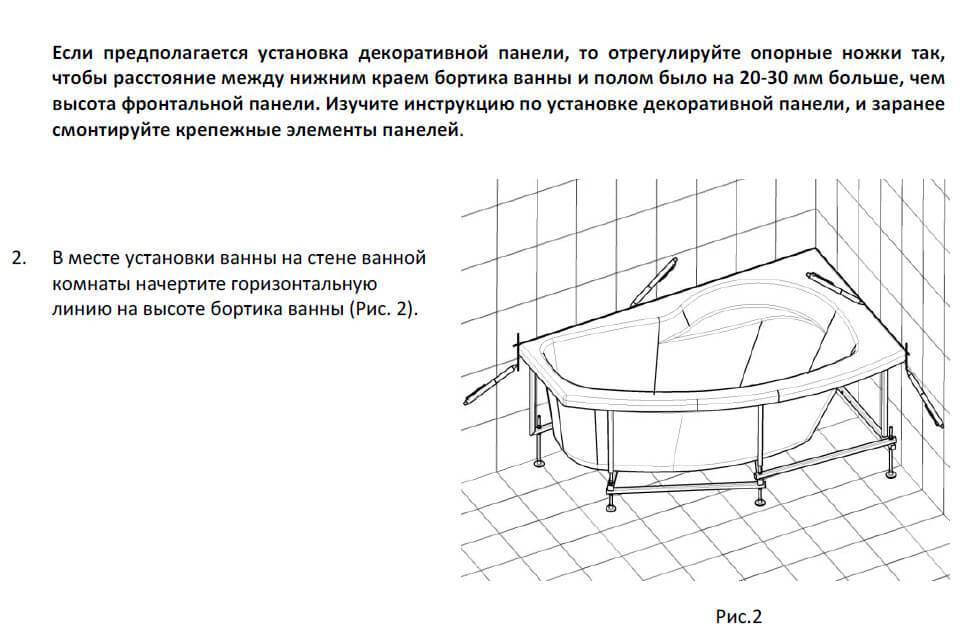
Screen installation is provided with the help of special clips. On the sides of the bath there is a reinforced layer for attaching the upper clips. After their installation, the level is set vertically and the location marks of the lower clips are transferred to the floor, after which they begin to fit the screen.
For the manufacture of the screen, only moisture-resistant materials that do not absorb moisture are used. It can be plastic, moisture-resistant drywall, OSB boards, organic or tempered glass. Red ceramic bricks are also classified as moisture resistant materials. The wooden frame, if it is needed in the structure, must be impregnated with moisture-resistant components or drying oil three times.
Foam bath insulation
Treatment of the bottom of the bathtub with foam from the outside allows you to increase the heat-insulating properties of the acrylic material and reduces the noise effects of beating jets to zero.
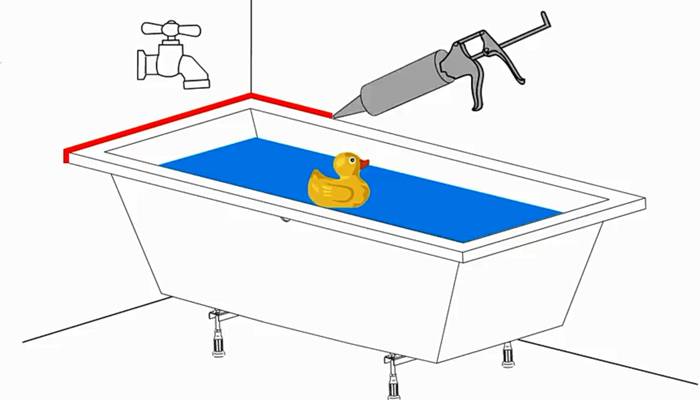
For this purpose, you will need a mounting gun and three or four cylinders of mounting foam. You can use such a can of foam, for which you do not need a gun, the foam is released by pressing a button. The bath is foamed in an inverted position with a fixed metal frame and legs. Before applying the foam, the surface is moistened with a brush or cloth.
The foam is distributed evenly over the bottom and walls, given that after the foam dries, its volume will double
Carefully mount the foam around the drain hole and the adjusting bolts of the legs and frame. After the procedure, the foam will dry for 20 hours, then the bath can be installed
Features of choosing a bath
When buying a bath, pay attention to the presence of a manufacturer's certificate and the material of the bath. It is advisable to purchase products from cast acrylic, and not in a combination of plastic and acrylic, which is lower in quality. They buy bathtubs of famous world brands that have proven themselves in terms of durability and product quality.
They buy bathtubs of famous world brands that have proven themselves in terms of durability and product quality.
Turkish and Chinese fakes, although they are cheaper, are of poor quality and last a short time. Before going to the store, they measure the free space for installation, so as not to be mistaken with the dimensions of the product.
Do-it-yourself bath installation is available to a skilled owner and will save significant funds.
Screen types
Dimensional factory standard - 70 x 50 cm.The parameters of non-standard panels vary between 75 - 120 cm in length and 40 - 60 cm in height. The factory equipment includes a frame, legs and fasteners. The structures are divided into three groups.


Sliding screens
These are two or three sections that move apart in different directions of the doors. The benefit of decorating is obvious and does not need additional advertising. Retail offers a sliding mechanism on rollers and panels on skids.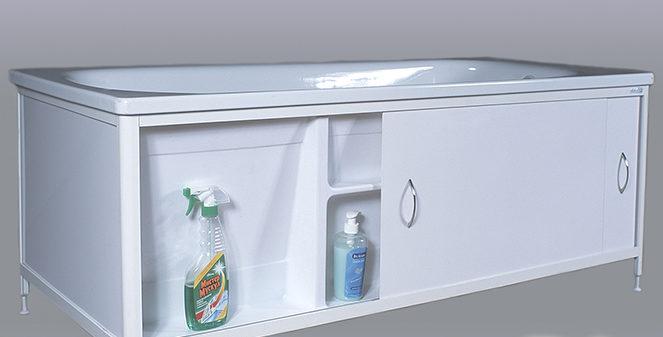
hinged screen
Hinged or folding screens are a rare option. It is made according to individual projects. Hinged/hinged doors require a lot of space. In conditions of small apartments, there is a shortage of square meters. Therefore, doors that swing open outward are a luxury.
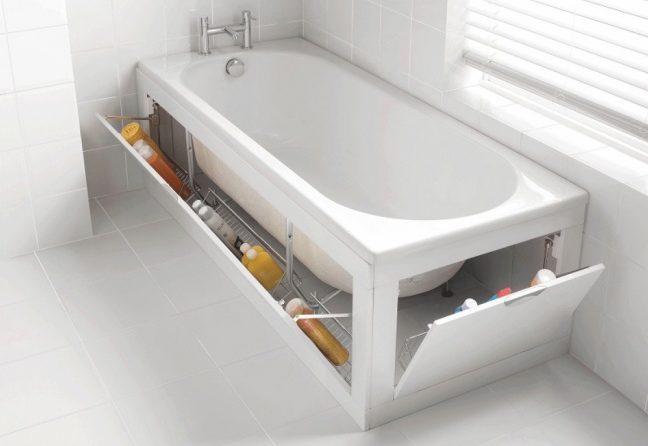
blank screen
Deaf - monolithic stationary structures of factory or independent production. Installed under heavy plumbing made of cast iron or steel.