
- Do-it-yourself Wi-Fi amplifier
- Focus attachment for Wi-Fi router
- We create a Wi-Fi signal amplifier with our own hands
- How to make a repeater from a router
- How to make a repeater from a router
- Why is the repeater not working?
- Wi-Fi extender
- Beer Can Amplifier
- Amplifiers
- Checking the operation of the repeater router and resetting the settings
- Speed testing via repeater
- Network setting via PC
- How TP-Link WiFi router works in WDS bridge mode
- Where to place the repeater
- Turning on and connecting the device
- How to connect an amplifier?
- Why disable WPS
- Helpful Hints
- Setting up the receiver on a laptop or computer
- Homemade antennas
- Router replacement
- Recommendations
- Wi-Fi Signal Amplifiers
- Connecting Chinese repeaters
- Making Wi-Fi signal amplifiers with your own hands
- Applications on the Android OS to turn your smartphone into a repeater
- FQRouter
- NetShare
- Net Share (with a space in spelling)
- General setup scheme
- Additional settings
Do-it-yourself Wi-Fi amplifier
If you wish, you can make a Wi-Fi amplifier yourself from improvised means, thereby saving money. However, it is worth noting that the benefits of such “home-made products” are rather doubtful, and the risk of making the router unusable is very high.Below we will look at the designs of directional signal amplifying nozzles that allow you to amplify the Wi-Fi signal without risking the “health” of your router.
Focus attachment for Wi-Fi router
The Wi-Fi router signal propagates in a circular pattern - as it moves away from the source, it deteriorates, and when it goes beyond the reliable reception zone, it begins to break off. If necessary, the signal can be focused and transmitted in the right direction, where the coverage of the router is not enough. To make a focusing nozzle, you will need copper wire with a diameter of 0.8 to 1 mm and a piece of plastic or thick cardboard.
The assembly of the nozzle is carried out in the following sequence:
Such a nozzle gives up to 10 dB of gain, while the diagram takes on a directional shape, that is, the Wi-Fi signal is stably broadcast for the most part only in one direction.
We create a Wi-Fi signal amplifier with our own hands
There are many needleworkers who have created amplifiers on their own. Let's look at the most common and working options. You can make such Wi-Fi signal amplifiers with your own hands in just 10 minutes from improvised materials.
The very first and easiest option is to use a disc box. It has the perfect radius for our purpose. So, we take the CD BOX and cut off the spire, but not completely. It is necessary to leave about 18 mm. Now, with a file on the spire, we make small cutouts for fastening.
The next step is to create copper squares. We are looking for a wire 25 centimeters long and make two squares out of it by bending the ends. These copper structures are analogous to the antenna, we fix them on the spire of our disc box and glue them.
The ends of the antenna must be soldered together and soldered to the coaxial cable that leads to our modem.At the bottom of this setup, place a CD that will act as a reflector here.
How to make a repeater from a router
Having correctly configured the device, the owner will be able to use the router in. Some router models have a mode switch button, which greatly facilitates the transition process. In the absence of such a change occurs in the Internet menu. The presence of a second router allows you to independently make a repeater.
This problem can be solved by changing the signal transmission channel on the main transmitter. After making changes, you must save the new settings. After completing all the steps, a bridge is created between the two devices using a wire. These simple operations allow you to quickly make a wireless repeater from an old router.
How to make a repeater from a router
The repeater mode is most successfully implemented in Zyxel and Asus routers. Everything is very easy to configure through the web interface and works flawlessly.
In order to turn the router into a repeater, you need to change its mode of operation. For some devices, such as the Zyxel Keenetic Lite III, the operating mode is changed by a switch on the rear panel. In this case, you just need to select the "Amplifier" or "Repeater" mode. If there is no such switch, we change the operating mode through the web interface.
We enter in the browser the address of your router (usually 192.168.0.1 or 192.168.1.1) and your username and password. If you have not changed the default settings, information about these parameters can be found on the sticker at the bottom of the router. If you have any difficulties at this stage, check the documentation for your device or look for a manual on the Internet.
We will assume that you have successfully logged into the web interface. Now we need to find the menu item we need.
In Zyxel routers, you need to go to the "System" tab and select the "Mode" item there. Here we put a tick in the item "Amplifier - Wi-Fi zone extension", save the settings and reboot the device.

Everything, it's done. However, there is one "but".
After enabling the repeater mode, you will not be able to enter the web interface of your router at 192.168.0.1. The web interface will not be available over Wi-Fi or cable. Because the repeater receives an IP address from the main router that distributes the Internet, and this address is different from the default address.
To find out, you need to go to the main router and see the list of devices connected to it. Among them will be your repeater. Here you can also see its IP and, if necessary, enter the settings.
So, the repeater mode is activated. There is only one thing left - to connect the repeater to the main router that distributes the Internet in your apartment.
To do this, press the WPS button on the main router and on the repeater router. It is available on almost every modern router. If it is not there, WPS mode can be activated in the web interface of the device.
After pressing the buttons, you need to wait a bit. The Wi-Fi indicator will blink for a while until a connection is established. The Internet connection (WAN) indicator should light up on the repeater. Open the list of available networks on your laptop or smartphone and check the signal quality.


On Asus routers, setup is done in the same way. In the settings, find the "Administration" tab, and in it - the "Operation mode" item. Select "Repeater Mode" and click "Save". This will open a list of available wireless networks. Select the one you want and enter the password. The repeater will connect to the network.
If you want to disable the repeater mode, you can do it in the same place, in the operating mode settings. Of course, after finding out the new IP of your device. If this method does not solve the problem, you can always use the proven method - reset the router to factory settings using the button on the rear panel.
Why is the repeater not working?
In cases where a wireless Internet network is organized using two routers, a problem may arise in the operation of the router in repeater mode. If he does not want to copy and transmit the Internet signal, you must follow these steps:
- Check IP addresses for conflict. Change the IP address of the router operating in repeater mode.
- Check the signal transmission channel. It must match on both devices. You can solve the problem by choosing another channel.
- Check that the WPS and DHCP options are disabled on the extender.
- Make sure that the types of encryption match, as well as the correctness of the entered user password.
If performing these steps does not lead to the desired result, you need to reset the settings and also check the compatibility of the devices. A conflict may arise between different models of routers, which prevents the correct organization of the wireless network. In the absence of proper experience in this area, you can contact the manufacturer of the router. And it is best to call a professional wizard who will properly organize and configure the wireless Wi-Fi network. All providers supplying a signal to subscribers have such a specialist.
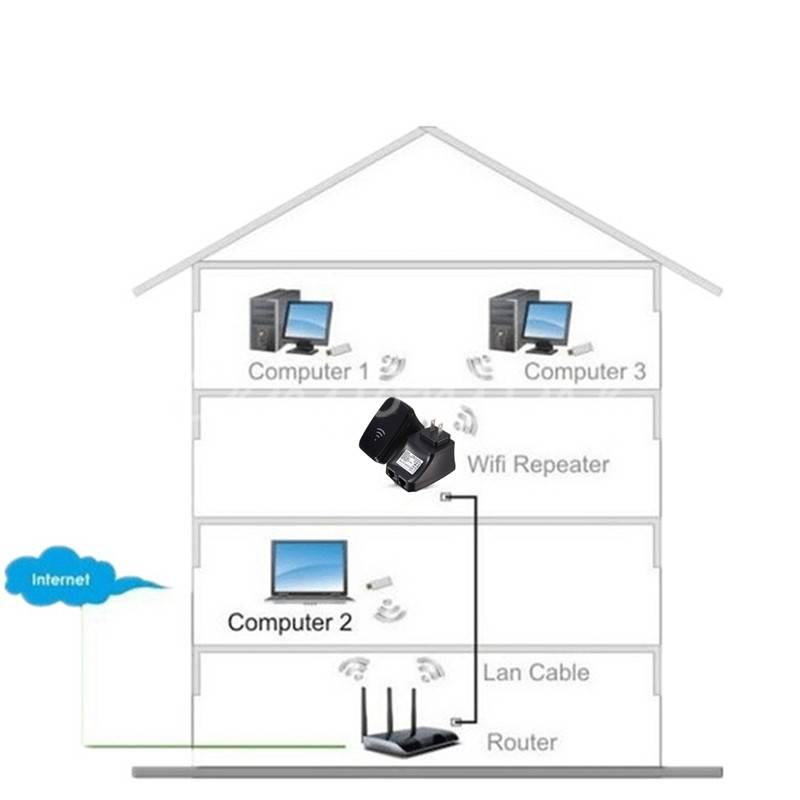
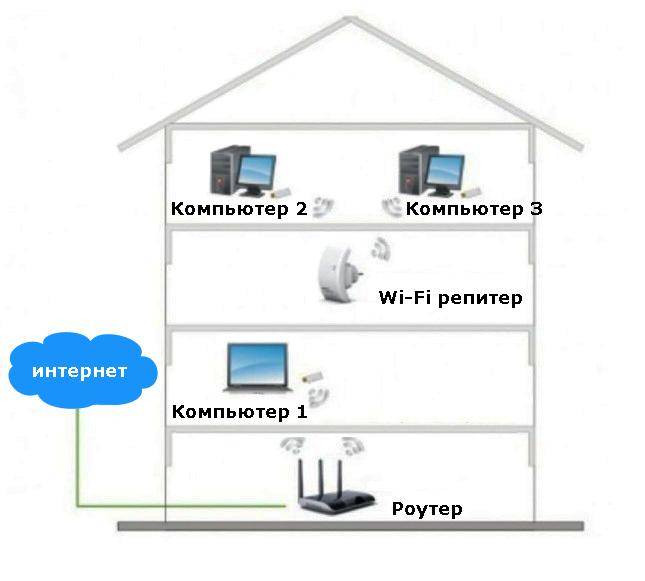
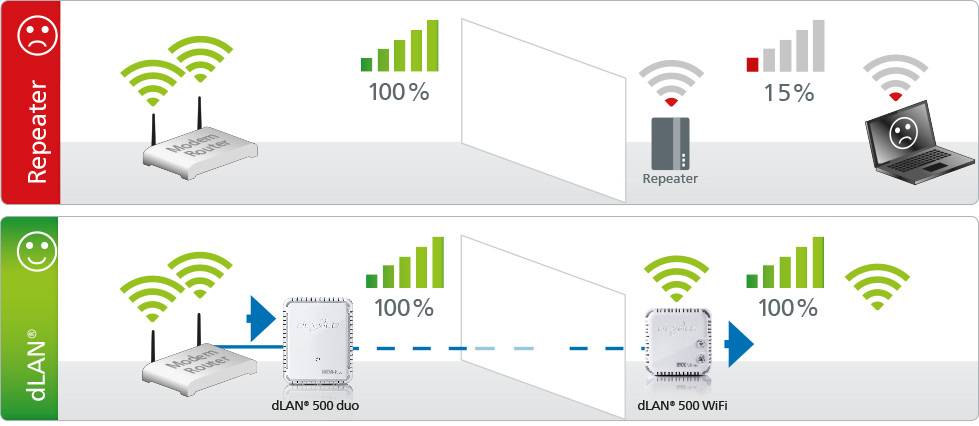
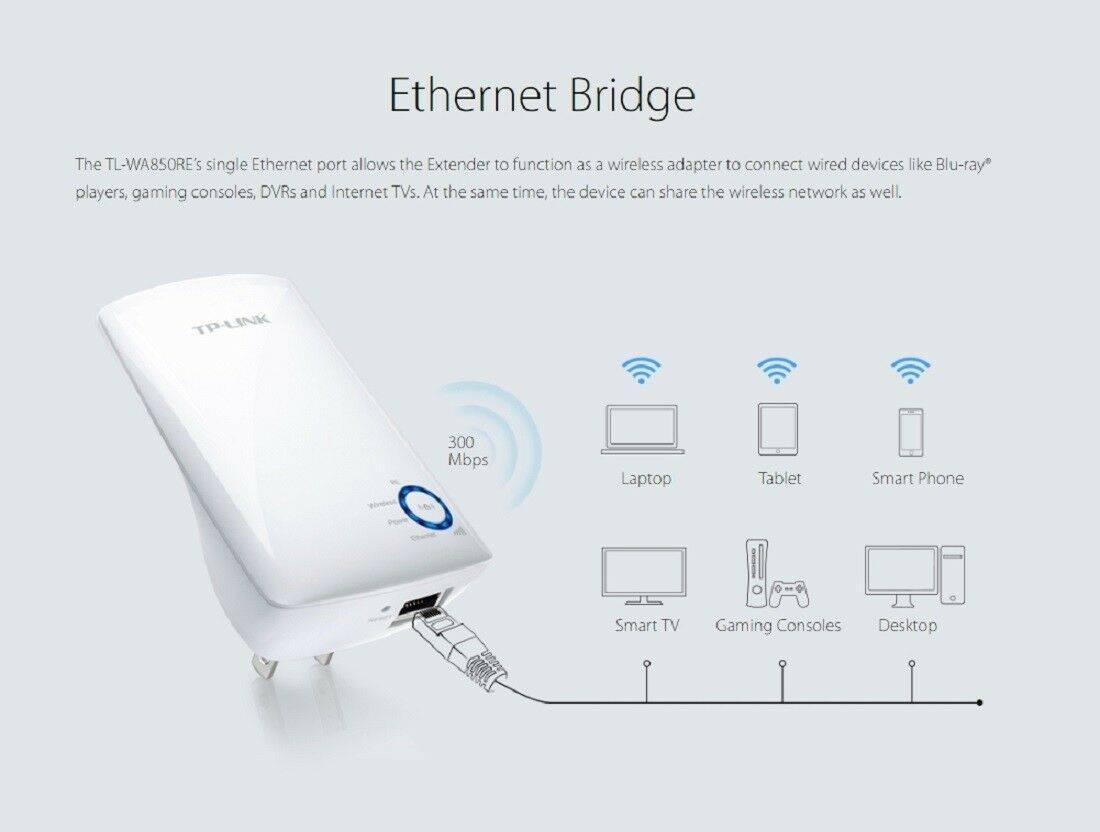
Wi-Fi extender
Important! It's very easy to damage a Wi-Fi cable.
It is advised to handle it with care
As for extension cords, unlike the amplifiers presented above, they work in a slightly different way. To make it easier to learn and understand the nature of their functioning, you should know that they do not require a special Wi-Fi cable as such. It is most often used in amplifiers.
The extension cord is able to function much more elegantly and simply. In a particular case, the device transmits a good signal from one part of the room to another, but it should not be located directly in the area of \u200b\u200bthe maximum effective range of the router. The principle is fundamentally different from the antenna method.
Extension cords in their work use only electrical wiring that is used in a building or structure. These wires transmit the signal from the distributing Wi-Fi equipment. In this case, you need to manually connect one part of the extension cord to an electrical outlet near the router, and the other to the place where you want to improve the connection quality. That is, in a place where the user plans to engage in work or entertainment on the Internet. In addition, you can connect any device directly using the Ethernet port.
As can be seen from the diagram, one part of the extension cord needs to be connected in the children's room near the router, and the second - in the kitchen electrical outlet, where the user spends a lot of time on the global network.
Note! However, like any other device, the extension cord has negative qualities. The most notable among them is the low level of signal reliability and stability.
You can have a video chat conversation at high speed, and after a few seconds, the connection can be disconnected, which is disappointing.
Beer Can Amplifier
In this case, we will focus not so much on the amplifier as on the signal reflector. The principle of the following design is based on concentrating the receive / transmit signal in a specific direction. That is, in order to get a stronger signal, the antenna will need to be directed to a place where the wi-fi signal is weak.
So, first, find an iron can of any size, cut off the bottom and almost completely the top. But do not cut the upper part to the end, leave a small mount on the side of the hole. The antenna of the router will enter this hole.
So we get a cylinder that needs to be cut along, directly opposite the hole in the top of the can. So we got a smooth oval surface that perfectly reflects the waves. Put this whole structure on the antenna of the router and turn it in the direction where you need to amplify the wi-fi signal.
It should be noted that the efficiency of this method is somewhat lower compared to the previous one. In this case, we do not amplify the signal in any way, but only concentrate it in one direction. It will most likely become weaker elsewhere in the room.


Amplifiers
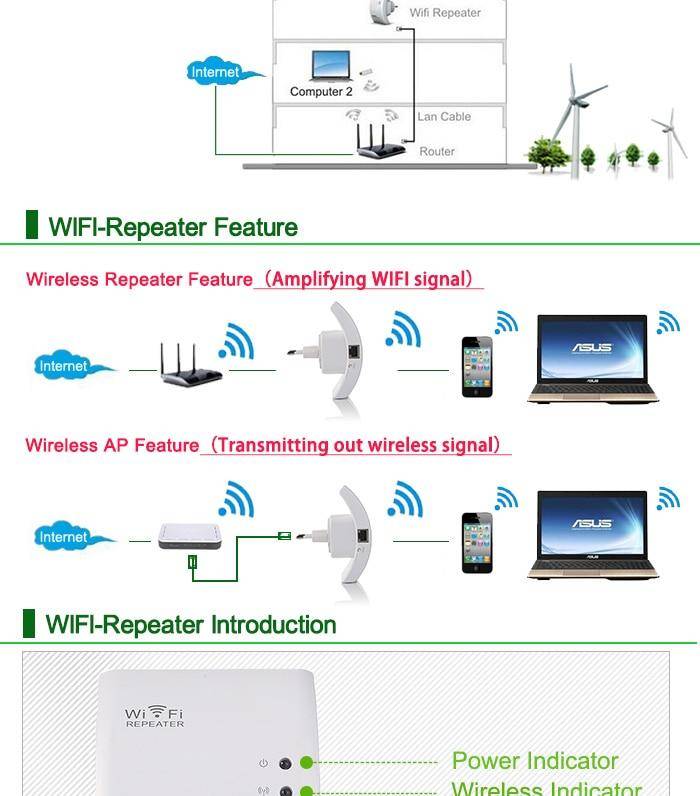
There are two ways to help boost your Wi-Fi signal. router or modem - software and hardware.
You can start with hardware, since they are considered the most effective ways. These include the following equipment, which has the ability to lengthen and improve the signal with better pickup without interfering with system and software settings:
- Repeaters;
- Antennas;
- Reflectors;
- Routers.
Important! The principle of operation of the listed equipment is to influence electromagnetic waves, which actually improves and amplifies the received signal.There are special amplifiers that plug directly into a power outlet or via a USB cable to a router.
Which one to choose is up to the user to decide.
There are special amplifiers that plug directly into a power outlet or via a USB cable to a router. Which one to choose is up to the user to decide.
The positive side of hardware equipment to improve the signal is the ability to increase the speed of the Internet for all devices that are connected to the home network.
As for the first method, software, today there is no program with which one could really improve the quality of the received signal on the phone. There are special applications that allow you to control the quality of communication, that is, they directly transmit data to the user about the level of the received signal. That is, with their help, you can choose a place with the best level of communication. Some programs may automatically switch to a station with a better information rate. On this, the possibilities of such software methods are exhausted.
To choose the best Internet signal booster for your phone, tablet or any other device at home, you need to know the main differences and types of equipment presented. Such devices can be external and internal, active and passive, have repeaters or simply an antenna connected directly to the router.
All amplifiers, according to their parameters and characteristics, are divided into the following two types:
- Active. Such devices operate using a signal amplification method that uses amplifying equipment (repeaters, amplifiers, repeaters, and others).
- Passive.This type is a way to amplify the communication signal, in which there is no active amplifying device (based on the use of various types of antennas and a passive repeater).
Checking the operation of the repeater router and resetting the settings
To properly test a router operating in Internet signal repeater mode, experts recommend using software designed specifically for such purposes. At the moment, wi-fi Analyzer is considered the most popular analysis program. It features an intuitive menu, ease of operation, and a set of high-quality diagrams. Such advantages allow almost all owners of routers to use such software.
In cases of building a wireless network using two routers, it may be necessary to reset the settings. To do this, follow these steps:
- Go to the main menu of the System tools device.
- Go to the system tools section.
- Find factory defaults.
- Carry out a reset using the corresponding button.
If it is not possible to open the main settings menu, a mechanical backup is provided using a recessed button on the rear panel of the router. To press, select a thin object, and hold in this position for at least 10 seconds.
Speed testing via repeater
After the introduction of repeaters to the modern computer market, users have an urgent question about the effect of these devices on the speed of the Internet. To give the most complete and reliable answer to this topic, many experts conducted a whole range of tests using the AIDA 32 Network Benchmark program, which included the following activities:
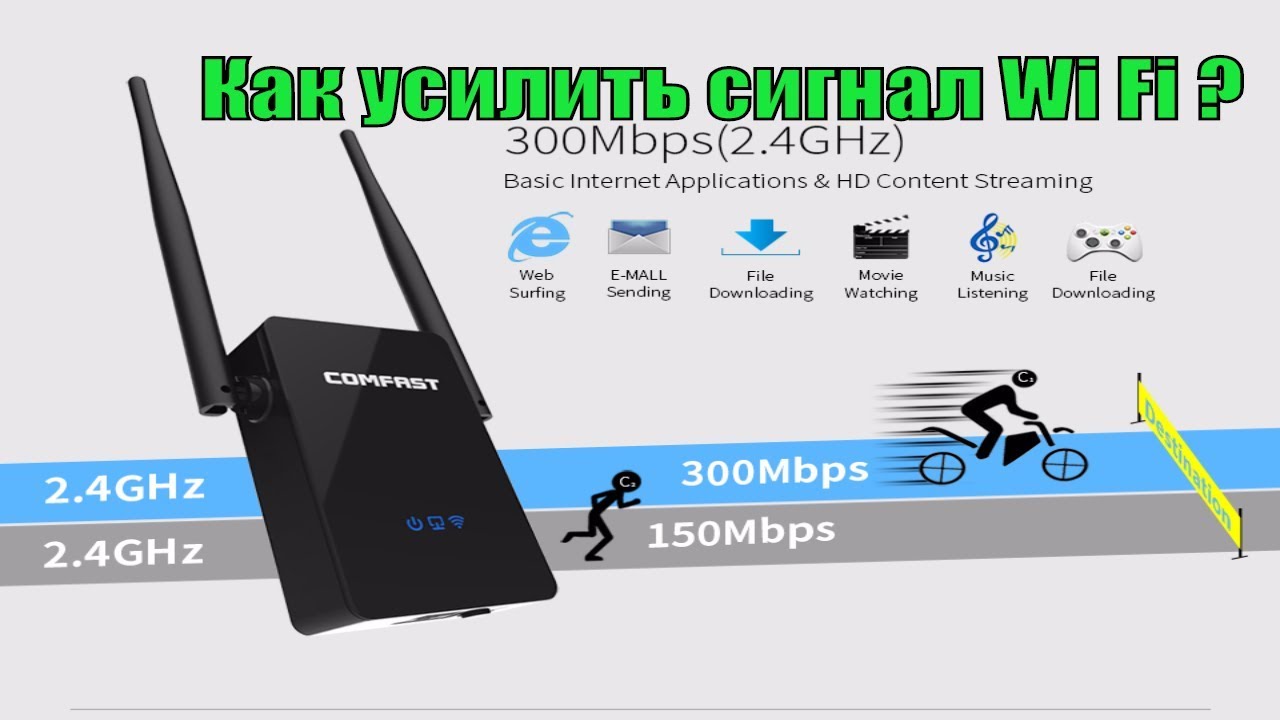
- Checking the speed in normal operation mode, the computer is connected to the router, there is no signal repeater. The speed was 17 Mbps.
- The computer connection was left in the same form as in the first test, but a laptop was added to the network, which has a connection to a signal repeater. The speed dropped to 12.5 Mbps.
- The laptop was connected directly to the router, and the computer through the repeater, the devices were connected to each other using a patch cord. The signal is notable for its stability, but the speed dropped to 8.5 Mbps.
- The last test was to simultaneously connect a computer and a laptop to a signal repeater, while for the purity of the experiment, both wired and wireless connection methods were used. The signal is good, but the speed fluctuates very much, constantly changing its values, the highest figure reached 37 Mbps.
After analyzing the results of the tests and comparing them with each other, we can conclude that the presence of a repeater in the network somewhat reduces the speed, but in some cases this measure is justified, since this device amplifies the signal.
Also, as can be seen from the test results, the best rates of maintaining speed were recorded when connecting a computer and laptop to each other using a signal repeater and excluding the router from this scheme.
Network setting via PC
This method is recommended to be used only when the user does not have the opportunity to open the router settings.
Below are the setup instructions:
- Open the Start menu.
- In the search bar, enter "Control Panel".
- Next, in the search bar in the upper right corner, enter "Network and Sharing Center". Also, this tab can be found without searching by going to the "Network and Internet" tab. The names may differ depending on the version of Windows.
- After that, you need to open the "Change adapter settings" tab.
- Select the network whose settings you want to change and double-click to open the network menu.
- The window that opens will provide up-to-date information about the state of the network and its main characteristics. Then click on the "Properties" tab.
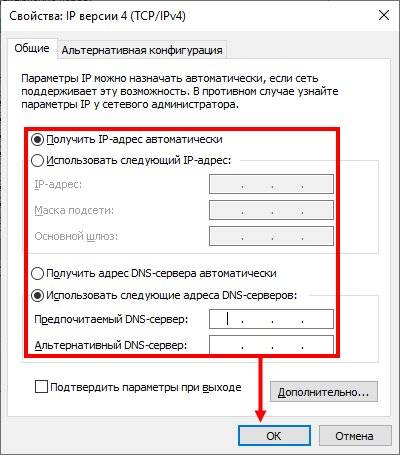
- We find the section "IP version 4 (TCP / IPv4)". On each version of Windows, the name of this protocol may differ.
- Next, double-click to open the protocol menu and select the items “Obtain an IP address automatically” and “Obtain DNS server address automatically”.
Also, if there are other connections, it is necessary to configure them in the same way.
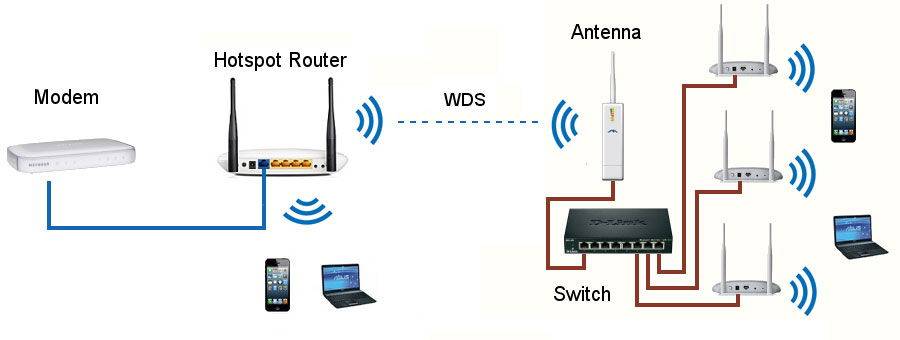
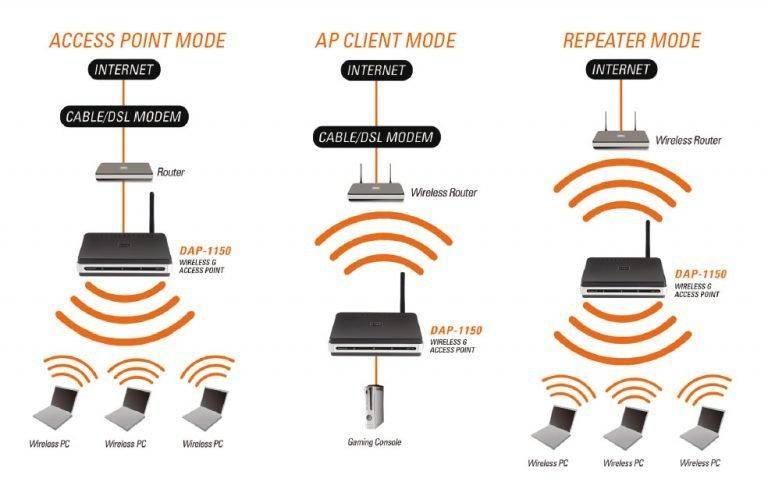
How TP-Link WiFi router works in WDS bridge mode
TP-Link routers are an example where the WDS wireless bridging function is combined in one setting with the repeater (repeater) mode. This can cause confusion.
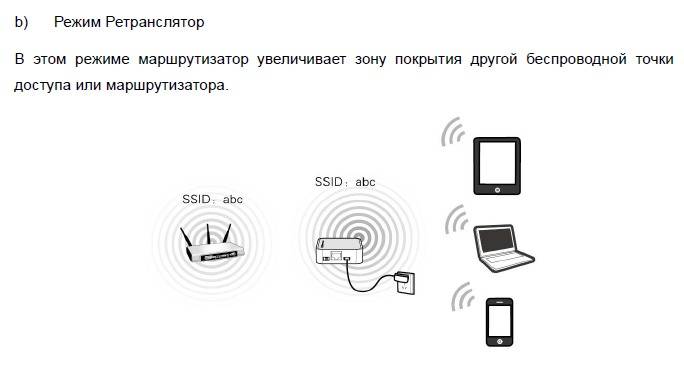
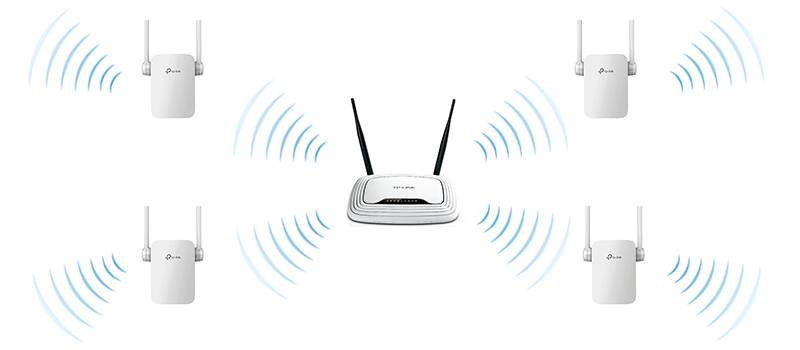
In their purest form, they differ in that when using the router as just a wifi repeater, it will only extend the existing signal. You will see one single network on your phones and laptops everywhere in the reception area, as if only one router is working, only very powerful.
The WDS bridge implies that the second router will also relay its own wireless network, which will have its own SSID, and, accordingly, its own password from it.At the same time, these networks will not be interconnected in any way, except for the common Internet. You can see two connections at once from your phone or computer and select any of them to access the Internet. But to work with a local network, you need to join exactly the one to which all other devices are connected.
In addition, in bridge-WDS mode, TP-Link is able to transfer the Internet to a device without WiFi support, that is, it works in client mode.
In other models, WDS, WISP and Repeater (Extender) are separated into different sections of the menu.
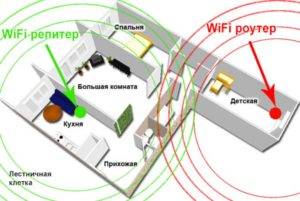
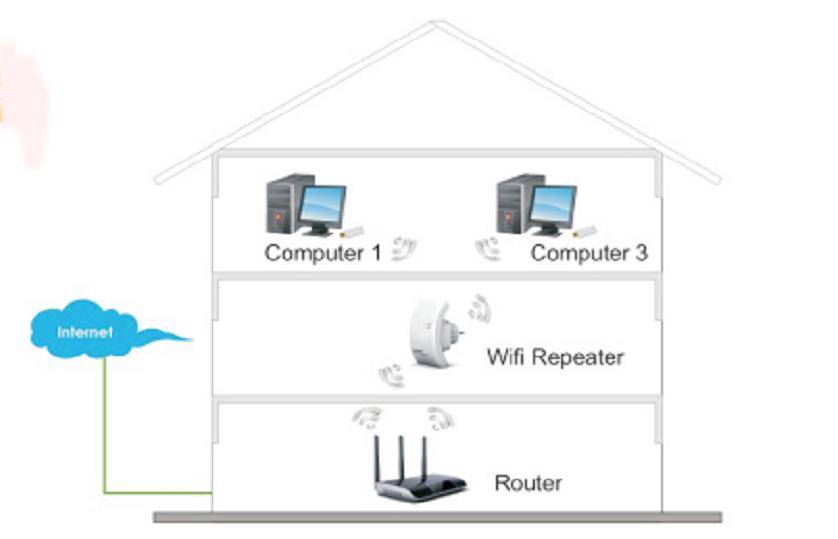
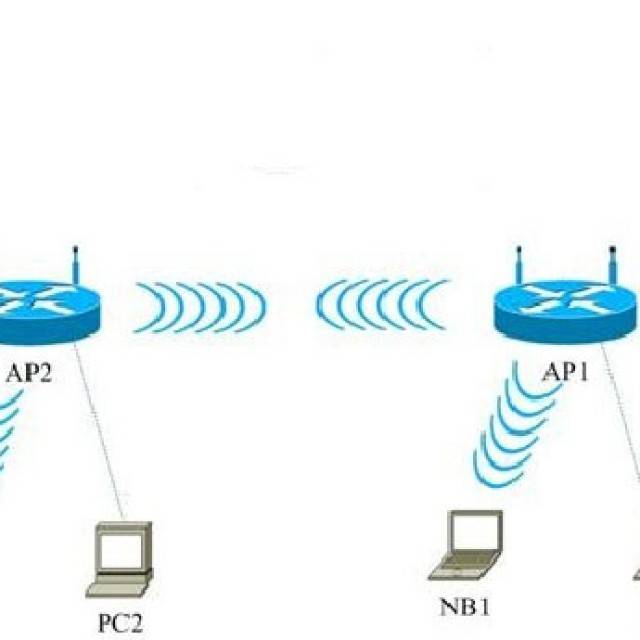
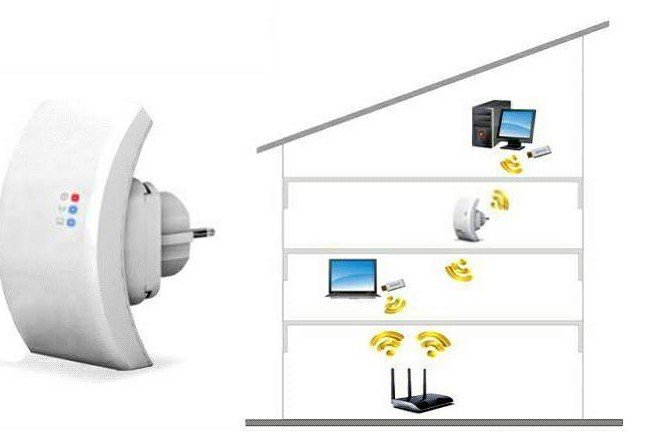
Where to place the repeater
As already mentioned, the repeater only repeats, retransmits the received signal, but does not improve it. Therefore, you need to place a repeater or router in repeater mode in a stable reception area. If you place it where the signal is already weak, the internet quality will be poor.


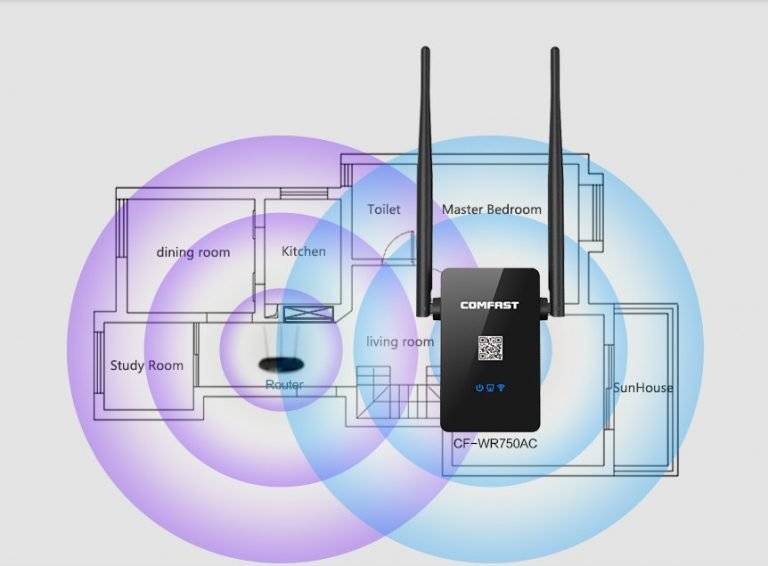
For example, in your apartment, the router is at the front door, in the zone of stable reception - the kitchen, the hallway and the first room. The second room and the loggia are in the weak reception zone, since they are located the farthest. In this case, the repeater should be placed as close as possible to the second room, but always in the zone of stable reception. For example, in the first room. If you install it directly in the second room, you will see that the Wi-Fi signal is 100%, however, the Internet will still work poorly.
Applications that can be used to view the Wi-Fi signal level at different points in the apartment are described here.
Finally, it is worth noting that fiddling with setting up and using the router as a repeater makes sense if you already have an extra router at your disposal.If there is a question about purchasing a new device, then it would be more correct to buy a repeater separately.
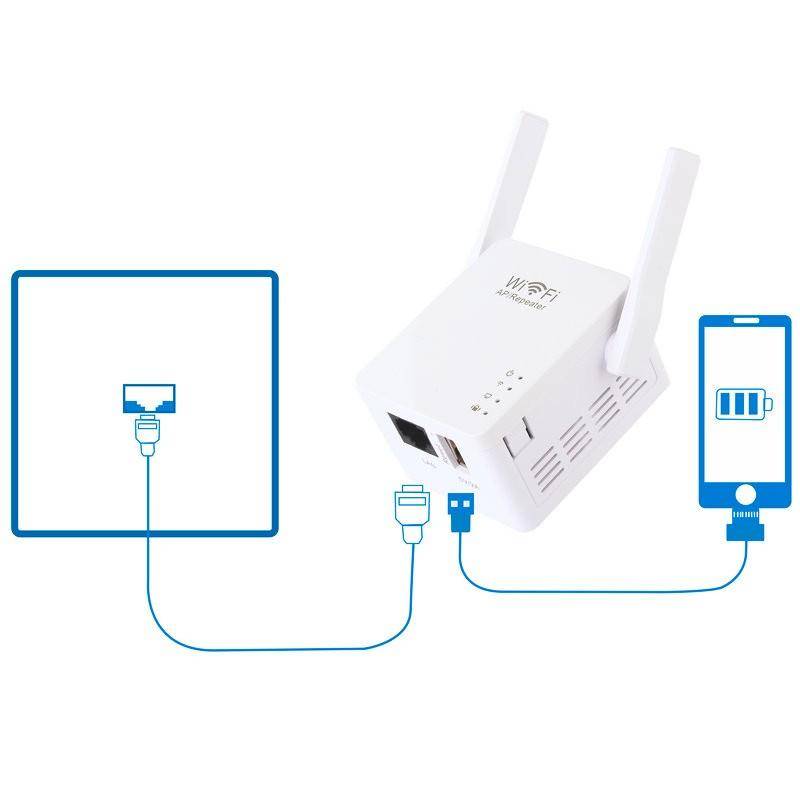
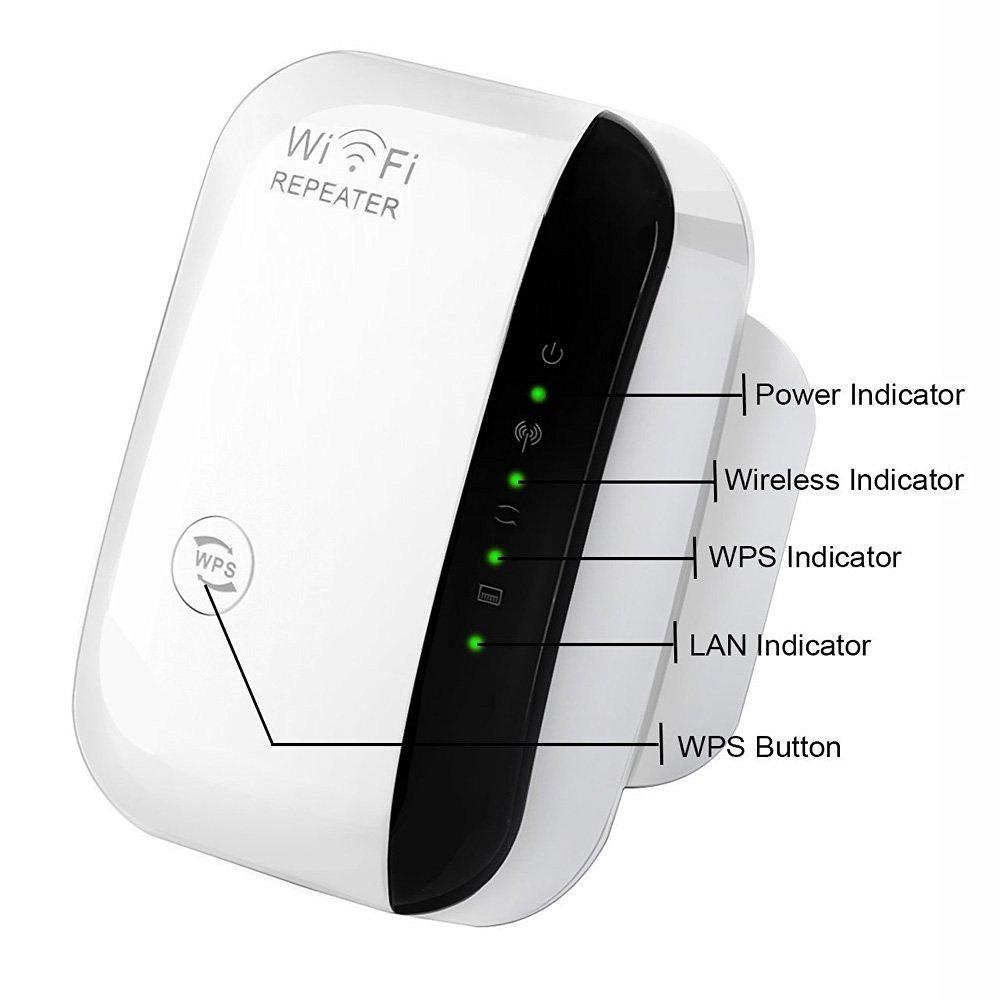
Turning on and connecting the device
A typical repeater plugs into an outlet. The Power LED should light up. The connection with the computer is made over the air, but setting up the device requires a wired connection. There can be two options here:
- connection via LAN cable directly to the router. This method assumes that the repeater itself will take all the necessary parameters and start distributing Wi-Fi.
- connecting the repeater to a computer/laptop and manual configuration.
On some models, there is a power button that you will need to press
Please note that using a repeater, you can distribute the Internet over a wire to a laptop or other device that is not equipped with a Wi-Fi module
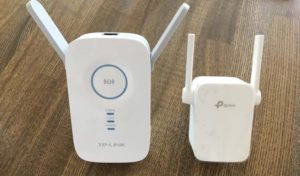
How to connect an amplifier?
A modern repeater is a small device that plugs into an outlet and amplifies the signal of the router. The kit, as a rule, includes the WiFi repeater itself, an RJ-45 cable and an adapter. There should also be instructions with instructions on how to properly configure the WiFi repeater. Information is most often provided in English or another language, which creates a number of difficulties for the user.

The repeater increases the coverage area by amplifying the signal, but first you need to install it and “tie it up” to the router. Connecting a WiFi repeater does not require special knowledge and takes a few minutes. The algorithm is this:
- install the device in an outlet near a PC or laptop (horizontally or vertically);
- note that when you turn it on for the first time, the indicator lights up, signaling the power supply;
- wait a while for the device to "warm up";
- connect the amplifier to the router.
This completes the preliminary steps. For more information on how to set up a Wi-Fi repeater, we will consider the instructions below for two options - if the WPS button is provided or not.
Why disable WPS
Despite a lot of advantages for uninformed owners, WPS significantly reduces the degree of security of a wireless network. Any intruder can hack into the local Wi-Fi network, which will open access to a personal computer, personal information, and information about the user's payment cards. To implement hacking today, you can find a lot of programs on the global network. Using the large WPS (Wi-Fi Protected Setup) vulnerability, any novice hacker can download a cracking program and gain unhindered access to the selected network. This indicates the need to disable a potentially dangerous feature that reduces the security of Wi-Fi coverage.
Helpful Hints
There are other ways to amplify the signal. Perhaps this is with the help of laptop settings or the use of improvised means, self-manufacturing of the antenna. It is really possible to gain a router without an antenna if you follow simple rules:
- Set it high.
- Do not place near flat metal objects.
- Avoid radio interference.
Setting up the receiver on a laptop or computer
Few people thought about using what means to amplify the wi-fi reception signal on a personal laptop and whether this is even possible. The solution to the problem, not noticed by anyone, often lies on the surface. Often users put their laptop into power save mode to conserve battery life.At home, this is useless, since at any time it is easy to connect the beech to the mains, but wi-fi networks “lose” significantly from this, hence the weak signal. To strengthen it, just change the power settings:
- Open "Control Panel".
- Go to the "Electric control" section.
- Select "High Performance".
Homemade antennas
Many people know how to slightly increase the signal of a wi-fi router with their own hands, without resorting to standard means. Tellingly, the methods work. Increasing the range of the device is possible due to the manufacture of original wi-fi repeater repeaters with your own hands. For this, nothing special is required: the manufacturing scheme is quite simple. You need to take a piece of foil or cut an empty tin can, give them a curved shape and install them behind the router, preferably near the wall, artificially creating a directional wave. Reducing the angle, the waves bounce off the surface of the improvised antenna, the signal is slightly amplified.
Router replacement
Actually, after this, problems are excluded, provided that users do not save on purchases, otherwise they will again have to look for a reason from the outside or engage in “needlework”. It is better to purchase a modern wi-fi router that supports operation at a frequency of 5 GHz, then you can forget about a weak signal once and for all.
Recommendations
There are some general tips on how to set up a router in different modes, including repeater mode:
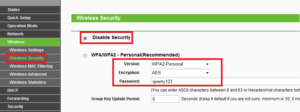
In the Wireless Security - "Security" section, set the protection level to the maximum, that is, WPA2.
- After the first login to the router, it is mandatory to change the password to access the settings of the device itself.Do not allow an attacker to use someone else's network device for personal purposes.
- The password is created based on the following simple requirements: the minimum length is 8 characters; at least one digit - 1,2,3; one capital letter - D, F, G; any special character - $, *, +. The password itself should not contain any personal information about the user.
- If possible, it is better to use a separate device that performs the functions of a repeater. Unfortunately, this is not always convenient, each user himself determines the most convenient option for him.
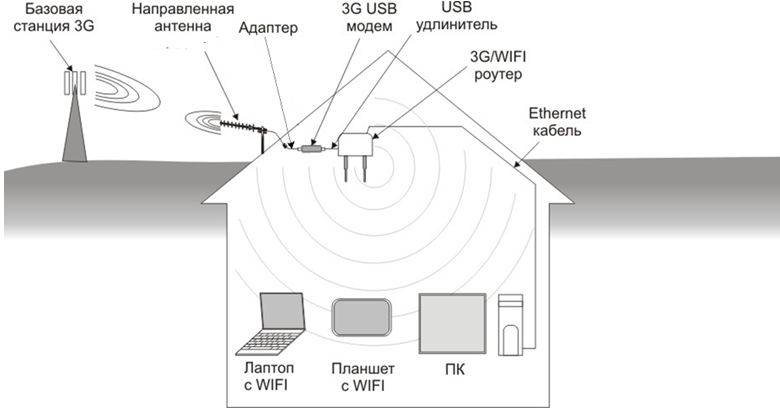
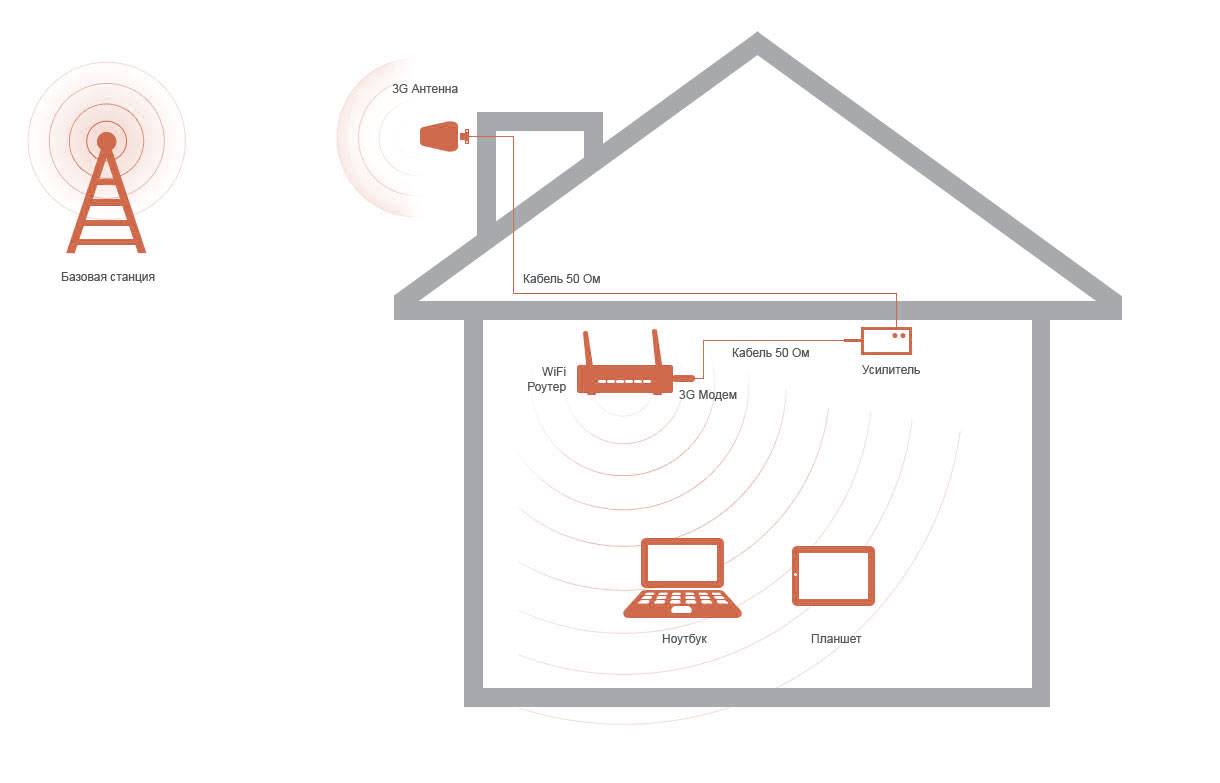
Wi-Fi Signal Amplifiers
There are at least a few ways to make your Wi-Fi signal stronger. The easiest option is to buy a ready-made amplifier. Such a device can transmit a signal through reinforced concrete structures and at a distance of up to 200 meters. In open space, such amplifiers transmit a signal for 2 kilometers. In addition, such devices can receive a signal over long distances. By installing one at home (on the roof), you can catch up to twenty networks, and some of them may even be without passwords. As a result, a Wi-Fi signal booster will allow you to connect to free Internet. This topic is being actively discussed. Indeed, some users whose Wi-Fi does not even reach the door remove the password and make their network available to such receivers.
Connecting Chinese repeaters
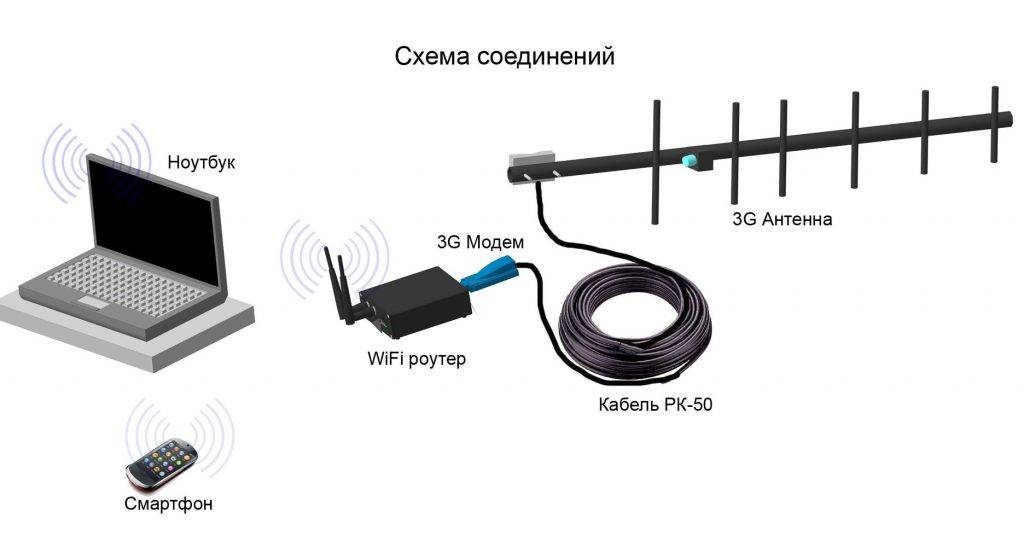
Many users buy Chinese amplifiers in order to save money. This raises the question of how to set up a WiFi repeater from China so that it works correctly. Consider the principle of connection using the example of a standard amplifier.
To connect, follow these steps:
- Plug the product into a power outlet and wait for the operation indicator to light up. Try to keep the device as close to the PC as possible.
- Wait for the indicator to light up if the device connects via WiFi. Otherwise, connect to it with a wire.
- When setting up a WiFi repeater from China, the latter must be within the range of your wireless home network. Click the icon and select Connect.
- As soon as information about the new router appears, click on the link to connect to the network.
After that, the Internet will turn off, and a sign will appear in the PC tray, indicating the successful connection of the amplifier.
Now you can configure the Chinese WiFi repeater. To do this, follow these steps:
- Enter the browser and in the address bar type in the IP of the amplifier, which is indicated on the device itself or in the instructions. As a rule, you need to specify 192.168.10.1.
- Enter the authorization data to enter the control panel. Most often, you need to specify admin twice.

In the menu that appears, set the connection mode in the Wireless repeater mode column. Select Repeater Mode or AP Mode for WiFi or wired connection respectively.


Find your network from several suggested options, then click on it and confirm your choice with the Apply button. If prompted by the system, enter the password.
If the required network is not available, click the update button.
If the setup of the Chinese WiFi repeater was successful, a corresponding message about the connection appears. The interface is no longer needed and can be closed. This increases the signal level.
The instructions discussed above apply to the situation when the WiFi repeater needs to be configured from scratch. The situation becomes more complicated if settings have already been made to the repeater and it is not possible to get into the interface. In this case, you need to configure the PC. For this:
- Turn on the amplifier and connect it to the PC with a cable.
- Sign in to the Network and Sharing Center and navigate to the Change adapter settings section.

Left-click the local network icon and go to the properties section.
In the new window, select TCP/IPv4 and its settings.
Click on the “Use the following IP” checkbox and enter the following data - 192.168.1.111, 255.255.255.0, and 192.168.10.1 for IP, mask and gateway, respectively.
After saving the settings, you can log into the WiFi repeater and use the network normally.
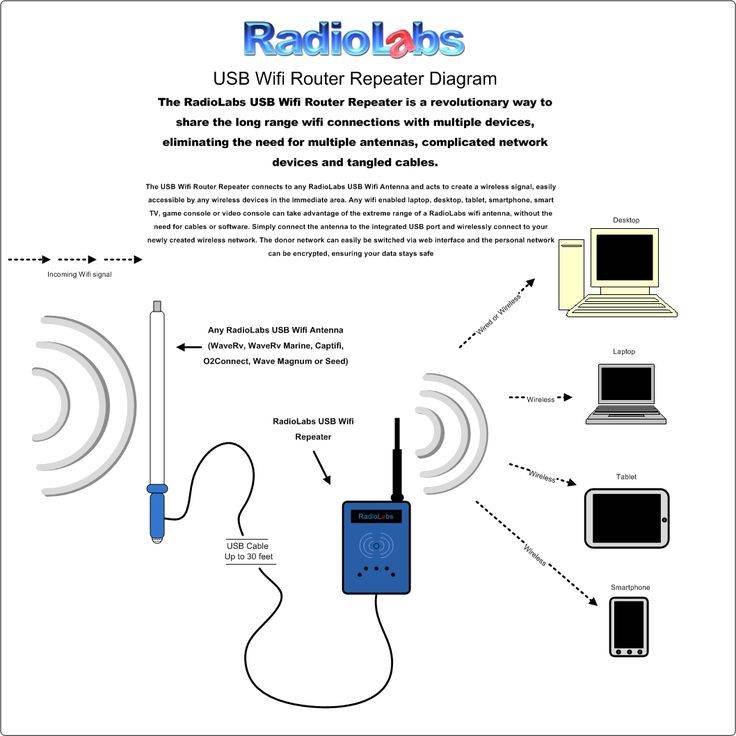
Making Wi-Fi signal amplifiers with your own hands
There is a huge market for Wi-Fi amplification equipment today, but why spend money when you can build a device at home for less money, or maybe nothing at all?
In order to make such an amplifying antenna, you need to take a coaxial cable, a small aluminum sheet, a plastic lunch box, wire and a soldering iron.
- We make two rhombuses from the existing wire, each side of which should be 31 mm long, and one of the corners of each rhombus should be soldered.
- After the rhombuses are ready, we solder their upper ends together so that we get an inverted (upside down) triangle.
- We solder a small piece of wire 5 mm long on both lower ends.
- We attach the copper core of the coaxial cable to the top soldering point, and the metal braid to the bottom.It should be remembered that bad weather and precipitation can greatly affect the performance of the antenna, so we put the device in a sealed plastic lunch box.
To enhance the signal strength and its directional properties, you can additionally make a reflective foil screen.
There are many different reasons why a tablet or laptop does not pick up a Wi-Fi signal well. It is quite possible that the reason lies in the laptop itself, which tritely uses a weak antenna that does not allow you to use the Internet in full force, but most often the problem lies in the router itself. This is easy to check, because if the phone, tablet, and laptop in the house do not catch the signal well, then the whole problem is in the transmitting device. And in general, cheap routers with weak antennas often cannot “break through” a concrete wall. In this case, it sometimes makes no sense to be surprised at a weak signal. To fix the situation, you need a Wi-Fi amplifier. You can make it yourself.
Applications on the Android OS to turn your smartphone into a repeater
There are currently three apps available that have good reviews. Their description and instructions on how to make a WiFi repeater out of a phone using the appropriate settings are presented below.
FQRouter
This software must be downloaded as an apk file, for example, from the w3bsit3-dns.com website. At the time of this writing, a version of the system above 4.0 was required for correct operation, and there is also a list of devices on which the application runs without problems in the forum thread. After saving the file to your phone, you need to follow a few simple steps:

- install the application, for this you may have to allow installation of applications from external sources in the phone settings;
- open the program interface by clicking on the corresponding icon on the desktop of the smartphone;
- go to the “WiFi Repeater” soft button and move it to the “ON” position;
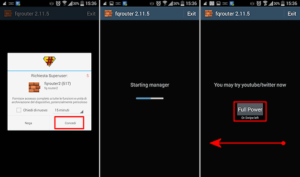
After that, the phone will relay the WiFi network available to it.
Important! In the built-in features of Android, there is an option to enable hotspot mode. It must be remembered that this and the described technology have a completely different principle of operation.
The mode available on the OS allows you to distribute only mobile Internet.
NetShare
This program, thanks to which Wi-Fi is relayed through the phone, is available for installation from Google Play services, therefore, first of all, it must be installed by typing “NetShare” in the search bar, then follow these steps:
- open the application by clicking the desired icon;
- activate the connection by pressing the radio button "START SHARING";
- Three parameters will be displayed in the interface window:
- SSID is the name of the new wireless network.
- Password - the password for it.
- Ip Address - network address of the phone acting as a router.
- Port Number - the number of the port through which data is being transferred.
These values must be used when connecting the client and configuring the proxy server. It must be remembered that after the phone is not used as a repeater, the use of a proxy server on the device must be turned off, otherwise it will not work correctly with other routers.


Net Share (with a space in spelling)
An analogue of the previous program that implements a WiFi repeater for Android works on exactly the same principle.
Difference: it has a paid functionality, in the free version it distributes the Internet for 10 minutes, after which the client needs to reconnect.The motivation behind the use is that this application has a larger list of supported devices.
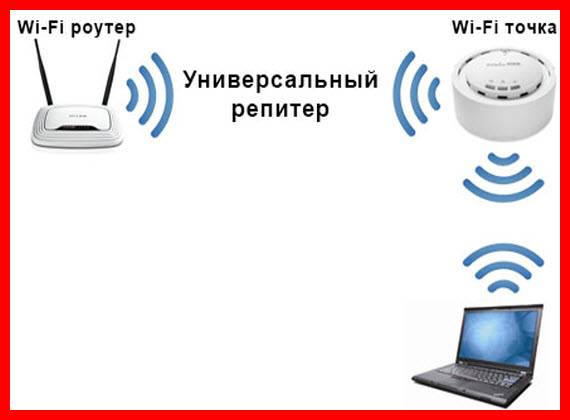
General setup scheme
So, the bottom line is to connect both devices to the same WI-FI network. Setting the router to signal repeater mode will differ for models from different manufacturers. But there is a general approximate configuration scheme.
For a video instruction on setting up the repeater mode on a TP-LINK router, see the following video:
The signal expansion scheme is given using the example of a TP-LINK router, since it contains all the most common parameters for setting up a router in repeater mode.
- We go into the web interface of the router settings, which will distribute the signal. To do this, enter the IP address indicated on the sticker of the device into the address bar of the browser.
- In the windows that appear, enter the login and password, which can be found in the documentation for the device, or also on the sticker (it is located on the modem case). Most often, the word "admin" is used as a login and password.
- We go to the “Wireless Mode” section (it can be called “Wireless Network”, “Wireless”), set the parameter in the “Channel” line (any digital value), remember the entered number.
- We connect a router to the computer, which will work as a repeater. Similarly, we go to the web interface.
- In the "Wireless Mode" section, check the box next to the "WDS Mode" parameter (may be called "Repeater Mode", "Universal Repeater"). Click "Survey" and select your network.
- In the "Channel" field, enter the numerical value that was entered into the distributing router (similar to point 3).
- After connecting to the desired WI-FI network, enter the password for access to it, if necessary, specify the type of encryption.
- Save the changes, wait for the connection process to complete. Both devices after completing all the settings, it is better to reboot.
Additional settings
If you want TP-Link to distribute a network with a different name and password, then just change these settings in the "Wireless Mode" - "Advanced Network" section. There you can change the name (SSID) of the extended network, password, and save the settings. I do not advise changing the protection of the extended network (leave WPA-PSK / WPA2-PSK).
As for the IP and DHCP server settings, after switching the router to the “Wi-Fi Signal Booster” mode, the “Smart IP (DHCP)” operating mode is automatically set in the LAN network settings.
In this mode, TP-Link automatically configures the required parameters. In this case, the DHCP server is disabled, and the main router issues IP addresses. This is how it should be when using the router as a repeater.
An important point: when you connect devices to the LAN port of the router, the Internet will work. This means that in this mode, the router can also be used as an adapter (Wi-Fi receiver) for wired devices (PCs, TVs, set-top boxes, etc.). Since there is no separate “Adapter” mode on these routers (perhaps not yet).


