- Terracing
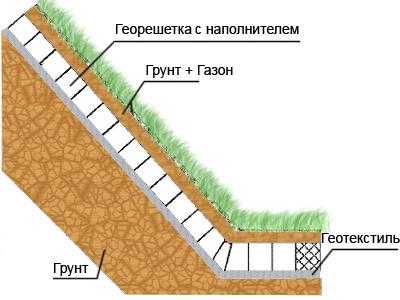
- Geogrid use
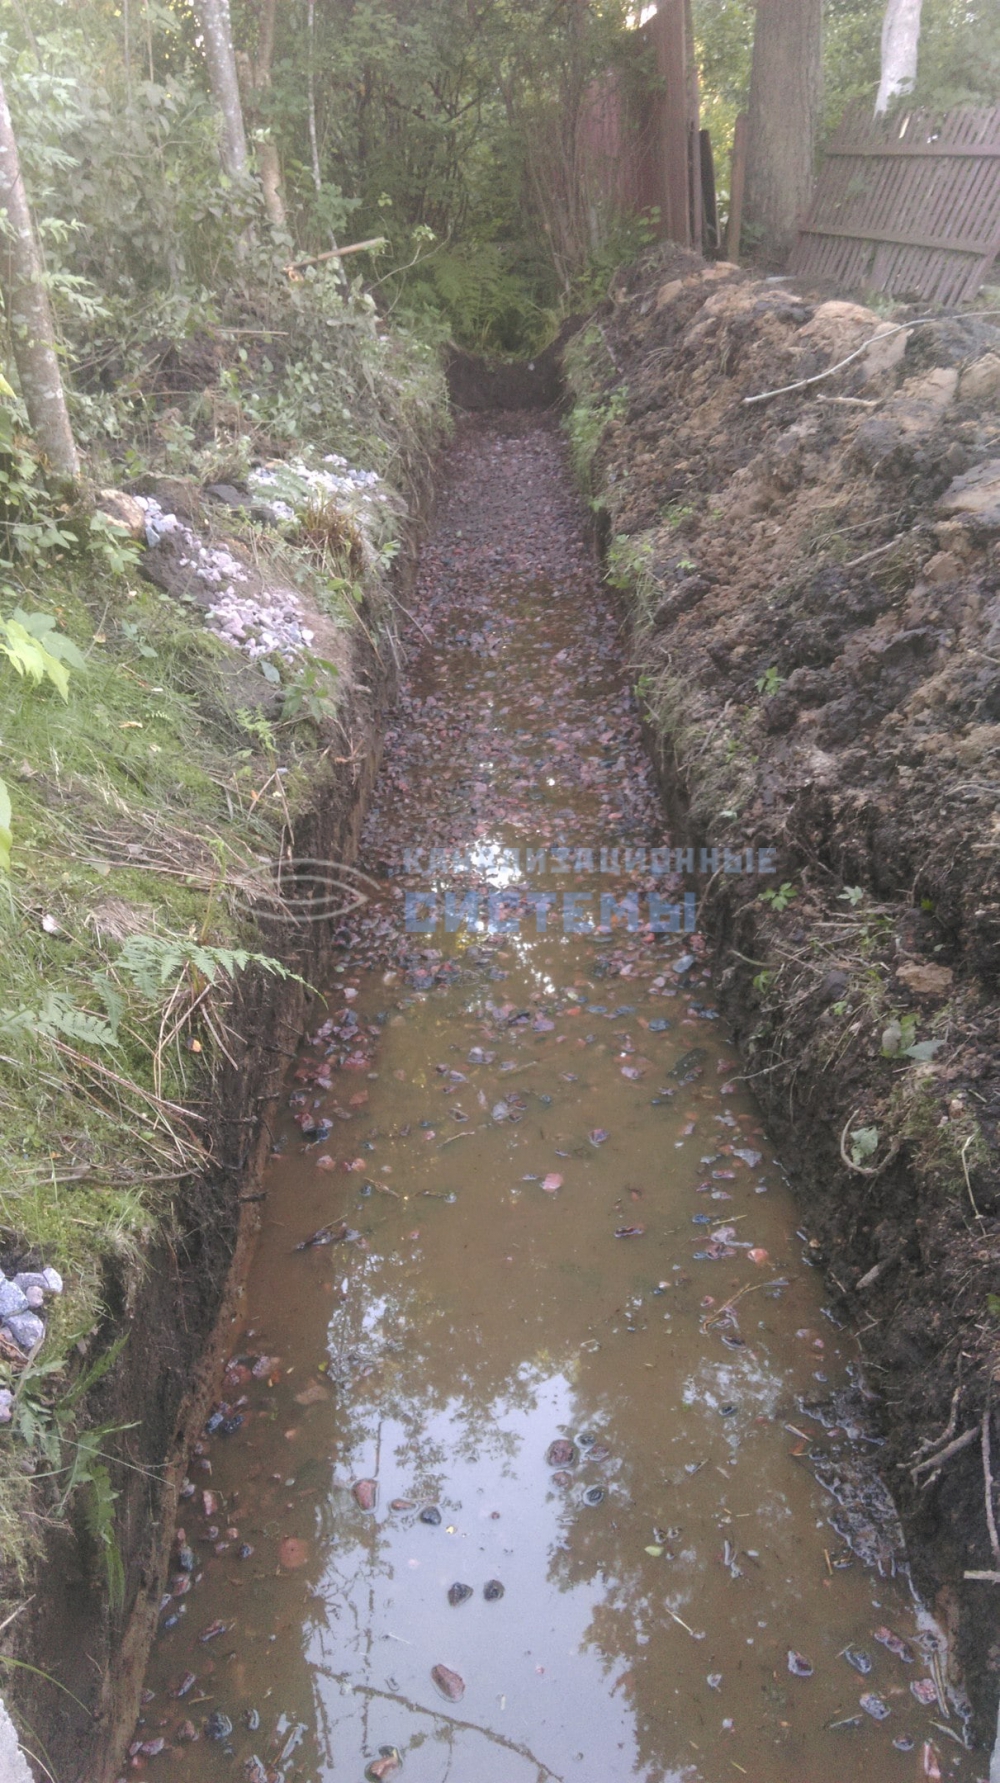
- Drainage ditch device
- Determining the direction of flow
- Sequence of work
- Drainage system tests
- improvised means
- Strengthening with slate
- Strengthening the ditch with tires scheme
- slope improvement
- Installation instructions for perforated pipes
- Not to drain
- Drainage ditch technology
- Arrangement of the drainage system
- Types of drainage
- By installation method
- By type of implementation
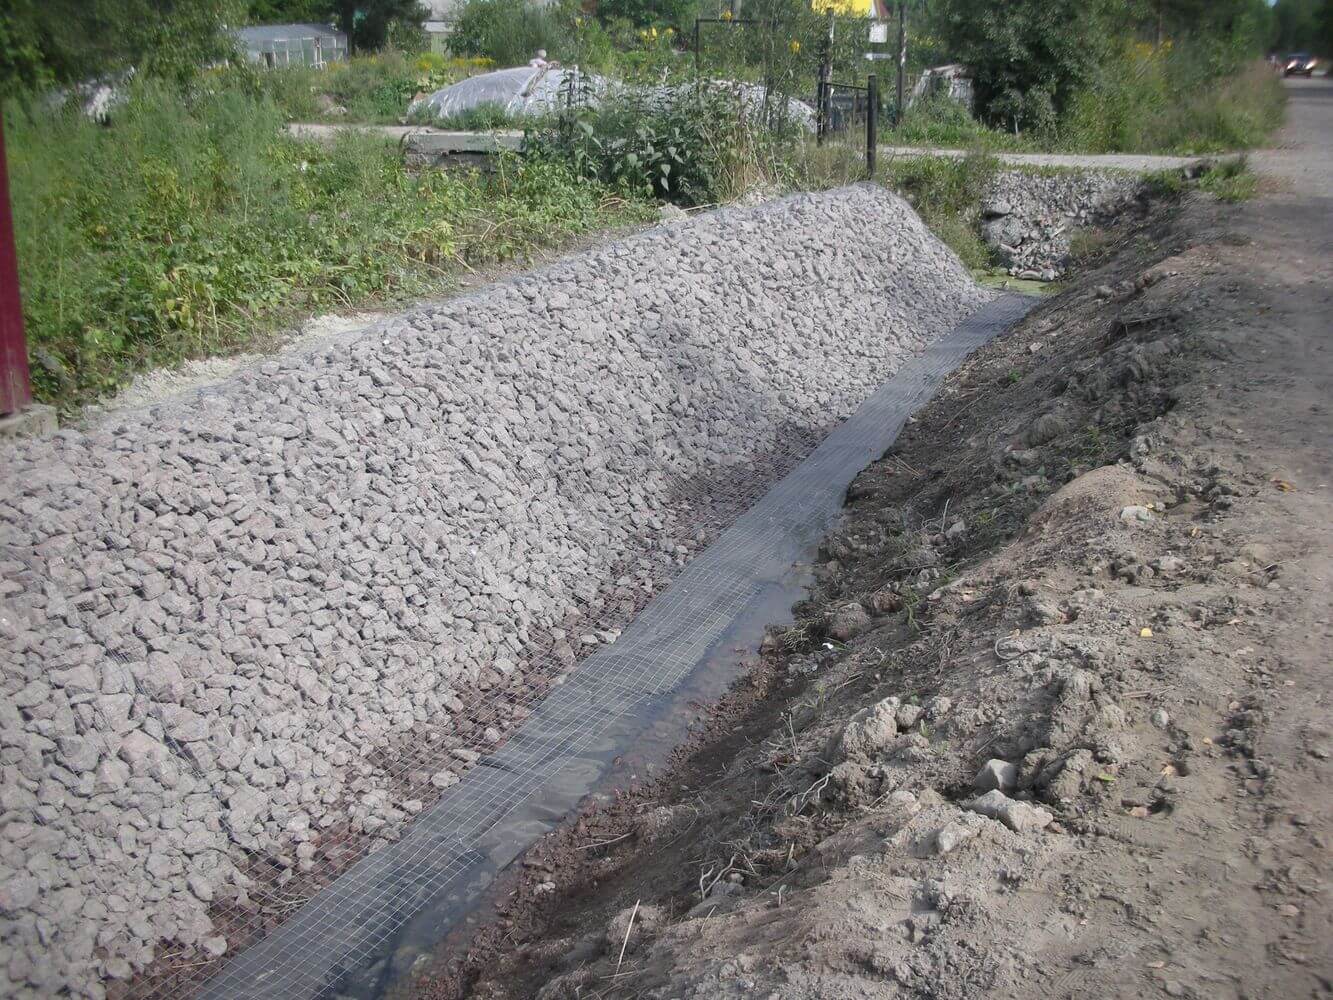
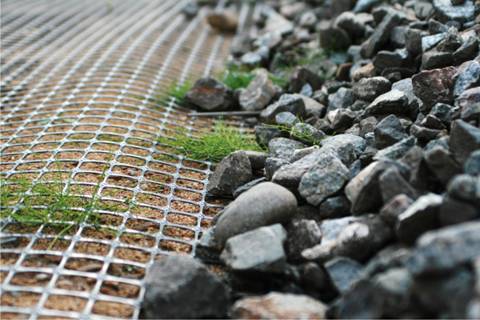
- Option 1 - a three-dimensional geogrid to strengthen the walls of the drainage ditch
- Step-by-step installation of a geogrid
- Wall reinforcement methods
- How is ditch protection installed?
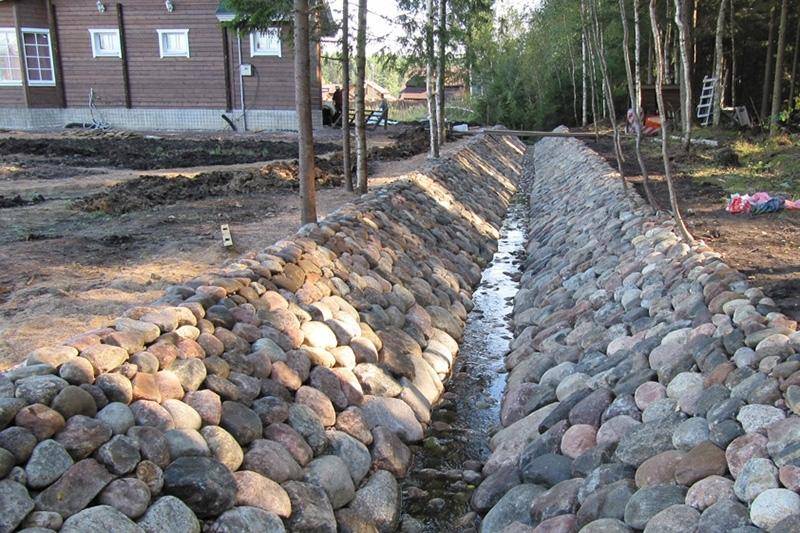
- Advantages of the gabion
Terracing
There are several types of terraces on the slope: ridge, trench and stepped.
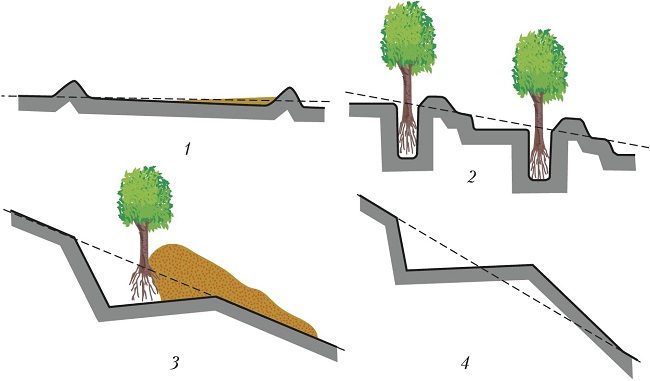 Types of terraces: 1 - ridge; 2 - trench; 3 - terrace-ditch; 4 - stepped.
Most of the technologies for organizing terraces provide for the presence of internal and external slopes, which also need to be strengthened by one of the above methods. But the fortified slope is generally limited in agricultural use. Of course, you can plant a lawn there or plant some trees and shrubs.

But most of them are decorative. The "useful" exceptions in shrubs include blackberries, raspberries and barberries. There are no fruit trees on this list.
Stepped terraces with vertical retaining walls almost completely solve the problem of beneficial use of land on a slope.

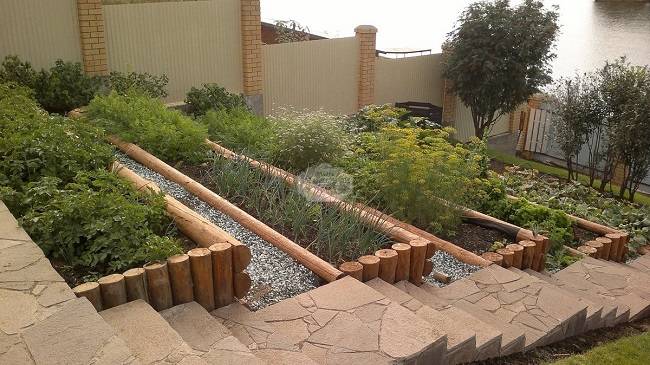 Your own garden on the terraces
For the construction of such walls, the traditional technology for the construction of vertical structures is used - arrangement of a strip or pile foundation as a base.
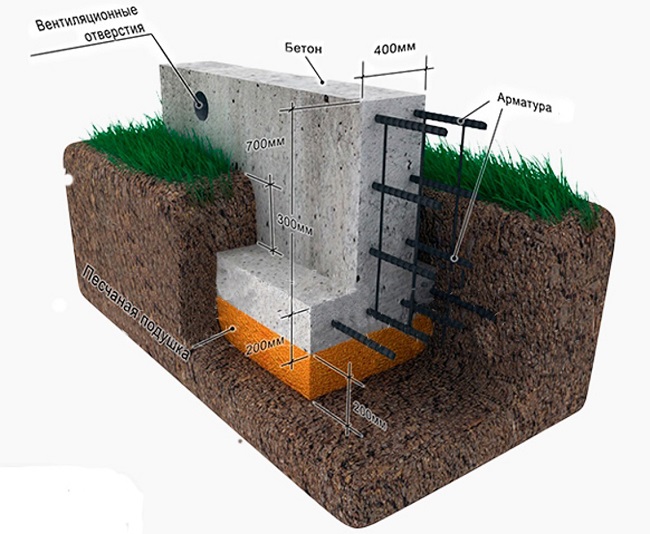
And the materials of the walls can serve:
- monolithic reinforced concrete;
- foundation blocks;
- ceramic brick;
- processed natural stone;
- wild natural stone;
- all types of wooden building materials (log, beam, thick board);
- corrugated board.
And for retaining walls made of wood and corrugated board, piles are used. And specifically for these purposes, PVC sheet piles are produced.
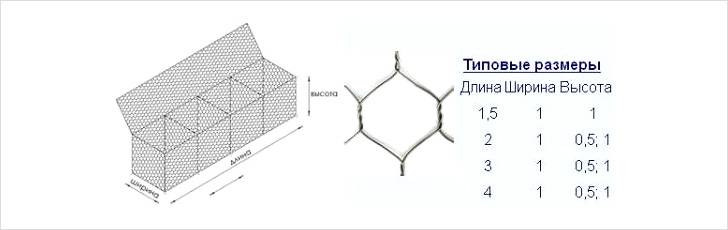
A little aside is the technology of installing a retaining wall from box-shaped gabions.

The gabion does not have a rigid connection between the individual elements, like masonry from building blocks or natural stone. When the base moves, the gabion wall does not crack - the rigidity of the structure is provided by external wire boxes interconnected by wire. And for him it is not necessary to arrange a foundation - it is enough to level the site, fill in and tamp a layer of rubble.
dislandshafta
Helpful2Useless
Geogrid use
A geogrid is a grid consisting of high-strength polyethylene cells.
To strengthen the slopes you will need:
- fine sand;
- geogrid;
- fasteners - fittings bent in the form of a one-sided hook, or a special plastic fixture.
The ditch is strengthened as follows:
- If the ditch is filled with water, it must be pumped out (using natural drainage, a pump) or simply scooped out.
- Clear the banks of the ditch, remove branches, stones.
- Spread the grate along the entire length of the slope.
- Fasten with fasteners (the service life of the grate depends on the quality of fastening; if used correctly, it will last 10-20 years).
- The cells of the geogrid are filled with reinforcing material (gravel, sand, gravel).
- Decoration. It not only performs an aesthetic function, but also helps to strengthen the coast. For decoration, small shrubs are used, which serve as additional protection against corrosion.
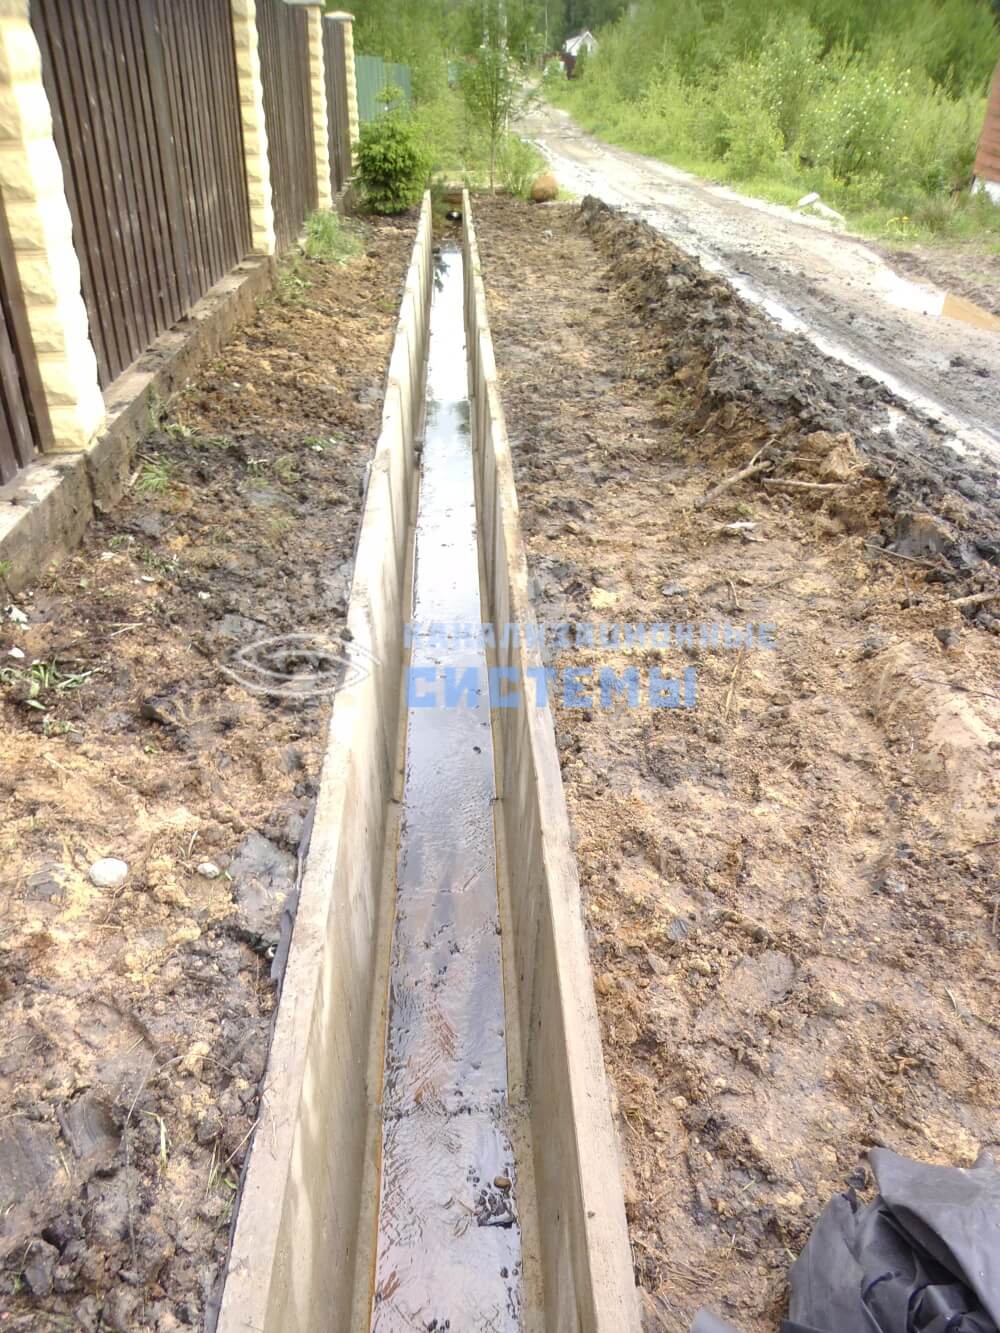
Drainage ditch device
Determining the direction of flow
In the absence of drainage, as already mentioned, the water flows anywhere. But even in this chaotic, at first glance, its movement has its own patterns: it flows downhill. Determining the lowest point of the relief is a very crucial moment, and this can be done in two ways:


- having studied the relief map of the area in Google Earth,
- observing the movement of water during heavy rain.
An extensive drainage system consists of a main and drainage ditches leading to it. If the site is small, you can get by with one ditch passing through the most flooded part of it.
The first thing to do is to figure out how the drainage ditch in the country house will pass through the site, that is, mark its route.
Advice from a professional: It is obvious that it should go downhill, but it should not be strong, otherwise, with a rapid flow of water, the patency of individual fragments of the system may be insufficient.
An example of a drainage route scheme
Then perform the calculation of the drainage area. Having marked the site and marking the route on it, you need to remove all vegetation from it. Now you can start digging a trench.
Sequence of work
The sequence of the drainage ditch is as follows:
- The ratio of the width of the ditch to its depth should be approximately one to two. In this case, the slope should be smooth.
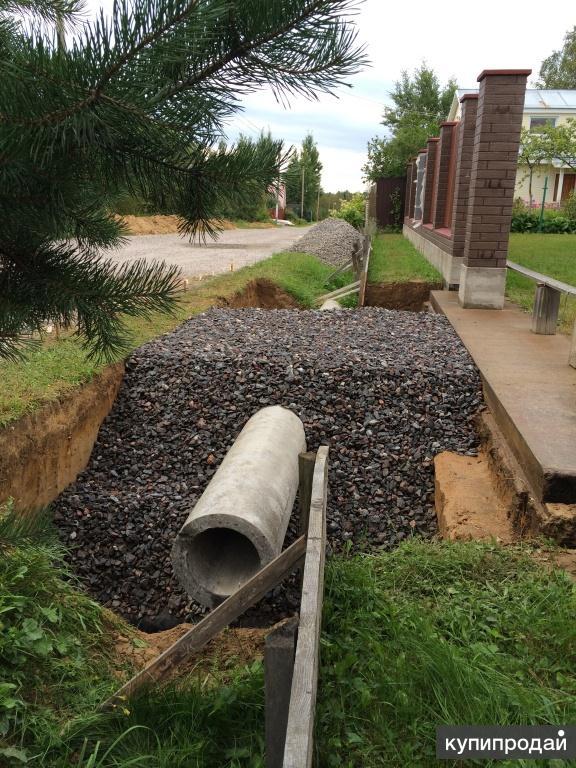
- Drainage pipes should be prepared. Ordinary plastic ones, with a diameter of 63mm or larger, will do. If there are asbestos-cement "hundred parts", then it is also good, even better. The purpose of the pipes is to collect water, bring it out in the right direction, and not clog.
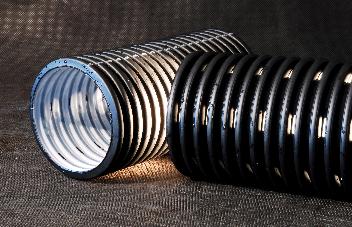
Ready-to-use perforated pipes
- In order for them to cope with this task, it is necessary to make holes in the upper part of their surface in two or three rows. Distance 10-15 cm, diameter - one and a half centimeters. It is not very difficult to cut such holes in PVC pipes, but it will take time. You can also deal with asbestos cement.
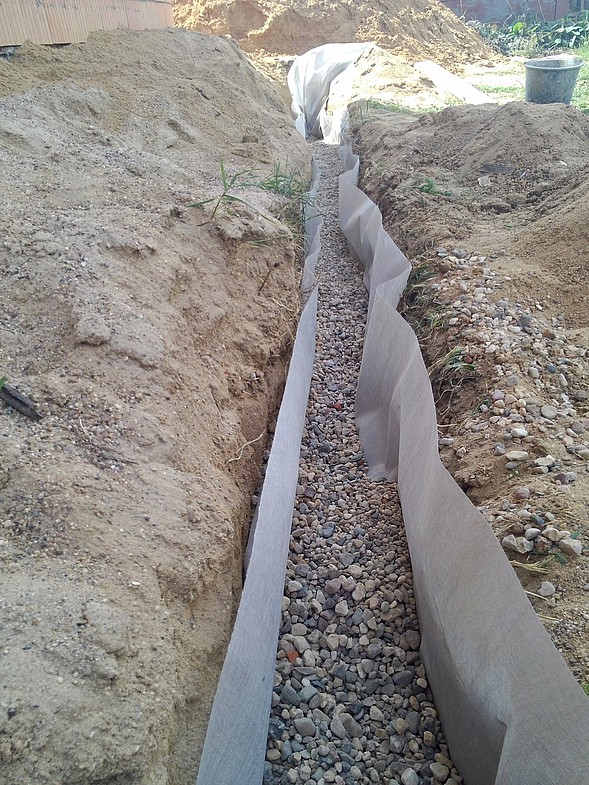
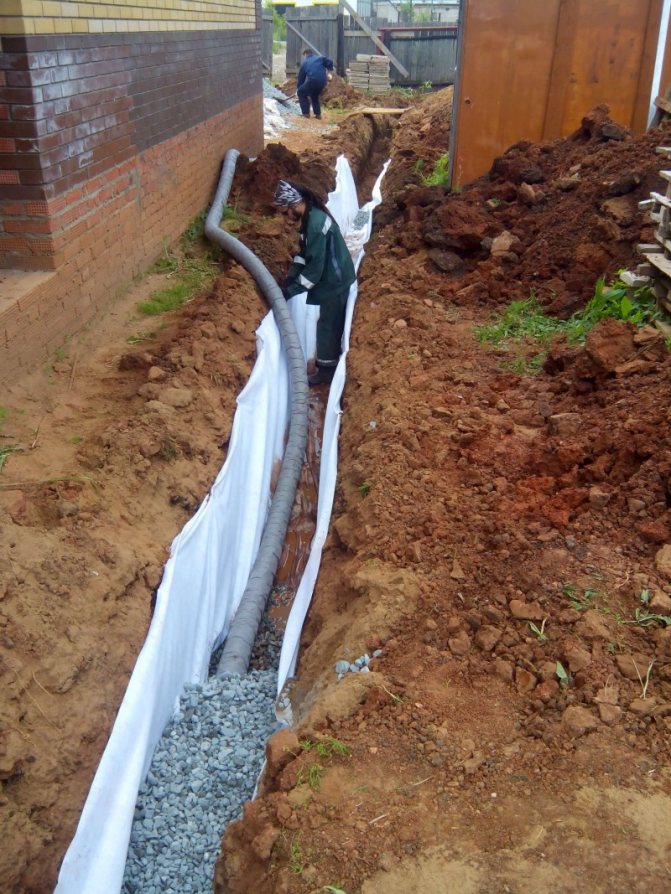
- However, if the holes are left unprotected, then earth and other contaminants will certainly get into the pipe, it will quickly silt up and clog. To prevent this from happening, the pipe for the drainage ditch must be equipped with a filter. It is easy to make - the pipe must be wrapped with a special fabric, geotextile, not very dense, so that water passes through it well. It is in this form that the pipes are laid in the trench.
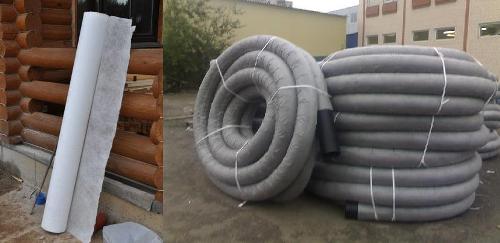
You can purchase both geotextiles in a roll and ready-made pipes wrapped with it
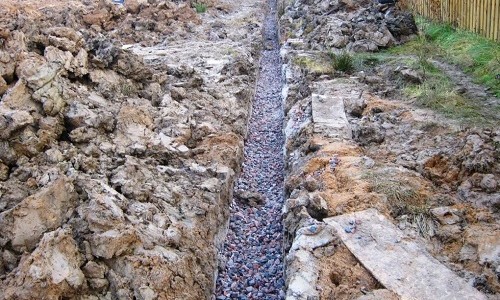
- The next step is to strengthen the drainage ditch. It is covered with improvised small pebbles, crushed stone, expanded clay, broken brick or coarse sand, broken cement mortar - in a word, everything that is at hand, and that under other circumstances could be considered as construction debris. The main requirement for this material is that its layer must pass water well.
Pro tip: Flowers and grasses growing along the edges and at the bottom of the drainage ditch will strengthen it with their root system and serve as a natural natural filter. In addition, they will decorate this long and, in general, not very aesthetic hole.
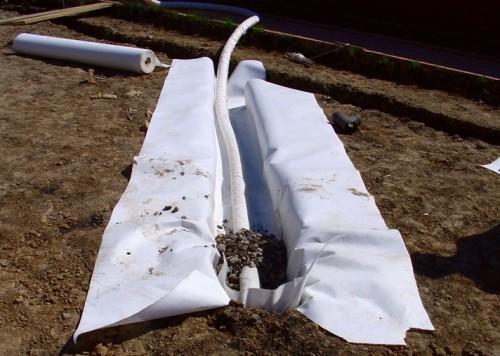
It is possible to lay wrapped geotextile pipes on an additional layer of material
Drainage system tests
Thinking over how to make a drainage ditch, and deciding on the technology for performing this work, one should not forget that it may not work right away. Therefore, breaking through the ditch, and laying drains in it, and this is what pipes and conduits are called, you should not immediately fill them up. It is better to wait for heavy rain and see if the water drains well, and if necessary, correct something.
Proper drainage around the house will complement the drainage system of the site.
improvised means
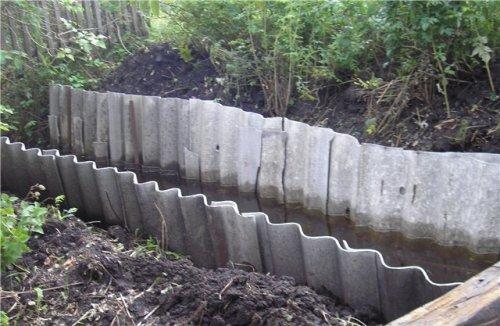
Strengthening with slate
One of the easiest and most easily accessible ways to strengthen the walls of a drainage ditch is to use slate. In this case, you can use the material that was in use. The main thing is that there are no large holes and cracks in it.
The technology using slate is quite simple. Sheets (whole or cut, depending on the size of the ditch) are laid on the slopes of the ditch tightly to each other. This can be done both strictly vertically and at a slight slope. Then, on both sides of the sheets, in a checkerboard pattern, pieces of reinforcement or thin pipes are driven in.
This method has both its advantages and disadvantages. The first ones include the following:
- low financial costs, and if used materials are used, then you can do without investments at all;
- ease of installation.All work can be done by one person.
The disadvantages of this design in its fragility. The appearance of the site itself may also suffer.
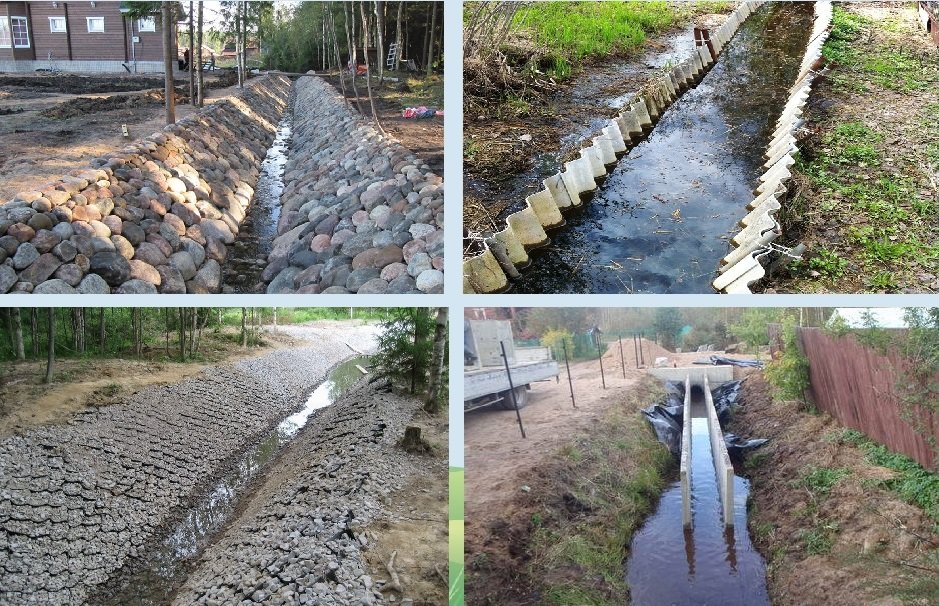
Strengthening the ditch with tires scheme
Strengthening slopes with the help of old car tires looks more aesthetically pleasing. In addition, this method allows you to make a structure that will last much longer than the slate version (up to several decades).
Here you can resort to two methods, depending on the available space. One involves stacking the tires along the edges of the ditch. Soil is poured inside, but sand or gravel is better. For greater reliability, metal pipes can be driven in.


If the area allows, then it is better to lay the tires with an offset. Each top row fits up to half the bottom. The result is a kind of ladder. Soil is poured inside and plants can be planted. Thus, a beautiful slope is obtained.
slope improvement
If the ditch is small and the slope angle is less than 8 degrees, then its walls can be strengthened with plants. Small bushes or perennial grasses are planted along the edges. Their roots will reliably strengthen the walls and will not allow water to wash them away and turn the ditch into a large ravine.
Installation instructions for perforated pipes
Before proceeding directly to the installation, it is necessary to perform calculations and select the appropriate material.
For design work, you will need a site layout and special data, which are best requested from your local land office:
- seasonal groundwater level;
- soil characteristics and soil structure;
- the amount of moisture falling in the form of precipitation and flood waters.
Using this data, specialists will carry out the necessary calculations and determine the required trench depth and pipe diameter.
The most affordable solution for arranging the system are plastic parts. The extremely simple device of the drainage pipe assumes the presence of two layers of polyvinyl chloride or polyethylene, which allows them to serve at least 50 years at a fairly significant depth. In addition, the two-layer construction promotes self-cleaning, preventing blockages. As a prevention of clogging of the holes on the pipe body with soil particles and small debris, they are wrapped with a coconut fiber cloth or geotextile before laying.
Work order next:
- The installation of the drainage system begins with the marking of the territory, which is carried out according to the scheme drawn up in advance. Trenches are dug along the marked lines, the depth of which is determined by preliminary calculation. To determine the width of the structure, 40 cm is added to the outer diameter of the prepared parts. When carrying out work, you need to remember about the required slope of the drainage pipe, which is usually at least 3 °.
- At the bottom of the prepared trench, a crushed stone-sand cushion is mounted. To do this, first, a layer of sand 10 cm thick is covered. The material is well compacted. Then a layer of crushed stone 20 cm wide is laid out on top of it.
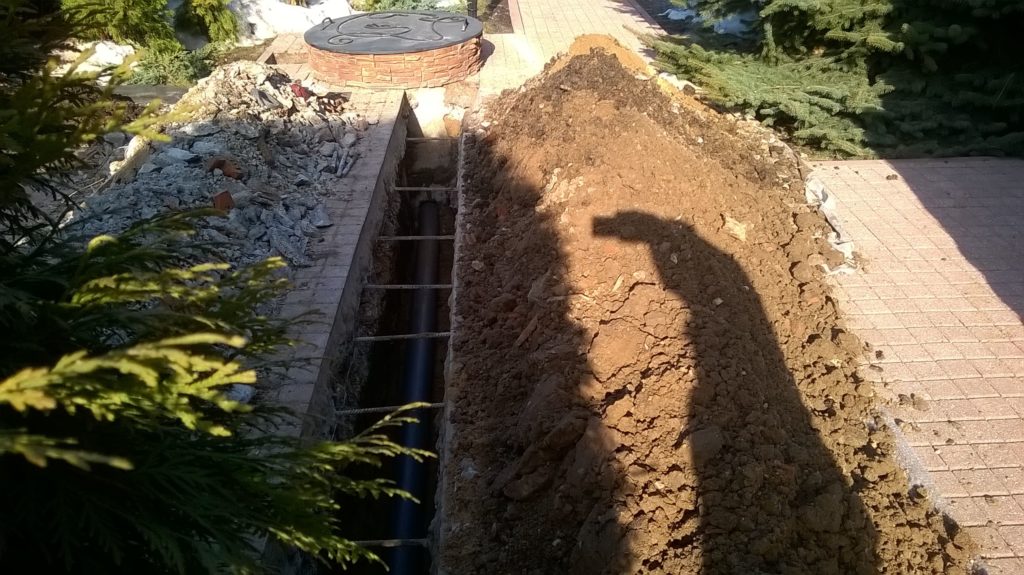
- Pipes wrapped with geotextile are laid on the prepared base. You can cut the part of the required length with an ordinary mounting knife. To connect the elements, special couplings are used. In order to prevent freezing of the system, it is recommended to lay drainage pipes deeper than the ground freezing level.
- After laying the pipes, their slope is checked again.To do this, you can use the usual cord stretched along the pipeline.
- In places where trenches turn and in areas where the slope angle changes, special manholes must be equipped. They are equipped with lids to prevent clogging of the structure. These structures are necessary for the control and periodic cleaning of the drainage system.
- At the last stage, backfilling is carried out, that is, all actions are performed in the reverse order. A layer of crushed stone is poured over the pipe, followed by sand, and the last layer of soil, which was taken out when digging a trench. Sod can be laid on top.
The output of the system is carried out in an open reservoir or rain sewer. In any case, a check valve is mounted at the end of the outlet pipe. If it is impossible to organize such a conclusion, a so-called prefabricated well is equipped. As it fills, it is necessary to pump out water from it.
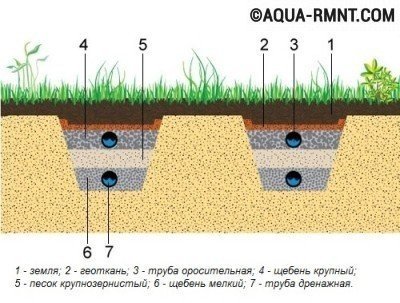
Perforated drainage pipes are laid on a sand and gravel cushion
During installation, you should try to avoid common mistakes that lead to a violation of the functionality of the drainage. These include:
- Insufficient depth of trenches, which can lead to a violation of the water balance of the site.
- The use of pipes that are not suitable for the type, which leads to a quick failure of the system.
- Incorrect drainage angle, which disrupts the functioning of the structure and can lead to serious problems with the water regime on the site.
Practice shows that laying of drainage pipes with your own hands - a completely doable event. The only thing that must be entrusted to specialists is the calculation of the system and the drawing up of a pipe laying scheme. Everything else is pretty easy work.
When performing it, it is very important to follow the instructions, carefully monitoring the key points: the slope of the system, the reliability of the pipe connection, the organization of manholes, etc. A well-equipped drainage system will serve for many years, preventing excess moisture from damaging the foundation of the house and ruining the site.
Not to drain
The installation of a drainage system is an expensive undertaking. If it is possible to get by with other measures, it is worth doing it. Other measures include the following:
- Storm sewer device.
- A blind area device (for heaving soils, an insulated blind area is desirable).
- In areas with a slope, the device of the upland ditch is a moat of sufficient depth, which is located on a slope higher than the house. From this ditch, water is diverted below the site, into the sewer, discharged into a ravine, river, lake, etc.
So that the edges of the ditch do not sprinkle, it can be planted with moisture-loving plants with a powerful root system. - Foundation waterproofing. To eliminate capillary suction of moisture, several layers of waterproofing material are laid on top of the finished foundation, to eliminate problems with damp walls in the basement, external waterproofing of the foundation is made (dig out to the full depth and treated with waterproofing materials). For greater reliability from the inside, the walls of the basement and / or basement floor should be treated with penetrating waterproofing of the Penetron type.
If after all these activities the situation does not suit you, it makes sense to make a drainage system.
Drainage ditch technology
It is not difficult to answer the question of how to make a drainage ditch, since the technology for constructing this structure dates back more than one hundred years.Modern materials that have replaced outdated approaches make the task much easier.
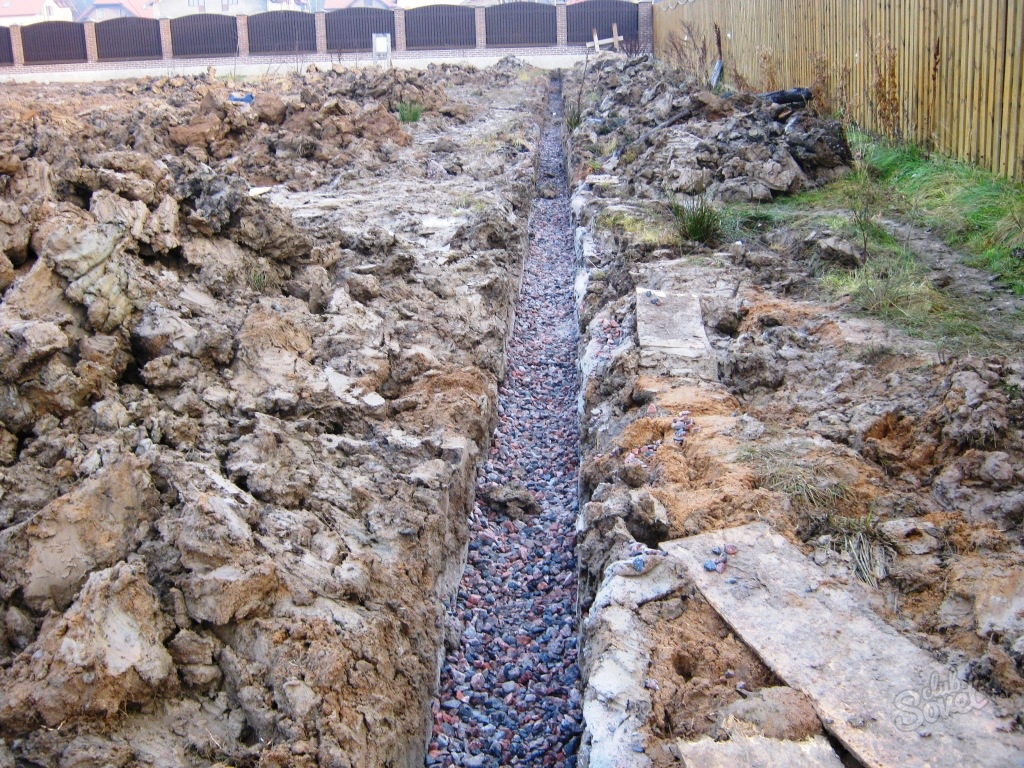
The arrangement of a drainage ditch begins with digging a trench.
Depends on its depth new groundwater level.
The bottom of the ditch is sprinkled with sand chips to create an effective drainage system. A drainage pipe is mounted on the sand cushion.


For these purposes, you can use:
- plastic products,
- asbestos-cement structures.
The next layer of this multi-level system is a volumetric gravel filter, which contributes to the free flow of discharged water. Crushed stone must be separated from the next sandy layer with a special geotextile.
If you do not use this important element, the sand cushion will quickly wash out and mix with gravel. A layer of soil is laid on top of the sandy layer.
The main difficulty in arranging drainage is digging a pit, which can be done using the necessary equipment. The soil layer should be periodically cleared of vegetation, which may impede the flow of drained water.
Arrangement of the drainage system
The drainage device in the country, both open and closed, can be done on your own. This is a fairly simple procedure that can be carried out as soon as possible, since earthworks take up most of the time.
The technology of laying drainage of an open type is a system of drainage ditches with water drained into a special well or other body of water. This system is suitable for giving a small area, which is operated only in the summer.
When installing an open type system, a natural flow of water in the required direction should be ensured.
closed drainage system is a more complex engineering solution. Structurally, it consists of water intake trays, a system of drainage water pipes and special wells. To equip the system, appropriate pits are created, in which plastic pipes are laid and connected with fittings. The entire structure is wrapped with geotextile, laid in ditches and covered with rubble.
Types of drainage
Site drainage is a complex system with many nuances and features. By structure, it can be local (local) - to solve a problem in a particular area. Most often it is the drainage of the foundation, basement and semi-basement (basement) floors. Also water drainage systems on the site are common - to drain the entire site or a significant part of it.
Soft drainage without a pipe. Suitable when it is necessary to drain a small amount of water in a summer cottage or near the house
By installation method
According to the installation method, the drainage system can be:
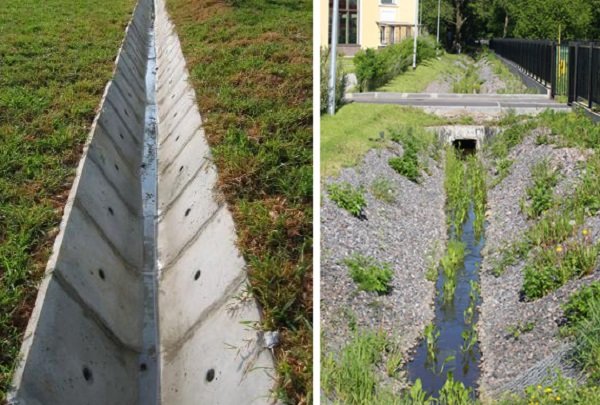
open. Concrete or stone trays are used, ditches are dug around the site. They remain open, but can be covered with decorative grilles to protect the system from large debris. If you need a simple solution for draining surface water in your country house, these are ditches along the perimeter of the site or in the lowest zone. Their depth should be sufficient so that at maximum flow the water does not overflow. So that the unreinforced walls of the drainage ditches do not collapse, they are made at an angle of 30 °,
So that the walls of open drainage ditches do not crumble, ground cover plants are planted on the slopes or laid out with cobblestones. Open drainage near the driveway, parking lot does not spoil the picture at all. and so can take a significant amount of water
- closed. Water is caught by laid special permeable - drainage - pipes. Pipes are led into a storage well, into a sewer, a ravine, a nearby reservoir. This type of drainage on the site is good for permeable soils (sandy).
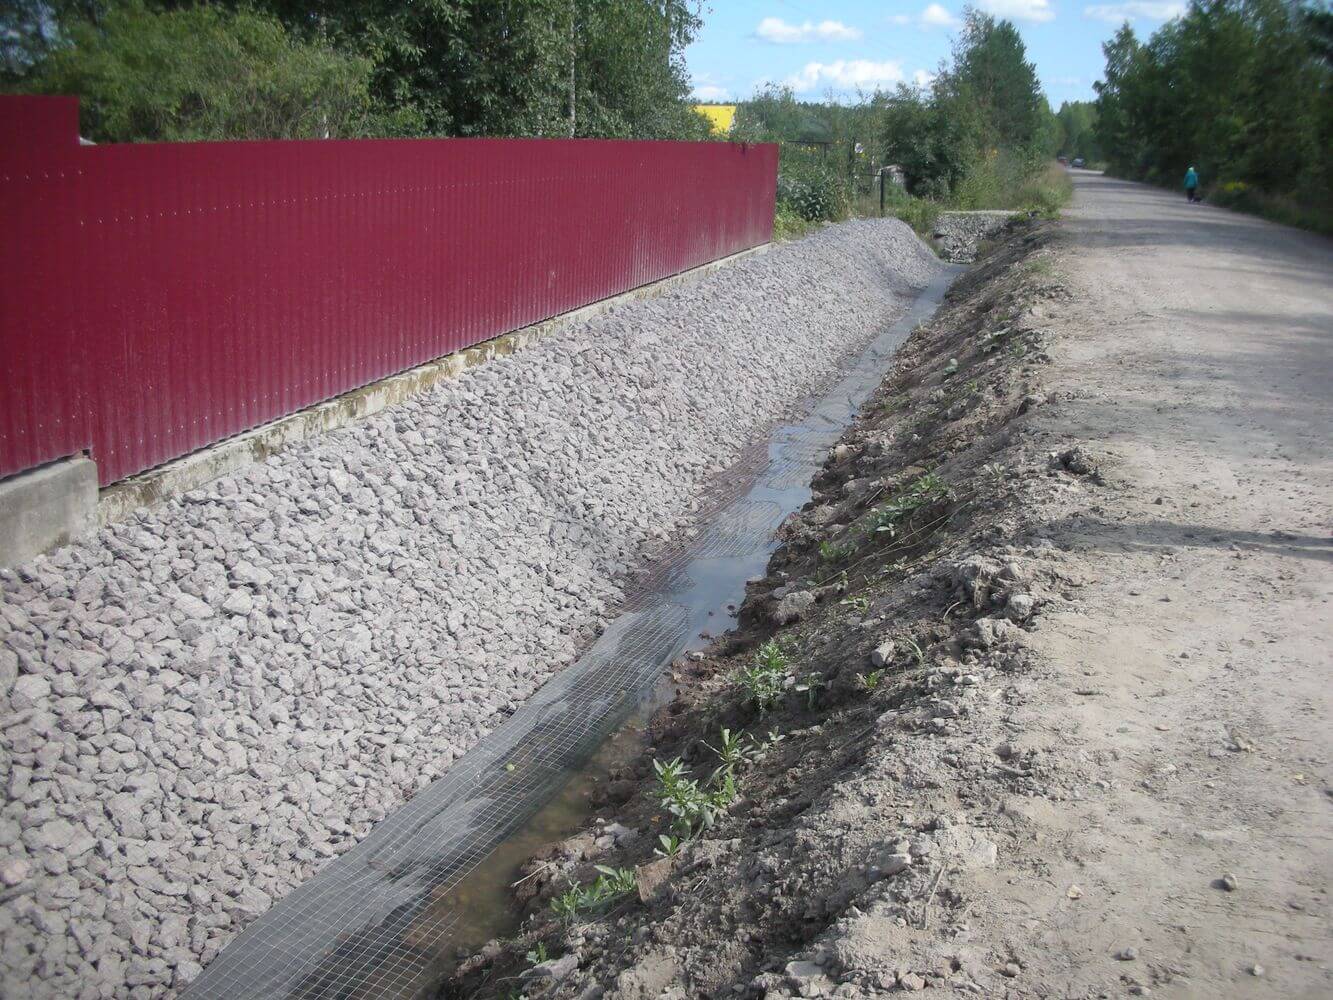
- Zasypnoy. Drainage of this type of site is usually used on clay soils or loams. In this case, the pipes are also laid in ditches, but a layered sand and gravel backfill is arranged in them, which collects water from the surrounding soils. The worse the soil conducts moisture, the more powerful the backfill is required.
Drainage pipe in gravel backfill
The specific type of site drainage is selected based on site conditions. On clays and loams, an extensive gravel-sandy zone is needed, into which water will drain from the surrounding soil areas. On sands and sandy loams, there is no need for such a pillow - the soils themselves drain water well, but only a specialist on the results of geological research can specifically say.
By type of implementation
There are several types (schemes) of drainage devices on the site:
- Annular. Pipes are closed in a ring around the object. Usually they are the house. It is rarely used, since it is necessary to deeply deepen the drainage pipes - the pipe itself must be laid 20-30 cm below the groundwater level.This is expensive and difficult to implement.
- Wall drainage - to drain water from the walls. It is located at a distance of 1.6-2.4 m from the walls (in no case close). In this case, the drain is located 5-10 cm below the basement floor. If the floor is poured over a large crushed stone cushion, the drain is laid 5-10 cm below this level.
The right solution for drainage from the foundation - storm sewer system and drainage - Reservoir drainage. It is used in the construction of slab foundations in difficult situations. It is necessary for the removal of perched water, it is usually used together with wall water drainage. Reservoir drainage is layers poured into the pit - sand, crushed stone, waterproofing (as they are poured from bottom to top). Reinforcement is already laid on top of this pillow and the foundation slab is poured.
- Systematic and radiation. Used to dry areas. They differ in the way the drains are located relative to the central pipe. With a beam scheme, the system is similar to a Christmas tree (already existing plants can be taken into account), with a systematic scheme, drains are laid with a calculated step (usually arranged when planning a site).
Radiation drainage of the site
When draining the site the central drain or collector is made of pipes of a larger diameter (130-150 mm versus 90-100 mm for conventional drains) - the volume of water here is usually larger. The specific type of drainage system is selected based on the tasks that need to be solved. Sometimes you have to use combinations of different schemes.
Option 1 - a three-dimensional geogrid to strengthen the walls of the drainage ditch
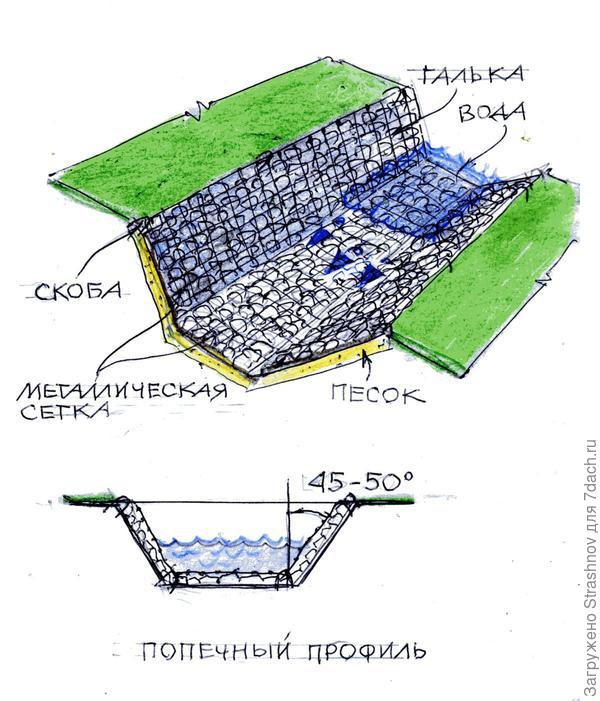
The geogrid is very often used to fix the slope. It is a cellular mesh of reinforced threads intertwined with each other. The junctions of the threads are additionally fixed.For production, a polymeric material is used. Also, polymer compositions are used for additional processing in order to strengthen the network. The roots of plants planted close to the ground easily penetrate into the honeycomb holes and thus create additional soil anchorage on the slope surface.
Geogrid limit slope deformation and ground movement
The polymer from which the geogrid is made is resistant to decay, adverse natural factors, and corrosion processes. The grid is not subject to deformation and has high wear resistance; able to withstand high loads and stress. The geogrid is made of a flexible material, so it is laid even on uneven surfaces.
Lay the grid as follows:
- With the help of a hand roller, the soil inside the ditch is compacted.
- Next, rolls of material are rolled out, the strips are joined together.
- Fasten the material inside the trench every 1.5 m with special brackets.
- The grid is decorated or masked by backfilling or planting.
Step-by-step installation of a geogrid
Even a novice landscape designer, as the owner of a summer house can be called, can strengthen a small piece of land on his own. If a ravine or a ditch with crumbling slopes is located on the summer cottage, you can use a three-dimensional geogrid - a modern polymer tape structure.


If you fill the cells of the geogrid with plant soil, you will prepare an excellent place for planting climbing or erect plants. Lawn grass or small shrubs will grow well on this site.
Geogrid elements are welded together. The result is a lattice having large sections. Lattices are filled with heavy building material, for which crushed stone, sand, concrete are quite suitable.You can fill the grids with special nutrient soil in order to plant plants in it.
Use of a geogrid to reinforce slopes and protect them from collapse.
Slopes that consist of sand or other sedimentary rock are most often and quickly destroyed. They crumble from the action of wind and rain. If the ditch crosses the summer cottage, you can strengthen both of its slopes by creating an original stone stream, or by building an unusual type of rockery, planting coniferous plants and flower beds.
Before carrying out reinforcement, soil preparation is necessary. To do this, large plants are removed, the earth is leveled and compacted as far as possible.
Geogrid laying can be done in two existing ways:
- For geotextiles. At the same time, geotextiles are spread along the entire slope, acting as a draining layer, on top of which a grid is laid.
- Directly on the ground - direct mounting of the mesh is carried out, which is laid on the prepared section of the soil.
Geogrid cells must be placed along the entire slope. The material for them is chosen according to the basic principle: a wider tape is used if the slope is steeper. Lattice segments are stretched in different directions and fixed around the perimeter with anchors or specially planed pegs.
For small slopes, especially if the area is arid, where drainage can be dispensed with, it is enough to lay one geogrid - additional insulating materials are not needed.
Each cell is filled or fixed using sand or gravel for this purpose.If you plan to plant flowers, trees, grass or bushes in this place, fill the cells with fertile and fertilized soil.
You can fill the grate with earth or sand using construction vehicles, a garden wheelbarrow or a simple bucket and shovel.
This is the easiest option for strengthening the slope at their summer cottage. With fantasy turned on and using various decoration methods, you can turn any crumbling slope into a beautiful and original flowering garden.
Wall reinforcement methods
The drainage ditch only partly acts as a transport system, the water entering it must be effectively absorbed into the soil along the entire length along the bottom of the ditch. It is not advisable to use concrete sections or otherwise reinforce the bottom.
The use of a rigid waterproof base is allowed only if underground communications pass under it, which should be protected from the effects of precipitation and groundwater.
Effective ways to strengthen slopes:
During the earthworks and the preparation of the foundation of the ditch, an extended pit is dug with a width of about twice as much as necessary. A pillow of coarse sand or gravel is poured along the bottom.
The slopes are compacted manually or mechanically, covered with the material chosen for reinforcement. Next, a layer of soil is poured in the same way with tamping and compaction, only of a lesser intensity.
How is ditch protection installed?
The period of their operation, stability and reliability depend on the correct sequence of actions during the strengthening of the walls of the drainage. First of all, you should choose a way to strengthen the walls of the drainage.It is recommended to use professional modern tools: geogrid, geomats and geogrids, in especially difficult conditions - gabions.


Regardless of the method chosen, work should only be started with a dry ditch, so work is carried out during the minimum groundwater level. Let us consider in detail the installation sequence of some of the materials listed above.
Installation of the geogrid is carried out on a surface cleared of debris, large stones and branches. The ideal option is a flat slope, which may be slightly overgrown with grass. Along the upper edge of the drainage, pieces of reinforcement 50-60 cm long are hammered into the ground, and the distance between them should correspond to the size of the grid cells. The upper end of the reinforcement is bent at an angle of 90 °, thus creating an L-shaped fastener.
The mesh is put on the fasteners and stretched in the direction of the opposite side, fastening in the same way. After the lattice has taken a stable position, pieces of reinforcement or anchors make fasteners in separate cells. It is not necessary to install fasteners in each segment, it will be enough to distribute them evenly in a checkerboard pattern.
The final stage is filling the cells with fine gravel, gravel or sand. The dimension of the material depends on water speed - the higher it is, the larger the filler should be.
Geomats and geogrids are also rolled material, which is used to cover drainage slopes. Under these materials, you can install a non-woven insulating material that will freely pass water, but not allow the soil layer to erode. A geomat or geogrid is laid on top of it.Their upper edge is fixed along the slope with anchor bolts, stretched to the opposite side, where the action is repeated. The surface of the material is covered with a small layer of soil mixed with lawn grass seeds. Within a couple of months, all layers will grow together, creating a reliable natural slope protection.
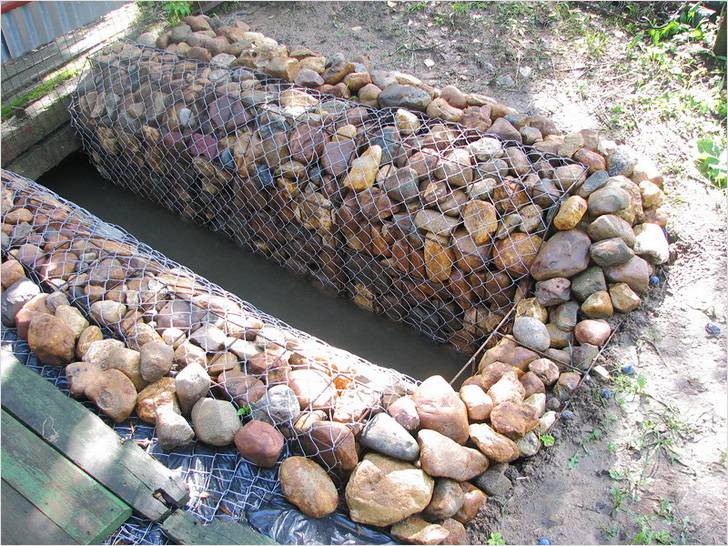
Gabions are used in cases where saving space on the site is critical. They allow you to make the ditch wall almost vertical, narrowing the drainage to a minimum.
Creating a gabion on your own requires significant financial and time costs, but the result will be a reliable design that will last for decades.
For work, you will need reinforcement bars with a diameter of 5-6 mm, a fine mesh netting (preferably with a polymer coating), a welding machine and a large number of large stones. First, long mesh boxes are welded from the reinforcement, the height of which should correspond to the depth of the ditch. The size of the cells will be such as not to allow stones to pass through them. After installing the boxes on both sides of the drainage, they are filled with stones, and the entire structure is covered with a chain-link mesh on top, screwing it with galvanized wire to the reinforcement.
The advantage of gabions is their beautiful appearance, which fits into landscape design. A budget way to strengthen is to install an old slate. For this, both wavy and flat coatings are used. It is buried in the ground along the slopes of the ditch, reinforced with spacers from metal pipes or fittings of large diameter.
Constant flooding of the site due to the high level of groundwater is a fairly common problem that can be solved with the help of properly arranged drainage.
Drainage using special ditches is the easiest and cheapest way to perform drainage. For arrangement of the drainage system landscape features are used - ditches are dug along natural slopes and drain moisture into a nearby reservoir or a separately built well to collect drainage water.
Advantages of the gabion
This factory product is a product made in the form of a parallelepiped from a double-twisted metal mesh and filled with large stone or crushed stone.
- For the manufacture of gabions at the factory, a special galvanized wire is used, which also has a PVC coating. It is she who reliably protects this structure from corrosion, aggressive chemical environment and mechanical damage. Even heavy loads are not terrible. The average service life can be more than 70 years. But this affects the cost.
- Therefore, you can make a gabion on your own. To do this, you will need reinforcement bars having a diameter of 6 mm, as well as electric welding. In addition, you need to stock up on a tape measure, a marker, a grinder, a chain-link mesh, a shovel and a wheelbarrow. You will also need cobblestones.
- A design with dimensions of 80 × 40 × 80 cm is suitable for a small area. Reinforcing bars are welded together, forming a rectangular structure. The width of the cells will depend on the diameter of the selected stones.
- With the help of a shovel, it is necessary to prepare and widen the slopes of the ditch. Only then can be placed along the entire coast of the cage.
- Each cell is filled with large cobblestones and, if necessary, several rows are installed at once.
- The chain-link mesh is attached from above for better fixing.In order to avoid the need to change it often, it is better to choose a mesh that will also have a PVC coating. From above it is easy to strengthen with the help of cobblestones. In addition, it gives the whole structure a good decorative look.

Gabions can last the longest, while they fit well into the ecosystem. Manufacturers guarantee at least a hundred years of service.


