- Purpose and types of systems
- Open
- Closed
- Drainage from the roof for water - drainage device from pitched roofs
- 1. Draining water from the roof
- 2. Place (node) adjoining the roof to the wall
- 3. Plumb roof
- 4. Components of the drainage system
- Surface and deep schemes
- Expert advice
- Correct calculation of the slope of the drainage pipe
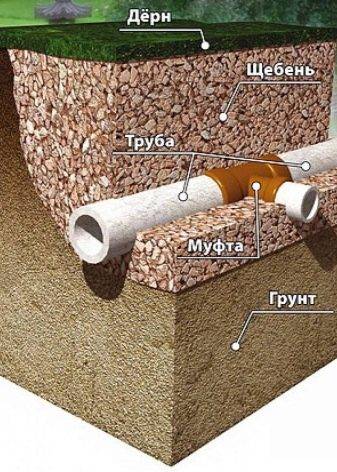
- Drainage pipes for groundwater drainage: complete product classification
- Groundwater drainage pipes: an introduction to the topic
- Basic elements and materials of foundation drainage
- Pipes
- Wells
- Livnevki
- Geotextile
- How to lay pipes correctly?
- DIY drainage - step by step technology
- Scheme and order of the device
- closed drainage system
Purpose and types of systems
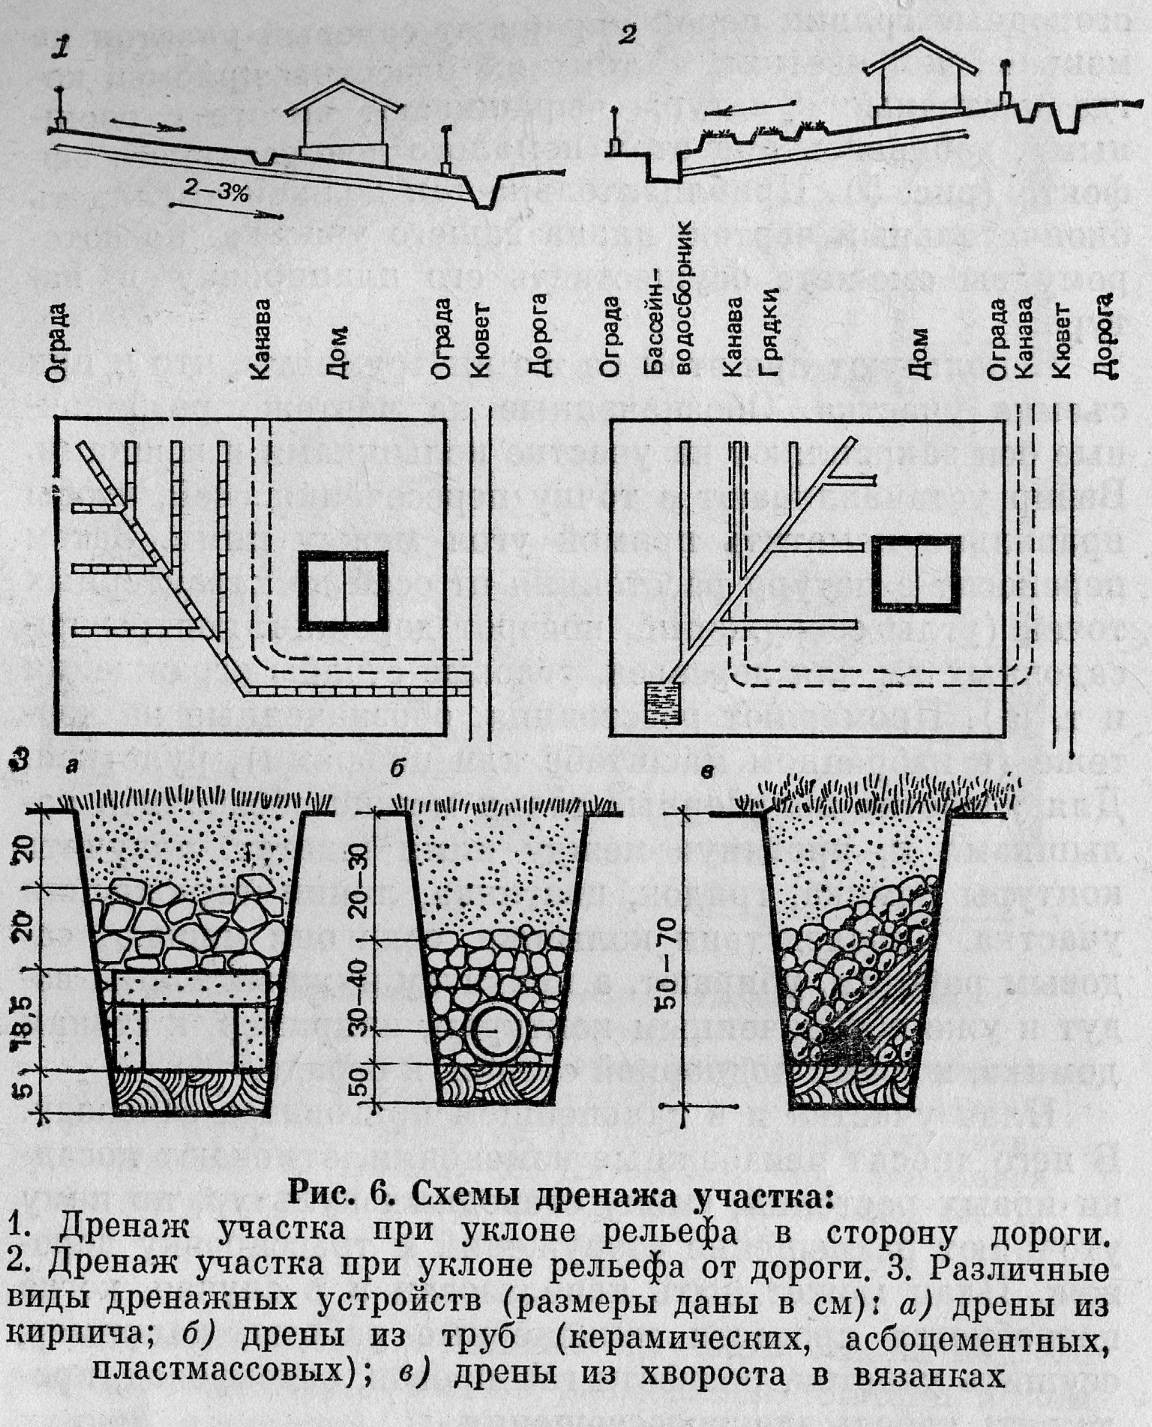
The methods of organizing drainage systems on the site differ depending on the amount of precipitation, the level of groundwater, the characteristics of the type of soil, the topography of the site, the location of the house and other factors.
Drainage according to the installation method can be divided into two types.
- A perfect drainage system is installed at the level of natural water runoff. Moisture enters the drains through the holes located on the sides, as well as through the top of the pipes.
- An imperfect drainage system is installed higher than the water level. Moisture penetrates the drains from the bottom, top and sides.To strengthen the sides of this design, a drainage cushion made of sand and gravel is used.
According to the way the drainage is arranged, it is divided into open and closed.
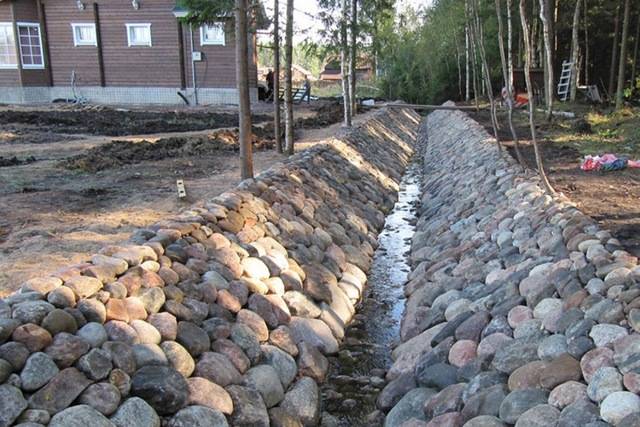
Open
Drainage is a system of gutters, trenches, gutters, catchment trays. This system is organized without pipes. Such drainage looks like a trench 0.5 meters wide and 0.5-0.6 meters deep, designed to drain melt and storm water from the house or from the site. The trench necessarily has a slope towards the main water intake trench, so that water is drained in the right direction by gravity.
The main advantages of such a drainage system are its low cost and speed of creation. However, in order to divert a large amount of water due to precipitation, a deep drainage line is required, which is unsafe. In addition, if the walls of the ditches are not equipped, they will quickly collapse. Another disadvantage of such a system is that it makes the site look less neat and aesthetically unattractive.
To increase safety and increase the service life of this drainage option, special concrete or plastic trays are used, which are closed with gratings on top. Open drainage is most often used in agriculture to divert water from already cultivated areas.
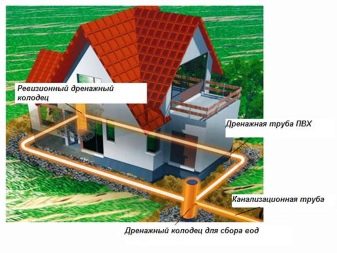
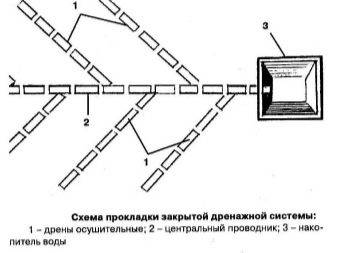
Closed
Underground drainage is a pipe system. It has a nicer look compared to the previous one, as it is equipped with a protective grill, but the receiving ditch is much narrower and smaller. Closed drainage schemes are used to protect the foundation, basements from groundwater and increase their service life.
Especially closed drainage is suitable for wetlands, as well as areas near which there are natural reservoirs or located in a lowland. In this case, closed drainage is best supplemented with storm sewers. Underground drainage is also called deep.
Underground drainage is divided into two types:
- wall-mounted;
- trench.
If the house is already completely ready, then you should opt for a trench ring drainage system. But it should be borne in mind that it is only suitable for houses without a basement. In small areas where there is no need for open drainage, backfill drainage is used. The system of such backfill trenches is not serviced without dismantling after complete arrangement. This is its main drawback. The organization of backfill drainage is carried out in several stages.
Drainage from the roof for water - drainage device from pitched roofs
Roofs on houses of old construction have a simple gable
roof structure. But, modern houses are equipped with more complex rafters.
systems. There are more slopes, they are adjacent to each other at different angles. it
requires a proper roof drain.
Therefore, we will consider step by step each of the elements.
1. Draining water from the roof
This point is important because water can get inside the house before reaching the drain. There are three areas of increased risk on the roof, as a result of which the roof of the house is leaking (and ways to fix the leak on the roof).
The junction of two slopes with the formation of an internal corner. If a private house has a roof, such as in the photo, then installation of a valley or a groove on the roof is necessary.


There are two types of valley:
Single overlap (lower valley).
Nuance.The choice of overlap is influenced by the material of the roof and the angle of inclination of the roof slope. With a high wave height of the roofing material (slate, metal tiles) and with a slope angle of more than 30 °, a single overlap is used. If the material is flat (bituminous tiles) and the angle is smaller - double overlap.
Double overlap (lower and upper valley).
Nuance. The design of the lower valley is very simple, so it
usually do it by hand. It's just a sheet of metal folded in half. But for
in order for it to perform its functions, you need to know how to install it correctly
lower valley. Competent installation is as follows: the bottom valley is attached
using clamps (the use of self-tapping screws is not allowed).
2. Place (node) adjoining the roof to the wall
In this case, a special junction bar is used
for the roof. Installation of the strip is carried out in the corner between the house and the roof.
The specifics of choosing a strip for adjoining
The photo shows three types of straps.
But only the bar "c" will ensure the tightness of the joint, due to
a small edge that winds up in a gash on the wall. Plank "a" does not have
rolling in general. At the bar "b" the lower rolling is external. This is the place with
which the bar will begin to rust.
Nuance. For a tight connection in a brick, you need to make
washed down and bring one edge of the bar there. The second lies freely on the roof.
3. Plumb roof
According to the rules for installing a drainage system, roofing material
should end in the middle of the gutter. Then water won't get out of it.
on the walls of the house.
However, this is not always possible. This may be due to
features of the roofing material (for example, the length of the metal tile is always
multiple of 350 mm, and the usual multiple of 1 pc.) or with a miscalculation during design
rafter system. In this case, an additional eaves bar is mounted.
The second component of the system for draining water from the roof is a gutter
system.
Let's get acquainted with its main elements and see how
make your own drainage system.
4. Components of the drainage system
Before proceeding with the manufacture of the ebb, you need to figure out what elements (components) are needed:
gutter. Serves for receiving water from slopes. Its diameter depends on the area of the slope;
funnel or drainpipe. Connects the gutter and pipe;
pipe. Discharges water into the drainage system or away from the foundation;
corners and turns. They allow you to bypass the house, protruding elements or install a pipe at the right distance from the wall;
plugs. Used in places where a funnel is not provided.
Advice. Plugs are installed in the highest place.


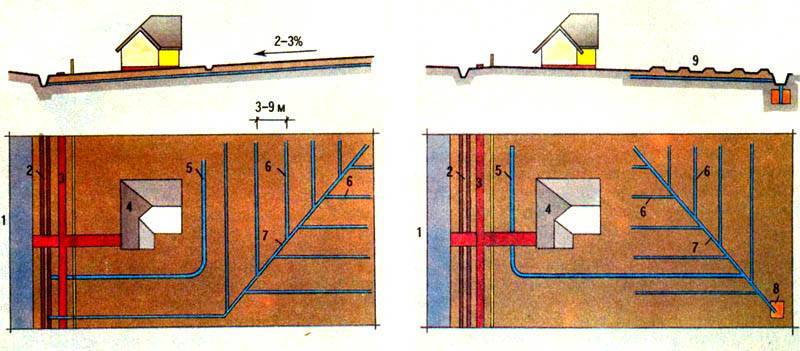
fasteners. For gutter and pipe.
Visually, the elements of the drainage system are shown in the diagram.
Surface and deep schemes
Based on the calculated parameters of drain penetration, surface and deep drainage schemes are distinguished. The purpose of the surface scheme is the collection and removal of atmospheric precipitation products, as well as closely occurring groundwater.
The purpose of the deep scheme is to lower the level of groundwater, collect it and divert it beyond the boundaries of the site where the construction site is located.
An example of a surface drainage system. Surface drainage is widespread in private housing construction.A system for the collection and removal of atmospheric precipitation products is necessary for each case of construction of residential buildings
The scheme of water inlets of storm sewer systems supports point or linear execution. In the first case, wastewater is diverted from local sources (drains, sidewalk pits, collections of entrance groups).
The linear scheme provides water drainage throughout the facility. As a rule, a combined solution with the introduction of both schemes is used at residential construction sites.
Deep drainage is mandatory in almost all cases of private housing construction and landscaping of household plots. This is an effective protection of those elements of building structures that are located below the zero level (foundation, basements, plant root system).
It is permissible to exclude the construction of deep drainage on hills, where the groundwater level does not exceed 1.5 m, where effective soil drainage is noted.
A fragment of the layout of deep drains. Typically, such schemes provide for the placement of drainage wells - at least one for every 30 meters of the length of the main. On straight sections, installation frequency is allowed every 50 meters
Designing a deep drainage scheme requires high accuracy of calculations. Even a slight error in the calculations can cause low system efficiency.
The practice of installing such schemes often indicates a common mistake - an inaccurate calculation of the depth of laying drains. The result is an uneven drainage of water from the territory of the facility or, even worse, flooding of fertile lands and basements.
There are other articles on our website where we examined in detail the construction of various drainage options. We recommend that you check them out:
- Drainage device around the house: do-it-yourself design and arrangement of a drainage system
- How to make do-it-yourself foundation drainage at home: the secrets of proper organization
- How to competently make the drainage of a garden plot with your own hands: we disassemble the correct arrangement technology
Expert advice
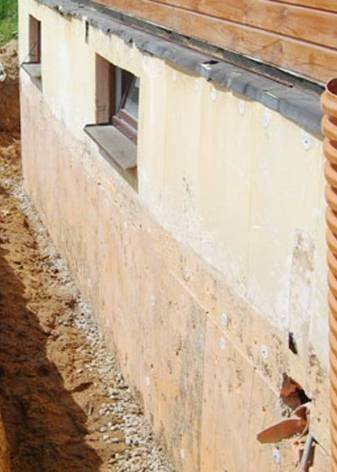
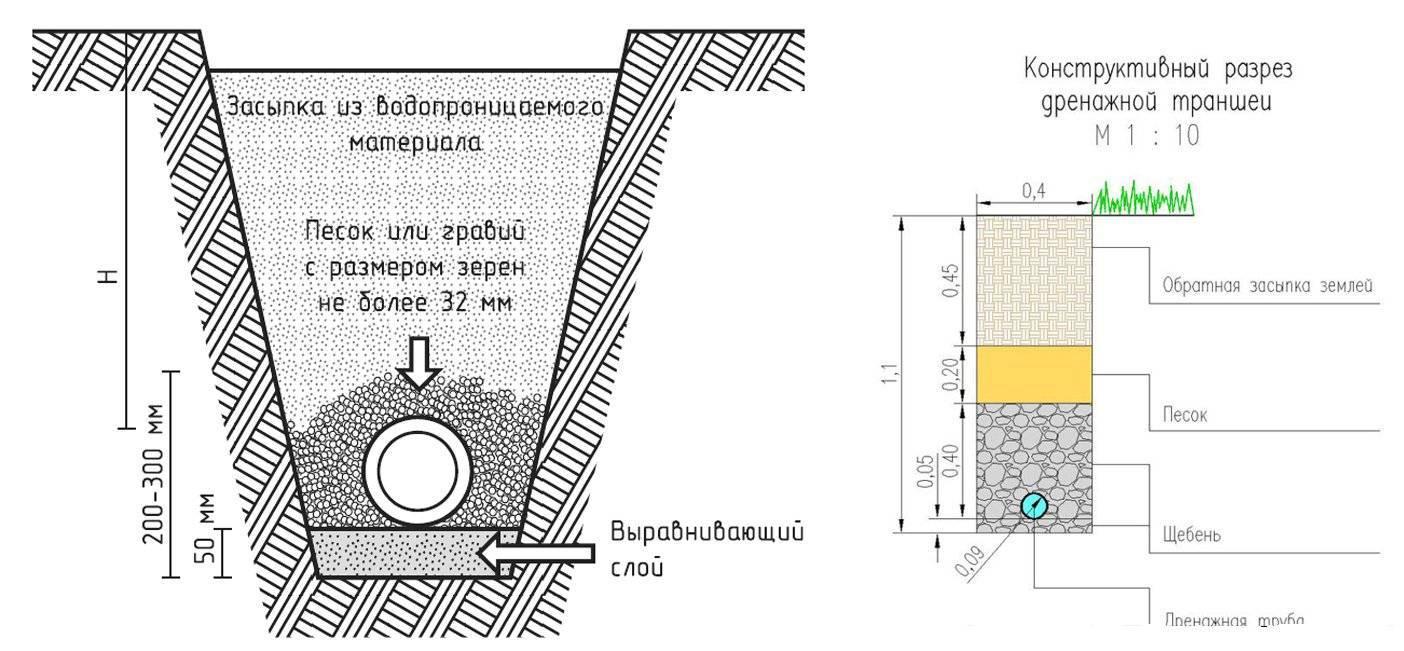
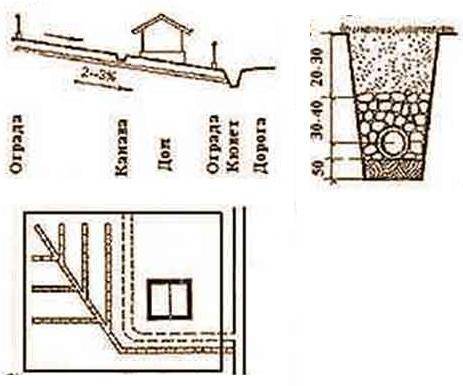
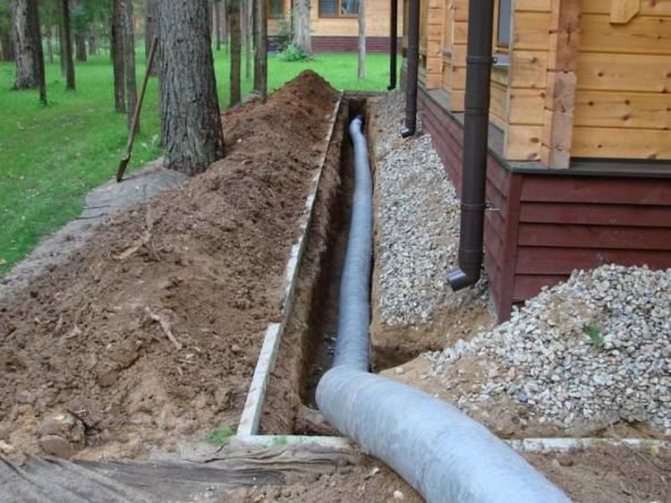
When performing earthworks, it must be remembered that the moat should expand from above. To prevent freezing of the system at low temperatures, it is necessary to lay pipes below the soil freezing line. For the correct operation of the system, it is not enough to ensure the correct slope of the drainage pipe. It will also be necessary to make a blind area from the foundation to the drainage under a slight slope. This will allow rainwater to enter the catchment.
After that, 15 cm of sand is poured into the ditch, crushed stone is laid on top, its layer will be approximately 20 cm. Pipes are laid on the base, which can be wrapped in construction interlining. It has good water permeability. When the slope of the pipe between the septic tank and the drainage well has been arranged, it is necessary to think about what material to use as a filter. It could also be coconut fibre. For loam and sandy loam, non-woven or needle-punched textiles are usually used to serve as a filter. On sandy soils, fiberglass is an excellent option.
You should not be afraid to increase the cost of the work by laying the biomaterial between the layers of crushed stone and sand. This will eliminate silting and make system maintenance less necessary.In addition, this approach helps to extend the operating time.
Installation of drainage pipes is necessarily accompanied by trimming products. To do this, use a mounting knife. The parts are interconnected by special couplings. To increase the strength, you can use a welding machine.
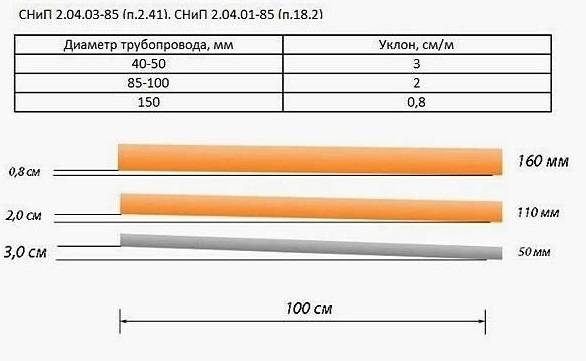
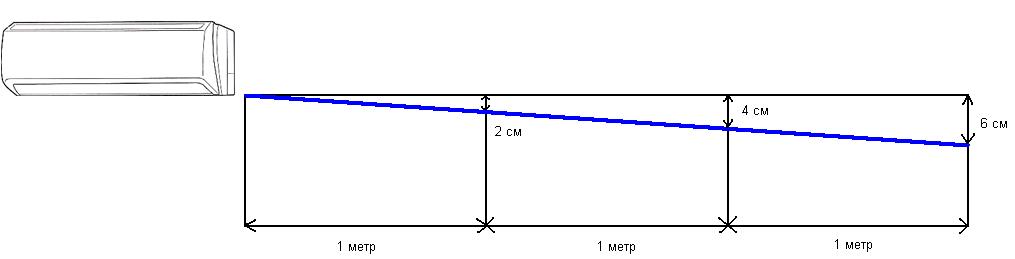
Correct calculation of the slope of the drainage pipe
To correctly lay a functional drainage system, you need to accurately calculate the angle of inclination of the pipes. The following parameters are taken into account:
- soil type;
- section and type of drains;
- laying depth;
- surface topography;
- UGV on the ground.
Algorithm for calculating the slope of the drainage pipe:
- measure the length from the extreme point of the pipe to the wastewater tank, for example, take the number 20 meters;
- measure the distance from the highest to the lowest point of the contour, for example, you get 10 meters;
- add two indicators - we get 30;
- in order to calculate the differential height from the obtained indicator, 1% is taken, i.e. we get 0.3 - the drainage system must be laid so that the difference between the upper part of the pipe and the lower one is 30 cm.
We offer you to watch a video about drainage systems - installation rules, distance from the foundation, laying depth:


Drainage pipes for groundwater drainage: complete product classification
This article discusses groundwater drainage pipes: a complete classification of drainage products, their advantages, characteristics and main parameters are presented. Thanks to this information, you will learn how to select the appropriate types of pipes for certain types of drainage systems in accordance with their requirements, soil conditions, etc.
Corrugated pipe walls are highly resistant to any deformation changes under the influence of loads
Groundwater drainage pipes: an introduction to the topic
The drainage pipe acts as the main building element, on the basis of which a drainage system is formed, designed to drain areas. This element is responsible for collecting and diverting groundwater, melt and rainwater outside the territory with their preliminary filtration.
Note! A large volume of melt and storm water can provoke a rise in the groundwater level. The appearance of such a situation is highly undesirable, because as a result, the destructive effect on the foundation part of the building, as well as all elements of landscape design located on the site, increases. Drainage system helps to get rid of excess water in the area
Drainage system helps to get rid of excess water in the area
Installing large diameter drainage pipes allows you to cope with problems such as:
- high soil moisture
- mold formation,
- flooding of the site, the foundation of a residential building and buildings for household purposes, as well as cellars,
- permafrost formation,
- the appearance of puddles on paved surfaces,
- formation of ice on footpaths,
- rotting of the roots of garden flowers, vegetables and other vegetation due to an excess of moisture in the garden and summer cottages.
Features of drainage pipes with partial perforation, full or no perforation
If we talk about the general classification of products for drainage systems, the range is represented by the following types of pipes (by type of material):
- asbestos-cement,
- ceramic,
- plastic drainage pipes with and without perforation, as well as with its partial presence.
In the building materials market, drainage pipes are represented by a wide variety of types and sizes.
However, most construction companies have already abandoned the use of pipes made of ceramic or asbestos cement due to the numerous disadvantages inherent in them:
- Large weight, requiring significant costs for transportation and installation, because the installation of such dimensional products cannot do without the use of specialized construction equipment.
- The slow process of installing a drainage system, which can only be carried out by the hands of professionals.
- Low performance. Drainage pipes without perforation are usually on sale, so the holes are made manually. Because of this, during operation, the pipeline clogs faster, so frequent cleaning is required, and in some cases, a complete replacement of elements.
- The construction of systems based on them is much more expensive than in the case of using plastic elements.
Installation of a water drainage system on a land plot using corrugated plastic pipes with perforation
Note! The table shows the average price of drainage pipes 200 mm from various materials. There are other diameter options, however, in products made of ceramics, asbestos cement and plastic, the standard dimensional parameters do not match. Therefore, for comparison, a drainage pipe diameter of 200 mm was taken, which is present in the assortment of all these products.
Therefore, for comparison, a drainage pipe diameter of 200 mm was taken, which is present in the assortment of all these products.
Comparative pricing table:
Drainage pipes for groundwater drainage: complete product classification Drainage pipes for draining groundwater from a suburban area: types of products, their characteristics, prices and features of use in drainage systems.
Basic elements and materials of foundation drainage
The most basic element of a deep drainage design is a pipe.
Pipes
The drainage pipe can have a different cross-sectional diameter, but a pipe with a diameter of 100 - 110 mm is mainly used. To evenly distribute the load and prevent soil from being crushed, the pipe has additional transverse stiffening ribs. To receive moisture from the soil, the drainage pipe has a perforation, which is evenly distributed around its entire perimeter.


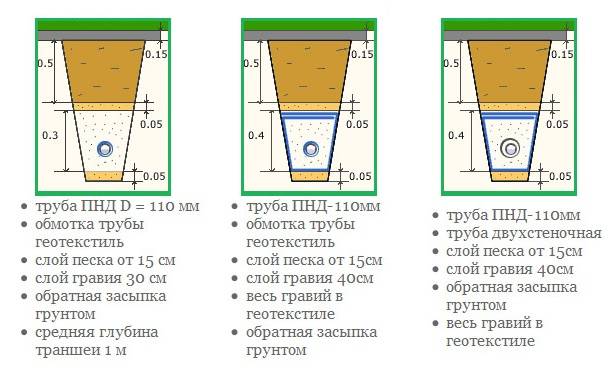


The most common materials from which pipes for removing ground moisture are made are PVC and HDPE. PVC material is known to everyone, its main qualities are strength, excellent resistance to corrosion and low temperatures. The downside is the lack of flexibility. To form bends in a PVC system, many different fittings must be used.
In view of this, with a shallow depth and soil pressure on the pipe, it is more expedient to use HDPE material, or low-pressure polyethylene, which bends easily and is able to withstand fairly high pressure. When using it, it becomes possible to save on fittings.
For drainage at great depths, it is advisable to use two-layer PVC pipes.
Wells
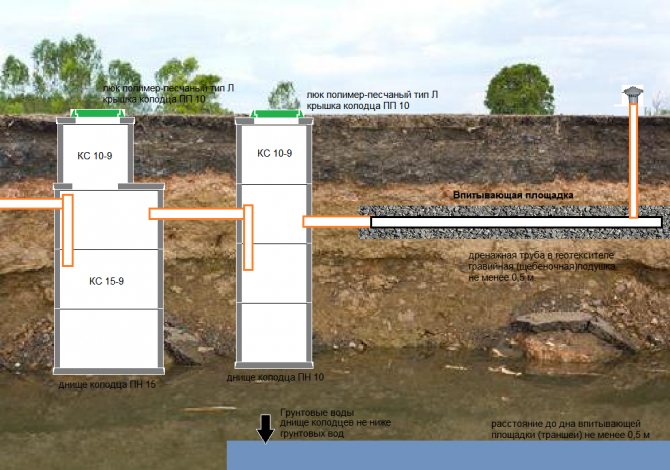
Another important element of the design are wells. They are divided into viewing and reception areas.Manholes are installed at the corners of the ring system and are usually made of plastic. Receptions are installed at the exit from the site and serve to ensure that the water, after it has entered the well, gradually goes into the soil.
They can be both plastic and made of concrete rings. If it is not possible to organize a well with the function of filtration and self-emptying, then its bottom is also concreted or a plastic well with a closed bottom is installed. Thus, it becomes necessary to periodically pump out water using special equipment.
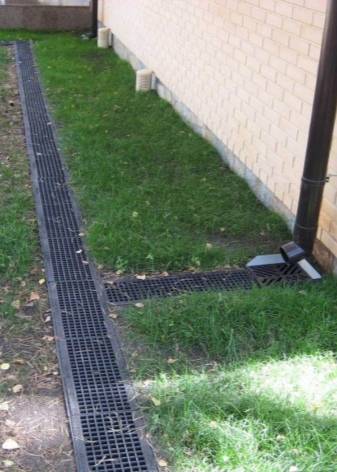
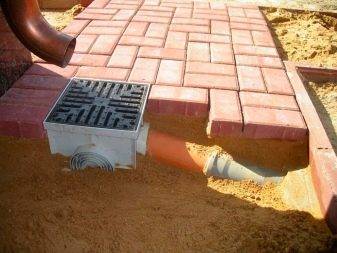
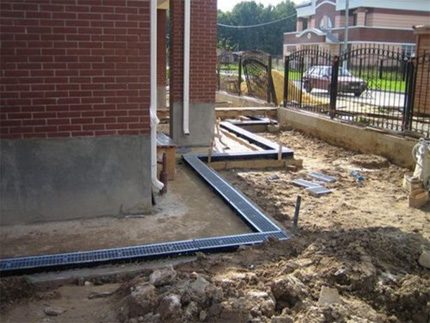
Livnevki
Storm drains are elements of the surface water drainage system from the foundation of the house, they have a semicircular shape. Storm drains are installed around the entire perimeter of the blind area or in those places where water accumulates after rain. Storm drains can also be used as an element of decor, as their receiving grates can have a different look.
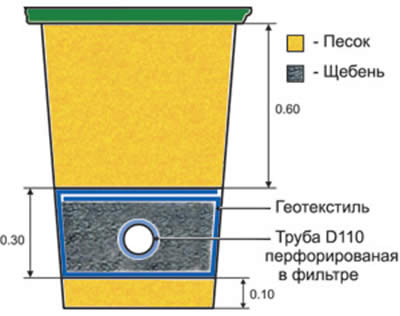
Geotextile
A special fabric made from polypropylene yarns with unique characteristics that no other natural fabric has. Geotextiles are used in the drainage system as a filter, retaining fine sand particles that, once inside the drainage pipe, can clog it over time.
These were the main design elements of the drainage system, in conjunction with which a large number of adapters and various small parts are used, which may vary depending on the manufacturer. It is for this reason that when buying a drainage system, it is necessary to make sure that all structural elements are made by one manufacturer, otherwise they may simply not be combined.
How to lay pipes correctly?
The correct instructions for laying drainage pipes will allow you to create a drainage system that will take care of the backyard for many years.
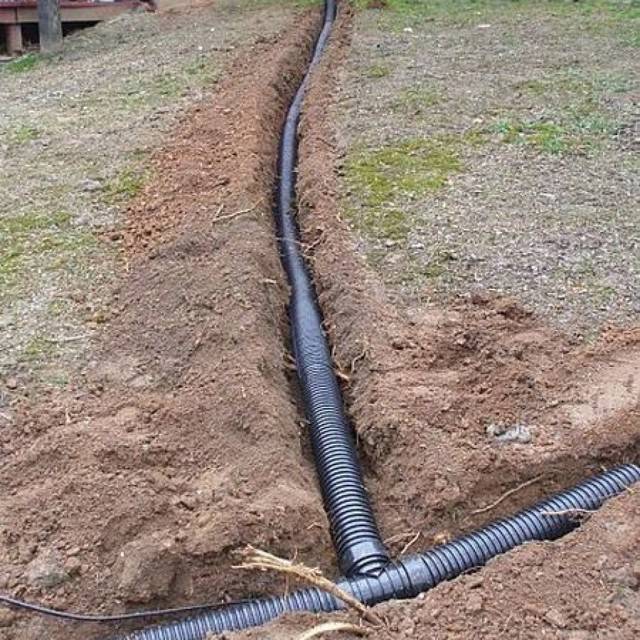
- First you need to dig a trench to a depth of about one meter. Bottom width within 40 centimeters. The moat should widen at the top. To prevent freezing of the system during severe frosts, it is better to lay pipes below the freezing level of the soil. The trench is made under a slope. To understand what slope the drainage pipe should have, you should focus on the catchment area. But throughout one branch of the system, it should be within three degrees.
- Before laying the pipes, you can make a blind area from the foundation of the house to the drainage at a slight slope. This will allow rainwater to drain freely into the catchment.
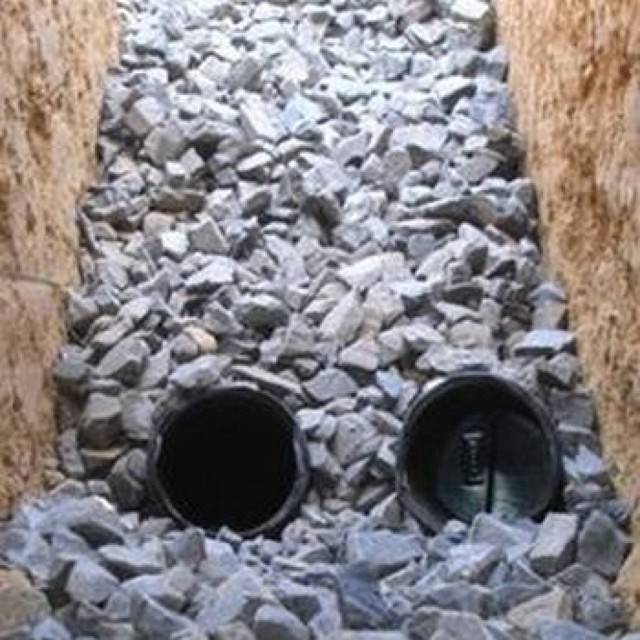
- After that, a layer of sand about fifteen centimeters thick is poured into the ditch. On top of it is a ball of rubble about twenty centimeters.
-
On such a base, plastic pipes wrapped in geotextiles are laid. Construction interlining is often used as such material. It has very good water permeability. If drainage is done on clay soil, the plastic pipes are wrapped in a coir filter. For sandy loams and loams, non-woven or needle-punched filter textiles are used. On sandy soils, a thin material such as fiberglass is the best option.
- In order to prevent silting of the drainage system, the geomaterial is laid additionally between the balls of sand and gravel, on the sides. This is more expensive, but increases the operating time of the technology.
- You can cut the required length of the pipe with an ordinary mounting knife. Each part is connected with a special coupling.For extra strength, you can use a special welding machine.
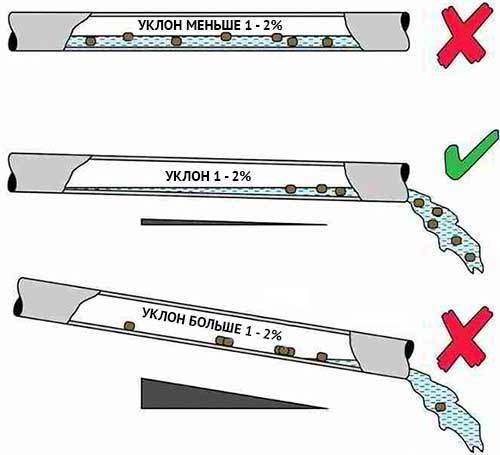
- Pipes must be laid at an angle. The bevel of the pipe, first of all, depends on its size. If the hole is too large, the water will flow very quickly. As a result, silt deposits will remain at the bottom. As a result, you will often have to clean the entire system. If you make the slope insufficient, the water will stagnate. This will cause the pipes to overflow and stop draining the area. In other words, the smaller the diameter of the pipe, the more it needs to be sloped. For a personal plot, a slope of no more than three millimeters per meter of length is considered acceptable, if there are no features of the relief.
-
When laying drainage pipes, you should correctly calculate the distance between them. The location step directly depends on the type of soil. If work is carried out on heavy soils, for example, clay or loamy, pipes should be laid more often, at a distance of 5 to 15 meters. On sandy and sandy loamy soils, a sufficient step is within 25–30 meters. On average, one meter of drainage pipe drains an area of about fifteen square meters.
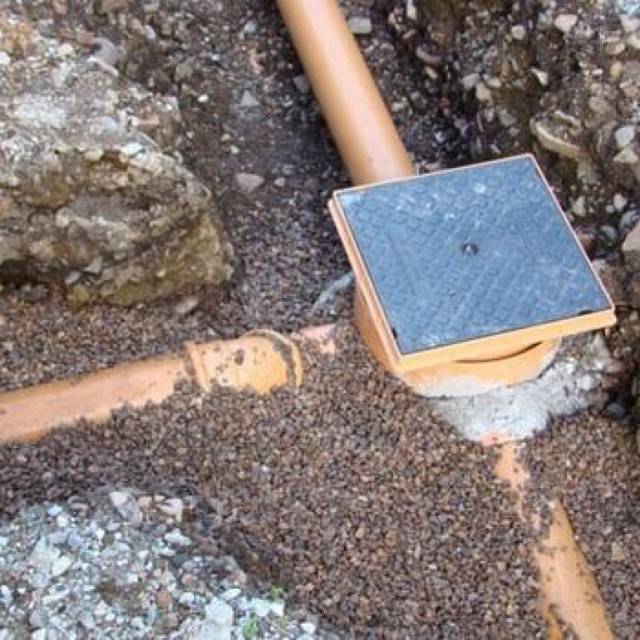
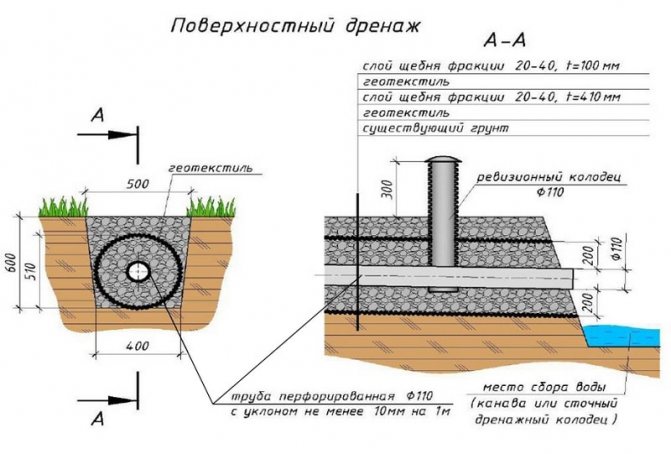
- In those places where the ditch turns or its slope changes, manholes should be made independently. They are equipped with concrete or plastic rings with a diameter of about 50 centimeters. From above they must be covered with lids or similar material. Such manipulations are required to protect structures from debris. These structures are necessary to control and periodically clean the drainage system.
- After the pipe, they are covered with rubble to ¼ of the depth of the trench, sand is placed on it and the work is completed with a layer of earth. As for crushed stone, it is better to use several of its fractions when working.It would be ideal if coarse material (50–70 mm) is used for the first layer, crushed stone of medium size (20–40 mm) is used for the second ball, and a fine fraction (up to 20 mm) is suitable for the third. The topmost layer of rubble should be about 40 centimeters thick.
- The output of the drainage system occurs in the water intake. Such a place can serve as an open reservoir or sewerage. Otherwise, you will need to dig a special well, which will have to be pumped out from time to time. Such a well should be dug in the lowest part of the backyard. The depth depends on the amount of water that will drain into it. However, it is not advisable to do less than three meters. The bottom should be covered with gravel. And it is better to refrain from concreting. Water should seep freely into the ground.
- A non-return valve is mounted at the end of the output pipe.
DIY drainage - step by step technology
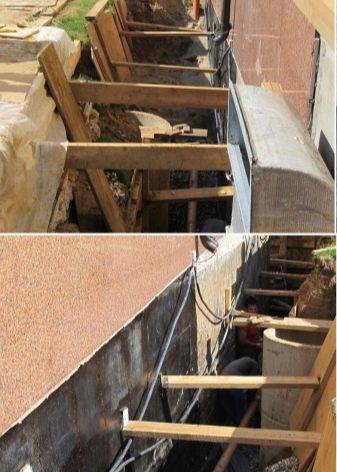
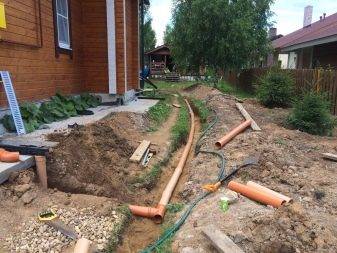
Today we will look at how to properly make drainage around a house under construction with our own hands.
At the very first stage, it is necessary to determine what type of soil prevails on the site, for this it is necessary to conduct geological surveys. After the study, it will be clear which soils prevail and, accordingly, it will immediately be clear at what depth the drainage pipe should run. If drainage is being laid to simply drain water from the site, then it is not necessary to do surveys, but if we are talking about building a private house and installing foundation drainage, then it is better to use the services of specialists in order to avoid problems with a “floating” foundation in the future and the possible formation of a technological cracking:
The photo above shows a do-it-yourself drainage scheme around the house.
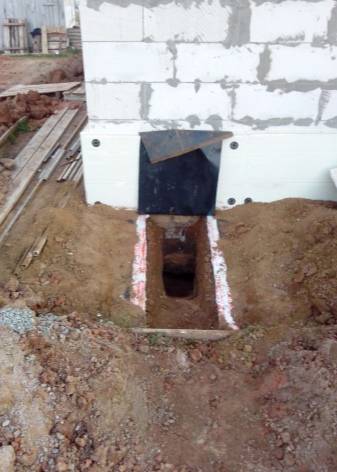
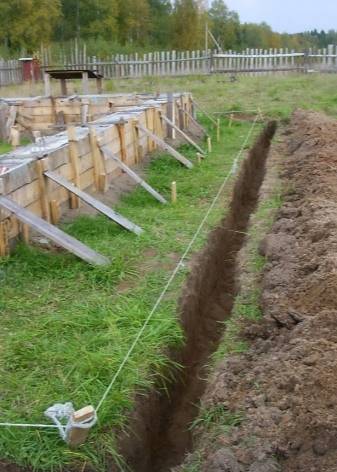
In our case, it is necessary to do the drainage of the site on clay soils with your own hands. In addition, it turned out that groundwater comes close to the surface. We will dig a trench around the house for laying a drainage pipe with a depth of 50 cm.
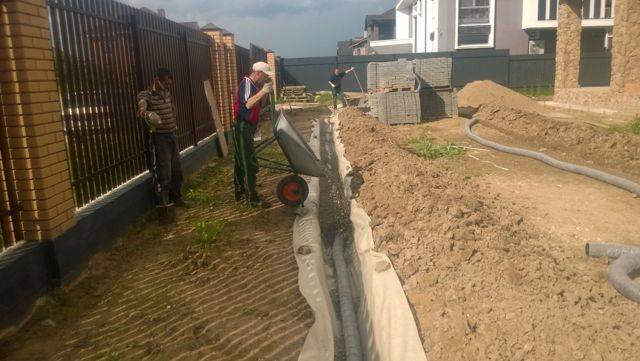
After the trench is ready, we fill the bottom with sand and ram it with a homemade rammer. The sand at the bottom of the trench is used as a coarse fraction:
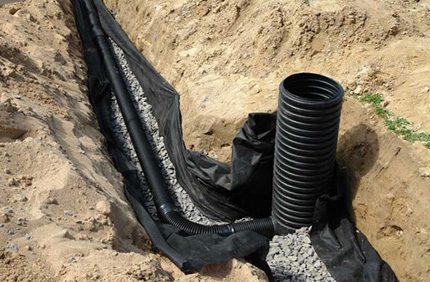
After the work done, we lay geotextile on top of the sand, it does not allow the layers to mix, that is, the sand does not combine with the gravel that will be laid next. Geotextile is a synthetic non-woven fabric that acts as a filter, water passes through it, but large particles cannot pass through. In the process of arranging drainage with our own hands on the site, we lay the geofabric so that there is a margin on the sides for further “wrapping” of the pipe, lined with rubble on all sides:
As mentioned earlier, a layer of gravel is laid on the geotextile. It is better to use fine gravel. The layer should be large enough for better groundwater filtration. We set the required slope with gravel at the bottom of the trench. A drainage pipe is laid directly on the gravel layer. This pipe is made of polyethylene, it is corrugated, with special holes through which groundwater enters. The pipe is usually laid with a slope of at least 3%, if possible more, so that the water flows better to the well (revisions):


Further, in order for the drainage of the foundation, made by oneself, to be of high quality, we sprinkle the pipe with crushed stone of the same fraction as under the pipe. On the sides, top and bottom of the pipe, the layer of crushed stone should be the same.If one pipe is not enough, you can make drainage from small sections by joining them with a special coupling:
The meaning of all the work is to ensure that the groundwater that has fallen into the pipes is diverted somewhere. This will prevent the foundation from being washed away with water, which can cause it to simply collapse. Therefore, during the do-it-yourself drainage around the house using perforated pipes, a real drainage system is created, which includes pipes and wells for collecting water that act as revisions. Wells are designed to always have access to the pipe, and if necessary, it could be cleaned.
In our case, the wells were located at pipe bends. After sprinkling it with crushed stone, we close the layer of geofabric with an overlap, as mentioned earlier, we “wrap” the pipe with a layer of crushed stone. After the geotextile is closed, we again sprinkle with sand, and again we ram. After completing the work on the drainage device around the house with our own hands, we fill the trench with the previously selected soil. If desired, you can additionally insulate the drainage system by placing a layer of thermal insulation material on the top sand cushion. You can already make a path along the layer of earth. So it will always be visible where the pipes of the drainage system pass.
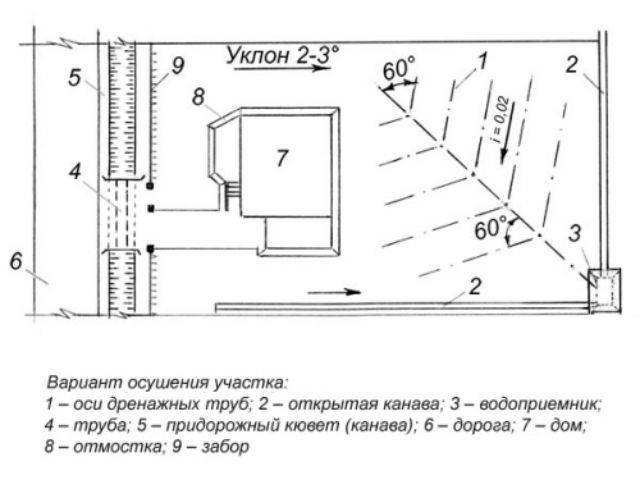
Scheme and order of the device
After the necessary geological surveys have been carried out and the level of groundwater location has been established, it is possible to proceed with the construction of drainage on a site located on a hill.
First of all, it is necessary to exclude soil erosion by spontaneous drainage, provoked by the steepness of the slope. To do this, the following construction work should be carried out:
- Install a horizontal drain at the highest point of the site.
- Create a similar drainage system at the bottom of the slope.
- Both of these structures are connected by perpendicular channels.
- From the drainage located at the lower level, draw a drain to the drainage well.
The device of the drainage system largely depends on the terrain on which the site is located. It may be necessary to install point drains for transition platforms and retaining stairs, which will then go into a linear drain system.
Following the instructions of SNiP, the parameters of the slope of the drain are correlated with the indicators of the movement of wastewater. The minimum slope of drainage pipes with a diameter of 150-200 mm is 8-7 mm, respectively.
When using trays to drain water, the slope is set so that the liquid can naturally clean itself. The filling of a tray with a width of 20 or more millimeters should not exceed 80%.
closed drainage system
Scheme of the longitudinal section of the drainage ditch.
Such a system consists of collecting drainage pipes (or drains), a main pipe (or collector), manholes, a drainage system and a water intake. For its device, first of all, it is required to create a water intake. It can be a pond dug at the lowest point of the site or a storm ditch outside the territory. If the site is located in a lowland and the groundwater level is too high for a pond, water collection wells equipped with a pump are used. As they fill up, water is pumped out of them to higher areas of the terrain where there are water inlets - storm sewers, ravines or ponds.
After the device of the water intake, they begin to create a drainage system, which should have a slope. It is calculated in the same way as the slope for drainage.For drainage, pipes with a diameter of 10-16 cm are used. They are laid on a cushion of crushed stone, wrapped in geofabric.


