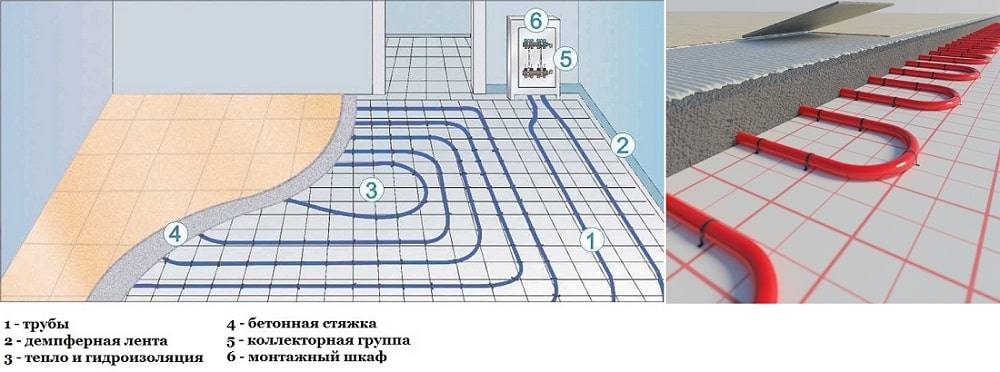
- Features of fixing pipes in the circuit
- Common installation steps
- Collector arrangement methods
- Choice
- Types of pipelines for the water system
- Polypropylene
- Polyethylene
- Stainless
- Copper
- Lack of calculation of heat losses for heating
- Laying schemes for the water circuit
- Laying schemes for the water circuit
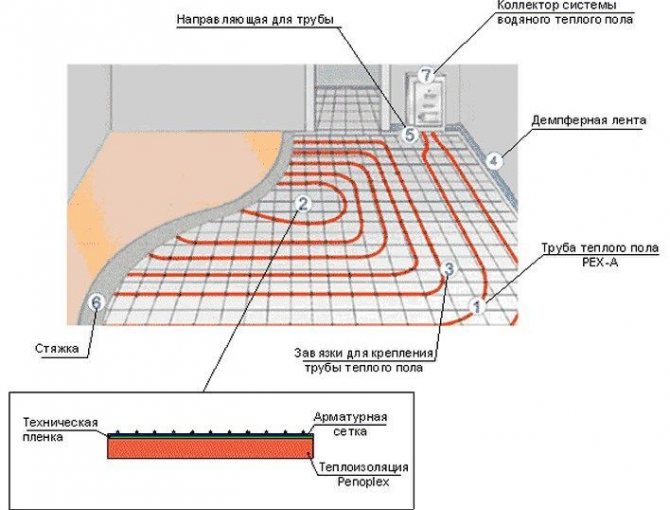
- Installation of underfloor heating pipes
- Step 3. Laying thermal insulation
- Installation of a warm water floor
- System selection
- Preparation stage
Features of fixing pipes in the circuit
Underfloor heating pipes can be laid in one of the following ways:
- using plastic strips that look like a cantilever tape;
- using special mats with laying grooves;
- laying a warm floor with a metal mounting tape;
- using separate brackets - they are attached to the base at a distance from one another.
As an example, consider the use of a plastic strap for fasteners, on which there are grooves for 16 and 20 mm pipes. At the same time, opposite clamps on the fastener are located at intervals of 50 millimeters, and pipe clamps are located at a distance of 20 centimeters from each other.
A convenient installation method is to fasten the contour with plank (or tape) clamps - they provide a 200 mm pipe pitch when laying a warm floor and therefore no marking is required.
A similar distance of 20-25 centimeters should be adhered to in the case of mounting the heating structure using point brackets. They are designed to ensure that the screed is heated evenly, regardless of the laying methods - a spiral or a snake.
It is also possible to provide a fixed gap between the pipes by using aluminum heat-distributing plates. They are placed on plates of extruded polystyrene foam, which have special grooves on their surface. The result is a kind of assembly system that has much in common with children's designers, since all the necessary sizes are already provided in them.
To avoid deformation of the metal-layer during a sharp turn of the heating circuit, a steel spring is put on the pipe before installation work, having a length of 20-25 centimeters and a width of 18-20 millimeters. It should be pulled over the intended bending point, as a result of which it will compress the walls and the plastic will begin to stretch evenly, so that the hall will not occur. During the laying process, the spring is pushed further to the end of the contour and then removed.
You need to know how to properly lay the pipe for the underfloor heating along the screed so that the coating warms up evenly. The fact is that warm air through concrete rises not strictly vertically to the top, but at an angle of 45 degrees, resembling a cone in shape.In the event that the edges of the flows cross on the surface of the concrete layer, then the floor covering will warm up evenly and no temperature difference is felt when moving along its surface.
In fact, it is enough that the thickness of the screed is less, namely about 10-12 centimeters, and there are several explanations for this:
- On top of the concrete layer, a finishing floor covering will still be laid, which will increase the height of the floor.
- In practice, pipes located in the screed do not create clear heating limits, and the concrete is heated nearby, as a result of which the same temperature is kept at the surface.
Installation and selection of pipes for underfloor heating is a completely solvable task. But it must be remembered that the heating system is equipped once for a long time and repairs as a result of a breakdown will cost a significant amount.
Common installation steps
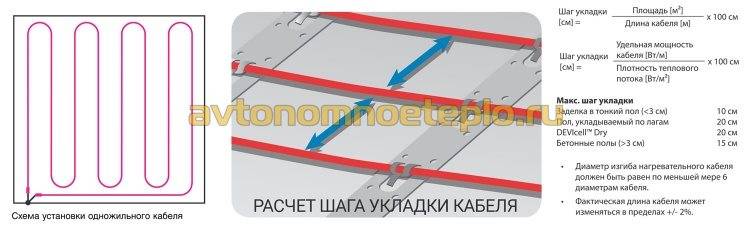
Typically, pipes are laid so that the distance between them is 100-300 mm. More accurately, the step is determined only after calculating the total length of the pipeline and determining the heating area (room area minus the area of bulky furniture). In practice, the distance is calculated approximately (see below), and then a scheme for laying a warm floor is drawn and the step is specified.
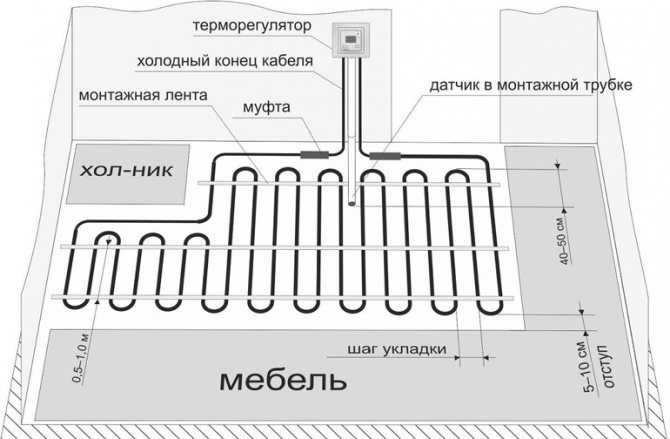
The approximate distance in bathrooms is 100-150 mm, in residential premises - 250 mm, 300-350 mm in corridors, lobbies, kitchens, utility rooms, storerooms, etc. more in the rest of the room. Any method of arranging warm pipelines can have a different pitch in different parts of the room.
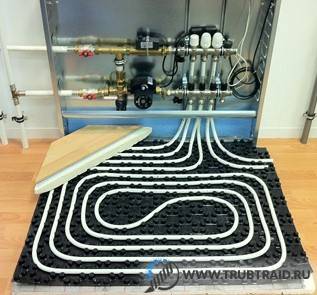
Collector arrangement methods
The choice of a ready-made mechanical or automatic collector model depends on the characteristics of the heating system.
The first type of control module is recommended to be installed for warm floors without a radiator, the second one can be used in all other cases.
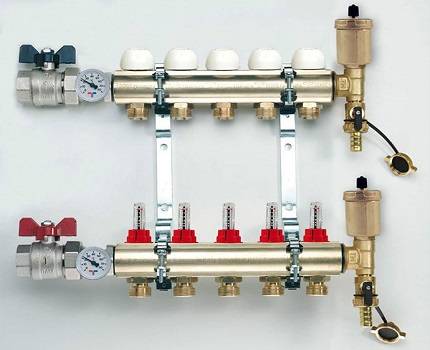
According to the scheme, the assembly of the distribution comb for underfloor heating is carried out as follows:
- Setting the frame. As an installation area for the collector, you can choose: a prepared niche in the wall or a collector cabinet. It is also possible to mount directly on the wall. However, the location must be strictly horizontal.
- Boiler connection. The supply pipeline is located at the bottom, the return pipeline is at the top. Ball valves must be installed in front of the frame. They will be followed by a pumping group.
- Installation of a bypass valve with a temperature limiter. After it, the collector is installed.
- Hydraulic test of the system. Check by connecting to a pump that contributes to pressurizing the heating system.
In the mixing unit, one of the mandatory elements is a two- or three-way valve. This device mixes water flows of different temperatures and redistributes the trajectory of their movement.


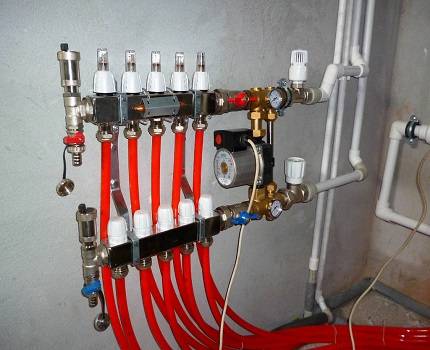
If servo drives are used to control the collector thermostats, then the mixing unit is expanded with a bypass and a bypass valve.
Choice
Polypropylene pipes are presented on the market in several versions. They are divided into single-layer and multi-layer. In relation to multilayer, reinforcement is carried out with aluminum or fiberglass. In the underfloor heating system, multilayer pipes must be used. They exist in three types:
- With an aluminum layer, which is located on the outside or between the layers of polypropylene.
- Composite reinforced between layers with a mixture of aluminum and fiberglass base.
- With a layer of fiberglass are optimal for underfloor heating. They do not deform during temperature changes, they are characterized by increased durability and strength, they lie well in the screed.
Types of pipelines for the water system
Currently, the consumer market offers several options for materials and components for a water heating system. When choosing a pipeline for underfloor heating, you need to build on their cost, characteristics and service life.
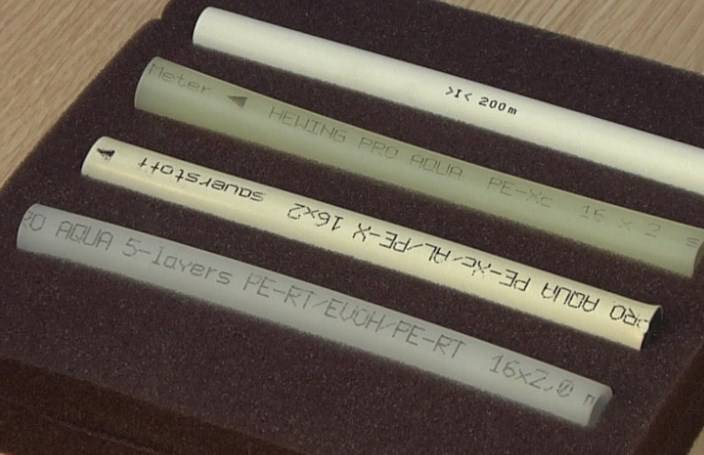
Consider the most common types of pipelines and their characteristics.
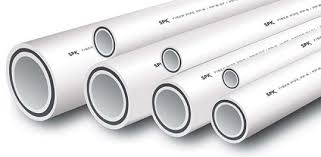
Polypropylene
In the building materials store, you can find two options for polypropylene pipes, such as metal-polymer and polymer. They are characterized by good resistance to corrosion, resistance to the abrasive action of the coolant and a durable top layer that does not deform upon contact with the cement mortar. Manufacturers of metal-plastic pipelines guarantee that they will last for about 40 - 45 years, polymer products for more than 50 years.
Polyethylene
A distinctive feature of these pipes is that no accessory connections are needed for installation. Docking of products is carried out using a soldering iron. For the elasticity of the pipeline, it will be enough to warm it up with a hairdryer. Polyethylene products are reliable and durable, but for a water floor they must necessarily have a reinforcing layer. The average life of a pipeline is 50 years.
Stainless
Corrugated pipes made of this material are considered the most durable, their service life has not yet been established. They do not corrode, do not deform from high temperatures and do not freeze during frost. The flexibility of the material allows the pipeline to be laid in steps of different sizes, which simplifies installation work. The only drawback of stainless pipes is that their rubber seals have a service life of only 30 years.
Copper
According to consumer reviews, pipes made of this material have the highest heat transfer. They can be used with coolants like antifreeze or antifreeze. They are convenient to use. Due to its optimal size, the strength of the concrete screed does not decrease during installation. Their service life is about 60 years.
In addition to the above characteristics, when choosing pipes for laying underfloor heating, it is necessary to pay attention to their technical parameters. They must meet the following requirements:
- Linear expansion no more — 0, 055 mm/mK;
- Thermal conductivity not less than - 0.43 W / mK;
- Diameter - from 1.6 cm to 2 cm.
It is also worth paying attention to their purpose. Many beginners make a big mistake by choosing conventional plumbing for hot water for underfloor heating.
Therefore, before buying it is very important to read the attached instructions, where you can make sure that the product is suitable for the heating system.
Lack of calculation of heat losses for heating
This is the biggest mistake when installing underfloor heating (and any other heating system). When installing radiators for a heating system, one should not be guided by the same standards that are considered generally accepted in a house without underfloor heating.You should not install sectional batteries according to the number of windows in the room and based on the calculation of the area of the room. This can lead to a non-functioning system or increase unnecessary costs for installing a heating system.


According to the rules, the installer himself is obliged to calculate the number and power of radiators and underfloor heating. If a specialist suggests that you put radiators under each window opening, and the number of sections is determined by your desire or budget, then it is better to refuse immediately. In this case, there is a possibility that you will freeze in winter. As a result, you will have to change radiators to more powerful ones, or build up existing ones. Taking into account the cost of installation and dismantling of heating, an impressive amount is obtained. In addition, you may have to redo the heated floors themselves.
The calculation takes into account such positions as the pitch of the underfloor heating pipe, the wall thickness and inner diameter of the pipe, the thickness of the reinforcing mesh, the total thickness of the screed, the offset from the load-bearing wall, the thickness of the insulation, the thickness of the screed above the pipe, the thickness and type of flooring, the thickness of the substrate or a layer of tile adhesive
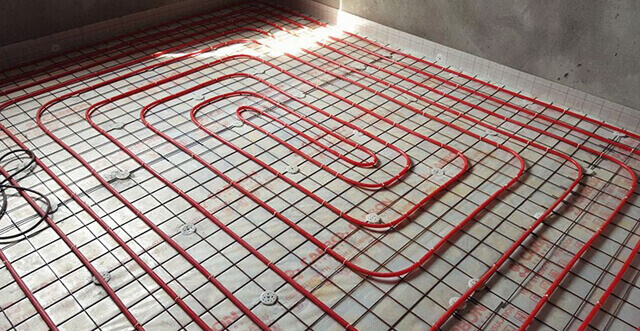
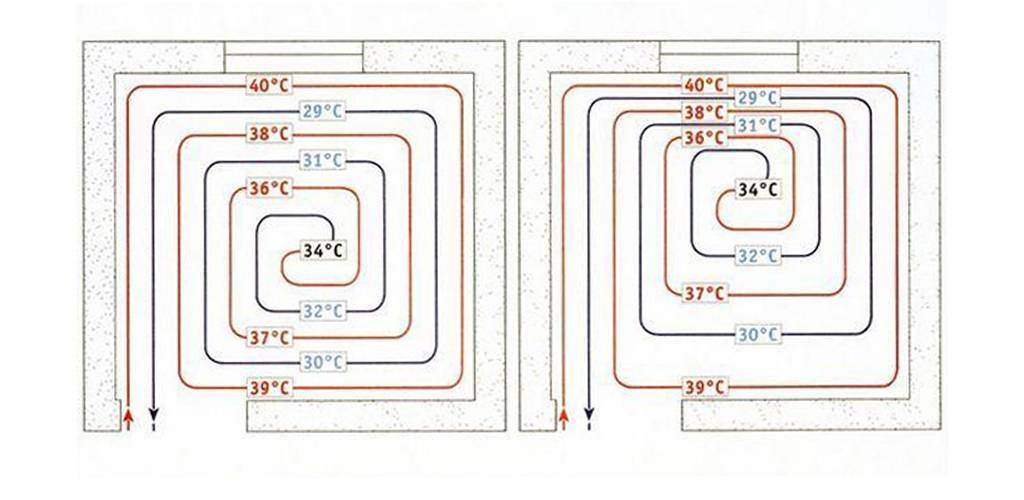
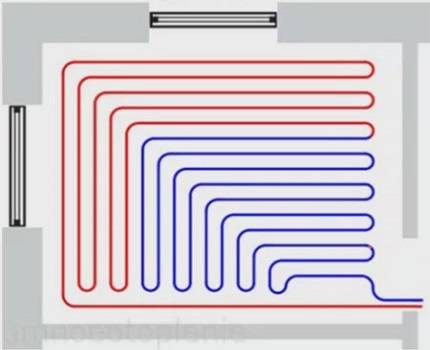
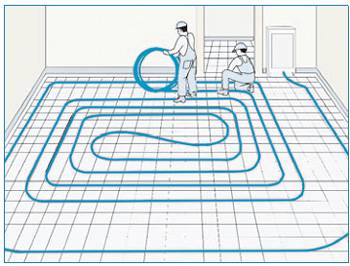
Laying schemes for the water circuit
Schematically, laying pipes for arranging a liquid circuit can be done in one of the following ways:
- coil;
- double coil;
- snail.
Coil. The method of laying such a contour is the simplest and is performed in loops. This option will be optimal for a room divided into zones of various purposes, for which it will be convenient to use different temperature conditions.
The installation of the first loop is carried out around the perimeter of the room, then a single snake is allowed inside.Thus, in one half of the room the most heated coolant will circulate, in the other - cooled, respectively, and the temperature will be different.
The turns of the coil can be evenly spaced, however, the bends of the water circuits in this case will have strong creases.
The serpentine pipe placement method is ideal for rooms with little heat loss. They are used not only for apartments and private houses, but also for industrial facilities where there is a need to heat all year round.
Double coil. In this case, the supply and return circuits are located next to each other throughout the room.
Corner coil. It is used exclusively for corner rooms, where there are two external walls.
The advantages of the serpentine shape include simple layout and installation. Disadvantages: temperature fluctuations in one room, pipe bends are quite sharp, so a small step cannot be used - this can cause a pipe break.

When laying the contour in the edge zones of the room (floor areas where external walls, windows, doors are located), the step should be smaller in comparison with the rest of the turns - 100-150 mm
Snail. Using this layout, the supply and return pipes are mounted throughout the room. They are placed parallel to each other and are installed starting from the perimeter of the walls and moving to the center of the room.
The supply line in the middle of the room ends with a loop. Further, parallel to it, a return line is installed, which is laid from the center of the room and along its perimeter, moving towards the collector.
The presence of an external wall in the room may cause double laying of pipes along it.

Due to the alternation of the two lines when laying the volute, the temperature fluctuation in the supply and return lines can be up to 10 °C
The advantages of this method include: uniform heating of the room, due to smooth bends, the system has little hydraulic resistance, and savings in consumables can reach 15% compared to the serpentine method. However, there are also disadvantages - complex design and installation.
Laying schemes for the water circuit
Schematically, laying pipes for arranging a liquid circuit can be done in one of the following ways:
- coil;
- double coil;
- snail.
Coil. The method of laying such a contour is the simplest and is performed in loops. This option will be optimal for a room divided into zones of various purposes, for which it will be convenient to use different temperature conditions.


The installation of the first loop is carried out around the perimeter of the room, then a single snake is allowed inside. Thus, in one half of the room the most heated coolant will circulate, in the other - cooled, respectively, and the temperature will be different.
The turns of the coil can be evenly spaced, however, the bends of the water circuits in this case will have strong creases.

The serpentine pipe placement method is ideal for rooms with little heat loss. They are used not only for apartments and private houses, but also for industrial facilities where there is a need to heat all year round.
Double coil. In this case, the supply and return circuits are located next to each other throughout the room.
Corner coil.It is used exclusively for corner rooms, where there are two external walls.
The advantages of the serpentine shape include simple layout and installation. Disadvantages: temperature fluctuations in one room, pipe bends are quite sharp, so a small step cannot be used - this can cause a pipe break.
When laying the contour in the edge zones of the room (floor areas where external walls, windows, doors are located), the step should be smaller in comparison with the rest of the turns - 100-150 mm
Snail. Using this layout, the supply and return pipes are mounted throughout the room. They are placed parallel to each other and are installed starting from the perimeter of the walls and moving to the center of the room.
The supply line in the middle of the room ends with a loop. Further, parallel to it, a return line is installed, which is laid from the center of the room and along its perimeter, moving towards the collector.
The presence of an external wall in the room may cause double laying of pipes along it.
Due to the alternation of the two lines when laying the volute, the temperature fluctuation in the supply and return lines can be up to 10 °C
The advantages of this method include: uniform heating of the room, due to smooth bends, the system has little hydraulic resistance, and savings in consumables can reach 15% compared to the serpentine method. However, there are also disadvantages - complex design and installation.
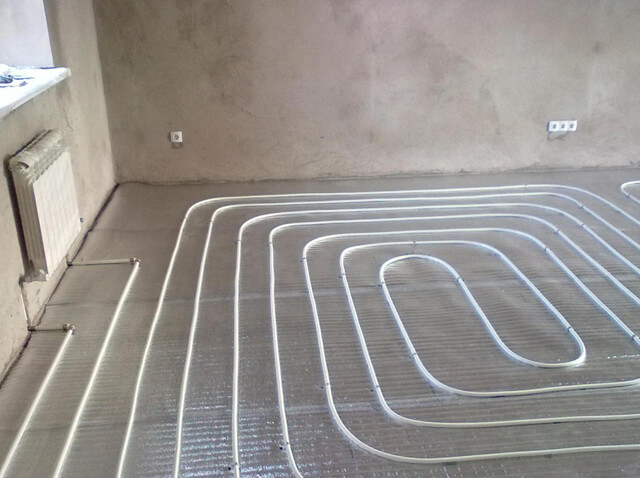
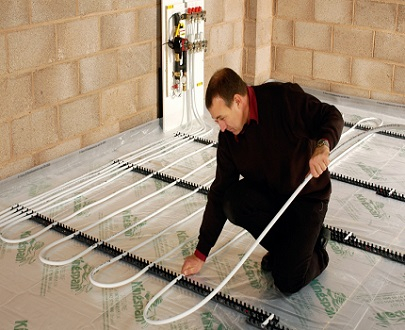
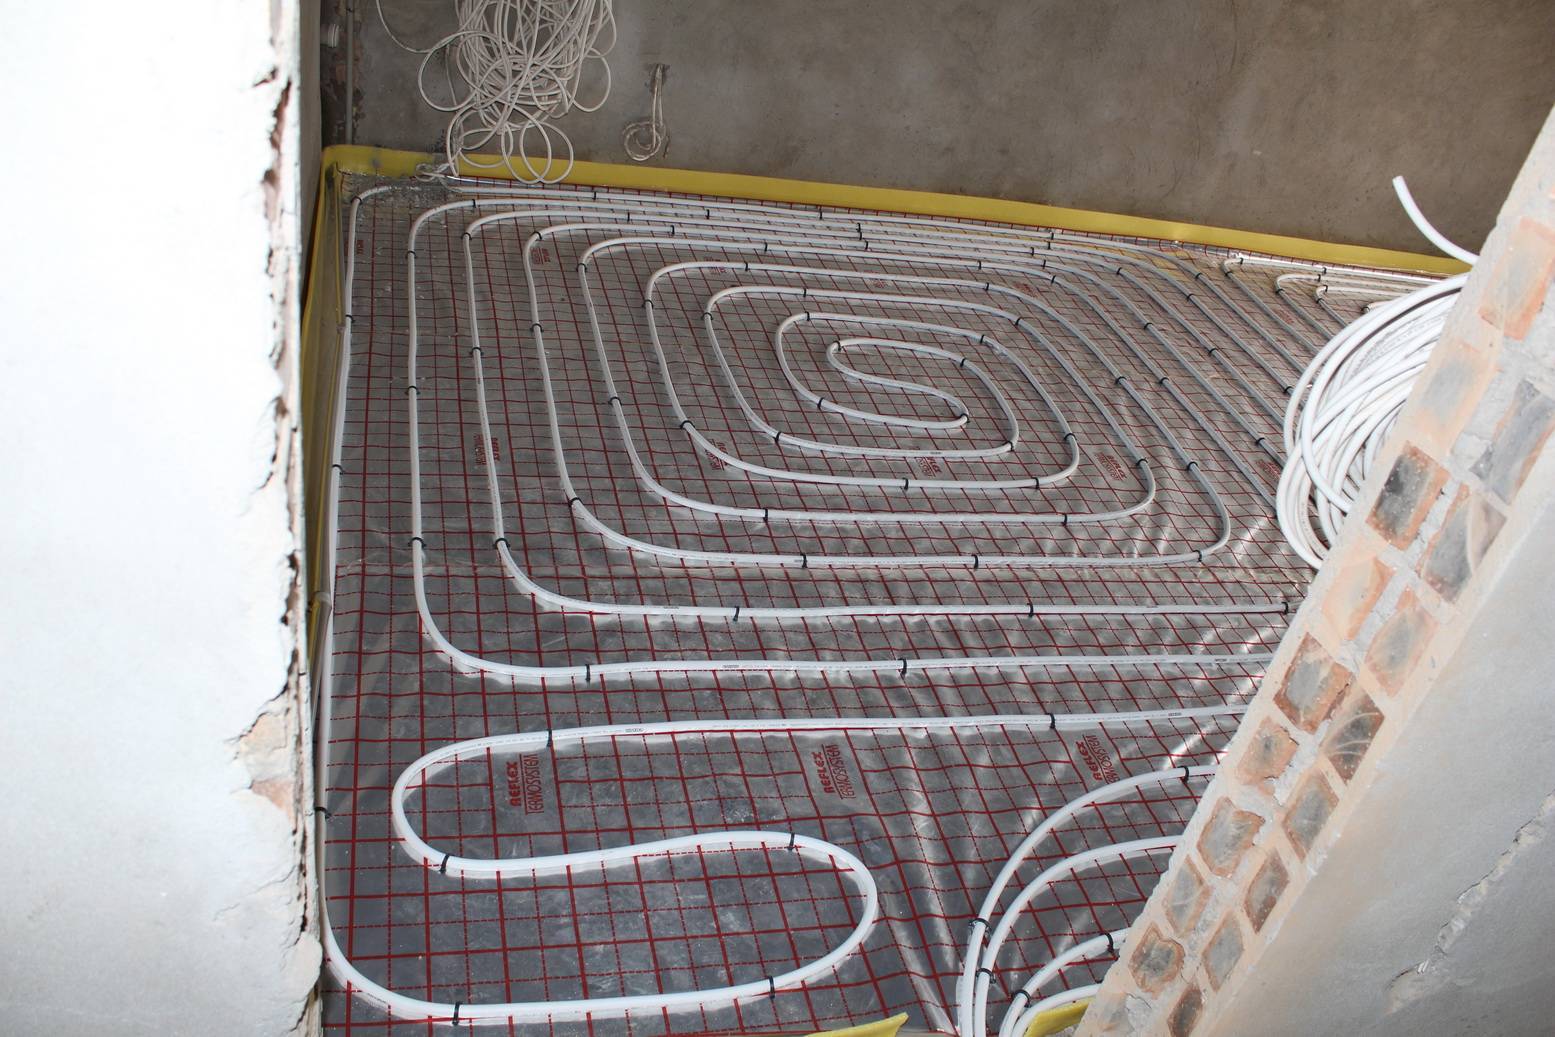
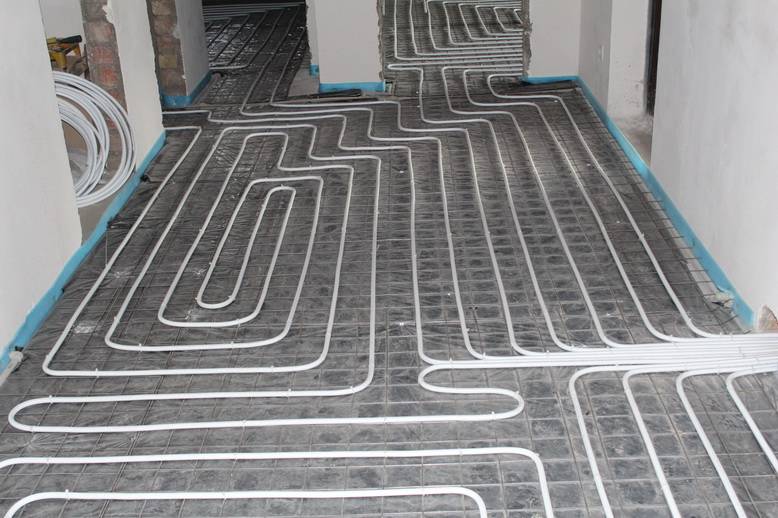
Installation of underfloor heating pipes
After the film, the pipe is mounted. When talking with the client, I gave him all the necessary recommendations on the height and installation of the cake, on the number and location of the contours.But we must understand that the client will never be able to transfer my experience to the covenant, on which he decided to save money. Thus, now we will see the most terrible installation of pipes on a film with markings and consider why it all turned out so scary.
When installing pipes for a warm water floor, I use pipes dm 16 mm. Fortunately, in this case, the client listened to my opinion and did not buy pipe dm 20 mm, since such a pipe is more difficult to work with and the volume of water almost doubles. Where is the economy here?
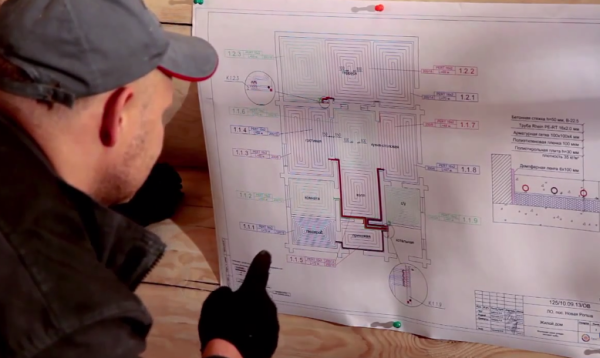
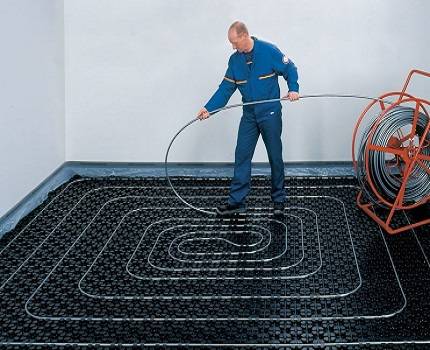
Before starting to roll out the pipe, it is necessary to make a diagram of the warm floor on the plan. Mark the places where the highways pass, decide on the size of the indent from the walls. Decide quantity pipes passing through walls sleeves for them. The plan will show all the problem areas and difficulties.
But the reality is that only a few percent of plumbers do it. And this is because they do not want to learn and adopt someone else's successful experience. After all, there is nothing easier than to put your ego to hell and learn from others how to draw a diagram of a warm floor. But no, most are already cool masters. They just got sick of drawing diagrams. They know it all.
Thus, without a floor heating pipe layout, pipe installation turns into chaos. And the first manifestation of this chaos is that the installers did not agree on the size of the indentation of pipes from the walls. Accordingly, we get errors and shortcomings in the installation of a water-heated floor
In my experience, by default, my colleagues and I retreat from the walls by at least 100 mm. And in some cases, if necessary, more. And the photo shows that there is no indentation from the walls at all.

And the fact that the wall is external or internal has nothing to do with it.External walls are reinforced by arranging an edge zone with a step, for example, 100 mm, and not by passing a pipe close to the wall. At the same time, one pipe, pressed close to the wall, will not make the weather. Thus, instead of leaving an indent for mounting a plinth or engineering low-voltage systems (relevant from the second floor), now there is no place and no order. In one place the pipe is close to the wall,


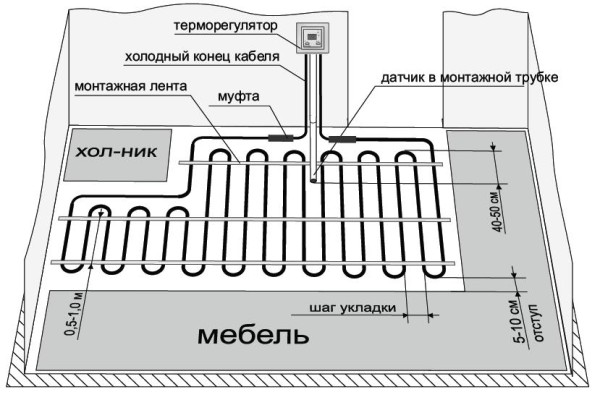

in another it recedes by 30 mm, in the third by 50 mm.

And in this photo you can see how to properly indent:
Moreover, this is not even a pipe made of cross-linked polyethylene, but a metal-plastic pipe. It is a pleasure to work with a metal-plastic pipe with certain skills. So we come to the skills necessary to work with pipes for underfloor heating.
In order to mount water-heated floors, one of the most important skills is needed - this is the ability to bend the pipe at any angle manually. Yes, yes, by hand. Many say that there are springs for this. Yes, there are springs, but not a single master has yet shown me how to mount a circuit 90 meters long with an external spring. I'm not saying it's not real. Very real.
But here it is clear to all adequate masters that when a pipe with an external spring is bent, this spring is clamped. And to pull it out of the bend and stretch it to the next turn, you need effort, a healthy lower back and knees. Not to mention that it is necessary to stand in an interesting position. And given my medical education and statistics, which says that after 30 years, more than 70 percent of the male population has problems with this. Here is your spring.
In order to facilitate this work, I shot a video on how to manually bend plastic pipe. Without this skill, no spring will help.Because I'll say it again. That no one sent information on how to install underfloor heating with an external spring.
But instead of watching a video on how to bend a pipe by hand and try it in practice. Most began to advertise springs and all sorts of pipe benders.
But in fact, we see how, without the simplest ability to manually bend a pipe, we get the following deplorable result:


Everything is crooked, as if the bull has done it. But at the same time, the masters are sure that they did everything right. You can’t call this a direct error in installing a warm floor, but this is definitely a drawback.
Step 3. Laying thermal insulation
The previous steps were necessary for you so that you could lay the insulation. In view of the fact that the insulation sheets are quite large, they can lie unstable on the hillocks, and they can sink in the recesses.
Expanded polystyrene with a density of 35 kg/m3 is used as insulation. This is the same foam, only of greater density. This density is needed so that the insulation under the weight of the screed does not decrease in thickness.
The thickness of the insulation for the first floors should not be less than 5 cm. If it is possible to lay the insulation thicker, it is better to use this opportunity. The thickness directly affects the downward heat loss. We do not need to warm up the lower layers. All heat must go up.
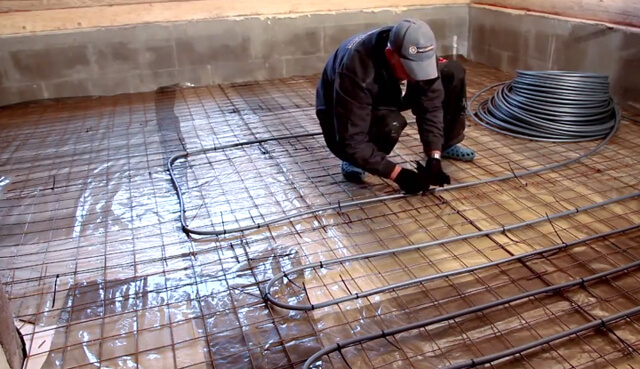
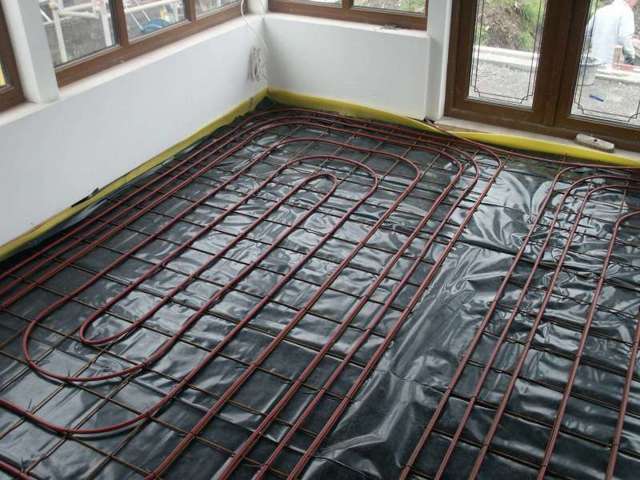
Installation of a warm water floor
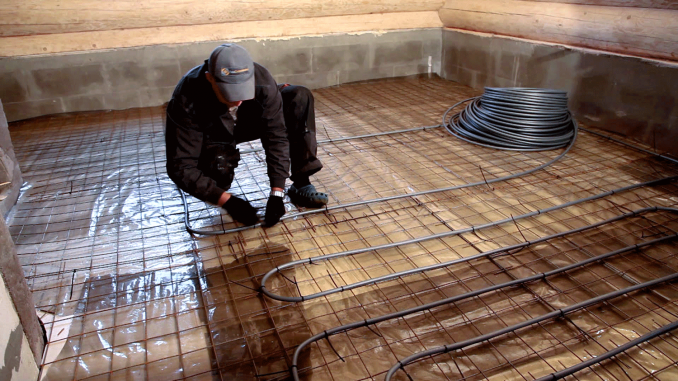
Any system of a warm water floor consists of such basic elements as pipes, as well as the technology of their fixation. As a rule, they use two methods:
- In a dry way, using wood and polystyrene, which form the basis on which the pipes are laid.To distribute the heat more evenly, the pipes are also laid evenly in the grooves specially provided for this. After that, hard material is laid on top of the pipes, such as plywood, OSB, GVL, etc. A solid base is used for laying floor coverings of any origin.
- Wet method, which is associated with laying the pipe system in the screed. The technology consists of several layers. The first layer is a heater with a pipe fixing system, the second layer represents the heating system itself and the third layer is a screed. The floor covering is laid directly on the screed. It is advisable to provide a layer of waterproofing so as not to flood the neighbors from below. For greater reliability, a reinforcing mesh can be mounted in the screed. The whole system will turn out to be more reliable, since the reinforcement will prevent cracking of the screed, which, in turn, will protect the heating system from damage. The presence of a damper tape should not be ignored, which should be present around the perimeter of the room, as well as at the junctions of two circuits.
Neither system can be called ideal, although laying pipes in a screed is considered the best option, therefore, most people prefer this particular technology.
System selection
When choosing a system, it is necessary to analyze a number of factors. Dry systems are more expensive in terms of funds, but they allow them to be operated much faster. Their use is preferred for a number of reasons.


The first and main reason is the weight of the entire system. The heating system, embedded in the screed, has a significant weight, so not all structures are able to withstand such weight. The thickness of the screed can reach at least 6 cm, and this is a significant weight.In addition, tiles can be laid on the screed, which is not light, especially if it is intended for laying on the floor. If there is no certainty that the structure will withstand such a load, it is better to refuse the “wet” option, preferring the “dry” option.
The second reason has to do with the maintainability of the system. Any system can fail at any time, no matter how well it is installed. Despite the fact that warm floors are laid without joints and joints, they sometimes burst due to the slightest marriage or are damaged as a result of repair work or other manipulations. If a pipe in the screed bursts or is damaged, it is very difficult to repair it, because you have to break the screed, and this is sometimes not easy. Naturally, after repair, this place is considered the most susceptible to various mechanical loads.
 The process of installing a water heated floor
It is not recommended to turn on warm floors in a screed until the screed is completely dry, which is about 30 days.
If the screed is laid on a wooden floor, then this in itself is a real problem. A wooden base, and even under the influence of high temperature, and even more so if the technology is violated, will quickly become unusable, bringing down the entire system at any time.
The reasons are quite weighty, therefore, in certain cases, it is better to give preference to dry technologies, and if the problem is solved independently, then such a technology may not be as costly as it seems. The most expensive element is metal plates, but it is not problematic to make them yourself. It is better if aluminum is used as a material for manufacturing.The problem is only to bend the metal so that the grooves for laying the pipes are obtained.
A variant of installation of a floor heating system based on polystyrene, made according to the "dry" technology, is presented in the video.
Water heated floor on a wooden base - Part 2 - Laying contours
Watch this video on YouTube
Preparation stage
Whatever technology of laying a warm floor you choose, you need to make an accurate calculation of the required amount of materials to solve the problem in a particular room. To do this, you need to determine the optimal parameter for the power of the heating circuit, the temperature in the system, the amount of heat loss and the flooring option.
You need to stop at the choice of a high-power underfloor heating system if:
- the top coat will be massive granite or marble slabs, or any other building materials characterized by high heat capacity;
- the room has poor thermal insulation of the balcony and walls;
- there is a significant number of glazed structures, such as a balcony, a bay window or a winter garden;
- the room is located on the last or first floor.