- Methods for finishing fireplaces
- Location for a fireplace
- Fire safety measures when laying a corner fireplace
- First kindling of the fireplace
- What to lay out a fireplace?
- Purpose of decorative fireplaces
- Project No. 1 - a compact mini-fireplace
- Work on the chimney
- Drywall installation
- Creating a base for a corner fireplace
- Preparing the base for the fireplace
- Step 1. Marking under the fireplace
- Step 2. Foundation pouring
- Step 3. Building a partition
- Step 3. Making a pedestal for a firebox
- Chimney installation features
- Preparatory activities
- masonry
- How to arrange a fireplace with a cast-iron firebox yourself?
- Base device for a cast-iron firebox
- Installation of a cast-iron firebox
- Exterior finish of the fireplace
- Video: Do-it-yourself mini fireplace for a country house
- Characteristic features and advantages of a corner fireplace
Methods for finishing fireplaces
If high-quality facing bricks were used when laying the outer walls, then all that is required to improve the aesthetics of the structure is to perform jointing. To do this, they are overwritten, and the outer surface is ennobled with the help of a special tool - jointing. It is also necessary to grind the irregularities of the bricks and cover the walls with a special composition. The simplicity of this method has a big disadvantage - over time, the surface of the fireplace darkens and loses its attractiveness.
A very simple way to improve the appearance of a fireplace is plastering. Ready-made decorative compositions, which are presented in a wide range on the shelves of retail chains, are best suited for this. You can start plastering work only after the walls of the fireplace dry out and shrink. If necessary, the portal can be painted with water-based paint, but this can only be started after the finishing layer has completely dried.
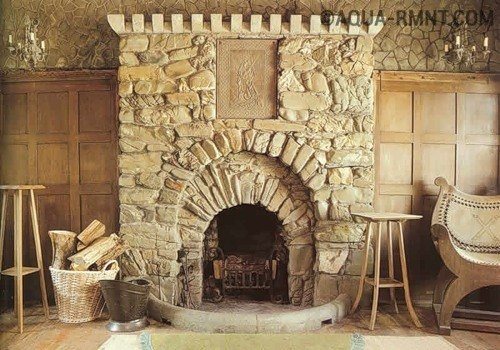
Fireplace, trimmed with natural stone, as if transferred from the era of knights and beautiful ladies
Currently, there are many options for lining the fireplace with materials of natural or artificial origin. Tiles will help to make the stove bright and irresistible. They will completely transform the portal of the heater, making it especially warm and homely. Finishing with marble slabs or stone, on the contrary, will create the effect of an expensive and presentable building. As for facing the fireplace with ceramic tiles, you should choose only heat-resistant varieties - majolica, clinker, porcelain stoneware or terracotta. Of course, when laying facing materials, only special, heat-resistant adhesives should be used.
Location for a fireplace
Equally important is the place where the fireplace will be located. This issue must be approached very responsibly and seriously, everything must be clearly considered and only then a balanced decision should be made.
There can be many options, the fireplace can be installed in an extension to the wall or built inside the wall, and the fireplace can also be installed in the corner of the room. In this case, it is necessary to take into account that the fireplace is in harmony with the interior of the room.
Also, in addition to the fireplace, it is very important to make a high-quality chimney that will facilitate the exit of smoke from the stove, as a rule, the length of such a structure does not exceed 5-6 meters. This is a very important element in the design of the fireplace, while in the room itself there must be reliable ventilation.
Fire safety measures when laying a corner fireplace
-
A separate base must be built under the brick fireplace. It is better to separate the foundation from the main one even at the construction stage, but if the fireplace project is already being implemented in an operating house, then you will have to remove part of the flooring, go deep into the ground and build a separate foundation.
The weight of a brick fireplace exceeds 1 ton, and if the main foundation of the house sags during shrinkage, this should not affect the design of the fireplace. Otherwise, it may be deformed, and the gas will enter the room.
- All interfloor ceilings through which the chimney pipe will be removed must be insulated with asbestos material. In the same way, we isolate the walls that are next to the fireplace.
- If a fireplace is being built in a house with wooden walls, then a metal sheet must be laid between the adjoining wall, the size of which exceeds the dimensions of the fireplace by 20-25 cm on each side.
- When building an open hearth fireplace, lay brick or ceramic tiles in front of the fireplace to prevent accidental sparks and intense flames from starting a fire.
First kindling of the fireplace
After the construction of the fireplace is completed, before its first kindling, you need to wait about a week. This is done so that the moisture that is in the structure during construction evaporates naturally, without additional coercion.
The first time after the start of operation, an unpleasant odor may come from the fireplace, emitted by the materials used in construction. This is a normal occurrence and should not be alarmed. After a few weeks, the smell will completely disappear.
A corner fireplace will be an excellent structure for both residential and country houses. It combines an efficient heating device and a spectacular interior element. And with a great desire and a small level of skill, you can even build it with your own hands.
What to lay out a fireplace?
After creating the order, calculate the required amount of building materials and purchase them in a specialized store. The material should be counted by the piece. And even incomplete products must be included in the calculation as whole elements. Additionally, add about 10% of the stock.
It is important that the brick is solid and properly fired. You can also use a used brick from a disassembled furnace, if it is in good condition
It is enough to clean the material from the remnants of the previous solution.
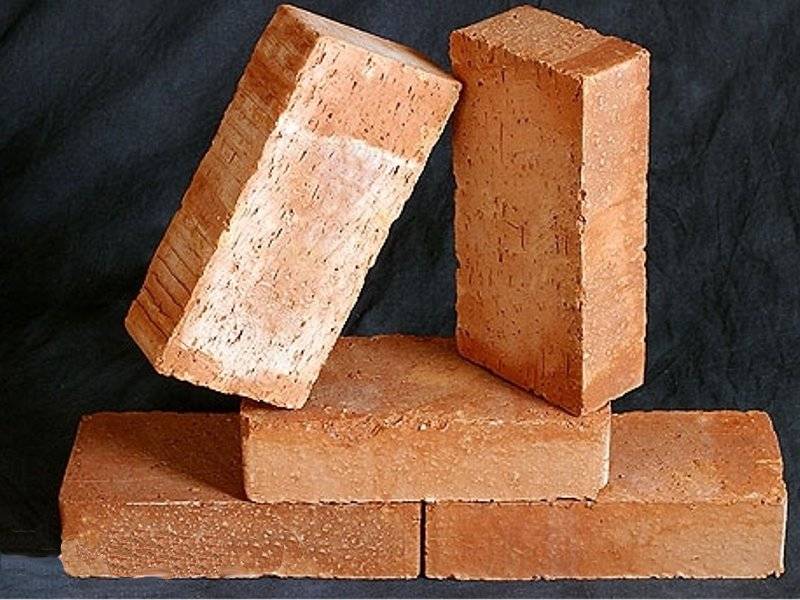
Pay attention to the quality of the brick
Lay out the firebox of the corner fireplace from fireclay bricks.
To prepare the solution, you will need a number of materials. So, the sand for the solution should be sufficiently coarse-grained (grains up to 1.5 mm). Beforehand, the sand must be sieved and cleaned of all sorts of third-party inclusions.


Quarry coarse sand
Laying a fireplace will require the use of clay. The best option is Cambrian, it is also blue clay. But if you are confident in the quality of local clay, you can prepare a solution using it.
soaked clay
You also need to buy materials for arranging the foundation. This is the usual Portland cement M400 and gravel with a diameter of 20-60 mm.
Portland cement M400
Additionally, buy a smoke damper and steel reinforcing bars. Optimally suitable rods with a length of 70 cm and 10 mm diameter or so Togo. In this example, about 12 reinforcing bars are used. In accordance with the dimensions of your fireplace, their number may vary.
Purpose of decorative fireplaces
A few decades ago, the fireplace served as a source of heating in the house; wood and coal for space heating. Now the need for it has disappeared - more modern and ergonomic heating systems have not left him a chance to compete, making him a relic of the past.
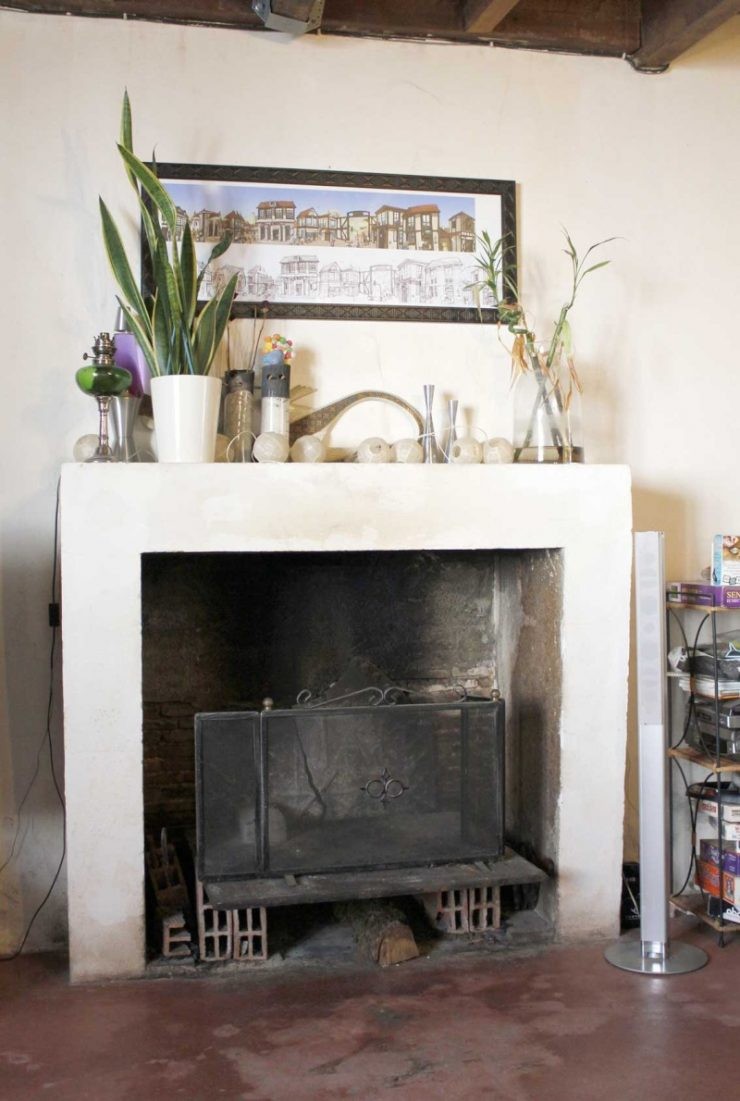
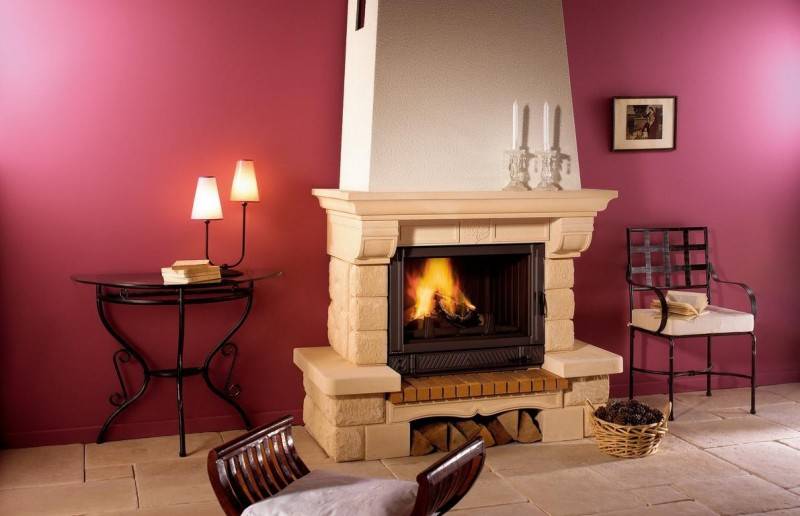
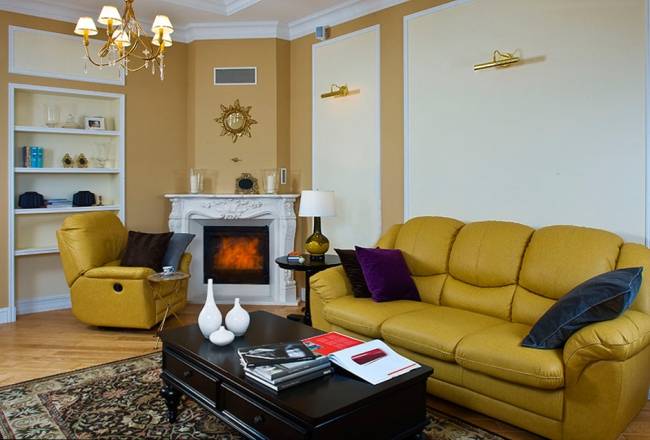
 Decorative fireplace in the interior of the living room
The need for such visualization of heat still exists in humans. Not every house and apartment allows the installation of a fireplace, therefore, decorative false fireplaces came to the rescue. It will not give a completely natural smell and fire, but it is able to create a pleasant atmosphere of comfort in the room.
Project No. 1 - a compact mini-fireplace
This hearth is suitable for heating a room of 16-20 m² in a country house or a small country house. Another option for using the design is as an outdoor barbecue built in a garden gazebo. A feature of the fireplace is lateral convection channels that heat the air in the room. The size of the building is 102 x 51 cm.
To lay out a mini-fireplace, you will need the following materials:
- solid ceramic brick - 240 pcs. (chimney not included)
- revision door 24 x 14 cm - 1 pc.;
- cast-iron grates 18 x 14 cm;
- valve 25 x 14 cm;
- stainless steel sheet 1 mm thick, 500 x 1000 mm in size;
- a sheet of black or galvanized metal, laid in front of the firebox, dimensions - 70 x 50 cm.
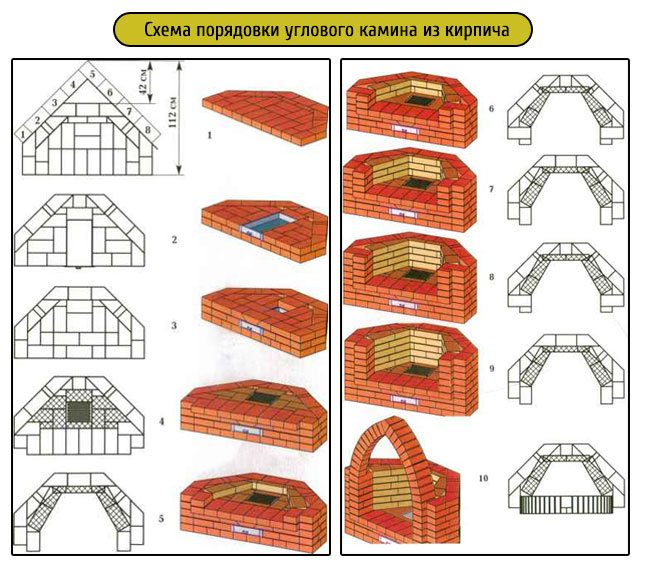
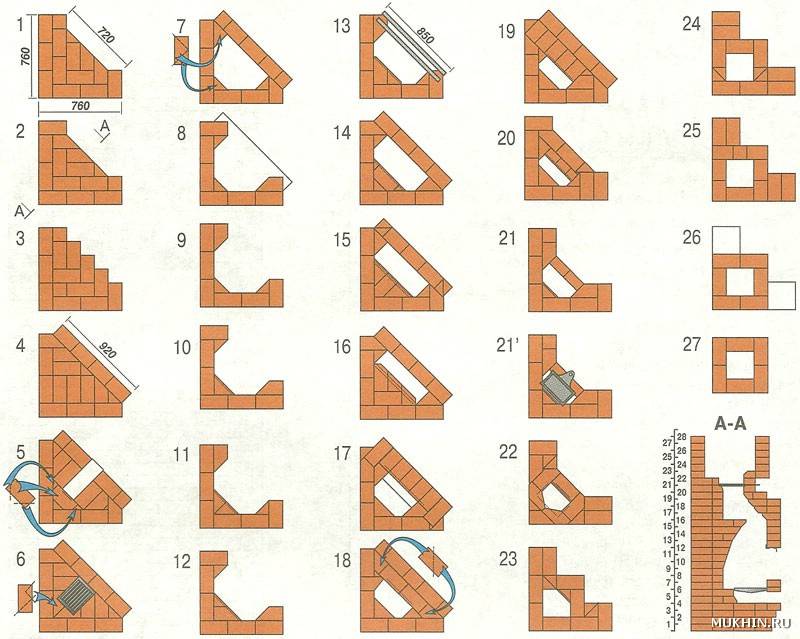
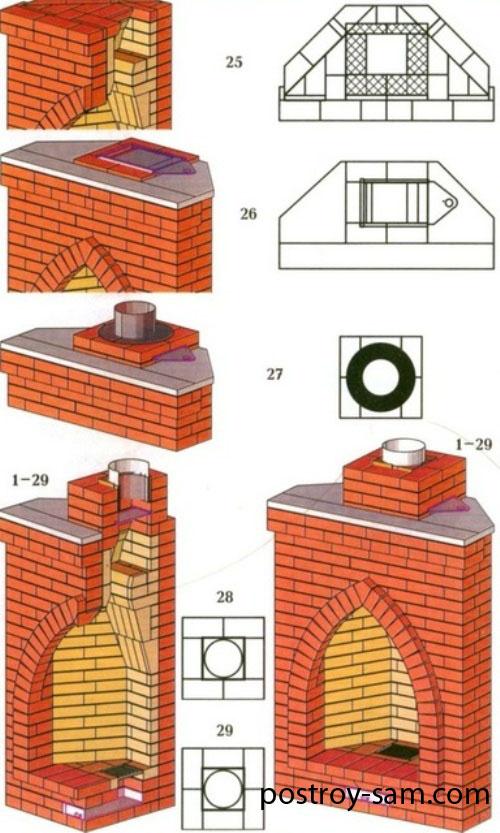
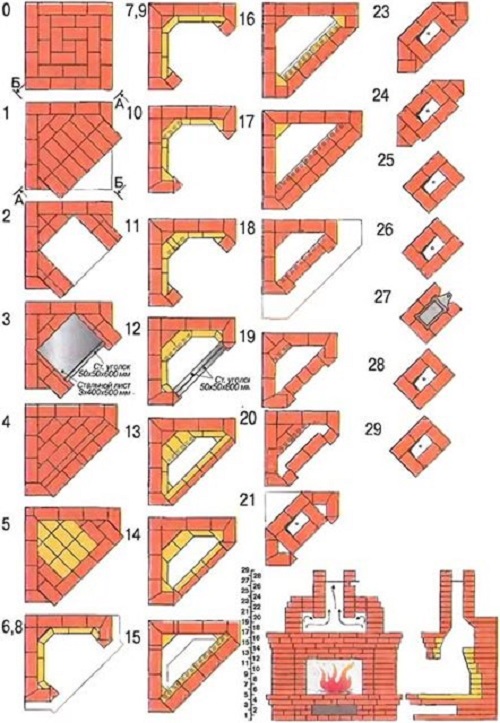
Sectional drawing of a mini-fireplace. Outlets of convection channels are provided on the side walls
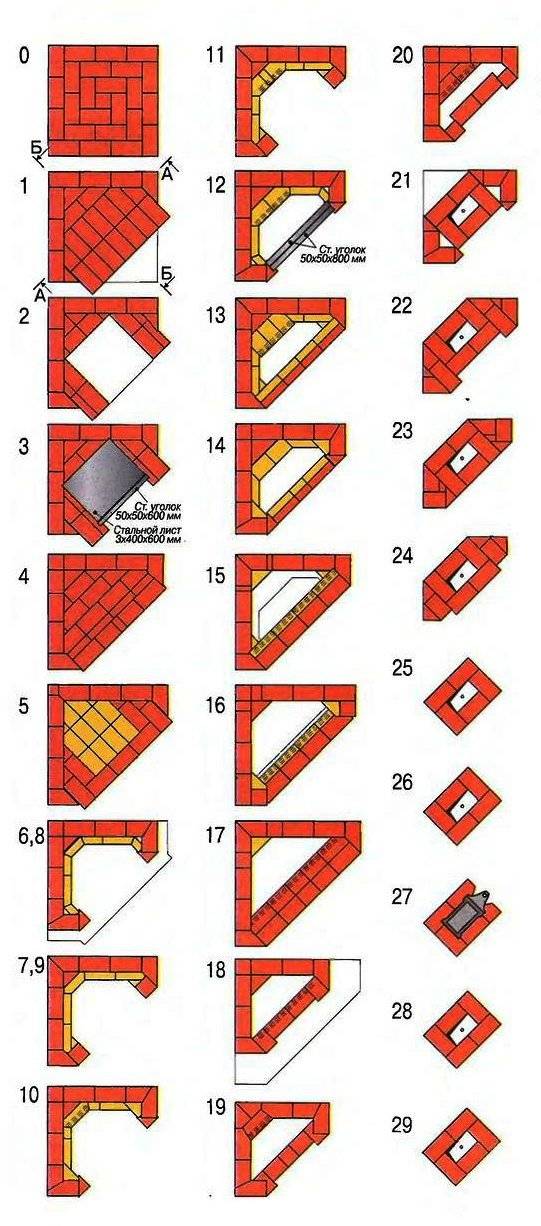
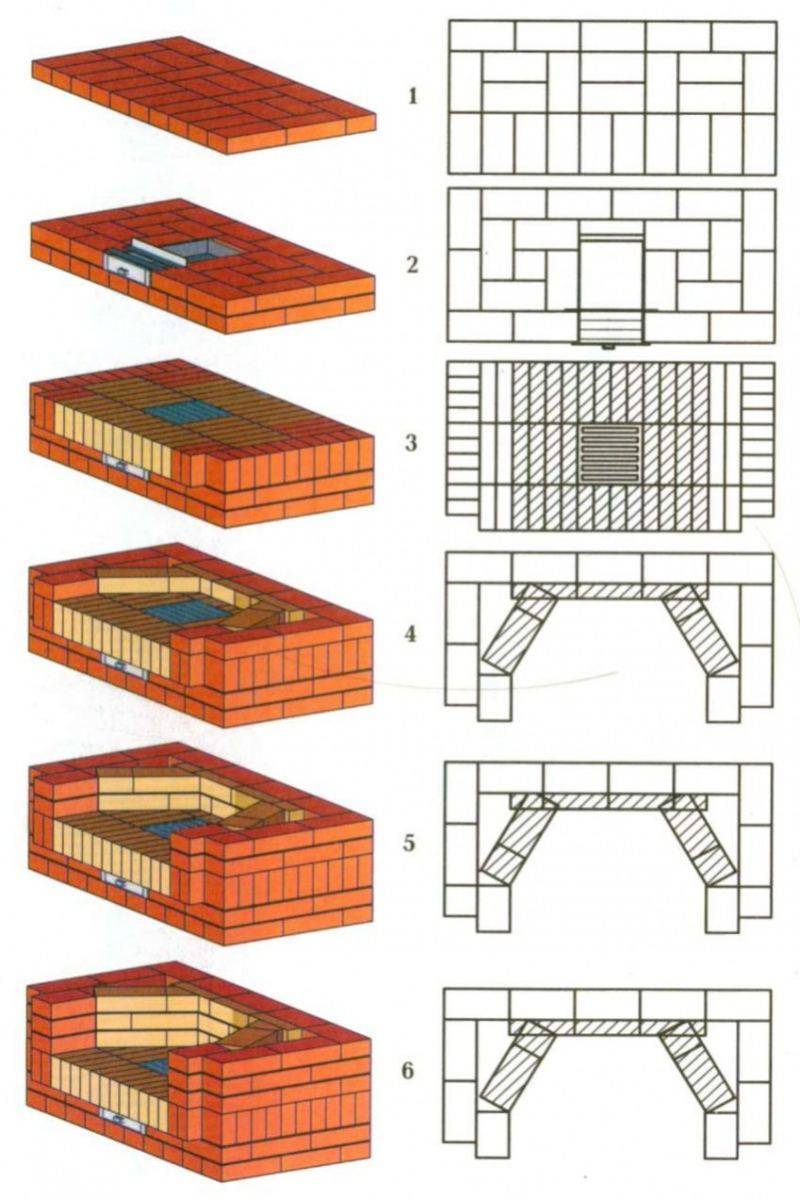
The mini-fireplace shown in the drawing is laid out in this order:
- The first tier is solid. On the second, 3 air channels are laid - 2 side and one in the middle, located under the grate.
- On the third row, a hearth part and a grate nest are formed (it is made 5 mm wider than the product). Then the grate itself is placed.
- From the 4th to the 10th tiers, a fireplace insert is being built. On the V row, 2 metal rods Ø5 mm are laid for mounting a stainless sheet.
- In the 10th row, the back brick protrudes a quarter into the furnace, the side stones move outward by 40 mm. The width of the firebox in this place is 49 cm.
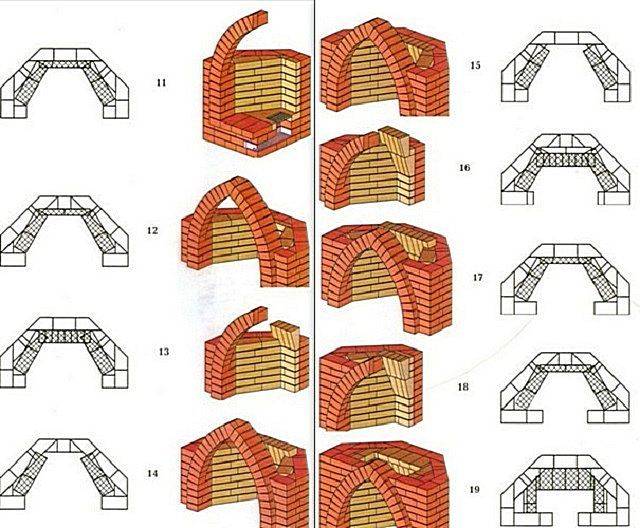
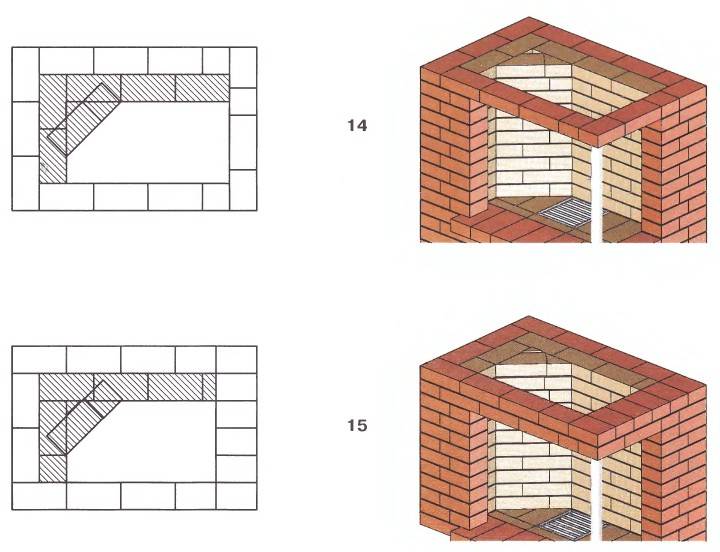
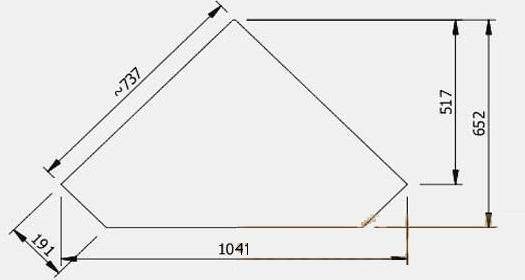
- The ends of the side stones of the 11th tier are sawn at an angle of 28 ° to the vertical line. You will get the supporting platforms of the arched vault. 2 stones in the depths of the firebox are placed on the edge.
- The vault is built from 9 stones, cut in the form of a trapezoid with a base size of 65 and 52 mm, as indicated on the order. Circled radius - 51 cm.
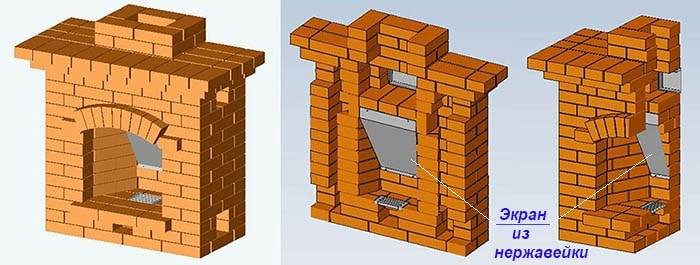
- On the 12th tier, the formation of the vault is completed, the upper steel rods are placed and a stainless screen is installed.
- Tier 13–14 forms the outlet openings of the convection channels. An inspection door is installed here.
- 15th row - overlap is being built, 16-18 - the beginning of the chimney.
The master will tell you in detail the algorithm for laying a mini-fireplace in his video:
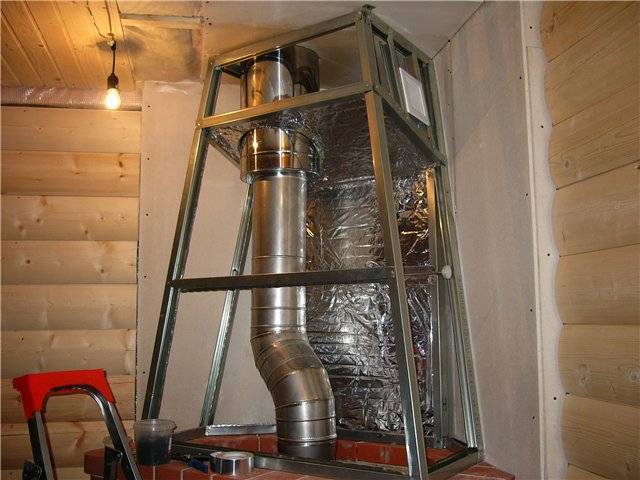
Work on the chimney
The classic channel has the shape of a cap, inside which is placed either a pipe or ceramic blocks. The back wall of the structure is always vertical and perpendicular to the base.Inclined side elements (45-60 degrees) ensure uniform narrowing of the chimney. The channel walls should be fairly thick to reduce heat loss.

The minimum pipe height is 5 m. This figure depends on the height of the house. At 2 m above the base of the firebox, a smoke damper is attached with a liquid cement mortar.
The thermal and thermal insulation of the pipe is of great importance: if the necessary measures are neglected, condensation may begin to accumulate in it or even a fire may occur. A spark catcher and a deflector are installed at the outer edge of the pipe.
Drywall installation
After creating the frame, the dimensions of its planes are checked again: they often change during the installation process. If you cut drywall according to the drawing, then the cut out elements may not fit.
GKL is cut with a painting knife:
- A cardboard shell is cut along the line on one side of the sheet.
- Gently break the sheet, laying it on the edge of the table, and then bend it.
- Cut through the cardboard on the other side with a knife.
On the cut fragments, it is recommended to make chamfers at the joints. It is not very convenient to remove them after installation with a knife, it is better to choose in advance with a planer. Bevel angle - 45˚.


The cladding elements are fastened with self-tapping screws in increments of 10–15 cm. The work will be facilitated by a special bit for a screwdriver designed for drywall installation. Its shape does not allow you to drive the hardware deeper than necessary and wash the material.
The assembled structure is prepared for finishing:
- The seams between the drywall fragments are glued with a reinforcing mesh.
- Putty is applied on top and leveled with a spatula. The rules for puttying seams are described here.
- The recesses formed by the heads of the screws are also puttied.
- After the putty has dried, rub the seams with fine-grained sandpaper.
- The entire surface of the fireplace is primed twice. The second layer is applied only after the first has completely dried.
If you plan to finish the fireplace with artificial stone or tiles, you do not need to putty the entire surface of the structure.
Stages of creating a portal for the fireplace in the photo:
Creating a base for a corner fireplace
A brick corner fireplace should be built on an independent foundation, since it is unacceptable to build a structure weighing more than 600 kg on the floor surface. For this reason, it is most convenient to lay the foundation for the future fireplace immediately during the construction of the dwelling.
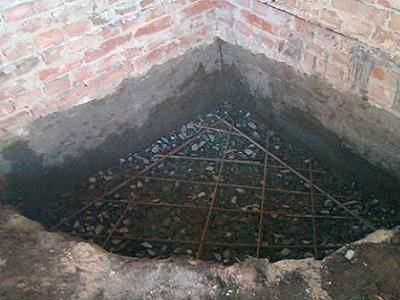
It will be necessary to dig a pit to the level of the main foundation (600 mm for a one-story house and 800 mm for a two-story house). On the flat bottom of the recess, it is required to pour a sandy layer with a thickness of at least 30 mm. Large stones and rubble are laid on the sand, then everything is poured with cement mortar. Below is a step-by-step algorithm for laying the foundation for a fireplace:
- the recess under the base goes into the floor by 600 mm, its width is 150 mm more than the expected width of the fireplace;
- crushed stone is poured at the bottom of the resulting pit, which is carefully rammed and leveled;
- foundation construction begins with the preparation of formwork from boards treated with resin and covered with roofing material for strength;
- the height of the box structure is equal to the height of the foundation;
- the formwork should be poured with a cement-sand mixture in a ratio of 1: 3;
- the top layer must be carefully leveled;
- when everything is ready, it is covered with polyethylene and left to dry completely for 6-7 days, depending on the climate and season.
Preparing the base for the fireplace
The weight of the firebox and the fireplace body is very large, so the base under it must be as strong and reliable as possible.
It is especially important that this basis is not had fluctuations in height, otherwise the structure will settle unevenly, cracks will appear. In addition, the walls adjacent to the firebox should be lined with non-combustible materials or sheathed with refractory insulation and galvanized sheets.
Cast iron fireplace insert
At the preparatory stage you will need:
- cement-sand mortar;
- brick;
- metal mesh for reinforcement;
- building level;
- trowel;
- insulation;
- waterproofing material;
- roulette.
Step 1. Marking under the fireplace
The area where the fireplace will be mounted must be free and clean. Measure the width and length of the fireplace with a tape measure, draw markings on the floor with chalk. If the load-bearing wall is made of wood, it is recommended to either cut out its section and replace it with brickwork, or lay out an additional brick partition butt.
Marking under the fireplace
If the second option is chosen, the partition should be installed on the same foundation as the firebox. This must be taken into account when marking the base in the floor and add the thickness of the masonry around the perimeter. Lines are also drawn on the wall indicating the width of the fireplace.
Step 2. Foundation pouring
The area of the foundation should be larger than the area of \u200b\u200bthe fireplace, so 30-40 cm are added on each side. The depth of the foundation is approximately 50 cm, a thinner base will not withstand the load. If the floor in the house is made of boards, a fragment of the coating is cut out according to the marking along with the logs. The cement mortar is kneaded, then a small amount is poured onto the prepared area.They level it, lay a reinforcing mesh on top and again fill it with a solution.
Foundation for a fireplace
You can make a brick foundation: red brick is laid out in several rows with mandatory dressing until the base rises to the level of the finished floor. The surface of the foundation is checked with a level, if necessary, leveling with a solution. When the solution dries well, the base is covered with a waterproofing material.
Filling the foundation under the fireplace
Step 3. Building a partition
Masonry is made of brick, aerated concrete or tongue-and-groove slabs - refractory materials. Between the masonry and the firebox, there must be free space for the exit of warm air. It is impossible to lay bricks or blocks close to the pedestal and the walls of the firebox. For a bunch of refractory masonry with a bearing wall, metal rods are used, which are laid between bricks and driven into the wall.


Ready brickwork plastered with cement mortar or laid with mineral wool, and covered with foil material from above with foil outward. You can upholster the masonry with galvanized sheets. If the fireplace is mounted in a corner, the seam between the walls is sealed with a special sealant.
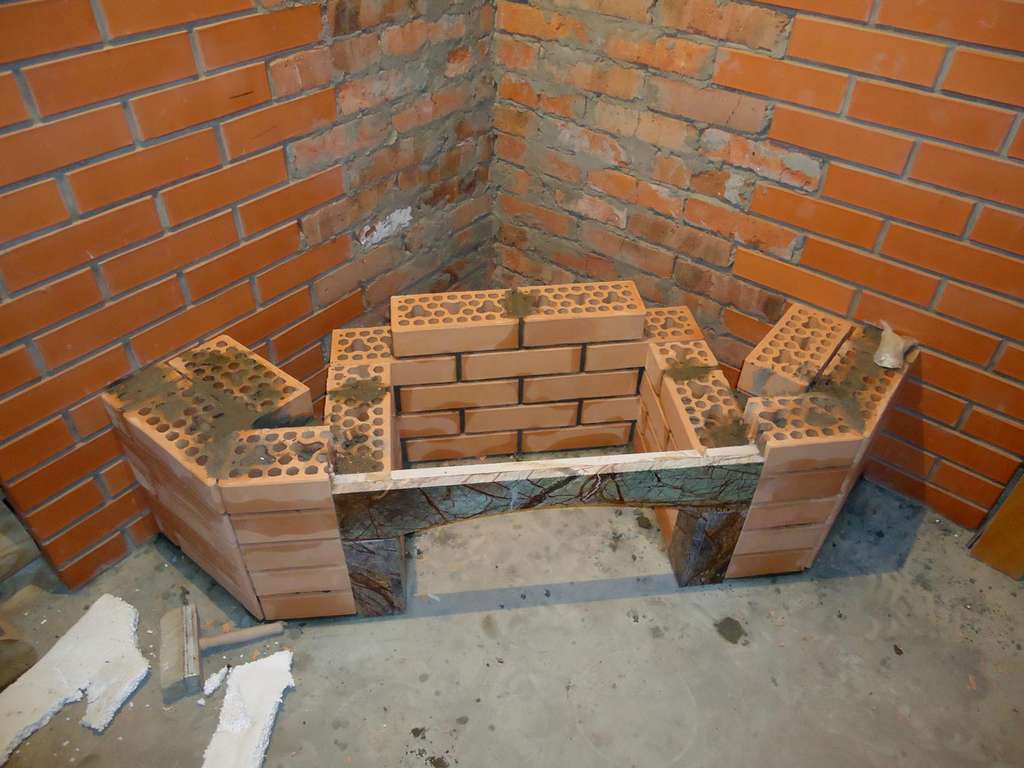
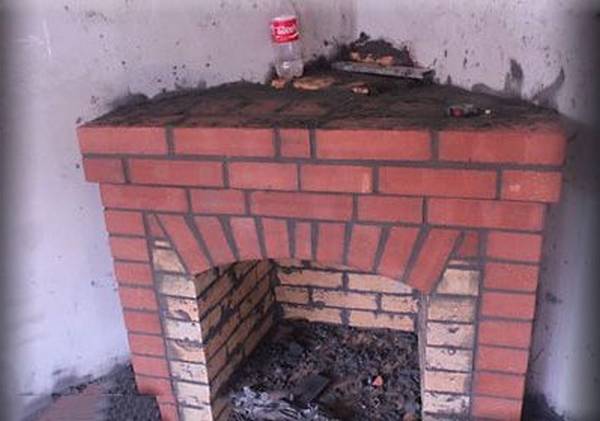
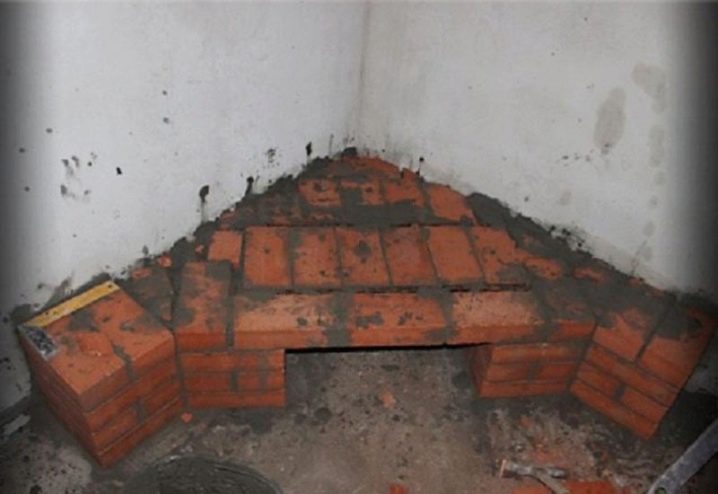
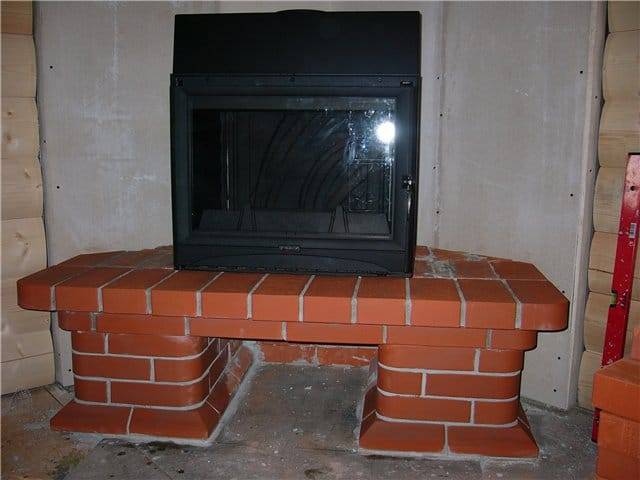
Step 3. Making a pedestal for a firebox
A U-shaped pedestal is laid out on the red brick floor. It consists of 3-4 rows, depending on the desired height of the fireplace. A mixture of clay and sand is taken as a binder solution. To reduce the load on the floors, instead of bricks, you can take aerated concrete blocks, and then plaster them with a cement mortar. Each row must be checked with a level, the bricks are corrected with a rubber mallet. Excess solution is immediately removed with a trowel.
Making a pedestal for a firebox
Making a pedestal for a firebox
Steel corners are laid on the bricks of the fourth row so that they connect opposite walls. The corners are placed at a distance of 15-15 cm with a protrusion upwards. The bricks are placed on the edge and the grooves are sawn through, then they are laid so that the protrusions of the corners fit tightly into the cuts. Only 2/3 of the top of the pedestal is laid with bricks, leaving the space near the wall free. Strengthen all this with a solution and level. The surface must be perfectly horizontal.
overlap
overlap
Chimney installation features
The inner surface of the chimney is a straight channel, but its outer part has design features.
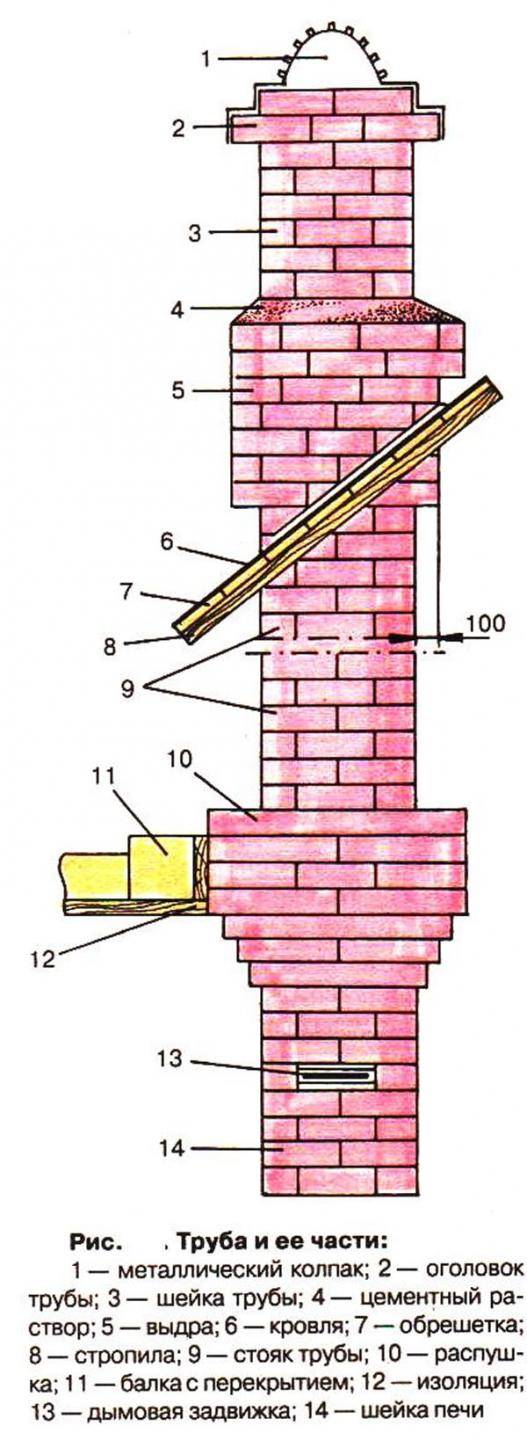
Design features keep you warm
At the intersection of the floor beam the chimney has an extension. This design element is important because it reduces the temperature of the outlet streams. As a result, there is no need to make additional thermal insulation in this place.
At the level of the intersection of the roof, the chimney has an extension. This feature protects the brickwork from the harmful effects of precipitation.
The smoke channel also has protection in the form of a metal cap. It is recommended to equip the chimney with a spark arrester.
Preparatory activities
The design of a false fireplace, whether it is angular or rectangular, usually involves the presence of two basic elements: a portal and an apparatus inside. A massive structure is called a portal, designed to imitate a stove, and a biofireplace burner or an electric fireplace can act as an apparatus. In principle, you can not install the device inside, then it is easy to decorate the firebox with firewood, candles, spruce branches or other decorative elements.
In the future, any decorative coating can be easily fixed to the drywall base: tiles, mosaics, gypsum moldings, plastic panels with imitation brickwork, whatever.
Before starting work, it is advisable to choose a suitable place where the false fireplace would fit perfectly. Many people choose a corner fireplace because it takes up less space. An excellent solution would be to place the dummy opposite the front door in an unused corner. With this arrangement, the fireplace immediately becomes the main focus in the interior of the room, the center of attention.
A simple sketch of a future fireplace
You can easily be inspired by ideas from the Internet, it’s also easy to find even a drawing of a drywall corner fireplace with dimensions. You will only have to adjust them to fit your realities. It is necessary to choose the appearance of the fireplace in such a way that it does not particularly stand out from the style of the entire room, but better supports the given style.
At the final stage of preparation, the necessary tools for construction and suitable building materials should be collected. Let's briefly go over the materials, you will certainly need:
- Metal profile for the construction of a frame for drywall.
- To make a solid structure, you will need self-tapping screws for metal and wood to fix drywall.
- Drywall for sheathing the frame and creating a false fireplace shape.
- To align the corners, recesses from the screws, plaster is required.
- A primer is required to prepare for tiling. Before painting, it is also better to prime the drywall.
- At the preparation stage, you should decide how the finishing will be done and purchase the appropriate material: tiles, plastic panels, mosaics.
Additionally, you may need various decorative elements: corners, moldings and more.
Successful placement of an imitation of a real fireplace
To make a drywall corner fireplace, you will need a construction tool:
- For marking, you will need a pencil or marker, ruler, tape measure, level, plumb line.
- For basic work, you will need a screwdriver, a puncher, an electric jigsaw, a construction knife, metal shears, pliers, a screwdriver, a hammer.
Other tools may come in handy, it all depends on the complexity of the design and the methods of finishing it.
masonry
If the owner of a suburban area does not have experience in laying bricks for a fireplace, then step-by-step instructions will help him build a structure from scratch. There are many variants of such plans, but they all have approximately the same structure. A manual laying lesson for a home or outdoor fireplace usually consists of 5 - 7 stages, each of which describes the installation of 2 - 3 rows of bricks and its features. Along with this, other necessary issues are considered: how to properly reinforce a brick or concrete base, how to make a smoke box and an air heat exchanger, how to decorate a fireplace facade.


How to arrange a fireplace with a cast-iron firebox yourself?
One of the undeniable advantages of such fireplaces, which were not mentioned above, is the ability to mount the base for them directly on the floor of the room. The only exceptions are the floors of a floating structure.In addition, you do not have to think about how to equip the fireplace with good draft or arrange an ash pan. All this is already provided by the design. In a word, making a fireplace with a cast-iron firebox with your own hands is easier than laying out the simplest open brick fireplace.
Base device for a cast-iron firebox
- You need to choose the right place to install the fireplace. First, the room must have sufficient space. Experts do not recommend installing this heating equipment in rooms whose area is less than 20 squares. In addition, when choosing a place, do not place the fireplace in line with the openings of windows and doors.
- In the event that the room is ventilated through a ventilation system or with an air conditioner, it is necessary to provide additional air flow to the room. For example, install a ventilation pipe with an automatic ventilation system. A closed hearth fireplace requires an average of 500 cubic meters of air
Brick pedestal
After choosing a place to install the fireplace, make a base for it. To do the work with your own hands, you need to put a layer of waterproofing, and arrange a reinforced cement screed on top. If the floors are wooden, then a layer of thermal insulation is also needed. The thickness of the screed is at least 10–15 mm; a metal mesh can be used as reinforcement.
After the base reaches the desired strength, you can proceed to the device with your own hands of the pedestal under the cast-iron firebox itself. It can be made of brick, aerated concrete blocks or other material, or you can purchase and install a ready-made plinth made of natural stone.
If the floors are not durable, then it is better to give preference to aerated concrete as a sufficiently strong and lightweight material that can be effortlessly given any desired shape and size. Subsequently, it can be plastered or lined with ceramic tiles, natural or artificial stone.
Blocks are laid on special glue or ordinary cement-sand mortar. The surface of the pedestal is leveled with a layer of plaster 1–1.5 cm thick.
In addition, the heating unit will work unevenly.
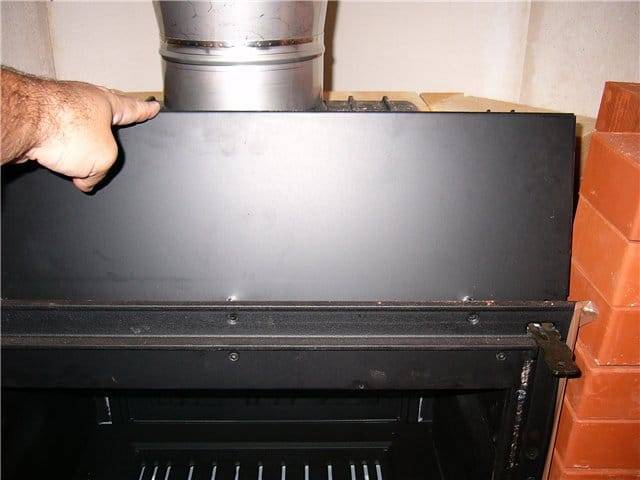
Installation of a cast-iron firebox
Regardless of what the base for the firebox is made of, a layer of thermal insulation is laid on it, for example, asbestos cardboard and a sheet of roofing iron.
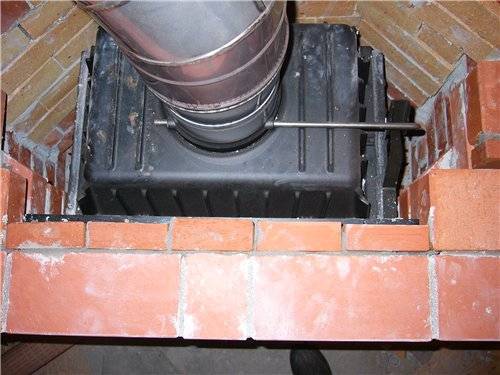
Chimney installation
To properly install the firebox with your own hands, place the bars in place of its installation, align the firebox in place, and then carefully remove the lining. The chimney of the firebox, made in the form of a metal sleeve or pipe, is installed in the hole intended for it and taken out through the ceilings and roof to the outside in compliance with all fire safety rules.
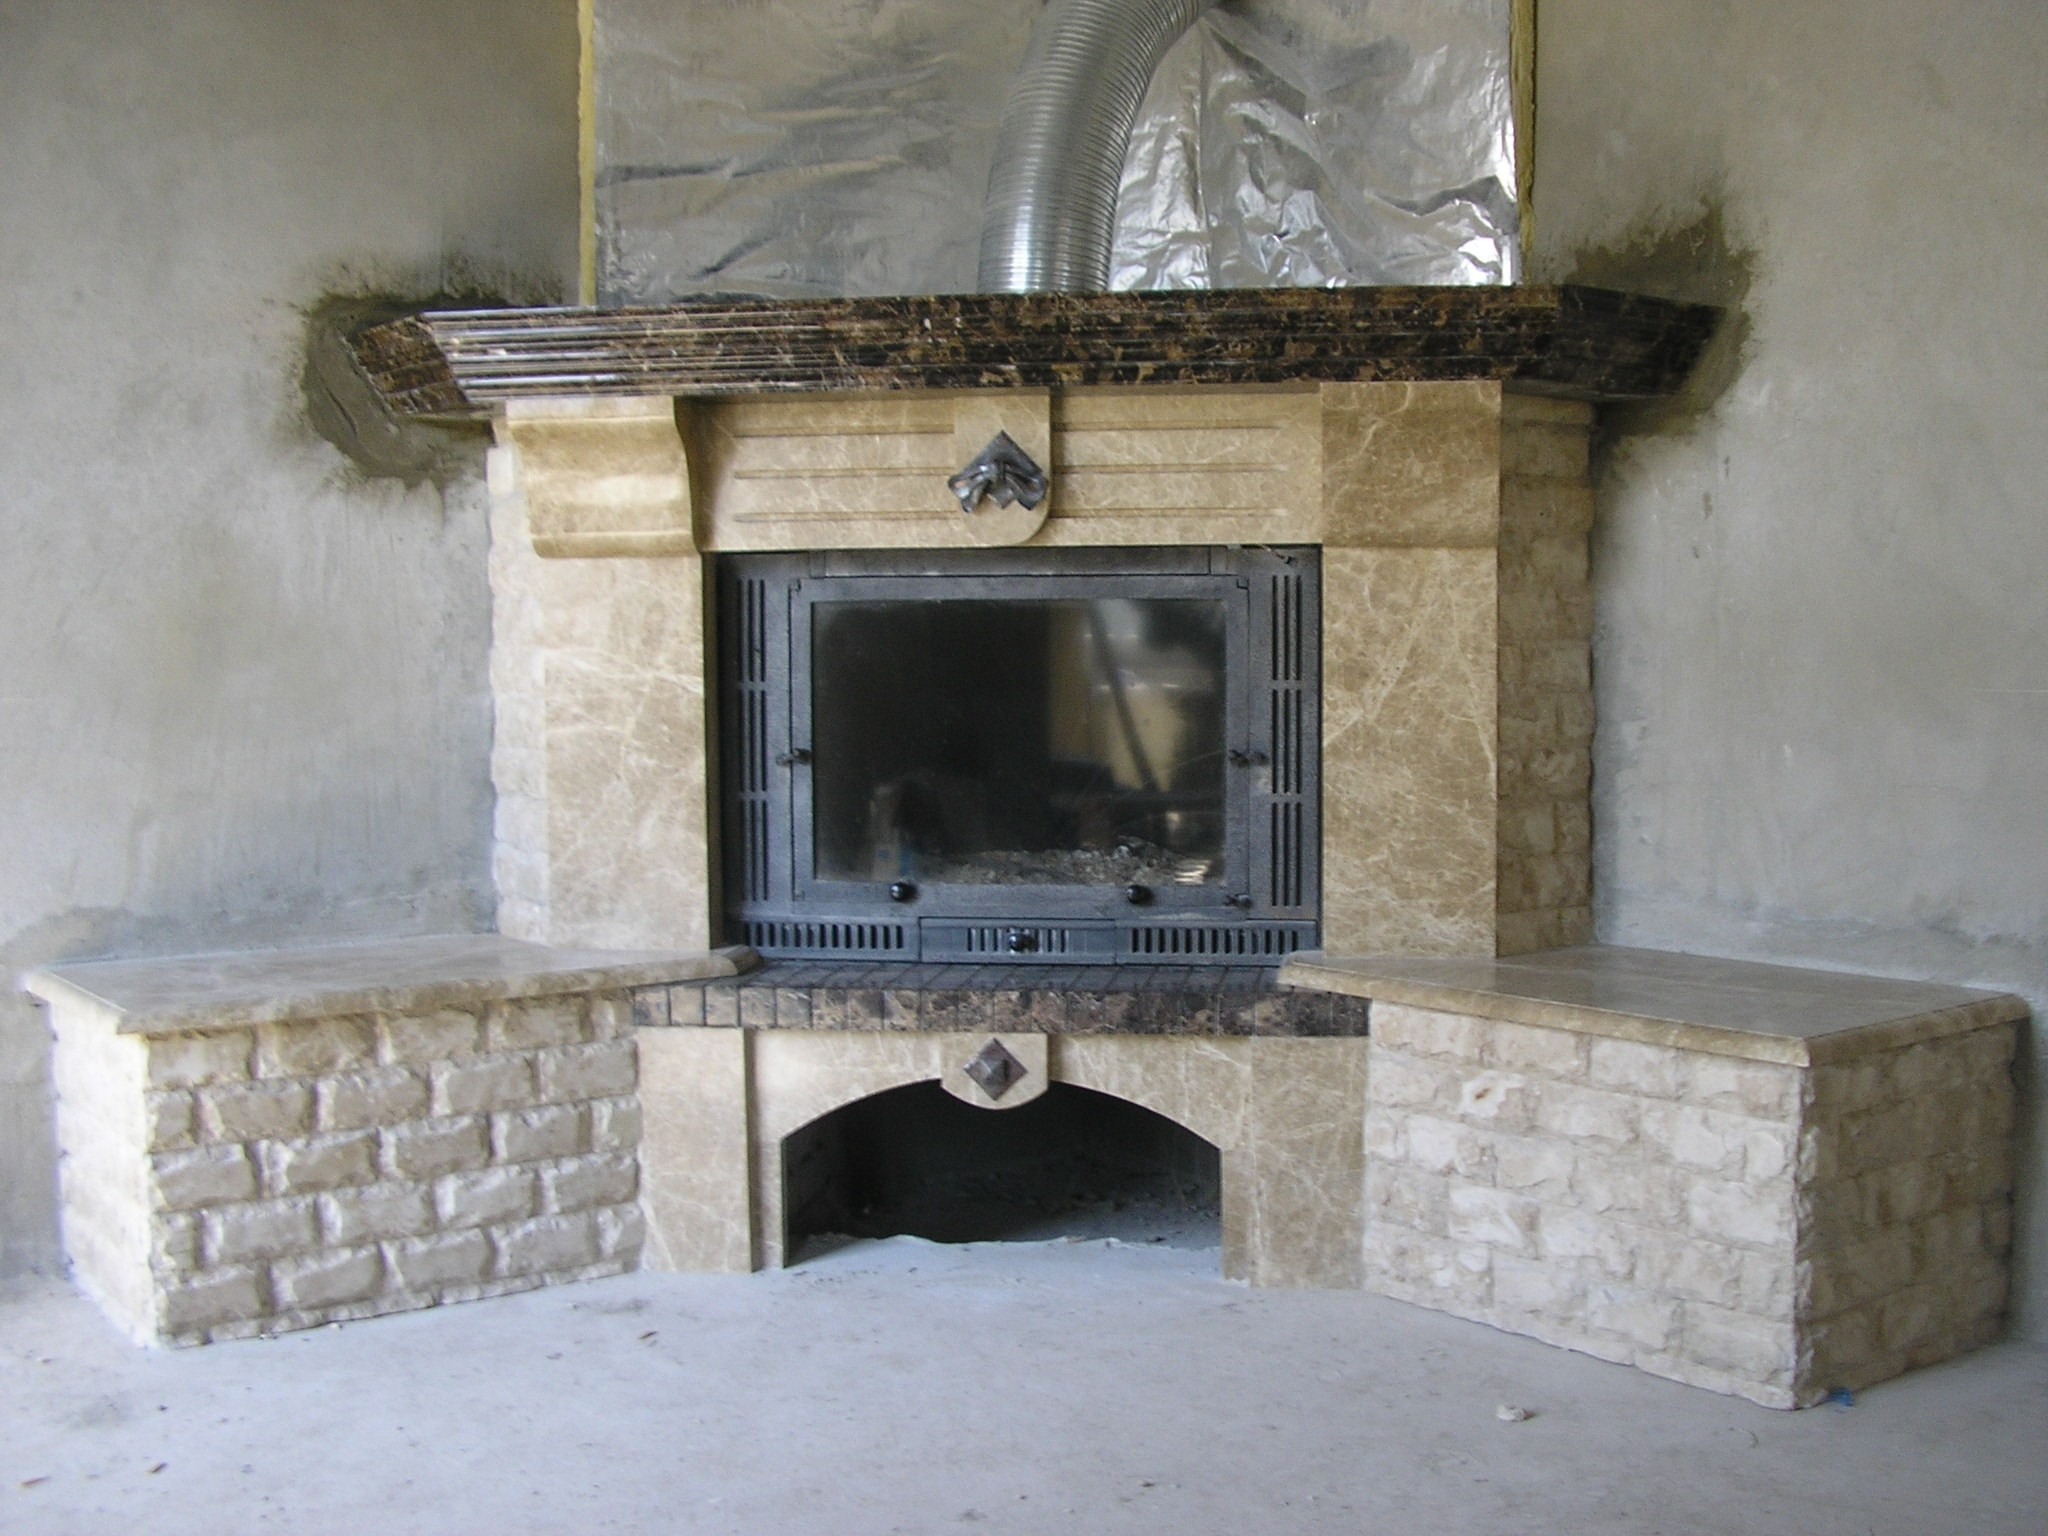
Exterior finish of the fireplace
If the lower part of the fireplace is already ready and needs only a decorative finish, then you only have to close it on the sides and top (see Finishing the fireplace).
Brickwork around the firebox with a gap
Answering the question of how to build a fireplace with a cast-iron firebox with your own hands, you need to know what the installation will be made of. If it is completely made of brick, then it is necessary to continue laying, stepping back from the walls of the firebox for a certain distance and leaving several holes in it for hot air to escape.
Thermal insulation around the chimney
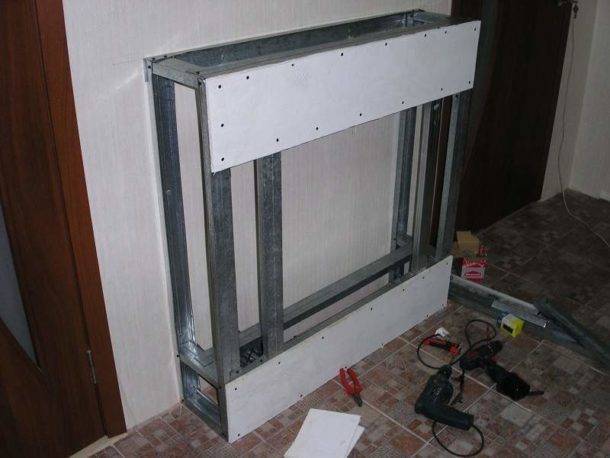
But you can do it easier and cheaper, at the same time significantly facilitating the design - to arrange a frame for sheathing.
Video: Do-it-yourself mini fireplace for a country house
Mini fireplace for a country house - do it yourself
Secrets of the treatment of joint pain from our regular reader.
My name is Gennady Alekseevich. I am a baker with over 20 years of experience. I am engaged in both repair and construction of Russian stoves and fireplaces. I always perform the work very efficiently and carefully, which negatively affects the condition of the joints. As I got older, the pain got worse and worse, to the point where I could no longer work. Having tried a lot of both medicinal and folk methods of treatment, I realized how serious my disease was, since there was no positive effect. Until I came across one tool, which I want to tell you about.


It is a unique blend of the rarest and most powerful natural healing substances. This tool has proven its effectiveness not only to patients, but also to science, which has recognized it as an effective drug. Pain in the joints and back go away in 10-15 days, studies have shown. The main thing is to strictly follow the instructions in the methodology. Order the product in the original packaging. with a guarantee of quality can be on the official website.
Dubinsky: “It is necessary to treat pain in the joints, first of all, by excluding it.
How many times to repeat: age spots instantly go away from the usual.
Want to bring your girlfriend to ecstasy. Use a fail-safe novelty.
Arthritis is a direct path to disability! How to save yourself.
Characteristic features and advantages of a corner fireplace
Among the features of corner fireplaces that distinguish them favorably against the background of frontal models, the following can be distinguished:
- The corner arrangement allows you to significantly save the area occupied by the fireplace. A room equipped with such a structure is more ergonomic. Thanks to this, it is possible to use a corner fireplace without loss of comfort even in relatively small interiors, for example, in a bedroom. In turn, frontal models are very demanding on free space; they are installed mainly in halls or living rooms.
- The contact of the fireplace body with adjacent walls of different rooms makes it possible to achieve greater efficiency as a heating device. In addition to the room where it is located, other rooms adjacent to it are also warmed up.
- The location of the fireplace in the corner is also advantageous in aesthetic terms. The center of the flame of such a fireplace is clearly visible from any point in the room where it is located.
- Unlike built-in fireplaces, a corner fireplace can be installed after the design and construction of the house.


