- Learning to cook with electric welding. Video tutorial
- What electrodes to weld a 2 mm profile pipe.
- Selection of welding mode and type of electrodes
- Weld defects
- Lack of fusion
- undercut
- burn
- Pores and bulges
- Cold and hot cracks
- Preparation for work
- Electric welding technology
- How to light an arc
- Welding speed
- Manual arc welding technique. How to cook by welding
- Pros and cons of inverter equipment
- Step-by-step instructions: how to cook with electric welding
- What is direct and reverse polarity?
- The basics of electric welding for beginners to weld from scratch
- Equipment
- What to work in - equipment
- Safety
- How metal is welded
Learning to cook with electric welding. Video tutorial
In order to learn how to cook by electric welding, it is not enough to study the theoretical foundations and learn the secrets of craftsmanship. Only the experience that is gained with every centimeter of the weld can bring you closer to the ability to weld metals.
A video on how to cook by electric welding will help you understand all the nuances of this craft, tell you about what other materials and tools, in addition to the welding machine, will be needed during the work.
Made in the form of step-by-step lessons, the video of the welding process begins with a story about the preparation of surfaces before welding. Next, you will learn how to perform the simplest seams, and only after that you can begin to connect the parts.
Thanks to the recommendations in the video, welding your first structure will not be a big deal, and quality control of the seams will show how well you have mastered the welding technique. Watch a video on how to cook with electric welding, prepare theoretically, and then pick up an electrode and start creating.
What electrodes to weld a 2 mm profile pipe.
When choosing electrodes for electric welding, they are guided by the thickness of the workpieces, which is directly related to their diameter.
The necessary data can be obtained from the tables on the package or determine the dimensions yourself, given that the diameter of the electrode approximately corresponds to the wall thickness with values not exceeding 4 mm.
Selection of welding mode and type of electrodes
The current passed through the electrodes is directly related to their diameter, its value is usually indicated on the packaging. Additionally, its value can be set from tables or approximately determined by calculations, based on the fact that 1 mm. electrode thickness requires a current of 30 amperes.
There are four main types of electrodes depending on the coating material:
- Sour (A). They are characterized by a high content of iron and manganese, the metal electrode passes into the seam in the form of small drops with the formation of a liquid bath, when solidified, the slag is easily separated. When working, too high arc temperature leads to undercuts, the seam is highly prone to cracks - this limits the use of this type.
- Cellulosic (C). In addition to cellulose, the composition includes ferromanganese ores and talc, which completely burn out when heated, forming a protective gas, while the seam does not have a slag coating.The electrode goes into the seam with medium and large drops, forming a rough uneven structure with numerous splashes.
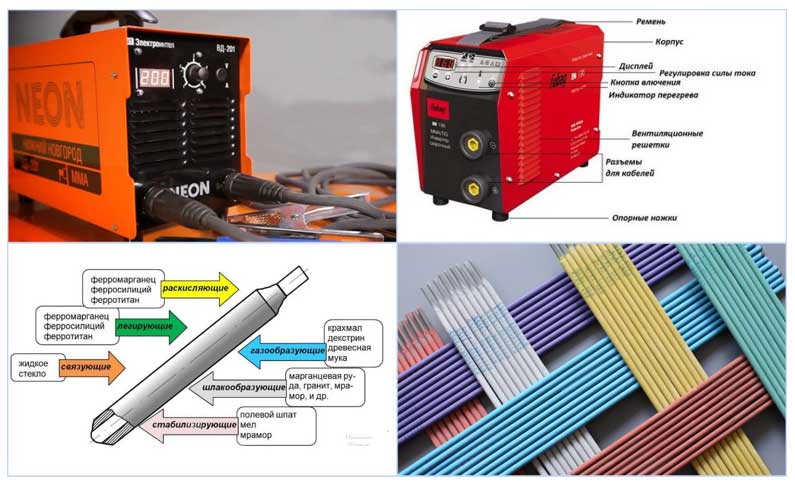
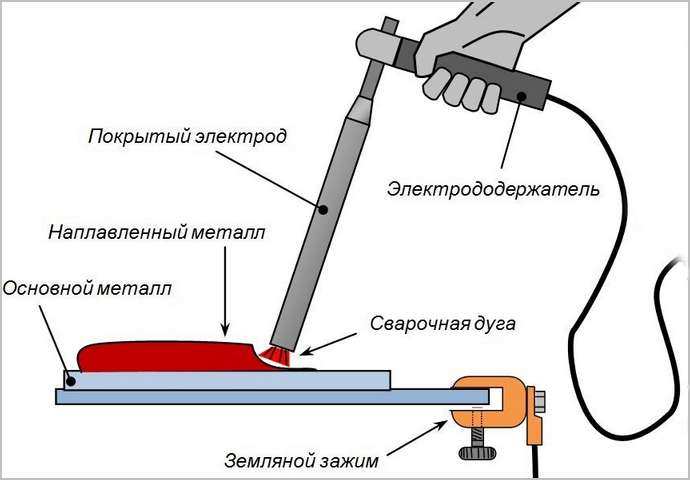
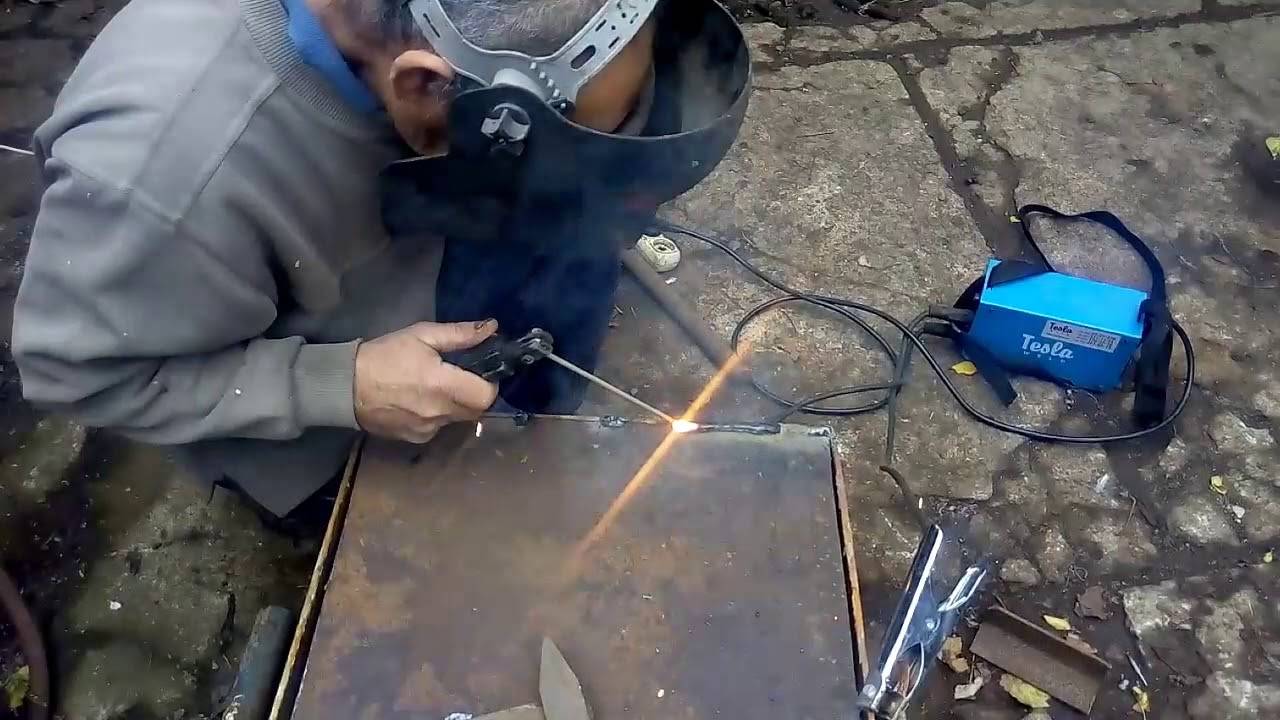
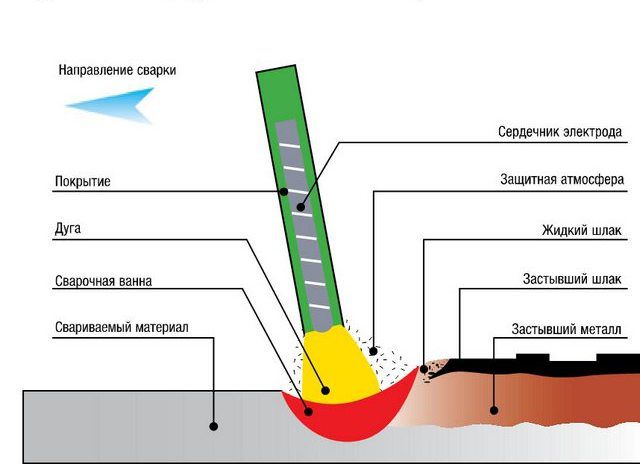
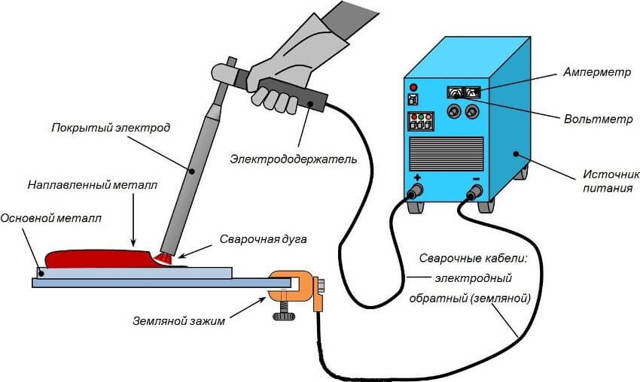
Rice. 10 Appearance of the electric arc apparatus and electrode
Rutile (P). The coating consists mainly of titanium dioxide or ilmenite, the electrode metal passes into the weld pool with medium and small drops with a small amount of spatter and the formation of an even, high-quality seam. The slag coating has a porous structure and is easily separated from the seam.
For electric welding of low-carbon steel alloys, from which shaped pipes are made, good electrodes of the UONI-13/55, MP-3, ANO-4 brands are most often used, OK 63.34 can be used for welding stainless steel.
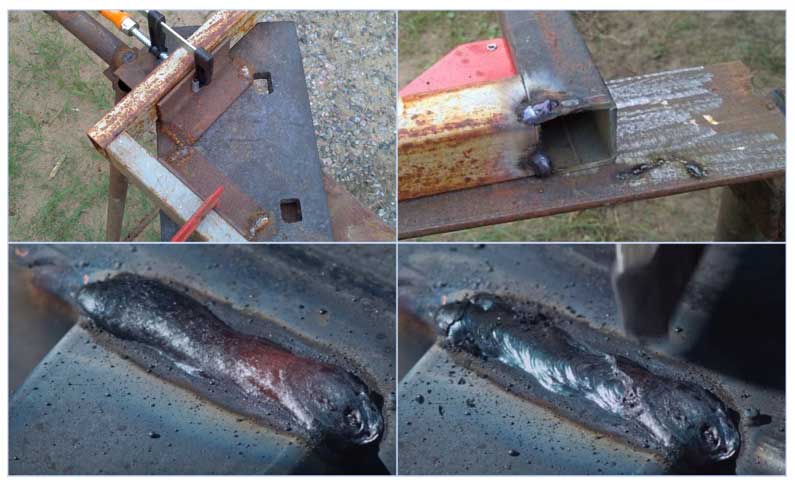
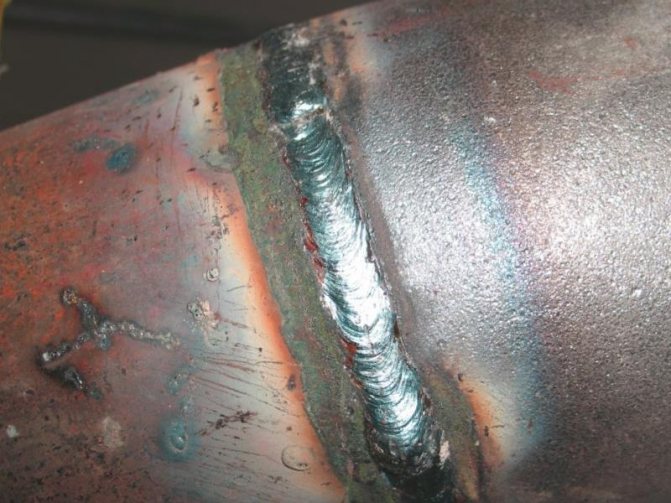
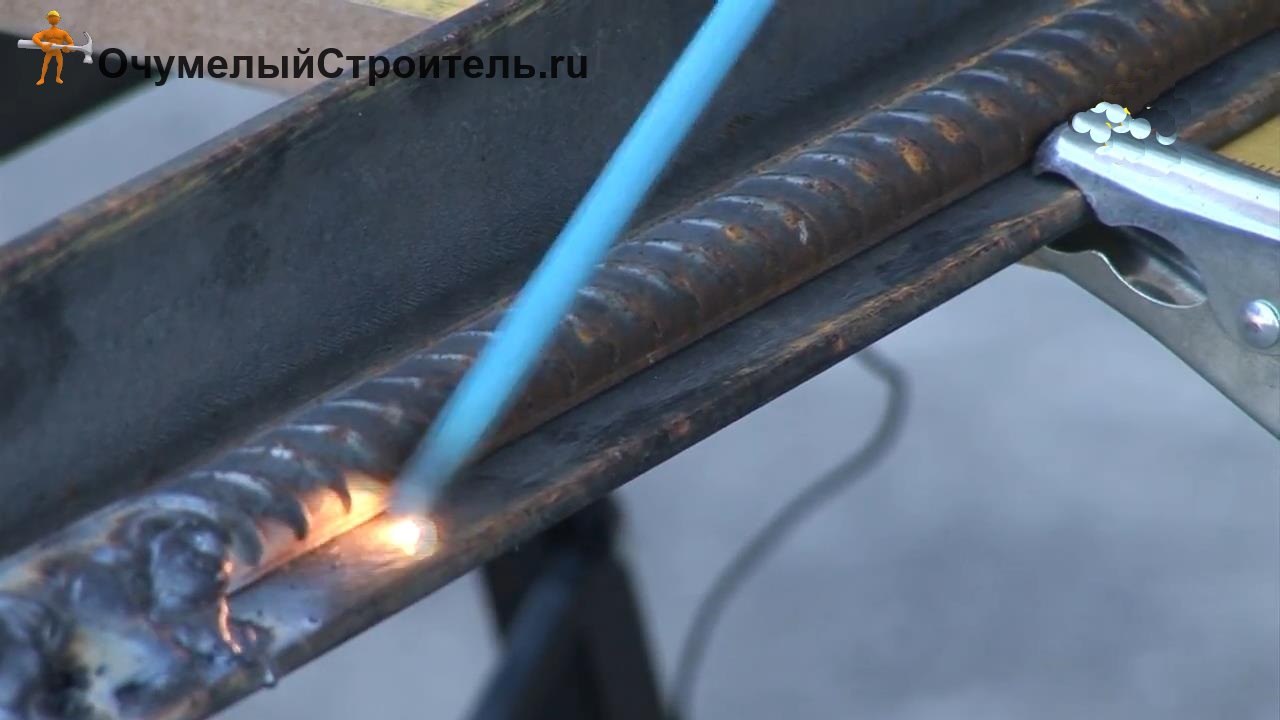
Fig.11 Welding of thin-walled pipes
Weld defects
Beginning welders often make mistakes when making seams that lead to defects. Some are critical, some are not.
In any case, it is important to be able to identify the error in order to correct it later. The most common defects among beginners are the unequal width of the seam and its uneven filling.
This happens due to uneven movements of the electrode tip, changes in the speed and amplitude of movements. With the accumulation of experience, these shortcomings become less and less noticeable, after a while they disappear altogether.
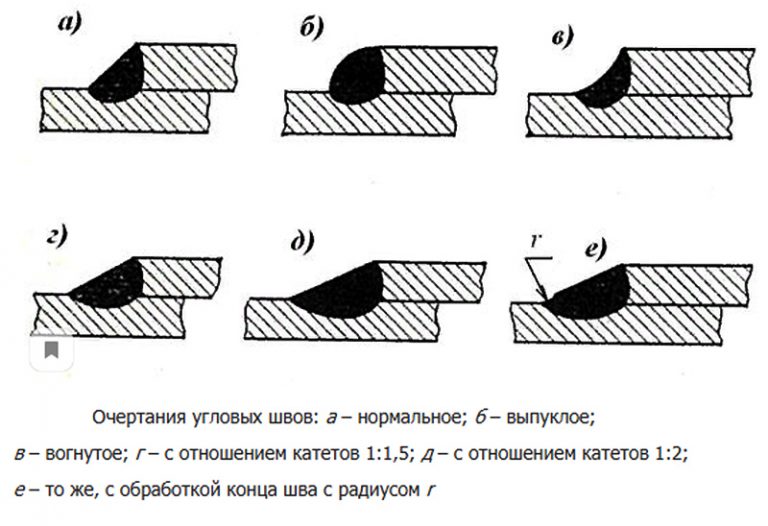
Other errors - when choosing the current strength and the size of the arc - can be determined by the shape of the seam. It is difficult to describe them in words, it is easier to depict them. The photo below shows the main shape defects - undercuts and uneven filling, the reasons that caused them are spelled out.
Errors that can occur when welding
Lack of fusion
One of the mistakes that novice welders make: lack of fusion
This defect consists in incomplete filling of the joint of parts. This disadvantage must be corrected, as it affects the strength of the connection. Main reasons:


- insufficient welding current;
- high speed of movement;
- insufficient edge preparation (when welding thick metals).
It is eliminated by correcting the current and reducing the length of the arc. Having chosen correctly all the parameters, they get rid of such a phenomenon.
undercut
This defect is a groove along the seam in the metal. Usually occurs when the arc is too long. The seam becomes wide, the temperature of the arc for heating is not enough. The metal around the edges quickly solidifies, forming these grooves. "Treated" by a shorter arc or by adjusting the current strength upwards.
Undercut in gusset
With a corner or tee connection, an undercut is formed due to the fact that the electrode is more directed towards the vertical plane. Then the metal flows down, a groove forms again, but for a different reason: too much heating of the vertical part of the seam. Eliminated by reducing the current and / or shortening the arc.
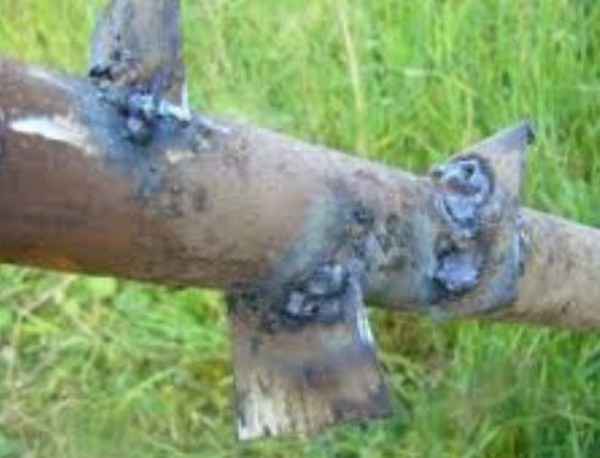
burn
This is a through hole in the weld. Main reasons:
- too high welding current;
- insufficient speed of movement;
- too much gap between the edges.
This is how a burnt seam looks like when welding
The correction methods are clear - we are trying to choose the optimal welding mode and the speed of the electrode.
Pores and bulges
The pores look like small holes that can be grouped in a chain or scattered over the entire surface of the seam. They are an unacceptable defect, as they significantly reduce the strength of the connection.
Pores appear:
- in case of insufficient protection of the weld pool, an excessive amount of protective gases (poor quality electrodes);
- draft in the welding zone, which deflects protective gases and oxygen enters the molten metal;
- in the presence of dirt and rust on the metal;
- inadequate edge preparation.
The sags appear when welding with filler wires with incorrectly selected welding modes and parameters. Represent a numb metal that has not connected to the main part.
Main defects in welds
Cold and hot cracks
Hot cracks appear as the metal cools. Can be directed along or across the seam. Cold ones appear already on a cold seam in cases where the loads for this type of seam are too high. Cold cracks lead to the destruction of the welded joint. These shortcomings are treated only by repeated welding. If there are too many flaws, the seam is cut off and re-applied.
Cold cracks lead to product failure
Preparation for work
The connection of profile pipes without welding is mainly carried out using specialized clamps and bolts. Over time, the fasteners loosen, so when caring for the product, it is necessary to constantly check the strength of the structure. To reduce problems during operation, welding is used to assemble the structure.
To obtain a strong weld, it is necessary to prepare the surface of the pipe. For this:
pipe sections are cut to the required length;
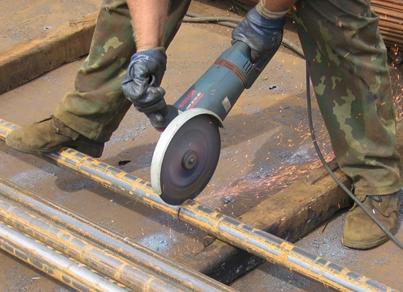
Using a grinder for cutting pipes
It is recommended to cut pipes with special tools, for example, a hacksaw, which allows you to make the cut as even as possible.
- if it is necessary to connect the elements at an angle, then the pipes are carefully adjusted to each other so that the gaps are as small as possible. This will increase the quality of the weld and, as a result, the reliability of the finished product;
- the places where the weld is supposed to be located are cleaned of rust, burrs and other foreign deposits. Any inclusion negatively affects the strength of the seam. Cleaning can be done with a simple metal brush or specialized equipment, such as a grinder.
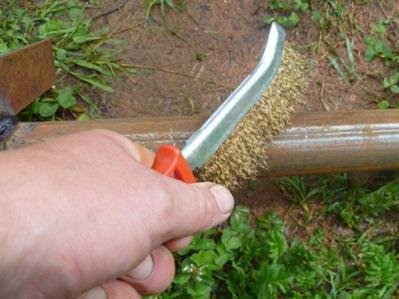
Surface preparation before welding
Electric welding technology
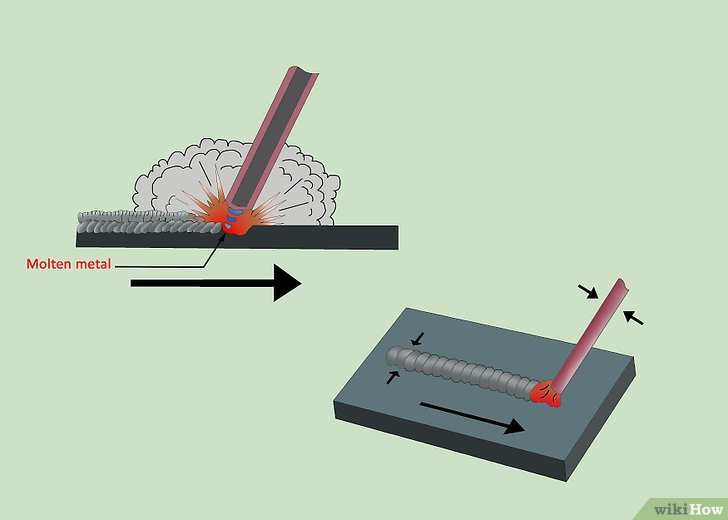
Electric welding is a process that occurs under the influence of high temperatures, above the melting of the metal. As a result of welding, a so-called weld pool is formed on the metal surface, which is filled with a molten electrode, thus forming a weld.


Therefore, the main conditions for the implementation of electric welding are to ignite the electrode arc, melt the metal on the workpieces to be welded and fill the weld pool with it. It would seem, in all simplicity, it is very difficult for an unprepared person to do this. First, you need to understand how quickly the electrode burns, and this depends on its diameter and current strength, and also be able to distinguish slag during metal welding.
In addition, it is necessary to maintain a uniform speed and the correct movement of the electrode during welding (from side to side), so that the weld is smooth and reliable, able to withstand rupture loads.
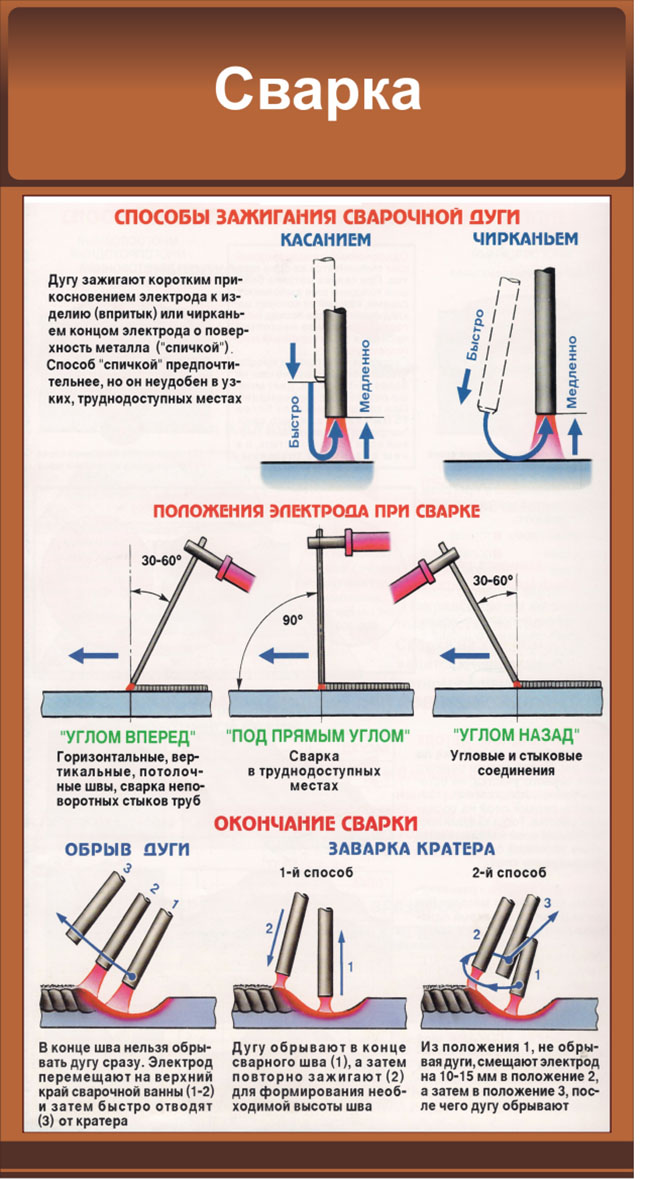
How to light an arc
Beginning the development of electric welding should be with the correct ignition of the arc.Training is best done on an unnecessary piece of metal, but it should not be rusty, as this will seriously complicate the task and may confuse a novice welder.
There are two simple ways to start an arc:
- By quickly touching the electrode on the surface of the workpiece and then pulling it up to a distance of 2-3 mm. If you lift the electrode from the metal above, the arc may disappear or become too unstable;
- Striking the electrode on the surface of the workpiece to be welded, as if you were lighting a match. It is necessary to touch the metal with the tip of the electrode, and draw it 2-3 cm along the surface (towards the welding site) until the arc ignites.
The second method of arc ignition is best suited for beginner electric welders, as it is the simplest. Also, short-term guidance on metal warms up the electrode, and then it becomes much easier to cook with it.
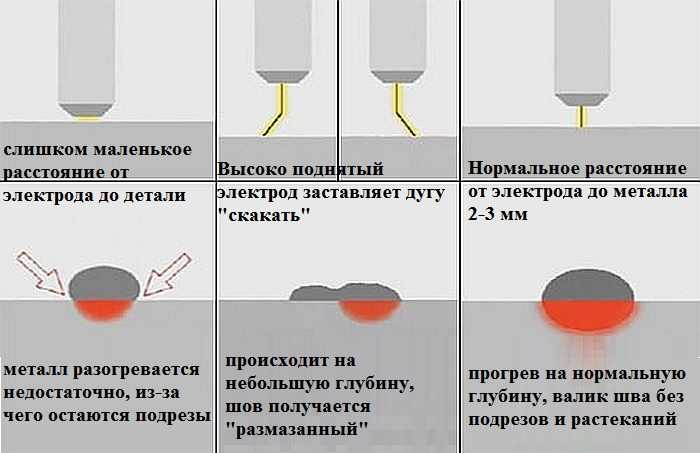
After ignition of the arc, it should be kept as close as possible to the surface of the workpiece, at a distance of no more than 0.5 cm. In addition, this distance must be kept approximately the same all the time, otherwise the weld will be ugly and uneven.
Welding speed
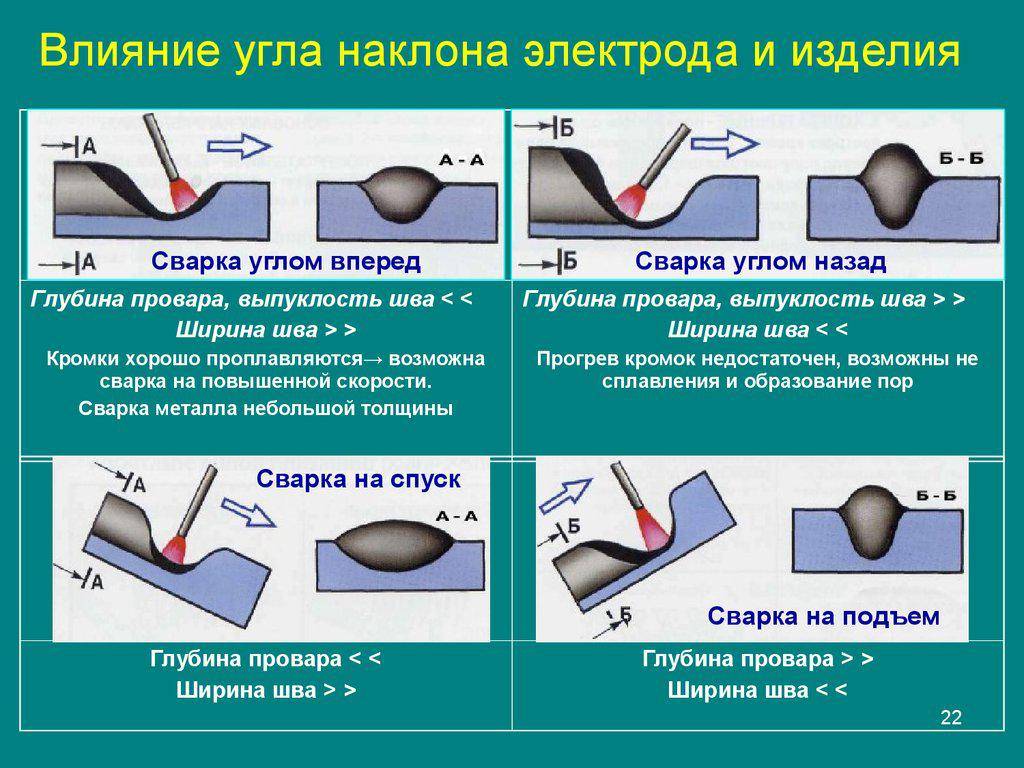
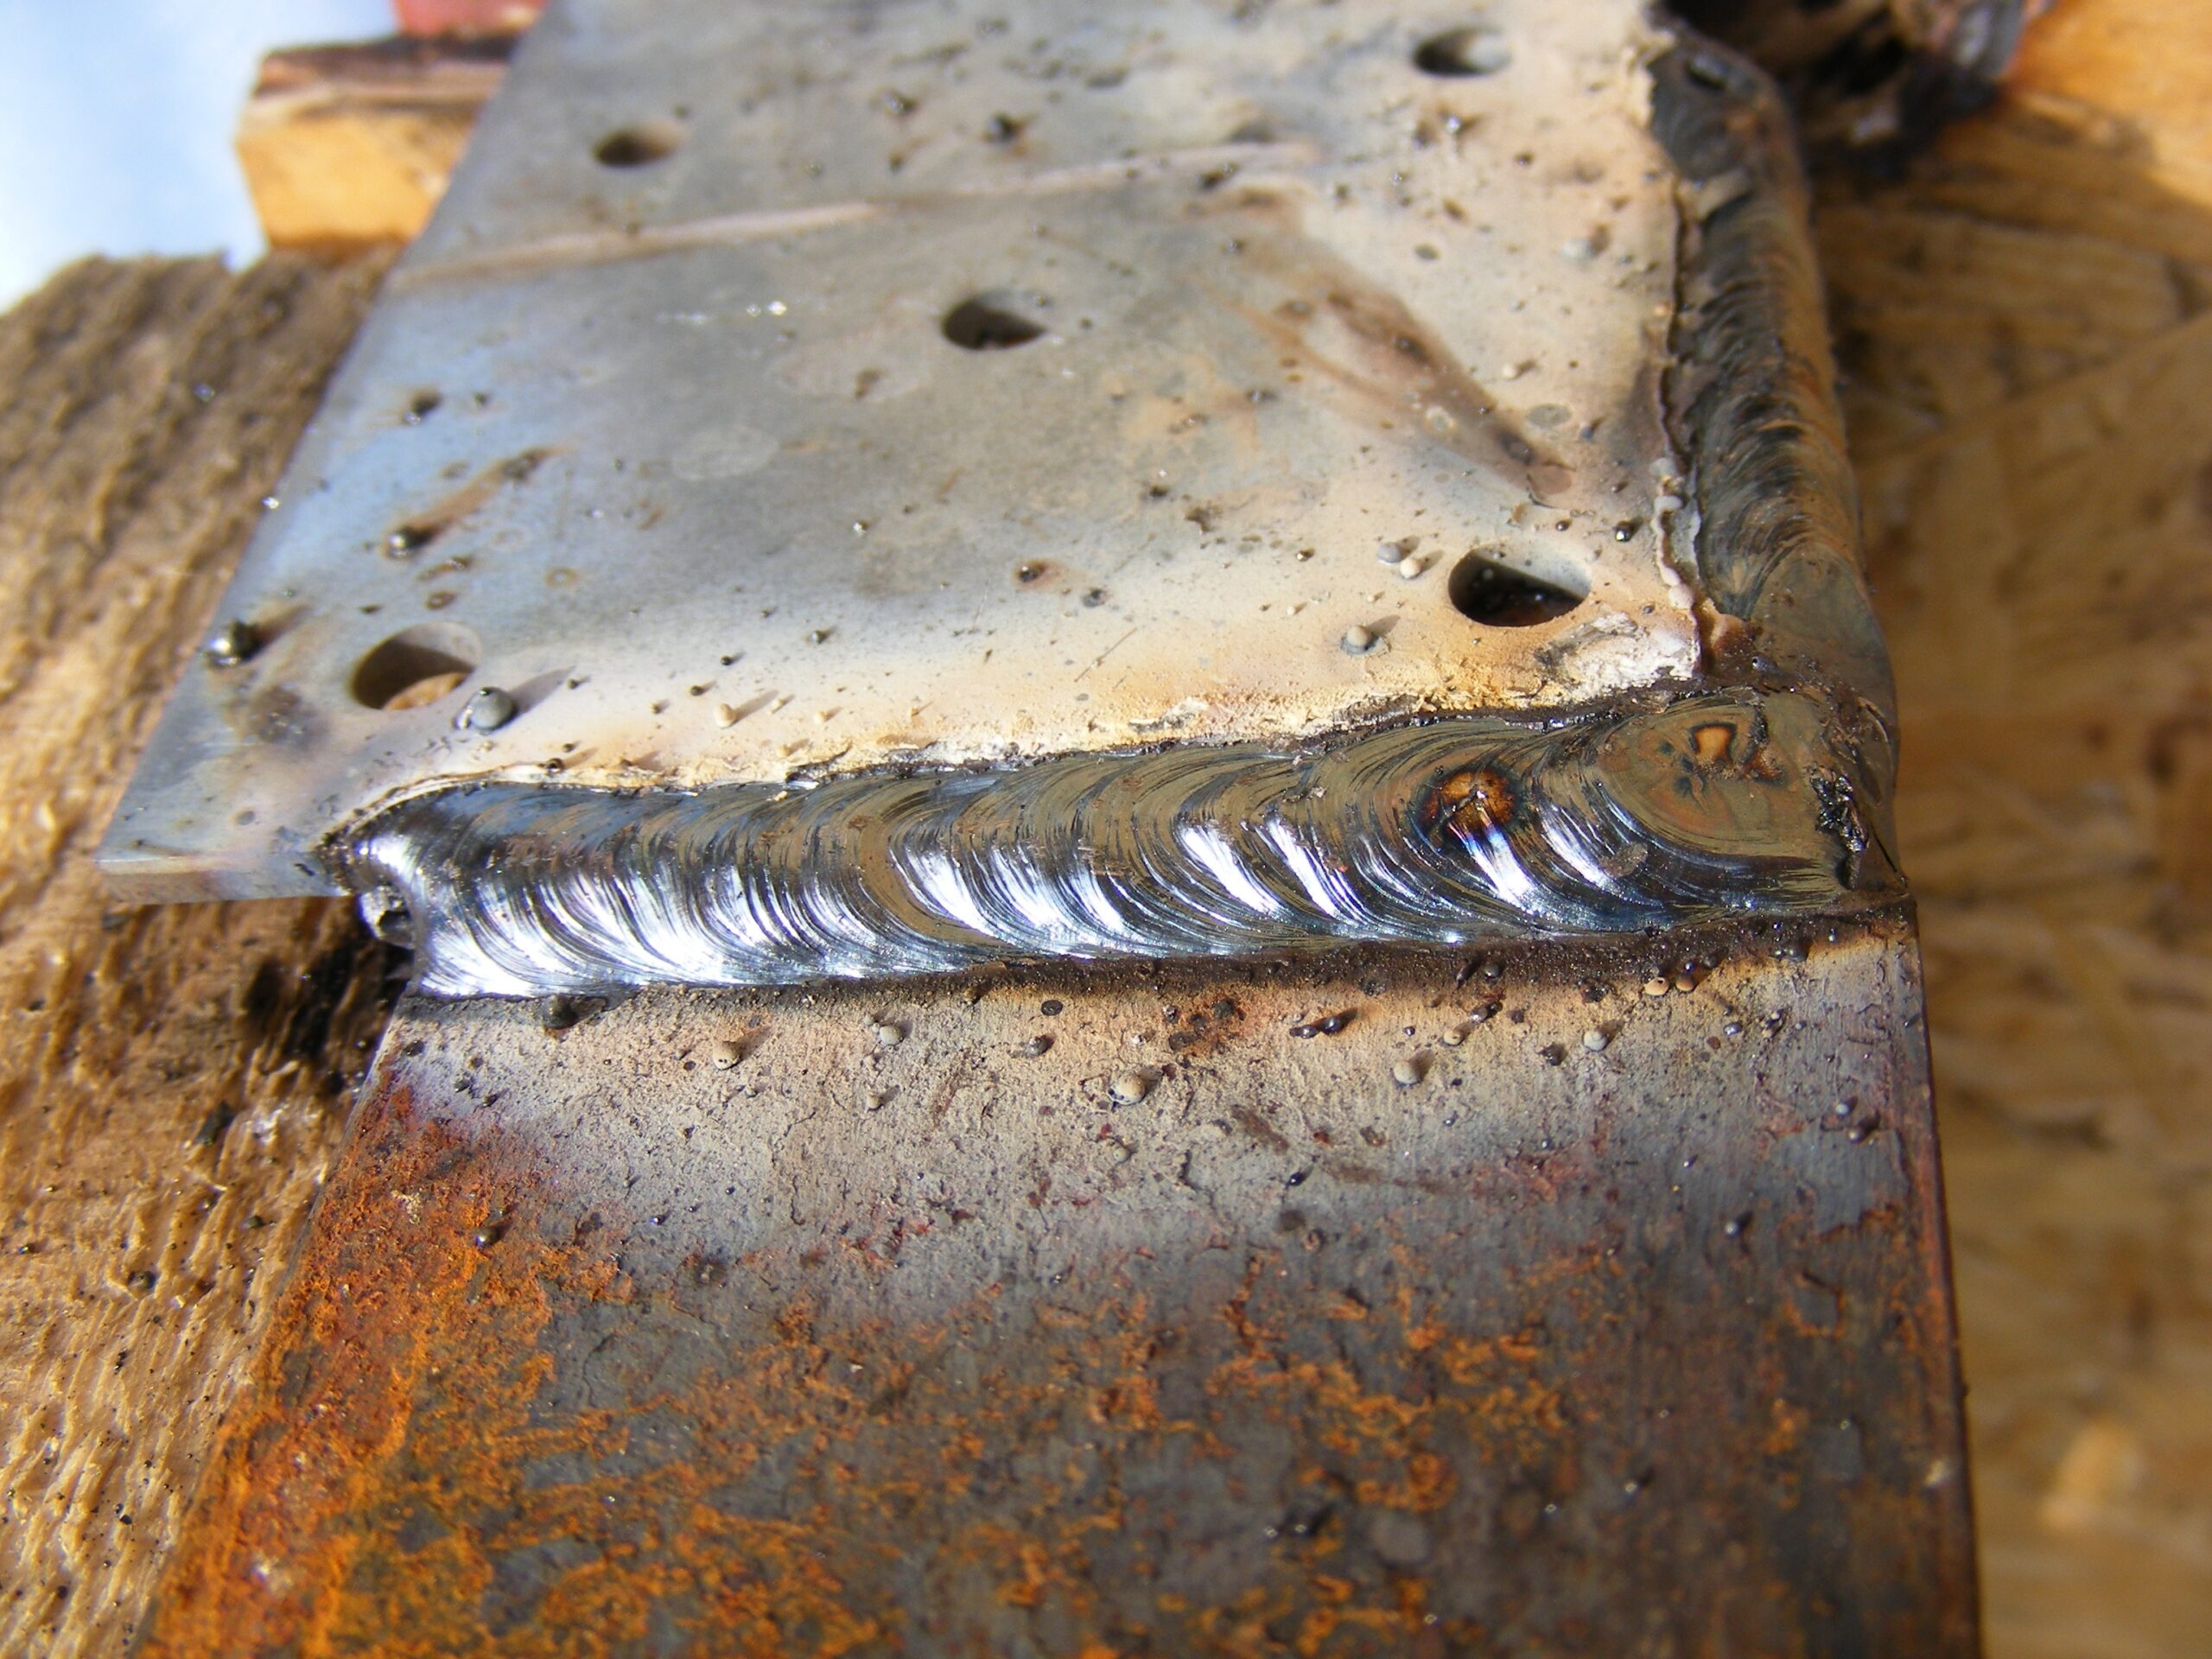
The speed of the electrode depends on the thickness of the metal being welded. Accordingly, the thinner it is, the faster the welding speed is, and vice versa. Experience in this will come with time, when you learn how to light an arc and begin to cook more or less. The pictures below show illustrative examples by which you can understand at what speed the welding was carried out.
If slowly, then the welding seam turns out to be thick, and its edges are strongly melted.If, on the contrary, the electrode is driven too fast, then the seam is weak and thin, as well as uneven. At the correct welding speed, the metal completely fills the weld pool.
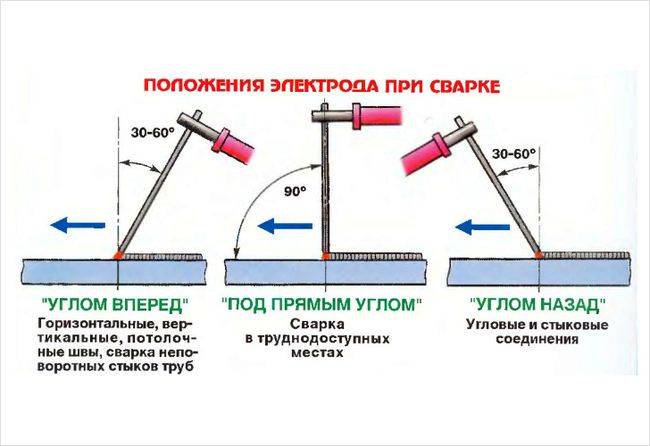
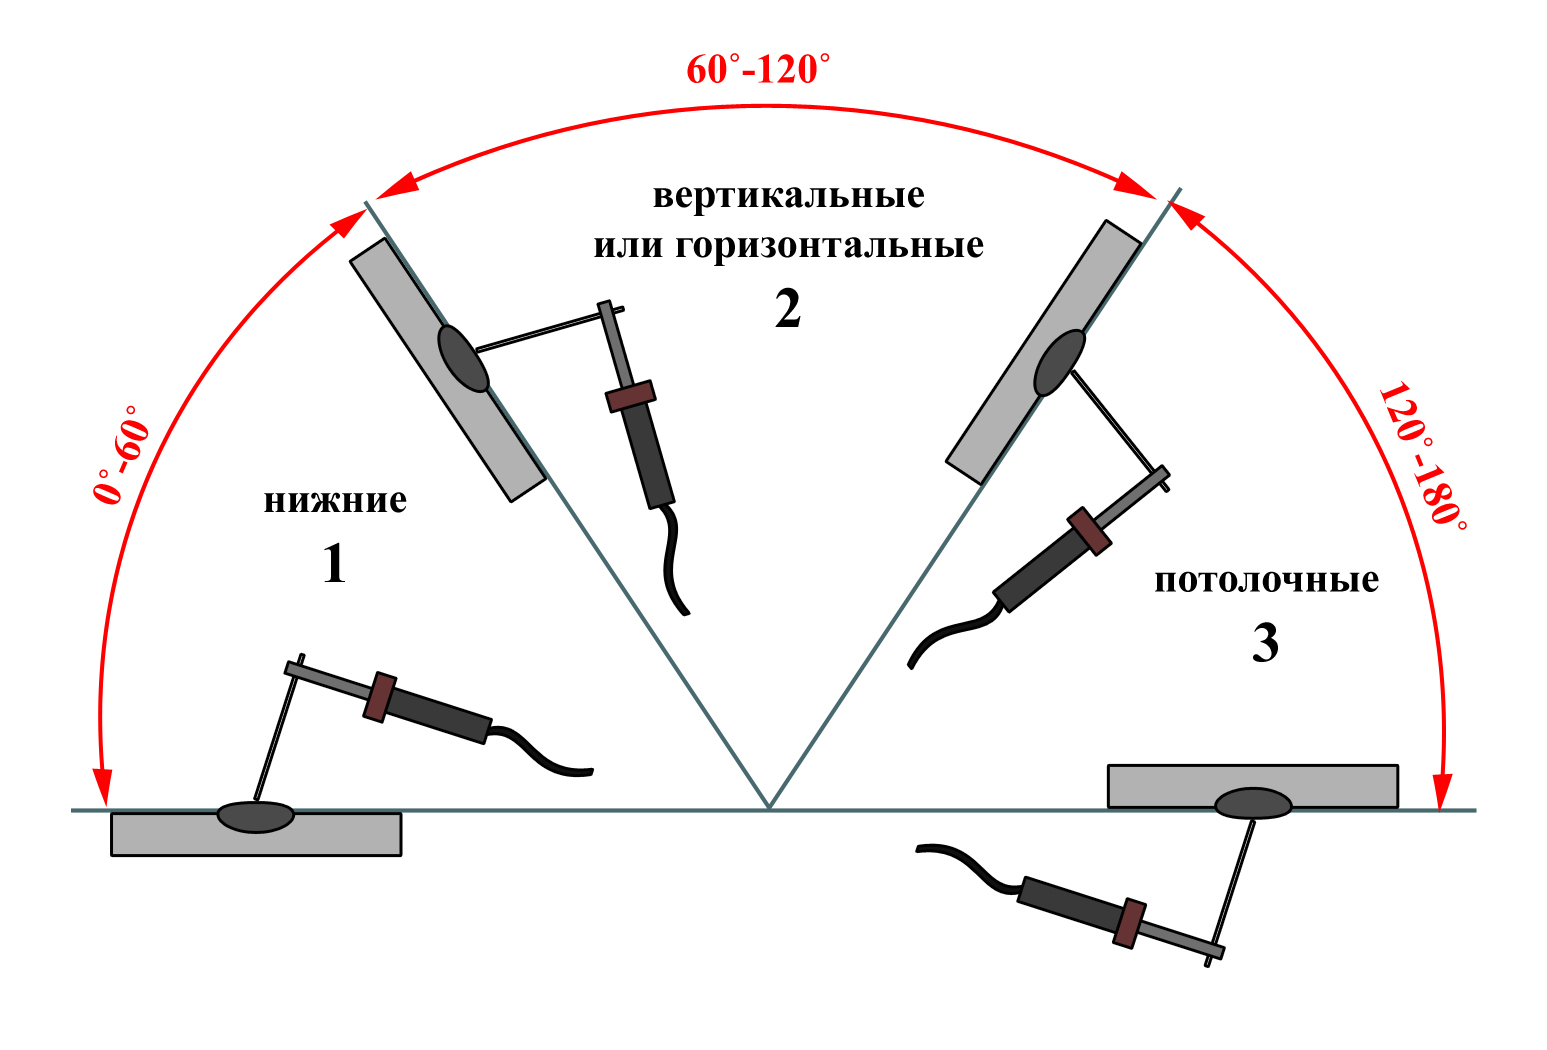
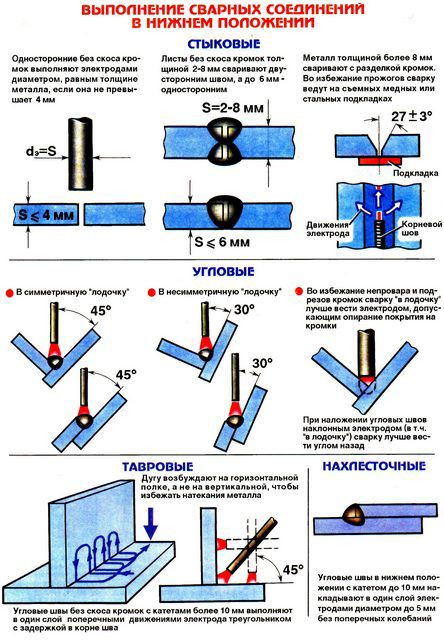
In addition, when practicing welding, you need to monitor the correct angle of the electrode in relation to the metal surface. The angle should be approximately 70 degrees and can be changed if necessary. During the formation of the weld, the movement of the electrode can be longitudinal, translational and oscillatory, from side to side.
Each of these electrode leading techniques allows you to achieve the desired seam, reduce or increase its width, and also change some other parameters.
Manual arc welding technique. How to cook by welding
Before proceeding to practical exercises, I would like to once again remind you of safety precautions. No wooden workbenches and combustible materials near the place of work. Be sure to put a container of water in the workplace. Be aware of the risk of fire.
In order to figure out how to properly weld by welding, we present to your attention detailed instructions and a video of the welding process.
First try to strike the arc and hold it for the required time. To do this, follow our advice:
- Using a metal brush, it is required to clean the surfaces of the parts to be welded from dirt and rust. If necessary, their edges are adjusted to each other.
- It is best to learn how to cook by electric welding correctly with direct current, so connect the “positive” terminal to the part, install the electrode in the clamp, and set the required current strength on the welding machine.
- Tilt the electrode with respect to the workpiece at an angle of about 60° and slowly pass it over the metal surface. If sparks appear, lift the end of the rod 5 mm to ignite the electric arc. Perhaps you failed to get sparks due to a layer of coating or slag on the edge of the electrode. In this case, tap the part with the tip of the electrode, as suggested in the video on how to properly weld with electric welding. The resulting arc is supported by a 5 mm welding gap throughout the entire welding process.
- If the arc lights up very reluctantly, and the electrode sticks to the metal surface all the time, increase the current by 10-20 A. If the electrode sticks, shake the holder from side to side, possibly even with force.
- Remember that the rod will burn out all the time, so only maintaining a gap of 3-5 mm will allow you to keep a stable arc.
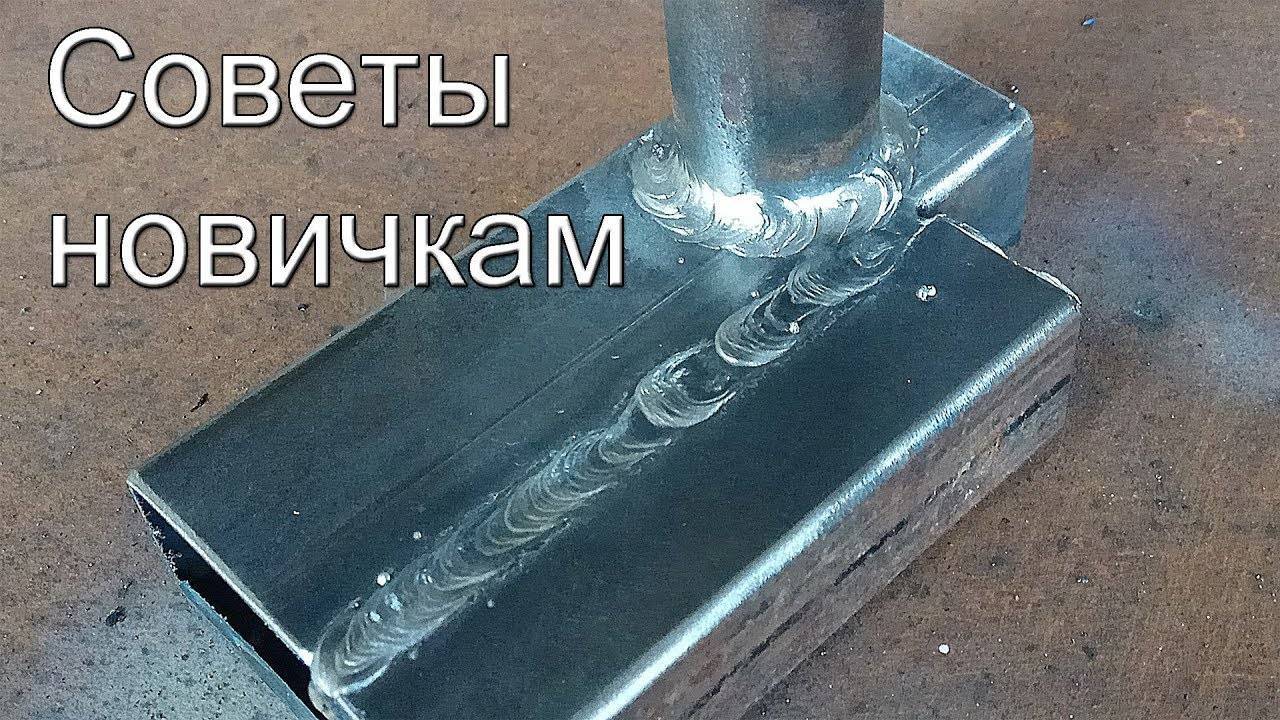
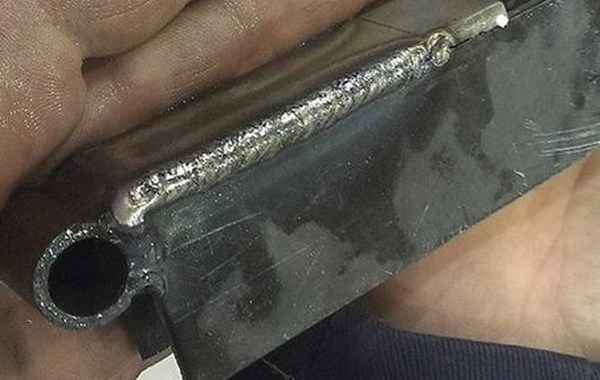
Having learned how to strike an arc, try to slowly move the electrode towards yourself, while making movements with an amplitude of 3-5 mm from side to side. Try to direct the melt from the periphery towards the center of the weld pool. After welding a seam about 5 cm long, remove the electrode and let the parts cool, then tap with a hammer at the junction in order to knock down the slag. The correct seam has a monolithic wavy structure without craters and inhomogeneities.
The purity of the seam directly depends on the size of the arc and the correct movement of the electrode during welding. Watch a video on how to cook by welding, filmed using protective filters.In such videos, you can clearly see how to maintain the arc and move the electrode to obtain a high-quality seam. We can make the following recommendations:

- The required length of the arc is maintained by the translational movement of the rod along the axis. During melting, the length of the electrode decreases, so it is necessary to constantly bring the holder with the rod closer to the part, observing the required clearance. This is what is emphasized in numerous videos on how to learn how to cook.
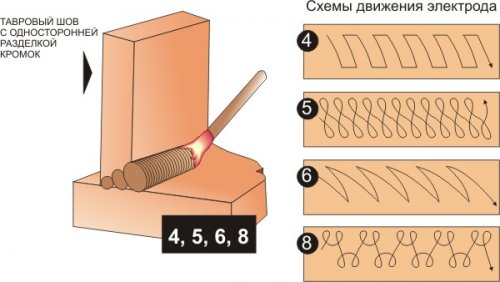
- Longitudinal movement of the electrode creates a deposition of the so-called filament roller, the width of which is usually 2-3 mm greater than the diameter of the rod, and the thickness depends on the speed of movement and current strength. The thread roller is a real narrow weld.
- To increase the width of the seam, the electrode is moved across its line, carrying out oscillatory reciprocating movements. The width of the weld will depend on the magnitude of their amplitude, so the magnitude of the amplitude is determined based on specific conditions.
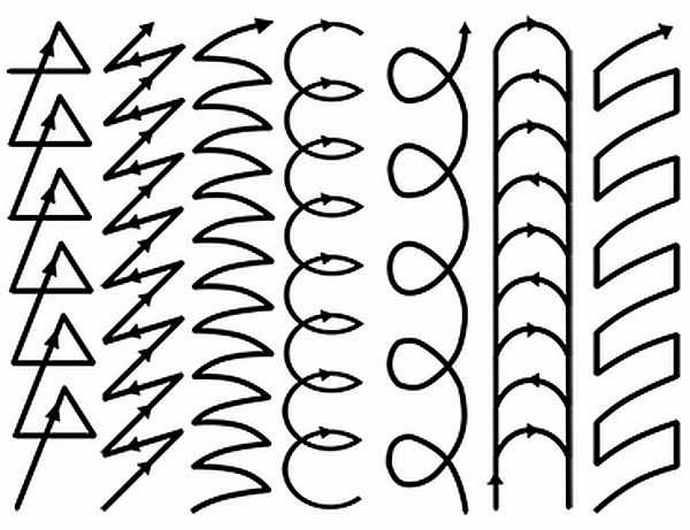
The welding process uses a combination of these three movements to form a complex path.
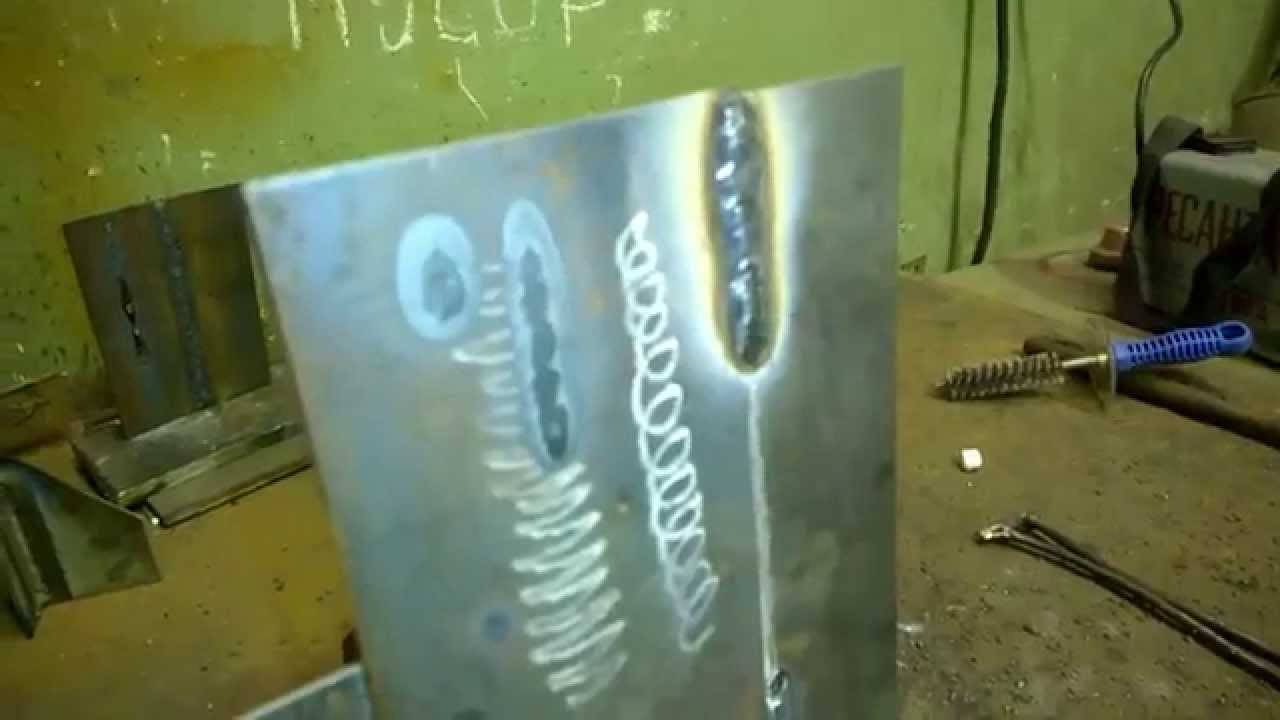
After reviewing the video on how to weld with electric welding and having studied the diagrams of such trajectories, you can figure out which of them can be used for overlap or butt welding, with vertical or ceiling arrangement of parts, etc.
During operation, the electrode will melt completely sooner or later. In this case, welding is stopped and the rod in the holder is replaced. To continue work, slag is knocked down and an arc is set on fire at a distance of 12 mm from the crater formed at the end of the seam. Then the end of the old seam is fused with a new electrode and work continues.
Pros and cons of inverter equipment
Among all the existing methods, the inverter welding technique for beginners is considered the most convenient and affordable. If you wish, in just one day you can learn how to cook with an inverter welding machine at home.
The advantages of this type of equipment are undeniable:
- Availability. The cost of the equipment is low and almost every specialized store offers an extensive selection of models.
- Mobility. Due to its low weight (only 3-10 kg), the equipment can be moved from one place to another without assistance.
- Versatility. The rules for welding with an inverter allow the use of electrodes for direct and alternating current, which is of great importance in cases of welding non-ferrous metal, cast iron and other alloys.
- Convenience. The device allows you to adjust the current strength in a wide range, due to which argon-arc welding with non-consumable tungsten electrodes becomes possible.
- Multifunctionality. In most models, the control circuit makes it possible to carry out various functions that facilitate the process of welding parts.
Speaking of the pluses, one cannot also mention the efficiency of the devices in terms of electricity consumption, as well as the ease of learning, which allows you to learn the secrets of welding with an inverter in a short time.
Along with the advantageous properties of inverters, they are also characterized by some negative points that must be studied before welding with a welding inverter:
- in comparison with a conventional transformer, the price of a welding inverter is about 2-3 times more. This is due to the highest complexity and efficiency of the equipment;
- since semiconductor parts are used in the device circuit, the equipment is characterized by increased sensitivity to dust and during the season it is necessary to clean at least 2-3 times;
- some models are not able to fully operate at sub-zero temperatures, which limits their scope.
But if we compare the minuses with multiple positive qualities, they seem insignificant and are fully compensated by the ease of learning to weld, ease of use and the ability to create strong one-piece connections.
Step-by-step instructions: how to cook with electric welding
- Be sure to clean the surface of the metal being welded. This can be done using an angle grinder or a metal brush;
- Connect the welding inverter to the household power supply. Do not use long and twisted extension cords if possible, check the wire size before connecting the welder. Conductors must be able to withstand a large load;
Install an electrode in the electrode holder, it is necessary to create a welding arc and the subsequent welding process;
Connect the two workpieces to be welded with a clamp. Connect the negative terminal from the welding inverter to one of the blanks;
Set the desired current value on the welding machine (depending on the diameter of the electrode, you can see it here) and turn on the inverter;
Touch the electrode to the surface of the metal and tear it off immediately, but not too far so that the electric arc does not disappear. To get a smooth and beautiful weld, always keep approximately the same distance between the electrode and the metal (approximately 3 mm);
Be sure to practice, and when you can keep the arc in a stable state, start leading the electrode in the direction of welding the workpieces
Pay attention to the angle of inclination and the movement of the electrode. The angle of inclination should be approximately 70 degrees, and the electrode should be oscillated from side to side, from one edge of the metal, and then to the other edge;
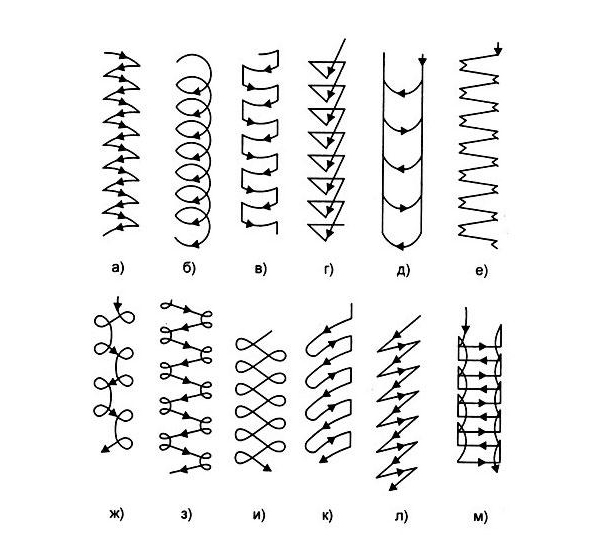
Please note that there are various techniques for moving the electrode, in the form of a loop, herringbone or zigzag. Your goal is to learn how to cook with electric welding in one day, and everything else, like experience, will come with time.
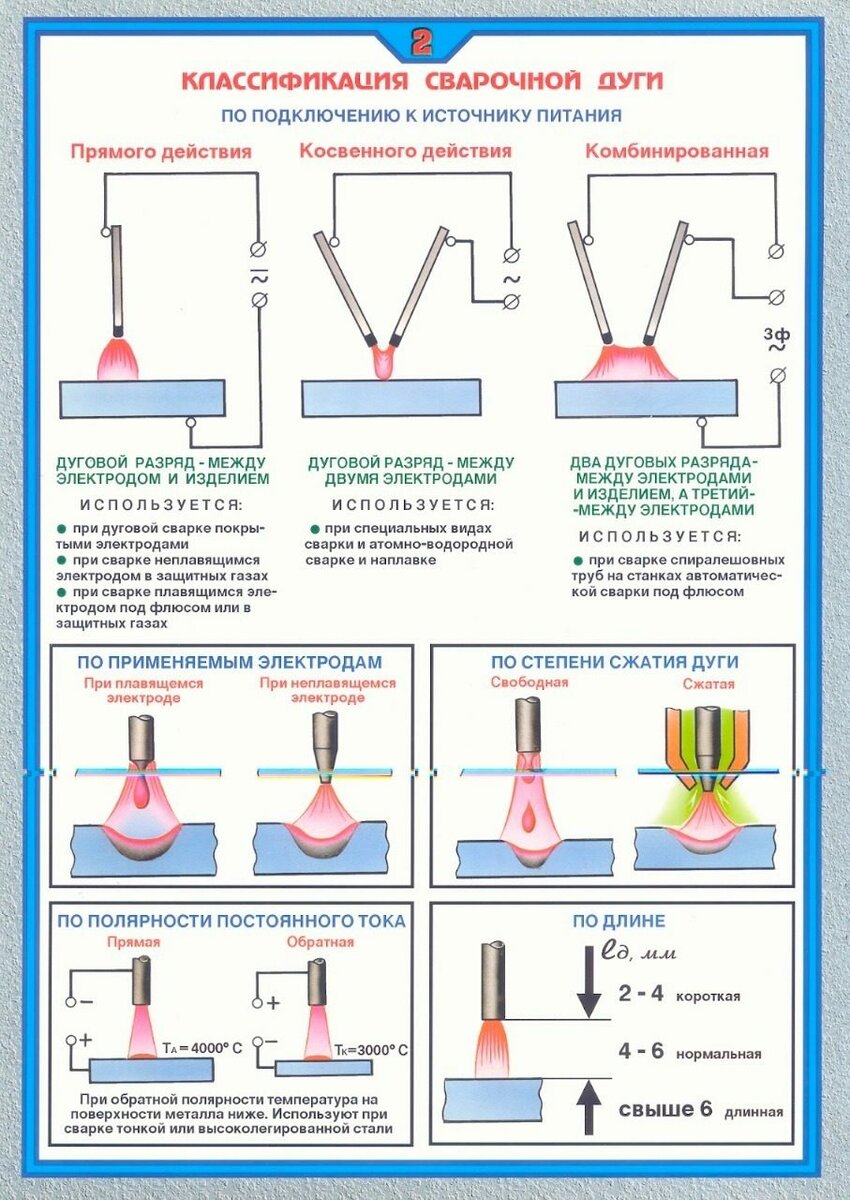
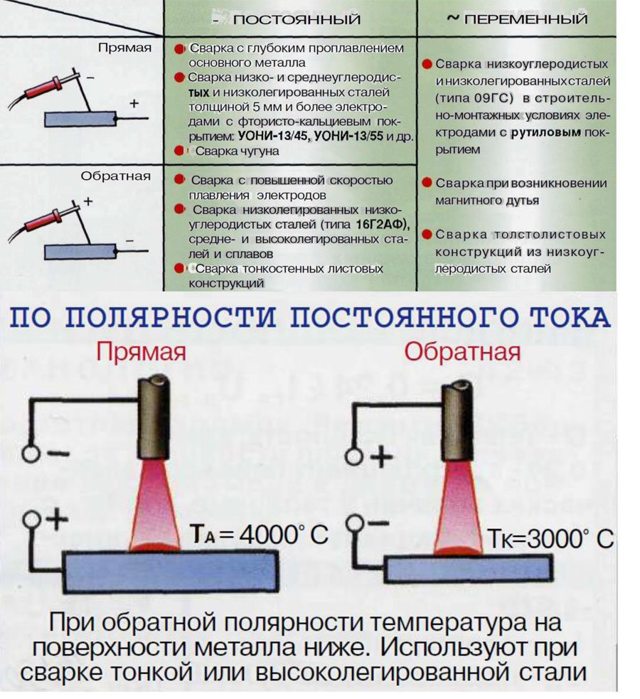
What is direct and reverse polarity?
The metal is melted under the influence of the arc. It is created between the product and the tool under the influence of an electric current. It is permissible to perform welding in several ways, they differ from each other by the method of connection.
With direct polarity, the rod is connected to the minus, and the product itself to the plus. The melting zone is deep and narrow. With reverse polarity, the opposite is true, both the connection method and the result. The place of melting is shallow, but wide.
The element that is connected to the plus is subject to greater heating, it is important to consider this when choosing a technique. It is acceptable to use several methods when working with one product
There is a special table that shows recommendations for choosing a particular method. It all depends on the thickness of the metal.


The basics of electric welding for beginners to weld from scratch
Modern inverter devices are economical and easy to use. The base load goes to the power grid. Previously, users were faced with the fact that traffic jams were cut down due to the high energy consumption of the device.Today, models are equipped with capacitors for energy storage. Due to this, long-term work is permissible without compromising the power supply.
The principle of operation is based on the melting of the core of the device and the product. After prolonged exposure to the subject with an electrode. Clarifying how to learn how to cook with a welding inverter from scratch, we note that first of all we need to figure out what is needed and how to ensure safety.
Equipment
First of all, you need a good welding machine, it is inexpensive. The tool must weigh no more than ten kilograms. Other materials that will be required include:
- electrodes;
- welding wire.
When selecting equipment, one should be guided by two principles: quality and safety. The larger the tool, the more experience is required. And also note that a gas cylinder is required for massive units.
When purchasing, it is important to consider the following:
- The greater the welding current, the more expensive the tool, but also more functional.
- One hundred and sixty amperes is enough to work with metal up to five millimeters thick.
- Household networks are not adapted for devices with a capacity of more than two hundred and fifty amperes.
When using a wire work with different metals and thickness is admissible. Let's learn how to learn how to cook with electric welding at home.
What to work in - equipment
 The one who carries out the work also needs a protective suit and a good mask. An ideal option would be a chameleon welding mask.
The more serious work is planned to be carried out, the better protection is needed. For short-term welding, special glasses are enough.
Clothing must be made from non-combustible materials.As a rule, suits made of tarpaulin or suede are used. Clarifying how to properly learn how to cook with electric welding for beginners, we note that the selection of clothes should be approached thoroughly, the health of a person and others depends on it.
Safety
In connection with the occurrence of powerful radiation of light and heat, safety rules apply both to the worker himself and to people in the immediate vicinity.
Consider the key safety standards:
- The distance between the gas cylinder and the generator must be at least five meters.
- To avoid damage to the hoses, they are suspended.
- The welding space must be fenced off so that people and animals in the room do not get burned.
Also note that the processing of pipes under pressure is unacceptable. First of all, they must be emptied, and only then proceed to work.
Considering how to learn welding on your own, we determine that compliance with safety precautions is no less important than learning the process itself.
How metal is welded
For an electric arc to occur, you need two elements through which current will flow. One element through which a negative charge flows is a metal workpiece. An electrode serves as a positive charge. An electrode is a consumable material consisting of a steel base and a surface coating in the form of a special protective composition.

When the connected electrode to the equipment touches a metal surface, elements having dissimilar polarity provoke the formation of an electric arc. After the arc is created, the metal and the electrode melt.The melted part of the electrode enters the weld zone, thereby filling the weld pool. As a result, a welding seam is formed, whereby metal parts are connected. You need to know the principle of metal welding in order to learn how to use welding. If you do not understand the principle of work, then you will master the manipulations.


When an electric arc is formed, the metal is melted, which provokes the appearance of vapors or gases. These gases play a very important role, as they protect the metal from the negative effects of oxygen on it. The composition of gases depends on the type of protective coating. The resulting seam fills the weld pool during operation, thereby providing a reliable and secure connection.
Welding seam is formed when the bath is moved
The bath appears when the ignited electrode moves, so it is very important to control not only the speed of movement, but also the angle of the electrode
After the metal weld cools, a crust forms on the surface - slag. These are the results of the combustion of gases that protect the metal from exposure to oxygen.
As soon as the metal cools, the slag is hammered with a special welder's hammer. When upholstered, fragments fly apart, so it is imperative to use safety glasses for the welder when working.

Having dealt with the technology of joining metal by means of a welding machine, you should proceed to the training procedure. Before you learn how to work with welding, you should first purchase special ammunition. These are goggles or a welder's mask, gloves, as well as overalls and boots. Of the tools, in addition to the welding machine and electrodes, you will need a hammer.If you are not a professional welder, a regular hammer will do.