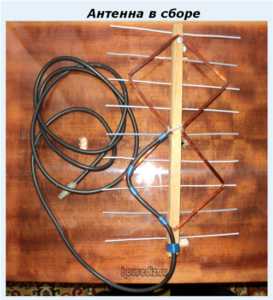
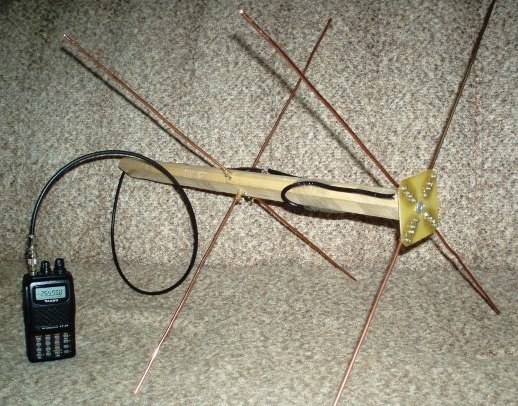
- Butterfly
- How to make an antenna for digital television with your own hands: step by step instructions
- Double or triple square for 100 km
- Construction and materials
- Connecting an active frame (vibrator)
- Do-it-yourself television antenna for long-distance reception. Homemade Design Options: General Principles
- How does a digital TV antenna work: I explain simply
- What technical characteristics of the antenna determine the quality of TV signal reception
- Antenna "eight"
- Types of antennas
- Do-it-yourself television antenna for digital television. Digital TV antenna in 15 minutes
- Making an antenna from beer cans with your own hands
- Necessary materials and tools
- Drawings, diagrams and manual calculation
- Mast making
- Assembly
- Installation
- Connection and setup
- Antenna from a metal can
- Option for an apartment
- Board Assembly
- Receiving Antenna Types
- Conclusions and useful video on the topic
- How to make a TV antenna from a cable, step by step instructions:
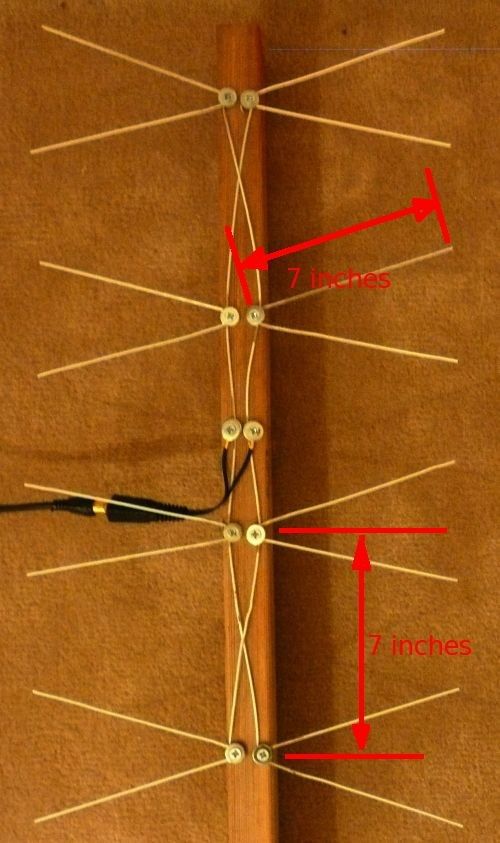
Butterfly
In its execution, it resembles Polish analogues, which were widely used for receiving analogue broadcasts.
Antennae are located on the vertical frame. It is installed outdoors, for this reason it is necessary to use a wire of sufficient thickness for the antennae so that the wind does not bend them.In the case of using copper, 2-3 mm is sufficient; for aluminum, the thickness should be slightly larger.
The length of the antennae is calculated depending on the broadcast frequency of the repeater. For Moscow, broadcasting is carried out at a frequency of 314 MHz. We calculate the wavelength: 300/477 \u003d 0.633 m. This is 64 cm, respectively. The length of the active part is 16 cm.
After twenty centimeters, mark four points. We draw perpendiculars relative to the frame. With the help of a protractor, the line measures up and down an angle of 30 degrees in both directions.
When using a wooden frame, it is enough to use self-tapping screws to attach the antennae. After installing the antennae, we connect them with wire, and attach the television cable.
How to make an antenna for digital television with your own hands: step by step instructions
In order to calculate the length of the cable sections for the antenna, based on frequency maps, you need to use the formula for determining the wavelength:
λ=300/F, where F is the frequency of the transmitted signal in MHz.
For example, for a frequency of 546 MHz, the wavelength is about 550 mm. It is this piece of cable that must be used to obtain the first circle of the antenna.
To receive the second multiplex at 498 MHz, the length of the antenna cable should be about 600 mm.
The first step is to cut the cable to the required lengths. In our case, these are 550 and 600 mm. After that, each end of the cable is released by 15 mm from the outer braid, and twist the shielding into a tight pigtail and tin with a soldering iron. Leave the central part of the wire untouched in the braid. She won't be needed.
The second step is to solder the right end of the tinned shield pigtail of one wire to the other, then do the same with the left ends of the cable. Do not touch the center wires of the antenna cable.They can even be wrapped with electrical tape so that the ends do not touch each other.
Thus, the basis of our concentric antenna is done.
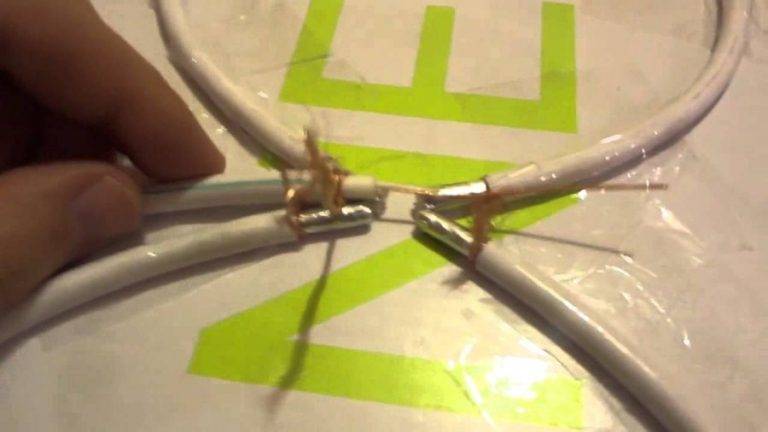
The third step is to fold both segments into rings and place them concentrically, i.e. one ring inside the other, for example, on a shoe box and secure closer to the ends with packing wires.
The matter remains small - connecting the antenna cable leading to your TV and insulating the exposed contacts.
Fourth step - take your antenna cable of the required length, strip both ends of the outer braid by about 15 mm. Strip the end of the cable leading to the antenna in a special way: twist the braid of the shielding cable into a tight pigtail and tin it.
And strip the center wire from the remaining braid by 10 mm, leaving about 5 mm of braid to protect it from a short circuit with the screen wire.
Fifth step - bring the antenna cable with prepared ends to the previously obtained antenna from concentric rings and twist the end of the braid from it with the end from the left side of the antenna, solder the resulting connection.
The sixth step is to isolate the bare wires. For these purposes, you can use electrical tape or a glue gun (if you have one). The second wire is the central core of the cable, twist it with the end of the braid on the right side of the antenna and solder the connection. Thus, you will get the screen braid soldered to the left side of the ring, and the central core to the right side of the circuit.
The seventh step is to connect the cable to the antenna plug. To do this, cut off about 15 mm of the outer plastic sheath of the cable and turn the shielding wire inside out, pulling it over the sheath. Carefully strip 10 mm of the center core.Insert it into the center part of the plug (if the design permits), and then screw on the outer shield nut so that it fits snugly around the shield part of the wire. The rest of the screen can be carefully cut off.
Thus, our universal antenna for receiving two frequency bands is ready for indoor use. The antenna does not require amplification and additional power supplies. But in dense urban areas, the question still remains how to properly install an antenna for digital television. To do this, try experimentally to determine the place of the best reception.
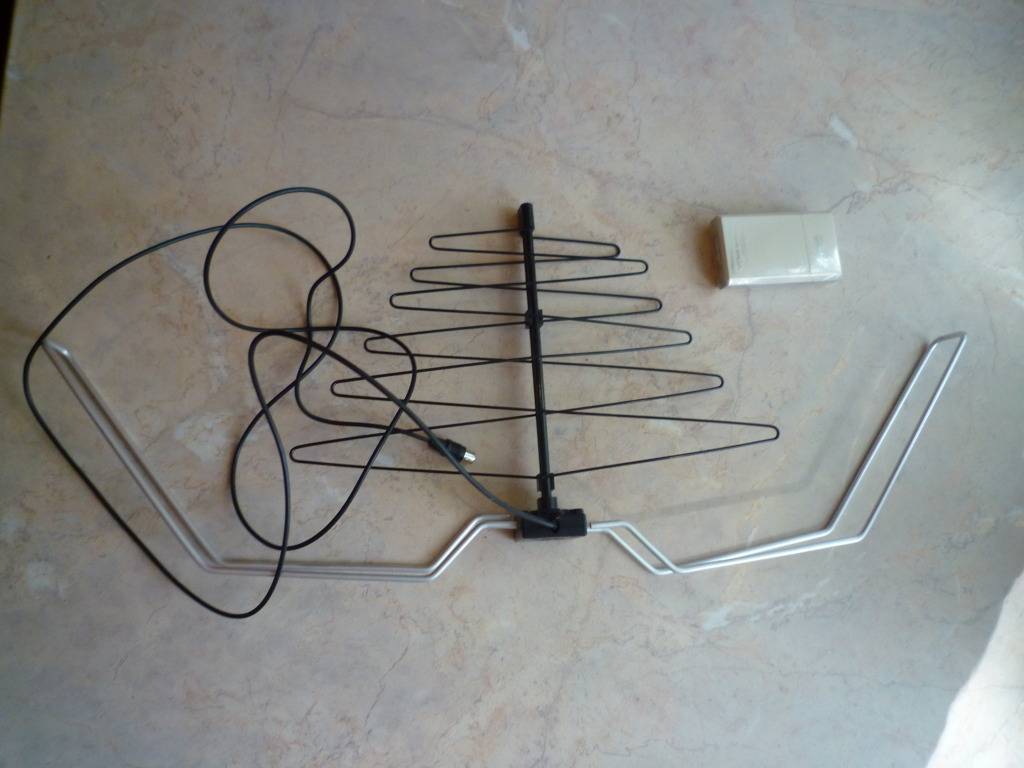
If your TV is not equipped with a modern receiver for receiving terrestrial digital television of the DVB-T2 standard, you will need to purchase this unit.
If you consider the procedure for making the antenna yourself difficult, you can buy a ready-made antenna for receiving DVB-T2 for about 400-1200 rubles. For example this one:
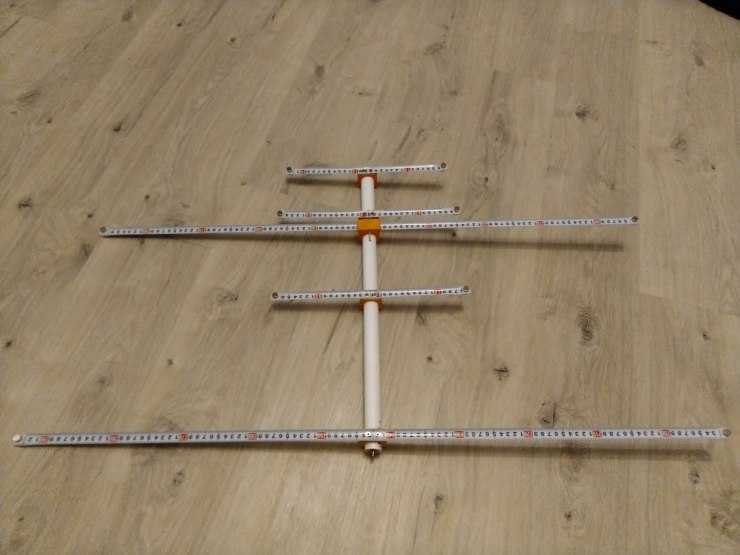
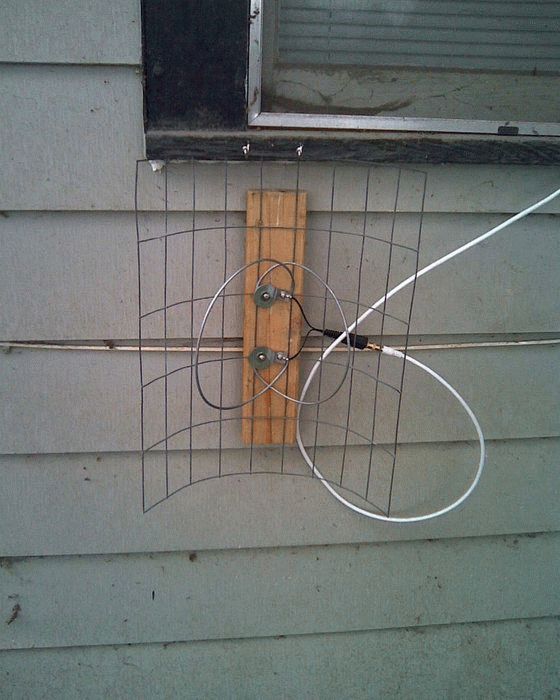
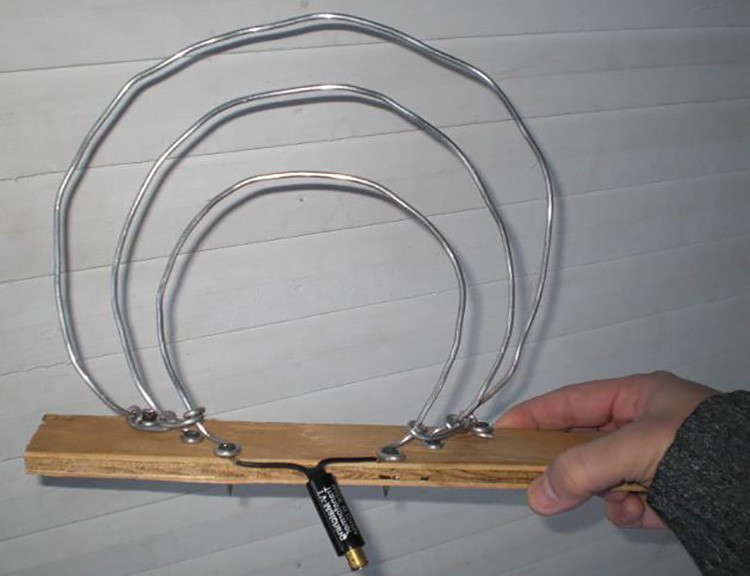
Double or triple square for 100 km
This design is an alternative to a home-made indoor antenna, with which you can quite effectively amplify even a weak signal clogged with external interference. The antenna is actually made up of two, three or more squares formed from a conductor (copper or brass wire) and mounted on two bars (made from the same conductor).


Its main feature is that such an antenna needs a clear positioning: it must look exactly at the transmitter, otherwise the effect of amplifying a weak signal will not be achieved. Such an antenna is suitable for receiving a signal at a distance of 100 km.
Construction and materials
Frames-squares are the smaller, the farther they are removed from the holder.
The location of each subsequent square relative to the previous one is 50% of the length of the side of the square.
- The biggest one is the reflector.
- The smaller square is called the vibrator.
- The smallest (third) square is the director.
- The planks that hold the squares together are called arrows.
3 squares give the most powerful gain (the main thing here is to accurately point the antenna at the emitter). Such an antenna should be mounted on a wooden holder, and any metal parts and parts should be removed from the frames at a distance of at least one and a half meters.
Connecting an active frame (vibrator)
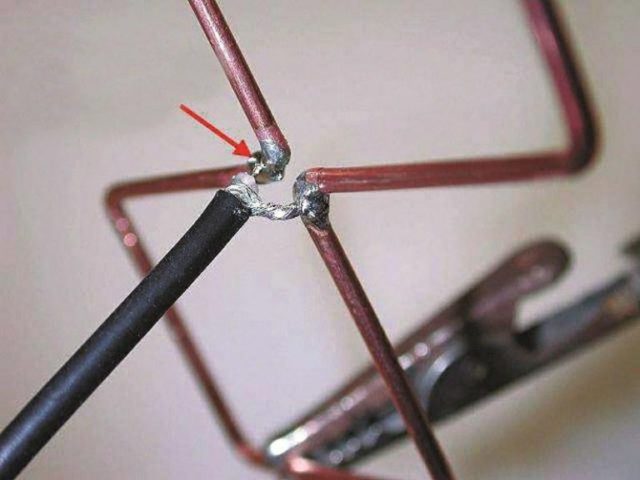
 Connecting the antenna frames to the coaxial cable is necessary using a matching device. As the latter, a balancing short-circuited loop is used. It is made from sections of the antenna cable and has 2 sections: the right one is the “loop” and the left one is the “feeder”. The task of the loop and feeder is to be an adapter from the antenna volumetric circuit to an asymmetric coaxial cable. To connect the ends of both the loop and the feeder at a distance of 20-25 cm, the insulation is removed and the aluminum screen is removed, and the cable braid is twisted into a bundle. Then:
- The braid of the loop and the core of the feeder cable are soldered to the left end of the vibrator (which is cut in this place, forming a square half-ring).
- The feeder braid is soldered to the right end of the vibrator.
- The cable braid (from the other end) is also connected to the feeder braid by means of a metal jumper. The harnesses connected in this way should be soldered together.
- The cores of the cables must be parallel to each other. The distance between them should be no more than 5 cm.In order to guarantee such a mutual arrangement, it is necessary to use, for example, a textolite plate as a mounting base.
- The coaxial cable to the TV is connected (soldered) to the bottom of the feeder. That is, it turns out that the braid is soldered to the braid, and the central conductor is soldered to the central conductor.
Such an adapter will add clarity to the image and eliminate interference, especially at long distances between the antenna and the transmitter.
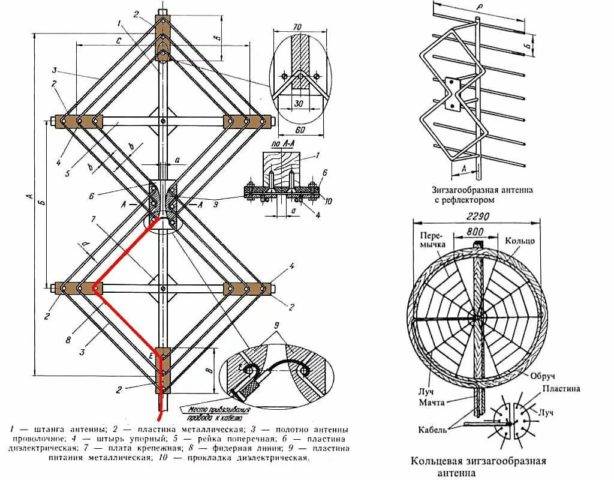
Dimensional drawing as below:

Do-it-yourself television antenna for long-distance reception. Homemade Design Options: General Principles
Depending on the distance between your TV receiver and the transmitting antenna of the TV center, the signal level will change. Another negative factor affecting the quality of television wave propagation is the presence of obstacles. Ideal reception occurs with a line of sight between the two antennas. That is, you can see the mast of the television center, even with binoculars. If there are buildings or tall trees in the way of the TV signal, there will be no reliable reception. However, waves reflected from other objects can be received using a TV antenna amplifier. If even weak waves do not “break through” to your house at all, you will have to make a mast. The network of TV and radio broadcasting stations is located in such a way that you can catch a signal in any settlement.
- Indoor antenna. Operates without an amplifier in relative proximity to the transmission mast. If a television center is visible from your window, some of the channels can be caught literally on a piece of wire.How to make a TV antenna with your own hands can be seen in the illustration. The quality of workmanship in such conditions only affects the aesthetic component. But if you live on the 1-3 floor, and even surrounded by concrete boxes of a residential microdistrict, a simple design will not work. An indoor antenna, especially a DIY one, will require a signal amplifier.
Information: Room version, it is not necessarily the classic "horns" installed on top of the TV receiver. The product can be placed on a wall, in a window opening, inside a glazed loggia.
The advantage of this design is that there is no need for weather protection.
- An outdoor TV antenna may look exactly the same as an indoor one. In this case, a prerequisite is high strength (so that the wind does not change the geometry), and protection of the contact group from corrosion. It is located, as a rule, in the immediate vicinity of the window (in high-rise buildings) or on the roof of a private household. The connecting cable is relatively short, so an amplifier is not required for reliable digital or analog signal reception. With the exception of the case when the transmitting center is far away. The design is available for maintenance and repair, this is an indisputable plus of close placement.
- Outdoor antenna for long range TV. As a rule, this is a rather bulky design with a screen and additional elements that amplify a weak signal. An electronic amplifier is welcome, but with a well-executed design, it may not be needed. Unless to compensate for a long cable (it will definitely have losses).Such devices are mounted on the roofs of high-rise buildings or on masts in private households. The fastening must be strong, otherwise the wind can easily destroy the structure.
- The type of antenna is selected based on the characteristics of the reception, and the wind load in the region. For example, the Kharchenko antenna (the most popular homemade option) should not have a high windage. It may be necessary to choose another, more complex project.
How does a digital TV antenna work: I explain simply
Before you start assembling any of the four models of receiving antennas, you should have a good understanding of the processes that should take place in them.
Electromagnetic waves propagate in all directions of the horizon from the generator of the transmitter of electrical signals installed on the TV tower.

They have enough power for their coverage area, but as the distance increases, their signal weakens. Its magnitude is also affected by the terrain, various electrical and magnetic obstacles, and the state of the atmosphere.
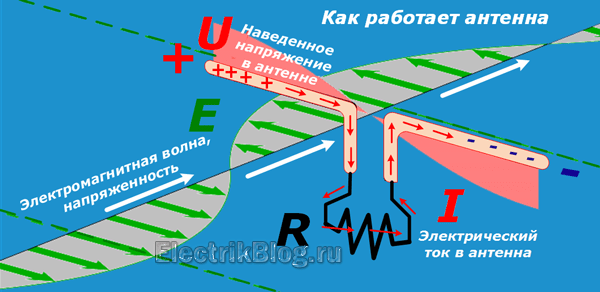
In a vibrator oriented perpendicular to the movement of an electromagnetic wave, voltage is induced according to the laws of induction. The positive and negative half-wave of the harmonic create their own sign.
The voltage reaches its maximum value - the amplitude at the points of time corresponding to ¼ and ¾ of the period or 90 and 270 degrees from the sinusoid of the electromagnetic wave strength.
Any shape and size of active vibrators is created for the most efficient voltage induction with minimal energy loss. Accounting for the position of these points is calculated from the wavelength or harmonic frequency.
The voltage, closed to the internal resistance of the television receiver, generates an electric current in the created circuit.Its shape and direction change and proportionally repeat the signals of the transmitter on the active load.
Due to the use of various types of digital modulation on the transmitter side, information signals are received and processed inside the television receiver circuit.
I will not go further to consider the question of how a digital antenna for a TV works when it is created.
What technical characteristics of the antenna determine the quality of TV signal reception
The antenna is classified as a reversible device because it works the same way on the transmitter and receiver sides. When analyzing the characteristics, its inclusion as a generator is used.
For effective reception of a digital signal, it is necessary to take into account that on the side of the generator, the emitter of electromagnetic waves can be placed at any angle to the horizon, but only two directions are legally accepted: horizontal and vertical.
Our task is to repeat this orientation for our own TV.
The polarization direction and other digital signal transmission data can be found on the operator's website through a search engine.
We go to the site, select the necessary information.
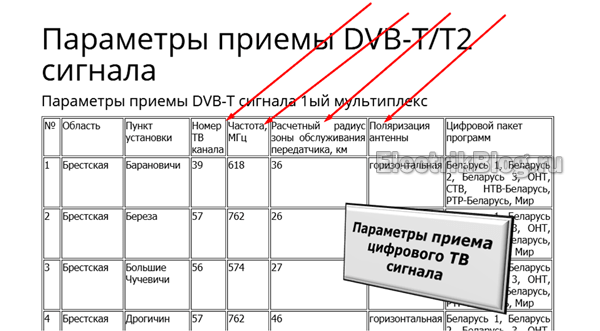
We are primarily interested in 3 characteristics:
- channel number and its frequency, for which we will create an antenna according to strict dimensions;
- the radius of the transmitter coverage area, which affects the signal quality and the choice of vibrator design;
- polarization direction.
The distance of the TV from the transmitting TV tower greatly affects the design of the antenna.
The higher the antenna is installed, the better the quality of the received signal will be, but the length of the cable can significantly weaken it.In this regard, residents of the upper floors of multi-storey buildings have a significant advantage over their neighbors below.


For the zone of reliable reception, I tested the simplest Kharchenko models and loop assemblies made of coaxial cable and wire, which have a wide range of reception frequencies.
For long distances, it is better to collect a wave channel or a log-periodic scheme. Of the simple designs, the Turkin antenna, modified by Polyakov, has proven itself well.
For example, in my area, the distance from the TV tower was 25 km, which is included in the zone of reliable reception, and the signal frequency was 626 MHz of vertical polarization.
I calculate the length of the electromagnetic wave through the speed of light in frequency: λ=300/626=0.48 meters. A half wave will be 24 cm, and a quarter - 12.
Under these characteristics, I made 4 test antennas for digital television with my own hands, which I describe below.
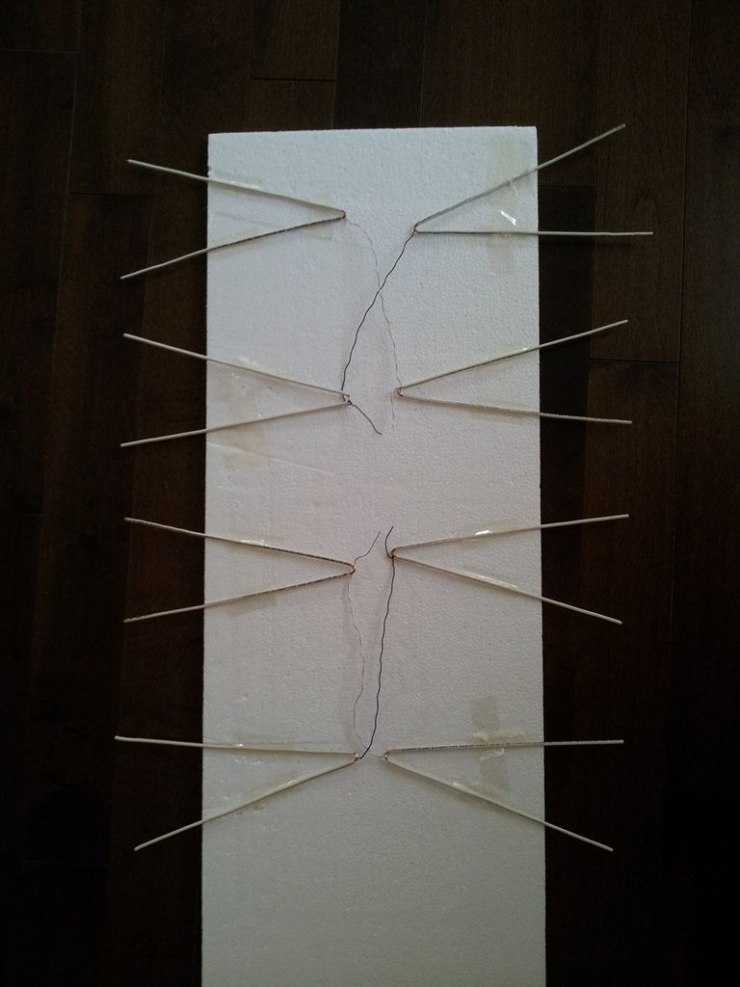
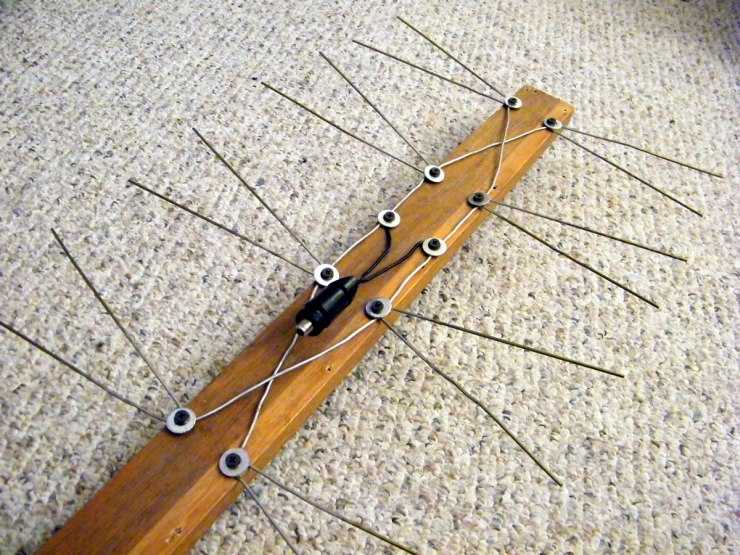
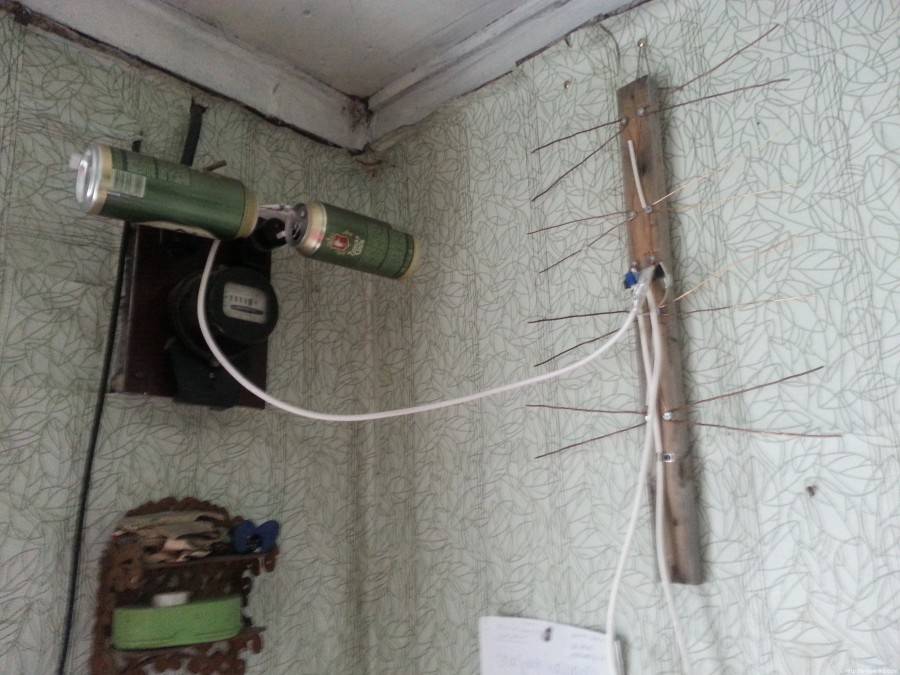
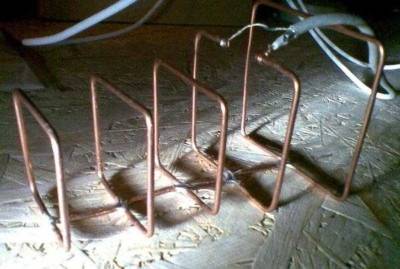
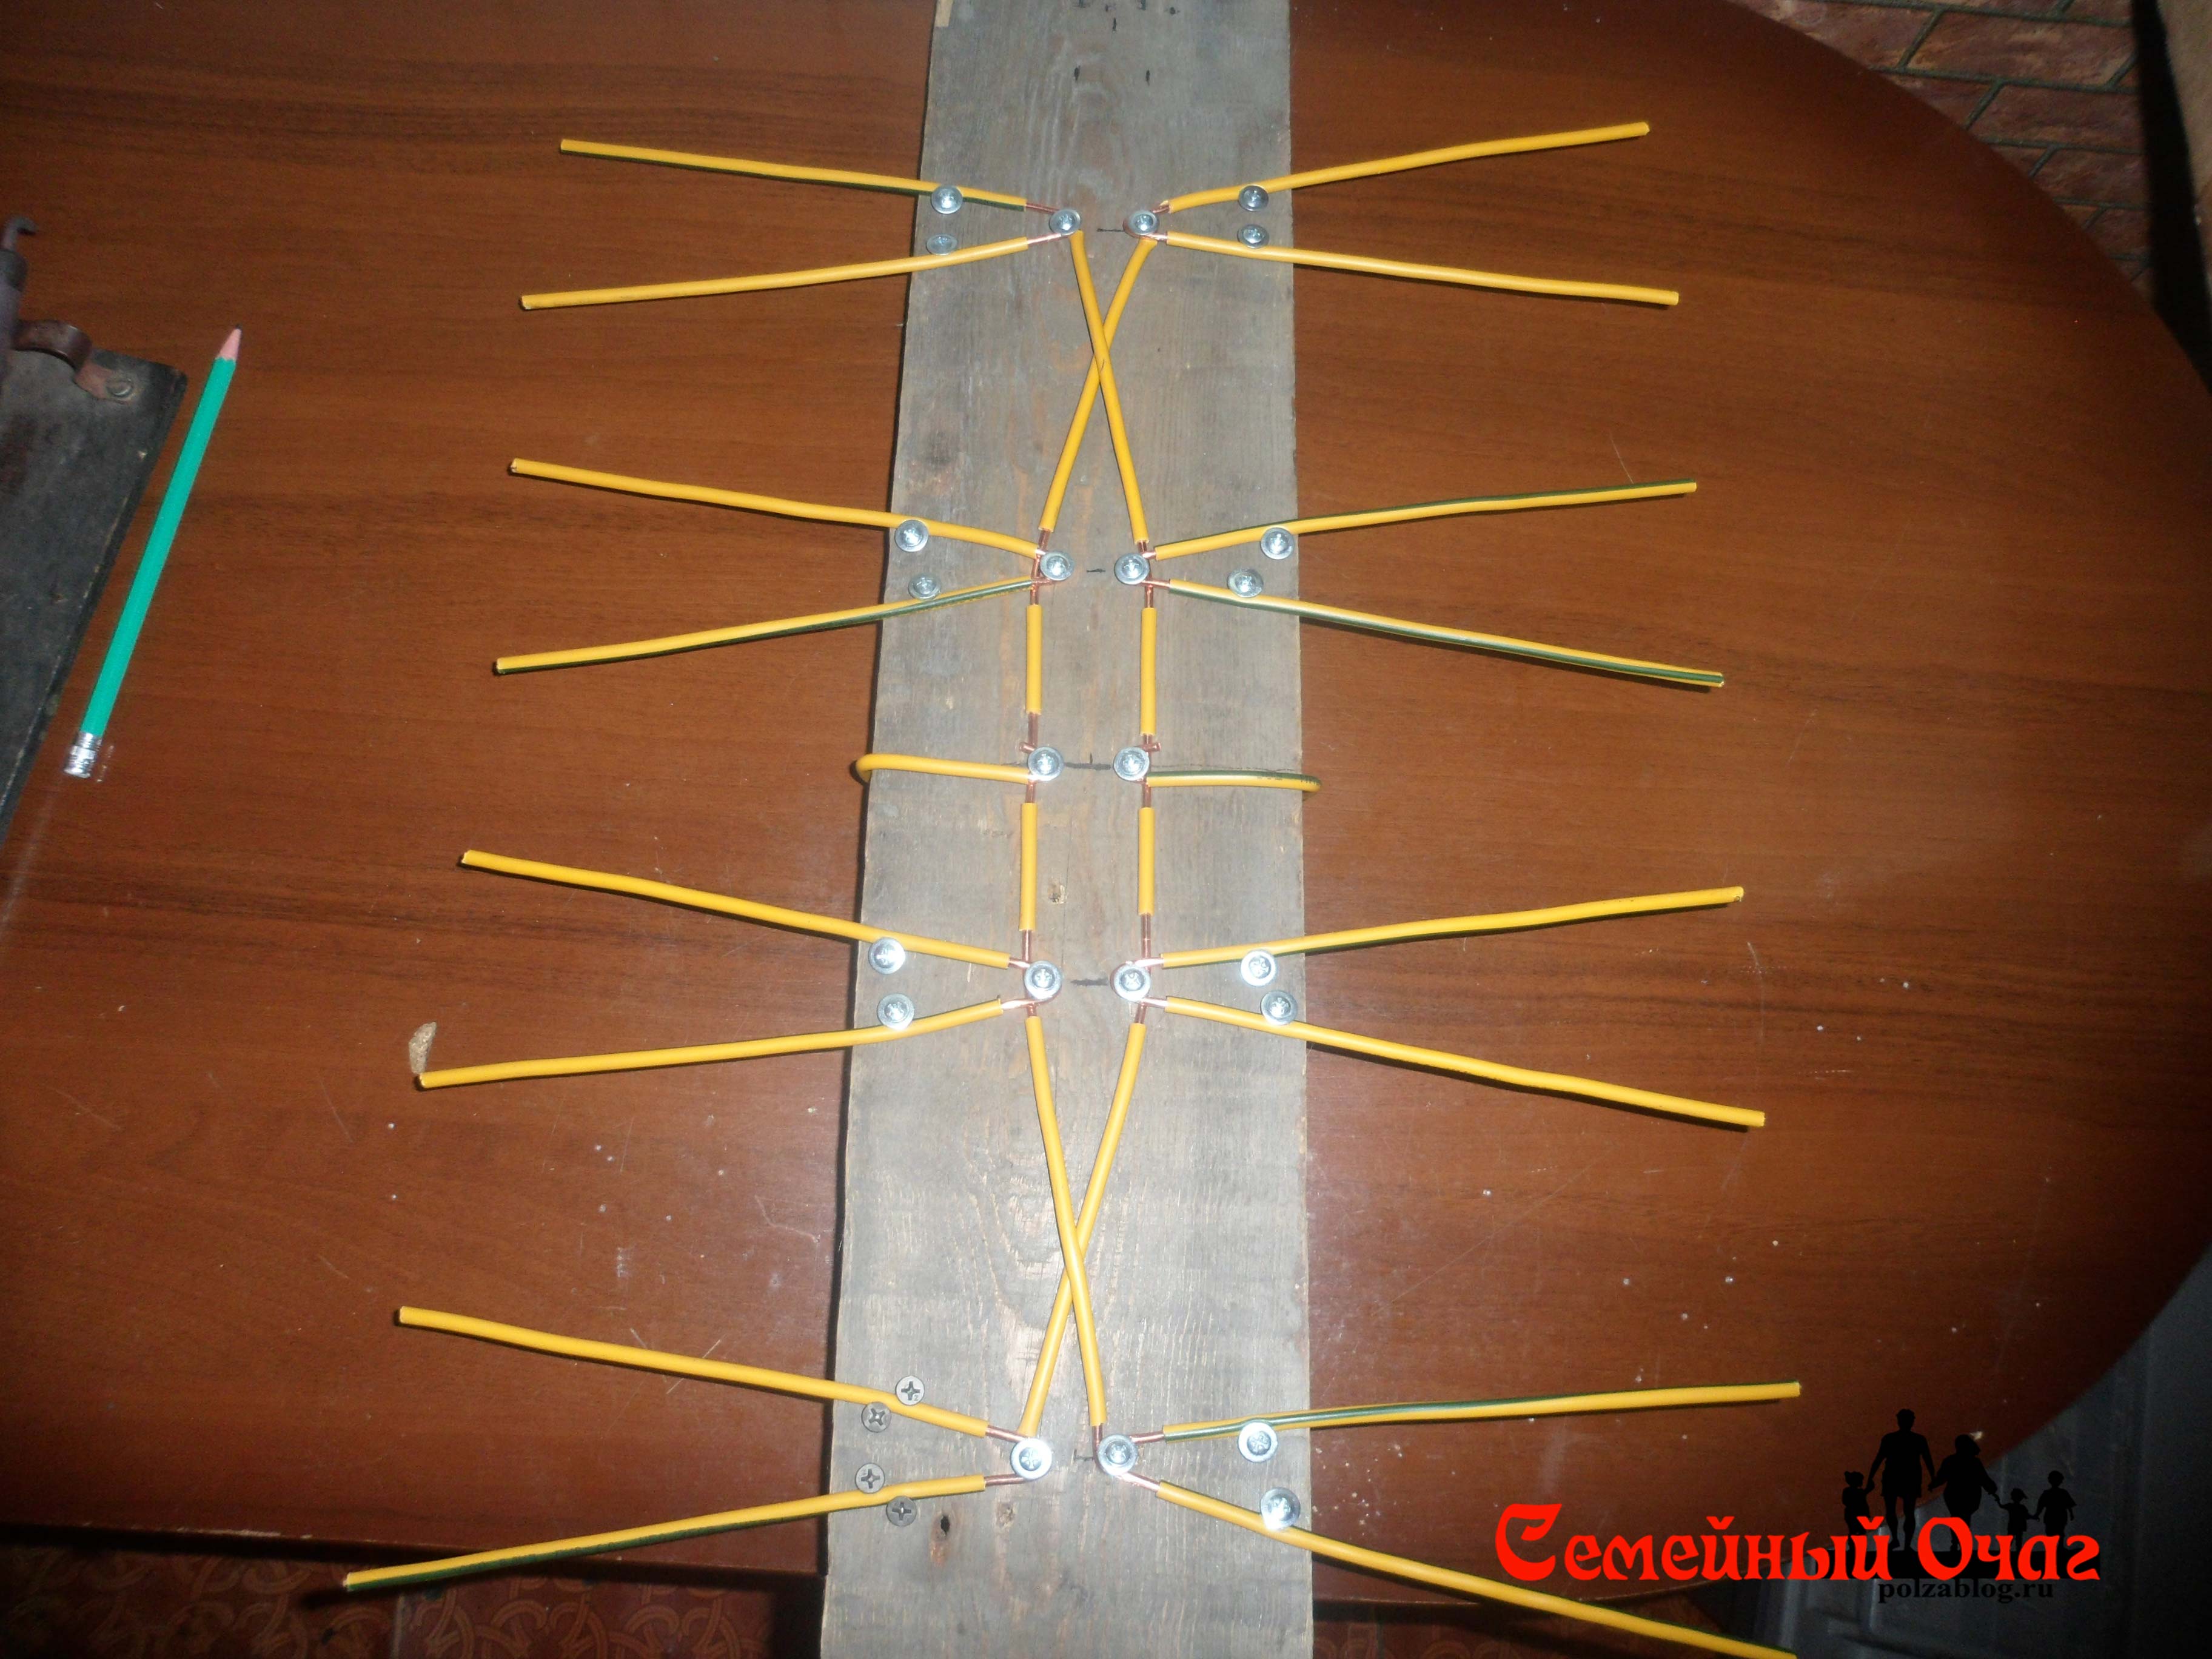
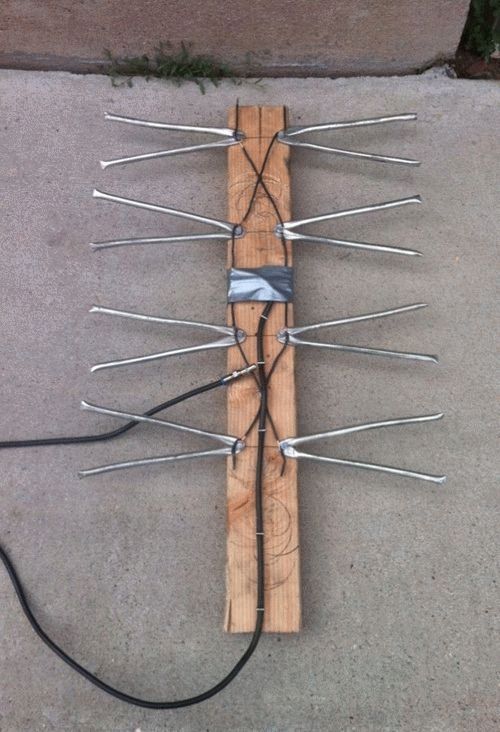
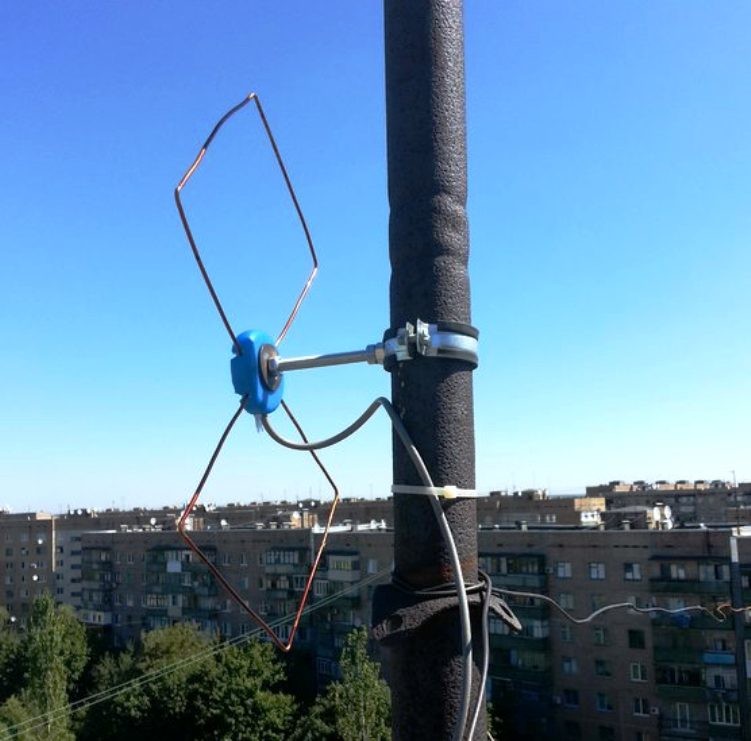
Antenna "eight"
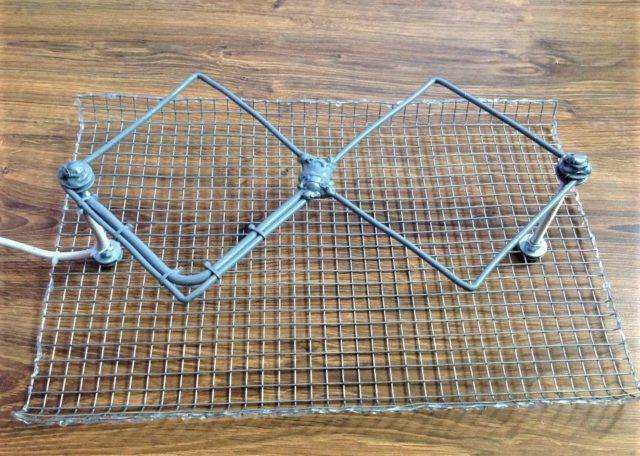
Even in Soviet times, people built double squares of aluminum and copper wire on the roofs of their houses. Today, experts have improved the scheme, creating it specifically for digital broadcasting. "Eight" - the fruit of the work of engineer Kharchenko. Its feature is the mounting of squares at the tops of the structure. Contains a rhombus. They are connected by open corners, where the cable is connected. A conductive grating is mounted behind the device to enhance directivity.
Required materials for the manufacture of the antenna:
- copper wire (diameter - 12 mm) for setting up to 5 channels;
- grid of conductive material;
- coaxial cable;
- wooden rail;
- tools (sharp knife, drill, hammer, pliers), if necessary, attaching a television antenna to the wall.
Kharchenko's model is economical.The main thing is to make the correct calculation when doing it yourself:
- designate the wavelength of the signal;
- divide the resulting number by 4;
- find your nearest TV tower
Assembly steps:
Find out the frequency with the polarization of the wave, which is important for obtaining a linear model.
Make a copper bi-square (zagzag) so that the elements are located at the corners, and touch each other with only one corner.
Lay the structure on its side for mounting vertical polarization or “standing” when making a horizontal version.
Calculate the square side formula, divide by 4. Calculate the wavelength.
Bring the cable on both sides of the voltage, for which block one of the directions of the diagram, mounting the fetal copper screen, putting the cable on the braid
The distance is 0.175 mm from the operating wavelength.
Make a reflector from metal plates or textolite boards.
Install the resulting design, connect to the receiver.
It remains to check the quality of the incoming waves.
To obtain the greatest number of channels, it is recommended to install a shielding grating approximately in the middle of the antenna. Also wrap with electrical tape to avoid negative impact from the outside. The cable is soldered in the middle to one of the connection points of the ends of the wire. The connected pairs of ends must be isolated.
For installation:
- Open the menu on the TV box. Press the button - "automatic channel search"
- Set up manually. If they show flawlessly, then all the step-by-step steps were carried out correctly.
If interference occurs, it is worth turning the TV antenna, tracking the degree of improvement in the image and pictures. Fix the device.
Types of antennas
There are different types of antennas that you can make yourself at home:
All-wave antenna. Easy to make and cheap. It is possible to make such an antenna in just an hour. This is an ideal option for urban residents, but it will no longer work in settlements far from television towers.
Z-shaped antenna. This option is quite labor-intensive, both in terms of material and physical. However, it has very good technical characteristics, it can receive a wide range of signals.
If you are making several antennas, then you will need to lay a cable between them, which will have to pass through the zero potential value.
Do-it-yourself television antenna for digital television. Digital TV antenna in 15 minutes
Many of us at least once in our lives have encountered a situation where, in the presence of a TV, we have a complete absence of an antenna or cable television. And the most annoying thing is that the TV tower is over there, and the TV shows weather phenomena in the form of snow. And the radio waves themselves do not want to fly into the antenna socket and move the electrons.


Part of the population, brought up under the vigilant gaze of the all-seeing eye of the party, will undoubtedly rush headlong to fulfill their civic duty as a consumer to the nearest household appliance supermarket, where the consultant’s sly look will immediately single you out as the object of a 100% divorce. - Why? - you doubt, sorting through the files in your head in search of knowledge about antennas ...
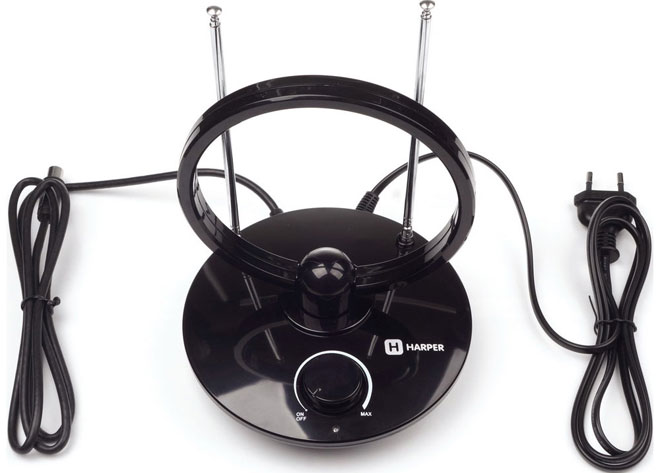
So for those who have not found anything, I will explain. You will be heavily soldered with an antenna “specially designed for digital television broadcasting” and without it, your TV, dear, will not be able to give a high-quality image.Some, especially zealous consultants will argue that she even takes a companion. (The consultant, he, like a traffic cop, has the skills of psychological influence and recognizes the level of your competence from the first words.) The price of such a “cool” antenna can be more than 1,500 rubles. She looks like this:
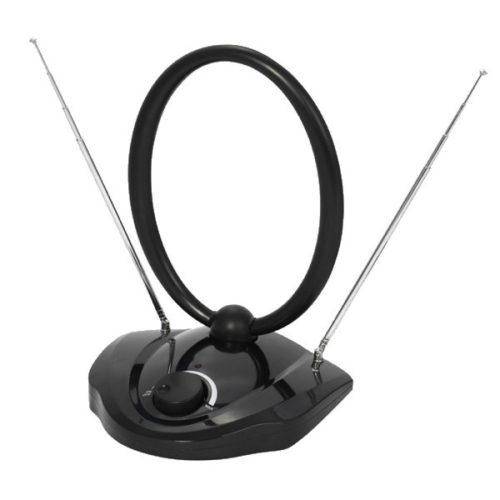
Let's take a closer look at what's what here. Two telescopic active elements of a symmetrical vibrator for receiving meter waves (very few channels work in this range, and digital ones do not work at all). By pushing or pushing these tubes, you tune the antenna into resonance with the carrier frequency of a particular TV channel, and both elements must be the same length. The black "donut" is a UHF antenna (there is a broken wire ring inside, just)
This antenna is not precisely tuned to any UHF channel, but has average characteristics, that is, it does not catch well, but on all channels. Inside the stand there are matching transformers and, if there is a power cord, then an amplifier, the gain of which is changed by the regulator
This amplifier is the most useless thing in this whole construction. Let me explain. When the TV tower is within sight (10 - 15 km), the power of the useful signal will already be enough for reliable reception, and if further, then such a broadband antenna will also receive interference, which will also be amplified by the amplifier. In such remote places, it is necessary to take care of an external antenna.
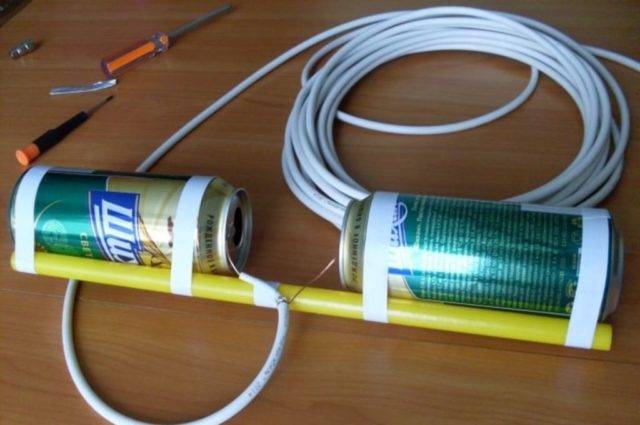
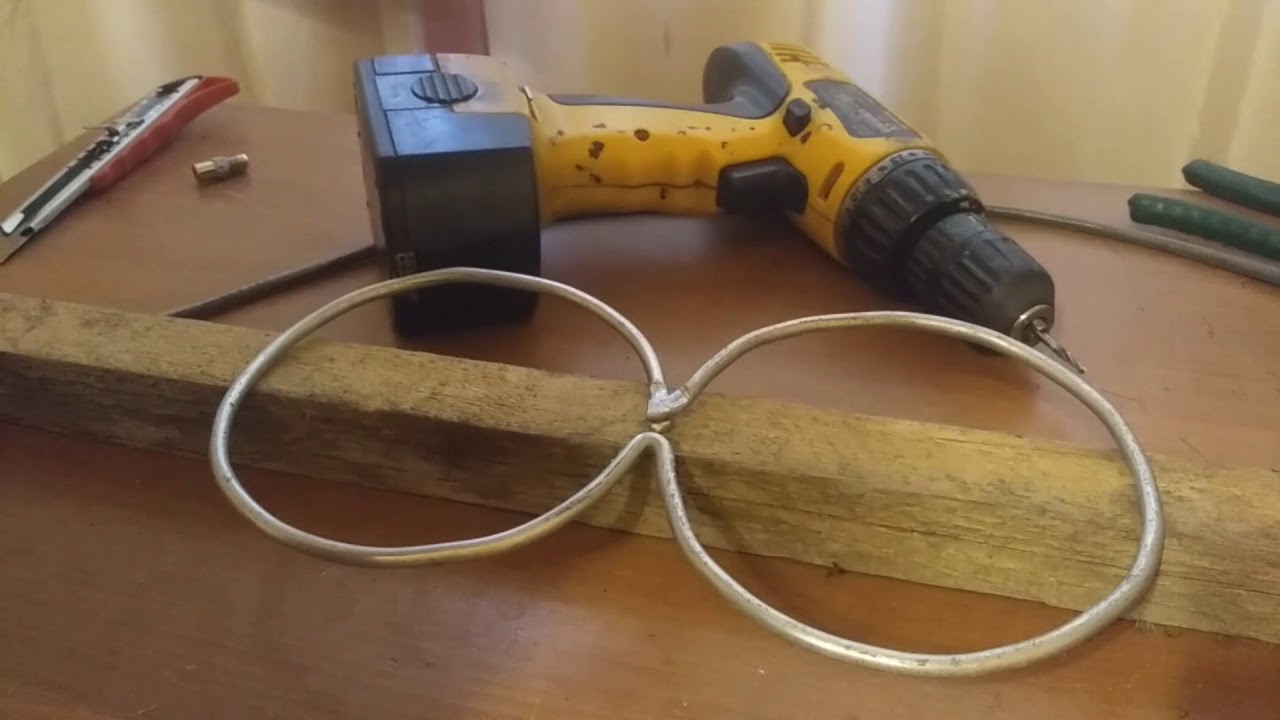
Making an antenna from beer cans with your own hands
To make your own antenna from beer cans for digital television, you do not need to have special knowledge or skills.It is enough to stock up on time and patience, because, despite the simplicity, difficulties can arise when creating such a device for the first time. To cope with the difficulties, it is recommended to use the proposed instructions.
Necessary materials and tools
The list of materials that will be required for the manufacture of an indoor television antenna is extremely short. He contains:
- several beer cans;
- self-tapping screws and a screwdriver (if possible, it is replaced by soldering and a soldering iron);
- antenna cable;
- rail for fixing the resulting structure;
- insulating tape.
The listed items are within walking distance, so everyone can get suitable materials and make an antenna with their own hands.
Drawings, diagrams and manual calculation
There is no universal scheme for capturing a powerful, uninterrupted signal, since in order to obtain a working structure, it is enough to follow 2 rules:
- banks should be paired opposite each other (recommended 4-8, but sometimes two are enough);
- the braid and the central core are attached to different banks.
Additionally, the distance between elements is taken into account. Usually it is 75-80 millimeters, but you will have to look for the exact parameters manually, so you can’t fix the parts right away. It is required to keep them mobile for subsequent tuning and searching for a stable television signal.
Mast making
The manufacture of a frame and a mast for attaching a finished structure depends on the imagination and capabilities of a person. For high-quality reception of channels, you can do:
- a rail to which banks are wound with electrical tape;
- rail with several cross rails (for a powerful antenna of several elements).
To install the finished structure, you can use any stick, metal tube, or even the wall of the house. The main condition is the absence of contacts between the metal elements and the mount. That is, the use of screws is acceptable, but you need to monitor their location.
If you have any questions or complaints, please let us know.
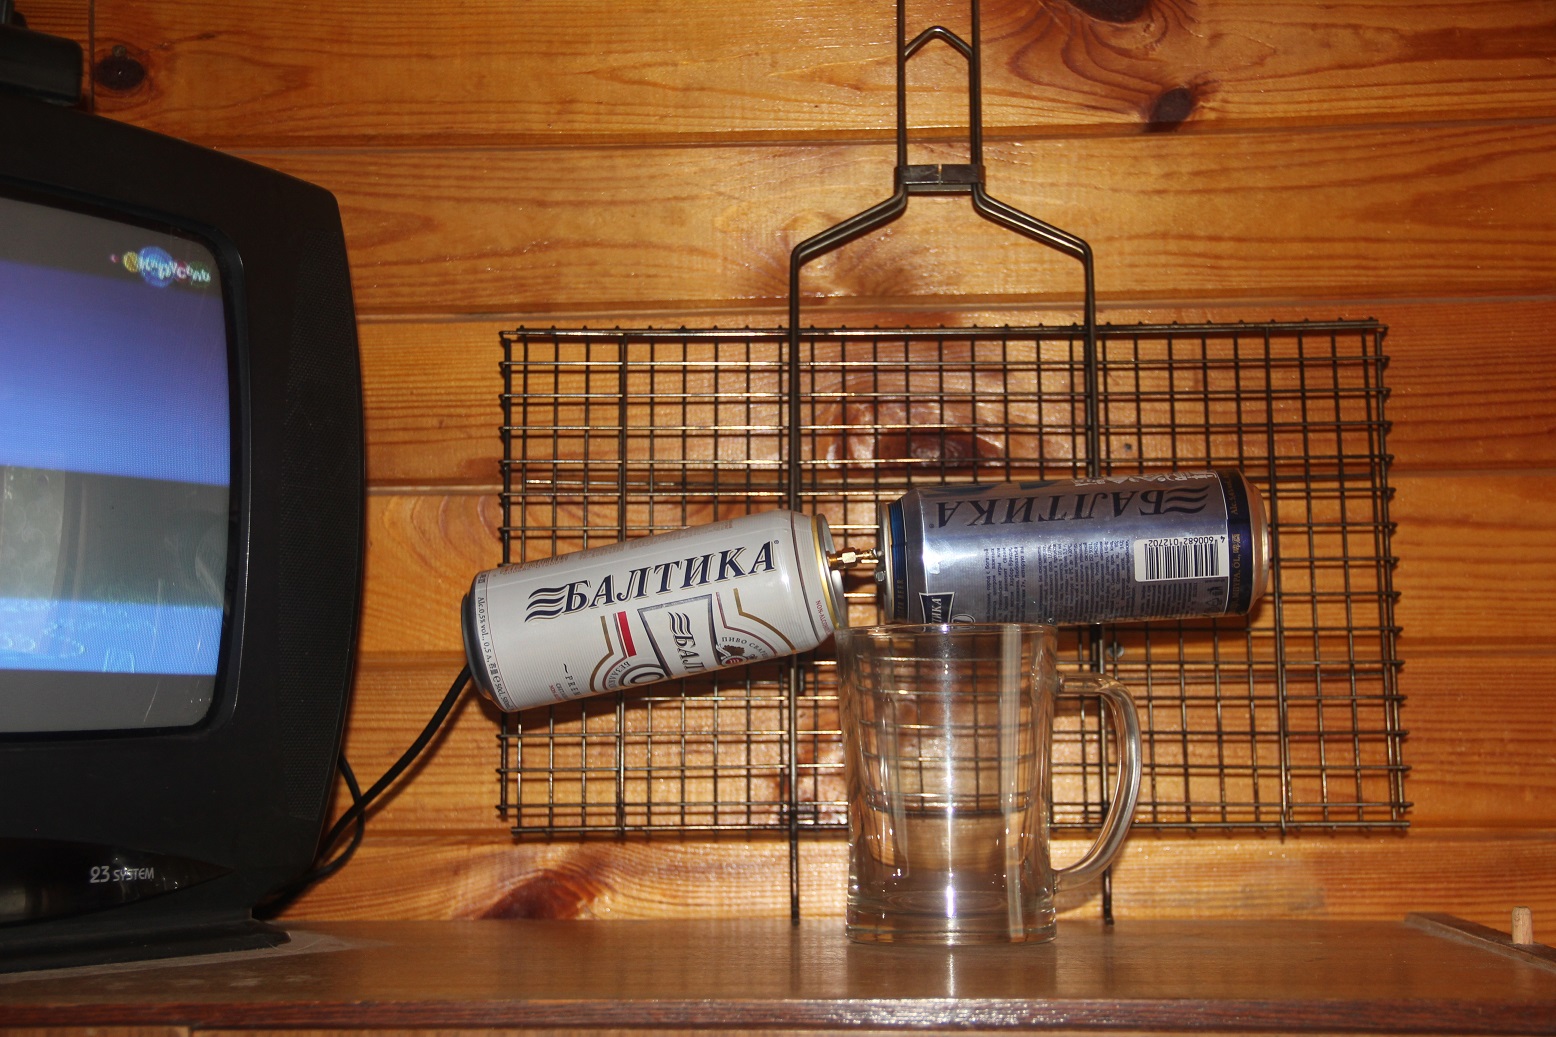
Assembly
Having prepared the frame and assembled the required parts, you can assemble the main part:
- screw the screws into the jar (you can first make a hole in it);
- attach a cable vein to one self-tapping screw, and a braid to the other;
- fix the cans on the rail, adjust the signal.
It is important to emphasize that viewers who wish to dispense with screws are able to attach the cable to the can "tab" with which it opens. Also, a braided core can be soldered, after cleaning the wall of the jar. To improve reception, it is recommended to connect several jars in series
In this case, banks with different connections (braid and core) should be placed in a cross order
To improve reception, it is recommended to connect several jars in series. In this case, banks with different connections (braid and core) should be placed in a cross order.
Installation
The next step is to install the antenna. To do this, you should walk around with the device connected to the TV, checking where the channels are received most confidently. The quality of reception in different parts of the house is different, so you should not count on the fact that the optimal place will be found instantly.
This also applies to the installation of home-made equipment in the yard or on the roof of the building: to get a stable, uninterrupted broadcast, you will have to explore all available antenna locations.
Connection and setup
Having chosen a place, it remains to set up the broadcast by finding the correct location of the cans on the rail. For this you will need:
- move jars to the right, to the left, changing the distance between them;
- monitor changes and improvements on the TV screen (now on modern TVs and digital receivers there is a special reception quality scale);
- after finding the optimal position of the jars, fix them with electrical tape.
Nothing extra is required, and the main difficulty lies in the number of jars. The more of them, the more difficult it is to determine the desired position on the rails.
Antenna from a metal can
A tin can will do.
Additionally you will need:
- cable;
- a piece of brass, copper wire (length - 40 mm, diameter 2 mm);
- RF-N connector (although you can do without it).
Step by step:
- cut off the top
- mark a point on the sidewall where to install the emitter;
- make a hole in the bank, always at the right point to amplify the signal repeatedly;
- drill holes, starting with a small size and gradually increasing to 12-16mm;
- process the edges with sandpaper or a file;
- solder a brass (copper) wire 3.5 mm long to the RF connector;
- clean the end of the wire again with sandpaper to completely eliminate the oxide film;
- solder the machined end to the output of the RF connector by clamping the connector in a vise;
- make sure that the emitter is directed upwards;
- install the connector in the prepared place;
- tighten with clamping bolt;
- solder the cable to the back of the connector.
If you follow the plan, then everything will work out.
Option for an apartment
You can make an antenna for indoor use in any of the above ways.
Another simple option at home is made as follows.
A simple do-it-yourself loop indoor antenna is made of copper wire or a cable with foil in the winding. The device not only receives television channels, but also performs the function of a selective anti-interference filter.


To calculate the size of the loop, you need to know the frequency of the wave for a given region. The length of the loop will be equal to the product of the coefficient (300 units) and the average frequency range.
Cut off the required amount of wire or cable, if necessary, clean the edges. They fold a loop out of it and solder the TV cable leading to the receiver. A plug is attached to it.
The design can be hung or installed on a stand. This simple device, with accurate calculations, is most effective for digital television.
A reliable device for the home is a diamond-shaped antenna. She is the simplest representative of zigzag television receivers. To improve reception, it is equipped with capacitive inserts and a reflector.
The device is assembled from plates or tubes 1-1.5 cm wide made of brass, copper or aluminum. For the manufacture of capacitive inserts, foil, tin or metal mesh is used, which are soldered around the perimeter. The cable is laid from the center and on one side, avoiding sharp bends. It must not leave the frame.
Situations when a new television antenna is urgently needed are not so rare. You went with friends to barbecue, but at the same time, you would like to watch an interesting football match. Or we went to the dacha, where there is no stationary catching device yet. It happens that the wire on which the whole house receives TV programs is cut off by the wind - and what then? You can always find a way out of the situation. Aluminum cans of beer, lemonade or energy drinks are fine to watch football. How to make an antenna out of beer cans? We will talk about this now.
Board Assembly
To continue assembling such an antenna for television, you will have to make a board yourself. There is nothing difficult in this. We take a piece of textolite 2.5 * 3.5 cm in size and 1.5 mm thick, and place copper wire tracks on its surface, as indicated in the diagram.
Board Assembly Diagram
The wire diameter must be within 0.4 mm. It can be attached to the board with glue. To reduce the impact from the outside and give our design a beautiful look, we hide our board in a plastic or metal box, having pre-drilled holes for the ring and cable. After these preparatory work, we begin to assemble the structure.
Receiving Antenna Types
The main task of a television antenna is to catch a signal in a certain frequency range. TV receives 2 frequencies:
- meter - fixes analog in the range of 1 - 300 MHz.
- decimeter catches waves at frequencies of 0.3 - 3 GHz.
The range is classified into terrestrial and satellite television. The essence of the work is that when the signal is in contact with metal parts, it forms an electromagnetic field. In the metal, due to its active force, a current is formed.It moves to the TV via a special cable and is formed by a beautiful picture and clear sound on the TV. The biggest challenge is to position the receiver so that the signal is generated as clearly as possible. Therefore, sometimes you have to hang the device on the street or constantly adjust its horns, especially after a long negative impact of weather conditions.
Conclusions and useful video on the topic
step by step manufacturing instruction TV antennas from aluminum cans:
Calculation, assembly of a digital broadcasting antenna according to Kharchenko:
A home-made design will save the budget, because a primitive signal catcher can be built from improvised means. Manufacturing work does not take much time.
Subject to a number of standards, assembly and connection technology, it will be possible to make an effective device for replacing a standard television antenna.
Do you have a homemade antenna installed in your country house? Please share with other users a unique photo of your homemade product, tell us what materials at hand you needed and how long it took you to assemble.
Or maybe you assembled a television antenna according to one of the schemes considered in this material? Tell us about your experience of using this model, add a photo in the comments block.
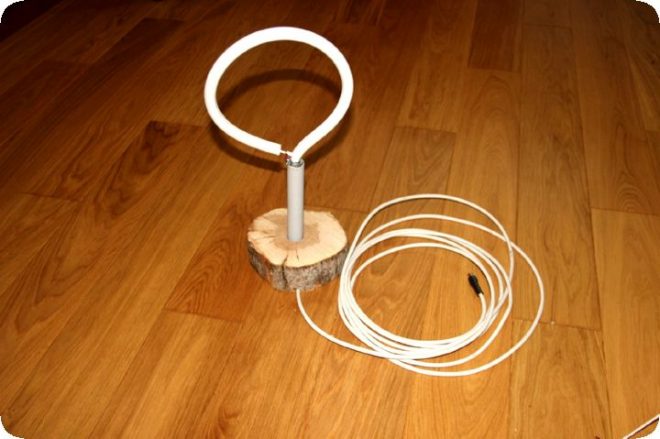
If it became necessary to connect some simple antenna to a newly purchased DVB-T2 digital television set-top box that would confidently receive TV channels, then in just 5 minutes you can make an indoor TV antenna from a small piece of television cable and at the same time it will look decent enough. If you remember on our website we laid out how to make a biquad antenna, but this antenna is even simpler and is made from almost nothing.
To make an indoor TV antenna, we need:
- TV cable 75 Ohm;
- Antenna plug;
- White tape or electrical tape;
- Knife.
How to make a TV antenna from a cable, step by step instructions:
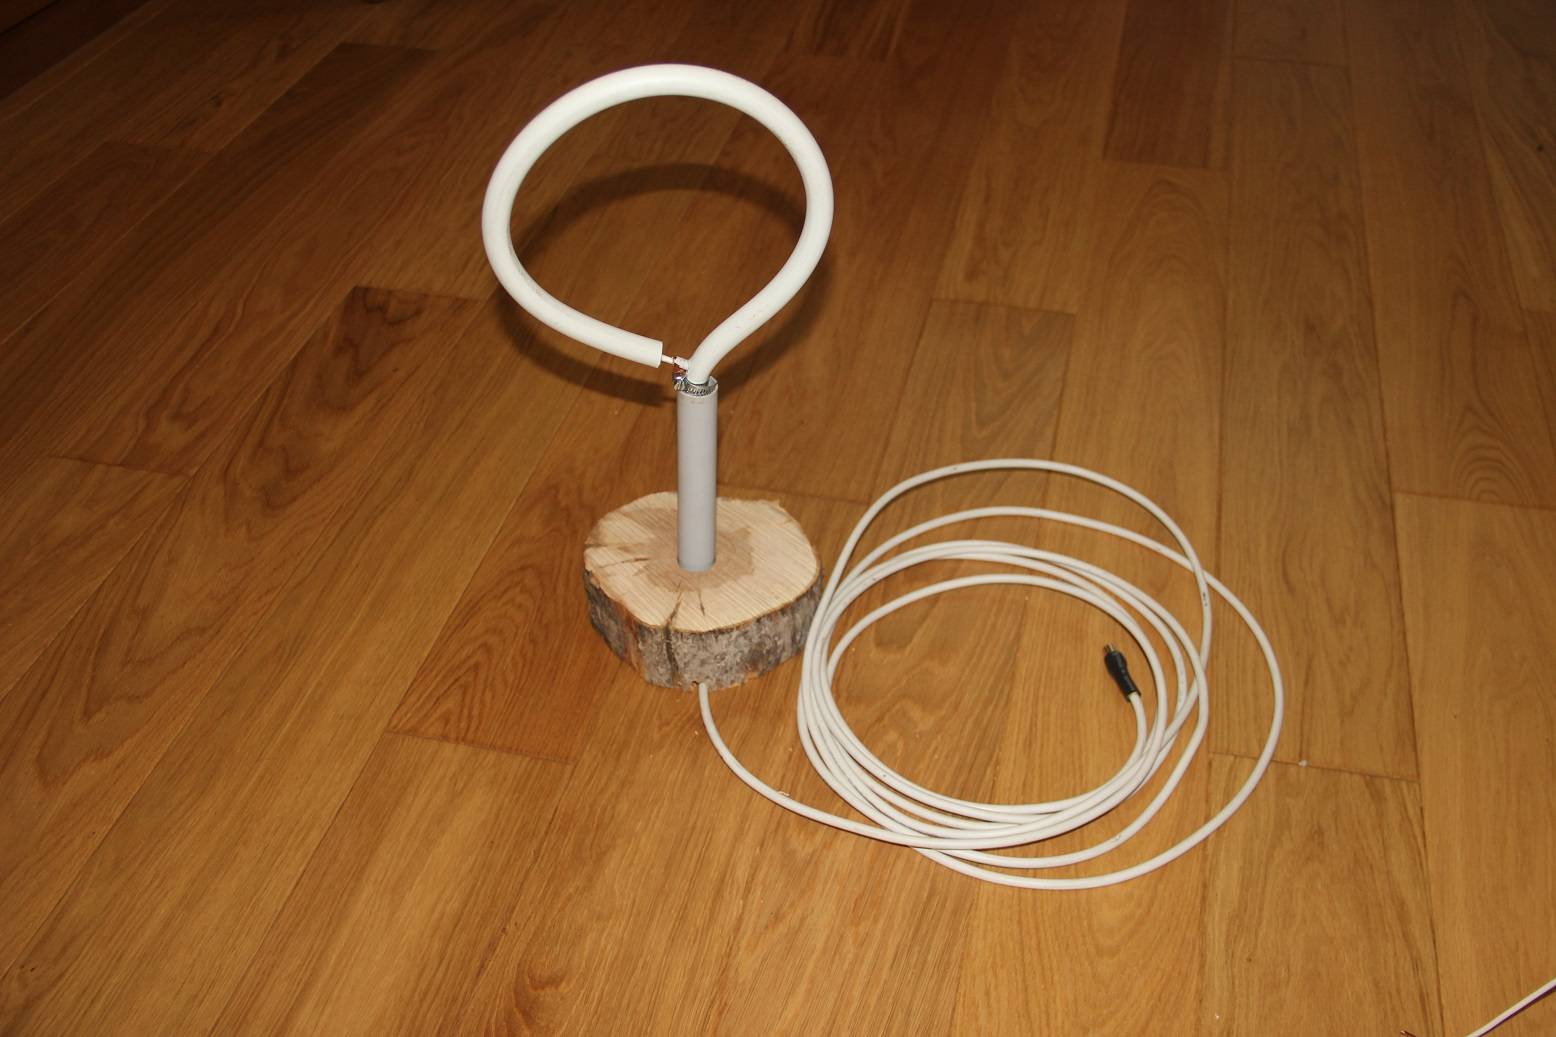
To create an antenna for T2 digital television receivers, we take a regular coaxial 75-ohm TV cable, cut off a piece 50 cm long from it, this will be enough for a room antenna.
At one end of this piece of cable, we measure 5 cm, cut and remove the upper plastic insulation, then the inner interlayer insulation, leaving only the braid and the central core.
Then we twist the braid together with the central core.
Next, you need to measure 22 cm from the place of twisting, and starting from this place, remove a section of 2 cm of external insulation along with the screen braid, leaving only the interlayer insulator and the inner core.
Then we retreat again 22 cm from this place to the other side and at this place on a 1 cm section of the cable we remove only the outer insulation, exposing the screen, trying not to damage it.
Now we wind the end with twisted wires together onto a bare spot of 1 cm with a shielding braid.
We align the created loop in, if possible, forming a beautiful and even circle.
The place of twisting can be wrapped with white electrical tape for aesthetics and insulation, plus it will help to better keep the shape of the bend.
At the other end of the cable, we screw the plug to connect to a TV set-top box or TV.
That's it, a do-it-yourself TV antenna for DVB-T2 digital television is ready in 5 minutes! It's time to connect it to the TV box and turn on the search for channels.
I have caught all the TV channels that are broadcast in my city on this antenna, the signal level is very good and stable.I tried to connect just a coil of cable instead of an antenna for comparison, but I didn’t catch anything, I even twisted the ends together and had the same result. Friends said that digital TV can be caught even with a paper clip, I tried it for the sake of interest, but this also did not give any result. So I think that my simple antenna made from a piece of cable is quite effective and of high quality despite the simplicity of its manufacture and design.


To be able to watch digital television on your TV, you will need an appropriate receiver, as well as an antenna to receive the signal. Such an antenna for digital TV can be purchased at specialized stores, or you can make it yourself from a television cable. In this article, we will look at the simplest and most affordable ways to make antennas for digital TV.
It is not always advisable to buy expensive equipment for receiving a television signal. Very often, with a relatively close location of the radio tower and the absence of interference, home-made antennas compete with factory models, and in some respects even surpass them.


