- Pipe bender stationary step by step instructions
- Making a manual roller model
- Necessary materials and tools
- Pipe bender manufacturing process
- For profile pipe
- With center roller
- With break frame
- Simple pipe bender
- For round pipe
- From the vise
- Homemade roller
- From the jack
- Crossbow type
- Making a crossbow pipe bender
- Do-it-yourself manual pipe bender for profile pipes
- Required materials and tools
- Blueprints
- Construction assembly steps
- How to make a snail pipe bender?
- Necessary materials and tools
- The assembly process of the snail pipe bender
- Technology features
- What materials and design nuances are needed
Pipe bender stationary step by step instructions
If you plan to independently make a greenhouse from steel pipes, then you will need to acquire not just an ordinary pipe bender, but a reliable product. After all, with this approach, you will need to bend more than a dozen profile pipes. To make the design of the greenhouse neat and beautiful, you need to use a stationary pipe bender.
Before proceeding with the manufacture of the greenhouse, you need to take care of the presence of the appropriate tool for bending profile products. You will need the following elements to design a stationary pipe bender:
- rod for 25;
- 6 bearings;
- channel.
You will also need a welding machine, with the help of which all the components will be connected. Step by step manufacturing instructions stationary pipe bender looks like this:
- Bearings are welded to the base (channel), which are interconnected by a shaft in the form of a steel pipe of the appropriate diameter.
- To prevent the shaft from being too close to the base, the bearings should be welded onto cuts of a rectangular pipe 5 cm each.
- In order to deliberately make a unit that could regulate the bending radius, the base must be made of two channels connected by curtains, as seen in the photo above.
- Two shafts with bearings are located at the same height, and the third (central) is welded with a rectangular tube 15-20 cm higher.
- An additional tube must be welded to the upper shaft, to which the handle will be attached. This shaft will be driven by muscular force.
- The handle is welded to the upper shaft, after which the resulting product can be checked for operation.
When installing a profile tube of any size, you should adjust the radius of the final bend. This can be done using a jack located under the base, on which one of the shafts is fixed. Having adjusted the required bending radius, the handle rotates. The result is high-quality curved tubes. The advantage of a pipe bender is the ability to bend materials of any size and diameter.
Of the shortcomings, only the possibility of operation in one place can be noted.
It is important to understand that such a device can be used for any need. For the manufacture of such a device, an investment of no more than 500 rubles will be required.You need to buy only 6 bearings, and all other elements can be found in the household of each master
You need to buy only 6 bearings, and all other elements can be found in the household of each master.
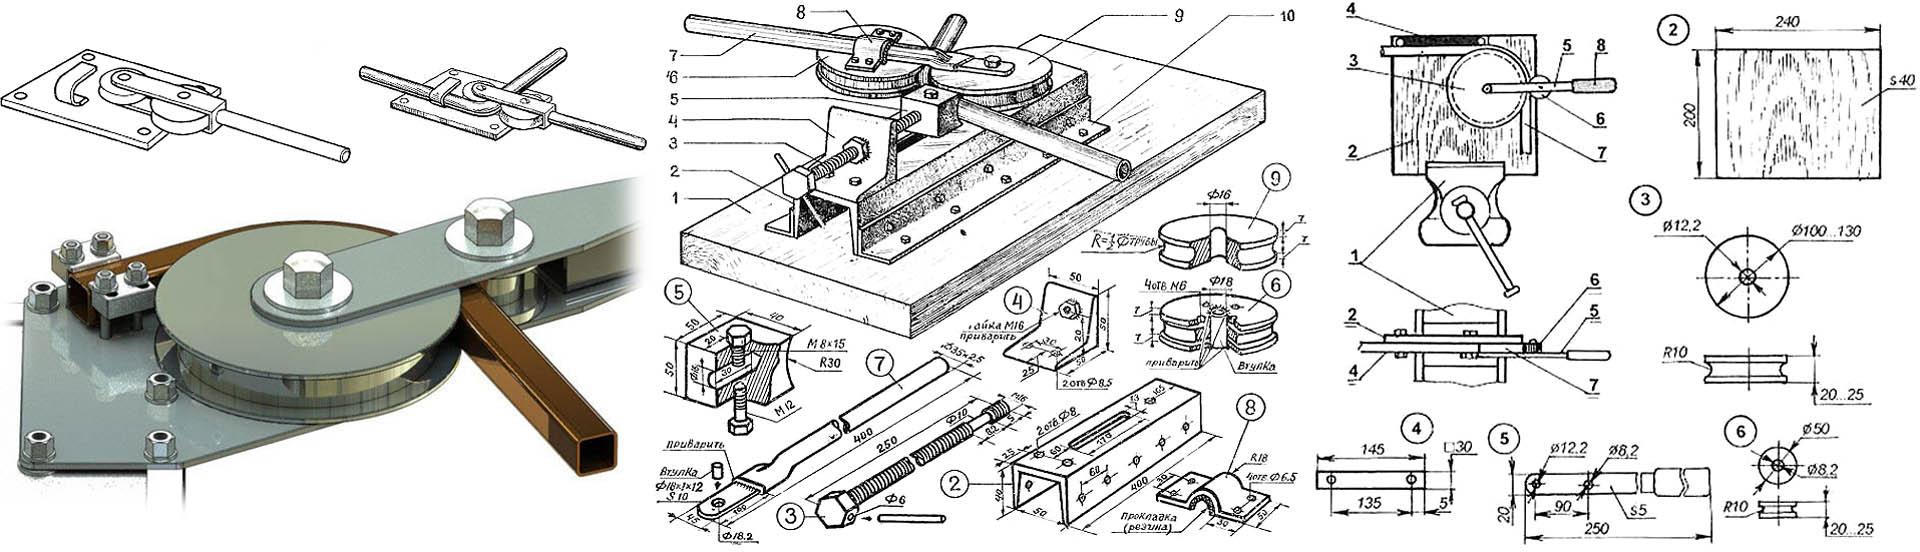
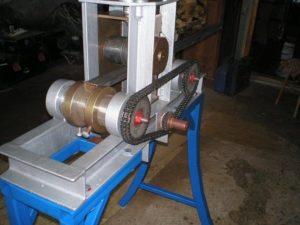
Making a manual roller model
Making a manual pipe bender with your own hands is made from steel parts alone without the use of special mechanical devices. This device is designed for local pipe bending. Direct manual force is used to deform the profile, so the pipe bender must be equipped with a long and strong arm.
Next, the manufacturing process of a two-roller pipe bender attached to the support frame will be considered. The dimensions of the tool may differ from those suggested, depending on the needs and materials.
Necessary materials and tools
Pipe deformation is a laborious process that requires good and durable materials, otherwise the working tool itself can be bent instead of the profile.
To make a mechanical manual radial pipe bender you will need:
- Welding machine.
- Two rollers made of strong steel (for example, grade 1045) that have been pre-turned. The diameter of the larger one is 100 mm, and the smaller one is 60 mm. Both are 35mm thick and have a 0.5" outer cavity radius.
- Steel pipe with a diameter of at least 1.5 inches with a thick wall (minimum 3 mm). It will serve as a lever, so its minimum length is 1.5 meters.
- Four steel strips measuring 15 x 6 cm and 4-5 mm thick for fixing the base of the pipe bender in a vise, supporting the pipe and making the handle. You will also need 20-25 cm of a steel plate 60 mm wide and 3 mm thick.
- Two bolts: the first one is 0.75" in diameter and 60mm long for the large roller, and the second is 0.5" in diameter and 40mm long for the small roller.
- Steel plate 300 x 300 mm and minimum 3 mm thick.
- Vice.
In the process of work, other general household tools may be needed: a hammer, files, sandpaper, a ruler, etc. The above rollers are designed exclusively for 1 inch pipes, but by eliminating the circumferential recess from them, you can get a universal tool for bending a metal profile.
Pipe bender manufacturing process
When all the necessary parts and tools are collected in one place, you can proceed directly to the manufacture of the pipe bender:
- Prepare a drawing marking the location of the main elements.
- Check the compatibility of the holes in the rollers with the diameter of the bolts.
- Drill two holes in two metal strips with a diameter of 0.5 and 0.75 inches. The distance between the axes of the holes must be exactly 80 mm (the sum of the radii of both rollers).
- Make a hole in the center of the base frame with a diameter of 0.75 inches. Insert the corresponding bolt into it without protruding it from the back. Weld the bolt to the metal plate.
- Take drilled metal plates measuring 15x6 cm, a 0.5-inch bolt, a smaller roller, a strip of steel 35 x 60 mm and weld the design of the letter "P" from them, after inserting the bolt with the roller put on in the appropriate holes.
- Weld the ends of the bolt to the metal strips. You should get a kind of horn with a larger diameter hole closer to the open edge.
- A pipe-handle must be welded to the base of the resulting horn.
- Weld the support bar for the pipe onto the metal frame.The distance from the lath line to the center bolt axis should be equal to the radius of the large roller plus 0.5 inch.
- Weld a bar 15 x 6 cm at the bottom of the bed for fixing in a vice.
- Insert a large roller into the horn, put the structure on the central bolt and screw the nut on top.
- Clamp the pipe bender in a vice and carry out the first tests.
Important manufacturing details:
Welds are the weak point in the entire resulting structure, so special attention is paid to them in the manufacturing process of the pipe bender.
For profile pipe
A profile pipe is often used to assemble frames for greenhouses, gazebos, gates and wickets, awnings and much more.
Therefore, the owner of a garage or a summer cottage sooner or later raises the question of how to bend a professional pipe at home.
A pipe bender will come to the rescue.
However, ready-made solutions cost a lot of money. Therefore, the best option is to do it yourself.


To make such a device, you will need the following tools:
- Angle grinder, colloquially - grinder;
- Drill with a set of drills for metal;
- Welding machine, best of all - a household electrode inverter;
- A set of keys or heads.
Before starting work, you need to draw up a drawing of the future bending machine so that all the details relate to each other.
The main elements of a home pipe bender are:
- Frame welded from a steel channel or I-beam with a thickness of at least 4 mm;
- roller shafts;
- The rollers themselves;
- Asterisks for connecting chain transmission;
- Chain for driving from an old bicycle or gas distribution mechanism;
- Screw lowering the pressure roller;
- Clamping screw and shaft rotation handles - hollow steel tube or solid rod;
- Various accessories: nuts, bolts, washers, grover, cotter pins.
It’s worth mentioning right away that if you don’t have rollers and shafts in your arsenal, it’s not possible to make them yourself without a lathe. As a last resort, the existing metal rods can be cut to size and sanded down. Barrels with an internal hole can be used as rollers.
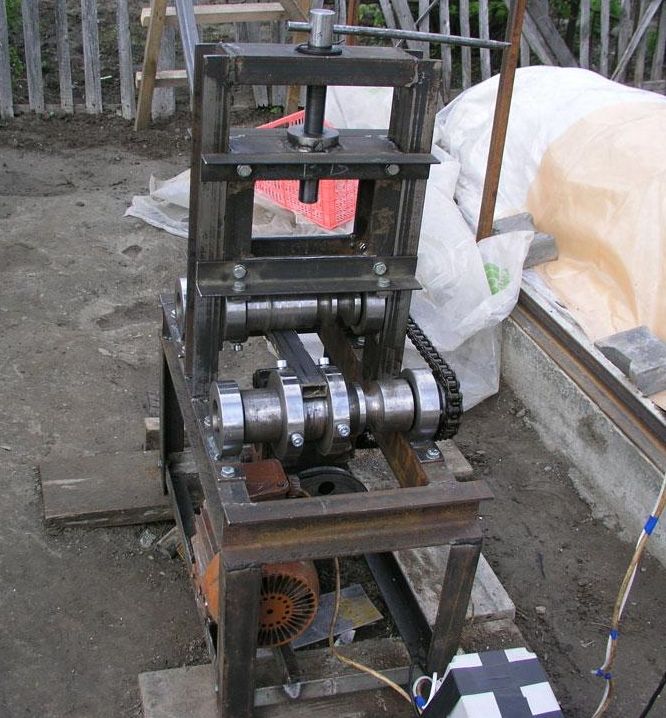
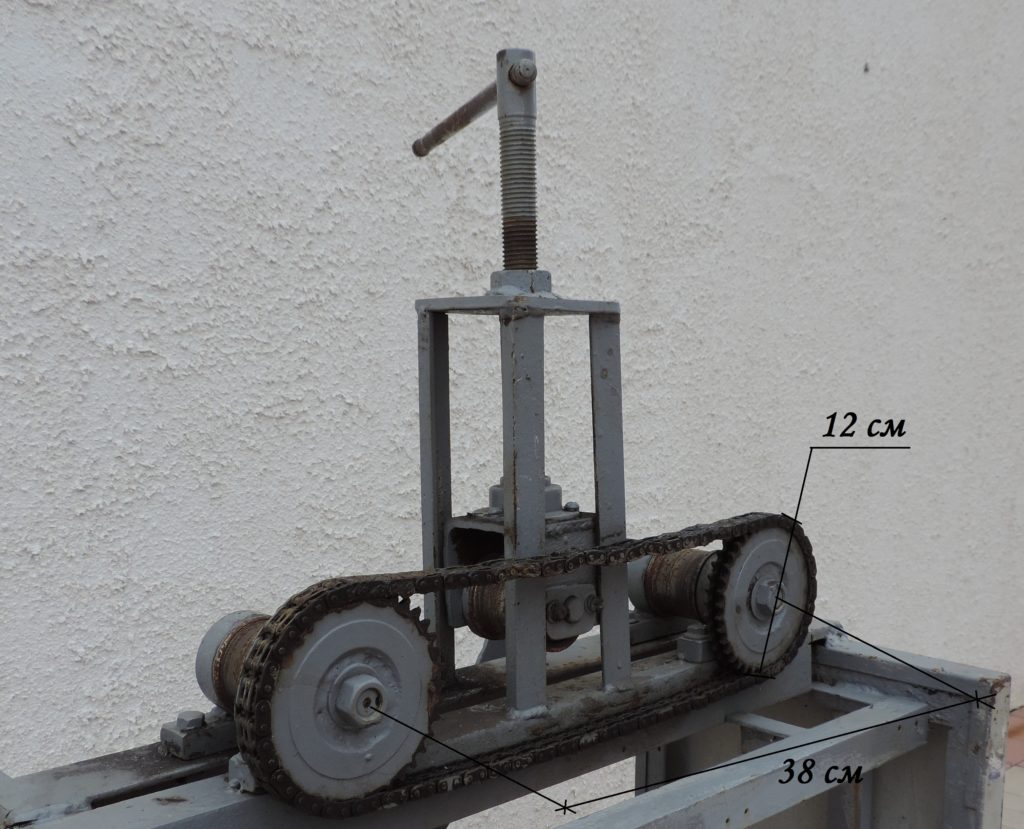
With center roller
The sequence of actions when assembling a homemade pipe bender with a central pressure roller will be as follows:
- Using a grinder, cut the channel or I-beam into parts of the desired size. Grab them pointwise, and then, when the frame is ready, boil along the entire length. After, for aesthetic reasons, you can grind the seams with a grinding wheel.
- Provide either legs from scraps of the same channel, or mounting holes for bolts that will allow you to grab the machine to the workbench.
- Drill holes for the shafts. Also, using a drill and a grinder, make cuts in the vertical part of the frame. They will go up and down the pinch roller shaft. Insert the shafts with the rollers on into the holes made and fix them with cotter pins.
- The threaded connection of the pressure roller rod and the blind frame is done either with a lathe or with a tap. Remember that large diameter threads are very difficult to cut. Be sure to use grinding or other cheap lubricant when cutting threads.
- Gently grind the outer part of the shafts on both sides so that you can put stars on them.Put on the chain with a slight slack, if you make the grip too tight, additional strength will be spent to overcome the resistance.
- Attach a lever to one of the shafts - for fixing, use the same lock as for the sprockets. If there is a desire to strengthen the lever on the shaft, drill a hole and cut the internal thread. After screwing the bolt there, the lever will be fixed, and by unscrewing the bolt, the lever can always be removed for transportation. By turning the lever, it will be possible to pull the workpiece through the rollers. By tightening the clamping screw, you can change the radius of curvature of the bent pipe.
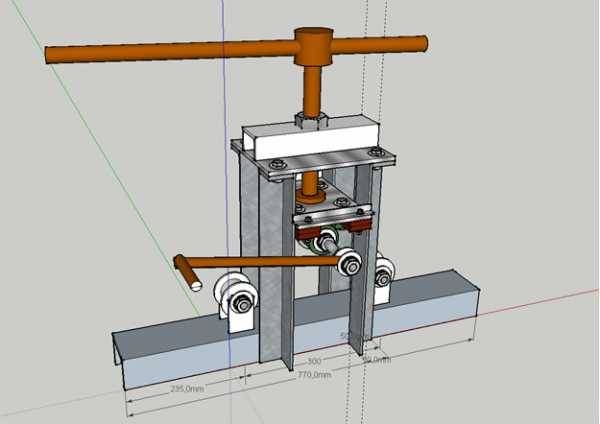
Drawings and dimensions of a homemade design:
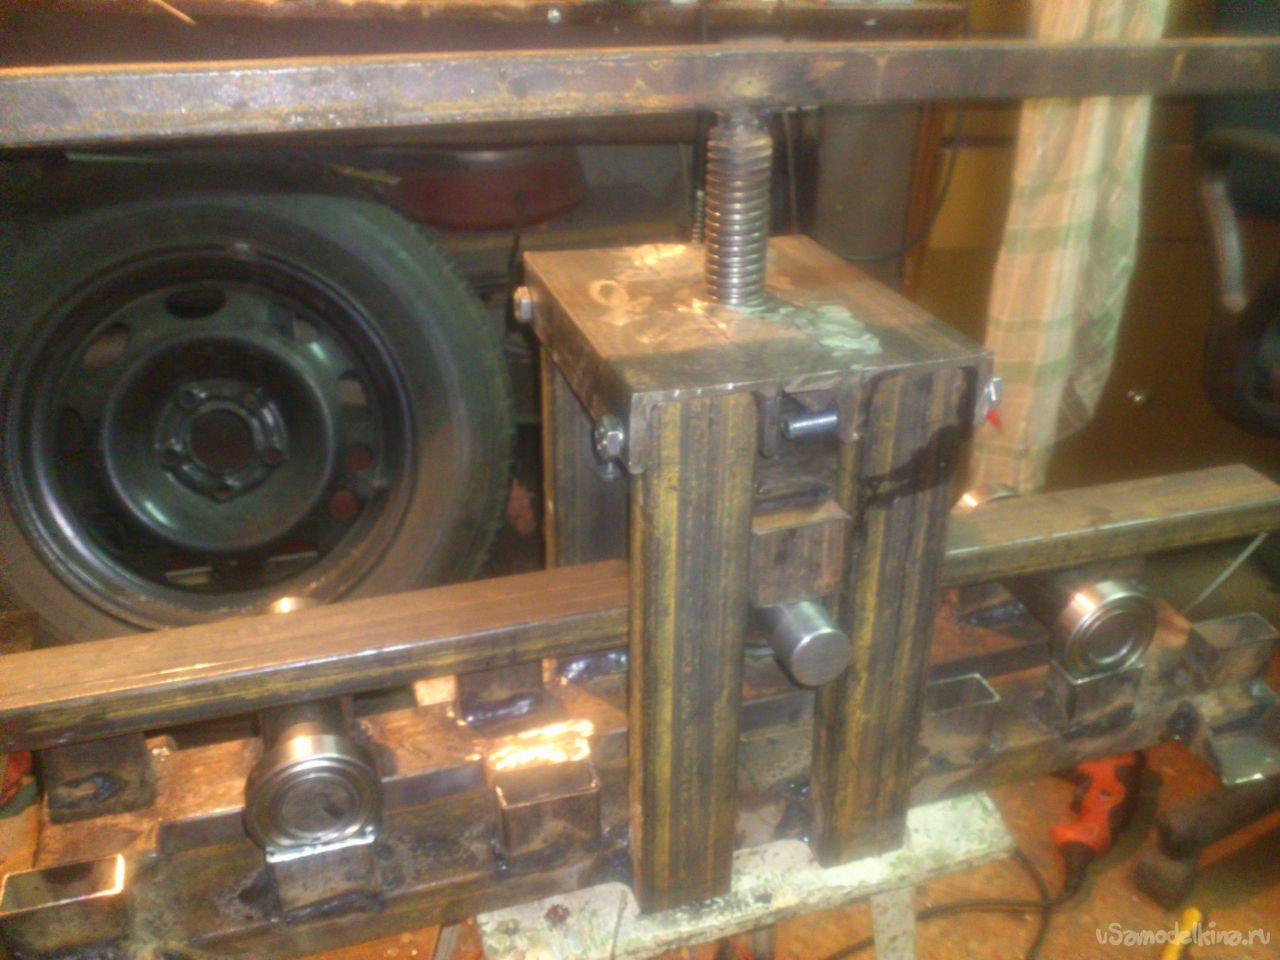
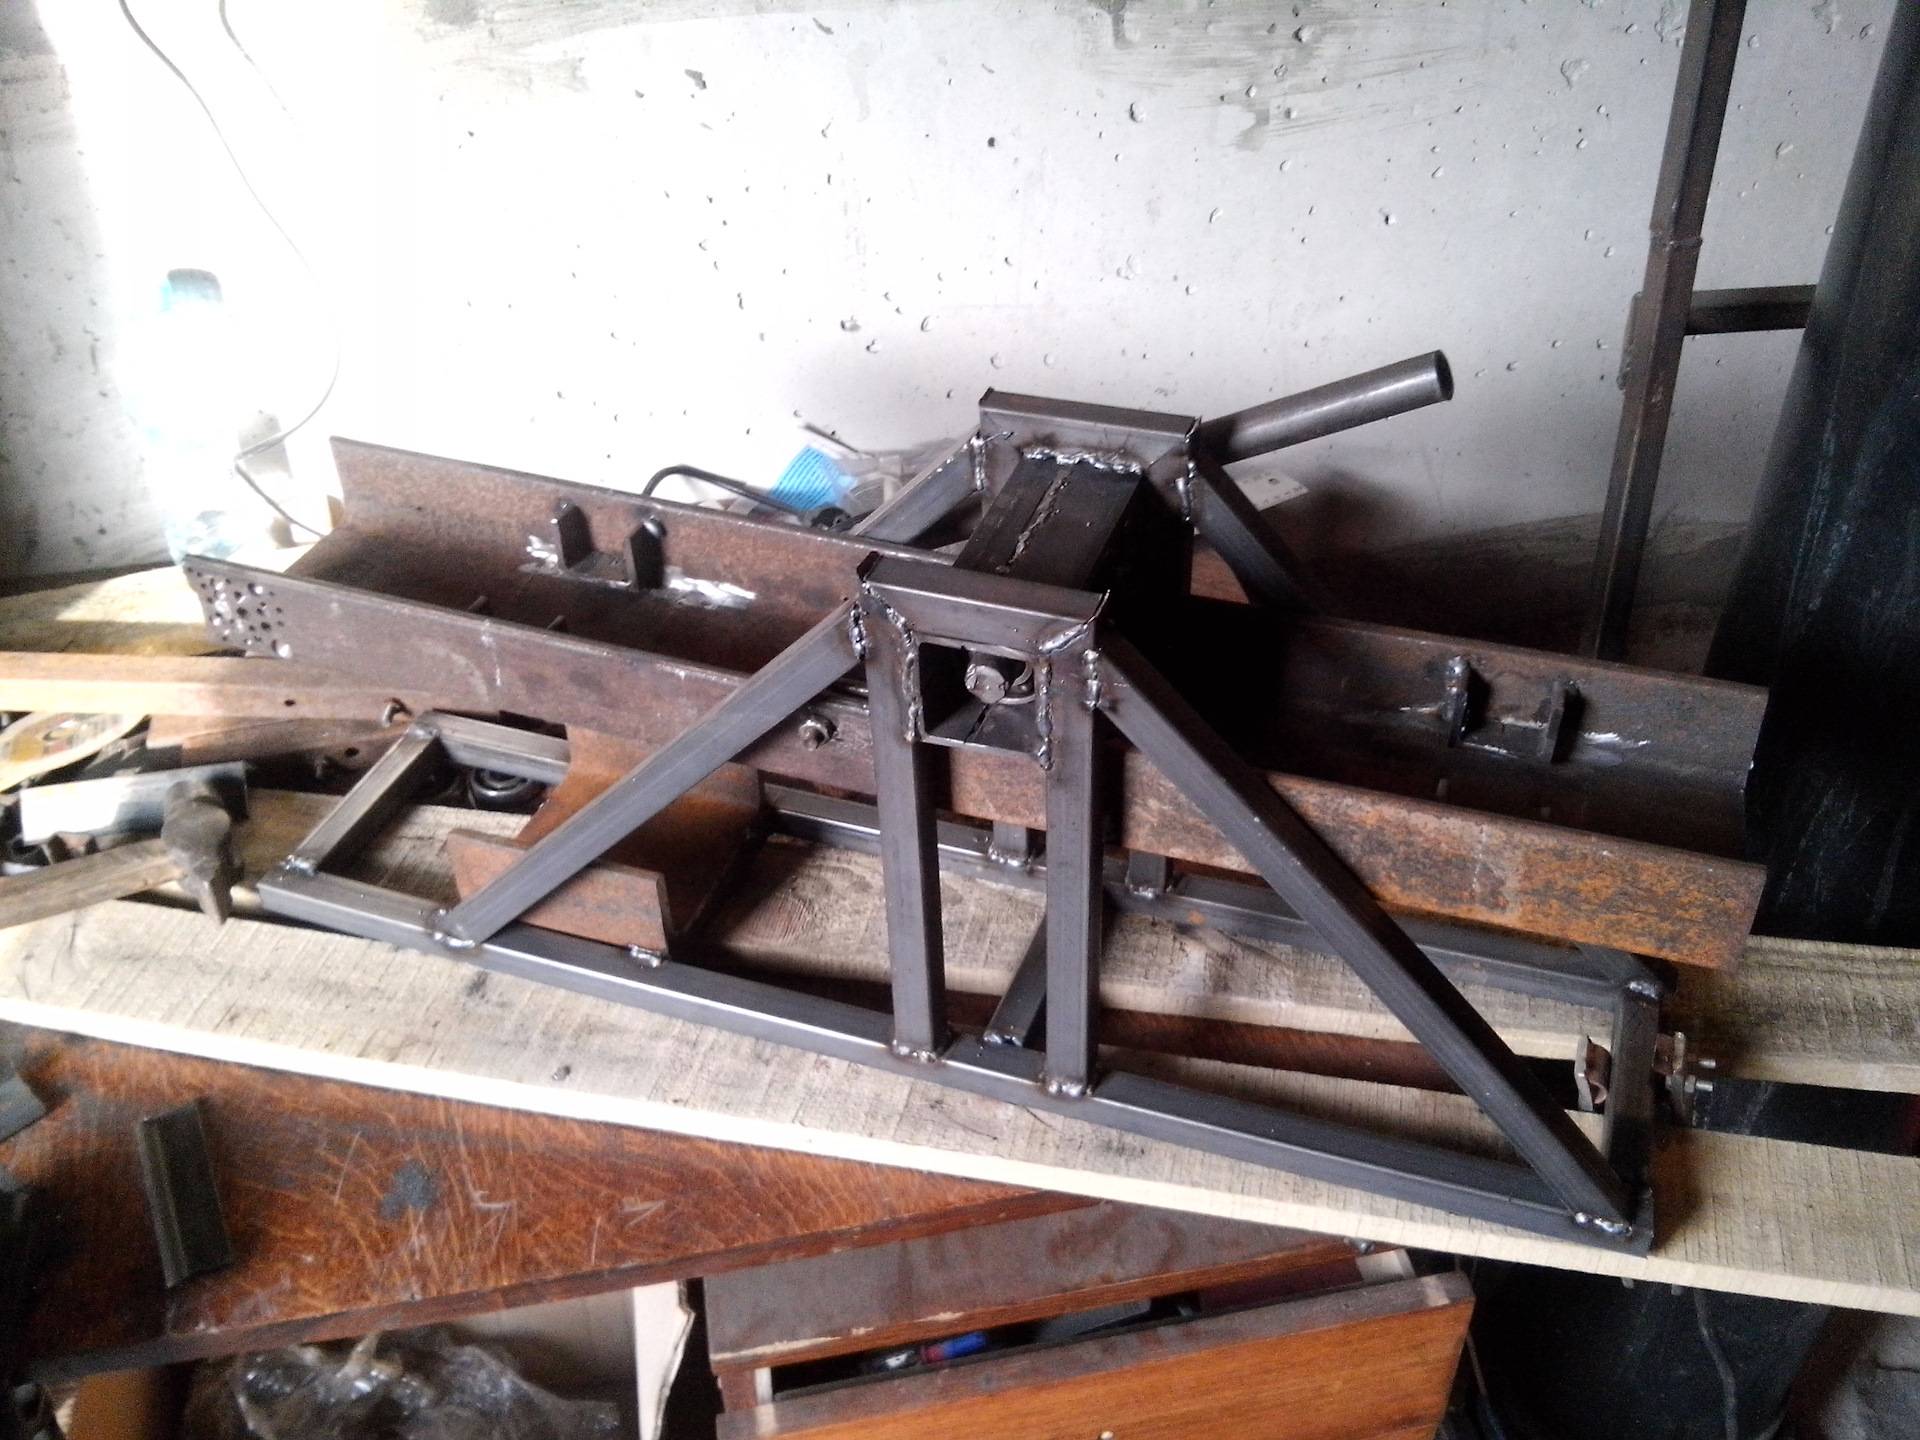
With break frame
No less popular in the manufacture do-it-yourself is a pipe bender diagram with break frame. Structurally, it differs in that all the rollers in it are stationary, that is, they only rotate, but move up and down.
The pressure on the pipe occurs by lifting the part of the frame where one of the extreme rollers is mounted. The assembly process is similar to the previous one, but has its own nuances:
- Make the frame for the fracture pipe bender not one-piece, but consisting of two parts. Two parts can be connected with a stud with two nuts.
- It is very convenient to lift the end roller with a screw lifting device or a jack.
- To rotate the sprockets, some craftsmen adapt an AC electric motor or even a gasoline one removed from a walk-behind tractor or a fuel generator.
But most often, such units still use the user's muscular strength. In this case, they require almost no resources. This is their value: it is very easy to put such a device in the trunk of a car and bring it to a construction site where there is still no electricity.
Below are the drawing and dimensions of a homemade pipe bender:
Another example:
Simple pipe bender
In a home workshop, several types of pipe benders can be made. Much here depends on the needs of the user of the device. In a situation where a person needs to constantly bend a small diameter copper tube at a right angle, making a stationary pipe bender with a breaking frame based on a jack seems to be a waste of time and effort.
Below are the simplest and easiest to manufacture types of pipe benders for various needs.
For round pipe
The simplest pipe bender with a minimum of parts is a manual device consisting of a base, two pulleys, an emphasis and a lever.
It is designed for bending round pipes at right angles or less.
The base can be a simple metal plate. A pulley is fixed in its center. A U-shaped bracket is fixed on the axis of the first pulley. The end of the bracket continues with a lever, and in the middle a second pulley is fixed to the eyes, which rotates freely. Below the first pulley is a stop that prevents the pipe from turning.
The mechanism of such a pipe bender is extremely simple. The round tube is inserted between the stop and the first pulley. The bracket touches the stop with one of the edges, and the pipe is sandwiched between two pulleys. Turning the bracket with a lever, the master puts pressure on the end of the pipe and gradually the second pulley describes a circle around the first, motionless one. The pipe clamped between them is bent along the radius of the fixed pulley.


From the vise
The task of assembly is facilitated by the fact that the vise bender does not require a frame connecting the upper pressure and lower thrust rollers.For him, two channels of sufficient depth are enough so that holes can be drilled in the walls for the roller shafts.
Thrust rollers are mounted on a wide base at a distance of at least 400-600 mm from each other. On a narrow base, one roller is assembled, rotated by a lever of sufficient length. Then the structure is inserted into a vise, a pipe is placed between the rollers and tightened. By rotating the handle of the lever, the pipe or profile is pulled through the roller rollers.
This model is convenient in that it is as portable as possible and can be removed from the toolbox only when necessary.
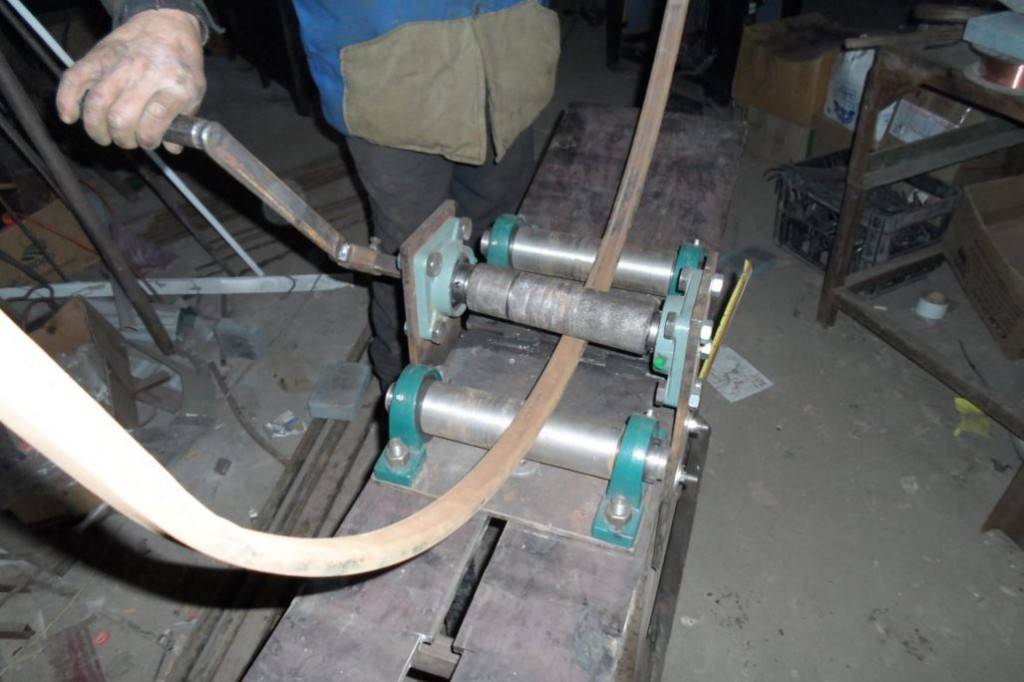
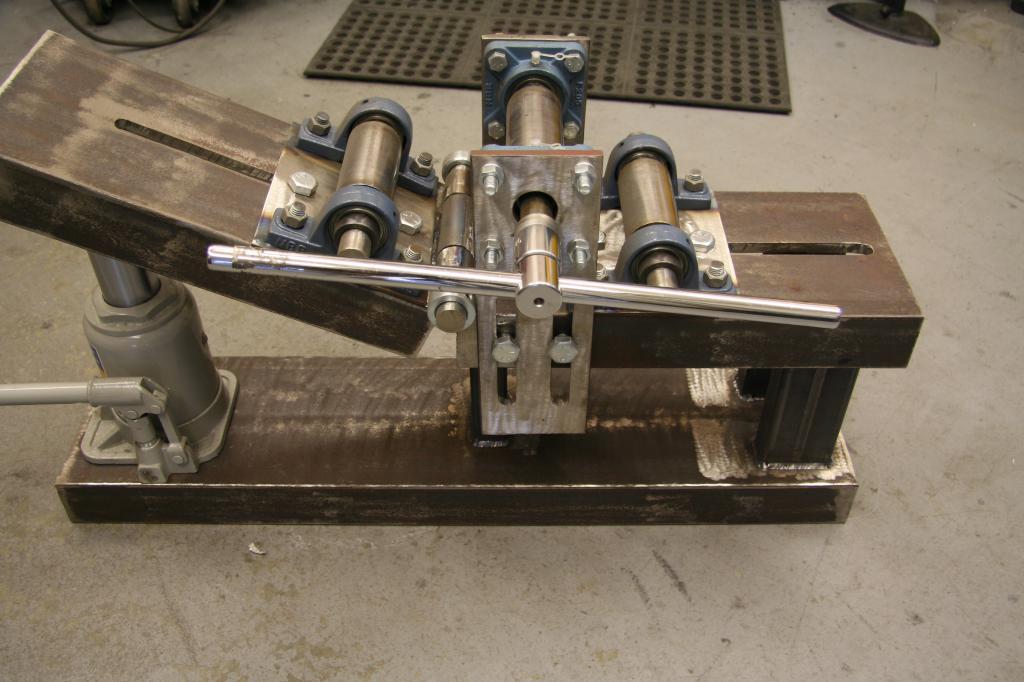
Homemade roller
The roller pipe bender can have a different configuration. It can be either a simple manual mechanism, consisting of two levers, a pulley and a pressure roller, or a fairly complex rolling device with an electric or even gasoline drive.
A key feature of this pipe bender is the rollers, which either compress the pipe by rolling over it, or squeeze it from different sides. Depending on the cross section of the rollers, the device will be sharpened for a round or shaped pipe.
In the first case, the inner surface of the roller between the two ridges will be concave, in the second case it will be even.
Blueprints:
From the jack
It is convenient to use a hydraulic jack to press the pipe. Its use is justified with round and shaped steel pipes, large diameters or thick walls.Considering that a hydraulic jack can lift more than three tons, it turns out that the diameter and thickness of the pipe that you can bend is rather limited by the design of the system itself and whether you can scroll the lever while pulling the workpiece.
Drawing and dimensions:
With a sufficient length of the roller handle lever, this type of pipe bender requires the least physical strength when working with serious materials.
Crossbow type
It is used when the product bends to a short length.
The pipe bender got its name for a metal triangular frame located parallel to the ground.
At the tops of this frame there are two supports oriented to a round or shaped pipe (this depends on the shape of the notch on the stops). At the third vertex there is a rod with a punch, that is, an arc curved outward. To press the punch against the pipe, which is deformed between two stops, a hydraulic cylinder is usually used. In everyday life, it is easiest to replace it with a hydraulic jack.


Drawing of a homemade crossbow-type pipe bender:
Thus, for the manufacture of a crossbow pipe bender equipped with a hydraulic jack, it is necessary to weld a triangular frame, at the tops of which stops and a clamping rod will be located.
Making a crossbow pipe bender
The crossbow pipe bender is the most compact, although it is characterized by increased labor intensity of manufacture. The sequence of operation of the device is that the tubular billet to be bent is pressed against two steel rollers rigidly fixed on the frame, the distance between which is determined by the radius. A manual hydraulic cylinder is mounted in the body of the pipe bender (often they use a brake, from a car).By pressing the trigger, a high-pressure liquid is admitted into one of the cavities of the cylinder, under the influence of which the piston rod begins to move towards the deformable workpiece. Since the rollers and the cylinder are mounted on the same base plate, the accuracy of the crossbow pipe bender will depend only on the quality of manufacture and assembly.
The advantage of the device is the exclusion of physical stress applied by the user (an ordinary jack can be used as a pressure source). The disadvantage is the increased complexity of work in the house when assembling and setting up the device: it is necessary to make a supporting frame, carefully fit it to the existing dimensions of the jack, ensure the alignment of the rollers and the perpendicularity of the movement of the rod to the axis of the original workpiece.
Do-it-yourself manual pipe bender for profile pipes
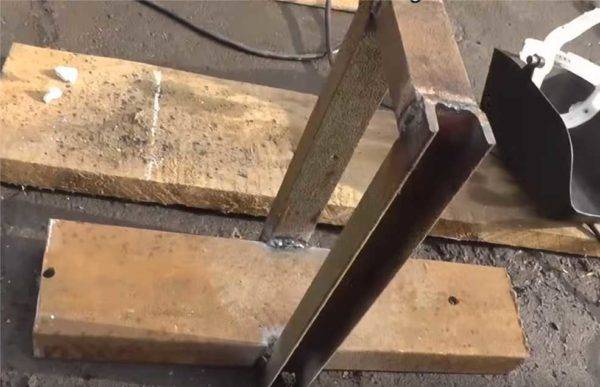
To bend profile pipe with small cross-sectional dimensions without a pipe bender, craftsmen use templates of the desired curvature made of metal or wood. The workpiece is pressed manually to the edges of the segment, rigidly fixing one end.
wood template
The thin-walled element can be deformed when heated. The area is heated with a blowtorch to a temperature of 350-400°C and, using manual force, the profile is arched.
If you use simple methods that do not allow product parameters, you can design a manual roller pipe bender for a profile pipe. With its help, arches and arcs are made for canopies, greenhouses and other structures of complex shape.
Required materials and tools
To make a device, you will need:
- channel No. 8 or No. 10 for a rigid frame;
- 2 hardened steel rollers with steps for profiles of different heights or restrictive rings;
- notched roller for the movable shaft;
- finished bearing units;
- 2 or 3 gears or "sprockets";
- steel chain;
- clamping screw;
- thin pipe for the gate;
- lever;
- welding machine;
- drill;
- "Bulgarian";
- a hammer.
Still need cotter pins, nuts, threaded bushings, washers. To process the finished structure, paint and lubricant will be required.
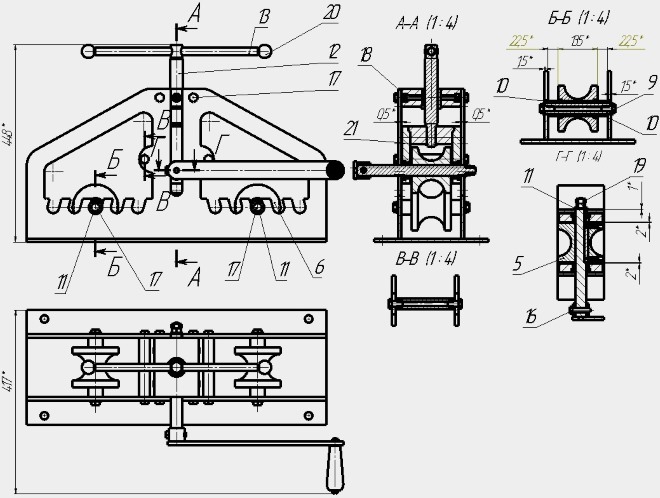
Blueprints
The drawing is the basis that will help you make a pipe bender without gross errors
This is especially important when working with metal
Ready-made drawings are posted on the Internet. With sufficient experience, they are easy to understand and adjust to your capabilities.
You can imagine an exemplary pipe bender device when studying the factory analogue, and then develop a detailed diagram of your model.
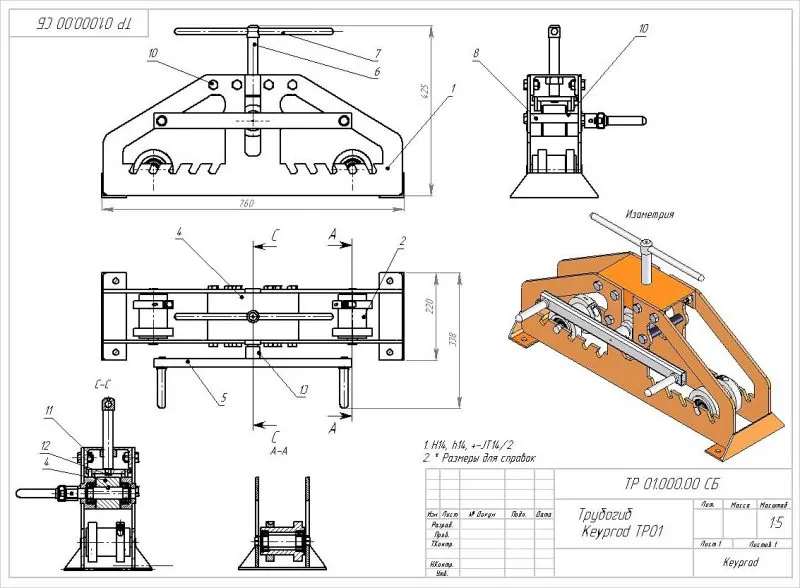 Drawing and general view of a hand tool
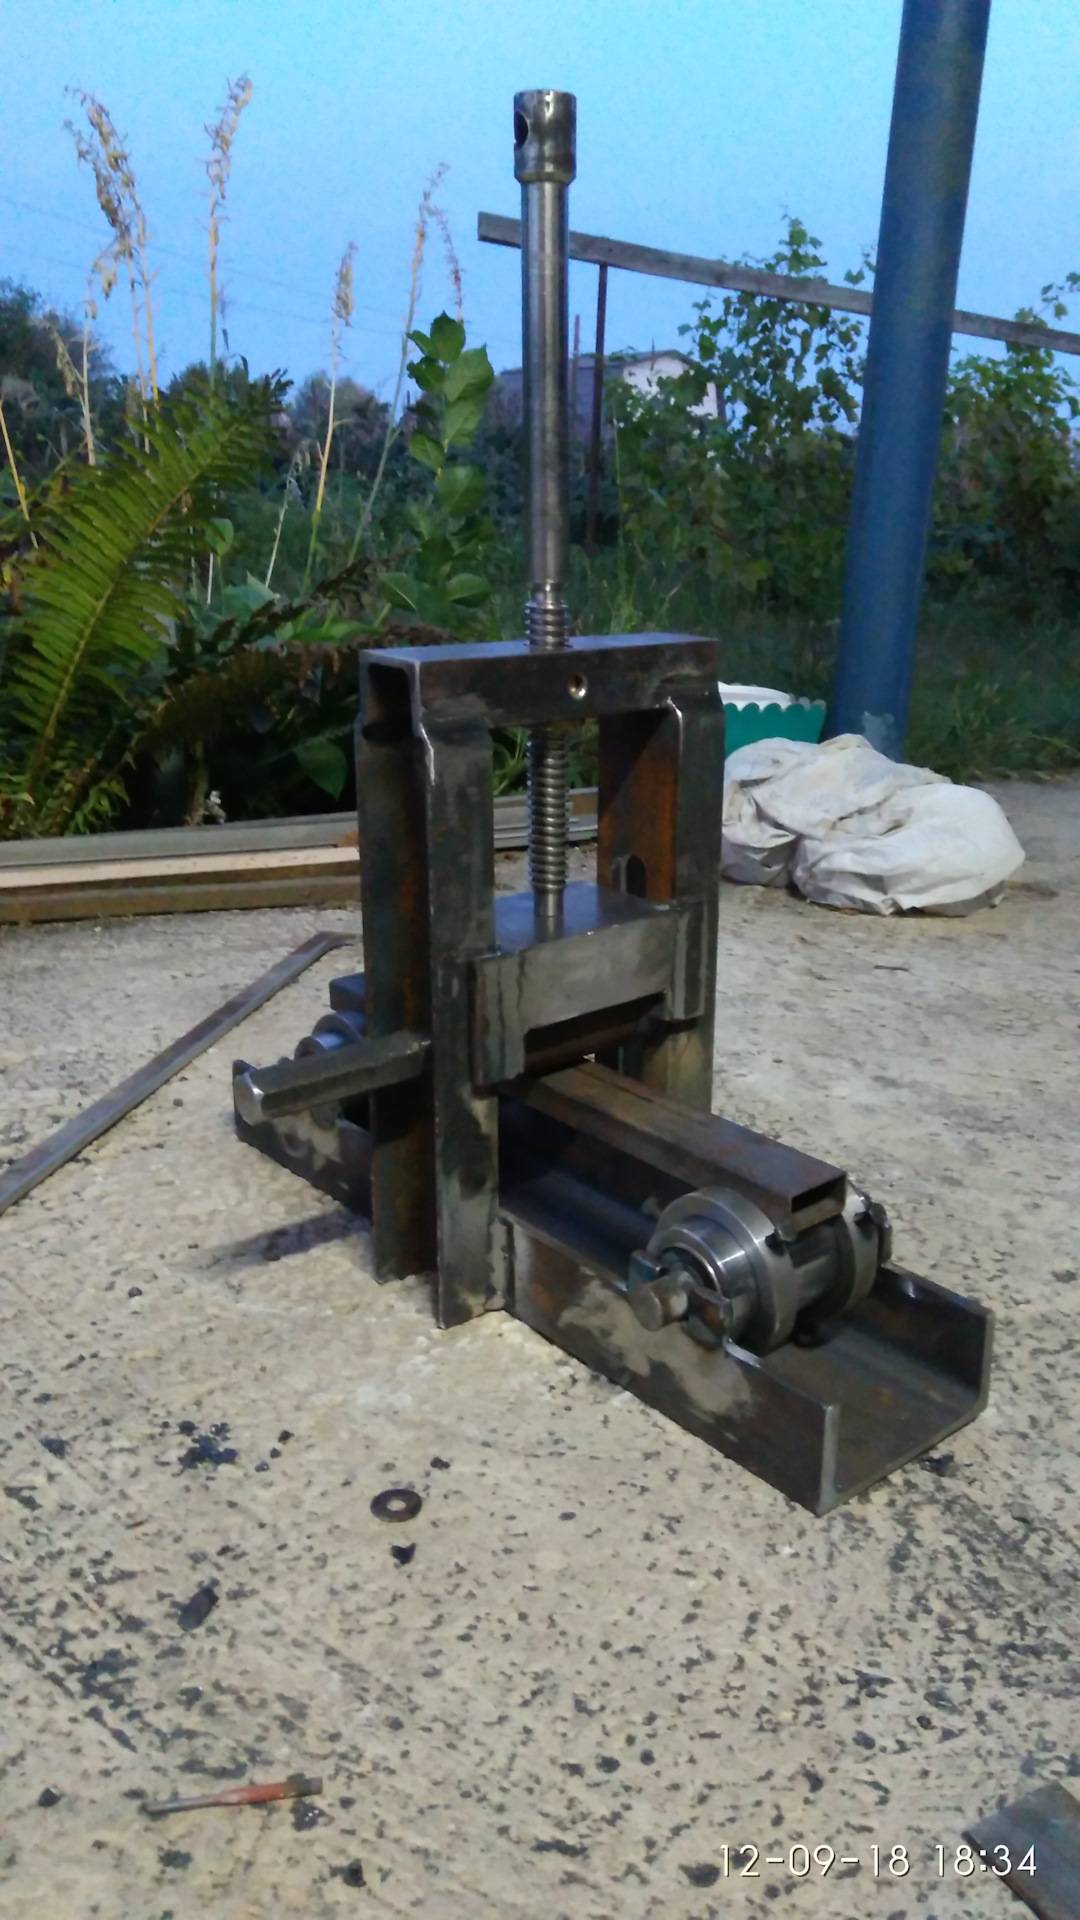
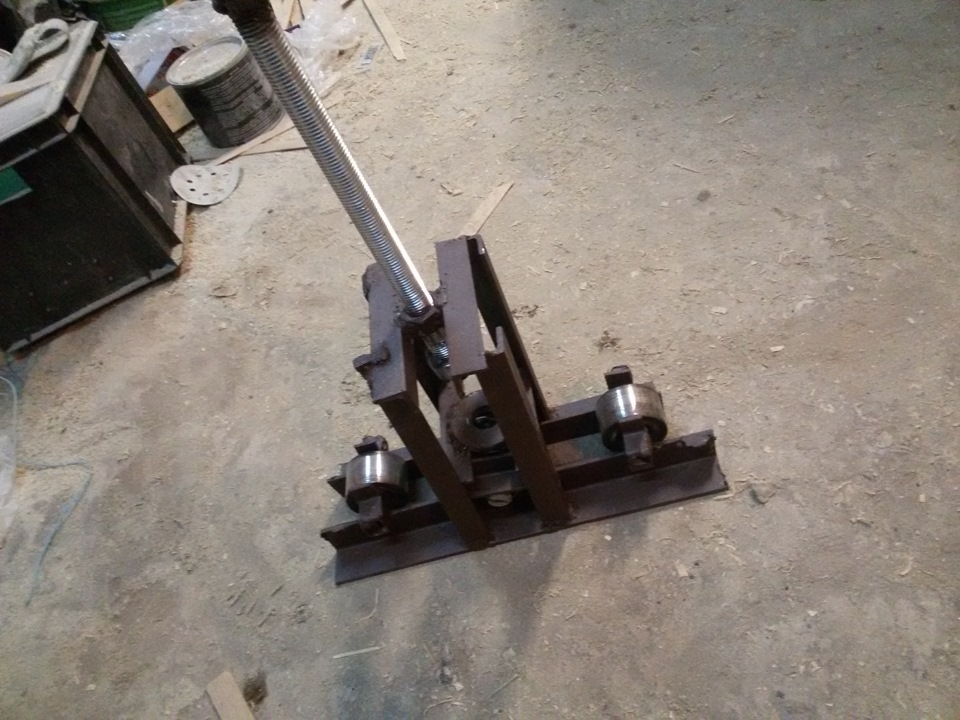
Construction assembly steps
The sequence of operations for the manufacture of a homemade roller pipe bender:
- Cut the channel according to the dimensions of the racks and base.
- Drill holes in the frame parts for mounting the rollers.
- Weld the support frame with the uprights from the channel.
- Cut and weld a body with holes for installing the drive roller from the channel. The shaft should rotate easily inside.
- Fasten the clamping screw to the resulting box using bearings. Drill a hole in the top of the screw for the gate.
- Insert a housing with a drive roller between the uprights. The structure must move freely vertically. Fasten the cover with a screw nut from above.
- Screw the bearing units to the frame.
- Insert the collar into the hole of the clamping bolt.
- On the shaft axis from the outside, put the gears on the key or taper split bushings with nuts. Attach the third "asterisk" to the rack. Put on the chain, press the sleeve for the handle.
- Carry out trial tests, if necessary, make adjustments.
The last step is to disassemble, clean the metal from burrs, paint the fixed parts, reassemble. Assemblies that are subject to friction during operation should be treated with Litol or other grease.


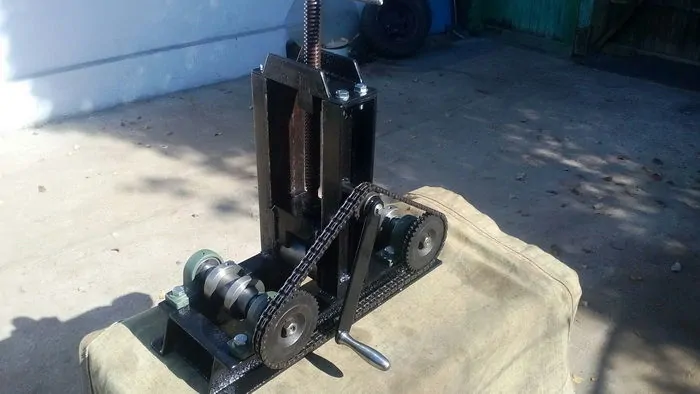 Ready homemade machine
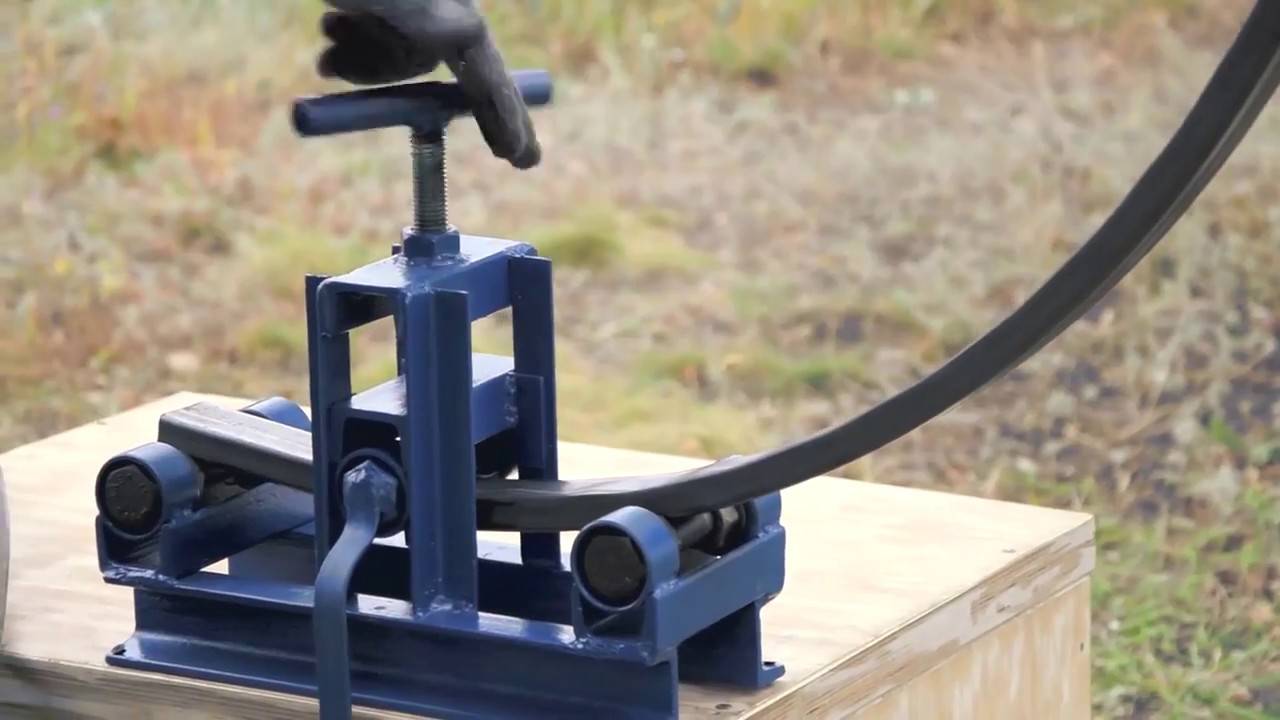
To bend the workpiece, it is placed on fixed rollers, the clamping screw is lowered to the stop and pulled with the help of a rotating handle alternately in one direction and the other.
After each rental, the screw is tightened with a collar. When the arc has acquired sufficient curvature, the screw nut is fixed with a lock nut. This will allow you to bend several arches with the same radius.
Such a homemade pipe bender can be used even for professional purposes. He will "master" profiles up to 60x60 mm in size or at the same time 3 pipes with a section width of 20 mm.
Details of the manufacturing process of a manual machine can be seen here.
How to make a snail pipe bender?
Independent production of a snail pipe bender may seem complicated. In fact, this device is no more difficult to assemble than a roller pipe bender. The process differs only in the parts used and assembly time.
The snail pipe bender allows you to bend the profile along the entire length at once, and not just in one place. For this property, he gained popularity among installers.
Necessary materials and tools
Since the described roller pipe bender does not have a specific working diameter and can be made from any available materials, the proposed materials will not contain specific sizes of parts. The thickness of all metal structural elements should be 4, and preferably 5 mm.
To make a pipe bender you will need:
- Channel - 1 meter.
- Sheet iron.
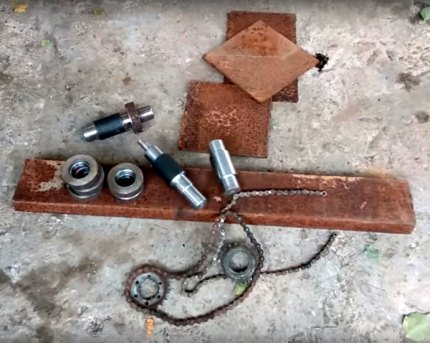
- Three shafts.
- Two stars.
- Metal chain.
- Six bearings.
- Metal 0.5-inch pipe for the manufacture of gates - 2 meters.
- Sleeve with internal thread.
- Clamp screw.
Particular attention is paid to the dimensions of sprockets, shafts and bearings, which must match each other. Asterisks can be taken from old bicycles, but they must be exactly the same size
Steel plates and profiles for the manufacture of a pipe bender should not be with deep rust, because they will have high loads during operation
Before choosing and purchasing all materials, you need to draw a drawing with a schematic representation of all structural elements so as not to buy them in the process of manufacturing a pipe bender.
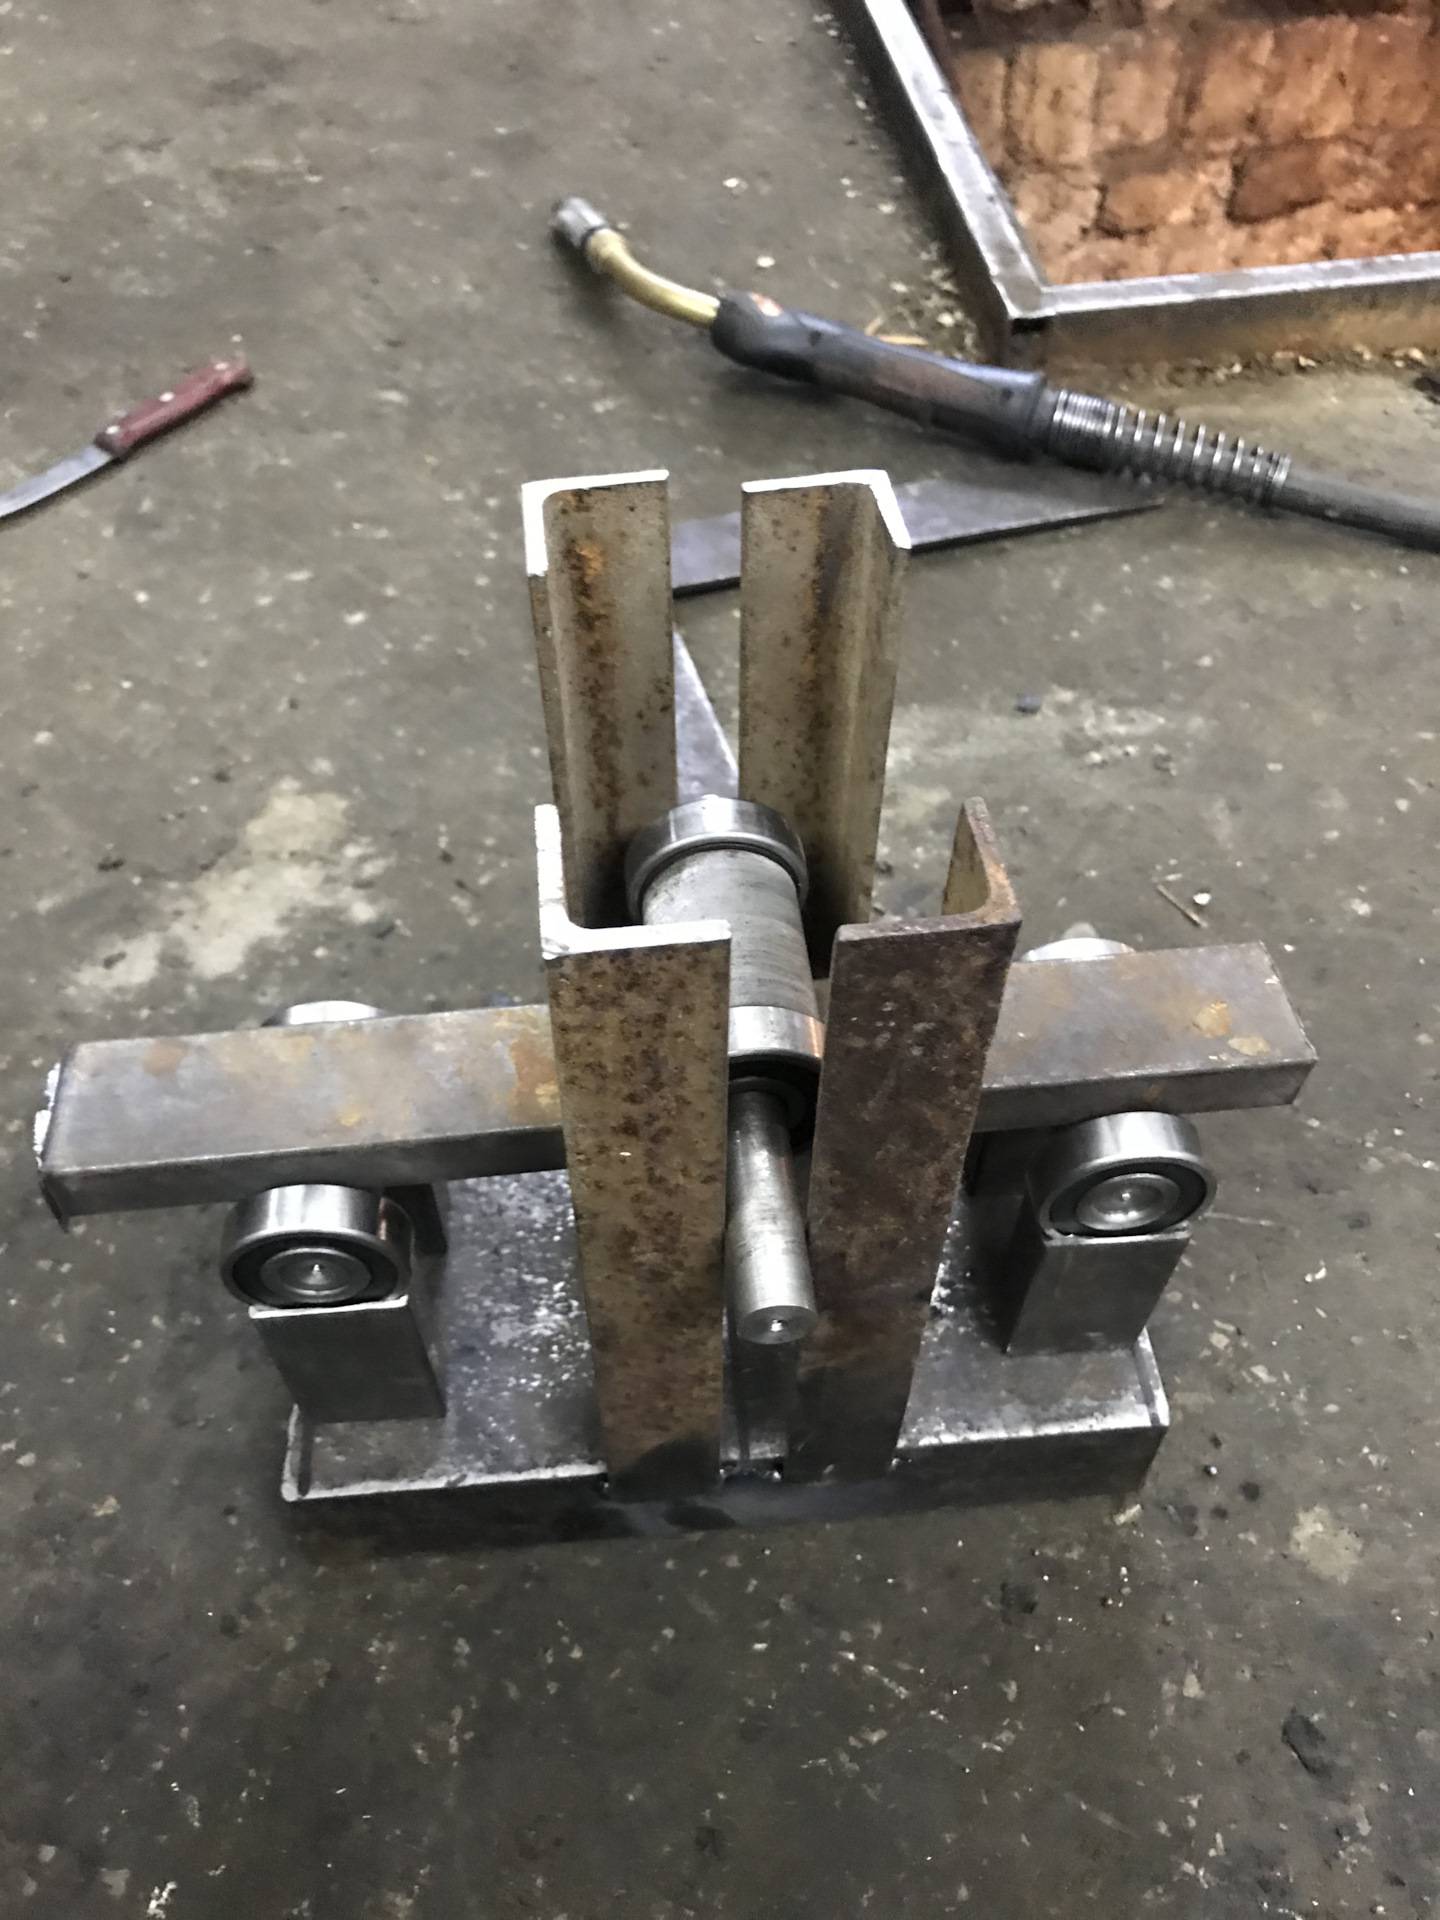
The assembly process of the snail pipe bender
The assembly of any equipment begins with the drawing up of a drawing diagram.
After that, you can proceed to the main workflows, which are shown in the photo instructions:
- Weld the base of the tool from two parallel channels. If desired, you can use just a metal plate 5 mm thick or one wide channel.
- Put bearings on the shafts and weld two such structures to the base. It is desirable to limit the shafts with metal strips or place them in the inner cavity of the channels.
- Put on the sprockets and weld them, after stretching the chain between them.
- Cut and weld to the base the side guides of the clamping mechanism.
- Put the bearings on the pressure shaft and assemble the press structure with side stops from strips or channels.
- Make a base for the bushing and weld it to the plate.Screw in the clamping screw.
- Weld to the upper edge of the clamping screw and to the driving shaft of the pipe gate.
- Lubricate the bearings with engine oil.
Some useful tips:
After assembling the pipe bender and testing it, you can paint the structure with anti-corrosion paint to better preserve the welds. To increase the convenience of work, a spring is additionally attached to the guides to return the press to the upper position.
Technology features
 The nuances of the process using a pipe bender are as follows:
- At small bending radii (r < 3h), wrinkling is likely under any deformation schemes. A helical extension spring can help out, the outer size of which is slightly larger than the inner height of the pipe. The spring is passed into the pipe until it begins to deform, and then everything follows in the above sequence.
- For low-plastic materials, the following technique helps. Fine-crystalline dry sand is poured inside the pipe, and both end holes are tightly plugged with wooden plugs. When bending with a pipe bender, back pressure is created, which balances the tensile stresses, compensating them with the corresponding compressive ones. The probability of cracks in the outer fibers of the metal is reduced.
- Manual bending is appropriate for profile metal materials, the largest transverse dimension of which does not exceed 50 ... 60 mm (for non-ferrous metals and alloys, it can be larger).
- The thicker the wall of the pipe, the slower the process of deformation by the pipe bender should be (be aware of the effect of plastic inertia of the material, which increases with an increase in the mass of a unit section).
- It is not necessary to design a spatial pipe with different bend radii: this will not give much benefit, and the design of the pipe bender will become more complicated.
In some cases, the only way in which a profiled tubular part can be produced is by cutting off a straight section and then joining it (for example, in the manufacture of volumetric ventilation ducts). A good weld will be almost invisible, and at the same time reduce the final cost of the assembly unit.


By the way, do-it-yourself plastic bending of stainless pipes is impossible and drive machines should be used.
What materials and design nuances are needed
The base of the pipe bender is made from a channel or two welded corners. The thickness of the shelves is not less than 3 mm, the width of the shelves and the back of the channel, select the available parts. One rule - the base must be massive and reliable.
Several holes can be made along the edges of the platform. Through them, you can fix the machine to some kind of heavy base using large-diameter self-tapping screws. Fixation is necessary, since when bending pipes with a thick wall, significant efforts have to be made and it is more convenient to work if the machine is firmly fixed.
This is how the bed looks like in welded racks for attaching a movable roller
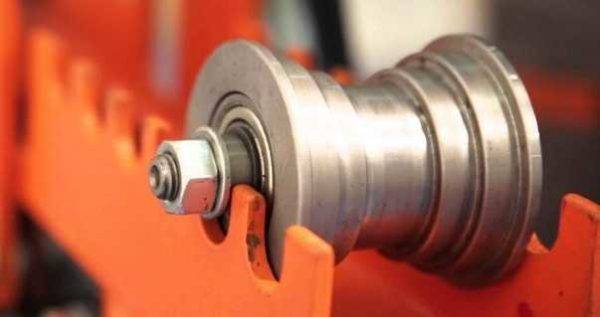
A few words about rollers. They should be made of good quality, preferably hardened steel. It is on the rollers and on the axles that hold them that most of the load falls.
It is necessary to say about the form of rollers. They should not be smooth - there should be rollers along the edges that will not allow the pipe to “walk” during rolling. Only under such conditions will the arc from the profile pipe be even, and not twisted.Ideally, each pipe size needs its own rollers. But then the design becomes more complicated - they need to be made removable, to think over a reliable method of fastening. The second option is to make videos of complex shape, such as in the photo. Carve several steps for different sizes of pipes.
Rollers for bending profile pipes of different widths
The same photo shows that the upper part of the bed is uneven, but notched. With the help of such teeth, it is possible to rearrange the rollers at different distances and thus also adjust the bending radius.
In general, they assemble home-made bending machines for shaped pipes from what is at hand or what they find / buy inexpensive. Who has the opportunity - grinds rollers, inserts bearings. Those who do not have such an opportunity use what they have - up to the bushings from bicycle wheels. In general, it is necessary to understand the design and


