- Work in difficult conditions
- How to install?
- Shower drain in the floor under the tile: definition and purpose
- Advantages of showers with a built-in drain
- Benefits of a shower with a built-in drain
- Design features
- Main malfunctions and their elimination
- Ladder installation
- Installation of a drain under a tile for a shower cabin
- Necessary materials and tools for work
- Kinds
- What is a "trap" and what is it for?
- Additional Helpful Tips and Findings
- Siphon and outlet pipe device
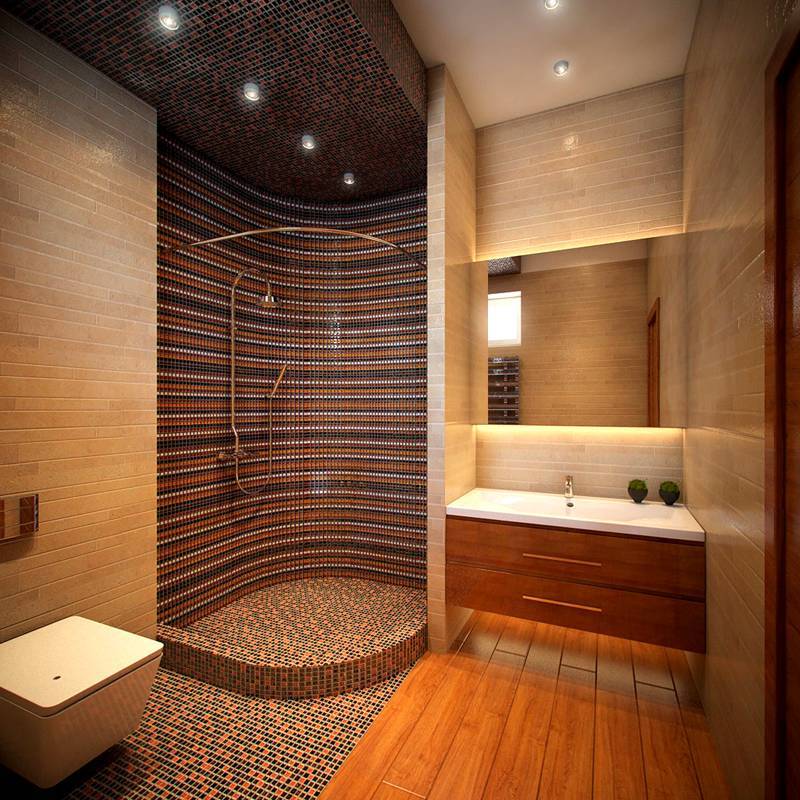
Work in difficult conditions
As you now understand, such a structure cannot be installed on a wooden floor. The floor itself will have to be completely disassembled and a completely waterproofed coating installed. But if the issue of room design is critical, then in this case you just need to choose tiles in brown tones in order to bring the colors as close as possible to the tree.
Another problem is small apartments. It is their users who often want to install a shower with a ladder instead of a bath. But in such premises, the sewage level is often set too high, which excludes a full raising of the floor level. In this case, resort to the creation of a podium. All structures will be hidden under it, and it will take up little space in the bathroom.
Visual video demonstration of the installation of the drain in the corner of the shower
How to install?
Before starting work, it is necessary to prepare all the necessary tools and materials. The amount of consumables depends on the size of the bathroom.
For work you will need:
- tape measure, laser or regular ruler, corner;
- construction knife;
- marker;
- a set of keys and screwdrivers;
- wire cutters;
- bucket and shovel for screed solution;
- hand tools for leveling the base: trowels, spatulas and graters;
- tile cutter;
- ladder in a complete set;
- metal-plastic pipes;
- dry sand-cement mixture for screed (5 kg per 1 m2);
- expanded clay and foam concrete - for the first layer of the screed;
- polystyrene sheets 5 cm thick;
- waterproofing membrane (3 kg per 1 m2);
- mastic (3 kg n 1 m3);
- isoplast;
- tile adhesive (5 kg per 1 m2);
- grout for seams;
- sealant paste;
- ceramic tile.
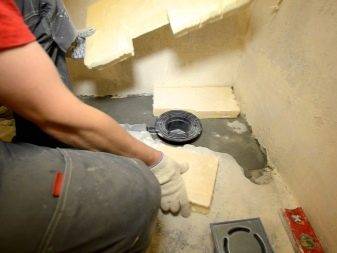

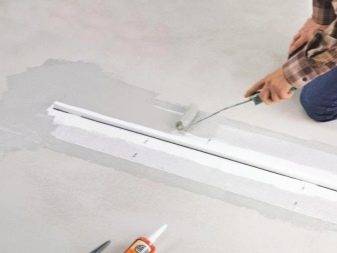
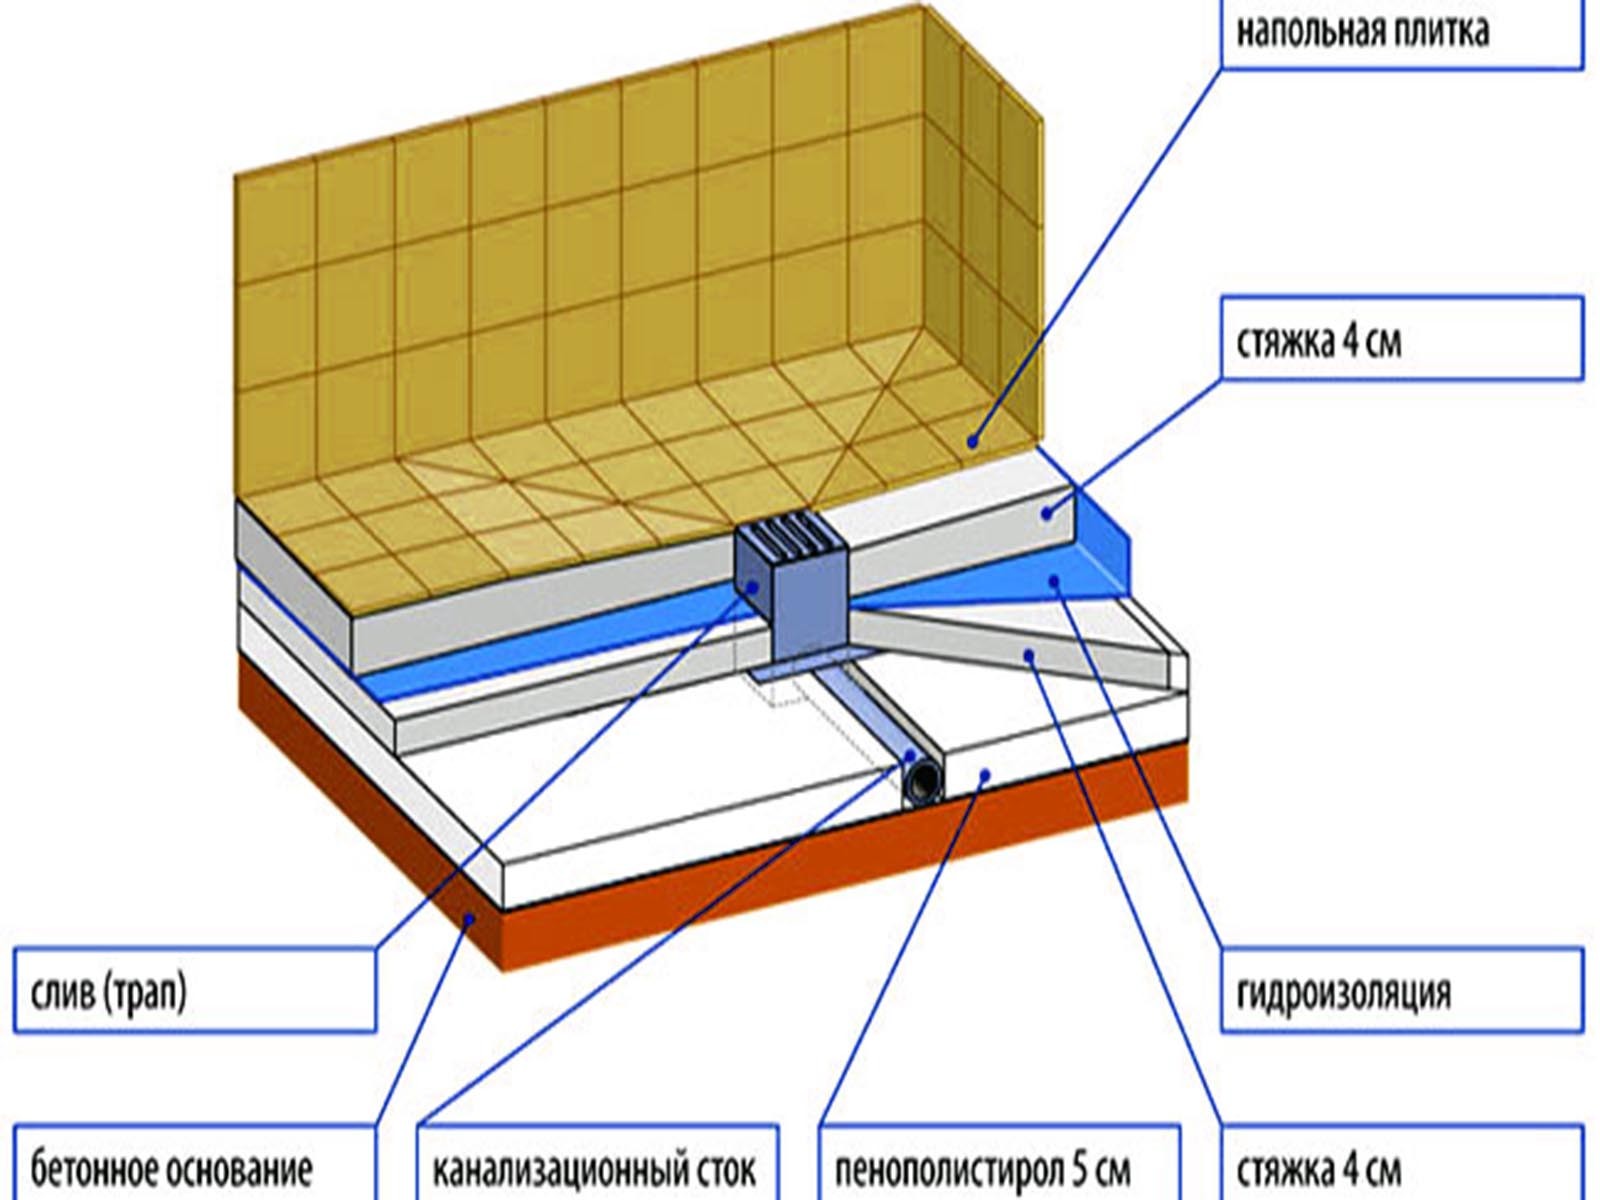
The situation is different if the drain needs to be installed in the bathroom of an apartment building. Installation work must be carried out in stages. First of all, pipes with a ladder are laid and work is carried out on the screed and waterproofing layer. All tasks must be completed simultaneously. The laying of the entire structure takes place in several levels and resembles more a multilayer cake, which is laid at a slope of at least 2%. Then comes the screed again, and then the floor tiles.
Detailed step by step instructions.
- The outlet pipe is joined to the sewer at an inclination of about 2 cm. The connection contour is covered with a sealant paste.
- The main requirement for such showers is that the flooring should have a slight slope to quickly drain the water. In this case, you do not need to additionally install bumpers and borders around the edges. Therefore, the next important step is to calculate the height of the screed.To do this, a ladder is tried on 1.5 cm above the outlet pipe and markings are made along the wall using a laser ruler. For unhindered water flow, it is necessary to make a slope of about 1 cm per linear meter. On the wall, mark the height of the future floor with a marker.
- In a new house under construction, all work can be done without any difficulties. In an old house, it will be necessary to remove the flooring in the bathroom and replace the pipes, and then do all the work step by step. As for apartment buildings, in most cases it is necessary to raise the floor level by 12-15 cm at an angle.
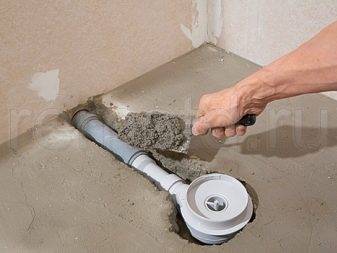
- Next, you need to completely clean the surface and repair the existing cracks or irregularities. Subtract 8 cm from the floor level mark indicated on the wall (5 cm for a sheet of expanded polystyrene and 3 cm for a screed). According to the new label, we begin work on the rough screed. To ensure a smooth slope, it is necessary to use special metal slats. But before that, it is necessary to lay a damper tape along the walls, it will create the effect of a floating screed and will not allow the floor to deform further. For the first screed, we use foam concrete and expanded clay, they are necessary in order to reduce the weight of the future floor. After this stage, it is necessary to dry the draft layer of the screed. As a rule, for a layer of 3 cm, about 14 days are needed.
- After two weeks, you can proceed to the waterproofing layer. To do this, a sealing water pipe is applied with a wide brush.
- Then a heat-insulating layer of expanded polystyrene is laid. The floor is covered from separate parts of the material.
- After that, you can proceed to the second layer of the screed. A few days after complete drying, it is necessary to lay a waterproofing layer.To do this, you can use isoplast, separate sheets of material are laid on the floor and heated from the back with a blowtorch. Irregularities and corners must be treated with sealing mastic.
- Further, the body of the ladder is fully assembled, but instead of a decorative lattice, a small piece of waterproofing material is placed on top. This is necessary so that the cement mortar does not clog the internal structure. After that, the third layer of the screed is poured, its thickness should be lower than the height of the ladder by the thickness of the tile and the adhesive layer. Before laying the tiles, it is necessary to completely dry the entire cake. Experts recommend waiting 40 days.
- After a few weeks, tiles are laid according to the selected pattern. Installation starts from the ladder towards the wall. After a couple of days, it is necessary to process the seams with a moisture-resistant grout. Next, you can close the ladder with a decorative grille. The joint between the drain and the tile is filled with silicone sealant.
- After all the stages of work, you can proceed to the installation of a fence for the shower cabin or leave the space open. In this case, you can choose transparent partitions or curtains.
Shower drain in the floor under the tile: definition and purpose
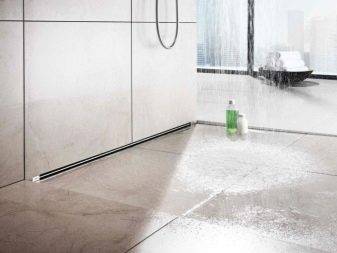
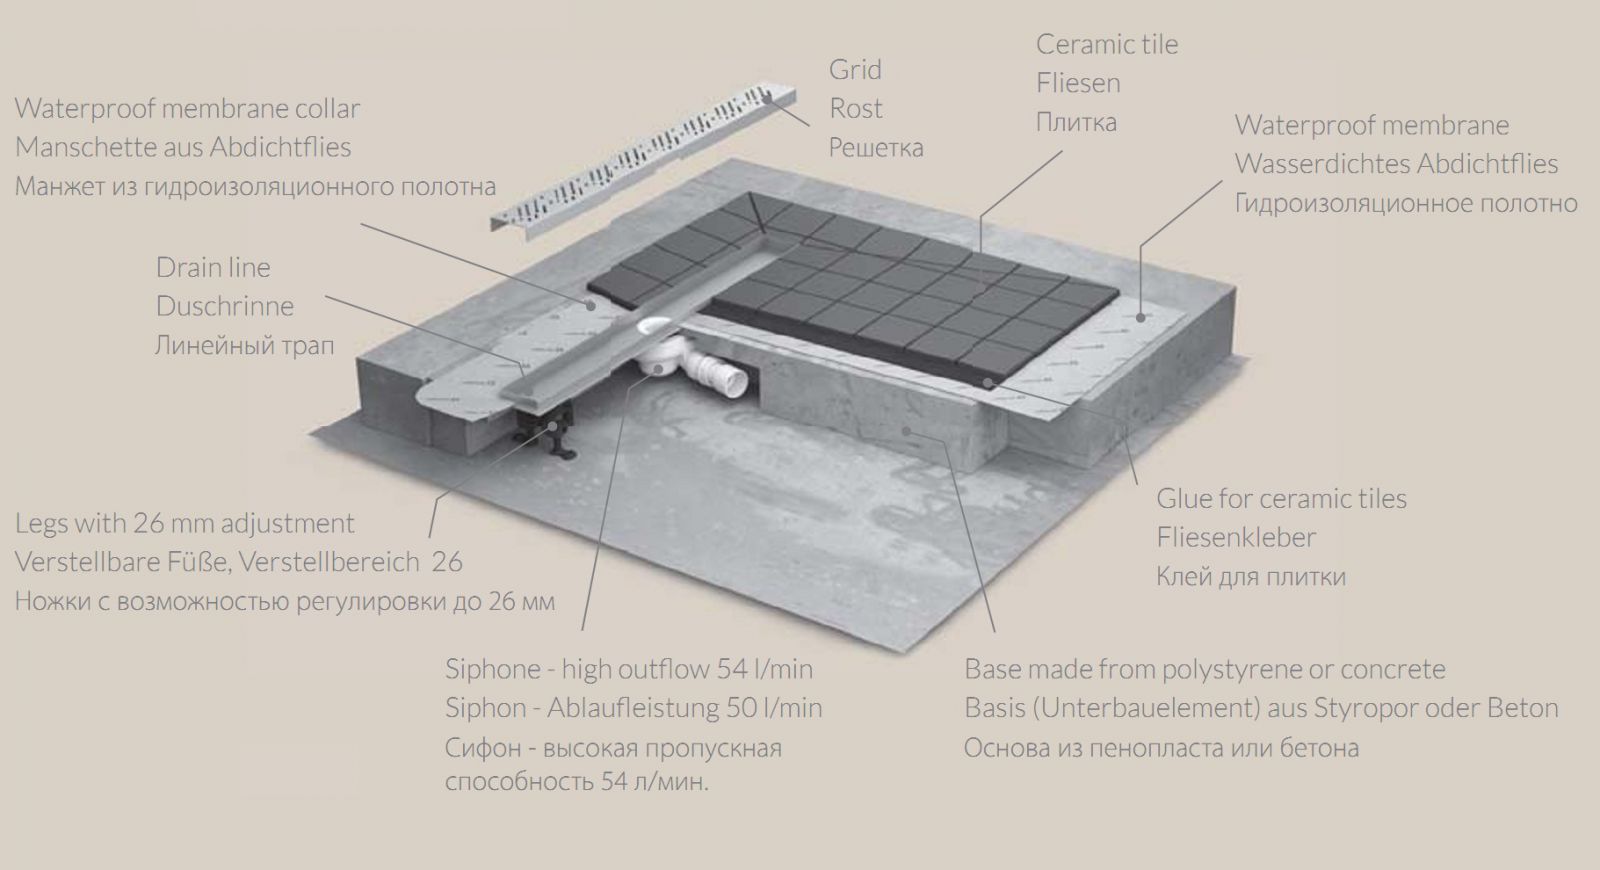
The drain is a plastic, metal-plastic or metal plumbing device that is designed to collect and divert wastewater from the shower room to the main drain riser. It has a simple, user-friendly design that mounts under a waterproof floor. All components of the product are made of anti-corrosion material.

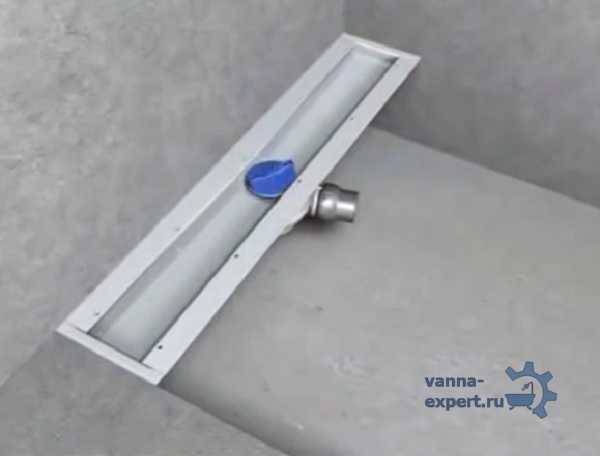
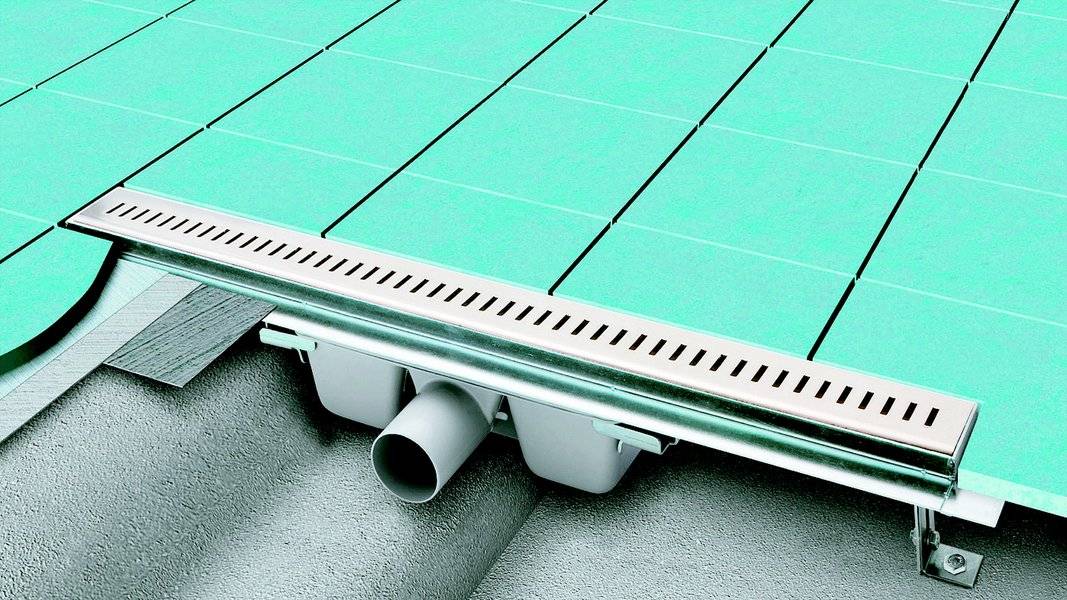
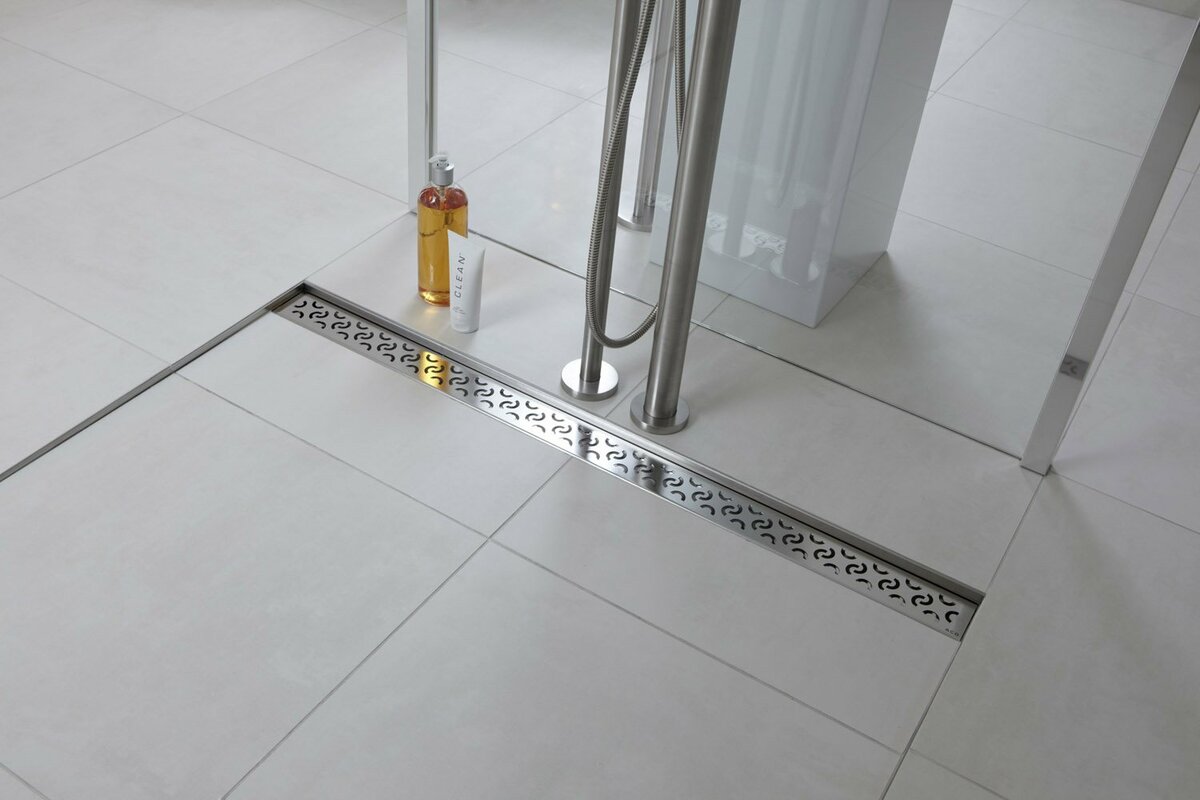
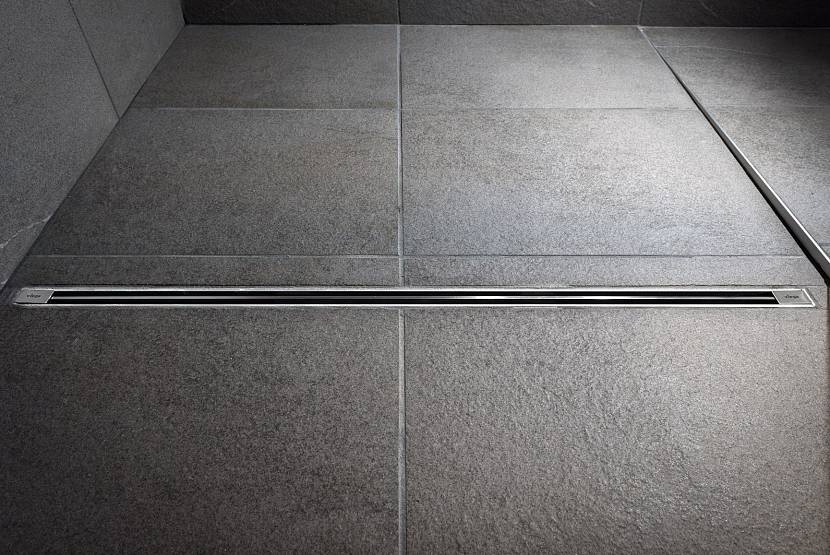
Stainless steel linear drain
In addition to the main purpose, the ladder also has several additional functions:
- performs filtration of waste water from large contaminants;
- provides complete sealing with floor covering;
- protects against unpleasant odors coming from the general sewerage system.
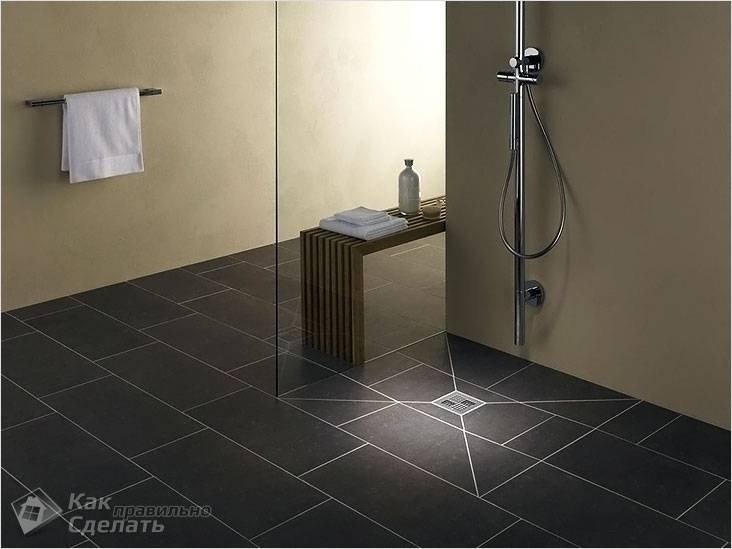
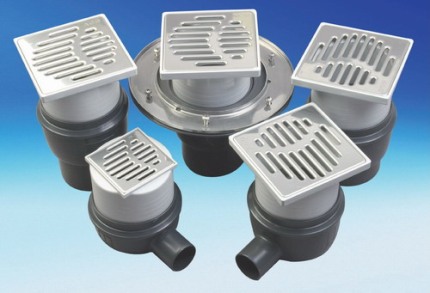
The appearance of the sanitary ladder can be oval, rectangular, square or round. By design, these are wall, linear or point devices. A wall and linear drain for the floor is installed along the edges or in the corners of the shower room, and a spot drain can be located anywhere in the room.
You can buy a shower drain starting from the simplest model and ending with a complex design with a cut-off and a cascade of wet and dry check valves. The ladder of the standard model is designed for a ton of weight and medium temperature up to 80°C.


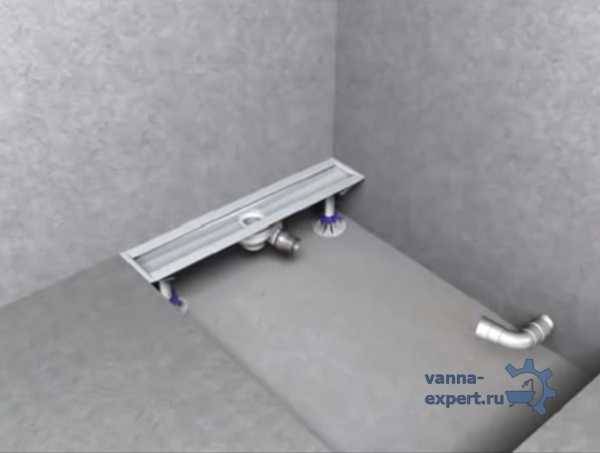
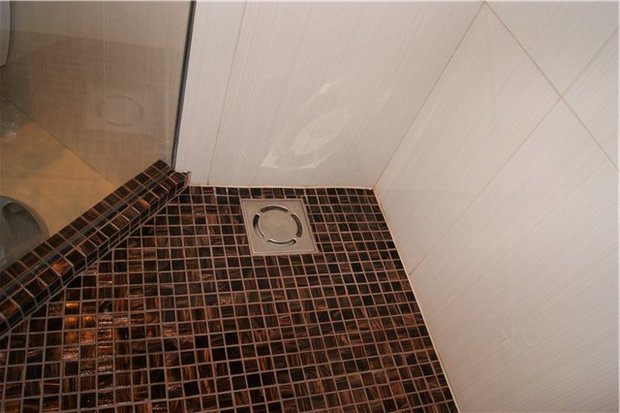
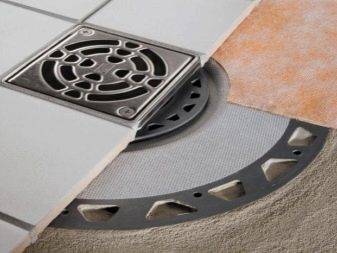
Corner drain in the floor of the shower cabin
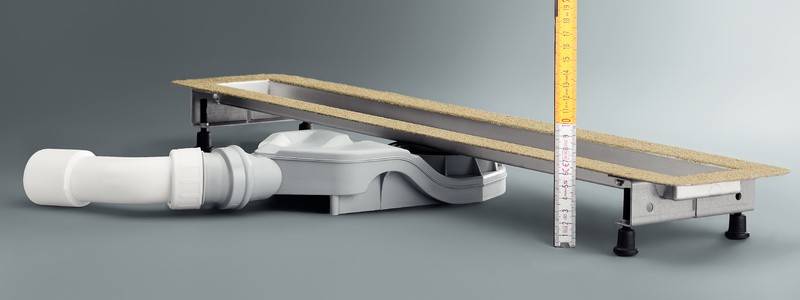
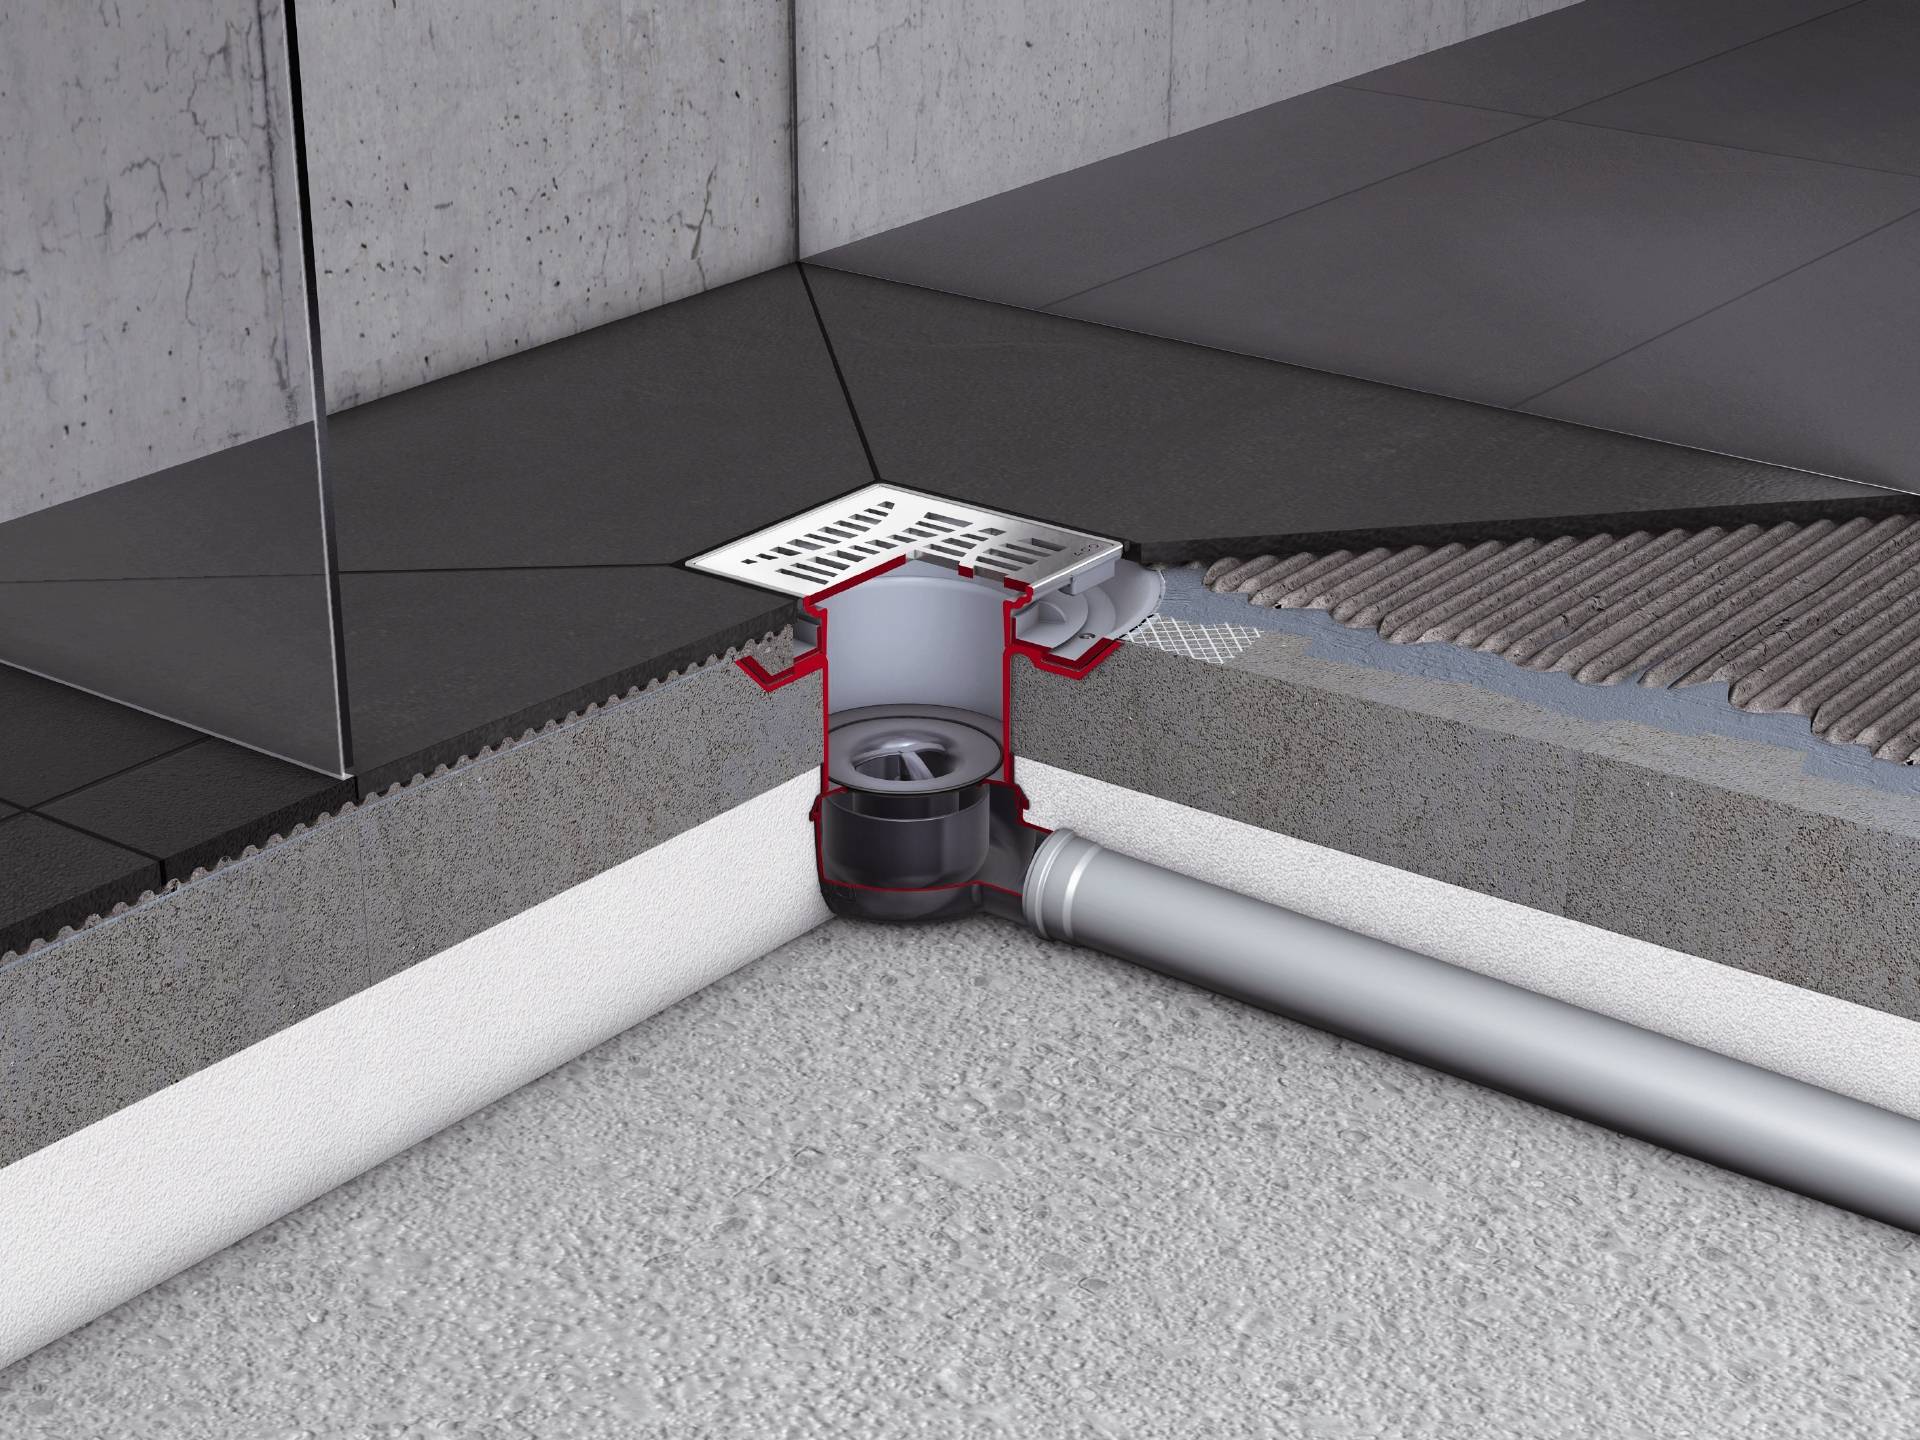
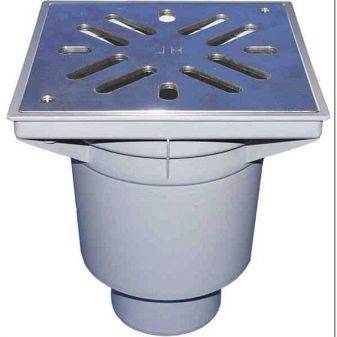
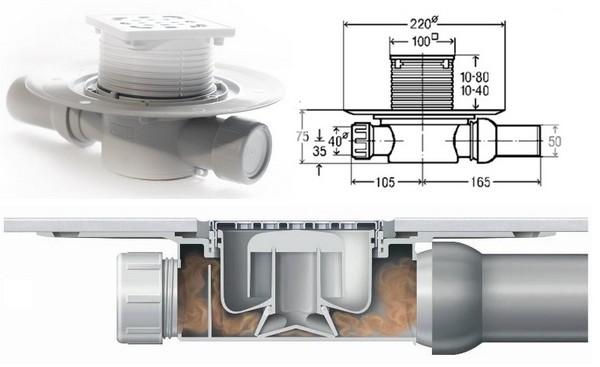
To facilitate the installation of the device, manufacturers began to produce structures with a variable height of the product. The optimal solution for a domestic shower is a plastic drain with a stainless steel grate, direct or side outlet, water trap and dry trap.
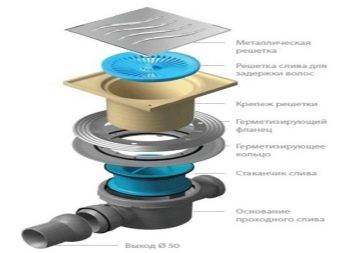
The upper part of the shower drain consists of a decorative stainless steel grate. This is followed by a drain filter grate, which traps large debris and protects the room from sewer odors. This grille is fixed with sealing flanges and rings. This is followed by the drain itself, consisting of a glass and a base with a branch, which is connected to the pipeline using a coupling. The outlet can be single and through, for several devices connected to one pipe.
Advantages of showers with a built-in drain
In the case of a mounted shower drain in the floor, the shower cabin can be of any size and located in any room, even with a non-standard layout. Thanks to the lightweight design of the drain, all installation work can be done independently.

L-shaped arrangement of two linear ladders
If you buy a drain for tiles for a shower cabin with a dry shutter, then the possibility of unpleasant odors from the sewerage system entering the shower room is immediately excluded. A simple mobile design allows you to clean the drain from contamination and change worn parts.
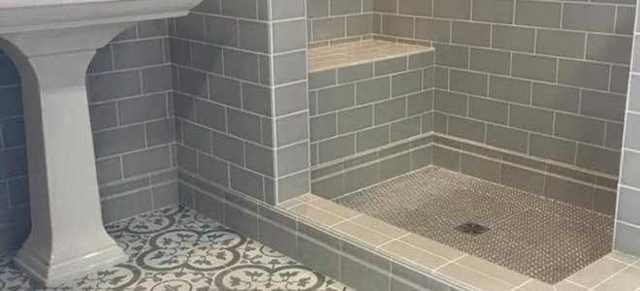
The low affordable cost of the product allows you to get a full-fledged shower cabin at no extra cost. It is enough to lay out the floor with non-slip ceramic tiles, arrange restrictive boards and plastic compartment doors and properly connect all communications.
Benefits of a shower with a built-in drain
The variety of trays and drains for drain water is explained by the fact that there was a need for showers - not purchased, representing a single prefabricated structure, but stationary, without a pallet and complex electronic "stuffing".
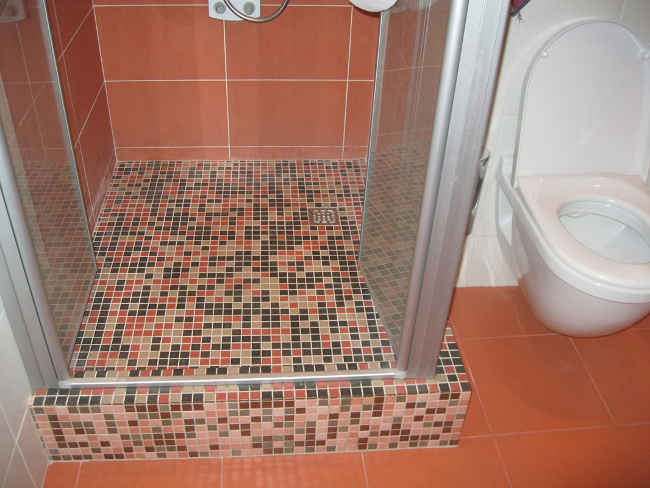
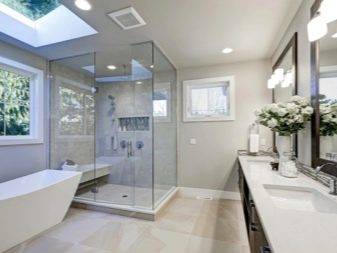
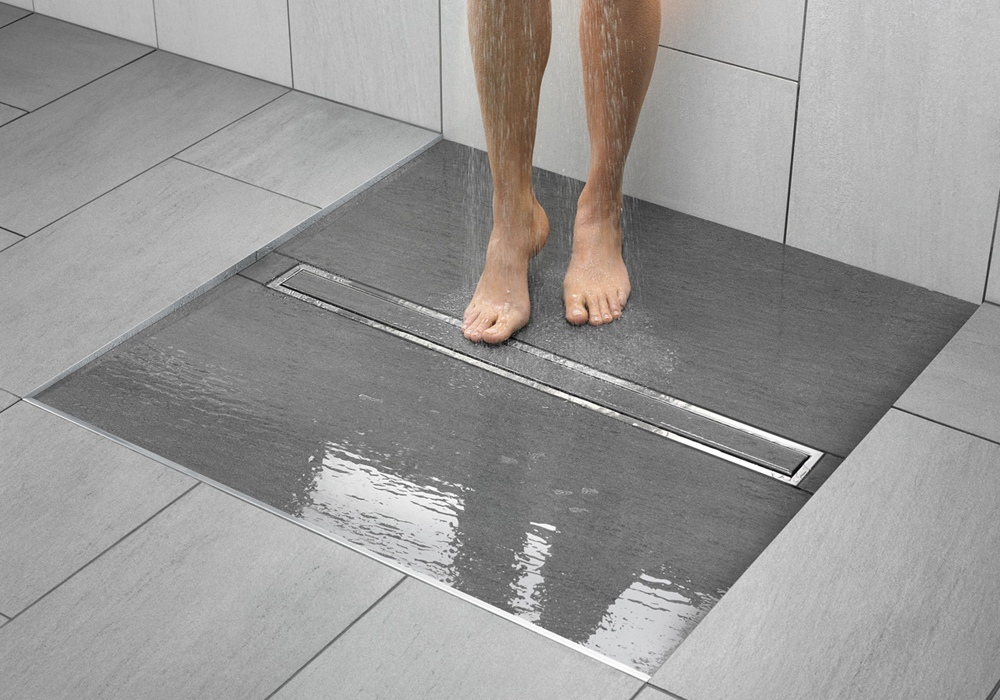
The device of the cabin is simple and convenient: a bar with a shower, smoothly opening plastic compartment doors, a non-slip floor covered with ceramic tiles. Such a place for taking water procedures can be organized independently by laying the floor and walls with tiles and connecting the communications correctly.
Even without the restrictive sides and curbs, water does not flow out of the cabin if the floor covering is properly equipped - with a slight slope, ensuring the outflow of water into the drain
Why do owners of spacious bathrooms and cramped bathrooms choose this option for a shower cabin? It has a lot of advantages:
- variety of sizes and configurations;
- possibility of placement in non-standard premises;
- creation of a unique design;
- ease of care and regular cleaning;
- comfortable use of the shower by the elderly.
One of the technical advantages is the presence of an emergency drain. During force majeure circumstances (water supply failures in your apartment or with neighbors from above), the water will leave through a ladder built into the ceramic floor tiles.
Design features
According to the place of installation, ladders can be divided into the following types:
- horizontal;
- vertical.
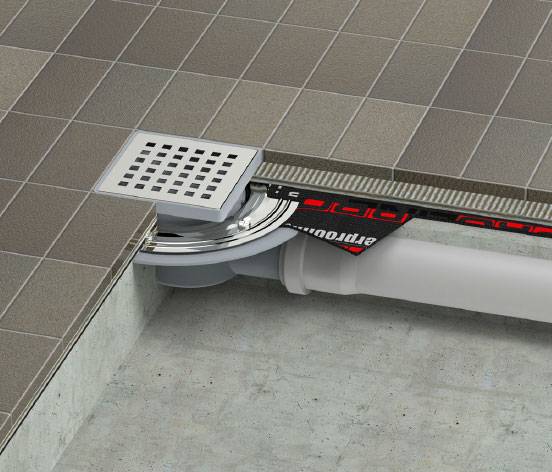
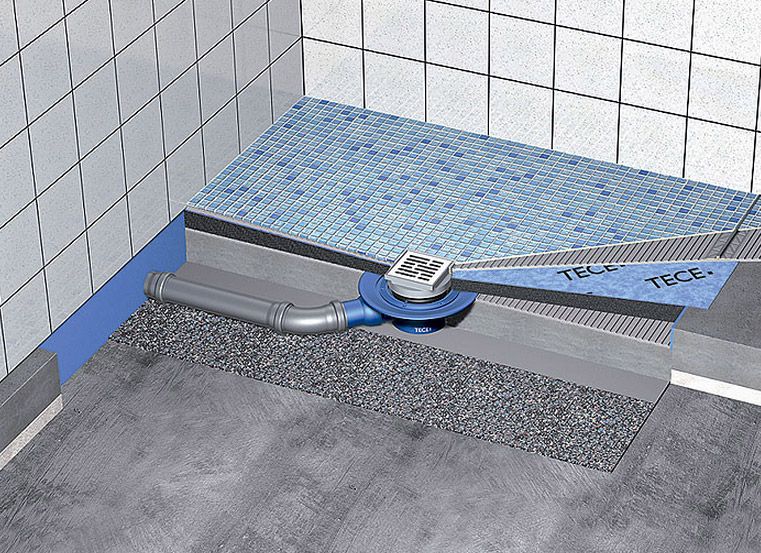
A horizontal drain is more often installed in an apartment that is located in a multi-storey building, since often the sewer connection runs on the side, at a slight angle of water discharge into the sewer pipe. Thus, the water will go to the side, directly into the sewer.
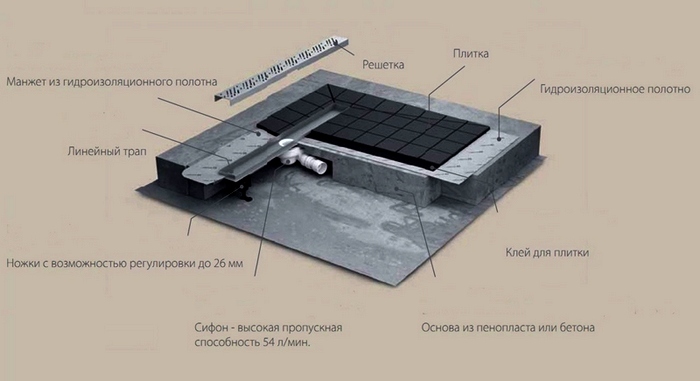
Shower drain kit
The shower drain kit is as follows:
- Siphon. It consists of a water seal and a dry/mechanical seal. This design serves to block unpleasant odors that may pass from the sewer. The dry shutter is a float design that reacts to the drying of the siphon and prevents the ingress of a fetid odor from the drainage pipe. When the water dries up, the float drops and the sash closes. A mechanical shutter is a non-freezing design that is used in an unheated room.
- Decorative lattice. It is installed on the body of the ladder and rests on its surface. The surface of the grate on the outside is at the same level with the sides of the ladder.
- Drainage ring.If a waterproofing rupture occurs, the ring will allow water to flow back into the drain through the hole in the ring.
- The pressure flange made of steel is used to ensure the tightness of the waterproofing connection with the body of the shower drain.
- Ladder body.
Main malfunctions and their elimination
Unpleasant smell - such a situation arises when the valve malfunctions, the undocking of the pipe entering the riser.
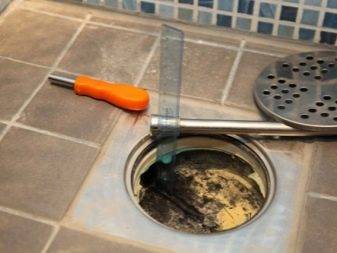
Stagnation of water - the reason for this may be a blockage in the hairnet or going from the device to the sewer. Eliminate this problem by cleaning the grate of hair and breaking through the blockage with a small flexible sewer cable.


Low drainage capacity - this problem can be caused by both blockage and the wrong choice of drainage device. In the first case, the pipe is cleaned with a cable, in the second, part of the pallet is dismantled, the ladder is removed and replaced with a one with a greater drainage capacity.
Ladder installation
The easiest way is to install a shower drain in the floor under the tiles when building a private cottage. In this case, you can consider different options at the design stage. For maximum performance, a vertical outlet to the drainage is used. Apply point and slot systems as needed.
It is more difficult to implement a project in an apartment building. To ensure uninterrupted functionality of the drain, it is necessary to create a slope of 25 to 35 mm per meter. For a standard size bathroom, this means raising the floor by 10-16 cm and reducing the height of the ceiling accordingly.
Below is the technology for installing a shower drain in the floor under the tiles:
Picture
Actions
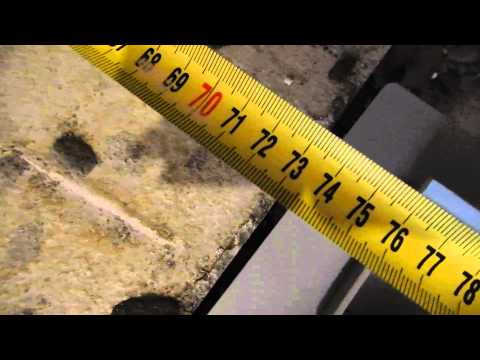
First you need to make a markup.The ladder is installed in the right place, at a height that ensures that the above conditions for good drainage are met. You should add the height of the glass. In this example, it is 12 mm
When choosing the mounting point, take into account the dimensions of the ceramic tiles. It is best if you get a multiple of their distance so as not to trim
We must remember about the seams between the hotel elements. To maintain the exact distance (for example, 2.5 mm) will help special mounting devices, plastic crosses.
To drain towards the drain from the farthest point of the shower floor, you need 14 mm. Mark the appropriate value. In the example, a value of 21.5 cm was obtained. This is the total thickness of the layers that will be successively installed above the floor slab between floors.
It is not advisable to make this gap monolithic. There is enough space for installing additional thermal insulation. If possible, water or electric heating can be installed here.
This example uses a simple solution. The lower layer is formed from expanded clay concrete (11-12.5 cm). It is durable and inexpensive. Before pouring, a damper tape is installed around the perimeter, and polyethylene foam (4 to 5 mm thick) is laid on the concrete base. Formwork is made from cutting boards, drywall, and other improvised means. In this case, the load on it will not be excessive.
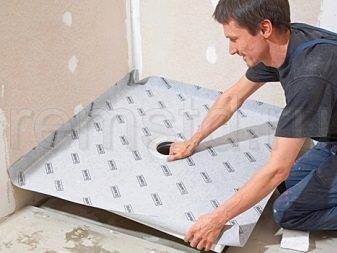
Formwork can be removed after 24 hours. At this stage, you can try on the body of the drain and the tile, check the accuracy of the choice of the installation point.
Next, polystyrene foam (4-5 cm) is laid. You should purchase quality products from a reliable manufacturer with a density of 35 kg per 1 cubic meter. and higher.Such plates have sufficient strength and low thermal conductivity. With proper installation, even without additional means, good tightness will be ensured. Expanded polystyrene is cut off effortlessly with an ordinary clerical knife. Therefore, the fitting of individual elements to the shape of a particular space will be done accurately.
In polystyrene foam make the necessary cutouts. After - install trapiki to drain the water, connect the drain to the sewerage system. The holes between the parts of the structure are filled with mounting foam.
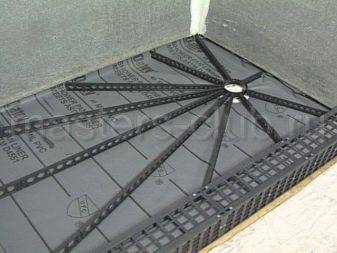
For the next step, a special device is needed. This is a set of rails and a ring element with plastic grooves. Each of the guides is created with a variable height. They are installed with a bevel towards the drain. The screed is poured at these levels. This will ensure an optimal height change (about 10-11 mm per 1 m of floor length). It will be enough to quickly move the liquid, but there will be no feeling of discomfort due to an uneven surface.
During filling, the final level is controlled. It should turn out below the ladder by the total thickness of the adhesive and ceramic tiles. Do not remove plastic parts from the solution. They will perform the functions of expansion joints that prevent the destruction of the structure when the temperature changes.
For laying use tiles that are resistant to high humidity. Its installation starts from the drain and further - to the walls. This technique will help to minimize errors and limitations of certain sizes. Cut tiles near the walls will be less visible than in the central area. Small tiles (mosaic) are better suited for such projects. With such products, it is easier to create the correct slope in the right directions.The cut parts at the joints look less noticeable. The gaps between ceramic tiles are rubbed with specialized mixtures of the desired color. The gap between the plastic drain body and the finish coat will be filled with a water-resistant sealant.
At the last stage, the temporary plastic cover of the drain with a dry shutter for the shower is removed, and the grate is installed. After - check the performance of the system.
Related article:
Installation of a drain under a tile for a shower cabin
In the case of installing a drain for a private house, a shower drain is arranged in a monolithic floor, and a vertical outlet of the sewer pipe is provided. For an apartment in a multi-storey building, the thickness of the floor screed is not enough for such a design. In this regard, it is necessary to additionally raise the floor level by 12-15 cm in the bathroom and at the same time arrange its slope.
Installation of the ladder consists of several stages:
- determination of the location of the gangway
Here it is important to take into account the size of the tiles in order to be able to lay a multiple of its number from the wall to the ladder. Then you don’t have to cut it, which will make the appearance of the shower room more aesthetic;
- connection of the ladder with the sewer drain through gray plumbing pipes with a diameter of 40-50 mm;
- the device of a heat-insulating layer with a thickness of about 5 cm. Extruded or granulated polystyrene foam is perfect as an insulating material. Under all plumbing elements, the necessary contours are cut;
-installation and fastening of the grate on the body of the ladder. The protective grille should be flush with the surface of the tile or be a couple of millimeters below it.
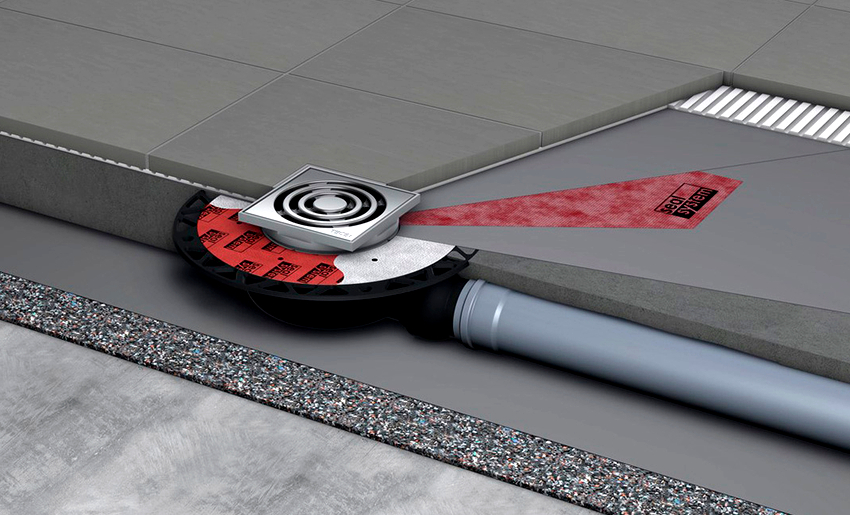
Useful advice! To protect the decorative grille from mortar, it is recommended to seal its surface with adhesive tape during the work.
After each new layer, the joints of the floor with the walls should be treated with waterproofing mastic or sealed with damper tape for insulation. This procedure will eliminate the possibility of water penetration into the lower layers, which can contribute to the formation of foci of mold and fungus.
Useful advice! For waterproofing, you can also use bitumen-rubber or bitumen-polymer coating mastic. It is applied after a primer layer 2-3 cm thick.
Necessary materials and tools for work
At any stage of installation, you should have marking material with you - a marker, tape measure, level, construction knife. To install a concrete screed, you will need a container for preparing a working solution, a hand tool for applying mastic and leveling the layer (level, grater, trowel).


To lay ceramic floor tiles, you will need a bucket and a drill with the necessary nozzle for preparing an adhesive solution, spatulas of various sizes, a tile cutter, and a level.
The amount of consumables depends on the total floor area. To install the floor under the ladder you will need:
- dry sand-cement mixture for concrete screed with the calculation of 5 kg per 1 m²;
- extruded or granulated sheet polystyrene foam 5 cm thick for thermal insulation;
- waterproofing membrane, ten-centimeter tape, mastic at the rate of 3 kg per 1 m²;
- a set of metal-plastic pipes, a drain ladder with couplings and fasteners;
-ceramic tile;
- glue for tiles at the rate of 5 kg per 1 m²;
- sealant, grout.
Kinds
Plumbing devices differ in type of construction, appearance, shape and size. And in all this diversity it is easy to get confused. First, let's define the main classifications.
Ladders differ in design.
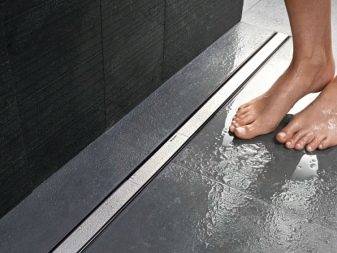
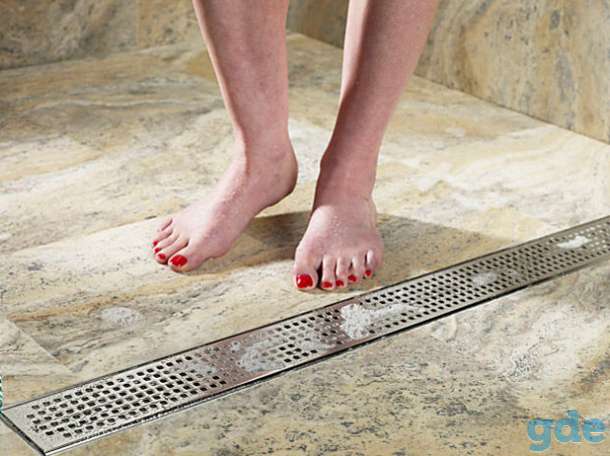
Linear - more like a rectangular tray, installed on the sides, in the corner along the wall or at the exit. This type of construction is also called slotted. The installation process is simplified by the fact that in this case it is necessary to equip the slope in only one direction. In addition, in one minute the linear ladder passes about 60 liters of water.
Point - has the most compact dimensions and can be located anywhere
They are often placed in the central part, but it is very important that there is a uniform slope of the floor on all sides. Despite its miniature size, the point ladder is able to pass water in the amount of 20-25 liters per minute.
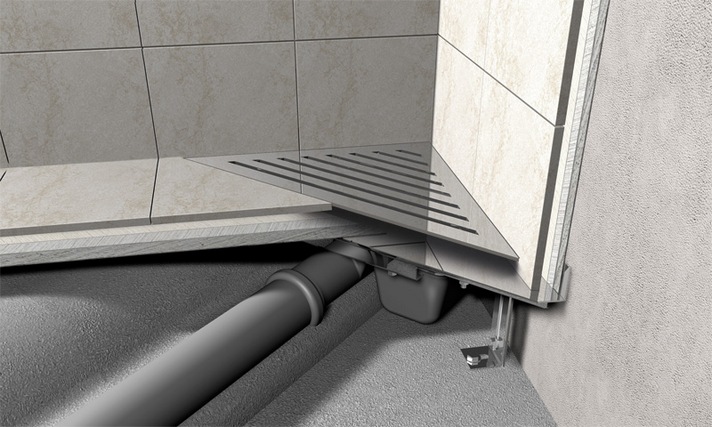
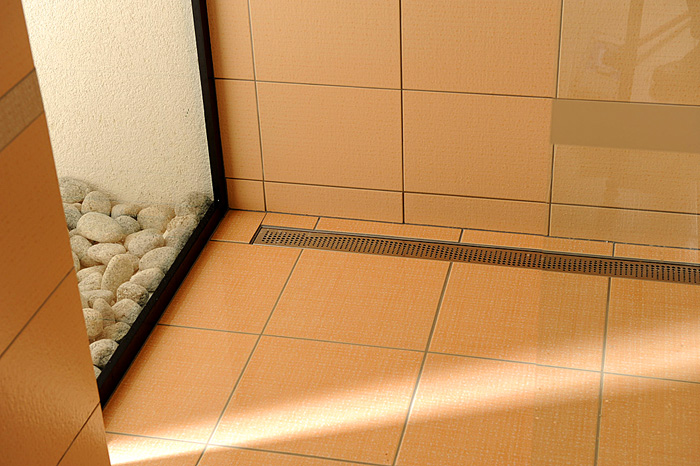
Corner (wall) - located near the wall and is considered the most inconspicuous
A decorative grill hides the joint between the wall and the floor. The cost of such models is slightly higher than conventional point ones, but in one minute the wall ladder passes up to 40 liters of water. In addition, installing such a model is much more difficult and is possible only at the stage of building a bathroom or during a major overhaul.
In most cases, sewer pipes are located too high in apartment buildings and in such a situation it is necessary to raise the floor level by at least 20 cm, which is completely irrational. Therefore, the only option for installing a drain in this case would be to create a podium with waterproofing for the shower.
Regardless of the appearance, the internal design of the ladder is always the same:
- funnel body;
- removable decorative grille;
- filter grid for collecting debris and hair;
- funnel for receiving water;
- siphon - necessary to prevent the appearance of unpleasant odors;
- pipe for draining water from the sewer - has a horizontal or vertical position, the diameter of the hole should ideally match the size of the downpipe.
Inside the siphon there is a shutter, which is necessary so that unpleasant sewer odors do not penetrate into the bathroom.
Modern manufacturers offer models with two types of shutters.
- A water seal is the most affordable and practical option, in which water acts as a barrier to an unpleasant odor. But if the shower is not used for a long time, the universal shutter with a non-return valve will not cope, the drain will dry out, and unpleasant odors can leak out.
- Dry seal - unlike a drain with a water seal, the design is complicated by an additional valve that closes the hole in the absence of water. Therefore, in order to increase the reliability of a shower cabin, which is rarely used, experts recommend choosing a siphon with a dry shutter. Such dampers are opened by a stream of water, and then closed and do not allow sewer gases to pass through.

What is a "trap" and what is it for?
The drain water drain refers to plumbing devices disguised as flooring. In fact, this is a drain of a simple design mounted under a waterproof floor.


The main purpose of a simple-looking element of sewer communications is to drain effluents into the main drain shaft - a riser, but there are a number of equally significant functions:
- preventing blockages by filtering used water from large contaminants with the possibility of periodic cleaning;
- ensuring a tight connection with the floor covering;
- protection from unpleasant sewer odors.
The material from which all components of the drain device are made must be anti-corrosion, so the ladder is assembled from plastic or stainless metal parts, sometimes in a combined version.
According to the external shape, the ladder can be oval, round, rectangular or square. Structurally, these are linear, point and wall devices. A point ladder can be placed anywhere in the room. Linear and wall drains are used along its edges and mainly in the corners of the room.
The shape and dimensions of the ladders are represented by a whole line from various manufacturers. From the simplest reliable models to complex designs with shut-off and a cascade of dry and wet check valves. For convenience, some standards have been developed for the height of the product, which is selected depending on the thickness of the floor screed.

The height of the product is of great importance - it is usually equal to the level of the floor rise
The product must be durable, wear-resistant, not violating the tightness of the floor covering.
Today, manufacturers produce ladders with a variable height of the structure, which greatly facilitates the installation of the product.
One of the best options for a home shower is a plastic drain with a stainless steel grate, dry seal and water seal, side or direct outlet.
Outwardly, the ladder resembles a funnel, equipped with a fixing flange on one side, and an outlet on the other.Outlets are single or pass-through (in case several devices are connected to one pipe in the shower stall).
Each outlet ends with a coupling for connection to the pipeline. Inside the housing there is a through-flow siphon with a filter grid, which is a water seal that protects against blockages and odors. Trays have a different structure.
When choosing a drain, pay attention to the dimensions of the outlets - they must correspond to the diameter of the inlets in the pipes. It is better to purchase everything in a kit, and for reliability, make a trial assembly.
Do not forget about couplings and fasteners, each part must be in good condition, without cracks and chips.
The prefabricated design of the drain allows, if necessary, to remove the upper parts and replace them with new ones, as well as to carry out cleaning during blockage without repair work
This is interesting: A shower room made of tiles without a pallet: we illuminate point by point
Additional Helpful Tips and Findings
Installation of this product is a rather complicated construction event. It is combined with a general overhaul of the bathroom. Thus, advance detailed planning is useful. 3D modeling will help you get the necessary aesthetic parameters without errors. For this, specialized computer programs are used.


In order not to waste your own time, you can use the help of specialized specialists. Experienced sellers of ceramic tiles offer services for the preparation of the optimal layout for free. They must be contacted with the exact parameters of the room and a list of special requirements.
To equip the shower with a "warm floor" system, you will need an appropriate project.When using water as a heat carrier, a separate circuit is created and connected through a switchgear to an individual heating boiler. Electric heating can be installed in an apartment building. But you have to take into account the increase in power consumption.
 Computer simulation simplifies the implementation of complex projects
Information on how to shower without tray in the apartment - this is only part of the necessary knowledge for a comprehensive refurbishment of the bathroom. You will find answers to additional questions on the thematic pages of this site.
 Watch this video on YouTube
Siphon and outlet pipe device
The purpose of the siphon is to prevent the penetration of unpleasant odors from the sewer pipes into the bathroom. This function is performed by a water seal located inside the siphon. But if you don't shower regularly, the drain will gradually dry up and smells will start to seep in.
In this case, the drain system must be equipped not only with a hydro-, but also with a “dry” shutter. Its reliability will increase many times over, since there are several dampers in the drain with a “dry” shutter, blocking the drain under their own weight. The dampers are opened by the flow of drain water, and then closed again.
In non-residential cold rooms, ladders must also be equipped with a mechanical shutter that does not freeze in the cold and has a special drainage ring. If the waterproofing breaks, the water returns to the drain through the holes in this ring.
The ladder must be "drowned" in the existing floor. If this is not possible, then the floor will have to be raised, i.e. build something like a podium
Shower drains also differ in the cross section of the sewer pipe to which they are connected.It has a vertical or horizontal outlet. The diameters of the branch pipe and the sewer pipeline must correspond to each other.
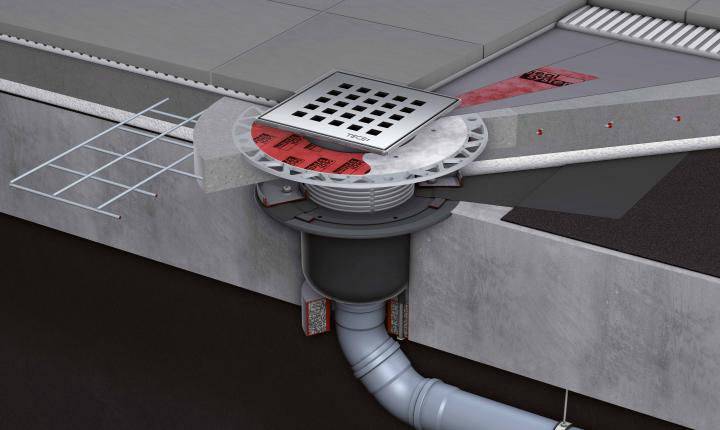
If the drain is vertical, then the cross section will be 110 mm. This option is suitable for country houses and cottages, in this case the sewerage system is connected from below.
The second option, where the connection with the sewer pipe is lateral (horizontal), is considered more universal, and for apartments in multi-storey buildings - the only possible one. For domestic purposes, in this case, a diameter of 40-50 mm is sufficient.


