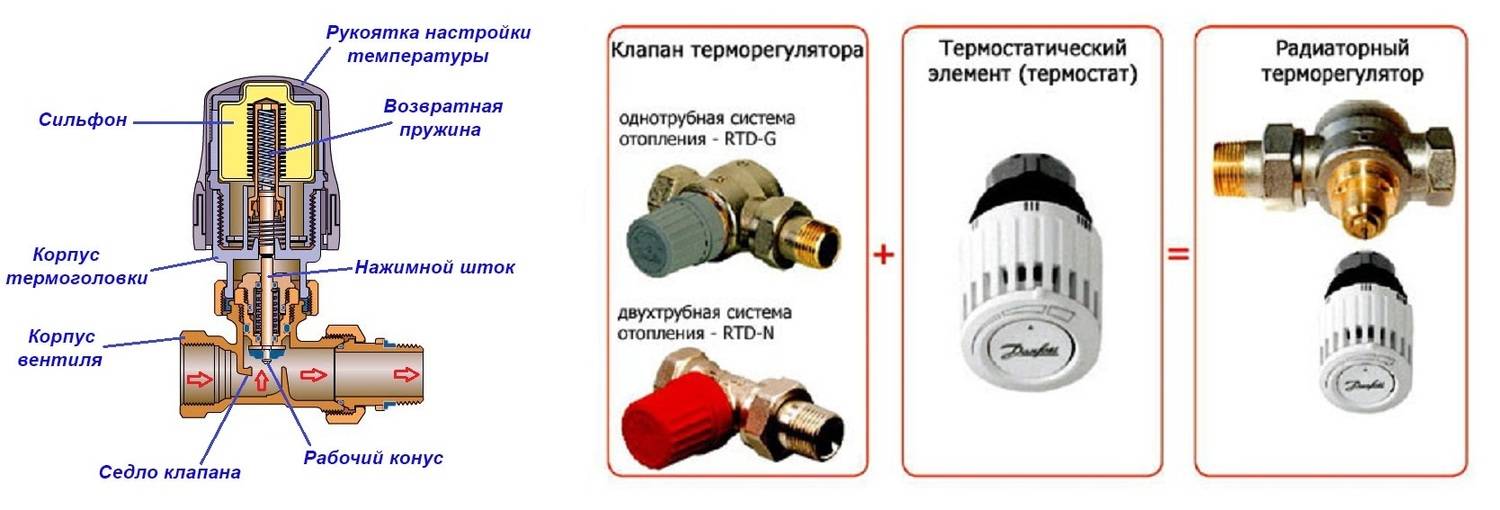
- Types of thermostatic radiator valves
- Connection Features
- Ways to connect radiators
- System types
- Principle of operation
- Design
- Kinds
- Mechanical
- Electronic
- Factors for choosing a mixing fixture for underfloor heating
- Installation and adjustment
- How to do?
- How to setup?
- Adjustment
- Types of heads by design
- Thermostat device
- Installation and operation of the thermostat
- Classification of thermostats
- The device and principle of operation of the thermostat
- Installing and configuring a thermal valve
- Overview of popular models
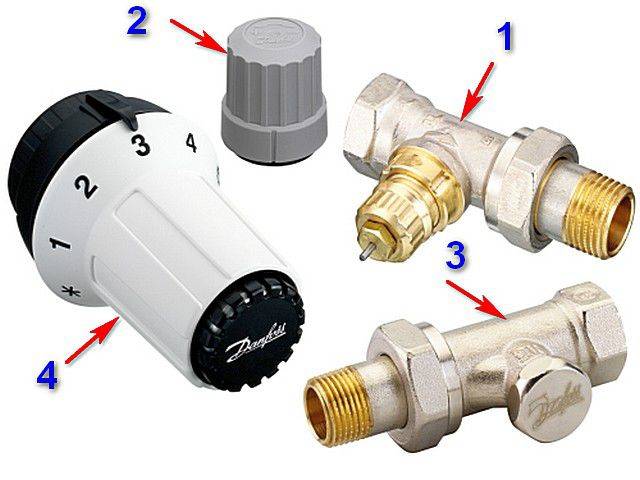
Types of thermostatic radiator valves
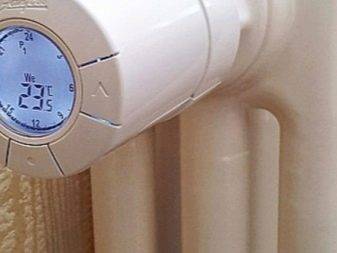
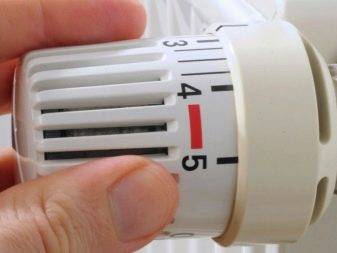
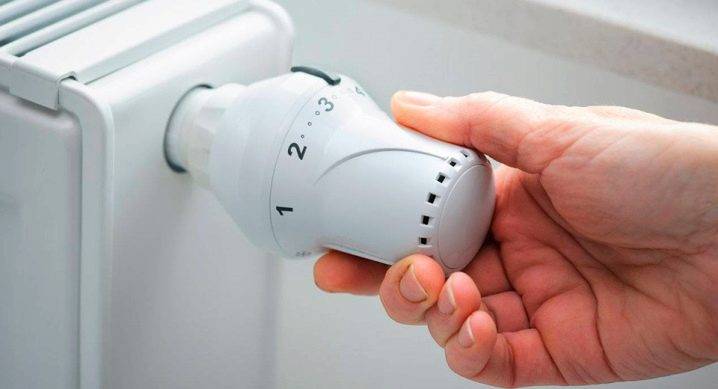
Thermostatic valves operate in manual or automatic mode. In the first case, the user changes the temperature level of the radiator by turning the adjusting head. In the second, the heating value is set using the marks on the device. Further adjustment takes place automatically.
Types of thermostatic valves for radiators:
- For single pipe systems. They have a large throughput, up to 5.1 m3/hour. Installation in open heating circuits is allowed.
- For two pipe systems. The most common type of valves is chosen according to technical parameters, comparing them with the characteristics of heat supply.
- Three-way.Mounted together with a bypass, they perform the functions of distributing the heat flow in the system.
- With the possibility of hydraulic adjustment.
- With connection of an external thermometer.
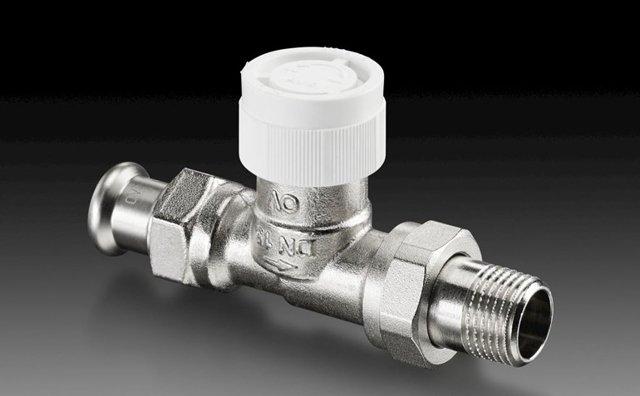
Valves differ in the method of installation - angular, axial. The choice affects the method of connection to the radiator, where the inlet and outlet pipes are located. It is possible to install an additional shut-off valve, one or two-pipe bypass. This will optimize the work of heat supply, increase safety.
Connection Features
Ways to connect radiators
When installing heating systems in private homes, the following connection methods are used:
In this case, the supply pipe is connected from above, and the return pipe is connected from below to the same section. This heating battery connection scheme allows the radiator to heat up evenly. However, if the accordion has a large number of sections, then significant heat losses will occur, so it is better to use other connection options.
Saddle and bottom
This method is an excellent option for cases where pipes run through the floor. The connection is made to the nozzles located at the bottom of the structure, in opposite sections. The disadvantage of this method is only low efficiency, since heat losses can reach 15 percent.
It is used when connecting devices with a large number of sections. As you might guess, the inlet pipe in this case is connected from above, and the outlet pipe is connected from below, in the opposite section. This scheme for connecting heating batteries in a private house contributes to the uniform distribution of the coolant and maximum heat transfer from appliances.
Note! When using a thermostat for heating in parallel with a radiator, a bypass must be provided. This will allow you to adjust the degree of heating of the device.
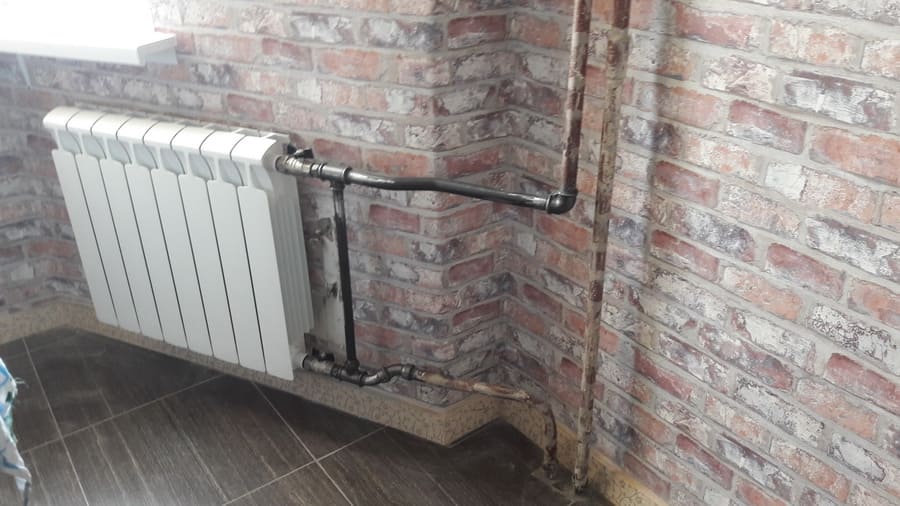
Radiator connection diagram
As we can see, the methods of connecting heating batteries depend on a number of factors, such as the method of laying pipes, the power of the equipment, etc. In particular, the type of system is of great importance. We will talk in more detail about the types of heating systems below.
Scheme of a one-pipe system
System types
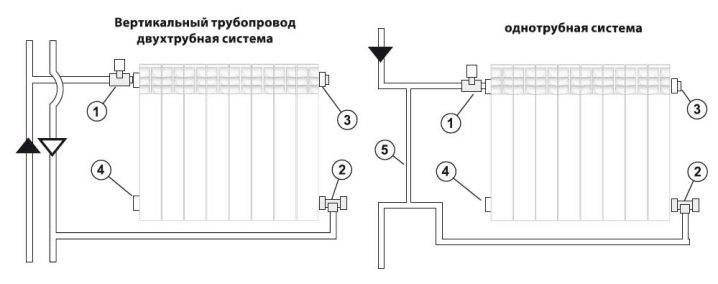
When installing heating systems, two schemes are used:
- Single-pipe - is the simplest, since the coolant circulates through one pipe, to which heating devices are connected in series. Its disadvantage is that it does not allow you to regulate the heat supply. Therefore, heat transfer corresponds to the design norm laid down in the design. This scheme is used in small systems, since with a large length of the pipeline and a large number of radiators, the devices will heat up unevenly.
- Two-pipe - its meaning lies in the fact that hot water flows through one pipe, and the cooled water returns to the boiler through another. The connection of heating batteries in a private house in this case is carried out, respectively, in parallel. The advantage of such a device is the uniform heating of the sections, as well as the ability to adjust heat transfer. Of the shortcomings, only the need for more pipes can be distinguished, respectively, the cost of the structure increases.
Scheme of a two-pipe system
It should be noted that, regardless of the type of system, connecting heating batteries with your own hands can be done in two ways:
- According to the vertical scheme - the heating device is connected to a vertical riser, from which wiring is carried out to the radiators.
- According to the horizontal scheme - the circulation of the coolant is carried out through horizontal pipelines.
The choice of the scheme for connecting heating batteries depends on the characteristics of the house. For example, if the housing contains several floors, then the connection is implemented according to the vertical scheme.
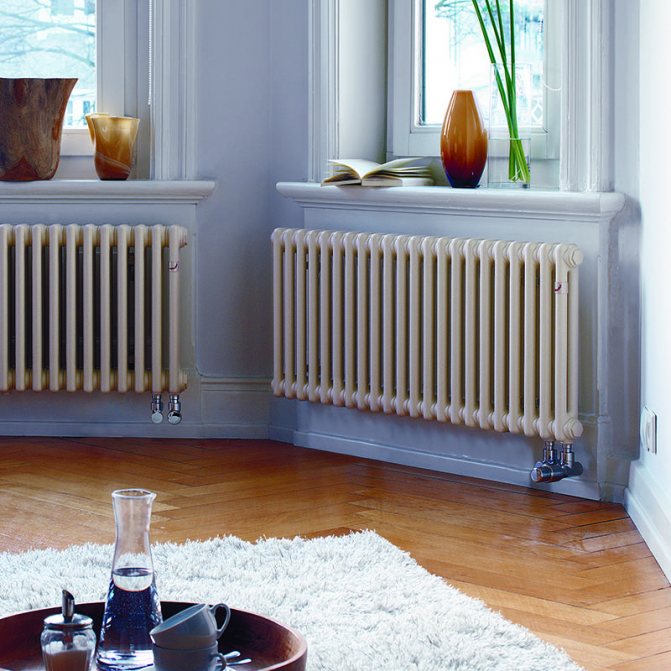
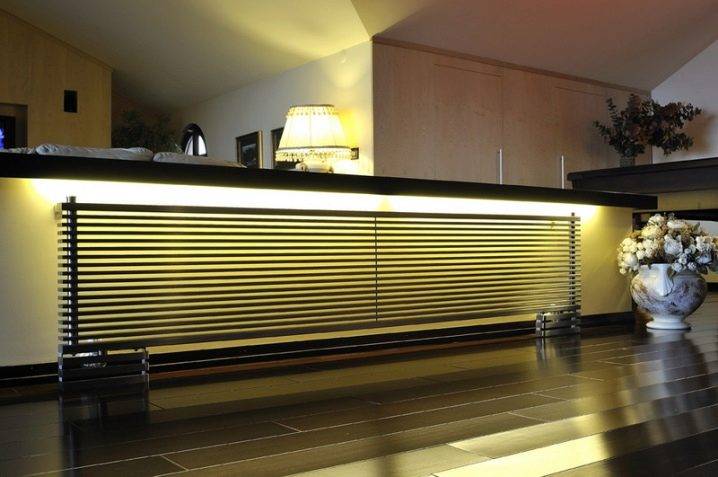
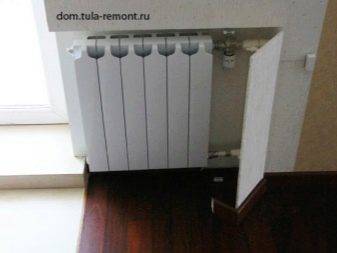
In the photo - a radiator located under the window
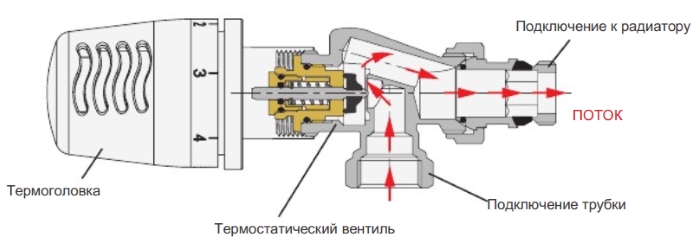
Principle of operation
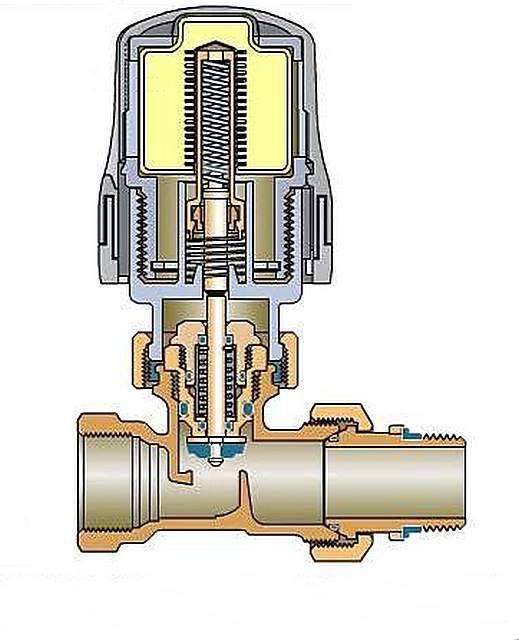
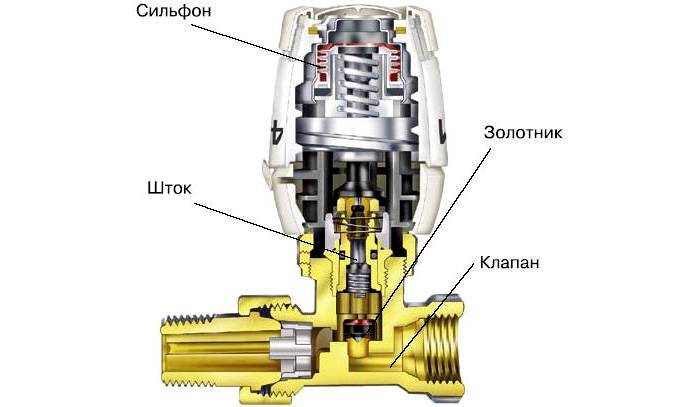
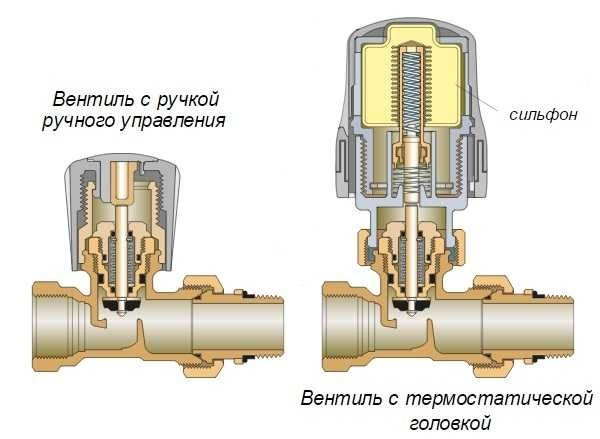
As the temperature rises, the material inside the bellows begins to expand, causing the bellows to stretch and push against the valve stem. The stem moves down a special cone, which reduces the flow area of the valve. When there is a decrease in temperature, the volume of the working medium decreases. In this case, the composition cools down, so the bellows is compressed. The return stroke of the rod increases the coolant flow.


The amount of coolant in the heating system will change every time the temperature in the heated room changes. Reducing or increasing the bellows will actuate the spool, adjusting the flow of coolant. The temperature sensor responds to temperature changes outside. The battery itself will not warm up completely when installing the device. Some of its sections will be chilled. If you remove the head at the same time, the entire surface will gradually warm up.
The thermostatic head (thermal head) for the regulator needs to be adjusted. The temperature of the radiator heat is regulated by means of a coolant passing through it. Valves for single-pipe and two-pipe wiring are mounted differently, which is associated with different hydraulic resistance (it is 2 times less for single-pipe systems).It is unacceptable to confuse or change the valves: there will be no heating from this. Valves for one-pipe systems are suitable for natural circulation. When they are installed, the hydraulic resistance will increase.
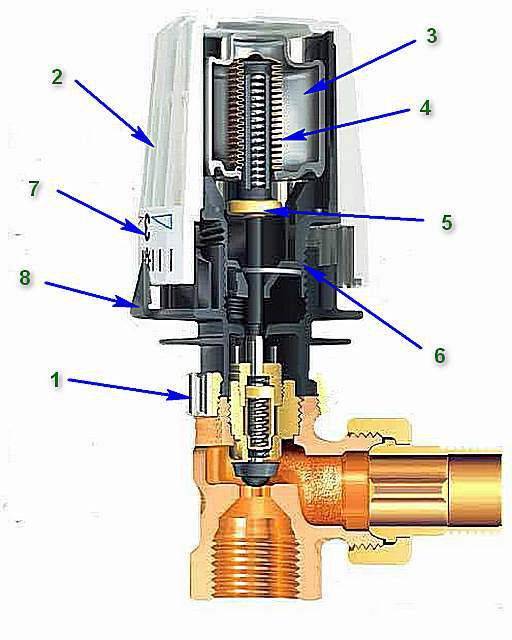
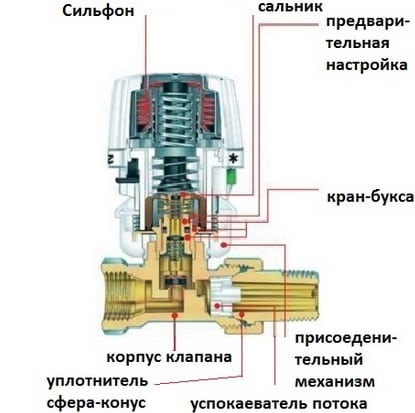
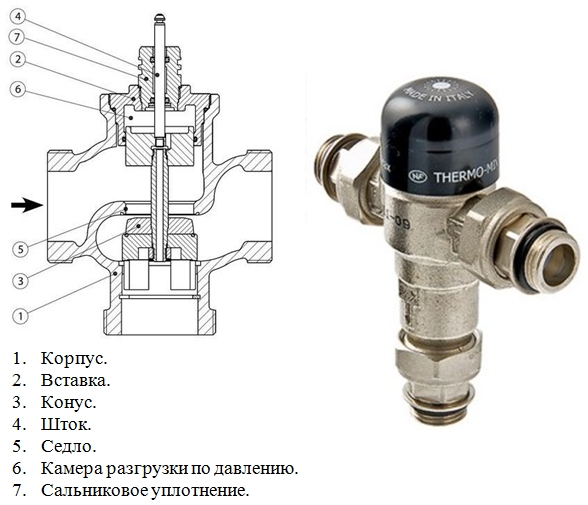
Design
There is a wide variety of models of such valves, but their design is similar.
Mandatory layout includes the following elements:
- body, usually made of brass;
- a mixer used as a directional regulator;
- control lever;
- other small parts in the form of seals, nuts and so on.
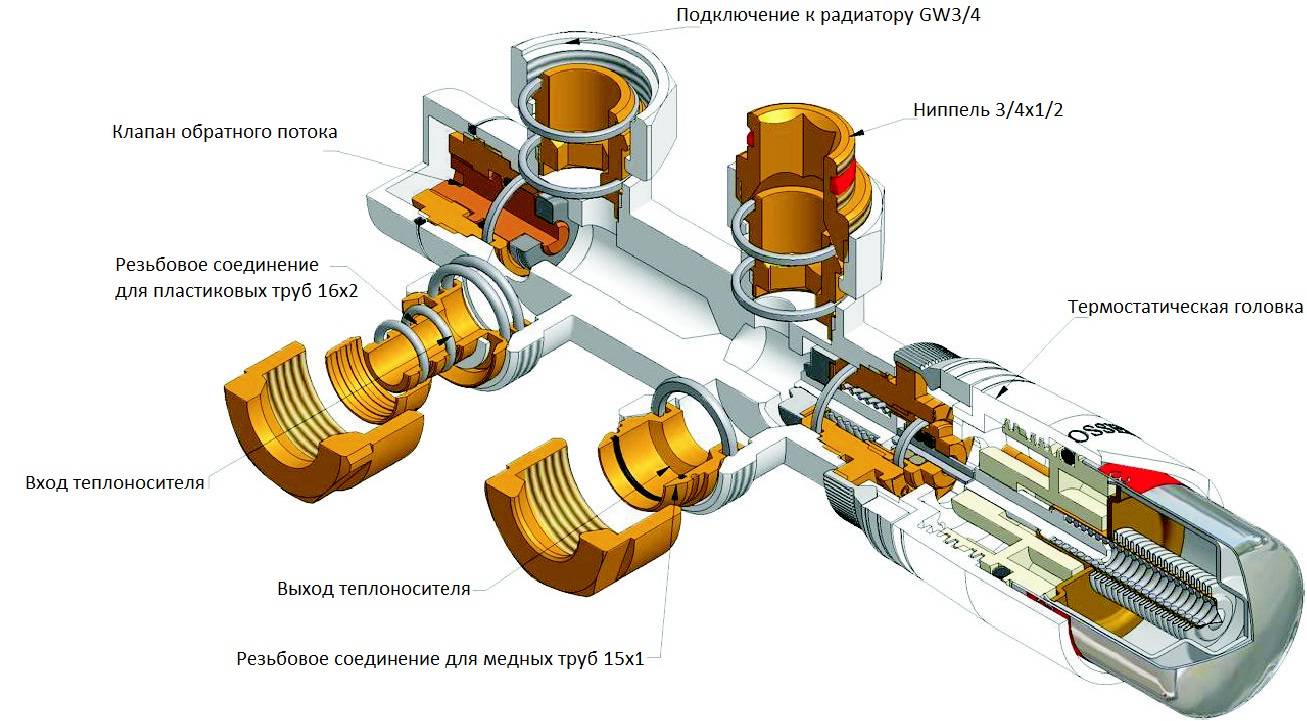
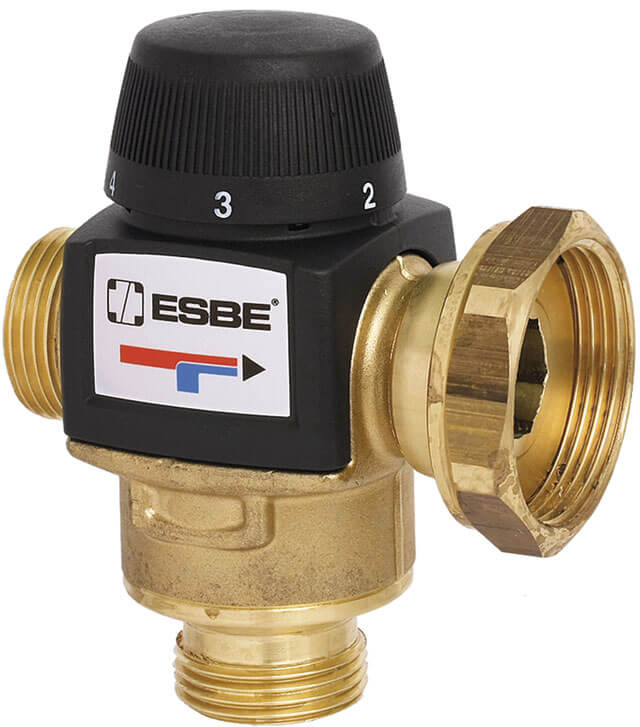
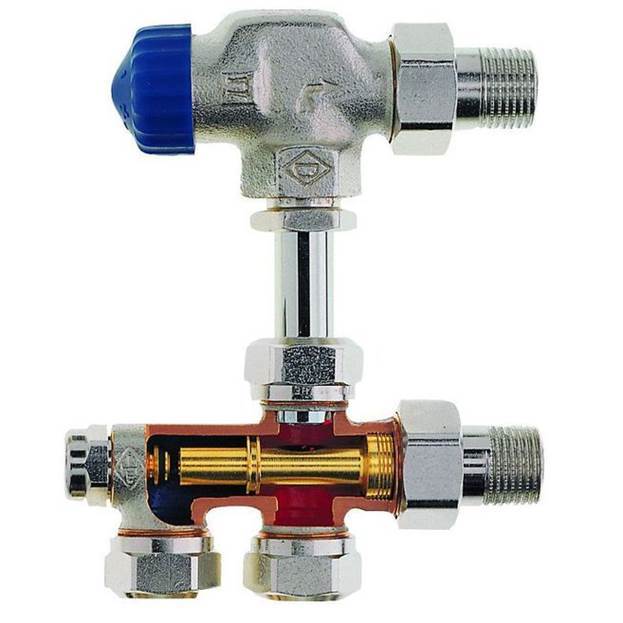
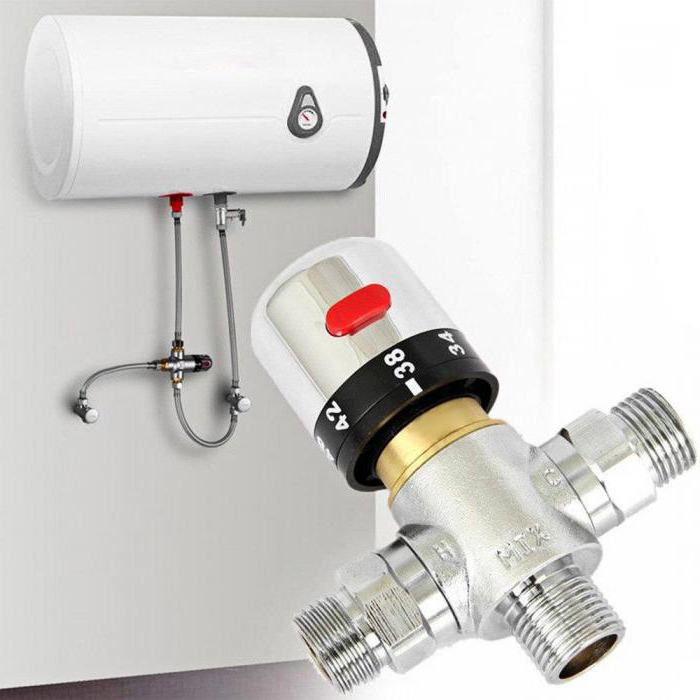
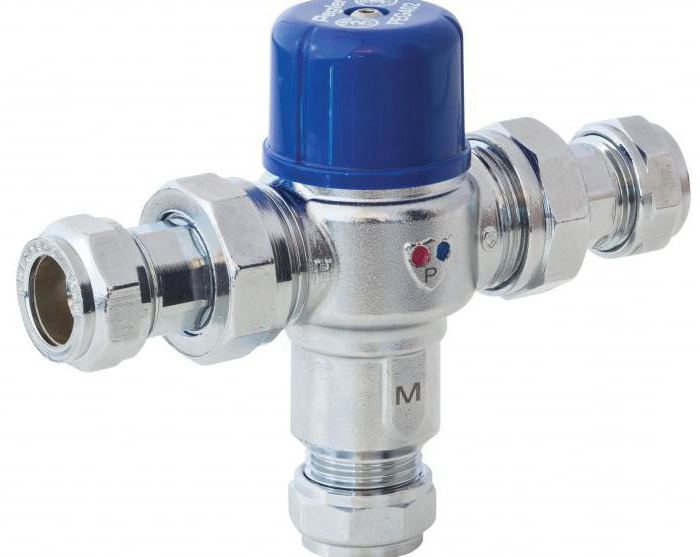
The valve body has 2 inlets and 1 outlet. A liquid of different temperatures enters through the inlets, and through the outlet it exits, already heated to the required temperature. In the inner part of the housing there is a mixer that regulates the direction. This element, depending on the valve model, functions differently. A simple option - a spring locking element is installed in the design, which reacts to temperature, and, accordingly, pressure. If the spring tension increases, the outlet temperature decreases.
The control knob is needed in order to set a specific position of the valve. With its help, the spring stiffness is set and the position of the locking part is adjusted.
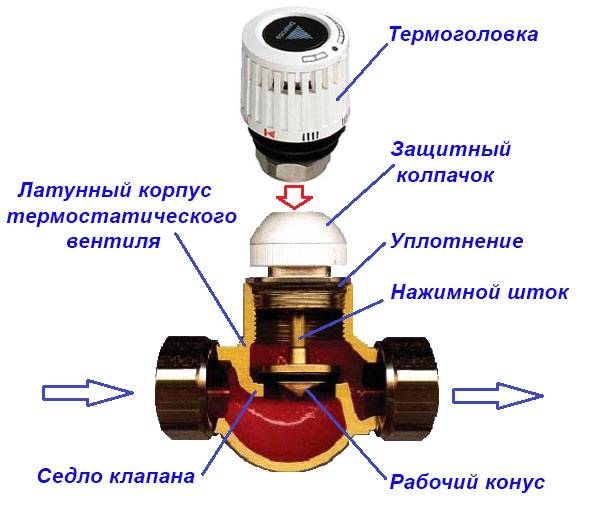
Valve design
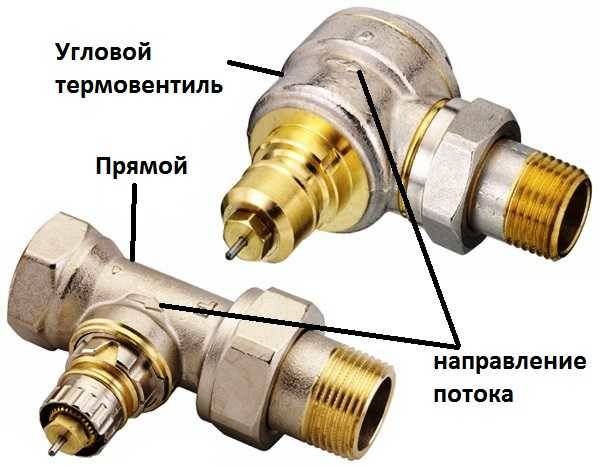
Kinds
According to the method of signal transmission to the thermal element, it can come from the coolant, indoor air. The valve in different species can be almost identical. They will differ in thermal head. To date, all existing varieties can be divided into 2 types: mechanical and electronic.Devices have their own characteristics, which are reflected in their performance.

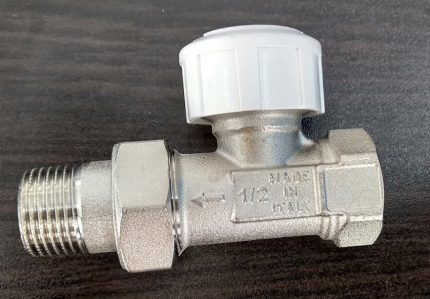
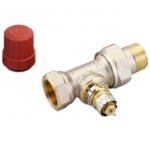
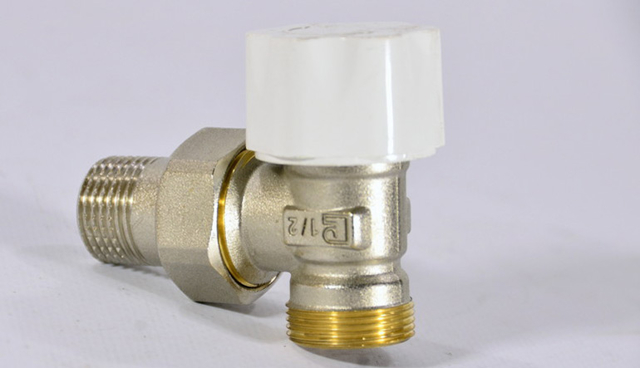
Devices differ not only in the type of material, but also in the method of installation. They can be angular or straight (through) type, depending on the type of connection. For example, if the line is connected to the side, a direct type valve is mounted. The angular method is used when making a connection from below. The valve option is chosen the one that becomes better in the system.

The choice between them depends on the preferences of the buyer and his financial capabilities. Products can be calculated for a specific type of thermoelement. To understand what the differences between thermostats are, it is necessary to briefly note their main nuances.
Mechanical
Mechanical thermostats are characterized by ease of operation, clarity and consistency in use. They don't need a network connection. Handmade products are different from electronic counterparts. They work on the principle of a conventional tap: the regulator is turned in the right direction, passing the required amount of coolant. The devices are cheap, but not the most convenient, since in order to change the heat transfer, it is necessary to manually turn the valve each time.

If you install them torus instead of ball valves, you can use to adjust any of them. The devices are technologically advanced and do not require preventive maintenance. However, often at the inlet and outlet of the radiators of this design there are no markings for adjusting the heating temperature. Almost always it is necessary to expose it empirically.

Before installing such structures, it is necessary to adjust them, as well as to set the hydraulic resistance.Smooth adjustment is carried out due to the throttle mechanism, which is located inside the device. This can be done on one of the valves (inlet or return). The operation of a mechanical type thermostat depends on the points of cold and heat inside the room, as well as the direction of air movement in the room. The disadvantage is the fact that they react to the operation of household appliances with their own thermal circuits (for example, refrigerators, electric heaters, as well as hot water pipes).

Electronic
Such modifications are more complex in terms of design in comparison with manual counterparts. With their help, you can make the heating system flexible. They not only allow you to control the temperature of a separate radiator, but also provide for the control of the main components of the system, including the pump and mixers. Depending on the model, programmable devices are equipped with different types of sensors.


An electronic mechanism can measure the ambient temperature of a particular space (the place where it is installed). Due to the software, the analysis of the received data is carried out, a decision is made to reduce or increase the temperature. This mechanism can be analog or digital. The digital version has 2 modifications: its logic is open or closed.
The difference between the categories is that products with closed logic are not able to change the functioning algorithm. They remember the level of the initially set temperature and maintain it. Analogues of open logic are able to independently select the desired control program.However, they are rarely used in domestic settings, as it will be difficult for the average buyer to initially program them, choosing the desired options from the many built-in functions.
Factors for choosing a mixing fixture for underfloor heating
Before you start installing a three-way valve on a warm floor or any other device, you need to consider a number of factors. In particular, the heated area is of great importance.
The least costly from an economic point of view will be standard valves, however, they are used only for small rooms. At the same time, for the equipment of a small room, bathroom or toilet, for example, you do not need to spend a lot of money on a mixing unit. The installation of three-way valves will be somewhat more expensive, but they will automatically regulate the temperature.
Of course, devices with built-in thermostats will cost a little more. Although the difference between two-way and three-way valves will not be too big. The mixing unit will cost much more.
Alternatively, if the price of a mixing unit for a large room seems prohibitive, you can assemble it yourself if you have the necessary experience and technical knowledge. If desired, you can find many schemes for installing regulators for underfloor heating, which are easy to do on your own. In any case, self-assembly of the node from individual elements will save a lot.
Installation and adjustment
The thermostat works well when it is installed in accordance with all the rules and taking into account some of the nuances.In order for its operation to be effective, durable, correct, it is necessary to initially provide free access, especially if these are mechanical control devices. The automatic type thermostatic element must not be covered with curtains or radiator screens. From this, the analysis of temperature fluctuations may have errors.
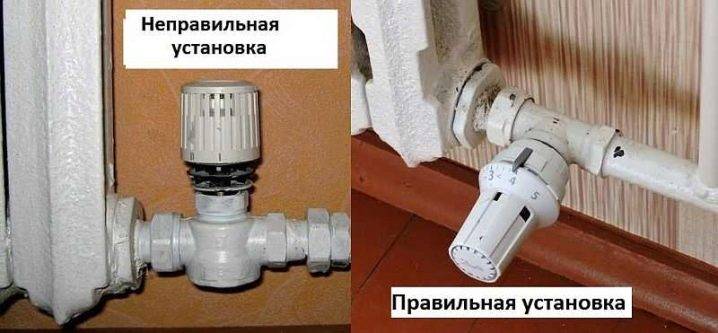
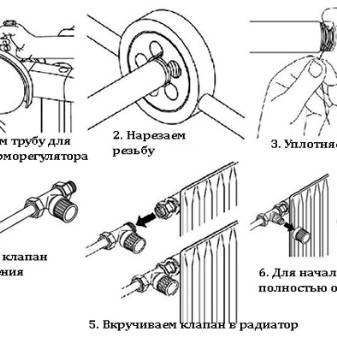
Before direct installation of the thermostat, all water is drained from the heating system. Prepare the necessary equipment and installation kit for connection, not forgetting about the accessories. The installation of the device must be carried out perpendicular to the location of the radiator panel. It is worth remembering that the direction of the heat supply flow must coincide with the direction of the thermostat arrow.
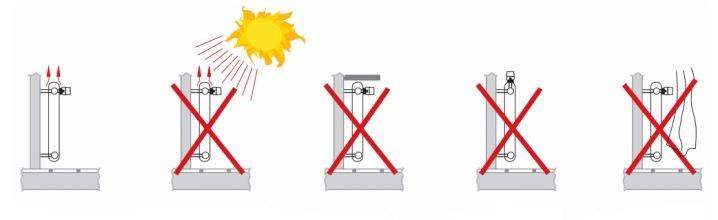
If the position of the thermal head after installation is vertical, this will affect the correct operation of the bellows. However, this nuance is not related to devices with a remote sensor or an external control unit. You can not mount the thermostat where the sun's rays will constantly fall on it. In addition, the operation of the device is not always correct if its location is near large household appliances with thermal radiation. The same rule applies to hidden-type options that mask niches inside to increase the aesthetic appeal of the interior of the room.
How to do?
If there is no heating in the apartment or house during the connection, it is necessary to open the thermostat completely. This will save the valve from deformation, and the regulator from clogging. If installation is carried out in a private house with two or more floors, work starts from the top, since warm air always rises
It is also important to take into account rooms where temperature fluctuations are more pronounced. These include the kitchen, sun-drenched rooms, and rooms where households often gather.
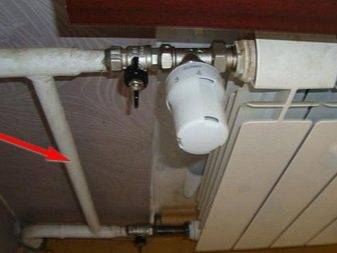
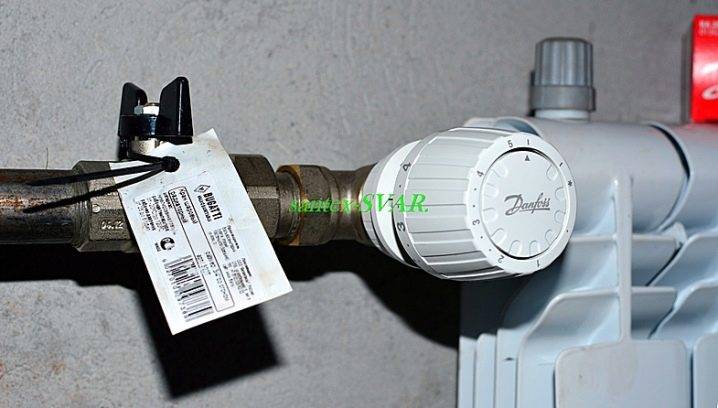
Regardless of the scheme, the thermostat is always installed on the supply pipe. Until the valve is ready, the thermal head is not removed from the package. The horizontal supply pipes are cut at the required distance from the battery. If a tap was previously installed on the battery, it is disconnected. Shanks with nuts are unscrewed from the valve, as well as the locking element. They are fixed in the plugs of the heating radiator.
Piping after assembly in the selected location is attached to the horizontal pipes of the riser. The valve is screwed to the battery inlet, making sure that its position is horizontal. It is possible to mount a ball valve in front of it


This will simplify the replacement of the thermostat if necessary, it will prevent its increased load, which is important when the valve is used as a shut-off valve
The valve is connected to the line supplying the coolant
After that, open the water, fill the system with it and check the tightness of the connections, which is especially important when you need to put the device on old batteries. There should be no leaks or seepage of water.
This must be eliminated by tightening the attachment points. Preset the valve as needed. For it, the retaining ring is pulled, after which the mark is combined with the necessary division. After that, the ring is locked.
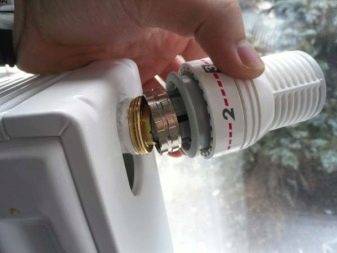
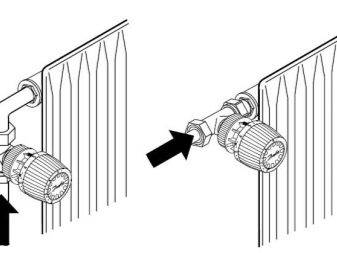
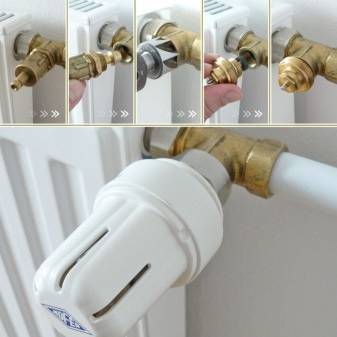
It remains to install a thermal head on the valve. At the same time, it can be fastened with a union nut or a snap-in mechanism.It is possible to install a thermostat on a battery if the material of its manufacture is aluminum or steel, and also if the design of the radiator is bimetallic. Cast iron are characterized by high thermal inertia, so it makes no sense to install these devices for such batteries.
How to setup?
If it is necessary to adjust the thermostat in order to avoid confusion in the operation of the sensor, it is necessary to initially create the correct conditions in a particular room.
You can work according to the following scheme:
- close windows, doors, turn off existing air conditioners or fans;
- put a thermometer in the room;
- the valve for supplying the coolant is fully opened, turning to the left until it stops;
- after 7-8 minutes, the radiator is closed by turning the valve all the way to the right;
- wait until the falling temperature becomes comfortable;
- smoothly open the valve until the noise of the coolant is clearly audible, indicating the most comfortable conditions for the temperature background of the room;
- rotation is stopped, leaving the valve in this position;
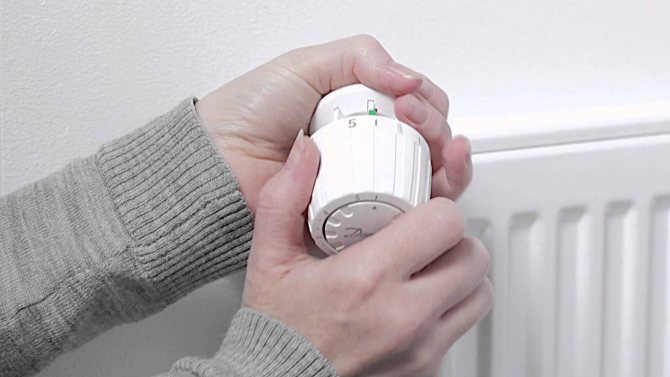
- if you need to change the comfort temperature, use the thermostatic head controller.
How to install and configure a thermostat on a heating radiator, see the video below.
Adjustment
How are thermostatic radiator valves regulated?
- If necessary, the throttle on the return pipeline balances the heating system.
- The thermostatic radiator valve opens fully.
- The handle of the thermal head is removed and reinstalled so that the maximum heating on its scale corresponds to the fully open position of the valve. Further adjustment is made by turning the knob.
A fully open valve corresponds to the maximum heating on the thermal head scale.
- If the thermal head scale is marked in degrees, it is calibrated using a conventional room thermometer, which lies at the level of the table away from the battery.
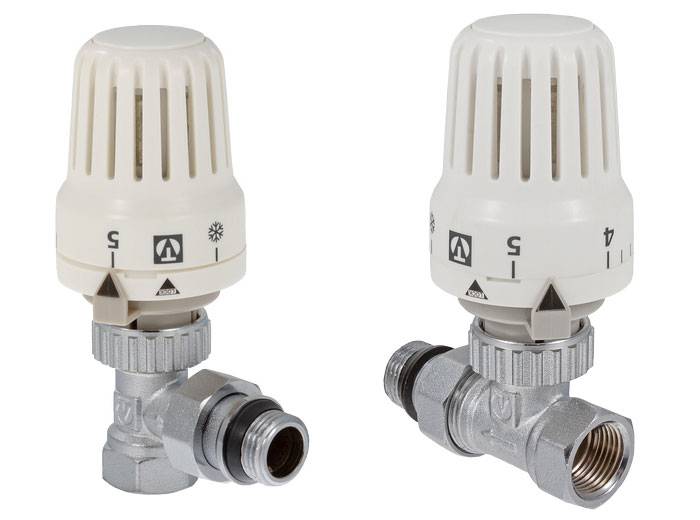
Types of heads by design
There are thermostatic devices according to the type of design. They are selected depending on the characteristics of the pipeline of a particular heating system and the method of installation to the radiator.
It is necessary to take into account the peculiarity of the installation of the head. This node was always located horizontally. In this position, the device will be more efficient. The head can be better washed by air currents.
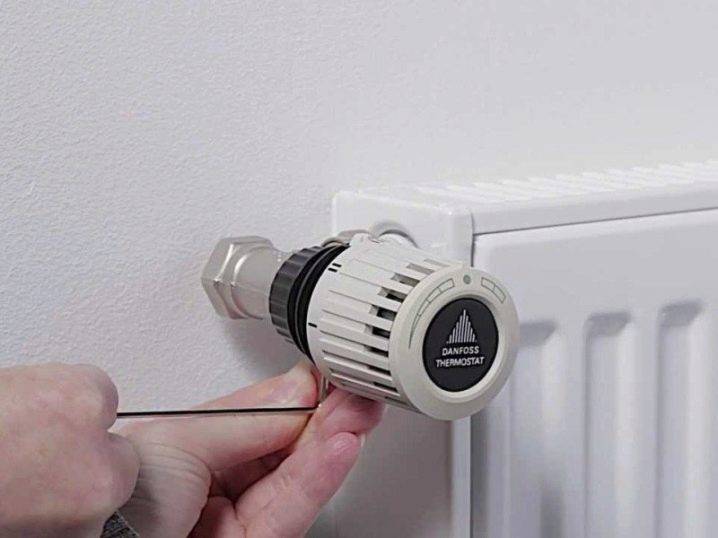
On sale there are devices independent without radiator valves or with them. The Danfoss thermostatic valve, for example, has just such an arrangement. But the company produces completely different systems. Instead of a scale on this product, a special scheme is applied, according to which you can accurately adjust.
But it is not always advisable to use such equipment. In this case, instead of automatic solutions, other types of gates can be used. The difference here is that the adjustment is carried out not in automatic, but in manual mode. Adjustable valves and thermal heads are installed on the supply line. At the return outlet of the battery, it is recommended to install simpler fittings.
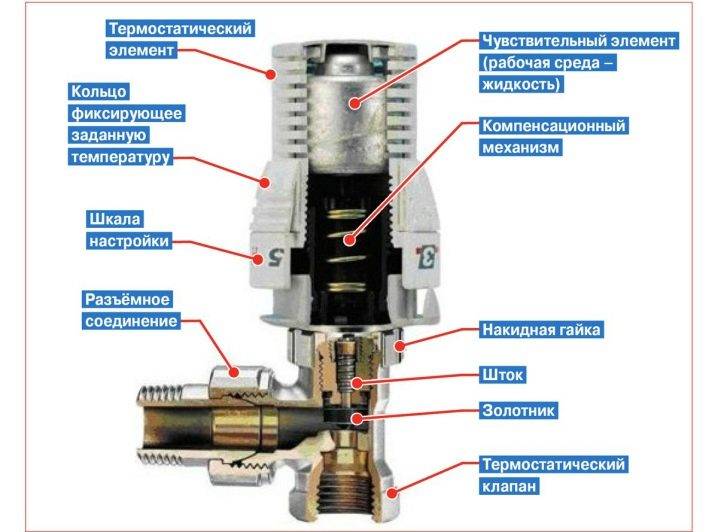
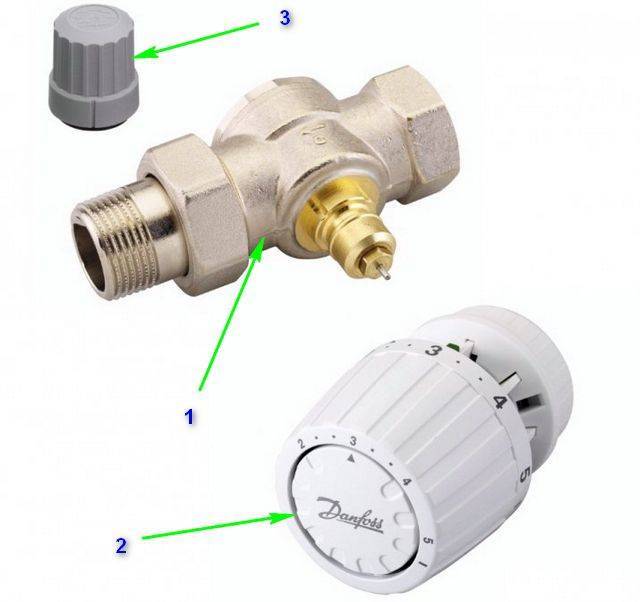
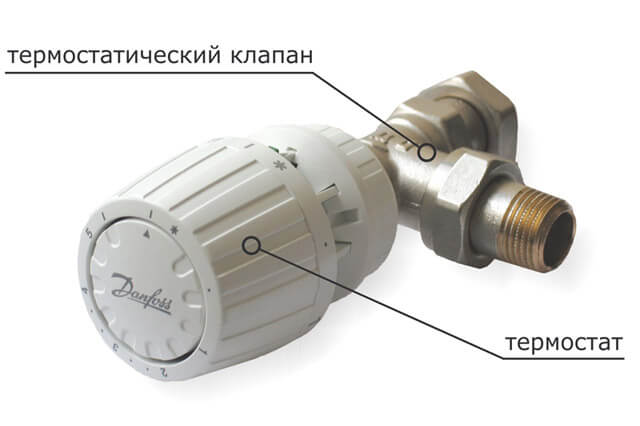
Thermostat device
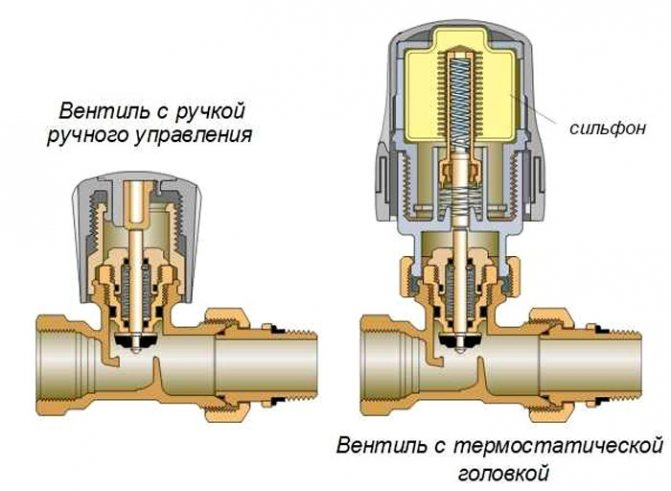
The heating battery thermostat device consists of two parts: a valve and a thermostatic head. The thermostatic valve is usually made of brass, its base covers the pipe, and the upper part is an extension of the pressure rod with a spring. The process of pressing the rod is carried out by a thermostatic head.The more pressure it exerts on the spring, the more the valve closes.
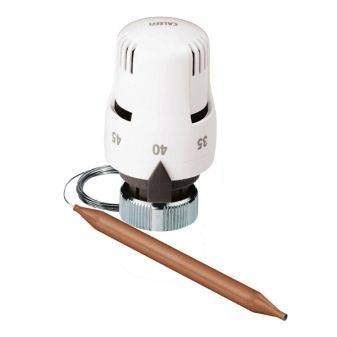
In the structure of the thermostatic head, a sensitive element is isolated, which is located in a cavity filled with gas or liquid. When heated, the temperature-sensitive medium expands and pushes the sensing element forward, it exerts pressure on the stem with a spring, and then on the shut-off valve.


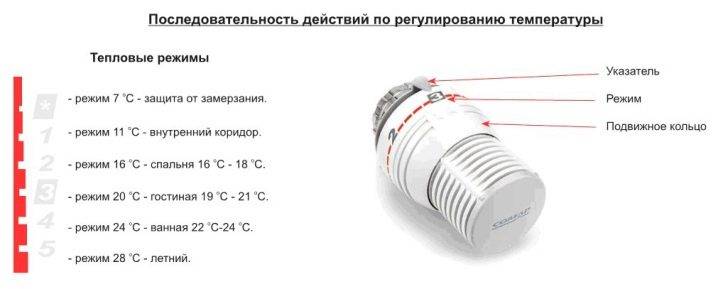
Additional elements of the thermostatic head are a handle (plug), on which a scale of operating modes is applied. Electronic temperature controllers are available for precise setting of values.
Installation and operation of the thermostat
The thermostatic head for radiators is a fairly simple device, but requires proper installation and calibration before use. The accuracy of his work depends on this.
Classification of thermostats
Any thermostat can be divided into 2 main components: a thermal head, which, in fact, monitors the temperature change in the house and a valve, the movement of which changes the coolant current.
Depending on the design features and the principle of operation, such types of control devices can be distinguished as:
mechanical thermostatic regulator on the radiator, adjustment is carried out manually by turning the knob
. This reduces the flow rate of the coolant and the heat transfer of the heater. For ease of use, such regulators are equipped with a scale;
automatic devices
. Calibration is performed only once, after the regulator is installed.In the future, he himself will regulate the volume of coolant passing through the battery, adjusting to the temperature in the room;
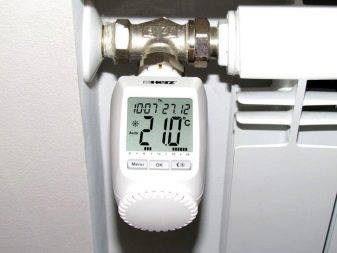
you can purchase a thermostatic kit for connecting a radiator with an electronic control device
. This is the most complex category of thermostats, but they provide much more opportunities. In addition to simply adjusting the room temperature, you can, for example, set the operating mode of the heating system for each day of the week and even the time of day. When the owners are away, the heating system will operate in economy mode, not heating empty rooms.
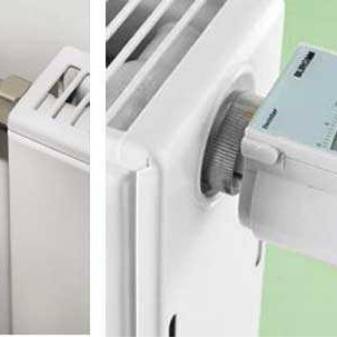
As for the appearance, you can choose a thermostat for any type of battery. Under conventional batteries, devices are selected that crash directly in front of the battery. But you can also purchase a built-in thermostatic valve for steel radiators, it is slightly different in design, although the principle of operation remains the same.
The device and principle of operation of the thermostat
In terms of cost / efficiency ratio, automatic control devices can be considered the best choice. Electronic kits are too expensive, and manual ones are not so convenient to use, if the house is large, you will have to manually adjust the temperature of each heater.
The key element responsible for the fact that the thermostatic radiator valve quickly responds to temperature changes in the room is a bellows filled with liquid or gas. Gas devices respond faster to temperature changes, but also cost a little more.
The bellows looks like a sealed container (sometimes with corrugated walls), when the gas or liquid inside it is heated, the container expands and pushes the stem, and the spool partially blocks the pipe passage, this is the principle of operation of the thermostatic valve for the radiator.
The initial calibration is carried out in order to determine the position of the handle at which the room will have a comfortable temperature. In the future, the device itself will be engaged in the adjustment.
Installing and configuring a thermal valve
The regulator is installed only on the supply pipe, the process itself is simple, so you can do it yourself from start to finish.
Its installation is no different from the tie-in of a conventional valve, the work is performed in the following sequence:
first, the radiator is turned off from the heating system, the water descends. That is, the connection diagram should look like this: first there is a bypass, then a ball valve, and only then a thermostat;
Adjustment is carried out in the following sequence:
- first, the valve opens completely, we wait until the temperature in the room rises and stabilizes;
- then it closes completely and wait until a comfortable temperature is established in the room;
- after that, little by little, you need to start opening it until the sound of passing water is heard, and the body of the device becomes warm.
This completes the installation of the thermostatic head on the radiator.
Overview of popular models
Today, a wide range of thermostats for heating radiators is offered to the attention of buyers.
In order not to get lost in the wealth of choice, you can pay attention to the products of brands that have been time-tested and highly appreciated by professional craftsmen.
The list includes several companies:
- Danfoss
- Caleffi;
- far;
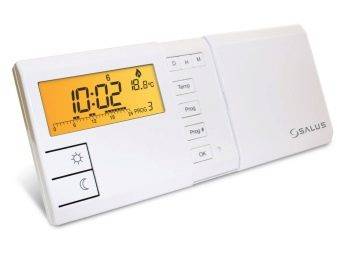
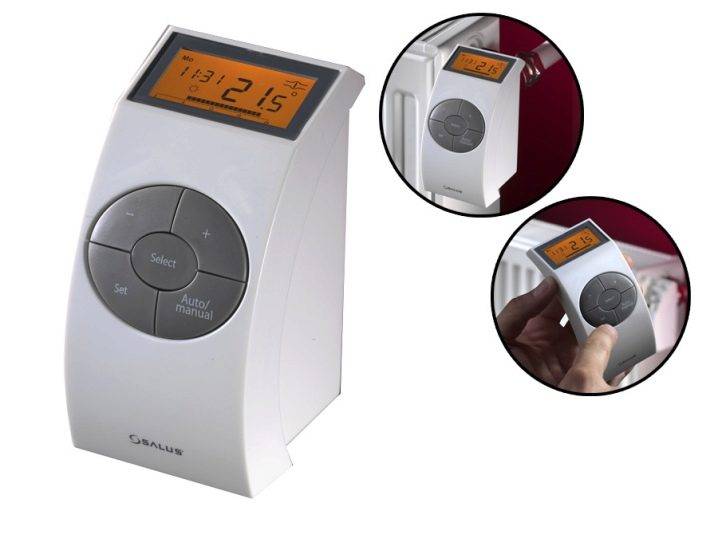
- Salus Controls.
In addition to high-quality work, these products are characterized by accuracy of readings. For example, Danfoss radiator thermostats are equipped with built-in and remote sensors. Varieties RA 2000 have a thermostatic element of a standard type, RA 2994 and RA are distinguished by the presence of frost protection for the heating system. RA 2992 is notable for the presence of a casing, which is the protection of the device from unauthorized intervention. Modifications RA 2992 and RA 2922 have a 2 m long thin tube that connects the sensor to the working bellows.


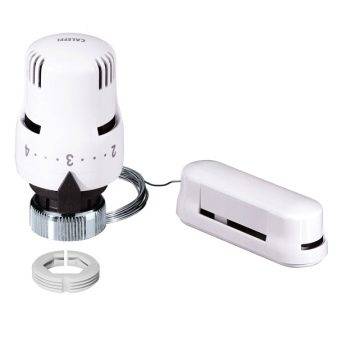
The manufacturer Caleffi offers customers thermostatic fittings capable of operating at pressures up to 10 bar at t from 5 to 100 degrees. The company's thermal heads have a digital liquid crystal type temperature indicator. Products have the ability to block the temperature and can be installed in a heating system, the thermal material of which is water, as well as a glycol mixture with a glycol content of up to 30%. The kit includes an adapter, the models have frost protection. You can look at the options Caleffi 20-50 with an external probe, Caleffi 0-28 with an adapter, a modification with weekly programming.
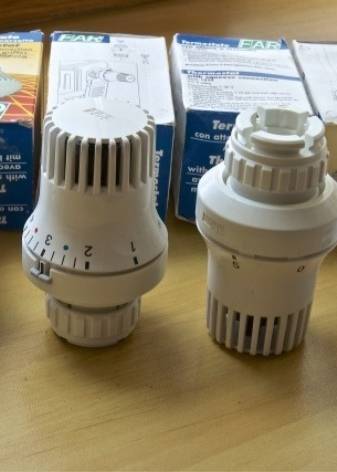
Far produces automatic type regulators from thermostatic and electric (electrothermal) heads, as well as thermostatic expansion valves with manual control. The maximum room temperature level can be up to 50 degrees, the length of the power cord of the products is 1 m. The maximum working pressure can reach 10 bar, the maximum length of the capillary for the remote sensor is 2 m.The temperature of the liquid used can be heated up to 120 degrees. Worthy of attention are thermal heads 1914, 1924, 1810, 1828, 1827.

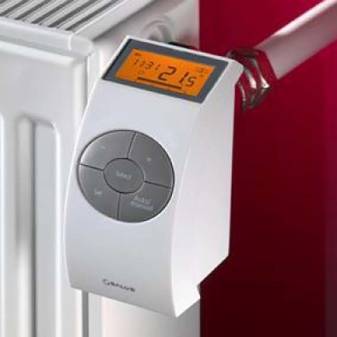
The Salus Controls brand pleases customers with a wide range of programmable electronic thermostats and thermostats (Salus 091 FL, Salus 091 FLRF). Products maintain the desired level of indoor temperature and save energy when no one is in the room. This is a digital technique that controls the cooling and heating of the coolant in accordance with a series of user settings. The line includes overhead modifications with surface mounting on a pipe or a container with a visible external scale (Salus AT10).