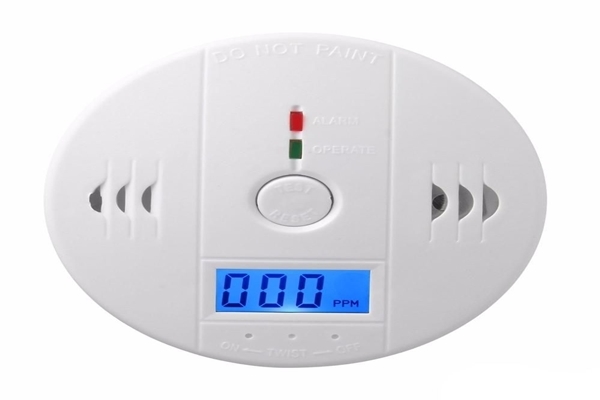
- Why gas stove thermocouple?
- Specialized repair service "Remontano"
- How to weld a burnt gas column thermocouple
- Physical basis of thermocouple operation
- Product cleaning and maintenance
- gas stoves
- Popular Models
- Advantages and disadvantages of this system
- Check, clean, replace
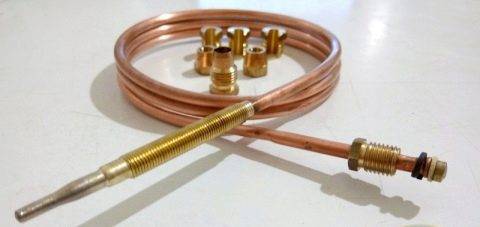
- Gas stove thermocouple replacement
- Checking the thermocouple of a home geyser
- Stage # 1 - preparation for verification by the tester
- Stage #2 - visual inspection for defects
- Stage # 3 - testing the performance of the sensor
Why gas stove thermocouple?
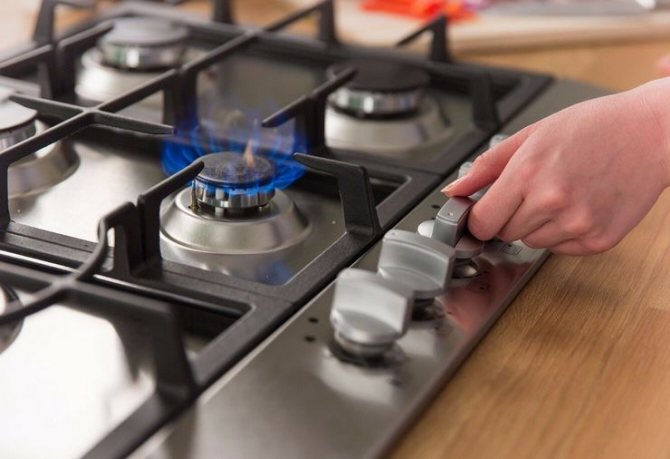
The gas in the stove burner is ignited with matches, a manual piezo lighter or a built-in electric ignition. Then the flame should burn itself without human intervention, until the fuel is shut off by the valve.
However, it is not uncommon for a fire on a gas hob or oven to go out as a result of a gust of wind or a splash of water from a boiling pot. And then, if there is no one nearby in the kitchen, methane (or propane) begins to flow into the room. As a result, when a certain concentration of gas is reached, cotton with fire and destruction occurs.
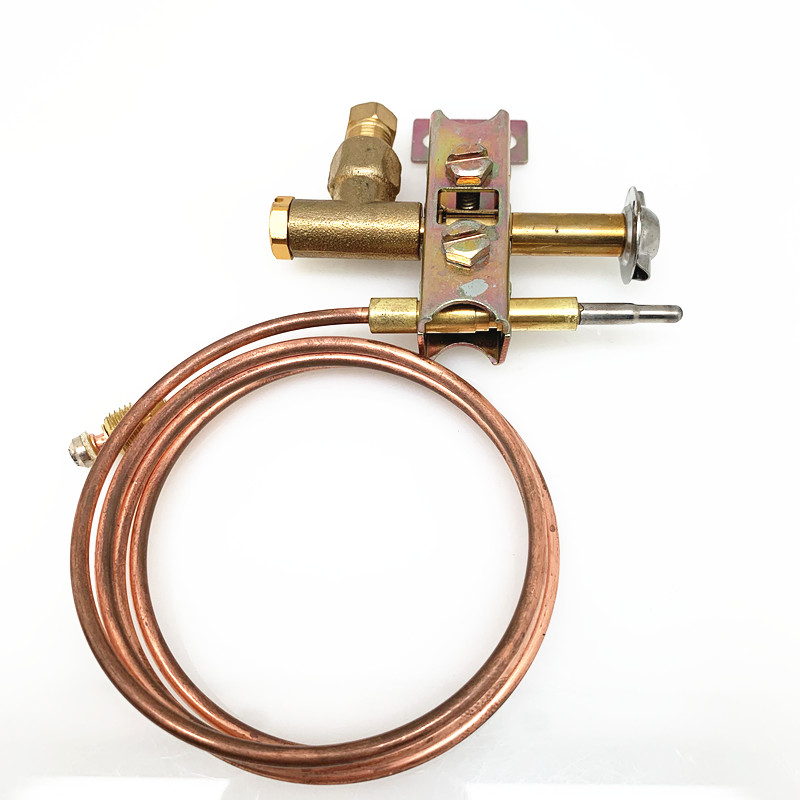
 The thermocouple controls the presence of an open fire in the burner, and if it is absent, it shuts off the gas supply for half a minute or a minute to prevent a tragedy
The working function of the thermocouple is to control the presence of a flame. While the gas is burning, the temperature at the tip of the control device reaches 800-1000 C, and often even higher. As a result, an EMF occurs, which keeps the gas solenoid valve on the nozzle to the burner open. The burner is working.
However, when the open flame disappears, the thermocouple stops producing EMF to the electromagnet. The valve is closed and the fuel supply is turned off. As a result, the gas does not enter the kitchen without accumulating in it, which eliminates the occurrence of a fire from such an emergency situation.
A thermocouple is the simplest temperature sensor without any electronic devices inside. There is nothing to break in it. It can only burn out from prolonged use.
The following article, which is fully devoted to this interesting issue, will acquaint you with a complete set of sensors designed to control and safety of the operation of the gas column.
 Thermocouple burnout usually occurs only in gas boilers and boilers that operate constantly. In gas stoves, the considered gas control temperature sensors serve for 20–30 years before replacement
Among the advantages of thermocouples:
- simplicity of the device and the absence of breaking mechanical or burning electrical elements;
- the cheapness of the device is about 800–1500 rubles, depending on the model of the gas stove;
- long service life;
- high efficiency flame temperature control;
- fast shutoff of gas;
- ease of replacement, which can be done by hand.
There is only one significant drawback of a thermocouple - the complexity of repairing the device. If the thermocouple sensor is defective, it is easier to replace it with a new one.
To repair such a device, it is necessary to weld or solder at a high temperature (about 1,300 C) two different metals. It is extremely difficult to achieve such conditions in everyday life at home. It is much easier to buy a new control unit for a gas stove for replacement.
Specialized repair service "Remontano"
If your gas stove or hob does not turn on, do not panic and run to the store to buy a new appliance. Often the breakdowns of such units are minor and can be easily fixed by the hands of professional craftsmen.
The specialist of the company "Remontano" perform diagnostics, maintenance and restoration work, regardless of the brand of the device. The company has its own warehouse of spare parts for equipment: Gefest, Hansa, Ardo, Mora, Ariston and others. If you need a quick and reliable repair of household appliances at home, call us at 8(495)777-19-19 or leave a request on the website. We are open every day, seven days a week, from 7:00 to 23:00.
How to weld a burnt gas column thermocouple
Due to professional necessity, I periodically have to manufacture thermocouples for devices for maintaining a given temperature in drying cabinets and in equipment for annealing twisted magnetic cores for transformers at a temperature of 800°C. Therefore, in the manufacture of another thermocouple, I decided to try welding to restore the functionality of a burned-out thermocouple from a gas column.
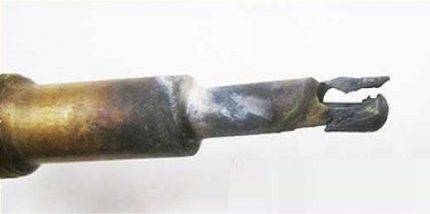
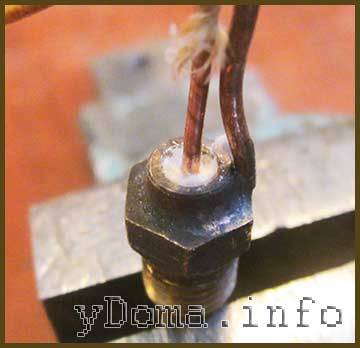
The central wire of the thermocouple was welded to the copper wire of the electrical wiring and had a length of about 5 cm. In the photograph, the soldering point is clearly visible on the left. This length of wire would be enough for several repairs.
The tubular conductor of the thermocouple, about a centimeter long, was completely burnt out, but its part with a thicker wall remained.

The place of the previous welding was removed from the central conductor, and the thermocouple parts were cleaned of soot and soot with fine sandpaper.
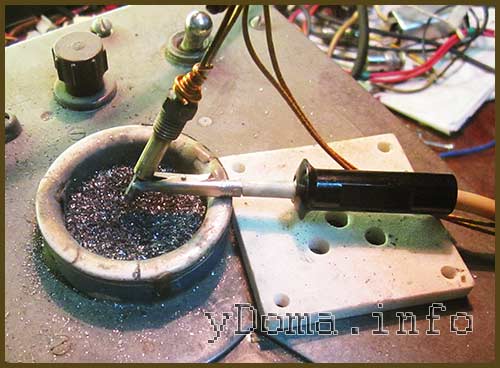
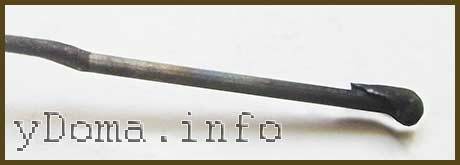
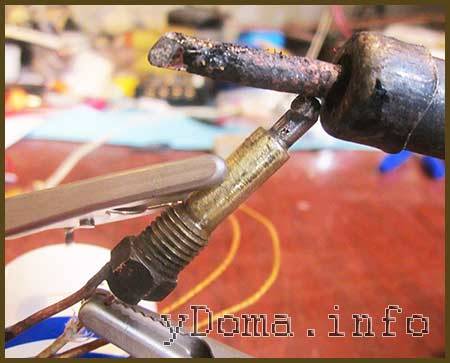
The central conductor was inserted into the base of the thermocouple so that its end protruded by one millimeter. Welding was carried out on a special installation, the device and circuit of which I will describe below, for about four seconds at a voltage of 80 V and a current of about 5 A.


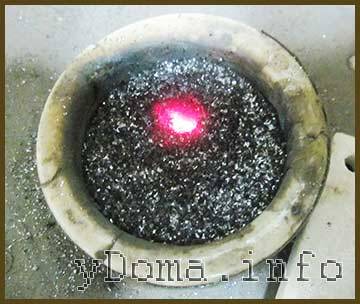
I did not make a video recording of the thermocouple welding process for fear of damaging the camera from a bright arc, but I took a picture of hot graphite powder a couple of seconds after the end of welding.
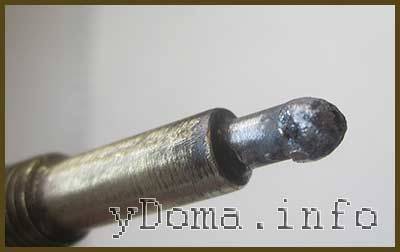
The thermocouple junction turned out, contrary to my expectations, of excellent quality and beautiful shape. There was confidence that I started the repair of the thermocouple not in vain.
To exclude short circuit of the central conductor of the thermocouple on its body, fiberglass wool was densely packed into the gap. Asbestos is also good for these purposes.
To make sure that the thermocouple is working, it was heated with a soldering iron to a temperature of about 140°C.
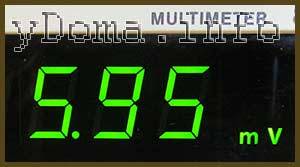
The multimeter recorded the EMF generated by the thermocouple at a value of 5.95 mV, which confirmed the health of the thermocouple. It remains to check the performance of the thermocouple in the gas column.

Although the thermocouple became shorter by a centimeter, its length was still quite enough for the junction to be in the igniter flame. The restored thermocouple has been working flawlessly in the gas column for several months now, and I believe it will work much longer than the factory-made thermocouple, since the junction has become much more massive.
Physical basis of thermocouple operation
Seebeck discovered a curious effect by taking two pieces of wire of dissimilar conductors: soldered, the connection was heated, the circuit formed an EMF, a current flowed.
What is heterogeneity. With a close study of the issue, it turns out: if the conductor is heated from one end, the opposite end is left at room temperature, an emf appears in the wire. The value has a different sign. Scientists explain the change in the energy levels of the particles that carry the charge. As a result, electrons rush from the heated part of the conductor to the cold one or vice versa, forming a positive/negative EMF.
What determines the direction of movement of charge carriers. Determined by the physical features of the conductor. For each material, the thermopower value was entered, the figure is positive or negative. For pure iron, the parameter is +15 μV / ºС, for nickel - 20.8 μV / ºС. Now a few words about the purpose of the thermocouple.
Product cleaning and maintenance
To prolong the operation of the gas oven and prevent its breakdowns, regular preventive maintenance should be carried out.
Do not neglect the instruction manual for the product, it is important to follow it clearly. Meals should be cooked according to the recommended temperatures for them.
It is important to know the design of the gas oven components, follow the instructions for washing and lubricating the connecting elements.
After cooking, clean the walls and bottom of the oven from burning
All dirt and food debris must be removed immediately.
Observe safety precautions when using a gas oven.Do not leave the stove unattended, do not make the ignition modes so large that are not described in the instructions.
In order for the internal parts of the oven to remain intact, not to oxidize, after washing the oven, you need to dry them well or wipe them dry.
For washing, use only high-quality household chemicals, as cheap products will spoil the inner coating: they can harden the seal, destroy the enamel, or scratch the glass of the door (read about glass damage and repair here, and how to repair the doors is described here).


Ovens are considered reliable appliances. If the device is broken, the help of the master is not always required. Some faults can be fixed by yourself.
gas stoves
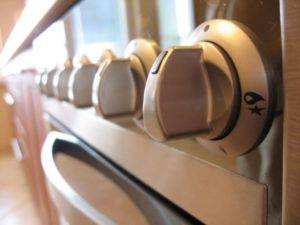
A modern gas stove is a complex device, but using the unit is a pleasure. Most products are equipped with electric ignition, so get ready to connect to the outlet, like other household kitchen appliances. The principle of operation of the ignition is the accumulation of charge by the capacitor, followed by discharge through the key element after the voltage reaches a fixed value. A voltage with an amplitude of 2-3 kV breaks through the spark gap located in the burner, an electric arc occurs, igniting the gas. The blue fuel supply valve opens simultaneously with the above process. The discharge occurs instantly.
Electric ignition is present only on the burners. Sometimes, to automate the oven, it is necessary either to lay additional conductors according to the instructions, or to completely modify the design. As soon as automation reached such heights that the gas stove ignites itself, it is not surprising that the designers provided the technique with protection against the extinction of the fire.The simplest example is when gas disappears in network communications, then it is supplied again. And without warning from the utilities.
The owner finds a kitchen filled with a specific pungent smell. The explosion is far away, and the water from the kettle will have to be poured into the sink, for fear of poisoning. Some foods are picking up odors, it will not be possible to eat spoiled by the aroma.
The presence of a gas stove thermocouple helps to avoid such excesses. If you inspect the burner by removing the reflector, divider, we will notice two things:
- Candle, reminiscent of a car.
- Thermocouple.
The first is responsible for igniting the flame, the second controls that the fire burns properly. To be honest, I have not seen models that spark when the gas is re-applied, made for safety (if the concentration reaches explosive, the kitchen will explode). The current level of technology simply does not give a 100% guarantee of the correct operation of the structure. If there is enough gas in the kitchen, a fire is guaranteed. In practice, a pair of analyzers outside, a turbine speed sensor in the pipeline would correct the situation, but who wants to take risks. Automation can try to light an extinct fire 3-4 times.
Due to the reasons described, the thermocouple detects the extinction of the flame, the blue fuel supply path to the gas stove is blocked. Not always the oven is equipped with electric ignition and protection against flame extinction
It is important to keep track of the supplied options. We have a chance to fill the kitchen with a portion of gas if there is no protection against the extinction of the flame. Ask your consultant where thermocouples are located
Then, to avoid human error, check the words with the manual for the gas stove. It is better to spend an extra quarter of an hour doing these operations than to endanger life.
Ask your consultant where the thermocouples are located. Then, to avoid human error, check the words with the manual for the gas stove. It is better to spend an extra quarter of an hour doing these operations than to endanger life.
A typical ignition device (a block inside a gas stove) is supplied with six or four pairs of contacts. Each is capable of producing a spark. Professional slang describes in words: the outputs are connected in parallel. Always retrofit a gas stove. Models are presented on the counter, where a special diagram shows the route for laying conductors that complement the oven with electric ignition. A similar procedure can be done with combustion control by equipping a selected area with a thermocouple. To introduce another element will not be difficult for an experienced technician.
Popular Models
The gas control mode in cookers is now as popular as, for example, a timer or auto ignition. Almost every manufacturer produces models with support for this mode.
- The domestic brand De Luxe offers an inexpensive but decent model -506040.03g. The hob has 4 gas burners with electric ignition using a button. Low flame mode supported. The oven has a lower gas heating and internal lighting, is equipped with a thermostat, a mechanical timer. Gas control is supported only in the oven.
- Slovenian company Gorenje, model GI 5321 XF. It has classic dimensions, which allows you to fit it perfectly into the kitchen set. The hob has 4 burners, the grids are made of cast iron. The oven is made like a wood stove with optimal distribution of hot air.
Other benefits include a heat-resistant enamel coating, grill and thermostatic heating. The door is made of two-layer thermal glass. The model has auto-ignition of burners and ovens, as well as an electric timer. Gas control is supported on the hob.
- Gorenje GI 62 CLI. Very beautiful model in a classic style in ivory color. The model has 4 burners of different sizes, including WOK. The oven is made in the style of Home Made with thermostatic heating. Burners and oven have auto ignition. The model is endowed with an alarm clock, a timer, jets for bottled gas, Aqua Clean cleaning, and is distinguished by the presence of full gas control.
- The Belarusian brand Gefest is another well-known manufacturer of gas stoves with gas control support (PG 5100-04 002 model). This device has an affordable price, but includes all the necessary equipment for convenient and safe use. Has a white color.
There are four burners on the hob, one with fast heating. Coating - enamel, gratings are made of cast iron. The model is distinguished by the presence of a grill, thermostat, lighting, electric ignition for both parts. Gas control is maintained in all burners.


Other well-known brands - Bosch, Darina, Mora, Kaiser - also actively support the function of partial or complete control of the blue fuel leakage. Considering this or that model, you need to ask the seller how long the protection is activated.
Many people, having heard enough of their acquaintances and read from various sources about the tragic cases that occur when handling gas stoves, despite their popularity, excellent cooking data, economy and ease of operation, are wary when choosing gas samples when buying hobs, based on at risk of danger when handling them. But technology is constantly evolving, becoming safer and better, and its quality is improving year by year. Gas stoves are no exception. Gas control is one of the latest security systems installed on almost all models, which controls the gas supply.
Advantages and disadvantages of this system
Like any technical element, the gas control system has its advantages and disadvantages. The former, as a rule, border on its functions and boil down to the fact that gas control allows you to:
- automatic shutdown of the gas supply when the flame goes out on the burner or in the oven;
- getting rid of constant monitoring of the furnace during its operation;
- prevention of dangerous situations associated with fires and explosions.
Nobody relieved the gas control of the shortcomings. Inventors are working to eliminate them, but for now they are still there. These usually include:
- the need to keep the knob or button pressed while waiting for the thermocouple to warm up and send a signal to the solenoid valve;
- lack of stable operation of the burners and oven in the event of a system failure;
- difficult repairs (especially if you decide to do it yourself and do not have such skills in work).
Due to these shortcomings of the gas control system, many users resort to turning it off. To achieve this goal, it is necessary to adhere to the following algorithm of actions:
- turn off the gas supply from the gas pipeline;
- find where the gas control system is located in your case (in all models, its location is different);
- disconnect and remove the solenoid valve;
- pull out the spring, which is responsible for the flow and shutoff of gas;
- return the solenoid valve to its place.
The removal of the spring is just responsible for ridding the stove of the automatic restriction on the gas supply. In this case, the valve will always be in the open state, regardless of whether it receives a signal from the thermocouple or not.
Disabling gas control will not be difficult, however, any independent operations with gas household appliances can lead to an accident, so it is best to call a specialized craftsman for such work.
The master, when shutting down the system, at the end of the work, makes appropriate notes in the operation log of the device indicating the date and reason for the action (very often the gas control is turned off when it goes out and is out of order, so as not to waste money, time and effort on its repair).
Gas control ceases to function properly in the following cases:
- with severe contamination of the sensor elements;
- when the thermocouple is displaced (its rounded end must always be on the border with the flame);
- thermocouple obsolescence;
- solenoid valve wear;
- weakening the connection of elements.
Repairs related to the replacement of elements are best left to a specialized organization in order to protect yourself and avoid legal problems.You can clean the thermocouple from contamination or tighten the connections yourself.
Check, clean, replace
If the stove starts to light up poorly, it is likely that the thermocouple is clogged or out of order. But it is worth noting that the cause of the malfunction may not affect this element.
To check, follow these steps - turn the oven knob and ignite the gas. If after you release the knob, the oven goes out, this is the first sign that the gas control system does not open the gas supply valve in the stove.


Most likely, the surface of the measuring element is clogged, and it does not perceive temperature changes in the environment. To repair gas equipment in stoves from Hephaestus, Ariston, Indesit, Gorenje, etc. you should first clean the thermocouple in the stove, for this:
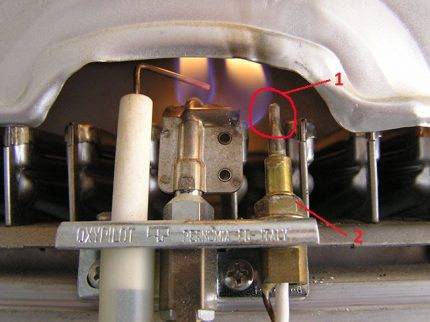
- Open the oven and remove everything superfluous from it - you should freely get inside, if something bothers you, remove it, if necessary, you can remove the door from the stove; Rice. 5: remove everything from the oven
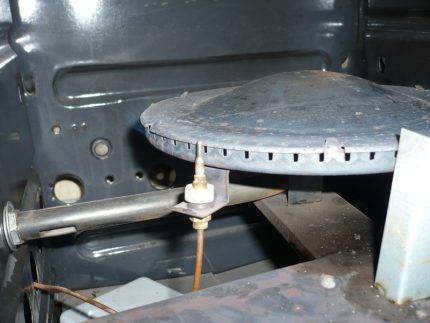
- Find the thermocouple itself - as a rule, it is located in the upper part of the oven, it must be installed near the flame divider; Rice. 6: oven thermocouple
- If soot, soot and other debris are found on its surface, they should be cleaned with fine sandpaper, it is strictly forbidden to clean it with an impact method, as you can permanently damage the thermocouple;
- Collect the removed garbage and test the functionality.
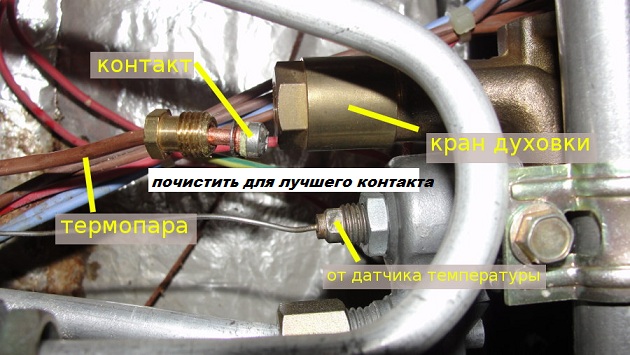
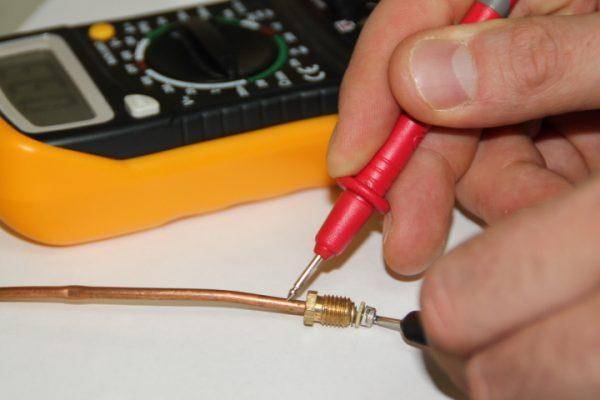
If such a gas control repair does not bring the desired result, you should check the thermocouple with a multimeter or millivoltmeter. To do this, you will need to get to the place where the thermocouple is connected to the electrical network of the stove.
As a rule, it is located under the front panel or top cover, where the temperature switch or gas valve is located. Here, the contacts could also move away, then it’s enough just to fix them, if not, go to the measurements.
Set the measurement limit of the multimeter in the region of tens of millivolts. Connect the probes to the thermocouple leads and heat the measuring element (not necessarily with an open fire, but this is a fairly affordable way).

Rice. 7: checking the thermocouple with a multimeter
If the millivoltmeter shows a change in voltage at the terminals, the device is working properly and the reason is something else. Otherwise, you may have incorrectly set the limit for your thermocouple model or the automatic gas control is faulty.
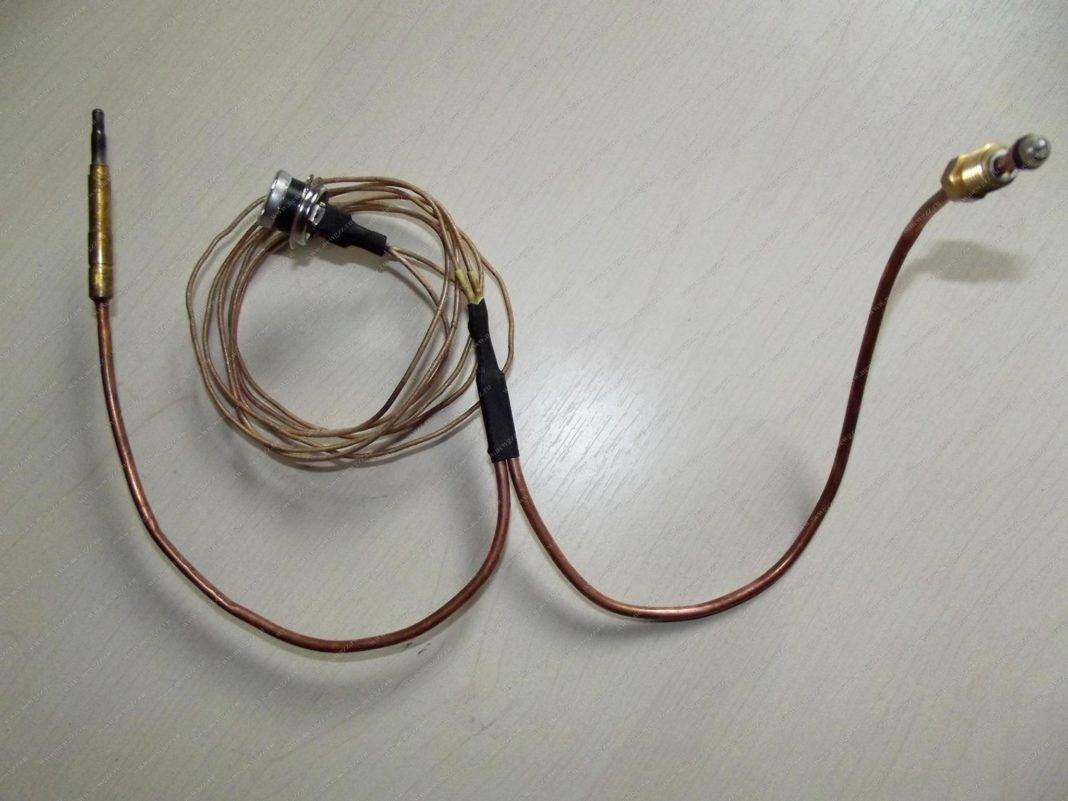
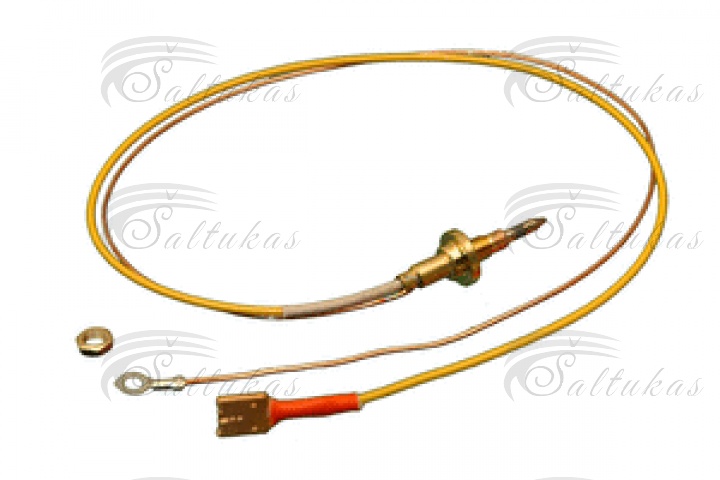
Gas stove thermocouple replacement
In most cases, the failure is characterized by the burnout of the conductors. Their independent soldering or welding at home is possible, but impractical, since after splicing it is impossible to ensure the same measurement accuracy. Therefore, the best option is to replace the thermocouple. For this:
- Purchase a new replacement model on the Internet, it is better to do this using the thermocouple code, which can be found on the device itself or in the gas stove passport;
- Also disconnect the stove from the electrical network and gas supply system;
- Remove the front panel and the top cover of the stove and disconnect the electrical outlets where they are connected to the solenoid valve; Rice. 8: Remove the front panel or top cover
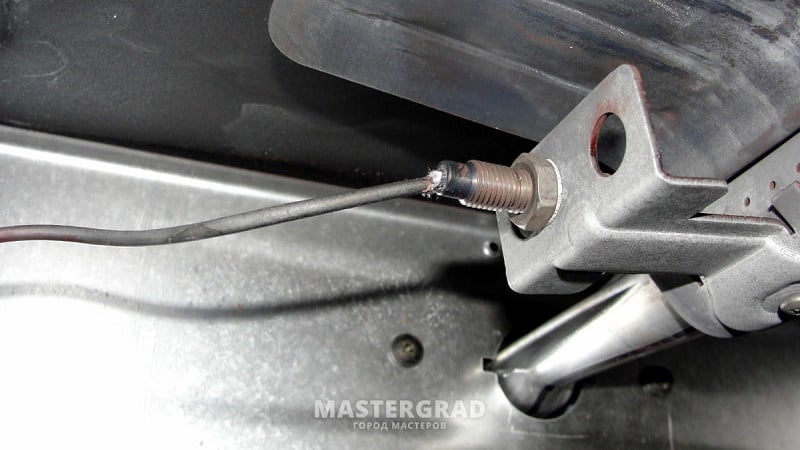
- Unscrew the fastening nut in the oven and remove the thermocouple, if the fastener does not immediately give in, do not apply excessive force so as not to break the fastening point, use WD-40 or any other solvent; Rice. 9: Unscrew the thermocouple
- Install a new thermocouple in the hole and fix it by analogy with the previous one, connect it to the internal electrical wiring circuit of the stove; Rice. 10: Install a new thermocouple
- Assemble in reverse order and test the operation of the gas stove.
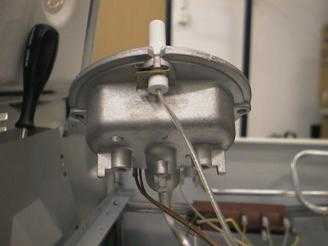
Checking the thermocouple of a home geyser
Long-term operation of a home geyser quite allows for a moment when the thermocouple fails. In this case, it is necessary to check the functioning of the system and, accordingly, check the control sensor itself.
Of course, not all owners of gas equipment are able to perform such work. And from the point of view of security, the best solution would be to contact the gas company to solve such a problem.
But at the same time, situations can be different, including the impossibility of contacting specialists for some reason. Then the only way out is to try to do the work with your own hands.
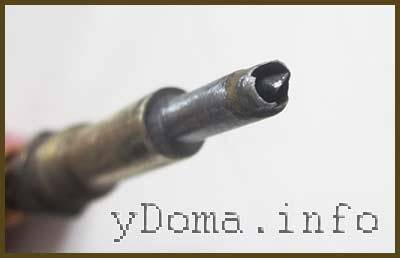
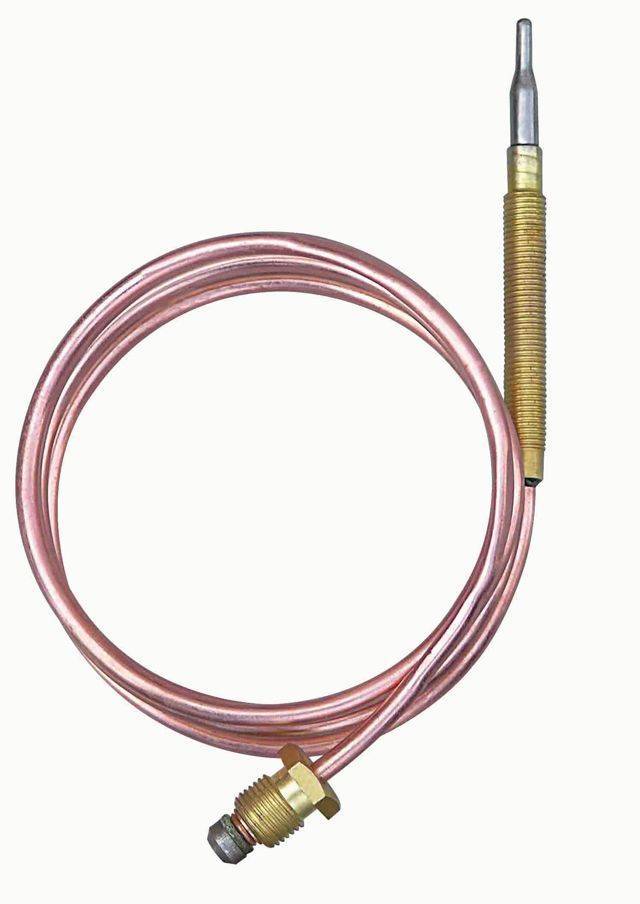
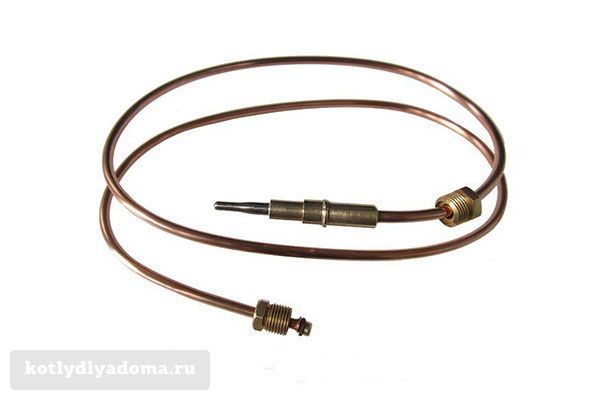
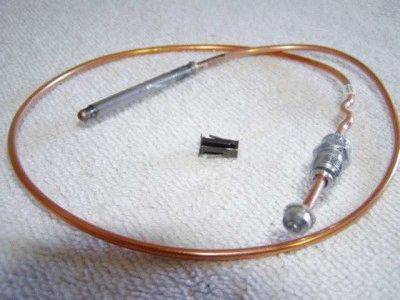
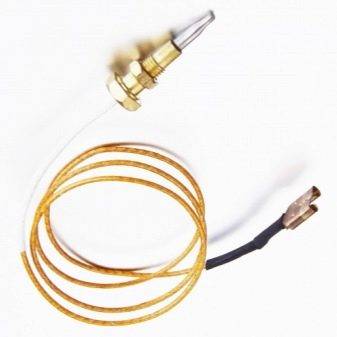
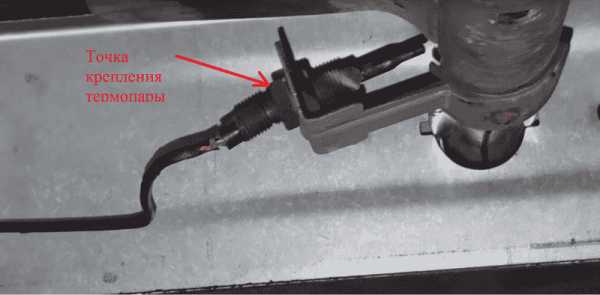
 The picture shows one of the options for the installed thermocouple that needs to be checked: 1 - directly hot area of the sensor, most often amenable to destruction; 2 - fastening nut, which must be unscrewed for dismantling; The same nut can be used on the other end of the thermocouple
In this scenario, a user inexperienced in gas matters is interested in how to check a thermocouple on a gas boiler using a tester - a common electrical and electronics diagnostic tool.Let's try to reveal this technological moment in order to facilitate the task.
Stage # 1 - preparation for verification by the tester
To begin with, we recall that the tester is a measuring device - pointer or digital, with which it is possible to measure:
- resistance;
- voltage value (AC and DC);
- current strength (alternating, direct).
The marked measured values are a kind of basic. And yet, modern testers are able to check a number of other parameters, for example, inductance or capacitance.
But taking into account the principle of operation of the thermocouple of a domestic gas boiler, a voltage measurement mode in the millivolt range is quite enough.
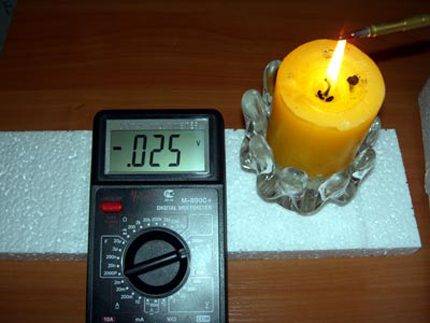
The procedure for testing a thermocouple using a measuring device and a simple heating element - a paraffin candle. As can be seen from the tester readings (25 mV), the gas burner flame control sensor is working
In addition to the measuring device (tester), the service technician will need another fairly simple tool - a heating source. It is better if such a source has the ability to emit an open flame. Therefore, the best option here would be to use a regular paraffin candle.


Stage #2 - visual inspection for defects
The flame control sensor test procedure itself is simple. However, before proceeding with the hot test, it is recommended that you carefully examine the thermocouple visually from the outside.
When inspecting the weld area and the descending rod, physical defects of the metal, including burnout areas, should not be visible on the surface.
Stage # 3 - testing the performance of the sensor
After completing the visual inspection, you can proceed directly to the hot test.To do this, the junction area and the descending section of the gas column thermocouple rod are placed above the candle wick.
Next, a measuring device (tester) is connected to the terminal ends of the thermocouple, after which the candle is lit. The generated potential is observed on the working scale of the measuring device.
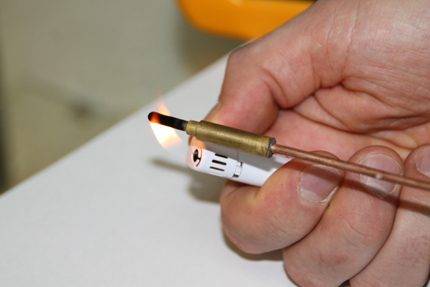
In fact, any suitable heat source, such as a household lighter, can be used to test the sensor's performance. True, depending on the power of the heating source, the readings on the tester may be below normal or, on the contrary, above normal.
The absence of any indication of electric potential clearly indicates a sensor malfunction. With partial defects on the measuring device, chaotic (unstable) readings of units of millivolts may be noted. If the geyser sensor is in good condition, a stable value equal to tens of millivolts (20-30 mV) is usually fixed on the device.
Moreover, as the thermocouple body is heated by a candle flame, the readings on the instrument scale slightly change upwards. If the candle flame is extinguished, the tester readings will rush to zero as the body of the rod and the solder area cool. Here, in fact, that's all. With such a development of events, the thermocouple, as quite serviceable, can be safely placed at the scene of action.