- Installation and adjustment
- How to do?
- How to setup?
- Types of thermostatic valves for heating radiators
- Hand heads
- Rules for installing a control valve
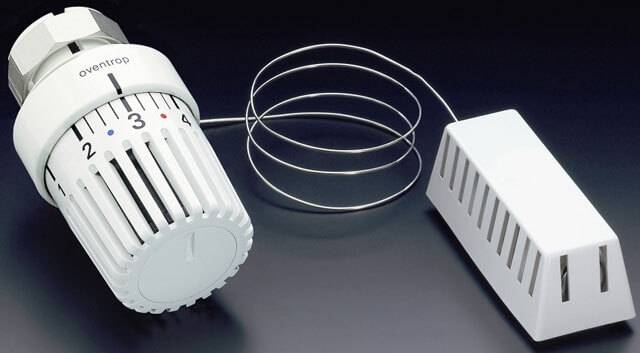
- Remote temperature sensor
- Thermostatic head working principle
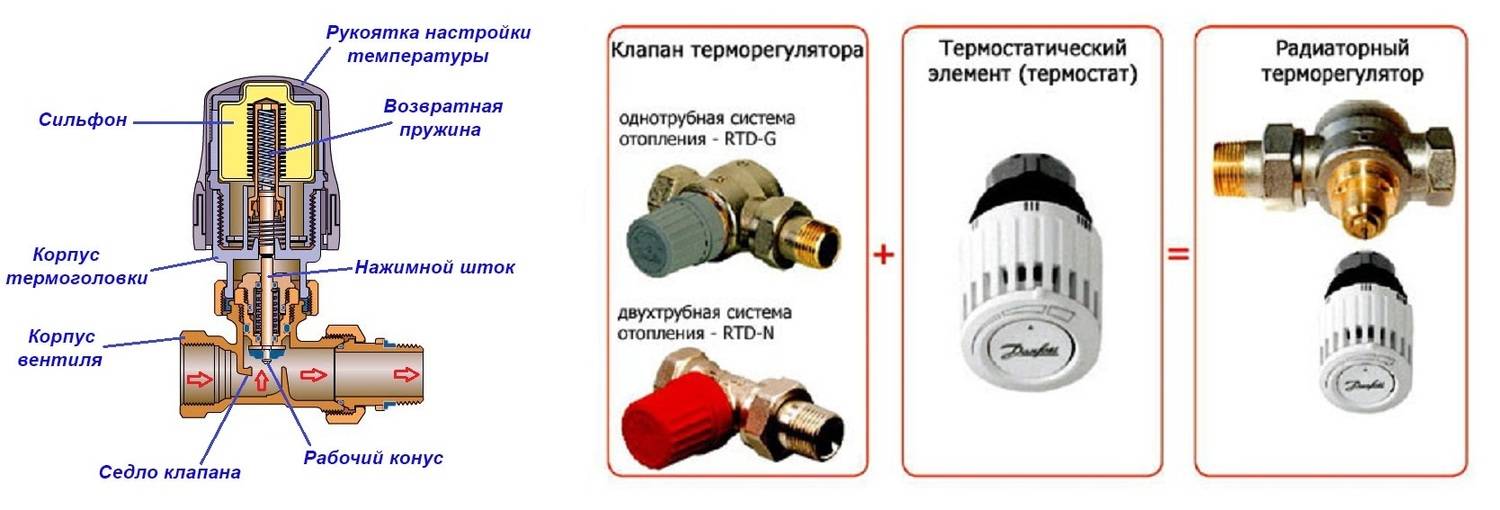
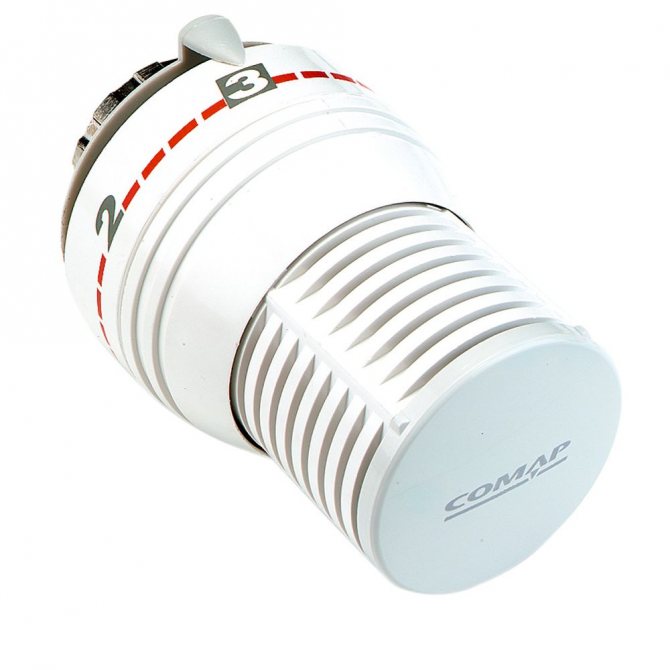
- Purpose and design of the thermal head for heating radiators
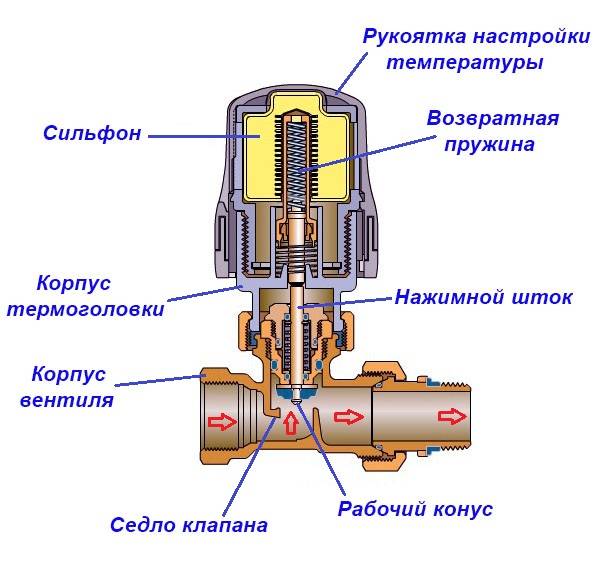
- Device
- thermostatic valve
- Principle of operation
- Varieties
- Thermostats for gas or liquid
- Advantages of the device
- Overview information
- Thermal head setting
- Principle of operation
- The principle of operation of the thermal head
- Remote temperature sensor
- Rules for installing a control valve
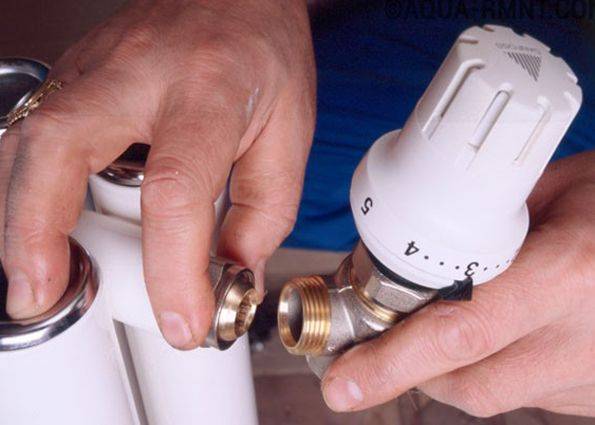
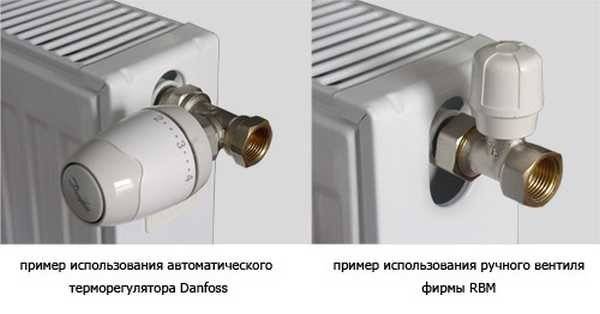
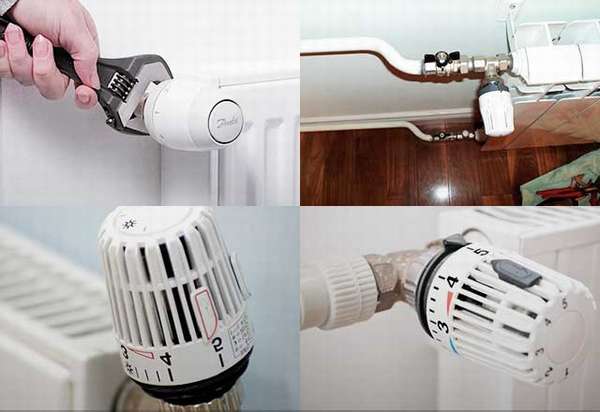
- Installing a thermostat on a heating radiator
- Features of mounting the thermal head
Installation and adjustment
The thermostat works well when it is installed in accordance with all the rules and taking into account some of the nuances. In order for its operation to be effective, durable, correct, it is necessary to initially provide free access, especially if these are mechanical control devices. The automatic type thermostatic element must not be covered with curtains or radiator screens. From this, the analysis of temperature fluctuations may have errors.
Before direct installation of the thermostat, all water is drained from the heating system.Prepare the necessary equipment and installation kit for connection, not forgetting about the accessories. The installation of the device must be carried out perpendicular to the location of the radiator panel. It is worth remembering that the direction of the heat supply flow must coincide with the direction of the thermostat arrow.
If the position of the thermal head after installation is vertical, this will affect the correct operation of the bellows. However, this nuance is not related to devices with a remote sensor or an external control unit. You can not mount the thermostat where the sun's rays will constantly fall on it. In addition, the operation of the device is not always correct if its location is near large household appliances with thermal radiation. The same rule applies to hidden-type options that mask niches inside to increase the aesthetic appeal of the interior of the room.
How to do?
If there is no heating in the apartment or house during the connection, it is necessary to open the thermostat completely. This will save the valve from deformation, and the regulator from clogging. If installation is carried out in a private house with two or more floors, work starts from the top, since warm air always rises
It is also important to take into account rooms where temperature fluctuations are more pronounced. These include the kitchen, sun-drenched rooms, and rooms where households often gather.
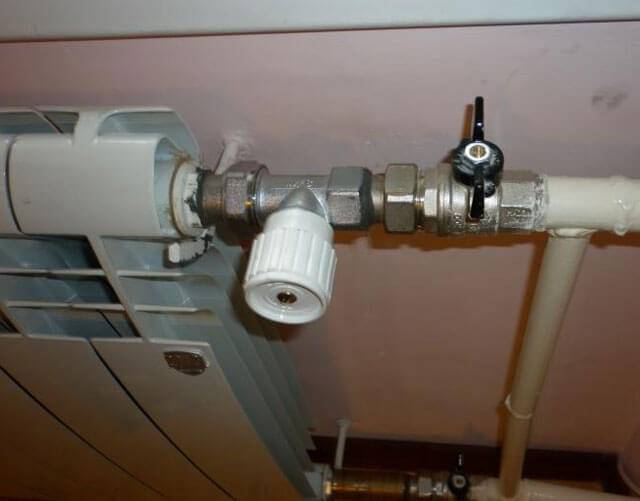
Regardless of the scheme, the thermostat is always installed on the supply pipe. Until the valve is ready, the thermal head is not removed from the package. The horizontal supply pipes are cut at the required distance from the battery. If a tap was previously installed on the battery, it is disconnected.Shanks with nuts are unscrewed from the valve, as well as the locking element. They are fixed in the plugs of the heating radiator.
Piping after assembly in the selected location is attached to the horizontal pipes of the riser. The valve is screwed to the battery inlet, making sure that its position is horizontal. It is possible to mount a ball valve in front of it
This will simplify the replacement of the thermostat if necessary, it will prevent its increased load, which is important when the valve is used as a shut-off valve
The valve is connected to the line supplying the coolant
After that, open the water, fill the system with it and check the tightness of the connections, which is especially important when you need to put the device on old batteries. There should be no leaks or seepage of water.
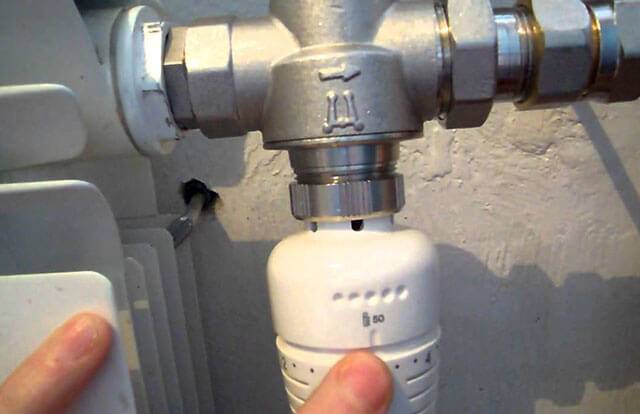
This must be eliminated by tightening the attachment points. Preset the valve as needed. For it, the retaining ring is pulled, after which the mark is combined with the necessary division. After that, the ring is locked.
It remains to install a thermal head on the valve. At the same time, it can be fastened with a union nut or a snap-in mechanism. It is possible to install a thermostat on a battery if the material of its manufacture is aluminum or steel, and also if the design of the radiator is bimetallic. Cast iron are characterized by high thermal inertia, so it makes no sense to install these devices for such batteries.
How to setup?
If it is necessary to adjust the thermostat in order to avoid confusion in the operation of the sensor, it is necessary to initially create the correct conditions in a particular room.
You can work according to the following scheme:
- close windows, doors, turn off existing air conditioners or fans;
- put a thermometer in the room;
- the valve for supplying the coolant is fully opened, turning to the left until it stops;
- after 7-8 minutes, the radiator is closed by turning the valve all the way to the right;
- wait until the falling temperature becomes comfortable;
- smoothly open the valve until the noise of the coolant is clearly audible, indicating the most comfortable conditions for the temperature background of the room;
- rotation is stopped, leaving the valve in this position;
- if you need to change the comfort temperature, use the thermostatic head controller.
How to install and configure a thermostat on a heating radiator, see the video below.
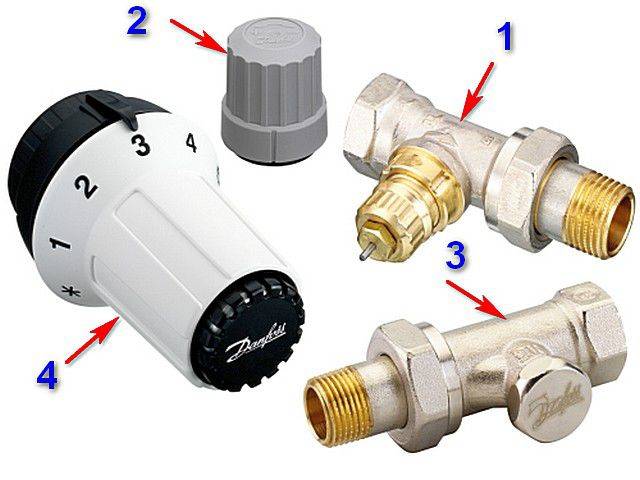
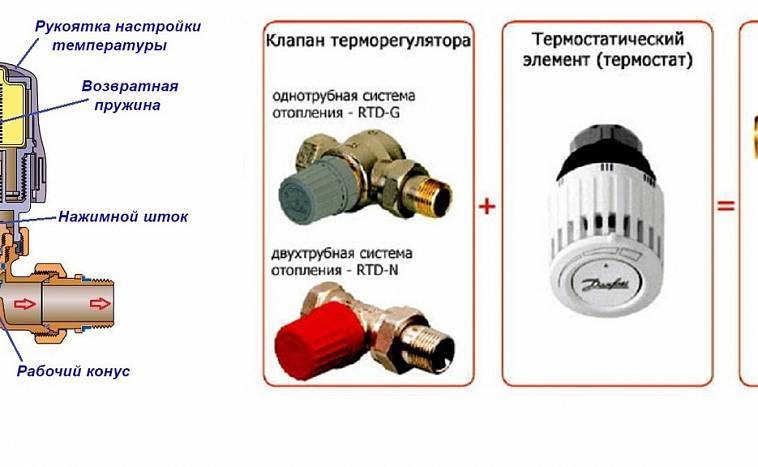
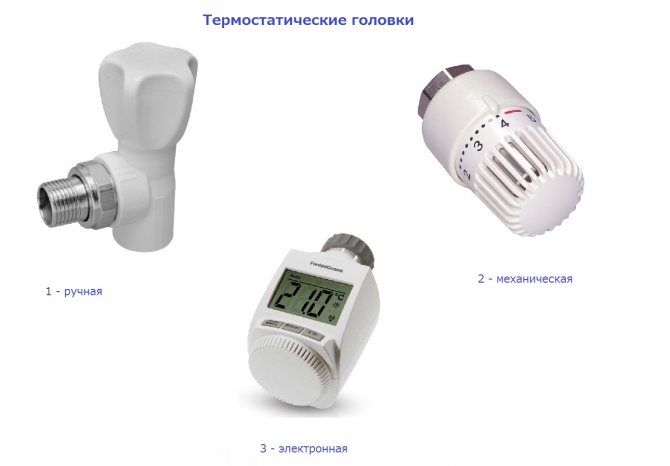
Types of thermostatic valves for heating radiators
Three types of thermostatic heads can be used in thermostats:
- manual;
- Mechanical;
- Electronic.
Any heat regulator on the battery is used to solve the same problems, but there are quite a few differences in their use, so it’s worth considering each of them in more detail and figuring out how to reduce the heating battery using one or another device.
Hand heads
Thermostatic heads with manual control, according to the principle of operation, completely repeat a conventional tap - turning the regulator directly affects the amount of coolant passing through the device. As a rule, such regulators are installed on both sides of the radiator instead of ball valves. Change of temperature of the heat carrier is carried out manually.


Manual thermostatic heads are the simplest and most reliable devices, distinguished primarily by their low cost.There is only one drawback - you have to manually adjust the thermostatic radiator valve, focusing only on sensations.
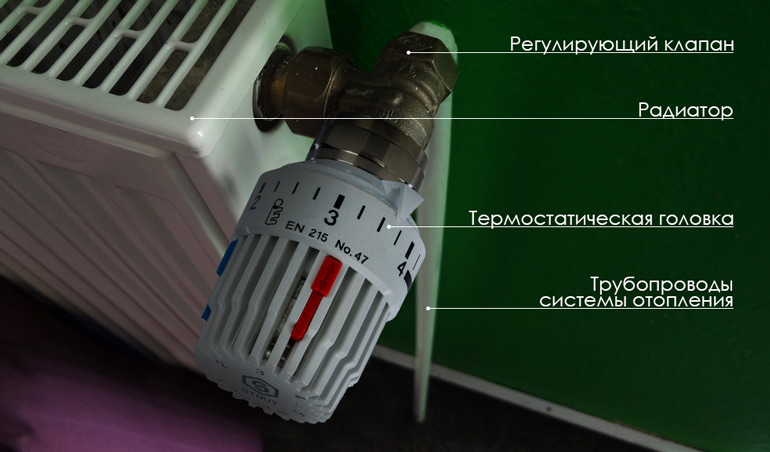
Rules for installing a control valve
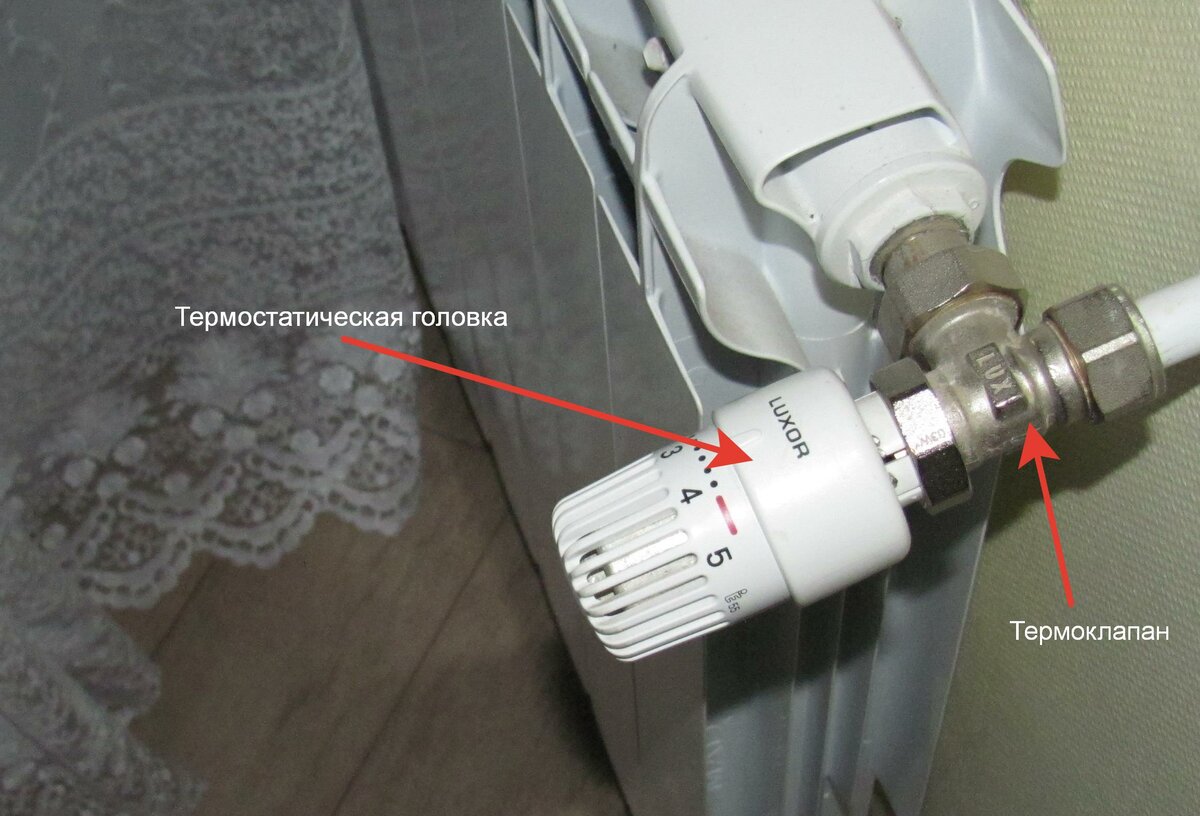
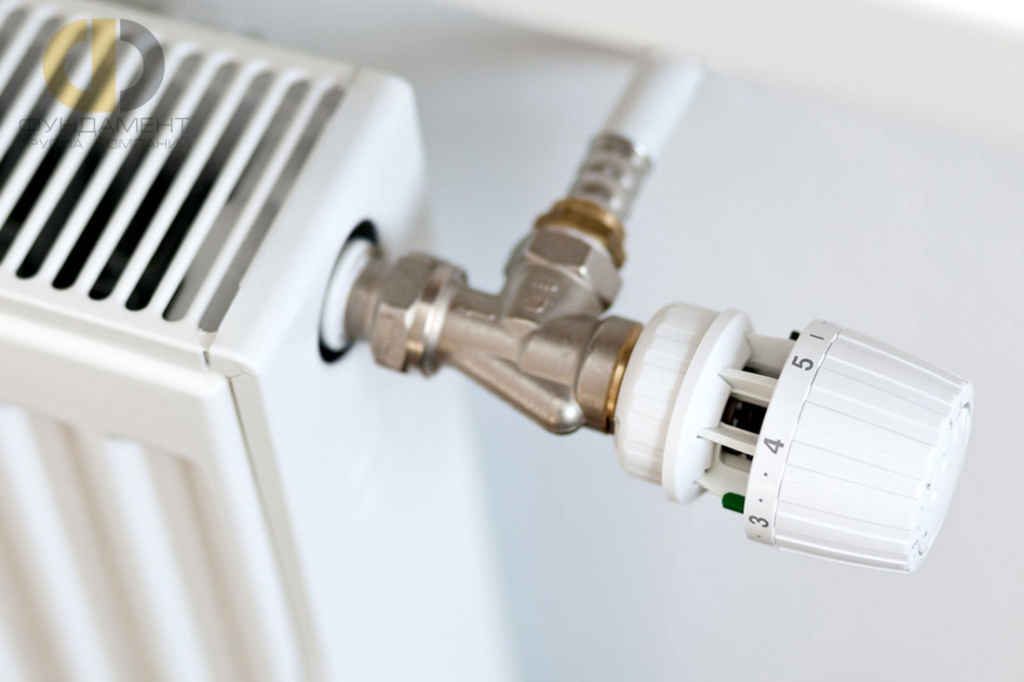
As mentioned above, the greatest efficiency is achieved when the thermocock is installed horizontally on the radiator.
The thermal head is installed according to special rules, according to which adjustment is necessary only for powerful radiators. Therefore, you should not equip every battery in the living area with this device. The greatest efficiency can be achieved if the thermostat is installed on the most powerful heating element in the room.
It is not recommended to install a faucet with a thermal head for a radiator on cast iron radiators, this will not give the desired effect. The reason for this is the inertia of cast iron batteries, resulting in a large adjustment delay. Therefore, the installation of a thermal head in this case makes no sense.
The best option is to install a valve on the supply pipe when connecting the battery to the system. Otherwise, it is necessary to insert the device into the finished system. For this purpose, the individual elements of the heating circuit are dismantled and the pipes are cut, after closing the tap. It is rather problematic to make a tie-in into metal pipes, so you need to study the instructions on how to install a thermal head on a heating radiator.
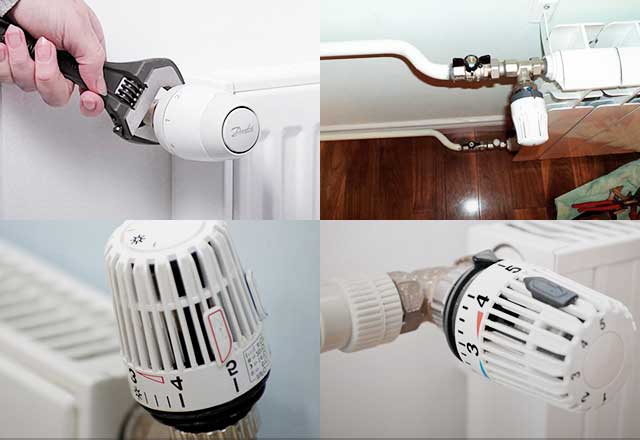
After completing the installation of the thermostat, it is necessary to fix the thermal head. This process is not particularly difficult and is as follows:
- On the body of both elements there are corresponding marks that must be combined.
- To fix the thermal head, you need to lightly press the device.
- A deaf click will tell you about the correct position and installation.
Anti-vandal thermostats are more difficult to install. In this case, to solve the problem of how to install the thermal head on the radiator, you need a 2 mm hex key.
The work proceeds in the following order:
- With the help of dowels, a plate is attached to the wall.
- The body of the device is fixed on the plate.
- By means of clamps on the wall fix the capillary tube.
- Install a valve with a thermal head for radiators, aligning the marks, and press it to the main body.
- Tighten the fixing bolt with a hex wrench.
Choosing the best option for a thermostatic head for a radiator is not particularly difficult. The main condition is that the option must correspond to the heating system, regardless of whether it is at the design stage or already presented in assembled form. In addition, the features of the installation of each type of thermostat should be taken into account. According to masters with many years of experience, programmable devices allow you to get the maximum benefit and savings.
Remote temperature sensor
The use of a remote sensor is necessary in several other cases:
- Heating radiators with a thermostat are covered with thick curtains.
- An additional source of thermal energy is located in the immediate vicinity.
- The battery is located under a large window sill.
Sometimes heating radiators are covered with decorative screens. This situation is observed in rooms with increased requirements for the interior.In this case, the thermostat located inside registers only the temperature behind the decorative trim. In addition, access to the thermal head is difficult. To solve the problem, a thermal head for a heating radiator with a remote sensor is installed.
As for programmable devices, they are equipped with displays for visual control and are also divided into two types. Some of them are equipped with a built-in control unit, while others have this element removable. The second option has some advantage: the disconnected control unit continues to work in the same mode
It is important to control how the thermal head works on the heating radiator.
Such models allow you to adjust the temperature individually for a particular situation. For example, during the day you can reduce the temperature values, and at night - increase. As a result, the savings are quite significant.
Thermostatic head working principle
The main sensor is the bellows, the liquid or gas in which is under a certain pressure. The balancing spring is responsible for balancing the device, which compresses the bellows when we set the temperature we need by turning the rotary knob.

Thermostatic head working principle
- As the temperature rises, the volume of the bellows increases (mainly due to gas expansion or partial evaporation of the working fluid).
- An increase in the volume of the bellows leads to the fact that the spring fixing the stem is released, and the valve gradually closes the gap in the pipe.
- This continues until equilibrium is established inside the device, or until the radiator valve under the thermal head is completely closed, i.e.the stem will not move to its lowest position.


Purpose and design of the thermal head for heating radiators
The main task of the thermostatic head is to maintain the air temperature in the heated room in accordance with the specified settings.
Depending on the capabilities of a particular model, a fixed or dynamic temperature background is set in the room.
This class of devices is characterized by high adjustment accuracy - for models of the middle price segment, the error does not exceed 1 ° C. In addition to maintaining a comfortable temperature, the use of such devices also contributes to more economical energy consumption by optimizing the circulation of the coolant in the heating system.
Important! Depending on the operating mode, the average amount of energy saved when using thermal heads varies from 10 to 20%
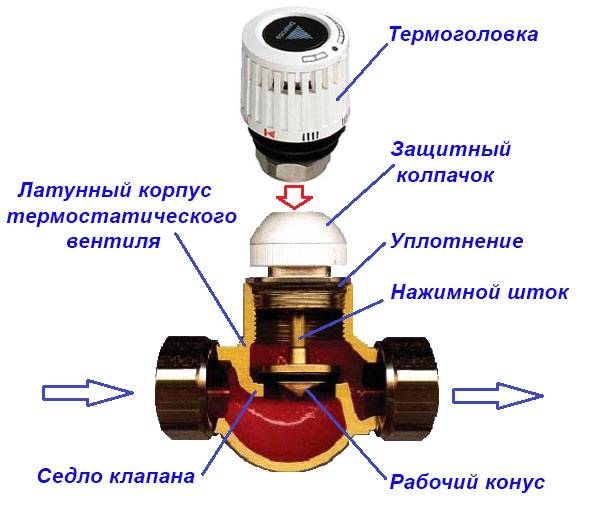
Device
The main structural elements of the thermostatic head:
- plastic case;
- bellows;
- rod, pusher and return spring;
- locking element;
- sealing elements;
- fasteners.
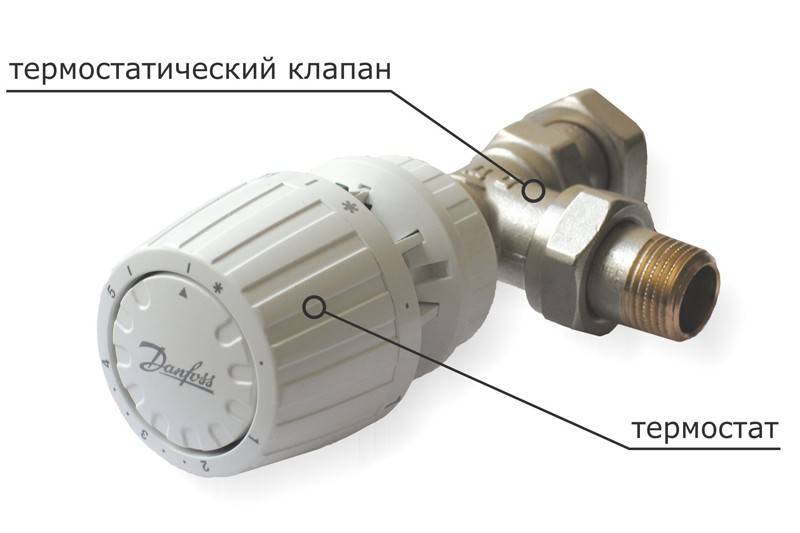
thermostatic valve
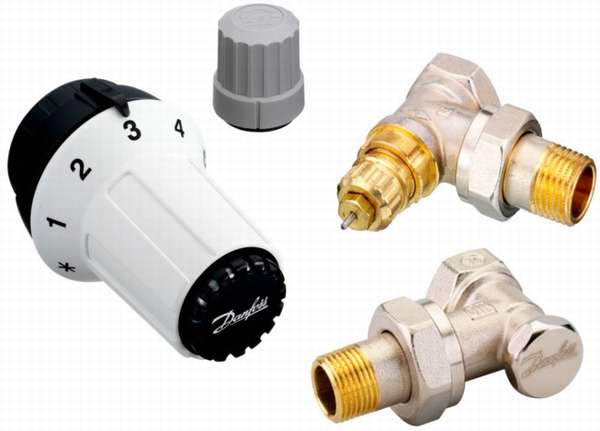
Most models of thermal heads are equipped with valves, the main task of which is to regulate the diameter of the radiator inlet. Thermostatic valves are mounted on a straight or corner section of the heating circuit.
Photo 1. Thermal head with a thermostatic valve. It is the valve device that regulates the amount of coolant admitted to the radiator.
Removing the thermal head from the valve at the end of the heating season allows you to solve this problem and significantly extend the period of effective operation of the device.
Attention! With prolonged inactivity or prolonged operation in one mode, the risk of “sticking” of the moving elements of the thermostatic head is greatly increased
Principle of operation
The bellows of the thermal head, filled with a substance with a high coefficient of thermal expansion (usually ethyl acetate, toluene or wax), reacts to changes in the temperature background in the room. The user sets the desired room temperature.
With an increase in this indicator, the bellows filler drives the stem, which reduces the diameter of the passage channel of the thermostatic valve. The throughput of the radiator decreases and the temperature drops in accordance with the set parameters.

Photo 2. The structure of the thermostatic head for radiators. The arrows indicate the component parts of the device.
When the temperature drops below the set value, the bellows filler decreases in volume and the reverse process to that described above takes place. The circulation of the coolant increases and the temperature in the room rises to the desired value.
Important! Installation of thermal heads on cast iron radiators is ineffective, since the cooling and heating of cast iron takes a long time, especially compared to aluminum, steel and bimetallic radiators
Varieties
Classification of thermal heads is carried out according to several criteria:
- compatibility with thermostatic valves of a certain standard;
- temperature control method.
Thermostats for gas or liquid
What is the difference between gas-filled bellows and liquid-filled bellows? There is a difference, and it would be better to know about it when buying!
- Gas-powered devices have a high service life - about 20 years.At the same time, the gas reacts very smoothly to temperature changes, which does not cause excessive sudden loads on the equipment.
- Liquid, on the contrary, work quickly, which affects the wear of working parts a little more, but allows you to quickly respond to a drop or rise in temperature. They work more accurately than gas.
- In liquid thermostats, the sensor can be remote or built-in. If it is built-in, then the device is placed in a horizontal position to reduce the influence of convection currents from the radiator and pipes.
- It is advisable to install remote-type sensors when the device is closed with thick curtains that affect heat transfer, the thermostat is located vertically, the radiator is installed in a deep wall niche or too close to the windowsill.
Modern temperature sensor
Advantages of the device
The use of thermostats has several benefits:
- With its help, you can maintain comfort and the required temperature conditions, significantly save thermal energy. This is noticeable in apartments with district heating, where there are heat meters. It is estimated that when using the device in an individual heating system, the savings are up to 25 percent.
- With the help of a thermostat, the microclimate in the room improves, since the air does not dry out from excessively high temperatures.
- You can set different temperature conditions for the rooms of the house or apartment.
It's never too late to embed a thermostat in radiators
The current system or just starting up - it doesn’t matter, the installation is not complicated.
When using the device, no additional maintenance costs are required.
Modern design solutions for thermostats are suitable for any room interior.
Long service life with proper installation.
The thermostat allows you to set the temperature mode with an accuracy of 1 degree.
The device helps to evenly distribute the coolant along the water circuit.
Overview information
Thermostatic heads of different companies with an operating temperature range from 0 to 40 degrees above zero, allow you to adjust the temperature in the room in the range from 6 to 28 degrees. Among them are the following devices:
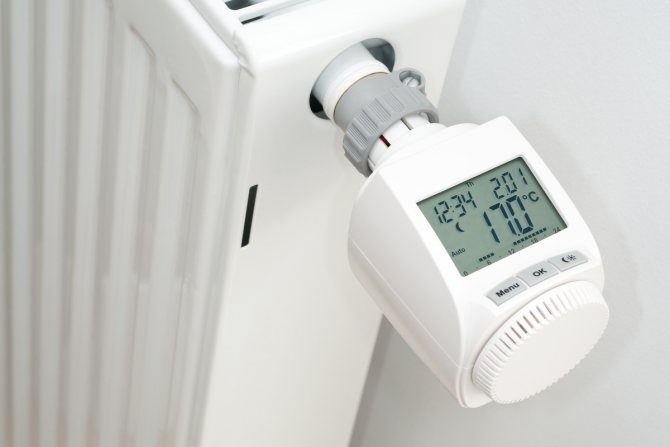
- Danfoss living eco, electronic programming model.
- Danfoss RA 2994, mechanical type, equipped with gas bellows.
- Danfoss RAW-K mechanical, differs in that the bellows are filled not with gas, but with liquid and is designed for steel panel radiators.
- HERZ H 1 7260 98, mechanical type, bellows filled with liquid, the device of this company will cost a little less.
- Oventrop "Uni XH" and "Uni CH" with liquid bellows, mechanically adjusted.
Thermal head setting
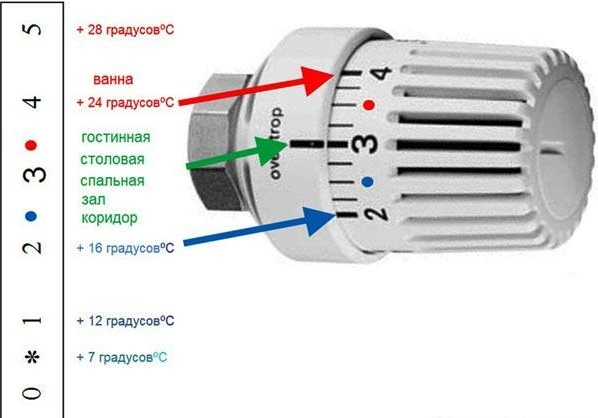
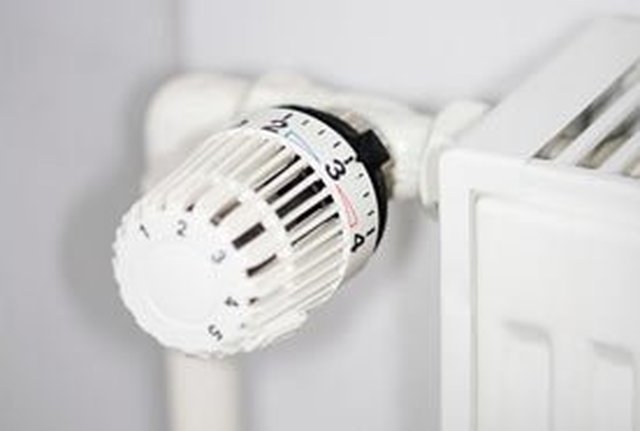
After the user has become familiar with the design of the device, learned how the thermal head works on a heating radiator, setting the optimal microclimate in each room is not difficult. By turning the handle relative to the scale with marks, you can adjust the temperature within +5 - +28 degrees.


Thermal head settings are carried out by turning the knob on a digital scale
In the first case, the system is guaranteed not to freeze in the absence of the owners inside the building of periodic operation. The maximum value is considered comfortable for users.The substance with which the bellows chamber is filled responds to an increase / decrease in temperature within 1 degree. Therefore, valve on/off cycles will occur regularly.
Thus, any home master will be able to select and mount the thermal head together with the valve. To do this, it is enough to take into account the above factors, to avoid the main installation errors.
Principle of operation
As the temperature rises, the material inside the bellows begins to expand, causing the bellows to stretch and push against the valve stem. The stem moves down a special cone, which reduces the flow area of the valve. When there is a decrease in temperature, the volume of the working medium decreases. In this case, the composition cools down, so the bellows is compressed. The return stroke of the rod increases the coolant flow.
The amount of coolant in the heating system will change every time the temperature in the heated room changes. Reducing or increasing the bellows will actuate the spool, adjusting the flow of coolant. For temperature changes the temperature sensor reacts outside. The battery itself will not warm up completely when installing the device. Some of its sections will be chilled. If you remove the head at the same time, the entire surface will gradually warm up.
The thermostatic head (thermal head) for the regulator needs to be adjusted. The temperature of the radiator heat is regulated by means of a coolant passing through it. Valves for single-pipe and two-pipe wiring are mounted differently, which is associated with different hydraulic resistance (it is 2 times less for single-pipe systems). It is unacceptable to confuse or change the valves: there will be no heating from this.Valves for one-pipe systems are suitable for natural circulation. When they are installed, the hydraulic resistance will increase.
The principle of operation of the thermal head
The temperature of the air near the thermal head affects the state of the substance in the bellows container. Increasing or decreasing in volume, the substance acts on the position of the rod, thereby regulating the volume of coolant entering the radiator.
Danfoss thermostat on a panel radiator.
If the air temperature in the room rises, the substance in the bellows begins to expand, squeezing out the rod, which in turn reduces the cross section of the channel, and the volume of coolant entering the radiator is reduced. When the temperature drops, the reverse process occurs: the substance in the bellows is compressed, due to which the rod rises, increasing the channel cross section, and the volume of the incoming coolant increases.
The opening and closing of the stem is facilitated by two stainless steel springs: one returns the stem after the valve is closed, the other after opening.
Valtec VT.5000.0. Liquid, bellows filler - toluene.
Note! One of the most common problems with thermostats is the sticking of moving elements when they are not used for a long time (or if the settings have been fixed for a long period of time). This is especially true for thermostatic fittings with a pressure force on the stem up to 2 kg. To solve this problem, devices with a pressure force of 4 kg should be installed. In addition, after the end of the heating season, it is recommended to remove the thermal heads from the valves, which will extend their service life.
For the correct functioning of the thermal head, it must be periodically cleaned of dust and dirt.It should be remembered that cleaning agents and abrasive materials should not be used for cleaning.
Thermostatic element RTR 7091 for Danfoss radiator valve.
Remote temperature sensor
The use of a remote sensor is necessary in several other cases:
- Heating radiators with a thermostat are covered with thick curtains.
- An additional source of thermal energy is located in the immediate vicinity.
- The battery is located under a large window sill.
Sometimes heating radiators are covered with decorative screens. This situation is observed in rooms with increased requirements for the interior. In this case, the thermostat located inside registers only the temperature behind the decorative trim. In addition, access to the thermal head is difficult. To solve the problem, a thermal head for a heating radiator with a remote sensor is installed.
As for programmable devices, they are equipped with displays for visual control and are also divided into two types. Some of them are equipped with a built-in control unit, while others have this element removable. The second option has some advantage: the disconnected control unit continues to work in the same mode


At the same time, it is important to control how the thermal head works on the heating radiator.
Such models allow you to adjust the temperature individually for a particular situation. For example, during the day you can reduce the temperature values, and at night - increase. As a result, the savings are quite significant.
Actual devices are ideal for homes where there are small children who touch and twist everything.
Therefore, it is important to know and understand how to install a thermostatic head on a radiator.
Temperature controllers of this type do not allow you to knock down the settings with careless handling. This option is also used in public buildings, including kindergartens and hospitals.
This option is also used in public buildings, including kindergartens and hospitals.
Rules for installing a control valve
As mentioned above, the greatest efficiency is achieved when the thermocock is installed horizontally on the radiator.
The thermal head is installed according to special rules, according to which adjustment is necessary only for powerful radiators. Therefore, you should not equip every battery in the living area with this device. The greatest efficiency can be achieved if the thermostat is installed on the most powerful heating element in the room.
It is not recommended to install a faucet with a thermal head for a radiator on cast iron radiators, this will not give the desired effect. The reason for this is the inertia of cast iron batteries, resulting in a large adjustment delay. Therefore, the installation of a thermal head in this case makes no sense.
The best option is to install a valve on the supply pipe when connecting the battery to the system. Otherwise, it is necessary to insert the device into the finished system. For this purpose, the individual elements of the heating circuit are dismantled and the pipes are cut, after closing the tap. It is rather problematic to make a tie-in into metal pipes, so you need to study the instructions on how to install a thermal head on a heating radiator.
After completing the installation of the thermostat, it is necessary to fix the thermal head.This process is not particularly difficult and is as follows:
- On the body of both elements there are corresponding marks that must be combined.
- To fix the thermal head, you need to lightly press the device.
- A deaf click will tell you about the correct position and installation.
Anti-vandal thermostats are more difficult to install. In this case, to solve the problem of how to install the thermal head on the radiator, you need a 2 mm hex key.
The work proceeds in the following order:
- With the help of dowels, a plate is attached to the wall.
- The body of the device is fixed on the plate.
- By means of clamps on the wall fix the capillary tube.
- Install a valve with a thermal head for radiators, aligning the marks, and press it to the main body.
- Tighten the fixing bolt with a hex wrench.
With the help of thermostats, you can not only regulate the temperature, limiting pins on the back wall. Devices allow you to set the smallest and largest value. At the same time, beyond the established limits, the wheel will no longer turn
Choosing the best option for a thermostatic head for a radiator is not particularly difficult. The main condition is that the option must correspond to the heating system, regardless of whether it is at the design stage or already presented in assembled form. In addition, the features of the installation of each type of thermostat should be taken into account. According to masters with many years of experience, programmable devices allow you to get the maximum benefit and savings.
Installing a thermostat on a heating radiator
It is rather difficult to describe how the thermostat is installed on a heating radiator step by step, because there can be a lot of options that depend on the type of material, internal circuit wiring. However, it is worth reading a few recommendations.
-
- The first thing to know is that the thermostat is always installed at the inlet of the supply pipes to the battery. The valve has a short fitting with a union nut, which greatly simplifies the mounting of the device with a heating battery and makes it detachable. On the other side of the valve is a threaded fitting. It will be firmly packed with the supply pipe or other strapping items.
- Before starting installation work, it is necessary to inspect the pipes for the presence of coolant. If necessary, drain.
- Installation always begins with the fastening of the thermal valve. The head is always installed last. The valve stem that protrudes must be covered with a cap so that unexpected mechanical damage does not occur.
- The valve is fixed in such a way that the head is in a horizontal position. However, a manual thermal head and a thermal head for a heating radiator with a remote sensor do not fall under this condition, because the position does not play a special role here.
- The valve is connected to the piping in the most suitable way for such pipes. For metal-plastic, packing of a press fitting may be suitable, and for polypropylene, packing of a fitting with a transition to a welded socket. If the pipes are made of metal and conditions allow, then you can make a direct packing, a system of drives, or use an “American” nut.
- Many people wonder whether it is worth installing a ball valve in front of the thermostat.Although it is not the main element, there are still some advantages in its installation.
If there are two radiators in the room, it would be pointless to install a thermostat on each. Devices will only interfere with each other's work. With the equivalence of radiators, it is logical to attach the device to any of them. Which one you install doesn't matter. With different power characteristics of heating devices, it is worth fixing the thermostat to the one that has a large heat transfer.
If the thermostat is mounted on a radiator connected to a one-pipe system, then several conditions must be observed. Of course, the thermal valve must be suitable for a one-pipe system.
It is important that a bypass (jumper pipe) be installed in the middle of the supply and return pipes. The diameter of the bypass must be less than the diameter of the wiring by the size
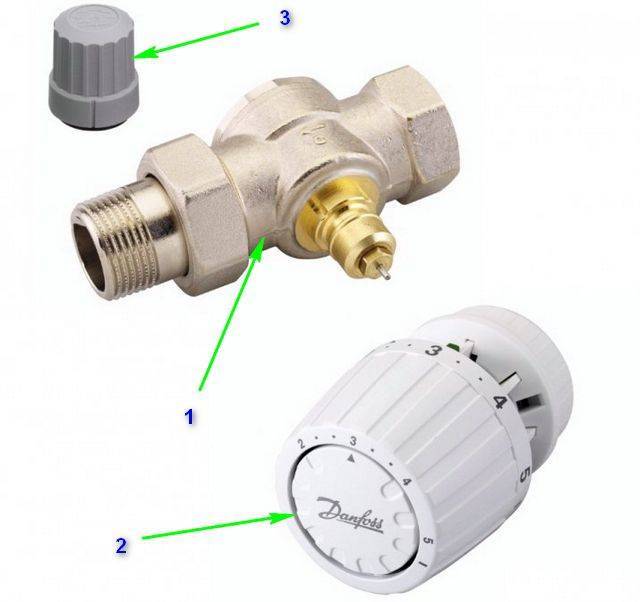
In no case should there be locking elements between the riser and the bypass. If it is a ball valve or a thermostat, then they should be located between the bypass and the battery. After the valve installation procedures, it is required to fill the radiator with coolant and start the system for circulation in order to check for leaks. If there are no leaks in the joints and from under the thermovalve stem, then the work has been done well. If you need to pre-install the thermal valve, then you should do it now. Look at the operating instructions for the device and set the desired value on the scale. Installation is done by yourself. To do this, it is necessary to remove the ring with a scale from the stopper and turn it until the required division is aligned with the mark. After all, you can already start installing the head. Options must be spelled out in the instructions.There are thermal heads that can be fixed with one click (typical for Danfoss production). There are those that are attached to the valve body with a union nut M 30x15. Make sure that the maximum visibility of the setting scale is ensured. Now the nut can be tightened. The last step is to adjust the thermostat. This can be done on your own. Programming of electronic thermal heads is carried out in accordance with the instructions.
Features of mounting the thermal head
Installation is carried out in a clear sequence. To install the thermostat, you can attract a specialist or make it yourself, but for this you need to familiarize yourself with the technology.


Before carrying out work, the heating system is turned off and the liquid is drained. Next, the pipe leading to the radiator is cut off at the specified location. If the battery was equipped with a crane, you will need to dismantle it. Having unscrewed the shank from the valve, fix it in the radiator plugs with a nut. After making the piping, install it in a certain place and connect it to the circuit. The thermal head is installed in an adapter located on the regulator body. This will allow you to change the control node in case of failure.
The thermostat setting is carried out after filling the circuit with coolant. The efficiency of the regulatory unit depends on the quality of these works.