
- What are the consequences of errors in the installation of the ECP
- System calculation and design
- How to make a floor screed on the ground for a warm floor
- Installation of a water heating system
- Preparatory stage
- Choosing the optimal step
- Video - Warm floor "Valtek". Mounting instruction
- We select the type of pipe rolling and produce their laying
- Mounting, proportions and hinge pitch
- Pouring cement-sand screed
- Video instructions
- How pipes are laid
- Filling the screed and setting up the collector
- How to make a water heated floor?
- Preparatory work
- How to make a water heated floor: types of styling
- Concrete paving system
- Polystyrene system
- How to make a warm floor from heating?
- Boiler installation
- Connection to an individual heating boiler
- Laying a warm water floor
- Which system to choose
What are the consequences of errors in the installation of the ECP
When laying pipes, it is important to ensure that they are strictly parallel to the floor. If the height difference between the beginning and end of the pipe is more than half of its diameter, this will lead to the formation of air pockets, which will impede the circulation of the coolant and significantly reduce the heating efficiency
Pipes must be placed strictly horizontally
Each circulation circuit must be made from a single piece of pipe, the connections in the circuit must be only with a manifold group. The connection of two pipe sections in one circuit and the pouring of this connection into the screed is highly undesirable. This greatly increases the possibility of coolant leakage, and several times reduces the reliability of the entire system.
The contour must be solid
Before pouring the screed, it is important to conduct a hydraulic test of the entire system with increased pressure at the operating temperature of the coolant. The pressure should remain constant throughout the day, it is important to make sure there are no leaks
After pouring the screed, it will be extremely difficult to find the place of the leak.
All tests are carried out before pouring the screed
The screed is filled with a filled circuit with a coolant temperature of not more than 25 degrees. Failure to comply with this rule can lead to deformation of pipes, the formation of air pockets and uneven solidification of the screed, which will lead to poor heating.
It is allowed to start the system at operating temperature no earlier than 28 days after pouring the screed. Heating at an earlier time will lead to the formation of voids inside the screed, which will reduce the efficiency of the warm floor by several times.
After pouring the screed, you can use the warm floor after 28 days
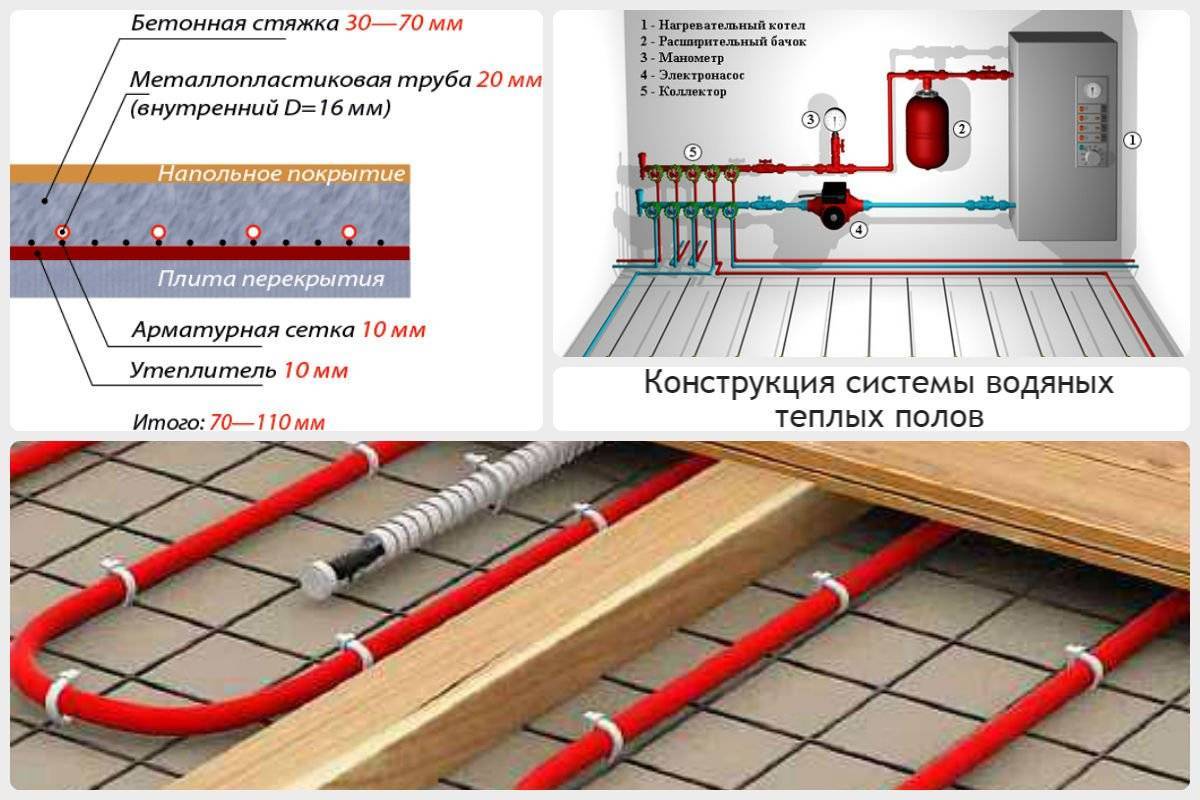
System calculation and design
How can you make a water heated floor with your own hands? You should start with the calculation and design of the system. This is the most important stage of work, on which the features of heating installation, heating efficiency and durability of the entire structure depend.
When designing, the following factors are taken into account:
- the volume to be heated (area, height, shape of the room);
- features of the temperature regime;
- materials to be used in the work.
When developing a scheme, all the nuances are taken into account, including the location of collectors, expansion joints
It is important that the deformation space and pipeline elements do not intersect.
It is also desirable to know in advance where and how the furniture and / or plumbing fixtures will be located. If furniture is planned above the pipes, then it should be made of materials that tolerate high temperatures well. It is better not to use a tree, because. it dries up.
Be sure to calculate the heat loss. How to do this is described in the video tutorial:
For each room of the house you need a separate circuit. If non-residential premises are heated (for example, a loggia or a veranda), then the circuit should not be combined with adjacent living rooms. Otherwise, the heat will go away to heat the non-residential area, and the living rooms will be cold.
In order not to make a mistake when designing, some nuances should be taken into account. An expert says this:
How to make a floor screed on the ground for a warm floor
The current methods of installing a concrete screed on the ground are divided, as a rule, into 4 main stages:
- preparatory work;
- pouring concrete screed;
- plane processing;
- cake sealing.
Of particular importance is the layered structure of the cake. It includes the following:
- base (it must be compacted before performing subsequent work);
- fine sand;
- crushed stone;
- waterproofing layer;
- primary concrete coating;
- steam protection;
- panel or roll insulation;
- finished concrete screed with reinforcement.
Preparatory work begins with leveling. This will determine the level of the soil and the floor of the future building.The soil must be compacted through the use of special units.
The waterproofing layer can be made of membrane materials. The only requirement for it is integrity. Otherwise, damage may be fraught with flooding. The maximum tightness of the layer will be achieved by overlapping it with fastening the parts with mounting tape.


The rough screed is made of lean concrete with an admixture of fine crushed stone. There are no special requirements for such a surface. By the way, it can have differences in height up to 4 mm.
Insulation of floors on the ground involves the use of high-quality materials. Ideally, this layer should perform the function of not only thermal insulation, but also protect the room from water penetration. This will help protect your home from flooding.
Installation of the finishing screed is carried out in several steps.
With a small value, you can use the road grid. If the expected loads are large enough, then it is recommended to use a frame made of iron rods with a diameter of 8 mm.
At the end of the work, the installation of guide beacons and the final pouring of the cement-concrete mixture are carried out. The final step is leveling the floor.
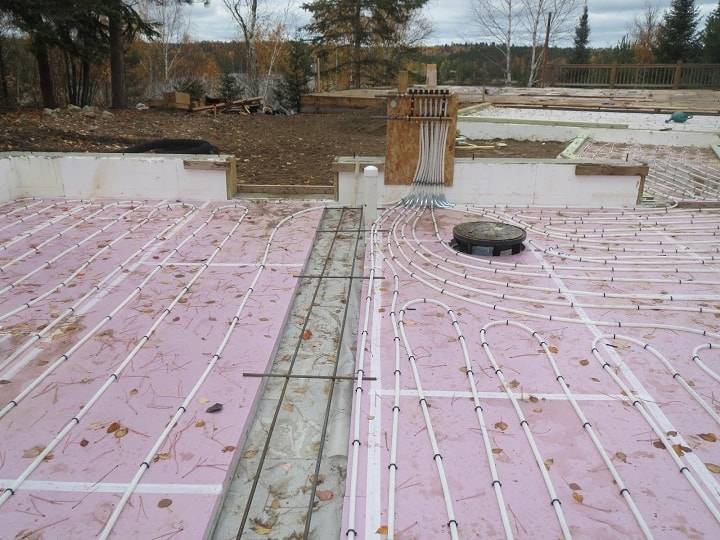
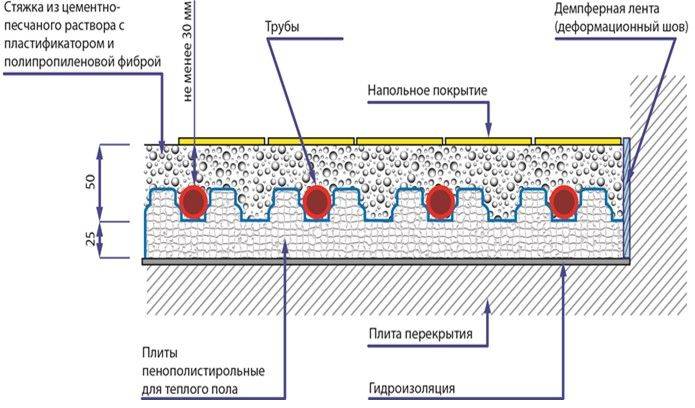
Installation of a water heating system
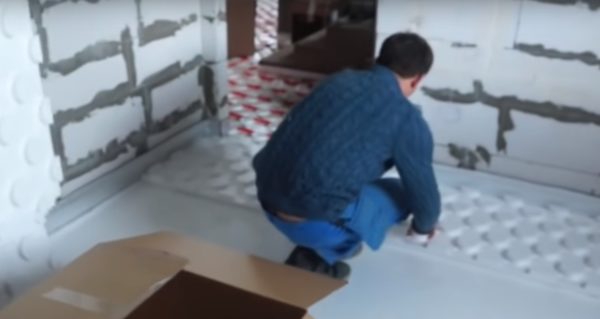
Let's see how the process of arranging a water floor takes place using polystyrene foam plates, but subject to pouring a screed over them. The slabs will be used instead of reinforcing mesh to fix the underfloor heating pipes to the base surface.
Step 1. First you need to prepare a rough base - level it and clean it of debris. The room must immediately be freed from all unnecessary
Only minor flaws in the base are not critical, you can ignore them
Preparatory work is carried out first
Step 2. Next, lay a layer of waterproofing material, and then a layer of insulation (in this case, foam is used)
As for the waterproofing layer, it is important to lay individual strips overlapping each other and glue the joints with strong adhesive tape. Insulation sheets are stacked tightly to each other, if necessary, they can be cut
They need to cover the entire surface of the floor.

Insulation laying
Step 3. Glue the damper tape along the perimeter of the wall near the floor. Also, if the wall material allows, it can be screwed onto self-tapping screws. It is necessary so that the screed does not crack when it expands to the sides when it dries. It is not worth neglecting the laying of the tape - this can affect the quality of the floors.
Damper tape attachment
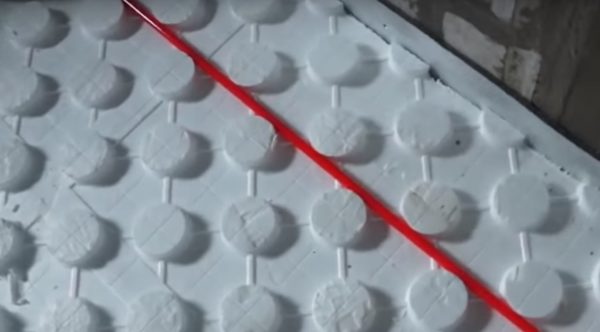
Step 4. Now you need to lay the polystyrene foam mats so that the protrusions on the elements adjacent to each other coincide with each other. It is necessary to lay mats over the entire surface of the insulation. They are easily joined together, and if necessary, they can be cut to cover the remaining free small areas of the floor, smaller in size than the mats themselves.
Laying polystyrene foam mats
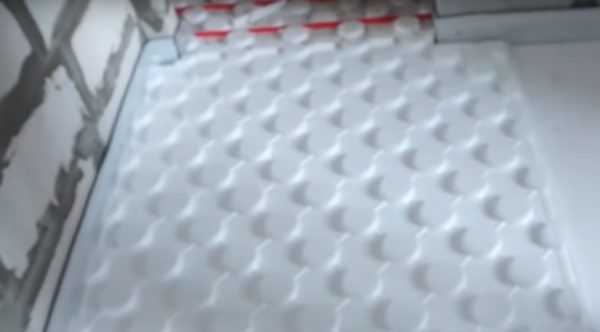
The protrusions must match
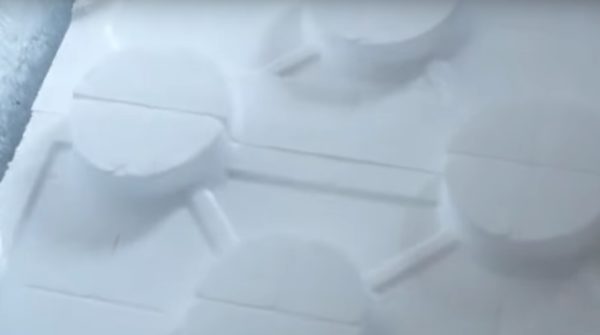
Mats can be cut if needed
Step 5
Before laying the heating circuit, it is important to remove all debris from the surface of the mats, which could be formed during their installation and during their cutting.
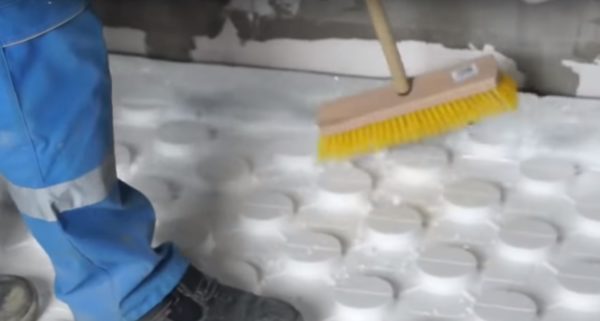
Removing debris from mats
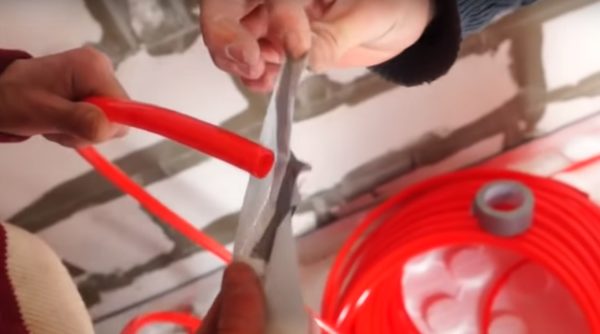
Step 6. In this case, the collector for connecting the heating system is located in another room, which means that pipes must be brought into the room. To do this, the easiest way is to drill a hole in the wall, which will allow the pipes to be pulled through.You also need to make a second hole nearby, where the second end of the pipe will start - it will supply the cooled water back to the heating system towards the collector.


Removing debris from mats
The pipe is inserted into the hole
Pipe outlet in the next room
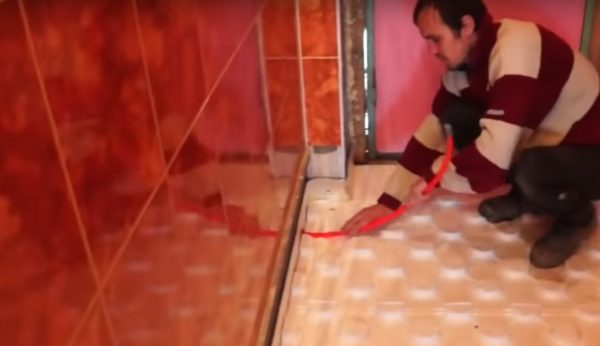
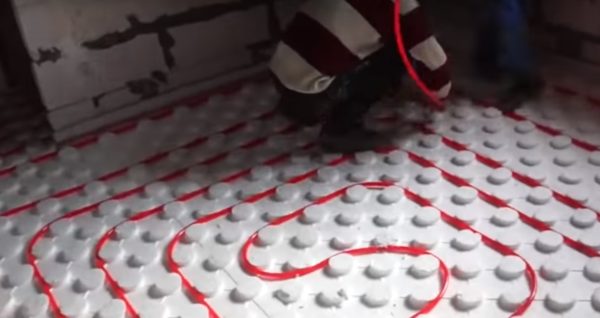
Step 7. In accordance with the chosen laying scheme (in this case, it is a snail), it is necessary to lay the pipes of the underfloor heating, fixing them between the protrusions of the mats, observing the step. In the center of the room, the pipes must be run in the opposite direction, and the end of the pipe must be inserted into the second hole. After passing the pipe through the wall, you can start connecting it to the collector
Before you start pushing the pipe through the wall, it is important to wrap its end with tape so that nothing gets inside it.
Pipe laying process
Another photo of the process
The end of the pipe is wrapped with tape
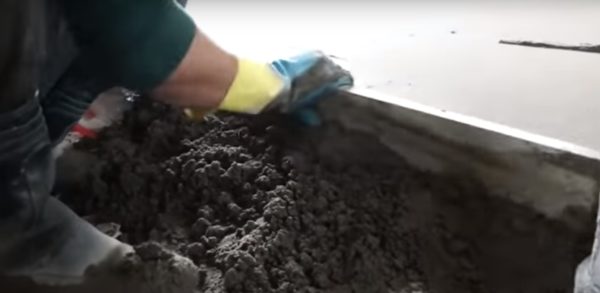
Step 8. After the pipes have been laid and connected to the manifold, you can test the system for performance by filling it with water. After that, you can start pouring the cement screed. It is carried out strictly according to the level. By the way, it is not worth draining the water from the pipes during the pouring of the screed. The liquid will not allow the system to deform under the weight of the cement.
Next, you can fill the screed
Uses a laser level
Step 9
If the room is large, it is important to install beacons, along which the screed will be equal. You can level it with a long rule, which will rely on beacons and remove excess cement composition, allowing you to make a flat surface.
Screed alignment
Step 10. Then you can grout the screed when it sets a little. This procedure will achieve a perfectly flat surface.Next, the screed must be left alone for 28 days and allowed to dry. It is forbidden to turn on underfloor heating and carry out any work until the screed dries - this can harm it. When the screed is dry, you can lay the final floor covering.
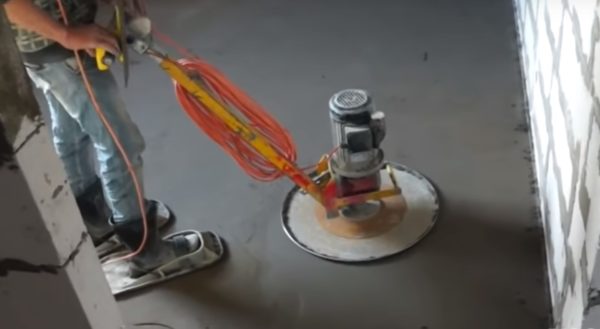
Screed grout
Preparatory stage
Before calculating a water-heated floor, determine the desired temperature for a given room
It is the same for all underfloor heating schemes.
You need to start by calculating the power of the system, while taking into account the area of \u200b\u200bthe room, the optimum temperature, and the actual heat loss. The power of underfloor heating should be increased for rooms located on the first and last floors, if the facade walls are not insulated according to the requirements of existing standards, if the finish is made of natural stone or ceramic slabs
Necessary conditions for high-quality work of water floors
Old floor coverings should be dismantled and, if necessary, level the base. The height difference over the entire area of the room cannot exceed five millimeters, otherwise the load on the pump increases significantly. In addition, there are high risks of air congestion and the difficulty of removing them.


Choosing the optimal step
After selecting the material and method of placing pipes, you need to determine the distance between adjacent turns of the circuit. It does not depend on the type of placement of coolants, but is directly proportional to the diameter of the pipes. For large sections, too small a pitch is unacceptable, just like for pipes with a small diameter, a large one. The consequences may be overheating or thermal voids, which will no longer characterize the warm floor as a single heating system.
Video - Warm floor "Valtek".Mounting instruction
A correctly selected step affects the thermal load of the circuit, the uniformity of heating of the entire floor surface and the correct operation of the entire system.
- Depending on the diameter of the pipe, the pitch can be from 50 mm to 450 mm. But the preferred values \u200b\u200bare 150, 200, 250 and 300 mm.
- The spacing of heat carriers depends on the type and purpose of the room, as well as on the numerical indicator of the calculated heat load. The optimal step for a heating load of 48-50 W/m² is 300 mm.
- With a system load of 80 W / m² and more, the step value is 150 mm. This indicator is optimal for bathrooms and toilets, where the temperature regime of the floor, according to stringent requirements, must be constant.
- When installing a warm floor in rooms with a large area and high ceilings, the heat carrier laying step is taken equal to 200 or 250 mm.
Underfloor heating installation project
In addition to a constant pitch, builders often resort to the technique of varying the placement of pipes on the floor. It consists in more frequent placement of coolants in a certain area. Most often, this technique is used along the line of external walls, windows and entrance doors - in these areas the maximum heat loss is noted. The value of the accelerated step is determined as 60-65% of the normal value, the optimal indicator is 150 or 200 mm with an outer diameter of the pipe of 20-22 mm. The number of rows is already determined during laying, and the calculated safety factor is 1.5.
Schemes for enhanced heating of external walls
Variable and combined laying pitch is practiced in external and edge rooms due to the urgent need for additional heating and large heat losses, in all internal rooms the usual method of placing heat carriers is used.
The process of laying underfloor heating pipes is carried out in strict accordance with the project
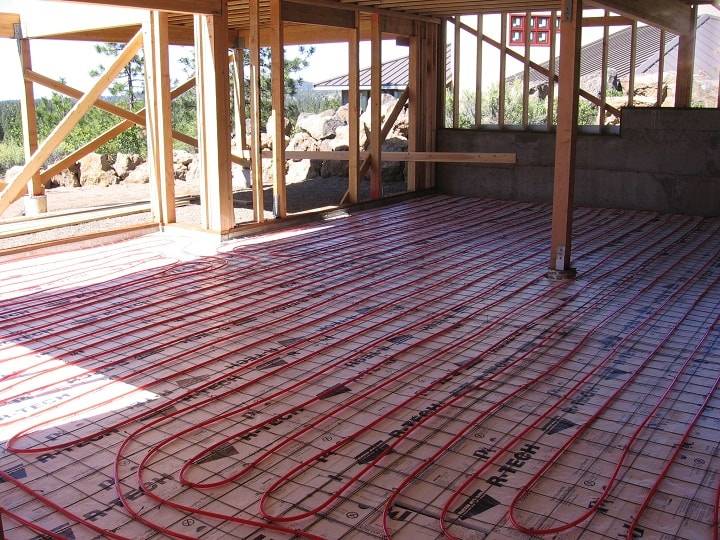
We select the type of pipe rolling and produce their laying
Before designing a warm floor, you should decide on the material of pipe products. Products made of metal-plastic, polyethylene, galvanized or copper are allowed. The most popular models are metal-plastic and polymer.
The quality of the structure depends on the strength of the material and the integrity of the contour. It is not allowed to lay pipes on a surface that has slopes and irregularities greater than 5 mm.
Mounting, proportions and hinge pitch
Installation of a warm floor on the ground must be carried out according to a previously prepared laying plan. If the room is not rectangular, then it is necessary to draw up a diagram of separate rectangles, with its own loop loop.
In each section, taking into account the purpose of the zone and the desired level of heating, the circuit can be arranged like a snake or a snail.
When carrying out work, you must follow some rules:
- To prevent overheating of the structure, it is necessary to correctly place the pipes on the surface of the area. They are located denser around the perimeter, and a rarer contour is made in the center. You need to retreat from the walls about 15 cm.
- The step between the heating elements, regardless of the laying method, should be 0.3 meters.
- At the junction of plates and ceilings, pipe products should be separated with a metal sleeve.
- The size of the circuit should not exceed 100 meters, as the level of heat transfer will decrease.
The contour can be laid in one of two options:
- bifilar (spiral) - characterized by uniform heating, the process is not complicated, since the bending angle is 90 degrees;
- meander (in the form of a zigzag) - the coolant cools down during the passage along the highway, thereby heating the floor becomes uneven.
The system is fastened to the concrete base through the bottom layer of insulation with dowels. Each branch of the pipeline, regardless of the selected circuit layout option, must go to the switch cabinet.
The ends of the pipeline are connected to the corrector unit by crimping or soldering. Each outlet must be equipped with shut-off valves, and ball valves must be installed on the supply sections. In addition, it is worth making the thermal insulation of the pipes leading to the room located nearby.
Before pouring the final screed, it is necessary to carry out pressure testing. There must be no air in the pipes that will be connected to the corrector. To do this, the air is removed from them through the drain valves.
It is important that the air outlets are closed at this point.
Testing of metal products is carried out using cold water, and testing of plastic products with a double increase in pressure in the pipeline.
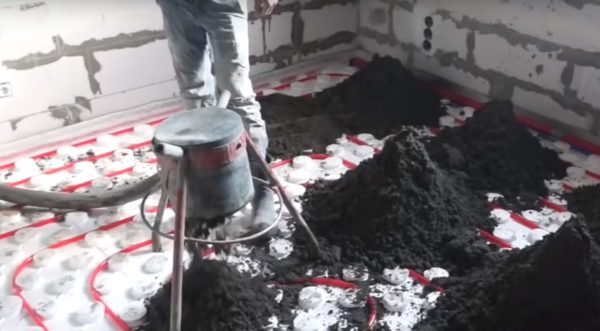
Pouring cement-sand screed
The mixture for pouring the screed is prepared from 1 part of cement, 3 parts of sand. Liquids need 200 grams per 1 kg of the mixture. To increase the strength of the structure, 1 gram of polymer fiber is added.
Pouring a warm floor is similar to installing a base. Reinforced screed 8 cm thick is recommended.An important point - you can operate underfloor heating only after a month, this time is necessary for the screed to harden. In addition, only after that you need to proceed with the installation of the finish coating.
If groundwater is located close to the layer of the warm floor cake, you need to take care of their diversion - equip drainage below the floor level by 30 cm.
The bottom is filled with river sand or gravel. It is poured in layers of 10 cm, and wetted with water. Usually 3 layers are enough, on which you need to put geological textiles.
Next, you need to equip the foundation with bituminous mastic or other waterproofing material, and lay polystyrene boards as thermal insulation. In the future, the scheme for installing a water-heated floor does not differ from the standard installation.
According to the analysis of specialists, the main mistake when installing a warm floor on the ground with your own hands is a violation of technology - the absence of compensation gaps in the slab, poor compaction of the powder, improperly laid waterproofing.
A warm water floor in a private house on the ground is a complex structure, and its installation must be approached very seriously. However, by opting for this option, you will initially lay the conditions for a comfortable atmosphere in the house.
Video instructions


How pipes are laid
Polystyrene boards are laid on the leveled floor surface. They serve as thermal insulation and prevent the spread of heat in all directions.
The actual pipe laying is carried out in two main ways: bifilar (parallel rows) and meander (spiral).
The first variety is used when there is a slope of the floors, there is no need for strictly uniform heating.The second - requires great effort and accuracy, is used when using pumps of lower power.
The number of circuits depends on the size of the heated room. The maximum area for placing one circuit is 40 sq m. The laying step can be either uniform throughout its entire length or vary depending on the need for enhanced heating in certain areas. The average step length is 15-30 cm.
Since the pipes are under strong hydraulic pressure, when installing a water-heated floor, it is unacceptable to connect them with couplings. Only one coupling can be used for each circuit.
It is recommended to use one circuit for heating each room, including the bathroom, loggia, pantry, barn. The smaller the circuit, the higher its heat transfer, which is especially important for corner rooms.
Filling the screed and setting up the collector
For the device of heating monoliths of underfloor heating, a cement-sand mortar of grade 200 is made with the obligatory addition of a plasticizing composition. The proportions of the components: cement M400 / sand - 1: 3, the amount of liquid plasticizer is indicated in the instructions on the package.
Work order:
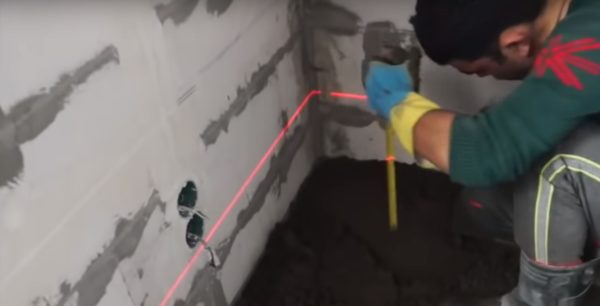
- Purchase lighthouses - metal perforated slats, prepare 2-3 buckets of a thick solution without a plasticizer. It is not recommended to make restrictive strips of wood.
- Using a trowel and building level, set the beacons at the required height, as shown in the photo.
- Mix a portion of the main solution, pour it in the far corner over the “pie” and stretch it along the beacons as a rule. If depressions with puddles form, add mortar, and reduce the amount of mixing water at the next batch.
- Repeat kneading until you fill the entire area of \u200b\u200bthe room. Walking on the monolith and carrying out further work is allowed when gaining 50% strength, and starting heating - at 75%. Below is a table of concrete hardening depending on time and air temperature.
After hardening up to 75% strength, you can start the boiler and start slowly heating the warm floors at a minimum temperature. Open the flowmeters or valves on the manifold 100%. Full heating of the screed will take 8-12 hours in the summer, in the fall - up to a day.
It is most convenient to balance the loops by calculation. If you know the required amount of heat per room, determine the water flow in the circuit and set this value on the rotameter. The calculation formula is simple:

- G is the amount of coolant flowing through the loop, l/h;
- Δt is the temperature difference between the return and supply, we take 10 ° С;
- Q is the thermal power of the circuit, W.
The final adjustment is made after the final coating is ready - epoxy self-leveling floor, laminate, tile, and so on. If you do not want to get involved with the calculations, you will have to balance the contours of the warm floor using the "scientific poke" method. Collector adjustment methods, including using the Valtec program, are described in the last video:
How to make a water heated floor?
The role of the heat carrier in such floors is performed by liquid. Circulating under the floor with pipes, heating the room from water heating. This type of floor allows you to use almost any type of boiler.
The following is a concise instruction on how to make a water-heated floor yourself:
installation of a group of collectors;
- installation of a mortise cabinet designed for the installation of collectors;
- laying pipes that supply and divert water. Each pipe must be equipped with shut-off valves;
- the manifold must be connected to a shut-off valve. On one side of the valve, it is necessary to install an air outlet, and on the opposite side, a drain cock.
Preparatory work
- Calculation of the power of the heating system for your room, taking into account heat losses and characteristics.
- Substrate preparation and surface leveling.
- The choice of a suitable scheme according to which pipes will be laid.
When the floor is already in the process of laying, the question arises - how to make the most suitable pipe laying. There are three most popular schemes that provide uniform floor heating:
"Snail". Spiral in two rows with alternating hot and cold pipes. The scheme is practical in rooms with a large area;
"Snake". It is better to start from the outer wall. The farther from the beginning of the pipe, the colder. Suitable for small spaces;
"Meander" or, as they also call it, "double snake". The forward and reverse lines of pipes run parallel in a serpentine pattern throughout the floor.
How to make a water heated floor: types of styling
In order to avoid mistakes in the process of laying a warm water floor, you need to immediately decide on the installation method.
Concrete paving system
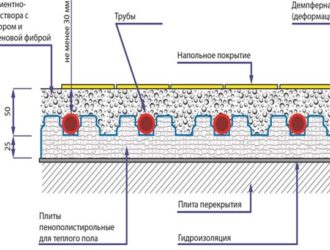
Laying of thermal insulation, which will have the following parameters: layer thickness from 30 mm with a density coefficient from 35 kg/m3. It is recommended to use polystyrene or foam insulation.
Special mats with clamps can be a good alternative:
- attaching damper tape around the entire perimeter of the wall. This is done in order to compensate for the expansion of the ties;
- laying a thick polyethylene film;
- wire mesh, which will serve as the basis for fixing the pipe;
- hydraulic tests. Pipes are checked for tightness and strength. Performed within 24 hours at a pressure of 3-4 bar;
- laying concrete mix for screed. The screed itself is installed at a level not lower than 3 and not higher than 15 cm above the pipes. On sale there is a ready-made specialized mixture for floor screed;
- drying of the screed lasts at least 28 days, during which the floor must not be turned on;
- tab of the selected coverage.
Polystyrene system
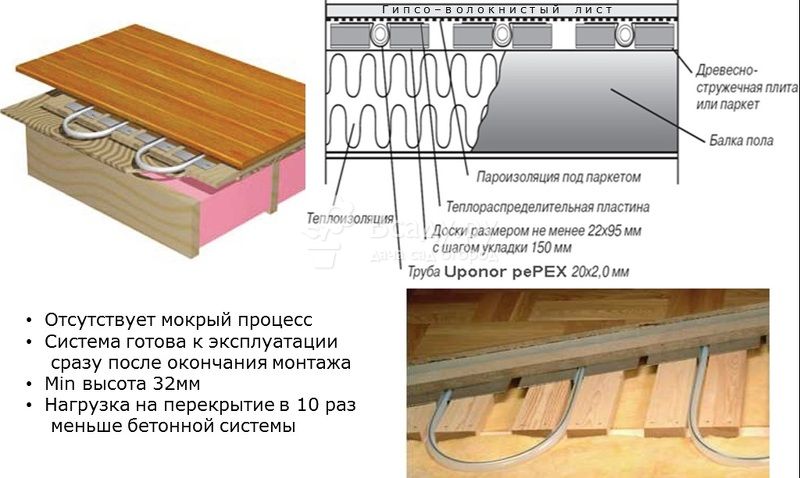
A feature of this system is the smaller thickness of the floor, which is achieved by the absence of a concrete screed. A layer of gypsum-fiber sheet (GVL) is laid out on top of the system, in the case of a laminate or ceramic tile, two layers of GVL:
- laying of polystyrene boards as planned on the drawings;
- good and high-quality aluminum plates that provide uniform heating and should cover at least 80% of the area, and pipes;
- installation of gypsum fiber sheets for structural strength;
- cover installation.
If the room is heated from a radiator heating system, then a warm floor can be laid from the system.
How to make a warm floor from heating?
Installing underfloor heating without changing the boiler becomes even faster. Therefore, now you will receive tips on how to make a warm floor from heating easier.
Floor preparation, screed and laying the contour is done according to the previous instructions
Pay attention to the difference in composition, as the screed mixture affects the proper functioning of the floor
At the same time, it is very important to take into account all the features of the heated room, possible heat losses and know exactly how to properly make a water heated floor. Might be interesting
Might be interesting
Boiler installation
For the "warm floor" system, a boiler is selected depending on the coolant. If there is gas in the house, then it is advisable to choose a gas boiler. It is installed indoors. Coolant costs will be minimal. Equipment with outlets for hot water supply and for a water floor line is required.


If a solid or liquid fuel stove is installed in the house, then a separate boiler room is equipped for heating equipment. The disadvantage is that you have to constantly monitor fuel consumption.
The water in the heat exchanger heats up to a high temperature, you will need to additionally install radiators, towel dryers, you can bring individual circuits to a bathhouse or garage. These measures are necessary to withstand a certain pressure and water temperature in the floor line.
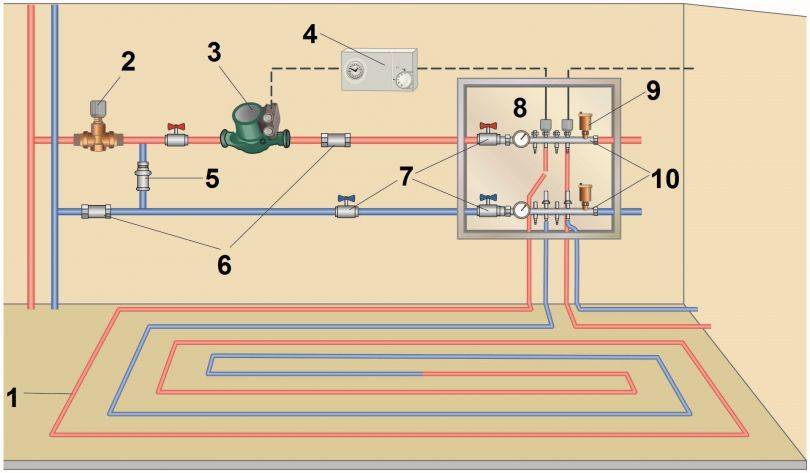
Connection to an individual heating boiler
The presence in an apartment or a private house of an individual boiler for heating removes all organizational problems to allow the installation of water-heated floors. In this case connection of a warm water floor does not require any permissions. Depending on the conditions of location and operation of the facility, boilers can be of various types:
- on gas fuel;
- on liquid fuel (solar oil, fuel oil);
- solid fuel: firewood, pellets, coal;
- electrical;
- combined.
In apartments of multi-storey buildings, gas or electric heating boilers, connection to the central heating system of the underfloor heating circuit is not required. In this case, the scheme differs slightly, and the functional purpose of the main elements remains the same.
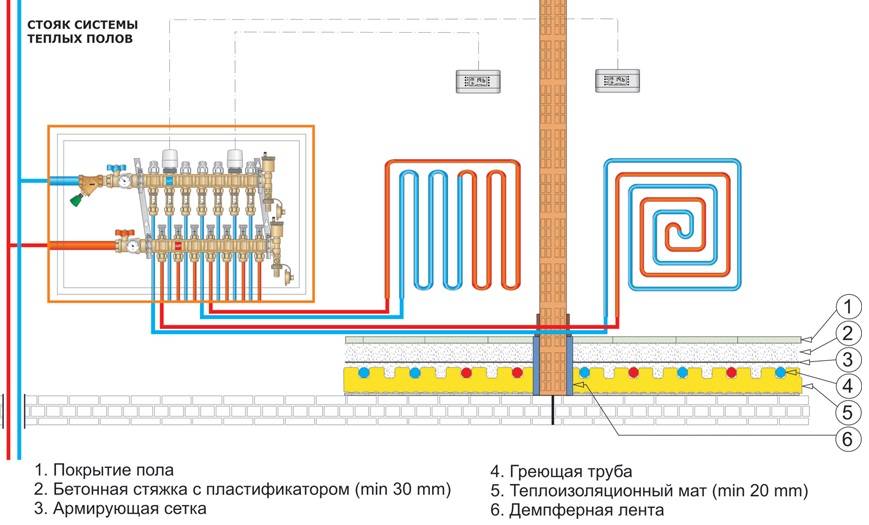
Scheme of a water-heated floor system in a private house with an autonomous boiler
Main elements:
- boiler;
- expansion tank;
- manometer;
- circulation pump;
- collector for underfloor heating;
In contrast to the case with central heating, the connection of underfloor heating to the boiler does not require the installation of a three-way valve to regulate the temperature of the heat carrier. Its installation is not mandatory, the temperature change is done from the boiler control panel. Temperature control sensors are also located on the external control panel.
The expansion tank serves to maintain a stable pressure in the system; when heated, the volume of liquid increases. In order not to collapse the collector of the warm floor, the pump and other expensive elements in the pipeline system, the tank compensates for the expansion of the volume of the coolant. The pressure gauge shows the pressure in the pipes. The main thing is that before pouring a warm floor with a solution, you need to check the performance of all nodes.
Control panel on the boiler body
Regardless of the modification of the device and its manufacturer, all panels have basic options, and some additional programming functions:
- buttons or regulators for increasing and decreasing the temperature of the coolant at the supply;
- button for automatic setting of a comfortable, economical temperature regime, room temperature - 20-22 ̊С;
- program control is possible, setting the modes "winter", "summer", "holidays", "system protection function against liquid freezing".
How to make specific settings for boilers with different control panels is described in the operating instructions. Filling a water-heated floor with a solution for a separate boiler is done in the same way as for central heating.
Remote control panel
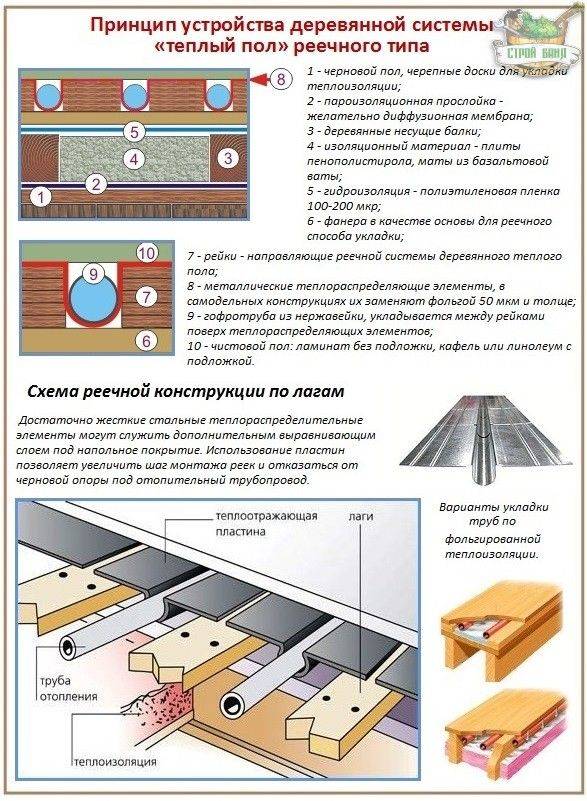
Laying a warm water floor
One of the key components of the system is pipes and their fixation system. There are two technologies:
-
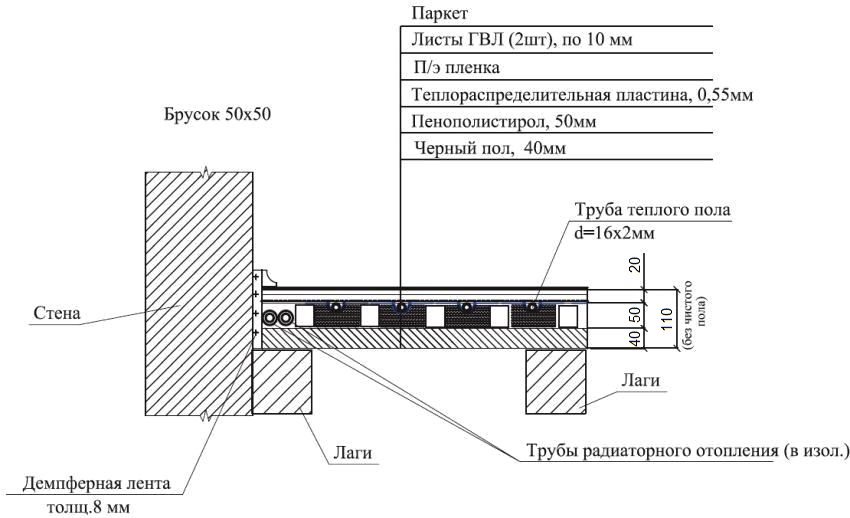
Dry - polystyrene and wood. Metal strips with formed channels for laying pipes are laid on a system of polystyrene foam mats or wooden plates. They are necessary for a more even distribution of heat. Pipes are inserted into recesses. Rigid material is laid on top - plywood, OSB, GVL, etc. A soft floor covering can be laid on this base. It is possible to lay tiles on tile adhesive, parquet or laminate.
-
Laying in a coupler or so-called "wet" technology. It consists of several layers: insulation, fixation system (tapes or mesh), pipes, screed. On top of this “pie”, after setting the screed, the floor covering is already laid. If necessary, a layer of waterproofing is laid under the insulation so as not to flood the neighbors. A reinforcing mesh may also be present, which is laid over the floor heating pipes. It redistributes the load, preventing damage to the system. A mandatory element of the system is a damper tape, which is rolled around the perimeter of the room and placed at the junction of two circuits.
Both systems are not ideal, but laying pipes in a screed is cheaper. Although it has a lot of disadvantages, it is because of its lower cost that it is more popular.
Which system to choose
In terms of cost, dry systems are more expensive: their components (if you take ready-made, factory ones) cost more. But they weigh much less and are put into operation faster. There are several reasons why you should use them.
First: the heavy weight of the screed.Not all foundations and ceilings of houses are able to withstand the load created by a water-heated floor in a concrete screed. Above the surface of the pipes there must be a layer of concrete of at least 3 cm. If we take into account that the outer diameter of the pipe is also about 3 cm, then the total thickness of the screed is 6 cm. The weight is more than significant. And on top there is often a tile on a layer of glue. Well, if the foundation is designed with a margin, it will withstand, and if not, problems will begin. If there is a suspicion that the ceiling or foundation will not withstand the load, it is better to make a wooden or polystyrene system.
Second: low maintainability of the system in the screed. Although it is recommended to lay only solid coils of pipes without joints when laying underfloor heating contours, periodically the pipes are damaged. Either during the repair they hit with a drill, or burst due to marriage. The place of damage can be determined by a wet spot, but it is difficult to repair: you have to break the screed. In this case, adjacent loops can be damaged, due to which the damage zone becomes larger. Even if you managed to do it carefully, you have to make two seams, and they are the potential sites for the next damage.
The process of installing a water heated floor
Third: the commissioning of a heated floor in a screed is possible only after the concrete has gained 100% strength. This takes at least 28 days. Before this period, it is impossible to turn on the warm floor.
Fourth: you have a wooden floor. By itself, a tie on a wooden floor is not the best idea, but also a screed with an elevated temperature. The wood will quickly collapse, the whole system will collapse.
The reasons are serious. Therefore, in some cases, it is more expedient to use dry technologies.Moreover, a do-it-yourself wooden water-heated floor is not so expensive. The most expensive component is metal plates, but they can also be made from thin sheet metal and, better, aluminum.
It is important to be able to bend, forming grooves for pipes
A variant of a polystyrene underfloor heating system without a screed is shown in the video.


