
- Infrared warm floor under the tile: laying features
- Which film floor to choose for linoleum
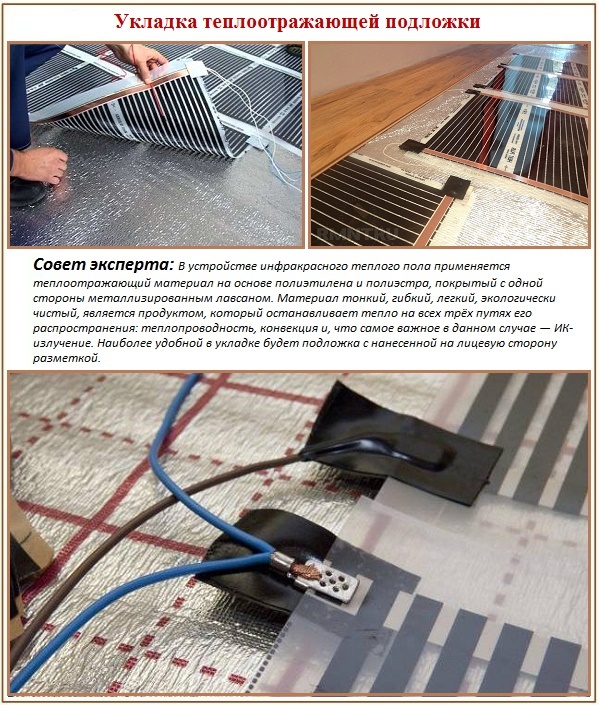
- Features of infrared film
- Mounting technology
- Connection process
- Features of laying linoleum
- Safety
- Which electric floor is better to choose under the tile?
- Cable
- mats
- Film floor heating
- Rod
- Stages and installation technology
- Preparatory activities
- System installation algorithm
- Laying decorative flooring
- What are the best places to use the system
- Types of quality linoleum
- Stage 3 installation of infrared floor heating
- 1. Preparation (learning security measures)
- Safety rules for installing IR floor heating:
- 2. Preparation of the thermostat installation site
- 3. Foundation preparation
- 6. Laying infrared floor heating
- 7. Installation of clips
- 8. Connecting the wires of the infrared floor
- 9. Installing the temperature sensor for the thermostat
- Pros and cons of the solution
- Conclusions and useful video on the topic
Infrared warm floor under the tile: laying features
Installation of IR floors under tiles is not as complicated as it might seem at first glance
But there are a few nuances that are important to take into account. First you need to worry about the materials and tools that you may need to work
This can be a heat-reflecting substrate, the IR film itself in the required quantity, tape for insulating wires, tiles and glue for it, adhesive tape, corrugated tube, drywall, contact clamps, polyethylene, wires for connection, scissors, etc.
Infrared floor - installation
For laying both tiles and infrared heating systems, you need a flat base. Therefore, it must be cleaned of debris and inspected for damage, protrusions. There should not be any relief on it - all cracks are sealed, and it is recommended that the bulges be sanded off.
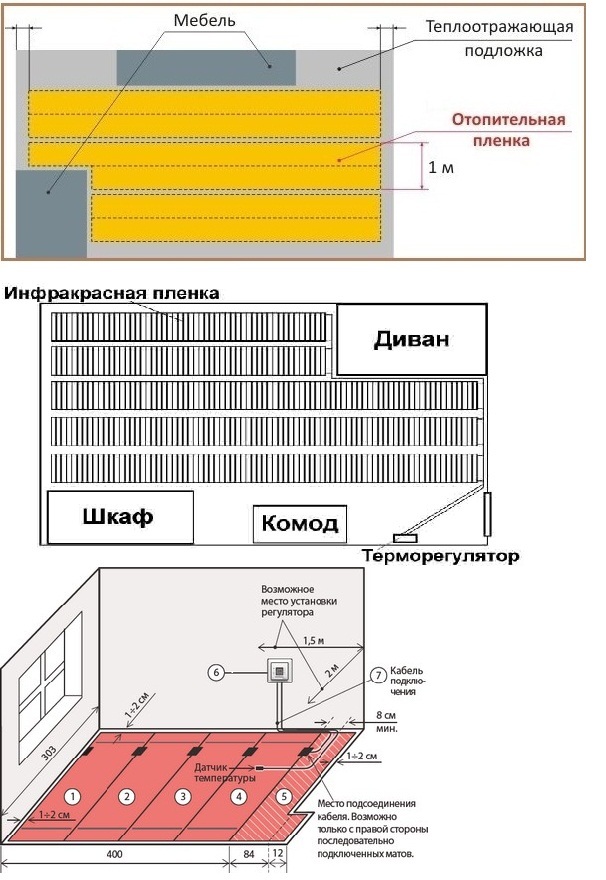
Also, the preliminary work on the installation of the IR floor system includes the creation of a scheme for laying the IR film and placing various elements such as a thermostat. In this case, the location of large-sized furniture and the places where the film will not be mounted should be taken into account.
It is important to remember that all wires coming from the heating system to the thermostat must be laid in a corrugation and a groove drilled in the wall. However, it is not always necessary to ditch the walls.
Sometimes the wires are laid in a plastic narrow channel, which is attached to the wall surface.
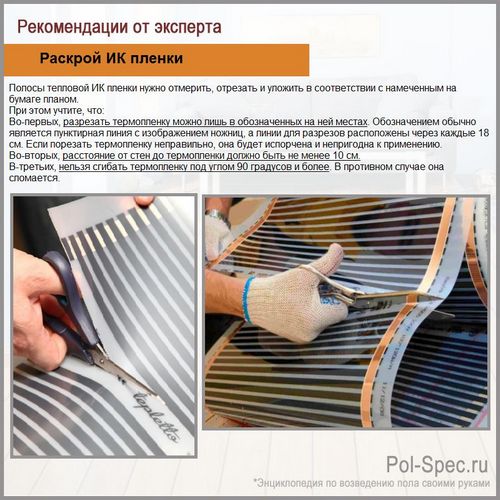
How to cut infrared heating film
All installation work must be carried out at an air temperature above 0 degrees, as well as at a humidity of not more than 60%
It is also important to ensure that the entire system is grounded.
Particular attention is paid to the insulation of contacts, as well as to possible places of damage to the film.
Table. Types of IR film mounting.
| View | Description |
|---|---|
| Dry | It is used when mounting on the surface of the IR film of laminate, carpet. It is used for mounting tiles, but rarely.It implies careful leveling of the surface, laying the heat-insulating material and the film itself, then installing the protective film layer (polyethylene), drywall sheets and the tile itself, which is fixed with glue. In this case, the film is not exposed to contact with caustic substances and will last a long time. But here the height of the base in this case turns out to be quite significant, which is not always relevant. In addition, this method of carrying out the work will cost more. |
| Wet | Used for laying tile, stone, etc. The so-called classic method. The work will cost less than with a dry type of installation, but they are much more difficult. In this case, the surface is also prepared, then the heat reflector is laid, on which the IR film is mounted. Then it is covered with a polyethylene film, reinforced and filled with a mixture for self-leveling floors. Ceramic tile is mounted by the classical method (on glue) on top of this layer after it dries. The underfloor heating system can be put into operation about a week after laying the tiles. |
Which film floor to choose for linoleum
There are different options for film-type heating systems on the market. Installing them is a job that anyone can do. For self-installation, options with large heating elements are not suitable - they are designed for large commercial or industrial premises.
The time required to carry out all the work on the installation of the film floor by a home master is minimal. After 2-3 days it will be possible to use it. All infrared film floors are sold in rolls of specific lengths.
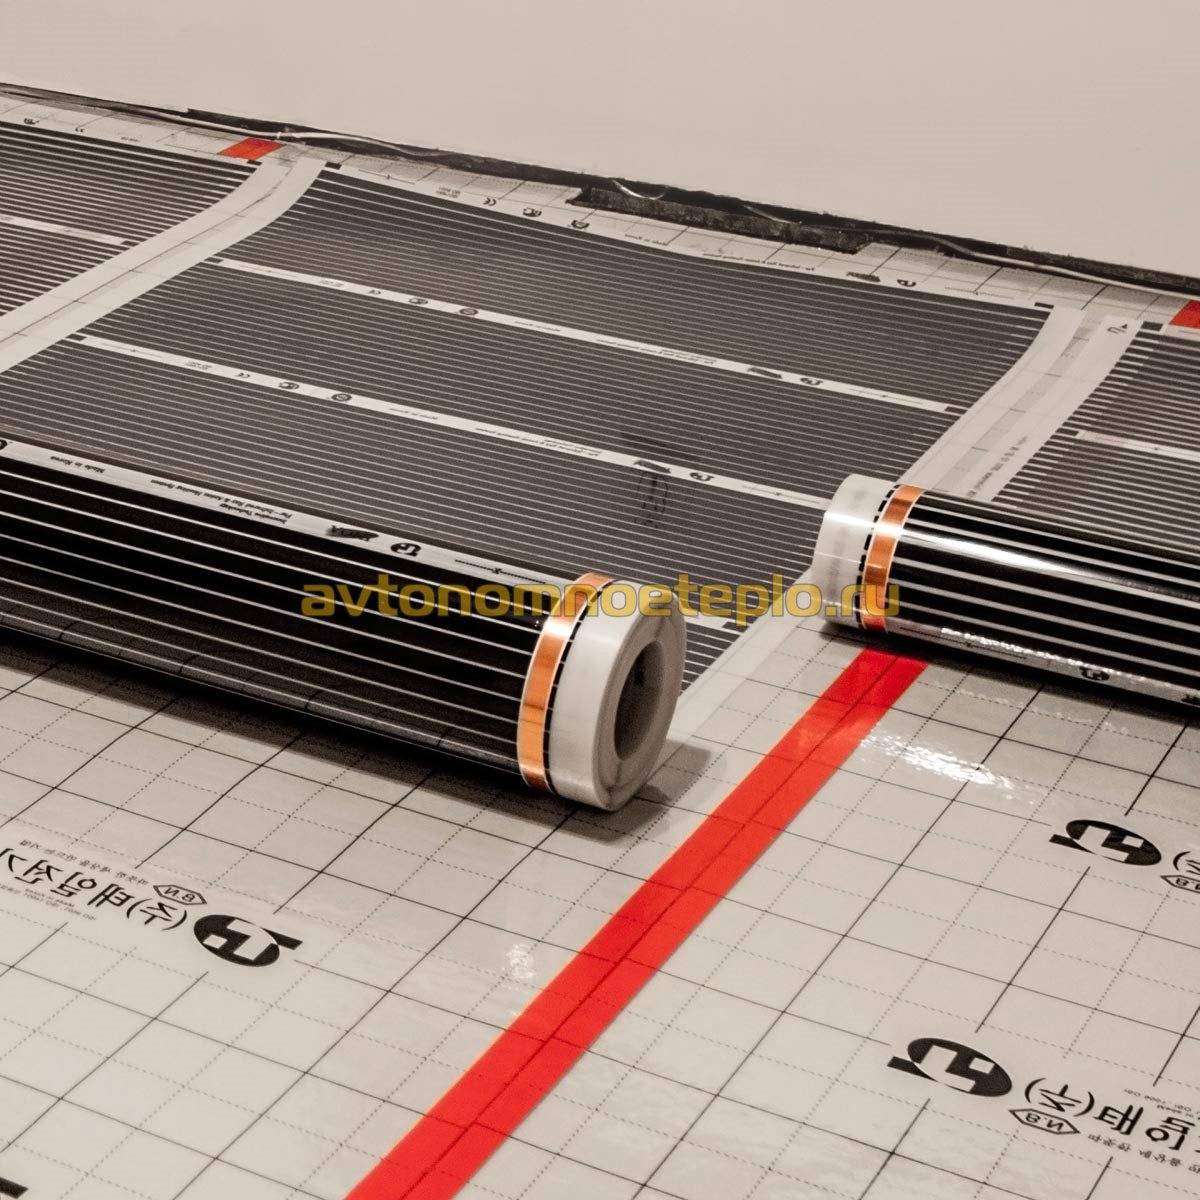
It is better to choose infrared mats, in which the heating element has a small width. They are also called striped. For small spaces of living rooms, they are best suited. Narrow strips make it possible to cut the film exactly along the border of the room.
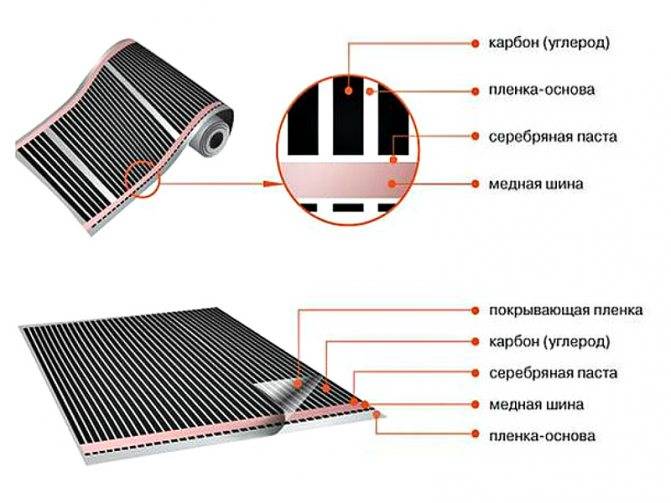
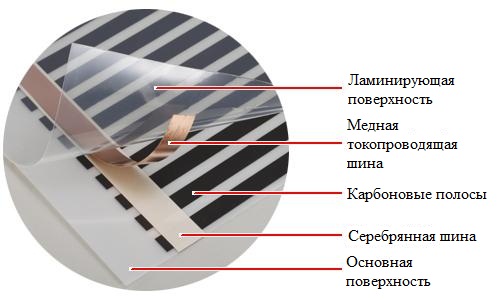
Electricity is supplied to the carbon elements by two contacts in the form of tires located at the edges of the strip. The contact can be silver or copper. A silver bar is better and more reliable, but much more expensive, so most people buy copper.
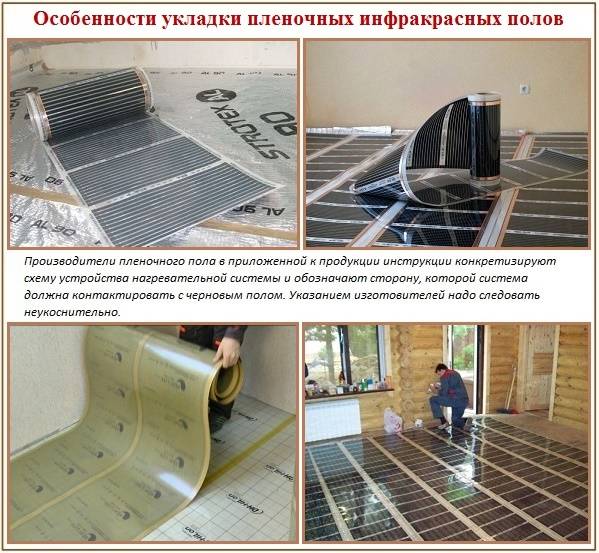
The contact strip when laying can be at the top or at the bottom when laying. This moment is very important - be sure to look at the marking - such a nuance is necessarily reflected by the manufacturer.


Features of infrared film
It is made from durable polymer. The production technology provides for the application of strips of carbon-graphite paste to the plastic panel. They are covered with another layer of plastic and laminated. Silver-plated copper bars are used to connect semiconductors. Carbon paste acts as a heating element that converts electrical energy into heat.
Copper busbars form a heating circuit, through which heat is evenly distributed. The degree of heating is controlled by a thermostat connected to a temperature sensor. When the temperature goes beyond the pre-set values, the system turns off or turns on. The laminating coating on the panel is a protective heat-resistant and electrically insulating layer with a melting point of 210 °C.
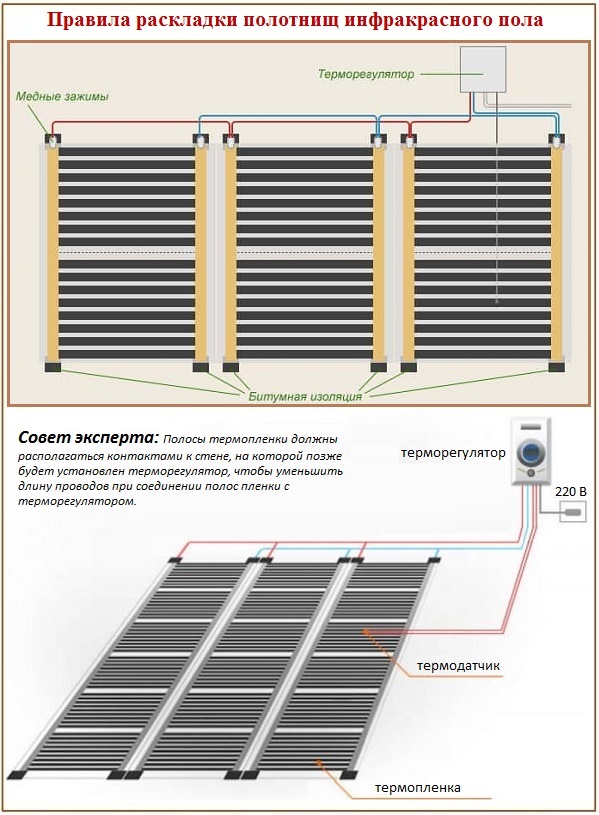
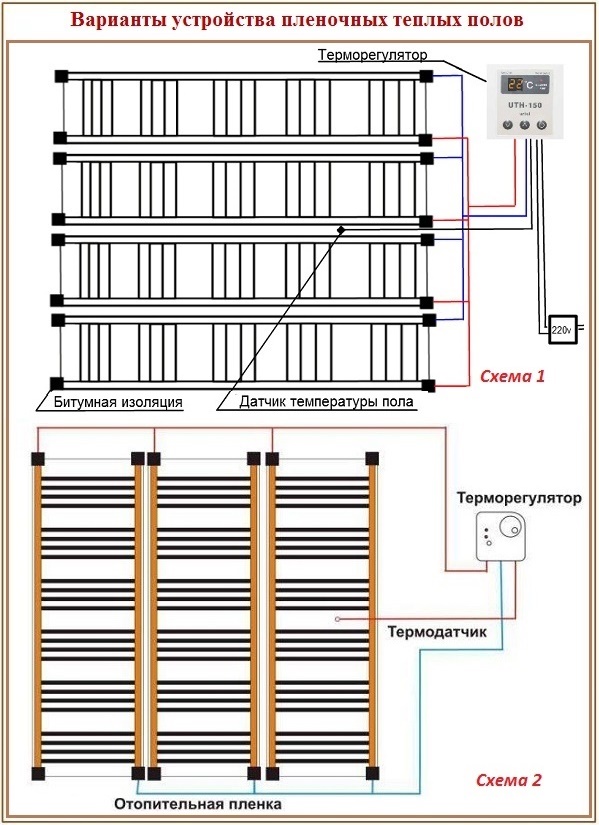
The material is produced in strips of 600-5,000 cm long. It depends on the model and brand. In any case, the maximum allowable length of the web in the assembly is indicated on the packaging.Usually it does not exceed 800 cm. For long rooms, it is recommended to collect two or three strips, and connect each to a thermostat. Otherwise, the equipment will not work correctly. Standard web width 500-1000 mm.
For residential premises, a material with a width of 500-600 mm is usually chosen. For industrial and office premises, as well as for baths, they acquire wider panels. The system is powered by a single-phase 220 V electrical network. Maximum heating occurs two to three minutes after power is applied. Overheating and melting of the laminating layer is unlikely given its high melting points. If the installation is carried out correctly, heating to critical temperatures never occurs.
Mounting technology
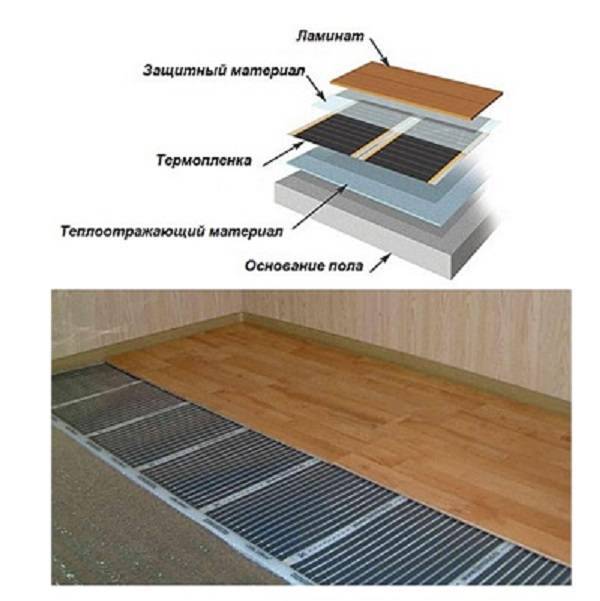
Pie installation film floor
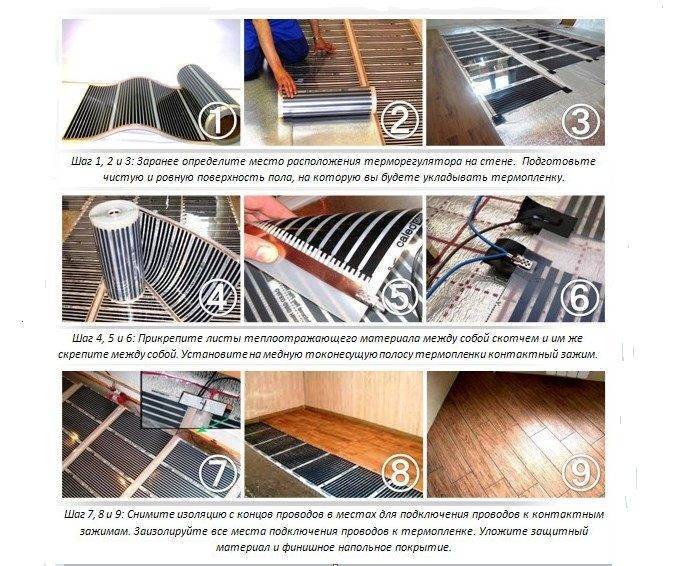
- Select the location of the thermostat and heating film in advance.
- Clean the floor surface from debris and dust, if necessary, level the base under the linoleum.
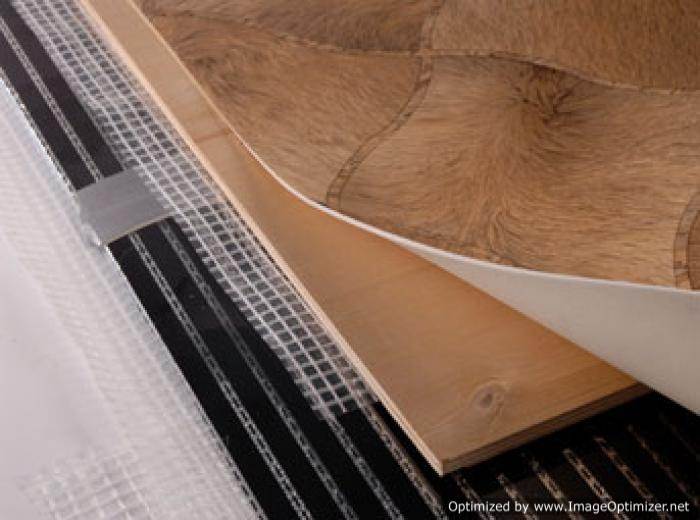
- Secure the heat reflective material to the floor with adhesive tape. It should hide the entire surface of the floor, without gaps, but it must not be overlapped.
- Cut the thermal film using the marked cut lines. One leaf can be from 20 cm to 8 meters long. To save money, it is best to arrange the sheets so that they are longer.
- Lay the thermal film on the heat-reflective substrate, copper side down. Sheets should lie tightly so that air gaps do not form under them. For even heating, place adjacent strips as close to each other as possible.
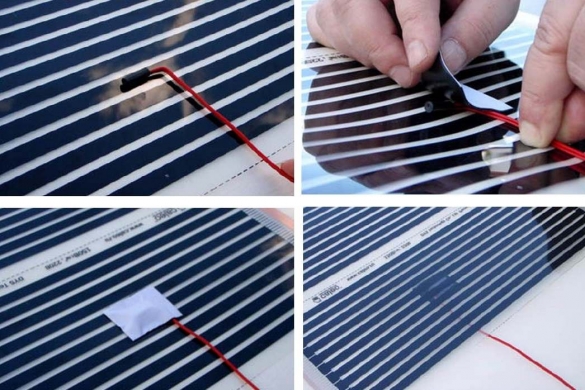
Connection process
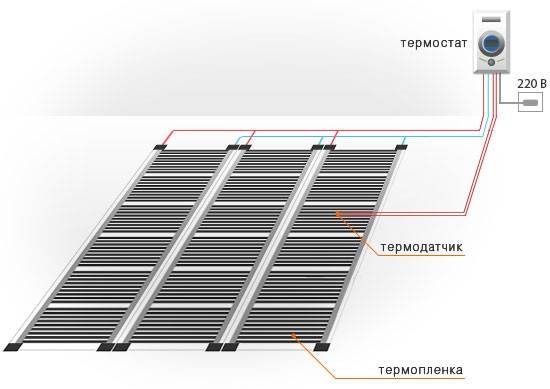
Scheme of connecting the system to the thermostat
- Install the thermostat on the wall. It must be easily accessible. If there are children in the apartment, you need to install it higher.
- Connect the power wires to the heating elements. They can be hidden with the help of a plinth with a cable channel, in a strobe or a plastic box.
- Connect the wires to the thermostat according to the wiring diagram.
- To control the heating level, install a temperature sensor under the film and connect it to the thermostat.
- Crimp each power wire suitable for the film in the terminal clamp.
Crimping and insulating electrical connection
- To smooth the floor surface as much as possible, cut out the linoleum underlay under the contacts and the temperature sensor.
- The cut lines on the film must be insulated with bituminous insulation. You also need to cover with insulation and bare wire connection points on both sides.
- To prevent the heating elements from moving when walking, fix it with double-sided tape to the substrate.
- Then you can connect the thermostat to the network and test the system's performance. For convenience and increased security, it is recommended to connect it to the network through a separate machine. During the test, do not set the heating temperature above 30 degrees, and check the performance of each sheet.
Connection to a thermostat
After mounting the infrared warm linoleum floors finished, you need to lay a layer of waterproofing on it, usually polyethylene. Lay it with an overlap of about 20 cm on top of each other and secure with tape.
Features of laying linoleum
Laying linoleum on plywood
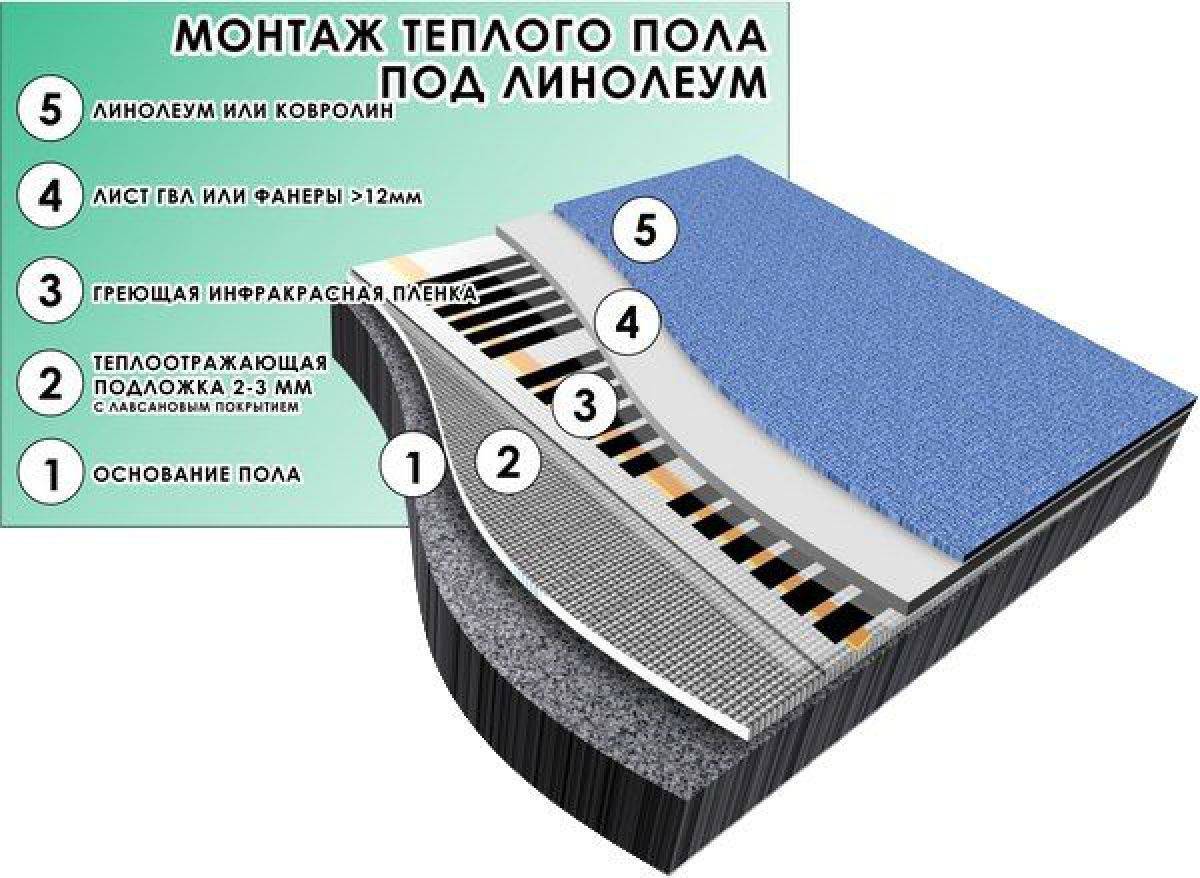
- In order for the linoleum to lie flat and not damage the heating elements, you must first lay a layer of plywood or any other similar material on the floor, such as OSB.Fiberboard is not recommended for use in an apartment due to the release of harmful substances - formaldehyde.
- We carefully fasten the plywood for linoleum to the main floor with dowels or self-tapping screws so as not to damage the heating mats. For this, plywood thicker than 6 mm is suitable. However, the thinner it is, the more elastic it will be, respectively, it will swell if you fix it with a large step.
- It is recommended to fasten thin plywood in increments of 15 centimeters, and the width of the thermal film - from 50 centimeters. Self-tapping screws can be screwed either along the edges of the sheets, or at the cut site, which means every 17 centimeters. This is not so easy to do without damaging the graphite heating plates, so you can choose a thicker material, but heating through it will be worse.
- The underlay must have more thermal resistance than the plywood layer on top to allow heat to flow upward.
- After that, you can lay linoleum in the usual way. In rooms less than 20 squares, it is not necessary to use glue for this.
- It is possible to use infrared heated floors under linoleum with an operating temperature of 27-28 degrees, in this mode no harmful substances will be released, and the performance of linoleum will decrease.
Laying infrared warm linoleum floors are shown in the video in this article.
Safety
During work, be sure to follow the safety precautions:
- Connecting the thermostat is possible only when the electricity is off.
- Before testing the system, you need to make sure that there is a layer of insulation on each contact.
- You can not connect heating without a thermostat or heat it more than 30 degrees. At a minimum, this will lead to the release of harmful substances, or even damage to the entire coating.
- Mechanical damage to the foil must not be allowed, therefore, in the case of linoleum, a protective layer in the form of a rigid material (plywood) is required.
Which electric floor is better to choose under the tile?
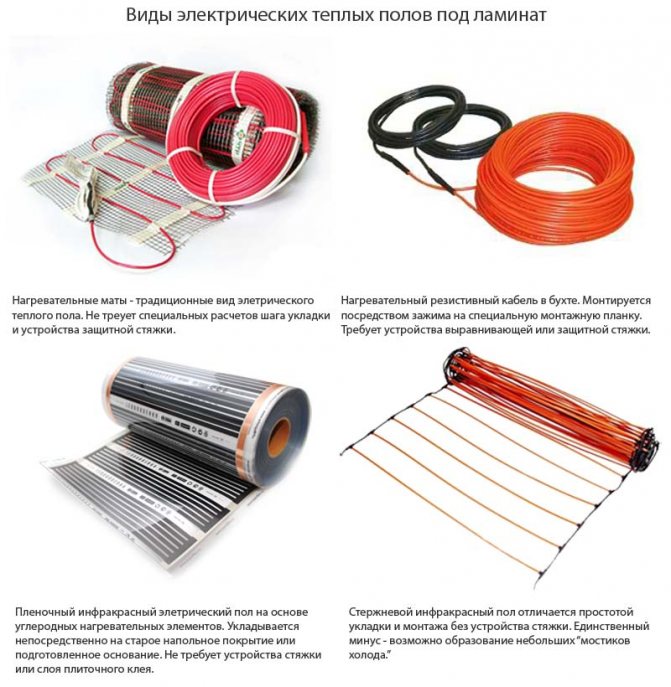
Electric underfloor heating in stores is offered in four variations:
- cables;
- mats;
- films;
- rods.
Each of these options has its own advantages and nuances of installation. The choice of the most suitable modification for a particular room and the flooring to be laid should be approached wisely and without haste.
Electric floor options
Cable
Warm floors made of heating cables are designed for laying under ceramic tiles and porcelain stoneware. They are mounted in a concrete screed 4–5 cm thick. They are not laid without concrete. If the floors in the house are old and additional overloads are contraindicated for them, then it is better to refuse the cable system.
The heating cable of a similar warm floor under a tile consists of one or two heating cores, which are packed in several layers of heat-resistant plastic. Plus, for strength, such a cord usually has a copper wire braid inside. At the same time, the plastic sheath and electric cores are designed for heating up to 70 0C.
The heating cable is:
- resistive;
- self-regulating.
The first is cheaper, but less efficient. It heats up the same throughout. And in the version with self-regulation, the heat transfer of a particular area depends on the ambient temperature. If there is enough heat in some place, then the veins at such a point begin to warm up less by themselves. This eliminates the appearance of tiles on the floor with local overheating and reduces the overall energy consumption.

Heating mats and cable floor
mats
Mats will cost one and a half to two times more expensive than cable when calculated per square meter of heated surface. However, this type of electric underfloor heating is the most optimal for tiles, it is difficult to find a more correct and better option for tiles.
A thermomat is a reinforcing fiberglass mesh on which the heating cable is already fixed with a snake with an ideal pitch. It is enough to roll out such a heating system on a prepared rough base and simply connect it to the power supply. The tile is then glued on top in the usual way without a screed.
How to lay tiles on heating mats
Film floor heating
If in the first two versions a cable with metal cores acts as a heating element, then the films are arranged completely differently. In the film floor heat, carbon-containing materials are heated, which generate infrared radiation when an electric current is applied. Between themselves, these thermoelements are connected by a copper bus, and from above and below they are closed with a sheath made of polyethylene terephthalate.
The thickness of the thermal film for the floor is only 3–4 mm. And it consumes 20–25% less electricity with identical heat transfer than the cable counterpart. However, it is difficult to call such films an ideal choice for tiling. Not every tile adhesive is suitable for them. There are compounds that can dissolve the film shell.
Manufacturers recommend installing this electric underfloor heating under tiles only with moisture and fire-resistant LSU between them. And this is an additional expense. Plus, the thermal film itself is expensive. The result is a fairly impressive amount per square meter.
Film and rod
Rod
The core heat-insulated floor heats also at the expense of infrared radiation.Carbon rod-tubes connected on both sides with conductive tires act as heating elements in it. Such a system is mounted under ceramic tiles in a thin 2–3 cm screed or in a centimeter layer of tile adhesive.
The main advantage of a rod thermofloor is several times lower power consumption compared to a cable. However, the lucky ones who bought this option, in the reviews, point to its excessive high cost and the gradual failure of the rods. As a result, you pay a lot of money, and after a few months, cold spots begin to appear on the floor.
Instructions for laying and connecting underfloor heating systems
Stages and installation technology
Let's consider how to properly install a film underfloor heating under linoleum. All work can be divided into three main stages.
Preparatory activities
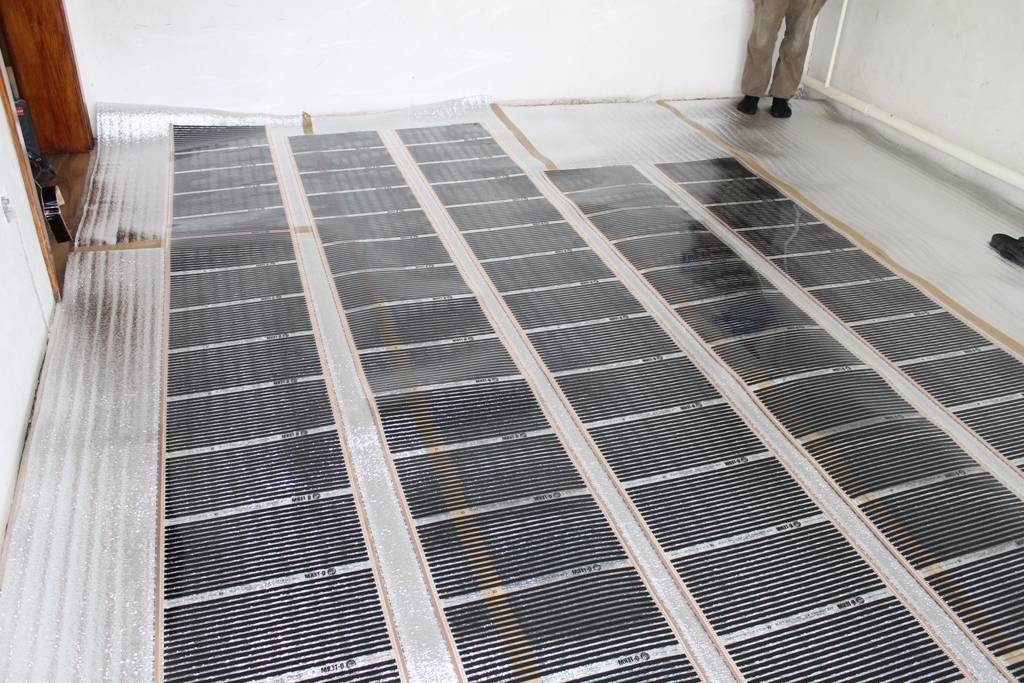
To begin with, a plan of the room is drawn up, which provides for the arrangement of furniture. In such places, the film should not be laid. After that, we plan to lay the film strips. The number of connections and the speed of installation will depend on the number of cuts made. For this reason, laying is recommended to be carried out along the long wall of the room. On the diagram, we additionally note in which places the temperature sensor and thermostat will be located.
The delivery set of the heating system includes an infrared film and connection elements (two pieces), a sensor and a relay, adhesive tape with a bitumen base for insulation. In addition, it is necessary to purchase additional material for thermal insulation, cable, waterproofing film, contactors.
The most complex tool that we need for installation is a crimp tool. If there are sufficient skills, this operation can be performed with simple pliers. In addition, you should prepare a set of screwdrivers and wire cutters, a mounting knife, a hammer, and scissors. As you can see, you can lay the IR film material under the linoleum using conventional construction tools.
System installation algorithm
How is the installation of a film underfloor heating under linoleum? To begin with, the foundation is being prepared. It must be clean and even. You may have to arrange a thin screed.
A layer of heat-insulating material is laid on the prepared surface. Rolled strips are joined and connected with adhesive tape. The main condition is the evenness of the laying.
Cutting the IR film into strips of the required sizes is a responsible matter. To do this, on the surface of the material there are special marks in the form of dotted lines, according to which it is recommended to cut. The minimum size of one strip may not be narrower than 20 cm, and the longest - up to 8 m.
The prepared film strips are laid out according to the drawn up plan over the heat-insulating layer. It is necessary to ensure that the copper strips are placed up with the side indicated by the manufacturer in the instructions. The film should fit snugly to the base, the presence of air cushions is considered unacceptable.
Let's move on to making contacts. Connecting clamps are installed on copper strips, crimped. At the same time, one part of them should remain between the film layers, fixed on the copper bus, and the second part should remain outside.
All connection points are hidden by insulating material, in addition, all strip contacts that are not connected to the wiring are insulated.The position of the entire film is fixed with adhesive tape to the floor surface so that shifts do not form during the laying of linoleum.


It remains to install the thermostat. As a rule, an easily accessible place on the wall is chosen for it, I connect it according to the instructions. The temperature sensor is placed on the film and connected with thermostatic wiring.
On this, the installation of an infrared film underfloor heating under linoleum can be considered completed. Before installing the flooring, it remains to make a test run to make sure that the heating system is working.
Laying decorative flooring
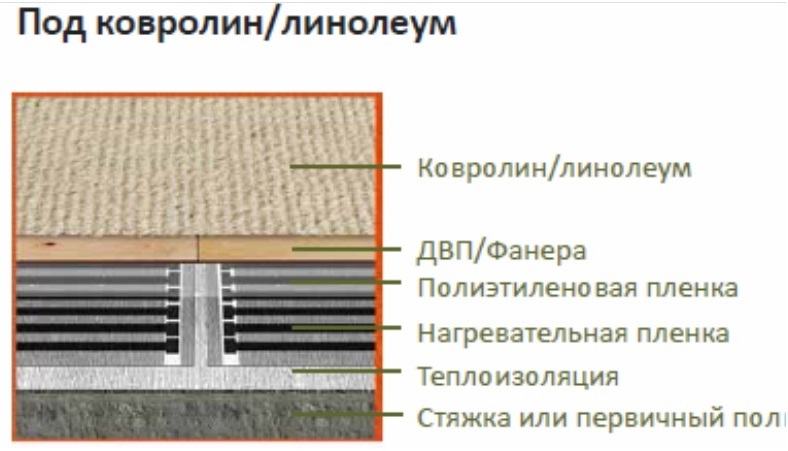
Before laying linoleum, the base must be prepared. For this purpose, polyethylene is laid on top of the infrared film material, which will perform waterproofing functions. Separate strips are stacked with an overlap of ten to twenty centimeters, fixed with adhesive tape
Remember to walk on the film carefully so as not to damage the graphite heaters.
It is necessary to lay polyethylene on the film warm floor
The next step is the device of a flat surface made of fiberboard. This material will create reliable security for the warm floor, will be an excellent basis for laying linoleum.
Since such coatings are supplied in rolls, they are pre-spread for several days in a large room. But in our case, there is an advantage - linoleum can be settled on fiberboard and turn on the underfloor heating system so that the material heats up. From the radiated heat, alignment will occur much faster. In this case, the thermostat should be set to warm up to 28 degrees, since it is this temperature that is considered optimal for linoleum.
As soon as the coating acquires the desired evenness, it can be fixed on the base. To perform this operation, use double-sided tape or glue. The second mounting option is used if the dismantling of the heating system and its transfer to another place is not planned.
What are the best places to use the system
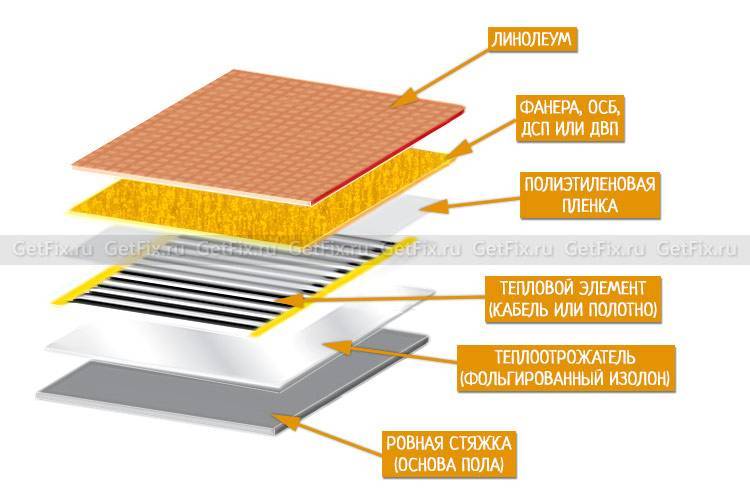
Initially, you need to understand what elements the system consists of. It includes the following components:
- electrical wiring;
- direct infrared film, and it should be sufficient to perform work in a particular room;
- temperature sensors;
- fastening clips;
- a temperature controller that allows the owner of the room to independently control the heating process;
- insulation.
 Infrared floor composition
 Film for infrared floor
You can use the infrared floor under the laminate in different rooms. Often it is formed directly throughout the apartment. Its use is considered optimal in the kitchen or in another room in which it is not planned to use carpets.
When planning the location of the film, the following points are taken into account:
- it is impossible to work in a damp room, since the infrared film will last a long time and, in accordance with its purpose, only in a dry room;
- it is allowed to twist the rolls, but it is impossible to create kinks that lead to rapid damage to the product;
- it is impossible for the film to be located next to various heating devices or a fireplace.
The installation of infrared underfloor heating under the laminate itself is considered an understandable and uncomplicated work, therefore, often the owners of residential real estate prefer to carry it out on their own.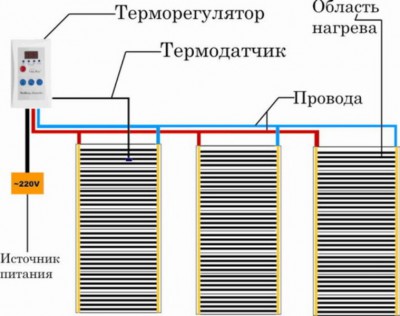 Scheme of installation of infrared floor heating
Types of quality linoleum
The rational choice of floor covering is a fundamental basis for the successful implementation of a heated floor project.
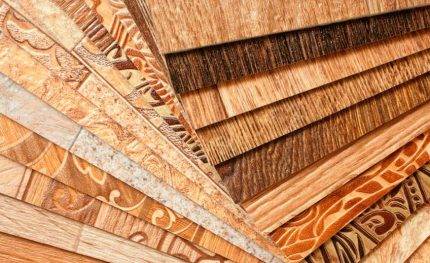
The building materials market is replete with a large number and variety of linoleum. For laying the product on the floor, models with a high rate of heat transfer are perfect
The finishing material should be selected based on the degree of toxicity of the raw material.
Particular attention should be paid to the composition and safety of the special coating:
- Vinyl. The product is formed on the basis of PVC, which gives it a beautiful design. But with strong heating, the material becomes a source of an unpleasant and pungent odor.
- Relin. The basis for the production of such linoleum is bitumen, synthetic rubber and high-quality rubber. The front layer experiences heat problematically, which does not allow it to be used in living rooms and premises.
- Nitrocellulose (coloxylin). The material has a high level of moisture resistance, but lends itself well to burning.
- Glyphthalic (alkyd). Fabric-based flooring does not withstand high temperatures, which leads to significant deformations.
- Marmoleum. The environmentally friendly material has high workmanship, which gives it fireproof and anti-static performance.
Professional builders agree that marmol or vinyl type linoleum is suitable for the formation of a water-heated floor. A more economical option are alkyd modifications with a special film coating.
An important factor is the ability of linoleum to conduct heat.If this indicator is low, then there is no point in using it. Beware of purchasing flooring made of jute, various felts and foamed PVC.

The floor surface under the linoleum should be displayed evenly. Otherwise, irregularities will be visible through a thin coating.
Between the film heater and relatively thin linoleum, it is necessary to place a solid base, for example, plywood. By ignoring this recommendation, you will ensure that all flaws will be visible to the naked eye.


Stage 3 installation of infrared floor heating
Step-by-step instructions for beginners with no experience in construction:
1. Preparation (learning security measures)
If the work is performed by a non-professional, you need to familiarize yourself with the installation technique and safety measures:
minimize walking on the laid film. Protection of the film from mechanical damage, which is possible when moving along it, is achieved through the use of soft covering material (thickness from 5 mm);
do not allow installation of heavy objects on the film;
prevent the instrument from falling onto the film.
Safety rules for installing IR floor heating:
it is forbidden to connect a heating film rolled into a roll to the power source;
film installation is carried out with no power supply;
connection to the power supply is carried out strictly according to SNiP and PUE;
film installation rules are observed (length, indents, absence of overlaps, etc.);
only suitable insulation is used;
installation of the film under furniture and other heavy objects is excluded;
installation of a film under low-standing objects is excluded. These are all items having an air gap between the bottom surface and the floor of less than 400 mm;
contact of the film with communications, fittings and other obstacles is not allowed;
isolation of all contacts (clamps) and cutting line of conductive copper bars is provided;
the film floor is not installed in rooms where there is a high risk of frequent water ingress;
mandatory installation of an RCD (residual current device);
break, cut, bend the heating cable;
mount the film at temperatures below -5 °C.
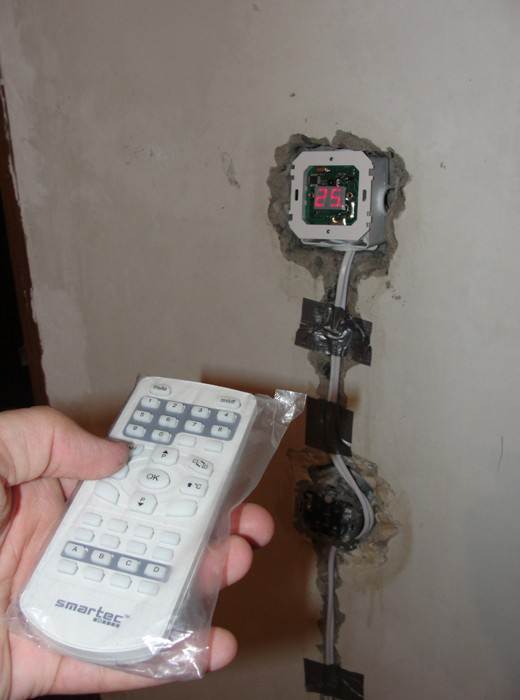
2. Preparation of the thermostat installation site
Includes chasing the wall (for wires and temperature sensor) to the floor and drilling a hole for the appliance. The thermostat is powered from the nearest outlet.
Advice. It is advisable to lay the wires in the corrugation, this technique will simplify maintenance and repair if necessary.
3. Foundation preparation
Infrared film is laid only on a flat and clean surface. Horizontal deviation of the surface exceeding 3 mm is also unacceptable. Masters recommend treating the surface with a primer.
Note. Dismantling of the old floor (draft) is not required if its surface is satisfactory.
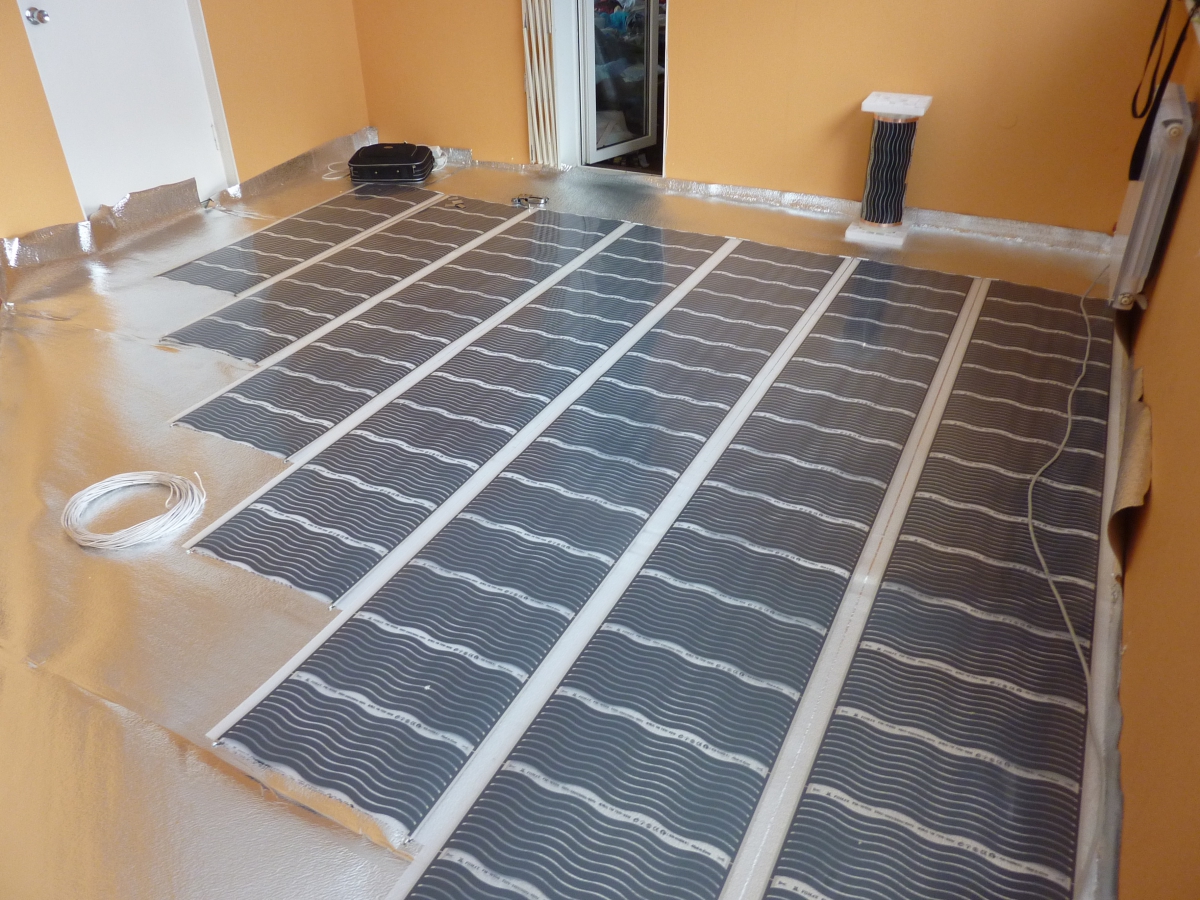
6. Laying infrared floor heating
drawing markings for laying on the floor;
preparation of a strip of film of the desired length
Please note that the film can only be cut along the cut line; the film is located towards the wall that is intended for the installation of the thermostat. Oriented strip copper heater down;
The strip is oriented with a copper heater down;
the film is located towards the wall that is intended for the installation of the thermostat. The strip is oriented with a copper heater down;
the recommended distance from the wall of 100 mm is maintained;
the recommended indent (gap) between the edges of the infrared film sheets of 50-100 mm is maintained (film overlap is not allowed);
strips near the walls are glued to the insulation with adhesive tape (squares, but not a continuous strip). This will avoid shifting the canvas.


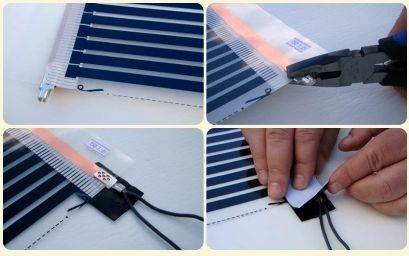
7. Installation of clips
Metal clamps must be attached to the ends of the copper bus. When installing, it is necessary that one side of the clamp is inserted between the copper bar and the film. And the second was located above the copper surface. Crimping is carried out evenly, without distortions.
8. Connecting the wires of the infrared floor
The wires are installed on the clamp, followed by insulation and tight crimping. The ends of the copper bus are also insulated at the point of cutting. The requirement of parallel connection of wires is observed (right with right, left with left). In order not to get confused, it is convenient to use a wire of different colors. Then the wires will be laid under the plinth.
Advice. So that the clip with the wire does not protrude above the film, it can be placed in a heater. Previously, a square is cut out in the insulation for the clamp.
9. Installing the temperature sensor for the thermostat
The temperature sensor is recommended to be installed in the center of the second section under the film. To the sensor was not damaged while driving, under it you need to cut a hole in the insulation.
Wiring diagram for a film underfloor heating thermostatConnecting a thermostat for an infrared underfloor heating
Pros and cons of the solution
All underfloor heating systems are similar in terms of the basic principle of operation: they heat the floor, and it, in turn, heats the air in the room.However, film infrared floors used for additional or main heating of rooms have a lot of advantages over traditional batteries or other underfloor heating systems. The most significant of these will be the following:
- The air in the room will not dry out and oxygen is not burned by such a system.
- The floor surface will be evenly heated by infrared radiation.
- The temperature of the coating will always be comfortable, since the surface does not heat up above forty degrees.
- It is possible to automatically control the heating temperature.
- Installation of the heating circuit is easy even with your own hands.
- Local repair of the system is possible.
- The film is very thin and will not affect the height of the room.
- When laying the film, there is no need to equip a massive cement screed, as is the case with other underfloor heating options.
- All laying operations can be carried out in a short time.
In addition to the advantages, such solutions have several negative qualities. Not all of them are very significant, but some should not be neglected. These should include the following factors:
- The impossibility of using film mats without an external protective layer of plywood or other similar materials.
- The cost of such heating is quite high in itself, and in addition, electricity bills will increase.
- In the case of connecting the mats directly to the mains, and not through a conventional outlet, it is necessary to involve a specialist with experience in such work.
As you can see, a warm infrared floor laid under linoleum has many more positive qualities than negative sides.
Conclusions and useful video on the topic
This video demonstrates in detail and clearly the process of laying the infrared floor:
Film underfloor heating is an excellent choice for laying under linoleum. Installation of such systems does not seem too complicated, but this is deceptive simplicity.
When laying infrared film, it is necessary to strictly adhere to the technology of work and strictly follow the manufacturer's recommendations. This will avoid mistakes and lay the system correctly to ensure a long service life.
Do you want to talk about how you arranged the floor heating system with your own hands? Would you like to share information that will be useful to site visitors? Please write in the block below, publish photos on the topic of the article, ask questions.


