- Competent installation of electrical devices for STP
- Laying thermal insulation
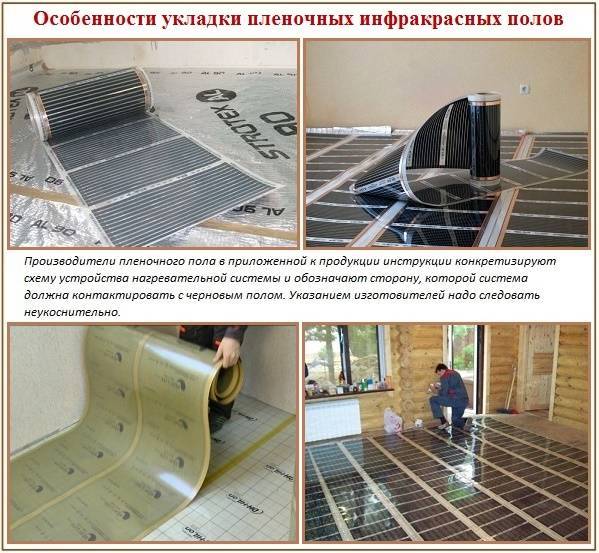
- Rules for the formation of the film floor
- How to install the thermostat correctly?
- Secrets of a water-type warm floor
- Complex of preparatory works
- Features of the pipe assembly process
- Communication with the heating system
- Why do you need underfloor heating?
- Technical features of underfloor heating
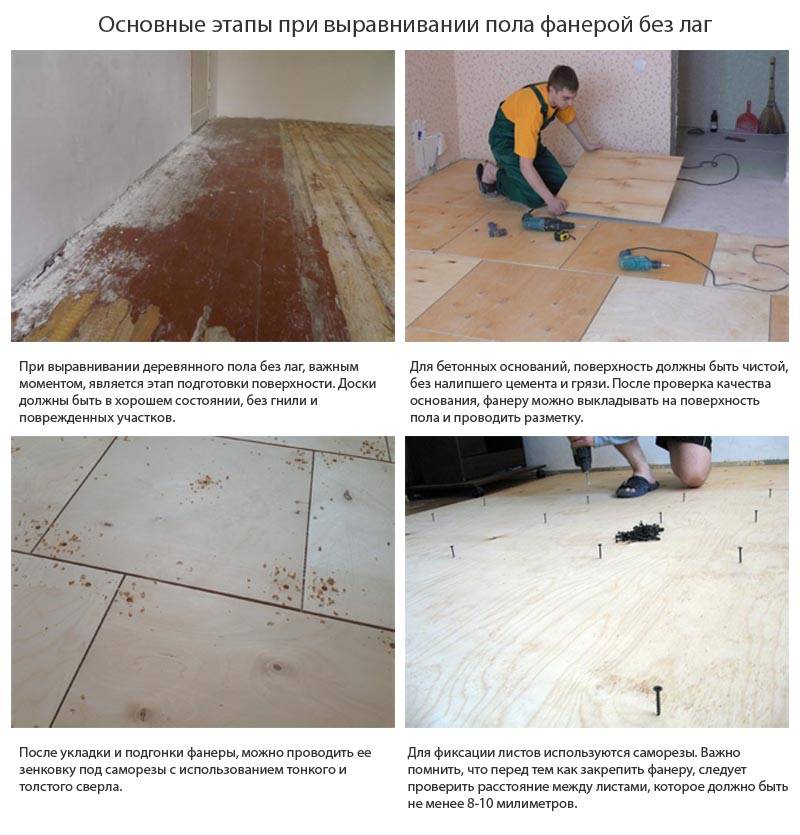
- Is it possible to use plywood sheets on underfloor heating Benefits of plywood floors
- What types of plywood are used for heated floors?
- Advantages of plywood floors
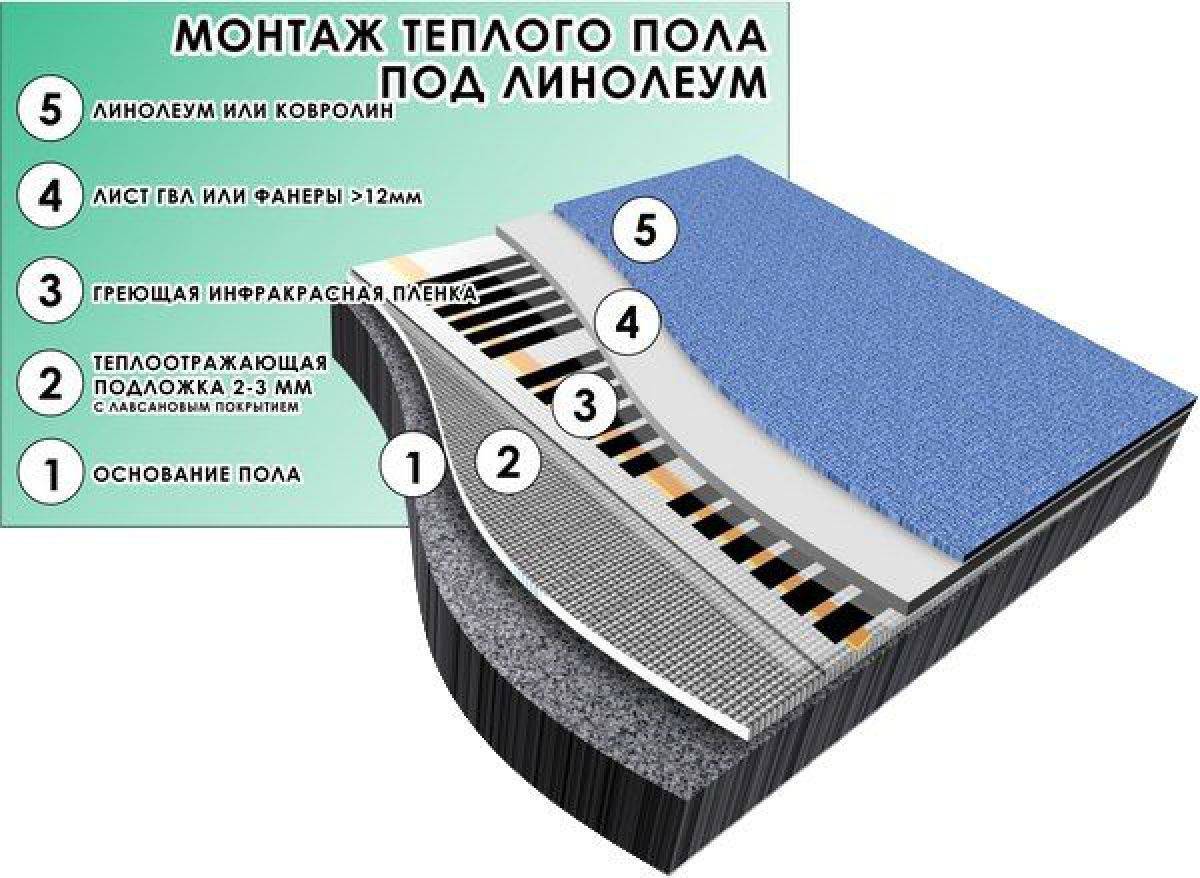
- Warm linoleum on concrete floor. Installation of a warm water floor under linoleum
- A little about warm floors
- Linoleum laying
- Preparation of the floor surface of ceramic and PVC tiles
- Which linoleum to choose?
Competent installation of electrical devices for STP
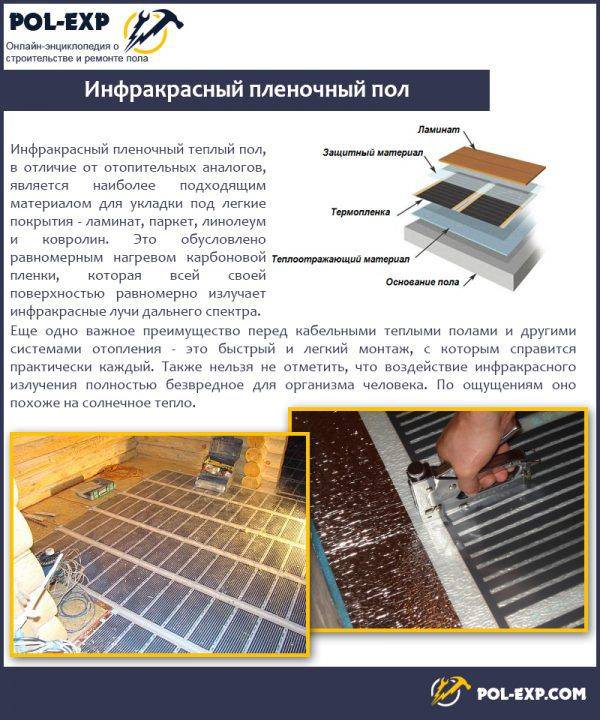
Careful preparation of all necessary materials for construction is an important point. When assembling a floor heating structure, it is necessary to purchase a high-quality film element. The product is laid at a distance of 50 cm from the walls.
It should be remembered that heavy objects in the form of large furniture and household appliances should not be placed above the film. IR heater does not regulate temperature
If large objects on top do not allow heat to pass through, then it gradually returns back to the source. As a result, the conductor may burn out or partially deform. The determination of the exact amount of film is carried out based on the technologies and features of laying.
For continuous operation of the heaters, clips-clamps are required, which fasten the contacts (2 units per separate strip). But first you need to lay a heat-insulating material with a high reflection coefficient, as well as install thermostats, prepare copper wires.
Laying thermal insulation
Laying the thermal insulation layer does not take much time, but this is a very important stage. The event is a must, as heat without a protective barrier will go up and down. As a result, a large amount of energy is wasted.
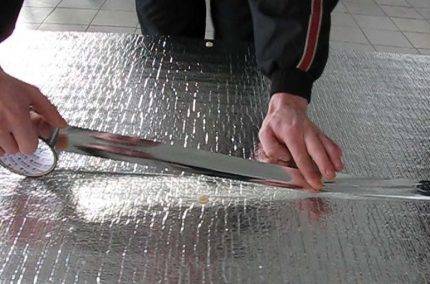
The implementation of work, as a rule, is carried out through a roll insulator. The product is rolled out on a wooden base, while its reflective surface should look up
Each strip is attached to the base with a stapler and double-sided tape. The strips are joined without any gaps. The joints are carefully glued with adhesive tape.
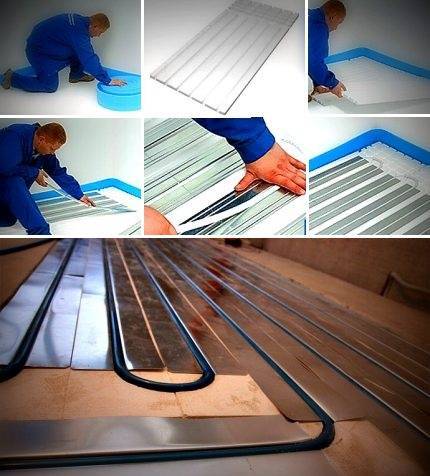
Rules for the formation of the film floor
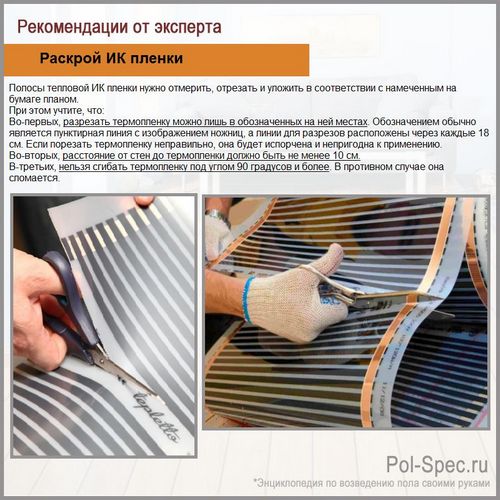
The process of rolling the infrared film is carried out over the insulator at a distance of 50 cm from the wall. In this case, the placement of the copper strip should be clearly below. If necessary, cut the material into equal strips, based on the marking of the film sections.
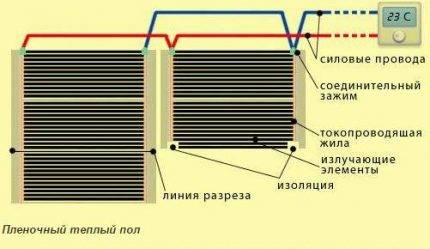
The peculiarity of cutting infrared type film is accuracy. The product is formed into strips of the required dimensions along the sectional lines.This way you will avoid damage to the heating elements.
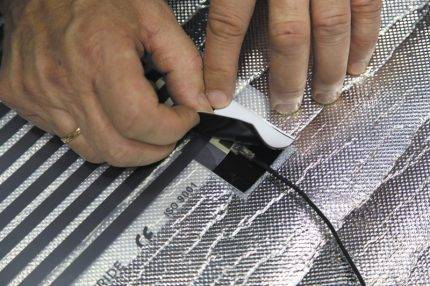
Carbon-based heaters must not be damaged. If you find scratches or tears on the product, then such places should be treated with bitumen-based mastic. This option is also excellent for insulating copper electrodes. Joints of materials are securely fastened with special clamps.
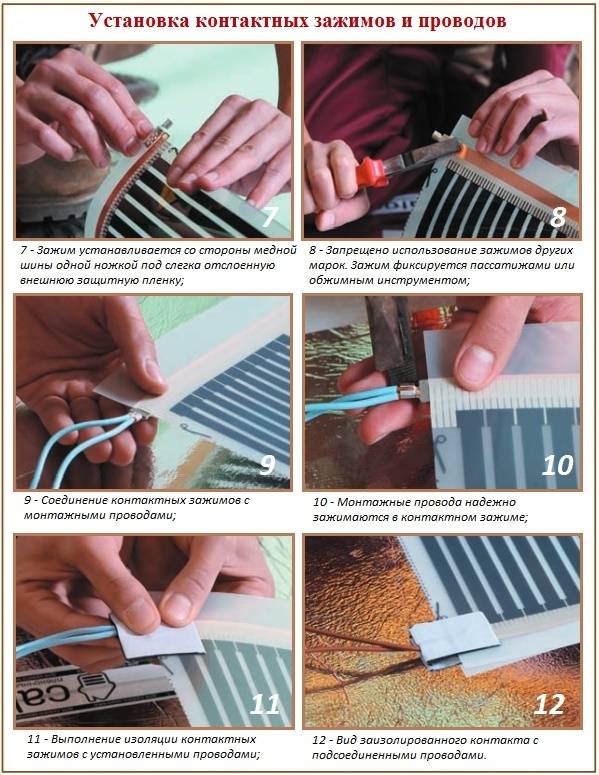
The parallel connection scheme has the following sequence:
- the placement of the first contact on the electrode surface is carried out inside a special film. The second contact is carefully applied from above;
- a strong and reliable connection is achieved by firmly pressing the electrode with the clamp using pliers.
After the detailed laying of all strips of the infrared type film, the formation of a common web is carried out by gluing with adhesive tape.
The bare ends of the electrical wires are insulated with pliers. Thermal film contacts are also subject to insulation, as they are made of silver along the edge and are capable of conducting current.
High-quality gluing of the canvas around the perimeter prevents slipping.
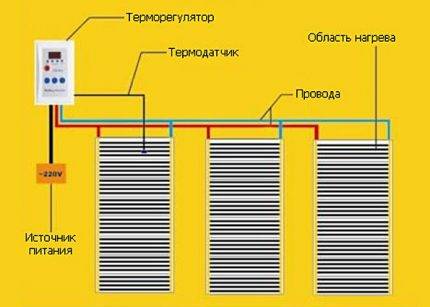
How to install the thermostat correctly?
Installing a thermostat in each room allows you to operate the floor heating system as efficiently as possible. Individual thermal sensors are glued to the IR film strips using mastic. In addition, each device must be securely fixed to the carbon thermal element.
The output of the sensor wires is carried out to the nearest wall. To avoid unevenness, a groove for the cable is cut out in the heat insulator.
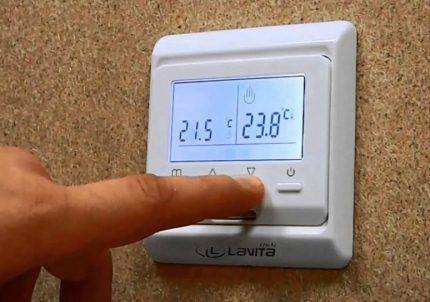
The regulator is fixed on the wall in compliance with the rules for connecting electrical wires based on the instructions from the manufacturer
In order to increase the efficiency of electrical protection, all devices with a power of more than 2 kW are connected to a separate circuit breaker. Having set the floor temperature to 30 ° C, they wait for the film to warm up.
In this way, the state and functioning of the system can be studied. If serious deficiencies are found, they are eliminated.
The last stage includes the installation of insulation - a film of polyethylene type, which securely closes the underfloor heating system. The product is carefully rolled out on top of the heating elements and fixed with small self-tapping screws to a wooden base. Perform this procedure carefully so as not to hook the electrodes.
Secrets of a water-type warm floor
The implementation of installation work of this format of the system consists in the formation of a special wooden base with grooves. This is where the pipes will be placed. An alternative option is to install them in polystyrene mats, which are tightly covered with heat exchangers.

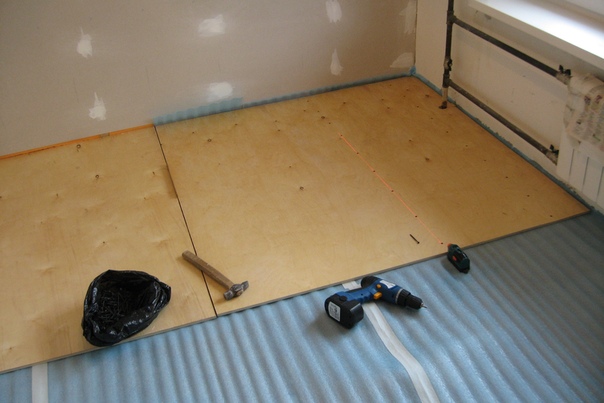
Complex of preparatory works
As a rule, logs are laid on a wooden base, on which a full-fledged floor is subsequently formed. Wooden elements are placed at the same distance of 60 cm and with equal height.
If you ignore these recommendations, then the linoleum finish surface will be skewed. Between the beams under the insulation evenly lies a layer of protection against steam, condensate and water.
The use of high-quality and original materials is the key to the successful implementation of the tasks. Therefore, if you use a regular film, then the steam will accumulate in the insulation itself and gradually destroy it.
On top of the waterproofing, a wide layer of insulation is placed in the form of mineral wool with a density of 40 kg / m3 or another type of product. At the end, the structure is covered with a special film with high-quality insulating characteristics.
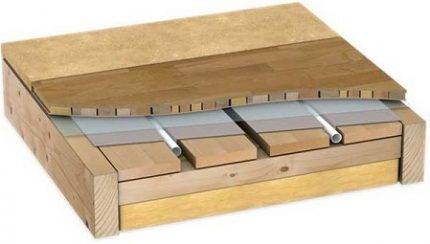
The flooring of the boards should be done so that an even groove is formed between the planks for mounting a specific pipe. The size of such an opening must clearly correspond to the diameter of the purchased element of the heating system.
However, do not forget to leave a small margin. So, for example, for a pipe of 16 mm, a groove measuring 20 * 20 mm is perfect. The end of the base should have a narrow gap with rounded edges in the form of loops to allow rotation for the thermal channel.
Features of the pipe assembly process
There is one important rule at the stage of installing underfloor heating pipes. A flat foil should be laid on top of each longitudinal type groove.
All elements must be tightly wrapped with metal "paper" and securely stapled to the board along the edges.
After such actions, the underfloor heating pipe is attached to the floor with special metal-based plates. This prevents the part from slipping out of the groove.
According to this scheme, all pipes are fastened
Pay special attention to the fact that there are no joints within the same contour. In order to save money, the exact amount of material needed is calculated in advance
At the same time, they adhere to the established restriction, in which the contour should not go beyond a certain area. In practice, this leads to a lack of pressure for the normal movement of the coolant and the “locking” of the circuit
In order to save money, the exact amount of material needed is calculated in advance. At the same time, they adhere to the established restriction, in which the contour should not go beyond a certain area. In practice, this leads to a lack of pressure for the normal movement of the coolant and the “locking” of the circuit.
Therefore, for a pipe of 16 mm, a maximum pipe length of 70-80 m is recommended, and for 20 mm - 110 m. If the estimated length is not enough, then it is rational to break it down into several circuits.
Communication with the heating system
One of the last steps in the formation of a water-based underfloor heating system is the connection to the heating unit. This operation can be implemented in several ways.
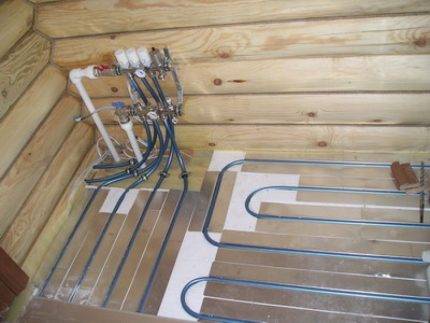
A common option involves the use of a collector structure with a mixing unit and reliable manual adjustment. However, the technology and the connection mechanism are chosen by the owner himself.
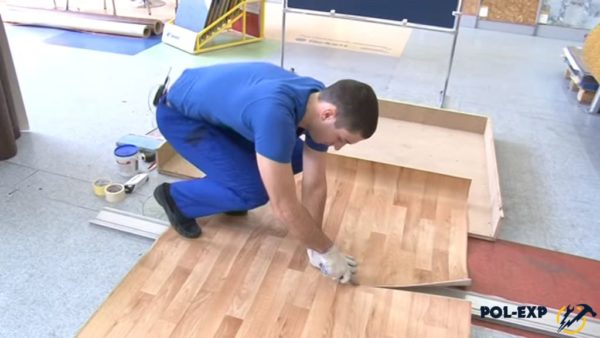
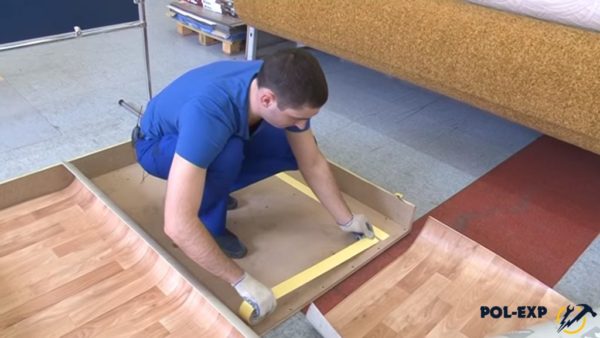
After connecting the elements, the process of pressure testing of the pipeline is carried out. The procedure is mandatory, as it minimizes the risks of leakage and swelling of the coating. Preparation of the base for the installation of linoleum or laminate consists in laying plywood sheets.
Why do you need underfloor heating?
A few years ago, underfloor heating was considered a sign of luxury - base heating systems were quite expensive, and not everyone could afford them. Many believed that it was easier to move around the house in slippers and warm socks than to equip warm floors in your home. However, now the situation has changed - these systems have become more accessible and are now widely distributed.
Warm floor
Underfloor heating systems will help to provide comfort and warmth in the house.Thanks to precisely adjusted thermostat settings, they help maintain a certain floor temperature throughout the day, as well as heat the floors in the house for the arrival of the owners, if they are not at home most of the time. Also, warm floors will help to additionally warm the apartment, and in some cases they can partially replace central heating, if we are not talking about those regions where the cold can be very strong in winter. The floors are also good in the autumn-spring period, when the heating is not yet turned on, and it is already cool outside the window. In this case, they are also able to keep the house warm and cozy.


Warm floor on a wooden base
Technical features of underfloor heating
According to the engineering device, these are rather complex systems with several layers. The specific list of works and materials depends on the characteristics of the base and finish coating. What should be considered during the manufacture of such a design for linoleum on a wooden floor?
-
The load-bearing capacity of a wooden floor. The structures are laid on logs, the calculation of the section of the elements of which was often done without taking into account the additional load. In new buildings, wooden floors have a sufficient margin of safety and hold heating systems without problems. Old structures are often of critical importance due to the natural wear of the elements or damage to the tree by rot. In the event of an increase in the load, the base may not withstand and sag, and the consequences of this are very unpleasant and require great effort to eliminate.
-
Lumber breathes, constantly increasing or decreasing the relative humidity, depending on the operating conditions.To increase the service life, the wooden floor must be able to get rid of excess moisture, and heating systems significantly impair the effectiveness of natural ventilation. During the construction of a warm floor, it is necessary to use a set of special construction measures to ensure optimal ventilation of wooden structures.
-
Linoleum must be laid only on flat and hard surfaces. This means that the heating systems must be closed. For these purposes, cement screeds, plywood or OSB boards are used. The specific material should be chosen after a competent analysis of the technical parameters and the actual condition of the wooden floor structures. At the same time, it is necessary to achieve cost reduction and increase the efficiency of the heating system.
Wooden floors are not considered the optimal base, but modern building materials and technologies allow us to achieve excellent results even in such adverse conditions.
Is it possible to use plywood sheets on underfloor heating Benefits of plywood floors
Many residents of high-rise buildings and private houses experience discomfort from chilled floor coverings that are impossible to walk barefoot on. Therefore, it is quite logical to want to insulate the floors. Many people lay plywood on a warm floor, on which they subsequently lay a top coat (laminate, tile, etc.).
What types of plywood are used for heated floors?
Manufacturers produce a large number of varieties, varieties of plywood.Therefore, consumers are asking questions, is it possible to use it for laying underfloor heating, what types are used? Note that all types are suitable for use in installing a warm floor (on logs, on a wooden floor, concrete), but it is worth choosing the material individually, for each specific case.
There are five grades of material, and some of them are moisture resistant. To make plywood of the 1st grade, only birch, oak, beech veneer is used; knots cannot be found on it. Such materials are laid on the floor, but their cost is high, and the construction of the floors will be costly.
Second-rate material is more suitable for arranging a warm floor, while the quality does not suffer, and it will not hit the wallet.
Advantages of plywood floors
With the help of plywood material, a good quality intermediate base is made for floor heating. When a piece parquet, a parquet board, fastened to the rough base with self-tapping screws, is placed on the adhesive mixture for a fine finish, then the addition of plywood sheets is mandatory.
Professionals advise putting such a "pie" of the floor even when laminate, linoleum is used as a decorative coating. With such a position of materials, the role of heat and sound insulation falls on plywood.
The general advantages of plywood in arranging underfloor heating include:
- Strength characteristics,
- environmental friendliness of the material,
- Acceptable cost in terms of purchase, work,
- The range includes moisture-resistant types for use in rooms with high humidity,
- The material is easy to process and maintain.
The use of plywood for heated floors is not as effective due to its poor heat conductivity. Therefore, underfloor heating under thermal insulation plywood will have to be used at full capacity so that heat seeps through the wood, and this will lead to increased heating costs. And in order to maximize the effect of the warm floor, it is recommended to choose the appropriate option for laying the structure.
Installation of floor heating on a plywood basis, unlike the traditional laying technique, is done without rigid fixation. Sheets of material are attached with this method of installation with metal mounting brackets. This makes it possible for the wood veneer to expand with an increase in humidity, and eliminates the appearance of swelling and cracks.
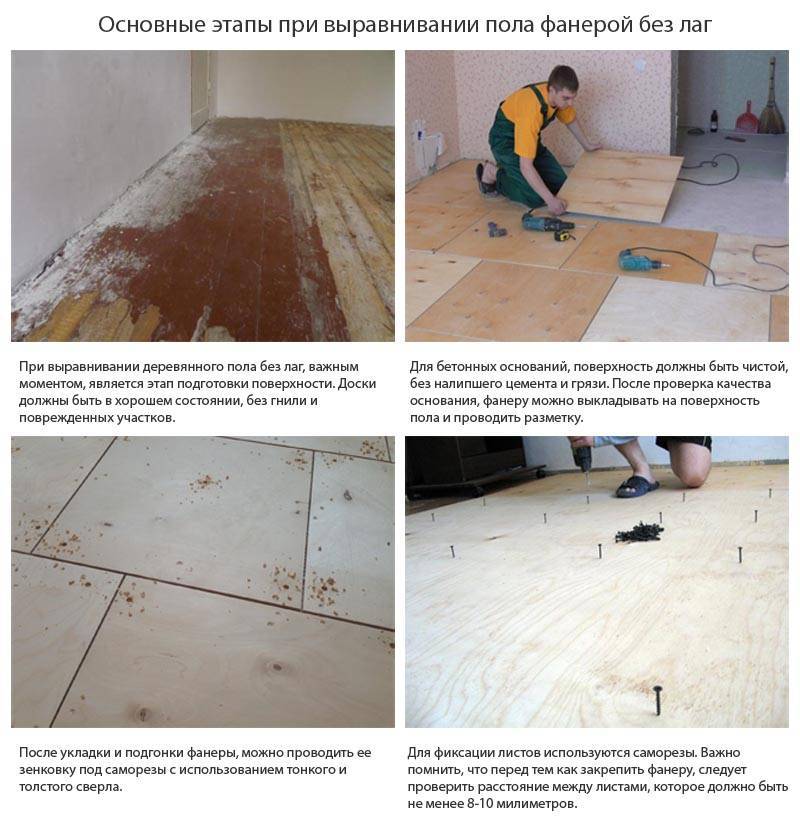
To install intermediate plywood flooring, several methods are used:
A material 1.2 cm thick is laid on a concrete screed,
Attention! Plywood sheets are attached to concrete using dowel-nails, adhesive mortar
- On the base of wooden logs, thick sheets 2 cm thick are applied in 2 layers with spaced seams,
- On old wooden floors apply material of any thickness.
Masters do not recommend installing a warm water floor under plywood, as this is ineffective, and there is a risk of damage, leakage of coolant pipes. And if this happens, then all the wet, damaged plywood will have to be thrown away. Therefore, for such floors it is better to choose a different finish.
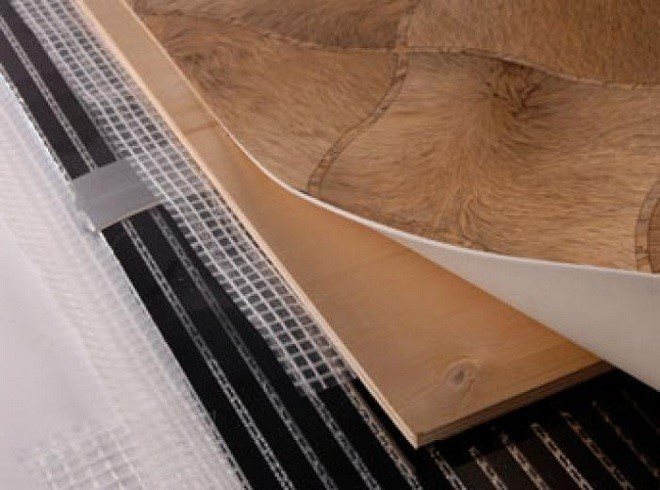
When installing a warm electric floor using plywood, and then laying carpet, linoleum, it is worth considering some features.For installation, it is recommended to use underfloor heating film components from one manufacturer, which prevents problems with the use of the coating.
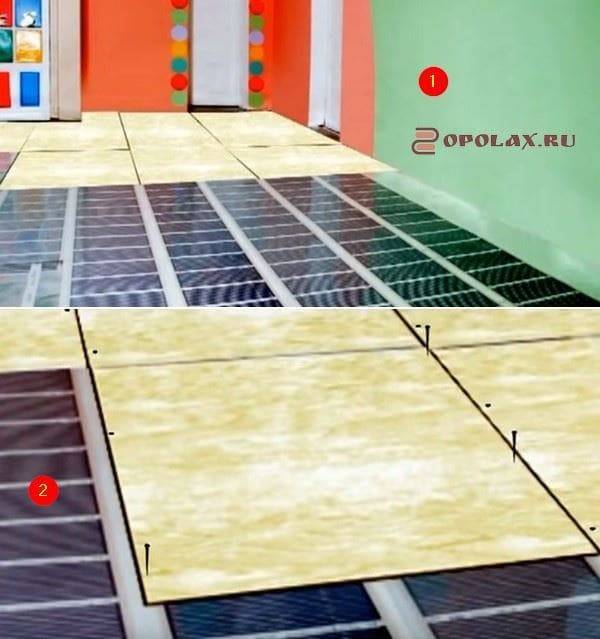
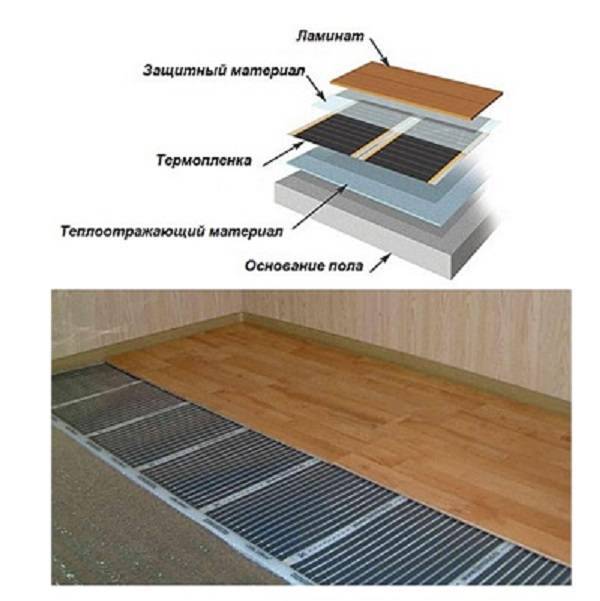
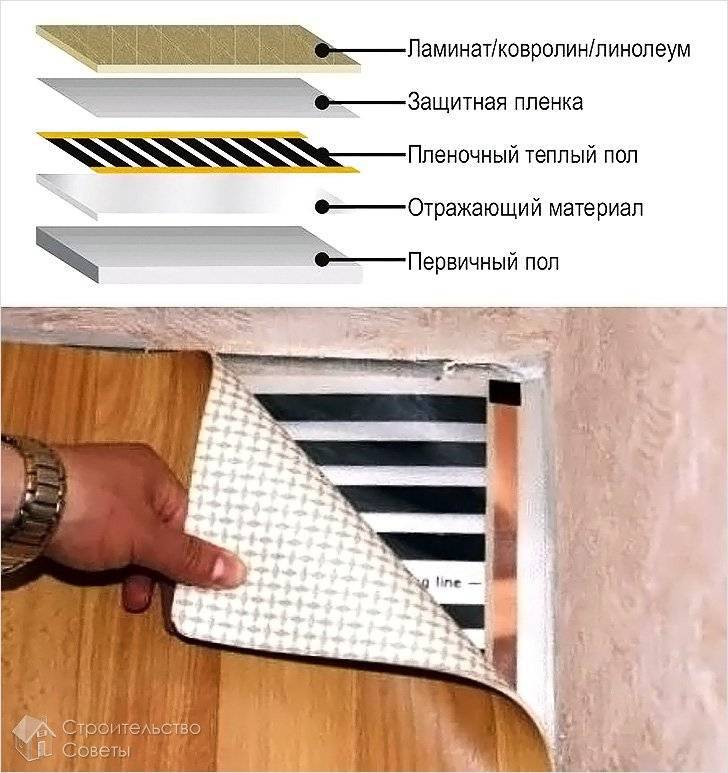
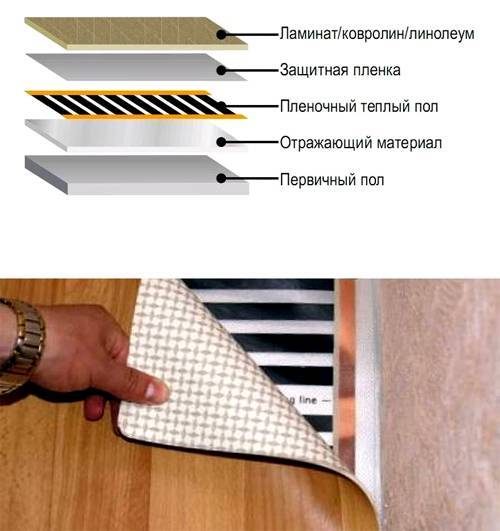
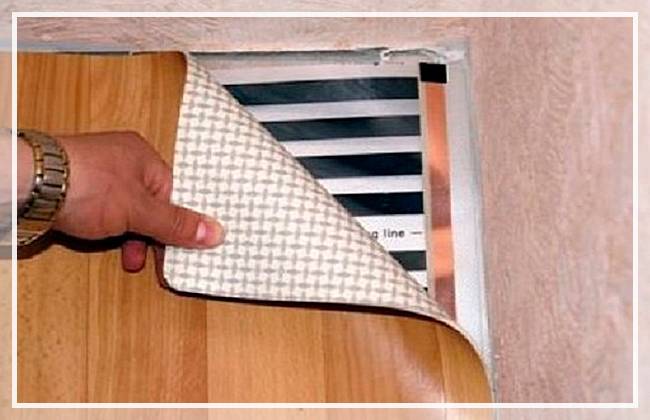
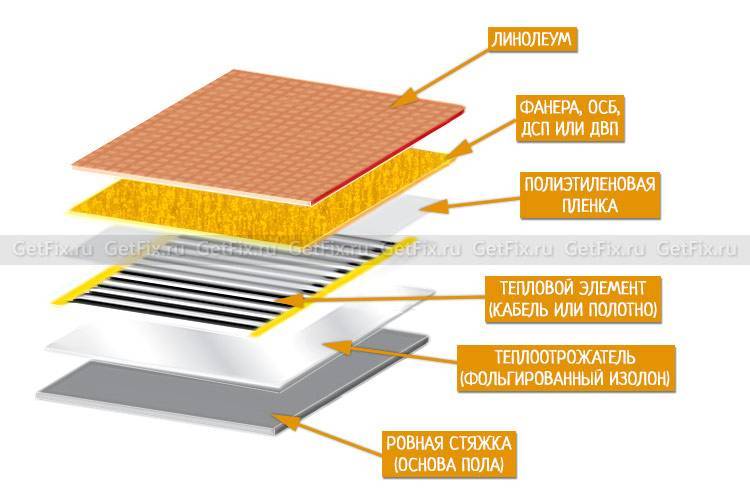
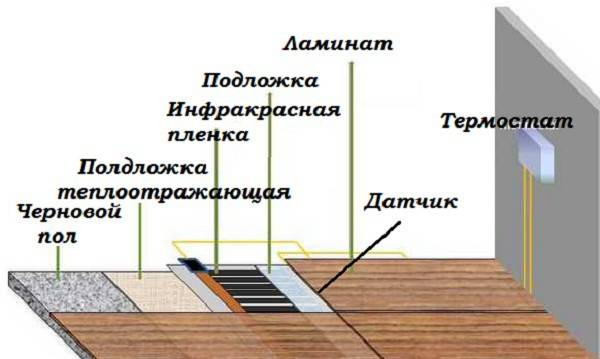
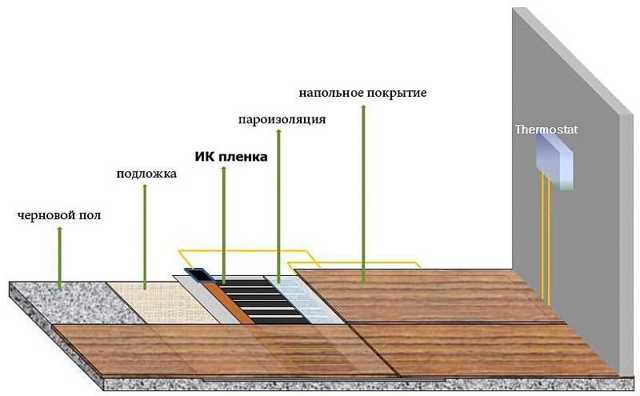
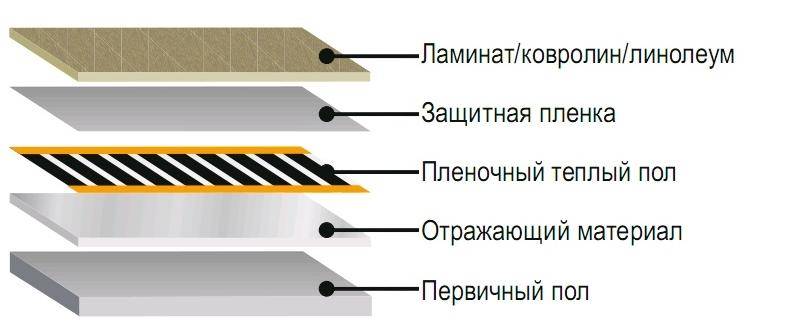
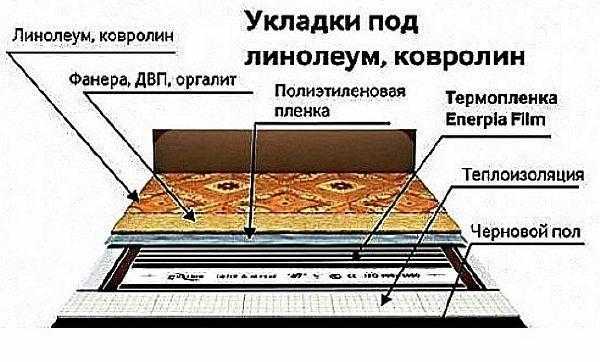
The assembly of a warm film floor resembles a "pie":
- A heat reflector is laid on the main floor,
- Then lay a layer of thermal film,
- Lay down the plastic film
- Then a hard coating is mounted, ensuring alignment,
Attention! It is not recommended to use sheets of chipboard, fiberboard, OSB - they do not give a flat surface, they can sag
- Plywood sheets are fixed with self-tapping screws to the main coating, the joints are puttied,
- After 2 days, lay the top coat.
A person who decides to make a floor heating system should remember that it is possible to use plywood on a warm floor system. You should only strictly monitor the base before laying - it must be perfectly dry, otherwise the plywood will absorb moisture, and the structure will become unusable.


Warm linoleum on concrete floor. Installation of a warm water floor under linoleum
An excellent combination of underfloor heating and a concrete base, although a linoleum finish is not a good option in this case. If desired, such material can be laid, but it must be of high quality and not be very thick. The process of installing a warm floor on concrete under linoleum is as follows:
- Think over the laying scheme - a snail or a snake.
- polyethylene film having a thickness of 150 microns;
- polystyrene (plate thickness 20 mm), preferably with bosses;
- reinforcing mesh;
- damper tape;
- collectors, input and output;
- XLPE pipe.
- Make waterproofing. A waterproofing substrate made of polyethylene film is laid on the prepared concrete base, the strips are glued with adhesive tape.
- Lay a heat-insulating layer - polystyrene sheets with bosses. Bosses are needed for ease of attaching underfloor heating pipes. Sheets are fixed to the surface with fasteners.
If the plates are smooth, then a reinforced mesh is installed on them, on which the pipes will be attached.
- Install manifold. It is attached to the wall, in the future pipes will be connected to it.
- Attach damper tape. It is glued to the walls, at the points of their junction with the floor around the entire perimeter.
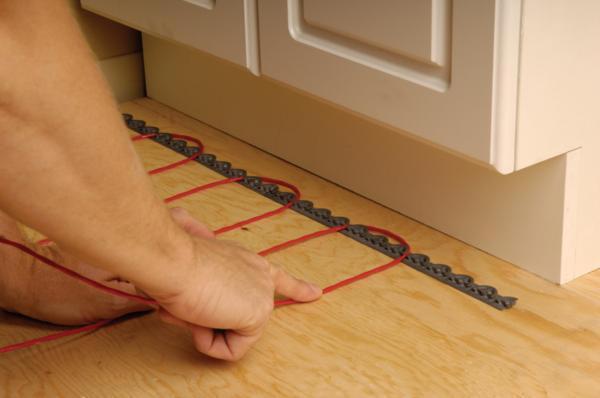
- Install heating elements. The pipes are laid in steps of 10 to 30 cm, the heat transfer of the structure depends on the size. The average consumption of a polyethylene pipe is 5 meters per 1 m2 of area. The pipes are located between the bosses and are fixed by them. In the absence of bosses on the slab, the pipes are attached to the reinforcing mesh or fixed with clips-clamps that are pre-installed on the concrete floor.
- Connect and test the heating device. The pipes are connected to the manifold, one end to the inlet, the other to the outlet, and the mixing unit is fixed to the manifold cabinet. The system is filled with water and pressure tested.
- Lay the reinforcing mesh. It is placed on top of polystyrene sheets with laid pipes. The goal is to strengthen the concrete screed, in which the warm floor will be hidden.
- Pour concrete screed. Its minimum thickness is 40 mm, the concrete must completely cover the pipes. It is necessary to allow the cement to dry before laying the flooring on it, this will take at least a month.
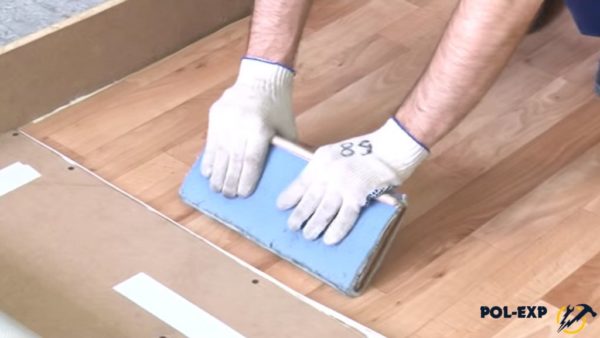
- Carry out the installation of the substrate for linoleum. Plywood sheets are used, which are spread over the entire area.
- Apply top coat. Linoleum is located on top of plywood throughout the floor.The material must rest before installing the skirting boards.
Important! A warm water floor can only be turned on after the concrete has completely hardened.
A little about warm floors
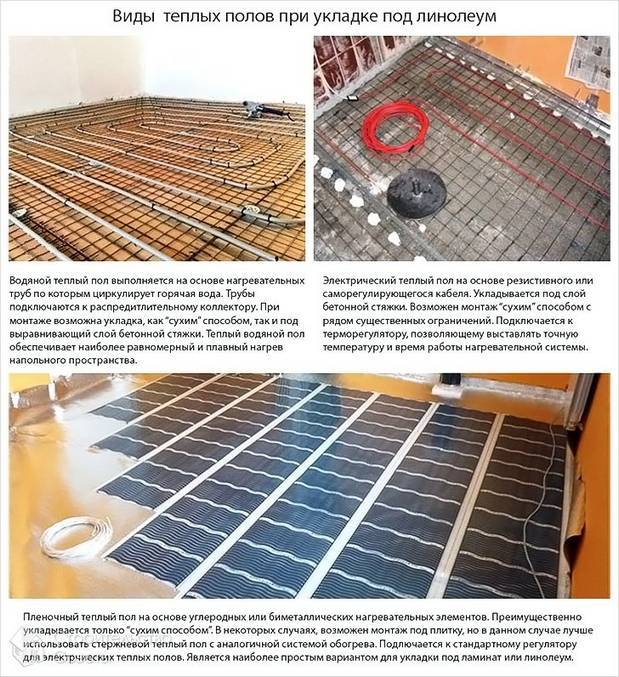
Electric underfloor heating can be either water or electric. Infrared floor heating deserves special attention, as the most economical, but at the same time the most expensive device that allows you to heat rooms of any type. However, it is possible to use such technologies on a wooden surface only using a limited number of methods. It uses:
- electrical circuit. Represents metallized (amorphous) tapes using a carbon or bimetallic film;
- water floor. Suitable only for flooring devices in which all pipes are in cavities intended for them, consisting of extruded polystyrene foam.
The wood used as the main covering will not allow you to install any other systems and cover them with linoleum. Without a screed, they cannot be installed, and it has a considerable weight that the wooden coating will not withstand. It is also worth noting that such a level will be at least seven centimeters. For small rooms, it is better not to install a screed at all. After installing the screed, the old doors can no longer fit into place, and they will have to be filed. In addition, peculiar steps will appear between the rooms, which hardly anyone will like.
Linoleum laying
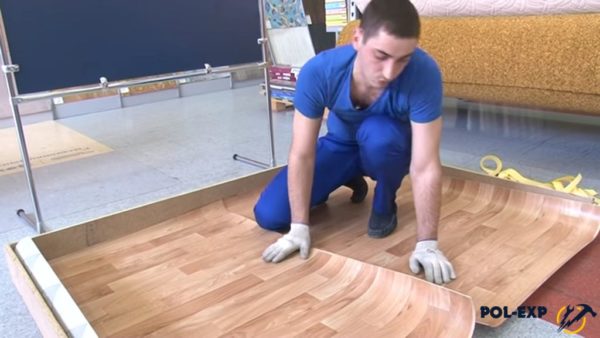
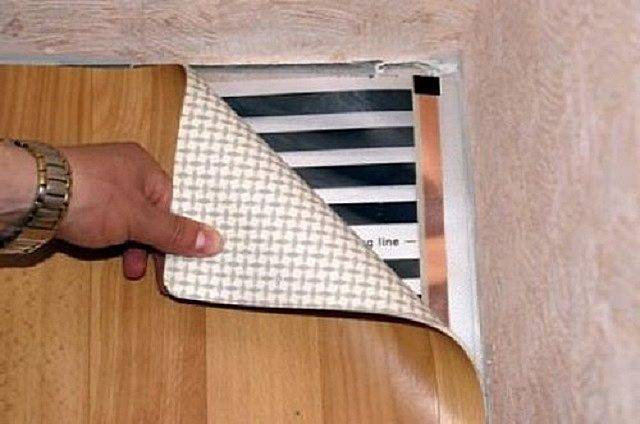
Before starting installation work, linoleum must be carefully unfolded and left on the floor for a day, so that the material has time to level out during this time and take the form of a floor covering.Such actions will help to facilitate further work. Only after that you can proceed directly to the installation. Below is a step-by-step instruction, following which will help even beginners cope with laying linoleum.
Features of laying linoleum
Step 1. Using a tape measure, measure the dimensions of the room (width and length). Doorways must be taken into account. Add 6-7 cm to the obtained values. Vacation is needed to take into account the curvature of the walls.
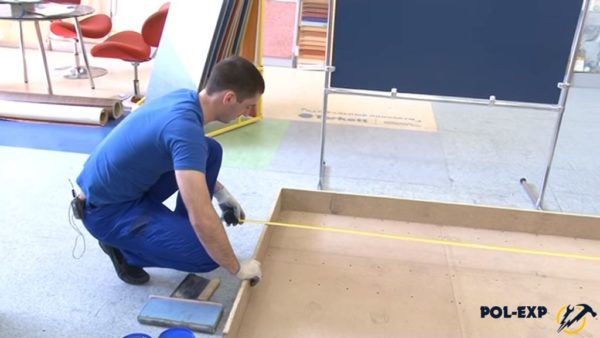
Measure the length and width of the room
Step 2. Cut off the required piece of material with a clerical knife. Use a ruler to make the cut line as straight as possible. Otherwise, difficulties may arise during further installation.
Cut linoleum into desired pieces
Step 3. If there is at least one even wall in the room, lay the linoleum right next to it, leaving a small gap or pressing it close. Carefully cut off any excess.
Press the linoleum against a flat wall
Step 4. Fix the linoleum sheets before placing them on the wall by gluing ordinary double-sided tape to the floor. This will prevent the material from shifting during trimming.


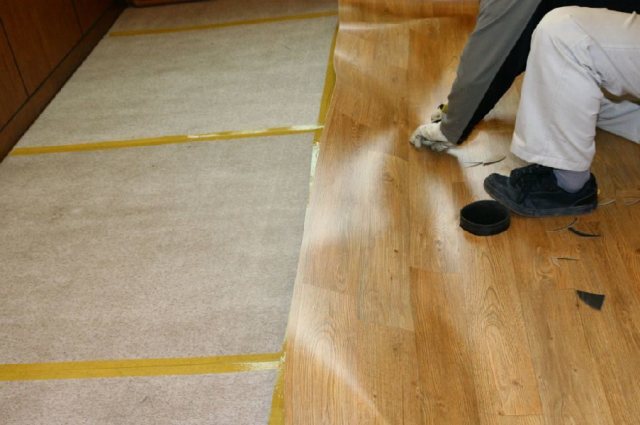
Stick double-sided tape to the floor
Step 5. Fit the patterns on the linoleum at the junctions. Of course, if the material is monophonic, then there is no need to deal with fitting. It is recommended to make a small overlap between the sheets of linoleum (no more than 3 cm). Throughout the process, make sure that the patterns on different sheets of linoleum match.
Customize the drawings on linoleum
Step 6. After fixing the linoleum on the base, trim, gradually cutting off the excess material.Trimming should be done little by little so as not to spoil the material (it is easier to cut off the linoleum several times in a small piece than to cut off the excess at a time).
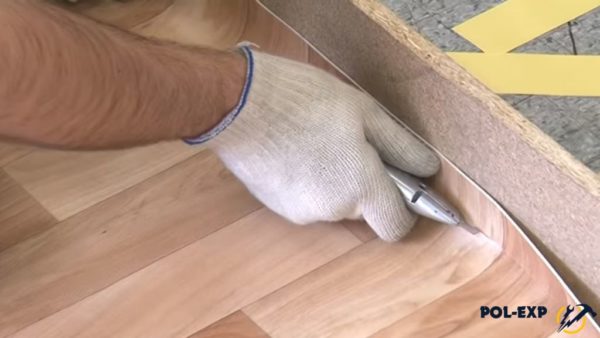
Cut off excess linoleum
Step 7. Apply glue to the surface of the base using a spatula. It is desirable to start processing with glue from the joint. To see the place where the adhesive was applied, draw a thin line on the base with a pencil. For gluing, use only high-quality products.
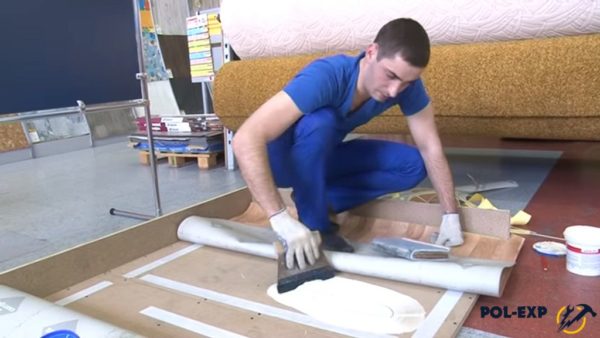
Apply glue to the base
Step 8. Remove all air from under the linoleum after gluing by carefully rolling it. Only after rolling can one proceed to the final trimming of the material at the junction. Now you need to wait a while until the glue dries completely and install the docking profile. At this stage, the process of laying linoleum can be considered complete.
Remove air clods

After removing the air, perform the final trimming of the linoleum
Preparation of the floor surface of ceramic and PVC tiles
If the old flooring is PVC tiles, then it is necessary to clean the floor from the polish. Ceramics, if any, covered the floor, usually left, but also carefully processed.
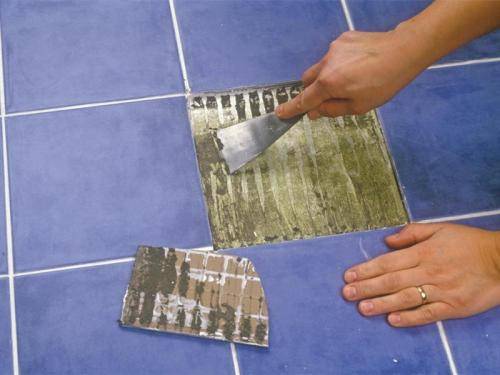
After inspection, chipped and cracked parts are revealed. Such tiles are removed from the surface. The rest must be washed well, and the resulting voids, after removing the cracked tiles, are filled with a solution that helps to level the surface.
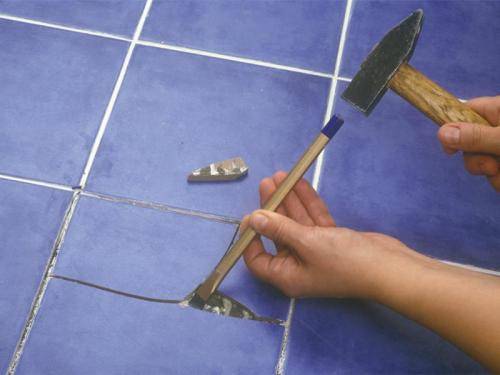
Dismantling of ceramic tiles
Dismantling of ceramic tiles
If the cracks do not pose a particular threat to linoleum, they are leveled with epoxy. Then the surface should be dried and sanded.


Which linoleum to choose?
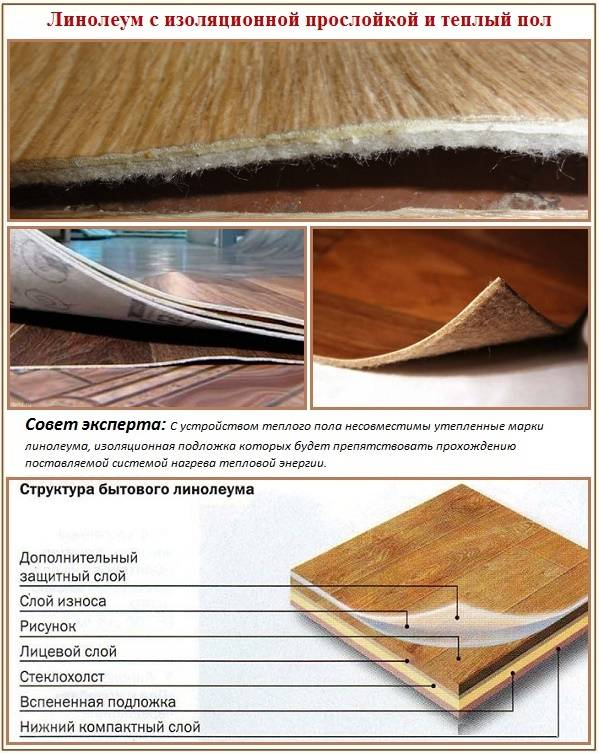
Linoleum present on the market, despite the visual similarity, differs in various parameters. It may have a different thickness, composition, structure, and the reinforcing base, if present, may differ in type.
When choosing linoleum, you need to correctly use the information encrypted in the markings applied by the manufacturer. It encodes information about the composition of this type of coating, the possibility of heating it, the maximum allowable temperature.
You should immediately exclude from your list a material based on a glyphthalic polymer, i.e. alkyd linoleum. It is a low thermally conductive coating that changes its size over time. For underfloor heating, these properties are a big minus.
An unsuitable option is coloxylin linoleum based on nitrocellulose, which is highly flammable. Although flame retardant acid is present in the composition of such linoleum, which somewhat reduces the fire hazard of the material, it is not advised to arrange underfloor heating under it.
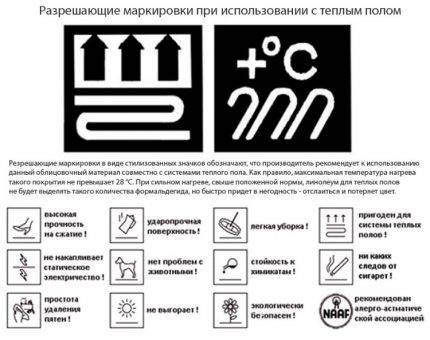 If the selected linoleum is recommended by the manufacturer for laying in tandem with underfloor heating, it has such a permissive marking as in the photo
Relin rubber linoleum should also not be considered. In addition to being a good heat insulator, when heated from below, the material can change its structure. This will quickly lead to its destruction.
PVC linoleum with good strength and hygienic characteristics, more suitable for underfloor heating than other types. A more expensive option is natural linoleum (marmolium), created on the basis of safe components.
It contains jute fabric, natural dyes and other natural ingredients.The main rule: PVC linoleum can only be heated up to 30⁰, and natural - up to 27⁰ maximum.
When choosing PVC linoleum for finishing underfloor heating, it is better to consider not its domestic appearance, but commercial or semi-commercial, as more durable. A heat-insulating base is not needed for this purpose, it will only reduce the efficiency of the system.
The material is more suitable either without a base at all or with a very thin fabric backing. At first, vinyl linoleum paired with a heating cable may emit an unpleasant odor, but then it will disappear.


