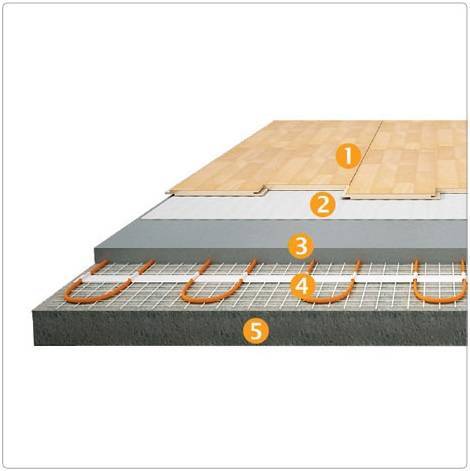
- Mounting Features
- Preparatory work
- Connection and isolation
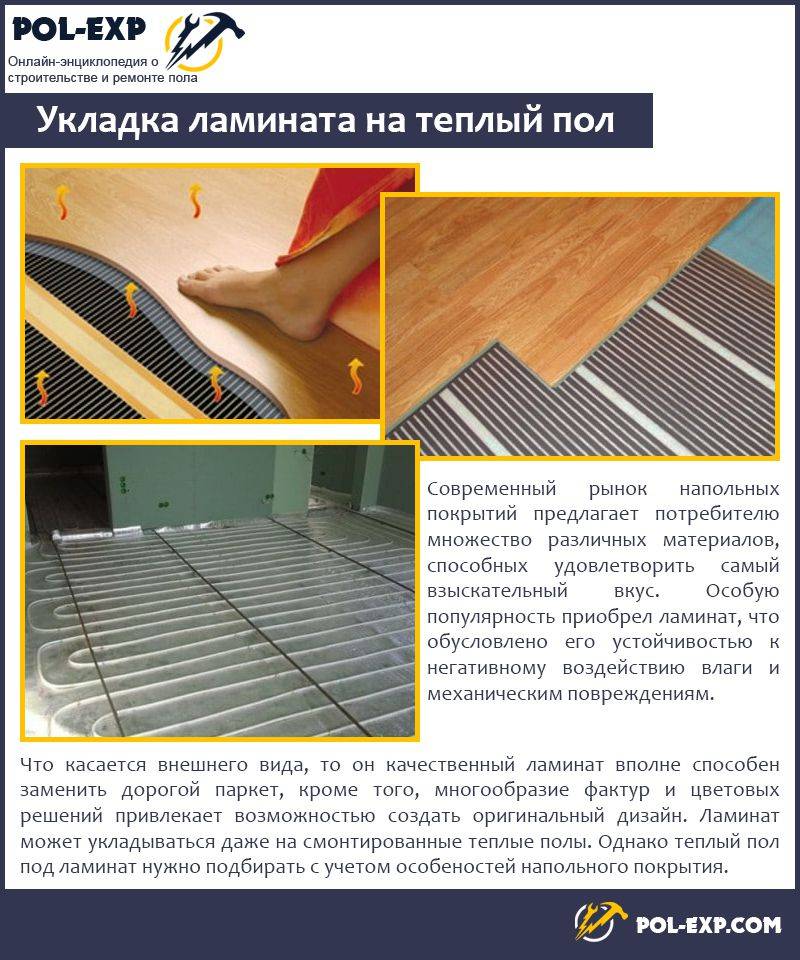
- Step-by-step instructions for installing laminate flooring on underfloor heating
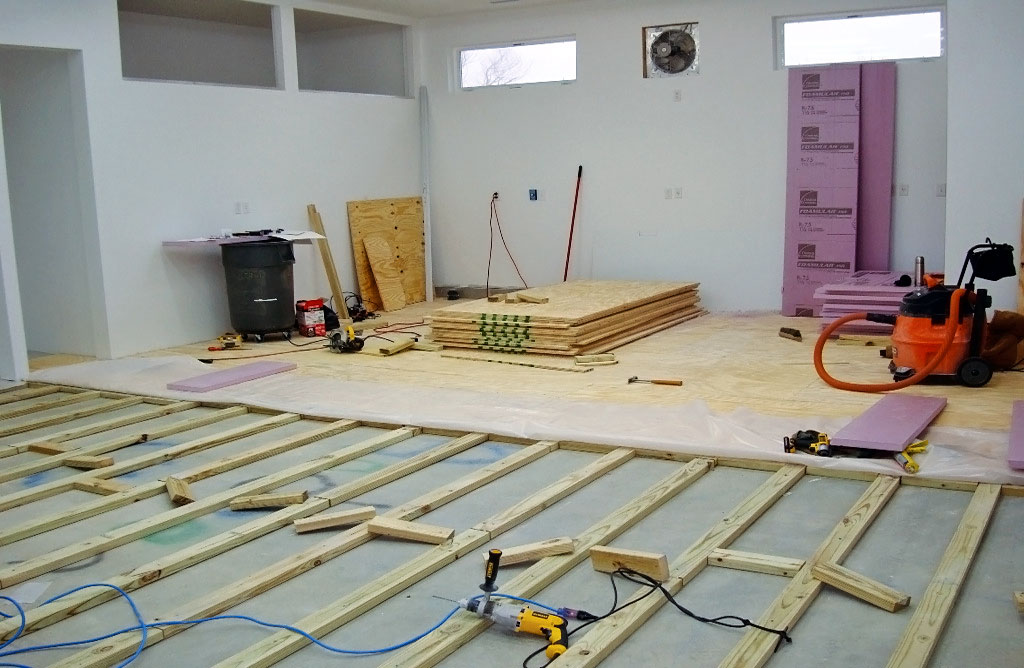
- How to install a dry floor on a wooden base?
- General requirements for installing laminate on underfloor heating
- Possible installation errors
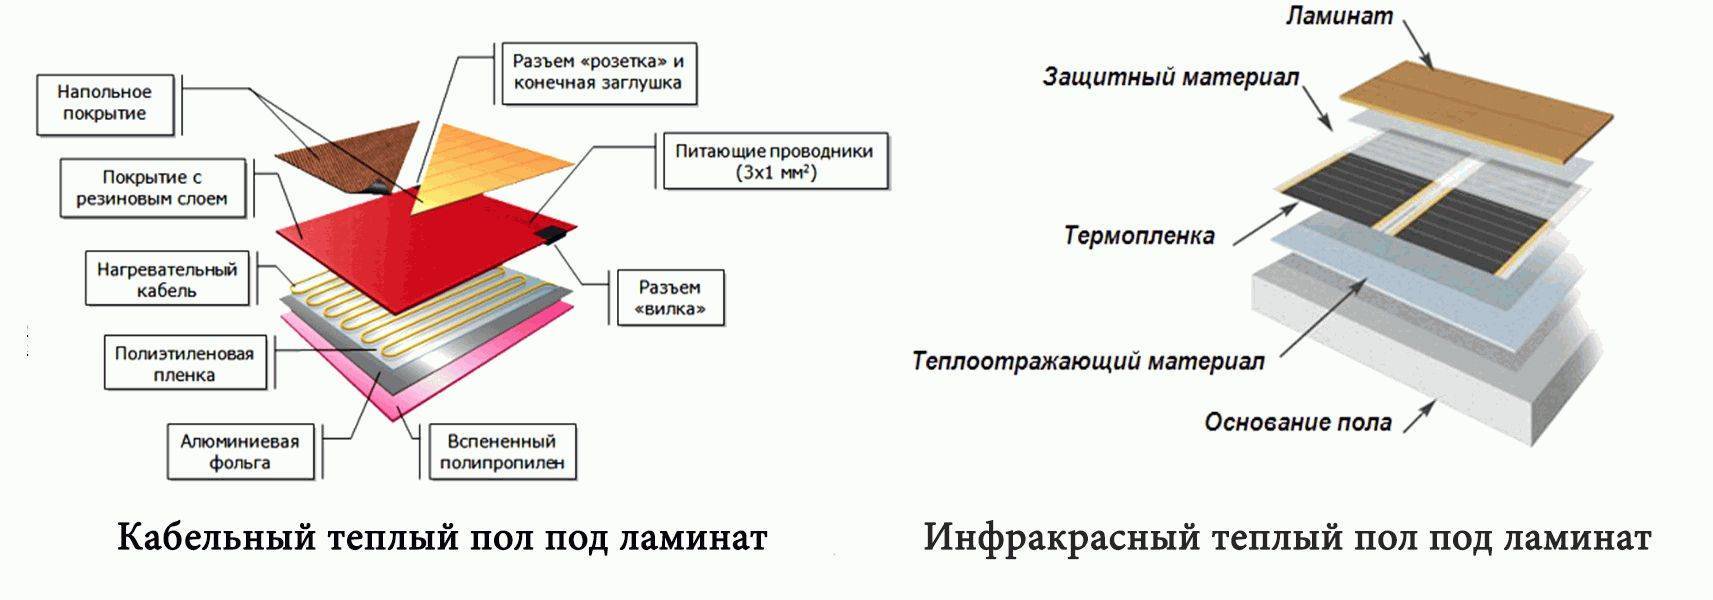
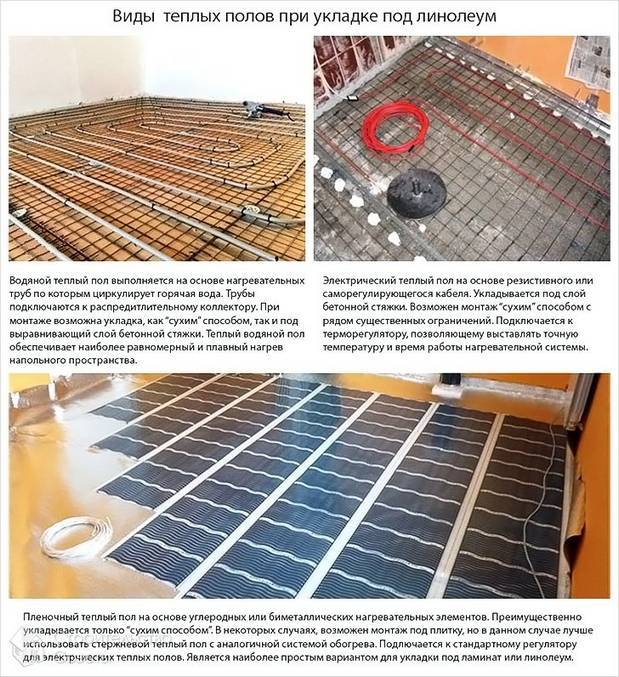
- Types of underfloor heating under laminate
- Water floor under laminate
- Electric floors under laminate
- Installation of a water heated floor
- Advantages of the "warm floor + laminate" scheme
- Film floor installation
- Important points when choosing a laminate for underfloor heating
- First important point
- The second important point
- The third important point
- Choosing a laminate on a water-heated floor
- Laying the right laminate for underfloor heating (water)
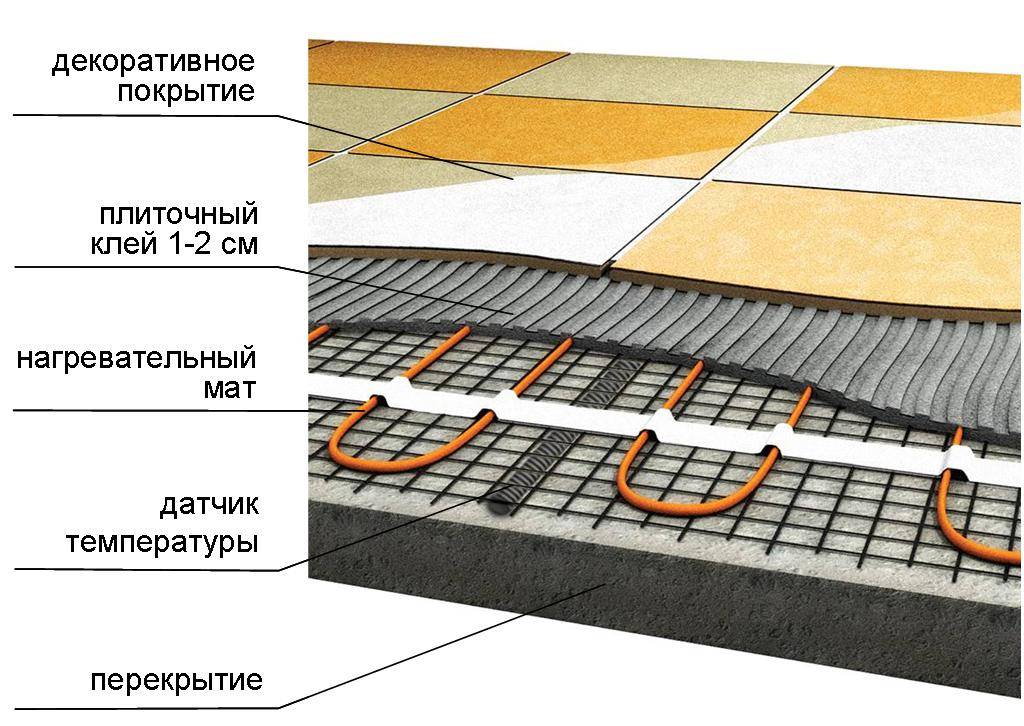
- Installation of a warm floor Cement-sand screed
- Installation of a warm floor on a dry screed
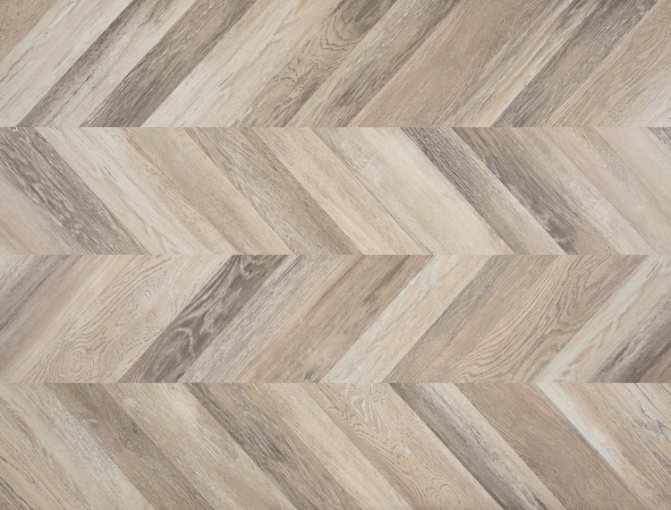
- Coating selection
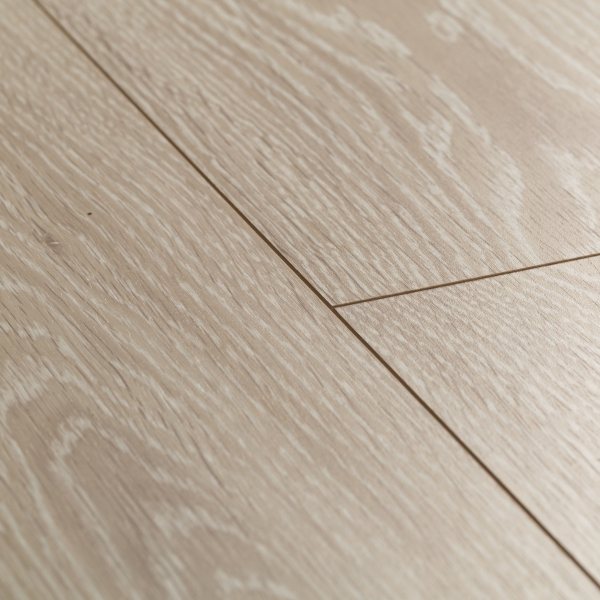
- Laminate class
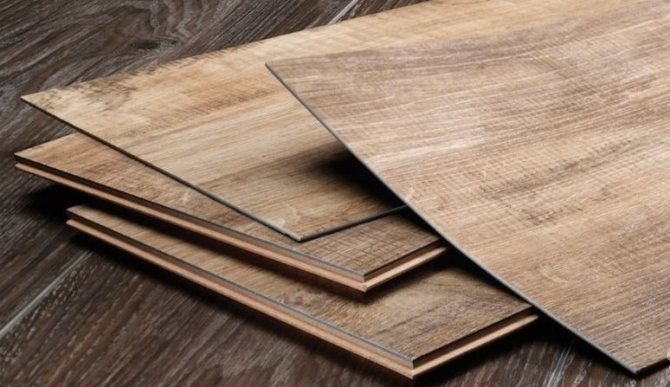
- Lamella material
- Electric floor heating
- Conclusions and useful video on the topic
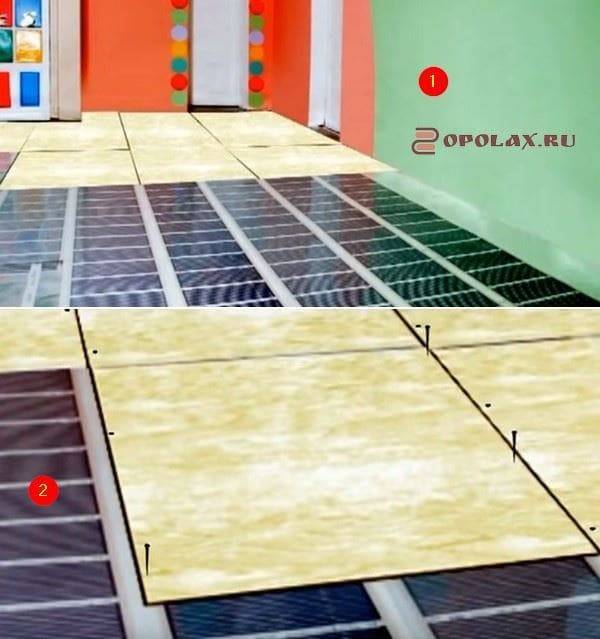
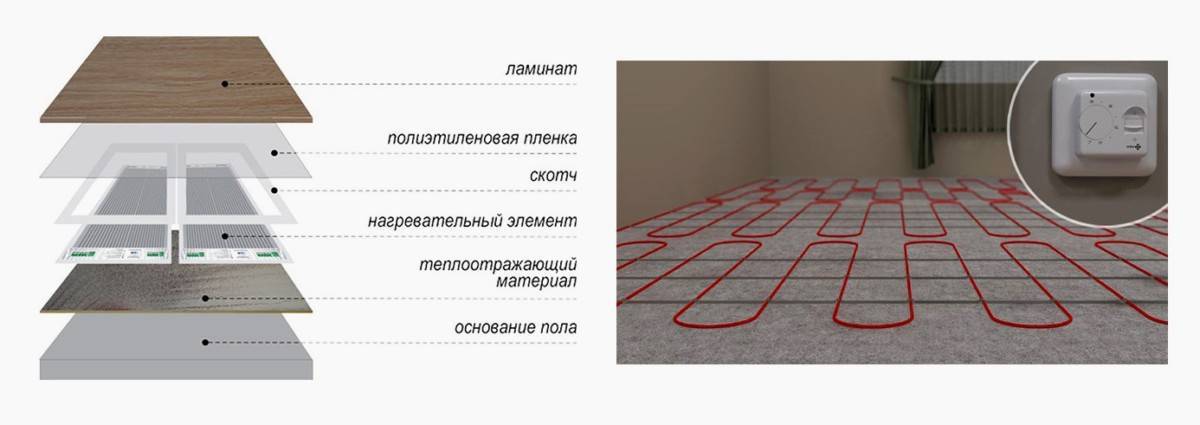
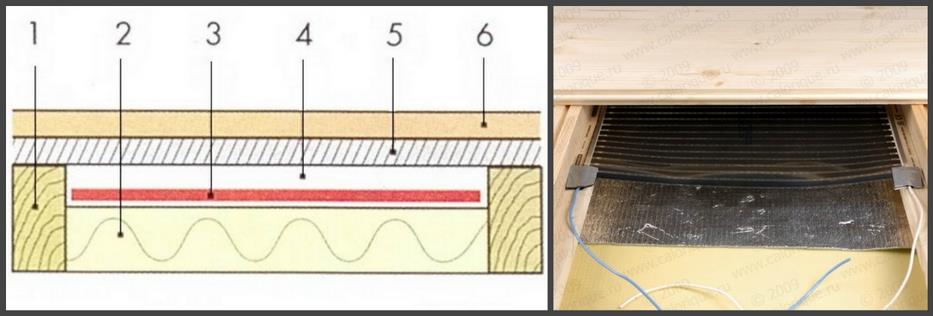
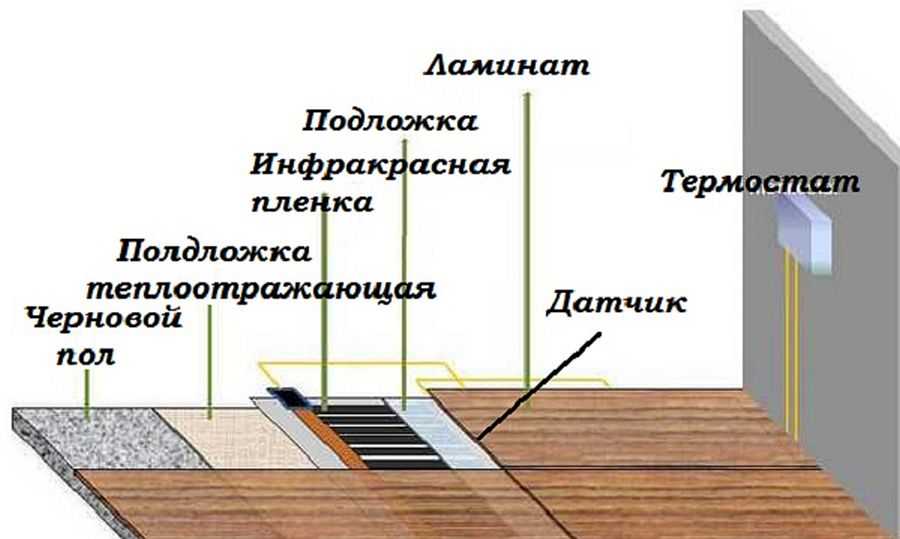
Mounting Features
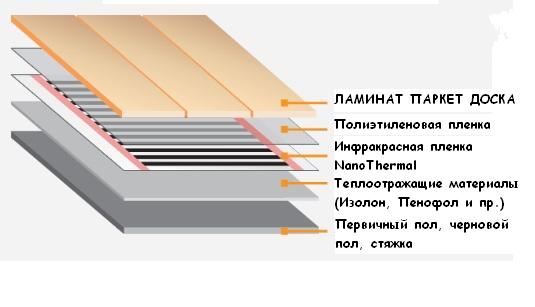
Laminate can be considered the most popular flooring installation. Due to the long service life, aesthetic appearance and affordable price. But we must not forget about the quality of space heating. If you lay the laminate just on a concrete screed, then in winter the apartment is unlikely to be warm. Therefore, experts recommend installing an infrared heating film between the concrete floor and the laminate.
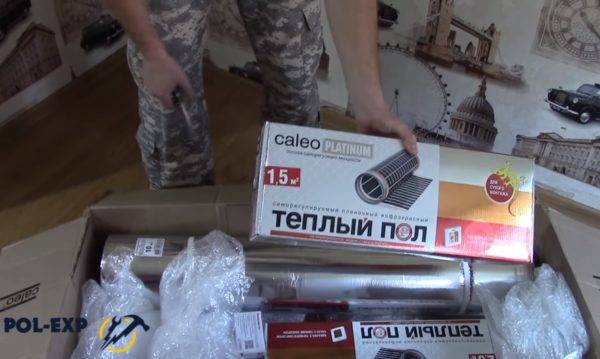
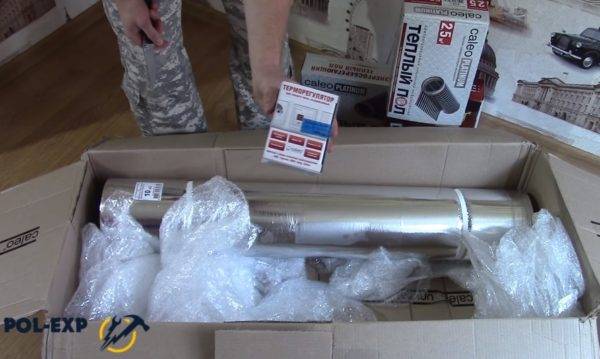
Installing an infrared underfloor heating system under a laminate does not require special knowledge and work skills. If you read the step-by-step instructions, you can do it yourself. The following tools and accessories are required for correct installation:
- Buy thermal film in a roll.
- Heat reflective material and protective polyethylene film.
- Tape and scissors.
- Bituminous insulation (set) and terminals.
- Electrical wiring, thermostat, stapler, pliers, screwdriver.
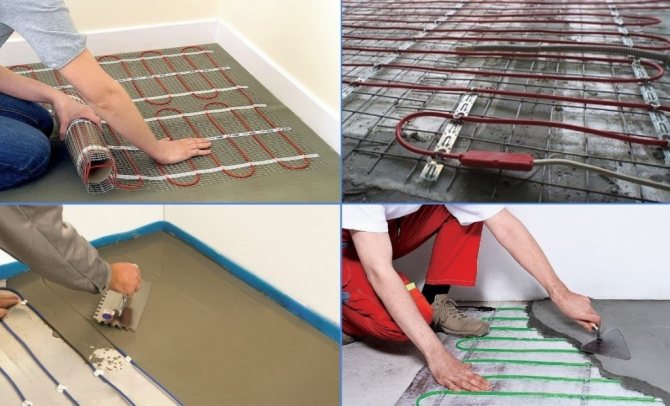
Preparatory work for laying is carried out using different methods. For example, it is customary to level the floor using a self-leveling mixture. After sufficient drying, you can start laying film floors.
Preparatory work
First you need to determine the size of the area for laying the thermal film. It is necessary to take into account the places where the furniture will be installed, since there is no installation
It is necessary to pay attention to the primary subfloor, it must be level to avoid damage to the film.

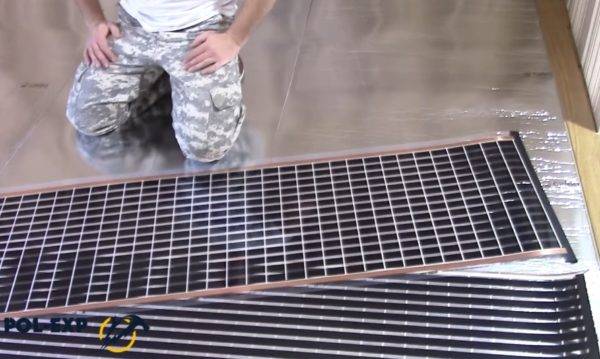
The next step is to choose a place to install the thermostat. Then the heat-reflecting material is laid over the entire floor area. If the surface is wooden, it is necessary to fix the material with a stapler. If the ceiling is made of concrete, double-sided tape can be used. After fastening, it is necessary to fix the strips of heat-reflecting material between themselves with adhesive tape. The use of heat-reflecting foil-based material is prohibited.
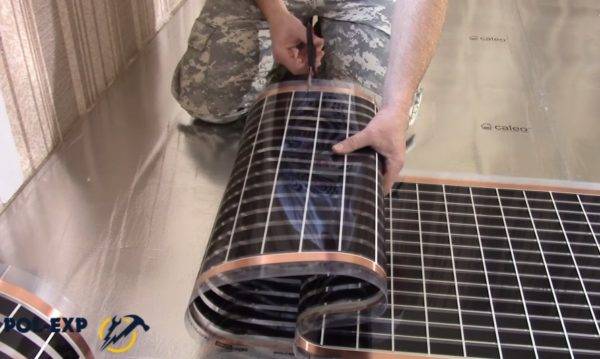
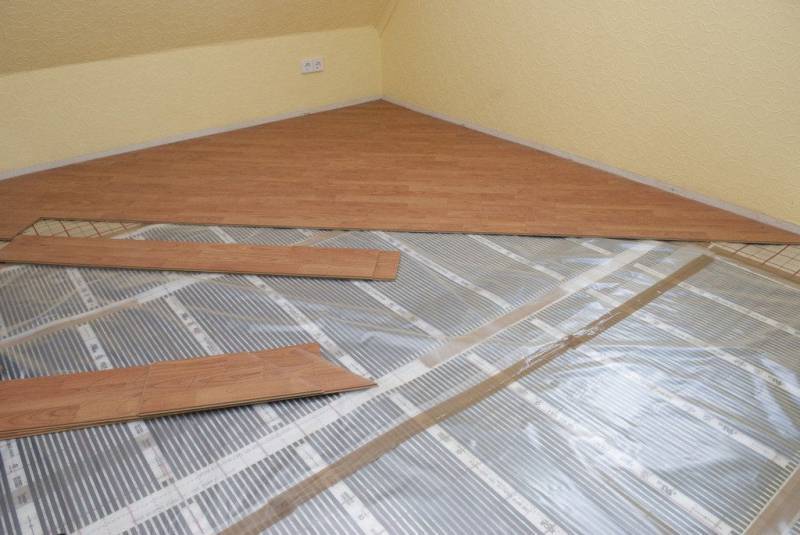
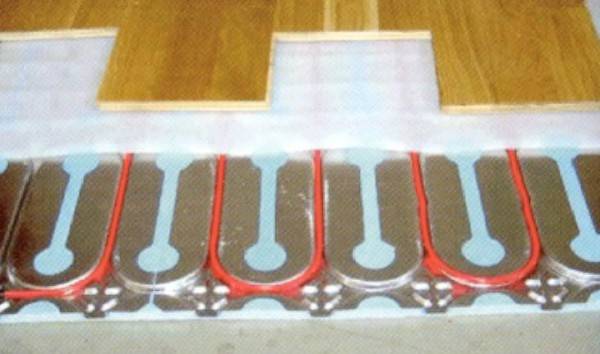
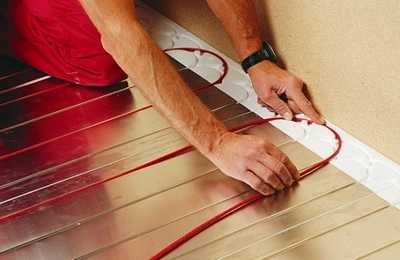
Next, roll out the film warm floor with a measured strip down. Cut strips to desired size. The distance from the edge of the walls should be at least 10 centimeters. Fix the strips of film together.It should be noted that overlapping thermal film is strictly prohibited. The film is laid with a copper strip down.
Connection and isolation
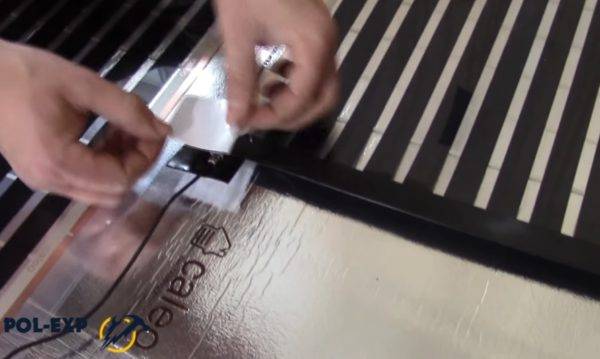
After installation infrared film floor it is necessary to insulate with bituminous insulation the places where the copper bus is cut. The insulation must cover the entire adjacent surface of the copper base of the connection of the heating carbon strips. Then we fix the contact connectors, while capturing the reverse side of the film and the copper strip. Tightly clamp the contact clamp with pliers.
Insert and fix the wires in the terminals. Insulate all connection points with pieces of bituminous insulation. It must be ensured that the silver ends of the clamps are completely insulated from contact with the floor. After carefully check all connections and contacts.
Next, you need to connect. The floor temperature sensor is included with the thermostat. It is attached to the film on the black strip of the heater using bituminous insulation. Make cutouts in the reflective floor material for sensors, wires, and other accessories. This is necessary to maintain a flat floor surface when laying the laminate.
Connect the wires to the thermostat according to the manufacturer's instructions. If the system will have a power of more than 2 kW, it is necessary to connect the thermostat through the machine. Testing is carried out at a given temperature of 30 degrees. It is necessary to check the heating of all sections of the film, the absence of sparking and heating of the joints.
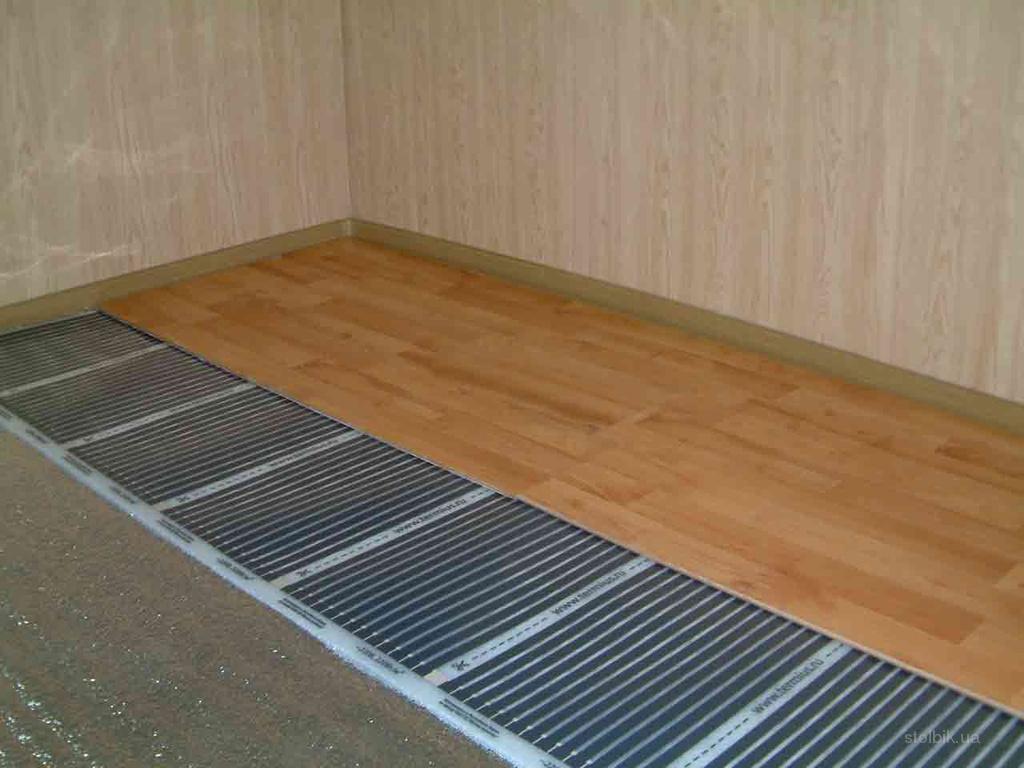
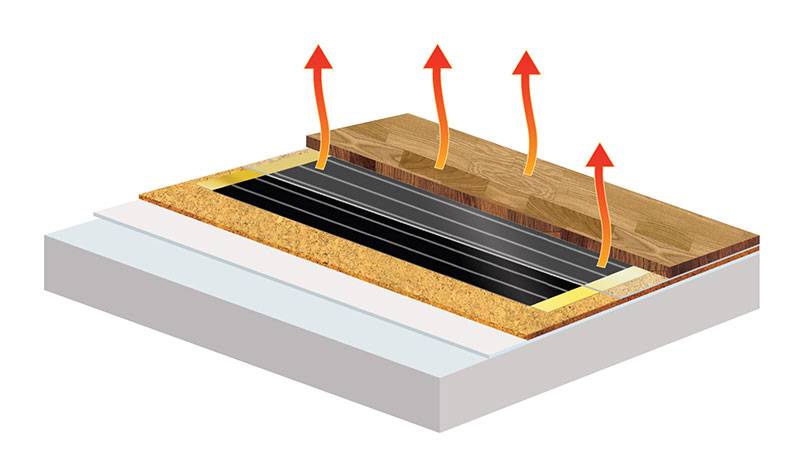
After that, you can install the laminate directly on the polyethylene surface of the floor covering. Laying a laminate on an infrared film floor is not particularly difficult.There is no need to lay additional funds for the intermediate substrate. Observing the technology of installing a laminate, you can make a floor set directly on the surface of the plastic film.
Step-by-step instructions for installing laminate flooring on underfloor heating
For example, consider the most successful option for underfloor heating - infrared elements are used as heaters.
Wiring diagram for IR floor heating
Step 1. Check the completeness of the supply of underfloor heating elements: the total size of the heating system, temperature controllers, switches and substrate. Read the manufacturer's instructions for use carefully.
Checking the completeness of the supply of underfloor heating elements
thermostat
Foil backing

Read the manufacturer's instructions in advance
Step 2 Carefully remove the old laminate. If the work is done correctly, then it will be completely reusable. But under one condition - such use is allowed by the manufacturer. How and where to find out about it, we talked about in this article above.
Dismantling the laminate
Step 3. Spread a special foil substrate under the infrared heating elements on the base. Work carefully, do not allow the formation of wrinkles. The substrate is perfectly cut with an ordinary mounting knife. If the stripes do not fit the width of the room or it has an irregular shape, then the laying algorithm will have to be slightly changed.

Laying the foil backing
- Spread strips of lining along the edges of the room. On an uneven area, a joint of various widths is formed.
- With the sharp end of the mounting knife, make a slot at the overlap. The tool must be pressed strongly, cut two strips at once.
- Remove the top and bottom cut off excess.You will have the perfect joint.
Joints are sealed with tape
It will not be even, but the substrate will lie in one layer. If there is a desire to make the joint even, then the excess must be cut off along a pre-drawn line
But this is a waste of time, it is only important for the system that there are no adjoining gaps and no overlaps are observed. To prevent the substrate from moving during the installation of heating plates and laminate, glue it with ordinary adhesive tape. Step 4
Proceed with the installation of a warm floor, while considering where the heavy furniture will be located, the floor should not heat up under it
Step 4. Proceed with the installation of a warm floor, while considering where the heavy furniture will be located, the floor should not heat up under it
Pay attention to the location of the front side of the elements, follow the recommendations of the manufacturers

Pay attention to the position of the front side of the elements
Pre-spread the heaters, think over the scheme of their final installation and connection. All contact groups should be located in one place near the wall. The less you have to ditch the internal interior partitions, the better.

IR heaters must first be spread
The film is cut between the strips
Step 5. Seal the contacts of the cut edges of the infrared carpets, the material is sold complete with the system. Reinsert the clamp and squeeze the contacts. Isolate connections.
Cut point insulation
Trimming excess insulation material
Terminal is inserted
Connect the wires in accordance with the manufacturer's instructions.
Contact isolation with special bitumen pads (included)
To prevent the infrared heaters from getting wet, you can cover them with an ordinary plastic film. But not all builders do this, these elements have reliable hydroprotection even without it.
Installing a thermostat
The heating system is ready, you can start installing the laminate. The algorithm of work is ordinary, there are no differences from ordinary floors. Except for one thing - the lamellas are mounted directly on the infrared systems, no additional lining is used.
Laying laminate over IR floor heating
How to install a dry floor on a wooden base?
- Polystyrene boards;
- Wooden slats and modules
Polystyrene mats, smooth or with bosses, are laid on the wooden surface. If they are smooth, then you need to cut holes in them for laying pipes. This dry floor installation system is not very expensive and very convenient. Most often, ordinary foam up to 4 cm thick or polystyrene foam is used. If the plate has bosses, that is, protrusions not higher than 25 mm, then polyethylene pipes (diameter 16 mm) are placed in the grooves and secured with mounting locks.
Modules can be bought at the store and assembled at home. Pipes are laid in recesses on the surface. The rack system is made of planks 2 cm thick and 130 cm wide with a pipe pitch of 150 mm (MDF or chipboard material). Often, metal plates are also installed, which create a continuous warm field. At the end, a substrate and a laminate are laid on the surface of the underfloor heating pipes.
General requirements for installing laminate on underfloor heating
You need to know that when choosing a laminate, take into account its capabilities as a floor covering for a warm floor of one or another option.Laminate of the same brand cannot be laid on a warm floor with a different heating system.
The installation of a laminate on a warm floor is difficult:
- The side faces of the material are connected, after which each subsequent element is joined to the previous one. Since the laminate panels are equipped with locking joints, fixing them to each other does not require much effort. To avoid gaps between the panels, you can use a hammer, applying light blows to the sides to be joined.
- Then skirting boards are installed, not forgetting the exit points of the wires, where holes are left. It is recommended to leave a technological space between the laminate flooring and the wall to ensure ventilation.
- The electric floor should not come close to active fireplaces or stoves.
- It is not recommended to use carpets on a laminate floor on a warm floor, as it can cause overheating of the equipment.
When installing underfloor heating, it must be borne in mind that the correct operation of this system will largely depend on a well-executed installation. It is impossible to answer unequivocally - which warm floor is better. If the installation of any of the underfloor heating options is carried out in accordance with the requirements, then reliable and durable operation will be provided to it and such a floor will be the best in this particular case.
Possible installation errors

Miscalculations are allowed not only by novice specialists, but also by experienced builders. The most common bugs are:
- purchase error. Keep in mind that laminate with a thickness of more than 10 mm is not suitable for underfloor heating. Due to the large thickness, it will be necessary to increase the heating temperature to 30 ° C, which will lead to the evaporation of harmful substances.They produce a lot of varieties designed specifically for the water base;
- it is not uncommon to find a combination of heated laminate and carpet. This is a fairly common mistake. No additional coatings should be present at the installation site of the warm floor, otherwise this will lead to overheating;
- try to level the base as best as possible. This will protect you from possible noises or squeaks while walking. For information on how to properly mount a laminate on a warm floor, see this video:
As you can see, a warm floor under a laminate on a concrete floor is, although not the best solution, but it is quite justified. If you follow the recommendations and rules, you will create a high-quality coating that will last a long time.
Types of underfloor heating under laminate
Warm floors under the laminate exist in three main versions. Each of them has certain advantages and disadvantages.
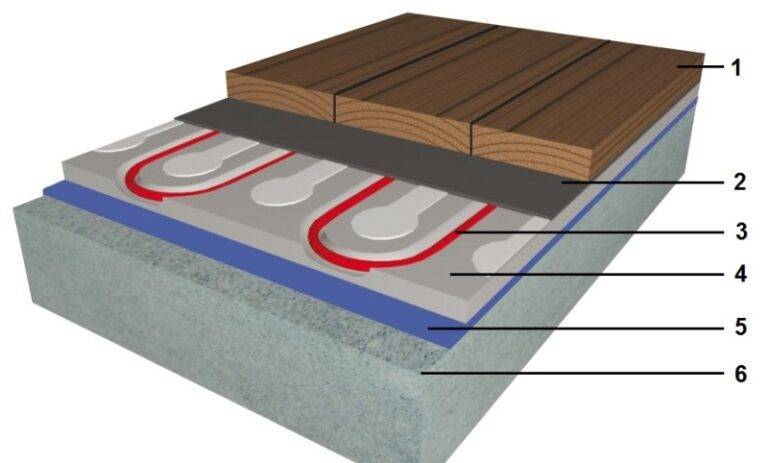
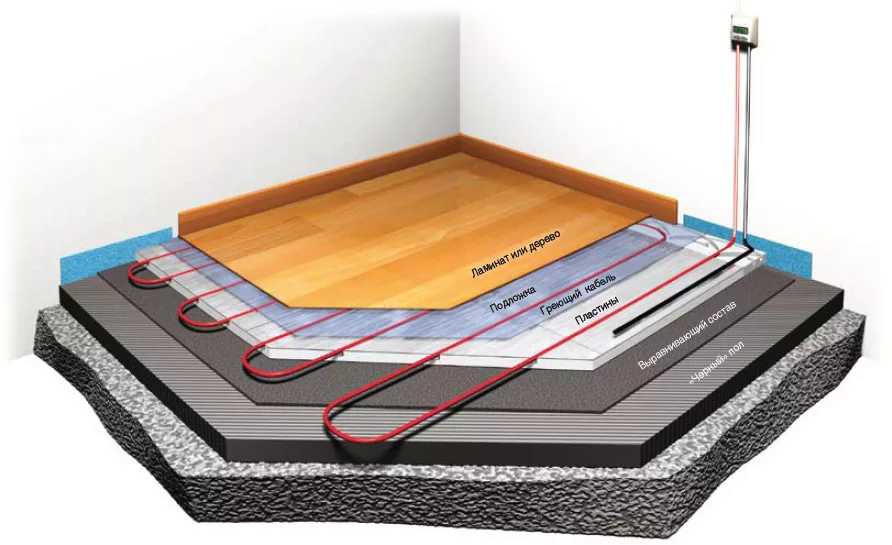
Water floor under laminate
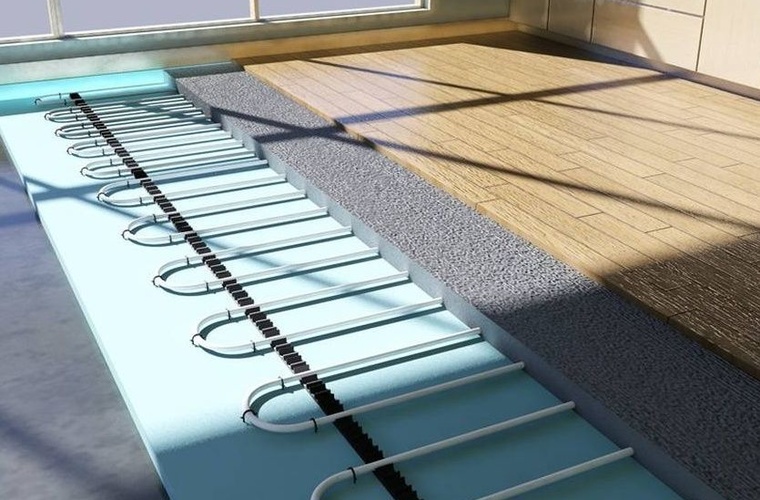
The design of such a floor consists of four layers:
- waterproofing membrane separating the floor from the floor slab;
- a heat-insulating layer that creates a screen for the heating circuit;
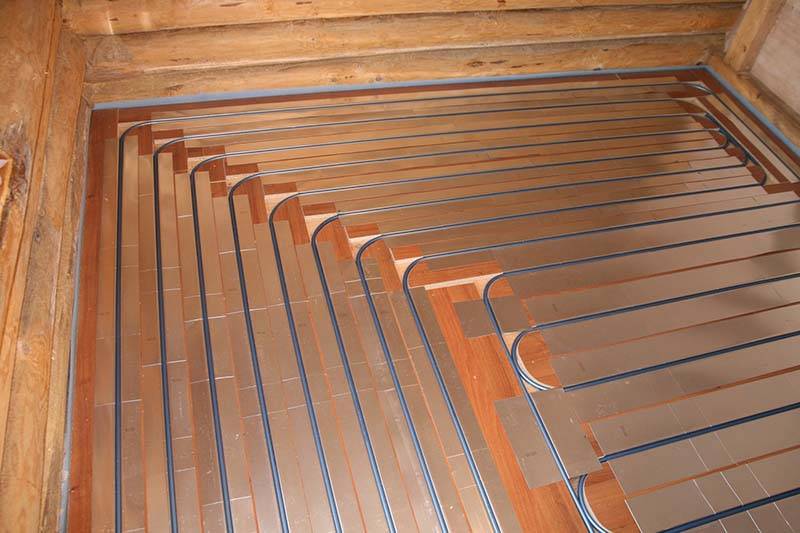
- heating circuit, consisting of pipes and concrete screed;
- the finish layer is laminate.
The advantages of a water floor are:
- uniform heating of the room due to heat radiation, and not air convection;
- in case of termination of heating, the water in the pipes of the warm floor remains warm for a long time;
- the air in the room does not dry out, which is an excellent indicator for its quality;
- additional space is freed up for the usable area of \u200b\u200bthe premises;
- saving energy costs for heating compared to other types of heating;
- the best option for installation in a country house in the presence of heat exchangers or autonomous heating;
- durable operation.
Disadvantages of a water floor:
- if the system is damaged, leaks are possible, which entails inevitable damage to the laminate;
- construction in the form of a complex layer cake, the installation of which requires professional knowledge and experience;
- the thickness of the heating element reaches 15 cm, which complicates the stage of pouring the plate;
- for the functioning of the system, additional equipment is required in the form of an electric or gas boiler;
- installation of a water floor in an apartment building is possible with official permission to connect it to centralized heating.
Electric floors under laminate
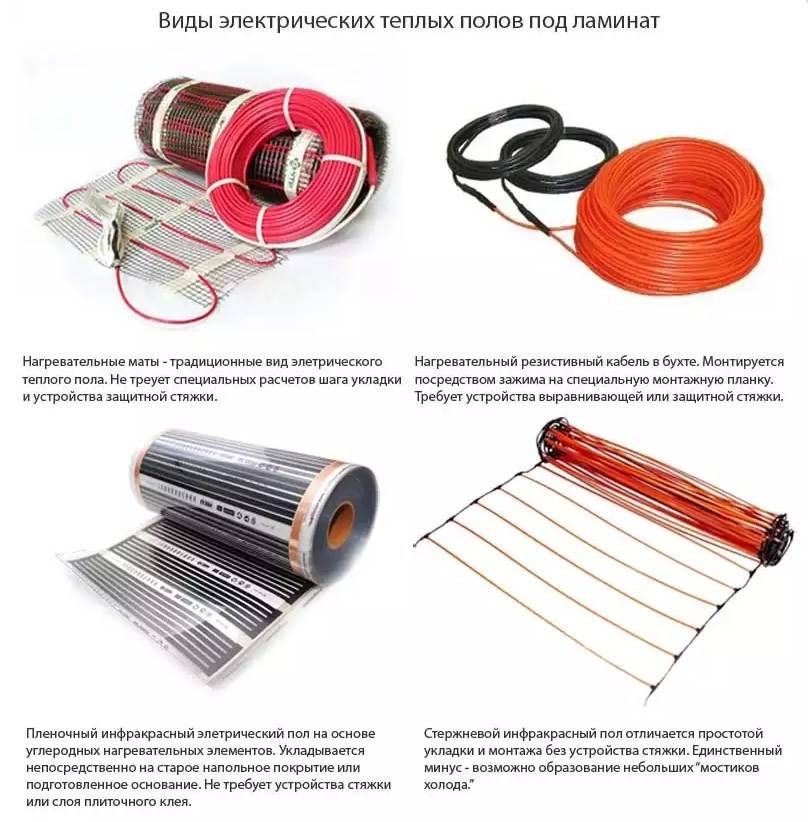
Underfloor heating for laminate, powered by electricity, can be installed in three versions:
Might be interesting
- Cable warm floor. It is characterized by special heat-conducting one- or two-core cables, which tend to accumulate heat and release it into the room. These cables are sold in sets for a certain area. Installation in rooms with a complex contour is possible. No screed is needed to install the cable floor.
- Heating mats. They are produced in the form of a cable, which is fixed on a grid. Thermomats have different power and are mounted both in a concrete screed and in tile adhesive.
- Infrared floor with film coating, easy to install due to the minimum thickness of the structure.
Advantages of electric underfloor heating:
- electric underfloor heating can be used not only in homes, but also in office premises;
- using a thermostat, the optimum operating temperature is set.It can be easily adjusted to a predetermined turn-on and turn-off time, which provides significant energy and financial savings;
- it is used both as the main and additional heating;
- installation of the electric floor can be done independently, as it is not difficult;
- has a long service life, subject to proper operation;
- no additional equipment is needed to install the floor from electricity;
- the surface of the floor warms up evenly, which makes the heating of the air in the room even.
With all the advantages, electric underfloor heating has disadvantages:
- high maintenance costs;
- there is a risk of electric shock, especially in rooms with high humidity;
- the heating cable creates a magnetic field when heated, which has a negative effect on the body during prolonged exposure;
- possible deformation of the floor covering;
- to use the electric floor as the main heating, it is necessary to use powerful electrical wiring in the installation.
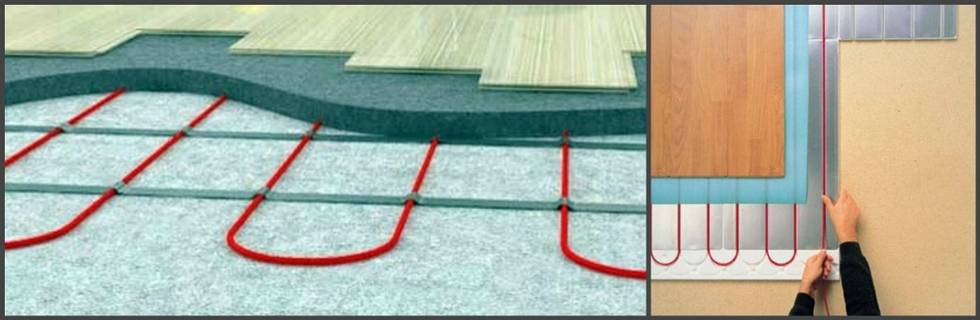
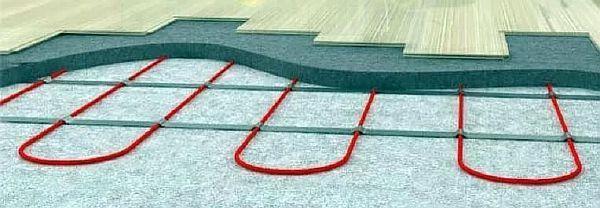
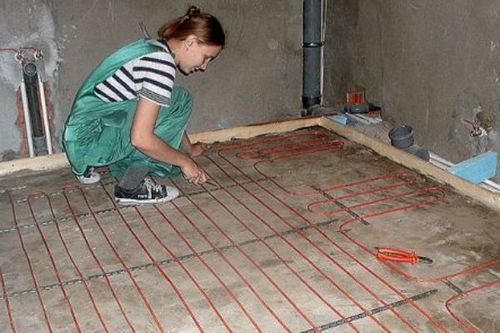
Installation of a water heated floor

Water floor under laminate
Installation of a warm water floor under a laminate is possible only if the hot water heating system in the house is completely autonomous. This condition is explained by the fact that in a centralized water heating system it is not possible to regulate the level of heating, as a result, due to the lack of the same level of heating, the laminate is deformed.
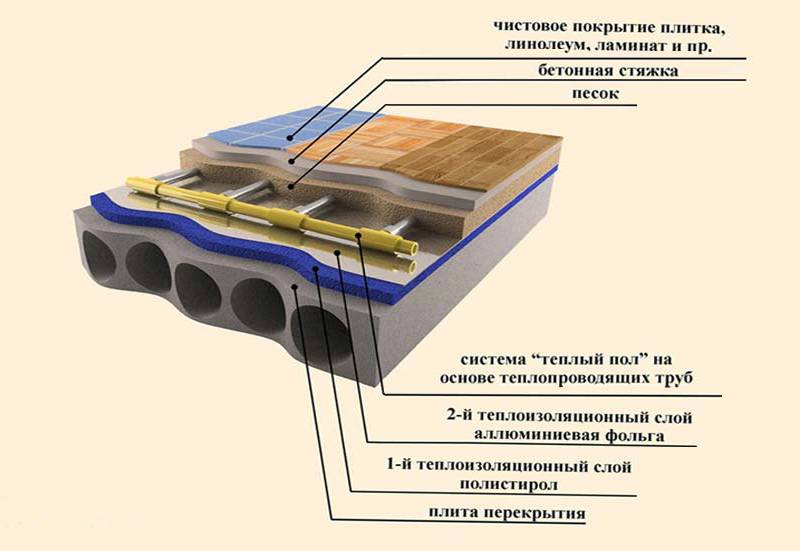
A warm water floor is laid under a concrete screed, but not under the laminate itself. A layer of insulation is laid on the subfloor - this is necessary in order not to waste energy on heating the floors between floors.A foil heat-reflecting material is laid on top of the insulating layer, then pipes. They are mounted with a certain step on a reinforcing mesh or a system of profiles with clamps. For greater convenience, you can use special mats for laying hot water pipes, while they can act as a heater, retainer and waterproofing. The concrete screed over the heating system must be laid in a thick layer, from 3 cm to 6 cm. Too thin a screed layer will lead to cracking of the concrete and deformation of the lamellas due to overheating. Too thick, as well as thin, concrete layer leads to uneven heating of the surface.
Advantages of the "warm floor + laminate" scheme
Warm floors are becoming more and more popular, as it became possible to do all the stages - from the rough screed (concrete base) to the finishing decorative coating - with your own hands. If the base of the floor in the apartment is a flat concrete coating, it is not difficult to install the STP.
Laminate has some advantages over other types of finishes. It is suitable for all types of electric and water floors, provided that a smooth surface, without drops and protrusions, is provided for laying the elements.
If you decide on a combination of STP + laminate, then you need to analyze the installation conditions, make preliminary calculations, and then select the materials:
- high-quality laminate, which does not deform over time from high temperatures;
- elements of a warm floor, the most suitable for specific conditions.
For example, if you live in a standard city apartment, then you should immediately refuse water floors. Installations of systems connected to central communications are prohibited.However, for a private house, which is heated by a gas boiler, this will be one of the most successful solutions.
When choosing a laminate as a finishing coating, it is possible to easily and quickly change the interior in the future. Tired or worn laminate flooring can be replaced with softer carpeting, easy-care linoleum, or another type of flooring, while not fundamentally changing anything in the underfloor heating system, except perhaps for installing another layer - plywood.
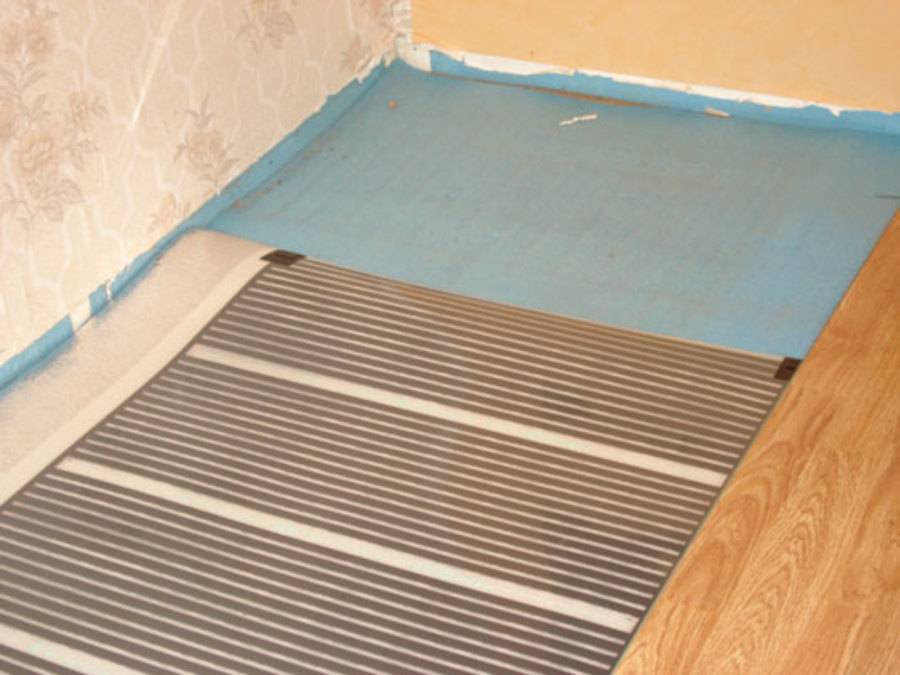
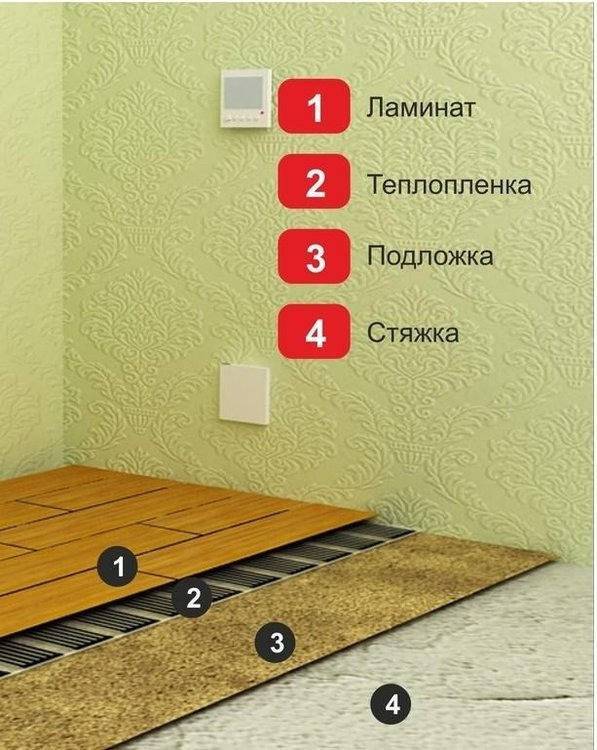
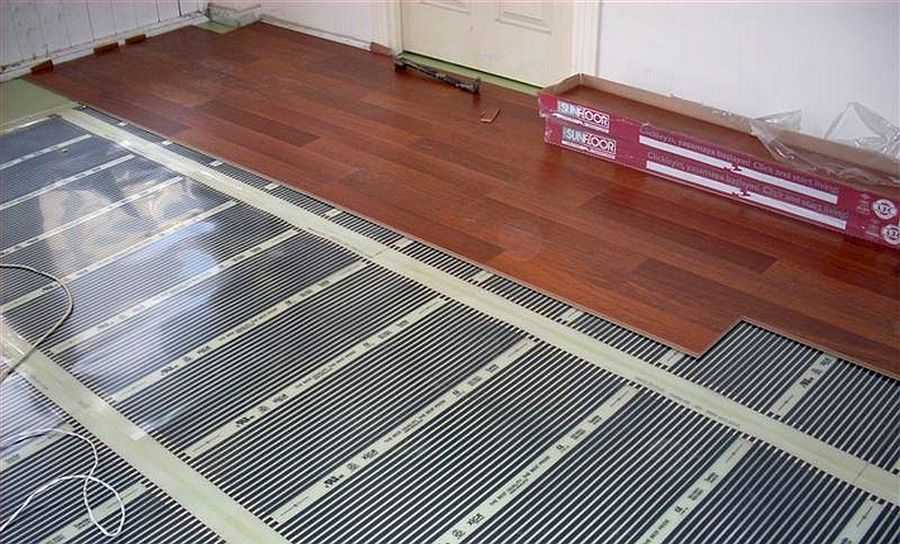
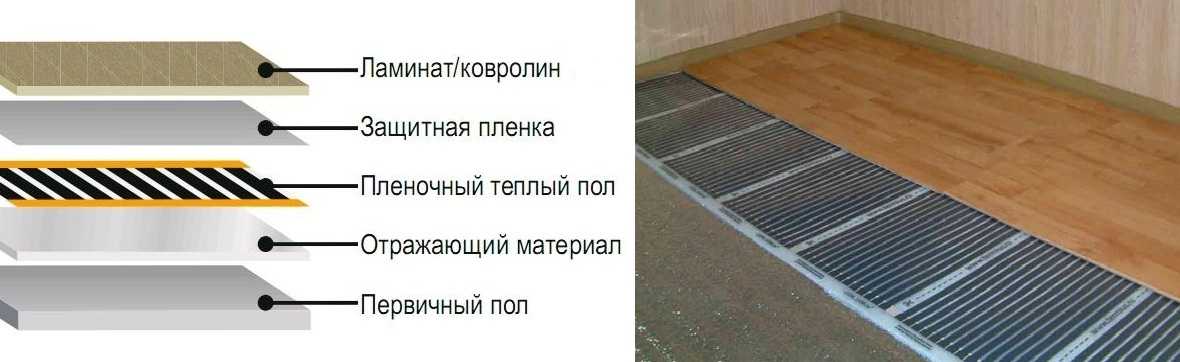
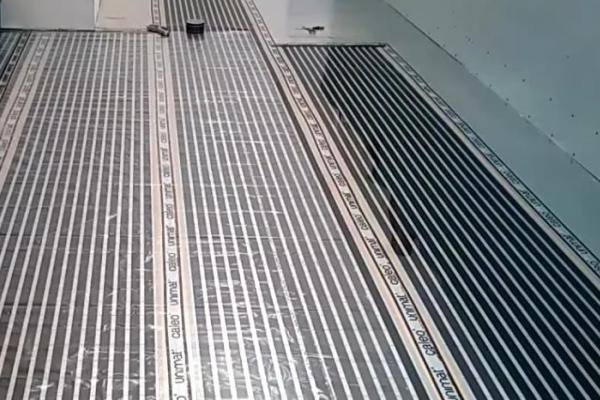
Film floor installation
Let's take a closer look at the process of installing an IR film under a laminate.
Table. IR mounting do-it-yourself floors - step by step instructions.
Steps, photo
Description of actions
Step 1
Measurements are taken from the entire floor in the room where the installation will be carried out. Also, using a level, it is recommended to check the evenness of the rough base.
Step 2
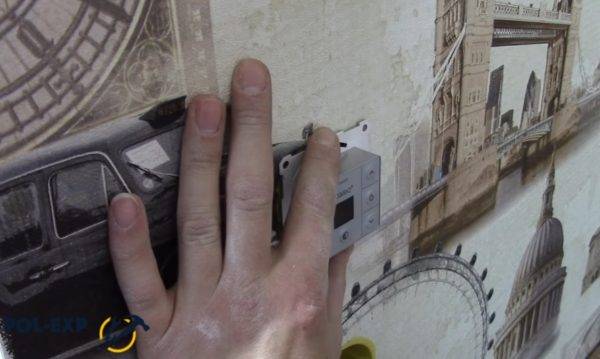
On the wall, a place is selected where the thermostat will be located.
Step 3
The surface of the subfloor is covered with heat-reflecting material. Strips of material are laid joint to joint with a shiny surface up. Isolon can be used as a heat reflector.
Step 4
The heat-reflecting layer is fixed to the base with adhesive tape or a stapler.
Step 5
The joints of the heat reflector are glued with adhesive tape.
Step 6
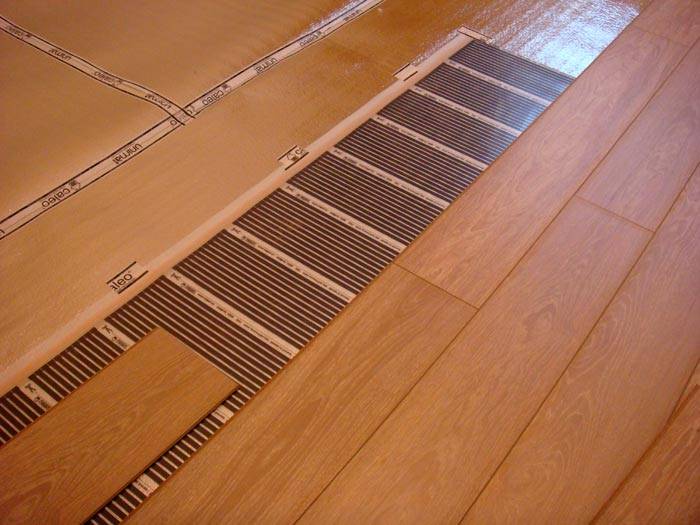
The IR film is placed on the heat reflector so that the copper strip is at the bottom.
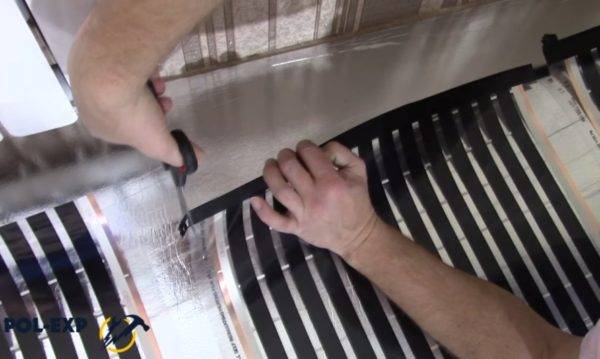
Step 7
The film is being cut. In this case, all cuts are made with scissors along strictly marked lines.
Step 8
The film strips are laid in such a way that there is a distance of at least 25 cm between them and the wall, and 5 cm between individual strips. Also, the film does not spread where large-sized furniture will stand, so that there is no overheating of the floors in the future.
Step 9
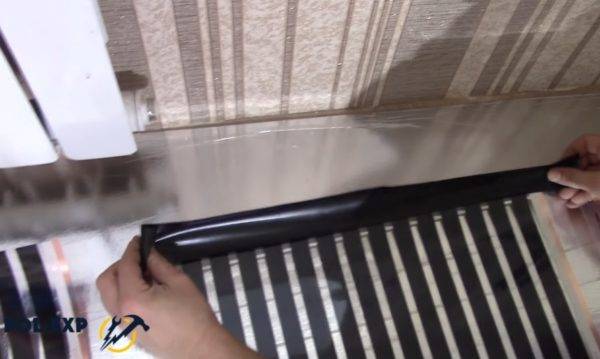
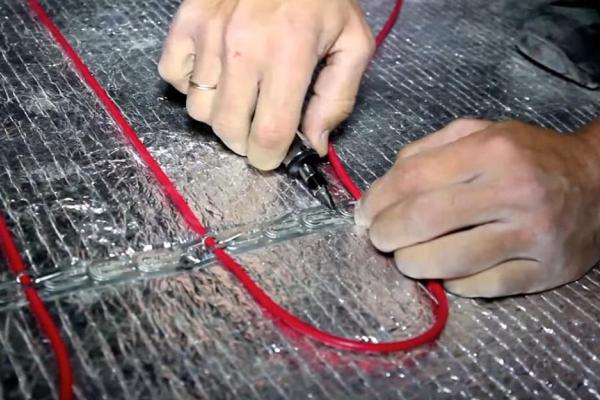
The places where the copper bus was cut are necessarily insulated with strips of bituminous insulation. It should cover the silver contacts along the entire cut.
Step 10
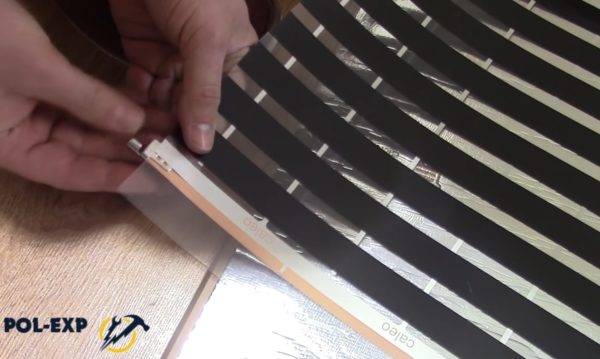
Where the wires will be connected, clamps for contacts are installed on strips of copper. They are arranged in such a way that one of them is inside the IR film, and the other is outside.
Step 11
The terminal is clamped with pliers.
Step 12
The strips of the film are fixed on the surface of the heat reflector and between themselves with adhesive tape so that the material does not move during operation.
Step 13
The wires are inserted into the terminal and fixed with pliers.
Step 14
All places for connecting wires to the IR film are insulated. Two pieces of insulating material are used for each contact point. One is fixed on the outside of the film, the other closes the inside of the film
It is important to ensure that the silver contacts at the edges of the film are also insulated.
Step 15
The temperature sensor is mounted under the IR film on the black graphite strip of the heater and fixed with a piece of insulation.
Step 16
A small incision is made for the sensor in the heat-insulating layer with a knife. The sensor should fit into it when the film is lowered.
Step 17
Cutouts on the heat reflector are also made for contacts and wires.
Step 18
All wires in the recesses are sealed with tape.
Step 19
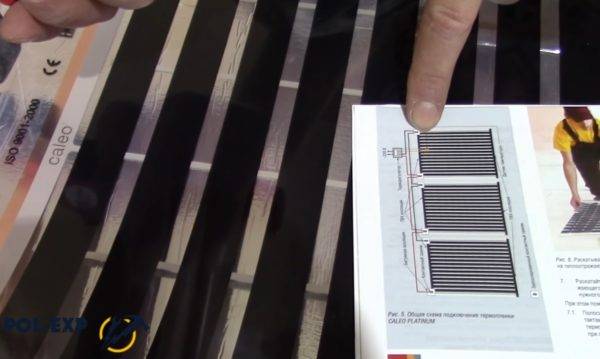
A temperature controller is installed on the wall surface in a selected place, to which wires are connected according to the instructions and connection diagram attached to the thermostat.
Step 20
System testing in progress
The heating system turns on, the floor temperature is set to a value not exceeding 30 degrees. The heating of all thermal film strips is checked.
Step 21
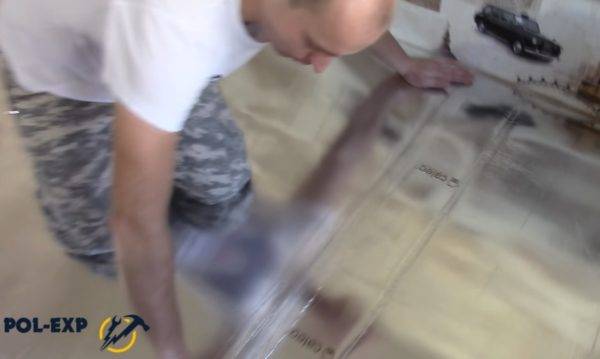
IR mats are covered with a polyethylene film for additional protection. The installation of the heating system is completed.
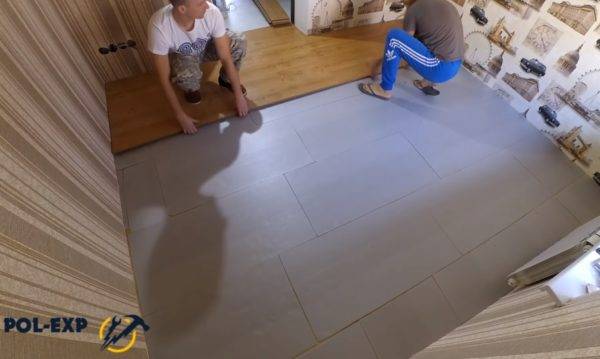
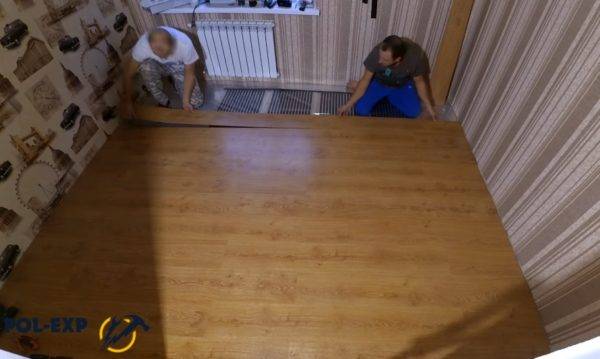
Step 22
The floor covering is being laid. The laminate is laid on top of the film using conventional technology. Work is carried out carefully so as not to damage the thermal film.
Important points when choosing a laminate for underfloor heating
The compatibility of underfloor heating and laminate flooring depends on the characteristics of the laminated product itself.
Therefore, when choosing a laminate, it is recommended to consider the following important points.
First important point
The laminate must have the required characteristics, because for laying on a warm floor, only the laminate is suitable, on the packaging of which there are corresponding icons, which means that the laminate is not afraid of rising temperatures:
Or such an icon with the inscription "Warm Wasser" means that this laminate can be laid on a water-heated floor.
Other types of laminate that do not have a label indicating the possibility of installation on underfloor heating will deform, collapse when heated, and harmful substances can also evaporate from them.
This is due to the fact that the technology for the production of laminate intended for laying it on underfloor heating differs, both in cost and in the quality of the products.
The density of such a laminate is about 1.5 times higher than usual, so it can withstand higher temperatures.
The second important point
Harmful substances contained in the laminate should not exceed the permissible limits, otherwise, when heated from 26 degrees and above, toxic formaldehyde vapors will be released from the laminate, causing harm to the health of people in the room.
To prevent this from happening, you should choose a laminate with a first or zero formaldehyde emission class icon, where “HCHO” is the formaldehyde formula.
Emission class is an indicator of the content of harmful substances in finishing materials, incl. and in laminate flooring.
These substances in themselves do not cause harm, but their evaporation is harmful, and they occur when heated or high humidity.
The most environmentally friendly products are labeled "E0", today such products are quite difficult to find.
Most often, laminate with the marking "E1" is used for laying on a warm floor.
The symbol "E1" means the minimum content of formaldehyde - less than 10 mg per 100 g of dry material.
The third important point
The laminate must comply with the basic requirements of the European Union, and have a special “CE” (European Conformity) mark on the packaging, indicating that it has passed the conformity assessment procedure for harmonized EU standards.
Products with this sign are harmless to the health of its consumers and the environment.
All these icons indicate that the laminate must be of high quality, and therefore quite expensive.
It is important to understand that cheap products carry many different threats, which subsequently require much more financial costs than high-quality flooring products and underfloor heating systems. Based on the foregoing, it is clear that a warm floor for a laminate should be chosen based on the specific situation and your preferences.
Based on the foregoing, it is clear that a warm floor for a laminate should be chosen based on the specific situation and your preferences.
Choosing a laminate on a water-heated floor
What is the best laminate flooring for underfloor heating? Does this solution have significant drawbacks? How to independently make water heated floors under the laminate? Many people ask these questions, and therefore, let's understand.
First, let's define terminology. What is a water underfloor heating system?
This is a system of pipes that, with a small step, are laid under the finish coating and warm it up. The warm-up temperature will be slightly lower than the temperature of the human body. What is the essence of such a heating scheme?
1. You can connect water heated floors to any boilers with circulation pumps, even solid fuel ones.
2. In order to create a water heated floor, there is no need to remake an existing heating system - you just update it with another circuit.
3
It is necessary to pay attention to the fact of adjusting the temperature, or adjusting the speed of water circulation, so that the temperature of the warm water floor is in the desired mode and does not go beyond.
4. Another plus - due to the fact that the heat source is located below, the air is heated throughout the volume.
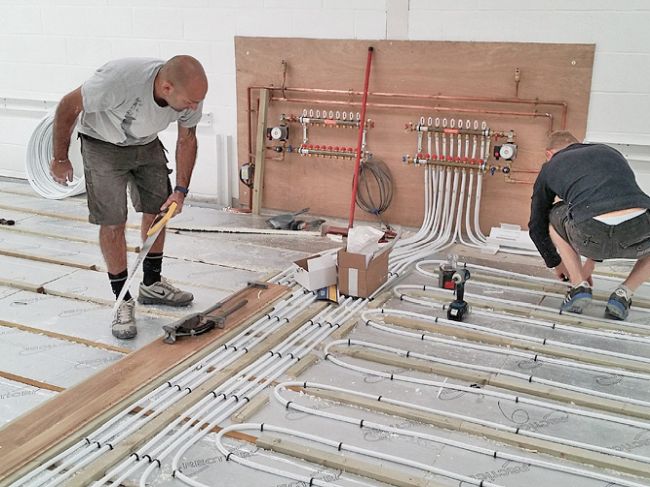
Of course, we all know that the truth is in the details. So, what is needed in order for the underfloor heating to function normally? Yes, we are talking about the idea of good thermal conductivity of the floor covering mass surrounding the pipe. Just in order to ensure this requirement, pipes of water-heated floors are usually laid in a screed.
Otherwise, the pipe will warm up only that section of the floor that passes above it, and the main part of the floors will remain cold. Among other things, the screed also performs the function of distributing heat. But here the question arises - what is the point in heating the screed if it is isolated from the room?
So the most traditional option for laying a water-heated floor is under a tiled or porcelain stoneware coating - they have good thermal conductivity. Another good option is homogeneous linoleum.
As for the question of which laminate to choose for underfloor heating, the answer is actually quite simple. Common sense must be followed. Since the laminate is made of pressed hardboard, its thermal conductivity is quite low, it serves as a heat insulator. Accordingly, the smaller the laminate boards are in thickness, the more efficient the heating will be. Speaking of a higher grade laminate, you need to understand that its density is higher, and the protective coating is thicker.
It is on this that its thermal conductivity depends. There are other reasons why you should purchase higher grade laminate flooring for your underfloor heating.The higher the class of the laminate, the less it will be prone to drying out and changing linear dimensions depending on temperature fluctuations and humidity. The more durable and durable it will be.
In addition to the laminate you have chosen, you should not forget about the substrate, because a lot also depends on it. We recommend that you choose a type of underlay for laminate flooring, which will be designed specifically for underfloor heating systems and have maximum thermal conductivity.
Laying the right laminate for underfloor heating (water)
So, as you already know, a water-heated laminate floor is reliable and safe. In this case, one of the advantages of a water floor is that the heating of the base, for example, a concrete screed, is carried out evenly, which leads to an increase in the service life of the laminate. Let's look at the main points of combining a warm water floor and laminate, depending on the type of floor.
We note right away that in order to ensure the required level of humidity of the screed after the water-heated floor is laid, it is enough to simply turn on the system. Thanks to this, the concrete will be perfectly dried and warmed up, you just need to remember about the gradual increase in temperature. Before you start laying laminate flooring, make sure that the substrate is in accordance with the conditions specified by the manufacturer in the recommendations for this flooring.
Installation of a warm floor Cement-sand screed
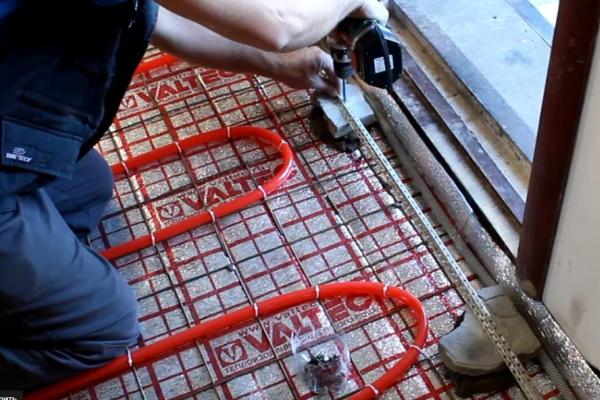
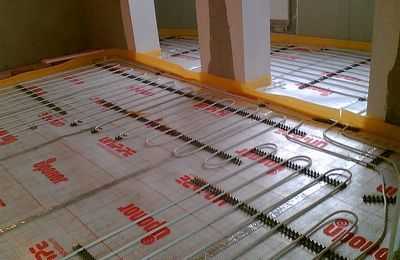
In order to carry out the installation of underfloor heating with your own hands in this case, you must:
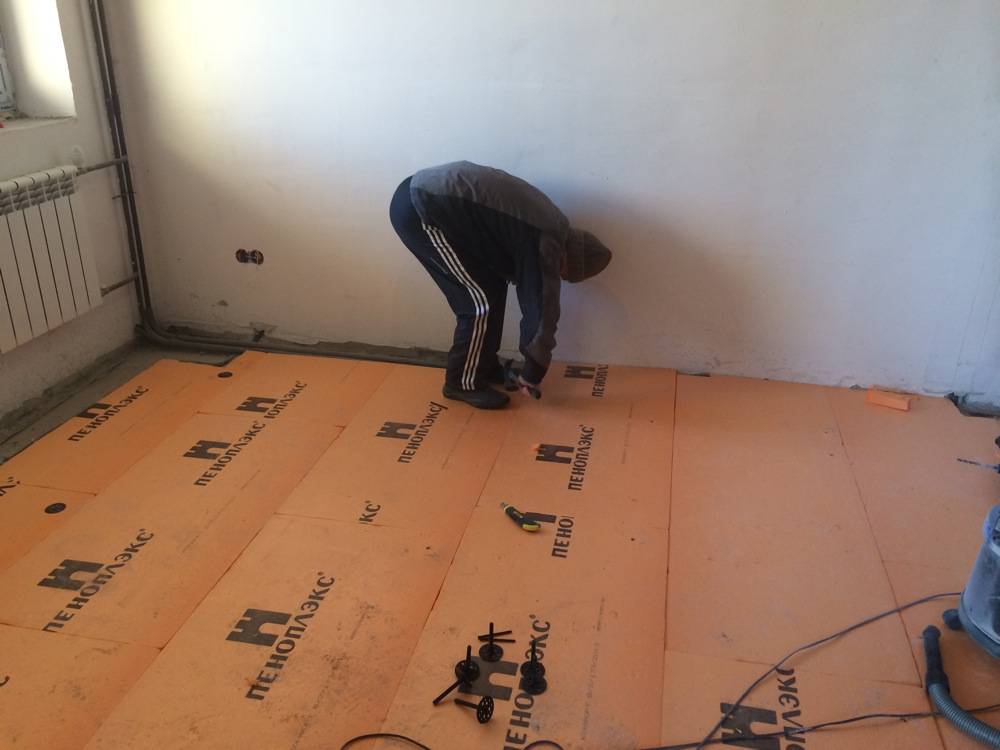
- On the floor, which is already leveled to the horizon (i.e., has differences of no more than three centimeters), you need to lay polystyrene foam (its thickness is from 2.5 to 10 cm).
- The next layer will be either polyethylene or foil penofol (the second option is preferable).
- A reinforcing mesh must be laid on top, the cells should be no more than 1.5 cm. Thickness - 2-4 mm.
- It is necessary to lay a pipe on top (cross-linked polyethylene, aluminum-reinforced polypropylene or metal-plastic) and fix it to the grid with plastic clamps.
- It is also necessary to lay a damper tape around the entire perimeter of the room. Any elastic material will work for the tape.
- Then you need to fill the floor with a sand-cement screed with fine screenings. As for the thickness - no more than 5-7 cm. There should not be more than 3 centimeters between the floor surface and the pipe (taking into account the thickness of the laminate).
- It will take three to four weeks for the floor to gain strength.
- After the substrate is laid.
- Before you start laying laminate on a warm floor, you need to warm it up to operating temperature. As in the case of standard laminate laying, there should be gaps along the edges (from the edge of the board to the wall), the width of such a gap should not be less than 6-8mm. To do this, you can use spacers.
Installation of a warm floor on a dry screed
I would like to note right away that warm water floors under a laminate, with a dry screed, are an inefficient idea in terms of heat consumption.

The only impressive plus of this option is that installation is much faster, since there is no need to wait until the concrete becomes strong.
So how do they combine dry screed, water heated floors and laminate? It happens like this:
- To begin with, laying waterproofing on the floor
- After the floor is covered with bulk materials (it can be expanded clay screenings or ordinary dry sand).
- You need to set beacon profiles along the horizon, with their help you can level the floors under the laminate using a rule or just a straight rail.
- Next, you need to lay out profiled aluminum heat-distributing plates under the pipes of underfloor heating. The pipe will fit into the recesses of the plates.
- The next step is to lay a tape of porous materials around the perimeter of the room.
- The floor must be covered, for this you can use two layers of drywall (as an option, plywood or OSB), the main thing is that a mandatory overlap of the seams is necessary. The layers are fastened with self-tapping screws at the seams in increments of 5 cm for plasterboard and 15 cm for plywood and OSB.
- Everything else is exactly the same as in the case of a cement-sand screed. The floor needs to be warmed up, the substrate laid, and then the laminate itself.
Coating selection
Even the highest quality concrete bases do not guarantee a long service life of floor coverings if their type is not chosen correctly.
What do professionals recommend for concrete foundations, what points to pay attention to?
Laminate class
For residential premises, it is necessary to choose a laminate that has the number “2” at the beginning of the number:
- 21 - the weakest coating, it is recommended to use for bedrooms;
- 22 - withstands medium loads, can be mounted in living rooms, offices and dining rooms;
- 23 - for kitchens, corridors and hallways.
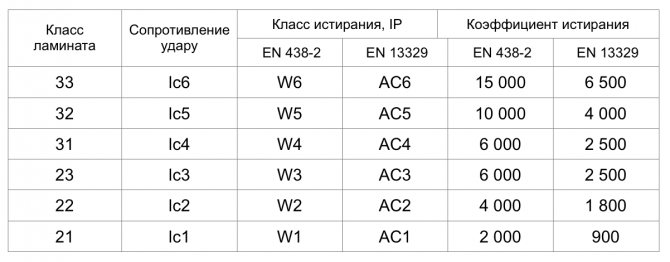
Laminate classes differ in strength, wear resistance and other parameters.
You do not need to buy a laminate with a large margin of safety, this significantly increases the cost of coatings. Commercial views in ordinary houses are not used.
Lamella material
Any material can be laid on concrete floors, but it is recommended to take into account the specific operating conditions.
| Material type | Recommended use of laminate |
|
MDF | The material withstands only short-term contact with water. It reacts negatively to an increase in relative humidity, it is not recommended to mount it in bathrooms. |
|
Composite plastic, bottom layer of ethylene vinyl acetate | It can be laid in rooms where wet cleaning is often done: hallway, kitchen, bathroom. |
|
Flexible vinyl | The most resistant to moisture, not afraid of flooding and other emergencies. Used for bathrooms, swimming pools, etc. |
The better the material resists high humidity, the easier it is to lay on concrete bases - there is no need to apply special measures for protection.
Electric floor heating
If we compare the installation of an electric underfloor heating with a water one, then the first one wins because of the ease of installation. It is noteworthy that electric heating mats can be safely installed under any surface, be it tiles, carpet or laminate. But at the moment, laying a warm floor under a tile is the most popular way, which is explained by several points. The tile itself is a "cold" material, and the installation process under it is the simplest.
There are several ways to lay a warm floor under a tile, and we are talking about installing not under the entire surface of the floor surface, but only under the one on which the inhabitants of the apartment are going to move. This is due to the savings in consumables and energy.Before laying the electric floor itself, you need to tidy up the surface, ridding it of cavities and bumps - it must be even. Often a cement screed is used for this.
The electric floor itself can be a heating cable, heating mini-mats or carbon mats, which are laid on the prepared surface when it is not only even, but also dry.
When installing a heating cable for underfloor heating, it is recommended to use one of the types of heat-reflecting coating that is laid under the cable. A perfect example is styrofoam, which is covered with a foil-like film. Thermal insulation increases the efficiency of the electric floor (its heat transfer) by 30-40%. In addition, a person saves money on heating. This confirms the fact that each laying technology has its own advantages and disadvantages.
Conclusions and useful video on the topic
If you decide to install the heating system yourself, we suggest that you study the work of the masters and listen to some practical tips from our selection of videos.
How to arrange a water circuit for heating a wooden floor:
Installation of an infrared film under a laminate and connection to a temperature sensor:


How to connect a water heated floor to a heating system:
As you can see, there is nothing super complicated in installing a warm floor under a laminate. But if you do not have experience in such work, it is worth drawing up a plan for the future design and indicating the location of all elements of the system, and seek advice from qualified craftsmen.
Share with readers your experience in arranging a warm floor on wooden basis.Please leave comments, ask questions on the topic of the article and participate in discussions - the feedback form is located below.


