- Step-by-step instruction
- Electric underfloor heating: its advantages and general installation information
- How to make a balcony warm?
- Warm floor on the balcony
- Balcony glazing
- Wall insulation on the balcony
- Warm balcony in a panel house
- Warm balcony in a brick house
- How to make a living room out of a balcony
- Balcony as an extension of the room
- Video gallery
- What to make the floor on the loggia from and which one is better
- Ceiling insulation
- First option: KNOW HOW from DEVI
- Balcony / loggia insulation scheme
- Loggia insulation sequence using PENOPLEX COMFORT
- The following bases can be laid on PENOPLEX thermal insulation:
- Insulation laying
- Substrate preparation for underfloor heating
- Benefits in use
- Preparing the loggia for the installation of insulation
- Wall and ceiling cleaning
- Sealing cracks and crevices
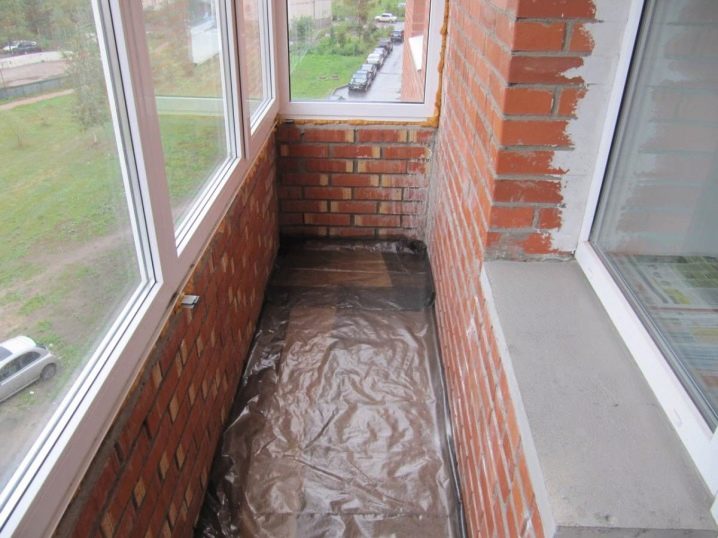
- Waterproofing device
- Warm floor on the balcony with your own hands
- Selection of material depending on the type of balcony
Step-by-step instruction
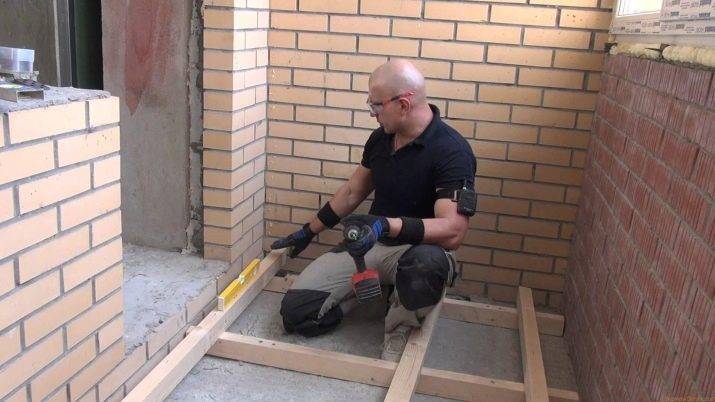
We will analyze two ways of laying the floor on the balcony. From simple to complex.
The first one is tiling. The procedure is simple:
- the surface must be cleaned and prepared for further use. Remove all irregularities, residual materials and prepare the walls by cleaning;
- measure how much it is necessary to raise the floor and, based on this information, select the necessary thermal insulation for the loggia. It must be laid on a waterproofing layer;
- after that, you need to pour the screed and lay the tile on the dried surface.
This floor option can be done on an open balcony. It is better not to refuse heating and use one of the electric options for underfloor heating. In order for the laying of tiles to be even and neat, experts advise using plastic crosses. At the last stage, they must be removed and grouted.
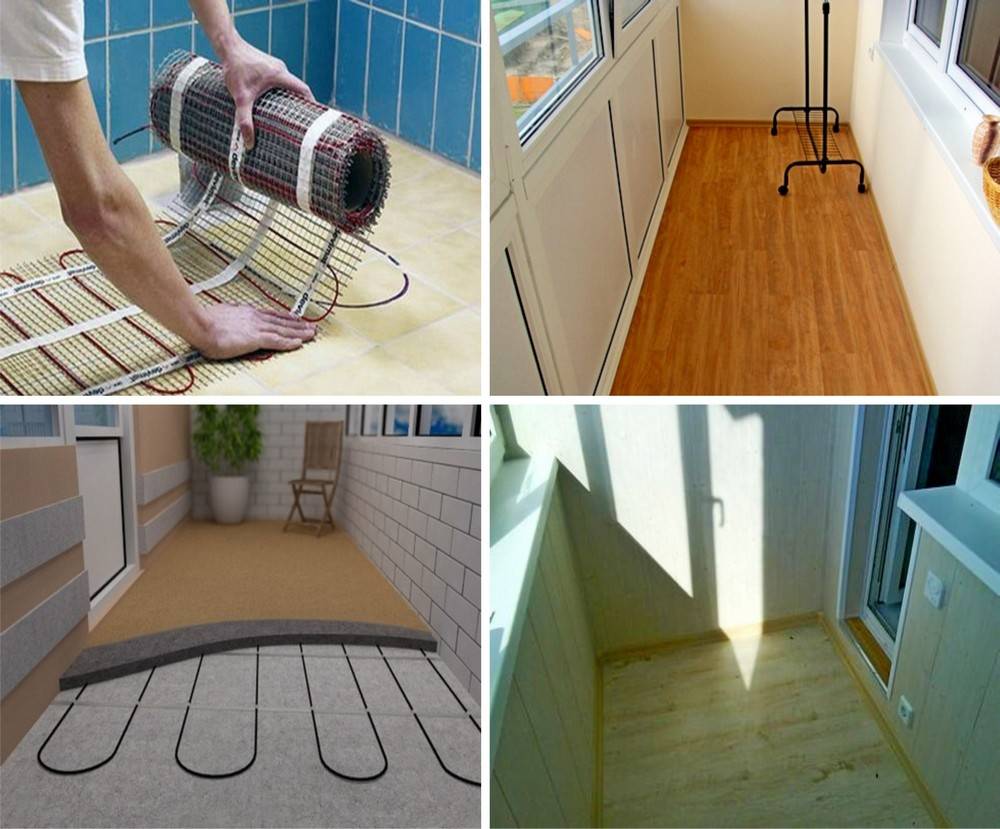
Electric underfloor heating: its advantages and general installation information
The second type of floor heating in balcony rooms has a number of undeniable advantages:
- Quick installation of the coating;
- Convenient temperature control;
- Affordable price for installation;
- Rapid identification and troubleshooting;
- Possibility of application in normal housing conditions without the need for additional installation permits.
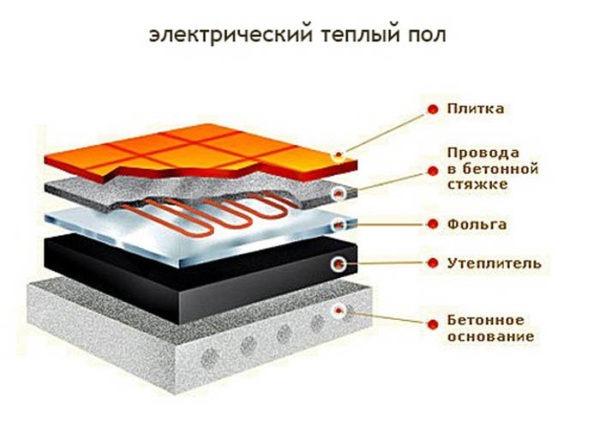
Schematic diagram of the electric floor heating device
Installing a floor with electric heating is characterized by only one drawback, which in today's realities may seem very significant to many - this is a large amount of electricity consumption from the general network, which will lead to an increase in spending on electricity bills.
Important! For electric surface heating to be really effective, you need to take care of installing a reliable heat-insulating layer.For typical apartments, expanded polystyrene will be used; for balconies standing on the ground or above basements, it is worth using a combined two-layer expanded clay gasket with the addition of foamed polyethylene and expanded polystyrene
The insulating layer must be at least 10 cm thick to obtain effective thermal insulation.
For typical apartments, expanded polystyrene will be used; for balconies standing on the ground or above basements, it is worth using a combined two-layer expanded clay gasket with the addition of foamed polyethylene and expanded polystyrene. The insulating layer must be at least 10 cm thick to obtain effective thermal insulation.

A variant of the electric heating device on the balcony along wooden logs
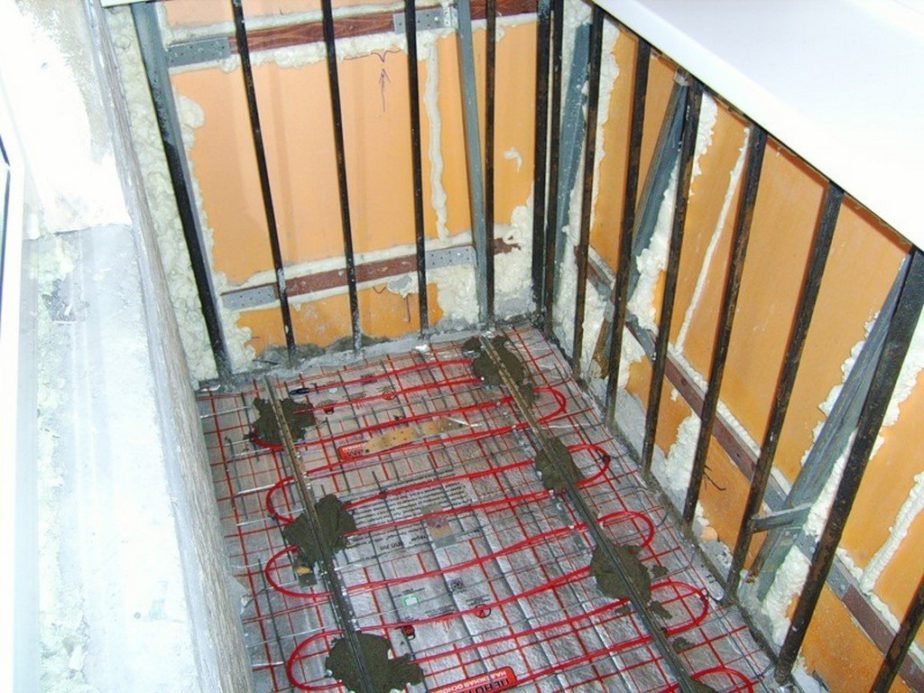
Underfloor heating on the balcony, what you need to pay attention to:
- It is necessary to correctly calculate the heat transfer of the cable. If there are places in the system with less heat transfer, this will lead to cable burnout and, accordingly, to reinstalling the system in this area;
- The right choice of cable tie. The first condition: the screed in which the cable will be located must conduct heat well. The second is the uniformity of the selected screed material: this will help to avoid premature damage to the cable;
- Also, in order not to damage the cable wiring, it must not be bent into arcs with a diameter of less than 4-5 cm;
- The cable should not come into contact with the heat-insulating layer: it must be laid on a special reinforced mesh;
- The area of the floor that people will walk on requires additional processing: the screed with the cable laid is fenced off from the rest of the floor with additional seams.
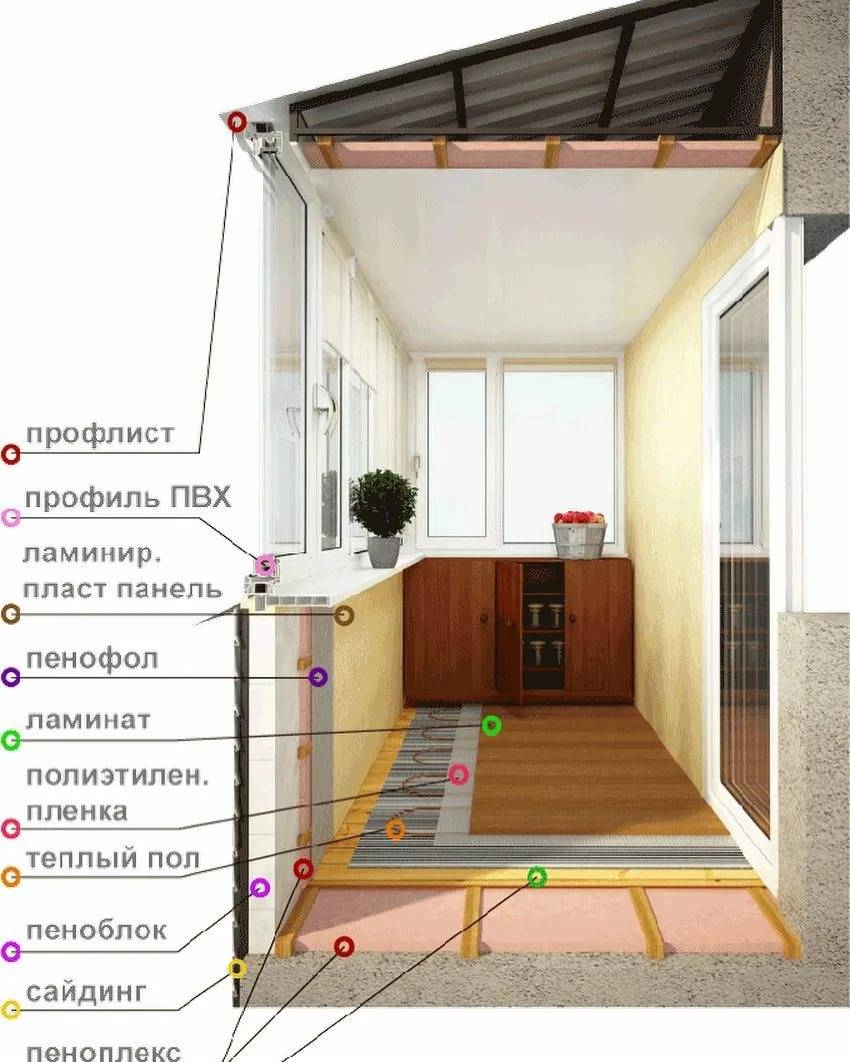
How to make a balcony warm?
As mentioned above, in order to make the balcony warm, it is necessary to install a warm floor, glazing and wall insulation. Each of these processes has its own technological features, which should be studied in more detail. The choice of one or another option, as a rule, depends on the goals of the owners of the premises and how exactly they plan to use the balcony space. For example, to use a balcony as a separate room, it is necessary to insulate absolutely all surfaces of this space. But for storing winter blanks and drying clothes, it is enough to insulate only the parapet.


Rice. 2. Balcony insulation options.
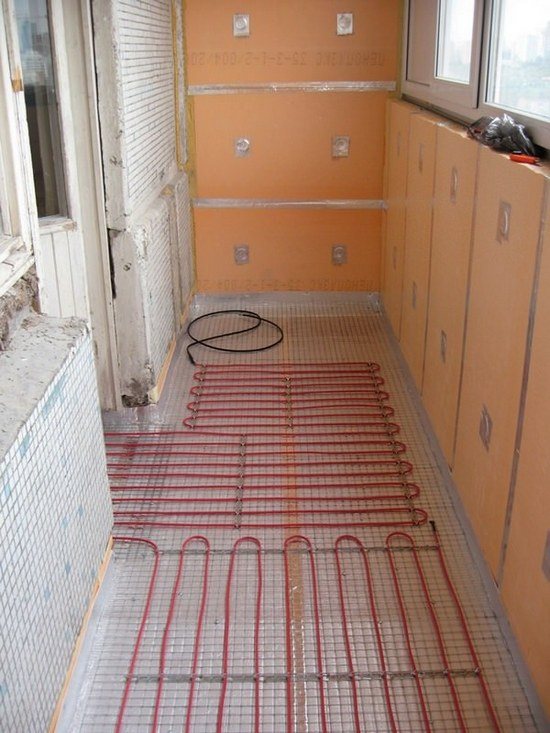
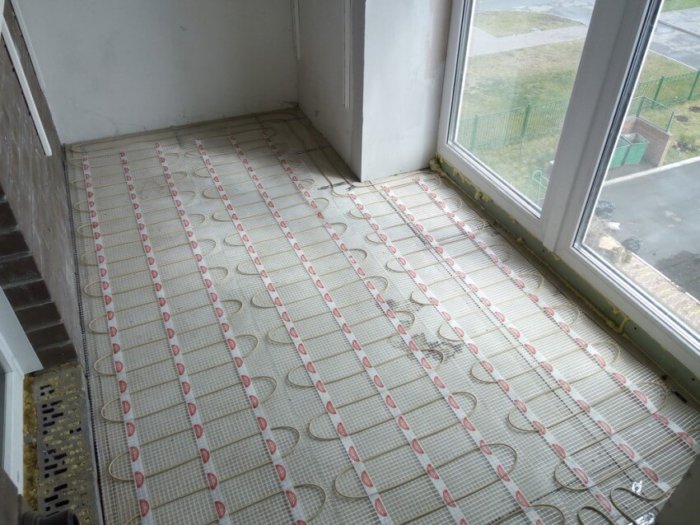
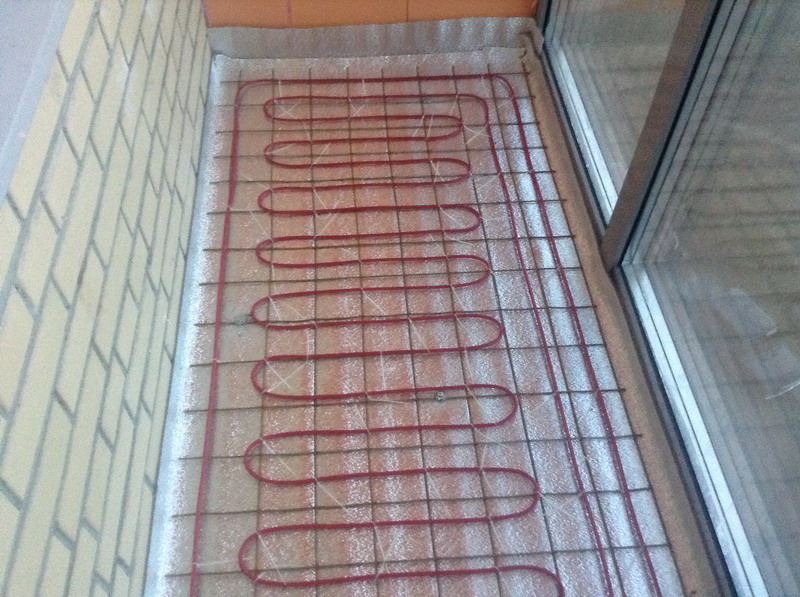
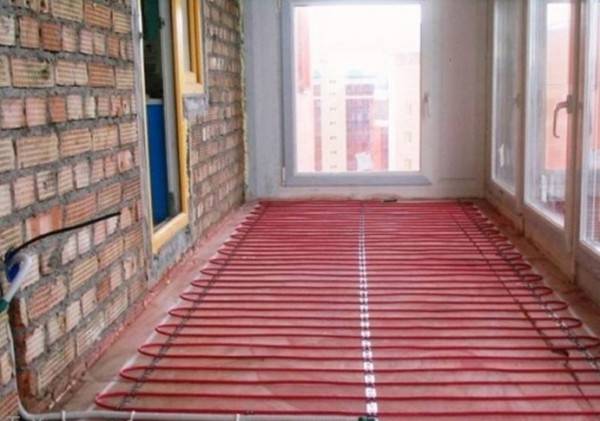
Warm floor on the balcony
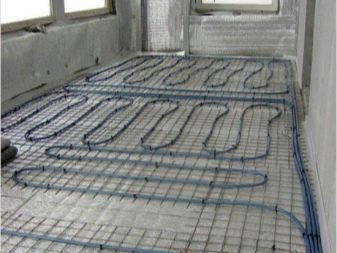
When choosing a warm floor for a balcony, first of all, you need to decide on its type. Today there are water and electric floors with cable. The first option is characterized by a uniform distribution of heat. But the main advantages of electric underfloor heating are considered to be affordable cost and ease of temperature control. Installation of the electrical option involves such activities as leveling the base, laying a layer of thermal insulation, installing a reinforcing mesh and a temperature controller, pouring the site with cement mortar, laying the floor covering and measuring the resistance of the cable after drying.
Rice. 3. Warm floor on the balcony.
Balcony glazing
In order to glaze the balcony, as a rule, windows with hinged doors and 2-chamber double-glazed windows are used. For this, energy-saving metal-plastic windows are usually used. However, aluminum profile windows or their wood-aluminum counterparts can also be used as an alternative.Among the main stages of do-it-yourself balcony glazing, it is worth noting: the exterior decoration of the room, the installation of the window system and ebbs, the sealing of the seams and the interior lining. At the last stage, all existing cracks are sealed. To do this, use mounting foam.
Rice. 4. Glazing of balconies.
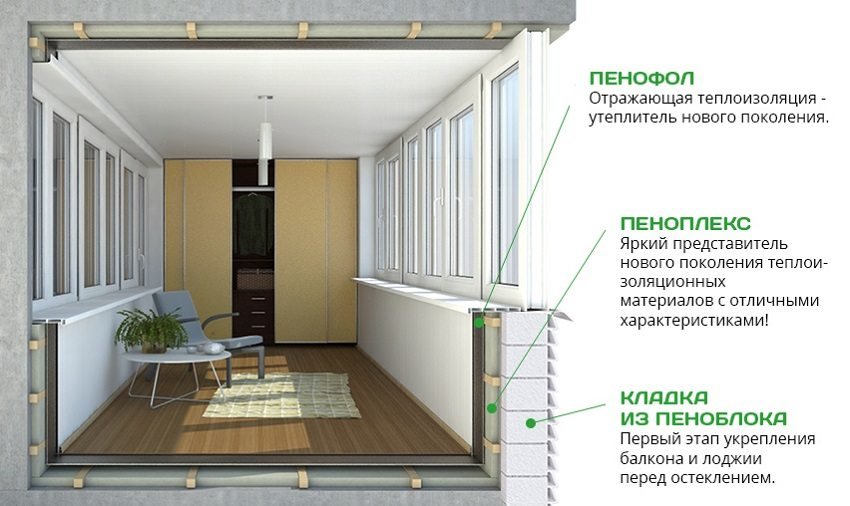
Wall insulation on the balcony
Instructions for warming the balcony with your own hands also provides for the insulation of the walls of this room. For this, a heater such as polystyrene is usually used. To attach this material to the walls of the balcony, a special cement adhesive is used, which must be applied in a thin layer. In order to ensure the most reliable fastening of this insulation, you can also use dowel-nails with wide caps. After that, penofol, which is an additional heat insulator, should be attached to the insulation. Then the seams of this heat insulator must be sealed with foil tape.
Rice. 5. Wall insulation on the balcony.
Warm balcony in a panel house
If the task is to make the insulation of the balcony in a panel house, then it is necessary to take into account the features of this structure. In particular, the presence of a technological gap through which rainwater can flow should be taken into account. This point greatly complicates the installation process.
To avoid any problems, it is necessary to install a window frame, which can significantly reduce the free space of the balcony. In order to avoid such a problem, the frame must be installed under the end plate. Thus, the balcony space retains its dimensions, while the gap between the plates is tightly closed.
Rice. 6.Popular options for warming a balcony in a panel house.
Warm balcony in a brick house
A step-by-step instruction on warming a balcony in a brick house involves the use of mineral wool or polystyrene as a heater. In addition, expanded polystyrene, penoplex or polyurethane foam can be used for this purpose. Isover sheets are also often used for insulation. The advantage of this option is ease of installation, good level of thermal insulation and lightness of the material.
The method of installing insulation in brick houses is practically no different from the installation algorithm in panel structures. The first layer of insulation is attached to the fence. Further, wooden bars are attached to the ceiling and floor, which create a "crate". The gaps in this crate are filled with insulation.
Rice. 7. Characteristics of popular options for heat insulators.


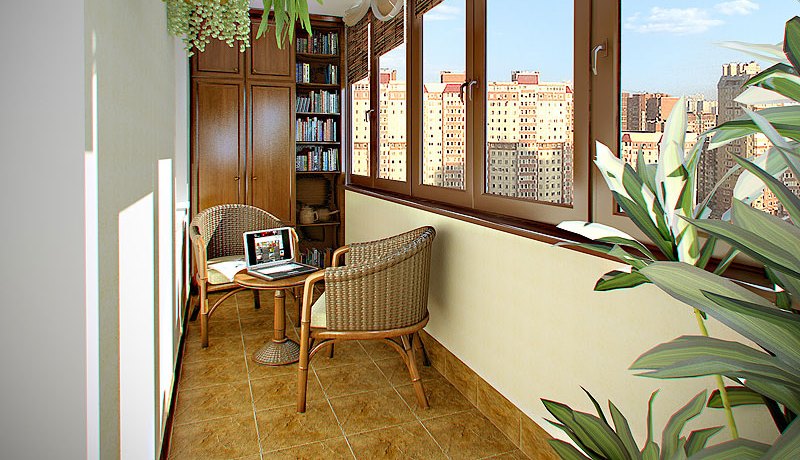
How to make a living room out of a balcony
Today we will talk about how to turn your old balcony into a cozy space that can be used as a small room or office. Experts from the Elitbalkon company, headed by Vladimir Kozhushko, who has experience in glazing since 1998, told us about the stages of creating a turnkey balcony. He started as an installer, then worked as a measurer, then as a manager, and since 2007 he has already become the owner of the aforementioned company. Thanks to the experience and direct participation of the CEO in each project, you can be sure that your balcony will have only high-quality glazing.
Balcony as an extension of the room
The design of the room connected to the balcony makes two options:
- these are two completely autonomous rooms, the room that adjoins the balcony becomes a walk-through, and these two spaces have a completely different interior;
- the room and the loggia are made as a single space, while they complement each other.

In the first case, the room and the balcony are visually separated by decor, it can be a curtain or a panel. This arrangement is well suited for apartments with a large area. If the room is small, then it is better to enlarge it with the help of a balcony. The addition of a room can have a different functional purpose, often it is a recreation area or an office, a library or a full-fledged dressing room. With this repair option, the main thing is that the design of the room and the balcony are the same and complement each other.
What is recommended to do when merging:
- a common floor, if the difference between the room and the balcony is maintained, then a neat step is made;
- the walls are decorated in the same style, made the same color;
- furniture is selected similar, preferably from the same collection;
- you can mask the opening with a beautiful drywall construction.

If the room serves as a bedroom, then it is worth using pastel shades, a large spacious bed and a TV on the opposite side look good. You can make an exclusive repair using photo wallpaper near the bed. Bedside tables and a wardrobe will not be superfluous. In the office, there must be a table and a chair suitable for the style. So that things can be stored on the walls, it is better to use whatnots and lockers with a large presence of shelves.
Video gallery
What to make the floor on the loggia from and which one is better
If the floor is to be deformed, pay attention to several ways of finishing.Depending on the budget, your capabilities and desires, you can install heating on the balcony with conventional hermetic insulation (cold look), make them insulated or warm
In the future, based on your preferences, you need to choose one of the options:
- a flat floor with a screed, but without thermal insulation;
- leveled surface using thermal materials;
- base with a dry screed, but without insulation;
- installation with semi-dry type screed with insulation;
- construction with a wooden floor on logs and thermal insulation (it is possible without it);
- wood mounting system using over linoleum;
- laying polystyrene foam with an addition, but without a lag;
- adjustment of the room with concrete with further laying of tiles or laminate;
- underfloor heating installation and installation. The heat exchange system can be electrically based or water based.
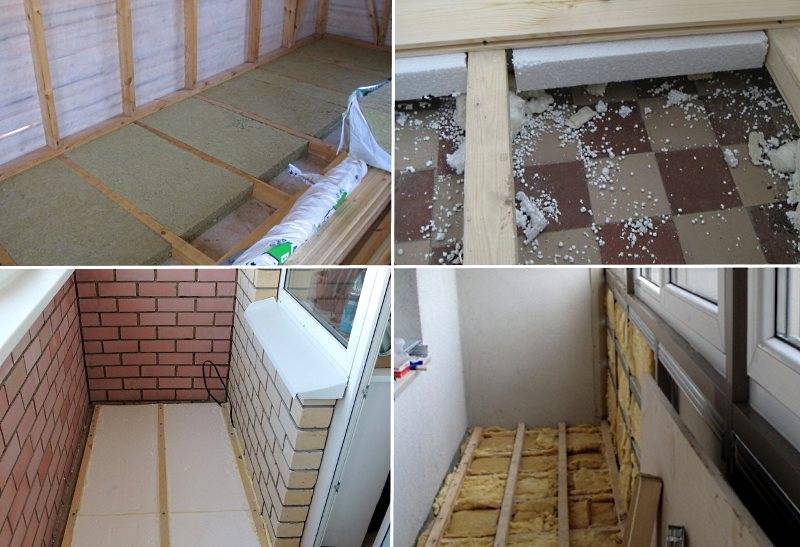
Ceiling insulation
If you plan to insulate the balcony with your own hands, then it is best to start from the ceiling and move further from top to bottom. Of course, if the ceiling of your loggia is the floor of your neighbors, then the process of protecting the room from frost and wind is much simpler. However, if the roof is independent, then a little effort should be made to insulate it.
For the best protection of the balcony from cold and wind, we recommend that you perform work in the following sequence:
- Spraying or special film for sound insulation.
- Balcony ceiling waterproofing. In this case, the most popular materials are PVC or polyester.
- The special membrane protecting from wind. It freely passes the steam that is released from the insulation, but it helps to completely isolate the ceiling from the wind and drops that can enter the room with it.
- Anti-condensation material that protects the insulation from the formation of water droplets.
- Frame (metal or wood of your choice). The crate is an optional element. Insulation can be installed using special glue. The main thing is to make sure that the mixture does not contain toluene. For greater reliability, when fixing the sheets, use dowels.
- Insulation for the ceiling of the balcony. We recommend that you use polystyrene foam, polystyrene foam or mineral wool. They provide good protection from the cold and are easy to install, which is especially important when insulating the balcony ceiling.
- Vapor barrier for insulation. It does not allow water vapor to pass inside, due to which the thermal insulation properties of the material are significantly increased.
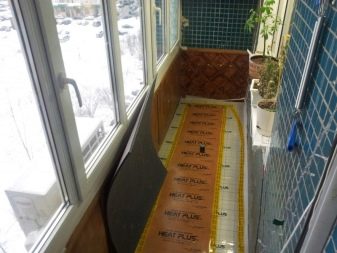
First option: KNOW HOW from DEVI
This is the "Devicell Dry" system - it allows you to install the heating cable in a dry way under a specialized laminated parquet board. This system has huge advantages, namely:
- you can start using a warm floor immediately after installation, and not wait a whole month, as in the variant with a screed;
- the load on the ceiling (floor) of the loggia is lightened by 2-3 times (depending on the floor area covered on the loggia);
- installation is carried out within one working day;
- installation can be carried out at any negative ambient temperature, which cannot be allowed in the version with a screed.
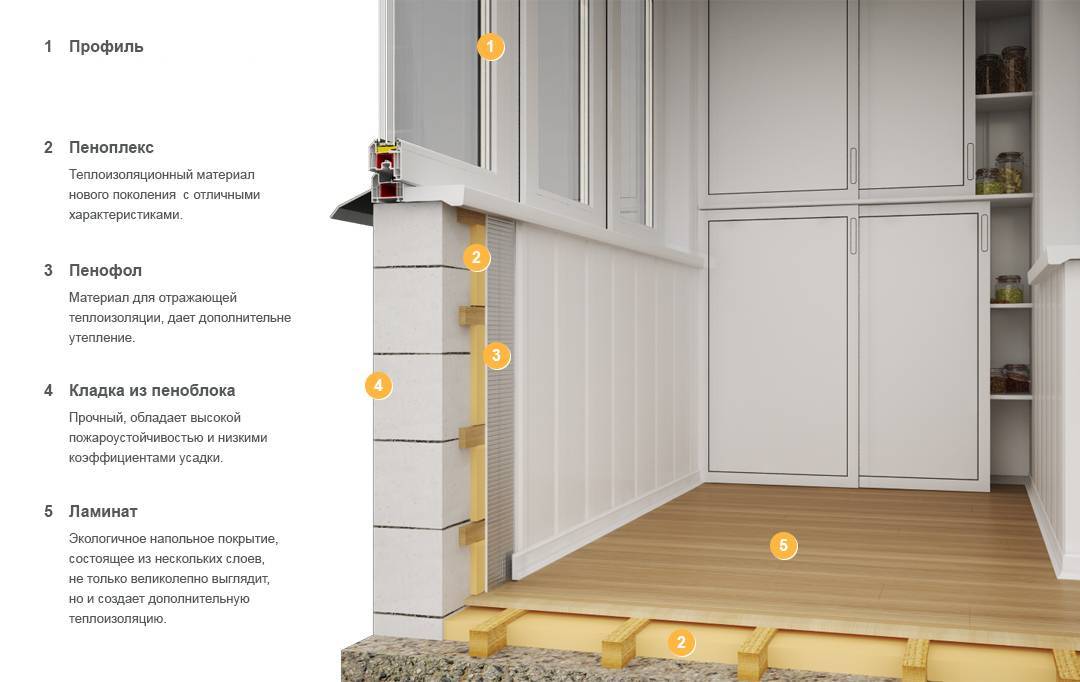
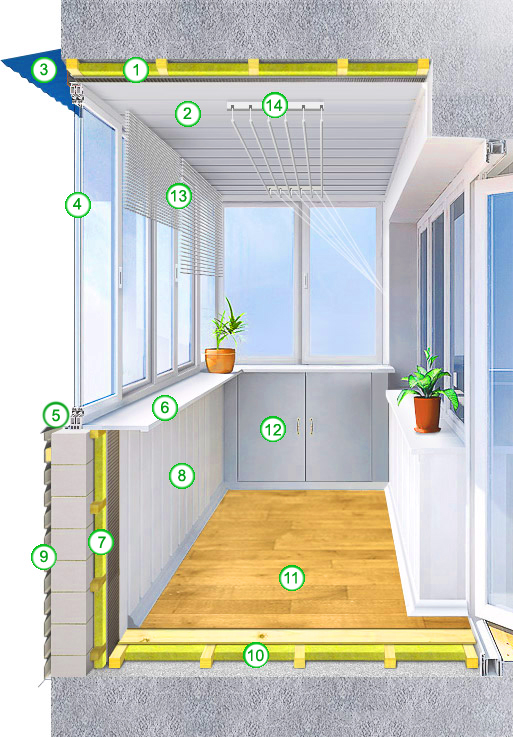
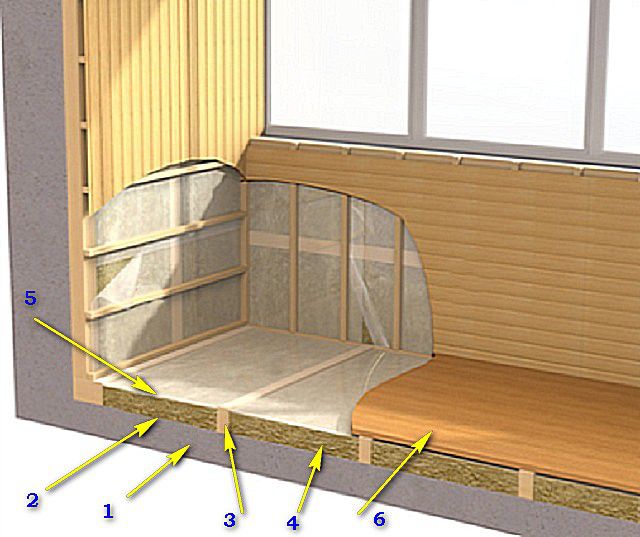
Balcony / loggia insulation scheme
- Balcony/loggia glazing
- Balcony / loggia wall
- Thermal insulation PENOPLEX COMFORT
- vapor barrier
- crate
- Wall finishing (plastic panels or moisture-resistant drywall)
- Fastener
- Screed for floor finishing
- Floor finishing
- Balcony/loggia floor.
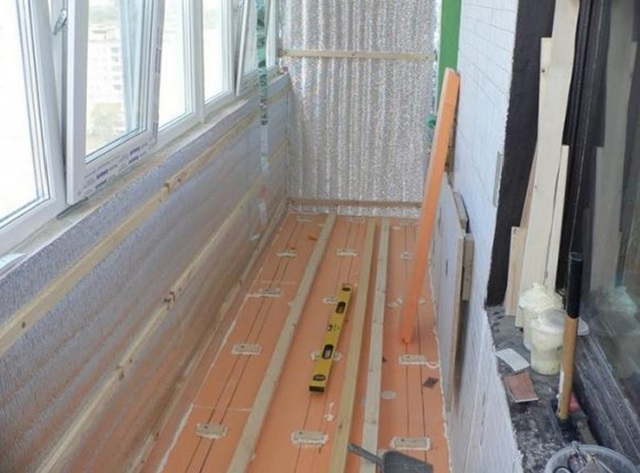
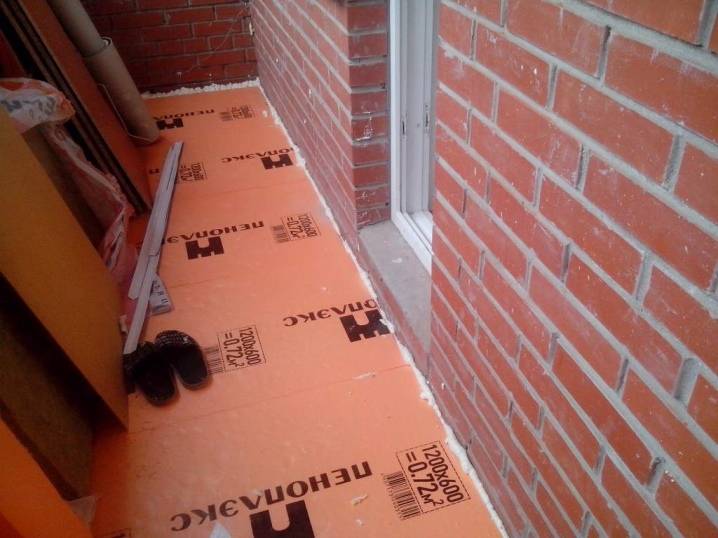
Loggia insulation sequence using PENOPLEX COMFORT
- Window blocks are installed. The PENOPLEXFASTFIX polyurethane foam will be the optimal means of sealing the joints.
- PENOPLEXFASTFIX boards are fastened with PENOPLEXFASTFIX polyurethane adhesive, which is also used to process joints between structures.
- The vapor barrier is attached - foil polyethylene film - using double-sided tape. The vapor barrier is placed end-to-end, while the joint between the canvases and structures is glued with metal tape.
- We mount the floor of the balcony.
In the photo - insulation of the loggia with PENOPLEX plates in the apartment of actress Marina Dyuzheva
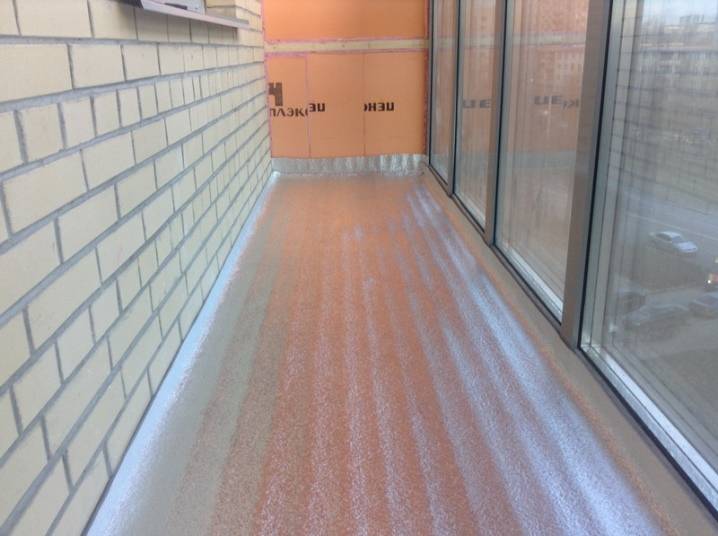
The following bases can be laid on PENOPLEX thermal insulation:
- Cement-sand screed (thickness 4 cm). Between the vertical wall and the screed, it is necessary to leave a temperature gap of 1 cm. To do this, it is enough to install a strip of foamed PE 1 cm thick around the perimeter before pouring the screed. After the screed has hardened, the finishing layer is laid.


- DSP screed with electric heating - according to the technology of the device of the underfloor heating system.
- Solid flooring from GVL (gypsum fiber sheets) - is arranged in two layers with a mandatory overlap of joints.
- The lathing on the walls, ceiling and parapet is made of dry wooden (treated with an antiseptic) slats and is exposed to vertical and horizontal levels. Attaches directly to concrete with dowels and self-tapping screws. Reiki can be 40x20 mm in size.
- Finishing trim is attached to the crate. Usually these are plastic panels 25 cm wide or moisture-resistant drywall.In the case of using drywall, additional finishing work is required, namely: priming, puttying, corner processing, leveling, wallpapering or painting.
- Electric heaters, lighting, etc. can be installed on the loggia. Electrical wiring is mounted to the interior in non-combustible boxes.
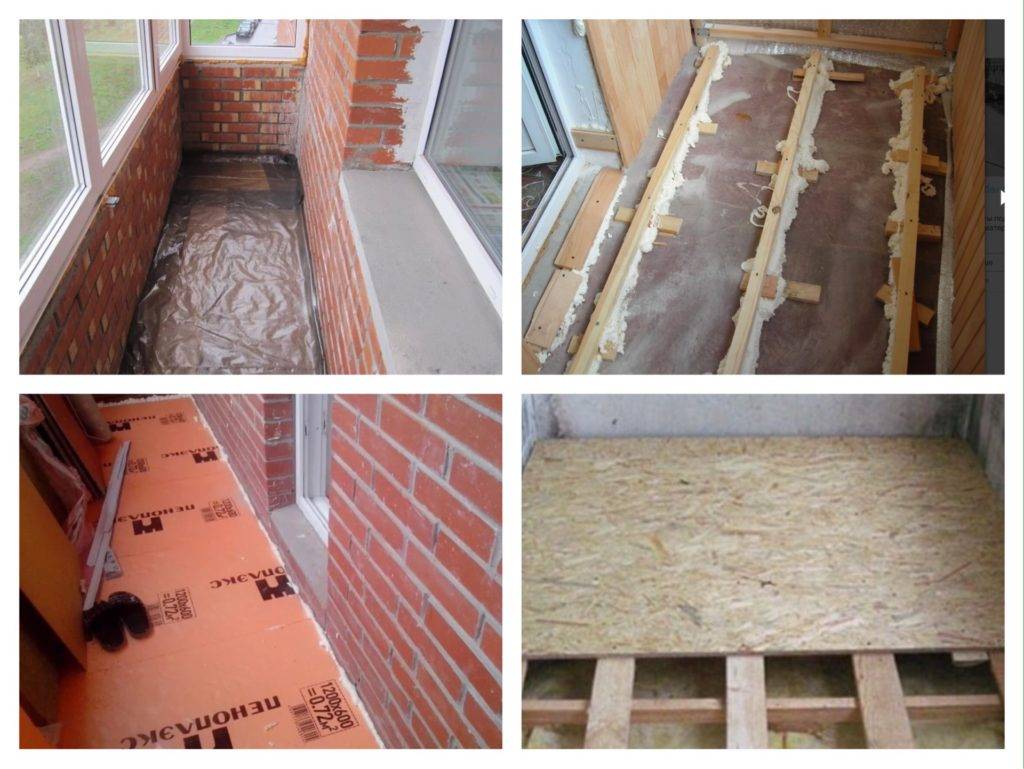
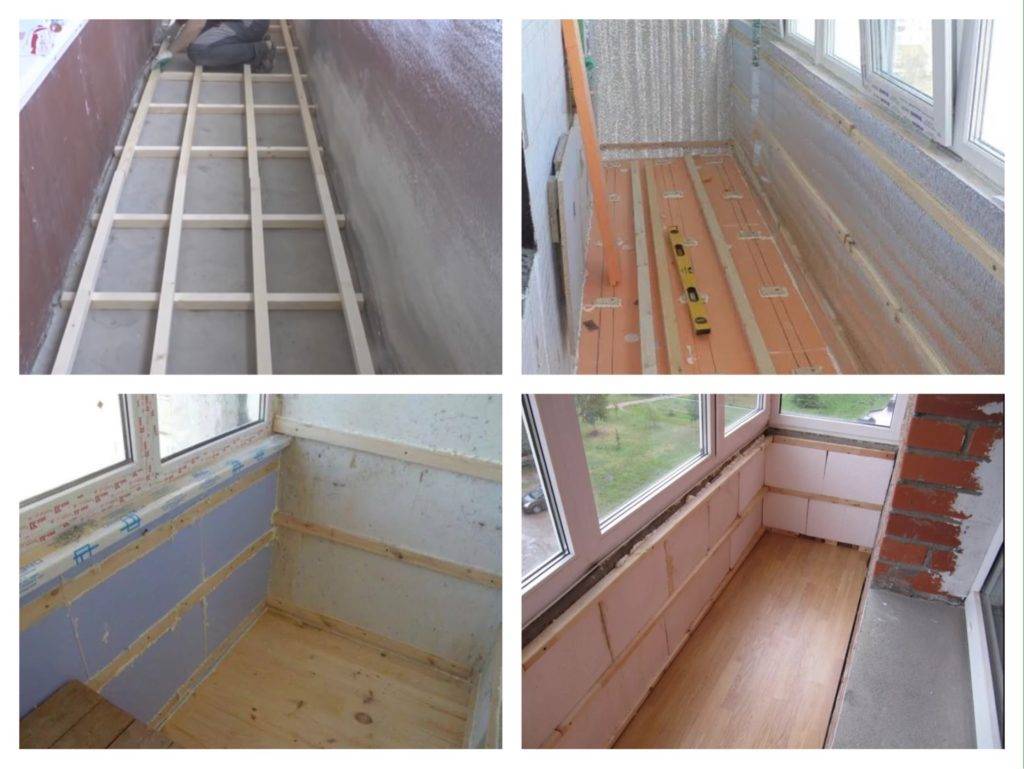
Insulation laying
When the solution hardens, it will be possible to lay a heater
It is important not to make a mistake with the laying side by installing it so that the reflective side is on top. When installing a heater, you must adhere to the following points:
- it is necessary to lay with an overlap, so that the insulation goes 3-4 cm onto the walls and the frame of the balcony;
- the remaining insulation must be rolled back into a roll;
- excess insulation is cut off with a construction knife;
- at the end, it is necessary to straighten and smooth the material so that its surface is even.
When the insulation is laid and straightened, it will need to be fixed with wooden logs, the installation process of which has already been described earlier. In fact, now you need to mount another layer of the “lattice”, between the planks of which another layer of foam will be laid, already the third in a row. The new foam layer must also be fixed on top with another layer of wooden planks.
At this stage, the installation of the floor can be completed by sheathing the resulting multi-layer structure with clapboard. Otherwise, for sheathing, wooden slats tightly adjacent to each other can be used, on top of which the floor covering will be installed. In order for the floor to be more durable, it is also desirable to lay the slats in two layers.
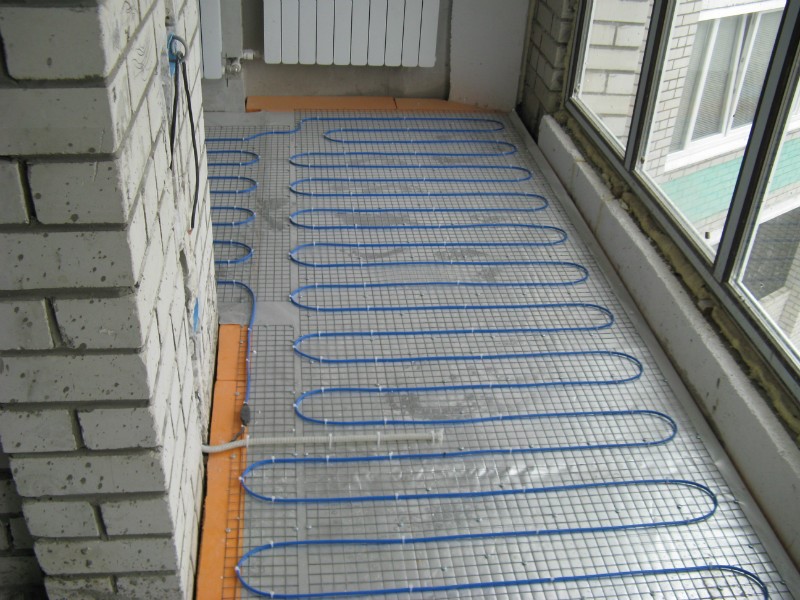
Substrate preparation for underfloor heating
Moreover, ensuring maximum efficiency of the selected floor heating system and reducing heat losses. However, this should first perform certain preparatory measures.
- Renewal of cement screed floor.
- Laying a layer of thermal insulation material.
- In the case of installing a water floor system, it is imperative to ensure effective waterproofing.
In this case, the most preferred materials in terms of the ratio of efficiency and financial costs are foil with heat-reflecting properties, mineral wool and a mixture of cement mortar in dry form.
It is also very important to take care of the maximum possible insulation of a glazed balcony or loggia in advance. First of all - about the protection of external walls from the release of heat to the outside of the room and the penetration of cold inside
Otherwise, the underfloor heating on the balcony under the tile, laminate or other coating will be practically ineffective.
On an unglazed balcony, the use of these floor heating technologies does not make sense at all. Here it is necessary to act differently: if necessary, repair the base and put a new topcoat. In the case of an open, that is, not glazed balcony, the floor is constantly affected by temperature changes, direct rays of sunlight, as well as rain and snow. Accordingly, the floor covering material in this case must be durable, frost-resistant, non-combustible and non-absorbent. Given these requirements, the list of available options is significantly reduced. Limited to porcelain stoneware, ceramic and rubber tiles, decking, PVC panels and special rubber-based paints.In addition, frost-resistant linoleum, which has recently appeared on the market, can be laid on an open balcony.
Benefits in use
In cold weather, the flooring evenly heats the air and prevents the residents of the apartment from freezing. The air temperature at the bottom of the room will always be warmer than at the top. The heated surface conducts well and gives off heated air. This ability is determined by the correct operation of the structure.
The advantage is also the surface area, which is much wider than the heatsink area. The system itself was invented in ancient Rome. Since then, it has undergone major changes and modified to modern realities.
The heating structure perfectly copes with the heating of loggias and balconies. The area of these premises is small, the consumption of materials too. And the comfort from the presence of a warm floor is noticeable immediately.


Main advantages:
- The modified heating system copes with its task much better than the standard one. More heat is released into the atmosphere, living in an apartment becomes more comfortable.
- Given the amount of heat that is released into the room, the temperature of the heating element is low.
- The design looks stylish and imperceptible to the eye, saves valuable square meters of living space. He also does not need special care, all the elements are hidden under the cladding.
- Heat is regulated by the residents of the apartment independently. This is done using an automated control panel. It allows you to keep the air in the apartment in optimal condition for a person, regardless of weather changes.
- The flooring has a long service life, no immediate replacement is required, the structure can serve for decades.
- You can install the heating system yourself, even if you have never done this before. No special mounting hardware is required.
- One of the most pleasant sensations is to come home from the cold and stand with cold feet on a warm floor covering.
But the heating structure also has its downsides.
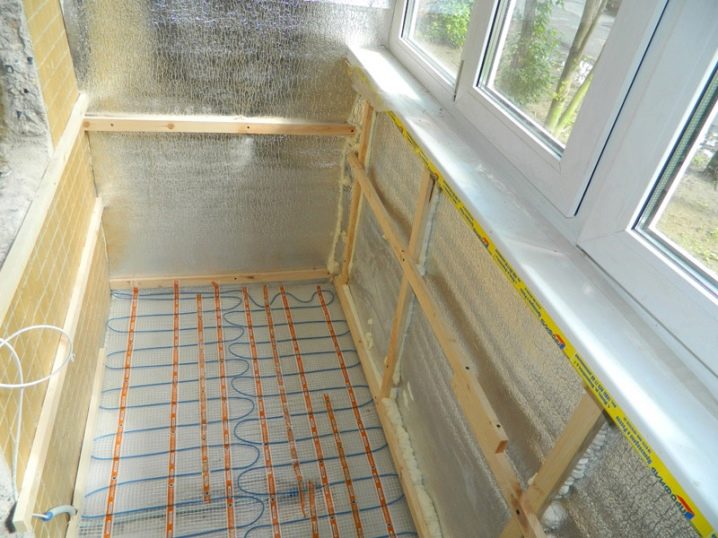
Preparing the loggia for the installation of insulation
As before any finishing work, before installing the insulation, the necessary preparation of the internal surfaces should be made. This includes:
- Cleaning walls and ceilings from the remnants of old finishing materials.
- Puttying cracks and joints.
- Installation of waterproofing.
Wall and ceiling cleaning
Particular attention in this work should be paid if you decide to fix the insulation sheets with an adhesive composition. If the walls or ceiling are covered with smooth oil enamel, it is also advisable to remove it with a scraper. If the paint is too tight, you can use a grinder to remove it or make notches on the surface with a construction pick or an old hatchet
If the paint is too tight, you can use a grinder to remove it or make notches on the surface with a construction pick or an old hatchet.
Sealing cracks and crevices
The next step is to carefully seal all joints and cracks. This will prevent cold winter air from entering the room, which is fraught with the formation of condensation between the insulation layer and the wall. And this, in turn, leads to the appearance of mold and fungus.
To seal small cracks, you can use ready-made putties or dry putty mixes, the choice of which is quite large in any building supermarket. Large gaps can be sealed with mounting foam or cement mortar (plaster or concrete).
Waterproofing device
Waterproofing is another important stage in the preparation of internal surfaces for the installation of insulation. Its purpose is to protect the loggia from the penetration of moisture from the outside through the smallest pores of concrete or brick. And this is again the accumulation of moisture under the insulation, mold and fungus.
For waterproofing, bitumen-based roll materials can be used. This is a well-known roofing material and its modern derivatives. Sheets of roofing material with the help of special bituminous mastics are pasted over the inner surfaces of the outer walls, the upper and lower concrete slabs, that is, the floor and ceiling of the future room. Joints of sheets of roofing material should overlap and be well smeared with glue or mastic.
For the same purposes, you can use special liquid mastics on a bitumen or polymer base, which, after being applied to the wall surface, harden, forming a moisture-proof film. Such mastics are applied with a brush or roller.
Warm floor on the balcony with your own hands
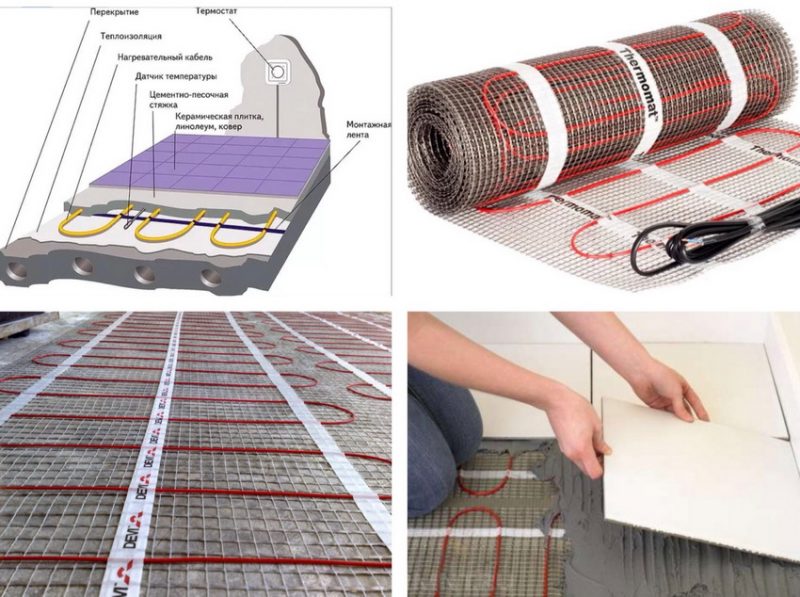
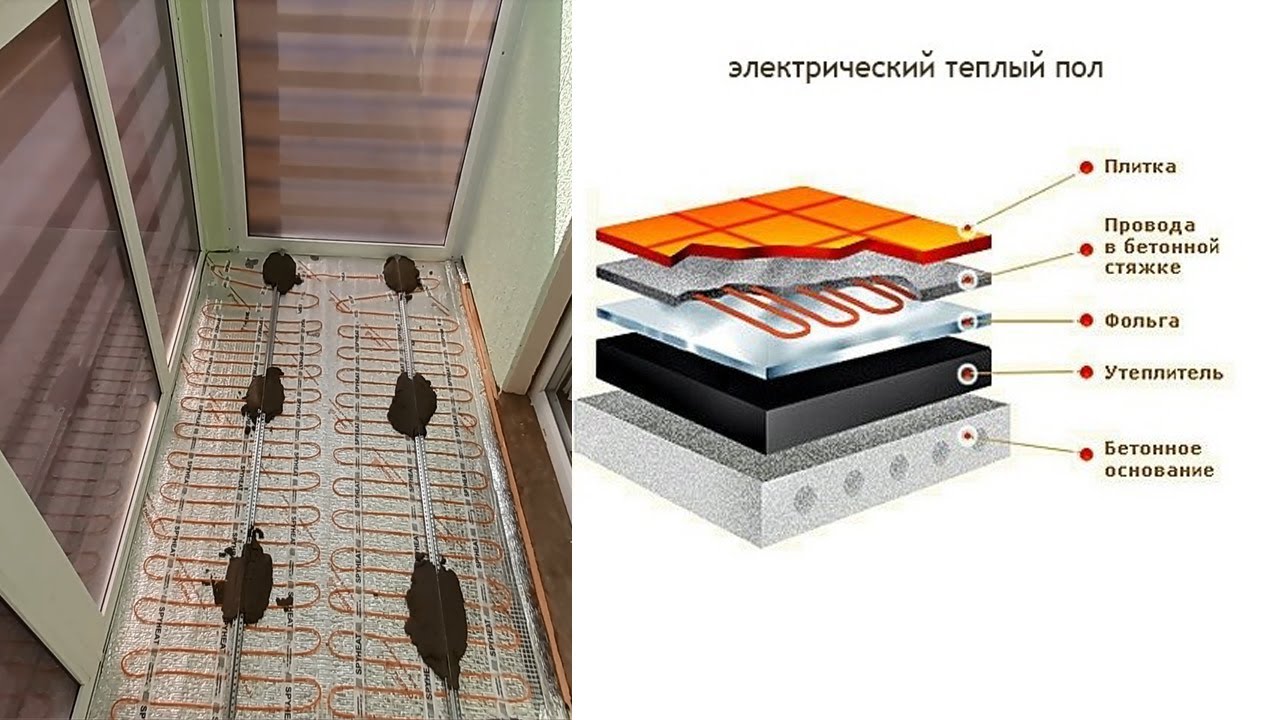
Electric underfloor heating is of the following types:
- With heated cable. To ensure a comfortable temperature, approximately 150 W per 1 m² of floor will be required. Next, the cable is poured with a screed, and after it hardens, the flooring is laid. If you follow all safety requirements, then you can start using the floor after a month.
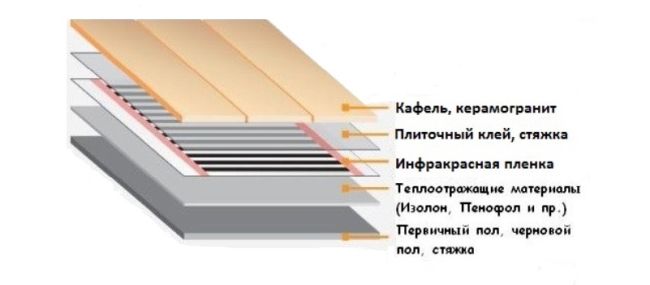
- Floor with infrared heating. It is the newest way of warming.For the installation of such a floor, the required coverage width is selected with a power of 80-220 watts. Under the film, a lavsan of at least 5 mm in thickness is laid over the floor, and the film is already laid on it, so that the copper side is at the bottom.
- With thin heated mats. The basis of such heating is an electric cord attached to a mesh base made of fabric. This floor is good because when laying it does not require thermal insulation. The mesh has a width of half a meter and a length of 2 to 24 m. The heating mats are simply rolled out on the floor, after which the floor is immediately ready for laying tiles.
The best flooring option if you are using electric heating is ceramic. The “heated” floor is connected to thermostats that help in maintaining the desired temperature.


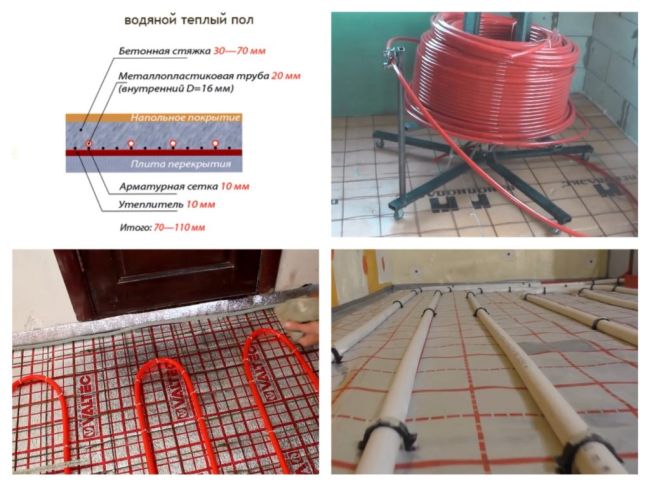
If, nevertheless, you have the opportunity to carry out a water heated floor, then it is better, of course, to dwell on this option. Such a decision should be taken for a number of reasons, including such as: efficiency and safety.
Well, that's all about the warm floor on the balcony. But, nevertheless, if you are serious about insulating the balcony, then it is better to consult a specialist about the most acceptable option and cost of work.
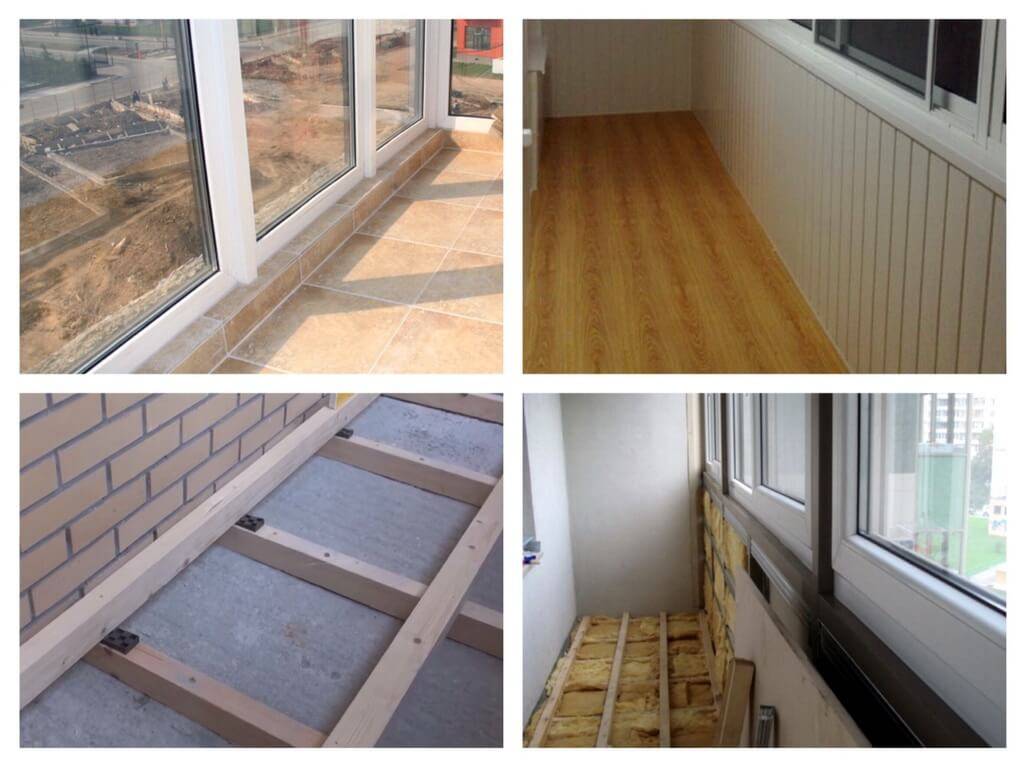
Selection of material depending on the type of balcony
It happens that the selected material does not match the type of balcony. If you lay it on the floor, then it will not last for a long time and you will have to start all the work again, and this is a waste of effort, time and finances. In order for everything to turn out beautifully and correctly the first time, you should initially understand the characteristics of the flooring and find out whether the material matches the type of balcony.
Open balcony. Suffering from weather events and natural disasters.When choosing a material, emphasis should be placed on options that are resistant to these indicators, which are not so many: tiles, porcelain stoneware, frost-resistant linoleum, deck board, decking. Concrete and wooden floors are covered with special paints and varnishes for outdoor use. The underfloor heating system, for obvious reasons, disappears immediately.
Glazed balcony. Here you can use any of the vending floor materials. The room is protected from the scorching sun, cold and rain by window frames. Self-leveling floors and tiles require additional installation of underfloor heating, and carpet and laminate need high-quality hydro and vapor barrier. An excellent option would be linoleum and garden parquet.
Unheated balcony. The biggest problem is dampness and cold. If the installation of floor heating systems is not planned, then it is worth choosing from moisture-resistant materials: tiles, linoleum, self-leveling floor, deck board, decking.


