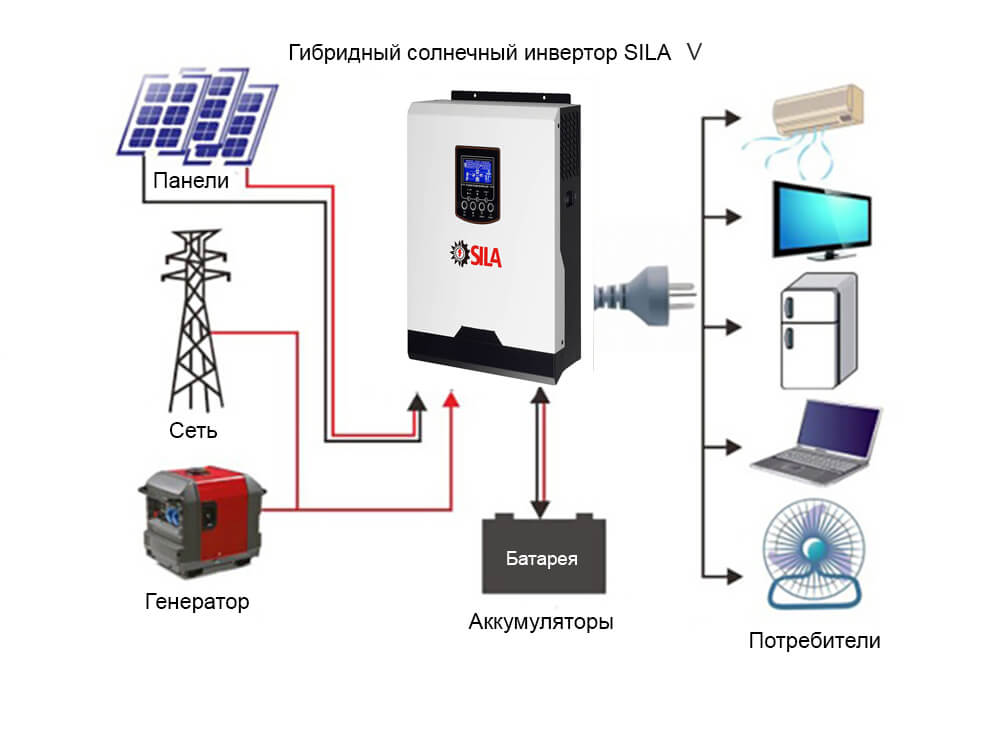
- Purpose
- Climate control and accessories
- Adjustment system
- Circulation pump
- Is there enough energy from skirting boards in our climate
- Features of baseboard heating
- The principle of operation of the baseboard heating system
- Installing the baseboard heating system yourself
- Advantages of baseboard heating
- Disadvantages of baseboard heating
- 5 Applications and design variety
- Heating system installation
- Installation of a warm plinth
- Assembling the water heating system
- Assembling the electric heating system
- How to make a warm skirting board with your own hands
- Option one
- Second option
- 6. Do-it-yourself installation of a warm plinth
- Self-installation of a warm water skirting board
- Self-installation of electric warm plinth
- Installing a water plinth
- Mounting
Purpose
Plinth heaters can serve as the main source of heating of the dwelling, and addition to the existing heating system. Depending on the type of heating elements, they can be installed in private houses, apartments, loggias, garden houses, garages, winter gardens, industrial premises. Electrical cable plinths, for example, are used where placement of other heating systems is not possible.Plinth heating pipes well protect the wooden parts of the house from dampness.
Heating baseboards work effectively in rooms with panoramic windows. Thanks to the rising warm flow, the rooms are heated completely and evenly, large windows do not fog up.
Climate control and accessories
When installing a contour heating system, especially if you make a warm water plinth with your own hands, you need to create a regulation structure and install some additional nodes
The presence of the latter is especially important. If a warm plinth is made in an apartment and connected to the heating risers, it is important not to violate the parameters of the centralized heating supply system
Adjustment system
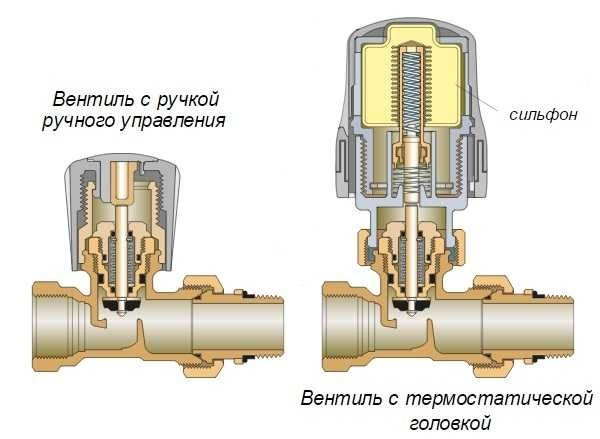
To control the amount of heat entering the room, in the simplest case, shut-off valves can be used. A conventional valve installed at the inlet to the circuit can change the amount of coolant pumped per unit time. This is convenient in conditions of stable water temperature in the circuit and the climate outside: you can increase or decrease the circulation several times a season “by eye”.
Automated systems are more functional. In this case, a thermal head is installed at the outlet of the circuit. Such a valve, roughly speaking, controls the temperature drop and shuts off the circulation at the set indicators of the water that has passed through the heating system.
Thermal heads with an external temperature sensor are more convenient. They receive a signal from small devices located inside the room, which determine the microclimate indicators and set the heating mode.
Thermal heads with external control can also receive data on the air temperature outside the building in order to increase or decrease heat transfer from the baseboard accordingly.
Thermal head
Circulation pump
Equipping a warm baseboard circuit in an apartment is a necessary step if the house heating system is built on a supply-return scheme with mixing. In such a structure, the gravitational principle of the movement of the coolant is applied. It is deprived of a warm water plinth. Therefore, forced pumping of water through the system will be required.
In apartments with a through circulation circuit (heating radiators without a mixing pipe between the supply and return), the use of its own pump for a warm baseboard will not affect the pressure indicators that exist in the centralized heating system.
Scheme with a circulation pump
Is there enough energy from skirting boards in our climate
It is easy to calculate that the perimeter of a room of 20 square meters will be 18 meters. Of these, 5 meters will be occupied by furniture against the wall, a doorway (a room without sofas, beds, wardrobes, chests of drawers against the walls is not functional ...). In total, you can count on getting 1.4 kW at 40 degrees of heating. At the same time, the recommended consideration of the minimum heat loss of such a room is 2.0 kW (100 W per square meter), and if it is a corner room with large glazing, then all 3.0 kW, but this is for well-insulated buildings. Thus, at a nominal temperature of 40 degrees, there is simply not enough power for a cold month. Raising the temperature threatens with gigantic heat losses and loss of comfort (more on that later).
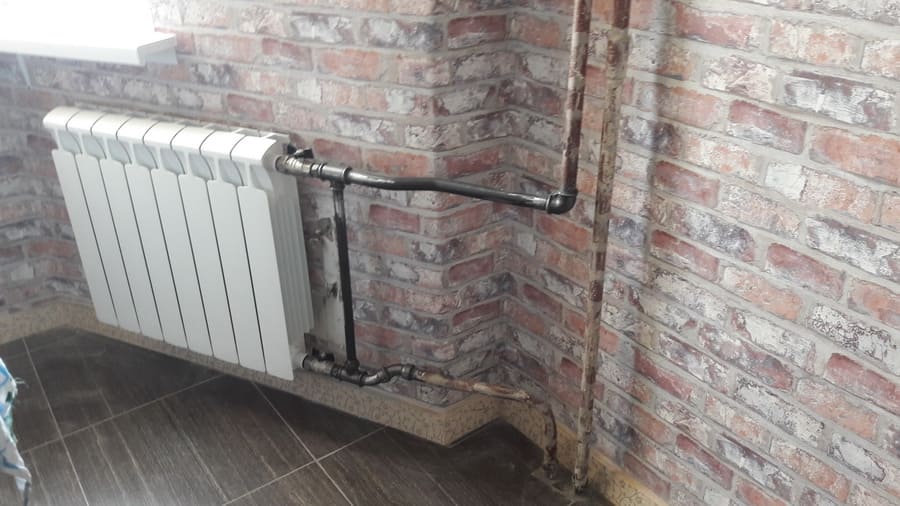
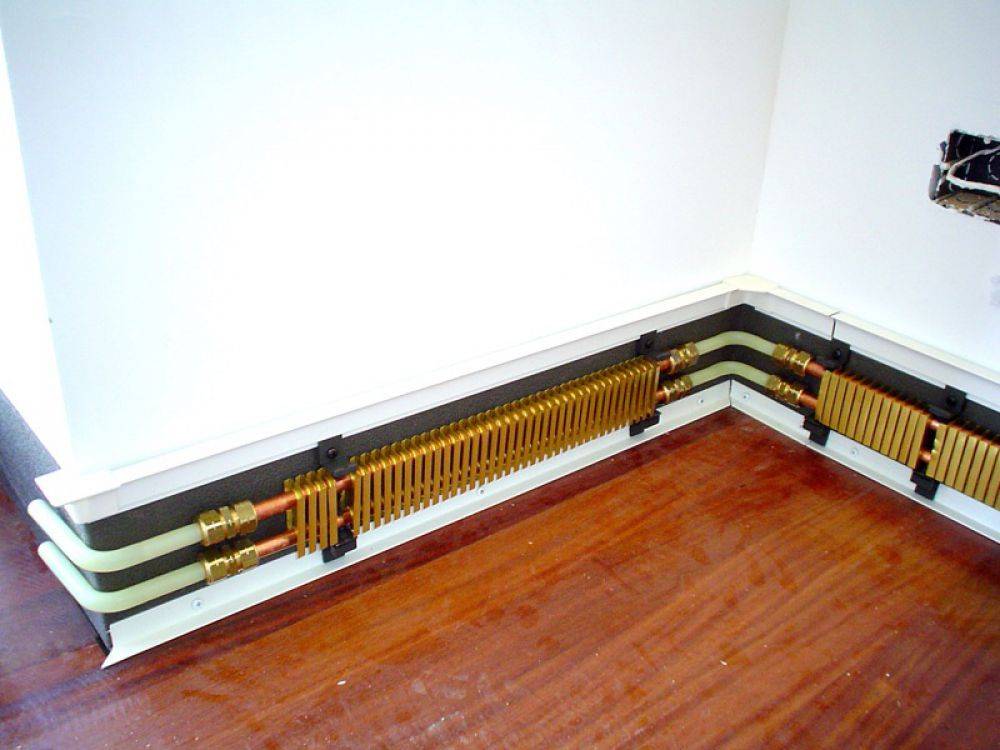
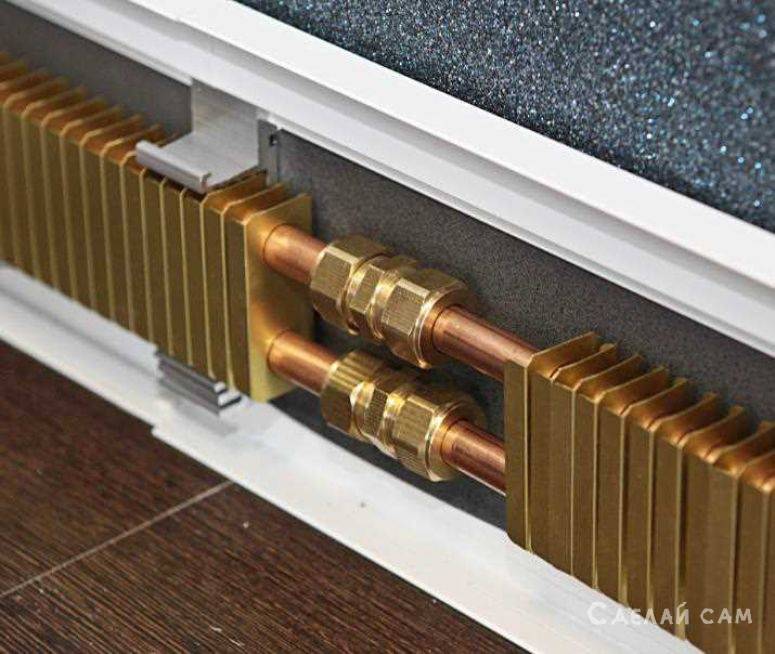
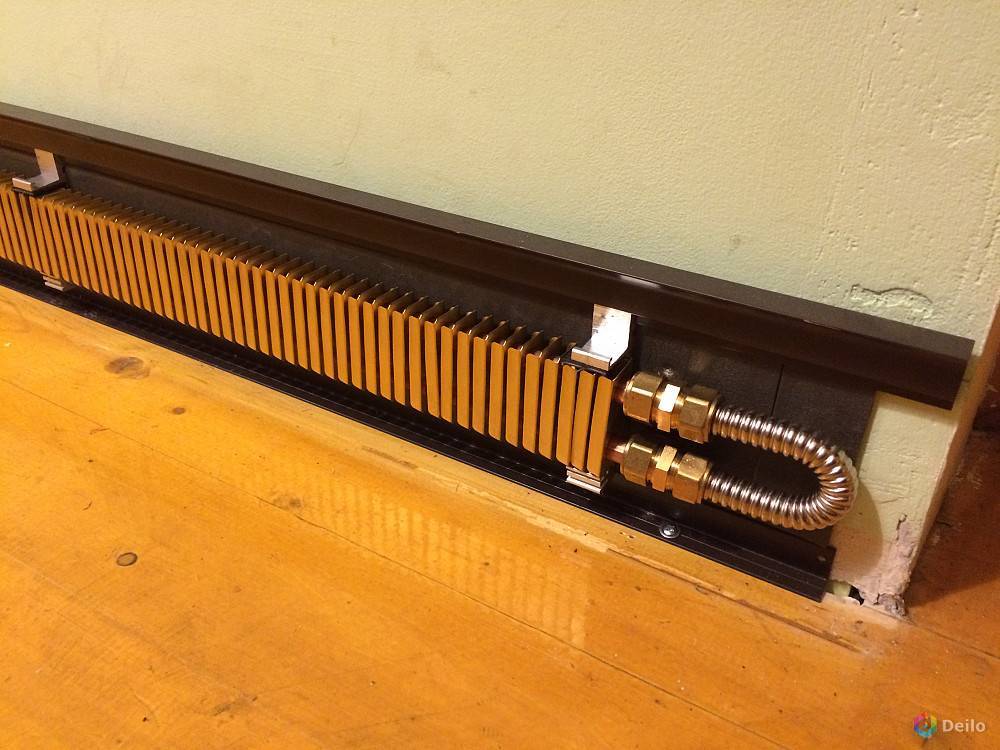
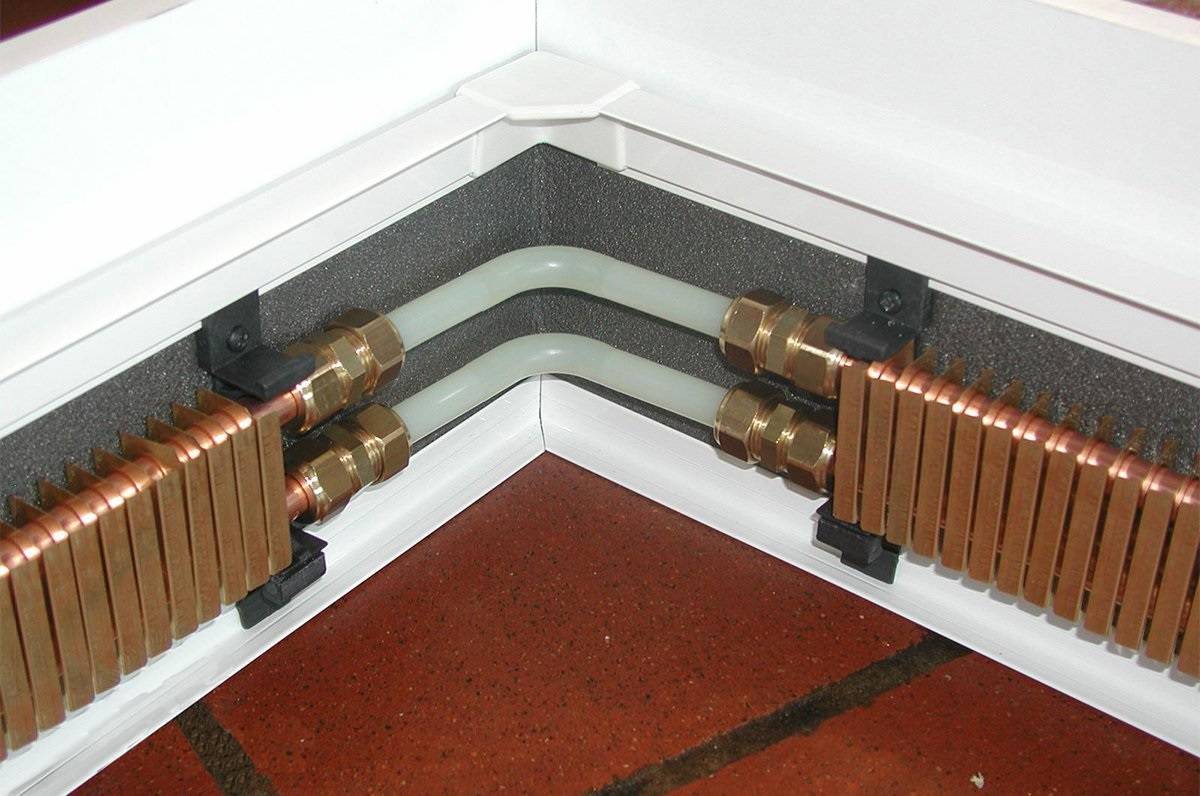
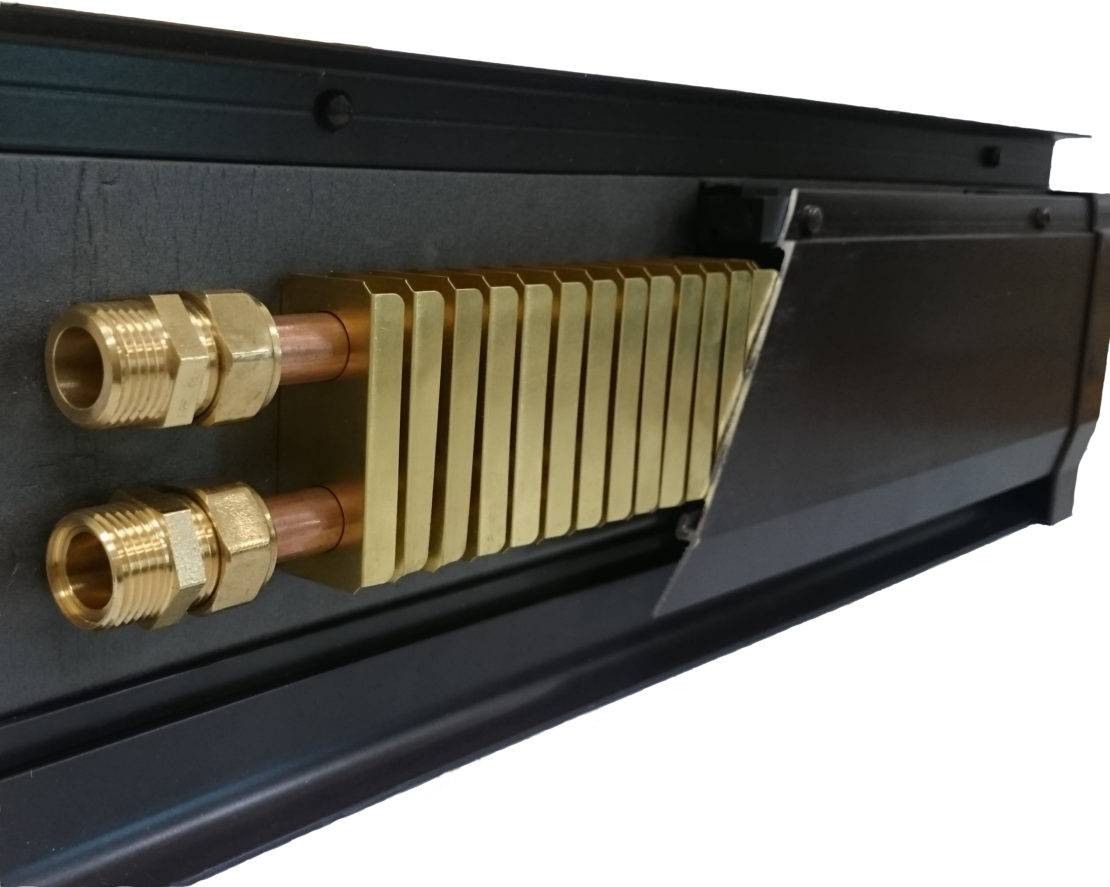
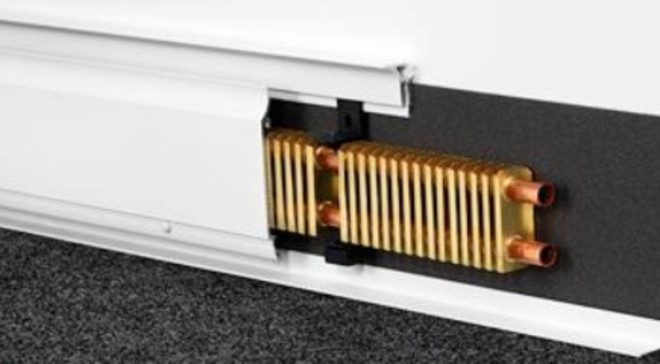
Separate sections of the warm plinth are connected by flexible pipelines with compression fittings through copper tubes
Features of baseboard heating
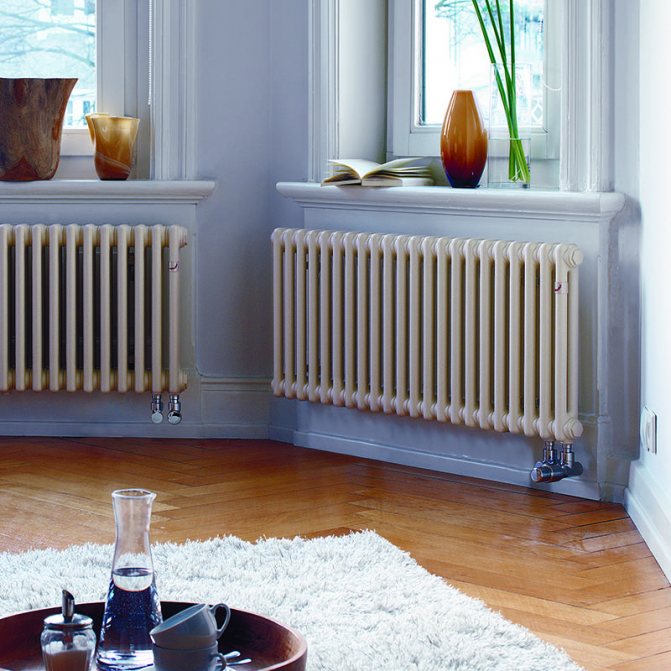
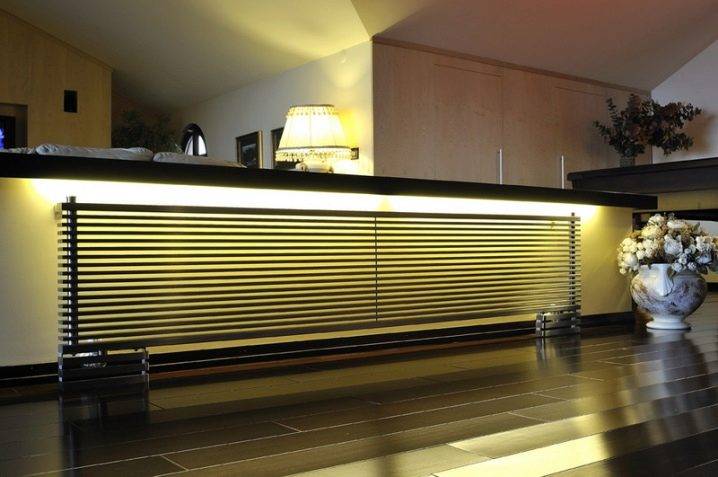
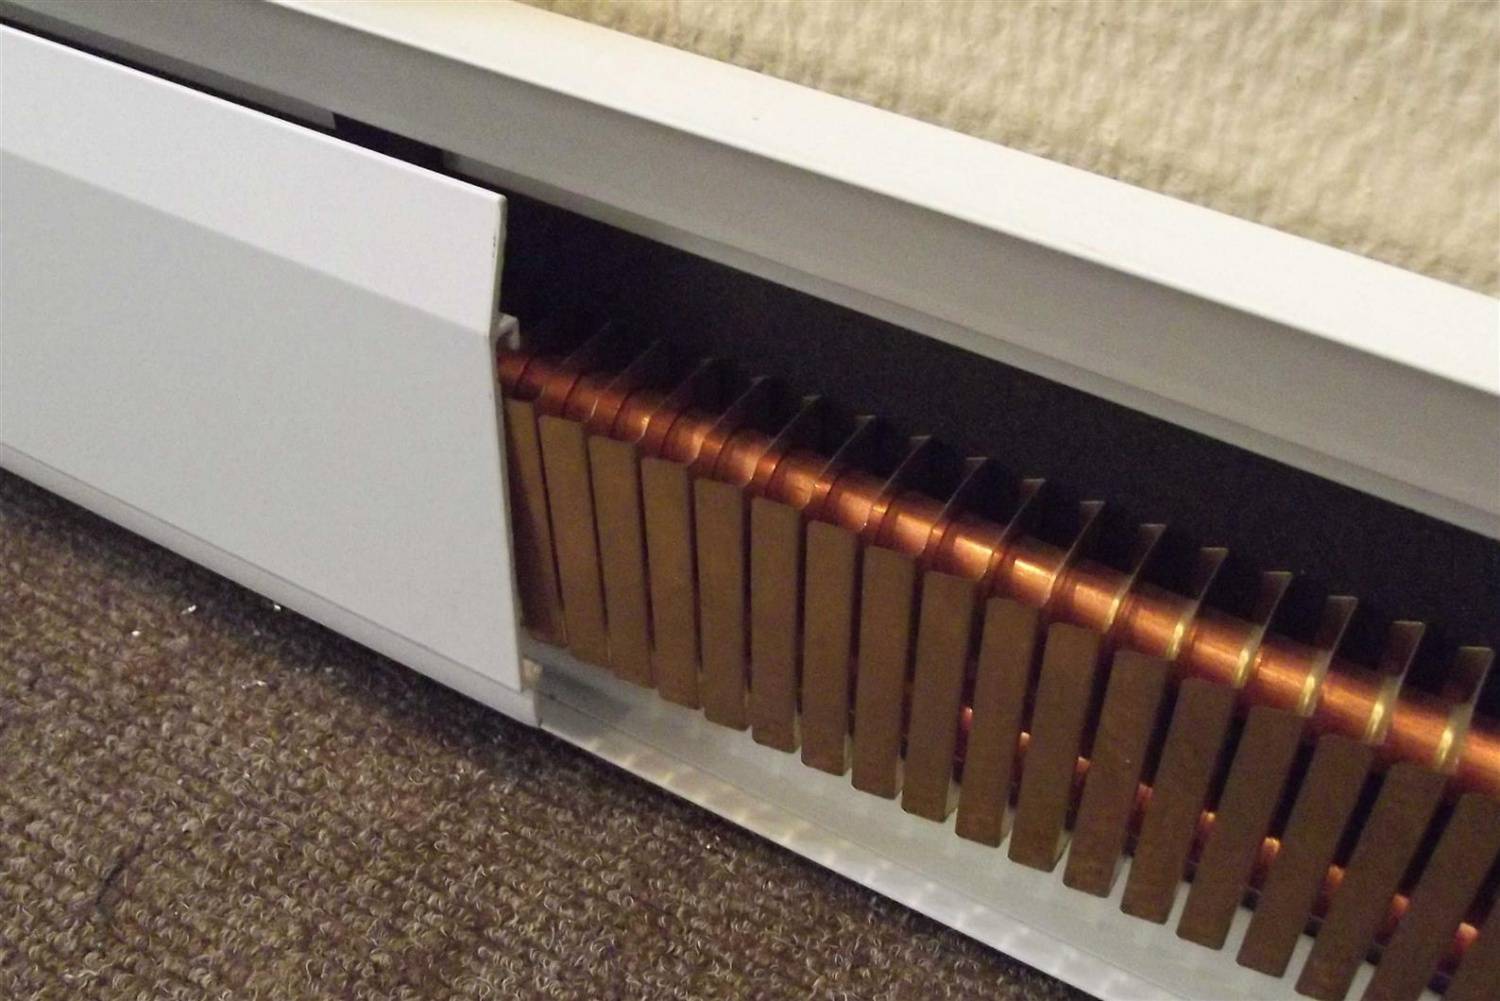
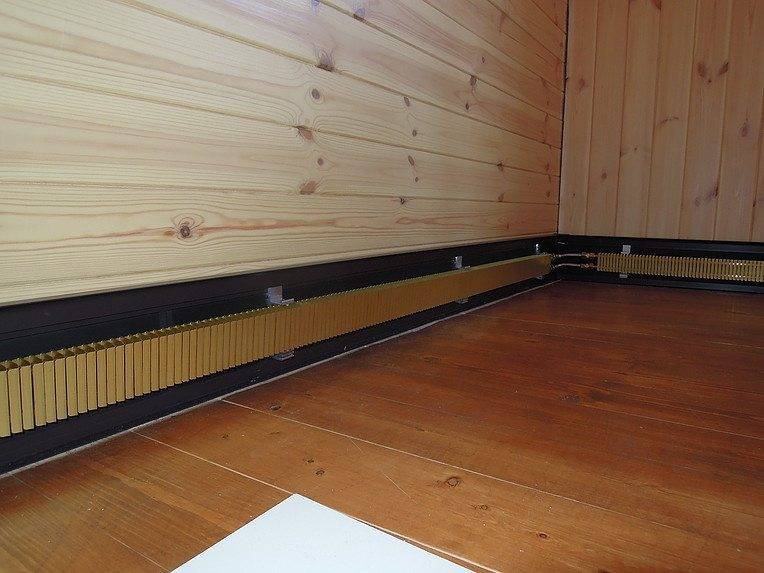
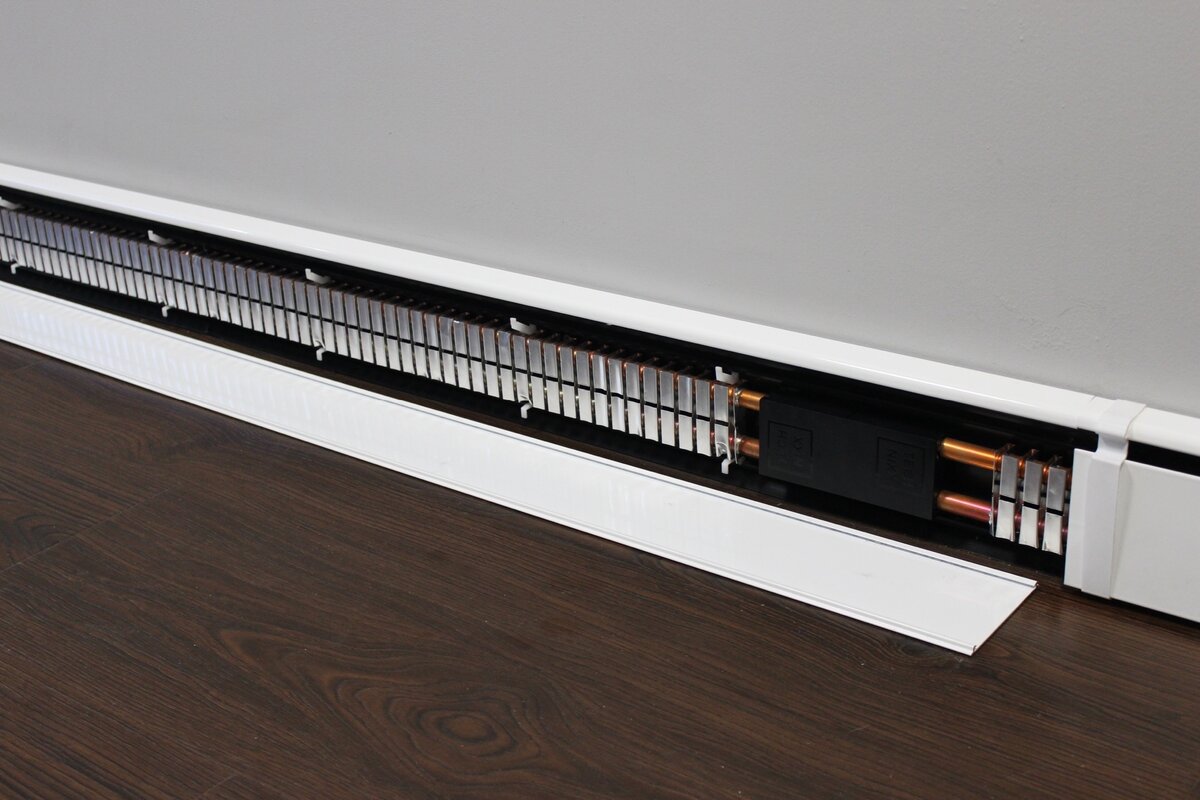
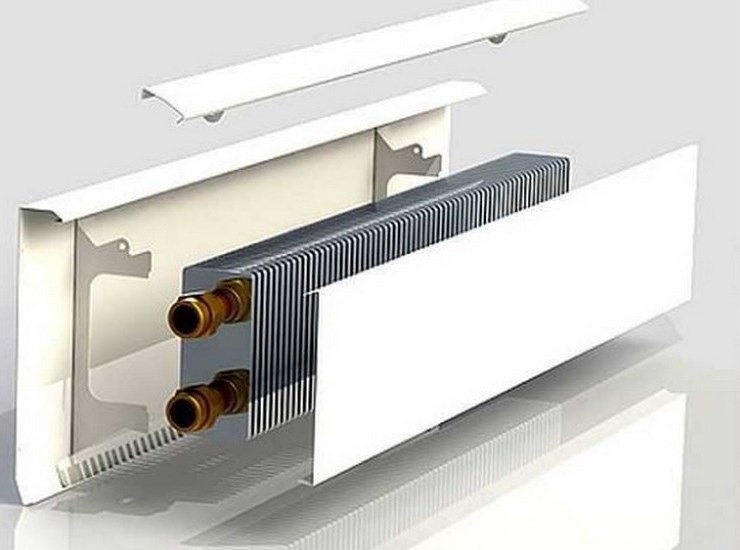
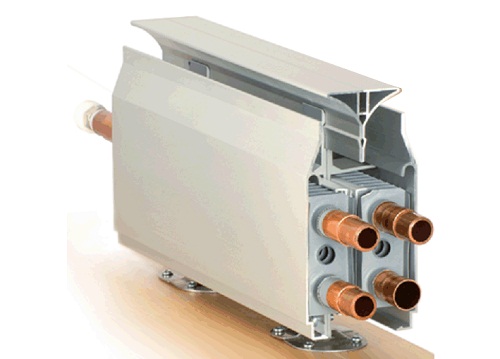
Heating skirting boards are small heaters installed around the entire perimeter of the floor. The main difference between the type of baseboard heating is the peculiar design of the heating parts and the unusual location. Long and low radiators are located on the floor surface.


It is easy to mount such a system with your own hands. It has free access to individual elements for timely maintenance. The innovation may well compete with the usual heating system.
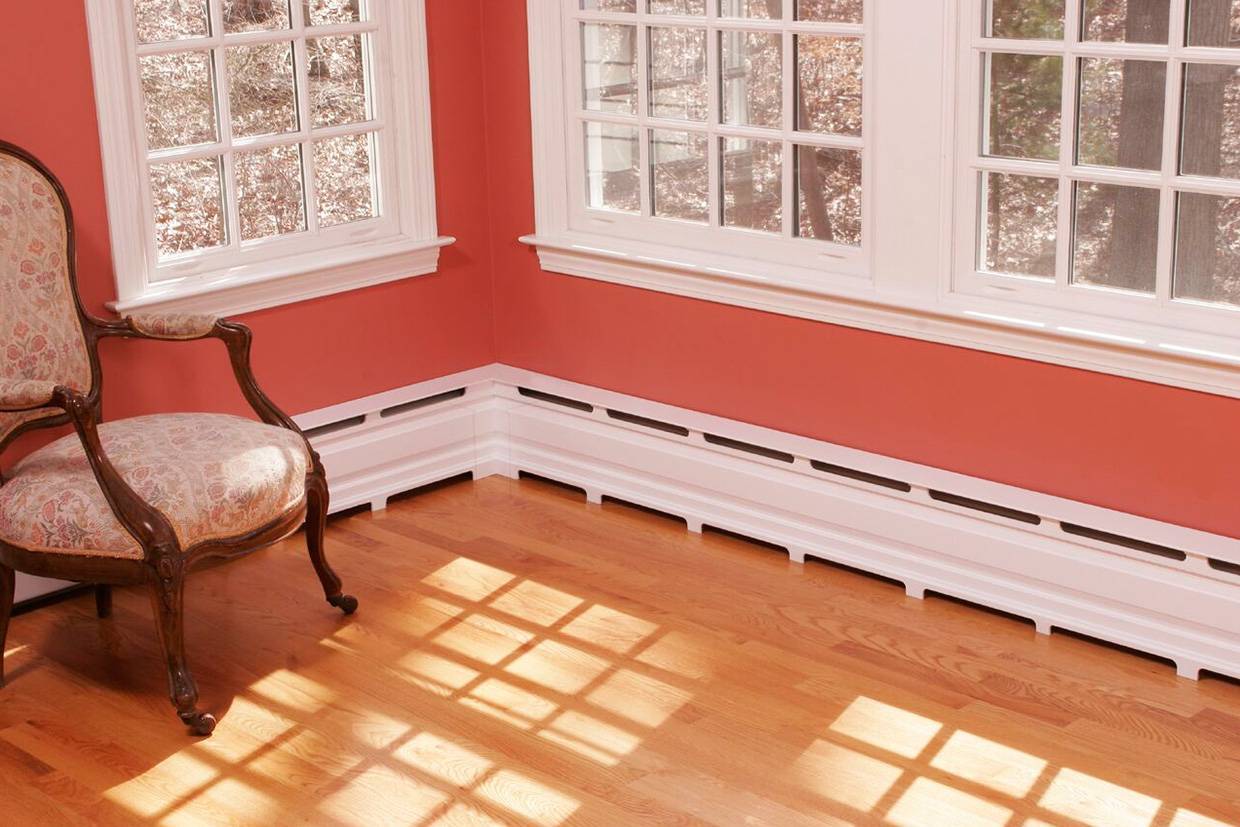
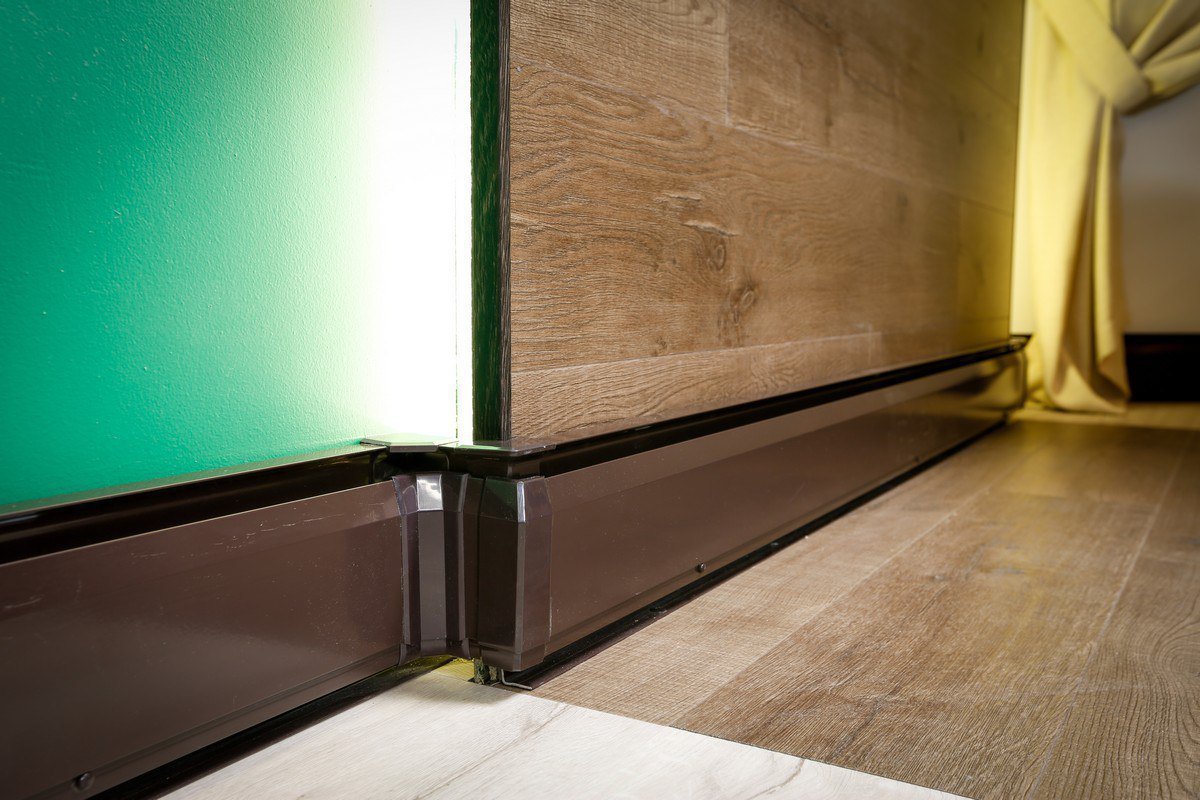
Heating devices are covered with a decorative strip, similar to a regular plinth. From that and the name - a warm plinth.

The principle of operation of the baseboard heating system
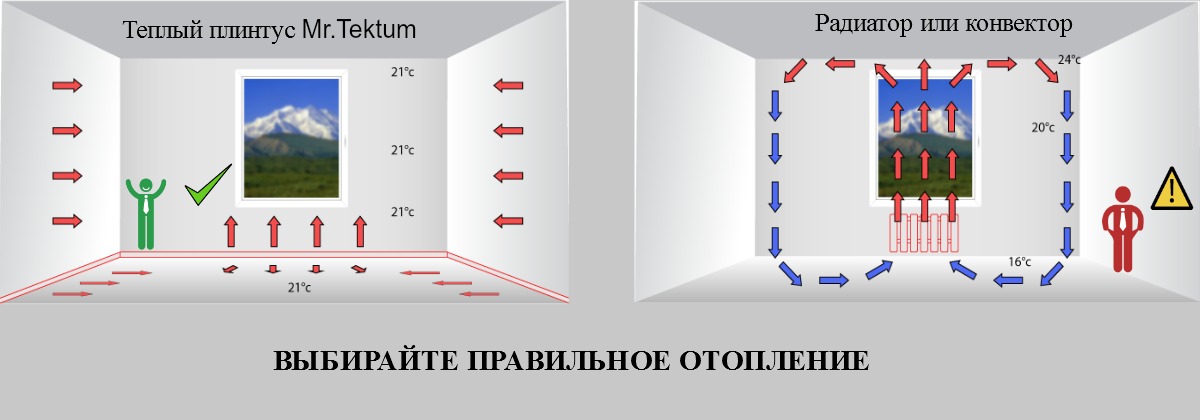
The principle of operation of skirting radiators is based not on air convection, but on the Coanda effect. Its meaning lies in the fact that a zone of low pressure arises near the surfaces, which is due to the free access of air from only one side and impermeability. A stream of air spreads over a large area, which develops only along the surface.
In the box, which is formed by aluminum slats, there are two horizontal holes along the entire length - near the floor and closer to the wall. The cold air flow enters the box, heats up and rises. So, air spreads over the surface of the wall. Due to this, infrared heat is distributed evenly over the material of the wall, thus heating the room and providing it with an optimal temperature, the same at the top and bottom of the room.
The principle of operation of baseboard heating
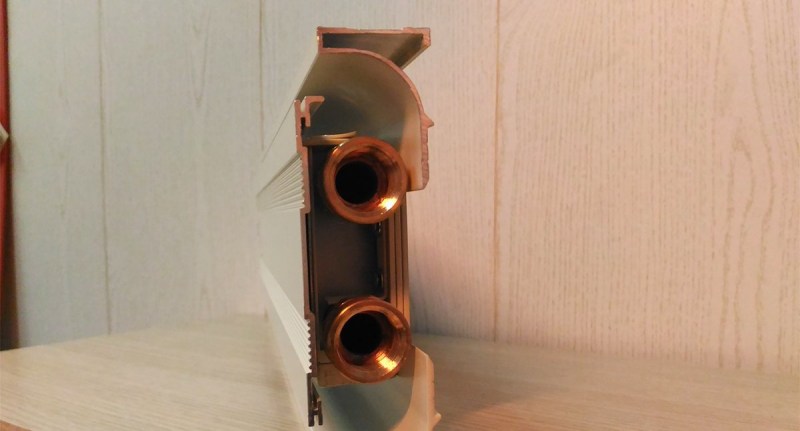
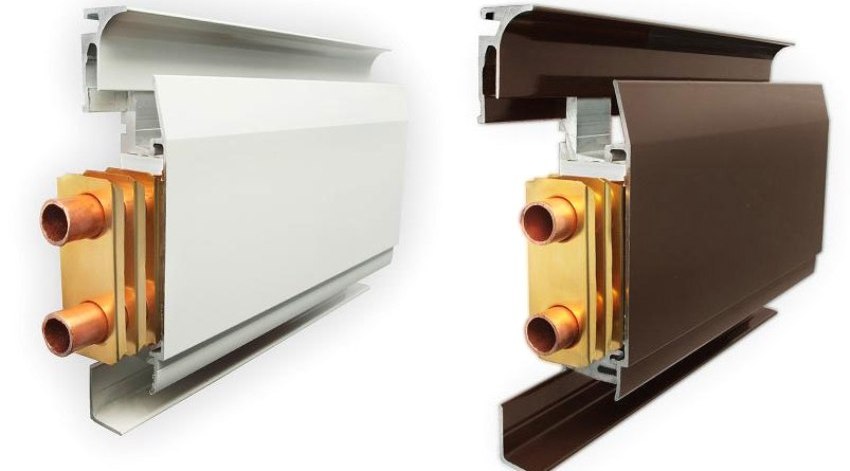
Since convection does not take part in the operation of such heating, there is no need to overheat the heat carrier.The baseboard type heating system uses in the constructions such materials that have good heat conductivity - aluminum, copper, etc.
Installing the baseboard heating system yourself
A baseboard heating system is installed in much the same way as a traditional heating system. The difference is only in different nuances. Of course, it is better to entrust such serious work to professionals, but if you do not want to incur extra financial costs or like to make repairs yourself, then you can do everything yourself. The process of installing baseboard heating consists of the following steps:
- wall plate installation. Such a bar is placed above the floor and fixed to the wall with self-tapping screws or dowels;
- installation and connection of individual convector modules into one system. For this, special crimp fittings are used;
- connection of the system to the heating main. This is done by the distribution manifold;
- system health check. Before closing, be sure to check the system for leaks;
- covered with a decorative panel.
Installation of a warm plinth
Advantages of baseboard heating
The positive properties of baseboard heating include the following points:
- lack of convection effect, which is usually accompanied by dust suspension;
- the presence of infrared heat, which is perceived positively by our body;
- heat is distributed evenly;
- heat does not accumulate near the ceiling, but the temperature is the same throughout the room;
- the problem of deposition of moisture on the walls and ceiling is removed, which would normally lead to mold;
- fast installation;
- there is no need to overheat the heat carrier, which will save resources;
- all elements of the system are suitable for repair, thanks to which it is possible to carry out repairs without opening the floor and walls;
- thanks to special thermostats, you can set the required temperature for each room separately.
We also note the fact that a baseboard-type heating system can also be used for cooling rooms. To do this, you just need to fill it with cold liquid.
Here it is important to keep the temperature of the liquid at a level that exceeds the dew point in certain conditions, since condensation will appear on the circuits.


Disadvantages of baseboard heating
Among the negative aspects in the arrangement of the baseboard heating system, one can single out such as:
- rather high initial cost, which also includes expensive installation. You can make plinth heating with your own hands, but the price of the elements of the heating system is due to the high cost of the materials from which they are made;
- you can not install different decorative overlays on the radiator, as they can significantly reduce heat transfer;
- radiators must fit very tightly to the wall, which often leads to warping of the film finish of the walls of the room;
- the room in which heating is installed with a warm baseboard must be kept more free, do not block the baseboards and walls with cabinet furniture. This may affect the heating efficiency.
Plinth type heating is not very decorative
5 Applications and design variety
This type of heating is not used very often, but quite widely.It can be used in greenhouses, and winter halls, and in crowded places - for example, in swimming pools, concert halls, gyms, museums.

This technology is also suitable for use in private homes. It is indispensable for owners of corner and end rooms, especially those prone to wind blows. You can install it in high-rise buildings on loggias or balconies.
Best of all, it manifests itself in rooms where the ceiling is very high. If you use a traditional heating system, then all the hot air will go upstairs, and it will be cool downstairs. This is easy to fix with the help of heating in the baseboard.
Heating system installation
Choose the right power radiators. We advise you to take devices 10-20% more powerful than indicated in the table, this will provide a reserve for the winter cold.
Nothing prevents you from installing baseboard heating with your own hands, no matter what the experts say - there is nothing complicated about it. And the assertions that good specialists will make the system more economical and efficient can also be questioned. The main thing is to correctly calculate the power of radiators based on the standard formula - for every 10 square meters. m. of living space requires 1 kW of heat.
Pipes for baseboard heating are laid under the floors, reaching the places where the initial sections of each of the circuits will be located (one or two circuits for each room, depending on the size). Installation of radiators is carried out in accordance with the instructions - first, a layer of thermal insulation is attached, on top of which the base of the decorative box is located. Next, pipes are laid and the radiators themselves (diffusers) are attached. At the last stage, the system is checked for tightness.
Electric convectors for baseboard heating systems are laid in a similar way. It is mandatory to use protective devices for each circuit. The wires must be laid in such a way as to avoid damage - for this they can be pulled in plastic pipes laid in the floors.
Installation of a warm plinth
For installation, you will need a tool: adjustable wrenches in a set, a drill with an impact function (or a puncher), a hammer, wire cutters, pliers, scissors (to cut plastic). The plinth heating system is quickly mounted if the connection points are prepared in advance.
Even before purchasing the necessary equipment, you need to plan what power the heating elements need and how to place them around the perimeter of the room.
Assembling the water heating system
Stage 1. We measure the distance from the point where the distribution manifold will be located to the location of the plinth. We cut off two lengths of the protective pipe and two with an allowance of 20 cm - connecting. We insert the connecting one into the protective one, clog the ends with adhesive tape to protect against dirt.
Mounting baseboard heating water system: red - main stream, blue - reverse. The return pipe must be higher
Stage 2. We pull the pipes along the floor without tension so that, if necessary, an extension can be laid next to one or more. We fix it with mounting tapes, cover it with a protective solution, protecting it from damage, and display it in the right place on the wall 6 cm above the floor and 10-15 cm from the edge of the wall or corner, fix it with cement.
Stage 3. After laying the final floor, we continue to work. We glue the insulating strip along the entire length.We stretch the aluminum edge (also along the entire length of the heating), closing the junction of the wall and floor. We screw it or fix it with adhesive tape, silicone.


Stage 4. We lay a special profile along the top line, put holders on it at a distance of 15 cm from the corners and every 40 cm along the wall.
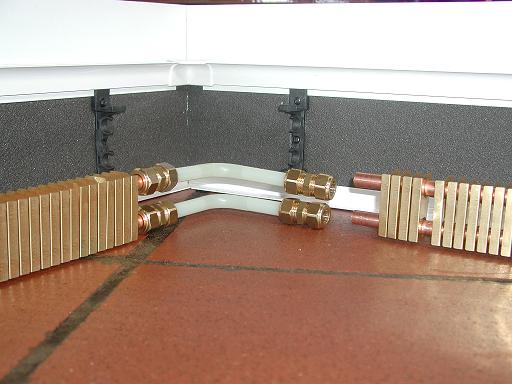
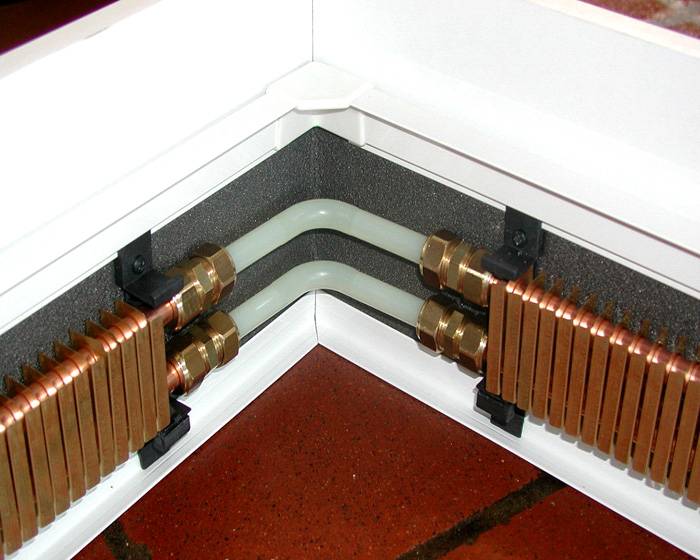
Stage 5. To connect the heating pipes and heating elements, we use couplings with nuts, bushings and gaskets, in the corners - 90º angled swivel tubes, at the ends - 180º end swivel tubes and plugs. Thermosections are interconnected by adapters.
When connecting the heating module, it is necessary to remove 2-3 lamellas from the edge and put connecting nuts, crimping parts, rubber gaskets on the tubes
Stage 6
The connected heating sections are carefully pressed into the holders. We put on decorative panels (we attach with screws or snap them in) and decorative corner elements. We connect the system to the collector, fill in water, test at operating and maximum pressure
The plinth will work if all technological operations have been performed without violations. When leaking, problematic connections must be squeezed with a wrench. The coolant is supplied through the collector by a circulation pump from the boiler or from a common (centralized) heating system.
Assembling the electric heating system
For warm skirting board in electric shield must be made a separate circuit breaker. Its power is determined by the number of heating modules.
Stage 1. We supply power to the junction box, which should be near the location of the system at a height of 4-6 cm from the floor.
Installation of an electric heating system: most often, an electric system is used where it is possible to supply power of the required power, or in small rooms as additional heating
Stage 2. We stick an insulating tape on the wall.
Stage 3. We install the lower aluminum profile (edge) and the upper one, on which we place the holders at the same distance as for the water system - 15 cm from the corners and in increments of 40 cm along the wall. We install a remote thermostat. It should be located at a height of about 1.5 m opposite the system modules and at a distance of at least 2 meters from them.
Stage 4. We insert the electric heating elements (heaters) into the lower pipe of the heating module, fix the modules in the holders so that they do not touch the wall. The electrical contacts of the heating elements have a thread, two nuts, a retaining ring on a spring, a heat shrink tube for additional insulation. The modules are connected in parallel with a heat-resistant power cable coated with silicone and heat-resistant up to 180°C.
Stage 5. From above we close the system with a plastic box.
To connect the heating modules, a 3-core cable is used: brown core - phase, blue - zero, green (yellow) - ground. It is necessary to ground the cable
Connecting the installed heating system to the power supply is best left to an electrician. He will check the reliability of the insulation with measuring instruments, supply electricity and adjust the thermostats.


How to make a warm skirting board with your own hands
Even Russian-made this pleasure is not cheap. But what if you want to try such a system, but there is not much “extra” money? Do it yourself. There are two working options.
Option one
Unannealed copper pipes with a diameter of 12 mm, sheets of roofing copper 0.4 mm thick were used. The order of work is as follows:
- Cut a strip of roofing copper (60 cm) with a grinder into strips of 15 cm.
- Flange the edges of the strips in full length at an angle of 90 o and a flange length of 7-8 mm. The length of the strips is not more than 3 meters - it is inconvenient to work with large pieces.
- Solder copper tubes to the back of this plinth. This requires solder (plumbing, containing 3% copper) and a burner. While soldering, point the torch at the tube: the strip is thin and will warp if it overheats. The tube can withstand heat well.
- Bend slightly at the ends of the tube before soldering. So it will be more convenient to put adapters on them.
- Oil-and-petrol resistant hoses were used for assembly, which can withstand working with coolant up to 120 o C (inner diameter 12 mm). At the junctions with the pipe, they were fixed with ordinary clamps.
- To regulate the temperature, a thermostat with manual adjustment by Giacomini is installed.
- The junctions are closed with similar inserts/plinths made of copper, but without pipes.
- The panels are attached directly to the wall using standard mounting clips (for pipes). Do not insert them into the recesses - most of the heat is lost.
Such a system has worked in a wooden house for 9 years. There were no problems or the need for repairs. The temperature of the coolant at the inlet is from 50 o C to 70 o C. In the room 20-21 o C when it rises, it is too hot.
Look in the video about the features of installing a warm skirting board. Might be helpful.
Second option
In this case, do-it-yourself aluminum profiles were used to make a warm plinth for working with drywall.Holes are cut (propylene) in them by a grinder at the top and bottom, after which they are attached to the walls. Two copper pipes are laid on a thin ceiling aluminum profile, screwed with aluminum wire. This whole structure is laid inside and fixed to the wall so that the pipes are one above the other. The assembly of pieces of such a home-made plinth was carried out by welding with copper pipes and fittings. "Front panel" - the same profile, only painted with paint for radiators to match the walls (floor). This homemade warm baseboard is less effective, more difficult to clean, but also very efficient.
“I have such a skirting board at home. In addition to underfloor heating. I also recommend you install it. A warm skirting board does its job well. Of course, it cannot be compared with warm floors in terms of power, but still there is tangible heat from it.
“I bought 9 m 2 “Megador” 600 W in the bedroom. At first it worked at full power, and now we set it to 200 watts to maintain 20 degrees. This is enough for my area, we don’t need a higher temperature, we don’t like it. And at the same time, on the wall where the heater is located, our ventilation hole is almost always ajar. I'm satisfied."
As you can see, reviews of warm skirting boards are positive. This is no wonder: heating is efficient, comfortable, and even unnoticeable. Only the high price spoils the picture, but there are options for making it yourself.
Like everything new, the plinth system has many critics-theorists. Their main thesis: “It is foolish to heat the walls in order to heat the air later. It is better to directly heat the air, and then start heating the walls. ” The point of view is understandable. It is she who is used for convector heating. But the result and its shortcomings are known to all.And for the effectiveness of heating the walls, an experiment was carried out: in one room the air was +12 o C, and the walls were heated to +37 o C. And the people in it were sweating. In another, the air was heated to +40 o C, and the walls were cooled to +12 o C, and people were freezing.
6. Do-it-yourself installation of a warm plinth
In addition to the high cost of the system itself, you still have to pay a tangible amount for its installation. In this case, the calculation is made for each running meter. Based on this, many people have a question - is it possible to install a warm baseboard system on your own? We can say that if you have the skills to work with electrical wiring and plastic pipes, as well as with due attention and legibility, this is not so difficult to do.
Self-installation of a warm water skirting board
To carry out the work you will need the following materials:
- metal-plastic pipes;
- Thermal insulation material;
- Collector equipped with taps;
- Metal and plastic adapters;
- Set of tools.
Installation should begin with the installation of the collector. It is necessary to bring a pipe to it, which will provide its power. A boiler operating on any type of fuel can be used as a source of heat carrier. The only condition is that for the correct operation of the system, it is necessary to provide a pressure of at least 3 atm. After you calculate the required length of the plinth according to the recommendations from paragraph 6, you can start laying pipes.
It must be remembered that the maximum length of the circuit should not exceed 12.5 or 15 m, depending on the manufacturer
And that there should be two pipes in the system - one for supply, the other for the intake of coolant;
It is also important not to forget about thermal insulation in order to reduce heat loss. To do this, special material must be laid along the perimeter of the room between the wall and the pipes;
Now you need to screw the base to which the heat exchangers will be attached.
The plank is fixed with self-tapping screws
Please note that when finished, the plinth should not fit closely to the floor. Leave a gap of about 1 cm to prevent the appliance from overheating;
Now fix the modules and connect them together using compression fittings;
When the structure is assembled, you need to connect it to a common line by mounting a collector;
Be sure to check the system for leaks before final assembly.
To do this, a trial run is performed, which at the same time will show the correct operation;
If the system works reliably, fix the front panel to the plinth. It is very easy to do this by following the instructions in the instructions.
Self-installation of electric warm plinth
Installing an electric skirting board requires very different skills and attention to slightly different factors. It is recommended to connect the system directly to the shield and equip it with a separate machine. How many contours will be in your apartment or house, there should be so many separate lines. Choose wires with a large cross sectionthat can definitely withstand the load (at least 2.5 mm). Do not forget about the need to connect a thermostat for each circuit and a temperature sensor for each room. This will help set the most optimal temperature for each room.


- The beginning of the installation should begin with the laying of thermal insulation material;
- Then screw the base of the plinth;
- Fix heat exchangers on it;
- Make a parallel connection of wires;
- Perform a thorough visual inspection for the absence of non-insulated areas;
- Close the structure with a front panel;
- Connect the heating circuit to the thermostat and connect to the switchboard;
- Perform a test run of the system.
The gap from the floor to the baseboard should be at least 1 cm, and the distance from the wall should be at least 1.5 cm. This will ensure proper convection and protect the system from overheating.
Installing a water plinth
Having prepared a set of necessary tools, you can begin to install a warm water plinth with your own hands. First you need to lay pipes for supplying coolant. Installation starts from the corner where these tubes go. To simplify the process, we have prepared a detailed step-by-step instruction:
- Install the bottom bar.
- We eliminate the gap between the wall and the bar with a sealant.
- We fix the bar with connecting materials.
- We glue heat-insulating material on the wall.
- The excess is cut off with a knife.
- We measure the required height of the plinth.
- We install the first holder at a distance of at least 15 cm from the corner.
- The remaining holders should be installed at a distance of 40 cm from each other.
- We fasten the holders to the wall. If the material allows, then this is done with self-tapping screws. Otherwise, for each holder, it is necessary to mark the places for drilling, drill holes, install dowels in them, and only then screw the holder.
- Similarly, we attach the rest of the holders to the wall.
- We carry out the installation of all planks and fasteners in those parts of the room where a warm baseboard will be installed.
- We install the necessary decorative elements and adjust the holders.
- We lay out the radiators on the floor and measure the required distance.
- If some areas of the room are shorter than the length of the radiator, it can be cut off and some links removed to simplify the work.
- We start connecting the system from the place where the coolant is supplied. We put on fittings and gaskets for connection.
- We connect the radiator to the coolant supply system.
- Tighten the fittings with wrenches.
- We fix the radiator on the holders.
- We connect the radiator sections to each other, having previously installed the connecting elements.
- At the end sections, the radiator tubes are closed with swivel hoses.
- After completion, the first start-up of the system is carried out, and the presence of leaks is checked. If they are found at the junctions, they are eliminated by tightening the keys more tightly.
- If the commissioning work has shown the system to be in good condition and ready for use, you can complete the work by installing a decorative front panel.
- A heat-insulating tape is glued to the inside of the decorative element. It prevents overheating and promotes the release of heated air.
- The front panel is attached to the prepared base.
- For reliability, it must be attached with self-tapping screws.
- The protruding parts of the screws are hidden under the plugs.
It seems that the procedure is too complicated, but in fact, every person who previously used wrenches and a screwdriver can handle it.
A detailed analysis of the preparatory work and installation of the plinth can be seen in this video:
Mounting
If the installation is carried out by a professional, then, as a rule, he will make the optimal calculation of the required system power
If this work is carried out independently, it is necessary to pay special attention to calculating the required number and power of heating elements, so that later in winter it would not be painfully cold. To do this, it is necessary to roughly estimate the possible heat loss due to the thermal insulation of the walls, the tightness of the windows and the severity of the climate. The more favorable the conditions, the lower the heating costs.
For example, a room with standard ceilings of 2.5 m and an area of 20 square meters, subject to the presence of double-glazed windows and good overall thermal insulation, can be easily heated by a 1 kW device. This is about twice as profitable as conventional convector heaters.
In terms of installation, the system of electric skirting boards is many times simpler than the warm floor familiar to everyone; its installation does not require capital construction work. Its installation is so simple that anyone who knows how to hold a puncher, hammer, level and tape measure can handle it. Due to the compact dimensions and low weight of the elements, they can even be placed on plasterboard or plywood partitions.
The delivery set of the device, as a rule, includes consumables in the form of self-tapping screws and brackets for fasteners. In terms of placement of devices, there are no special restrictions and rules; heating elements can be mounted in a continuous line around the entire perimeter of the room or to save money where they are most needed. At the same time, thanks to the ability to decorate parts of the system as you like, they can easily be combined with a regular skirting board without heating elements.
Proper installation of the unit provides for the installation of elements along the walls according to the level, at a height of about 1 cm from the floor, with a gap of 15 mm from the wall.It is necessary for the circulation of air masses, preventing excessive heating of the heating element.