- Installation of a water-heated floor without a screed
- Foundation preparation
- Subfloor installation
- Laying waterproofing material
- Lag installation
- Installation of thermal insulation
- Installation of waterproofing
- Substrate preparation for pipes
- Circuit setting
- Connection
- Laying underlay for finishing coat
- Floor covering installation
- Features of the water heating device
- Requirements for installing underfloor heating
- Features of the installation
- Rules for the device cable version
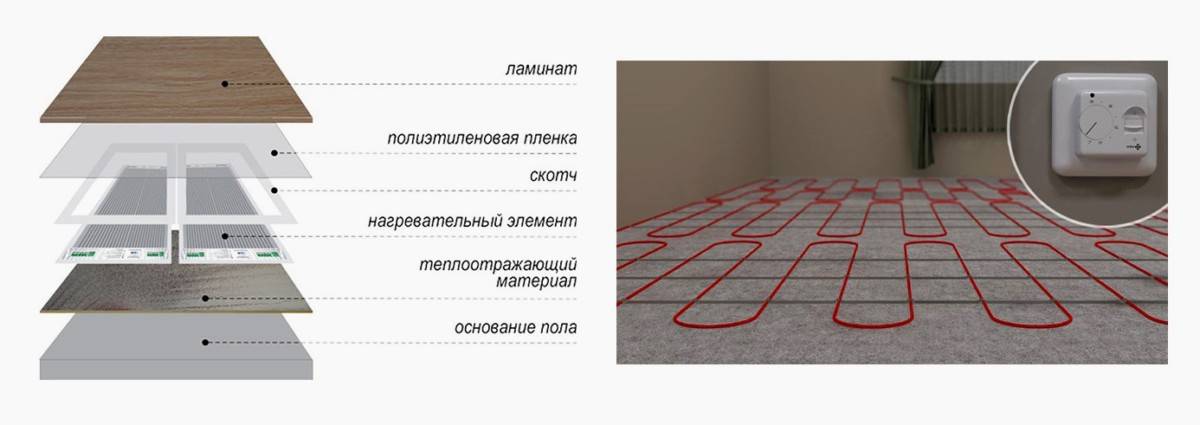
- Installation of infrared film floor
- Floor water heating system
- Pipe selection and installation
- Installing a wooden underfloor heating step by step
- Mixed method of installation of wooden underfloor heating
- Water floors in wooden houses
- Features of heating a wooden floor
- How can you make a base?
- Technology of laying wooden structures
- Ready-made polystyrene mats and chipboard modules
- Flooring
- Flooring with guides
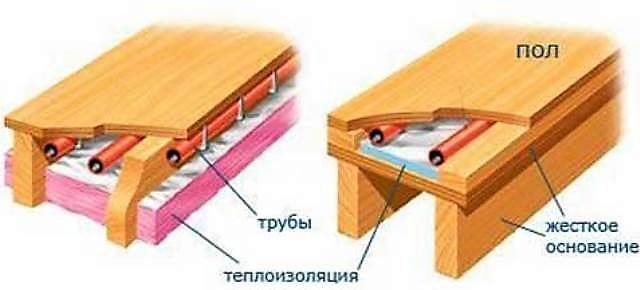
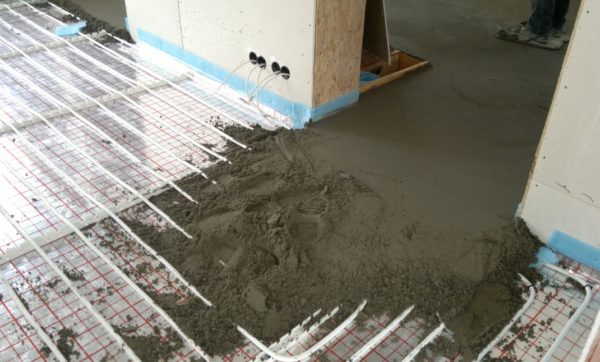
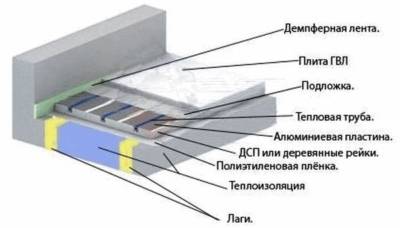
Installation of a water-heated floor without a screed
Most
common method to do water heated floors in a private house with
wooden floors are flat - without screed. The bottom line is
laying pipes between lags or on draft boards.
Before starting work, you need to prepare a tool and buy material. In addition, you should prepare a contour laying scheme: “snail” or “snake”.
If you decide to make warm water floors with your own hands in a private house in a screed - see this article, in it you will find a step-by-step installation of how to install it yourself.
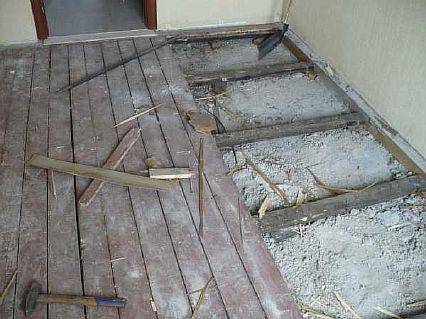
Foundation preparation
Feature Mounting
warm water floor in a house with wooden floors, which
operated for a long time, is to assess the condition
floors. If the building is new, then these steps are not required.
The assessment consists of
inspection:
- beams - determine the degree of strength;
- floor - for cracks;
- bases - to identify differences
(allowable no more than 3 mm).
If necessary
it is necessary to replace rotten beams, dry the wood, smooth out irregularities on
surfaces and seal the cracks with sealant. Then, treat the wooden floor
antiseptic.
If the foundation itself
outdated, then it needs to be dismantled and a new one built.
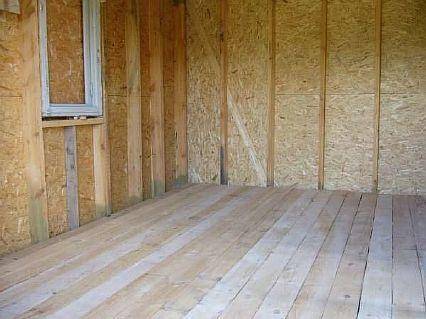
Subfloor installation
For the prepared
a flat base is mounted a draft floor made of wood of any kind, most importantly, do not
allow gaps to form. The boards must have a thickness of 20 mm, they are fixed
to the base with self-tapping screws.
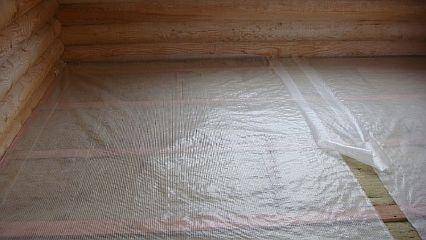
Laying
waterproofing material
A hydro-vapor barrier film is spread on the floor, ordinary polyethylene will not work, as condensation will form.
The product is laid with the membrane side down, with an overlap of one sheet on the other - 10 cm, and is interconnected using double-sided adhesive tape.
Lag installation
Installation process
you should start by fixing the corners. They are fixed on opposite
walls with a step of 60 cm. Logs are installed on the corners and aligned along
horizontal, parallel to the raised floor.
Installation of thermal insulation
As
thermal insulation material, you can use mineral wool in slabs or
basalt insulation. During the laying process, deformation of the plates must not be allowed,
otherwise they will partially lose their heat-shielding properties. The material is laid
between the lags, a layer of 10 cm.
Installation of waterproofing
The second layer of waterproofing is mounted. The polyethylene film should be laid on the logs in a stretch, it should not sag, and is fastened with a stapler to wooden beams.
Watch the video
Substrate preparation
under the pipes
across the lag
slats 2 cm thick are nailed, with an indent from the walls of 30 mm. Between them should
be grooves, their size depends on the pipe laying step, standard - 20 mm. Metal grooves are installed in these grooves.
plates in which water heating elements will be mounted.
Possibly replace
aluminum plates on the foil, which should be wrapped around the pipes before
put them in grooves. One end of the foil must be fixed with a stapler to the rails.
Circuit setting
Into the grooves, on the mounted
reflective profile, heating circuit pipes are laid. To make a turn
pipes, it is necessary to shorten the board from the end in this area by 10 - 15
cm.
Connection
There are a few
ways to connect the water circuit. The easiest is through the taps to the central
heating, this allows manual control. To connect to
home heating system, you need to install a pump.
Laying the substrate for
finish coat
as flooring
gypsum fiber boards or chipboard sheets can be used. They must be completely
cover heating elements that are well recessed in the grooves.


Floor installation
coatings
The final layer of the "pie" is the planned floor covering, it can be tile, linoleum, laminate. The main thing is that it is combined with warm devices.
On this, the process
installation of a water-heated floor on wooden floors without a screed is completed.
Despite the complexity of this method, it is popular because
less dirty and dusty, and does not create such a load on the floors.
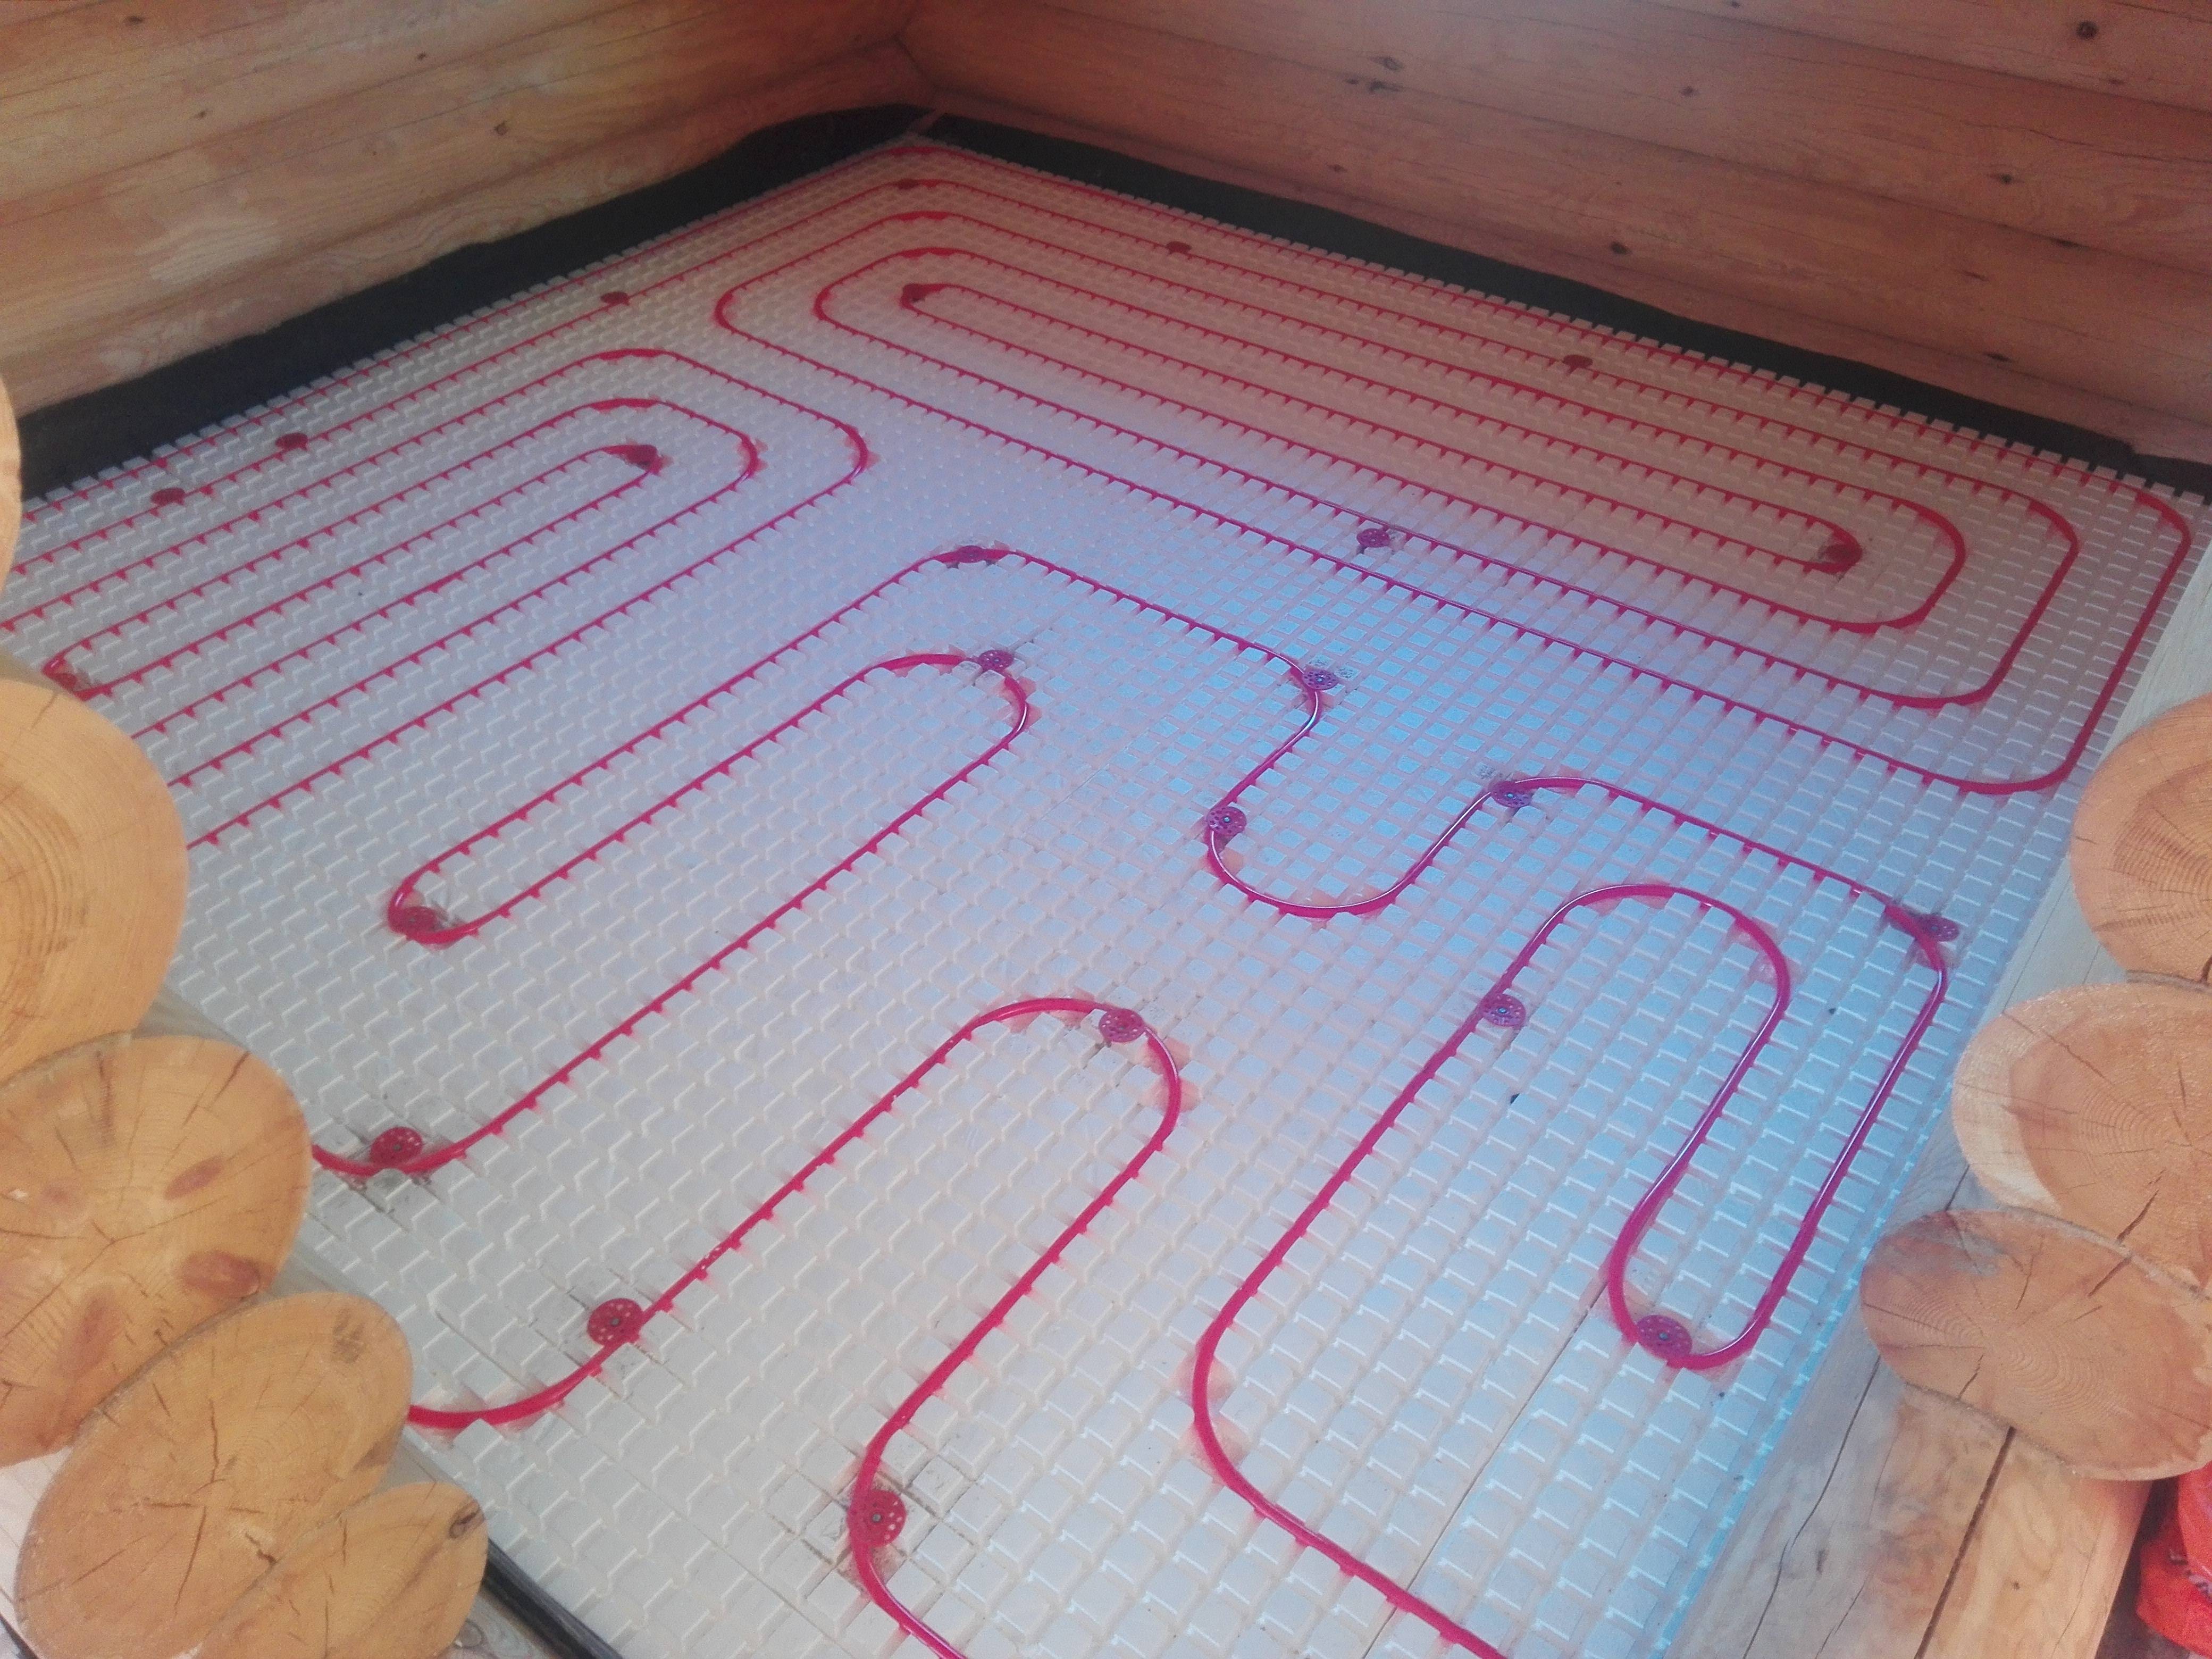
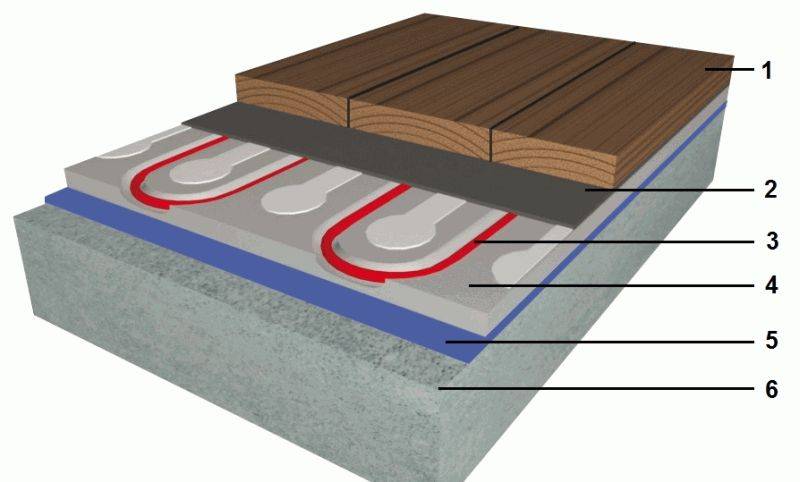
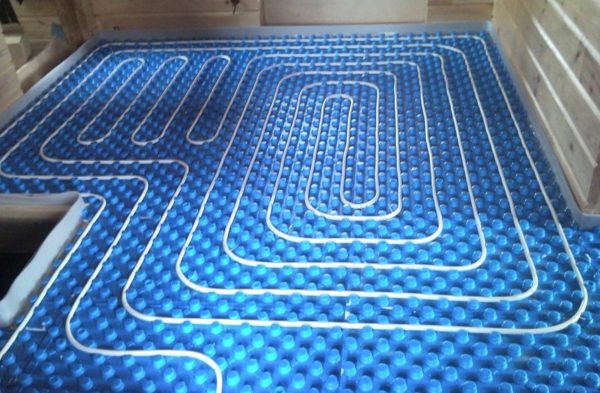
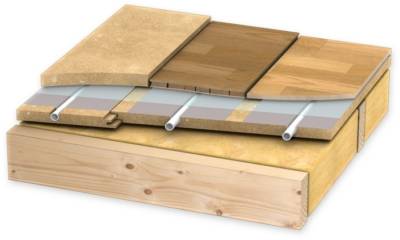
On the prepared rough base are laid
foil-coated polystyrene boards, they serve as hydro and
thermal insulation, pipes are mounted and fixed with bosses, placed on top
plywood and flooring.
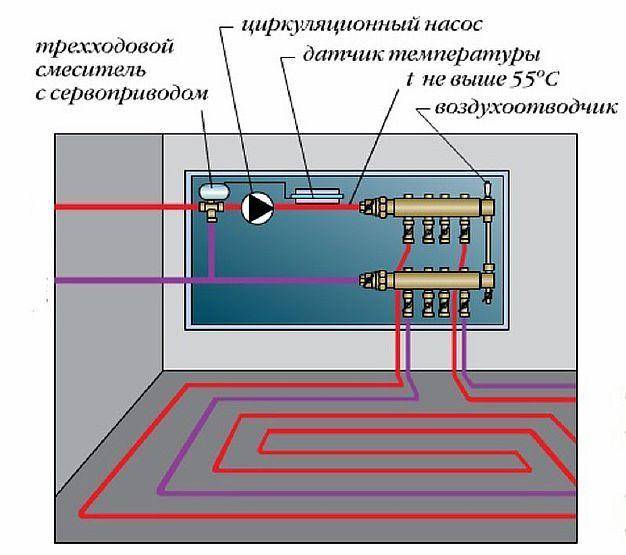
Features of the water heating device
Underfloor heating is a system of pipes laid according to a scheme convenient for the owner of the house. A heated coolant moves through them from the boiler. Its temperature is controlled by thermostats. The cooled coolant returns to the boiler, and the process resumes.
Different coolant flows are combined with the help of collectors - heating control units. The components of the system largely depend on the installation scheme of the underfloor heating pipes and the features of connecting the circuits in the collector.
As a rule, you have to buy circulation pumps, various types of valves, equipment for automating the operation of the heating system. If the pipes are laid under concrete, then additional building materials, reinforcing mesh will be required.
Especially carefully you need to choose pipes, because. the service life of the system depends on their quality and reliability. Usually metal-plastic and PVC pipes are used. Both types of products are durable and practical, but in most cases, homeowners prefer the first option.
Metal-plastic pipes are considered more reliable. They bend well and take any shape.
An important advantage is the reasonable price. Since for heating 1 sq.m.
floors need at least 6-7 meters of pipes, their cost significantly affects the total cost.
A detailed device of the underfloor heating system is described in the video below:
Requirements for installing underfloor heating
- Before starting the laying of pipes, it is necessary to carefully prepare the base. The surface must be perfectly flat, which will ensure uniform heating of the floor and, accordingly, the premises in the future.
- In addition to the materials necessary for the installation of the system itself, it is necessary to purchase thermal and waterproofing. It is laid on the subfloor before laying pipes.
- Laying loops are made with a single pipe with a section of 16, 17, 20 mm. This is necessary to prevent leaks at the joints.
- If a warm floor is mounted under a screed, then the start of the system should be postponed until the material has completely solidified - 4 weeks. After that, the system is started, and the temperature of the coolant is gradually increased. It will take 2-3 days to start the system at full capacity.
- The design temperature of the outer surface of the floor is regulated by SNiP 41-01-2003. It should average 26 degrees for rooms where people are constantly staying, and 31 degrees - where people are not constantly present and there is a need for a special temperature regime.
- The maximum coolant temperature is 55 degrees. The system must be designed and installed in such a way that there are no significant temperature differences in individual areas of the floor. The allowable difference is 5-10 degrees.
The thickness of the thermal insulation layer depends on the calculated thermal load. The larger it is, the thicker the heat-insulating layer should be.
Arrangement methods - concrete and flooring
The concrete installation method is reliable and efficient, because. the finished system is characterized by the best heat transfer, which completely covers the heat loss. Heating operation in a wide temperature range is possible.
The concrete system is capable of withstanding loads of 500 kg per 1 square meter, which allows it to be installed in any type of premises, including residential and industrial. Its service life can exceed 50 years.
The flooring method is used if the pipes are mounted under a wooden or polystyrene coating. Installation is carried out without "wet" processes, so that work can be completed faster, because you do not have to wait for the building mixtures to dry.
First, hydro-, thermal insulation is laid, the perimeter of the rooms is trimmed with adhesive damper tape. When calculating the thermal insulation layer, all heat losses must be taken into account. Insulation is mounted on the entire surface of the floor
The pipes are laid on top of the thermal insulation, fixed with brackets, dowel hooks, clamps or fastening strips. The ideal option is to use ready-made heat-insulating plates, in which fasteners are provided in advance.
A reinforcing layer is laid on top, after it - a carrier one. As a topcoat, it is best to choose ceramic tiles, natural or artificial stone, laminated parquet.
As a result, a heating "pie" is obtained, the thickness of which can reach 10-15 cm, depending on the pipe section, the thickness of the layers of thermal and waterproofing, and the finishing coating.
Features of the installation
Having learned how much it will cost to make a warm floor, many people think about how to do this work on their own. There is a rational grain in this desire, but in reality one will have to face rather difficult tasks of a technical nature that will require both knowledge and practical skills. Due to the technological differences between different types of underfloor heating, their installation is also different. We offer to understand the features of arranging a warm floor in each case.
Any of the above systems will consist of heating elements, temperature sensors and thermostats. Installation is more convenient to perform either immediately during the construction of the house, or during major repairs.
Rules for the device cable version
As mentioned above, different types of cables serve as a heating element in this system. They are laid either in a screed or in a layer of tile adhesive if a cable fastened with a special mesh is used. Installation is carried out in the following sequence:


- At the initial stage, a cable laying diagram is drawn up and the location of the sensor, thermostat, as well as the connection point for the underfloor heating is determined.
- Next, thermal insulation with a reflector is mounted on the base.
- Then, according to the scheme, cables are laid and a thermoregulation system is installed, which will protect the system from overheating.
- After that, the floor is filled with cement mortar. The main requirement at this stage is to avoid the formation of voids.
- After 30 days (at least) after the screed is completed, the system is checked for operability.
Cable underfloor heating is laid either in a screed or in a layer of tile adhesive
Installation of infrared film floor
Installation of this system is perhaps the best option for those who do not know how to make a wooden floor warm, although it is also a great solution for concrete floors. It is also captivating that you can lay on top of it those types of floor coverings that you like, without limiting your imagination. And the best part is that even a person who is not very experienced in repair matters will cope with the installation.
Main stages of work:
- Dismantling of existing flooring and preparation of the base. In case of serious surface defects, it is better to make a screed and wait for it to dry completely.
- Next, a film with heating elements is laid and a thermostat and sensor are connected.
- The next step is to check the performance of the system and troubleshoot if any.
- After checking, the thermal elements are covered with a protective film (dry installation) or filled with a solution (wet). When pouring, you must wait a month until it dries completely.
- The final stage is the installation of flooring, according to the technology.
This is just a brief description of the process, a specialist consultation will provide much more information, but if this is not possible, then it will be useful to watch the video below:
Floor water heating system
This option of underfloor heating, although captivating with its practicality and efficiency, is not very common in apartments, since the coolant (hot water) is taken from central water heating pipes, which can negatively affect the temperature of the radiators. In addition, this type of underfloor heating is quite laborious in terms of installation, requires professional skills and serious material costs.Another small minus, which can also play a role - when performing a screed, up to 10 cm of the height of the room is hidden.
Installation of a water heated floor is quite laborious, requires professional skills and serious material costs.
If you are still interested in how to carry out all the work, then we will list the main stages:
- They all start with the installation of a polypropylene riser, if the replacement has not been completed before.
- Next, a piping layout is drawn up.
- After that, another important point is the laying of a special reliable waterproofing, the strips of which are best overlapped, and the seams are connected extremely tightly.
- Next, a rough screed is made, the level of which should be approximately 5 cm below the expected level of the finished floor, and allowed to dry.
- The next stage is foil insulation, the joints of which must be glued with aluminum tape.
- And, finally, the installation of a polypropylene pipe according to the scheme, connecting it to the supply and return risers through a control valve.
- Checking the system for leaks. Then the water must be drained.
- Perform the final screed, which should be perfectly even. Let it dry and acquire the necessary strength.
Pipe selection and installation
The following types of pipes are suitable for a water-heated floor:
- Copper;
- Polypropylene;
- Polyethylene PERT and PEX;
- metal-plastic;
- Corrugated stainless steel.
They have their strengths and weaknesses.
| Characteristic Material | Radius bending | Heat transfer | Elasticity | Electrical conductivity | Life time* | Price for 1 m.** | Comments |
| Polypropylene | Ø 8 | Low | high | Not | 20 years | 22 r | They only bend with heat. Frost-resistant. |
| Polyethylene PERT/PEX | Ø 5 | Low | high | Not | 20/25 years | 36/55 r | Can't withstand overheating. |
| metal-plastic | Ø 8 | Below the average | Not | Not | 25 years | 60 r | Bending only with special equipment. Not frost resistant. |
| Copper | Ø3 | high | Not | Yes, requires grounding | 50 years | 240 r | Good electrical conductivity can cause corrosion. Grounding required. |
| Corrugated stainless steel | Ø 2.5-3 | high | Not | Yes, requires grounding | 30 years | 92 r |
Note:
* characteristics of pipes are considered at operation in water heat-insulated floors.
** Prices are taken from Yandex.Market.
The choice is very difficult if you try to save on yourself. Of course, you can not take copper for consideration - it is very expensive. But corrugated stainless steel, at a higher price, has exceptionally good heat dissipation. The temperature difference in the return and supply, they have the largest. This means that they give off heat better than competitors. Given the small bending radius, ease of operation and high performance, this is the most worthy choice.
Pipe laying is possible with a spiral and a snake. Each option has pros and cons:
- Snake - simple installation, almost always there is a "zebra effect".
- Snail - uniform heating, material consumption increases by 20%, laying is more laborious and painstaking.
But these methods can be combined within the same circuit. For example, along the walls "looking" at the street, the pipe is laid with a snake, and on the rest of the area with a snail. You can also change the frequency of turns.
There are generally accepted standards that professionals are guided by:
- Step - 20 cm;
- The length of the pipe in one circuit is not more than 120 m;
- If there are several contours, then their length should be the same.
Under stationary and large-sized interior items, it is better not to start pipes. For example, under a gas stove.
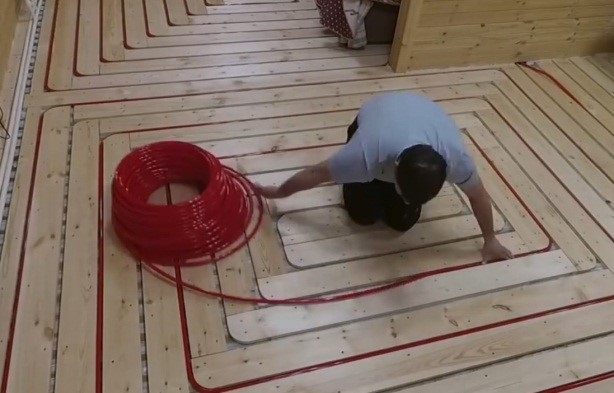
IMPORTANT: be sure to draw the laying diagram to scale. Laying starts from the collector
Unwinding the bay fix the pipe according to the scheme. For fastening it is convenient to use plastic clamps
Laying starts from the collector. Unwinding the bay fix the pipe according to the scheme. For fastening it is convenient to use plastic clamps.
Corrugated stainless steel is produced in coils of 50 m. For its connection, branded couplings are used.


The last element laid between the turns of the pipes is the temperature sensor. It is pushed into the corrugated pipe, the end of which is plugged and tied to the mesh. The distance from the wall is at least 0.5 m. Do not forget: 1 circuit - 1 temperature sensor. The other end of the corrugated pipe is brought to the wall and then, along the shortest path, is brought to the thermostat.
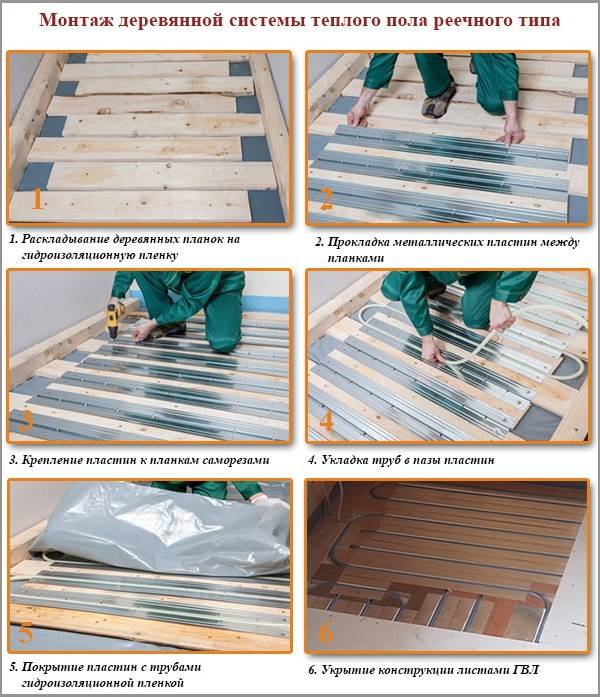
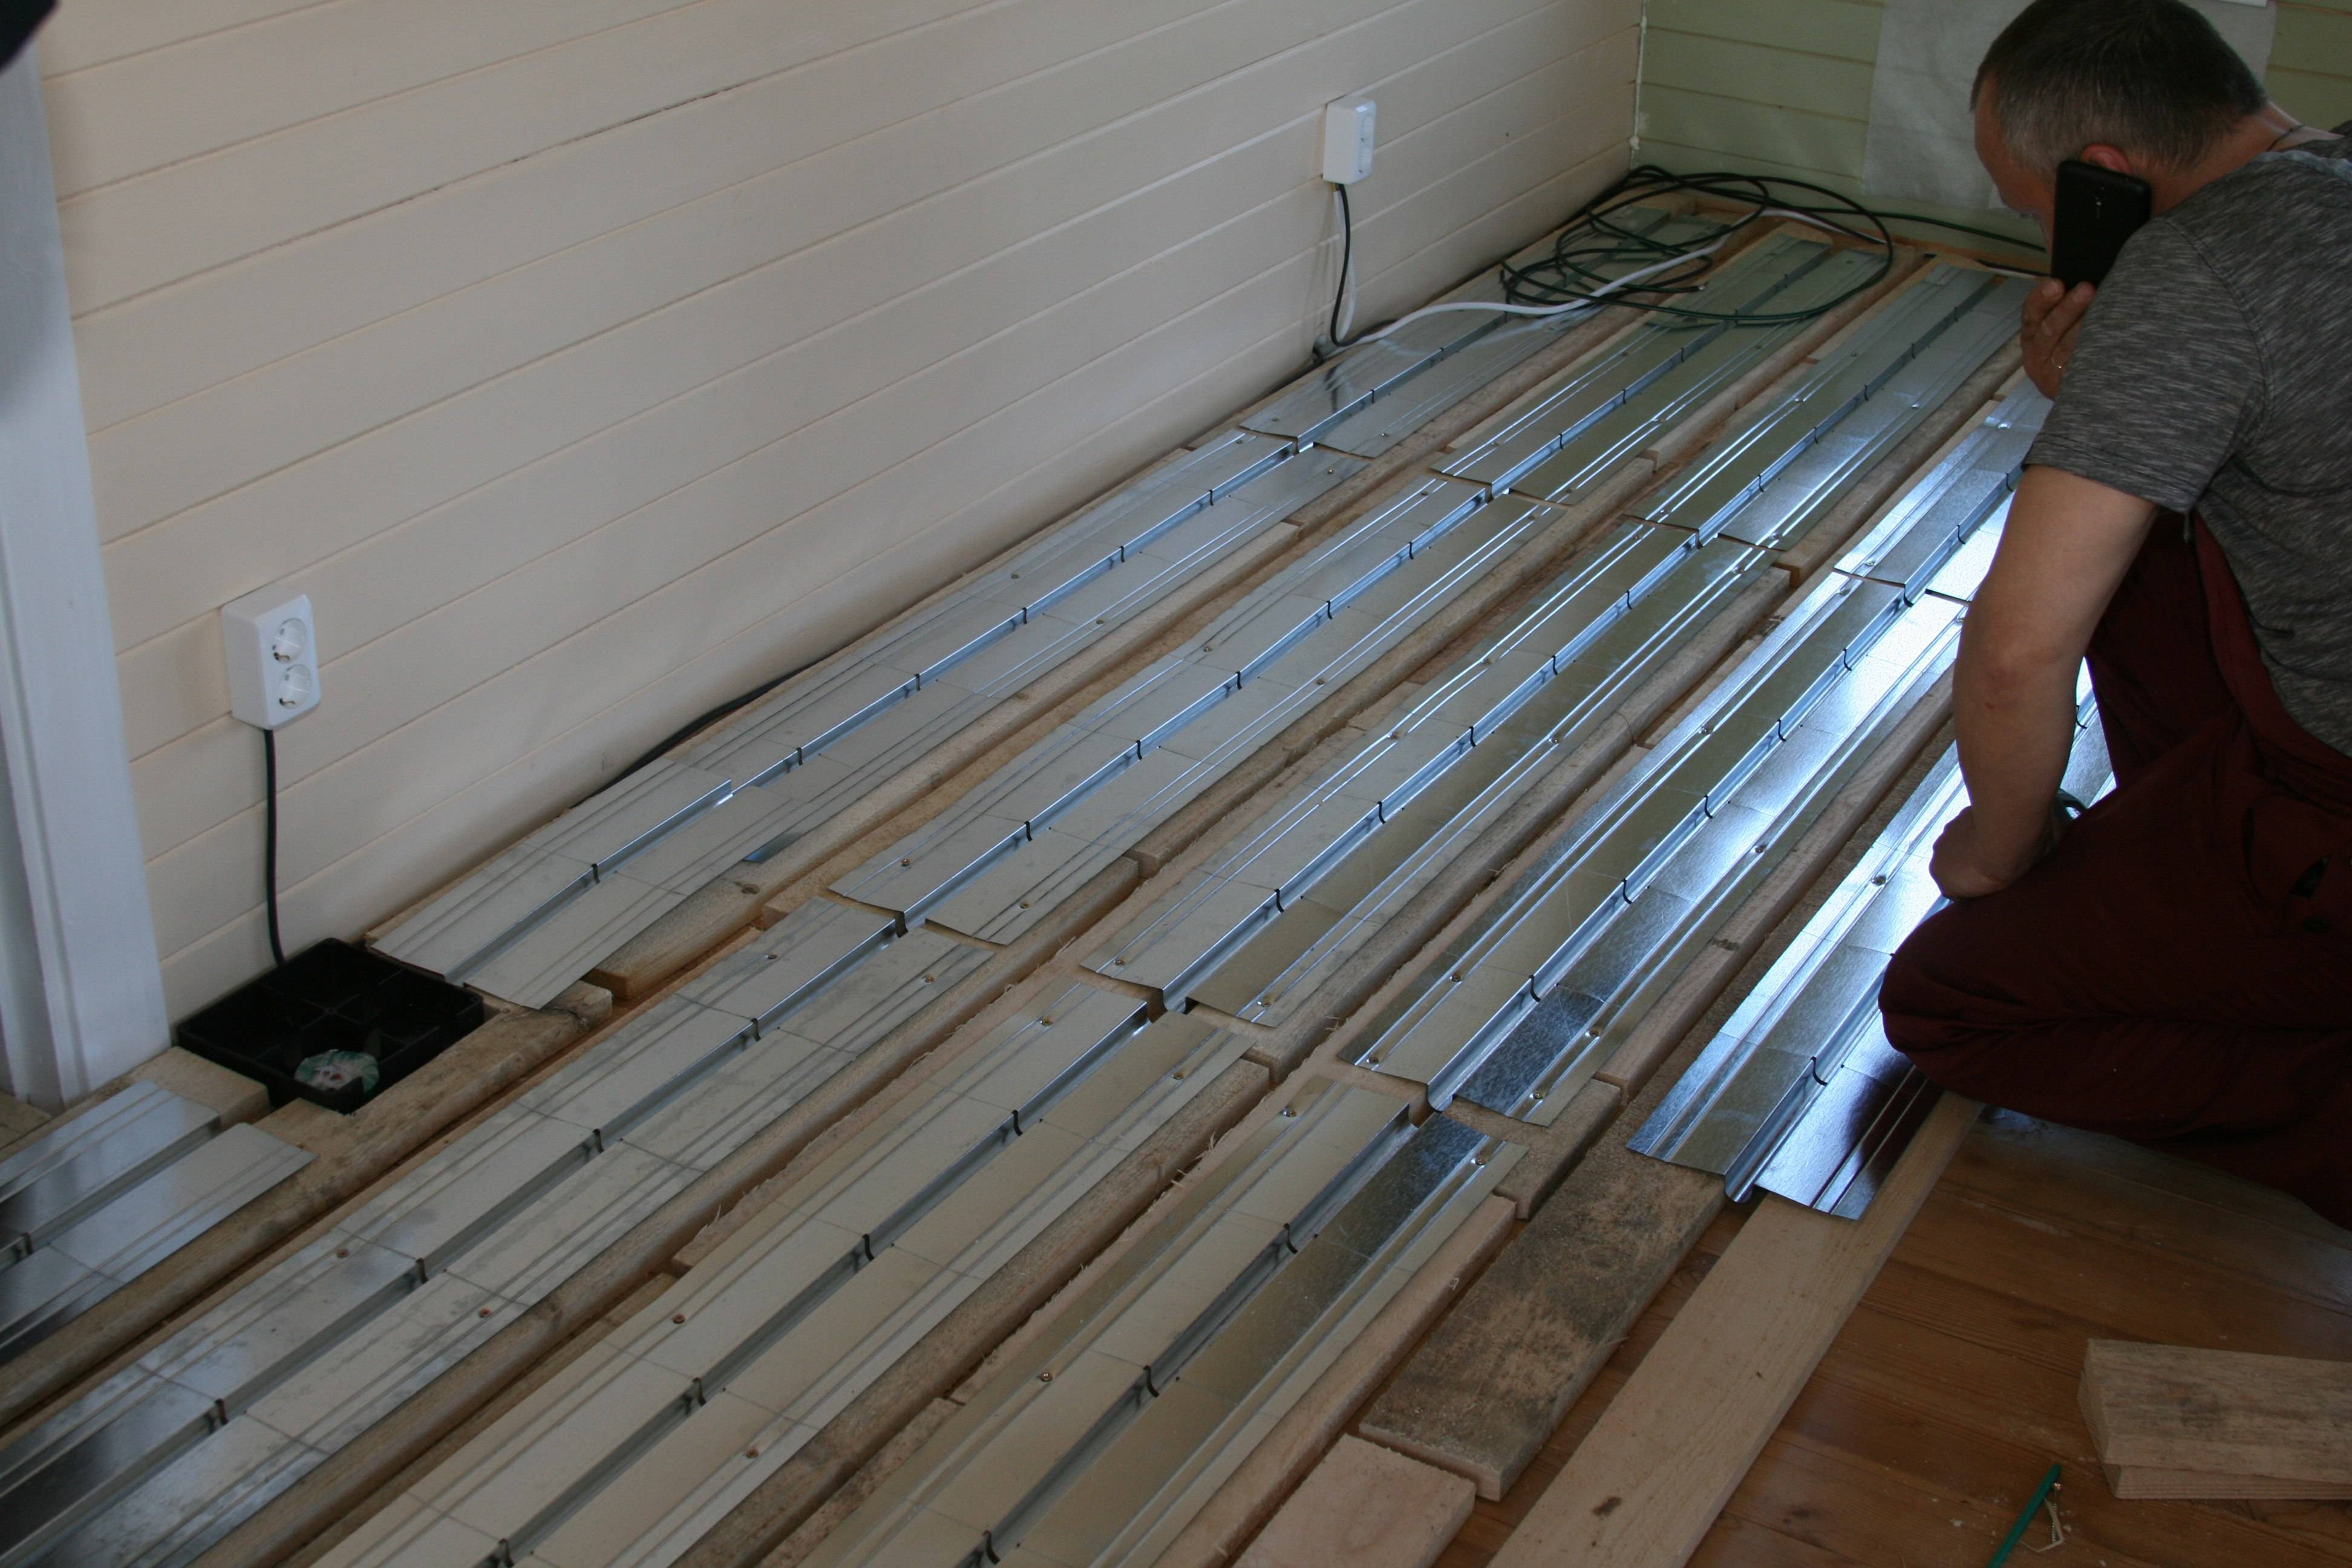
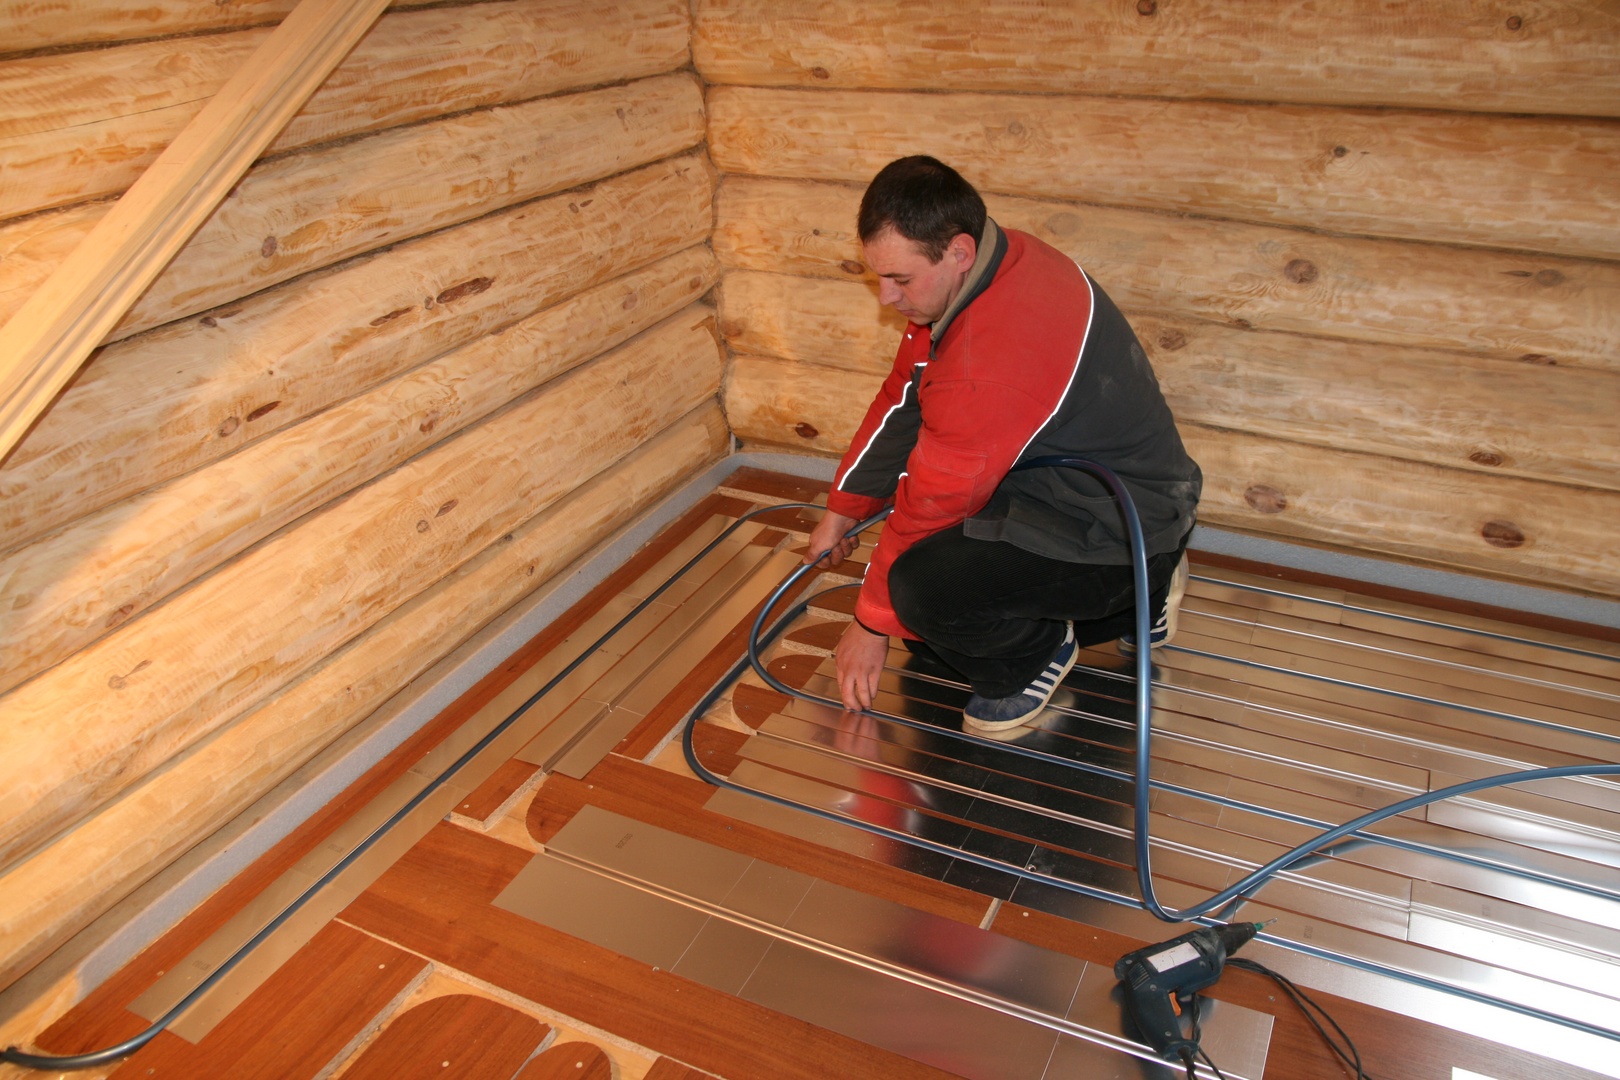
Installing a wooden underfloor heating step by step
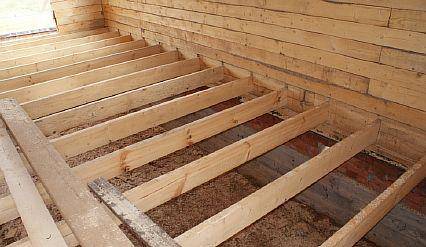
Now consider the installation of a warm water floor on wooden logs in detail, clearly and step by step. (This is just one of the options.)
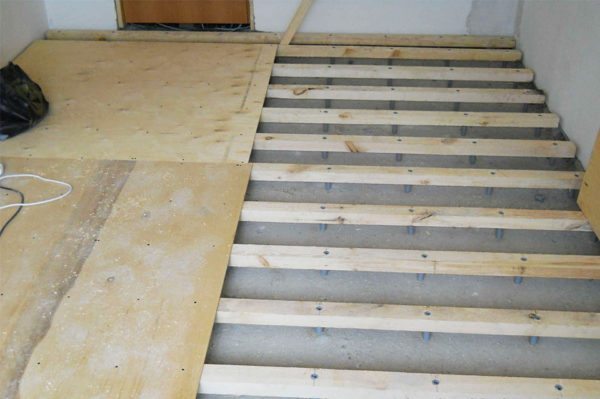
In the photo below we see logs for laying a wooden floor:

The logs are laid in increments of 0.6 m. Galvanized supports can be used to fasten the log, there are a lot of types of which are now produced:
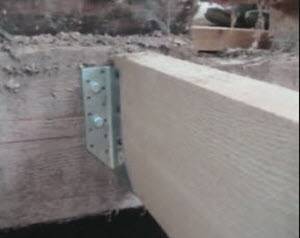
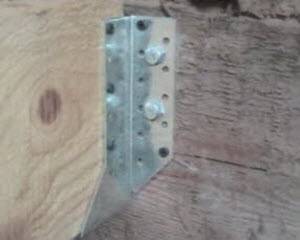
The convenience of using such supports is also that they can first be fixed with self-tapping screws or / and nails, setting all the supports to the level, and only then the logs themselves can be attached to the supports.
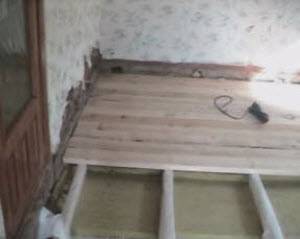
After fixing the lag, a draft floor is laid from below - in order to put a layer of thermal insulation on it:

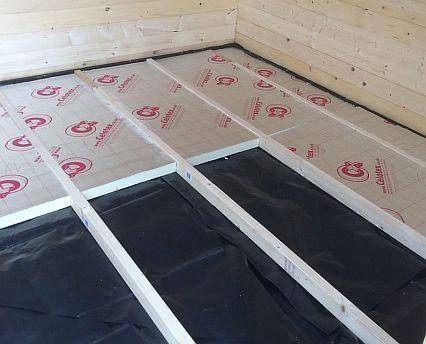
We lay a waterproofing film on the subfloor (it can be clearly seen in the following photos); then - thermal insulation:
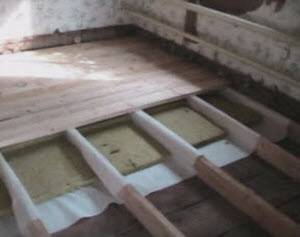
In the photo above, a mineral slab on a basalt base in two layers (100 mm) is used as thermal insulation. A board of 40 mm is laid on top of the thermal insulation (it is not necessary to lay this board, it is possible to lay chipboard strips on the logs (chipboard thickness 20-22 mm), between which there will be a floor heating pipe).
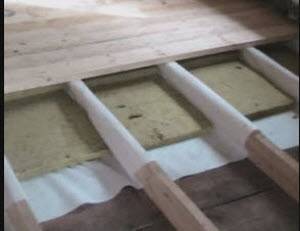
The next photo shows the stacked strips of chipboard with a step of 20 cm (because the calculations turned out to be such a step between the pipes):
Chipboard strips are laid in the following sequence: first, strips are laid along the walls, after which we already lay strips over the entire area. The corners of the strips are cut - for laying pipe bends:
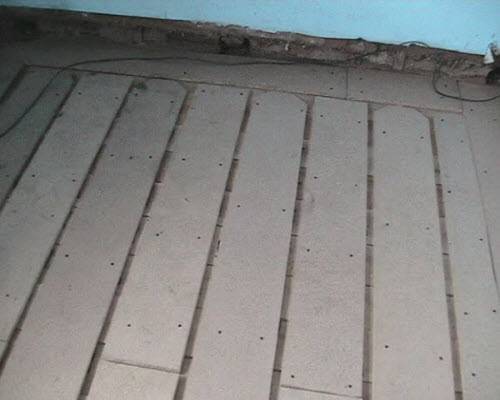
Between the chipboard strips, as can be seen in the photo, a gap is left in which the pipe will be laid.
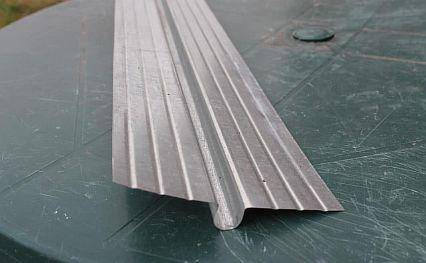
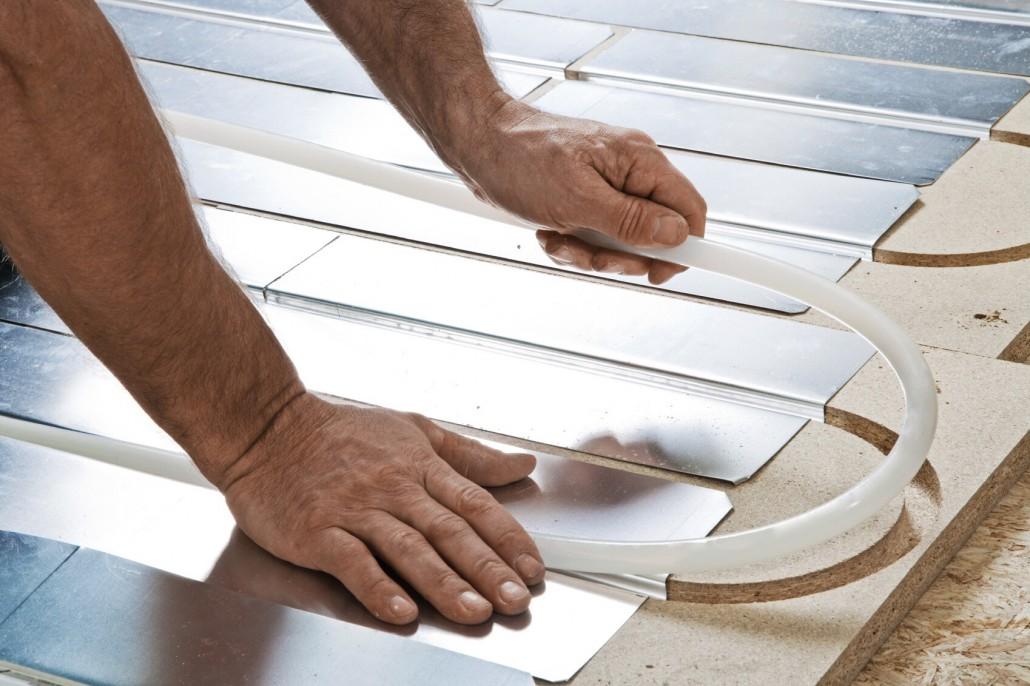
There are special aluminum sheets with extruded profiles for the pipe. Such sheets are needed as heat reflectors. Not everywhere they are on sale, so you can get by with sheets of galvanized iron 0.5 mm thick, which can be found in any building materials store.
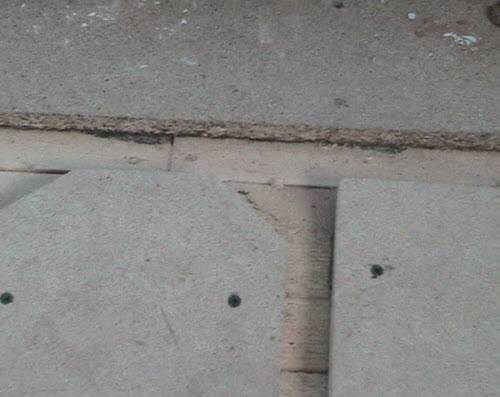
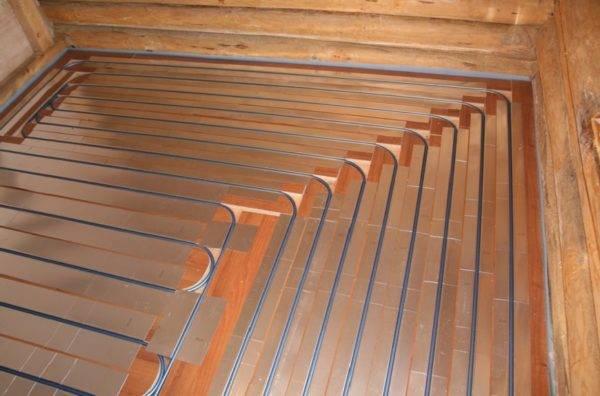
The photo below shows the galvanized steel strips referred to in the paragraph above, already attached to the chipboard:
Galvanization is attached to chipboard with ordinary nails. The galvanized strips are bent in such a way that grooves are obtained, into which the metal-plastic pipe is then laid.
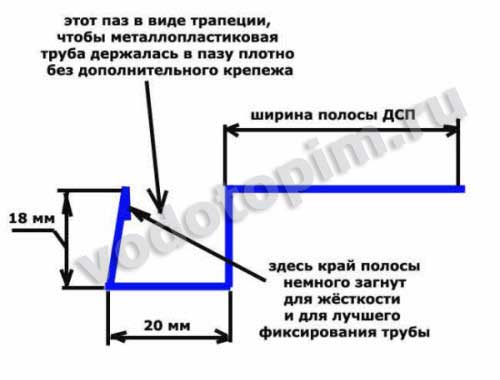
The figure below shows the profile along which the galvanized strip is bent:
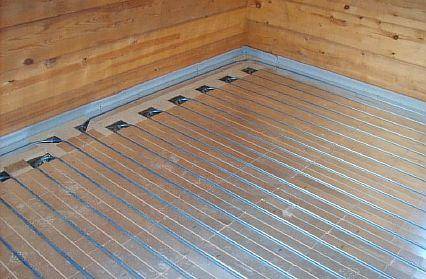
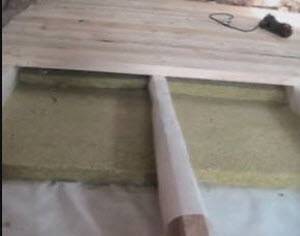
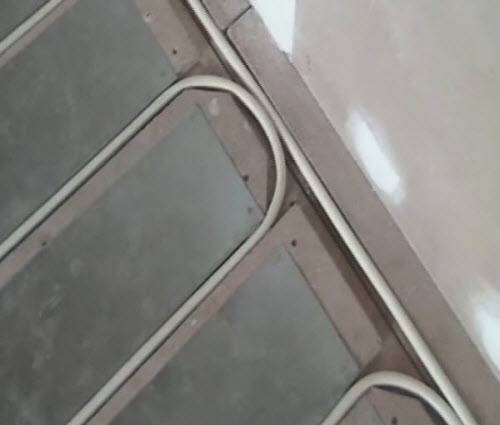
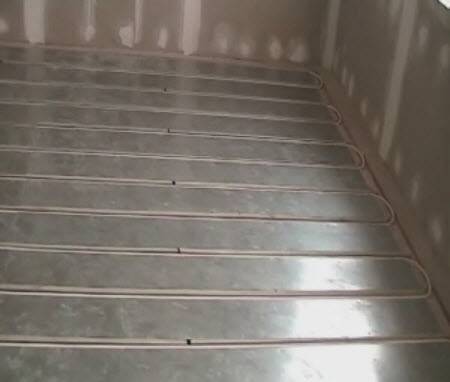
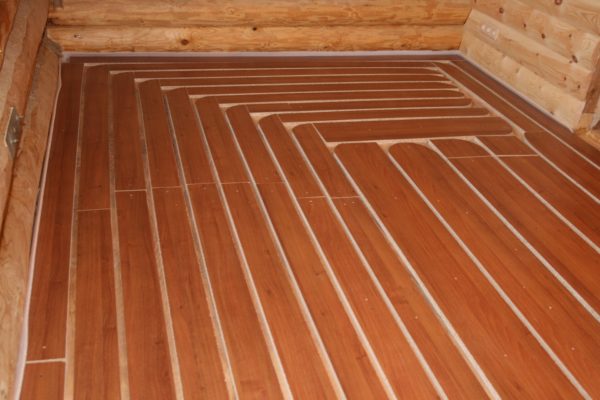
We see that a supply and return pipe is laid along the wall, and “kalachi” of the warmest floor are laid next to it:
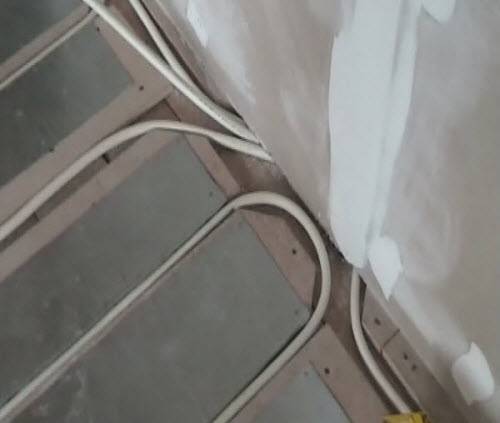
When designing, it is important to take into account all the gaps that should be left between the laid pipes, and then fasten the chipboard strips taking into account these gaps.Another important point is to lay the pipe so that it does not protrude above the floor level and does not interfere with the laying of the final coating later.
As you understand, it is for this that the pipe fits into the grooves of chipboard strips, and the thickness of the chipboard is taken more than the diameter of the pipe
Another important point is to lay the pipe so that it does not protrude above the floor level and does not interfere with the laying of the final coating later. As you understand, it is for this that the pipe fits into the grooves of the chipboard strips, and the thickness of the chipboard is taken more than the diameter of the pipe.


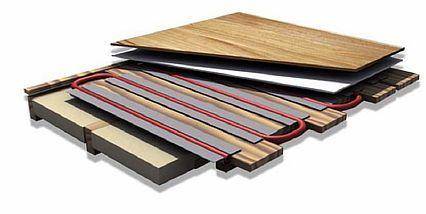
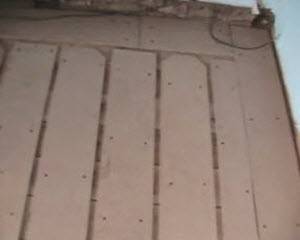
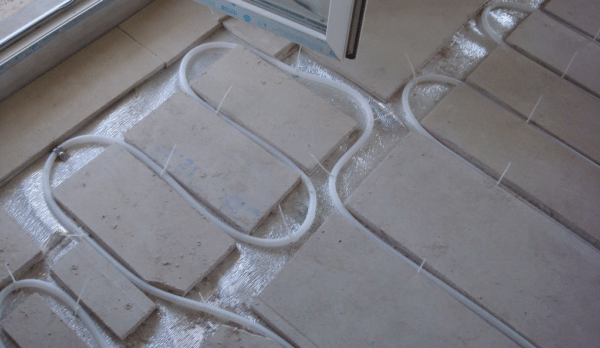
In the following photo, the finished wooden water-heated floor system:
The next step is to lay plywood on this floor and finish the floor on top (but first the system should be pressed: filled with water and kept under pressure).
Only two things can be said about laying plywood: moisture-resistant plywood is selected with a thickness of at least 10 mm, and a gap of 5-10 mm is left between plywood sheets (the gap can be filled with sealant, but you can not fill it; you need a gap due to the possible expansion of plywood - wood, as you know, takes in moisture - even moisture resistant, the same applies to OSB).
That's the whole installation of a wooden system of a warm water floor - as you can see, there is nothing super complicated.
wooden underfloor heating system
Mixed method of installation of wooden underfloor heating
Some masters prefer to use another installation method, which is a cross between a rack and a modular option. In this way, you can install underfloor heating easily, quickly and without spending a significant amount of money.
Begin work by selecting a quarter with channel dimensions in the edged board.Having measured at least seven centimeters from the wall, they make a strip or recess with a cutter so that the pipe is led to the next row. The thickness of the board must exceed the sampling parameters, and the width must be equal to the step during installation. The rough base does not need to be laid, and the planks are attached to the logs using self-tapping screws.
Water floors in wooden houses
Features of heating a wooden floor
A water heated floor under wooden floors, and even more so on a wooden base, is not mounted so often. There are several reasons for this:
When working with wooden bases, it is necessary to compensate for the heat capacity of wood using reflective elements.
- thermal conductivity of wood. On the one hand, this is a plus - the wooden base acts as a heat insulator. On the other hand, the floor will warm up for quite a long time. In addition, there is a risk that a significant proportion of the energy will be spent on heating the subfloor, and only part of the heat (relatively small) will enter the room.
- temperature deformation. Laying pipes with hot water in the thickness of a wooden floor can lead to an uneven change in the linear dimensions of its individual sections. As a result, the stability of the structure is significantly reduced - primarily due to the appearance of cracks in both the rough decking and the frame.
Wooden bases are subject to temperature and humidity deformations - this feature will have to be taken into account
- Moisture exposure. Of course, water-heated floor systems are made airtight, trying with all their might to avoid leaks.However, when laying under wood flooring, even condensation caused by temperature differences can cause the wood to swell.
Pipes must be hidden under the supporting elements, otherwise they will be damaged when walking on the floor
- Considerable thickness of heating elements. If the pipes of a water-heated floor are laid in a screed, their thickness can be easily compensated by pouring the desired layer of concrete. When mounting on a wooden base, these problems have to be solved differently, since simply laying a finishing coating over the pipes will not work.
The traditional option with pouring the screed (pictured) will not work here - the load is too high
However, everything that I noted above does not mean at all that the wooden water floor system is unrealizable in principle. If you take into account all these shortcomings and use modern materials, devices and technologies in your work, then the warm floor on logs or boardwalk will work to the envy of your neighbors.
How can you make a base?
When planning the installation of a warm floor in a house with a wooden floor or a lag system, we need to solve the main question - where to hide the pipes?
When laying on a wooden base, the pipes must be protected from the load using spacers made of wood or chipboard
The difficulty here is not only to protect them from the load. This, just, is easy to do - just raise the level of the finish coat by a few centimeters. But in this case, we lose a lot in heat transfer efficiency: an air gap is formed above the pipes, which acts as a heat insulator. That is, we heat anything, but not the floor itself.
That is why, when assembling the underfloor heating system, they try to lay the coating exactly at the level of the upper edge of the pipe.
For this, the following devices are used:
| Illustration | Method of laying the water heating system |
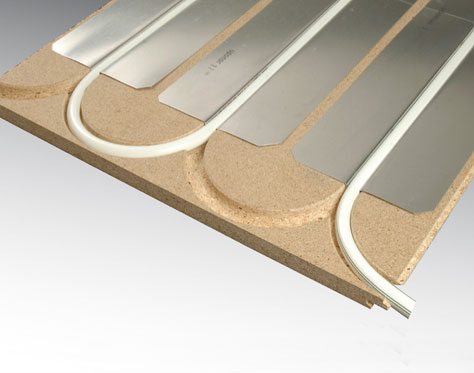 | Milled prefabricated bases. For laying pipes in the thickness of the floor at the desired level, chipboards (chipboards) with grooves made on a milling machine are used. The depth and configuration of the grooves are selected in such a way as to ensure the most rational distribution of pipes with coolant. Cons of modular chipboard flooring:
|
 | Rack structures. This option is a cheaper alternative to the modular base with milled grooves. Laths are stuffed on the subfloor, the gap between which corresponds to the diameter of the pipe being laid. The thickness of the rails is selected so that the clearance between the upper edge of the pipe and the finished floor is minimal - this reduces heat loss. Minus - the gaps on the sides and in the places where the pipes turn are large, because part of the heat is still lost. |
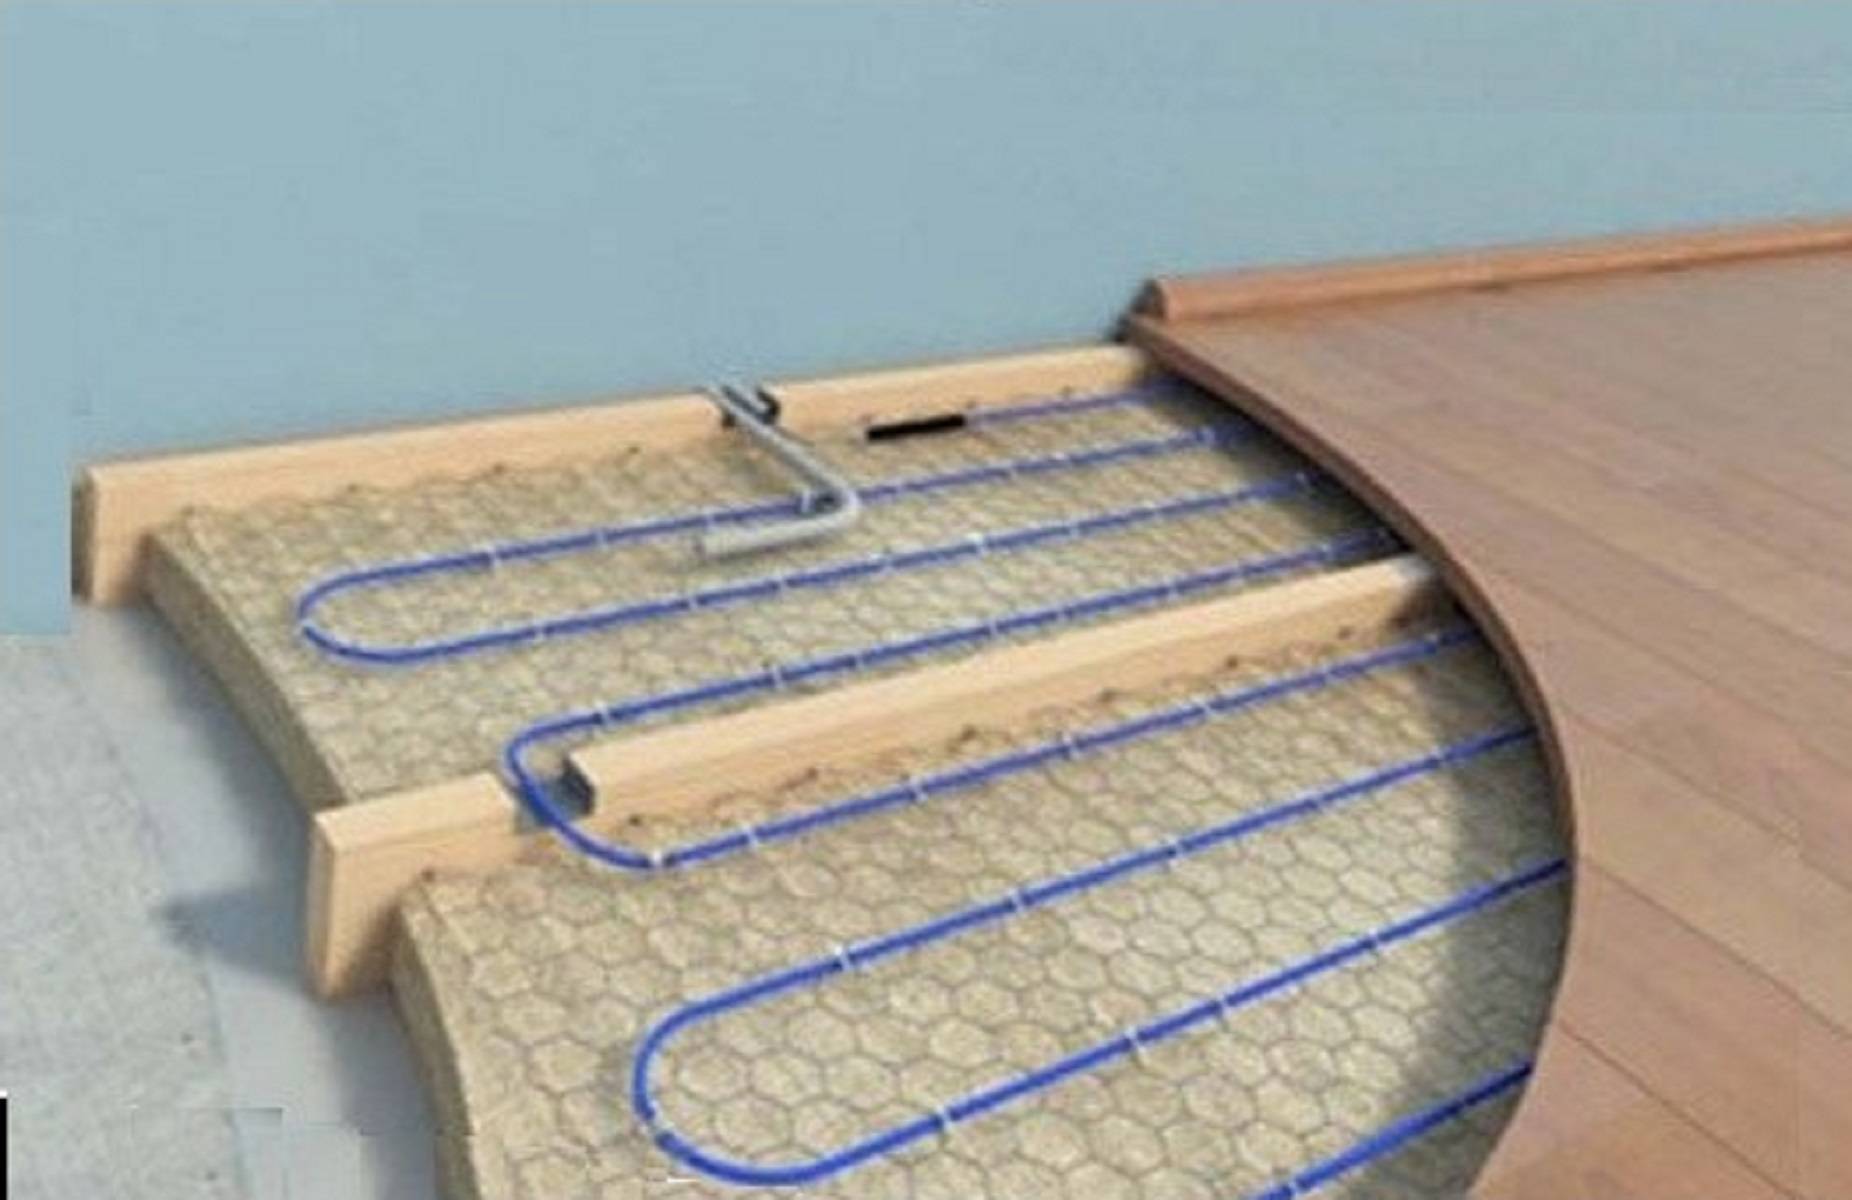
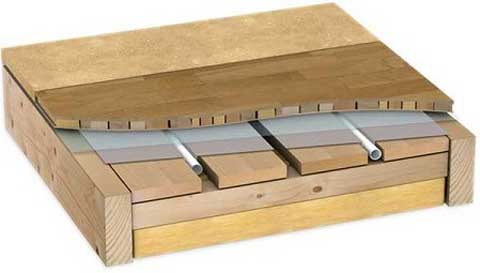
 | polymer mats. To solve a large part of the problems associated with heat loss, deformation and wetting, polymer mats with pipe laying grooves can also be laid on top of the rough deck. They function in the same way as milled chipboard panels, but the efficiency of these products is higher. The downside is the high price, which is only partially offset by savings on heating. |


Any of these options are suitable if we need to lay a warm floor on plywood or other wooden base. I am a supporter of polymer mats, but milled chipboard models, and even simple structures made of laths stuffed on the floor, have a right to exist.
Prefabricated base made of laminated chipboard, ready for pipe laying
Technology of laying wooden structures
Advice
When placing a warm water floor on wooden logs, you should first draw up a laying plan.
Requirements for her:
- Filling with a traditional screed in this case will not work. You can not make the height of the screed less than 5 cm, as the tree will not withstand a lot of weight.
- To strengthen the base of the system, it is necessary to lay metal sheets 2 mm thick on top of the log, which will also serve as a heat reflector.
- Sufficient heat reflectors and insulating materials should be used. They cover all the turns of pipes, which saves heat during operation and extends the life of the entire heating system.
 If the screed is high, then the distance between the turns of the pipes should be made as small as possible. The amount of heat loss depends on the location of the house in relation to the light, on the number and size of windows, as well as on the quality of roof and wall insulation.
building.
If the house is very dilapidated, then before arranging the heating it is tested for strength. All cracks, through holes, other defects through which heat seeps must be well sealed. If a house begins to be built, then energy saving issues should be taken into account at the stage of calculation during construction.
There are three options for laying a heating system with a wooden floor.
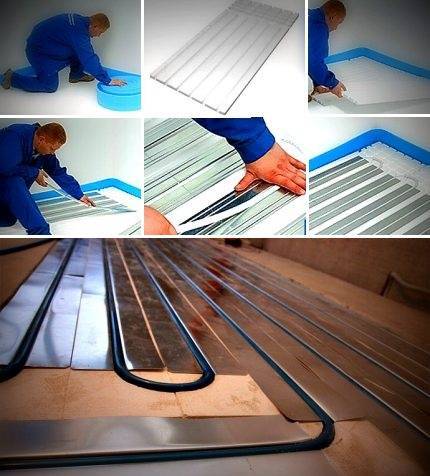
Ready-made polystyrene mats and chipboard modules
They can be purchased at any hardware store. Mats are pre-equipped with mounts for pipes.
To start laying them, you will need to prime the rough surface, lay a heater on it.
On the outside of each mat, they are smeared with a thick layer of glue and glued to the base.
To assemble the flooring, you also need to use chipboard modules
They are released from the recesses under the tubular circuit.
Important
The kit includes fasteners, plates and pipes made of metal with the effect of uniform heat distribution.
To increase the strength of the structure, the parts are connected by locking fasteners.
Flooring
The distance between the lags is 60 cm.
- The beams are firmly attached to the base so that it is easy to attach plywood, boards or other material to them, which will serve as the basis for the insulation (polystyrene or foam).
- To make the flooring, boards with a thickness of at least 3 mm are screwed to the logs. The width of the boards should correspond to the width of the metal elements that will distribute heat evenly throughout the room.
Between the boards, you need to keep a distance of about 15 cm. It will serve as grooves for turning the pipe. Space is left under the bends so that it is convenient to distribute the tubular elements on the floor. In the grooves they are fastened with nails or staples. The sides of the plates are closed so that a single screen is obtained that distributes heat.
Flooring with guides
Any kind of insulation is laid on a leveled base. It is better to take the easiest installation method to install - a snake.
To determine the dimensions of the elements, they draw up a plan of the room, mark the areas for installing equipment and supplying communications
At the same time, guides are drawn, which can be made of any material.
Each rail is laid on the surface, firmly fastened with self-tapping screws.
Attention
For laying pipes, leave the desired diameter. On the turning sections, protruding corners are rounded so as not to damage the heating elements.
Then, a 50 µm thick foil is laid along all the channels for attaching the rails so as to use all the corners and recesses
Attach the foil with a stapler.


