- 2 How to make and install a heat pump with your own hands?
- 2.1 Installation of heating units
- How to make a Frenette heat pump with your own hands
- Tools and working version of a homemade pump
- Distinctive features
- Using an old refrigerator
- The principle of operation of the device
- Generator insulation
- Do-it-yourself Frenett heat pump, assembly instructions
2 How to make and install a heat pump with your own hands?
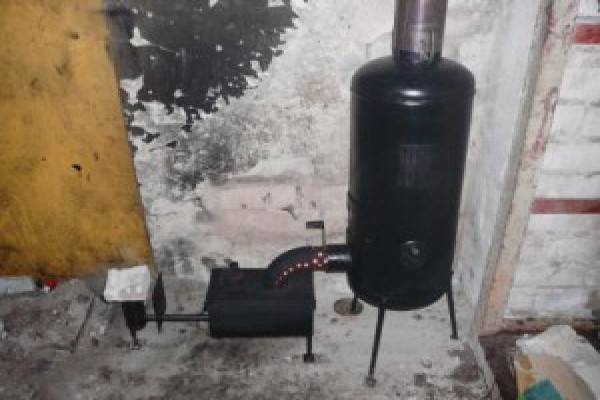
It is quite possible to make a heat pump with your own hands, but for this you need to find a good compressor.
As a condenser, you can use a stainless steel tank, approximately 100 liters. And for the circuit through which the heat exchanger will circulate, thin copper plumbing pipes are perfect.
DIY heat pump - manufacturing steps:
- Using a corner or L-shaped brackets, we fix the compressor to the wall in the place where the heat pump will be placed.
- Next, we make a coil from copper tubes - we wrap them around a cylinder of a suitable shape. Make sure that the winding pitch on all coils is identical.
- The tank is cut into two parts, a coil is inserted inside, after which the tank is welded back.At the same time, several threaded inlets are created in it - above and below, through which the extreme tubes of the coil are brought out.
- As an evaporator, we use an ordinary plastic barrel, into which pipes of the internal circuit are inserted (or any other container, the volume of which is identical to the condenser tank).
- For transportation of heated water, ordinary PVC pipes are used.
To charge the system with freon, it is recommended to contact a specialist.
To make a heat pump Do-it-yourself frenetta we need to get the following materials:
- Steel cylinder (choose the diameter based on the pump power that you need for heating: the larger the working surface, the more efficient the device will be);
- Steel discs, with a diameter of 5-10% less than the diameter of the cylinder;
- Electric motor (it is best to initially select a drive with an elongated shaft, since disks will be installed on it);
- Heat exchanger - any technical oil.
The number of revolutions that the engine can produce will determine the temperature to which the Frenette pump can heat water for heating a house or a pool. In order for the water in the radiators to warm up to 100 degrees, it is necessary that the drive provide 7500-8000 rpm.
The shaft of the power unit on bearings is placed inside the steel cylinder. The place where the shaft enters the cylinder must be securely sealed, since the presence of even the slightest vibration quickly disables the mechanism.
Work disks are mounted on the motor shaft. The required distance between them can be set by screwing the nuts after each disc. The number of disks is determined depending on the length of the cylinder - they must evenly fill its entire volume.
We drill two holes in the upper and lower parts of the cylinder: heating pipes will be connected to the upper one, into which oil will be supplied, and a return pipe is connected to the lower hole to return the used oil from the radiators.
The whole structure is fixed on a metal frame. After the unit is assembled, the cylinder is filled with oil, the pipes of the heating main are connected to it and the connections are sealed.
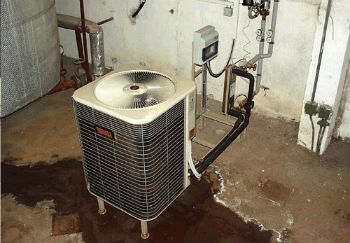
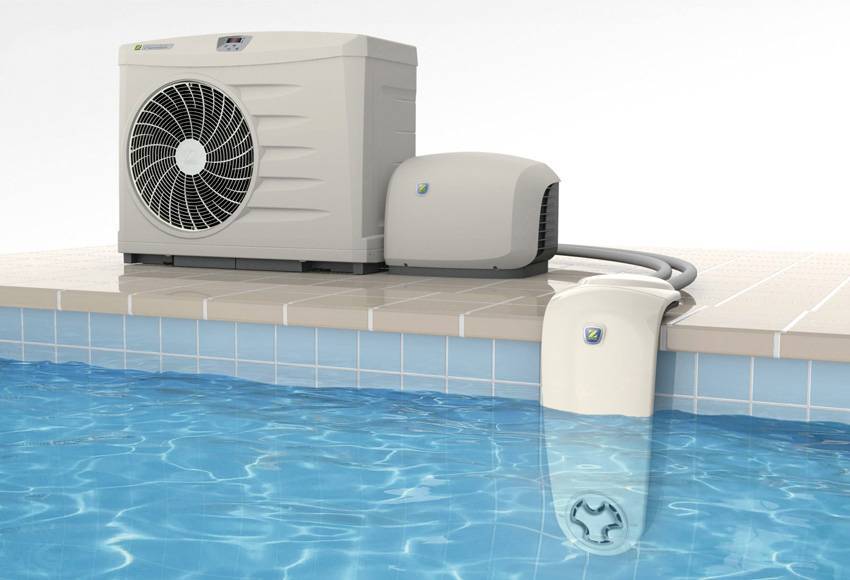
Factory built heat pump
The Frenetta heat pump has a very high efficiency, which allows it to be effectively used in any heating systems. It can be used to heat any utility rooms, garages, and residential buildings. In addition, due to its compact size, such a home-made pump is great for heating a pool or a “warm floor”.
But remember that when heating the pool and other large water containers, you need a pump of sufficient power, otherwise you will simply use it for other purposes and you will not get the desired results.
2.1 Installation of heating units
Features of installation of heat pumps depend, first of all, on the method of placement of the external circuit.
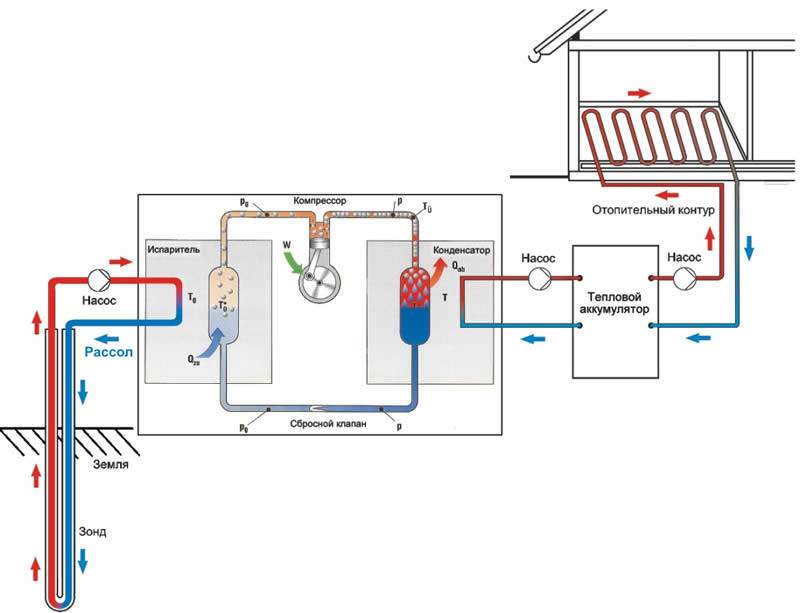
- Geothermal heat pumps. For the vertical installation method, wells are created with a depth of 50 to 100 meters, into which a special probe is lowered. For horizontal laying, a trench is created for the same length or a pit in which the pipes are laid parallel to each other. Pipes are laid in the ground to a depth of one and a half meters.
- Water-to-water pumps: the external circuit is laid at the bottom of the reservoir and led to the heat pump.
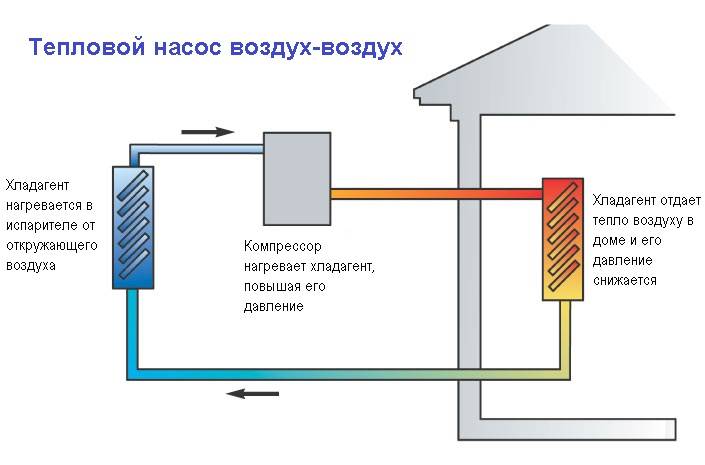
- Air-to-water: the unit with pipes of the external circuit is installed on the roof or on the wall of the building (in appearance it is difficult to distinguish it from the outdoor box of the air conditioner), and is connected to the heat pump indoors.
How to make a Frenette heat pump with your own hands
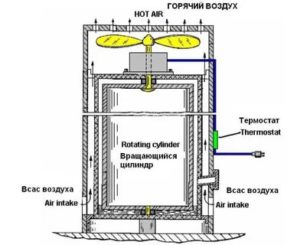
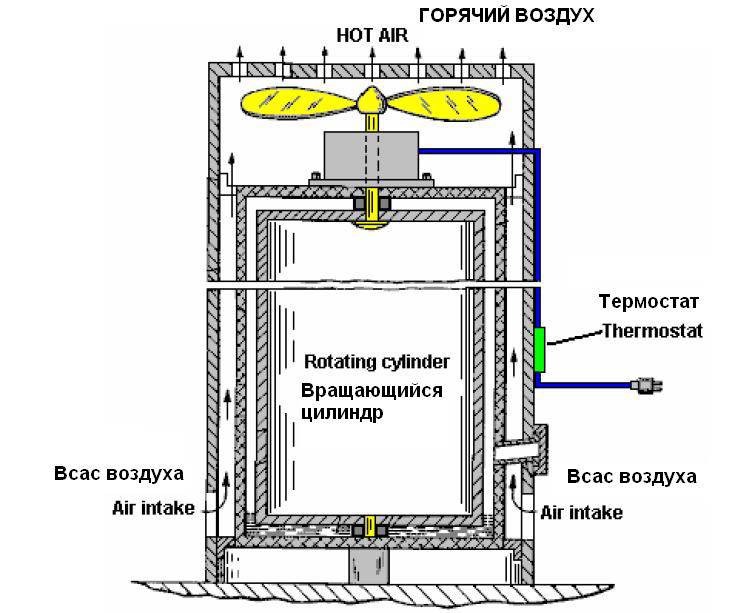
The classical design of the system assumes the presence of a rotor and a stator (cylinders of different sizes). In modern modifications, they are replaced with steel wheels. Also in the classical scheme there is a bladed fan. It directs warm air into the heated room. By replacing the rotor and stator with steel discs, the need for a fan is eliminated. It's not a particularly efficient part of the design, plus it creates noise.
It is better to use natural oil as a heat carrier. It has high thermal stability and oxidation resistance. This oil is non-toxic and does not emit harmful gases. Another useful tip: equip the unit with a temperature sensor so that it can turn on and off autonomously. And in order to save on self-assembly and not buy a new power element, use an electric motor from old appliances.


Tools and working version of a homemade pump
For assembly you will need:
- cylinder;
- electric motor with extended shaft;
- pipes and radiators from the heating system;
- power cable, glands, seals, nuts, branch pipes;
- steel discs (their diameter must be less than the diameter of the cylinder).
Important to know: The installation efficiency depends on the number of steel discs. The more of them, the higher the efficiency you will get.

Step by step assembly:
- Place the motor shaft into the cylinder.Lay all nodes with seals and seals.
- Install the discs on the shaft and secure them with nuts. The farther from the walls of the cylinder you install the disks, the higher the efficiency of the device will be.
- Make two holes on top of the structure. The coolant will be supplied through the first, and oil from the heating system will be supplied through the second.
- Connect the fittings to the cylinder and the cable to the motor. Pour oil into the cylinder.
- Make sure the device is not leaking. If there are leaks, eliminate them with rubber gaskets or other seals.
Before using the unit in a heating system, its efficiency should be calculated, which directly depends on the efficiency. Otherwise, the heat will either not be enough, or vice versa. Then you have to constantly turn the pump on and off. But even in this case, there is a way out - installing a temperature sensor. With it, the pump will independently regulate its work without your intervention.
Distinctive features
The manual oven has a number of advantages:
- it saves fuel;
- Upon request, you can design a furnace of any size that best suits the space;
- easy to transport;
- Ease of use;
- The moisture proof oven can be used for cooking. To do this, during construction, the pipe is installed on the side of the heater on the side wall.
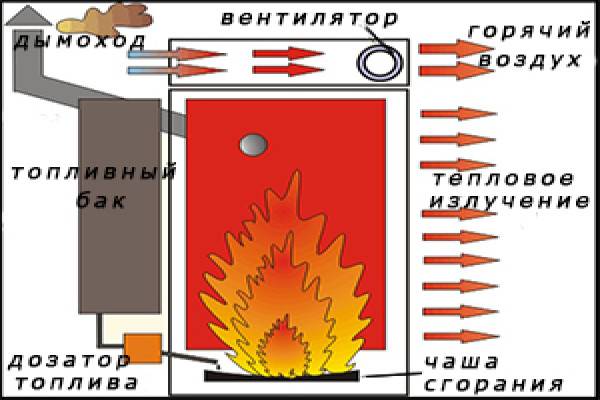
When making a drip heater with your own hands, follow the fire safety rules:
- The device must be located in a draft-free room;
- Flammable objects should be kept away from the heater, preferably in close proximity to it (about half a meter);
- Do not use water to extinguish or cool the heater.
Materials needed for the construction of the furnace:
- sheet metal;
- it is a copper pipe;
- pipe branch;
- rubber hose;
- gas cylinder;
- To hell;
- Medical burner. .
The main tools that will be useful are a welding machine, a drill and a clamp.
Using an old refrigerator
Refrigerator heat pump device
So, to assemble a heating system in a country house, you must have a heat pump.
Today, such units are not cheap, this is due to high technical characteristics and painstaking work on their assembly. But, if you wish, you can assemble the heat pump with your own hands.


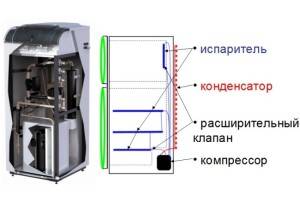
You can build a simple heat pump from a household refrigerator. The peculiarity of the technique lies in the fact that it has two main components of a heat pump - a condenser and a compressor. This will significantly speed up the assembly of the heat pump with your own hands.
So, the assembly of the pump from the old refrigerator is carried out as follows:
Capacitor assembly. The element is made in the form of a coil. In refrigerators, it is most often installed at the back. This well-known lattice is a condenser, with the help of which heat is transferred by the refrigerant.
The capacitor is installed in a container that has high strength and can withstand high temperatures. In order not to damage the coil during installation, experts recommend cutting the container and installing a capacitor in it. After that, the container is welded.
Next, a compressor is attached to the container. It is almost impossible to make a unit at home. Therefore, it is better to take it from an old refrigerator
At the same time, it is worth paying attention to the fact that it is in good condition.
As an evaporator, you can use a regular plastic barrel.
After all the elements of the system are ready, they are interconnected. Plastic pipes are used to connect the unit to the heating system. Thus, it is possible to build a heat pump from an old household refrigerator
If you need to pump freon into the system, then for this you need to call the wizard. This work can only be done with special equipment.
Thus, it is possible to build a heat pump from an old household refrigerator. If you need to pump freon into the system, then for this you need to call the wizard. This work can only be done with special equipment.
Take note: refrigerator heat pumps are often used to heat small spaces and domestic buildings. It could be a garage or a small shed.
The first channel will let air into the freezer, and the second will let it out. In this case, physical processes occur that cause the capacitor to heat up.
You may also be interested in an article on how to make a Frenette heat pump with your own hands.
You can read about Igor Savostyanov's Henk System heat pumps here.
The principle of operation of the device
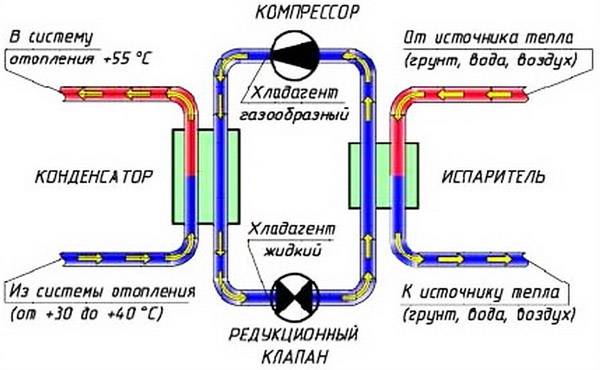
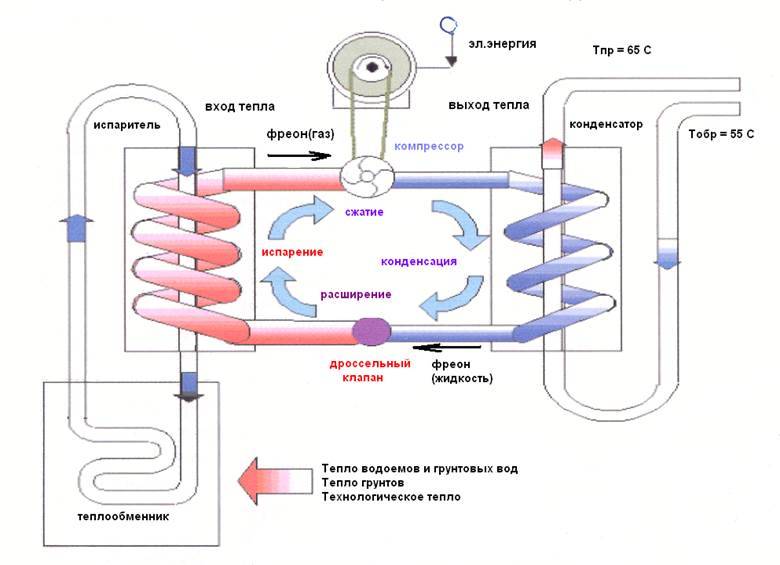
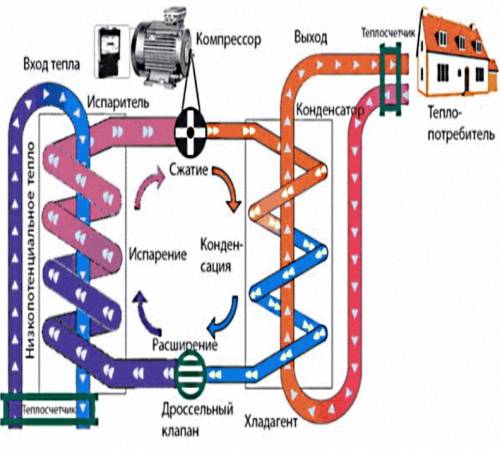
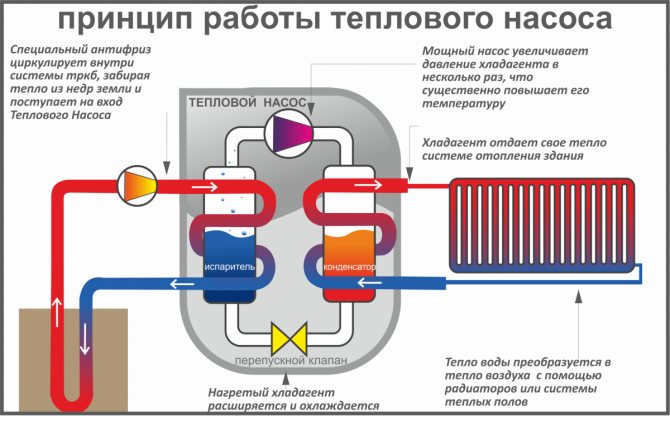
Those who come into contact with the issues of cost-effective heating, the name "heat pump" is well known. Especially in combination with terms like “land-water”, “water-water”, or “air-water”, etc.
Such a heat pump has practically nothing in common with the Frenette device. In addition to the name and the end result in the form of thermal energy, which is ultimately used for heating.
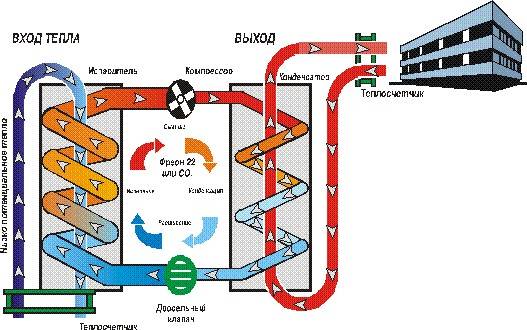
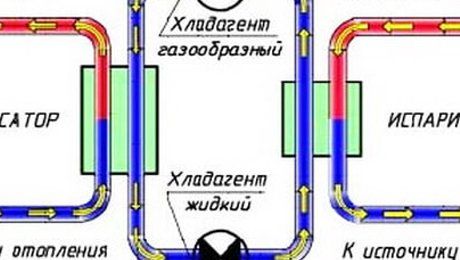
Heat pumps operating on the Carnot principle are very popular both as a cost-effective way to organize heating and as an environmentally friendly system.
The operation of such a complex of devices is associated with the accumulation of low-potential energy contained in natural resources (earth, water, air) and its conversion into thermal energy with a high potential.
The invention of Eugene Frenette is arranged and works in a completely different way.
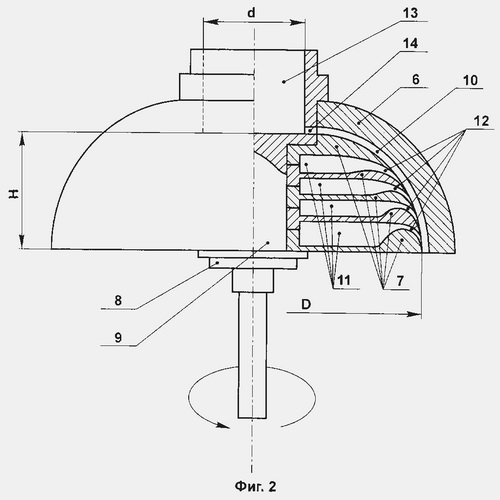
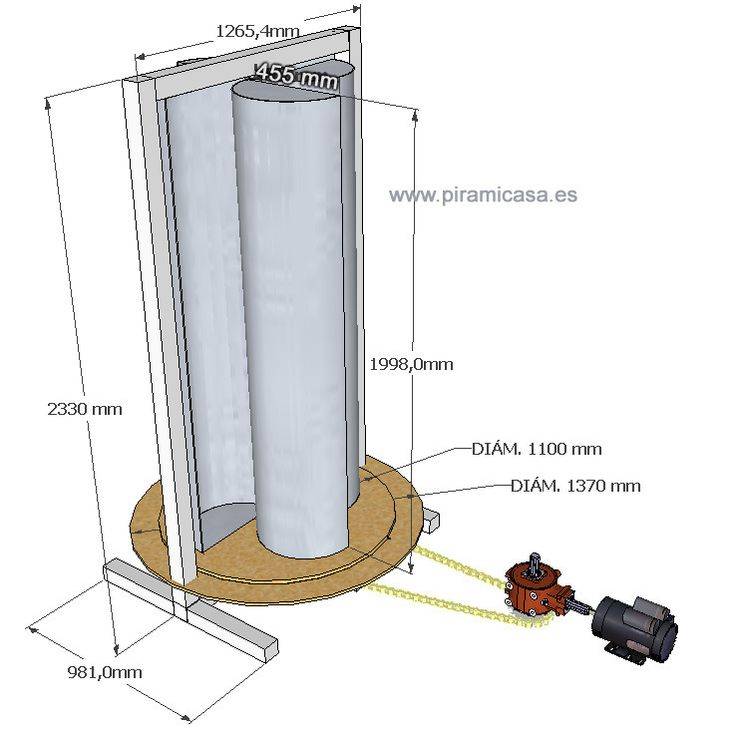
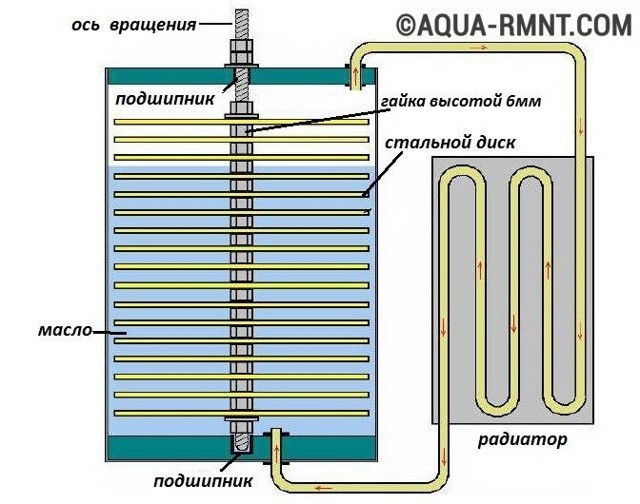
of The heat generating system developed by E. Frenette cannot be unconditionally classified as a heat pump. According to its design and technological features, this heater The unit does not use geo- or solar energy sources in its work. The oil coolant inside it is heated by the friction force created by rotating metal disks. The working body of the pump is an oil-filled cylinder, inside which the axis of rotation is located. This is a steel rod equipped with parallel discs installed approximately 6 cm apart. Centrifugal force pushes the heated coolant into the coil connected to the device. The heated oil exits the instrument at the top connection point. The cooled coolant returns back from below Appearance of the Frenett heat pumpHeating up the device during operationMain structural componentsReal dimensions of one of the models


The principle of operation of this device is based on the use of thermal energy, which is released during friction. The design is based on metal surfaces located not close to each other, but at some distance. The space between them is filled with liquid.
Parts of the device rotate relative to each other with the help of an electric motor, the liquid inside the case and in contact with the rotating elements is heated.
The resulting heat can be used to heat the coolant. Some sources recommend using this fluid directly for the heating system. Most often, a regular radiator is attached to a homemade Frenett pump.
Experts strongly recommend using oil rather than water as the coolant of the heating system.
During the operation of the pump, this liquid tends to heat up very strongly. Water in such conditions can simply boil. Hot steam in a confined space creates excess pressure, and this usually leads to rupture of pipes or a casing. It is much safer to use oil in such a situation, since its boiling point is much higher.
To make a Frenette heat pump, you will need an engine, a radiator, several pipes, a steel butterfly valve, steel discs, a metal or plastic rod, a metal cylinder and a nut kit (+)
There is an opinion that the efficiency of such a heat generator exceeds 100% and can even be 1000%. From the point of view of physics and mathematics, this is not a completely correct statement.
Efficiency reflects the energy losses spent not on heating, but on the actual operation of the device. Rather, the phenomenal claims about the incredibly high efficiency of the Frenette pump reflect its efficiency, which is truly impressive. The cost of electricity for the operation of the device is negligible, but the amount of heat received as a result is very noticeable.
Heating the coolant to the same temperatures using a heating element for heating, for example, would require a much larger amount of electricity, perhaps ten times more. A household heater with such a consumption of electricity would not even heat up.
Why are not all residential and industrial premises equipped with such devices? The reasons may be different.
Firstly, water is a simpler and more convenient coolant than oil. It does not heat up to such high temperatures, and it is easier to clean up the consequences of water leaks than to clean up spilled oil.
Secondly, by the time the Frenette pump was invented, a centralized heating system already existed and functioned successfully. Its dismantling for replacement with heat generators would be too expensive and would bring a lot of inconvenience, so no one even seriously considered this option. As they say, the best is the enemy of the good.
Generator insulation
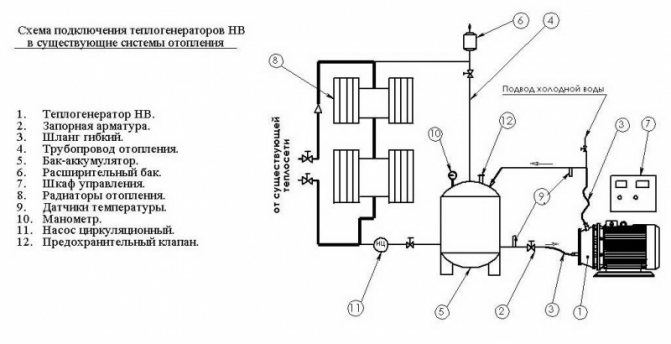
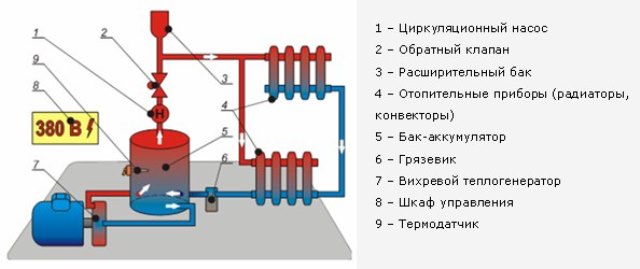
Scheme of connecting the heat generator to the heating system.
First you need to make a casing of insulation. Take a sheet of galvanized sheet or thin aluminum for this. Cut out two rectangles from it if you will make a casing from two halves. Or one rectangle, but in such a way that, after manufacturing, Potapov's vortex heat generator, which was assembled by hand, will completely fit in it.
It is best to bend the sheet on a large diameter pipe or use a cross member. Put the cut sheet on it and press the wooden block on top with your hand. With the second hand, press the sheet of tin so that a slight bend forms along the entire length. Advance the workpiece a little and repeat the operation again.Do this until you get a cylinder.


- Connect it with a lock, which is used by tinkers for drainpipes.
- Make covers for the casing, providing holes in them for connecting the generator.
- Wrap the device with thermal insulation material. Using wire or thin strips of tin, fix the insulation.
- Place the device in the casing, close the covers.
There is another way to increase heat production: to do this, you need to figure out how the Potapov vortex generator works, the efficiency of which can approach 100% and higher (there is no consensus why this happens).
During the passage of water through a nozzle or jet, a powerful stream is created at the outlet, which hits the opposite end of the device. It twists, and due to the friction of the molecules, heating occurs. This means that by placing an additional barrier inside this flow, it is possible to increase the mixing of the liquid in the device.
Related article: Installing windows in a frame house: how to perform the correct installation?
Knowing how this works, you can begin to design an additional improvement. It will be a vortex damper made of longitudinal plates located inside two rings in the form of an aircraft bomb stabilizer.
Scheme of a stationary heat generator.
Tools: welding machine, angle grinder.
Materials: sheet metal or strip iron, thick-walled pipe.
Make two rings 4-5 cm wide from a pipe of a smaller diameter than Potapov's vortex heat generator. Cut identical strips from strip metal. Their length should be equal to a quarter of the length of the body of the heat generator itself.Select the width so that after assembly there is a free hole inside.
- Secure the plate in a vise. Hang on it from one and the other side of the ring. Weld a plate to them.
- Remove the workpiece from the clamp and turn it 180 degrees. Place a plate inside the rings and fasten it in the clamp so that the plates are opposite each other. Fasten in this way at an equal distance of 6 plates.
- Assemble the vortex heat generator by inserting the device described opposite the nozzle.
Probably, it is possible to further improve this product. For example, instead of parallel plates, use steel wire, winding it into an air ball. Or make holes of different diameters on the plates. Nothing is said about this improvement anywhere, but this does not mean that it is not worth doing.
Do-it-yourself Frenett heat pump, assembly instructions
Self assembly
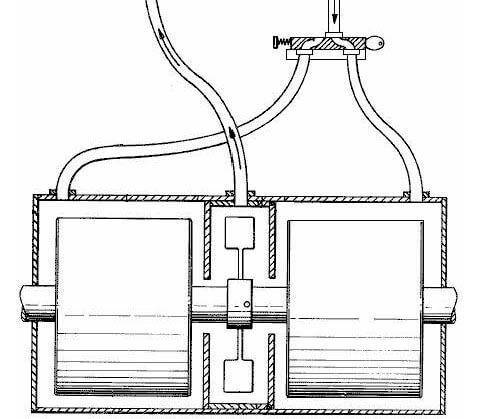
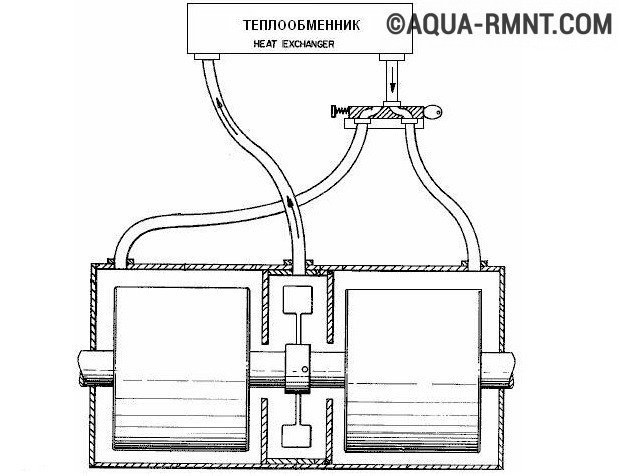
The most practical in a certain way is the Frenette device model without a cooler and an internal type of cylinder. Some disks rotate inside such a unit, and oil acts as a coolant. It enters the radiator, the oil goes through the cooling process and returns to the system again.
The process of preparing for the collection of the heating system.
There must be a slight gap between the housing wall and the rotating part
Therefore, it is important that there is a small difference between the diameters of the metal disks and the cylinder
The number of disks, as well as nuts, depends on the size of the unit, which nuts are usually six millimeters high.
Regarding the coolant, it is better to use liquid oil directly. Why? The oil temperature is higher.In addition, water pressure builds up. The result of this may well be damage to this type of structure, which would be highly unacceptable.


Bearing required for installation work
As an electric motor, even any type of model is quite suitable, capable of providing the required number of revolutions, for example, from an old fan.
How to improve the performance of the assembled device?
It is recommended to use the specifics of automatic on / off for the motor, which is controlled using thermal sensors attached to the body. In this case, the use will be quite convenient and economical.
Where to use this type of pump
Such a unit is suitable for heating small rooms, for example, a room. To heat the house, you can use it together with underfloor heating. The difference is that the liquid circulates directly through the tubes, in the screed. The regulation of such a system occurs with the help of the temperature sensor itself, installed on the body of the unit.