- Where to put
- forced circulation
- natural circulation
- Mounting Features
- Manufacturing
- How to connect a solid fuel boiler
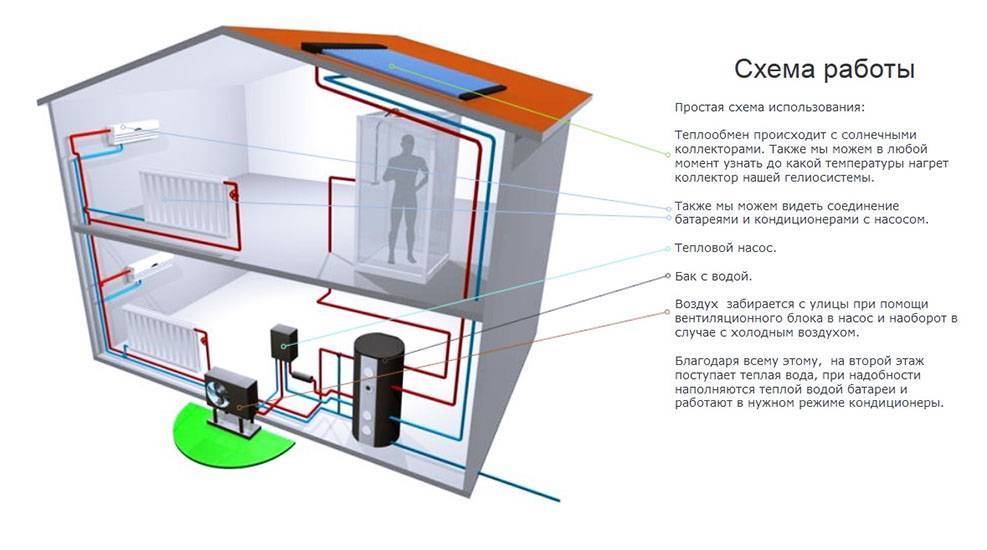
- How the scheme works
- Way to reduce the cost of strapping
- How to make a heat pump with your own hands from an old refrigerator
- Assembling the units and installing the heat pump
- Pros and cons of homemade equipment
- Which is cheaper for heating: electricity, gas or heat pump
- Connection costs
- Consumption
- Exploitation
- What are the benefits of using a heat pump?
- Types of heat pumps
- How to make such a device at home
- Elements for DIY assembly
- The sequence of work according to the drawings
- Frenetta heat pump principle of operation and the possibility of self-manufacturing
- Conclusions and useful video on the topic
Where to put
It is recommended to install a circulation pump after the boiler, before the first branch, but it does not matter on the supply or return pipeline. Modern units are made from materials that normally tolerate temperatures up to 100-115 ° C. There are few heating systems that work with a hotter coolant, therefore considerations of a more “comfortable” temperature are untenable, but if you are so calmer, put it in the return line.
Can be installed in the return or direct pipeline after/before the boiler up to the first branch
There is no difference in hydraulics - the boiler, and the rest of the system, it does not matter whether there is a pump in the supply or return branch. What matters is the correct installation, in the sense of tying, and the correct orientation of the rotor in space
Nothing else matters
There is one important point at the installation site. If there are two separate branches in the heating system - on the right and left wings of the house or on the first and second floors - it makes sense to put a separate unit on each, and not one common one - directly after the boiler. Moreover, the same rule is preserved on these branches: immediately after the boiler, before the first branch in this heating circuit. This will make it possible to set the required thermal regime in each of the parts of the house independently of the other, as well as save on heating in two-story houses. How? Due to the fact that the second floor is usually much warmer than the first floor and much less heat is required there. If there are two pumps in the branch that goes up, the speed of the coolant is set much less, and this allows you to burn less fuel, and without compromising the comfort of living.
There are two types of heating systems - with forced and natural circulation. Systems with forced circulation cannot work without a pump, with natural circulation they work, but in this mode they have a lower heat transfer. However, less heat is still much better than no heat at all, so in areas where electricity is often cut off, the system is designed as hydraulic (with natural circulation), and then a pump is slammed into it. This gives high efficiency and reliability of heating. It is clear that the installation of a circulation pump in these systems has differences.
All heating systems with underfloor heating are forced - without a pump, the coolant will not pass through such large circuits
forced circulation
Since a forced circulation heating system is inoperative without a pump, it is installed directly into the gap in the supply or return pipe (of your choice).
Most problems with the circulation pump arise due to the presence of mechanical impurities (sand, other abrasive particles) in the coolant. They are able to jam the impeller and stop the motor. Therefore, a strainer must be placed in front of the unit.
Installing a circulation pump in a forced circulation system
It is also desirable to install ball valves on both sides. They will make it possible to replace or repair the device without draining the coolant from the system. Turn off the taps, remove the unit. Only that part of the water that was directly in this piece of the system is drained.
natural circulation
The piping of the circulation pump in gravity systems has one significant difference - a bypass is required. This is a jumper that makes the system operational when the pump is not running. One ball shut-off valve is installed on the bypass, which is closed all the time while pumping is in operation. In this mode, the system works as a forced one.
Scheme of installation of a circulation pump in a system with natural circulation
When electricity fails or the unit fails, the faucet on the jumper is opened, the faucet leading to the pump is closed, the system works like a gravitational one.
Mounting Features
There is one important point, without which the installation of the circulation pump will require alteration: it is required to turn the rotor so that it is directed horizontally.The second point is the direction of the flow. There is an arrow on the body indicating in which direction the coolant should flow. So turn the unit around so that the direction of movement of the coolant is “in the direction of the arrow”.
The pump itself can be installed both horizontally and vertically, only when choosing a model, see that it can work in both positions. And one more thing: with a vertical arrangement, the power (created pressure) drops by about 30%. This must be taken into account when choosing a model.
Manufacturing
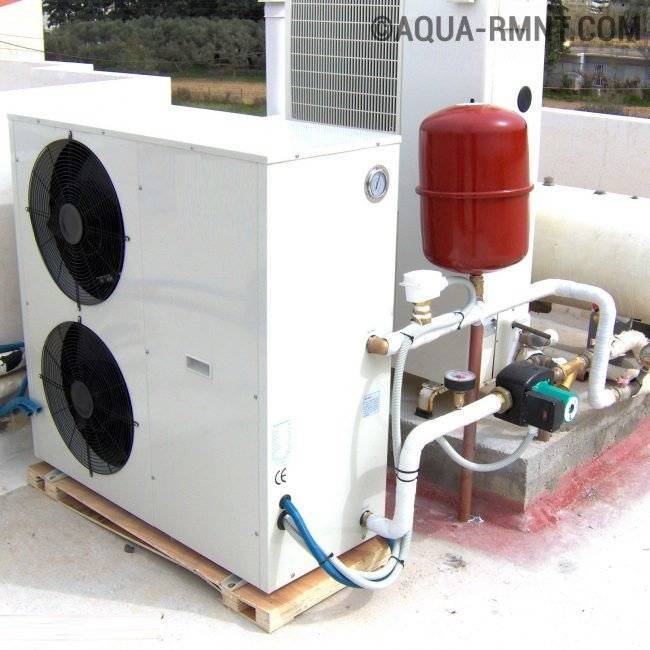
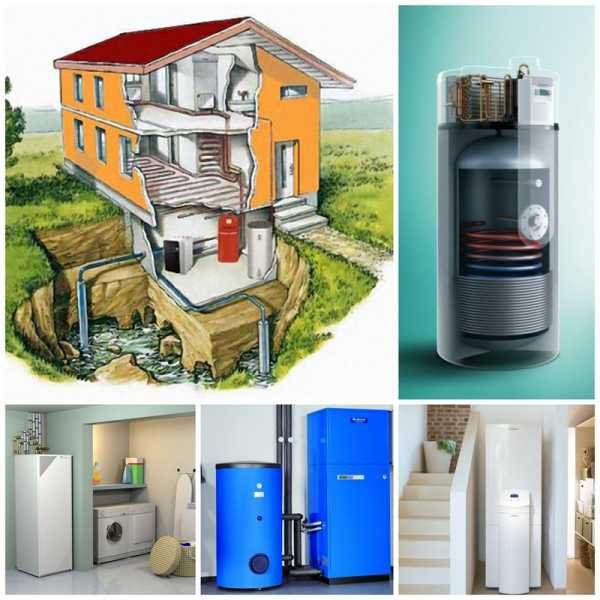
A heat pump can be made from commercially available parts or by purchasing cheap used parts. The installation procedure is as follows:
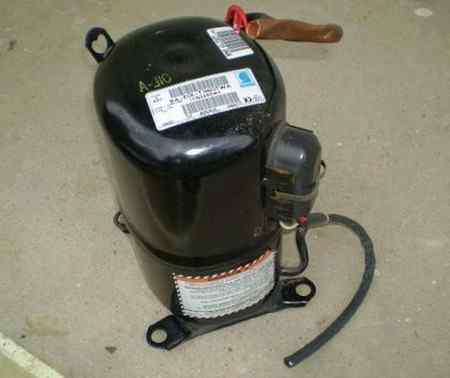
We purchase a ready-made compressor in specialized stores or use a compressor from a conventional air conditioner. We fix it to the wall where our installation will be located. Reliability of fastening is ensured by two L-300 brackets.
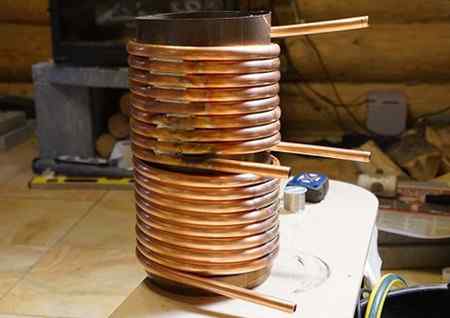
We make a capacitor. To do this, cut a stainless steel tank with a volume of about one hundred liters in half. We install a coil made of a thin copper tube with a wall thickness of at least 1 mm in the tank. For the coil, you can purchase a plumbing tube or use a copper tube from an old refrigerator


We make the coil as follows: a copper tube is wound around an oxygen or gas cylinder, it is important to maintain a small distance between the turns, which should be the same;
to fix the position of the turns of the tube, we take two perforated aluminum corners and attach them to the coil in such a way that each turn of our tube is located opposite the hole in the corner.The corners will ensure the same spacing of the coils and will give the geometric invariability of the entire coil structure.
After installing the coil, we weld the halves of the tank together, having previously welded the necessary threaded connections.
We make an evaporator
We take the usual closed plastic container with a volume of 60 or 80 liters. We will mount a coil from a tube with a diameter of ¾ inch and threaded connections for drain pipes and water inflows into it (ordinary water pipes are allowed). We also fix the finished evaporator on the wall using L-brackets of the required size.
We invite craftsmen to assemble the system, weld copper pipes and pump freon. If you do not have experience with refrigeration equipment, you should not try to do this work yourself. This can lead to failure of the entire structure and is fraught with serious injury.
After the main part of our system is ready, it is necessary to connect it to the heat distribution and intake devices.
The assembly of the heat extraction installation depends on the type of pump and the heat source.
How to connect a solid fuel boiler
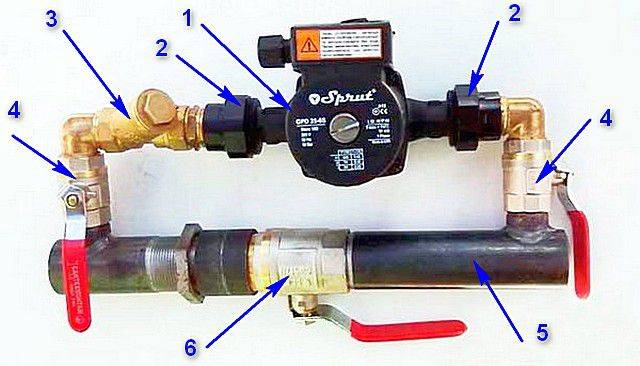
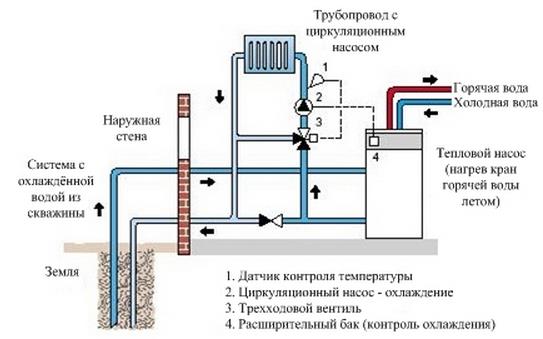
The canonical scheme for connecting a solid fuel boiler contains two main elements that allow it to function reliably in the heating system of a private house. This is a safety group and a mixing unit based on a three-way valve with a thermal head and a temperature sensor, shown in the figure:
Note. The expansion tank is conventionally not shown here, since it can be located in different places in different heating systems.
The presented diagram shows how to connect the unit correctly and should always accompany any solid fuel boiler, preferably even a pellet one. You can find various general heating schemes anywhere - with a heat accumulator, an indirect heating boiler or a hydraulic arrow, on which this unit is not shown, but it must be there. More about this in the video:
The task of the safety group, installed directly at the outlet of the solid fuel boiler inlet pipe, is to automatically relieve the pressure in the network when it rises above the set value (usually 3 bar). This is done by a safety valve, and in addition to it, the element is equipped with an automatic air vent and a pressure gauge. The first releases the air that appears in the coolant, the second serves to control pressure.
Attention! On the section of the pipeline between the safety group and the boiler, it is not allowed to install any shut-off valves
How the scheme works
The mixing unit, which protects the heat generator from condensate and temperature extremes, operates according to the following algorithm, starting from kindling:
- Firewood is just flaring up, the pump is on, the valve on the side of the heating system is closed. The coolant circulates in a small circle through the bypass.
- When the temperature in the return pipeline rises to 50-55 °C, where the remote-type overhead sensor is located, the thermal head, at its command, begins to press the three-way valve stem.
- The valve slowly opens and cold water gradually enters the boiler, mixing with hot water from the bypass.
- As all the radiators warm up, the overall temperature rises and then the valve closes the bypass completely, passing all the coolant through the unit heat exchanger.
This piping scheme is the simplest and most reliable, you can safely install it yourself and thus ensure the safe operation of the solid fuel boiler. Regarding this, there are a couple of recommendations, especially when tying a wood-burning heater in a private house with polypropylene or other polymer pipes:
- Make a section of the pipe from the boiler to the safety group from metal, and then lay plastic.
- Thick-walled polypropylene does not conduct heat well, which is why the overhead sensor will frankly lie, and the three-way valve will be late. For the unit to work correctly, the area between the pump and the heat generator, where the copper bulb stands, must also be metal.
Another point is the installation location of the circulation pump. It is best for him to stand where he is shown in the diagram - on the return line in front of the wood-burning boiler. In general, you can put the pump on the supply, but remember what was said above: in an emergency, steam may appear in the supply pipe. The pump cannot pump gases, therefore, if steam enters it, the circulation of the coolant will stop. This will accelerate the possible explosion of the boiler, because it will not be cooled by the water flowing from the return.
Way to reduce the cost of strapping
The condensate protection scheme can be reduced in cost by installing a three-way mixing valve of a simplified design that does not require the connection of an attached temperature sensor and a thermal head. A thermostatic element is already installed in it, set to a fixed mixture temperature of 55 or 60 ° C, as shown in the figure:
Special 3-way valve for solid fuel heating units HERZ-Teplomix
Note.Similar valves that maintain a fixed temperature of mixed water at the outlet and are designed for installation in the primary circuit of a solid fuel boiler are produced by many well-known brands - Herz Armaturen, Danfoss, Regulus and others.
The installation of such an element definitely allows you to save on piping a TT boiler. But at the same time, the possibility of changing the temperature of the coolant with the help of a thermal head is lost, and its deviation at the outlet can reach 1–2 °C. In most cases, these shortcomings are not significant.
How to make a heat pump with your own hands from an old refrigerator
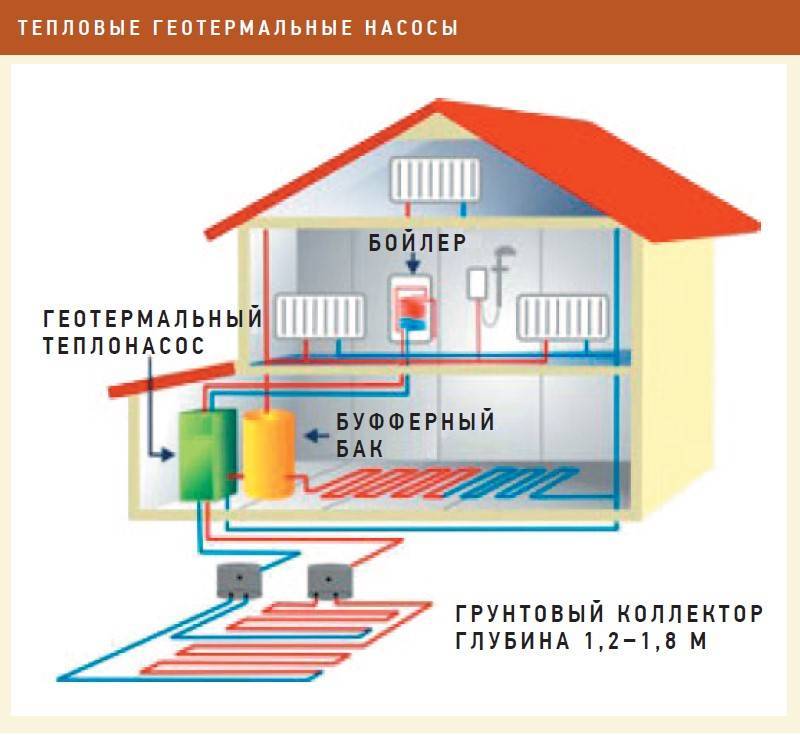
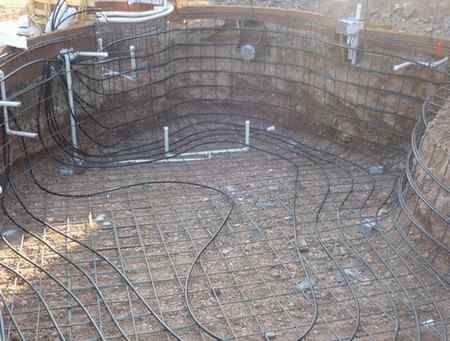
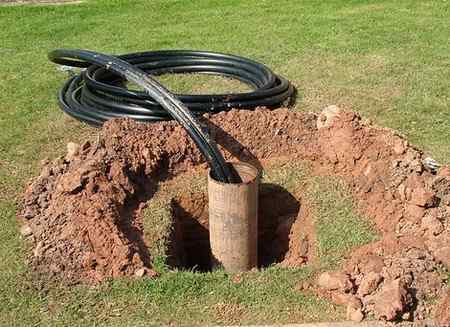
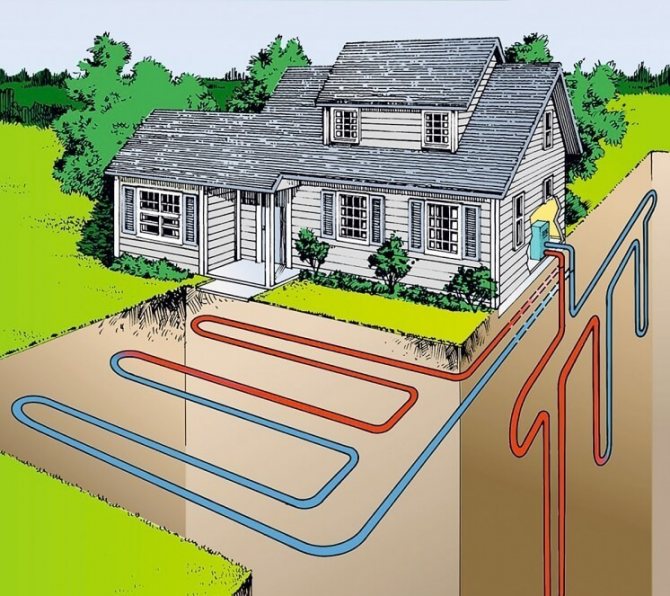
Before proceeding with the manufacture of a heat pump, it is necessary to select a heat source and resolve the issue with the scheme of operation of the installation. In addition to the compressor, you will need other equipment, as well as tools. Implementation of diagrams and drawings. To install a heat pump, you need to make a well, because the energy source must be underground. The depth of the well should be such that the temperature of the earth is at least 5 degrees. For this purpose, any reservoirs are also suitable.


The designs of heat pumps are similar, so no matter what the heat source will be, you can use almost any scheme found on the net. When the scheme is selected, it is necessary to complete the drawings and indicate in them the dimensions and junctions of the nodes.
Since it is rather difficult to calculate the power of the installation, you can use the average values. For example, a dwelling with low heat loss will require a heating system with a power of 25 watts per square meter. meter. For a building that is well insulated, this value will be 45 watts per square meter. meter.If the house has sufficiently high heat losses, the installation power should be at least 70 W per sq. meter.
Selecting the required details. If the compressor removed from the refrigerator is broken, then it is preferable to purchase a new one. It is not recommended to repair the old compressor, because in the future this may adversely affect the operation of the heat pump.
A thermostatic valve and 30 cm L-brackets will also be needed to make the device.
Additionally, you will need to purchase the following parts:
- sealed stainless steel container with a volume of 120 liters;
- plastic container with a volume of 90 liters;
- three copper pipes of different diameters;
- plastic pipes.
To work with metal parts, you will need a welding machine and a grinder.
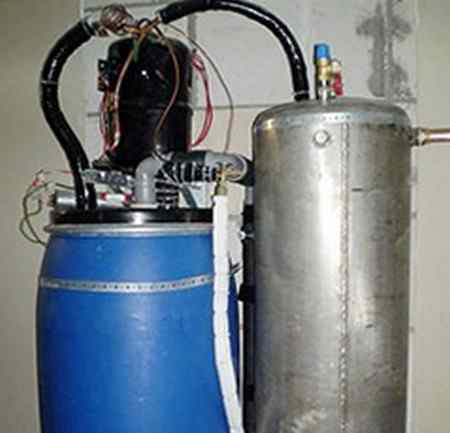
Assembling the units and installing the heat pump
First of all, you should install the compressor on the wall using brackets. The next step is to work with the capacitor. The stainless steel tank must be divided into two parts using a grinder. A copper coil is mounted in one of the halves, then the container must be welded and threaded holes made in it.
To make a heat exchanger, you need to wind a copper pipe around a stainless steel container and fix the ends of the turns with slats. Attach plumbing transitions to the conclusions.
It is also necessary to attach a coil to the plastic tank - it will act as an evaporator. Then fasten it to the wall section with brackets.
As soon as work with the nodes is completed, you need to select a thermostatic valve. The design should be assembled and filled with freon system (R-22 or R-422 brand is suitable for this purpose).
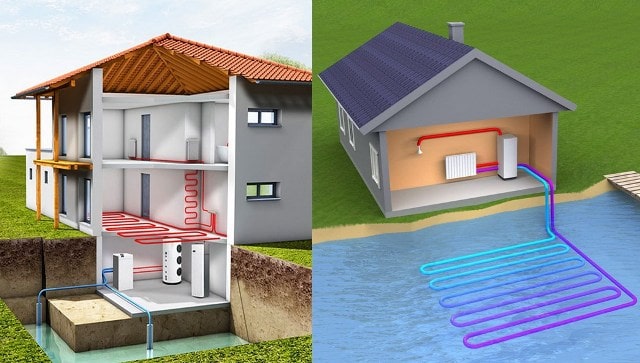
Connection to the intake device. The type of device and the nuances of connecting to it will depend on the scheme:
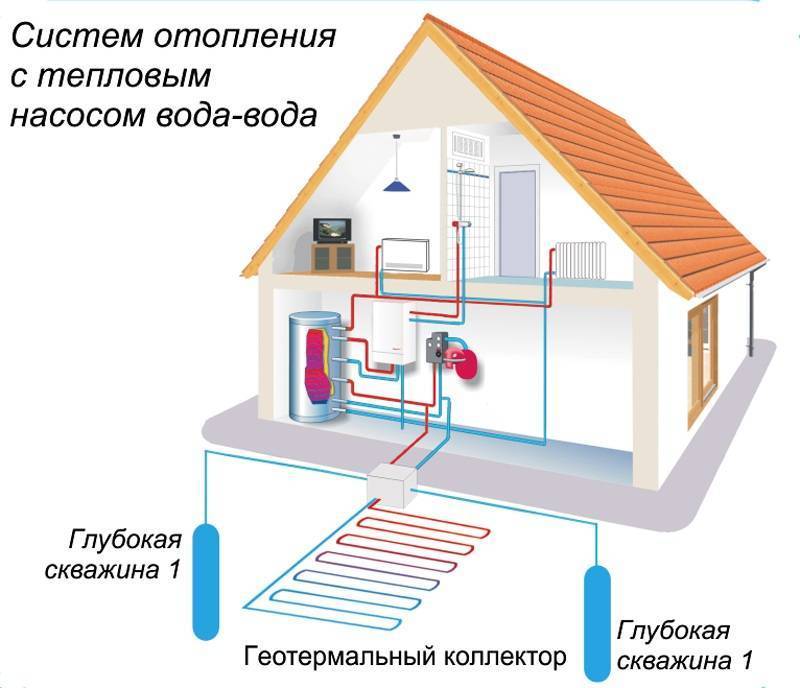
- "Water-Earth". The collector should be installed below the frost line of the ground. It is necessary that the pipes are at the same level.
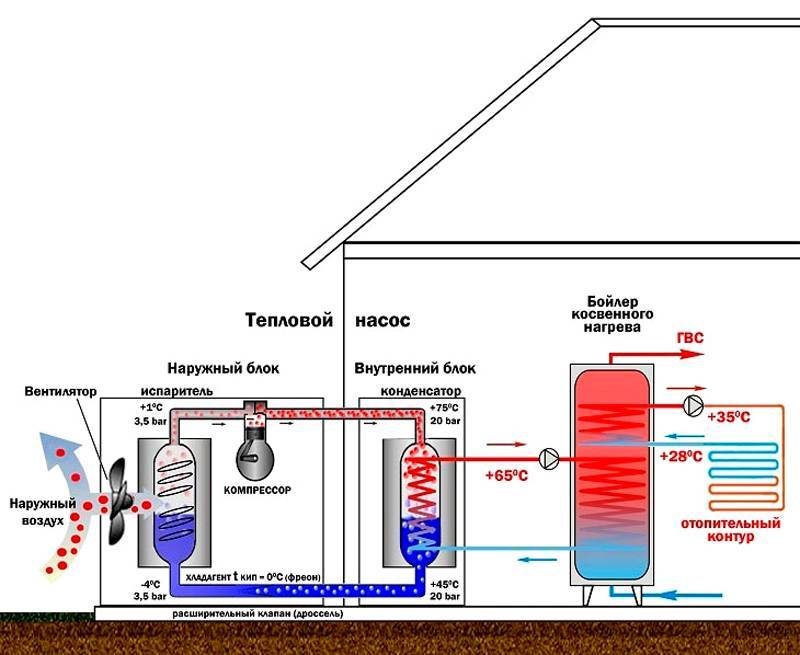
- "Water-air". Such a system is easier to install, since there is no need for drilling wells. The collector is mounted anywhere near the house.
- "Water-water". The collector is made of metal-plastic pipes, and then placed in a reservoir.
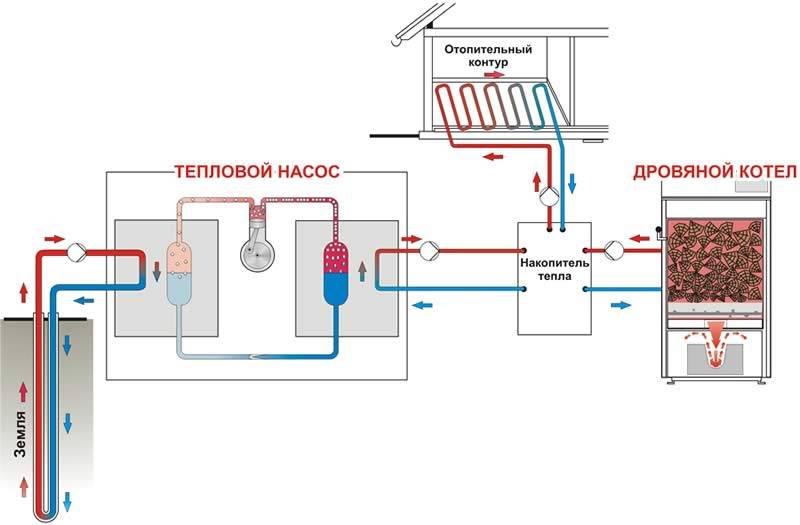
You can also install a combined heating system to heat your home. In such a system, the heat pump works simultaneously with the electric boiler and is used as an additional source of heating.
It is quite possible to assemble a heat pump for heating a house yourself. Unlike buying a ready-made installation, this will not require large financial costs, and the result will certainly please.
Pros and cons of homemade equipment
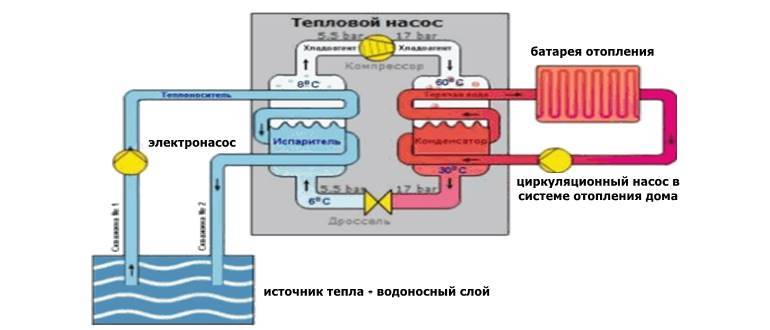
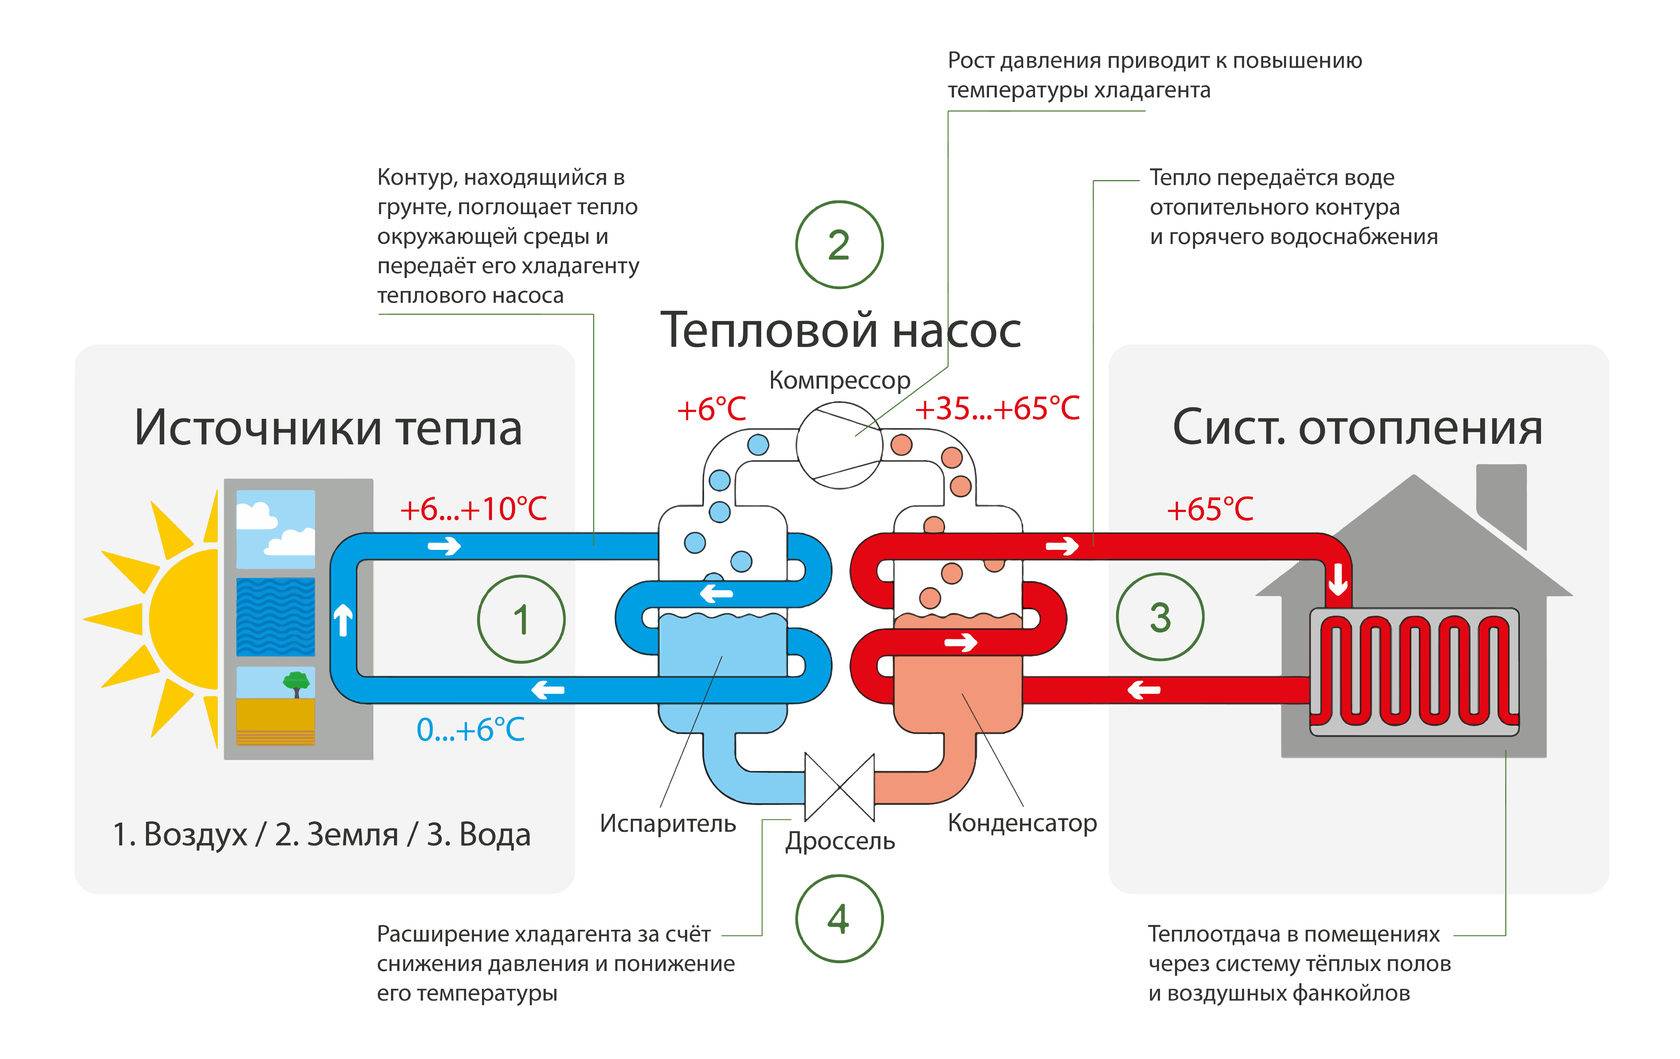
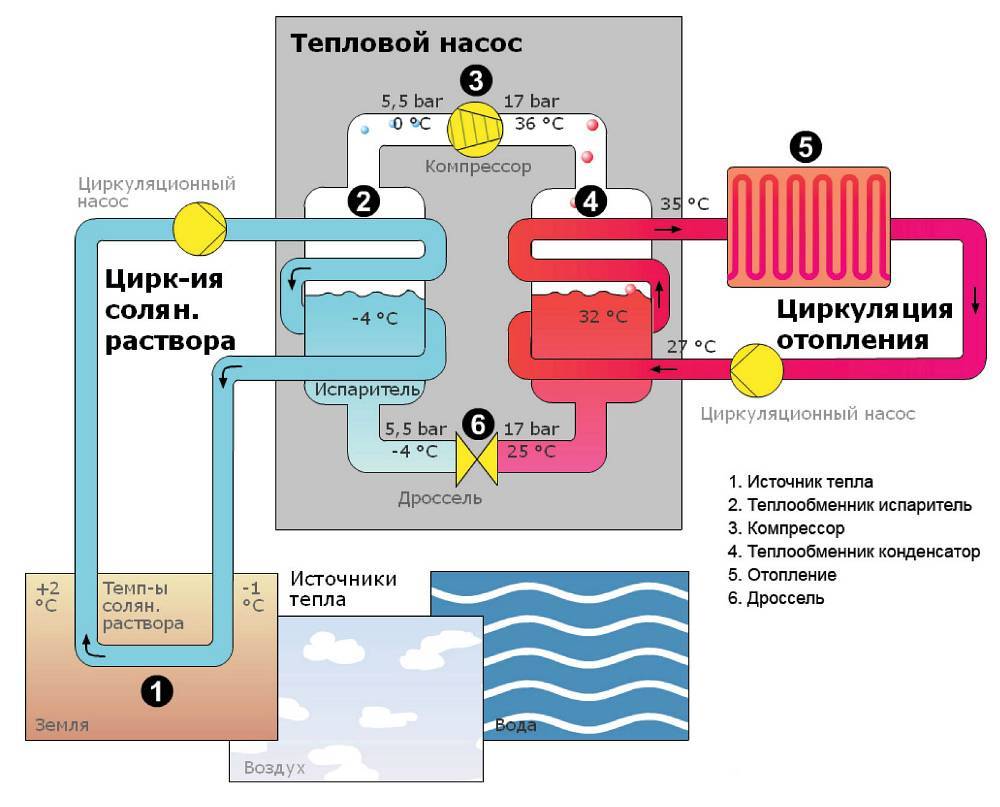
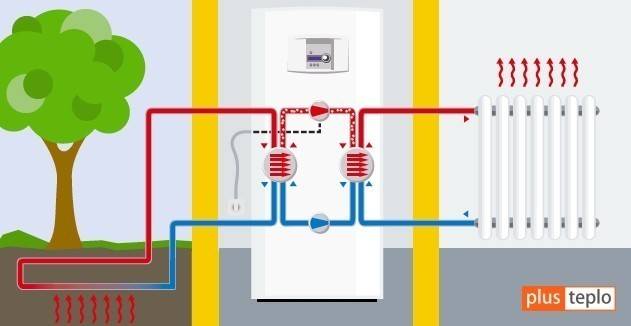
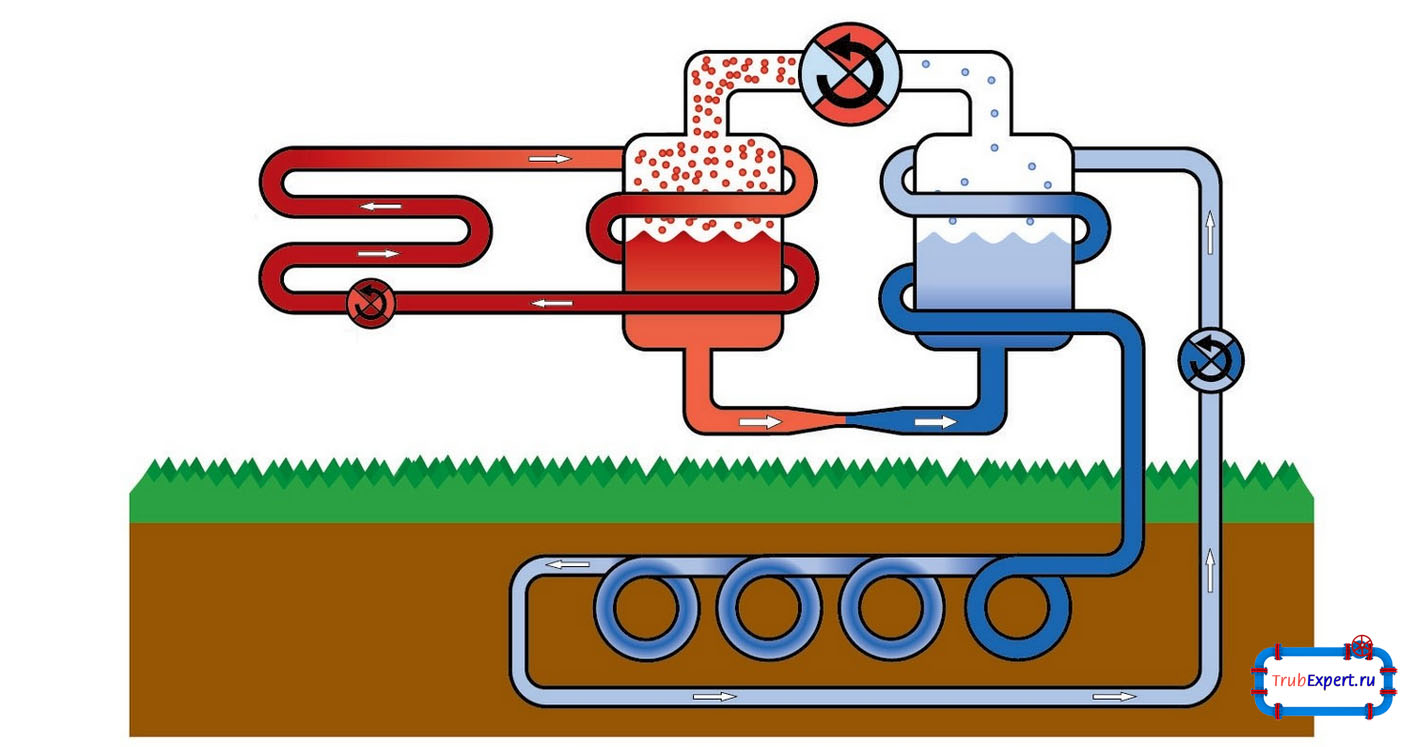
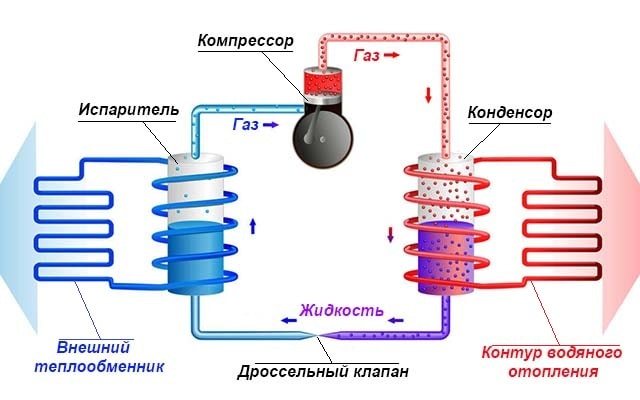
A heat pump is a device that does not produce heat, but moves it from one place to another, while raising the temperature through compression. This process proceeds according to the principle of the Carnot cycle, which consists in the movement of the working fluid (refrigerant) through a closed system. When its state changes from liquid to gaseous and vice versa, a large amount of energy is released or absorbed. This principle is used in the design of refrigerators, but the mechanism of action of a heat pump is to absorb heat from the outside and transfer it to the room.
Stages of the Carnot cycle:
- liquid freon enters the evaporator through the tube;
- interacting with the coolant, which is water, air or soil, the refrigerant evaporates, taking on a gaseous state;
- the working fluid passes through the compressor, is compressed under pressure, which contributes to an increase in its temperature
- then it enters the condenser, which acts as a heat exchanger;
- gives the received heat to the coolant and again takes the form of a liquid;
- in this form, freon enters the expansion valve, where, at low pressure, it again moves to the evaporator.
The device of industrial production is expensive, the payback period is an average of 5-7 years. The popularity of a heat pump from an old refrigerator is due to the minimum material investment in the manufacture of the unit and the possibility of saving energy costs during its operation.
Additionally, the following advantages of using home-made equipment are distinguished:
- no noise, no odors;
- installation of auxiliary structures, a chimney is not required;
- the operation of the equipment does not harm the environment, as it does not involve the emission of combustion products into the atmosphere;
- the ability to install the system in a convenient place;
- multifunctionality. In winter, the device is used as a heater, and in summer as an air conditioner;
- safety. Operation does not involve the use of fuel, and the maximum temperature of the units of the unit does not exceed 90 0C;
- durability, reliability. The service life of the unit when using high-quality components is 30 years or more.
The main disadvantage of home-made devices is their low productivity, so they are often used as an additional option for heating individual rooms in the house. It is recommended to assemble such a system in rooms with good thermal insulation and a heat loss level of not more than 100 W / m2.
Which is cheaper for heating: electricity, gas or heat pump
Here are the costs for connecting each type of heating. To present the general picture, let's take the Moscow region. In the regions, prices may differ, but the price ratio will remain the same. In the calculations, we assume that the site is "bare" - without gas and electricity.


Connection costs
Heat pump. Laying a horizontal contour at MO prices - 10,000 rubles per change of an excavator with a cubic bucket (selects up to 1,000 m³ of soil in 8 hours). A system for a house of 100 m² will be buried in 2 days (this is true for loam, where up to 30 W of thermal energy can be removed from 1 m of the circuit). About 5,000 rubles will be required to prepare the circuit for work. As a result, the horizontal option for placing the primary circuit will cost 25,000.
The well will be more expensive (1,000 rubles per linear meter, taking into account the installation of probes, piping them into one line, filling with coolant and pressure testing.), but much more profitable for future operation. With a smaller occupied area of the site, the return increases (for a well of 50 m - at least 50 W per meter). The needs of the pump are covered, additional potential appears. Therefore, the entire system will not work for wear and tear, but with some power reserve. Place 350 meters of the contour in vertical wells - 350,000 rubles.
Gas boiler. In the Moscow Region, for connection to the gas network, work on the site and installation of the boiler, Mosoblgaz requests from 260,000 rubles.
Electric boiler. Connecting a three-phase network will cost 10,000 rubles: 550 - to local power networks, the rest - to the switchboard, meter and other content.
Consumption
To operate a HP with a thermal power of 9 kW, 2.7 kW / h of electricity is required - 9 rubles. 53 kop. in hour,
The specific heat during the combustion of 1 m³ of gas is the same 9 kW. Household gas for Moscow Region is set at 5 rubles. 14 kop. per cube
The electric boiler consumes 9 kWh = 31 rubles. 77 kop. in hour. The difference with TN is almost 3.5 times.
Exploitation
- If gas is supplied, then the most cost-effective option for heating is a gas boiler. The equipment (9 kW) costs at least 26,000 rubles, the monthly payment for gas (12 hours / day) will be 1,850 rubles.
- Powerful electrical equipment is more profitable in terms of organizing a three-phase network and acquiring the equipment itself (boilers - from 10,000 rubles). A warm house will cost 11,437 rubles per month.
- Taking into account the initial investment in alternative heating (equipment 275,000 and installation of a horizontal circuit 25,000), a heat pump that consumes electricity at 3,430 rubles / month will pay off no earlier than in 3 years.
Detailed calculations in favor of the operation of the heat pump can be found by watching the video from the manufacturer:
Some additions and experience of effective operation are covered in this video:
What are the benefits of using a heat pump?
A heat pump heating system has a number of advantages:
The equipment does not require a lot of electricity to operate. On average, spending 1 kW of electricity, you can get up to 4 kW of thermal energy. During operation, the air is not polluted by various harmful substances.
The use of a thermal installation does not pose any danger to the environment. Such equipment is multifunctional: in winter it is used to heat the house, and in summer as an air conditioner.
Heat pumps are absolutely safe.Their operation does not require fuel, no harmful substances are emitted during operation, and the maximum temperature of the installation nodes is 90 degrees.
Types of heat pumps
Heat pumps are divided into two types: compression and absorption. The equipment of the first type is more popular, and just such an installation can be done independently using a compressor from an old refrigerator. Also for the manufacture will be needed an evaporator, condenser and expander.
Depending on the type of heat source, the installation can be air, geothermal (geothermal heating) or using secondary heat. One or two different heat sources are used in the inlet and outlet circuits.
According to this factor, the following types of heat pumps are distinguished:
- "air-to-air";
- "water-water";
- "water-air";
- "land-water";
- "ice-water".
It is important to consider that a homemade heat pump will not be as powerful as equipment produced at an industrial enterprise. But it will be quite enough to heat a separate room.
How to make such a device at home
The most practical of all existing homemade models under Frenette heat pump for heating housing is one in which there is no fan and no inner cylinder. Instead, a number of metal discs are used that rotate inside the instrument case. The coolant is oil that penetrates the radiator, cools and returns back.


A heat pump will help your boiler distribute heat evenly
Elements for DIY assembly
Make a heat generator according to the project E.Frenette at home is not so difficult. To do this, you need the drawings of the apparatus and the following elements:
- metal cylinder;
- steel discs;
- nut set;
- rod made of metal or heat-resistant plastic;
- steel butterfly valve;
- motor;
- several pipes;
- radiator.
Important! The diameter of the cylinder must necessarily exceed the diameter of each of the steel discs in order to have a gap between the housing and the rotating part. The number of discs and nuts is selected according to the size of the apparatus
The discs are put one after the other on a steel (or transparent plastic) rod, separating them with nuts. Usually nuts with a height of 6 millimeters are selected. The cylinder is filled with discs to the very top. An external thread is cut into the rod in full length. A pair of holes are drilled in the body for the movement of the coolant. Hot oil flows through the upper hole into the radiator, and through the lower one it returns back for subsequent heating.
It is advised to fill the system with liquid oil, not water, this ensures a high level of temperature heating of the coolant. Too fast heating of water creates excess steam, and due to it, increased pressure arises in the system, which is undesirable.
To mount the rod, it is necessary to prepare the bearing. Any model with a sufficiently large number of revolutions will fit the role of the engine. It may be a motor from a fan that has not been used for a long time.
The sequence of work according to the drawings
Do-it-yourself frenetta heat pump is assembled in the following sequence:
- Holes are drilled in the cylinder.
- A rod is installed in the center.
- One nut is screwed along the thread of the rod, then a disc is placed, another nut is screwed on, a second disc is placed, etc.
- The disks are strung until the body is filled.
- The system is filled with oil.
- The body is closed, the rod is fixed.
- Radiator pipes are connected to the holes.
- A motor is attached to the rod, a casing is attached to the motor.
- The device is connected to the mains and tested.
For the convenience of working with a heat generator, experts recommend building an automatic engine on-off switch. The boiler is controlled by a temperature sensor attached to the body of the device.
Frenetta heat pump principle of operation and the possibility of self-manufacturing
4c), a stable mode of self-generation of the universal generating unit is created, which ensures its operation without an external power source.
From the tank 1, if necessary, hot water, steam or oxygen and hydrogen through the outlet pipe 3 enter the hot water supply, heating, steam supply, cold storage or oxygen and hydrogen collection systems, respectively.
The most efficient universal generating plant operates with a curved shape of the inner surface of the housing 6 with a ratio of the maximum diameter "D" of the disk 7 (Fig.
2) to the diameter "d" of the shaft cavity 9 as 3:1, with the ratio of the maximum diameter "D" of the disk 7 (Fig. 2) to the height "H" as 3:1, with five disks 7 forming four vacuum zones 11 with four circular exits 12 into curvilinear channels 10 of rectangular section with a height of 1.4 mm and a width of 2 mm.
The layout of the universal generating set can be either horizontal or vertical, with a top or bottom drive, with installation on one or two bearings.
The excess water pressure created by the water heater in the tank 1 allows the universal generating unit to perform the functions of a circulation pump.
Now, here are some observations:
In accordance with the essence of the invention, a universal generating plant is manufactured with a speed of up to 13,000 rpm.
At the same time, the water heater includes: a body with a curved surface of the lower side and a height of "H" - 70 mm, with a curvilinear arrangement of channels in the amount of 73 pieces, having a rectangular section with a height of 1.4 mm and a width of 2.0 mm; 5 disks with a maximum diameter of the lower disk "D" - 210 mm, forming four vacuum zones with four circular exits to the channels; shaft with a diameter "d" of the shaft cavity - 70 mm.
Expected design parameters of the manufactured universal generating plant:
At 7600 - 8000 rpm, water is heated up to 100oC;
At 8000-10000 rpm, water is heated with vaporization, 100oC and higher;
At 10000-13000 rpm, vaporization occurs with a steam temperature of up to 400oC;
At 12500 rpm, the self-generation mode is set.
At 15,000 rpm and above, water decomposes into oxygen and hydrogen at a temperature of minus 60oC and below.
2015-2018 All rights belong to their authors.


This site does not claim authorship, but provides free use. Copyright Violation and Personal Data Violation
Conclusions and useful video on the topic
Rules for installing heating equipment in the video:
The video explains the features of a two-pipe heating system and demonstrates different installation schemes for devices:
Features of connecting the heat accumulator to the heating system in the video:
p> If you know all the connection rules, there will be no difficulties with the installation of the circulation pump, as well as when connecting it to the power supply at home.
The most difficult task is to insert a pumping device into a steel pipeline. However, using a set of lerok for creating threads on pipes, you can independently arrange the arrangement of the pumping unit.
Do you want to supplement the information presented in the article with recommendations from personal experience? Or maybe you saw inaccuracies or errors in the reviewed material? Please write to us about it in the comments block.
Or have you successfully installed the pump and want to share your success with other users? Tell us about it, add a photo of your pump - your experience will be useful to many readers.