- Do it yourself
- Preparatory stage
- Step-by-step instruction
- electric gun
- Required Materials
- Manufacturing process
- Fuel supply
- Operating principle of waste oil burners
- Nozzle
- Production of a gas heat gun
- Unit # 2 - diesel fuel heat gun
- How does such a design work?
- Assembly process
- Requirements for the installation and operation of an oil-fired oven
Do it yourself
The process of making a Babington burner is not very complicated and, with all the necessary materials and tools, it will take only a few days, depending on the skills of the person.
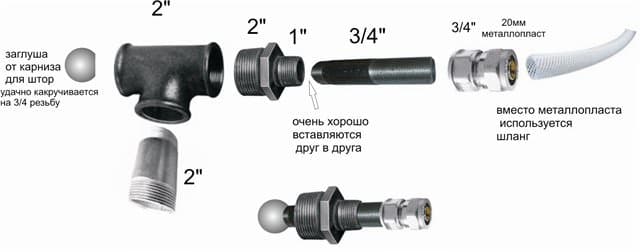
For the manufacture of this unit will require the following materials:
- steel tube DU10,
- metal tee with a diameter of 50 millimeters with an internal thread;
- a metal sphere (or hemisphere) with a diameter of less than 50 millimeters;
- copper tube DN10 not less than one meter in length;
- metal elbow DU10 with external thread;
- drive with a diameter of 50 millimeters with an external thread, a length of at least 10 centimeters;
You will also need a minimum set of tools:
- angle grinder (grinder) or hacksaw;
- perforator;
- special chuck for thin drills;
- drill;
- drill with a diameter of 0.1–0.3 mm;
- soldering iron;
Preparatory stage
Before starting the assembly, it is necessary to make a hole in the sphere (hemisphere). This is one of the most difficult and critical stages, since the hole must be made exactly in the middle. Otherwise, the burner flame will be directed to the side, which in turn may adversely affect the quality of the product and its efficiency.
In addition, drilling holes of this diameter is a difficult task, as thin drills can break. Therefore, this process must be carried out carefully and slowly.
Step-by-step instruction
Babington burner
After the sphere or hemisphere is ready, you can start assembling. It is very simple and consists of several simple manipulations:
- The metal squeegee will play the role of a nozzle. It is cut to the desired length and screwed into the tee. After that, a hole large enough is drilled in the side of the drive so that the jet can be ignited through it.
- On top of the tee, closer to the nozzle, a hole is made for a copper tube through which fuel will be supplied to the device.
- An elbow is attached to the copper tube to connect the fuel line.
- Several turns are made with a copper tube (2-3 will be enough) around the nozzle. They must be done at some distance from the drive. This will allow the oil to be heated to the correct temperature before it enters the sphere.
- In the sphere from the opposite end from the small hole, another one is drilled along the outer diameter of the steel tube. The tube is hermetically inserted into the sphere. This is necessary so that the air escapes only through a small hole, and pressure is created inside it. If a hemisphere is used instead of a sphere, then the tube is soldered in the place of a small hole and sealed.
- A metal tube with a sphere is inserted into the tee from the opposite end of the nozzle. She is fixed in it.
- Thus, the burner is ready for operation. It remains only to connect a compressor to the tube with the sphere, which will pump air into it and the fuel line to the copper tube.
- If desired, this system can be improved by connecting a pump to supply oil. You can also put a control unit control sensors. This will make the system automatic and more secure.
electric gun
This equipment is the safest and easiest to set up. If the site is connected to the mains, then it is best to make an electric heat gun with your own hands. A home-made device can be useful both during construction and in the future for various personal needs. The name "cannon" itself arose due to the similarity of the round body with a military gun. The body can also be rectangular or square.
Required Materials
Making a device for heating is not too expensive. To make an electric gun with your own hands, you will need:
- steel case;
- the frame where the structure will be located;
- electric fan;
- heating heater;
- wires for connecting the device to the mains;
- switch.
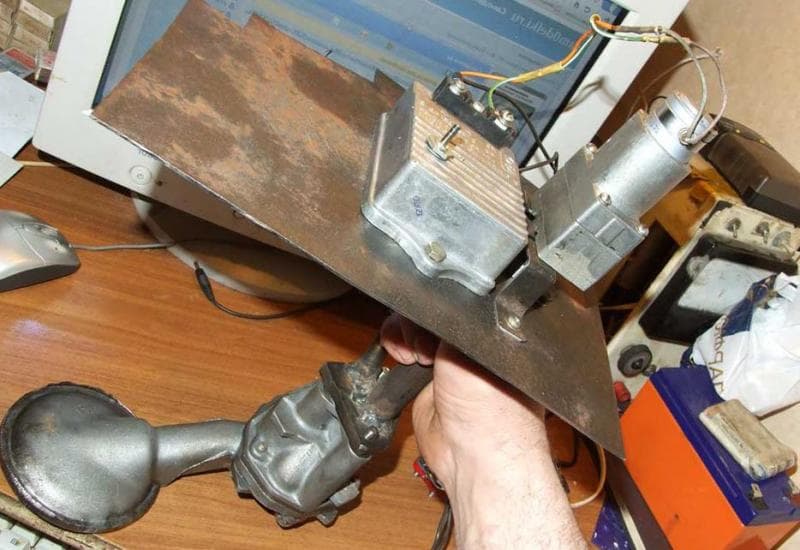
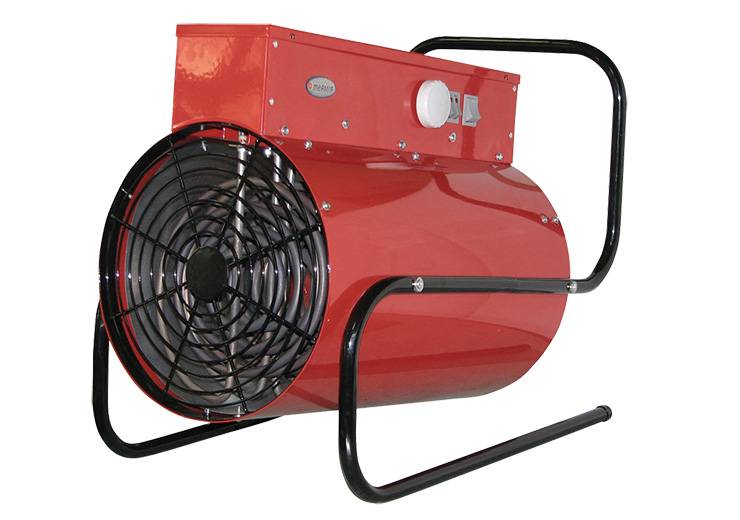 To create an electric gun, you will need at least a fan
The housing of this device may become very hot during use. Therefore, it is necessary to choose a rather thick or heat-resistant metal. In addition, it makes sense to apply thermal insulation to metal elements.


When choosing a heating element, one must not forget that the temperature of the outgoing air will depend on the number and power of these heating elements.At the same time, the fan speed will not affect the temperature, however, the faster this device rotates, the more evenly the heat is distributed throughout the room. That is, the heating element is responsible for the heating temperature, and the fan is responsible for the distribution quality.
To reduce costs, you can use a heating element from an old iron or other device. In some cases, it makes sense to shorten the length of the gun barrel in order to increase the warm-up temperature. A suitable electric motor with impeller can be removed from an unnecessary vacuum cleaner.
In this video you will learn how to make a cannon:
Manufacturing process
To assemble a heat gun, it is best to first draw a diagram of the electrical circuit of the heater. As a rule, ready-made schemes are used.
An electric heat gun is made in the following order:
- First you need to prepare the frame and body of the device.
- After that, one or more heating elements must be installed in the center of the body.
- Then you need to bring the power wire to them.
- After installing the fan, connect electricity to it.
- Connect the power cord, the cable from the heating elements and the fan to the control panel.
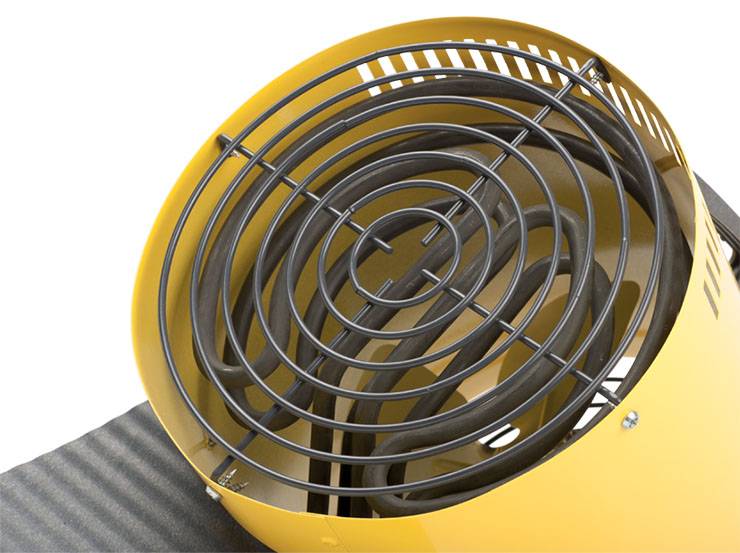
- Install the protective grille on the ends of the housing.
During assembly, be sure to isolate all wire connections. After assembly is completed, a test run of the heater is performed. If it works in normal mode, without failures, then you can use the equipment for its intended purpose.
 The order of manufacture of the gun is presented above.
Fuel supply
Amateur craftsmen often make the supply of drip furnaces with single-stage fuel: an oil tank, a ball valve, a supply tube.Firstly, it is dangerous: for the convenience and the same safety of starting the furnace, the valve must be placed closer to it. The feed pipe at the bottom fuel supply is quite hot. If heating passes through the pipe beyond the valve, to which there is a continuous column of fuel in the pipe, this threatens with disaster. Secondly, the fuel supply of the furnace turns out to be unstable: as the tube warms up, the drops become more frequent, because the oil thins out. If it pours in a trickle, then it is again dangerous.
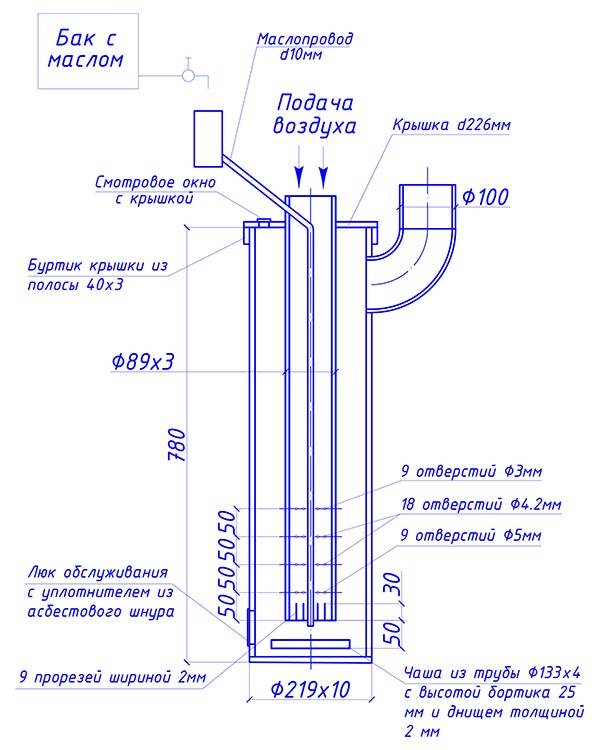
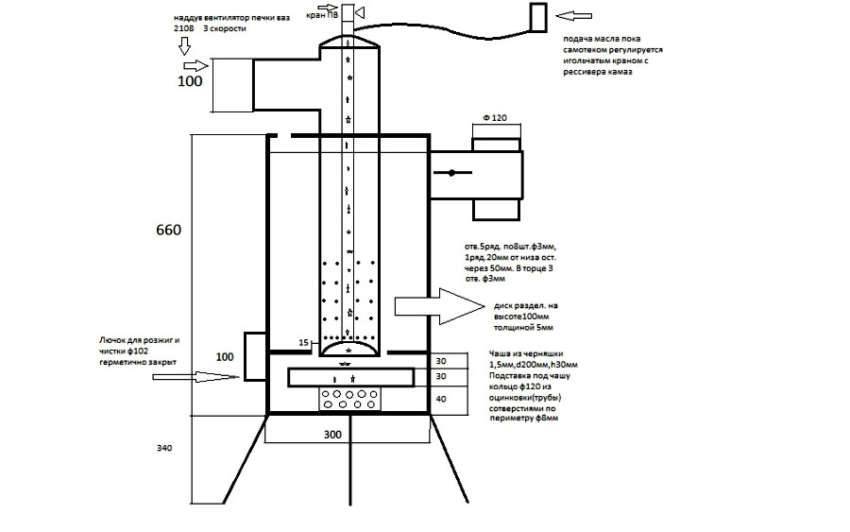
Drip oil supply to the furnace during mining should be organized according to a 2-stage scheme: main (accumulative) oil tank - valve - supply dropper - supply tank (tank) - free drain from it at least 60 mm from the bottom (for additional sludge sedimentation) - working drip. The fuel supply is opened when the kindling in the bowl (see below) is lit. While the oil drips into the tank to the level of the drain, you can slowly adjust its supply, and then it will drip into the bowl drop by drop.
Scheme of safe supply of a drip furnace from a supply tank with a safety valve and a capillary
This system, however, is not completely secure. If in a hurry, out of ignorance, or simply trying to warm up from the cold as soon as possible, open the valve too much, the consumable will immediately fill up, fuel will pour into the stove, and it will throw out a tongue of fire and go spitting burning spray. It would be correct to build a system for dripping oil into the furnace with a safety float valve and a dosing capillary (see the figure on the right).
Since different metals are wetted by mining in different ways, and its properties vary significantly from batch to batch, the length of the capillary will need to be selected: oil is supplied under a gravitational pressure of 120-150 mm (from a suspended container) at room temperature, and the capillary is selected so that it drips more often, but with drops clearly visible to the eye. From the same feeder, drip solar oven, but the capillary will need to be taken with a lumen of 0.6-1 mm and a length 2.5-3 times greater than for testing. There is only one disadvantage of such a scheme for supplying fuel to a drip furnace: mining is dirty fuel, and the capillary will have to be periodically cleaned.


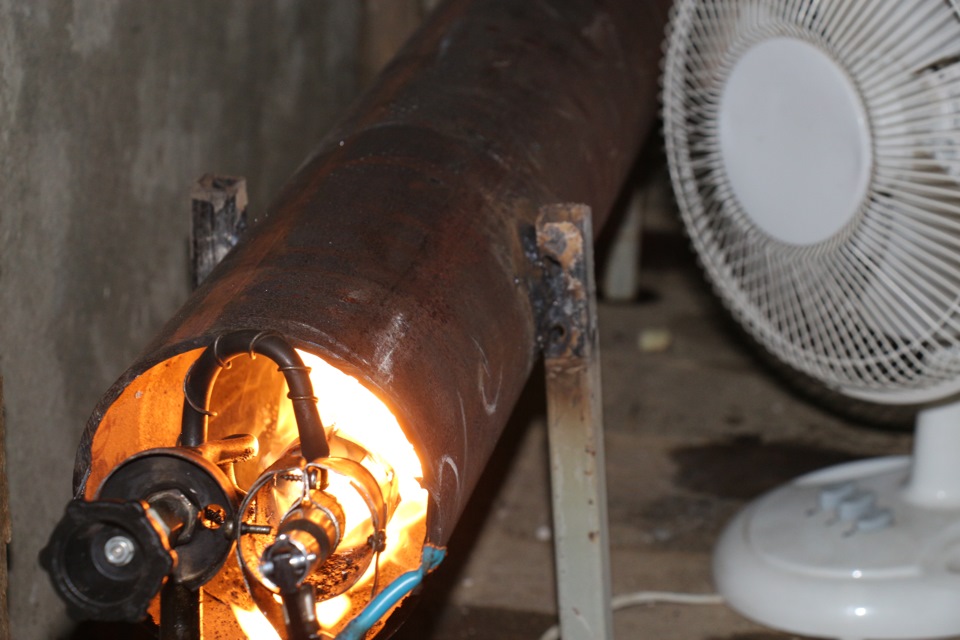


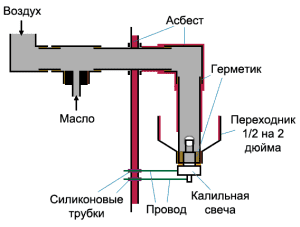
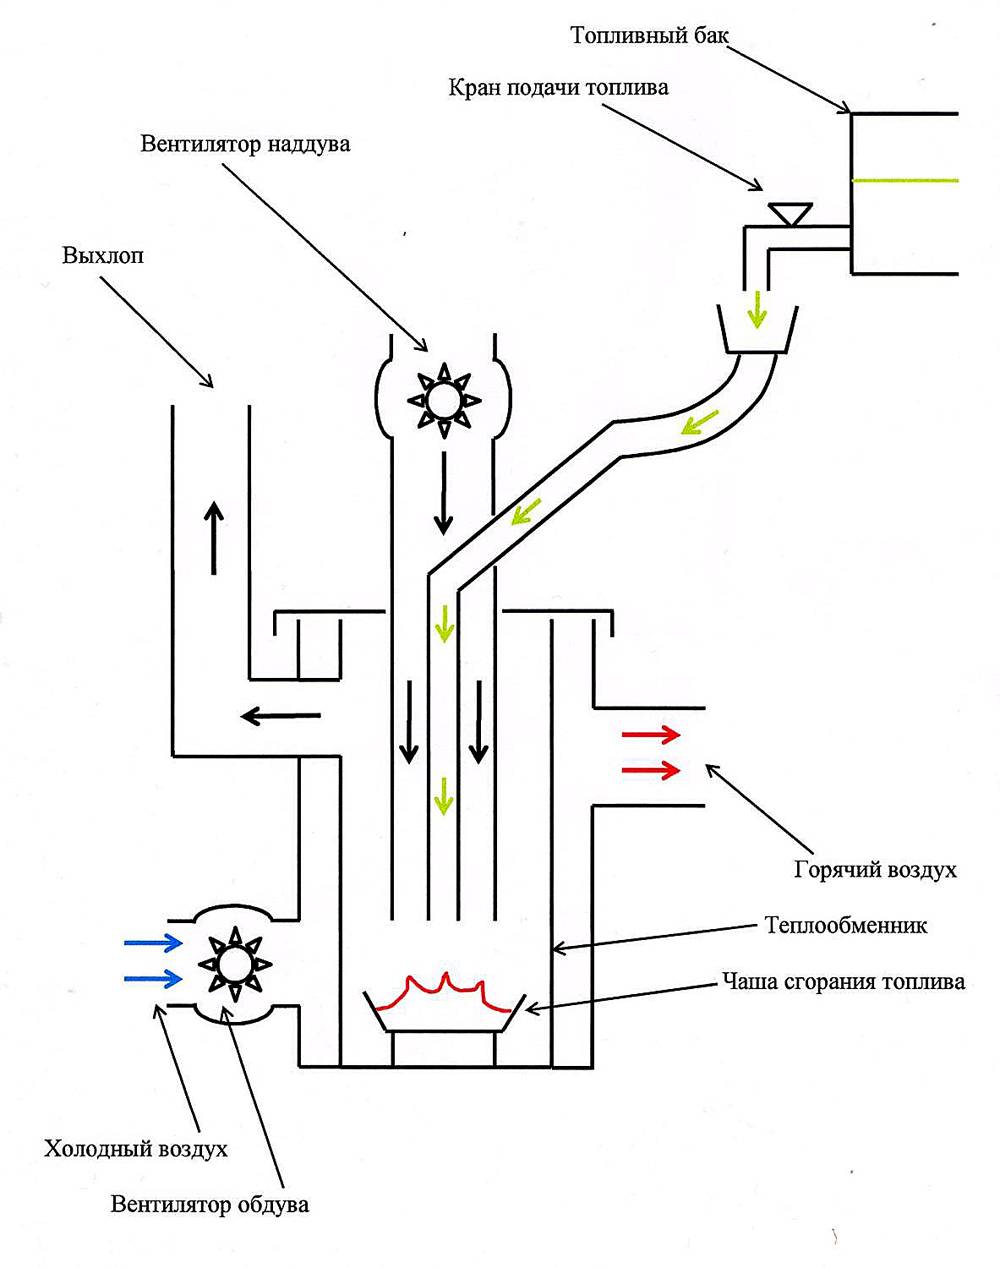
Operating principle of waste oil burners
Liquid fuel burners are also called nozzles. Their work is based on the principle of injection. That is, a strong air flow is created through the nozzle and a vacuum is formed in the fuel supply pipeline, due to which oil enters the combustion chamber and mixes it with air.
- Fuel preparation.
Before entering the burner, the fuel is filtered in the fuel filter and preheated in a special chamber. This is necessary to reduce the viscosity of the oil.
For burning mining, preheating is 80-900C. The fuel preheating temperature is controlled automatically.
- Fuel supply.
The fuel is pumped out of the tank by the fuel pump. Its intake is carried out from the surface of the flammable liquid mirror. This is due to the fact that mining may have mechanical impurities or water that settle at the bottom of the tank.
- combustion process.
To maintain the combustion process, it is necessary to have a certain amount of oxygen in the combustion chamber. The air that is used to rarefy and supply fuel is called primary, and it supports the combustion process, but this is not enough.
An additional fan supplies secondary air. The intensity of the fan is controlled by a damper and participates in the operation of the automation system.
- Fuel ignition.
For automatic ignition of a liquid fuel boiler, an ignition transformer and electrodes are used. The fuel is mixed with a jet of air and sprayed into small droplets. Then it is fed into the combustion chamber and ignites under the influence of high temperature.
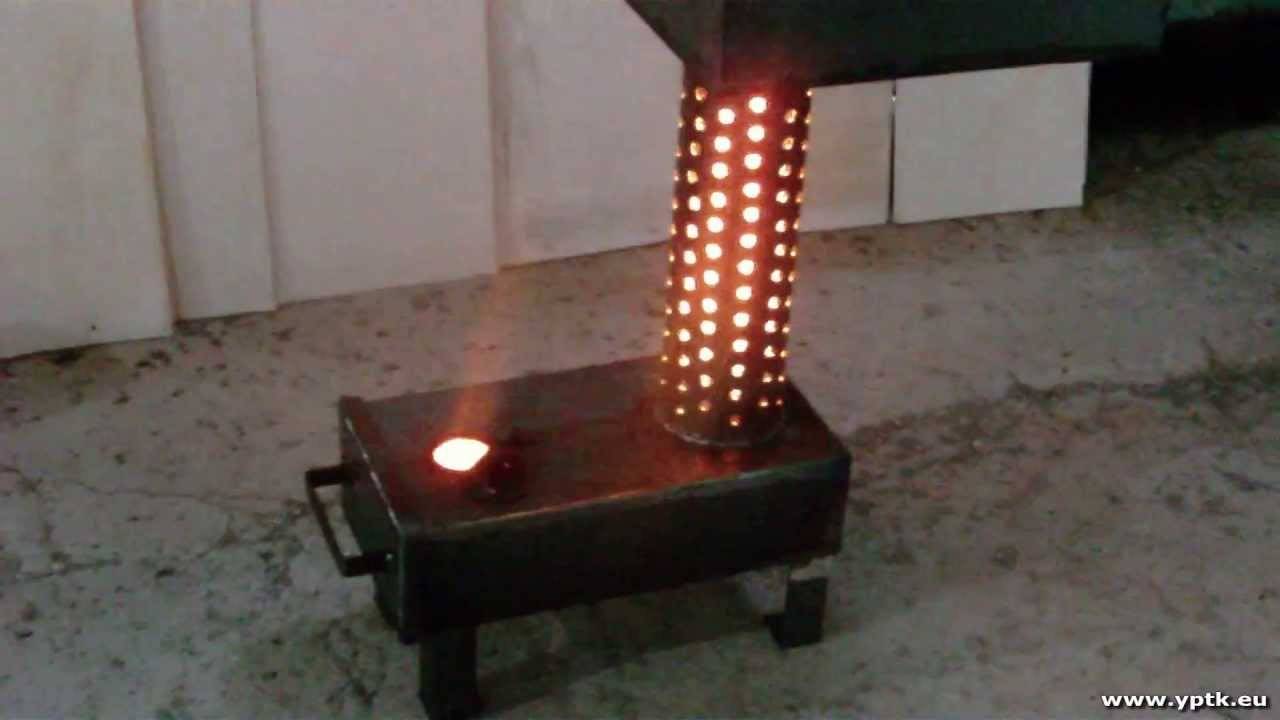
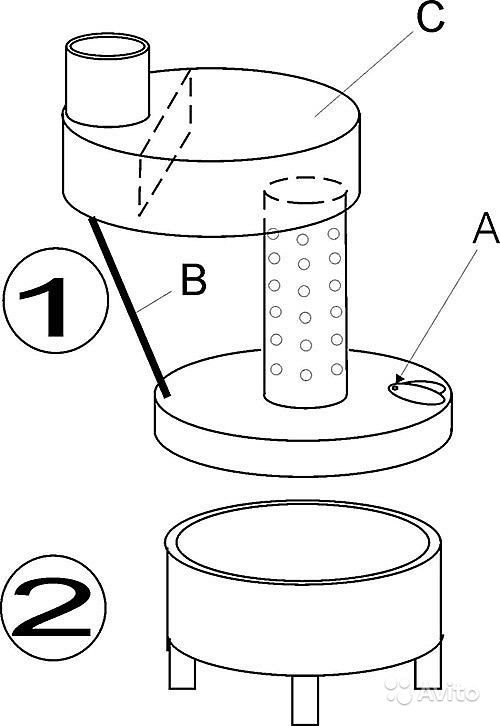
Nozzle
First you need to make a spherical nozzle, fuel will flow through it in the future. Make a hole in the sphere, the diameter should be approximately 0.25 mm
Please note that the power of a homemade burner depends on the diameter. The smaller the diameter, the lower the power and vice versa
All the difficulties await you precisely in the manufacture of the nozzle. The channel for the passage of air must be made perfectly even. It is necessary that the air hit forward, and not against the walls of the nozzle. The best option is to make a hole on a special machine.
But if luck smiles at you, and you find a jet with the right diameter, then do not miss the opportunity and put it in the center of the spherical element. If you do not find a hemisphere, you can use a small piece of sheet metal with a jet attached inside. As a result, you will get an oil spray nozzle.Heated fuel will flow into it, and spraying occurs due to the incoming air. When installing such a device in a universal boiler, you get an efficient and cheap source of heat.


Production of a gas heat gun
Like the previous version, this design has a cylindrical body made of metal. According to the laws of aerodynamics, the round section is optimal, and the metal has a high thermal conductivity, due to which the heated air is transferred from the housing to the room.
Guns are divided into two types:
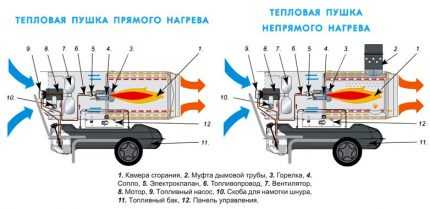
- direct heating . Inside the cylinder there is a gas burner with a circular cross section, it is blown from all sides by a fan. The heat at the outlet is mixed with combustion products and exits through the gun body from the opposite side. It turns out that gases also enter the room, which many homeowners are not satisfied with. Such devices can only be used in a garage, workshops or outbuildings with large areas, where they cannot harm a person.
- Indirect action . It has a built-in system of indirect action, which separates the flue gases, the heat from them is transferred to the blown air in a specially provided heat exchanger. Thus, gas and air do not come into contact with each other. The air after heating leaves the heat exchanger through the second opening in the housing. Burnt products are discharged through a side pipe connected to the chimney pipe.

The progress of the do-it-yourself gas gun is as follows:
- Extend the gas burner with a pipe of suitable diameter.
- Increase the burner opening by 5 mm, as well as the gas supply opening by 2 mm.
- Make a heat exchanger, it should be in the form of a pipe, insert an extension cord from the burner into one end.
- Fasten the structure with clamps.
- Cut a hole for the outlet of hot air into the room and weld a pipe of the desired diameter to it.
- Install a fan on the opposite side of the pipe.
- Drill a hole for fuel ignition. Provide a control valve.
Having the necessary skills and focusing a little on the operation of the gun, you can create it from the available materials. One of these devices is presented in the video:
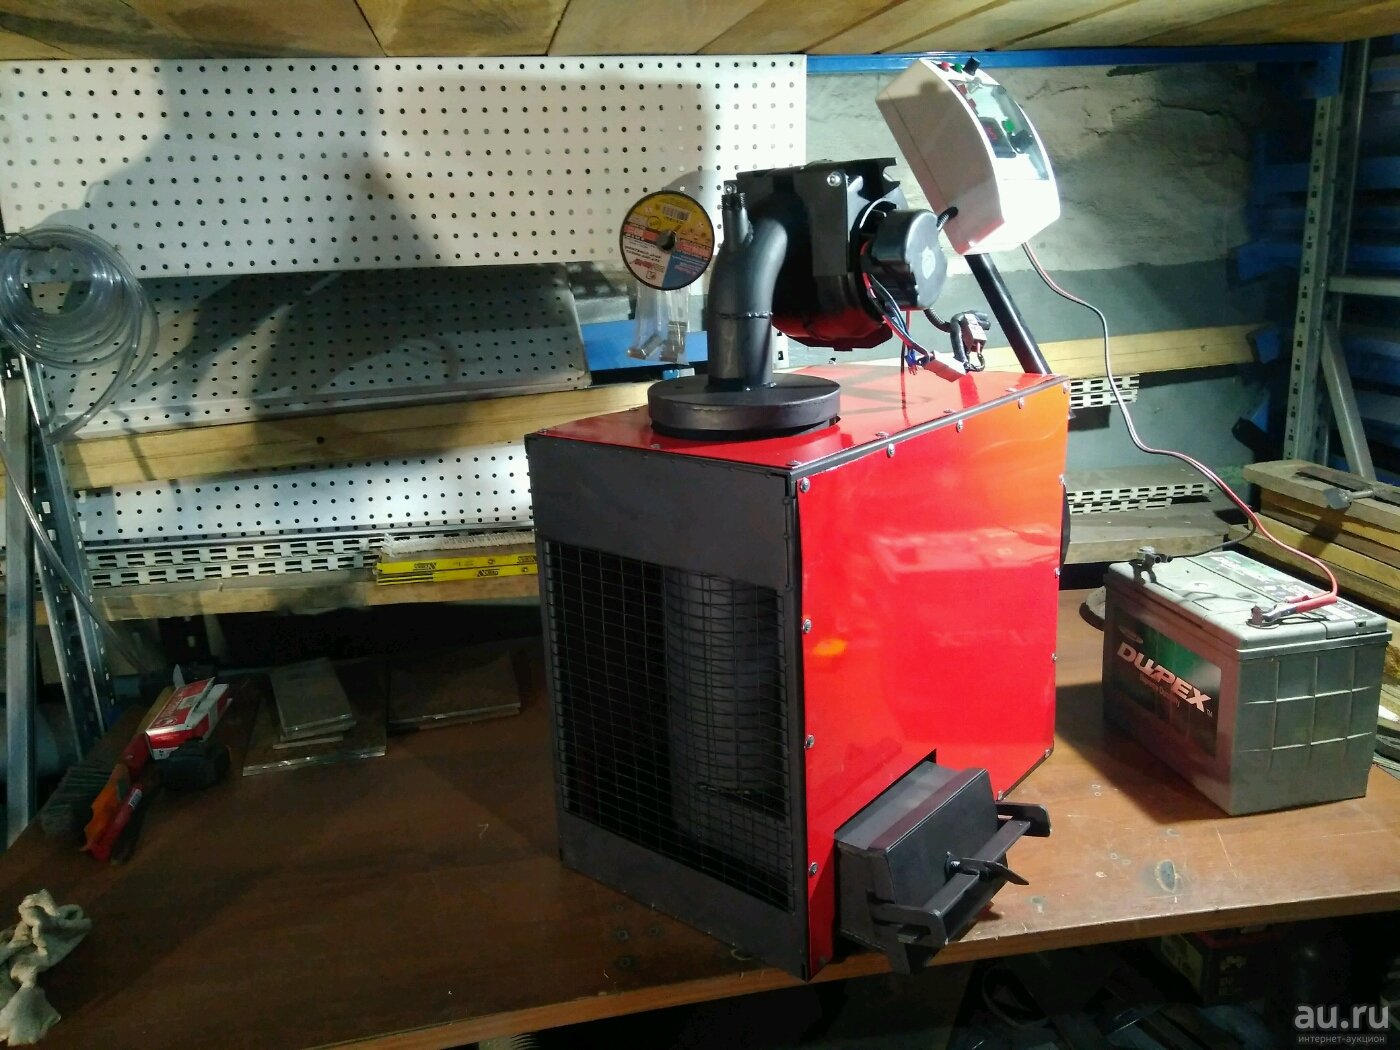
Unit # 2 - diesel fuel heat gun
Where access to electricity is limited or impossible, diesel-fueled heaters are often used. It is somewhat more difficult to make such a heat gun on your own than an electric model. You will need to make two cases and work with a welding machine.
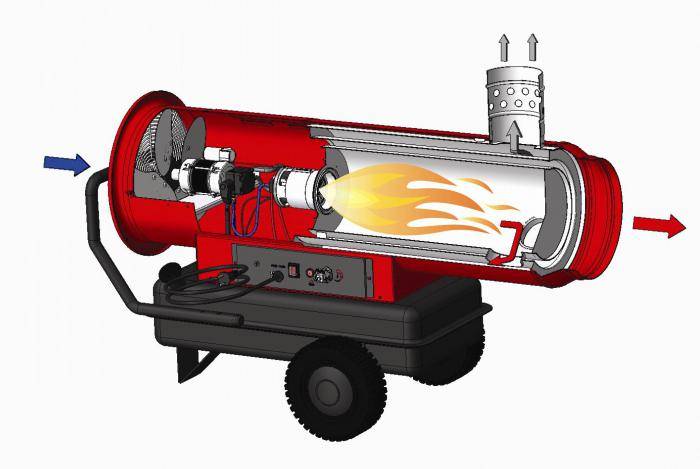
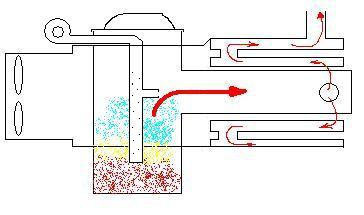
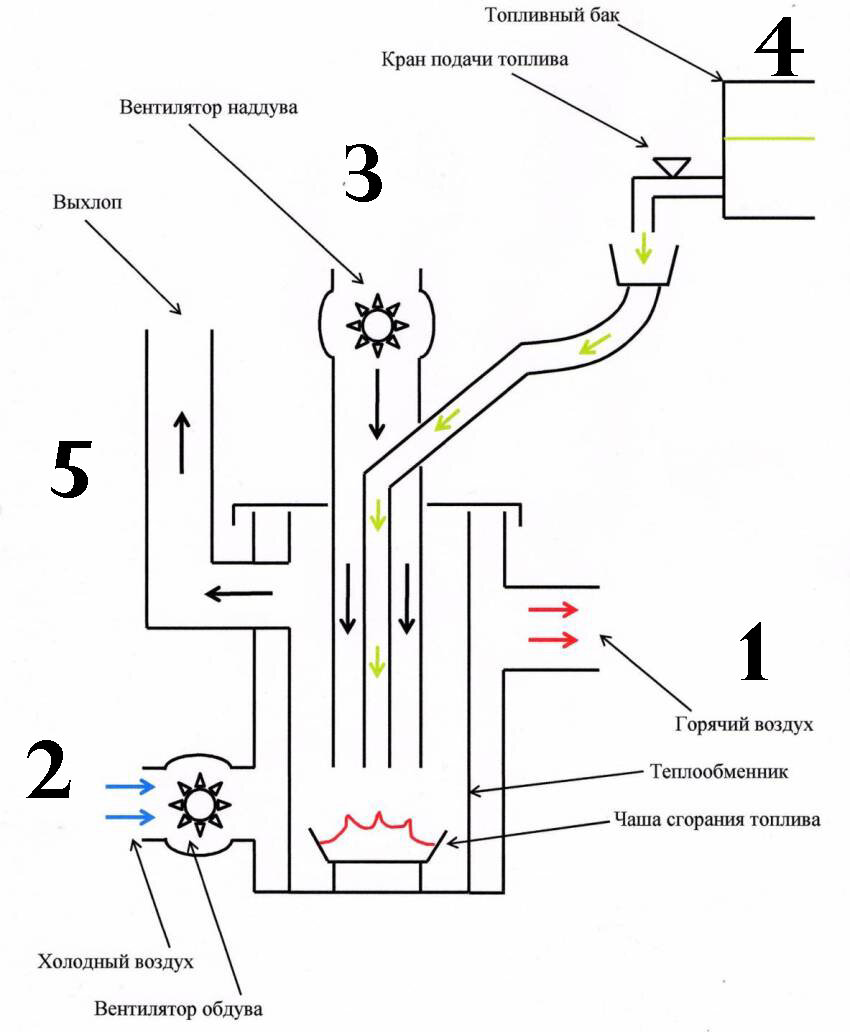
How does such a design work?
The bottom of the diesel heat gun is the fuel tank. The device itself is placed on top, in which the combustion chamber and the fan are connected. Fuel is supplied to the combustion chamber, and the fan blows hot air into the room. For transporting and igniting fuel, you will need a connecting tube, a fuel pump, a filter and a nozzle. An electric motor is attached to the fan.
The combustion chamber is mounted in the center of the upper body of the heat gun. It is a metal cylinder, the diameter of which should be approximately two times smaller than the diameter of the body. Diesel fuel combustion products are removed from the chamber through a vertical pipe. For heating a room of about 600 sq. m may need up to 10 liters of fuel.
Assembly process
The bottom case must be at least 15 cm from the top. To prevent the fuel tank from overheating, it should be made of a material with low thermal conductivity. You can also use an ordinary metal tank, which will have to be covered with a layer of heat-insulating material.
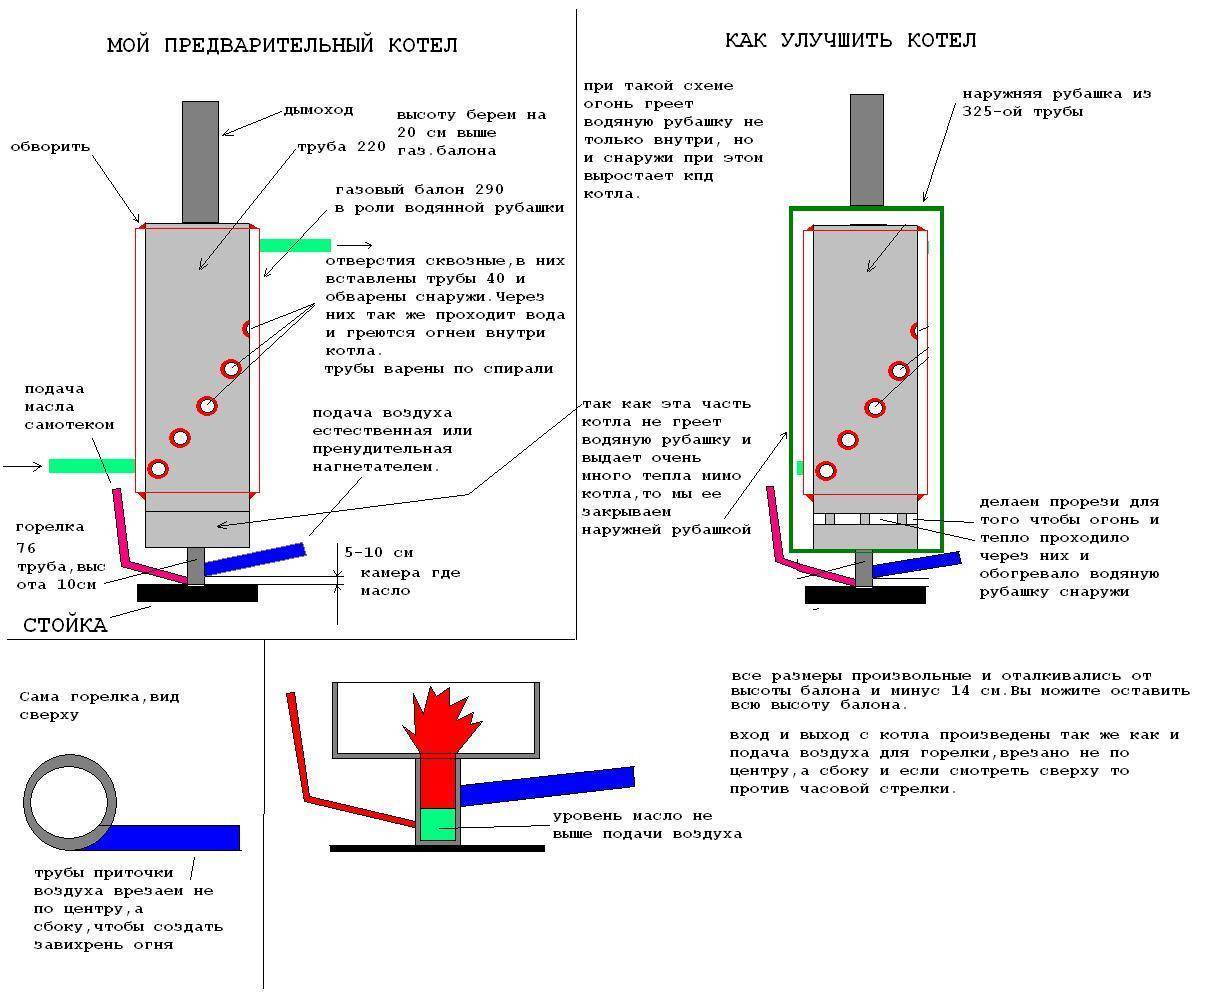
The diagram clearly shows the device of a heat gun operating on diesel fuel. The device must be mounted on a solid, stable frame.
The upper body must be made of thick metal, it can be a suitable piece of a wide steel pipe. It is necessary to fix in the case:
- combustion chamber with vertical outlet;
- fuel pump with nozzle;
- fan with electric motor.
Then a fuel pump is installed, and a metal pipe is removed from the tank, through which fuel is supplied first to the fuel filter, and then to the nozzle in the combustion chamber. From the ends, the upper body is covered with protective nets. The power supply for the fan will have to be taken care of separately. If there is no access to the electrical network, a battery should be used.


When using a diesel heat gun, it is important to adhere to safety regulations. Even at a distance of a meter from the case, the directional flow of hot air can reach 300 degrees
It is not recommended to use this device indoors, as combustion products from diesel fuel may be hazardous to human health.
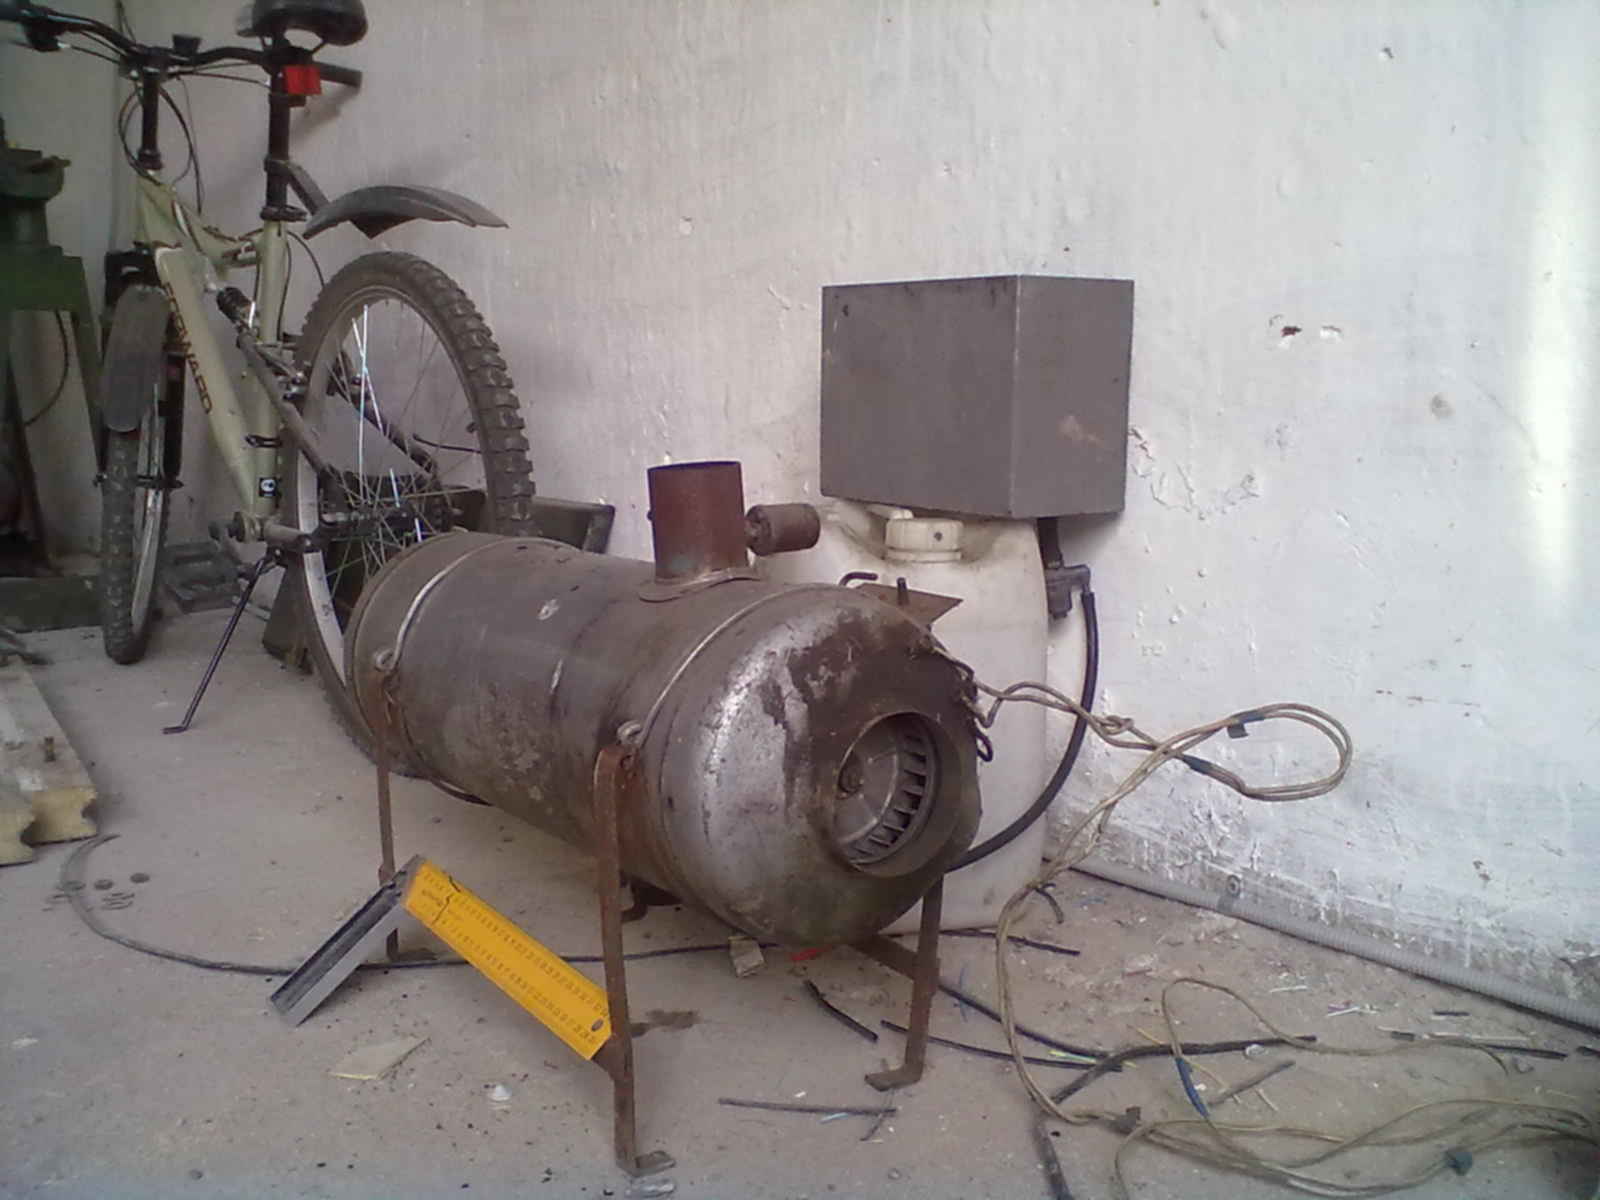
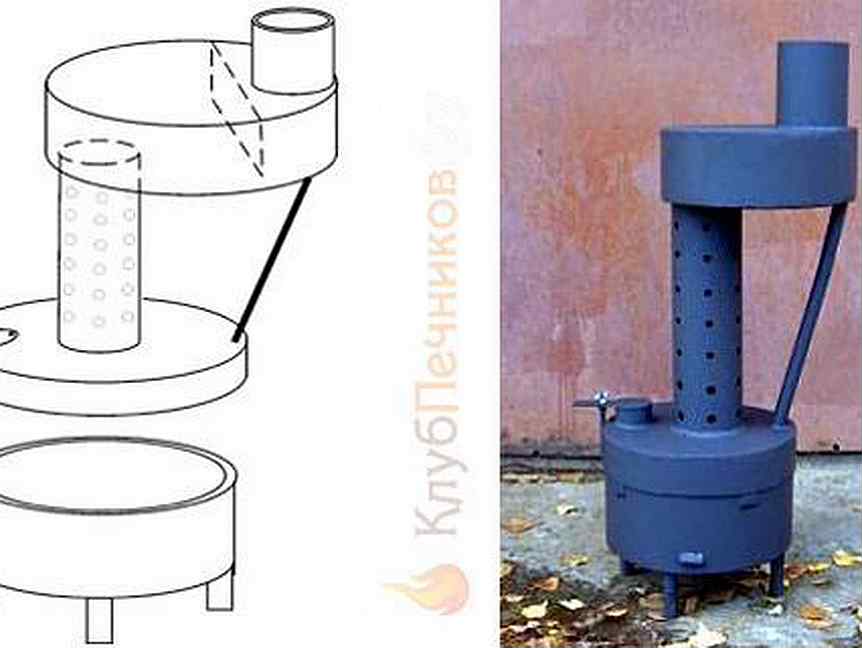
In addition to the unit running on diesel fuel, other types of liquid combustible materials are also used for heat guns, for example, used engine oil. An interesting version of such a device for “working out” is presented in the following video:
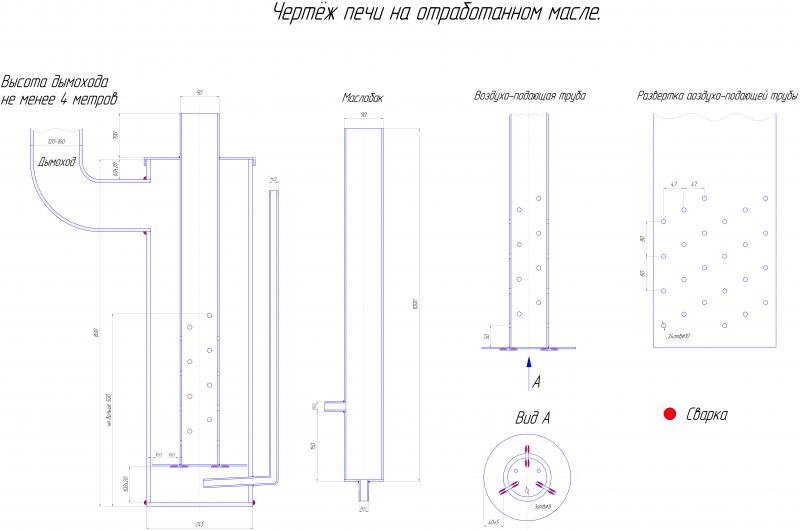
Requirements for the installation and operation of an oil-fired oven
Requires the oven to be located in an empty room away from flammable surfaces
Particular attention is paid to self-made devices. They must not be placed on a shelf or other support that could catch fire
A home-made furnace for mining should be located on a flat base, which can be concrete or brick. It is necessary that the distance between the apparatus and the wall is at least 1 m. To ensure good draft, the chimney must be longer than 4 m. On its outer side, insulation must be provided to prevent the formation of acid condensate.
The used oil must not contain any solvent or other flammable element, so such components must be kept away from the oven. It is also unacceptable to get moisture into the oil container. This will ignite the oven. In the event of an emergency, a fire extinguisher should be used to put out the fire.
The principle of operation of the stove with drip fuel supply is similar to the mechanism of operation of diesel engines
Before starting work, oil is poured into the container in an amount equal to half the volume of the tank, which will provide the necessary space for the formation of vapors. In order for the vapors to be enriched with oxygen, it is necessary to wait a while. Then the fuel is ignited with long matches. As soon as the process of ignition of vapors begins, the damper is half covered.


To improve the performance of the mini-furnace during mining, you can install a sealed tank with liquid above its upper chamber. To supply and drain water, fittings are attached to it, which are placed at different levels.Another option for increasing productivity is the necessary air convection, which is carried out using a fan located near the upper chamber. Taking warm air from the stove, it contributes to its cooling, which has a positive effect on the life of the device.


