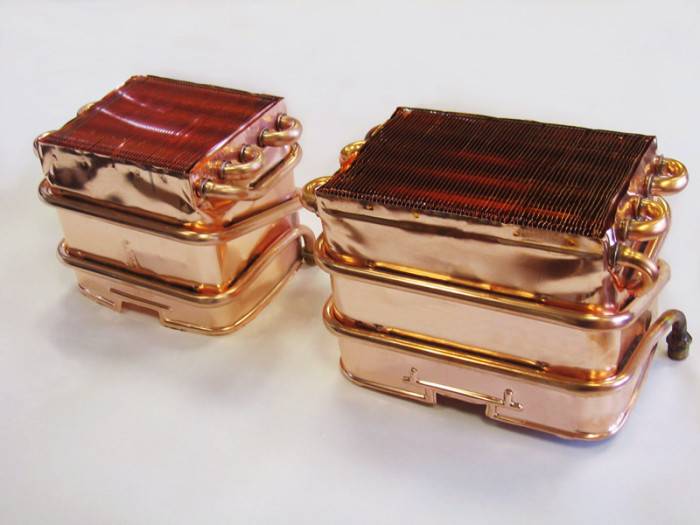
- The structure of the heat exchanger
- How to choose?
- Structural connection options
- Pipe on tin - simple and durable!
- Corrugation - cheap and cheerful
- Heat exchanger-hood - for heating the attic
- Pipeline installation
- What is a chimney heat exchanger, why is it needed and how does it work?
- What chimneys can be used?
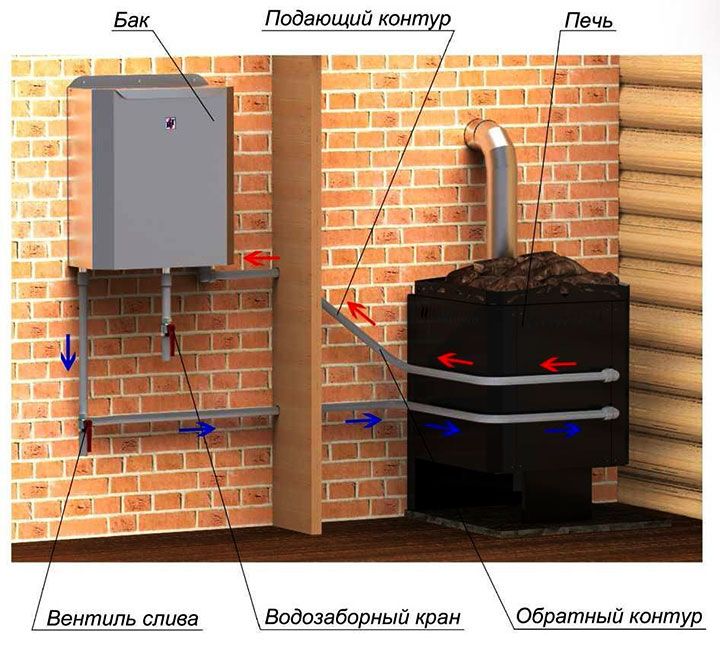
- Tank with water connection
- Tank making: step by step instructions and video
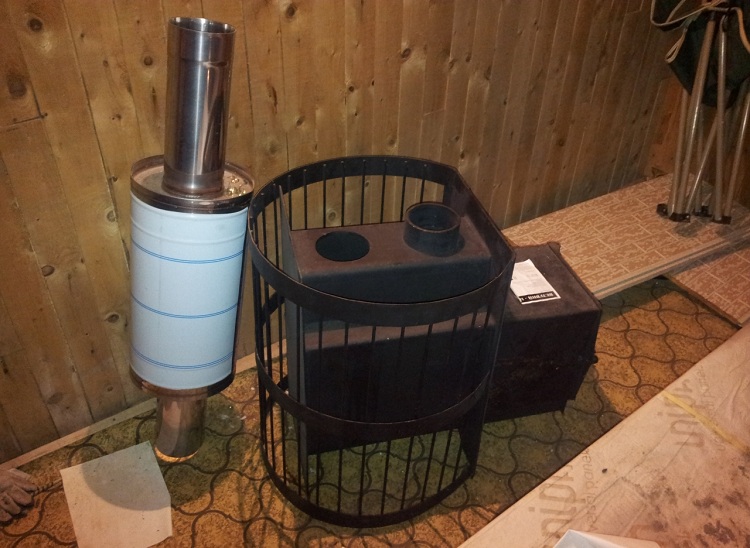
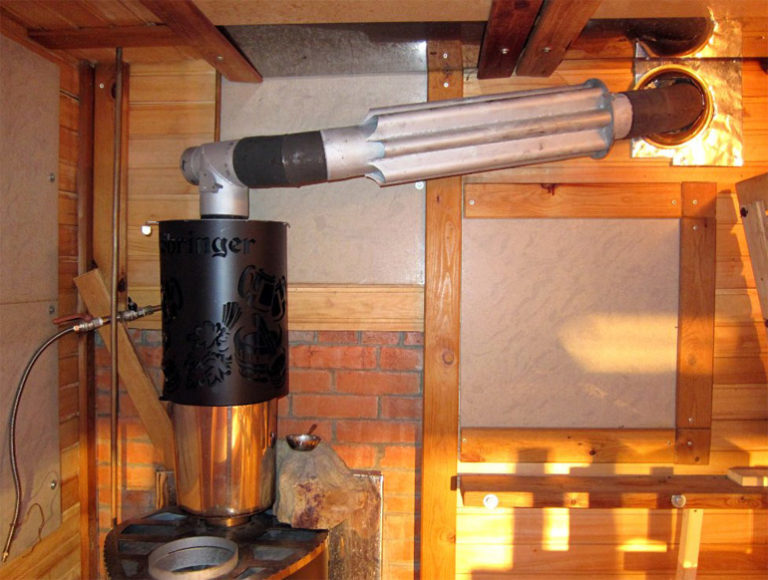
- Installation of converted sauna stoves
- How to make a device yourself
- What materials can be used
- Functioning mechanism
- water models
- How to do it yourself
- Choosing a material
- Copper or plastic?
- We are looking for improvised means
The structure of the heat exchanger
The heat exchanger can be made by hand at home
The equipment consists of fixed and movable plates, each has holes for the movement of the medium. Between the main plates, many other smaller secondary ones are installed, so that every second of them is rotated 180 degrees to the neighboring ones. The secondary plates are sealed with rubber gaskets.
The second important element of maintenance is the coolant. It flows through the channels of corrugated stainless steel.Cold and hot media move along all plates, except for the first and last ones, simultaneously, but from different sides, preventing mixing. At a high water flow rate, turbulence occurs in the corrugated layer, which increases the heat exchange process.
The device is connected to the pipeline using holes on the front and rear walls. The coolant enters from one side, passes through all channels and leaves the equipment on the other. The inlet and outlet openings are sealed with a special gasket.
How to choose?
When choosing a fundamental role is played by the price of the heat exchanger for the furnace. The design decision depends on the choice of material
The second most important aspect is the ability to manufacture
And finally completes the choice, the place where the stove will stand. Consider what needs to be achieved. Do you need a heating and cooking stove or garage heating, will it be sauna heater or a stove for heating a village house. Each option has its own characteristics and subtleties.
The main thing: to accurately calculate what area needs to be heated, whether hot water is needed along the way, how many units of fuel can be spent during the heating season, and much more. The result of all estimates should be one, focusing on finances, available materials, needs, to choose the most suitable design.
What is better in different versions:
Structural connection options
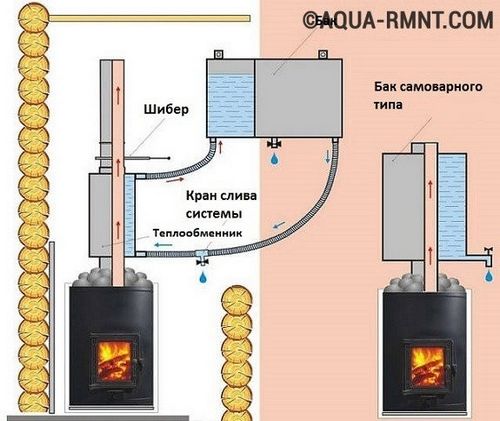
The heat exchanger on the chimney can operate in two main modes. And each of them has its own process of heat transfer from smoke to the inner tube of the heat exchanger.
So, in the first mode, we connect an external tank with cold water to the heat exchanger.Then water condenses on the inner pipe, which is why the heat exchanger itself is heated solely due to the heat of condensation of the water vapor of the flue gases. In this case, the temperature on the pipe wall will not exceed 100°C. And the water in the tank will be heated for a long time.
In the second mode, condensation of water vapor on the inner wall of the heat exchanger does not occur. Here, the heat flow through the pipe is more significant, and the water heats up quickly. To understand this process more fully, conduct the following experiment: put a pot of cold water on a gas burner. It will be clearly visible how condensation appears on the walls of the pan, and it begins to drip onto the stove. And despite the flame of 100 ° C, this state will go on for a long time until the water itself in the pan warms up. Therefore, if you use a heat exchanger on a pipe as a register for heating water, then give preference to its small designs with thick walls of the inner pipe - so there will be much less condensate.

Pipe on tin - simple and durable!
This option is simple, practical and convenient. In fact, here the chimney is simply wrapped around a metal or copper pipe, it is constantly heated, and the air distilled through it quickly becomes warm.
You can weld a spiral to your chimney with an argon burner or semi-automatic welding. You can also solder with tin - if you only degrease it in advance with phosphoric acid. The heat exchanger will hold on to it especially firmly - after all, samovars are soldered with tin, and they serve for a really long time.
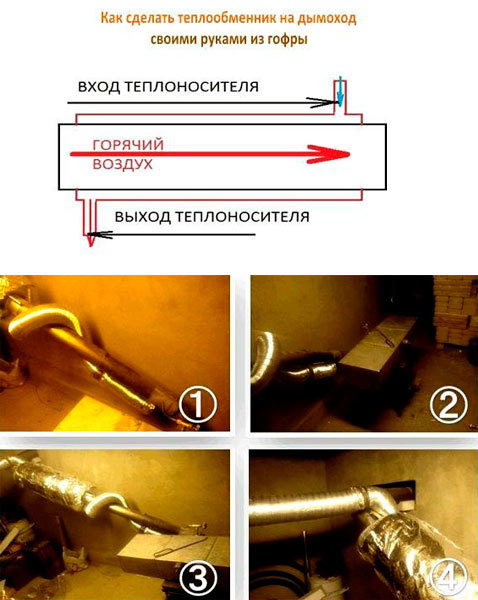
Corrugation - cheap and cheerful
This is the simplest and least budget option. We take three aluminum corrugations and wrap them around the chimney in the attic or second floor.In the pipes from the walls of the chimney, the air will be heated, and it can be redirected to any other room. Even a fairly large room will be heated to the point of heat while you heat the steam room stove. And to make the heat removal more productive, wrap the corrugated spirals with ordinary food foil.
Heat exchanger-hood - for heating the attic
Also, a heat exchanger can be installed on the chimney section in the attic room, which would work on the principle of a bell-type furnace - this is when hot air rises, and when it cools down, it slowly goes down. This design has its own huge plus - an ordinary metal chimney on the second floor usually heats up so that it cannot be touched, and such a heat exchanger will significantly reduce the risk of fire or accidental burns.


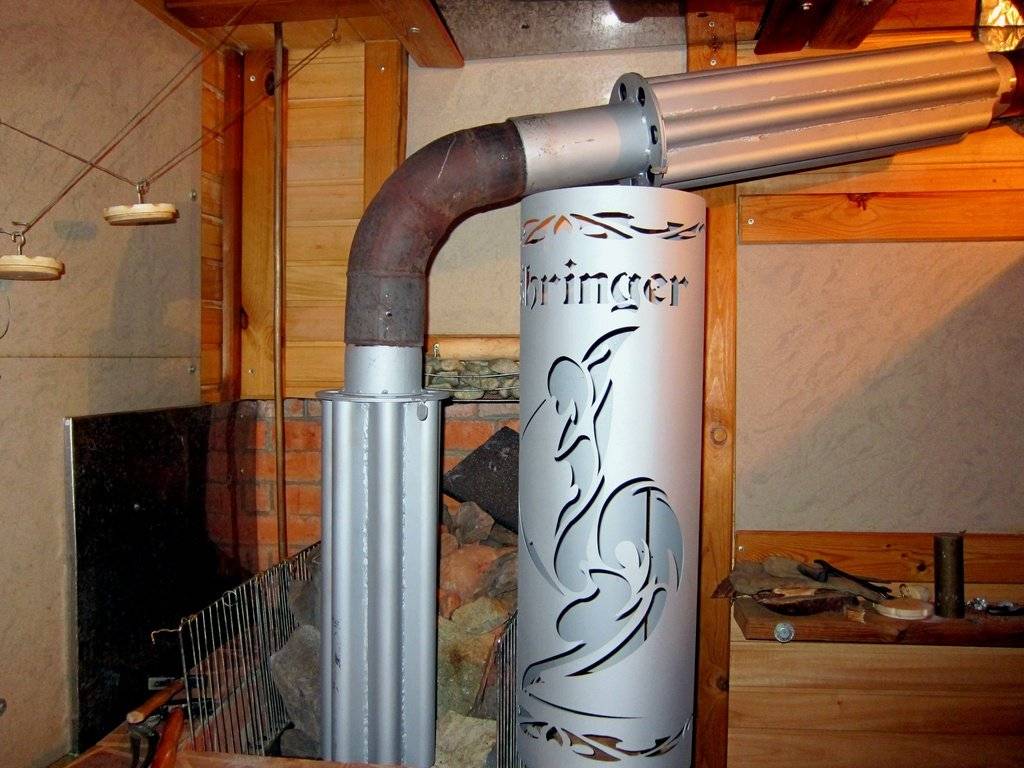


Some craftsmen also cover such heat exchangers with a mesh with stones for heat accumulation and decorate the heat exchanger stand. The attic in this case turns out to be even more comfortable and can be used as a living space. After all, based on practice, the temperature of the pipe of a bath stove does not exceed 160-170 ° C, if there is a heat exchanger on it. And the highest temperature will already be only in the gate area. Warm and safe!
Pipeline installation
We have already mentioned that it is better to use pipes with a diameter of 3/4 ″ for pipelines, this diameter is most often used in all heating systems and is suitable in all respects for a bath heat exchanger.
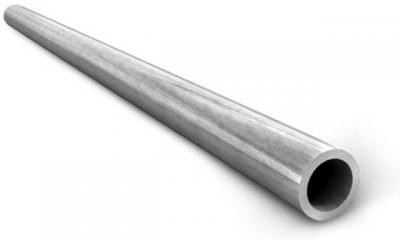
Pipe diameter 3/4″
Pipes can be metal or plastic. You can also use flexible corrugated hoses, but you need to keep in mind that they have a much smaller nominal diameter, and this negatively affects the water flow rate.
Flexible corrugated pipe for heating and water supply
Corrugated pipe for heating
Corrugated pipes
Open with a special tool.
We will give some advice on the installation of pipelines.
- Try to minimize the length of the pipelines, do not make many turns and bends in the pipe. Your task is to create the most favorable conditions for water circulation.
Remote tank connection metal pipes
- When using plastic pipes, do not allow them to overheat at the connection points to the heat exchangers. The presence of water inside will not allow their complete breakthrough due to the loss of strength caused by heating, but deformations are possible.
Connecting the heat exchanger to the sauna stove with plastic pipes
- Do not forget to put a drain cock in the lowest place. If the bath is not used for a long time, then in winter it is necessary to drain all the water from the system.
Scheme indicating the position of the drain valve
- During the connection of pipelines, provide for the possibility of dismantling them to perform repair or routine technical work.
- Try to keep the length of the horizontal sections of the pipeline to a minimum. Mount all such sections at an angle of at least 10°. Such activities have a positive effect on the speed of water flow.
What is a chimney heat exchanger, why is it needed and how does it work?
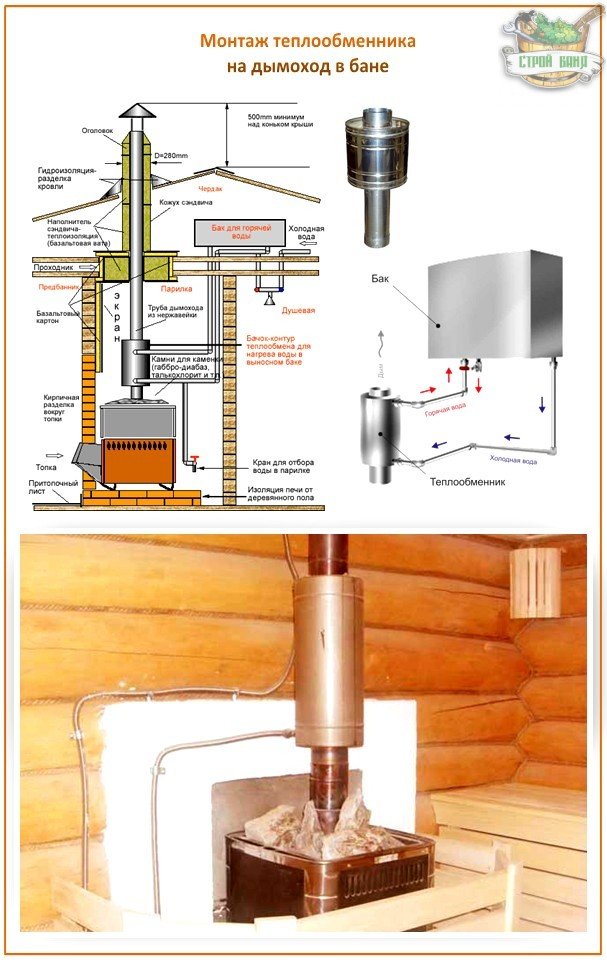
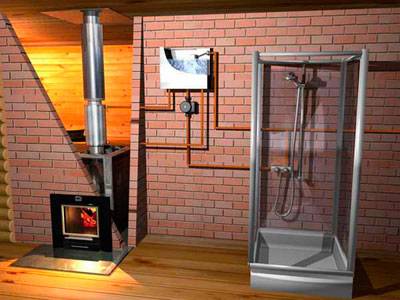
A heat exchanger (or a convector, or an economizer, if water is heated) is a part that is installed on the chimney. Hot smoke passing through the chimney heats it. A heat exchanger can heat air or water with this heat.
Since the hottest section of the chimney is the first meter at the outlet of the furnace, ideally, the convector should be installed here. If the chimney is not very long and passes without bends, then heating is also possible further from the firebox. For example, in this way you can heat a room or attic on the 2nd floor above the room with the boiler.
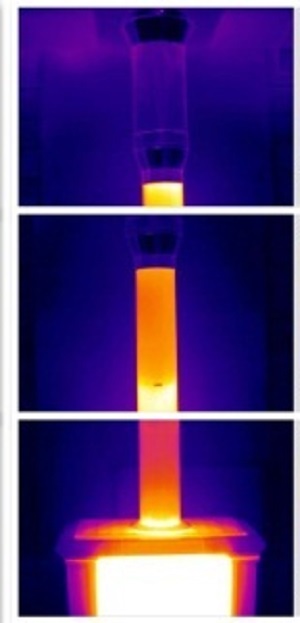
This is how the furnace firebox and the beginning of the chimney look like in the thermal imager
For full-fledged heating or instead of the “main” hot water boiler, the heat exchanger is not used - it will give out too little heat. But for additional heating it is quite suitable, because it is cheap, it does not consume electricity. In fact, it does not allow you to simply lose the heat that the furnace emits (solid fuel, or gas, or mining - any, except for an electric boiler).


What chimneys can be used?
For any solid fuel (wood, pellet) or gas boilers. It can be a bath boiler, or a potbelly stove, or a fireplace in the room.
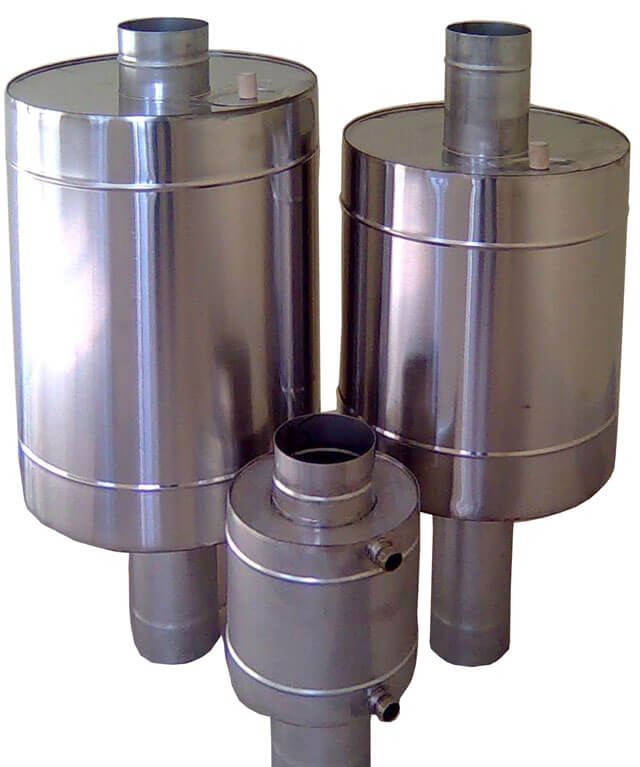
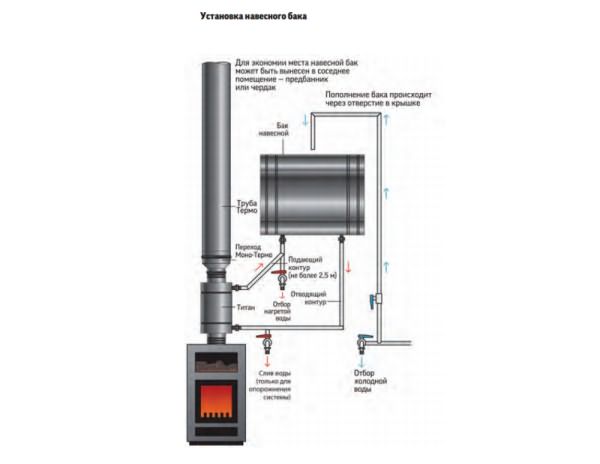
Tank with water connection
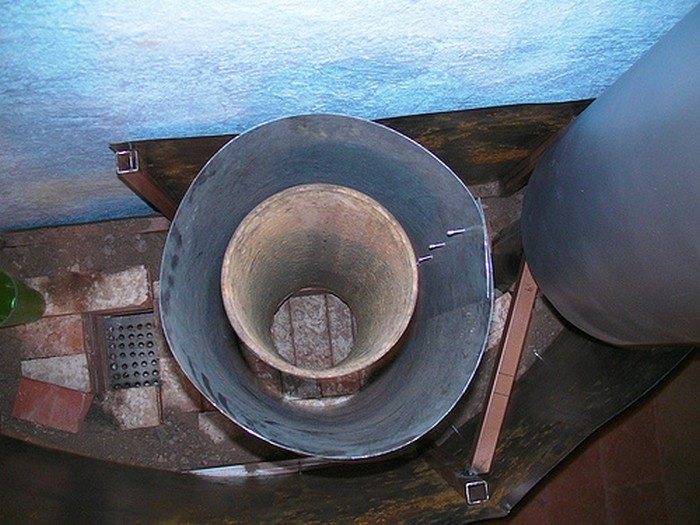
The heat exchanger in the form of a tank located around the chimney is made of stainless steel or galvanized sheet. In this case, the design of the furnace should be taken into account. If it provides for the afterburning of flue gases, and the temperature of the smoke at the outlet of the furnace does not exceed 200 degrees, any material can be used to make the heat exchanger.
In simple ovens without smoke circulation, the flue temperature at the exit can reach 500 degrees Celsius. In this case, it is necessary to use stainless steel, since the zinc coating emits harmful substances when heated strongly.
Most often, heat exchangers of this type are installed on a bath stove and used as a water heater for hot water supply.The tank is equipped with fittings in its upper and lower parts, pipes brought into the system are connected to them. At the same time, a hot water tank is installed in a shower or steam room. It is possible to use such a system for heating a utility room or garage.
Tank making: step by step instructions and video
Heat exchangers for industrial furnaces are sold complete with some modifications; when installing a new furnace, you can choose a suitable model with a ready-made water circuit. You can also make a heat exchanger on the chimney with your own hands. The following materials are required for its manufacture:
- stainless steel pipe segments of different diameters with a wall thickness of 1.5-2 mm, sheet steel;
- 2 fittings 1 inch or ¾ inch for connection to the system;
- storage tank made of stainless steel or galvanized steel with a volume of 50 to 100 liters;
- copper or steel pipes or flexible piping for domestic hot water;
- ball valve for draining the coolant.
The manufacturing sequence for a sauna stove or potbelly stove:
-
- Work begins with the preparation of the drawing. The dimensions of the tank installed on the chimney depend on the diameter of the pipe and the type of furnace. Furnaces of a simple design with a direct chimney are characterized by a high temperature of the flue gases at the outlet, so the dimensions of the heat exchanger can be quite large: up to 0.5 m in height.
- The diameter of the inner walls of the tank must ensure a tight fit of the heat exchanger on the flue pipe. The diameter of the outer walls of the tank can exceed the diameter of the inner ones by 1.5-2.5 times. Such dimensions will ensure quick heating and good circulation of the coolant.Furnaces with low flue gas temperatures are best equipped with a tank that is small in size in order to speed up its heating and avoid the formation of condensate and deterioration of draft.
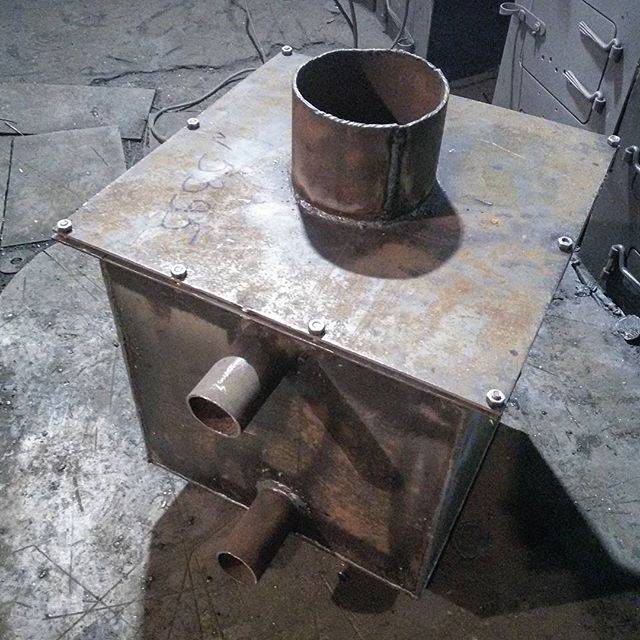
- Using a welding inverter, the parts of the workpiece are connected, monitoring the tightness of the seams. In the lower and upper parts of the tank, fittings are welded for supplying and discharging water.
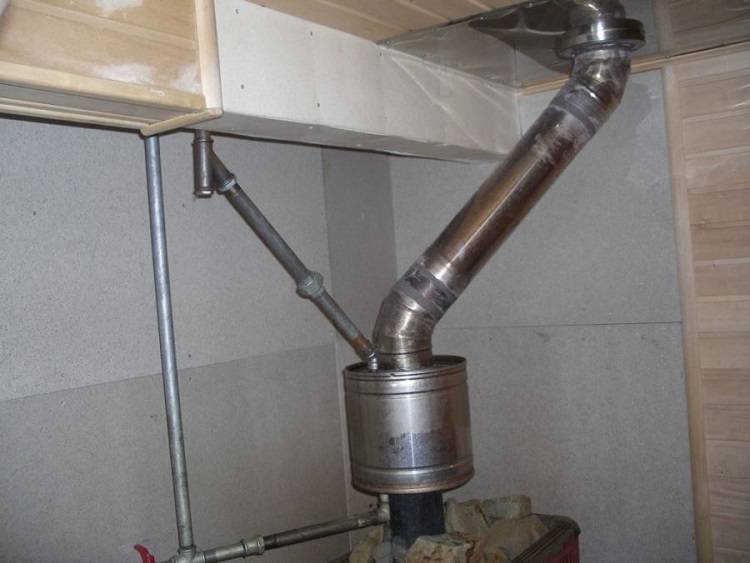
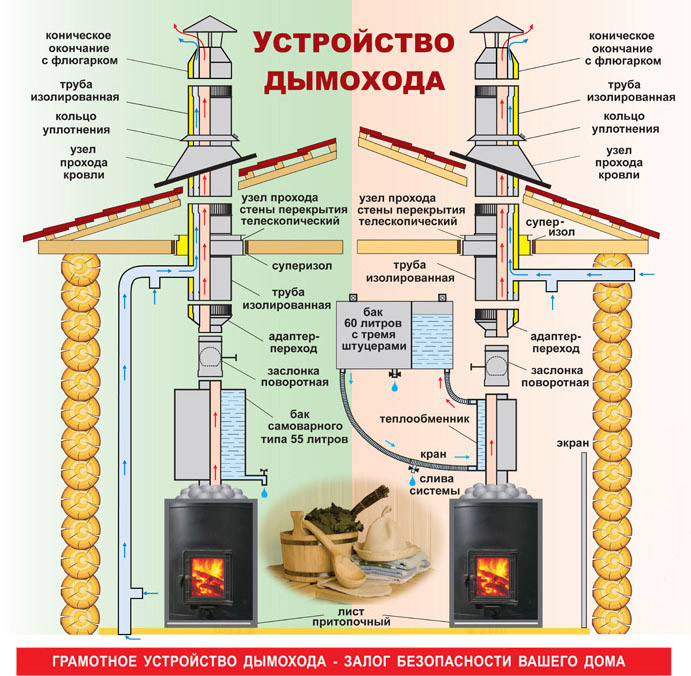
- The tank is installed on the flue fitting of the oven with a tight fit, smearing the connecting seam with heat-resistant silicate sealant. On top of the heat exchanger tank, in the same way, they put an adapter from an uninsulated pipe to an insulated one and take the chimney out of the room through the ceiling or wall.
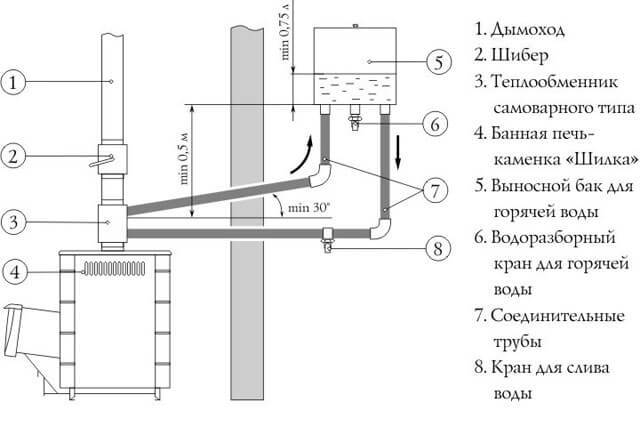
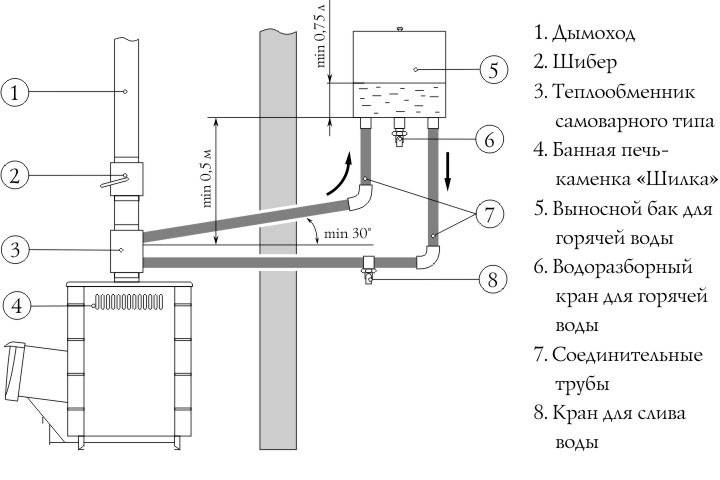
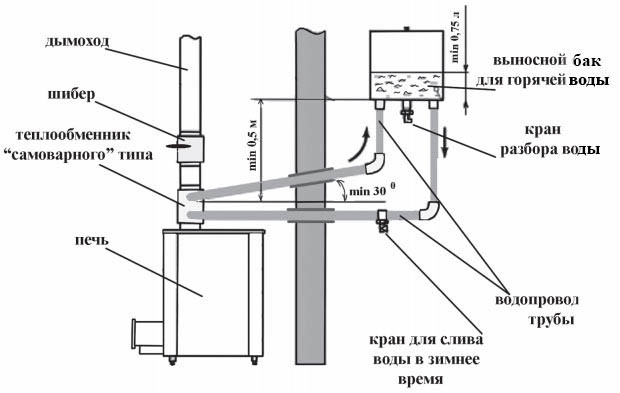
- Connect the heat exchanger to the system and storage tank. At the same time, the required degree of inclination is maintained: the cold water supply pipe connected to the lower fitting must have an angle of at least 1-2 degrees relative to the horizontal plane, the heated water supply pipe is connected to the upper fitting and with a slope of at least 30 degrees lead to the storage tank. The accumulator must be located above the level of the heat exchanger.
- A drain valve is installed at the lowest point of the system. In the bath, it can be combined with a tap for taking warm water for the steam room.
- Before operation, the system must be filled with water, otherwise the metal will overheat and lead, which can lead to a violation of the tightness of the welds and leaks.
- The water supply to the storage tank can be done both manually and automatically using a float valve. When filling manually, it is recommended to bring a transparent tube to its outer wall to control the water level in the tank so as not to run the system dry.
For good circulation of the coolant, it is necessary to use pipes with a diameter of at least ¾ inch, and their total length to the storage tank should not exceed 3 meters!
A do-it-yourself heat exchanger-water heater is shown in the video.
Installation of converted sauna stoves
There are several ways to implement a secondary circuit system in a furnace. The choice of the most suitable solution depends on the type of stove and the availability of technical possibilities, such as welding and a suitable material for the heat exchanger.
The most common schemes for equipment of a water heating circuit:
- Installation on the chimney or in the furnace furnace of a frame heat exchanger or coiled coil;
- Installation on the stove of an additional attachment tank for heating water circulating in the heating system;
- Equipment inside the combustion chamber of the system of pipes-registers.
If the area of the heated sauna room exceeds 30 m2, excluding the steam room, then it would be correct to provide for in the design sauna heaters with a water circuit an additional storage boiler for hot water. In this way, part of the boiling water can be used for the needs of the washing department and cleaning the premises after the firebox has been extinguished.
Not all of the listed methods of installing a hot water circuit are equally effective. For example, the simplest option, which involves the installation of a second attached tank for heating water, is recognized by experts as the most inefficient. Often, the stove and sauna are heated to the required temperature, while the dressing room and the relaxation room remain cold.
Warm air, heated by burning firewood from the firebox, rises, providing heat to the heater and the layer of stones located on it. The latter slowly releases its heat to the room, providing a comfortable temperature for the steam room.
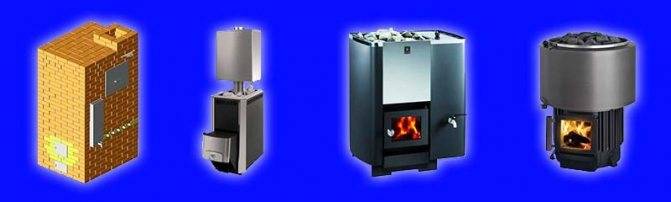
Manufacturers offer combined bath boilers wood burning, using gas as an alternative heating method. However, not all areas have the opportunity to connect to the gas supply system, so the classic mono-fuel model is more popular.
The difference between the designs of boilers in a wood-burning bath (photo below, the price is here or on the website of the manufacturer's company) is most often in the location of the water tank.
There are several areas of its installation that have positive qualities:
- Schemes with remote tanks. This type is the most popular design. With its help, it is possible to obtain hot water used in heating the rest of the building. This model allows you to warm the air inside well before the water has time to boil. It is in demand in baths that use dry and hot air. The material used for the tank is high quality stainless steel. Installation is carried out, as a rule, in an adjacent room, and the connection is carried out using registers, or a pipe hose. The disadvantage of the design is the relative complexity of installation work, additional costs for registers and the complexity of installation.
- The extension tank is mounted directly into the chamber to the firebox. The design is relevant for furnaces made of pipes. Heating of water in them is carried out at the top point of the furnace. However, this is not always an efficient solution.The main rule used in the installation of such structures is maximum tightness for all seams, which will extend the life of the device.
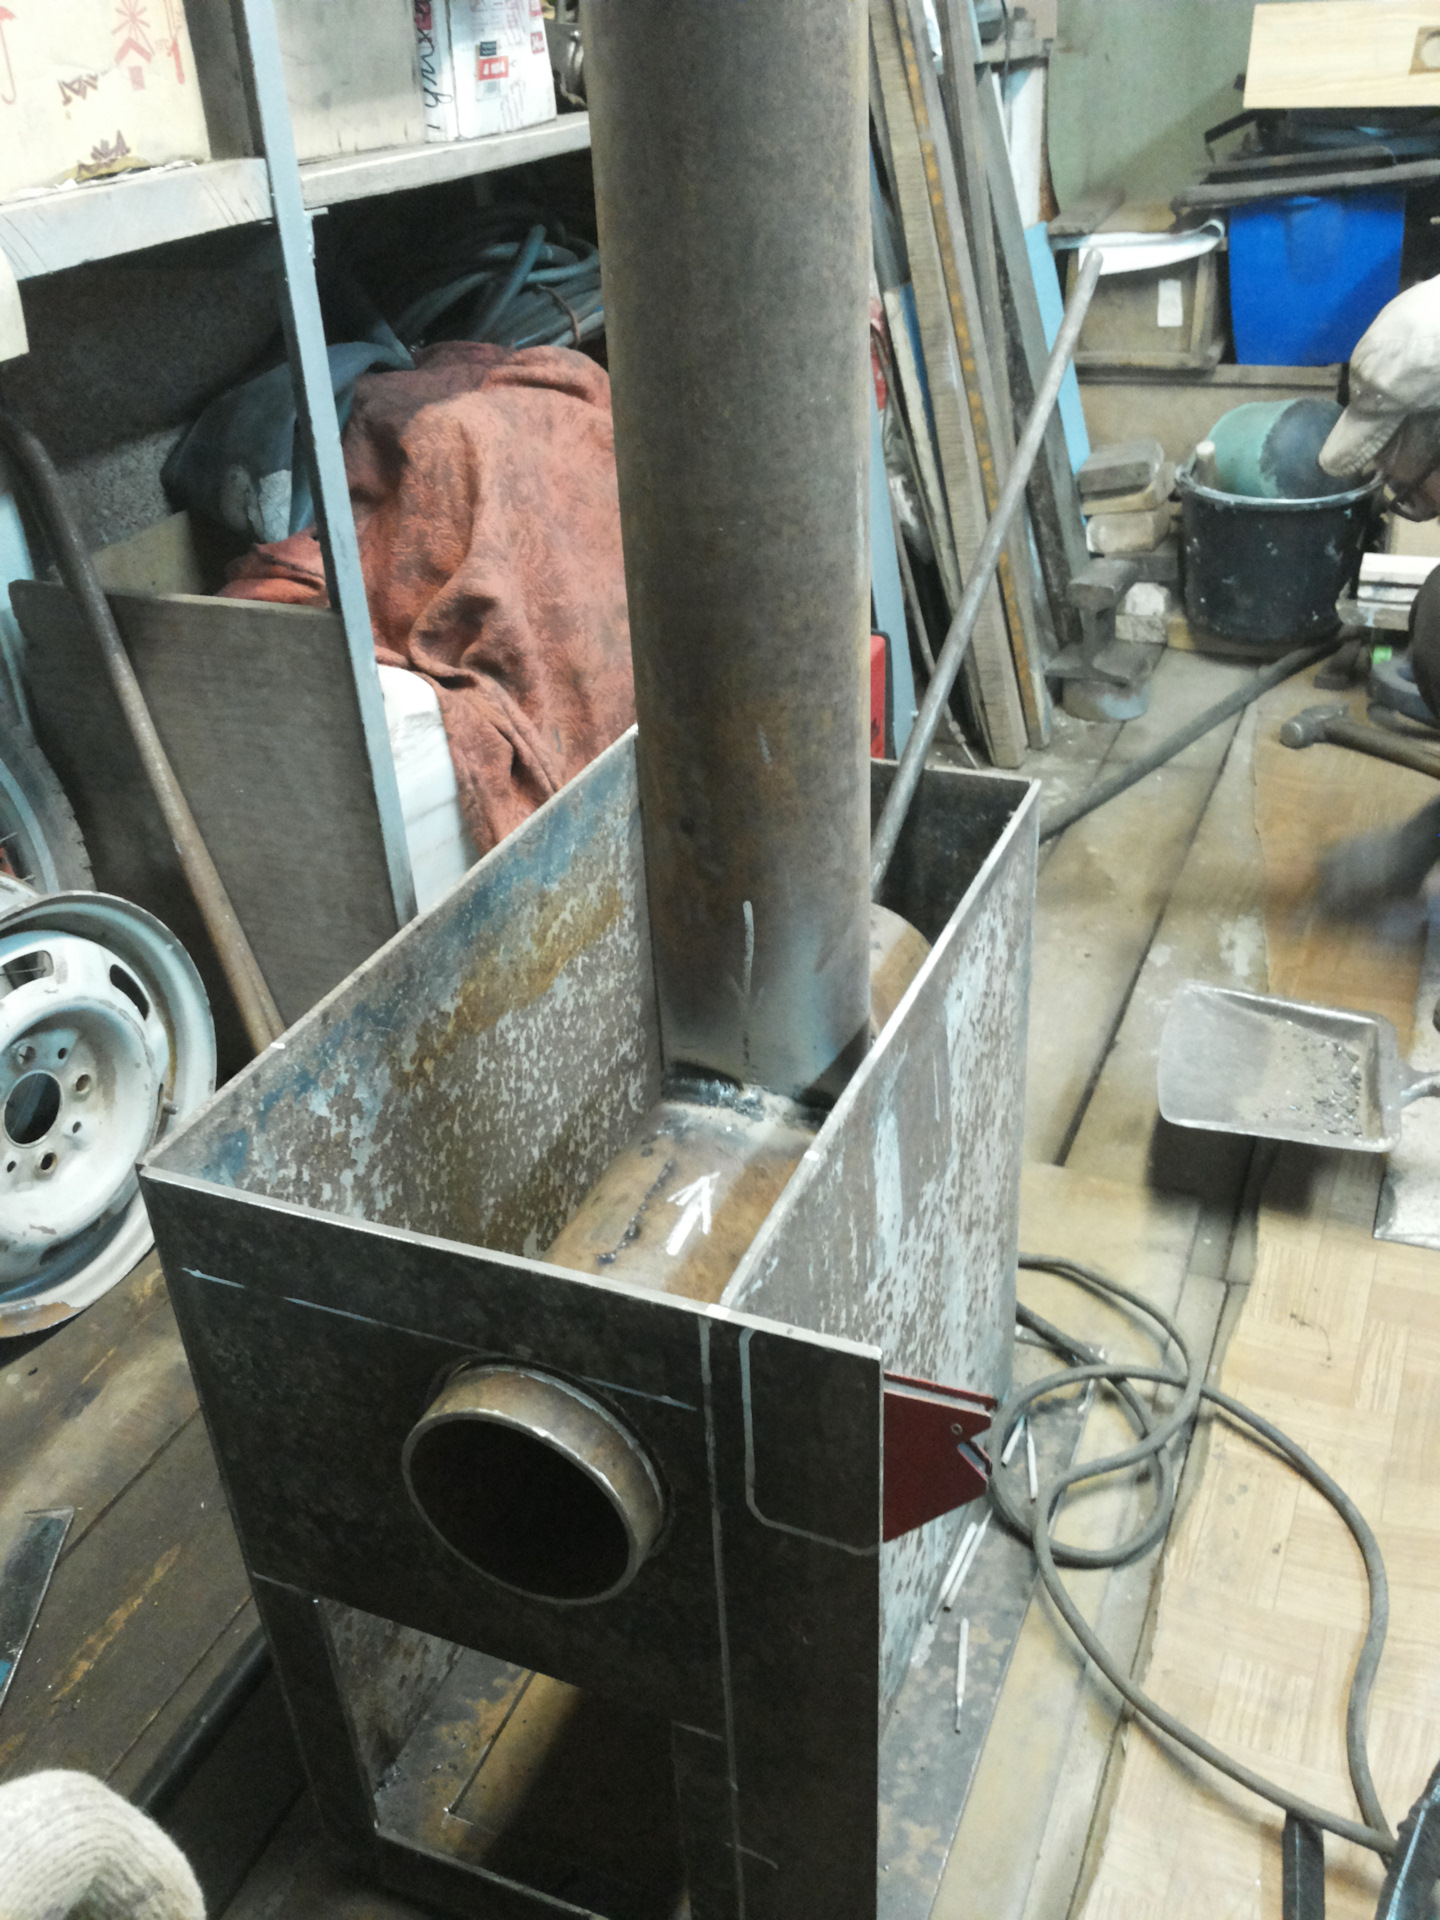
- Installation of a tank on a chimney pipe is distinguished by two installation options: a tank in the form of a cube or a parallelogram is a passage unit to the roof or a tank serves as a passage unit through the ceiling to the second floor. The container is heated not only due to heat exchange in the pipe, but also due to furnace registers, which allows the use of significant volumes during heating of the liquid.
- The hinged design of the tank provides for mounting on a wall or other vertical surface. The water is heated inside due to the heat exchange received from the furnace walls. The material used for this construction is stainless steel.
Average prices for stoves with different water tank locations
| Name (brand) | Type of water tank location | price, rub. |
| Tunguska | on the chimney | from 12000 |
| Helo (Finland) | built-in | from 27000 |
| Sahara | hinged | from 14000 |
We invite you to familiarize yourself Bath furniture from wood - buy wooden furniture for baths and saunas in a rest room in Moscow


How to make a device yourself
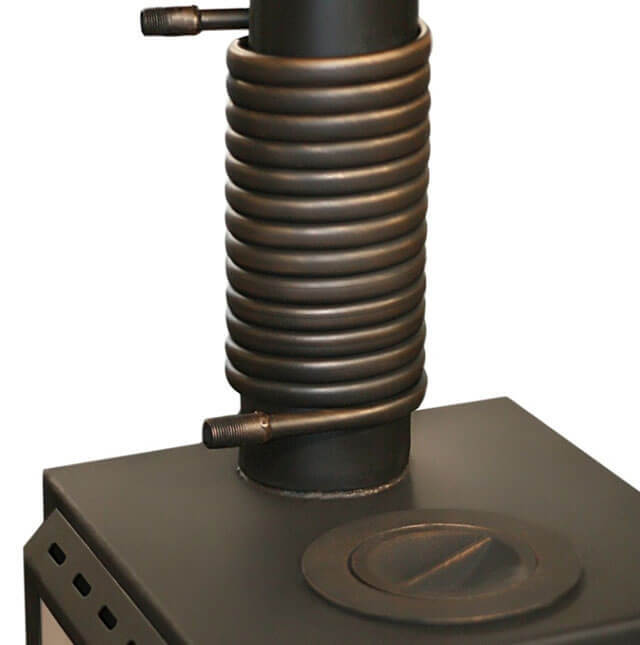
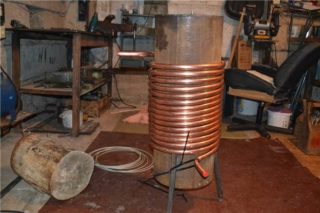
A simple coil is easy to make yourself from a copper tube. For a chimney with a diameter of 100 mm, a copper tube with a diameter of ¼ inch and a length of 3-4 m is suitable. Threaded fittings should be soldered to the ends of the pipe. Then the tube is filled with fine sand, twisted and wrapped around the chimney.
It is advisable to leave a small distance between the turns - then the pipe from the chimney will be heated by both heat transfer and infrared radiation. This work is easy to do with an assistant. The sand is then washed out of the pipe with pressurized water.Connect the pipes leading to the radiators and the expansion tank.
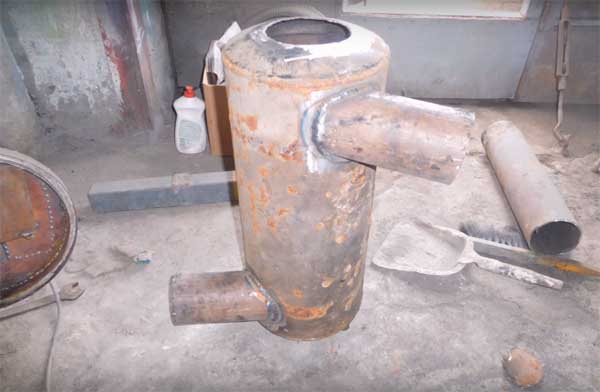
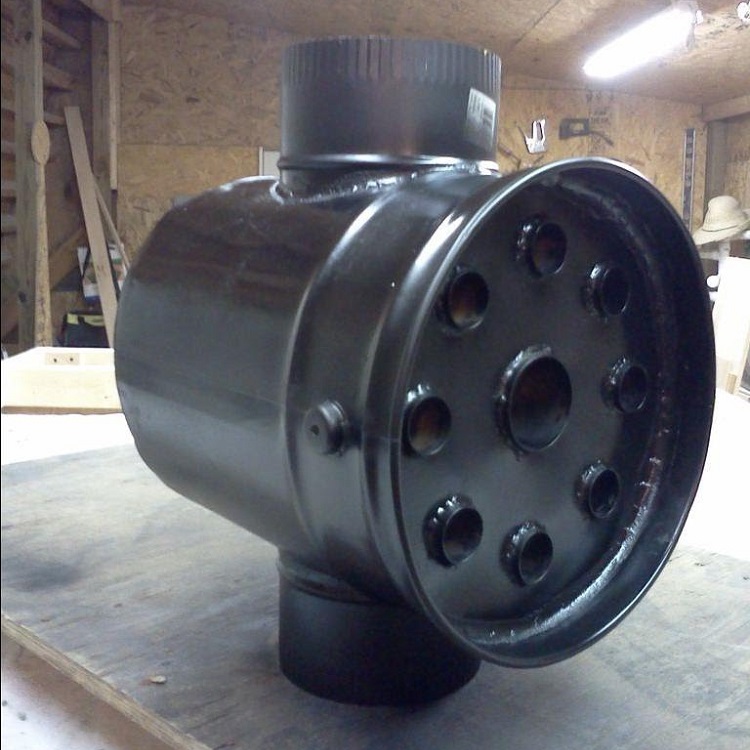
The Kuznetsov heat exchanger is performed by welding. The easiest option is to make a case from a gas cylinder or a large diameter pipe.
For the manufacture will need the following materials:
- Gas cylinder, large diameter pipe (300 mm) for the body.
- Pipe with a diameter of 32 mm (it is better to take one blank of a larger diameter - up to 57 mm). The length of the workpieces is 300-400 mm, the total number should be enough to cut the workpieces.
- Two small pipes of the same diameter with the diameter of the chimney; it is advisable to use a chimney pipe - if the chimney is prefabricated, then on one side of the structure the pipe will be with a socket, which is necessary for installing the heat exchanger.
- Two pieces of steel sheet, large enough to cut out the caps on the ends of the hull.
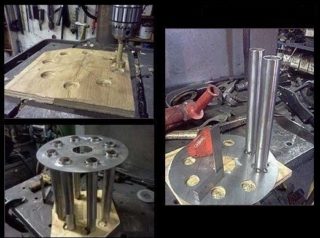
Air heat exchanger manufacturing technology:
- A large pipe or cylinder is cut to the desired size.
- 9 blanks of the same length are cut from thin pipes.
- Cut out circles for plugs.
- In circles, 9 holes are cut for pipes of small diameter; if one tube of a larger diameter is taken, then a hole for it is cut out in the center.
- Thin pipes are inserted into the holes of the plugs, baited by welding, then welded.
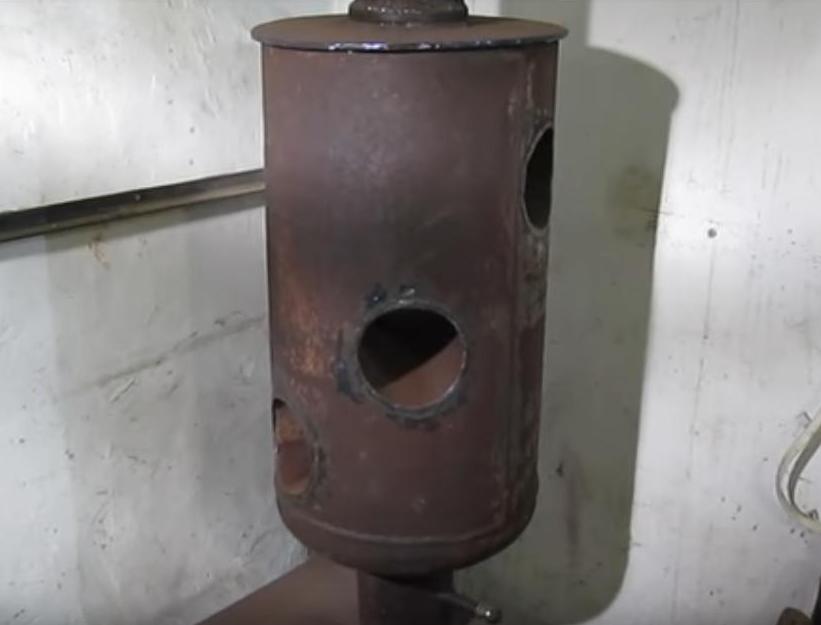
Holes with a diameter equal to the diameter of the chimney are cut into the body on the sides.
The design of thin tubes and plugs is inserted into the body and welded at the junction of the plugs and the body from a large pipe.
Branch pipes are inserted into the holes on the sides of the body and also boiled.
Alternative option:
What materials can be used
The ideal option is stainless steel (for example, food grade austenitic stainless steel 08X18H10 or AISI 304) or copper. Industrial products are sometimes made from titanium. But the price of these materials is quite high. But they are durable, do not rust, reliable and durable. If you have a potbelly stove in the garage or a home-made heater from improvised materials in the bath, it is quite possible to use ferrous metal (carbon steel).
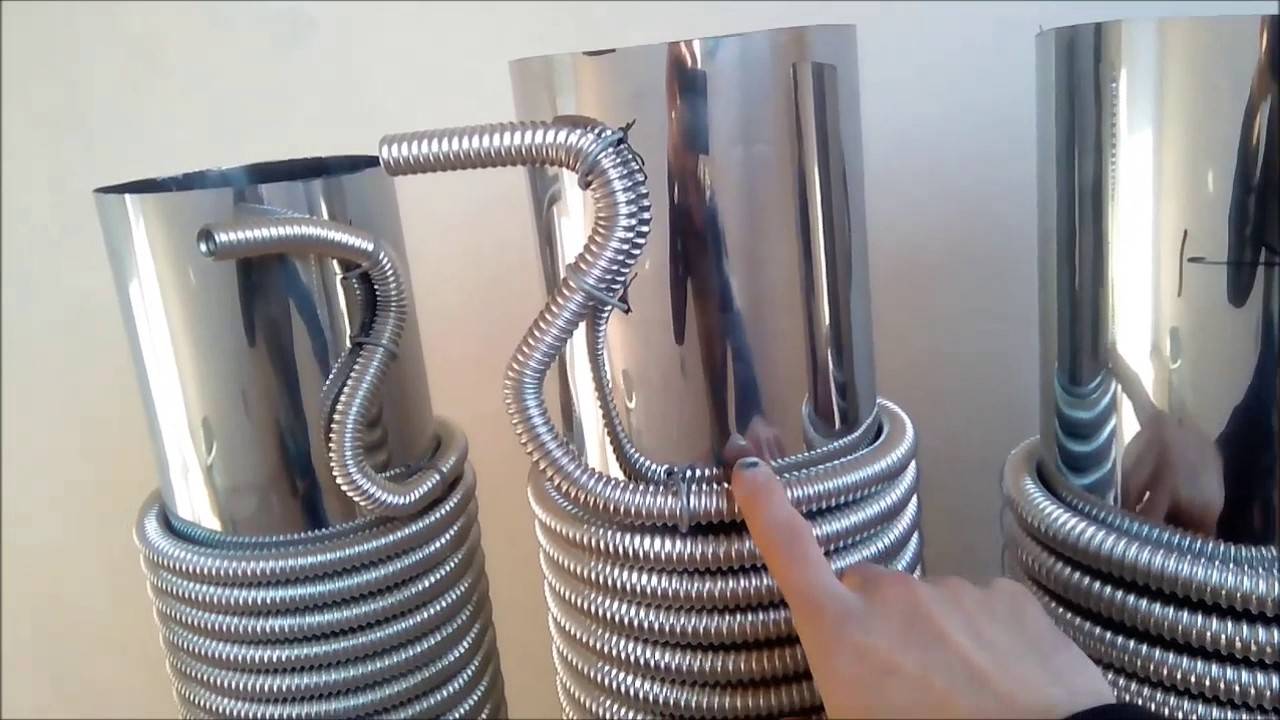
You can use high-quality corrugated stainless steel pipe. Galvanized corrugation is an undesirable and short-lived option. Aluminum pipes can also be used for the coil (but not for chimneys of solid fuel stoves).
Sometimes galvanized steel is also used, but it should be borne in mind that during welding, the zinc layer evaporates, and all the advantages of galvanizing (corrosion resistance) come to naught. At temperatures above 400 ° C, zinc begins to evaporate (zinc vapors are toxic), so do not use galvanizing for heat exchangers on chimneys of solid fuel boilers.
Functioning mechanism
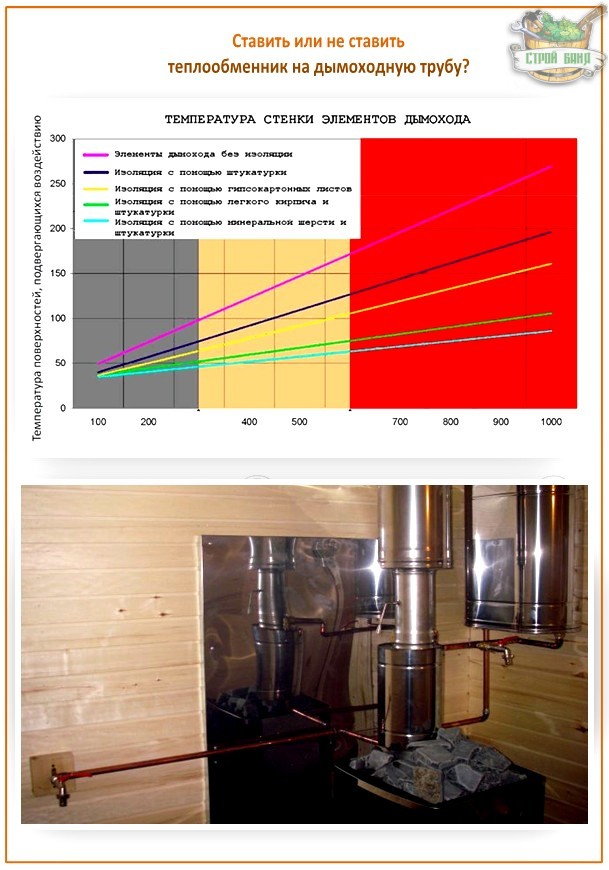
A metal stove located in a house, garage or bath is necessarily equipped with a chimney to remove carbon monoxide and organize draft. This pipe in the process of heating the furnace can reach very high temperatures, about 200-500 ℃, which is unsafe for people in the room.
If you install a heat exchanger on a chimney, you can significantly increase the efficiency of the furnace, as well as protect yourself from direct contact with a hot surface. In a tank or coil installed on the chimney, water will act as a heat carrier, however, it is also possible to mount an air heat exchanger on the chimney pipe.Due to the direct contact of the chimney with the coolant, their temperature indicators are balanced, that is, the water or air gradually heats up, and the pipe walls cool down.
As the temperature of the water inside the register rises to the pipe, it rises up, where it enters the water tank through a special fitting. Through the inlet fitting located at the bottom of the heat exchanger, cold water enters it, replacing warm water. This circulation continues constantly, while the water can heat up to very high values.


water models
In water heat exchangers, the medium for transferring energy from the pipe is liquids - water or antifreeze in heating systems or clean water for household needs.
There are two designs:
- in the form of a coil connected to the storage tank;
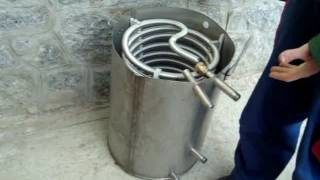
- "samovar" designs.
 Eliminating a large amount of heat can lead to reduced traction and condensation.
In the first case, several turns of a copper, aluminum or stainless tube are wrapped around the pipe, which lead to the drive.
The coil may be in airspace or inside an additional tank. The second option involves a sealed container located around a metal chimney. Fittings for supplying and discharging heated liquid are welded to the tank.
The water heated in the heat exchanger, due to the laws of physics, rises into an external storage tank. Be sure to arrange a circulation circuit. If it is not done, the heating water will break the heat exchanger.
Warm water is taken from the tank. A drain tap is needed to remove water if the room is not heated all the time. At a negative temperature, defrosting of all parts of the structure can occur.
Having added a circulation pump and a safety group to the circuit, one, maximum two heating radiators are connected to the heat exchanger. This design is sufficient for heating a one-room premise.
How to do it yourself
 Assembling the air heat exchanger
The manufacture of a "samovar" design is trusted by professionals or they buy a finished product in a store.
To avoid leaks in the seams, you need skills in welding.
They cook metal by gas welding - electric welds are unsuitable for durable work in systems filled with liquids.
They independently produce a heat exchanger in the form of a coil for hot heat supply.
From the materials you will need:
- copper or aluminum tube with a diameter of up to 25 mm;
- a tank with a float mechanism for supplying liquid from a water supply pipeline;
- flexible eyeliner;
- ball valve.
 The total length of the pipe should not exceed 3 meters
Work sequence:
- Threads are cut at the ends of the tube for connecting fittings.
- The pipe is wound around a mold of the same radius as the chimney. If the cross section of the tube is small, it is filled with sand. This will prevent creases and overlaps of the internal section.
- Install the finished coil on the chimney.
- Hang the heat exchange tank on the wall, but no higher than 50 cm from the hot water outlet from the coil.
- Make connections.
A simpler, but more expensive option is when a flexible corrugated stainless tube is used to make a spiral. They buy a corrugation with fittings already mounted. This will facilitate installation, for installing connectors you do not have to purchase special tools.
Choosing a material
The coil is traditionally made of a pipe, the length and diameter of which are determined by the desired level of heat transfer.The efficiency of the structure will depend on the thermal conductivity of the material used. The most commonly used pipes are:


- copper with a coefficient of thermal conductivity of 380;
- steel with a coefficient of thermal conductivity of 50;
- metal-plastic with a coefficient of thermal conductivity of 0.3.
Copper or plastic?
With the same level of heat transfer and equal transverse dimensions, the length of metal-plastic pipes will be 11, and steel pipes 7 times longer than copper pipes.
That is why for the manufacture of the coil it is best to use annealed copper pipe.
Such a material is characterized by sufficient plasticity, and therefore it can easily be given the desired shape, for example, by bending. A fitting is easily connected to a copper pipe with a thread.
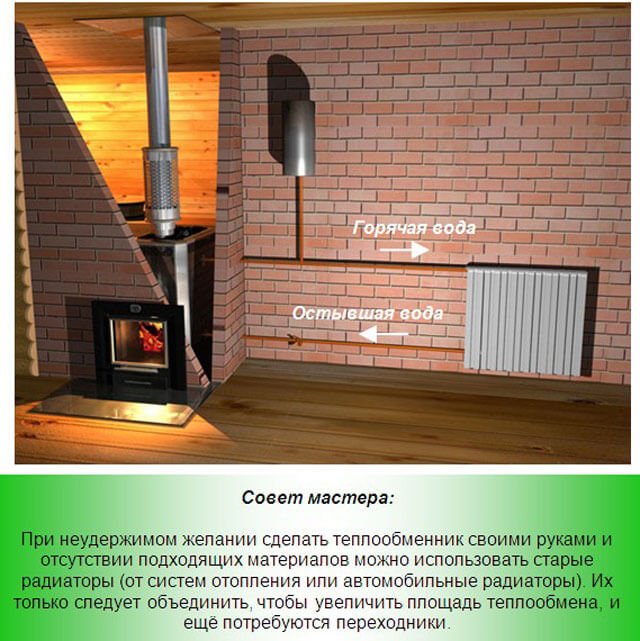
We are looking for improvised means
Given the high cost of materials, it would be appropriate to consider the possibility of using products that have already served their purpose, but have not yet fully developed their resource. This will not only reduce the cost of manufacturing the heat exchanger, but will reduce the time for installation work. As a rule, preference is given to:
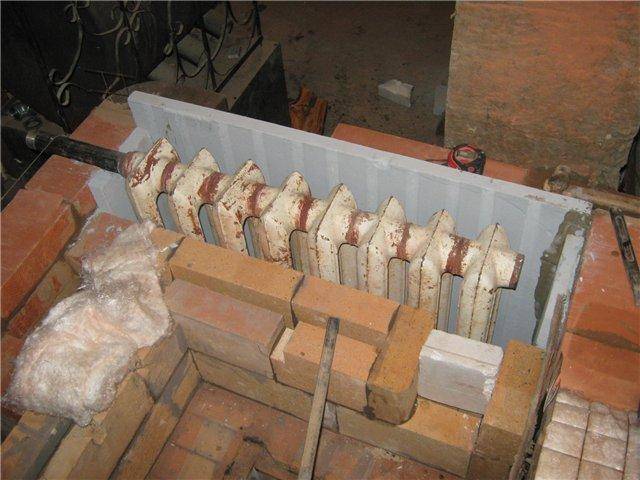
- any heating radiators that do not have a leak;
- heated towel rails;
- car radiators and other similar products;
- instantaneous water heaters.


