- PPR Soldering Tips
- Soldering mode and its influence on the process
- Temperature exposure, its features
- Finally
- The specifics of soldering polypropylene pipes
- General description of technology
- Soldering Machines for Pipe Welding
- Polypropylene Welding Procedure
- How to reduce the likelihood of marriage?
- Conclusion
- Preparation for welding polypropylene pipes
- Stages of work welding process
- Preparing the Welding Machine
- What is the welding process?
- Parameters for welding products made of polyethylene and polypropylene
- Melt flow index of materials (MFR)
- The temperature of the welding process of polypropylene and polyethylene
- Influence of humidity
- Soldering iron temperature and welding time
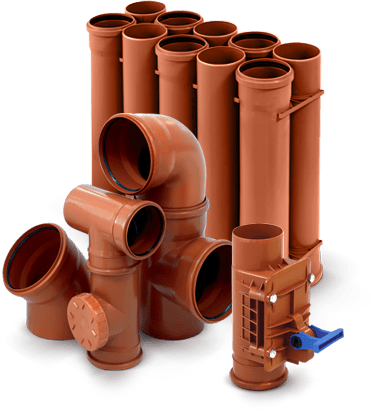
- Sewer system from PP pipes
- Internal sewerage
- Outdoor sewerage
PPR Soldering Tips
After turning on the soldering iron, it must be allowed to warm up for about 10 minutes. If there are dirt on the nozzles, they are removed on a hot soldering iron with a non-synthetic cloth or
paper. It is not recommended to remove dirt with metal objects - the non-stick coating will deteriorate.
Before welding, you need to carefully plan the sequence of assembly of all joints. The order must be such that the pipe or coupling has a range to remove the nozzle.
In the early stages of working with polypropylene, you need to pay more attention to planning.
Immediately before welding, the pipe and the inside of the fitting are wiped with a clean, dry cloth - the surfaces to be soldered must be clean. Certainly not worth the hassle
for sterility - there is no need to wipe the plastic with alcohol, as some advise.
The pipe and fitting are simultaneously placed on opposite sides of the heated nozzle and the required heating time is maintained. During warming up of polypropylene it is not necessary
rotate the pipe and fitting, for faster dressing on the nozzle! If the fitting is hard to fit on the nozzle, strain the pectoral muscles.
Some nozzles are designed so that when soldering the fitting fits very hard and is completely put on the nozzle after 3-5 seconds. When to calculate the required heating time? First of all, you should refer to the same document TR 125-02:
For an initial experience, such a guide is quite suitable. Let me just say that with experience comes understanding: with “tight” nozzles and a standard warm-up time,
excessive repayment.


After removing the pipe and fitting from the nozzle, they are connected as quickly as possible and kept stationary for a few seconds (welding time in the table). Objectively - after removal from the nozzle
soldering iron, there are 1-3 seconds to connect. Even after the welding time has elapsed, care must be taken that no extraneous forces act on the parts to be joined.
within minutes. Even the weight of the soldered pipe can deform the soldering point.
During welding, you can not rotate the pipe in the fitting, you need to connect them in a known correct position. For your own orientation, soldered pipe and fitting can be
mark with a dash - then during soldering it is more likely to connect the parts evenly. Nevertheless, you should not unconditionally focus on the lines, you need to see
the picture as a whole. Of course, during the connection process there is time for adjustment - no more than a second, when you can even out small soldering flaws.

For well-soldered parts, a rim (shoulder) should form around the pipe at the junction with the fitting. If you look inside the fitting, then the edge of the pipe will also have a little
melted edges.


Some plumbers blow into the pipe after welding to make sure the pipe has not soldered. From my own experience I can say that if the soldering temperature and heating time are observed -
this never happens. Although, theoretically, very low-quality polypropylene from an unnamed manufacturer may come across.
Soldering mode and its influence on the process
The technology of soldering polypropylene pipes consists in heating them, after which the plastic included in their composition softens. When connecting two heated products, diffusion (interpenetration) of polypropylene molecules of one technical product into the molecules of another occurs. As a result, a strong molecular bond is formed, making the resulting material hermetic and durable.
If insufficient mode is observed, then sufficient diffusion will not occur when the two materials are combined. As a result, the joint of the technical product will turn out to be weak, which will lead to a violation of the tightness of the entire material.
The output is a pipeline with a minimum internal hole at the junction, the diameter of which does not meet technological standards.
It is necessary to take into account not only the heating temperature when welding polypropylene pipes, but also the time, the temperature regime of the medium and the diameter of technical products. The heating time of pipe materials is directly dependent on their diameter.
The external environment matters. The minimum allowable temperature indicator for welding polypropylene products is -10 C. Its maximum allowable indicator is +90 C. The temperature table for welding polypropylene pipes clearly shows that everything basically depends on time.
The environment has a strong influence on the soldering quality. This is due to the fact that time passes from the moment the materials are removed from the welding apparatus to their direct connection. Such a pause greatly affects the quality of the weld. With a small external temperature regime in the workshop, it is recommended to increase the heating time of the joined products by a few seconds. The external soldering temperature of polypropylene pipes 20 mm must be above 0 C
It is important not to overheat them. There is a risk of polymer flowing into the inner hole of the tubular material and reducing its internal lumen
This will greatly affect the throughput of the future section of the pipeline.
Removing the pipe from the soldering machine
Temperature exposure, its features
Before answering what temperature is needed for welding polypropylene pipes, you need to decide on the welding machine used. A soldering iron is used to solder materials made on the basis of polypropylene. The question arises: what temperature of the soldering iron for soldering polypropylene pipes should be set? The optimum value is 260 C. It is acceptable to carry out welding work in the range of 255 -280 C.If you overheat the soldering iron over 271 C, reducing the heating time, then the upper layer of the products will warm up more than the inner one. The welding film will be excessively thin.


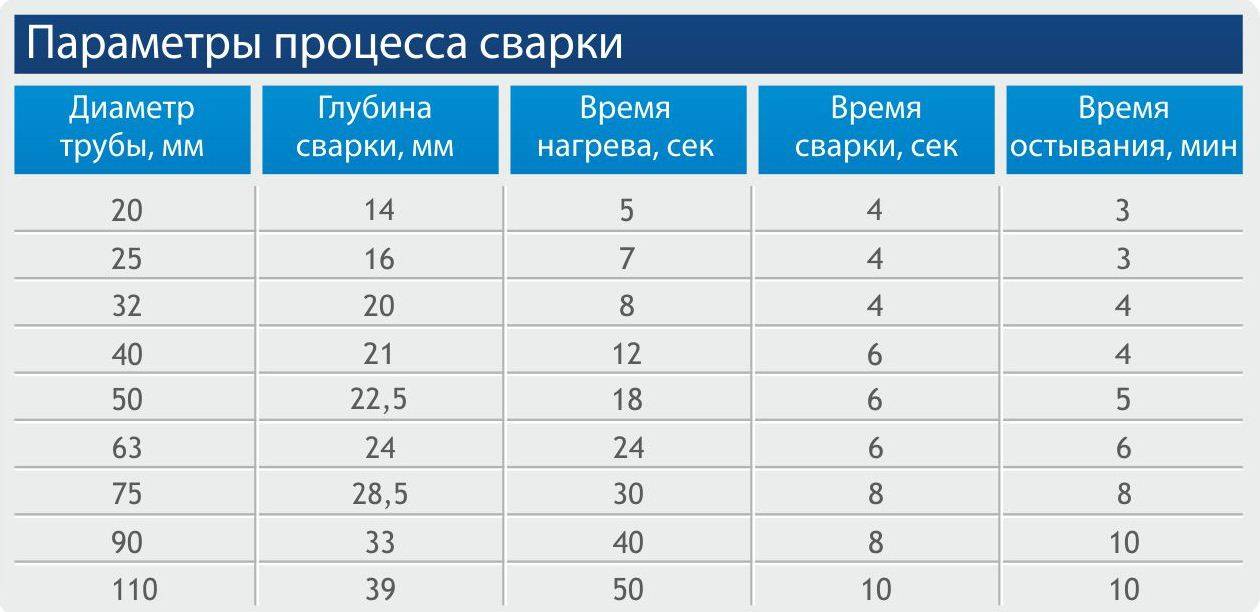
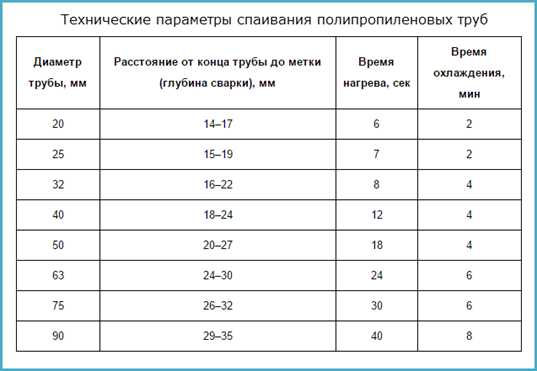
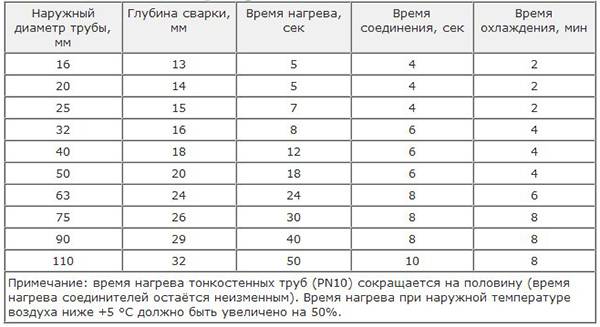
There is a table of soldering temperatures for polypropylene pipes.
| Pipe diameter, mm | Welding time, s | Heating time, s | Cooling time, s | Temperature range, C |
| 20 | 4 | 6 | 120 | 259-280 |
| 25 | 4 | 7 | 180 | 259-280 |
| 32 | 4 | 8 | 240 | 259-280 |
| 40 | 5 | 12 | 240 | 259-280 |
| 50 | 5 | 18 | 300 | 259-280 |
| 63 | 6 | 24 | 360 | from 259 to 280 |
| 75 | 6 | 30 | 390 | from 259 to 280 |
The welding temperature of 20 mm polypropylene pipes ranges from 259 to 280 C, as well as the welding temperature of 25 mm polypropylene pipes.
There are no special requirements for such an indicator as the welding temperature of glass fiber reinforced polypropylene pipes. It is set in the same range as for other technical products made of polypropylene. Before welding, it is necessary to remove the upper reinforced layer from such products with a shaver.
When welding products made of polypropylene, there are features:
- the need to avoid large distances between the soldering iron and the welding site, since there is a loss of heat and a decrease in the welding temperature, leading to poor quality of the seam;
- violation of the procedure for soldering, in which the master does not make the last joint due to the inability to install a soldering iron between two products, which is the result of deformation of the pipeline and the occurrence of static stress in its sections;
- inadmissibility of sequential heating of structural parts.
The fitting and tubing material must be heated at the same time, not sequentially. If the requirement for uniform heating of parts is not observed, the entire technology of the process will be disrupted.
Finally
To achieve the effectiveness of the process, it is necessary that the temperature regime is set in accordance with technological requirements, a high-quality unit is used for welding, the distance between it and the welding site is 1.4 m, and the room is sufficiently heated.
The specifics of soldering polypropylene pipes
PPR is made of polymeric material. It is thermoplastic, easy to melt at a temperature of 149 ° C, and retains its properties when cooled. Due to this, when heated, polypropylene pipes are easily joined, forming monolithic nodes of a single complex of communication systems. They are widely used in the construction of sewerage, drainage systems, and are also suitable for heating and water supply.
General description of technology
The soldering of polypropylene pipes is based on the principle of simultaneous melting with the help of a welding machine, the upper part of the pipe and the inner part of the coupling. After removing the heated parts from the heater of the soldering machine, they are joined to each other by compression.
At the confluence of the heated surfaces of the joined parts, an interpenetrating bond of molten masses occurs, forming a single monolithic unit during cooling. This method is called the coupling connection.
The method of welding PPR of one diameter is called direct (butt). It is based on the same principle of melting the edges of the pipes with their subsequent joining and fixing in a fixed position until it cools completely. The quality of direct welding depends on the exact alignment of the axes of the joined PPR.
The process of soldering polypropylene pipes with your own hands.
Soldering Machines for Pipe Welding
There are many varieties of soldering machines for PPR welding.Their technical design and dimensions depend on the diameters of the PPR with which they interact and the availability of auxiliary equipment.


Soldering machines are divided into:
- machine tools (with guides for centering the axis);
- bell-shaped ("Iron");
- butt.
For carrying out welding and installation work during the construction of a pipeline from PPR, you will also need:
- pipe cutter or scissors for polypropylene pipes;
- metalwork corner;
- pencil or marker;
- roulette;
- doorman;
- trimmer;
- alcohol-based surface cleaner (avoid acetone, solvents and products that leave a greasy, oily residue);
- work gloves.
Complete set for welding of polypropylene pipes.
Polypropylene Welding Procedure
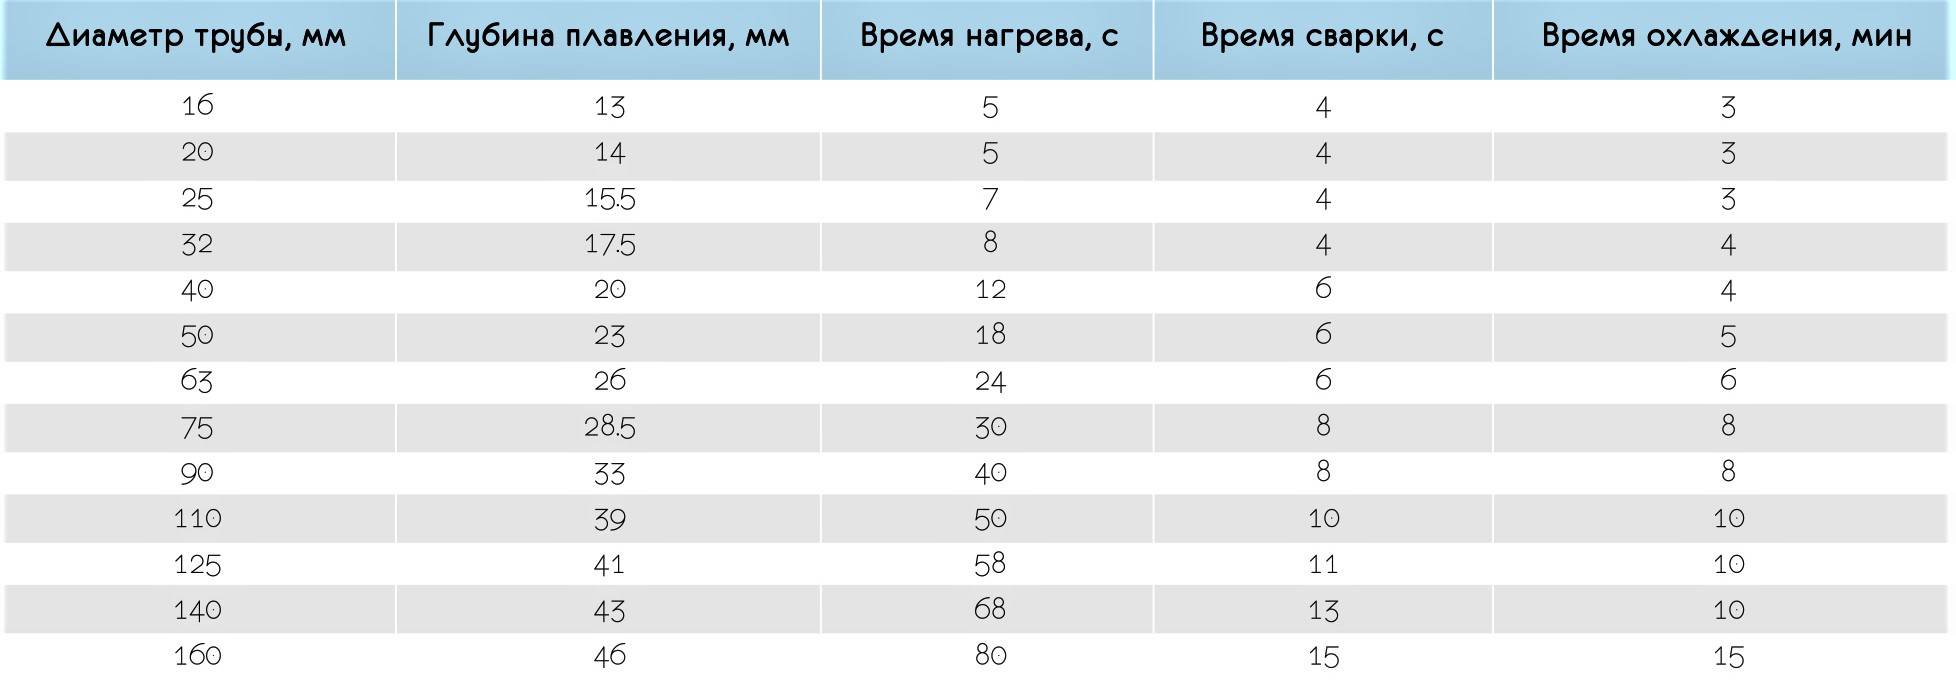
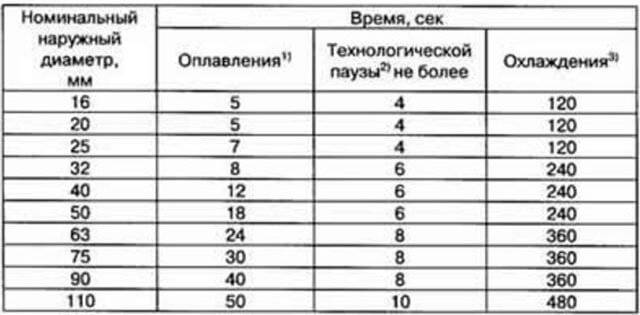
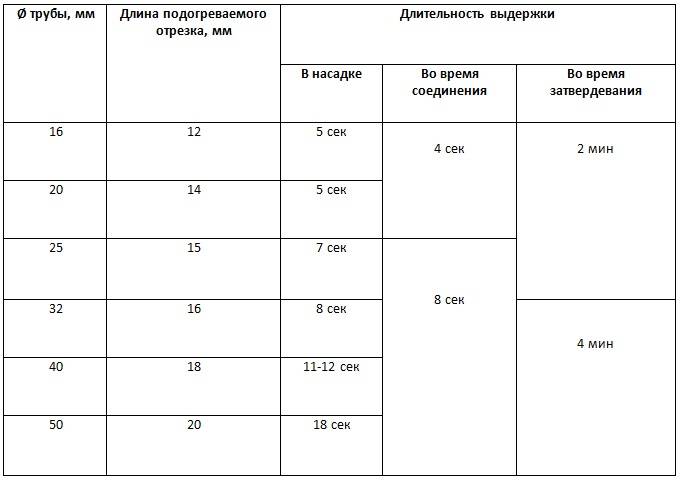
When performing PPR welding, it is necessary to observe the duration of heating of the parts. The wall of the part should not be strongly heated, but underheating also has a bad effect on the quality of the joints. The table reflects the amount of time sufficient to warm up the parts. The recommended soldering temperature is 260°C.
| Pipe section diameter, mm | Welding depth, mm | Heating duration, sec | fixation, sec | Cooling period, min |
| 20 | 13 | 7 | 8 | 2 |
| 25 | 15 | 10 | 10 | 3 |
| 32 | 18 | 12 | 12 | 4 |
| 40 | 21 | 18 | 20 | 5 |
| 50 | 27 | 24 | 27 | 6 |
For soldering pipes you need:
- Install nozzles on the soldering machine heater.
- Install the soldering machine in a place convenient for work, fix it with fasteners (if any), set the temperature controller to the required level and turn on the power.
- Prepare parts for welding.
- Treat the surfaces of the parts to be welded with a cleaning, degreasing agent.
- Measure the welding depth from the edge of the pipe and mark with a pencil. After putting the parts on the heater nozzles and keep the time indicated in the table.
During heating, do not allow the part to rotate around its axis, rotation worsens the tightness of the connection of the brazed parts. The heated parts must be removed from the heater and immediately docked by inserting one into the other.
When deepening (entering) the pipe into the coupling (fitting), it is impossible to turn it along the axis and cross the welding depth level marked with a pencil. It is necessary to fix the achieved position of the parts and not move them during the time necessary for the reverse polymerization.
To achieve the desired position when joining a pipe with a corner bend, both parts should be marked in advance by drawing a guide with a pencil at the junction. This will avoid rotation of the bend and achieve the required angle relative to the pipe axis without correction.
How to reduce the likelihood of marriage?
Soldering elements in conditions of difficult access is recommended to be carried out by two people. The second specialist helps to remove the second element from the nozzle, removes the soldering iron to the platform. The first master with two hands carefully joins the parts with a minimum pause. Sometimes the help of a third party is required. They resort to his services when the pipe needs to be fixed in the wall in the adjacent room. Attempts to perform all operations on their own in difficult areas always lead to marriage and the need to re-weld.

Landing depth marking
During soldering, it is necessary to observe the accuracy of movements. It is necessary to maintain the correct inclination of the fitting element relative to the second part, its axial angle of rotation on the pipe, the depth of entry into the fitting sleeve. To control the depth of entry and the angle of rotation of the fitting, marks are made on the surface of both parts. In order not to measure the allowance each time in sections of the same section, use a template.
The iron does not need to be turned off during the entire welding period. The master will lose time to warm up the equipment. The soldering iron is ready for use after the heating indicator goes out. A lit indicator indicates that the mirror is being heated to the desired temperature. If you start welding during this period, the pipe will not warm up qualitatively. In order to comply with the technological process and holding time, it is recommended to check the parameters according to the table, which is recommended to keep at hand.
If combined pipes are purchased, they are connected only after mandatory stripping. The depth of chamfering should be 2 mm greater than the depth of the sleeve into which the element is threaded. Reinforcement reduces deformation expansion by 10 times. On products with external reinforcement, before soldering, a part of the surface is removed with a shaver to the required depth for joining. Pipes with internal reinforcement do not need to be stripped. Their installation is faster.
About the secrets of fitting pipes in this video:
Conclusion
It should be remembered that unreinforced polypropylene is sensitive to hot water. When a liquid is supplied that exceeds +50⁰, the material expands by 1.5%. This leads to an increase in the length of the pipeline. For each meter of the line, the deformation will be 15 mm. Reinforced pipes are required for heating systems, and conventional polypropylene counterparts are only suitable for cold water supply.
Source
Preparation for welding polypropylene pipes
Before connecting to the network, we install two nozzles on the soldering iron: one for the inner diameter (couplings), the second for the outer one (pipe).
It is necessary to prepare parts for welding: a coupling and a pipe of the required length.
Since we deal with parts heated to high temperatures, we work with gloves, which were also taken care of before starting work.
We turn on the device for welding in the network. We also turn on both toggle switches on the case (see photo below). All models of soldering irons have two lights: one indicates that the soldering iron is plugged in, the second indicates that heating is in progress:


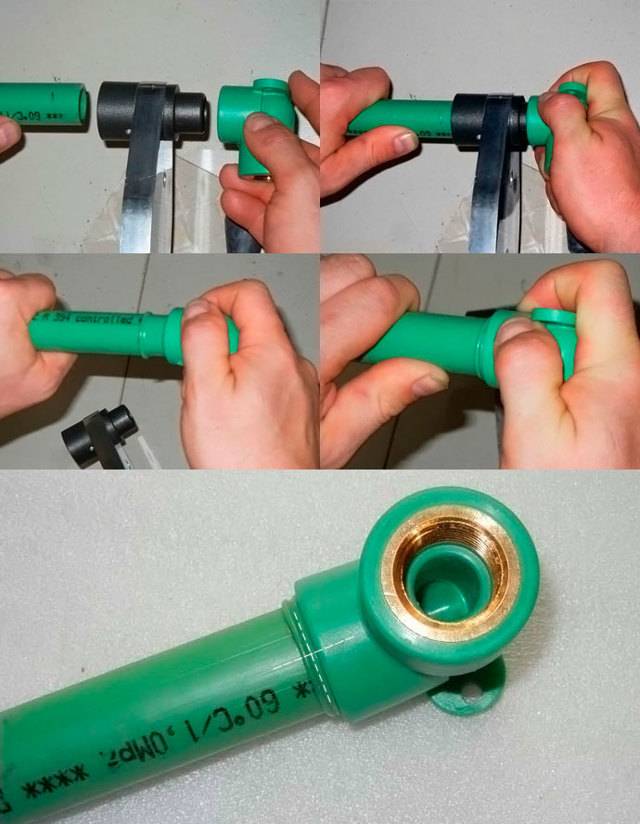

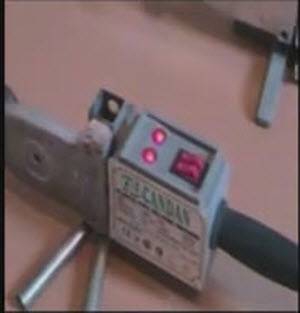
- as soon as the second light goes out, it means that the soldering iron is heated to the set temperature.
Stages of work welding process
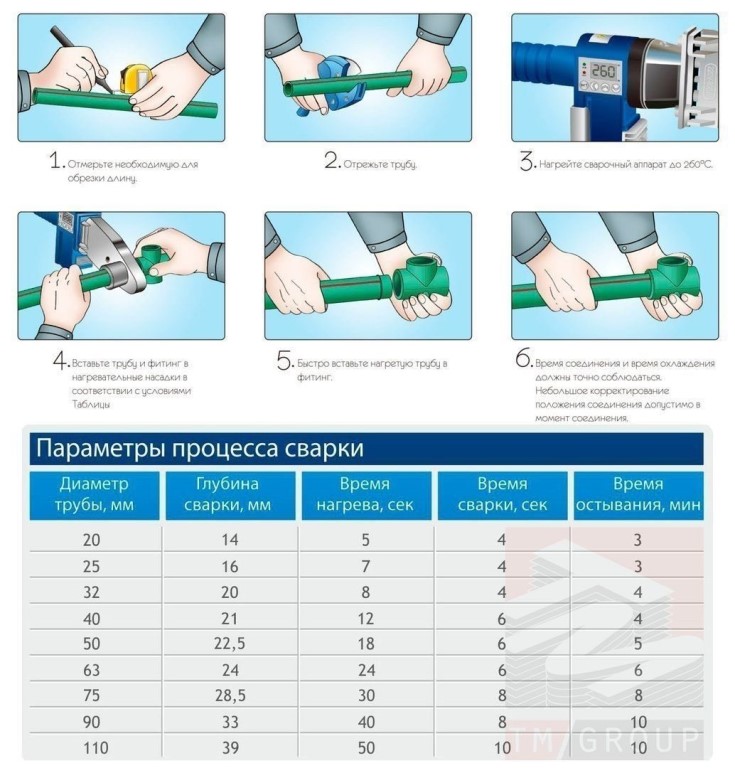
Having measured the required length of the pipe, make a mark on it with a marker. With a pipe cutter or scissors, cut the product at an angle of 90º to the axis. The tool must be sharp enough so that the pipe does not deform.
The pipe is cut at an angle of 90º to the axis
The edge of the reinforced product must be cleaned, getting rid of the top layer and foil. Without this stage, the aluminum foil, which is part of the pipes, will come into contact with the liquid during operation. As a result, corrosion of the reinforced layer will lead to a violation of the integrity of the seam. Such a connection will leak over time.
The edge of reinforced pipes is cleaned
For non-reinforced products at the end of the pipe, the depth of welding is indicated, focusing on the length of the fitting sleeve. Another important point in preparing pipes for welding is degreasing the surface. Treatment of the junction with alcohol will provide more reliable contact of the parts.
Preparing the Welding Machine
Before welding plastic pipes, it is necessary to prepare the welding machine. The handheld device is fixed on a flat surface. Machine parts must be clean and free of defects. Clean them with a cloth soaked in alcohol.The heating elements are put on when the tool is off. A mandrel is used to fuse a fitting, a sleeve is used to fuse a pipe.
The heating time of parts for welding is determined according to the table
Then the device is connected to the network. At the same time, the indicators located on the unit body should light up. One of them signals that the device is connected to the network. The second, after reaching the required heating temperature, should go out. After the indicator goes out, it is desirable that five minutes pass and only then begin the welding process. This time depends on the ambient temperature and lasts from 10 minutes to half an hour.
What is the welding process?
After heating the apparatus, put the fitting on the mandrel, and insert the pipe into the sleeve. This is done at the same time and with little effort.
After heating the device, put the fitting on the mandrel, and insert the pipe into the sleeve
In order to know how to properly weld polypropylene pipes, it is necessary to take into account the heating time. The correct period will allow the parts to warm up to the required temperature and not melt. It depends on the diameter of the pipe.
After the required period of time, the parts are removed from the apparatus and connected. In this case, the pipe must enter the fitting strictly up to the mark. During this process, it is forbidden to rotate the parts along the axis.
In the process of connecting parts, it is prohibited to rotate products along the axis
After joining the parts, mechanical impact on the seam is not allowed until it has completely cooled down. Subject to technology, the result should be a strong and tight seam.
The article gives the necessary recommendations on how to properly weld pipes, with a detailed description of each stage.By putting these tips into practice, you can independently conduct a pipeline for water supply or heating. The main thing is to choose the right pipes and follow the process technology. Only then the polypropylene pipeline will serve for a long time and uninterruptedly.


Cast iron has not been used in modern water supply and heating systems for a long time. It was replaced by light, easy-to-install and non-corrosive plastic. Today we will talk about welding polypropylene pipes with our own hands for beginners - the main stages of this process and its intricacies.
Parameters for welding products made of polyethylene and polypropylene
Melt flow index of materials (MFR)
Welding of high density polyethylene (PE-HD, HDPE)
Products made of high density polyethylene melting group index 005 (MFR 190/5:0.4-0.7 g/10 min.), group 010 (MFR 190/5:0.7-1.3 g/10 min. ) or groups 003 (MFR 190/5:0.3g/10min) and 005 (MFR 190/5:0.4-0.7g/10min) are suitable for welding with each other. This is confirmed by the DVS 2207 part 1 (DVS - German Welding Association) and confirmed by the DVGW (German Gas and Water Association) documents.
Welding of polypropylenes: polypropylene homopolymer (PP type 1, PP-H) and polypropylene block copolymer (PP type 2, PP-C, PP-R)
The weldability of polypropylenes is indicated within the melting index group 006 (MFR 190/5:0.4-0.8 g/10 min.). This is confirmed by DVS 2207 part 11.
The temperature of the welding process of polypropylene and polyethylene
Hot gas welding
| Air, l/min. | Nozzle temperature ˚С | Gas speed cm/min | ||||
| Nozzle diameter, mm | Speed nozzle diameter | |||||
| 3 | 4 | 3 | 4 | |||
| Polyethylene welding | 60-7060-7060-70 | 300-340300-340270-300# | 10-1510-15- | ok.10ok.10- | 50-6050-6025-30 | 40-5040-5020-25 |
| Polypropylene welding | 60-7060-7060-70 | 280-320280-320280-320 | ok.10ok.10ok.10 | 50-6050-6050-60 | 40-5040-5040-50 |
Hand extruder welding
| Extrudate temperature measured at nozzle exit, ºC | Air temperature measured at the warm air nozzle, ºC | The amount of air, liters / min. | |
| PE hard PP | 200-230200-240 | 210-240210-250 | 350-400350-400 |
Influence of humidity
Welded products (sheets, plates) and a welding rod made of polyethylene and polypropylene can, under certain conditions, absorb moisture. As a result of studies carried out by a number of manufacturers, it was found that polyethylene and polypropylene welding rods made of polyethylene and polypropylene absorb moisture depending on the material and the environment. In extrusion welding, the presence of moisture may appear in the form of shells in the seam or a rough surface of the seam. This phenomenon increases with increasing thickness of the weld.
In order to prevent such undesirable consequences, the following recommendations have been developed:
- Installation of moisture and oil separators in the air supply system,
- Prevention of a significant temperature difference between the parts to be welded (condensate moisture),
- Store the welding rod in a dry place, if possible,
- Drying of the welding rod at 80°C for at least 12 hours,
- Welding of wide seams (>18mm) in several passes.
Depending on the type of heating of polypropylene and polyethylene, the following types of welding are distinguished:
- Welding of thermoplastics with hot air (hair dryer)
- Extruder welding of thermoplastics
- Welding thermoplastics with a heating element
- Thermoplastic high frequency welding
- Laser welding of thermoplastics
Soldering iron temperature and welding time
The soldering temperature of PPR pipes is the same for all types of reinforcement and all diameters, and is 260℃.This temperature should be set on the thermostat of the soldering iron and
always stick to it. In the process of work, you can accidentally turn the thermostat, so I recommend to look at it sometimes. Two hundred and sixty degrees Celsius, plus or minus
a few degrees - no need to increase the temperature!
Some "uhari", to increase the speed, set the temperature to 300 ℃ (usually the maximum for a soldering iron). The soldering speed of course increases, but the quality and
significantly increases the likelihood of marriage! Elementary overheating worsens the strength of the weld, increases the likelihood of contaminated areas (polypropylene sticks to the nozzle and
burned out), there are often cases of soldering of the internal passage of the pipe.
The so-called "ass" in the jargon of plumbers is the end of the pipe sealed in the fitting, tightly or with a small throughput. Often such a marriage becomes the cause of catastrophic
low water pressure or poor heating of heaters. “Assholes” appear as a result of exceeding the temperature and soldering time - set the temperature on the soldering iron too high or too
I heated the parts for a long time, and sometimes both.
Another reason for the increase in temperature on the soldering iron is the reluctance to strain the pectoral muscles - the normal soldering temperature and high-quality polypropylene make a little
strain!
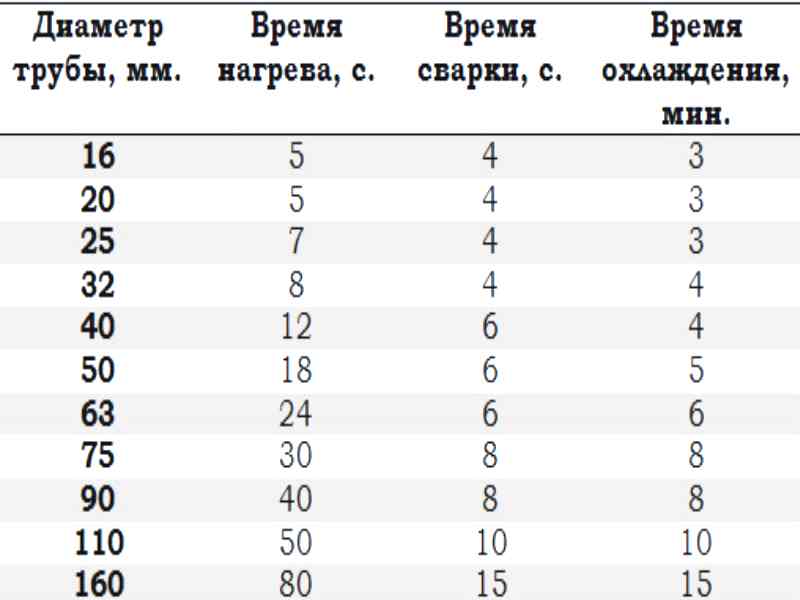
Therefore, for the correct execution of the process, it is necessary to observe both the temperature and the heating time of the parts to be soldered. The warm-up time of the pipe and fitting depends on the diameter. Data given
in the table below and are valid for any type of polypropylene pipes.
| Time | Pipe diameter (outer), mm | ||||||
|---|---|---|---|---|---|---|---|
| 20 | 25 | 32 | 40 | 50 | 63 | 75 | |
| Heating time, sec | 5 | 7 | 8 | 12 | 18 | 24 | 30 |
| Welding time, sec | 4 | 4 | 6 | 6 | 6 | 8 | 8 |
| Cooling time, sec | 120 | 120 | 220 | 240 | 250 | 360 | 400 |
Try turning your phone to landscape or change the browser zoom.
To display the table, you need a screen resolution of at least 601 pixels in width!
The data in the table is valid for an ambient temperature of 20℃. Generally over the soldering temperature may vary depending on the temperature
environment, actually for this purpose there is a regulator on the soldering iron. However, at the initial stage, you should not bother yourself with various coefficients, but learn
simple truth - soldering must be done in heat!
Experienced craftsmen regulate the temperature within small limits depending on the quality of the pipes, and the heating time depends on the environment. In other words, at
temperature of air only 5 ℃ increase the heating time, for example from 5 seconds (for 20 mm pipes) to 7-8, the temperature on the soldering iron does not change.
After some experience in soldering quality pipes according to the above table, there is a “feeling” of the material, a feeling of an underheated or overheated soldering iron. Only
then you can start experimenting with the welding temperature, naturally within small limits.
Someone who has already tried to weld pipes with his own hands may have a very important question: how much time is allotted for the docking of two
parts to be welded after removal from the nozzle?
The answer to this question is in the current technical recommendations TR 125-02. Technological pause for diameters 20-25 mm. is 4 seconds, for 32-50 mm.
6 seconds and 8 seconds for diameters 63-90 mm.However, I have an opinion, based on my personal feelings of the material, that these figures are overestimated, twice as much. Although I emphasize
that the pause is highly dependent on the specific material - polypropylene from different manufacturers loses its elasticity at different rates within a few seconds.


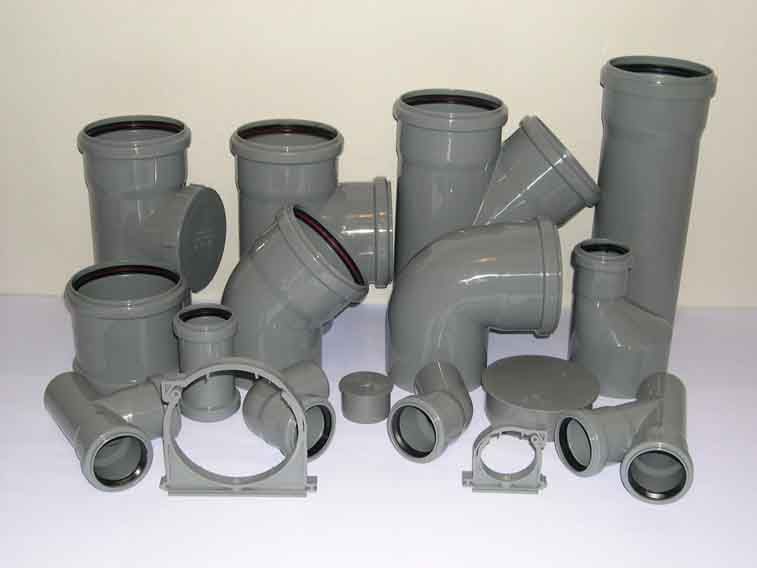
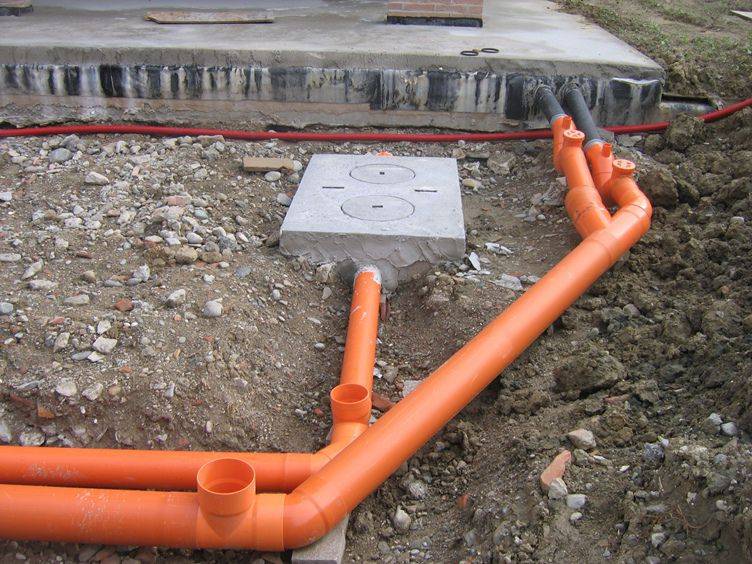
Sewer system from PP pipes
As noted earlier, polypropylene pipes are actively used today in the arrangement. The installation procedure in this case has its own nuances.
Internal sewerage
There are a number of rules that must be observed when installing sewerage in the house.
- The pipeline is laid at an angle in the direction of the sewer riser (about 3 cm per linear meter).
- If the room is not heated, then the pipes are additionally insulated with mineral wool.
- Do not make sharp turns at an angle of 90ᵒ, so-called half-bends are used instead.
- Fan-type ventilation is a mandatory component of the sewer system, which will prevent the penetration of an unpleasant odor into the home.
- The toilet is connected only after the sink, otherwise the water seal will break.
Outdoor sewerage
Step one.
The diameter of the pipes is determined, depending mainly on the number of people living in the house.
Step two.
A trench is dug from the sewer riser to a septic tank or cesspool. At the same time, a slope is observed, depending on the soil freezing line, or the pipeline is insulated with mineral wool.
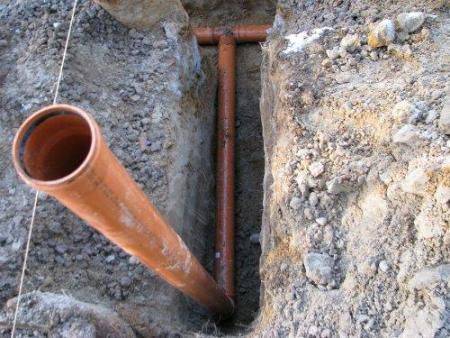
Step three.
The bottom is covered with a "pillow" of sand. Its thickness should be at least 20 cm.
Step four.
Pipeline is being laid
It is important to avoid possible sagging, otherwise the connections will soon collapse.Horizontal drilling of a trench for the pipeline is carried out using special equipment with pressure-action jack-pumps. Drilling takes place using a steel cone-shaped tip
Similar technology is used in the construction of:
Drilling takes place using a steel cone-shaped tip. Similar technology is used in the construction of:
Horizontal drilling of a trench for the pipeline is carried out using special equipment with pressure-action jack-pumps. Drilling takes place using a steel cone-shaped tip. Similar technology is used in the construction of:
- auto and railway roads;
- pipelines to basements;
- highways to working wells.
Do-it-yourself installation of a PP pipeline will help save a lot, but only if it is done correctly.
Products made of polypropylene are used, as a rule, when creating drainage and irrigation systems, as well as when laying a water supply system or arranging a heating system. Polypropylene belongs to the class of polyolefins, which means that all products made from this material are distinguished by a high degree of environmental safety.
In addition, polypropylene drainage systems can last a very long time, while the cost of their operation will be minimal. However, when working with such products, you need to know how to weld polypropylene pipes in such a way as to avoid their deformation and prevent leakage.


