- Myths about installation requirements
- Video: self-installation of switches in the room
- Types and characteristics of socket boxes
- Choosing a socket according to the material of the walls
- What form are the products made in?
- Installation box size
- The material of the junction boxes
- Important to know before starting work
- Security conditions
- Points to consider
- Rules for mounting sockets and switches
- Concrete wall marking
- Wiring diagrams for switches and sockets
- Socket connection
- Connecting multiple outlets
- Switch connection
- Connecting an outlet and a switch
- Optimum location height
- Mounting methods
- Optimum location height
- Which sockets to choose for the TV
- Which cable to choose for the kitchen
- Instructions for installing TV sockets
- How to connect a TV cable to an outlet
- Antenna cable difference
- Option 2 - Retractable sockets
- Rules for selecting devices for power supply
- Fitting the hole to the dimensions of the socket
- Installation of sockets in drywall
- How to install a simple TV outlet
- Types of TV sockets
- Single TV
- checkpoint
- What is the difference between terminal and simple models
Myths about installation requirements
The established requirements are basic for the installation of sockets and switches in residential and other premises.In this case, you can use the free method of location, that is, fix the elements in an order that is comfortable for the user. This option is often considered the only one, but we must not forget about the standards that ensure security.
Video: self-installation of switches in the room
All elements of the electrical circuit are important and require safety during installation and operation. Compliance with requirements and standards is a solution necessary to achieve high quality work.
Types and characteristics of socket boxes
Modern sockets, both in appearance and in the method of installation, differ significantly from those that were installed in the houses of the Soviet era.
If earlier they were simply embedded in the wall without the possibility of replacement, today it is not particularly difficult to install them and, if necessary, change the outlet.


Choosing a socket according to the material of the walls
The main selection criterion is the material of the walls into which the socket boxes will be installed.
On this basis, there is the following classification of boxes:
- structures intended for installation in walls made of solid materials: concrete, reinforced concrete, aerated concrete, brick;
- glasses for walls made of composite materials: drywall, plastic boards, chipboard, plywood and others.
In the first case, the socket box is a round glass, on which there are no additional elements. It is fixed in the wall with mortar.
Its walls or bottom have mounting holes for electrical wiring. When installing the socket, it is enough to remove the jumpers and squeeze out the plug.

For mounting several nearby sockets, you can use the glasses, on the side of which there is a mounting mechanism. Socket boxes are connected to each other with the help of special grooves and combined into blocks.
Drywall boxes have special clamping plastic or metal tabs designed to secure the elements in hollow walls. The clamps are mounted on screws that rotate to adjust their position.

What form are the products made in?
The most widespread are round-shaped socket boxes. It is very easy for them to make a hole in the wall using a variety of tools.
Round glasses can be used both for mounting a single socket or switch, and they can be combined into groups by connecting to each other by means of docking nodes.
Square boxes, although not used so often, have certain advantages. Their volume is much larger, so you can hide a lot of wires in them.
Often they are used for the installation of elements of the "smart home" system. There are single and group socket boxes of square shape, designed for installation of up to five sockets.
Oval boxes are also on sale, which, like square ones, have a large internal space. They are convenient in that you can immediately connect a double outlet to them. All the products described above are mounted in walls and used for hidden wiring.
There is another type of mounting boxes that stand somewhat apart - plastic lining or in other words multiboxes designed for open installation on a baseboard. They are designed for one or more outlets and are usually square in shape.

External socket boxes have two modifications - designs with installation to the middle of the plinth or to the floor. Since the multiboxes are mounted on top of the plinth, their distinctive feature is their aesthetic appeal and original design.
Installation box size
An important parameter of the socket boxes is their dimensions, which are selected based on the specific installation conditions. The size fork in diameter is 60-70 mm, in depth - 25-80 mm.
Standard designs have external dimensions of 45 x 68 mm, while keeping in mind that the internal depth in this case will be 40, and the diameter will be 65 mm.

Glasses of enlarged dimensions, the depth of which is about 80 mm, are advisable to use when there is no junction box in the electrical wiring, and the socket box itself performs its functions. As for square products, as a rule, they have a size of 70x70 or 60x60 mm.
The material of the junction boxes
The most popular are socket boxes made of non-flammable plastic. They can be installed in concrete walls and structures made of composite materials.
There are also metal boxes, which in the old days were used everywhere, but today they have almost been replaced by plastic products.
Metal sockets are usually installed when installing electrical wiring in wooden houses. They are made of galvanized or non-ferrous metal and cannot be welded, so the connection with a metal pipe is made by soldering.


Important to know before starting work
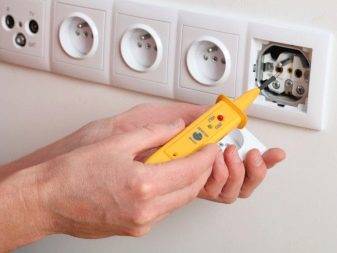
Security conditions
It is important to do all the work on installing sockets and switches, laying electrical communications only after a complete shutdown of the current in the network.Turn off the machine or traffic jams
And do not connect until the installation work is completed.
Take the indicator and make sure that the outlet or wiring you are going to work with is de-energized. Professionals suggest using two indicators at once. This will ensure that undesirable consequences are avoided.
Points to consider
- You should monitor the condition of the wire insulation, and do not use damaged copies in your work.
- It is strictly forbidden to cut live wires with wire cutters.
- In places where wiring has already been laid, it is impossible to engage in chiselling, drilling or cutting them.
Any touch with a screwdriver with zero and phase wires inevitably provokes a short circuit in the network.
Socket Installation Standards:
- not lower than 20 cm from the floor;
- for every 6-10 sq. m. housing rooms is made one outlet.
Rules for mounting sockets and switches
In order for the installed system to serve for a long time, it is important to choose the right wires and cables to be connected, and lay them properly.
For this, you should take into account:
- The power of all future energy-consuming appliances in an apartment or house. All devices are simply added together. It is necessary to know and what is the maximum power allocated by the network.
- The choice of the type of wire or cable depends on the method of laying them: open or internal. It is necessary to decide which gasket is suitable for a particular electrical installation site.
- When laying wiring, do not lay wires in bundles.
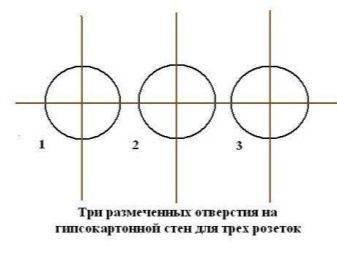
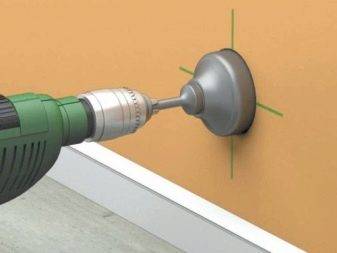
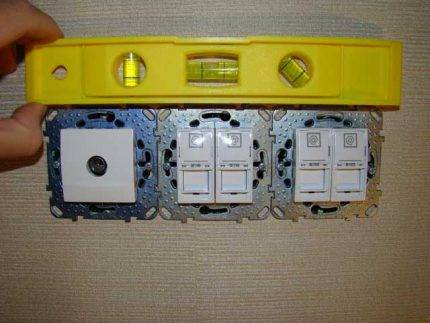
Concrete wall marking
In order to drill a hole correctly and without errors, before embedding the socket into a concrete wall, it is necessary to clearly mark its position on the wall.
Wherein:
- The center of the axis is marked on the wall surface, for laying wires and placing holes. For this, a pencil and a tape measure are used;
- If it is necessary to install adjacent sockets or a device block, a certain distance must be observed between the elements. It is recommended to choose an average distance between the axes of the socket boxes of 71 mm;
- Two axes are drawn in the center: vertical and horizontal. The lines must be of sufficient length so that the installation of the socket box is as even as possible.
Marking lines for laying wires.
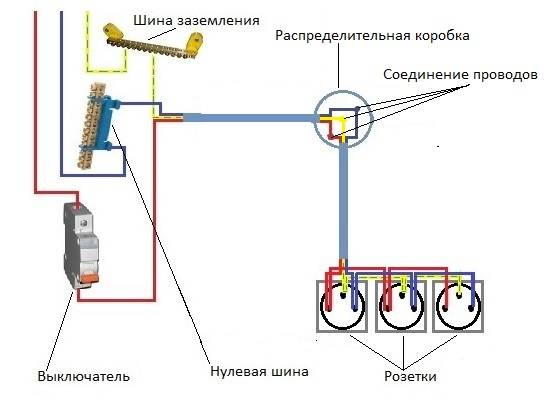
Wiring diagrams for switches and sockets
After completing all the preparatory measures, at the very last stage of installation, you can begin the process of connecting our electrical outlets. In our article, we will consider various options for connecting and combining the connections of sockets and switches.
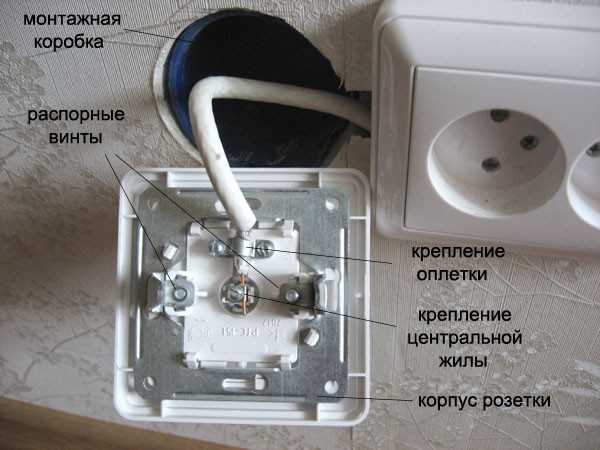
Socket connection
The simplest of the connections is the installation of a socket. It practically does not require any specific knowledge. The main thing is to follow our advice and not be a hero.
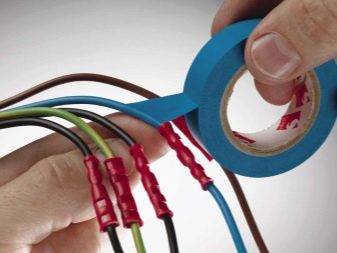
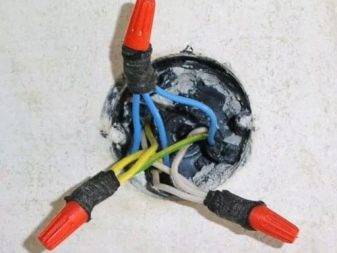
- To connect the outlet, we should use a three-wire wire. In which one core (yellow-green) is designed to perform protective grounding. One core (blue) is designed to connect the zero contact and the last (any color) - to connect the phase contact.
- To connect the socket, we mount the phase and neutral wires to its power clamps. We connect the protective conductor to the appropriate contact, which is usually located separately or can be determined visually.
 The photo shows the connection diagram of sockets
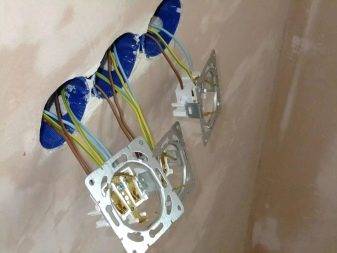
Connecting multiple outlets
The installation scheme of sockets and switches often involves the location of several devices at once nearby. In this case, to save energy on gating and wires, it is easier to connect one from the other.
In this case, such a connection scheme must be taken into account in the calculation of the wire cross section.
- In order to perform such a joint connection of two or three outlets, we connect the first outlet in the same way as described in our instructions above.
- After that, it is enough for us to make jumpers from the power contacts of the second outlet to the power contacts of the first outlet.
- We do the same with the protective wire.
- If it is supposed to connect the third, fourth and so on outlets, then we perform a similar operation with everyone.
Switch connection
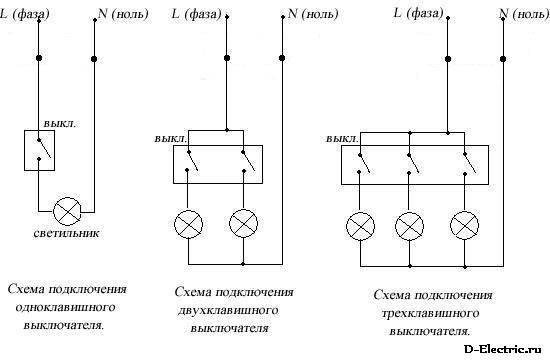 Connection options for various switches
- To make the connection, we need to determine the phase and neutral wires in the junction box. This is easy to do if you followed the rules of the PUE when installing the group wire.
- From the neutral wire in the junction box we connect one of the terminals of the lamp.
- From the phase wire in the junction box, we connect the input of our switch. It is usually located at the top. If it is a two- or three-pole switch, then it is one, and on the opposite side there are two or three leads, respectively.
- Then we connect the wire to the output of the switch and throw it to the lamp. Here we connect it to the second terminal of the lamp. If we have a two- or three-pole switch, then we perform the same operations for other fixtures. If we have one chandelier powered from a two-pole switch, then it must have three outputs. We connect the output from the switch to the third contact of the chandelier.
Connecting an outlet and a switch
There is also a wiring diagram for the socket and switch. It allows you to place two of these installation devices side by side with the connection of a switch from the socket. This allows you to save the wire and unload the junction box from a large number of connections.
 Connecting a switch from a socket
- To make such a connection, at the first stage, we connect the socket using the principles described above.
- Now we connect the lead wire to the phase contact of the socket, to the input of the switch.
- And we lay the wire from the output of the switch and connect it to one of the outputs of the lamp.
- If the luminaire that turns on the switch is located near the installation site of the switch, then you can connect the neutral and protective output from the socket directly to the luminaire. If it is sufficiently remote, then the connection of the neutral and protective wires is carried out from the junction box, as in the case of the usual connection of the switch.
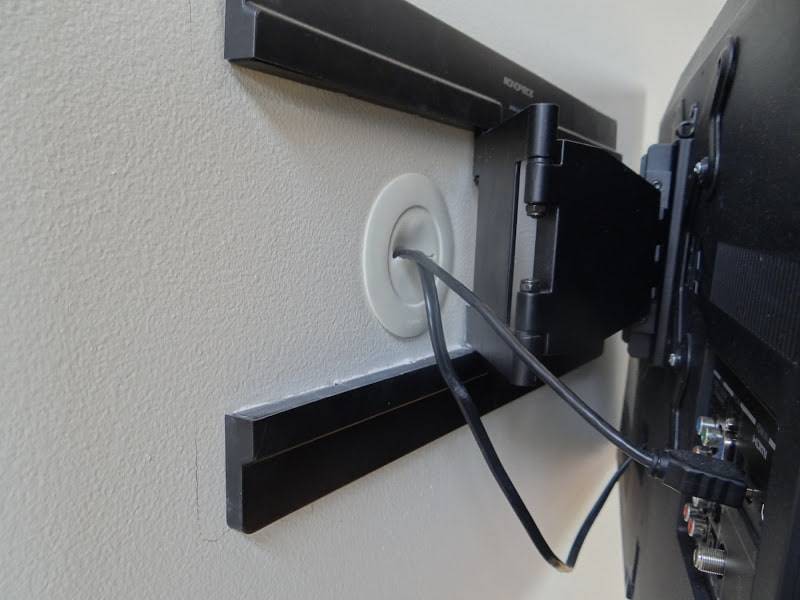
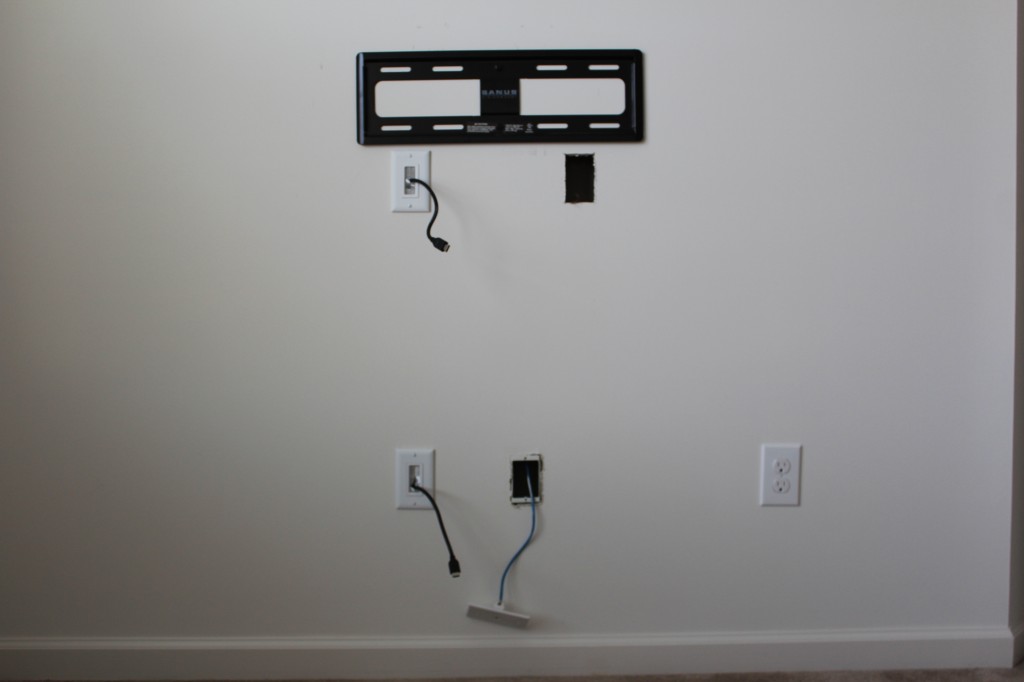
Optimum location height
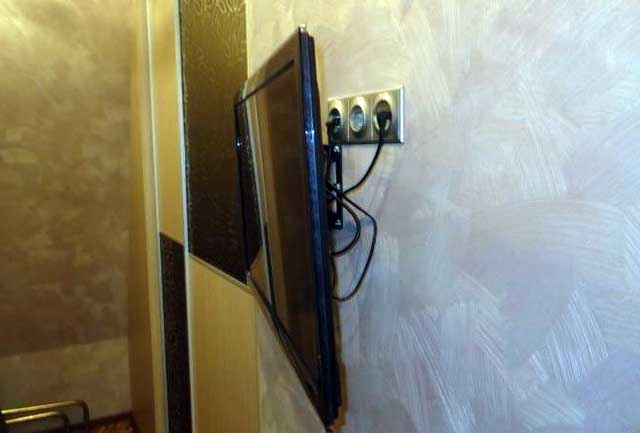
If you decide to place the TV on the wall, the installation height of the socket block is determined automatically - it is hidden behind the TV panel. The solution differs from the standard placement options for conventional power points. This method of mounting telesockets is designed for complete masking of inlets, connectors, visible cable segments.
Wires hanging on the wall can spoil the design of the most sophisticated interior, besides, their open location is a risk of breakage (small children will cut it, a dog will gnaw it, etc.).

The option for the correct installation of the TV: it is pressed against the wall as much as possible, all the wires are hidden under the lining, the sockets are in a hidden space, right behind the screen
The mounting height of the outlets is based on the height of the TV hanging, which may vary slightly. Usually television and video equipment is placed at the eye level of a person sitting on a chair or sofa. The optimal distance is considered to be 1.2-1.4 m (from the floor surface to the center of the outlet). In relation to the TV - a little below its upper edge.
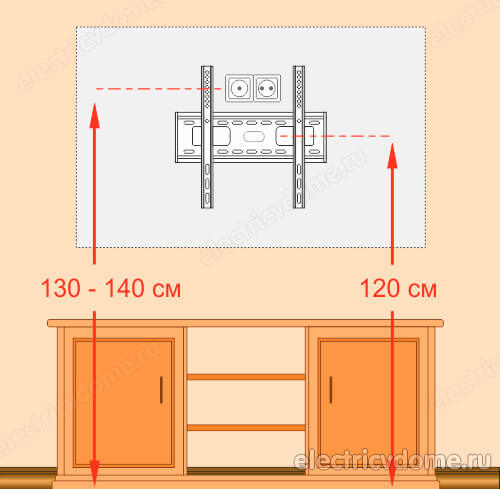


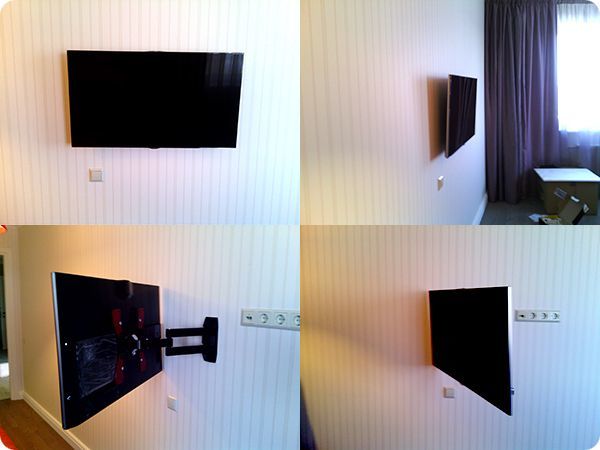
But there are also exceptions. For example, a kitchen video device is most often mounted a little higher in free space, respectively, and sockets should be installed above the specified height.
Mounting methods
The steps necessary for the successful installation of a socket box in a drywall wall are extremely simple, but do not forget that you must follow the prescribed procedure, otherwise the installation may result in the loss of a sheet of drywall, and its replacement is a costly procedure (financially and in relation to time).
The first action that needs to be taken when installing any products (electrical - especially) is marking. First of all, this is necessary in order to bring wires or other communications to this place, as well as for ease of installation and calculation of the material.
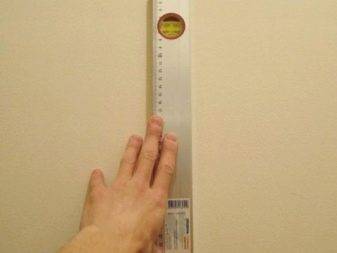
We need logic, knowledge of the location of communications, a pencil, a tape measure and a level (you can also use a ruler to save money, the main thing is to catch the point). It is worth noting that it is necessary to apply the markup, taking into account what type the socket or switch will be (for how many consumers).
In SNiP there are no restrictions on the height of the outlet, but there is a restriction on its distance from doorways (at least 20 cm), as well as on the distance from the countertop (20 cm).It is also recommended not to make sockets too low (at least 20 cm from the floor) due to the risk of a short circuit from moisture. In turn, a short circuit can lead to a fire.
Next, we proceed directly to the manufacture of the technological hole. Drywall is soft, so you can use a regular paint knife, but it's best to use a drill with a special round nozzle. This must be done to avoid unnecessary chipping or damage to the sheet.
Drilling with a ballerina must be done very carefully, since there is a possibility of breaking a sheet of drywall with strong pressure on the tool. This is due to the fact that we press on a certain point with a sharp object with a large area, which can lead to a fracture.
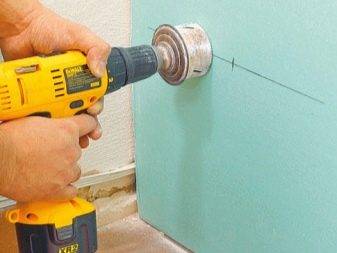
Another way is drilling. It lies in the fact that (instead of a special ballerina nozzle) a conventional drill is used. The material is drilled along the contour indicated in the previous paragraph, then it must be sanded so that the hole is perfectly even and of high quality. When the connector is ready, we throw out the wires into it. It is worth drilling carefully, at minimum speed.
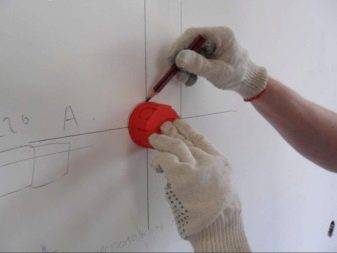
Now we proceed directly to the installation of the socket itself. We bring the wires into the holes of the socket, specially provided by the design on the back of the product, after removing the plugs. After the wire factory, we begin the installation of the socket box. To do this, we press the box closely, tightening the screws clockwise (each evenly) until fully fixed, but do not pinch, because this can also destroy the sheet and form a chip or crack.
For better fixation, you can drive two additional self-tapping screws into special holes. There are already no paws, so you need to use ordinary drywall screws (wide thread pitch).
If you're not going to proceed to the next step right away, it's best to tape the ends of the cable or put special caps on them to protect the cable from corrosion, which can negatively affect the quality of the wiring.
This completes the installation of the socket box in the GKL. The next step is to install the socket, switch. The principle is no different from how electrical devices are installed in a conventional socket box. The only special condition is that you should not hammer the socket with a hammer, as you can break the sheet, and this will lead to its replacement and installation of a new socket.
Everyone can mount a double or socket box for 3 posts correctly if you follow our advice. You just need to insert it correctly and secure it.
Optimum location height
If you decide to place the TV on the wall, the installation height of the socket block is determined automatically - it is hidden behind the TV panel. This method of installation allows you to completely mask the inlets, connectors, visible cable segments.
Wires hanging on the wall can spoil the design of the most sophisticated interior, besides, their open location is a risk of breakage (small children will cut it, a dog will gnaw it, etc.).

The mounting height of the outlets is based on the height of the TV hanging, which may vary slightly. Usually television and video equipment is placed at the eye level of a person sitting on a chair or sofa. The optimal distance is considered to be 1.2-1.4 m (from the floor surface to the center of the outlet).In relation to the TV - a little below its upper edge.
But there are also exceptions. For example, a kitchen video device is most often mounted a little higher in free space, respectively, and sockets should be installed above the specified height.
Image gallery
Photo from
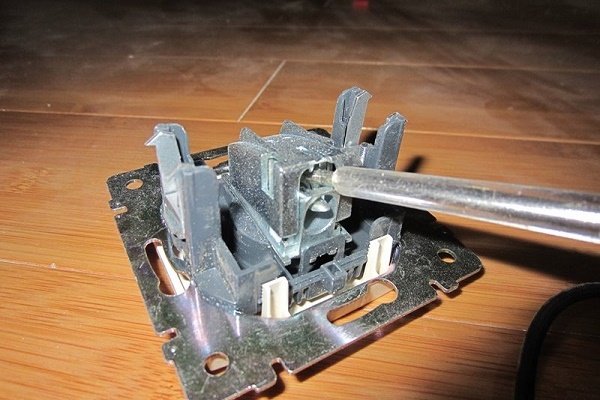
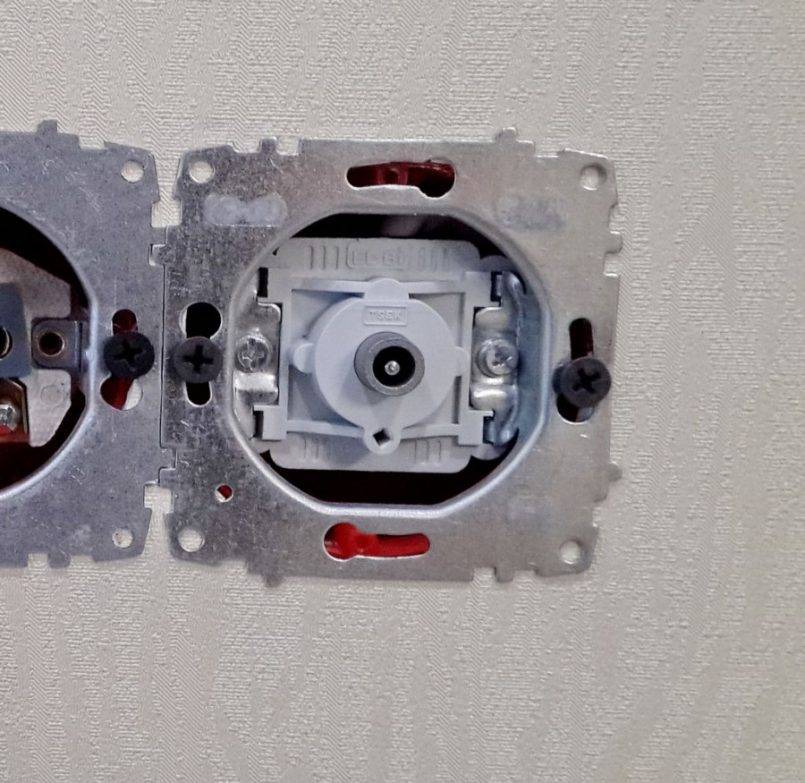
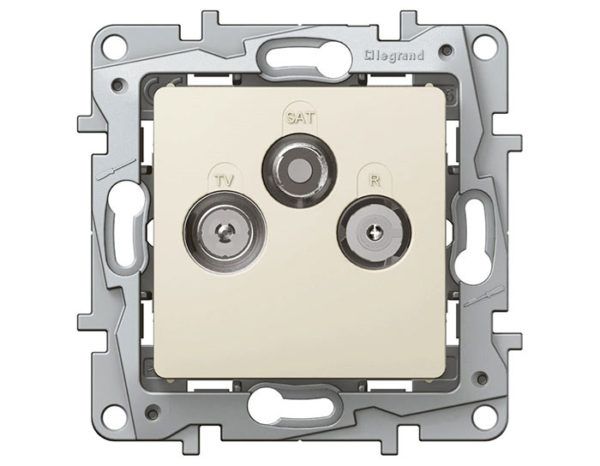
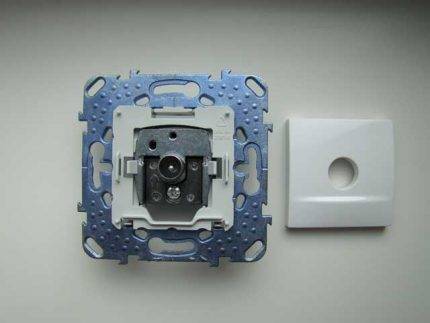
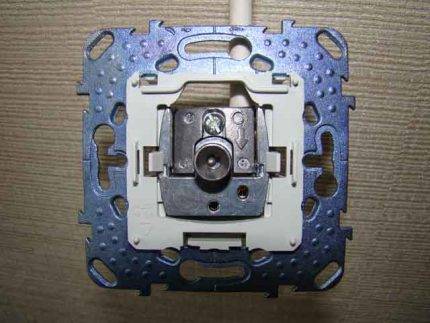
To make the connection, it is enough to separate the front panel from the mechanism by picking up its edge with a screwdriver
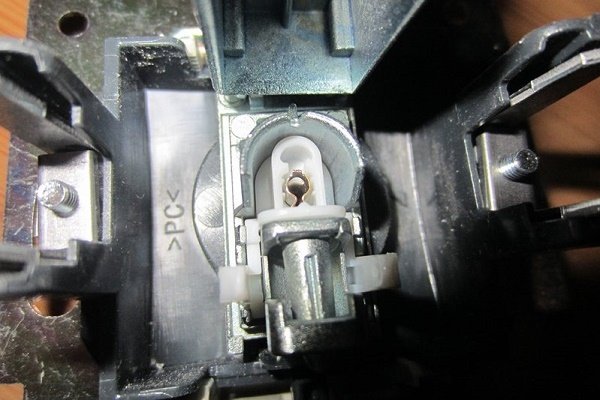
To connect the conductor, the socket mechanism is equipped with a self-clamping spring terminal, and for a snug fit of the TV cable screen, it is equipped with a plate
In the connected state, the mechanism of the indicated TV outlet shows a photo. The connection steps for all TV outlets are similar, the only difference is in the connection scheme to the terminals
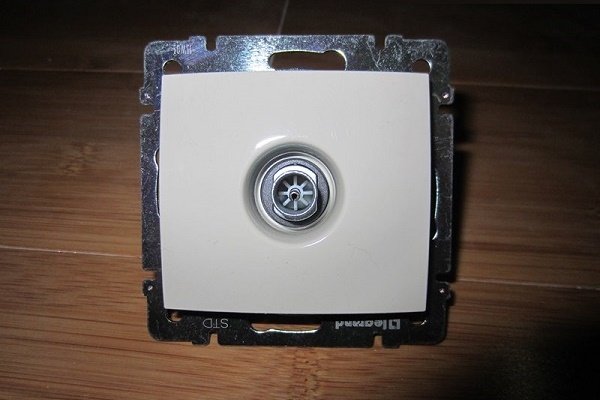
Legrand TV outlet
The easiest way to connect a TV point
Connection procedure
The principle of connecting a television outlet
Which sockets to choose for the TV
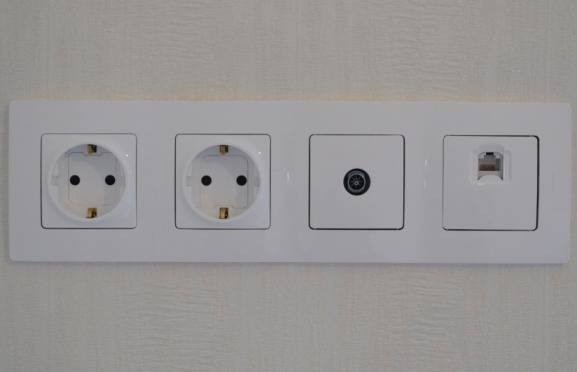
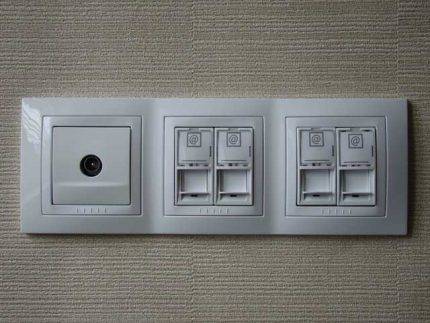
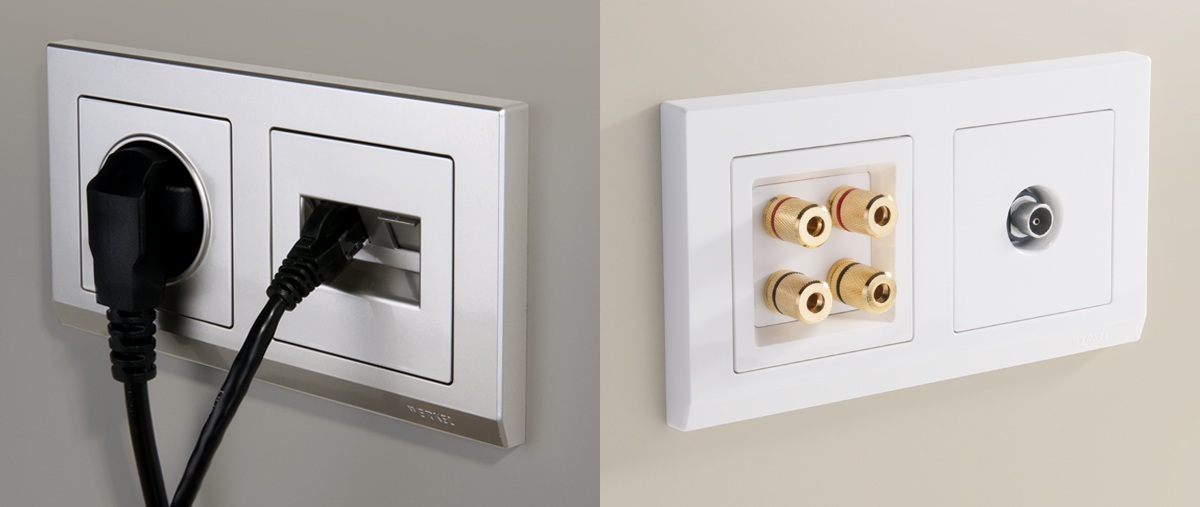
Sockets for TV are divided by purpose: power, for the Internet, multimedia, etc.
In addition, they differ in design:
- loop-through - with 1 input and 2 outputs (for connecting the next device);
- terminal;
- single (simple).
Sockets are also selected according to the installation method - for hidden installation or outdoor. In the latter version, the wires are usually laid in cable ducts.


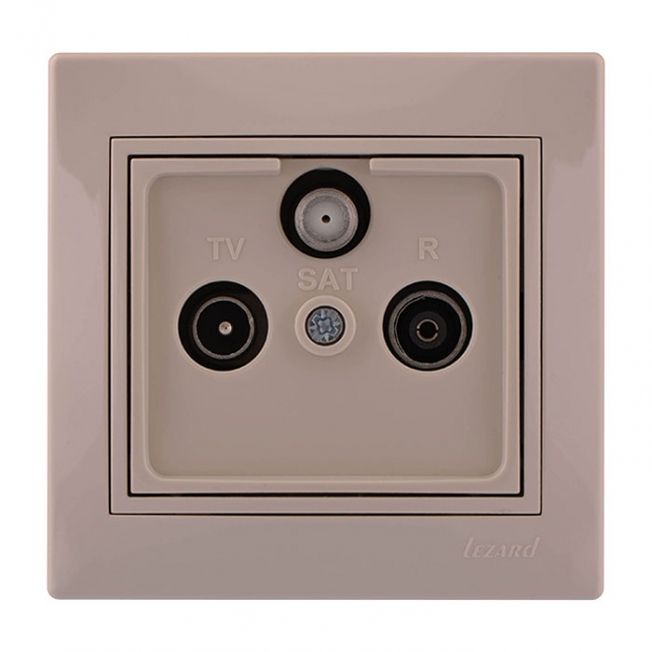


On sale there are sockets of the combined type:
- tv-rj45 - television and the Internet;
- TV-RD - TV and radio;
- tv-sat - terrestrial and satellite television;
- tv-rd-sat - TV, radio and satellite.
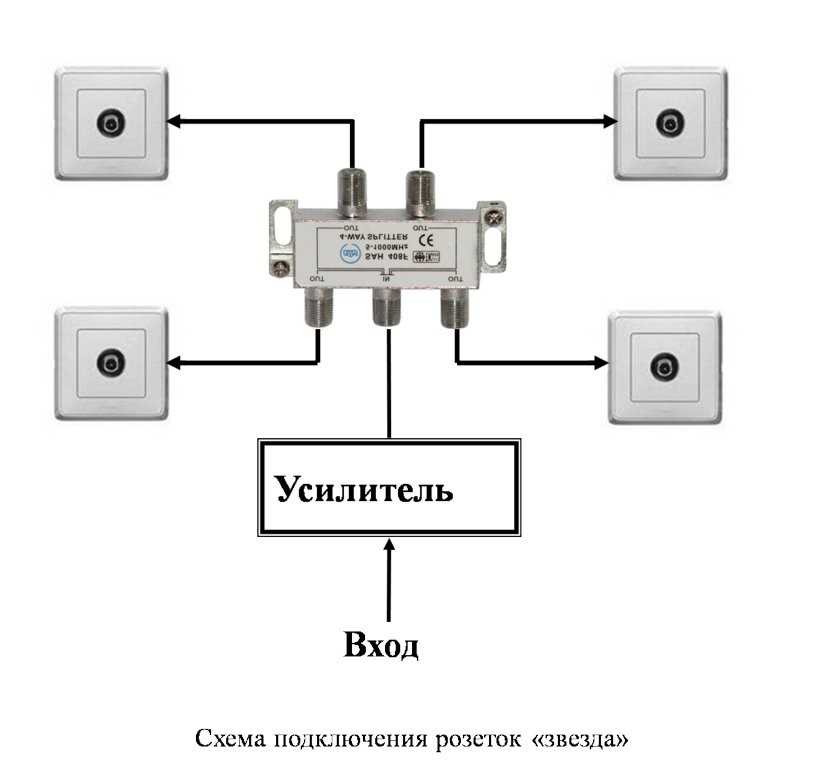
With such outlet nodes, a mixer block is often installed. It combines signals from different cables.
Terrestrial and satellite TV are connected via separate cables.You can connect the sockets to each other with a loop - according to the pass-through scheme, according to the “star” scheme, or use single nodes. Sockets can be matched by color, material and design along with power connectors.
Which cable to choose for the kitchen
Next, you need to calculate the cross section of the common supply wire of the electrical panel and the outgoing wiring to each pantograph. Follow the rules here:
with a load of devices up to 3.5 kW - copper cable VVGng-Ls 3*2.5mm2
with a load of devices up to 5.5 kW - copper cable VVGng-Ls 3 * 4mm2
with a total load of all devices up to 10 kW - copper cable VVGng-Ls 3*6mm2
with a total load of all devices up to 15 kW - copper cable VVGng-Ls 3*10mm2
Why the VVGnG-Ls brand should be, is detailed in the article below:
Even if you have a house with an old grounding system (without a third protective conductor), still do the wiring with a 3-wire cable. This will save you from additional costs for reconstruction and replacement of wires in the future.
In extreme cases, the third wire will be reserved for zero or phase, in case of a possible break or other damage.
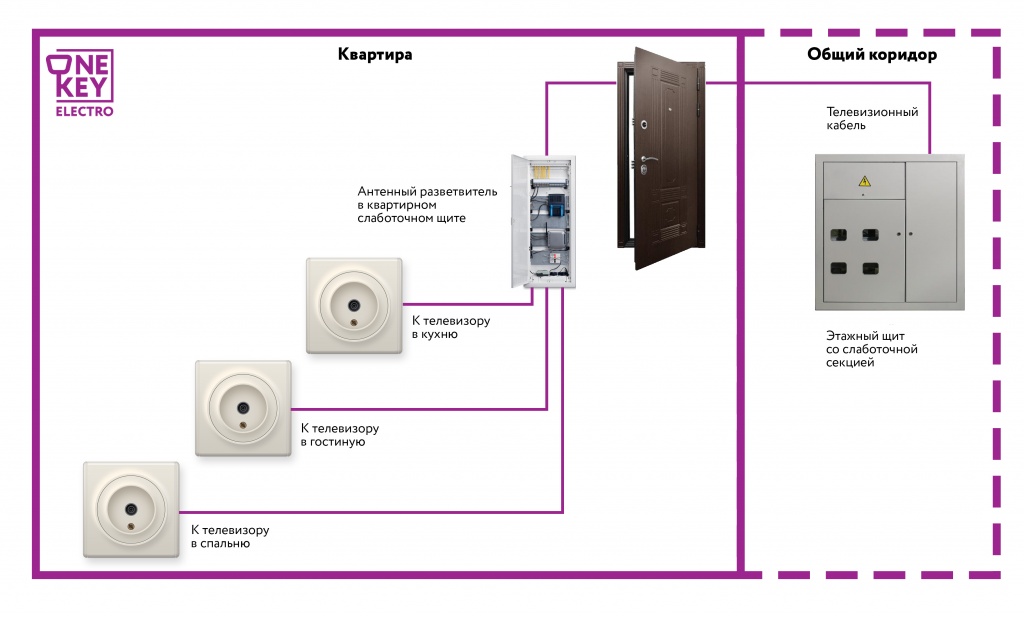
Instructions for installing TV sockets
Start by installing the cables. This will require a number of devices:
- With a weak incoming signal, it will be necessary to amplify the tele-impulse, which will amplify the signal and improve the image;
- Also, a TV wire separator, because the signal will be given in common, and only then it will be divided among all viewers;
- Tele-signal adder, will collect together signals of different frequencies and transmit an impulse using a conductor to your TV;
- Next, antenna plugs are needed to secure the television cable by soldering, which will create a reliable connection.
The next step is installation. First of all, you should decide on the type of fasteners, which are divided according to the types of socket installation:
- overlapping
- closed installation
- checkpoint
Next, you will need working tools for installation:
- the TV socket itself;
- perforator;
- screwdrivers of different types;
- fasteners;
- insulation strippers.

Device installation procedure:
- According to the dimensions of the device, a hole is made in the wall.
- Direct installation and fixation of the device.
- Removing the insulation of the wire, we control the process, especially we prevent damage to the core, otherwise the cable may bend and break off.
- We fix everything with a screw.
- We fix the outer cover.

If all operations are carried out correctly and carefully, then the device is completely ready for use.
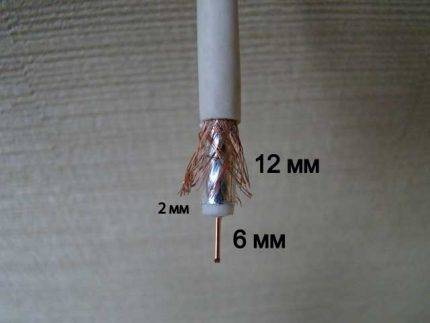
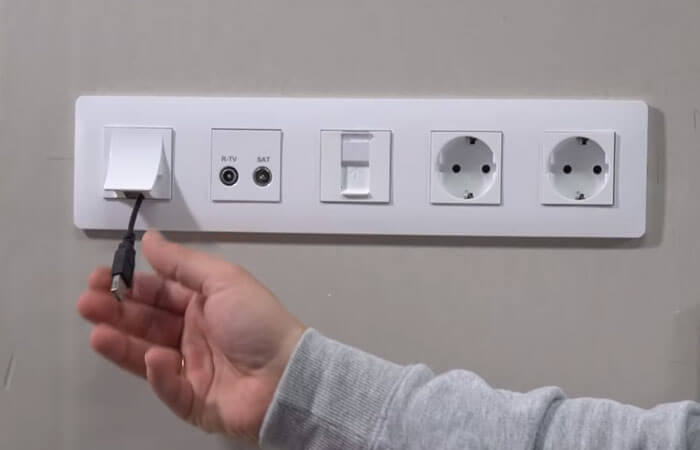
How to connect a TV cable to an outlet
Carefully, being careful not to damage the braid and the center conductor, strip the ends of the cable. To do this, make two circular cuts with a knife: the first (small) - at a distance of 2 cm from the edge of the outer insulation and the second, cutting through the insulation between the central core and the braid, - 6-8 mm from the edge
Remove the cut sections of the shells.

Plug the stripped end of the cable into the terminal block located at the back of the case. Tighten the screw mechanism with a screwdriver (check the contact). Insert the device into the socket and secure it with the screws that adjust the side clamps. Screw on the decorative frame.

Modern products, when connected, do not require special preparation of the cable, it is enough to insert the cleaned core into the clamping mount, where it is automatically pressed against the contact terminal, and the wedge-shaped stop penetrates under the insulation and closes the contact.
Antenna cable difference
For a high-quality connection, in addition to properly selected sockets, you will need an antenna coaxial cable, which has a special structure. Unlike a 2- or 3-wire electrical wire, it has one core for transmitting a television signal and a protective screen that acts as a barrier to surrounding electromagnetic fields.


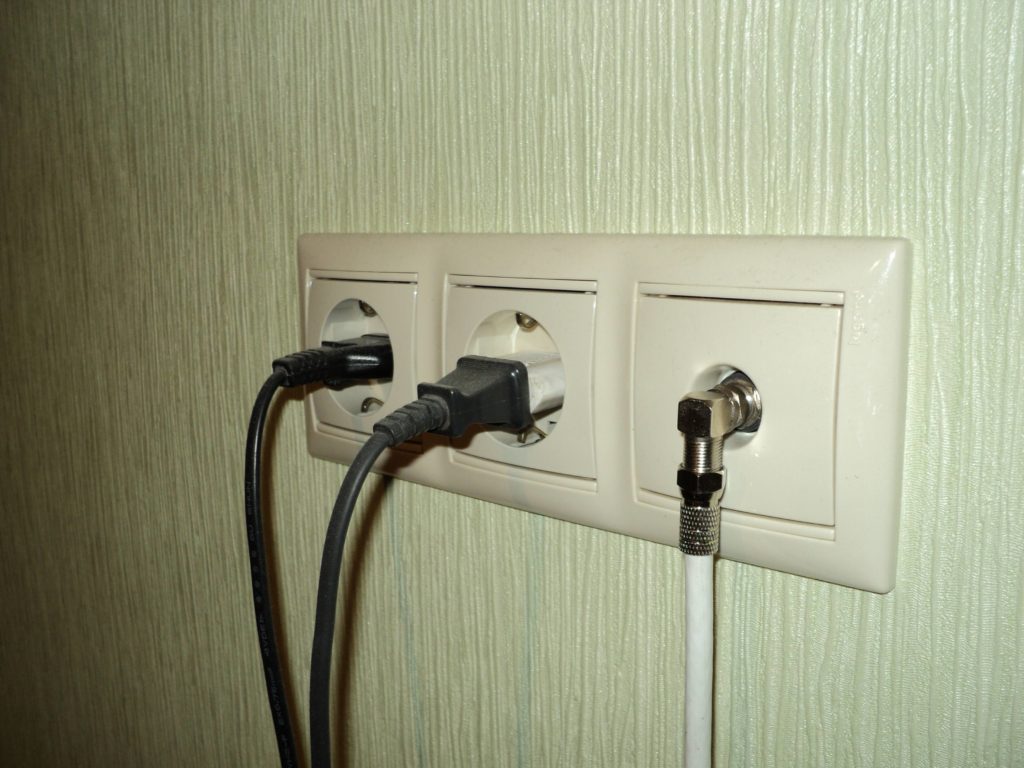


Externally, a television cable is a thick elastic wire of a round cross section, usually with PVC insulation in black or white. For in-wall installation, the color of the outer insulation does not matter.
The structure of the coaxial antenna cable: a copper conductor for transmitting a TV signal, dielectric insulation, a protective metal screen of a braided type, an outer plastic sheath
A thin insulating layer adjacent to the central core breaks the galvanic connection with the shielding braid. The screen, in turn, protects against electromagnetic interference and prevents the emission of a sensitive high-frequency signal, being, moreover, an additional conductor. If any of the components fail, the video signal transmission will be interrupted.
Here are several types of cables that are suitable for laying under plaster or other finishing material:
- SAT 50 (SAT 703);
- RG-6 (and for outdoor use);
- RG-11 (F1160BVM COMMSCOPE).
When buying, be sure to check the strength of the sheath, and during packaging and during transportation, try not to bend the cable so as not to violate the integrity of the copper core and screen braid.
Option 2 - Retractable sockets
Retractable hidden sockets give a chance to securely hide access to electricity from children, pets and thus not spoil the perfect interior. Also, devices built into the countertop or furniture body save space and make it possible to connect a large number of devices.

You can install models of this type yourself:
- Familiarize yourself with the instructions attached to the built-in set;
- Outline the dimensions of the hole at the installation site of the hidden structure;
- Carefully cut a hole;
- Fix the sockets with special fasteners, which must be included in the kit;
- Pull out the cord and plug into the nearest power source.
- Check functionality.

Rules for selecting devices for power supply
First of all, you need to figure out what and where the furniture will be located, as well as electrical household appliances in the room, for clarity, it is optimal to draw a plan diagram in the correct proportions, on which to designate all pieces of furniture and electrical equipment that must be connected to the electrical network.
Then list all sockets (electrical, television, telephone and computer), it is advisable to make a small margin. It is preferable to install sockets for devices that do not change their location (TV, system unit, etc.) so that they have constant access, but at the same time, it is better if they are hidden behind this technique.
Sockets for non-permanent use, installed in open areas of wall structures, should be optimally located at a single height - thirty centimeters from the floor surface, their number must be selected so that a household vacuum cleaner can reach any room.
Sockets located above a computer desk, chest of drawers, bedside table, etc., should be optimally installed at a height of 10-18 cm from the furniture surface. In order to correctly select the mounting height of the switch, first you need to determine in which direction the door leaf will be opened in this room and install the switch from the edge of the door frame where the handle is located. At a height of about 75-95 cm from the floor, depending on how tall you are, that is, this distance is determined in practice.
The position of the switches is strongly tied to the type of room, so, for example, in a narrow corridor or on a flight of stairs, they are usually mounted at the start and finish, in the bedroom or living room, it is optimal to install switches near the entrance to the room, as well as at the bedroom places to control lighting lying down.
Select the height of the switches according to the same rules, taking into account from what position they will be used more often, in other words, if it is at the exit of the room, then we take a height of 75-95 cm, given your height, and if near the bed, then the switch is needed positioned at such a height that it can be easily reached with an outstretched hand.
In those areas where you do not yet know how furniture or electrical devices will be arranged, we recommend mounting sockets at a height of thirty centimeters, and switches ninety centimeters from the floor surface, most often this is the best option for the height of switches and sockets.
By putting into practice these simple recommendations, common sense and not forgetting about basic safety, you are able to find the best location and height of sockets and switches in your apartment.Do not forget a simple rule - it is better to calculate and determine everything well in advance than to redo it all over again.
Fitting the hole to the dimensions of the socket
Before installing the socket in a concrete wall, the dimensions of the hole prepared for the device are checked to see if it fits. The diameter of the hole was originally made larger than the diameter of the socket, which eliminates problems with the width. All efforts are most often directed to adjusting the required depth.
For this:
- The depth of the hole is brought to such a value that the socket box is buried in a niche by 5 millimeters;
- Such a margin in depth is needed for laying material in the hole, for fixing the part - alabaster or cement mortar. In addition, some space will be occupied by a bend in the wire that fits the outlet;
Installing a socket.
Installation of sockets in drywall
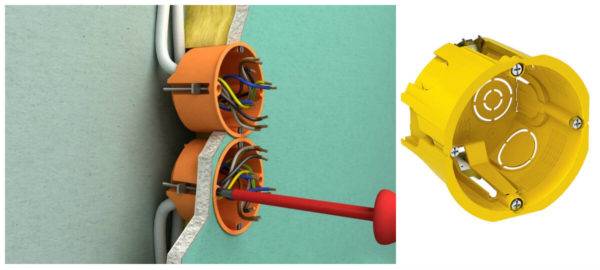
To work with drywall, you will need a special type of mounting box with a special foot that will allow it to be pressed against the sheet according to the principle of a vice or clamp. For installation, you need to drill a hole. This can be done with a special core drill for drywall. You can cut a circle with a mounting knife. Since the wires are hidden behind drywall, chasing is not required. The laid cable should be pulled out into the resulting hole and brought into the broken window of the socket. It is necessary to insert the mounting box into the wall and tighten the screws by retracting the clamping tab.
 Fastening the socket in drywall
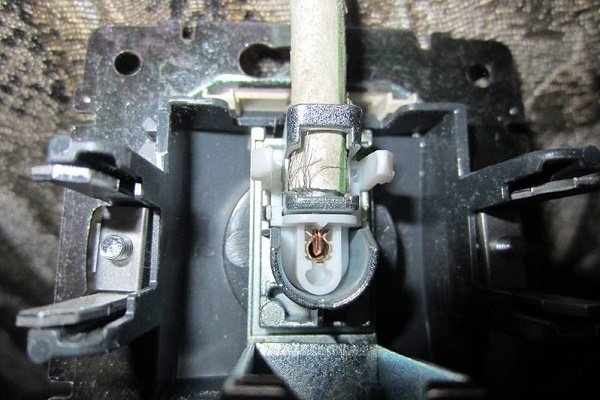
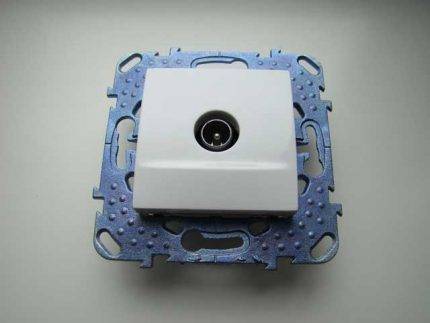
How to install a simple TV outlet
Before mounting the outlet, it is necessary to run a cable (for a simple single outlet, the only cable leading from the switchgear).It is masked either in a closed way - under plaster (drywall, decorative panel), or in an open way - along the wall surface, in a cable channel. The second option requires external (overhead) sockets.
For a sample, we take a quality product from a French manufacturer.
Before installing a drill with a round nozzle, it is necessary to cut a hole and insert a plastic box (socket box). A cable about 15 cm long should come out of the hole.
Next, we disassemble the body of the product into parts.
We insert the cable in the direction of the arrow and fix it with a special clamp by tightening the screw.
Checking by a tester will exclude the occurrence of a short circuit due to inadvertent contact of the braid with the conductor.
The result of assembly and installation is no protruding wires and unprotected connectors.
Mounting the pass-through module will be slightly different.
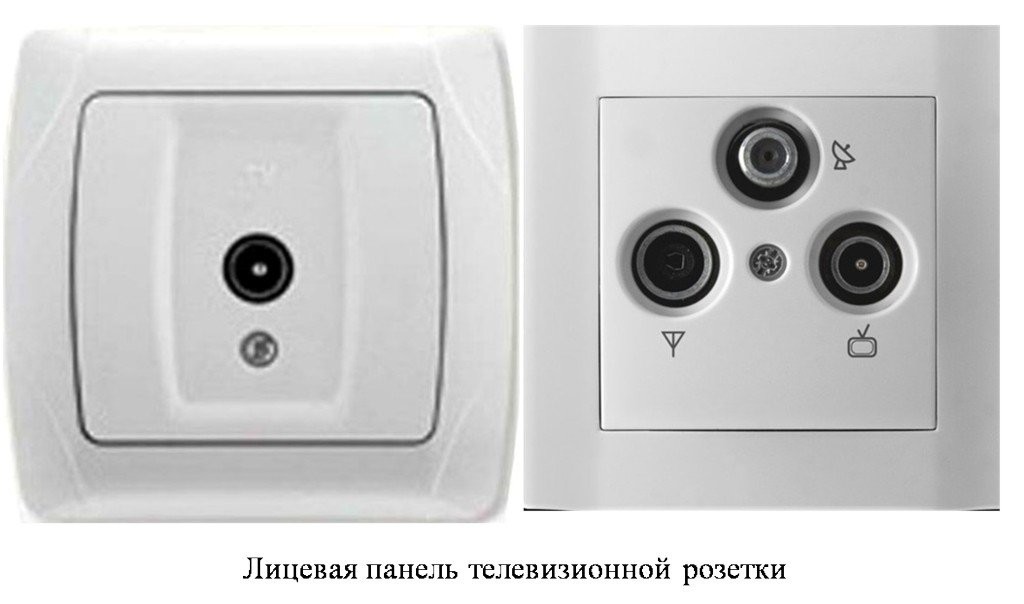
Types of TV sockets
A modern socket for an antenna has filters to suppress noise. The amount of interference from this is reduced, and the reception quality is improved.


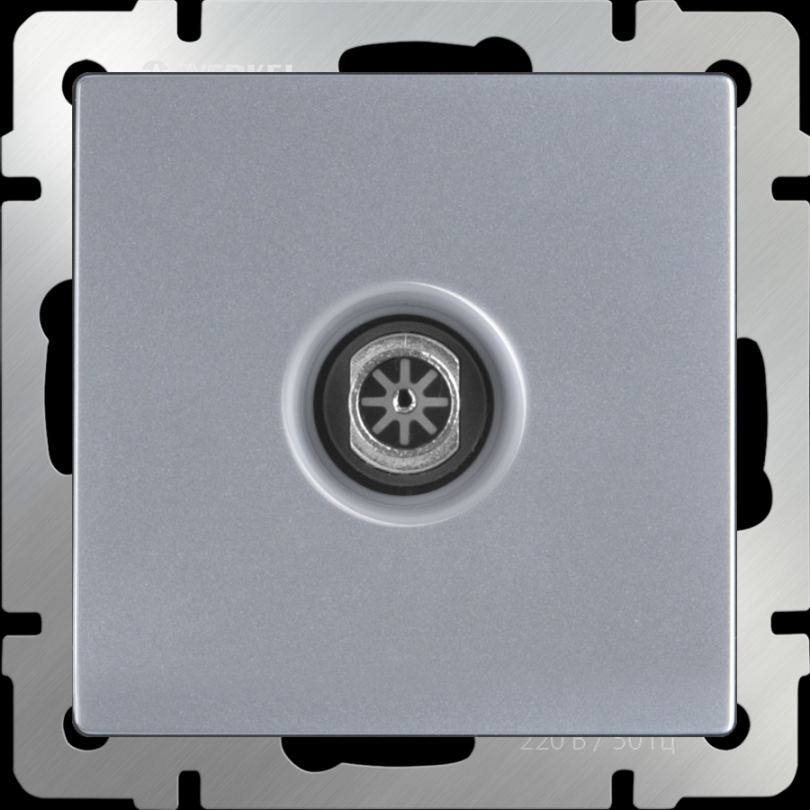
- To receive satellite broadcasts, a SAT-marked model is required.
- For radio reception marking FM.
- For analog, cable and digital signal marking TV.
There are single and integrated into blocks, terminal and through devices. Depending on the method of installation, they are made in two versions - surface and hidden. In the latter, the corresponding mounting boxes are provided.
Types of television sockets
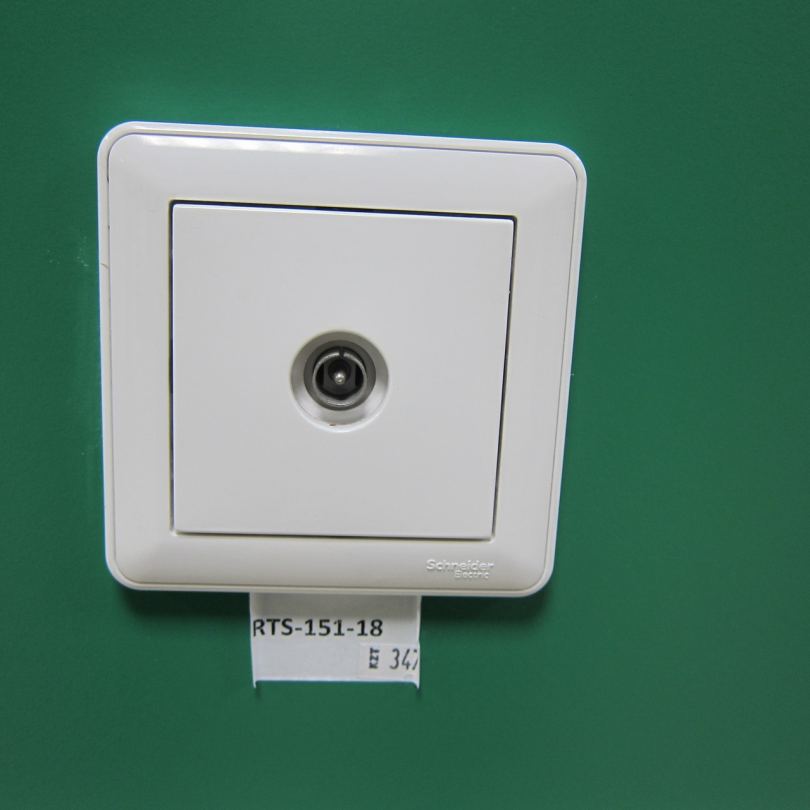
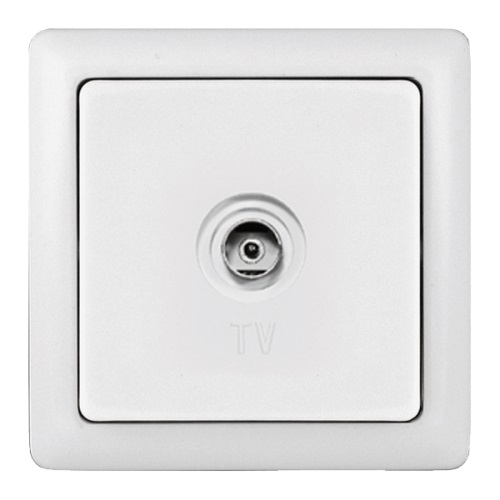
Single TV
A single model for one connector is a common electrical installation device for connecting a TV to an antenna. It is not equipped with matching devices, which is why it is subject to the effect of signal reflection back into the cable, which affects the image quality.
checkpoint
A pass-through outlet is actually a splitter. The signal, getting into it, goes not only to the socket, but is also redirected further, to the next outlet or to the terminal in the chain.
What is the difference between terminal and simple models
All types are characterized by different specifics of signal attenuation. A terminal socket differs from a simple, single socket by a large amount of attenuation.


