- A few words about the device fittings of the tank
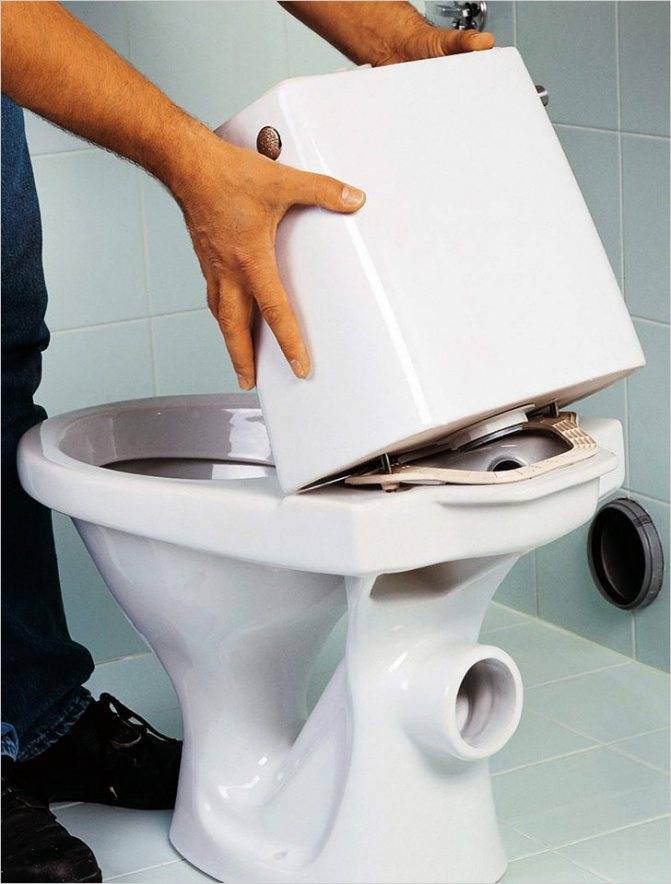
- How is the toilet set up?
- Leak Prevention
- Leak repair
- Troubleshooting Pear and Petal Problems
- Float position adjustment
- Ball valve adjustment (fluid goes through overflow)
- Problem between cistern and toilet seat
- Leaking at the junction of the hose and ball valve
- How does a flush tank work?
- How to prevent in the future
- Prevention
- Constant flow of water into the toilet bowl
- overflow
- Doesn't hold drain valve
- Leak from under the gasket
- Causes of liquid snot pathological
- A few examples of reasons why there may be liquid snot
- Siphon type
- Summing up
- Where to start the repair?
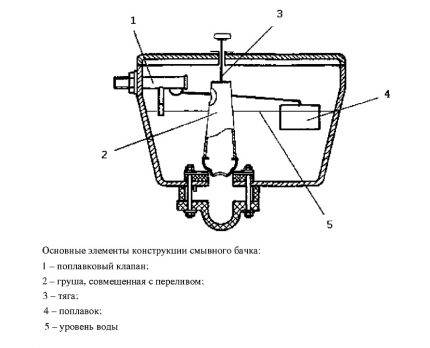
A few words about the device fittings of the tank
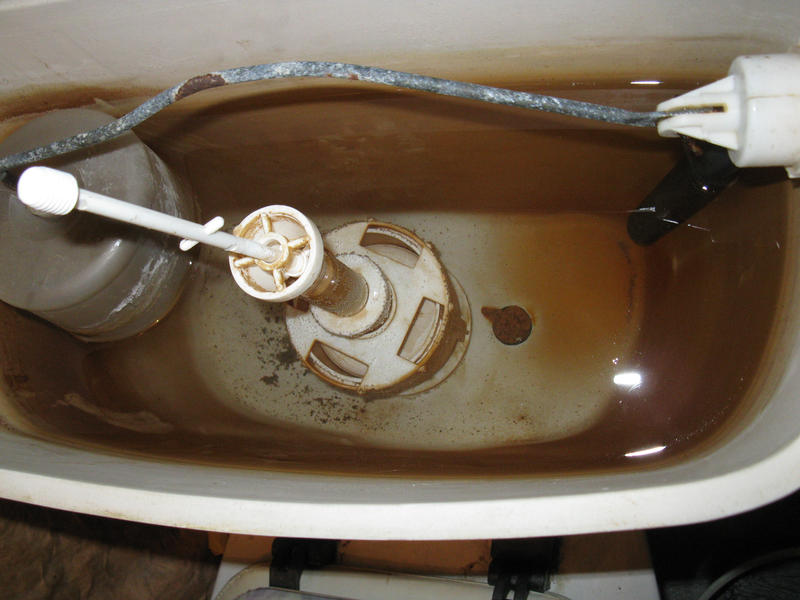
Before I tell you why a toilet cistern can leak, I will introduce you to the fittings so that you understand how it works.
Of course, there are a great many options for mechanisms at present.
However, the principle of operation of the tank always remains the same, since any valve includes three main elements:
locking mechanism - is a faucet that automatically shuts off water as it enters the tank. The float is responsible for the water level at which the shut-off valve operates;
Tank valve options
- dump system - is a valve that closes the drain hole. The valve is controlled by a button or lever;
- overflow system - prevents flooding of the apartment in case of failure of the locking mechanism. If the water in the tank is collected above a certain level, the overflow system ensures that it is drained into the toilet.
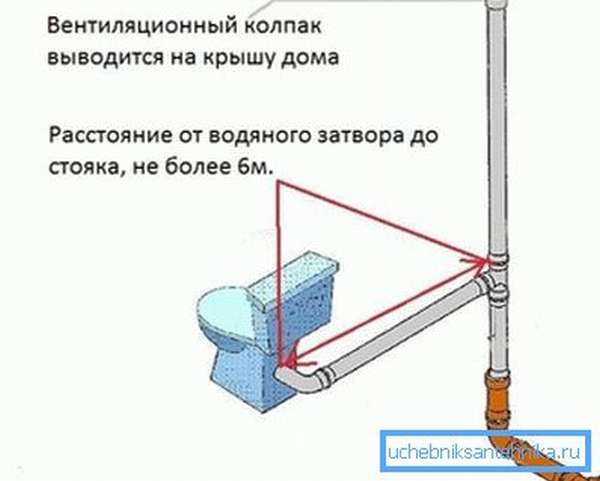
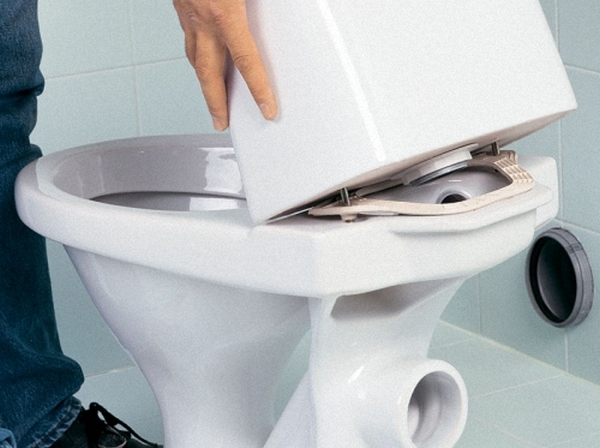
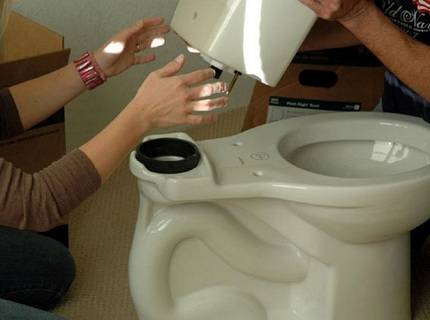
How is the toilet set up?
There are many varieties of this plumbing fixture. There are suspended and floor structures. The first are fixed on a special installation hidden in the wall. The second is installed on the floor. Regardless of this, each toilet has three main elements.
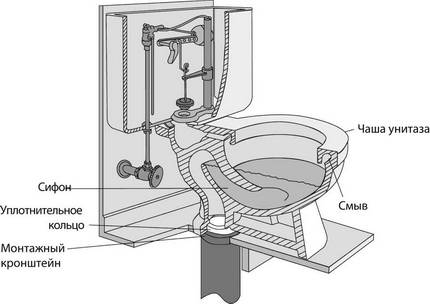
The largest structural element is the bowl. It usually has the shape of a vessel of the same name, for which it got its name. The open part of the part gradually turns into a siphon. This is the name of a curved channel, which is filled with water in working condition.
Its diameter and bend shape are calculated in such a way as to freely pass the required amount of drains. A water seal is formed in the siphon, which protects the room from an unpleasant odor.
Structurally, toilet bowls can differ significantly from each other, but the main elements are always present.
The tank in which the water intended for flushing is placed is called a cistern. It can have a different design and type of eyeliner. It is most often made of ceramics, but can be plastic or metal.
The main elements of the tank can be considered drain fittings, a filling valve, a drain and overflow mechanism. The drain mechanism is activated by pressing a button or a lever, it depends on the model of the tank.
Parts designed to provide maximum convenience when using the toilet are the seat and the lid. Most often it is made of various plastics, there are models made of wood or soft options covered with foam rubber. You can also find functional seats. They are built-in, for example, bidet nozzles.
Leak Prevention
Breakage is easier to prevent than after correcting its consequences, toilet leaks are no exception.
To protect yourself from unscheduled replacement of an expensive device, you should follow simple rules:
- regularly inspect the tank and accessories;
- clean the bowl and tank from the inside at least once every six months;
- prevent mechanical damage;
- if water appears on the floor near the toilet, immediately look for its source.
If a leak is found at the bottom of the toilet, do not panic to grab your head. In most cases, this is a small problem that any home master can solve. As a rule, this will require replacing a penny part, and the work itself will not take even an hour.
Leak repair
Depending on the identified cause of the toilet leak after flushing, they begin to fix the problem in an appropriate way.
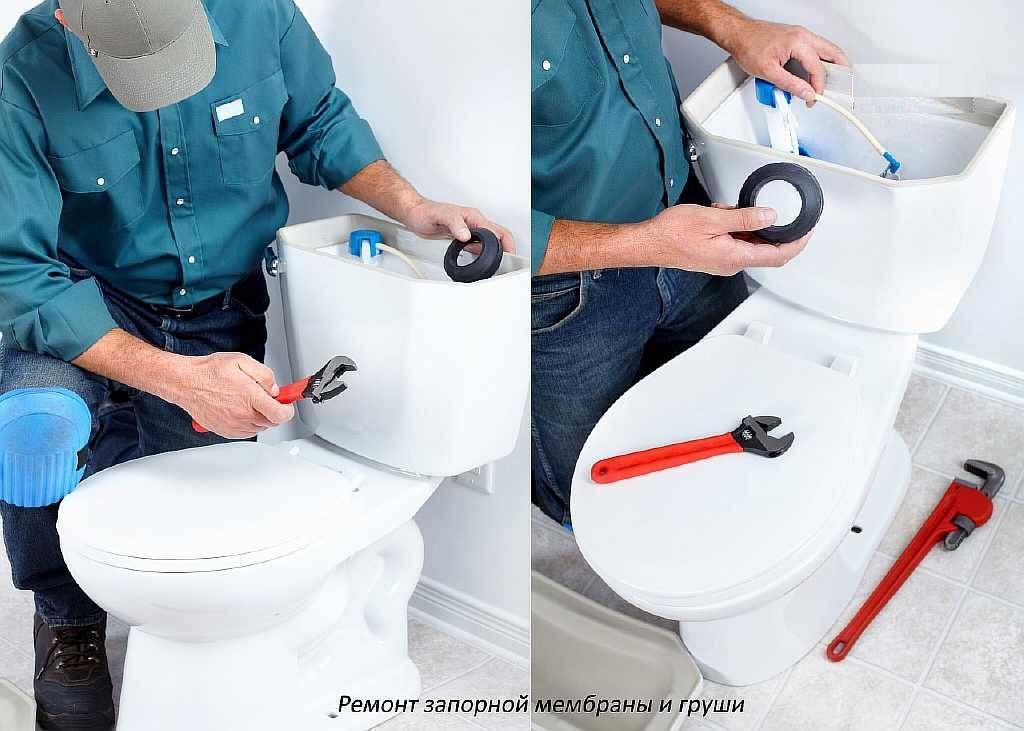
Troubleshooting Pear and Petal Problems
Most often, after lifting the lid, a weak fit of the pear is found due to the loss of elasticity of its walls. The problem is eliminated by replacing the deformed pear with a new one.


Seat corrosion leads to partial seating. In this case, the part is removed, all the screws and fastening elements of the lever are tightened, corrosion is removed with sandpaper, and it is installed in place.
It is recommended to examine the petal. Plaque on it appears from prolonged use. The petal and saddle are cleaned.
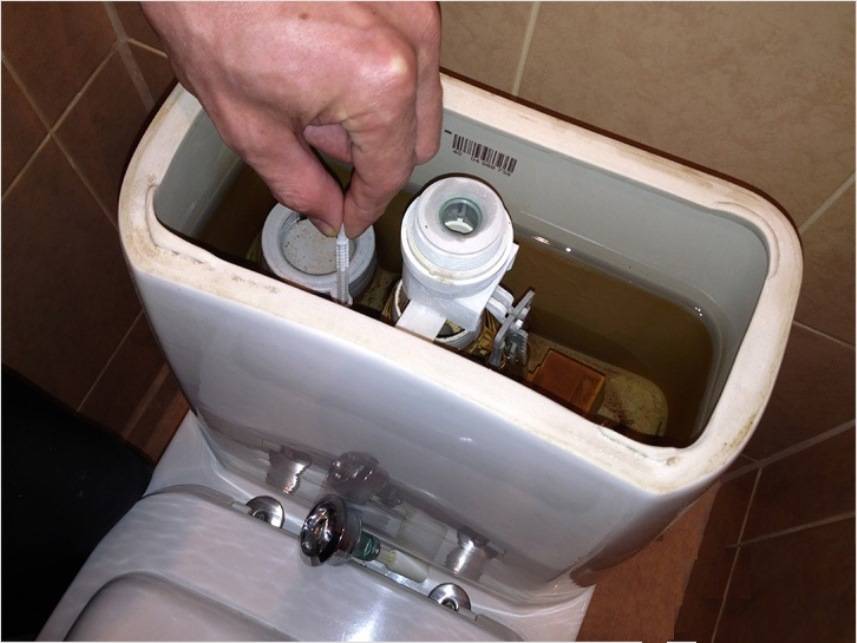
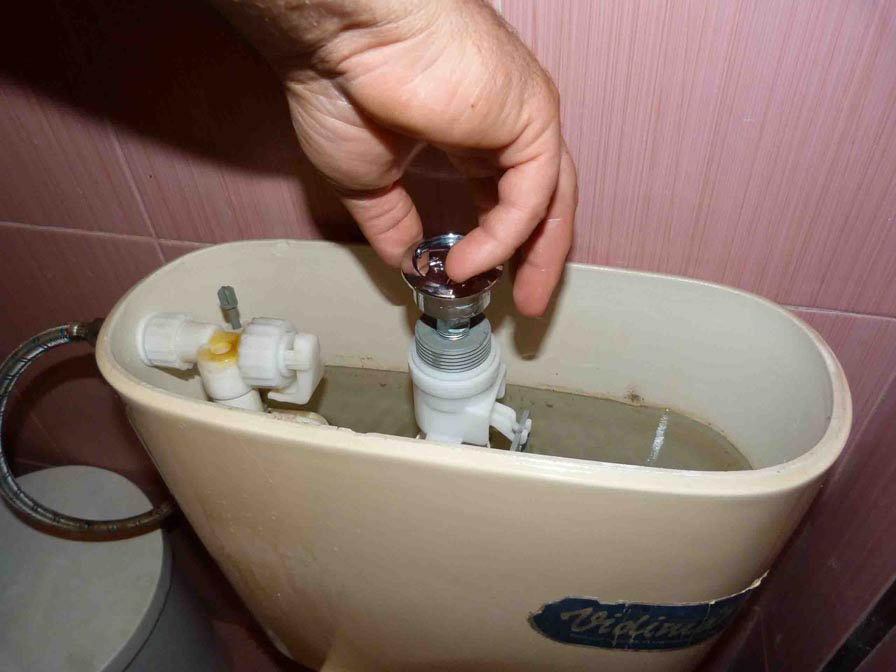
Float position adjustment
An incorrect position of the float will be noticed immediately after removing the reservoir cap. If, regardless of the water level in the tank, the position of the float does not change, then its position must be corrected. Rubber seals are immediately inspected. If you correctly set the float to the desired height, then problems with leakage will be eliminated.
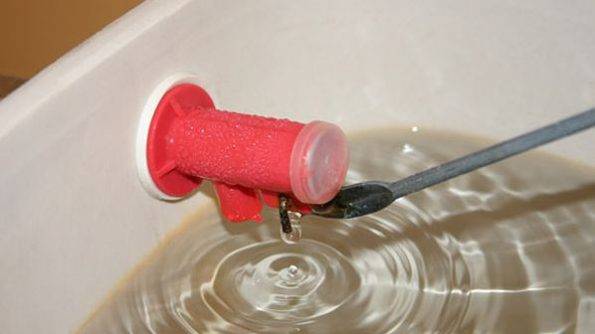
Ball valve adjustment (fluid goes through overflow)
When the liquid is poured out through the overflow, the conclusion suggests itself after inspecting the tank capacity that the correct operation of the ball valve has been violated. Its operation is regulated by bending the float lever. The liquid that got inside the float must be poured out, and the part must be installed in its place. The deformed part must be replaced.
The design of the ball valve has a rubber gasket, which can also cause breakage. It won't hurt to look at it.
If the reason is in the ball valve itself, then no matter what model it is, it is recommended to make the float position lower. Adjustment is done with a plastic pin. Sometimes cleaning the faucet helps to fix the breakdown. Or the last option: the part is being replaced with a new one.
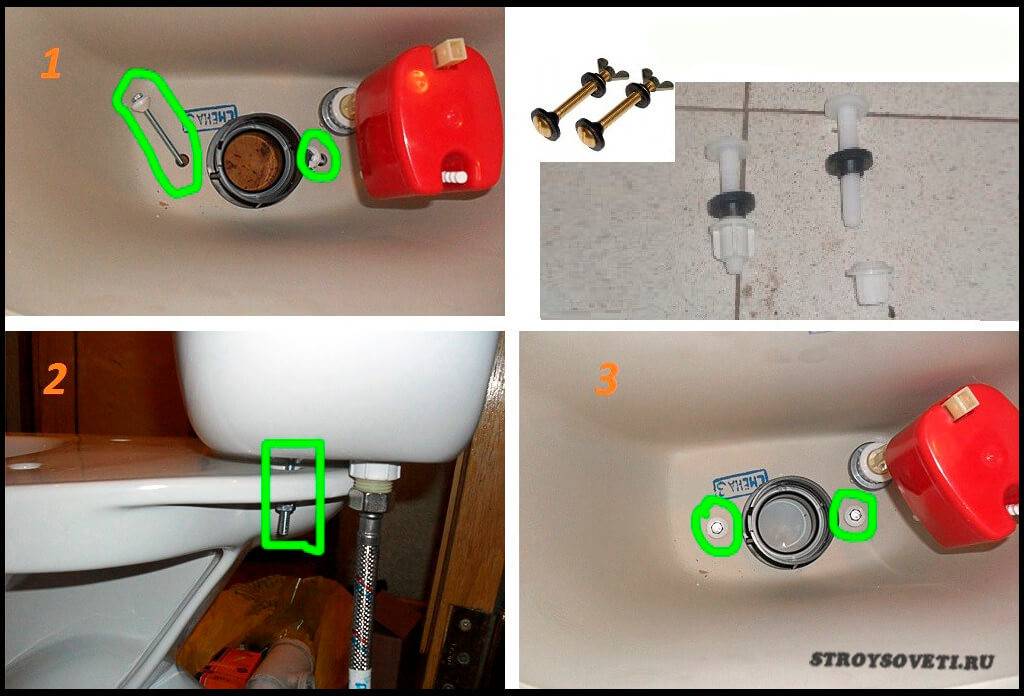
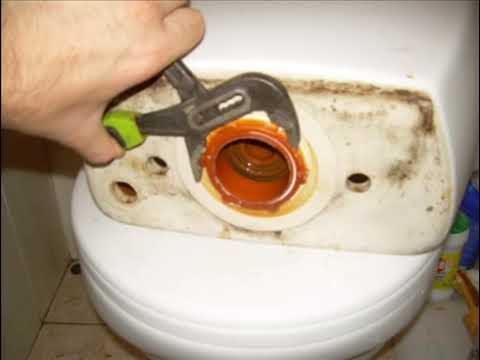
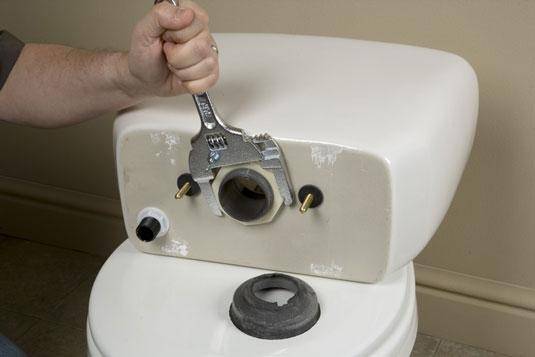
Problem between cistern and toilet seat
At the installation site of the tank, water leaks onto the toilet seat in 2 cases:
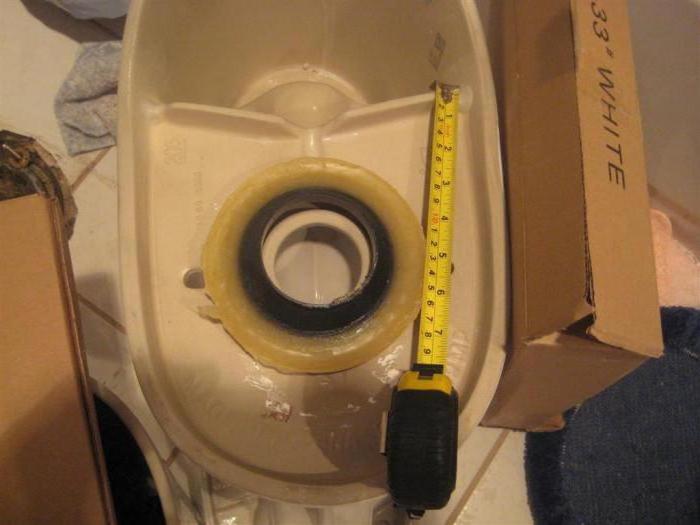
- if the connection bolts have loosened or the gasket under the nut has become unusable. Water is drained from the tank. The water supply is shut off. Bolts and nuts are inspected for integrity and absence of rust. The degree of wear of the gasket is estimated. You may need a new set of fasteners to install it.Rubber gaskets are lubricated with sealant to enhance the tightness of the joints;
- when the gasket, which is responsible for sealing the junction of the tank and the toilet seat, has worn out, and the protection of faience parts from abrasion has decreased. The liquid flows into the gap that has appeared, which was formed when one of the contact parts was shifted or as a result of the gasket abrasion. The whole gasket is lubricated with sealant to enhance the adhesion of the tank to the toilet shelf. The connecting bolts must not be tightened too much. This leads to deformation of the gum. Its service life is reduced.

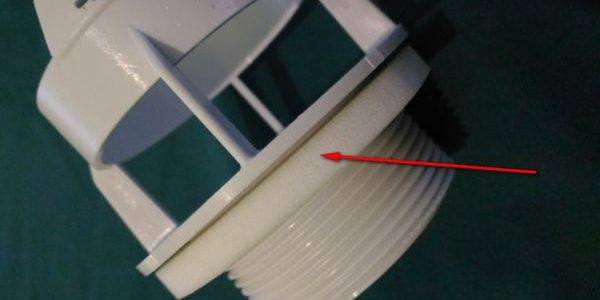
Leaking at the junction of the hose and ball valve
Fixing the problem is very simple. The first step is to tighten the nut on the hose. The second step is to check the gasket. It is necessary to disconnect the hose and the gasket will be in front of your eyes. A gasket that has lost strength will cause a leak. The only way to change the situation is to replace it with a new rubber band. The hose is installed in its place.
It is not difficult to fix a leak after draining if you know the cause of the breakdown.
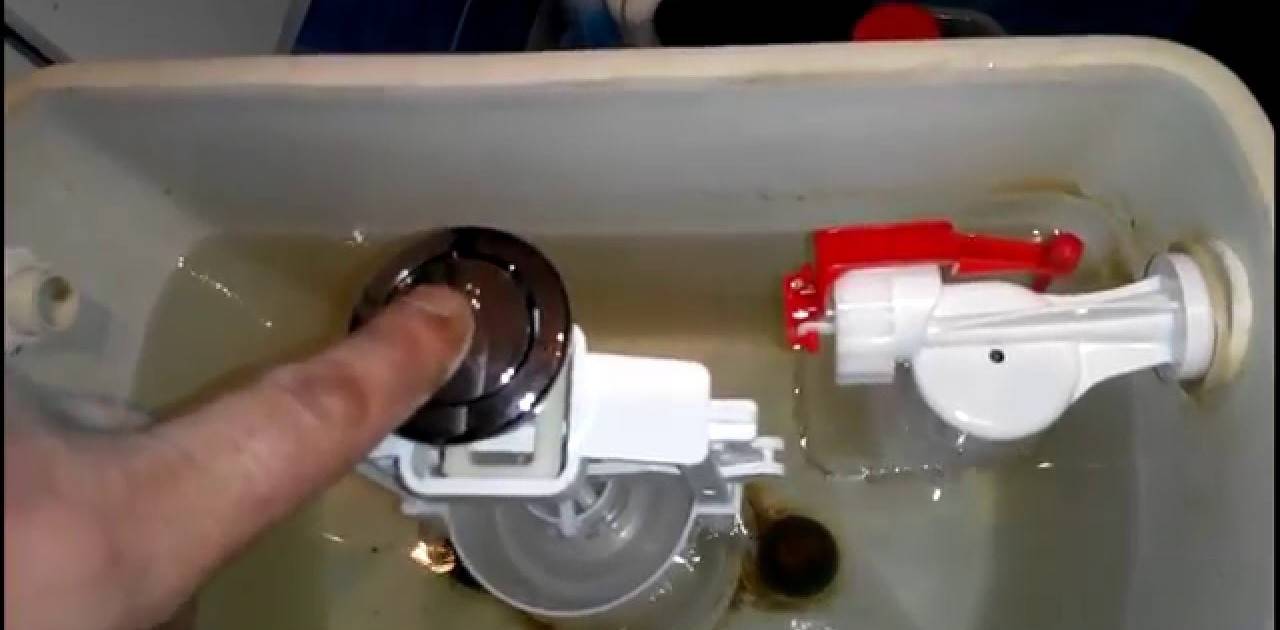
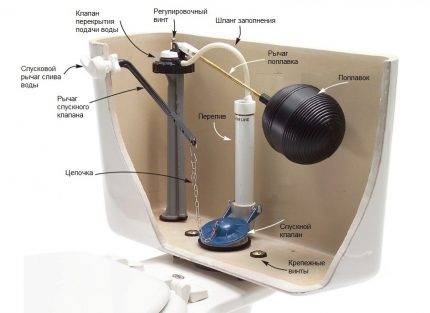
How does a flush tank work?
To fix the drain tank, you should understand its design and principle of operation, methods for diagnosing problems. It consists of several parts: body, float and drain valves, overflow, drain lever.
The float (filling) valve regulates the water level in the tank. When the water leaves, the valve pulls down the obturator, thereby opening the fitting. Gradually, the tank is filled with water, and the float valve rises and blocks its access.
 In many ways, the service life of the water intake fittings of the tank depends on the type of shut-off valve. It can be piston (rod) or membrane.Each of them has its own advantages and disadvantages: membrane ones are more convenient to use, and piston ones are more durable.
The overflow function is to protect the container from overfilling. The part is a hollow column into which water is collected. As soon as it rises to the top edge of the column, it begins to drain into the toilet bowl.
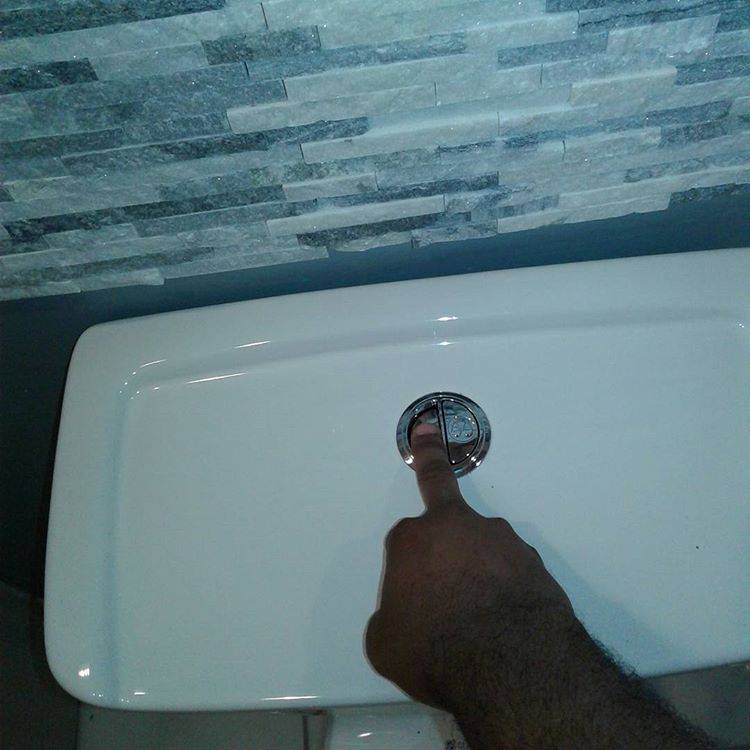
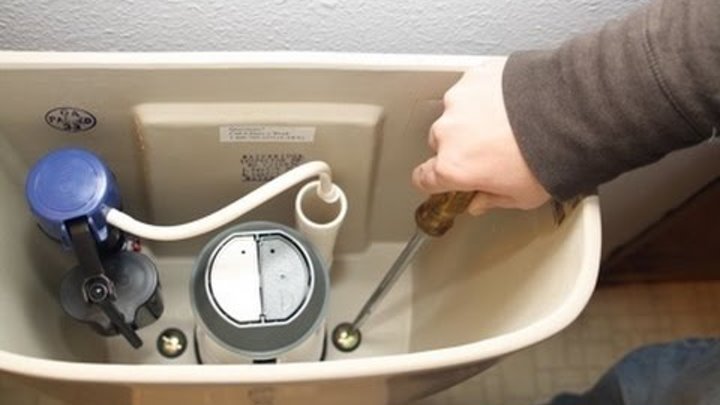
The flush mechanism can be made in the form of a button or lever, and it is located on the side or top. In modern toilet models, a lever is rarely used. If it is, then it can be activated by pulling the chain. If the drain mechanism is activated using a button, then it is placed on top - right in the center of the tank lid.
 The operation of the toilet cistern flush fittings is controlled by levers, handles, conventional or pneumatic buttons, which are located in a convenient place for use
Leaks are caused by malfunctions in the operation of the faucet, overflow and valve, so they should be checked first to determine the cause of the leak.
How to prevent in the future
Leaking toilet brings high humidity, persistent background noise, trouble with neighbors, and high utility bills
To use plumbing for a long time and not resort to constant repairs, you should:
- periodically check all joints and connections, as well as the condition of the pipes and rubber seals;
- carefully use the levers and flush buttons, avoid sudden pressing;
- it is recommended to install cleaning filters to prevent unnecessary impurities and particles from entering the drain tank that clog the system;
- choose high-quality components when replacing failed toilet elements.
Buying plumbing fixtures from reliable manufacturers, timely periodic inspection of the drain system and parts, as well as contacting the help of professional plumbing workers will save you from such trouble as a leaking toilet.
Prevention
To avoid breakdowns and extend the life of the toilet bowl, you should do a “general cleaning” in the tank and bowl at least once a week.
Clean out possible debris from the tank, get rid of plaque. Timely change fittings, monitor the condition of fittings.


Do not expose the toilet to mechanical stress and sudden changes in temperature. Then the plumbing product will last for many years.
You can understand the cause-and-effect relationship and eliminate the leak in the toilet with your own hands, even for a non-professional. Initially, you need to exclude simple breakdowns and only after that proceed with the analysis of plumbing to eliminate more complex problems.
Constant flow of water into the toilet bowl
There can be several reasons for this failure:
- The first thing that could be is overflow.
- The second is problems with drain valves.
- The gasket has lost its tightness at the point where the drain fittings are connected to the tank.
overflow
How "overflow" manifests itself. After draining, the tank capacity begins to fill, and at first nothing happens. But when the filling should have ended, the water from the tank begins to flow into the toilet.
This is due to the failure of the filling valve or float. Try lifting the float lever by hand. If the valve closes, then it's the float. Just drop it below. If the float is not fixed in the set position, it is required to replace it (if the design of the filling fitting allows) or replace the entire fitting.
When the flow does not stop when the lever is raised to the stop, the problem is in the valve. Perhaps he was clogged with dirt (as described above), or over time, a development formed on it, or a factory defect showed itself. You can determine this only after disassembling it.
If after cleaning the valve still does not work, you need to change all the filling fittings. There are craftsmen who repair the valve, but such repairs are short-lived and you will soon have to climb into the inside of the drain tank again.
But if you are one of these craftsmen, we advise you to watch a video on how you can repair the valve yourself:
Doesn't hold drain valve
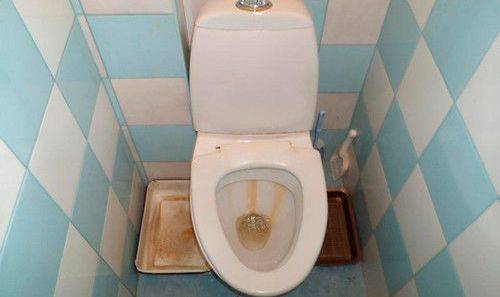
Constantly, in a thin stream, water enters the toilet - this is a sign that the drain valve (drain mechanism, valves) is not holding. If the leak is not eliminated, a rusty trace from this trickle will appear in the toilet bowl.
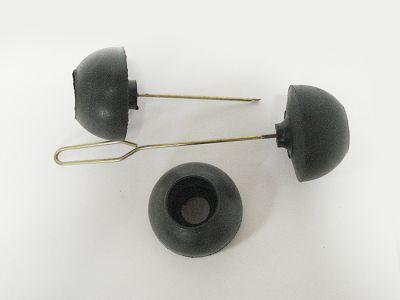
This happens because the drain mechanism was worn out - it does not fit snugly against the drain hole. The drain mechanism is rarely repairable, if it starts to leak, it needs to be changed. I especially do not advise you to bother with obsolete pear-type fittings. Even a new "pear", after replacement, often leaks.
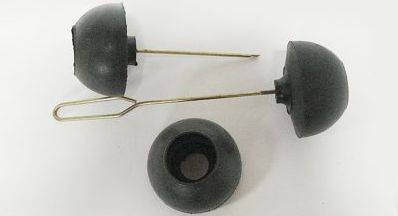
Pear type valve.
But, as an option, you can upgrade the old valve - it's very simple. You need to "weight" it. To do this, remove the drain fitting and put a load on the membrane that closes the drain hole. As a load, you can use a bag filled with sand, or a bunch of nuts wrapped around the stem. If, after modernization, the drain tank does not hold, there is only one way out - replacing the fittings.


Leak from under the gasket

This problem can be attributed to malfunctions of the drain fittings, although it has a slightly different character. It happens, over time, at the place where the drain mechanism is attached, the inner gasket loses its tightness. And water, bypassing the shut-off valve membrane, flows into the drain hole.
Here you can not do without replacing the gasket.
Causes of liquid snot pathological
The main causes of abundantly flowing fluid from the nose:
- inflammatory processes of an infectious nature;
- rhinitis;
- different forms of sinusitis;
- sinusitis;
- allergic reactions.
A few examples of reasons why there may be liquid snot
- If the snot flows constantly, a burning sensation appeared in the nose - these are the first signs of a cold. After a while, the liquid secretions acquire a thick consistency, nasal breathing becomes difficult. The duration of the disease is no more than two weeks.
- Quite often, a runny nose manifests itself as an independent symptom, for no apparent reason. This means that the person has been in the cold for a long time. Special treatment is not required, such snot is a protective form of the body and passes on its own.
- If fluid flows out of the nose when tilted down, you need to see a doctor, as this is a symptom of a serious pathological process - the maxillary cyst.
- If snot pours in a certain season and a runny nose is accompanied by sneezing, this indicates an allergic reaction. The easiest way to get rid of unpleasant symptoms is to identify and eliminate the allergen. Additionally, the nasal passages are washed and nasal preparations are used.

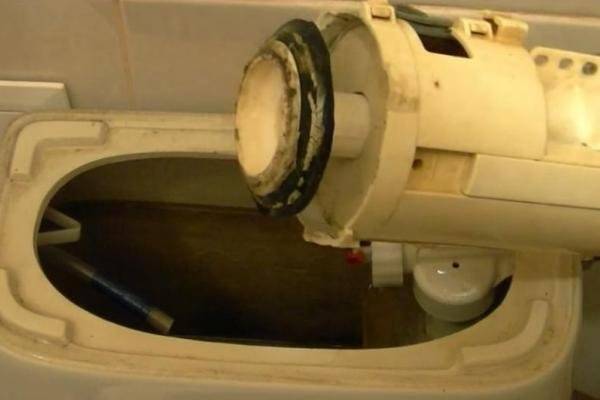
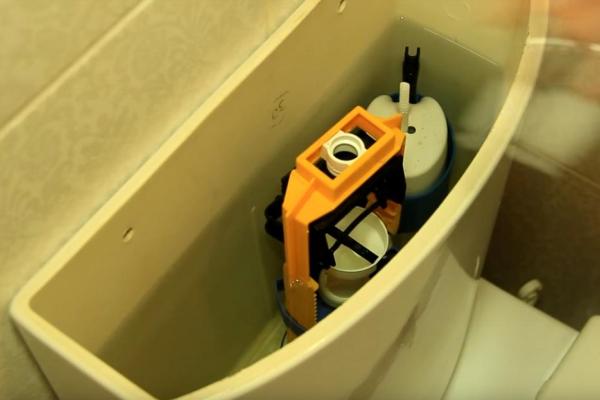
Siphon type
This design uses a lever to flush; this lever raises the large diaphragm of the siphon pipe.
If the tank does not flush, then the first step is to simply remove it from. cover it and check the operation of the linkage system of the diaphragm lifting mechanism. If everything is in order here, then almost certainly the cause will be a burst or worn diaphragm. It is easy to replace, but in the case of compact toilets, you will have to remove the tank from the wall to change the siphon.
There is a two-piece siphon design that allows it to be separated and makes this repair easier, but unfortunately they are not very common. Tanks with a drain pipe, such, do not require dismantling from the wall.
flush tank with siphon
To replace the diaphragm, do the following:
1. Turn off the water to the tank - perhaps there is a quarter-turn stopcock on the supply pipe.
2. Now you need to remove the water from the tank, perhaps even using a sponge if necessary, to remove every last drop, otherwise its remnants will be on the floor when removing the siphon.
3. For cisterns with a flush pipe, unscrew the large nut that secures it to the siphon by turning it counterclockwise.
4. Then unscrew the large nut that secures the siphon to the tank.
5. Now you can lift the siphon out of the tank. To complete this action, you will have to unhook the link to the lever and sometimes remove the float valve lever as well if it interferes.
6. Having dismantled the siphon from the tank, you can see what is under its base, and, accordingly, the old damaged diaphragm.


7. Remove the hook attached to the top of the rod that pulls the diaphragm; this will allow the diaphragm body to separate from the siphon base.
8. Having removed the old diaphragm, you can install its replacement.You can buy a new diaphragm if you're lucky enough to find one; however, I personally always use a thick plastic sheet from which I cut out a new diaphragm, laying the old one on top of it and using it as a template.
This requires a plastic such as for a waterproofing gasket or like a strong bag for construction debris. When you take out the old diaphragm, you will see what kind of plastic I am referring to.
9. After cutting out the new diaphragm, reassemble everything in reverse order. All connection gaskets should be in good condition, and where they are damaged, simply wrap PTFE tape around those connecting parts (not threads) that had old gaskets or seals.
10. Turn the water back on and check if everything works. Let's hope that another job is successfully done!
Summing up
As you can see, there are not so many reasons why water can flow in the toilet. Therefore, even an unprepared person can cope with the problem, in principle.
It is only important to carefully read the instructions, as well as act consistently and accurately. Then everything will work out - the toilet will work without failures. Is the toilet bowl leaking? Well, let it flow - this is not the biggest trouble
After all, the flowing water will still merge into the sewer. And so do many homeowners. Until they receive a water bill
Is the toilet bowl leaking? Well, let it flow - this is not the biggest trouble. After all, the flowing water will still merge into the sewer. And so do many homeowners. Until they receive a bill for the consumed water.
After that, a belated understanding of the whole danger of the situation comes to them, when your money flows from the tank into the sewer, almost before your eyes. Therefore, the leak of the toilet flush tank must be eliminated immediately, immediately after the discovery of this defect in the operation of your plumbing equipment. And in this article we will tell you how it is done.
How to fix a leaking toilet cistern if you are not familiar with its design? Of course not. Therefore, before reviewing the repair technology, we will dive into the structure of the object being restored.
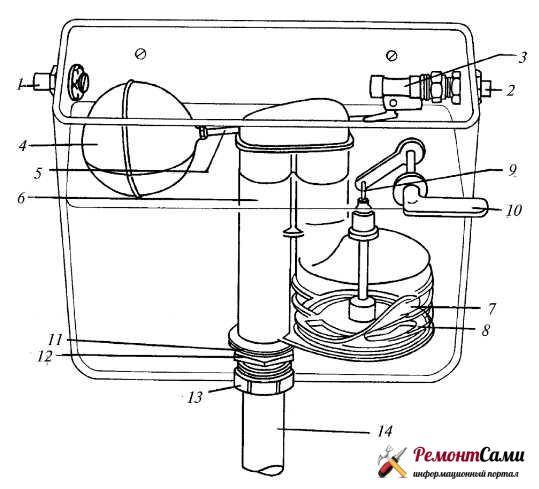
A typical tank consists of the following elements:
- Float valve (faucet) - a fitting connected to the water supply, on which a shut-off unit controlled by a float is fixed. If there is no water in the tank, the float pulls the shut-off element of the tap down, opening the fitting. When the tank is full - the float rises, closing the fitting.
- Overflow - a hollow column connected to the toilet. This column protects the tank from overflow. When the water level reaches the edge of the column, the liquid will overflow into the toilet, and will not rush into the toilet room.
- Bleed valve - a hinged hatch covering the drain hole leading to the toilet. If the hatch is closed, then water from the float valve fills the tank. If the hatch is open, then all the liquid accumulated in the tank flows down the drain hole into the toilet bowl.
drain lever- the control mechanism of the drain valve. This unit consists of a rack with a rocker, the edge of which is connected to the valve (hatch) by a polymer or metal chain. By pressing on the free edge of the rocker, you pull the chain up and slightly open the valve hatch. By releasing the lever (rocker), you loosen the chain and lower the hatch into place.
Of all the nodes described above, only the first three elements can provoke a leak in the toilet - a faucet, overflow, valve. Therefore, repairing a toilet cistern leak involves restoring the performance of these particular nodes..
As you can see: there is nothing complicated in the design of the drain system. But enough theory, it's time to move on to repair.
Where to start the repair?
Of course, from the search for the cause of the water leak. After all, only by understanding: why the toilet bowl is flowing, you will be able to eliminate the defect and establish the normal operation of the drain structure.


And there may be several such reasons, but most often plumbers deal with the following options:
The first option - leakage through the overflow - it is diagnosed very simply - water is constantly flowing in the toilet bowl. As if we have a bottomless structure in front of us, and not a capacity of 10-12 liters (or even less). Therefore - we heard a murmur - get ready to change or repair parts of the float valve.
The second option is a defect in the sealing gasket - noticeable by a constant stream, forming a characteristic lime "drip" on the inner surface of the toilet bowl. We saw him - get ready to dismantle the tank and change the gasket.
The third option is a loose bleed valve- is diagnosed by an intermittent stream flowing from the drain nozzles into the toilet bowl when water enters the tank. Therefore, if water flows from the tank into the toilet during a set of containers, get ready to change the valve shut-off element without options.
As you can see, there are not so many prerequisites for the formation of a leak. However, each of them requires its own approach to repair. Therefore, further we will consider three technologies for eliminating a leak, linked to three reasons for its formation.