
- How to choose a driver (power supply) for LEDs
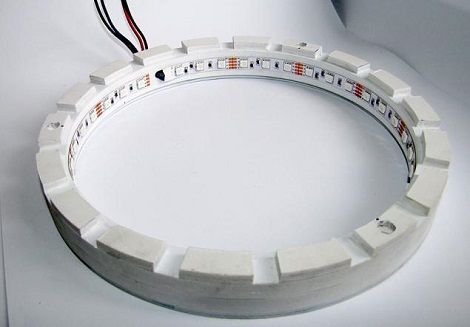
- Assembly of luminaires in a housing with LED strips
- Idea N1 - Halogen to help
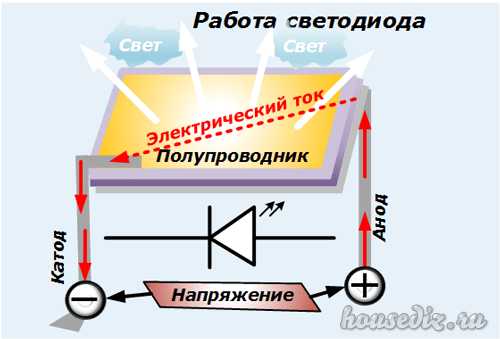
- The principle of operation of the LED light bulb
- Is it worth it: do it yourself or buy
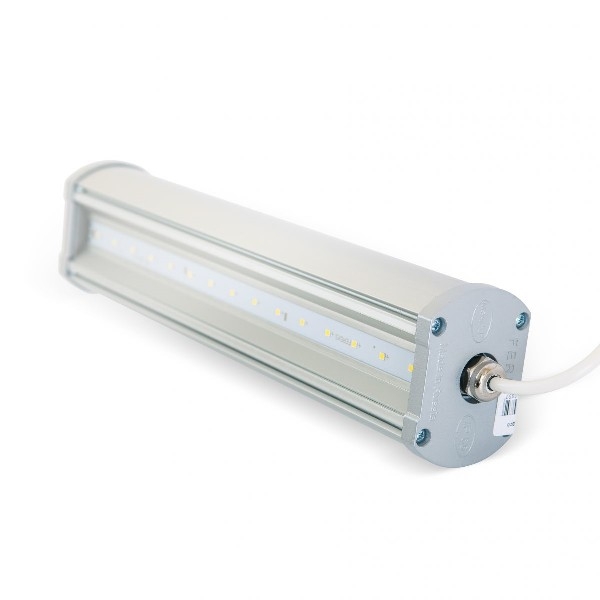
- Office lamp
- Schemes of LED lamps
- Variant with diode bridge
- LED element manufacturing
- Fixtures for softer light
- Resistor devices
- What power is needed
- LED lamp device
- Schemes of LED lamps
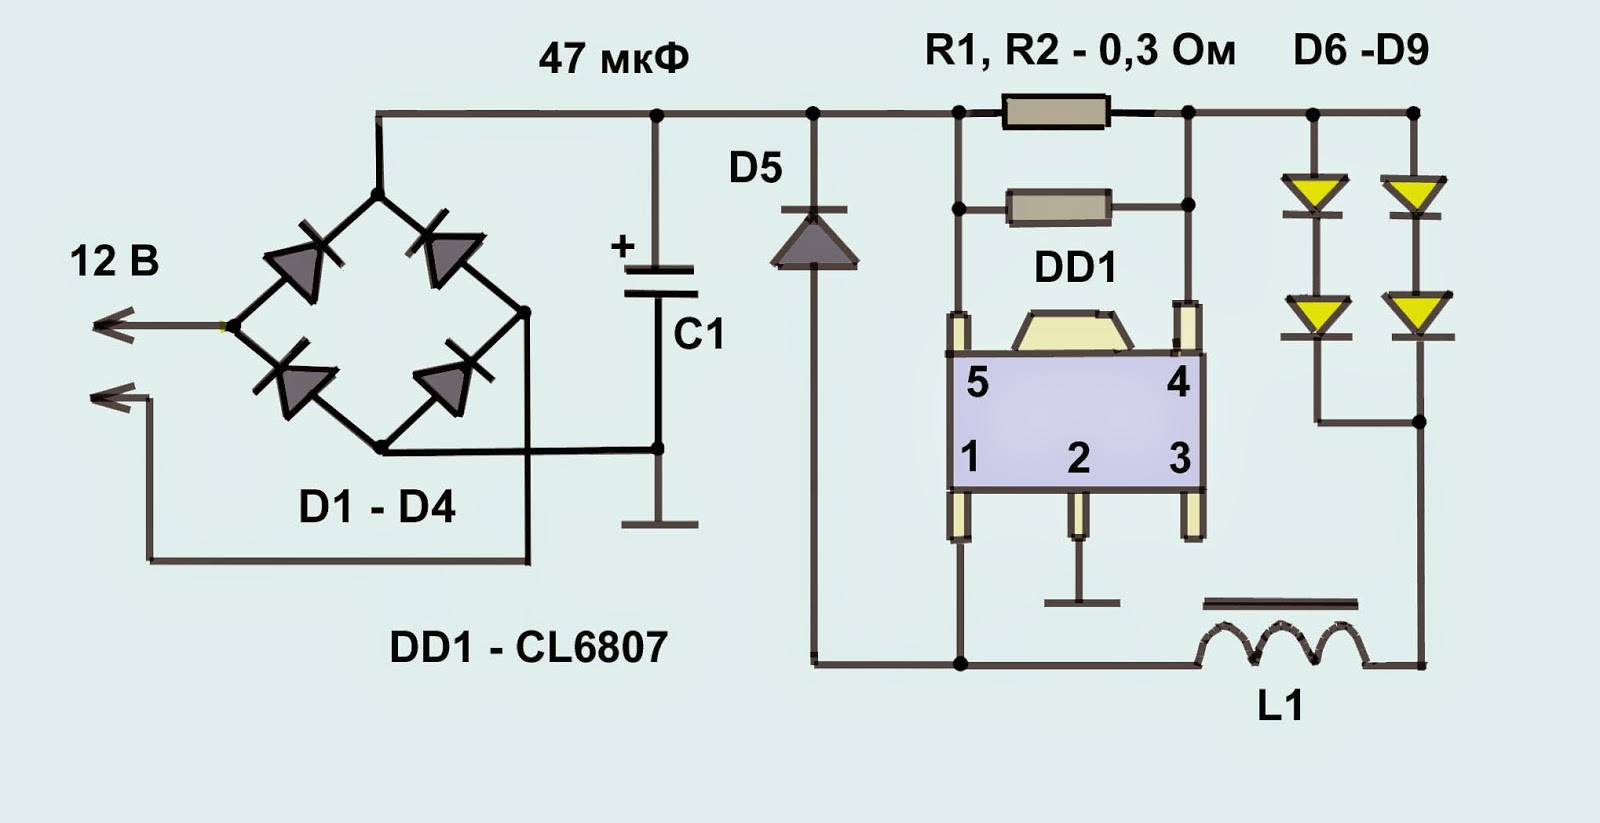
- Scheme of a converter with a diode bridge
- LED element
- Schemes for a softer glow
- What materials are needed to make
- LED diode device
- Driver
- Source of power
- Lamps and their effect on plants
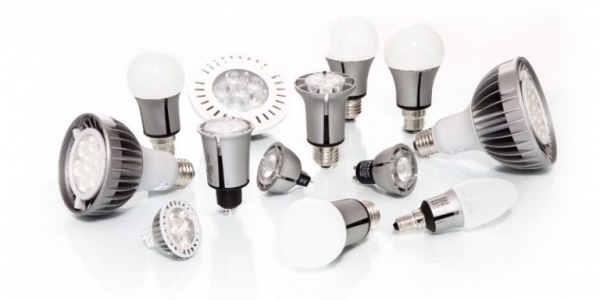
- LED lamps on various bases
- Important element: LED driver
How to choose a driver (power supply) for LEDs
Useful links:
- Components for assembling homemade phytolamps
- Photo and video examples of homemade phytolamps for plants
For each diode, in turn, the description indicates the voltage drop at different currents. For example, for a 660 nm red diode at a current of 600 mA, it will be 2.5 V:
The number of diodes that can be connected to the driver, the total voltage drop must be within the limits of the output voltage of the driver.That is, 24 to 33 660 nm red diodes can be connected to a 50W 600 mA driver with an output voltage of 60-83 V. (That is, 2.5 * 24 \u003d 60, 2.5 * 33 \u003d 82.5).
Another example: We want to assemble a red + blue bicolor lamp. We chose a red to blue ratio of 3:1 and want to calculate which driver to take for 42 red and 14 blue diodes. We consider: 42 * 2.5 + 14 * 3.5 \u003d 154 V. So, we need two drivers 50 W 600 mA, each will have 21 red and 7 blue diodes, the total voltage drop on each will be 77 V, which enters its output voltage.
Now some important clarifications:
1) Do not look for a driver with more than 50 W: they are, but they are less efficient than a similar set of lower power drivers. Moreover, they will get very hot, which will require you to pay extra for more powerful cooling. Also, drivers over 50W are usually much more expensive, for example a 100W driver can be more expensive than two 50W drivers. Therefore, it is not worth chasing them. Yes, and it is more reliable when the LED circuits are divided into sections, if something suddenly burns out, then not everything will burn out, but only a part. Therefore, it is beneficial to divide into several drivers, and not strive to hang everything on one. Conclusion: 50W is the best option, no more.
2) The current for drivers is different: 300 mA, 600 mA, 750 mA are running. There are quite a few other options. By and large, using a 300 mA driver will be more efficient in terms of efficiency per 1 W, it will also not heavily load the LEDs, and they will heat up less and last longer.But the main disadvantage of such drivers is that the diodes will work “at half strength”, and therefore they will need about twice as many as for an analog with 600 mA. A 750mA driver will drive the diodes to their limits, so the diodes will get very hot and require very powerful, well thought out cooling. But even despite this, in any case, they degrade from overheating earlier than the average “life” of LED lamps operating, for example, at 500-600 mA current. Therefore, we recommend using 600mA drivers. They turn out to be the most optimal solution in terms of price-performance-life ratio.
3) The power of the diodes is indicated nominal, that is, the maximum possible. But they are never powered to the maximum (why - see item 2). It is very easy to calculate the real power of the diode: you need to multiply the current of the driver used by the voltage drop of the diode. For example, when connecting a 600 mA driver to a 660 nm red diode, we get the actual diode voltage: 0.6 (A) * 2.5 (V) \u003d 1.5 W.
Assembly of luminaires in a housing with LED strips
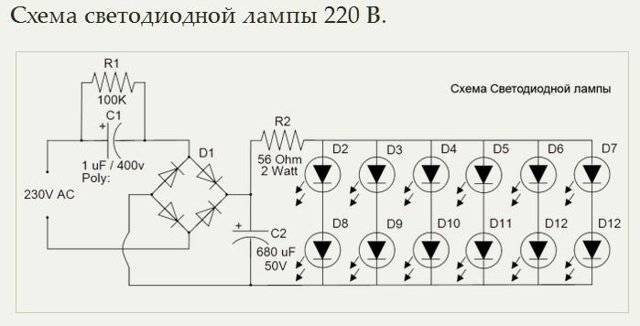
Before starting the assembly, it is recommended to study the classic circuit of a simple lamp connected to a 220 volt network. It consists of two 12 kΩ resistors and two LEDs connected in parallel. This scheme is used for an even number of LED lamps.
If an odd number of LEDs is used, a driver must be included in the circuit to stabilize the output current and voltage. It is recommended to purchase a ready-made product adapted to a specific lamp.Self-assembly of the driver is carried out using a rectifier bridge, capacitors and ordinary diodes used to convert the mains voltage into a voltage with the desired value and frequency. The role of the resistors in this circuit is to limit the current.
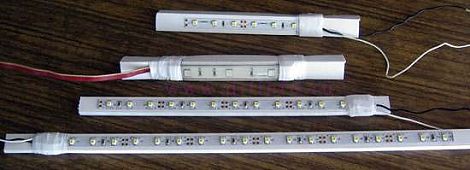
One of the simplest lamp options is an LED strip, which is attached to any flat surface with double-sided tape. Non-working lamps can serve as the basis, provided that their dimensions match the dimensions of the tape. When all the preparatory work is done, you can start making LED lamps with your own hands.
After fastening, the entire working part is connected to the power supply, which you can buy ready-made or assemble it yourself. In the latter case, the assembled unit can be placed inside the luminaire housing, while the finished power supply unit is installed only next to the luminaire. In both cases, the assembled lighting device will be neat and economical, providing normal illumination of the work surface.
When assembling, pay special attention to the quality of the insulation of all conductive parts.
Idea N1 - Halogen to help
The easiest option is not to reinvent the wheel from scratch, but to use an old or burned-out lighting lamp for the base. Among the wide variety of lighting equipment, halogen bulbs are quite widespread. In everyday life, their models with a G and GU pin base are especially popular, so we will consider the manufacture of an LED lamp using the example of such a lamp.
For work you will need the following elements:
- LEDs - provide a luminous flux, the power of a homemade light bulb will depend on their technical characteristics. For these purposes, it is desirable to have the same LED elements, as this will simplify the calculation and the principle of their connection.
- Resistors - in case you need to limit the current in the circuit of the LED parts, however, you can do without them if the resistance of the LEDs is sufficient for the selected connection scheme.
- Glue, sealant or other material to secure the LED elements.
- Connecting wires, base for fixing the LEDs in the LED light bulb.
- Locksmith tools (screwdrivers, hammer, pliers), soldering iron for electrical connection of LED and resistive parts.
When choosing the number of LEDs in a lamp, first draw up a layout on the plate, then choose how to connect them - series or series-parallel. You can only choose a parallel circuit for a homemade LED lamp if each part is rated for 12 V or you limit the voltage for each of them with a resistor.
You can come up with the layout on the future lamp yourself, or you can use the standard form:
 Rice. 1: LED layout
The process of manufacturing an LED light bulb will consist of the following steps:
Using a screwdriver, remove the sealant from the pins of the base of the old lamp and knock them out with a hammer or pliers.
 Rice. 2. Remove sealant from pins


It is important not to overdo it so as not to break the case. Prepare the base for the LEDs, textolite, getinaks, electric cardboard are suitable, paper pasted on an aluminum sheet will also fit
Cut a circle of suitable diameter according to the internal dimensions of the halogen lighting fixture
Prepare the base for the LEDs, textolite, getinaks, electric cardboard are suitable, paper pasted on an aluminum sheet will also fit. Cut a circle of suitable diameter to the inside dimensions of the halogen light fixture.
 Rice. 3: prepare the base for the LEDs
- In accordance with the chosen layout, make holes in the base, for this you can use a die cut, a hole punch or a knife.
- Install the LEDs into the holes on the base and fix them with glue.
 Rice. 4. Fix the LEDs to the base
Solder the LED elements in the lamp in such a way that the current flowing through each of them or a separate group does not exceed the allowable value. You can arrange in groups at your discretion; to limit the current strength, you can install a resistor in the circuit. When soldering, be sure to observe the polarity of the leads.
 Rice. 5. Solder according to the selected scheme
- Solder two pieces of copper wire to the obtained conclusions from the “+” and “-” semiconductor elements. It is not allowed to connect them with twists in accordance with clause 2.1.21 of the PUE.
- At the end of soldering, it is advisable to cover or fill the legs and joints with glue, it will act as a dielectric for the new lamp.
- Install the disk with LED elements into the light bulb housing.
 Rice. 6. Install the drive in the case
Glue it around the perimeter to secure it to the reflector. Now you have a finished assembled device in your hands, do not forget to mark the terminals.
However, note that you cannot connect the lamp directly to a 220 Volt network, since the device will be designed for 12 V.
The principle of operation of the LED light bulb
The operation of LED lamps is based on the action of a semiconductor with a size of 1-2 mm. Inside it, there is a movement of charged elementary particles that convert the current into a direct current from an alternating one. However, the chip crystal has another type of electrical conductivity - negative electrons.
Fig.1 - the principle of operation of LED lamps.
The side with the fewest electrons is called the p-type. The other, where there are more particles, is "n-type". When they collide, particles of light, photons, are generated. If the system is energized, the LEDs will continue to emit a stream of light. All modern LED bulbs work on this principle.
Is it worth it: do it yourself or buy
In the manufacture of their
There are several advantages to hand lighting panels based on LED strip:
- Saving. Purchased
models with similar lighting characteristics will cost several
times more expensive than the cost of homemade. - Design and
design implementations. You can make a LED panel with your own hands
any shape, size and light intensity for specific tasks, which is not always available
in the version from the store, and ordering from the master will be even more expensive. - At
using quality materials and properly designed equipment
such a lamp will last more than a dozen without any emergencies
years.
However, with all the benefits
in do-it-yourself assembly ice panels also have disadvantages:
- Using low quality, fake, cheap LED strips.Their service life ends quickly, so the device will have to be redone, repaired.
- Incorrect calculation of the power supply unit and controller.
- The heating of the LEDs with sufficient luminous intensity was not taken into account. The luminosity of ice crystals drops rapidly, and some burn out completely.
- Poor quality of components.
- Unstable parameters of the electric current at the output of the transformer.

If you have experience, self-confidence, as well as the availability of high-quality proven materials, you can start making your own LED panel. Otherwise, it is more profitable to order it from a professional or just buy it in a reliable store.
Office lamp
You can make a creative wall, table lamp or floor lamp in your office from several dozen LEDs. But for this there will be a stream of light that will not be enough for reading, a sufficient level of illumination of the workplace is needed here.
First you need to determine the number of LEDs and the rated power.
After finding out the load capacity of the rectifier diode bridge and capacitor. We connect a group of LEDs to the negative contact of the diode bridge. We connect all the LEDs, as shown in the figure.
Diagram: connecting lamps
Solder all 60 LEDs together. If you need to connect additional LEDs, just continue to solder them in series plus to minus. Use wires to connect the negative of one group of LEDs to the next until the entire assembly process is complete. Now add a diode bridge. Connect it as shown in the picture below.Positive lead to the positive lead of the first LED group, connect the negative lead to the common lead of the last LED in the group.
Short LED wires
Next, you need to prepare the base of the old light bulb by cutting off the wires from the board and soldering them to the AC inputs on the diode bridge, marked with a ~ sign. You can use plastic fasteners, screws and nuts to connect two boards together if all the diodes are placed on separate boards. Do not forget to fill the boards with glue, isolating them from a short circuit. This is a fairly powerful network LED lamp that will last up to 100,000 hours of continuous operation.


Schemes of LED lamps
First of all, you should develop an assembly option. There are two main methods, each with its own pros and cons. Below we will consider them in more detail.
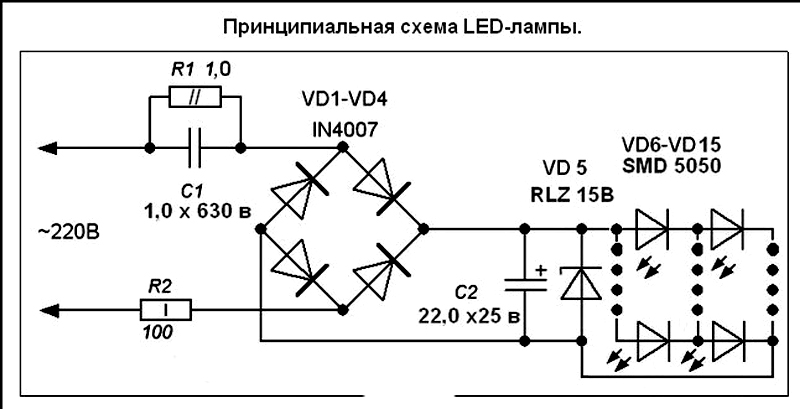
Variant with diode bridge
The circuit includes four diodes that are connected in different directions. Thanks to this, the bridge acquires the ability to transform the mains current of 220 V into a pulsating one.
 The LED bridge circuit is simple and logical. Even a novice master who masters the basics of independent work can perform it.
This happens as follows: when sinusoidal half-waves pass through two diodes, they change, which causes a loss of polarity.
When assembling, a capacitor is connected to the positive output in front of the bridge; in front of the negative terminal - a resistance of 100 ohms. Another capacitor is installed behind the bridge: it will be needed to smooth out voltage drops.
LED element manufacturing
The easiest way to create an LED lamp is to make a light source based on a broken lamp.It is necessary to check the operability of the detected parts, which can be done using a 12 V battery.
Defective elements must be replaced. To do this, unsolder the contacts, removing the burned-out elements, put new ones in their place
It is important to observe the alternation of anodes and cathodes, which are mounted in series
If you need to change only 2-3 pieces of the chip, you just need to solder them to the areas where the failed components were previously located.
With complete self-assembly, you need to connect 10 diodes in a row, observing the rules of polarity. Several completed circuits are soldered to the wires.
In the manufacture of the lamp, you can use boards with LEDs, which can be found in burnt out devices.
It is only important to check their performance. When assembling circuits, it is important to ensure that the soldered ends do not touch each other, as this can lead to a short circuit of the device and failure of the system.
When assembling circuits, it is important to ensure that the soldered ends do not touch each other, as this can lead to a short circuit of the device and failure of the system.
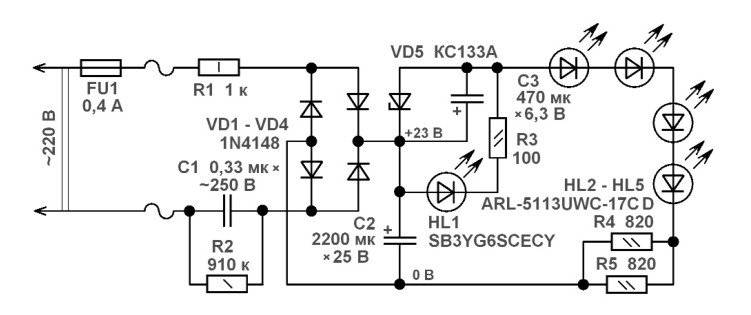
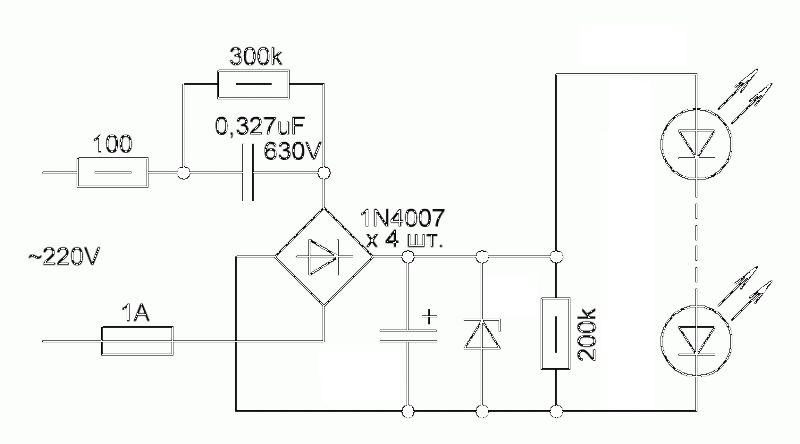
Fixtures for softer light
To avoid the flickering characteristic of LED lamps, the scheme described above can be supplemented with several details. Thus, it should consist of a diode bridge, 100 and 230 ohm resistors, 400 nF and 10 uF capacitors.
To protect the device from voltage drops, a 100 ohm resistor is placed at the beginning of the circuit, followed by a 400 nF capacitor, after which a diode bridge is installed and another 230 ohm resistor, followed by the assembled LED chain.
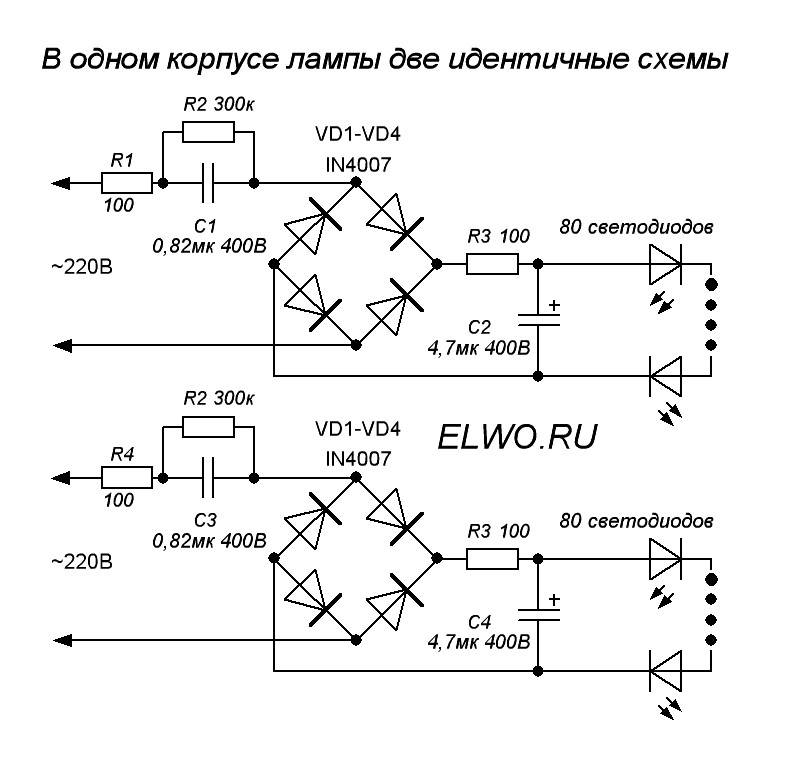
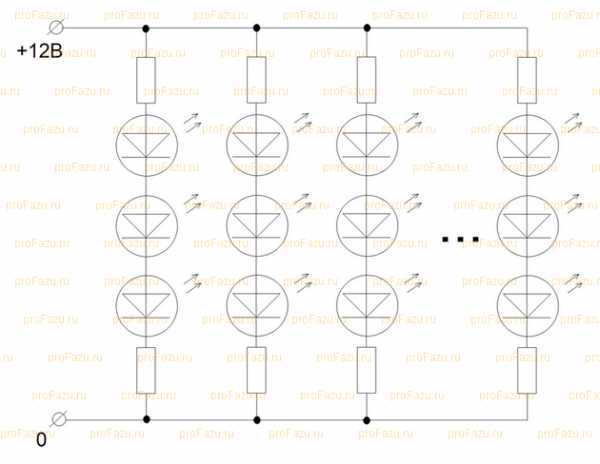
Resistor devices
A similar scheme is also quite accessible to a novice master.It requires two 12k resistors and two strings of the same number of LEDs that are soldered in series with respect to polarity. In this case, one strip on the side of R1 is connected to the cathode, and the other - to R2 - to the anode.
The lamps made according to this scheme have a softer light, since the active elements are lit in turn, due to which the pulsation of the flashes is almost imperceptible to the naked eye.
To calculate the lamp power, you need to know the amount of current that passes through the LEDs. This value can be calculated using the above formula. In this case, it should be taken into account that the voltage drop in series-connected 12 LEDs is approximately 36V
The devices are successfully used as a table lamp and for other purposes. To create optimal lighting, experts recommend using tapes of 20-40 diodes. A smaller number gives a small luminous flux, the connection of a larger number of elements is technically quite difficult to perform.
What power is needed
The power supply can only work for a long time, stably and reliably if it is correctly rated in terms of power in accordance with the following rules:
- First you need to decide how many and which LEDs will be included in the circuit. For example, one meter of SMD 5050 ice strip with 60 LEDs consumes 14 watts.
- Next, you need to calculate the total consumed load. If a total of 5 meters of such an LED strip is used (from the example discussed above), then the total power will be 14x5 = 70 watts.
- Now you need to determine the practical power of the power supply. It should be 20% more.In this case (70 W x 0.2) + 70 W = 84 W.
If the power supply is incorrectly calculated, the LEDs will begin to constantly overheat, which will eventually lead to their rapid failure or deterioration of the glow.
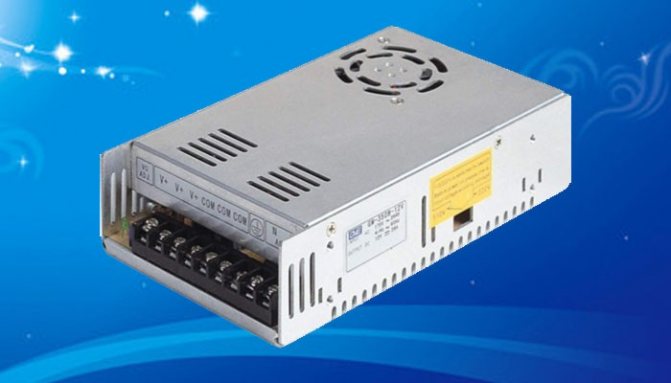
The driver and power supply for LEDs are completely different devices. The first, as a rule, performs the function of rectifying and stabilizing the current at the output, and the second also lowers it to the required value.


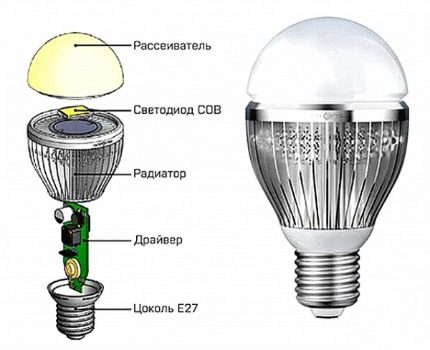
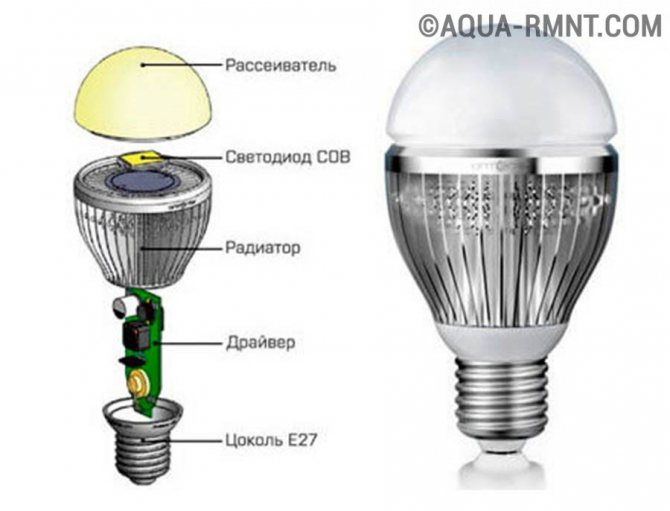
LED lamp device
The LED lamp consists of the following six parts:
- Light-emitting diode;
- plinth;
- driver;
- diffuser;
- radiator.
The operating element of such a device is an LED that generates a stream of light waves.
LED devices can be designed for different voltages. The most in demand are small products for 12-15 W and larger fixtures for 50 watts
The plinth, which can have a different look and size, is also used for other types of lamps - fluorescent, halogen, incandescent. At the same time, some LED devices, such as LED strips, can do without this part.
An important element of the design is the driver, which converts the mains voltage into a current, on which the crystal operates.
The efficient operation of the lamp largely depends on this node, in addition, a high-quality driver with good galvanic isolation provides a bright constant light flux without a hint of blinking.
A conventional LED produces a directional beam of light. To change the angle of its distribution and provide high-quality lighting, a diffuser is used. Another function of this component is to protect the circuit from mechanical and natural influences.
The radiator is designed to remove heat, excess of which can damage the device.Reliable heatsink performance optimizes lamp performance and extends lamp life.
The smaller this part, the greater the thermal load the LED will have to withstand, which will affect the speed of its burnout.
Schemes of LED lamps
Aligning variable sweat and creating the necessary power and resistance for LED fixtures is solved in two ways. Schemes can be conditionally divided into:
- with diode bridge;
- resistor, with an even number of LED elements.
Each option has simple schemes and its own advantages.
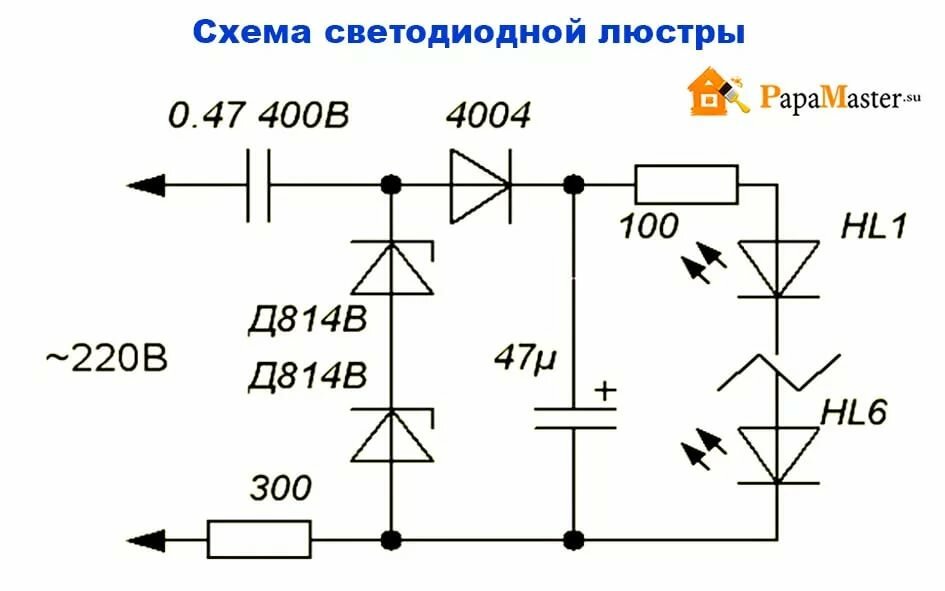
Scheme of a converter with a diode bridge
The diode bridge consists of 4 diodes directed in different directions. Its task is to turn a sinusoidal alternating current into a pulsating one. Each half-wave passes through two elements, and minus changes its polarity.
In the circuit, for an LED lamp, a capacitor C10.47x250 v is connected to the positive side of the bridge from the AC source. A resistance of 100 ohms is placed in front of the negative terminal. Behind the bridge, parallel to it, another capacitor is installed - C25x400 v, which smooths out the voltage drop. It is easy to make such a scheme with your own hands, it is enough to have the skills to work with a soldering iron.
LED element
The board with LED elements is used standard, from a failed lamp. It is necessary to check before assembly that all parts are working. For this, a 12 V battery is used, it can be from a car. Non-working elements can be replaced by carefully unsoldering the contacts and putting in new ones. Pay close attention to the location of the anode and cathode legs. They are connected in series.
When replacing 2 - 3 parts, you simply solder them in accordance with the position that the failed elements occupied.
When assembling a new LED lamp with your own hands, you need to remember a simple rule. The lamps are connected 10 in series, then these circuits are connected in parallel. In practice, it looks like this:
- Put 10 LEDs in a row and solder the legs of the anode of one with the cathode of the second. It turns out 9 connections and one free tail at the edges.
- Solder all chains to the wires. To one cathode ends, to the other anode.
In texts, verbal designation of contacts is often used, icons on diagrams. Reminder for novice electricians:
- cathode, positive - "+", joins the minus;
- The anode is negative - "-", joins the plus.
When assembling circuits with your own hands, make sure that the soldered ends do not touch others. This will lead to a short circuit and burn out the entire circuit that you managed to make.
Schemes for a softer glow
In order for the LED lamp not to irritate the eyes by blinking, several details must be added to the assembly diagram. In general, the current converter consists of:
- diode bridge;
- 400 nF and 10 uF capacitors;
- 100 and 230 ohm resistors.
To protect against power surges, a 100 ohm resistor is first placed, and a 400 nF capacitor is soldered behind it. In the previous version, they are installed at different ends of the entrance. Behind the capacitor after the diode bridge, another 230 ohm resistor is installed. It is followed by a series of LEDs (+).
What materials are needed to make
To assemble a light bulb, you need to buy the following structural elements:
- frame;
- LEDs (individually or mounted on a tape);
- rectifier diodes or diode bridge;
- fuses (if there is a burnt unnecessary lamp, they can be removed from it);
- capacitor. The capacity and voltage must match the number of chips and the wiring diagram;
- if you have to make a frame for installing chips, you need to purchase a heat-resistant material that does not conduct current. Metal will not work, so it is better to buy thick cardboard or durable plastic.
Of the tools for work, you will need pliers, a soldering iron, scissors, a holder and tweezers. You will also need liquid nails or glue to mount the LEDs if using cardboard.
LED diode device
The device of a 220 volt LED lamp is not very complicated and may well be considered even at an amateur level. The classic 220 volt LED lamp includes the following mandatory elements:
- Bearing body with plinth;
- Special diffusing lens;
- Heat dissipating radiator;
- LED module;
- LED lamp drivers;
- Power Supply.
You can get acquainted with the structure of a 220 volt LED lamp (COB technology) in the figure below.
The structure of the LED illuminator
This LED device is manufactured as a single unit and contains in its design a large number of homogeneous crystals, which are soldered during assembly to form numerous contacts. To connect it to the driver, it is enough to connect only one of the contact pairs (the rest of the crystals are connected in parallel).


In their shape, these products can be round and cylindrical, and they are connected to the network through a special threaded or pin base.For a public LED system, as a rule, luminaires are selected with a color temperature index of 2700K, 3500K or 5000K (in this case, the spectrum gradations can take any value). Such devices are quite often used for decorative purposes and for lighting advertising banners and billboards.
Consider the individual modules of the LED lamp in more detail.
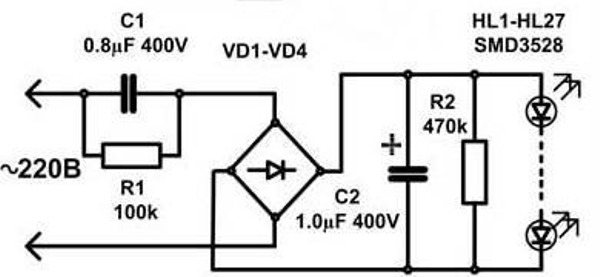
Driver
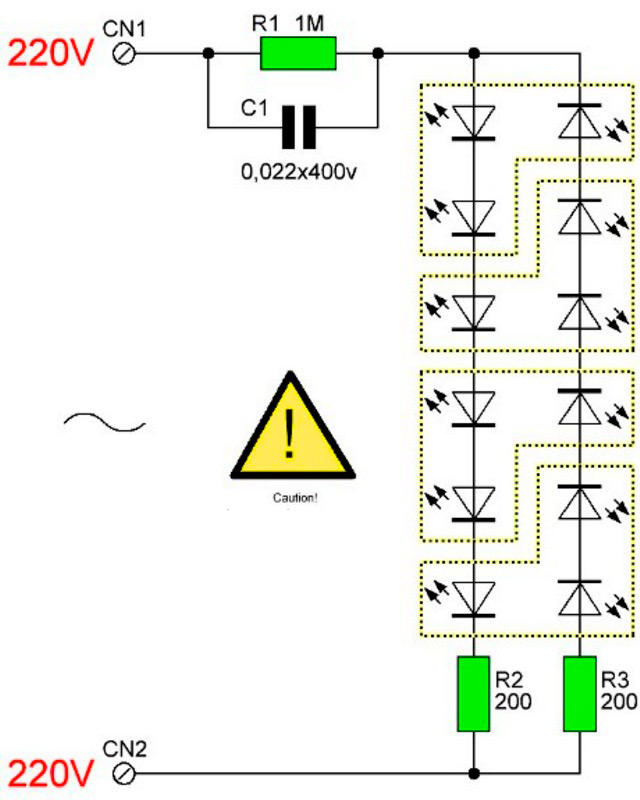
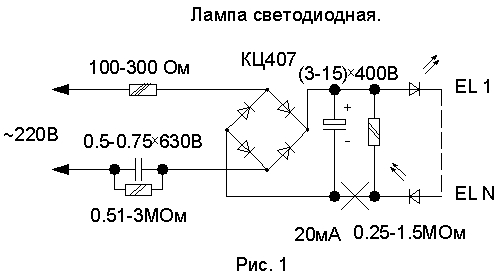
In a simplified form, the driver circuit used to power the lamp from a 220 volt network looks like it is shown in the figure below.
Scheme of the simplest driver
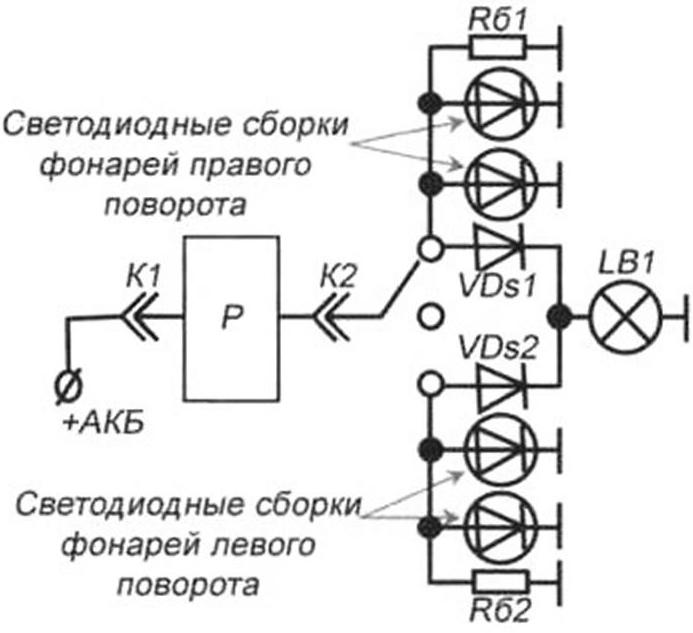
The number of parts in this device, which performs a matching function, is relatively small, which is explained by the features of the circuit design. Its electrical circuit contains two quenching resistors R1, R2 and LEDs HL1 and HL2 connected to them in an anti-parallel principle.
Additional Information. This inclusion of limiting elements ensures the protection of the circuit from reverse surges of the supply voltage. In addition, as a result of such an inclusion, the frequency of the signal arriving at the lamps doubles (up to 100 Hz).
The mains supply voltage with an effective value of 220 volts is supplied to the circuit through the limiting capacitor C1, from which it is supplied to the rectifier bridge, and then directly to the lamp.
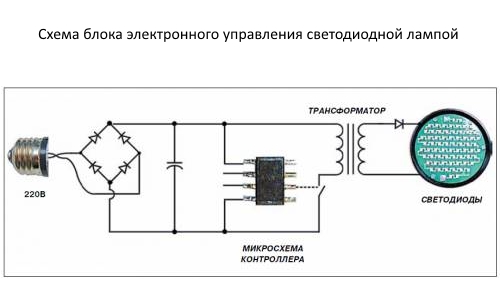
Source of power
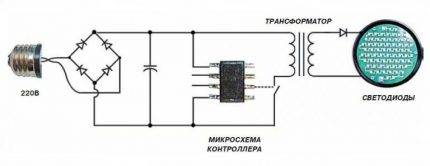
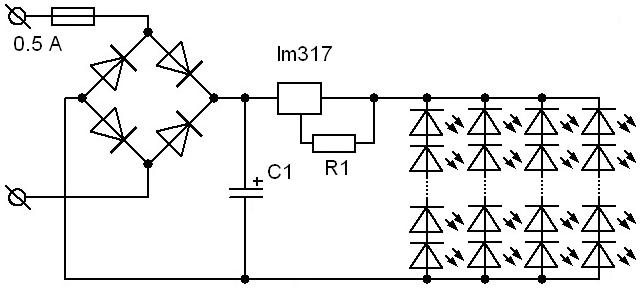
A typical LED lamp power supply circuit is shown in the figure below.
Diagram of a power supply module with a driver
This part of the lighting device is made in the form of a separate unit and therefore can be freely removed from the case (for the purpose of repairing it yourself, for example).At the input of the circuit there is a rectifying electrolyte (capacitor), after which the ripples with a frequency of 100 Hertz partially disappear.
Resistor R1 is necessary for the formation of a capacitor discharge chain when the circuit is disconnected from the power source.
Lamps and their effect on plants
Beginning gardeners often face many problems. One of them is greenhouse lighting. Science has long proven the positive effect of light on plants. It is worth recalling the spectral analysis of white light. It consists of green, blue and red colors. Almost all plants have green leaves. This means that they absorb blue and red from sunlight for themselves, and reflect green, they absolutely do not need it.
If we mix red with blue we get purple. This is exactly what plants need. Therefore, for their growth, it is better to use LED lighting, use lamps for greenhouses that do not have green. They also do not contain harmful ultraviolet and infrared colors. Therefore, the range of LED lamps today is considered the most effective for highlighting the future crop.
The principle of operation of a conventional LED is very simple. A current is applied to it, which, in turn, is converted into light rays. The LED bulb consists of the following parts:
- optical system;
- corps;
- heat dissipating substrate.
Such lamps for home and greenhouse are quite expensive, but they can work well at low temperatures. High temperatures, on the other hand, significantly reduce their resource, and can disable the LED. Lamps due to the substrate do not heat up. They can be placed next to plants. Connection to the network occurs using a conventional base E27 and E14
When purchasing lamps or LED strips, you should pay attention to the following parameters:
- the area of the illuminated territory;
- lamp life;
- supply voltage;
- device power;
- lighting angle;
- the size;
- the weight.
The illumination angle can be from 90 to 360°. The dimensions and weight of lighting fixtures also have significant differences. You can check the lamp for flickering by looking at it through the viewfinder of a digital camera. How to make an LED lamp with your own hands? It is required in its manufacture to take into account several factors:
To control the lamp, you need a special device - a driver that must be inserted into the base.
For a greenhouse of a large area, appropriate high-power bulbs are needed.
There are a lot of LEDs in high-power lamps. There may be more than a hundred of them. Often in the factory, lamps for greenhouses are equipped with red and blue LEDs. Special reflectors provide directional LED lighting for the greenhouse. Each planted plant in this case receives a certain portion of light. Lighting is switched on every morning and evening.


Lamps for greenhouses have the following advantages:
- they are very economical;
- have high durability;
- have a high light output;
- save electricity;
- products are environmentally friendly;
- do not require disposal in special conditions;
- do not harm plants and humans;
- differ in maintainability;
- the harvest ripens 10-15 days earlier than usual.
Lamps for greenhouses consume electricity 10 times less than usual. They can work continuously for at least 50 thousand hours, and often up to 100 thousand. It's over 10 years old.Even after such a period of burning, they simply reduce the level of luminous flux, but they do not always burn out. The only drawback of LED greenhouse lighting is the high cost of the equipment. Therefore, it is worth trying to make lamps for growing plants yourself.
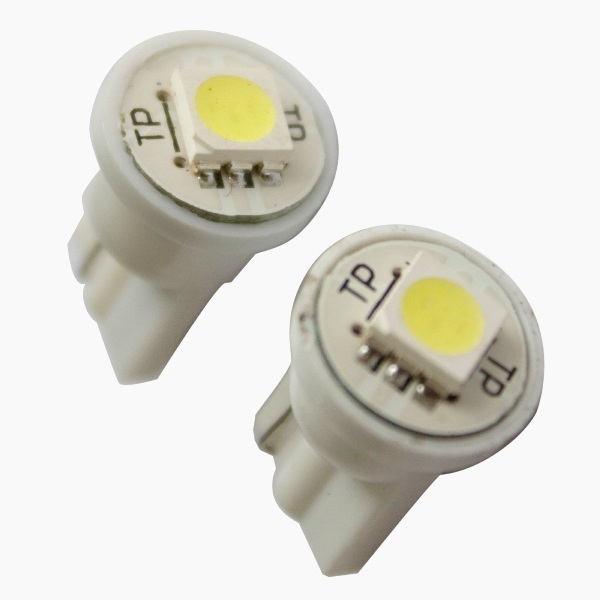
LED lamps on various bases
An economical version of the LED lamp can be made with your own hands on the basis of a burned-out lamp. To do this, it is necessary to carefully disassemble the burned-out lamp without damaging the base and clean and degrease it. In the base we place a 100 Ohm protective resistor and two 220 nF capacitors, the operating voltage of which is 400 V, a 10 microfarad capacitor responsible for the absence of flicker, a rectifier (diode bridge) and LEDs in a ratio of 1 (red glow) to 3 (white ). We connect the components of the circuit by soldering and isolate with mounting glue, filling the entire space of the base between the parts of the circuit and fixing them.
In addition to a conventional lamp, a halogen lamp is used to create an LED lamp with your own hands.
To assemble a lamp on a halogen lamp, the following components are required:
- assembly diagram, which you can make yourself or take from the Internet;
- LEDs;
- non-working halogen lamp;
- quick-drying glue;
- copper wire;
- soldering iron and solder;
- aluminum substrate 0.2 mm thick, which will replace the radiator;
- resistors;
- hole puncher.
The assembly process takes place in the following sequence:
- We clean the halogen lamp from all components and putties.
- We take it out of the reflector.
- We prepare a reflector disk on which the LEDs will be located.We stick the disk on an aluminum substrate (you can get a disk template on the Internet) and make holes in it.
- According to the diagram, we place the LEDs on the disk with their legs up, taking into account their polarity. We roll a little glue between them, avoiding contact with the contacts.
- We solder the contacts of the LEDs so that the chain starts with positive polarity (“+”) and ends with negative (“-”).
- We connect the positive contacts together by soldering.
- By soldering, we attach resistors to the negative contacts and connect their contacts to each other with solder, getting negatively charged resistors.
- We also connect the contacts of the resistors to each other and solder copper wires to them. To avoid a short circuit, fill the space between the contacts and wires with glue.
- We glue the disk and the halogen reflector together.
- After polymerization of the adhesive, a 12 V power supply can be connected.
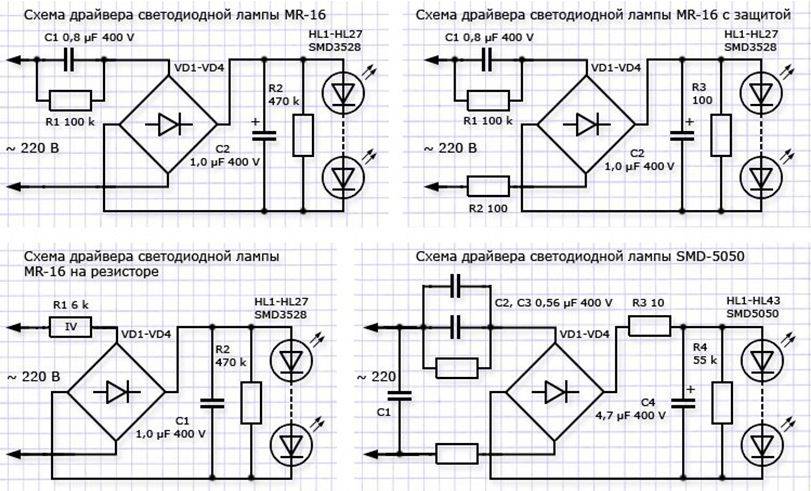
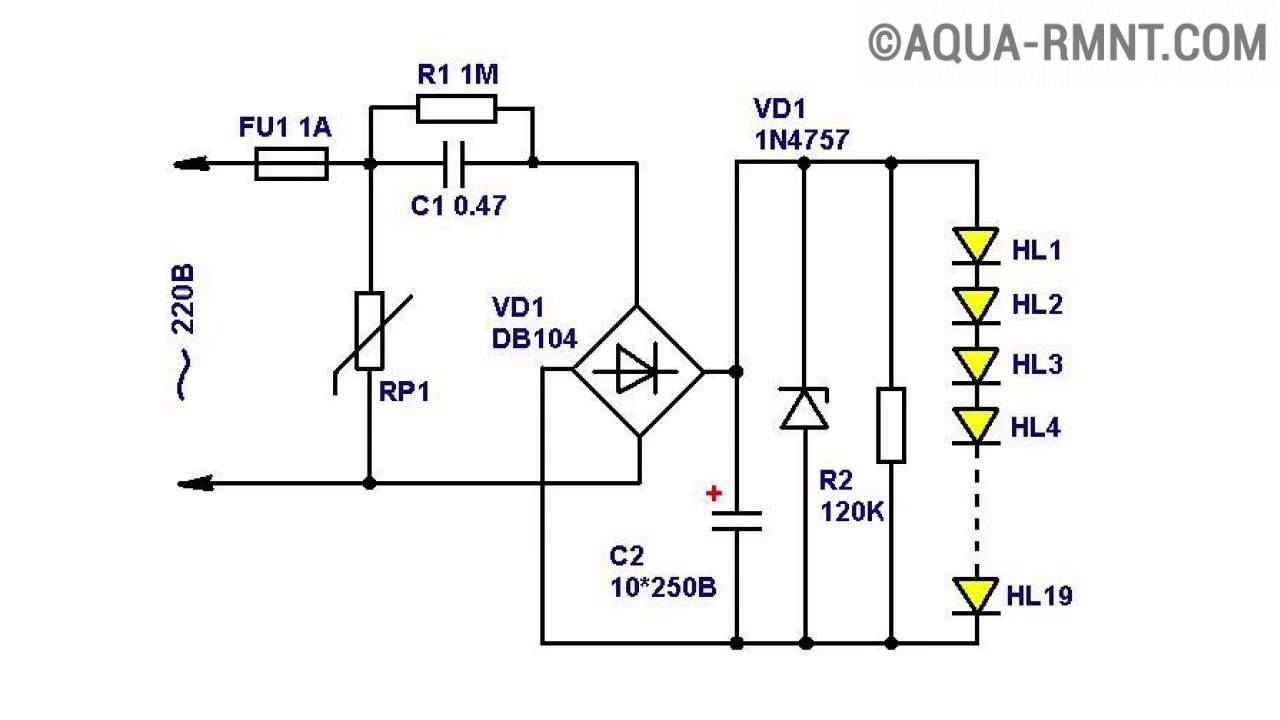
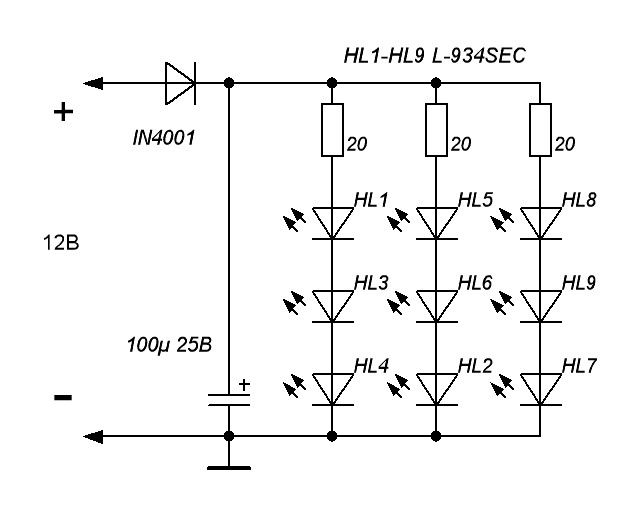
Important element: LED driver
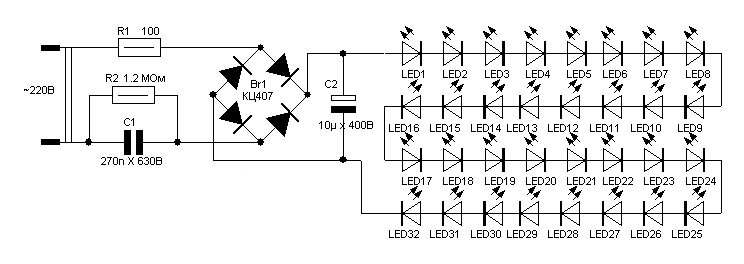
For the correct operation of the DIY LED device, you should resolve the issue with the driver. The scheme of this node is quite simple. The operation algorithm consists in passing an alternating current of 220V to the diode bridge through the capacitor C1.
The rectified current passes to series-connected HL1-HL27 LEDs, the number of which can reach 80 pieces.
The driver for a homemade LED device is assembled according to the above diagram. You can also use ready-made elements bp 3122, bp 2832a or bp 2831a
To avoid flickering and achieve a consistently even color, it is desirable to use capacitor C2, which should have as large a capacitance as possible.


