- Bonding of polypropylene sheets
- What to look for when choosing a plastic soldering iron
- Heating time for pipes and fittings
- Sword soldering irons for welding plastic pipes
- Soldering rods for polypropylene
- What are the tools for stripping polypropylene pipes
- Drill bits
- Working with a trimmer
- Distribution of polypropylene pipes
- We consider fittings
- Laying methods
- The nuances of soldering
- How to solder - a description of the process technology for beginners
- Welding of polypropylene pipes: what is it?
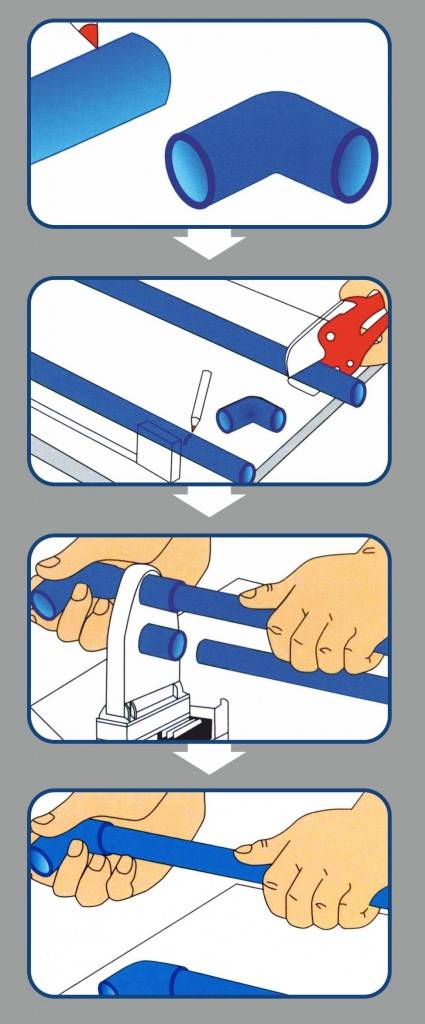
- How to solder polypropylene pipes
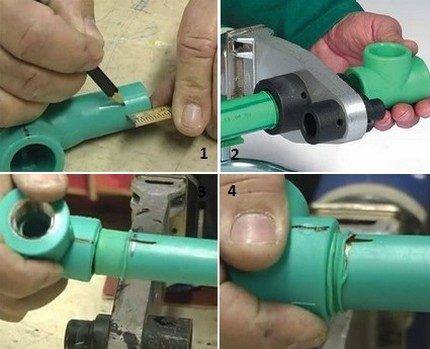
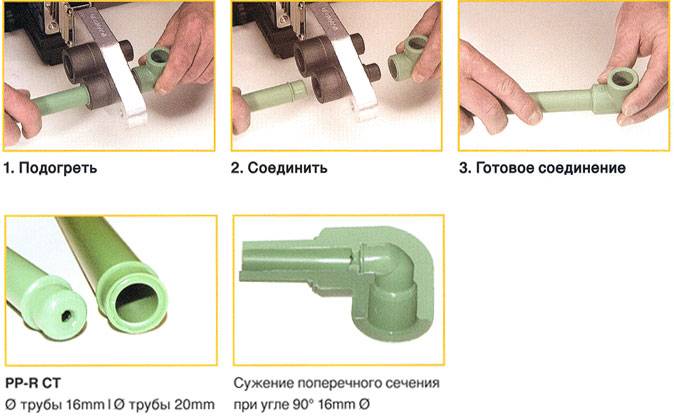
- PPR pipe welding process
- Preparation of the soldering iron
- Connection markup
- Pipe connection
- Work procedure
- Stage # 1 - preparing the welding machine
- Step #2 - pipe preparation
- Stage # 3 - warming up parts
- Stage # 4 - welding elements
- Step #5 - Cooling the Compound
Bonding of polypropylene sheets
Gluing polypropylene is a very time-consuming process that requires special training. This is because this type of plastic is particularly difficult to bond. There are a large number of adhesives on the modern market that can glue plastic together without any problems, the main issue will be the choice of a special solution.Special preparation for gluing the material will consist in pre-assembling all the parts in order to put the necessary marks, because an incorrect connection of polypropylene sheets or a banal mistake in the process can cost you damaged material.
The main recommendations for gluing and welding polypropylene with your own hands will be:
it is necessary to purchase glue, paying attention, first of all, to its brand, but not to the price. Your experience in this matter will be an additional bonus for you.
Sometimes glue from a high price category may be inferior in quality to cheaper counterparts;
it will be very important to pay attention to sharpening and processing the edges of polypropylene sheets, if this requirement is correctly met, the seam will turn out to be very neat;
choose the method of welding depending on the width of the sheet, as well as its size. The more correctly the connection technique is chosen, the stronger the seam will be at the exit.
What to look for when choosing a plastic soldering iron
According to the reviews of masters specializing in heating and plumbing systems, all the components of the heater are important. First of all, the quality of the steel and the coating of the nozzles are checked, as they bear a constant load on the temperature difference and ensure the quality of welding.
First of all, the quality of the steel and the coating of the nozzles are checked, since they bear a constant load on the temperature difference and ensure the quality of welding.
Heating time for pipes and fittings
| Diameter, mm | Heating time, sec | Relocation time limit (no more), sec | Cooling time, sec |
| 16 | 5 | 4 | 2 |
| 20 | 5 | 4 | 2 |
| 25 | 7 | 4 | 2 |
| 32 | 8 | 6 | 4 |
| 40 | 12 | 6 | 4 |
| 50 | 18 | 6 | 4 |
| 63 | 24 | 8 | 6 |
| 75 | 30 | 10 | 8 |
The heating time of a good household appliance is about 5 minutes.If you have to work with a budget soldering iron, which does not hold the heat regulator tightly, then smart craftsmen advise you to fix it with tape to avoid accidental drop and spoil the influx on the pipe.
When evaluating the quality of tips, it is important to check that the Teflon is of good quality, otherwise it will fail after a few uses. Pieces of plastic will remain in the nozzles; when turned on, strong smoke with harmful impurities will go out
Another subtlety is the location of the nozzles on the canvas. If this is an iron, then it is best to select a configuration with nozzles along the very edge of the heating plate, as this will make it possible to work in hard-to-reach corners.
The second sensitive factor is the guarantee of constant heating. In expensive professional devices, the deviation of heat indicators ranges from 1.5-3 °. Moreover, the electronic display not only controls the set heating temperature, but also shows it on the screen.
If an inexpensive manual device is used, then you will have to test its operation on pieces of pipes and fittings in order to achieve a good result. Experienced craftsmen advise using a template to mark the distance the pipe must enter the nozzle and heat up. With a smooth introduction to the desired segment, the influx will turn out to be even and will not bend inward, reducing the conductivity of the liquid in the future system.
| Diameter, mm | Entry into the nozzle/fitting, taking into account the space for the internal influx, mm | Distance to the outer, visible influx, mm | Mark distance (template), mm |
| 20 | 13 | 2 | 15 |
| 25 | 15 | 3 | 18 |
| 32 | 16 | 4 | 20 |
| 40 | 18 | 5 | 23 |
Thus, the third criterion for choosing a soldering iron will be electronic or manual control. And here we have to solve a dilemma.If you have significant work experience, then you are able to control the correct preparation and soldering process on a manual apparatus. But when you plan to weld for the first time, you will either have to learn from test material or buy an expensive electronic device to take control of the process for you.
And the last fourth criterion is the stand for the soldering iron. Since the device will operate at high temperatures, elementary safety precautions are extremely important. The stand or support under the heater should not be flimsy, otherwise it will not only turn over, but may also cause burns to you.
Sword soldering irons for welding plastic pipes
The most common options for a heating element with a wide platform and the ability to mount several nozzles at once. Popular for high volume work at large facilities. They have their own form of fastening nozzles with a key.


Soldering rods for polypropylene
They are characterized by a rod on the handle, to which nozzles are attached according to the clamp principle. The quality of heating does not differ from sword-shaped "irons" and depends only on the method of heating and adjustment. A feature is the ability to work not only on a horizontal surface, but also on weight in corner joints.
What are the tools for stripping polypropylene pipes
Proper pipe cleaning starts with the choice of tool. Its appearance and design depends on the type of reinforcement (external, internal), diameter. For edge soldering, special edge removal machines must be used. But polypropylene products are rarely made with a diameter of more than 60 mm.For this, pipes made of polyethylene are used.
Drill bits
To equip the pipeline with your own hands, you can buy several manual strippers for standard diameters - 16, 20, 25 and 32 mm. An example of a tool for external processing is the MasterProf or Newton series of models. Each is designed for two diameters, for example - 20x25 or 16x20. Knives are located vertically, their replacement, regulation of position is possible.
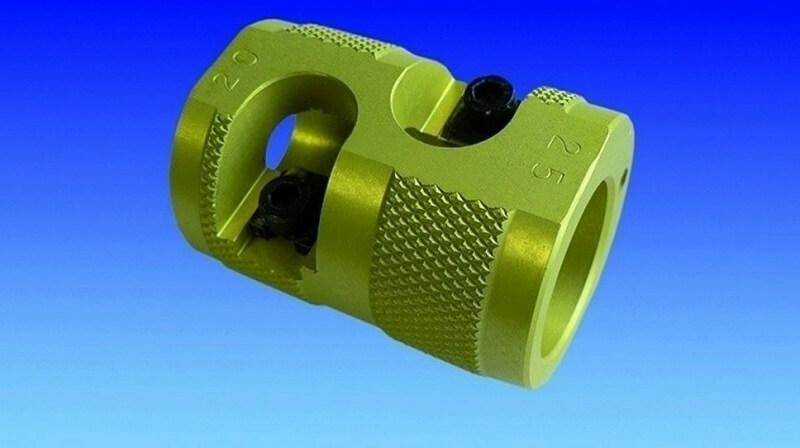
Manual removal is convenient for a small amount of work. If this needs to be done in bulk, it is recommended to purchase special nozzles for a drill. They also differ in size, but all are designed to mount in a standard drill chuck. These are optimal stripping tools for 20-25 mm polypropylene pipes.
How to choose manual type or drill type cleaning:
- made of tool steel;
- corrugated surface for easy fixation;
- for manual models, the length of the collar is from 15 cm, it is possible to replace it;
- nozzles for a drill (shaver) can be of different diameters. This is achieved by adjusting the position of the blades.
An additional tool is a vise or a clamp for fixing the nozzle. So it will be more convenient to process the surface, it will not be necessary to make great efforts to remove it.
Working with a trimmer
Trimmer is needed to clean the ends. It differs from nozzles and shavers in the location of the knives. Their plane is in a horizontal position at a slight angle. The chamfer is removed up to 1 mm of the aluminum layer. The advantage of this tool is its versatility. It is used to align the plane of the nozzles, which affects the soldering accuracy.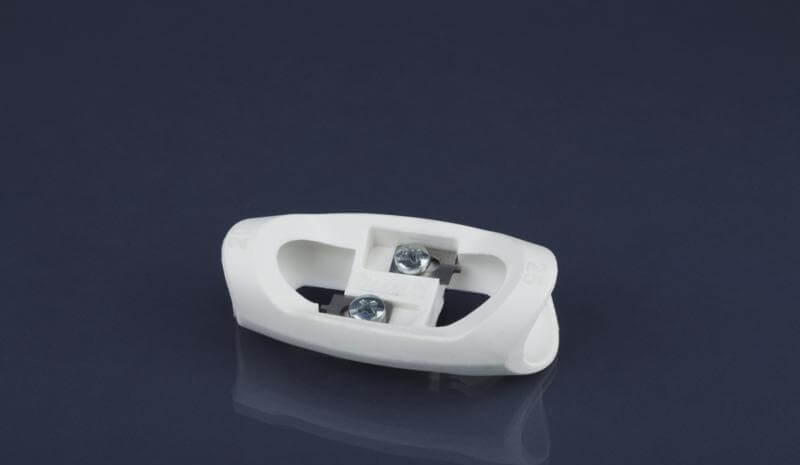 Features of trimmers:
- the ability to adjust the location of the knives, which will allow the use of one nozzle for pipes of several diameters;
- there are models for manual processing or installed in a drill;
- standard diameters are 20/25, 32/40 and 50/63.
The depth of chamfering depends on the evenness of the nozzle cut. Often, the trimmer is used first to level the plane of the butt, and then to clean the surface. Only a small part of the foil layer is removed, which excludes its appearance at the soldering site.
Tip: according to the reviews of the masters, plastic trimmers have proven themselves well. They are suitable for arranging central and autonomous water supply, heating.
Distribution of polypropylene pipes
Polypropylene pipes are used for mounting a comb of cold or hot water, heating. The choice of diameter in each case is individual - it depends on the volume of liquid that needs to be pumped per unit of time, the required speed of its movement (the formula in the photo).
The formula for calculating the diameter of polypropylene
Calculation of pipe diameters for heating systems is a separate issue (the diameter must be determined after each branch), for water pipes everything is easier. In apartments and houses, pipes with a diameter of 16 mm to 30 mm are used for these purposes, with the most popular ones being 20 mm and 25 mm.
We consider fittings
After determining the diameter, the total length of the pipeline is considered, depending on its structure, fittings are purchased in addition. With the length of the pipes, everything is relatively simple - measure the length, add about 20% for the error and possible marriages in the work. A piping diagram is required to determine which fittings are needed. Draw it, indicating all the taps and devices to which you want to connect.
An example of the layout of polypropylene pipes in the bathroom
To connect to many devices, a transition to metal is required. There are also such polypropylene fittings. They have a brass thread on one side, and a regular solder fitting on the other. Immediately you need to look at the diameter of the pipe of the connected device and the type of thread that should be on the fitting (internal or external). In order not to be mistaken, it is better to write everything down on the diagram - above the branch where this fitting will be installed.
Further, according to the scheme, the number of "T" and "G" figurative compounds is considered. For them, tees and corners are bought. There are also crosses, but they are rarely used. Corners, by the way, are not only at 90 °. There are 45°, 120°. Do not forget about couplings - these are fittings for joining two pipe sections. Do not forget that polypropylene pipes are completely inelastic and do not bend, so each turn is done using fittings.


When you purchase materials, agree with the seller on the possibility of replacing or returning part of the fittings. Problems usually do not arise, since even professionals cannot always immediately determine exactly the required assortment. In addition, during the installation process, sometimes it is necessary to change the structure of the pipeline, which means that the set of fittings changes.
Compensator for hot water supply and heating from polypropylene pipes
Polypropylene has a fairly significant coefficient of thermal expansion. If a polypropylene hot water supply or heating system is being installed, it is required to make a compensator, with which the lengthening or shortening of the pipeline will be leveled. This can be a factory-made compensator loop, or a compensator assembled according to the scheme from finigs and pieces of pipes (pictured above).
Laying methods
There are two ways to install polypropylene pipes - open (along the wall) and closed - in strobes in the wall or in the screed. On the wall or in the strobe, pipes made of polypropylene are mounted on clip holders. They are single - for laying one pipe, there are double - when two branches run in parallel. They are fastened at a distance of 50-70 cm. The pipe is simply inserted into the clip and held due to the force of elasticity.
Fastening polypropylene pipes to walls
When laying in a screed, if it is a warm floor, the pipes are attached to the reinforcing mesh, no other additional fastening is required. If the connection to the radiators is monolithic, the pipes can not be fixed. They are rigid, they do not change their position even when filled with coolant.
The option of hidden and external wiring in one pipeline (behind the bathroom, the wiring was made open - less work)
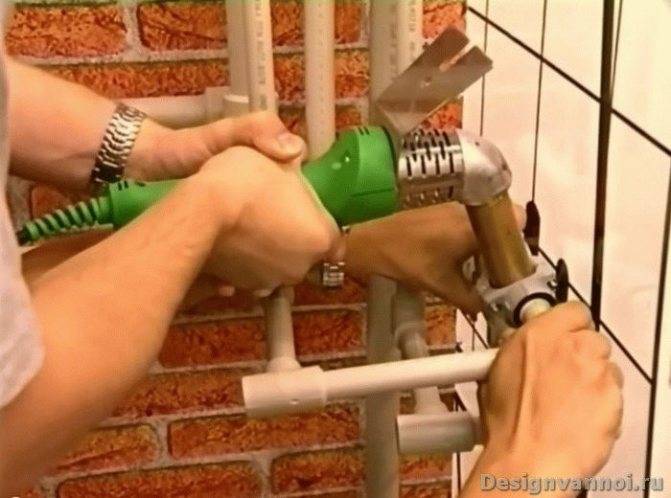
The nuances of soldering
The process of welding polypropylene pipes, as you have seen, does not leave much work, but there are a lot of subtleties. For example, it is not clear how, when joining pipes, to adjust the sections so that the pipes are exactly the length that is required.
Another point of welding polypropylene pipes is soldering in hard-to-reach places. It is not always possible to put a pipe and a fitting on the soldering iron on both sides. For example, soldering in the corner. Soldering iron, you have to put it in a corner, on one side the nozzle rests directly against the wall, you can’t pull the fitting on it. In this case, a second set of nozzles of the same diameter is installed and the fitting is heated on it.
How to solder polypropylene pipes in a hard-to-reach place
How to switch from iron pipe to polypropylene.
How to solder - a description of the process technology for beginners
For a hot apparatus, it is recommended to equip a stand, because the hands of a novice master should be free. Otherwise, it will be impossible to weld the structure.
On the regulator set the temperature to +260 degrees Celsius. This indicator is called optimal for melting polypropylene products. It is also safe for Teflon coated tips. The controller on the device may be missing.


This does not mean at all that such a welding unit is not suitable for joining plastic well. This happens for the reason that another temperature for heating plastic materials, in addition to the specified norm, is not used. Therefore, there is no point in focusing on this issue.
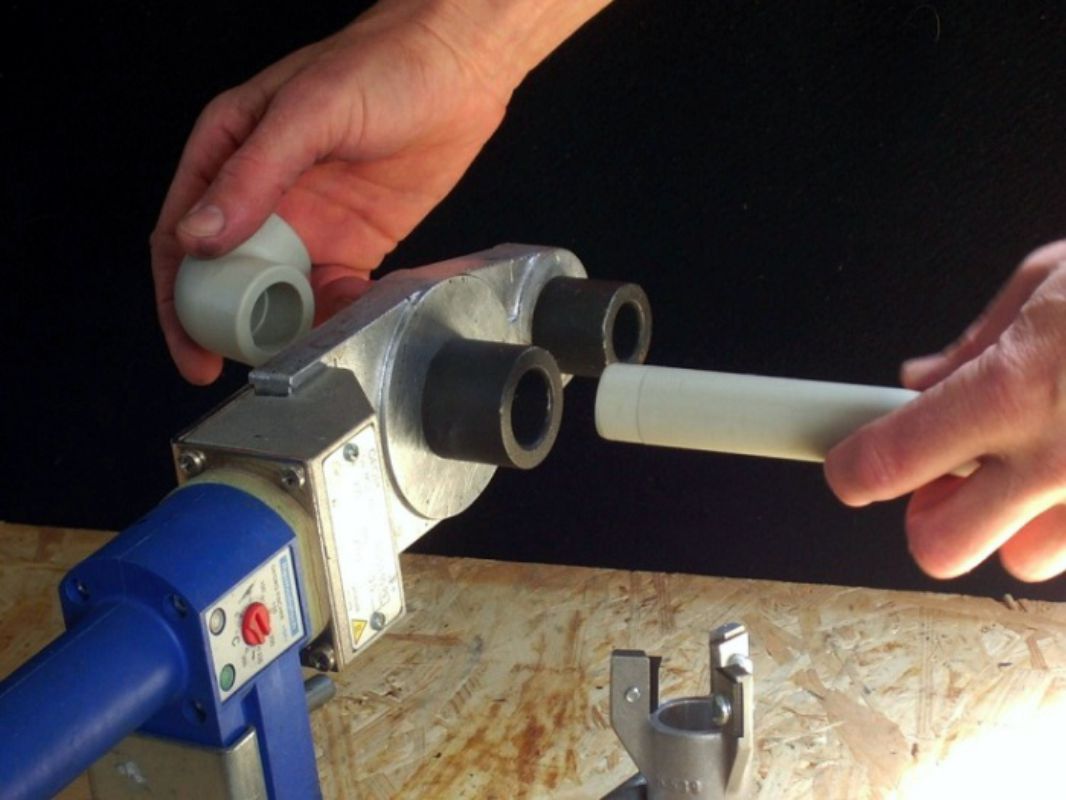
After that, they begin to do the soldering themselves with their own hands. The fitting and the pipe are put on the nozzles at the same time. It is necessary to insert the workpiece and the fitting element with a noticeable effort. This is dictated by the fact that each nozzle on the heating device is made in the form of a cone with a slope of five degrees.
The nominal value corresponds only to the inner diameter of the surface. The pipe blank must be inserted as far as it will go, but it must not be pressed down further. Strong punching in this situation may result in the formation of an internal thickening.
Self-welding of polypropylene pipes involves the fast bonding of heated parts made of polypropylene
It is also important to remember that it is impossible to rotate or shift the created structure until it cools completely.
In order to correct a small flaw, it will only take a few seconds. Any movement after that can adversely affect the tightness of the created assembly.
Welding of polypropylene pipes: what is it?
The most important property of polypropylene is increased rigidity, the impossibility of bending. Due to this quality, they have gained popularity. For this reason, for systems with various configurations, the industry produces the widest range of the same fittings.
These are couplings, bypasses, adapters, tees, angles, etc.
For this reason, for systems with various configurations, the industry produces the widest range of the same fittings. These are couplings, bypasses, adapters, tees, angles, etc.
The main condition for the success of the operation is the coincidence of the parameters (diameter, wall thickness) of the connected elements. These fittings are connected to pipes by soldering or welding. Both elements are heated to the melting temperature and quickly, in a hot state, dock. After 5-10 seconds, they are left to cool. As a result of simple actions, an absolutely tight connection is obtained.

Welding uses diffusion of the material, due to which repolymerization occurs - a process in which both parts turn into a single whole, into a monolith. The heating temperature is affected by the diameter and wall thickness of the joined parts, as well as the material from which the reinforcing layer is made. In order to be able to connect polypropylene with metal, combined fittings are produced. One of them is metal, having a thread, the other is made of polymer.
How to solder polypropylene pipes
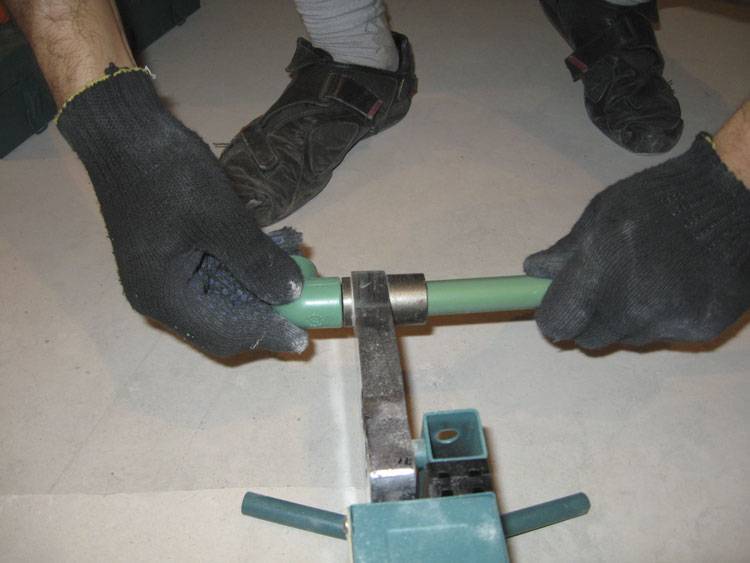
It is necessary to cut plastic products according to the values \u200b\u200bthat have been calculated. Further, the instruction provides for chamfering on the outside of all plastic elements. Equipment nozzles and sections of plastic pipes must be degreased before soldering.
Primarily, the technology involves drawing up a diagram on which the location of all future ones should be indicated:
- pipes;
- fittings;
- turns;
- Wall entrances.
When soldering pipes, safety precautions must be observed
Cleaning is a must. You can clean it with a special agent for polypropylene. Marks should be made on the surface of all elements that will help control the depth of their entry into the soldering iron.


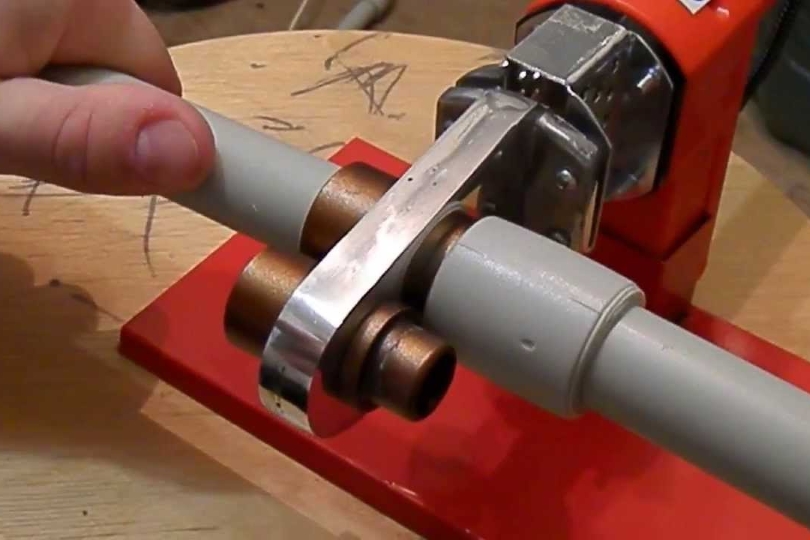
PPR pipe welding process
The key to success is to complete the maximum number of nodes in one position on the workbench. It is better to carry out work on soldering PPR pipes with an assistant, because with self-assembly it is easy to make a mistake.
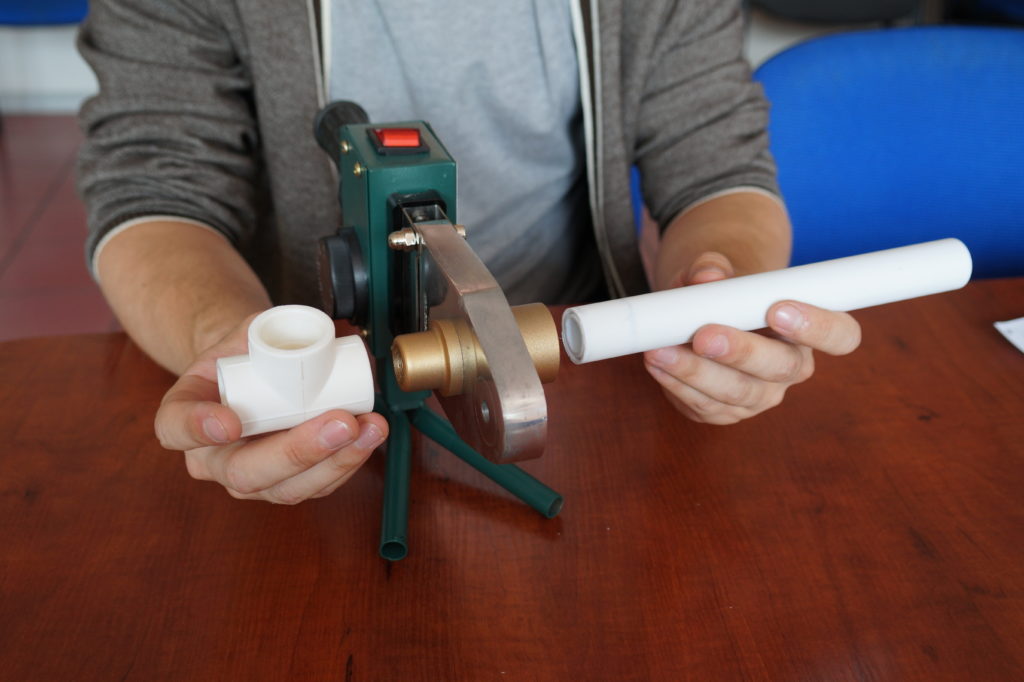
Preparation of the soldering iron

Working pairs - mandrels and couplings - are put on the heater and tightened with special screws. Diameters are selected according to working needs. If it is meant to work with one type of pipe, then it is enough to put on one pair, located as close as possible to the end of the heater.
Important! It is more convenient to work if the device is securely fixed on the working surface of the workbench. Well, if the design provides for a screw for mounting on the edge of the tabletop
If this is not possible, then you can screw the device to the surface with self-tapping screws. For such fixation, there must be a special surface.
To work with polypropylene, you need to turn on the temperature of 260 degrees on the soldering iron. The temperature is the same for all pipes. Only the warm-up time changes.
Care must be taken to ensure that the operating temperature has been reached. To do this, you need to view the display tools available on a particular device.
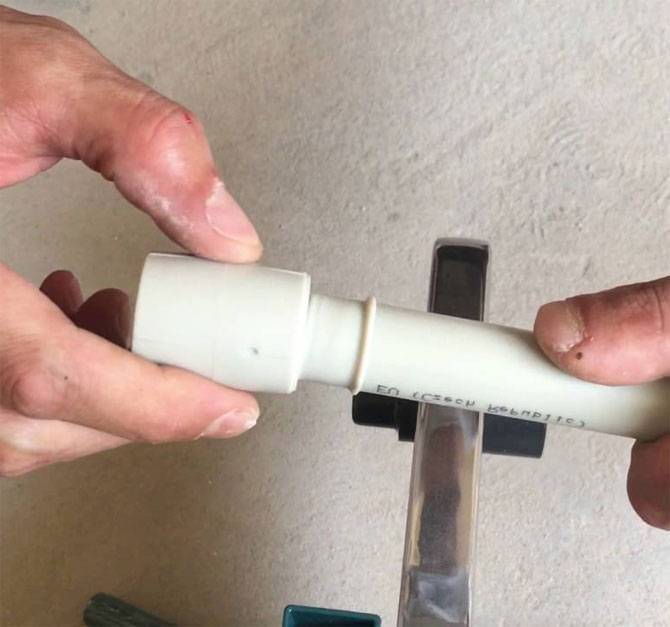
Connection markup
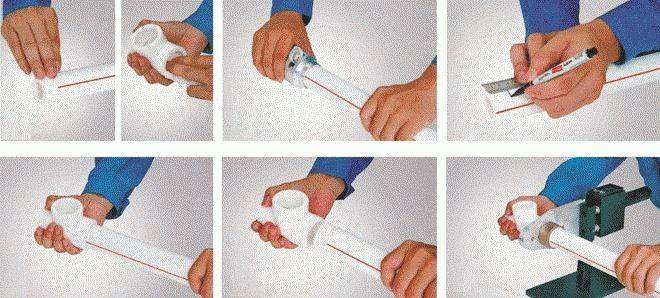
The next step is to label the connection. It is required to measure the length of the penetration belt and make a mark with a pencil or marker. This will be the place where the pipe will be inserted into the heating sleeve. For each diameter, its own indicator is set, and it must be followed. If necessary, an additional mark is applied if the relative position of the parts for mating matters.
Pipe connection

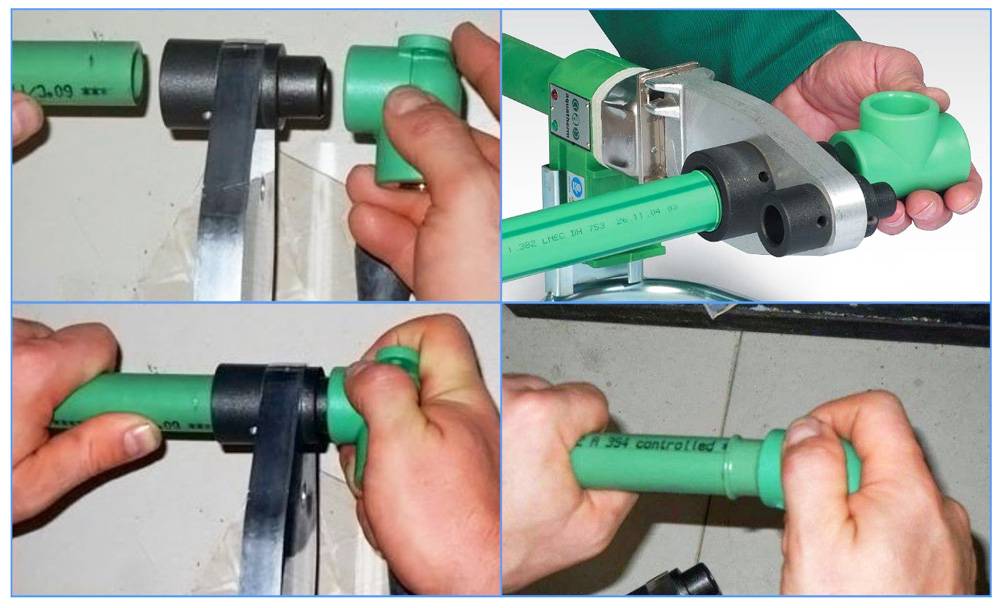
Next, the marked pipe elements are simultaneously inserted into the soldering iron sleeve, and the connection element is installed in the mandrel. The pipe must be inserted to the mark, the connection element - to the stop.
After the installation of the elements, the warm-up time begins to count down, depending on the diameter of the pipe, and it must be followed.
At the end of the warm-up time, the parts are also simultaneously removed. The master has seconds to connect them and give the correct position. Parts are forced into each other. Light adjustment is allowed in the first 1-2 seconds. Details are held without changing the position all the time allotted for fixation.
The finished assembly should not be used and stressed all the time provided for the polymerization of polypropylene.
Before the first soldering of polypropylene pipes, it is recommended to buy connecting elements and pipes for training. With successful soldering, a 1 mm bead is formed, which does not spoil the appearance of the product.
Read also:
Work procedure
The recommended technology for soldering polypropylene pipes involves several stages.
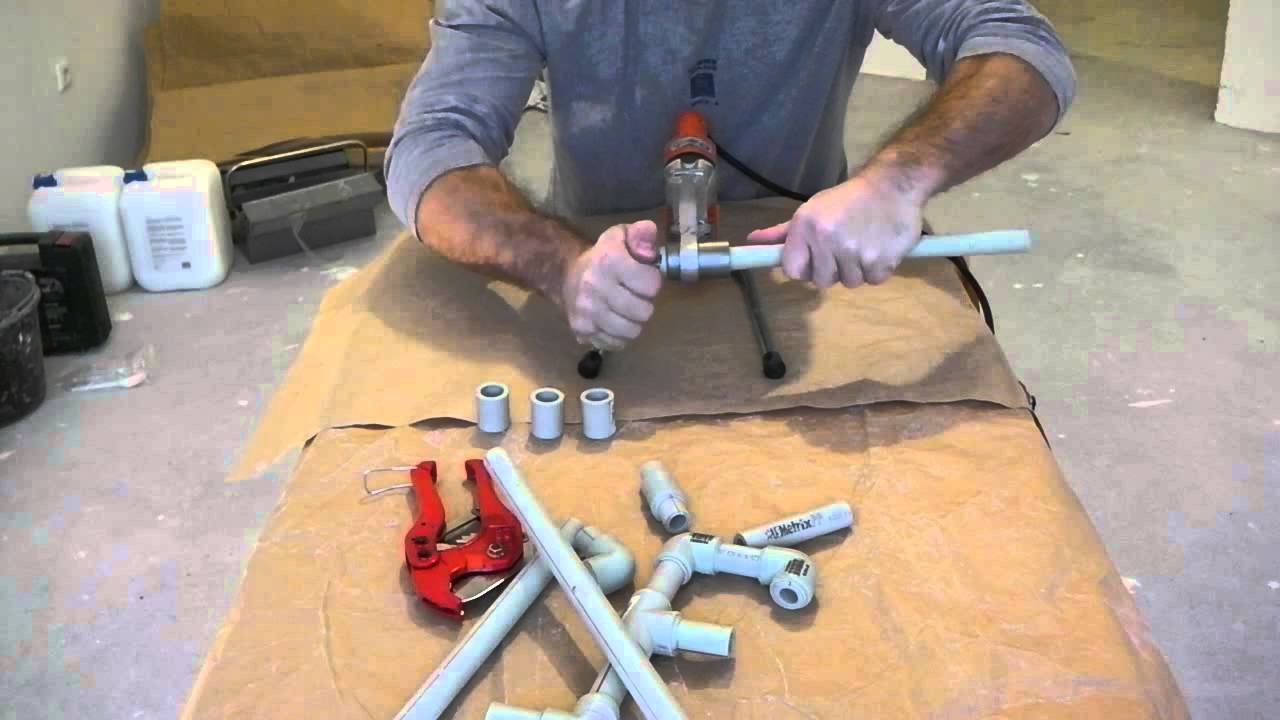
Stage # 1 - preparing the welding machine
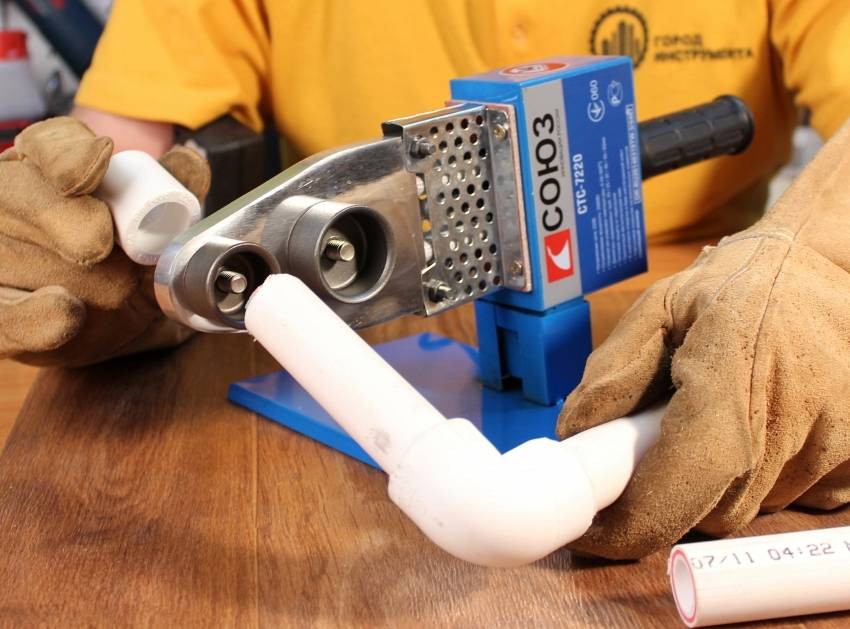
The appliance must be placed on a level surface so that it is easily accessible.Before starting work, it is necessary to determine which pipes of what diameters are to be soldered and prepare the necessary heating elements. The design features of the device allow you to use several nozzles at once.


It is recommended that you install everything you need before warming up the appliance. The device heats up evenly, so the location of the heating element does not affect the temperature of the nozzle. They are fixed in the way that will be most convenient for work. To install the nozzles use special keys. The desired temperature is set on the control panel of the device, for polypropylene pipes it is 260 °. The device turns on and warms up, which takes about 10-15 minutes.
At negative temperature values, welding is prohibited. In addition, the soldering time of polypropylene pipes depends on the temperature in the room: in the heat it is reduced, in the cold it increases.
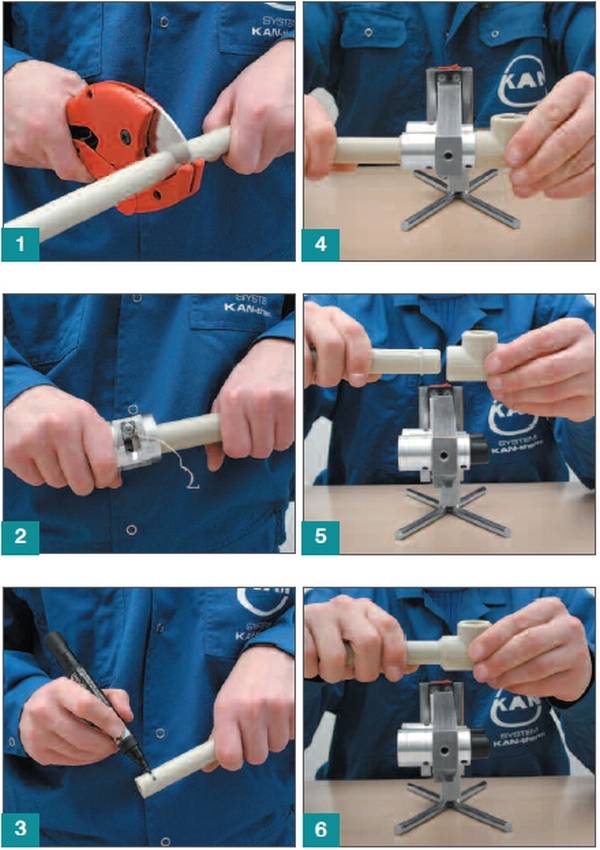
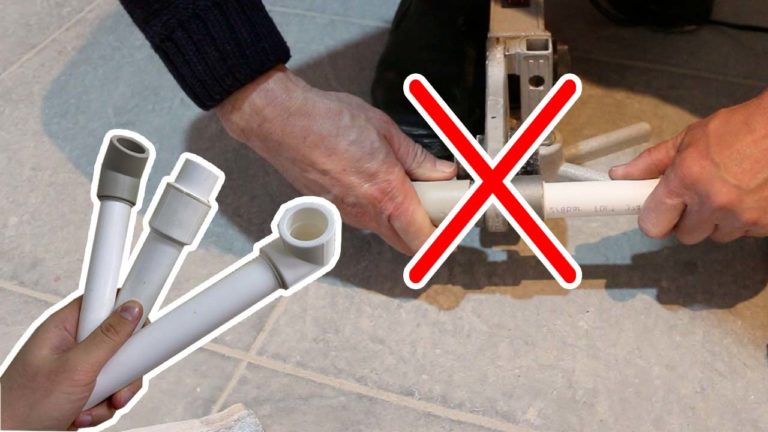
Step #2 - pipe preparation
Using a pipe cutter or special scissors, the part is cut at a right angle. The cut point is cleaned and, together with the fitting, degreased with a soap or alcohol solution. Parts dry well. If work is carried out with pipes of the PN 10-20 brand, welding can be performed. If with PN 25, it is necessary to additionally clean the upper layers of aluminum and polypropylene. Work is performed with the help of a shaver exactly but to the depth of welding, which can be determined by the size of the nozzle of the welding machine.
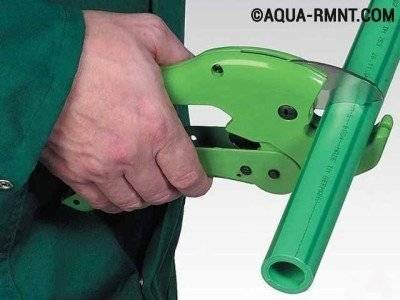
Cut a polypropylene pipe only at a right angle
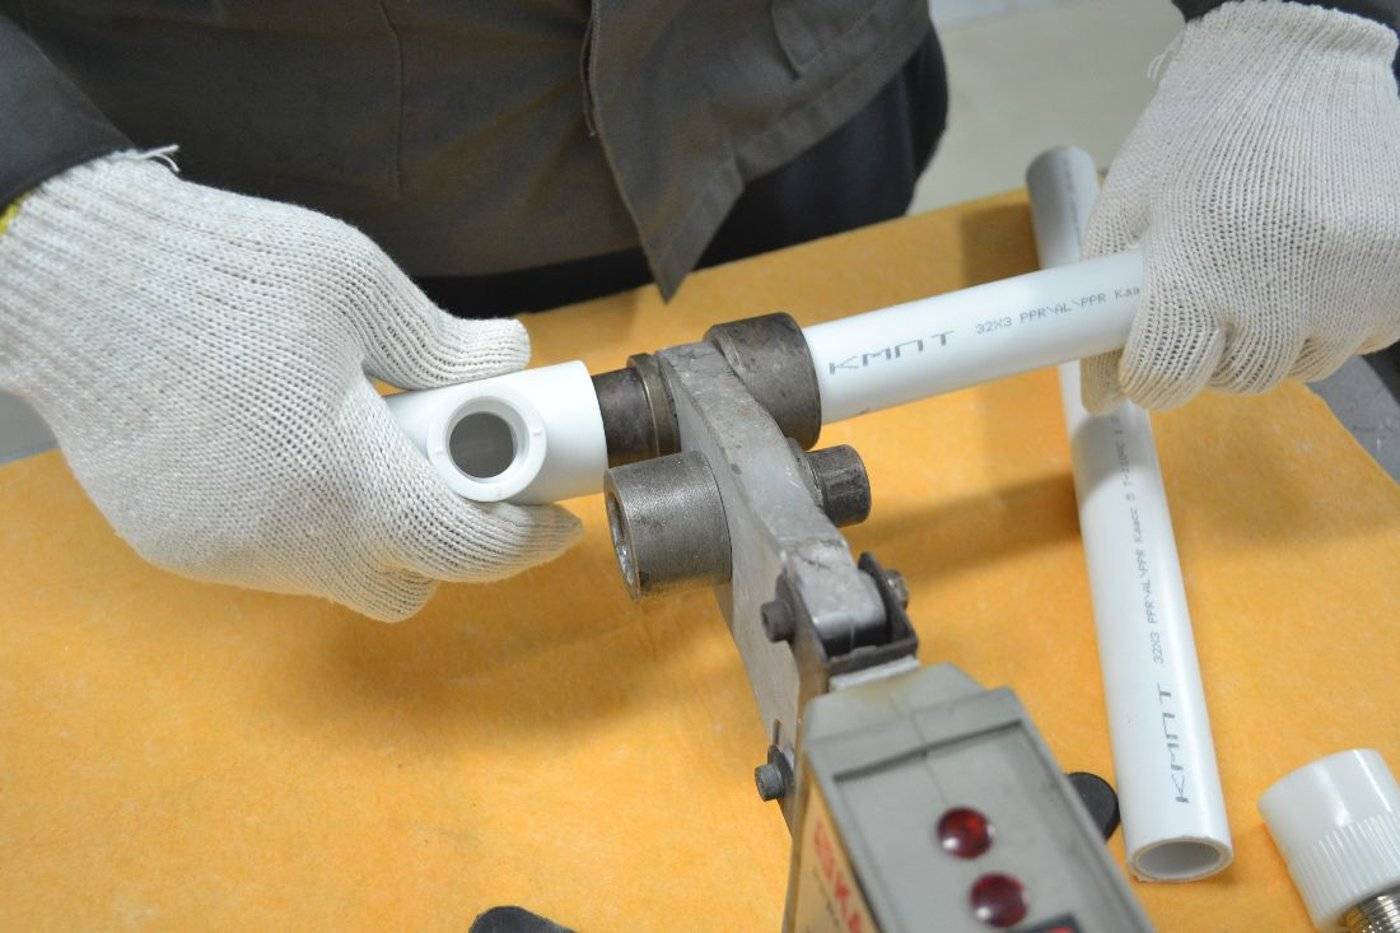
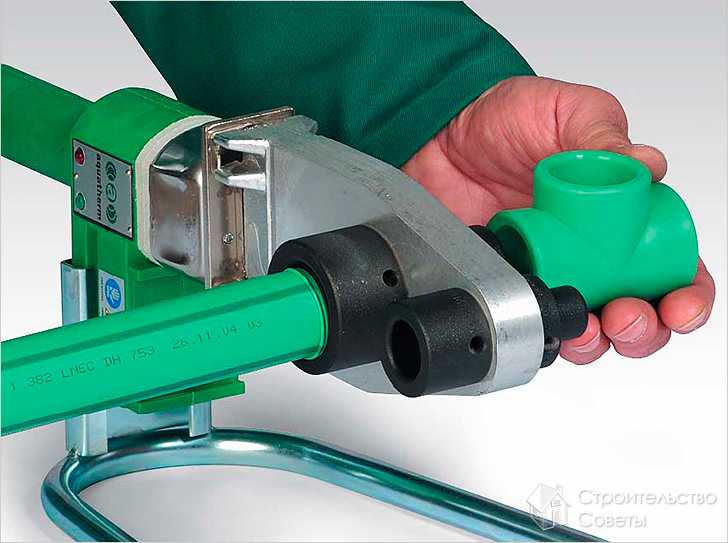
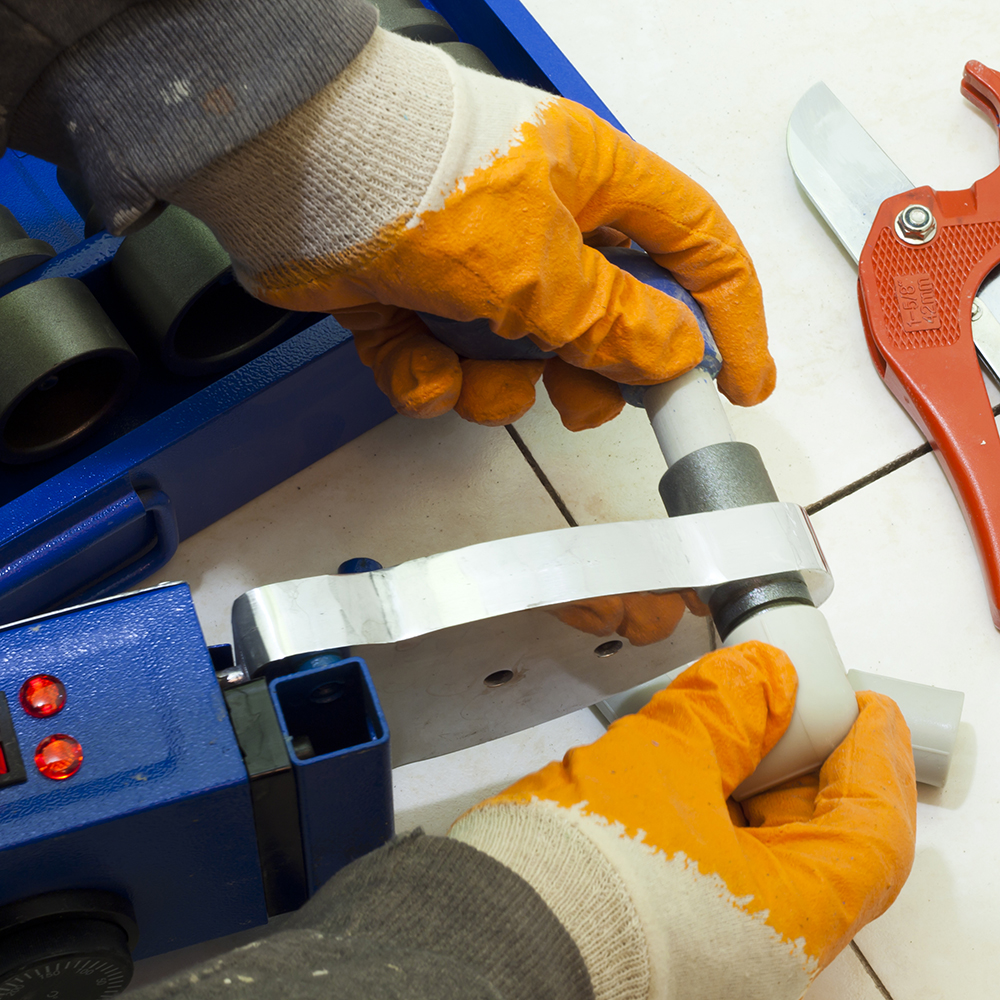
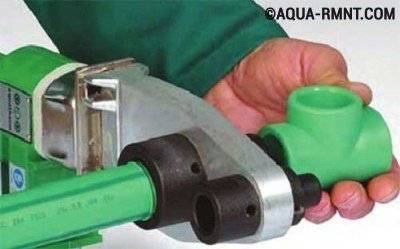
Stage # 3 - warming up parts
The elements are put on the nozzles of the apparatus of the desired diameter. The pipe is inserted into the sleeve up to the limiter showing the depth of welding, and the fitting is installed on the mandrel. The heating time of the parts is strictly maintained.For each type of pipe it is different, the values \u200b\u200bcan be found in a special table.
Stage # 4 - welding elements
The heated parts are removed from the apparatus and are connected to each other with a confident quick movement in compliance with the alignment of the elements. When connecting the parts, they cannot be rotated along the axis or bent. It is also necessary to strictly ensure that the pipe enters to a depth determined by the inner boundary of the fitting socket.
Parts are heated for a strictly defined time
Step #5 - Cooling the Compound
Heated parts must be allowed to cool, this is especially important for thin-walled pipes. Any deformation of the parts at this time is unacceptable, they can lead to soldering of the inner lumen of the pipe. After the parts have completely cooled, it is necessary to blow or pass water through them to make sure they are passable.
After the parts have completely cooled, it is necessary to blow or pass water through them to make sure they are passable.


