- Risk of cracking
- Device Requirements
- Pouring technology
- Preparation for work
- What is needed for arranging a screed?
- Fill Features
- Ceramic tiles: dispel the myths
- Useful tips and tricks
- Thickness under system
- We prepare the base
- Materials for a warm water floor
- Underfloor heating pipes and laying schemes
- Screed
- Minimum layer
- Types of screeds for a warm water floor
- The difference in the material of manufacture
- How to pour concrete screed
- Ratings
- Which is better to choose a water heated towel rail: manufacturer rating
- Rating of the best wired headphones of 2020
- Rating of the best mobile phones for games
- Project preparation
- Do-it-yourself installation
- Foundation preparation
- Frame manufacturing
- Pipe laying
- Connection
- Substrate
- How to fill with a "wet" screed
Risk of cracking
When using a traditional wet type of screed, it is very important to prevent cracks from occurring. Their appearance can lead to many negative consequences:
- uniform heating of the room will become impossible, which will negate the advantages of a modern heating system;
- uneven heating of floor areas will lead to overheating of individual thermal elements and their subsequent failure;
- the finish flooring may be damaged.
To prevent the occurrence of cracks in the manufacture of a screed with your own hands, you must:
- correctly observe the proportions of the solution, as well as the drying mode;
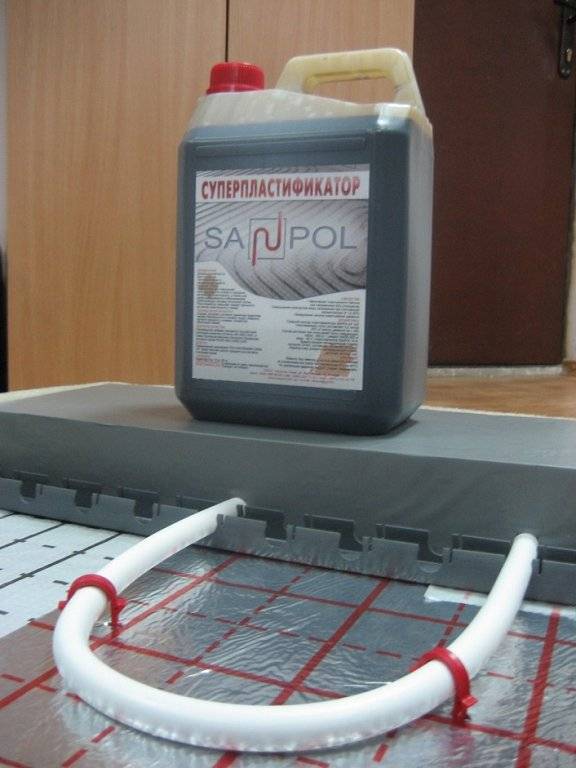
- use plasticizers to increase the elasticity of the composition;
- reinforce the structure with reinforcement or reinforcing mesh;
- install a damper between the wall and the screed.
The damper can be damper tape or low density foam. Its main task is to compensate for the expansion and contraction of the material as a result of temperature changes.
Device Requirements
All requirements for the device are spelled out in SNiP, which allows you to make a high-quality floor. This question is based on the following criteria:
- The minimum thickness is 2 cm. The given value is valid for the rough and finish coating. If additional sound insulation is used along with water pipes, the thickness increases to 4 cm.
- The thickness must exclude any deformation. Otherwise, the finish coating will collapse. Since the water floor requires the use of copper pipes, the top screed should be made thicker.
- The solution is made from cement and sand with the addition of PVA glue or a plasticizer. The strength of the finished composition should be 25 MPa. The minimum indicator is 15 MPa. If the finishing layer is a polyurethane self-leveling floor, which is then simply painted, it is enough to make the mixture with a strength of 20 MPa.
To check the plane of the coating, it is recommended to use a special level 2 m long. In this case, there may be irregularities of up to 2 mm if parquet, laminate, linoleum or a self-leveling floor based on a polymer mixture becomes the finish coating. If other coatings are used, unevenness of 4 mm is allowed.
Pouring technology
Preparation for work
Before you start pouring with your own hands, you need to prepare the room. Please note that the air temperature in the apartment during the work should range from + 5 to + 25 degrees Celsius. Naturally, the base must be cleaned of debris and dust. Otherwise, the solution may lie unevenly, and it will have poor adhesion to the surface. Try to eliminate all the cracks in the base. If necessary, make a rough curl of the base.
It is necessary to fill in the solution only after all the contours of the warm floor have been laid and its performance has been checked.
During preparation, it is necessary to take into account the possibility of expansion of the concrete mixture under the influence of a temperature difference. To avoid cracking of the solution after drying, it is necessary to equip the expansion joints. To do this, you can use a special damper tape or hard insulation, the thickness of which is at least 1 cm. Such an expansion joint should be made to the entire depth of the screed.
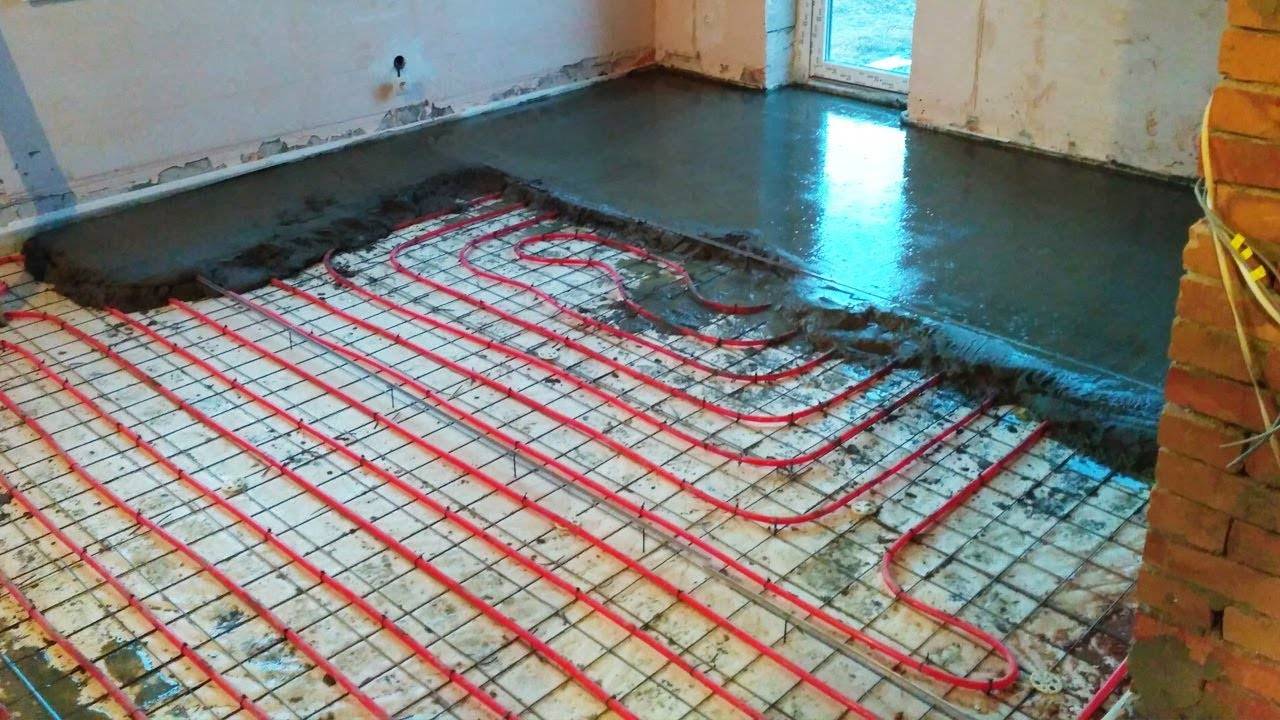
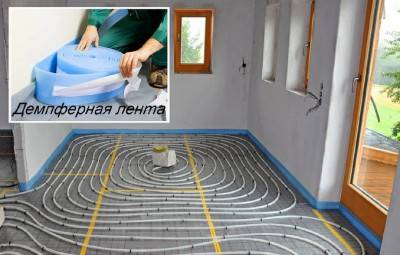 The photo shows the laying of the damper tape in front of the screed. Expansion joints are also arranged in the aisles between rooms
Filling the warm floor should be done only after careful preparation of the base. Before using the composition, do not forget to check the system for operability and the absence of defects.
What is needed for arranging a screed?
For work you will need the following materials:
- Cement mortar or dry mix.
- Reinforcing mesh or reinforcing composition.
- Waterproofing.
- Insulation.
- Fasteners.
- Container for mixing the solution.
- Construction mixer or drill with a special nozzle.
- Spatula for leveling the mixture.
- Tiles or other finishing material for surface finishing.
The reinforcing mesh should not have too small cells. Underfloor heating tiles are the most commonly used. Naturally, it is also necessary to choose this material correctly. You can lay it with your own hands, observing the technology of work.
Fill Features
A warm screed is equipped in several stages:
-
- Laying a waterproofing film, the thickness of which is usually 250 microns. Cloths overlap (20 cm) on each other, as well as with an allowance for the wall. Fix all joints with reinforcing tape.
- Heater installation. This is also done by hand. It is better to use a special material with an aluminum reflector that will direct the heat upwards.
- Fastening the damper tape. It is fixed at the edges, and also divides a large area into parts.
- Laying the mounting grid. It is on it that the elements of the warm floor are mounted.
- Installation of level beacons. They will allow you to pour the solution correctly and evenly.
- Preparation and filling of the mixture. The composition must be diluted as indicated in the instructions on the package. Otherwise, it may turn out to be too liquid or too thick.
- If necessary, the layer can be reinforced with a reinforcing mesh. It prevents damage to the screed after drying. The mesh is required if the layer is thicker.
- After a day, the dried composition will need to be covered with polyethylene and left for 7 days.
If you fill in a water heated floor, then there should be pressure in the pipes at this moment.
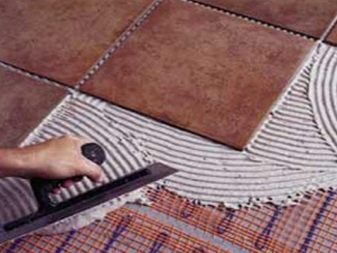
A couple of weeks after pouring the mortar, you will be able to lay the tiles.
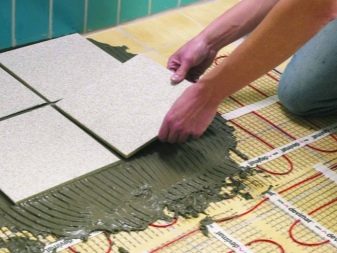
Ceramic tiles: dispel the myths
The most suitable floor covering of all existing is ceramic tile.It is almost 100% environmentally friendly and easily tolerates numerous heating-cold cycles.
But tile and porcelain stoneware also have some minus. The fact is that too tangible heat is not at all as useful for the legs as manufacturers sometimes want to imagine. Yes, for those who often get cold and get a cold from just touching the cold with their feet, this is the way out. But in the nursery it is not necessary to install it at all. After all, the younger generation is mobile, brisk and feels great at 18 ° C. But in greenhouse conditions, children get sick more often, they are irritated all the time and get tired quickly. Just do an experiment sometime.
If the ceramic tile suits you the most as a covering for a warm floor, you can finish it with all the floors in the apartment. Just choose the right pattern: under a tree, a stone or a specific pattern. And here is the installation process:


In addition, such a temperature has a beneficial effect on the reproduction of many types of bacteria, so that the microclimate will soon also not be healthy. It is not for nothing that underfloor heating is completely prohibited in preschool institutions in Canada, and in France their use is limited. That is why do not strive to make the floor exactly warm, with a temperature of 30 ° C - it is enough to make it comfortable, and a dense board will only contribute to this.
Useful tips and tricks
In order for the “warm floor” system to last for a long time, and the coating does not deform and retain a presentable appearance throughout its entire service life, some points should be considered:
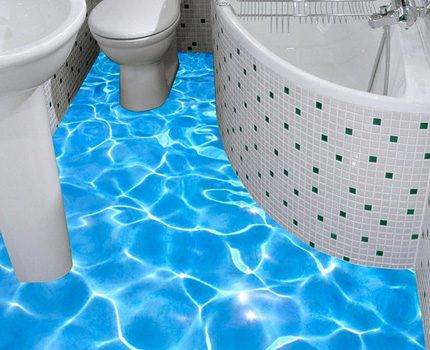
- when installing an electric floor in the bathroom, grounding must be done. This will make the use of the design completely safe;
- before starting pouring, you should draw a detailed layout of pipes or cables. If repairs are necessary, this will allow you to open the desired area and limit yourself to local repairs;
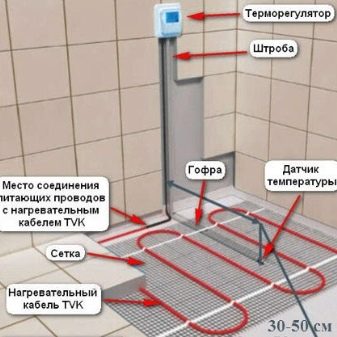
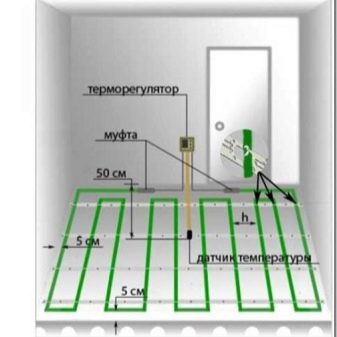
- thermomats and infrared film heating systems are laid either on a screed or in tile adhesive. The layer thickness must be made minimal, and the front part of the film structure must be left unfilled;
- for reinforcement, you need to use a metal mesh for a thick layer, and fiberglass for a thin one.
Laying a warm floor and forming a screed can be done independently. With a competent approach and adherence to the installation technology, it will be possible to obtain an even and solid basis for the decorative coating, while solving the problem of primary or secondary heating.
For information on how to properly fill the floor, see the following video.
Thickness under system
Before self-installation of a water-heated floor, you should find out the whole technology, including what thickness should be under the pipes. In this case, the following recommendations are followed:
- Under the pipes it is necessary to lay out a rough fill. They perform it qualitatively, since in order to correct errors, it will be necessary to dismantle the entire floor. Almost the entire load is applied to the draft. The presence of errors leads to the destruction of the entire coating. There is a loss of heat, pipe breakage and destruction of the finish coating.
- The composition for the rough fill can be made independently. For this, sand, cement and a plasticizer are used. You can purchase a ready-made bag of dry mix.
- For rough finishing, a plasticizer is used with the calculation of 1 liter per 100 kg of cement. In its absence, it is enough to take PVA glue to work, a similar amount is required.
The screed should be laid under the pipes with a layer of 2.5-3 cm. You can do a little more if you plan to pile up the room, including an additional partition. But you should not make a layer more than 4 cm, or less than 2 cm. Otherwise, the laid floor will begin to break.
We prepare the base
The purpose of the preliminary work is to level the surface of the base, lay the pillow and make a rough screed. The preparation of the soil base is carried out as follows:
- Level the ground over the entire floor plane and measure the height from the bottom of the pit to the top of the threshold. In the recess should fit a layer of sand 10 cm, footing 4-5 cm, thermal insulation 80 ... 200 mm (depending on climate) and a full screed 8 ... 10 cm, at least 60 mm. So, the smallest depth of the pit will be 10 + 4 + 8 + 6 = 28 cm, the optimal one is 32 cm.
- Dig a pit to the required depth and tamp the earth. Mark the heights on the walls and pour 100 mm of sand, mixed with gravel. Seal the pillow.
- Prepare M100 concrete by mixing 4.5 parts of sand with one part of M400 cement and adding 7 parts of crushed stone.
- After installing the beacons, fill in the draft base 4-5 cm and let the concrete harden for 4-7 days, depending on the ambient temperature.
The preparation of the concrete floor consists in cleaning the dust and sealing the gaps between the slabs. If there is a clear difference in height along the plane, prepare a gartsovka - a leveling dry mixture of Portland cement with sand in a ratio of 1: 8. How to properly put the insulation on the garzovka, look at the video:
Materials for a warm water floor
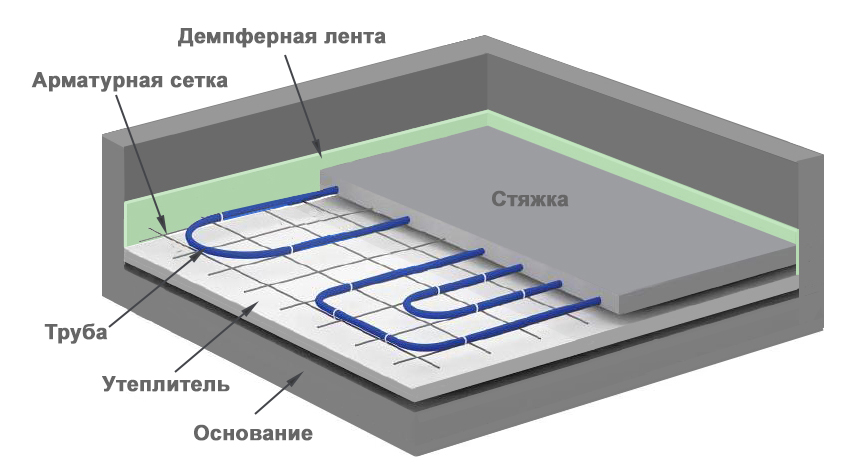
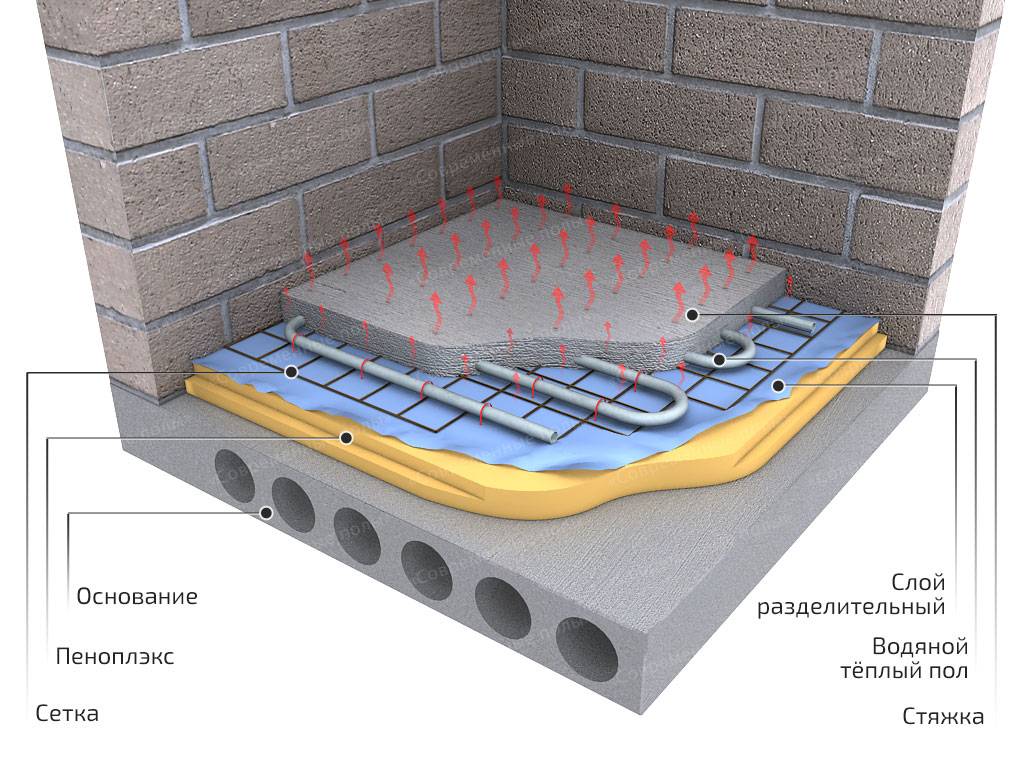
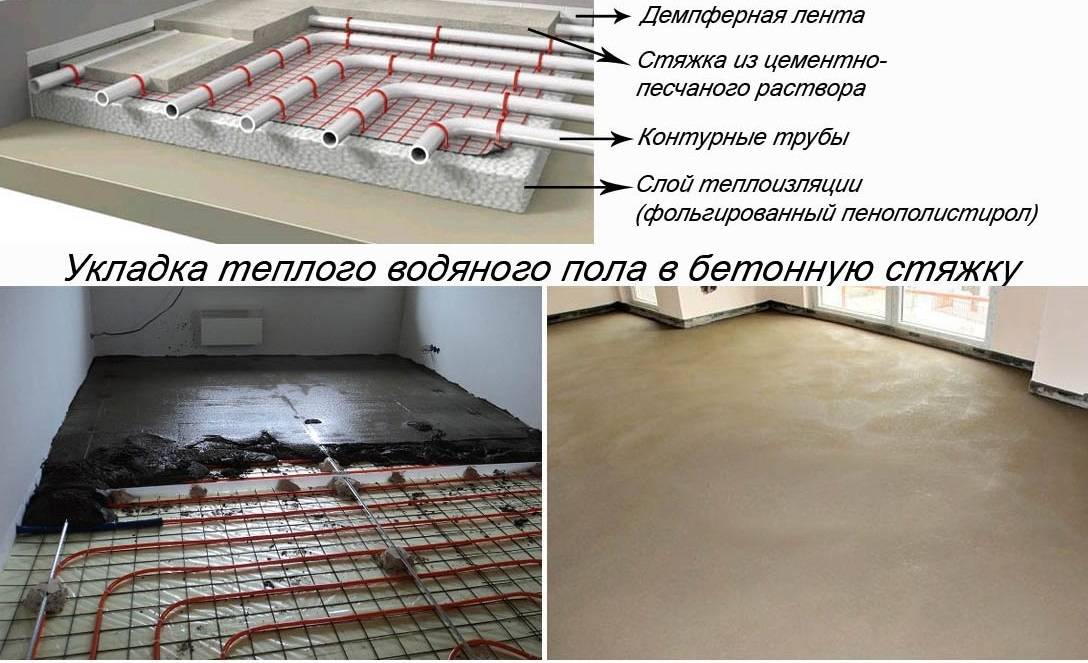
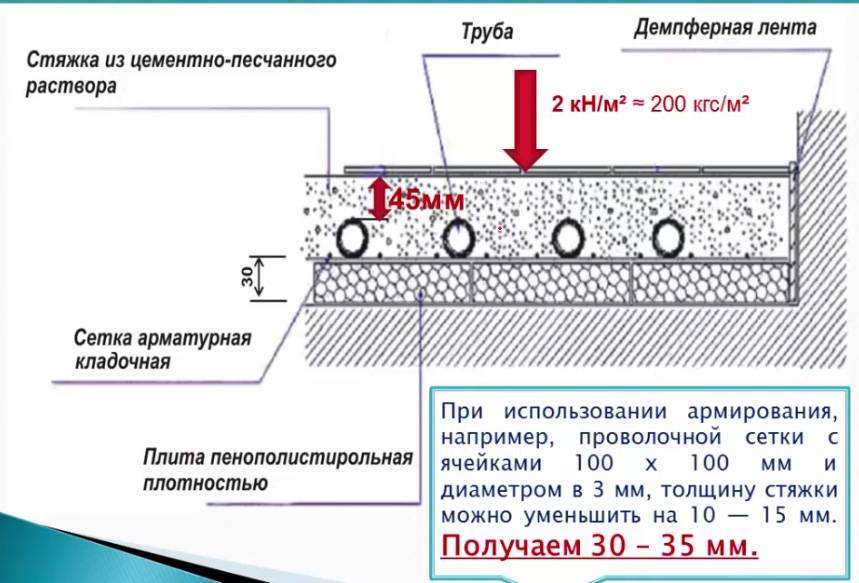
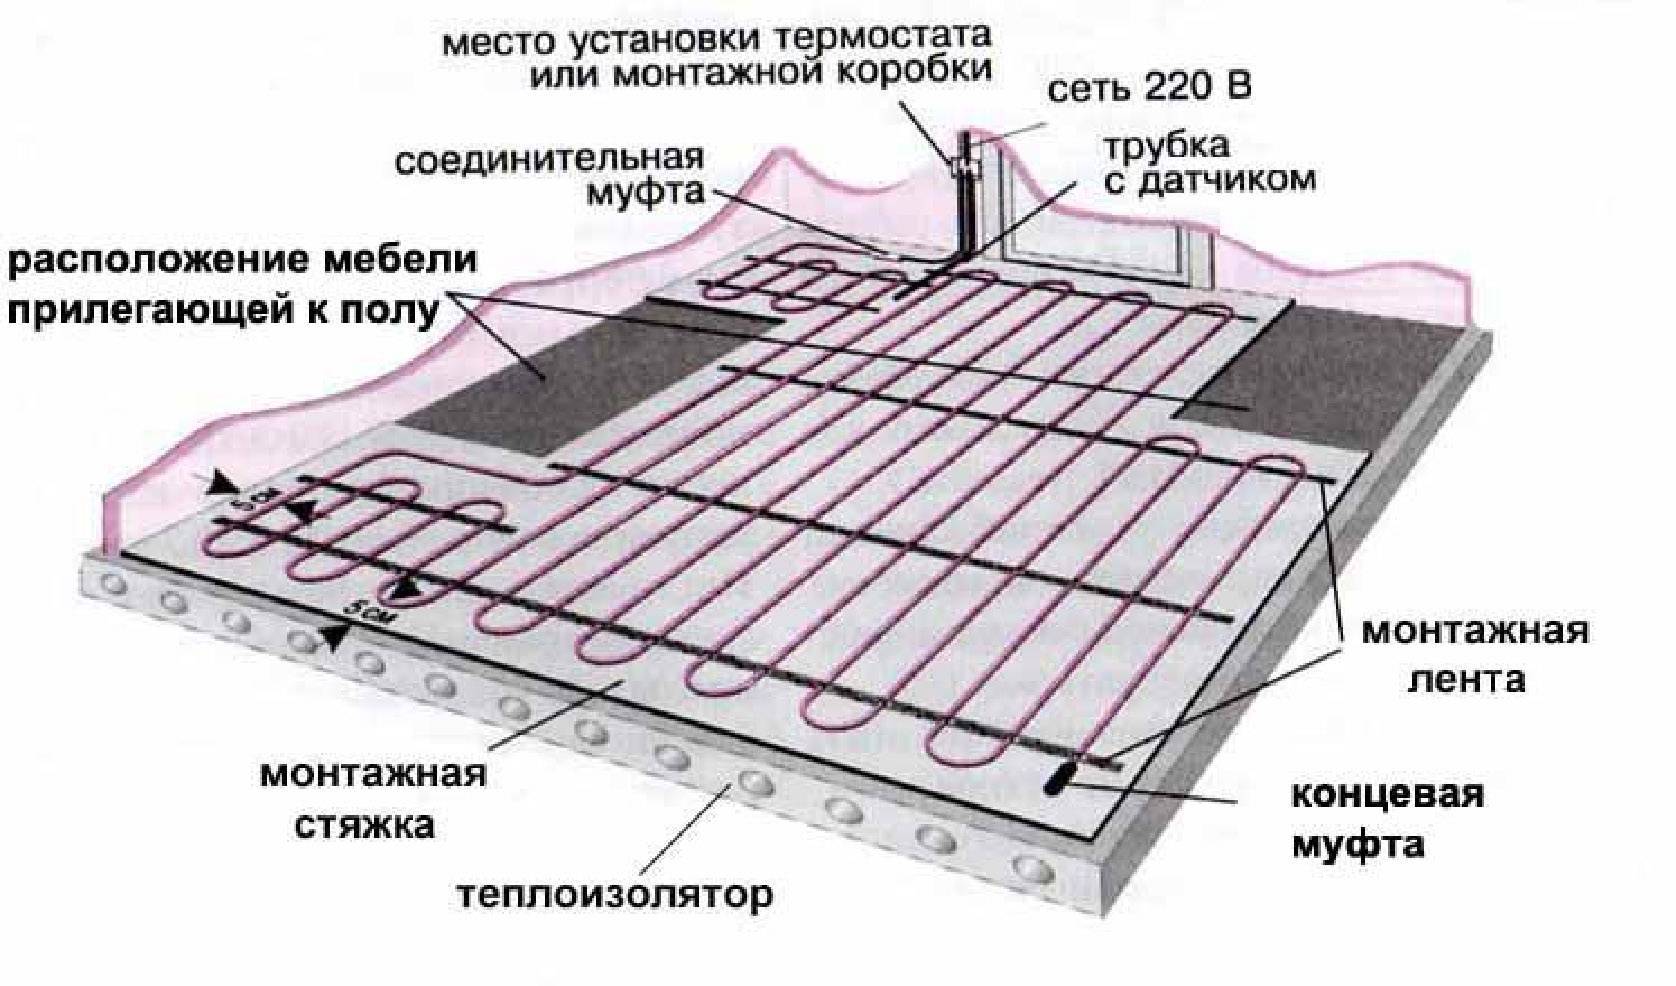
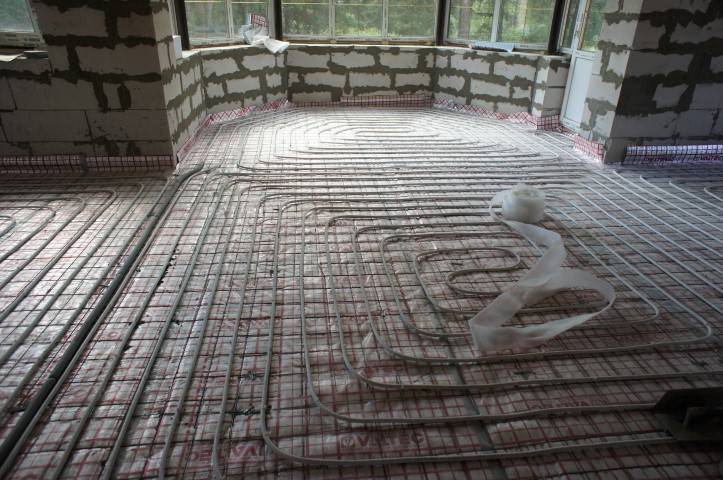
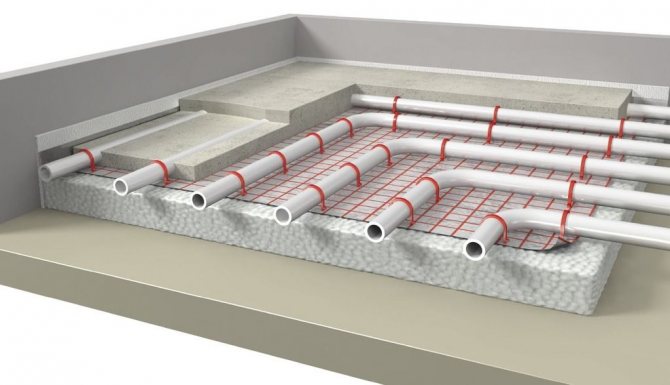
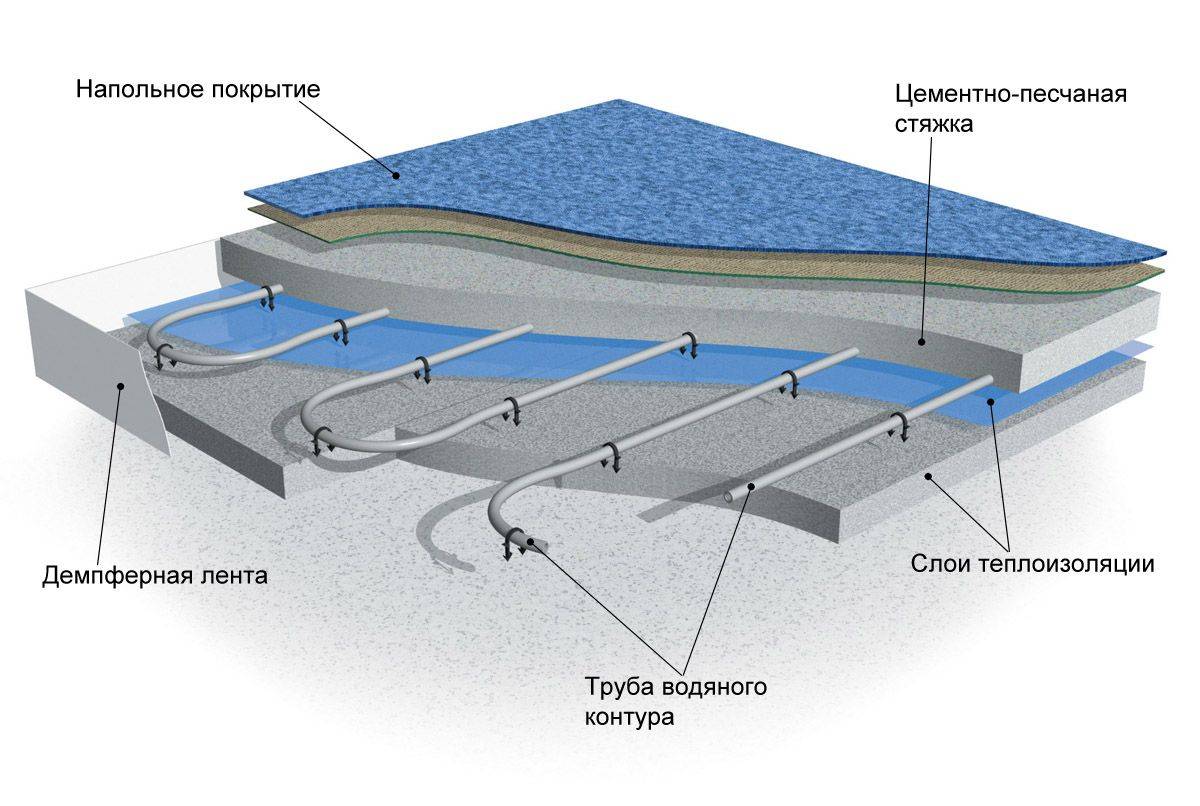
Most often they make a water-heated floor in a screed. Its structure and necessary materials will be discussed. The scheme of a warm water floor is presented in the photo below.
Scheme of a warm water floor with a screed
All work begins with leveling the base: without insulation, heating costs will be too high, and insulation can only be laid on a flat surface. Therefore, the first step is to prepare the base - make a rough screed. Next, we describe step by step the procedure for work and the materials used in the process:
- A damper tape is also rolled around the perimeter of the room. This is a strip of heat-insulating material, no more than 1 cm thick. It prevents heat loss for wall heating. Its second task is to compensate for the thermal expansion that occurs when materials are heated. The tape can be special, and you can also lay thin foam cut into strips (no more than 1 cm thick) or other insulation of the same thickness.
- A layer of heat-insulating materials is laid on the rough screed. For underfloor heating, the best choice is polystyrene foam. The best is extruded. Its density must be at least 35kg/m2. It is dense enough to support the weight of the screed and operating loads, has excellent performance and a long service life. Its disadvantage is that it is expensive. Other, cheaper materials (polystyrene, mineral wool, expanded clay) have a lot of disadvantages. If possible, use polystyrene foam. The thickness of the thermal insulation depends on many parameters - on the region, the characteristics of the foundation material and insulation, the method of organizing the subfloor. Therefore, it must be calculated for each case.
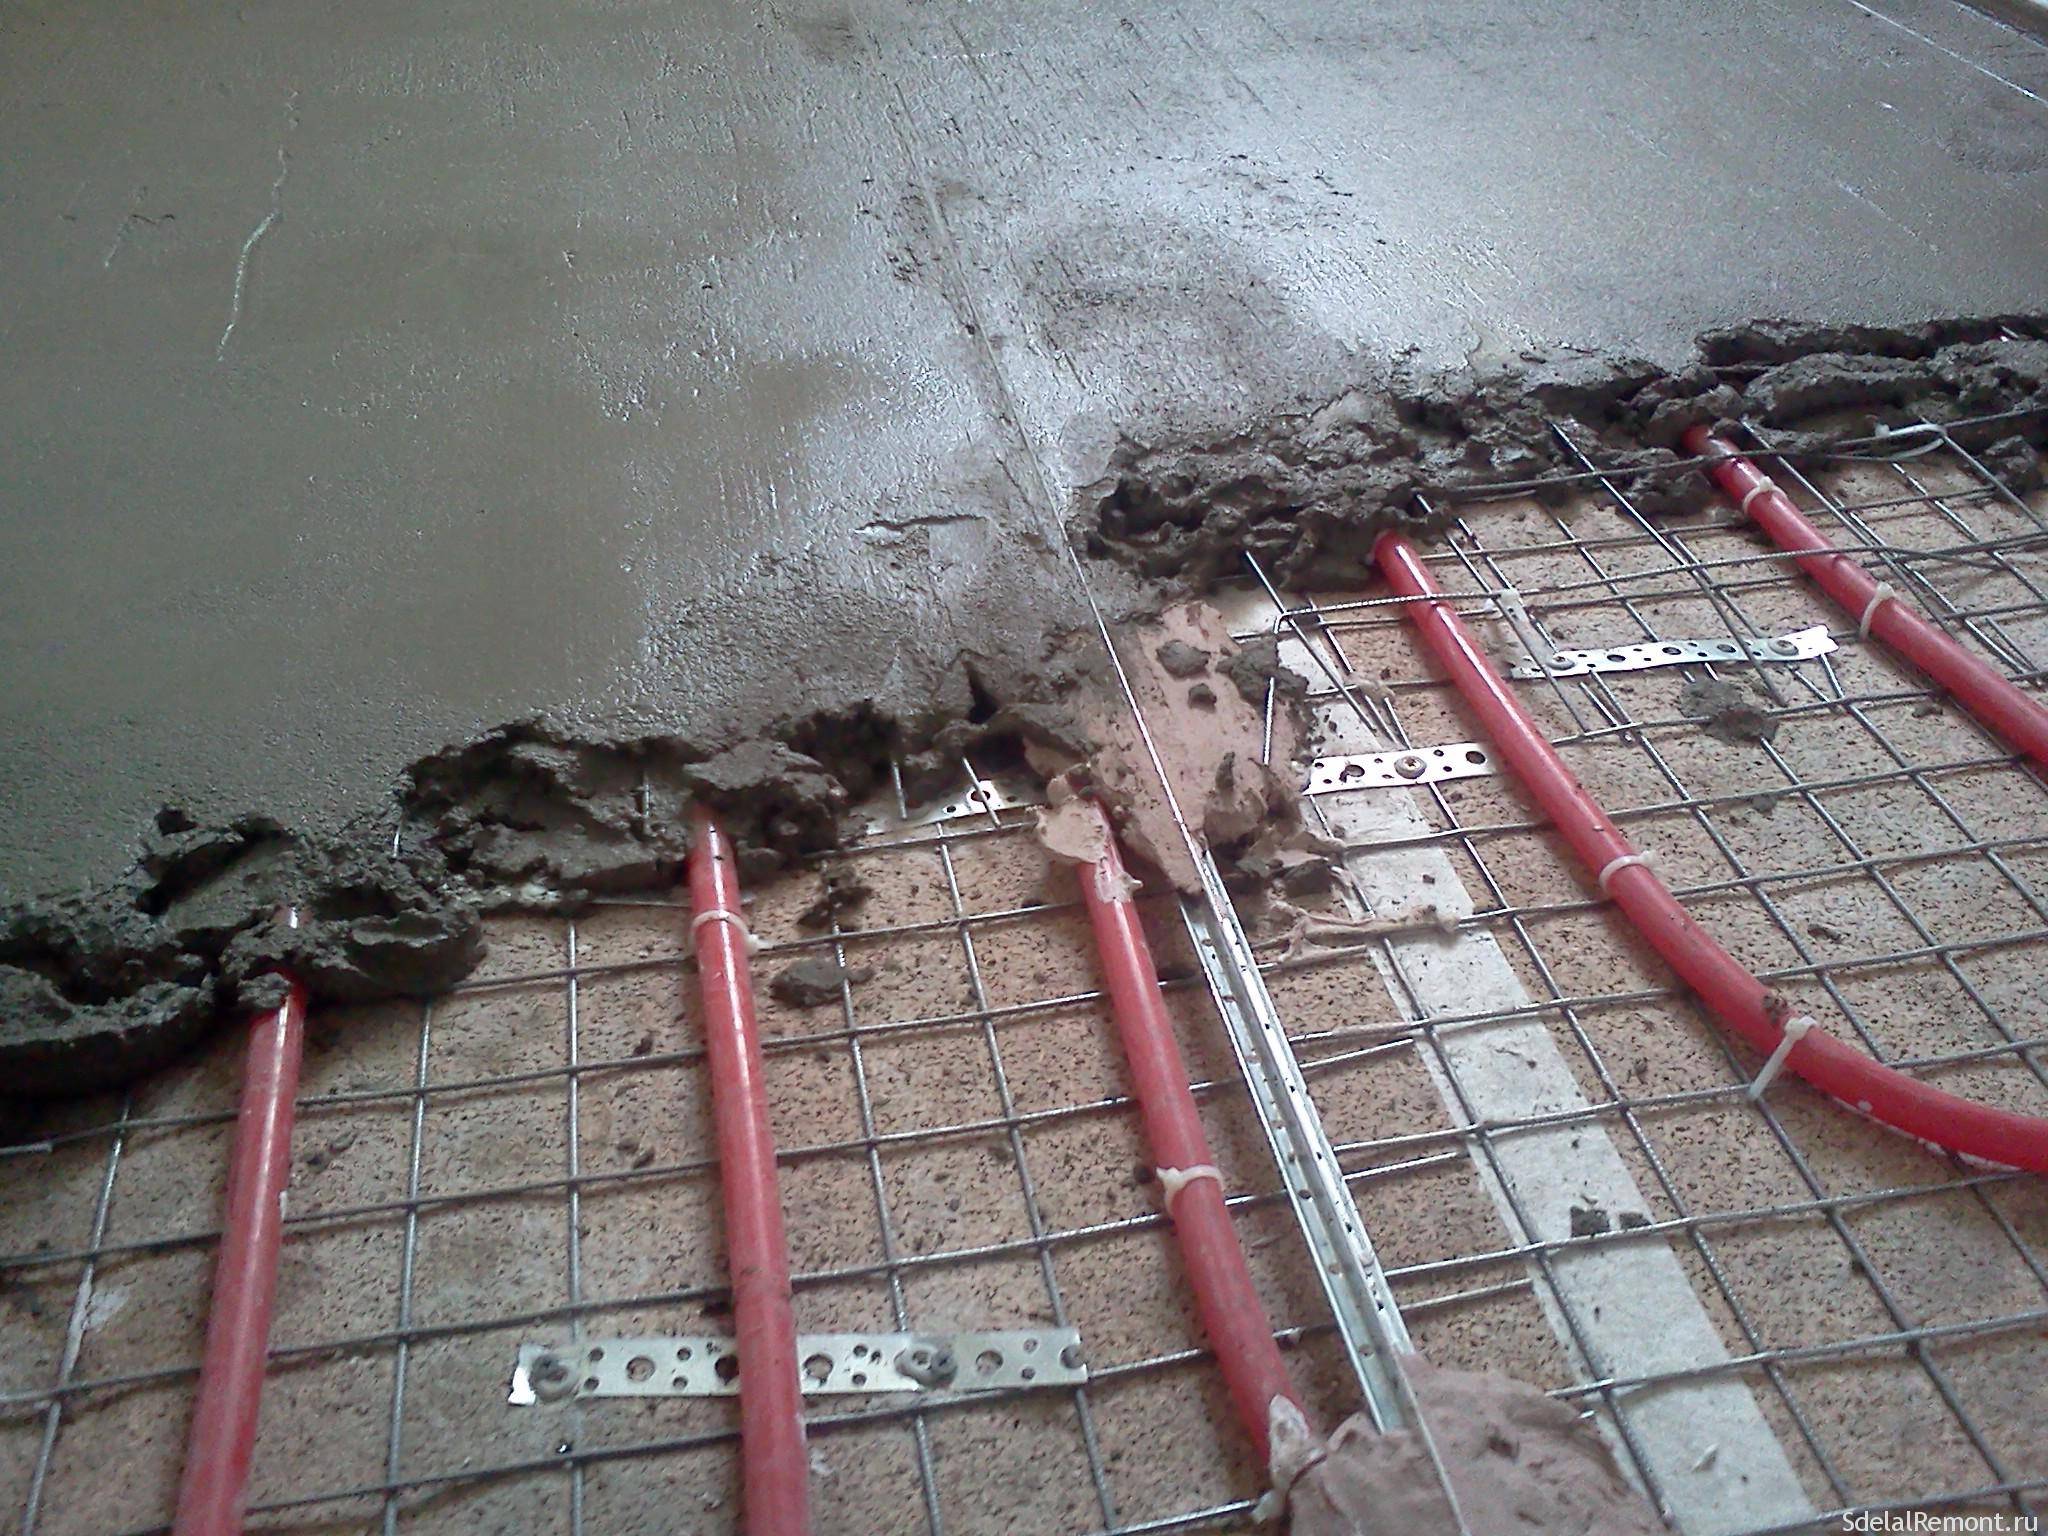
- Next, a reinforcing mesh is often laid in increments of 5 cm.Pipes are also tied to it - with wire or plastic clamps. If expanded polystyrene was used, reinforcement can be dispensed with - you can fasten it with special plastic brackets that are driven into the material. For other heaters, a reinforcing mesh is required.
- Beacons are installed on top, after which the screed is poured. Its thickness is less than 3 cm above the level of the pipes.
- Next, a clean floor covering is laid. Any suitable for use in an underfloor heating system.
These are all the main layers that need to be laid when you make a do-it-yourself water-heated floor.
Underfloor heating pipes and laying schemes
The main element of the system is pipes. Most often, polymeric ones are used - made of cross-linked polyethylene or metal-plastic. They bend well and have a long service life. Their only obvious drawback is not too high thermal conductivity. This minus is not present in the recently appeared corrugated stainless steel pipes. They bend better, cost no more, but due to their low popularity, they are not often used yet.
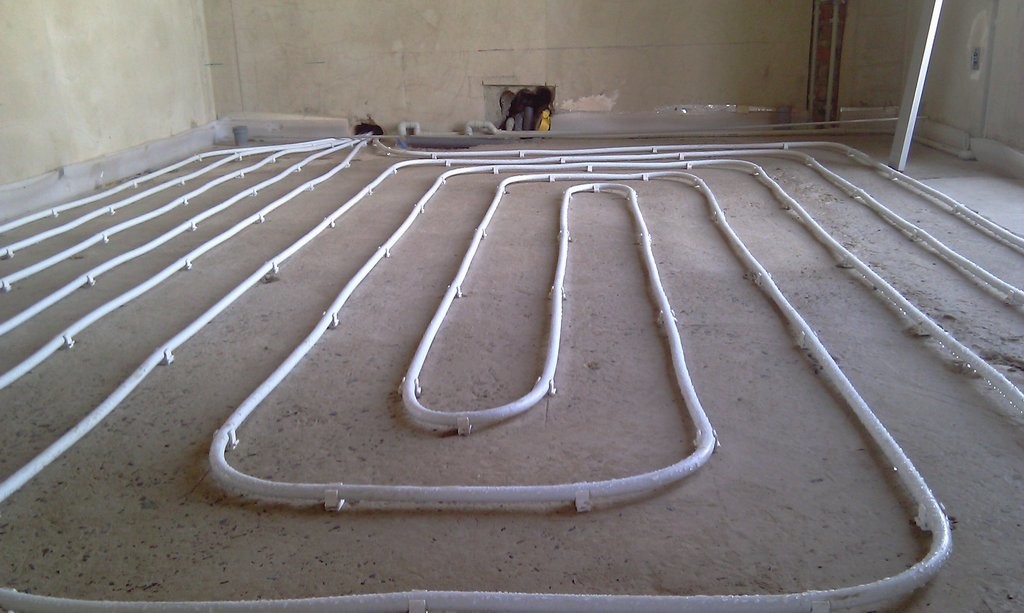
The diameter of pipes for underfloor heating depends on the material, but usually it is 16-20 mm. They fit in several schemes. The most common are spiral and snake, there are several modifications that take into account some features of the premises.
Schemes for laying pipes of a warm water floor
Laying with a snake is the simplest, but passing through the pipes the coolant gradually cools down and by the end of the circuit it is already much colder than it was at the beginning. Therefore, the zone where the coolant enters will be the warmest. This feature is used - laying starts from the coldest zone - along the outer walls or under the window.
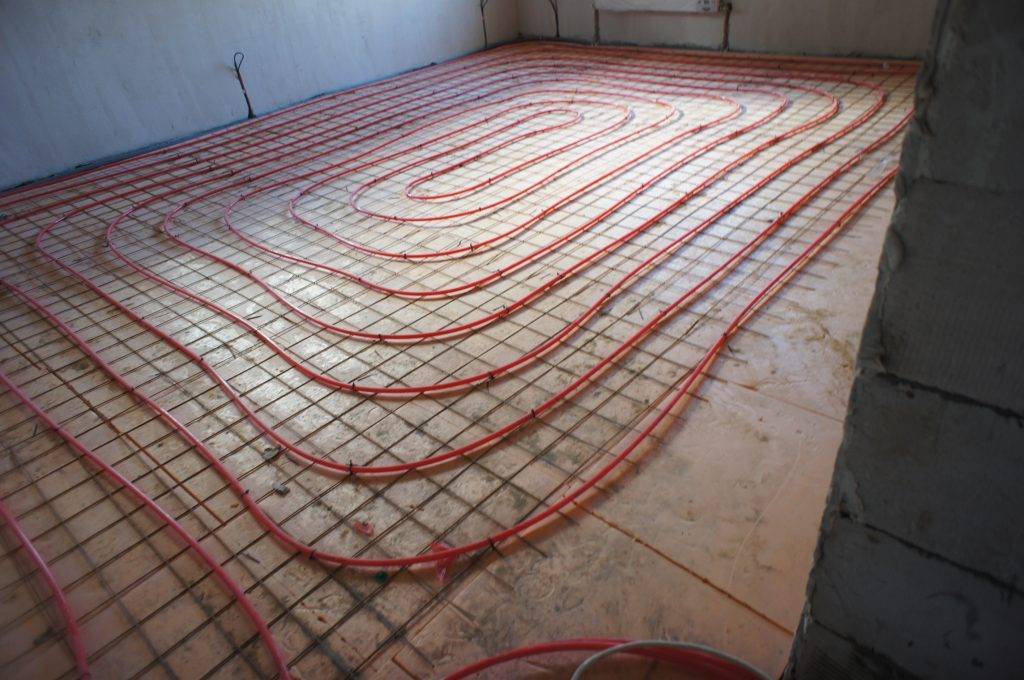


This drawback is almost devoid of a double snake and a spiral, but they are more difficult to lay - you need to draw a diagram on paper so as not to get confused when laying.
Screed
You can use a conventional cement-sand mortar based on Portland cement to fill a water-heated floor. The brand of Portland cement should be high - M-400, and preferably M-500. Concrete grade - not lower than M-350.
Semi-dry screed for underfloor heating
But ordinary “wet” screeds gain their design strength for a very long time: at least 28 days. All this time it is impossible to turn on the warm floor: cracks will appear that can even break the pipes. Therefore, so-called semi-dry screeds are increasingly being used - with additives that increase the plasticity of the solution, significantly reducing the amount of water and the time for "aging". You can add them yourself or look for dry mixes with the appropriate properties. They cost more, but there is less trouble with them: according to the instructions, add the required amount of water and mix.
It is realistic to make a water heated floor with your own hands, but it will take a decent amount of time and a lot of money.
Minimum layer
For apartments and individual households, the minimum thickness of the protective layer may be small. When used as part of a plasticizer mixture, the fill can be as little as 25 mm. A screed of this thickness can be poured if a high-quality mixture and reinforcement are used. The advantage of a thin layer is the low cost of execution. It should be borne in mind that with a thin layer, the load on the floor should be small - a light bath and furniture, no floor-mounted racks and heavy equipment.
Attention
A thin floor will heat up quickly, but also cool down quickly. Uneven distribution of heat is possible (cool places between pipes).
Types of screeds for a warm water floor
To create a base for flooring, heating pipes are poured with cement mortar - screed. The latter happens:
- dry;
- semi-dry;
- wet.
Water heated floor.
Wet type screed is poured with cement mortar with the addition of sand. This is the simplest and easiest way to close heating pipes, which does not require certain skills from the performer and special equipment. The solution can be mixed in a large container with a perforator without resorting to a concrete mixer.
With financial prosperity, you can buy not the components of the mixture, but a ready-to-use dry mortar, where the proportion between additives, sand and cement is already observed - just pour water and stir. Another plus of such a screed is that it is the thinnest and, therefore, steals the volume of the room less.
The composition of the solid components of a semi-dry screed is similar to that of a wet screed (cement, quarry sand, fiber and plasticizer). The difference in the amount of water is only 1/3 of the volume of the mixture.
Laying a semi-dry screed on your own is quite difficult. A concrete mixer is required without fail (it is difficult to stir manually, if not impossible) and a vibrating plate. Problems with equipment can be solved - rented, but without experience with a vibrator, you can spoil the work done.
The mixture will have to be bought ready-made - it is difficult to guess with the amount of plasticizer.
This method of performing the screed has two significant disadvantages:
- A thick layer of screed - reaches 8-12 cm. Therefore, it is not recommended to cover heating with expanded clay in rooms with low ceilings;
- Poor conduction of heat from pipes to the floor.
The difference in the material of manufacture
To perform the screed, various mixtures and materials can be used. You can prepare the solution yourself, buy a dry mix and knead it using the manufacturer's recommendations, or order ready-made material that will be delivered at the specified time.
The most commonly used options are:
- concrete - it can be ordered or made;
- a solution of sand, cement and additional additives to improve the properties of the future coating;
- ready-mix cement with mineral fillers such as Ceresit CN 85 and others.
When choosing ready-made materials for the installation of screeds, you should carefully monitor that they are intended for underfloor heating and strictly follow the recommendations of the manufacturers.
Especially it is necessary to comply with the requirements regarding the thickness of the coating being arranged - as a rule, this figure should not exceed 10 mm. Such a mixture dries quickly, but it can not be used in wet rooms and outside the building.
To do this, you have to buy a special liquid - a plasticizer for concrete. This substance is added in the proportions indicated by the manufacturer on the label. It allows you to get a plastic solution that is resistant to damage after drying.


You will also need polypropylene fiber - this is a filler used to reinforce the mixture. With its help, it is possible to create a composition that is as resistant to cracking as possible.
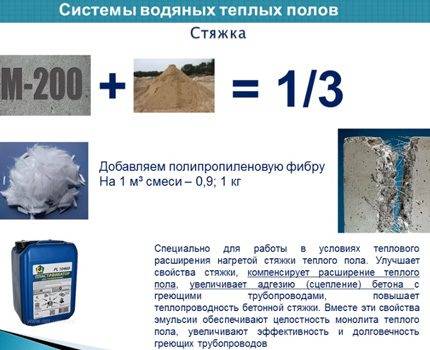
To prepare the solution, it is better to take cement grade M300, or M400. In extreme cases, the M200 is suitable, but no less. Sand should be chosen clean, not containing large fractions
How to pour concrete screed
It is not enough to choose the type of screed for pouring; you also need to know how to perform this filling correctly.Any mistake in the manufacture of such a coating reduces the effectiveness of underfloor heating, leads to the destruction of the screed. Prior to the pouring stage, work must be completed to prepare the base, lay the waterproofing and reinforcing layer, and install the heating system. The damper tape is also attached around the perimeter of the room before laying the warm floor. And only after that you can start making the screed.
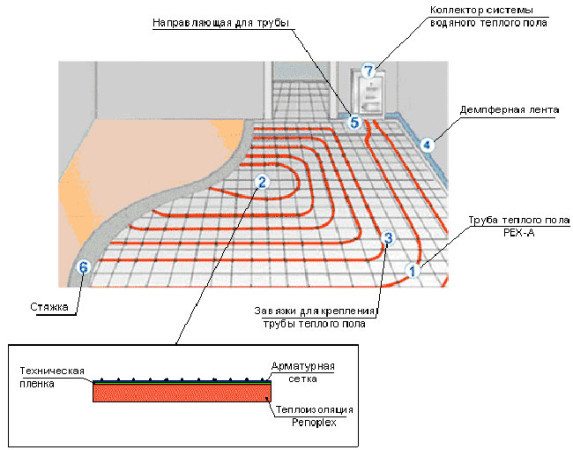
How to make a warm floor screed. Scheme
Screed device diagram
For work you will need:
- metal profile for guides;
- dry gypsum;
- container for mixing the solution;
- level;
- trowel;
- rule.
Underfloor heating screed options
Step 1. Using a level gauge on the wall, mark the line for pouring the screed. Please note that the thickness of the solution above the pipes should not be less than 3 cm.
Mixing the solution
Step 2. Knead the gypsum mortar and lay it out with a trowel in small piles along one of the walls at a distance of 20 cm. Lay the guides on the mortar and level them. A distance of 1.5-1.8 m is left between the beacons. Since the gypsum dries very quickly, you should not lay out the solution for beacons immediately over the entire area, do it in 2-3 steps.
Step 3 Prepare a concrete solution: mix the dry ingredients in the right proportions, pour in water, add a plasticizer.
The solution is poured between the guides and, using the rule, is distributed over the surface.
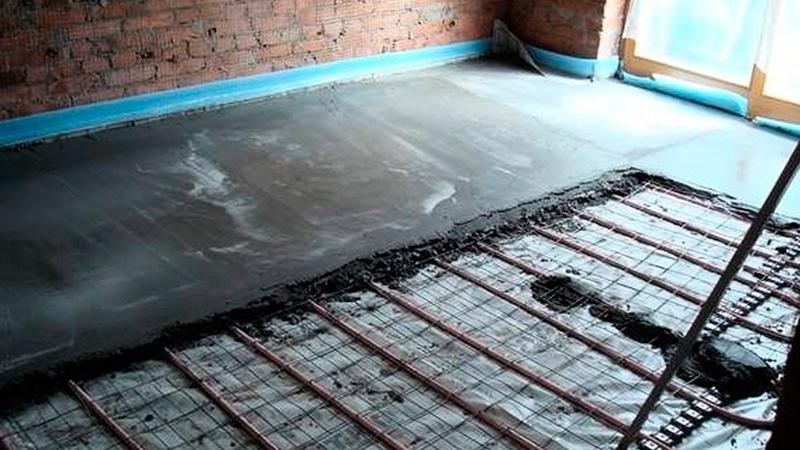
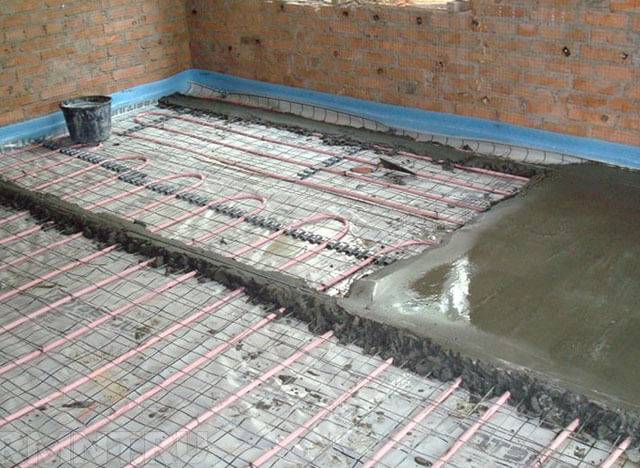
Step 4. When pouring the floor, the pressure in the pipes should be 0.3 MPa, otherwise the screed cannot be laid. The solution is poured between the guides and, using the rule, is distributed over the surface. You need to work very carefully so as not to step on the pipes. Filling is carried out in portions, dividing the room into several sections.If the floor area is more than 40 m2, a damper tape 5-10 mm thick is laid between the sections. It is best to use a special intercontour tape that has a T-shaped profile. It has standard parameters: width 10 cm, height 10 cm and thickness 1 cm. The tape is available in lengths of 2 m and is very inexpensive. Mounting it is much more convenient than a regular tape. Expansion joints prevent the screed from cracking during thermal expansion. The pipes passing in the seams must additionally be closed with a corrugation.
In the photo - a deformation seam and a pipe joint closed by a corrugation
When the entire floor is filled, the screed is covered with polyethylene and left to dry. A day later, the beacons are taken out, the recesses are sealed with a solution. Again covered with a film, and then periodically the floor is moistened with water so that cracks do not appear. As soon as the screed gains the necessary strength, and the moisture level drops to 5-7%, you can lay the top coat.
Ratings
Ratings
- 15.06.2020
- 2977
Which is better to choose a water heated towel rail: manufacturer rating
Types of water heated towel rails: which one is better to choose, rating of manufacturers and overview of models. Advantages and disadvantages of towel dryers. Features and installation rules.


Ratings

- 14.05.2020
- 3219
Rating of the best wired headphones of 2020
The best wired earbuds for 2019 A brief overview of popular devices designed for a variety of purposes. Pros and cons of budget gadgets.
Ratings

- 14.08.2019
- 2582
Rating of the best mobile phones for games
Rating of the best mobile phones for games and the Internet. Features of choosing a gaming smartphone. Main technical characteristics, CPU frequency, amount of memory, graphics accelerator.
Ratings
- 16.06.2018
- 864
Project preparation
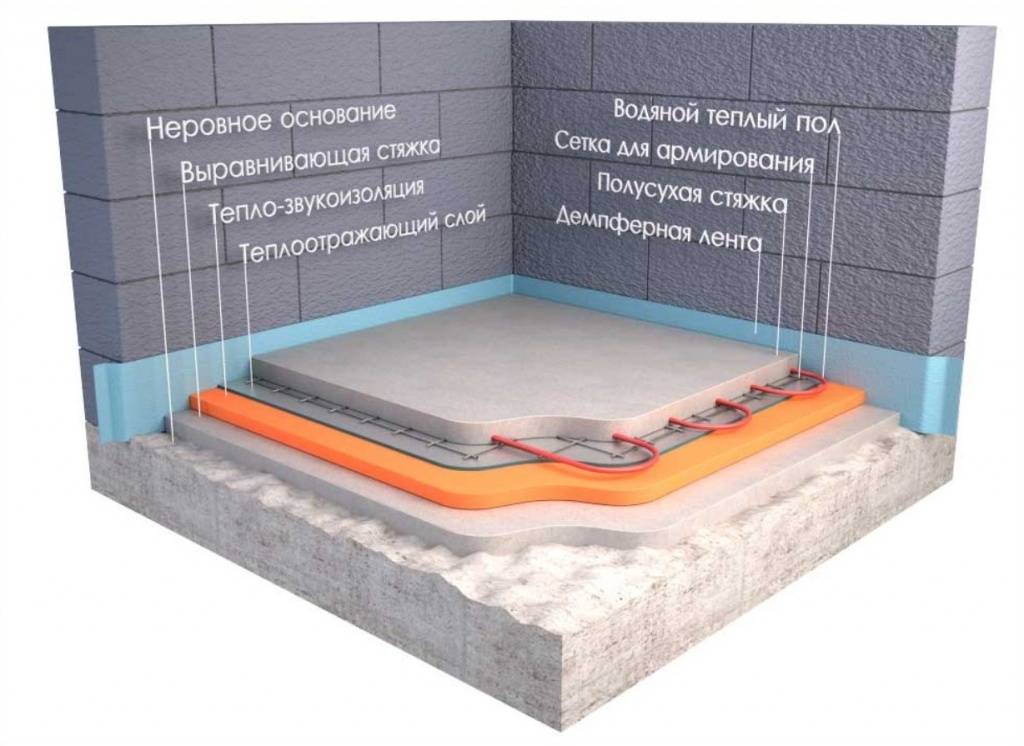
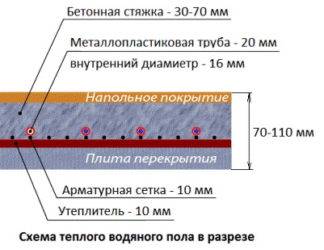
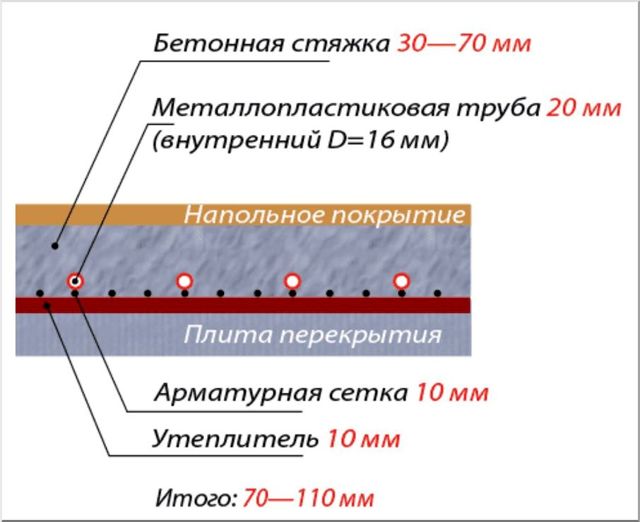
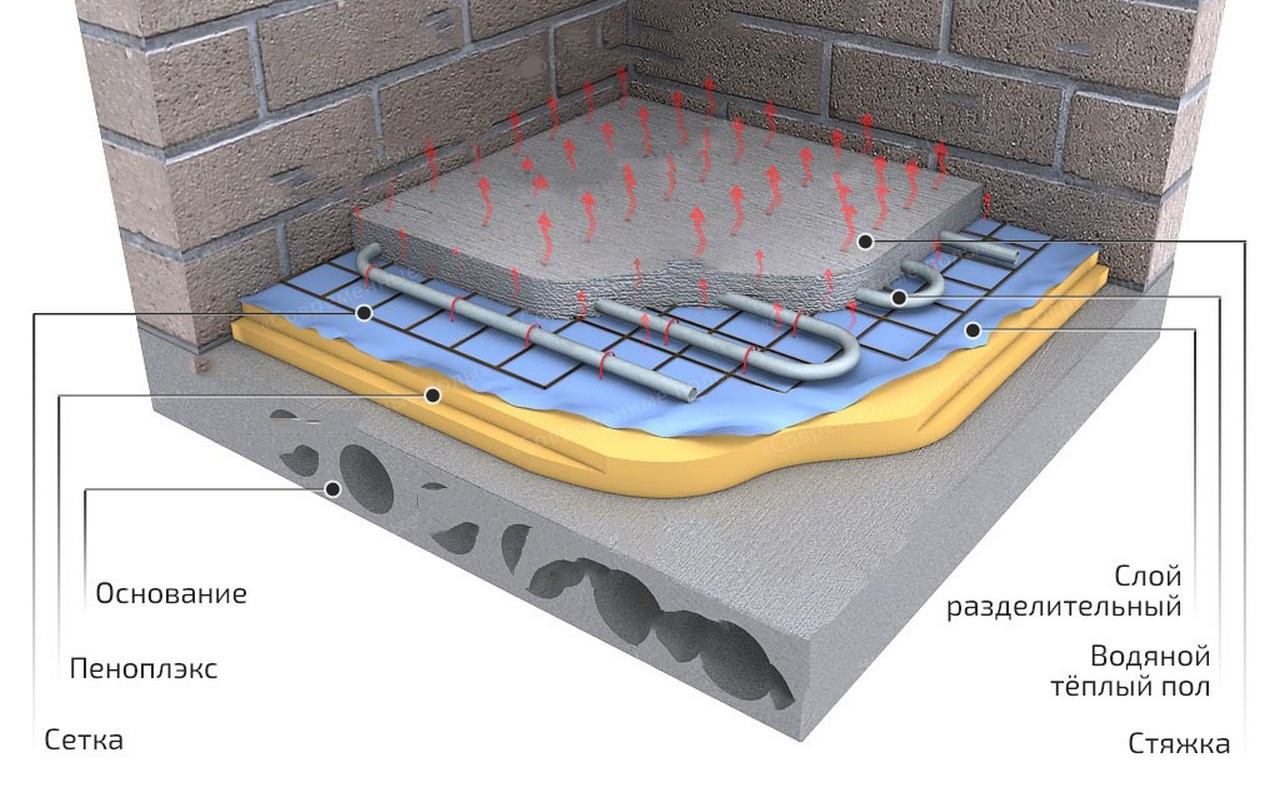
A high-quality water-heated floor consists of the following layers:
- A rough screed 5-6 cm thick. It is poured with a preliminary installation of a damper tape around the perimeter of the room.
- Heater of a coupler of a water heat-insulated floor. It is better to use factory-made foamed polypropylene with a density of 40 kg or more. m cu. and higher. The greater the thickness, the less heat loss. It is convenient to work if there are special cutouts on the ends of the products. They simplify precise docking and ensure the tightness of the connections.
- Above the insulation boards, a polyethylene film (125-150 microns) is installed. It prevents the penetration of moisture from the screed. If high-quality polypropylene slabs with locking joints are used, glued with adhesive tape, additional waterproofing is not needed.
- Reinforcement not only reinforces the screed. It is convenient to fix pipes on such a frame. Instead of traditional, metal, composite and polymer products are being used in construction. They weigh less, are not destroyed by corrosion processes.
- To speed up the work, you need to purchase the required number of plastic clamps. Apply 3-4 products for each linear meter of the line.
- Where the water-heated floor screed pipe passes through the expansion joints, a protective corrugation is put on it.
- When the whole structure is assembled, a cement-sand mixture with fillers is poured on top.
- Next, install the finish coat.
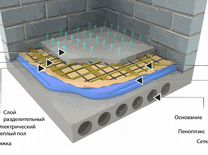
Distribution of layers on the subgrade
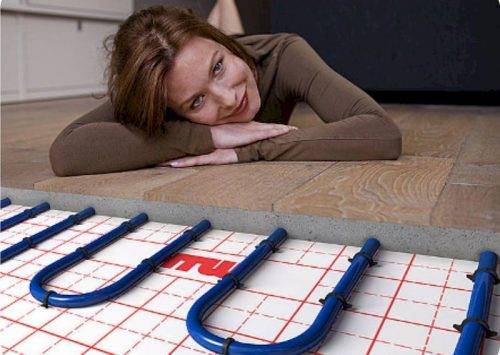
The structure of the structure is selected taking into account the features of the installation site, the structure itself.It is easier to mount a water heated floor on a special substrate with ledges. Corresponding kits are offered with edge and connecting elements. Some mats have IR-reflecting layers built into the bottoms of the mats to increase the efficiency of the heating system.
Substrate for pipe mounting
Using the data of the selected project, they make a list of necessary things, consumables, tools. When determining the thickness of the screed, the load capacity of the load-bearing structures of the property must be taken into account. Layer 1 sq.m. concrete with a thickness of 6-7 cm weighs from 300 to 340 kg.
Do-it-yourself installation
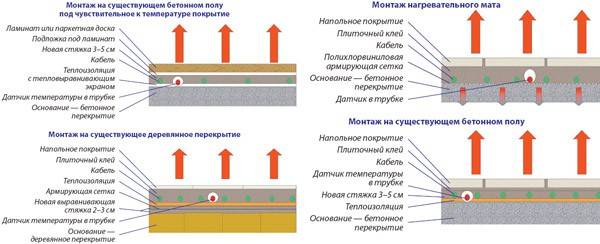
Before you put a warm floor under the laminate, you need to decide on the option of laying it. It can happen like this:
- According to the lags. To do this, it is convenient to use special modules made of chipboard, factory-equipped with grooves with special channels, metal heat-distributing plates and all necessary fasteners. They only need to be assembled in accordance with the instructions. But such a kit is very expensive.
- On rails. To do this, use a planed board, moisture-resistant plywood or chipboard with a thickness of 21-28 mm. The distance between the rails is usually equal to their width, and the width corresponds to the distance between the pipes in the circuit.
Foundation preparation
When laying the "water-heated floor" system on a wooden base, installation must be carried out after a set of preparatory works, which include:
- "Opening" the old coating and the base located under it. At the same time, old hydro- and heat-insulating materials are removed, and the base itself is cleaned of traces of dirt, fungus and mold.
- Visual assessment of the general condition of the foundation.It needs to be inspected for any damage. At this stage, sections of the beams that have become unusable should be dismantled, replacing them with new inserts. If strong distortions and blockages of the surface are detected, it must be leveled with metal corners, special linings and other fixing elements.
- Treatment of a wooden base with antiseptic preparations. This will avoid further decay and destruction of this material.
The last step in the preparation of the base is its cleaning from dust and debris. Detailed instructions for preparing a warm floor for a laminate can be found on the video presented on the Internet.
Frame manufacturing
When laying a warm water floor on a supporting wooden structure with a beam spacing of up to 60 cm, work can be carried out directly on this base. To do this, cranial bars are fixed in the lower part of the beams, acting as supports. Subfloor boards are stuffed on them.
It is possible to lay a draft floor without cranial bars. In this case, the boards are fixed directly into the supporting beams from the basement or underground side. The space between the supporting lags is filled with a vapor barrier material, on which a layer of thermal insulation 15-20 cm thick made of mineral wool, polystyrene foam or foam plastic is laid.
The distance between the primary floor and the heat-insulating layer should be at least 8-10 cm. For additional ventilation in the "rough base" near the wall, it is desirable to leave a small unwired area.
When making a frame for floors with a beam pitch of more than 60 cm, the cranial bars should be fixed at a higher height, since the subfloor in this case will be attached to chipboard or plywood nailed to the supporting beams.
After the insulation, it is necessary to attach a layer of vapor barrier. You can learn more about how the underfloor heating is laid under the laminate in the video.


Pipe laying
For the installation of water-based underfloor heating, pipes made of polypropylene and metal-plastic are used. Their layout can be done in two ways:
- in a spiral;
- snake.
The first method is more preferable, since in this case there is an alternation of "cold" and "warm" circuits.
At home, it is easier and more convenient to lay pipes with a “snake”. They should be laid out in increments of no more than 30 cm. Near the walls, the pitch can be minimal: 10-15 cm. This will avoid heat loss at the junctions.
Connection
Connecting underfloor heating to the heating system can be carried out in various ways. The most common are:
- Mixing nodes;
- collector system.
After that, a pressure testing procedure is performed, the main purpose of which is to identify leaks and malfunctions in the pipeline. This operation must be carried out before laying the flooring!
For "safety net" it is better to make a test run together with specialists. Additional information on connecting underfloor heating under the laminate with your own hands can be gleaned from the video.
Substrate
After the technical part of the structure has been tested under high pressure, a substrate is laid on top of the pipes, the function of which can be performed by the following materials:
- Cork;
- Foamed polyethylene with foil coating;
- Foil polystyrene;
- Extruded polypropylene.
The listed materials have different prices. For example, the most expensive is a polystyrene foil substrate. But it also has the highest thermal insulation characteristics.
How to fill with a "wet" screed
If a lot of water is added to the solution, then a “wet” screed is obtained. The solution will be plastic.
The ratios of the components are as follows:
- When laying underfloor heating in a dry residential area, an M200 mortar using M500 cement is suitable. It will take 1 part of cement, 3 parts of sand and 1-1.4 parts of water.
- When laying underfloor heating in a damp room (in the bathroom), you need an M200 mortar based on M400 cement. Take 1 part of cement, 2.5 parts of sand and 1-1.4 parts of water.
- In reality, the volume of liquid depends on the moisture level of the sand and the amount of dust in it. In this regard, water is added gradually, mixed and controlled plasticity. The result should be a mixture that looks like thick sour cream.
- The solution is leveled between the pipes, rammed, removing air bubbles.
The process of leveling the mixture is facilitated by a long rule and pre-placed beacons. The recesses are filled with the mixture and leveled again.
Perform a screed from screenings in the same way. But everything is done more carefully, more labor will be needed. The advantage of the "wet" method is the plasticity of the solution, which is easy to level with the rule.


