- What is needed for installation
- Mayevsky crane or automatic air vent
- Stub
- Shut-off valves
- Related materials and tools
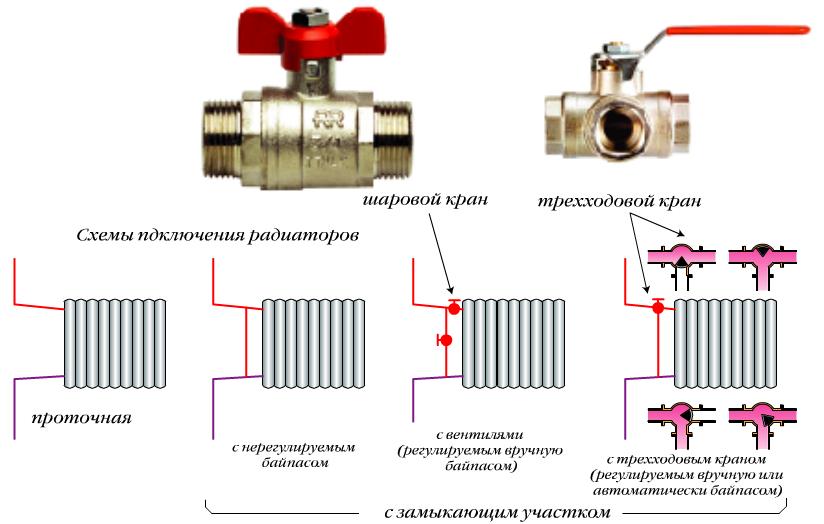
- Radiator connection options
- Installation of radiators
- Connecting heating radiators: wiring diagrams, battery installation | School repair
- The process of preparing for connection from the boiler
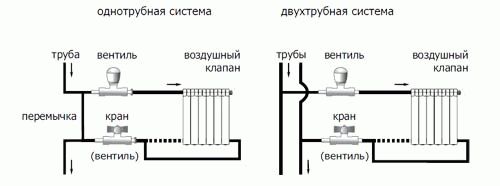
- Piping options in the system
- The specifics of one-pipe and two-pipe schemes
- Top and bottom coolant supply
- Vertical and horizontal risers
- Tying with polypropylene pipes
- Features of connecting radiators
What is needed for installation
Installation of heating radiators of any type requires devices and consumables. The set of necessary materials is almost the same, but for cast-iron batteries, for example, the plugs are large, and the Mayevsky tap is not installed, but, somewhere at the highest point of the system, an automatic air vent is installed. But the installation of aluminum and bimetallic heating radiators is absolutely the same.
Steel panel ones also have some differences, but only in terms of hanging - they come with brackets, and on the back there are special cast metal shackles with which the heater clings to the hooks of the brackets.
Here for these bows they wind up hooks
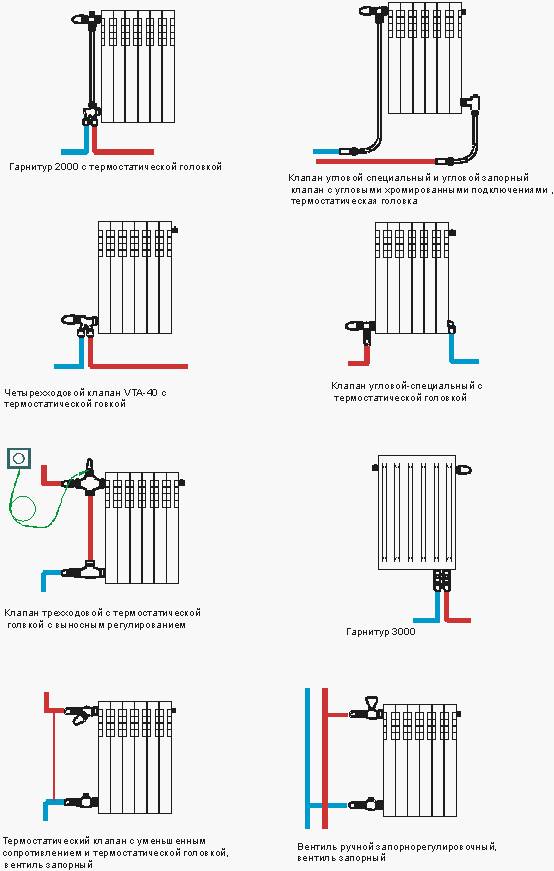
Mayevsky crane or automatic air vent
This is a small device for venting air that can accumulate in the radiator. It is placed on a free upper outlet (collector). Must be on every heater when installing aluminum and bimetallic radiators. The size of this device is much smaller than the diameter of the manifold, so another adapter is required, but Mayevsky taps usually come with adapters, you just need to know the diameter of the manifold (connecting dimensions).
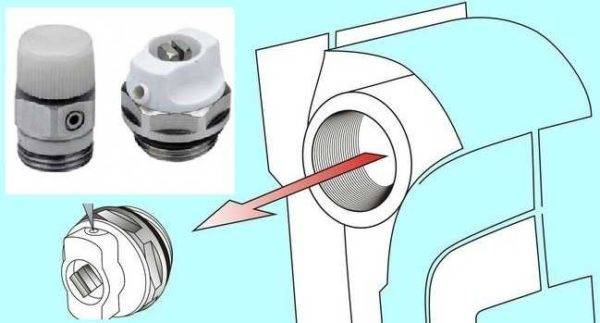
Mayevsky crane and method of its installation
Except Mayevsky crane, there are still automatic air vents. They can also be placed on radiators, but they are slightly larger and for some reason are only available in a brass or nickel-plated case. Not in white enamel. In general, the picture is unattractive and, although they deflate automatically, they are rarely installed.
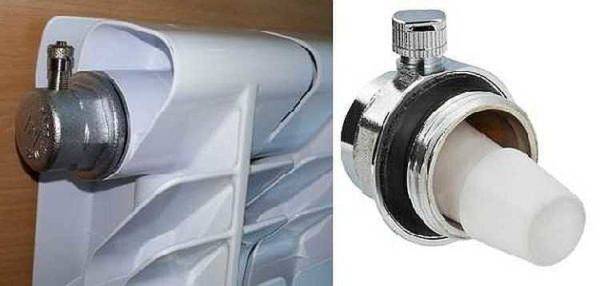
This is what a compact automatic air vent looks like (there are bulkier models)
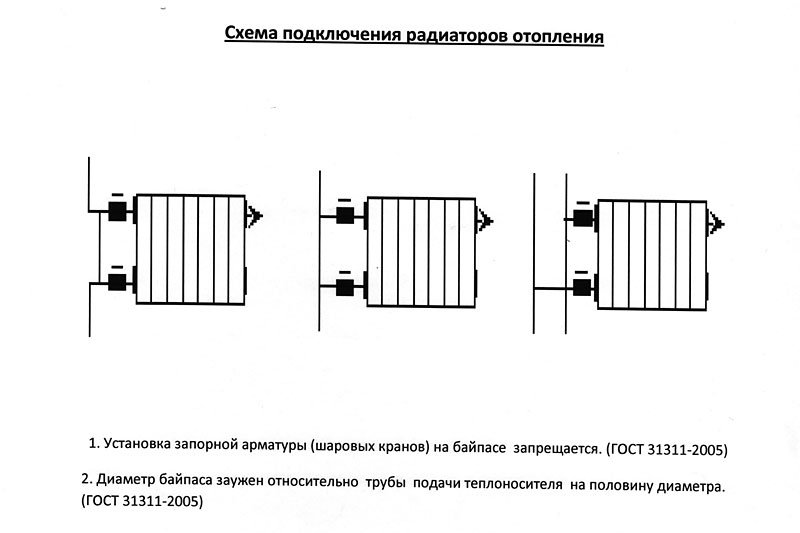
Stub
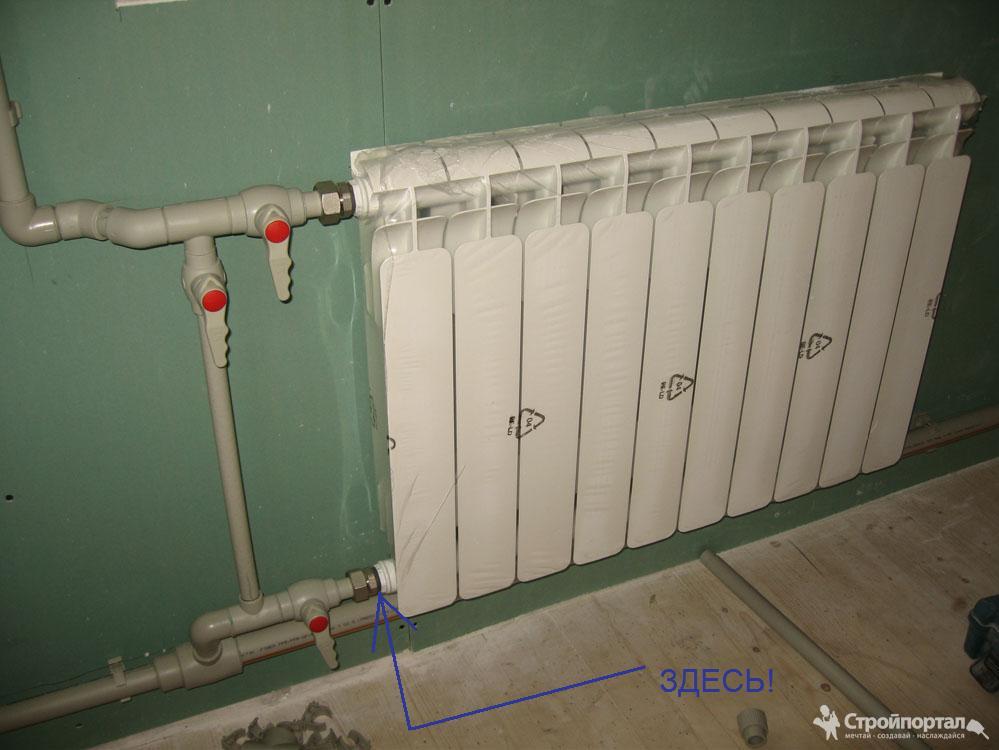
There are four outlets for the radiator with lateral connection. Two of them are occupied by the supply and return pipelines, on the third they put a Mayevsky crane. The fourth entrance is closed with a plug. It, like most modern batteries, is most often painted with white enamel and does not spoil the appearance at all.
Where to put the plug and the Mayevsky tap with different connection methods
Shut-off valves
You will need two more ball valves or shut-off valves with the ability to adjust. They are placed on each battery at the input and output.If these are ordinary ball valves, they are needed so that, if necessary, you can turn off the radiator and remove it (emergency repair, replacement during the heating season). In this case, even if something happened to the radiator, you will cut it off, and the rest of the system will work. The advantage of this solution is the low price of ball valves, the minus is the impossibility of adjusting heat transfer.
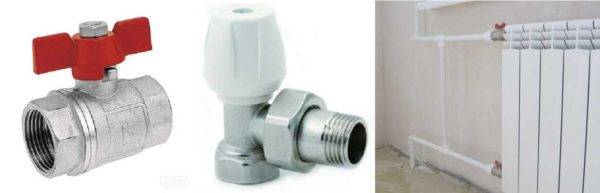
Taps for heating radiator
Almost the same tasks, but with the ability to change the intensity of the coolant flow, are performed by shut-off control valves. They are more expensive, but they also allow you to adjust the heat transfer (make it smaller), and they look better outwardly, they are available in straight and angular versions, so the strapping itself is more accurate.


If desired, you can put a thermostat on the coolant supply after the ball valve. This is a relatively small device that allows you to change the heat output of the heater. If the radiator does not heat well, they cannot be installed - it will be even worse, since they can only reduce the flow. There are different temperature controllers for batteries - automatic electronic, but more often they use the simplest one - mechanical.
Related materials and tools
You will also need hooks or brackets to hang on the walls. Their number depends on the size of the batteries:
- if the sections are not more than 8 or the length of the radiator is not more than 1.2 m, two attachment points from above and one from below are sufficient;
- for every next 50 cm or 5-6 sections, add one fastener from above and below.
Takde need a fum tape or linen winding, plumbing paste to seal the joints. You will also need a drill with drills, a level (a level is better, but a regular bubble one is also suitable), a certain number of dowels.You will also need equipment for connecting pipes and fittings, but it depends on the type of pipes. That's all.
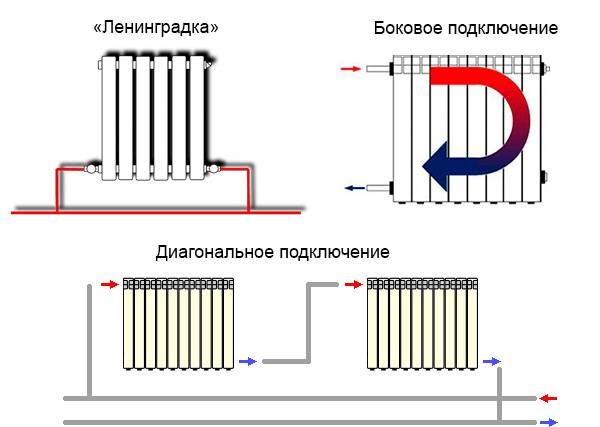
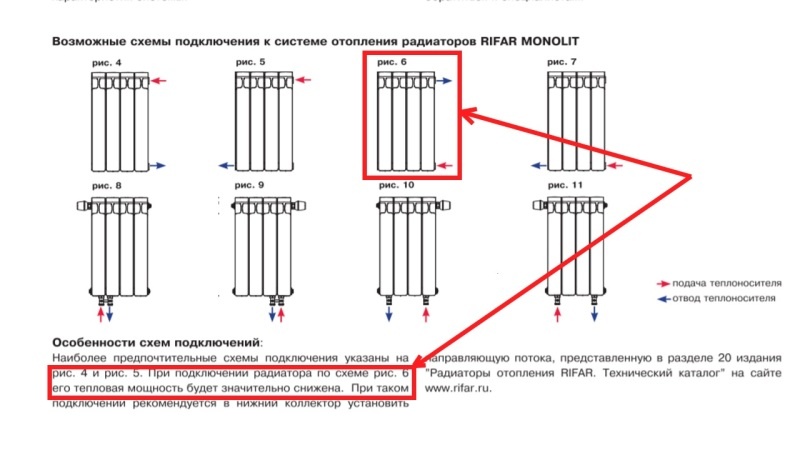
Radiator connection options
To know how to properly connect a heating battery, you need to consider that in addition to the types of piping, there are several battery connection diagrams to the heating system. These include the following options for connecting heating radiators in a private house:
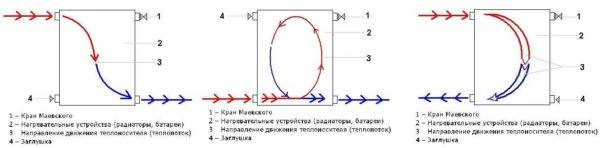
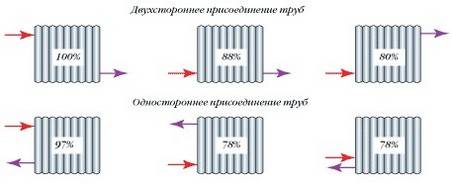
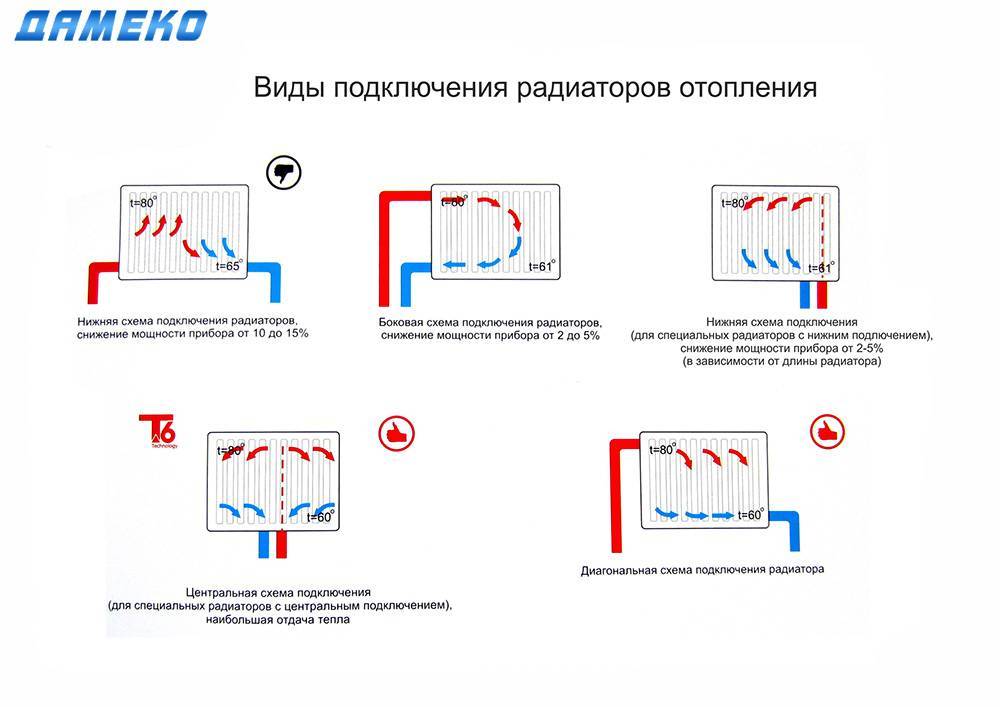
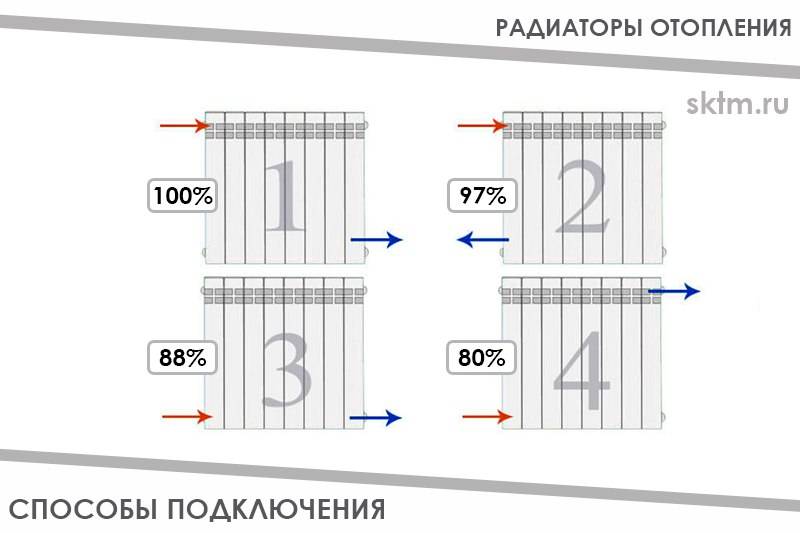
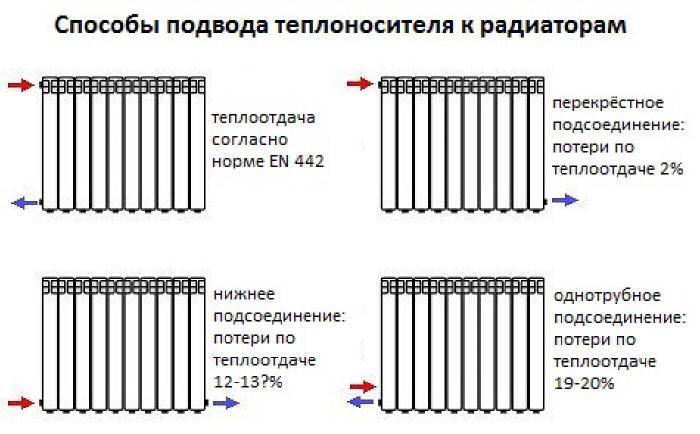
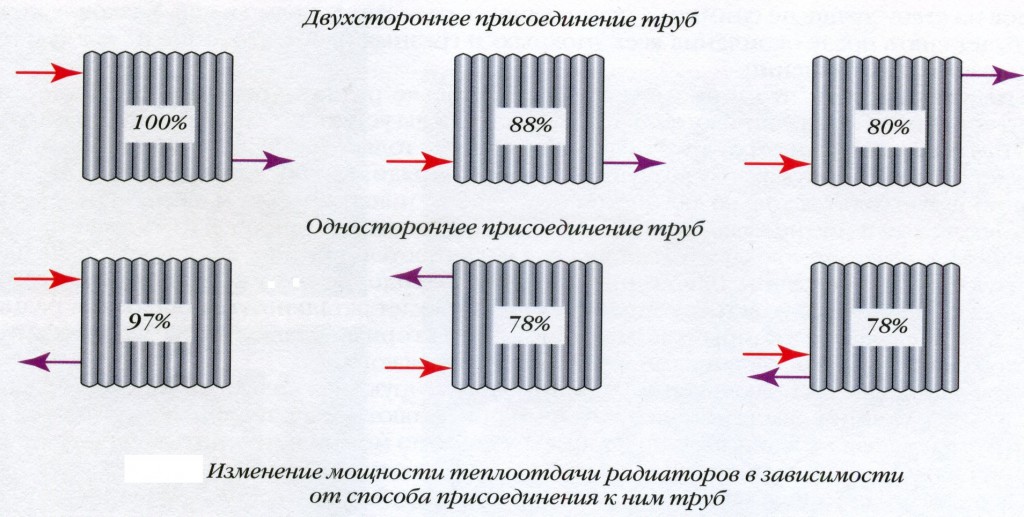
In this case, the connection of the outlet and supply pipes is made on one side of the radiator. This method of connection allows you to achieve uniform heating of each section at minimal cost for equipment and a small amount of coolant. Most often used in multi-storey buildings, with a large number of radiators.
Useful information: If the battery, connected to the heating system in a one-way scheme, has a large number of sections, the efficiency of its heat transfer will be significantly reduced due to the weak heating of its remote sections. It is better to ensure that the number of sections does not exceed 12 pieces. or use another connection method.
It is used when connecting to a heating system with a large number of sections. In this case, the supply pipe, as in the previous connection option, is located at the top, and the return pipe is at the bottom, but they are located on opposite sides of the radiator. Thus, heating of the maximum battery area is achieved, which increases heat transfer and improves the efficiency of space heating.
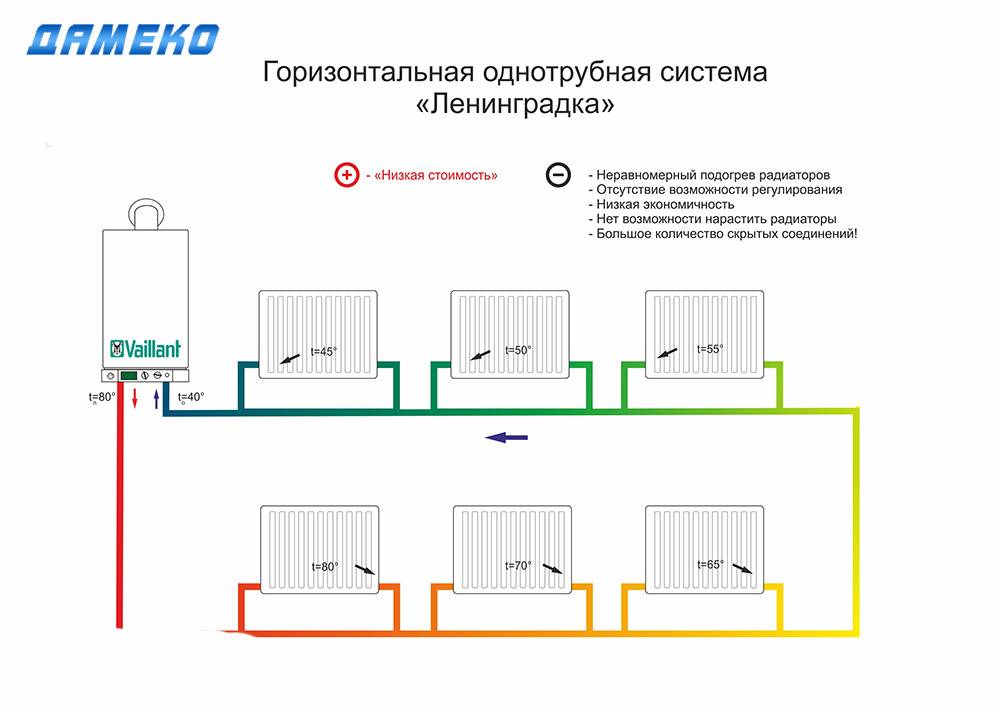
This connection scheme, otherwise called "Leningrad", is used in systems with a hidden pipeline laid under the floor.In this case, the connection of the inlet and outlet pipes is made to the lower branch pipes of the sections located at opposite ends of the battery.
The disadvantage of this scheme is heat loss, reaching 12-14%, which can be compensated by the installation of air valves designed to remove air from the system and increase battery power.
 Heat loss depends on the choice of the method of connecting the radiator
For quick dismantling and repair of the radiator, its outlet and inlet pipes are equipped with special taps. To adjust the power, it is equipped with a temperature control device, which is installed on the supply pipe.
What are the technical characteristics of aluminum heating radiators. you can learn from a separate article. It also contains a list of popular manufacturers.
And about what constitutes an expansion tank for closed-type heating. read in another article. Volume calculation, installation.
Tips for choosing an instantaneous water heater for a faucet are here. Device, popular models.
As a rule, the installation of the heating system and the installation of heating radiators is carried out by invited specialists. However, using the listed methods for connecting heating radiators in a private house, this can be done independently, strictly observing the technological sequence of this process.


If you perform these works accurately and competently, ensuring the tightness of all connections in the system, there will be no problems with it during operation, and installation costs will be minimal.
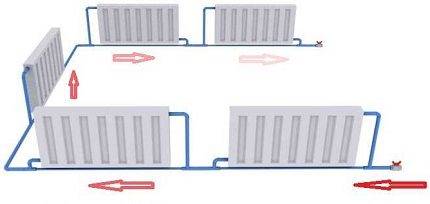
 The photo shows an example of a diagonal way to install a radiator in a country house
The procedure for this will be as follows:
- We dismantle the old radiator (if necessary), having previously blocked the heating line.
- We mark the place of installation. The radiators are fixed on brackets that need to be attached to the walls, taking into account the regulatory requirements described earlier. This must be taken into account when marking.
- Attach brackets.
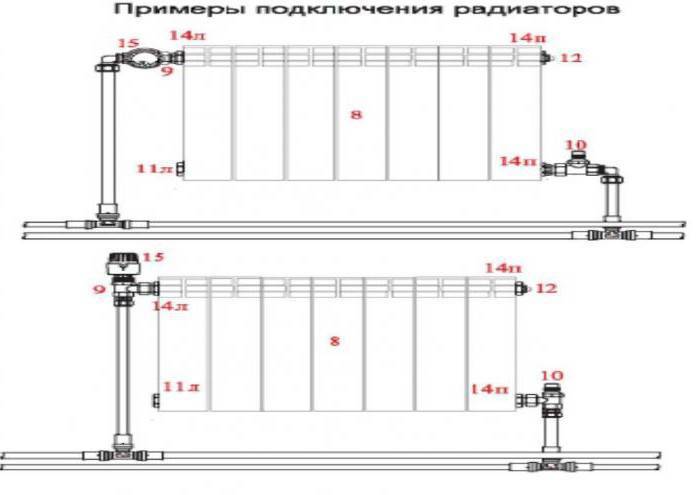
- We collect the battery. To do this, we install adapters on the mounting holes in it (they come with the device).
Attention: Usually two adapters are left-handed and two are right-handed!
- To plug unused collectors, we use Mayevsky taps and locking caps. To seal the joints, we use sanitary flax, winding it on the left thread counterclockwise, on the right - clockwise.
- We fasten ball-type valves to the junctions with the pipeline.
- We hang the radiator in place and connect it to the pipeline with mandatory sealing of the joints.
- We make pressure testing and trial start-up of water.
Thus, before connecting a heating battery in a private house, it is necessary to determine the type of wiring in the system and its connection scheme. At the same time, installation work can be performed independently, taking into account the established standards and process technology.
How the installation of heating batteries in a private house is carried out, the video will show you clearly.
Installation of radiators
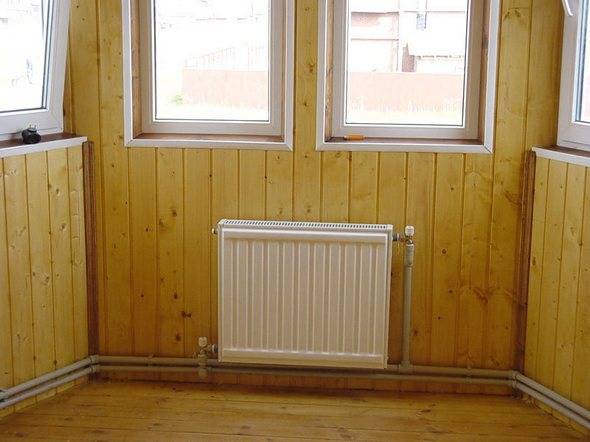
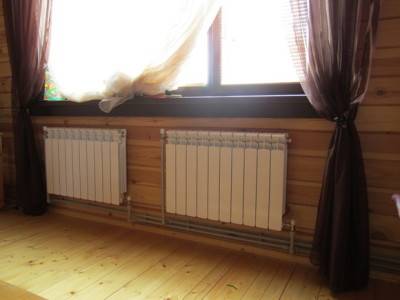
radiator installationRadiators should be installed in places with the greatest temperature difference, that is, near windows and doors. It is necessary to place the heater under the window in such a way that their centers coincide. Distance from appliance to floor should be at least 120 mm, to the window sill - 100 mm, to the wall - 20-50 mm.
The installation of the battery to the pipeline is carried out using fittings (corner, coupling combined with a thread) and an American ball valve, by soldering or welding. An air vent (Maevsky tap) is installed on one of the other holes, the remaining hole is closed with a plug.
Before filling the system, a first test run is carried out to clean it and check for leaks. The water should be left for several hours, then drained. After that, refill the system, increase the pressure with a pump and bleed air from the radiator until water appears, then turn on the boiler and start heating the room.
Common mistakes during installation: incorrect placement of the convector (close to the floor and wall), discrepancy between the number of heater sections and the connection type (side connection type for batteries with more than 15 sections) - in this case, the room will be heated with less heat transfer.
Spilling liquid from the tank indicates its excess, noise in the circulation pump indicates the presence of air - these problems are eliminated with the Mayevsky crane.
Connecting heating radiators: wiring diagrams, battery installation | School repair
Scheme of the heating system What is tied up? Hot water from the heating boiler is supplied to the building, flowing down the upper level through the heating devices, which installed in apartments of a multi-storey building or premises of a private house.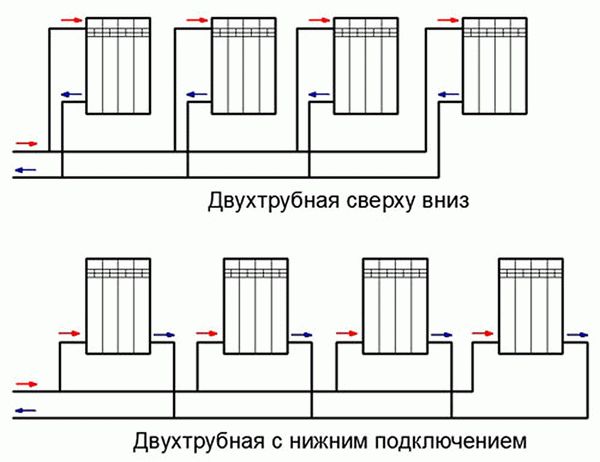
It allows you to maximize the use of heat, evenly distributing it to all heating devices.
This is necessary, since the connection may have its own characteristics depending on the selected system. After installation, the device must rest firmly on all fasteners.
The pump is installed on supply or return pipeline. Whatever it was, after choosing a particular system, they proceed to the choice radiator connection diagrams to the pipeline.
Its power depends on the area of the heated room.
This is what the piping of radiators in apartments usually looks like. You can connect the specified additional fittings yourself.
There are different temperature controllers for batteries - automatic electronic, but more often they use the simplest one - mechanical. The main advantage of such pipes is the ability to deal with the bad influence of an aggressive environment and, as a result, getting rid of blockages and blockages.
TWO-PIPE HEATING SYSTEM - with your own hands !!!


The process of preparing for connection from the boiler
Preliminary work is very important before installing heating radiators:
- Inspection of the current binding. The study will create a similar system, which will positively affect the operation.
- Checking accessories for the radiator. The set must contain: Mayevsky crane, shut-off valves, brackets.
Adapters and a gasket are included in some models, sometimes you need to purchase them. When manually replacing, you will need tools - wrenches that are suitable in size. And you also need to purchase a sealant.
- Checking pipes for compatibility with a new battery. The outer layer of the bimetallic device is made of aluminum, which is not compatible with soft materials. For example, copper piping or taps will need to be replaced. Otherwise, the system is threatened with imminent destruction.
- Choosing a location for the battery. This is especially true for mounts if an old device is being replaced.
- Examination of the radiator for visible damage, surface integrity, coating.
- With full compliance of the components, they proceed to the replacement. At the preparatory stage, water is drained from old batteries.
After completing the preparation, proceed to the choice of the connection scheme. The first paragraph states that you should choose an option similar to the old one. This will allow not to rebuild the entire system and maintain the current efficiency. The process is quite simple and is described below.
Important! At the end, a set of tests is carried out, known as crimping. It includes water, heat and pneumatic tests.
Piping options in the system
The efficiency, economy and aesthetics of the heat supply system depend on the layout of heating devices and connecting pipes. The choice of wiring is determined based on the design features and area of \u200b\u200bthe house.
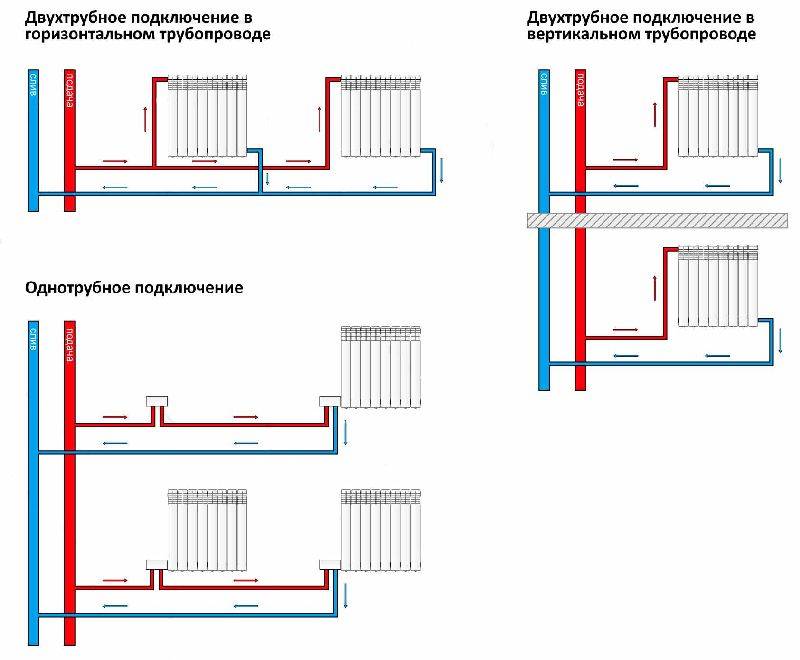
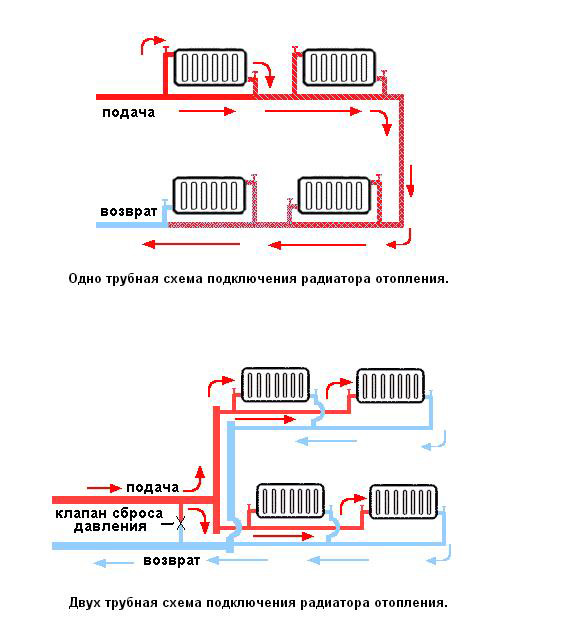
The specifics of one-pipe and two-pipe schemes
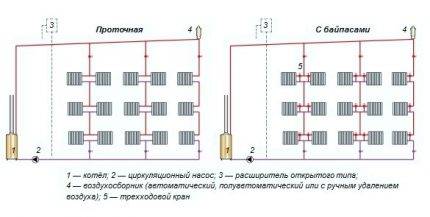
The heated water flows to the radiators and back to the boiler in various ways. In a single-circuit system, the coolant is supplied through one large-diameter line. The pipeline passes through all radiators.
Advantages of a self-circulating single-pipe system:
- minimum consumption of materials;
- ease of installation;
- limited number of pipes inside the dwelling.
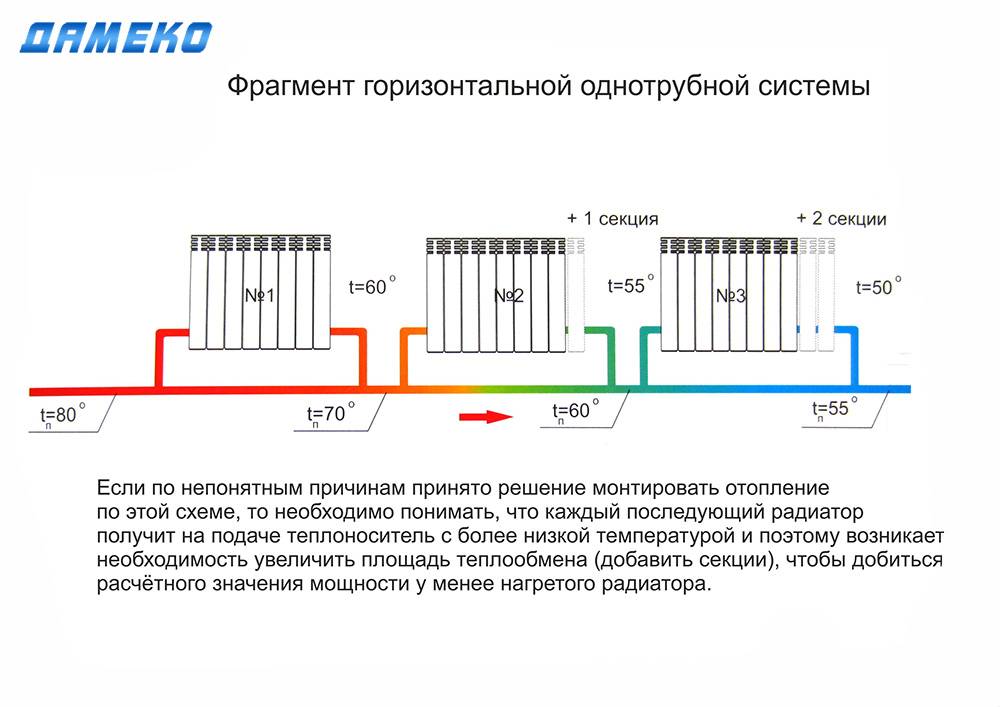
The main disadvantage of a scheme with a single pipe that performs the duties of supply and return is the uneven heating of heating radiators. The intensity of heating and heat transfer of the batteries decreases as they are farther from the boiler.
With a long wiring chain and a large number of radiators, the last battery may be completely inefficient. "Hot" heating devices are recommended to be installed in the rooms of the north side, children's rooms and bedrooms
The two-pipe heating scheme is confidently gaining ground. Radiators connect the return and supply pipelines. Local rings are formed between the batteries and the heat source.
- all heaters are evenly heated;
- the ability to adjust the heating of each radiator separately;
- reliability of the scheme.
A two-circuit system requires large investments and labor costs. It will be more difficult to install two branches of communications on building structures.
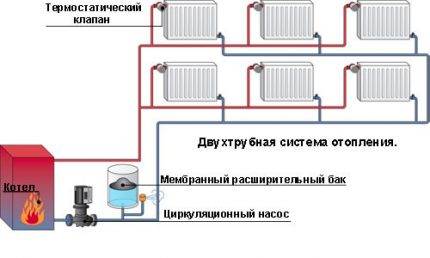 The two-pipe system is easily balanced, ensuring that the coolant is supplied at the same temperature to all heating devices. Rooms are heated evenly
Top and bottom coolant supply
Depending on the location of the line supplying the hot coolant, a distinction is made between upper and lower piping.
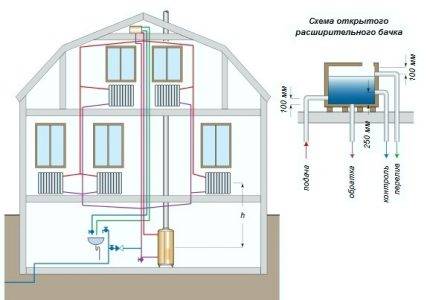 In open heating systems with overhead wiring, there is no need to use devices for venting. Its excess is discharged through the surface of the expansion tank that communicates with the atmosphere.
With the upper wiring, warm water rises through the main riser and is transferred through the distributing pipelines to the radiators. The device of such a heating system is advisable in one- and two-story cottages and private houses.


The heating system with the lower wiring is quite practical. The supply pipe is located at the bottom, next to the return. The movement of the coolant in the direction from the bottom up.Water, having passed through the radiators, is sent through the return pipeline to the heating boiler. The batteries are equipped with Mayevsky cranes to remove air from the line.
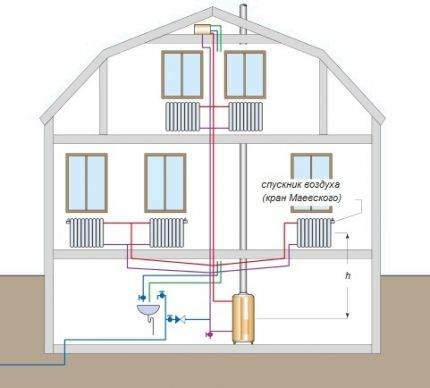 AT heating systems from the bottom wiring, it becomes necessary to use air exhaust devices, the simplest of which is the Mayevsky crane
Vertical and horizontal risers
According to the type of position of the main risers, vertical and horizontal methods of piping are distinguished. In the first version, the radiators of all floors are connected to vertical risers.
 Vertical wiring is used in the arrangement of houses with two, three or more floors with an attic, within which it is possible to lay and insulate the pipeline
Features of "vertical" systems:
- lack of air congestion;
- suitable for heating high-rise buildings;
- floor connection to the riser;
- the complexity of installing apartment heat meters in multi-storey buildings.
Horizontal wiring provides for the connection of radiators of one floor to a single riser. The advantage of the scheme is that fewer pipes are used for the device, the installation cost is lower.
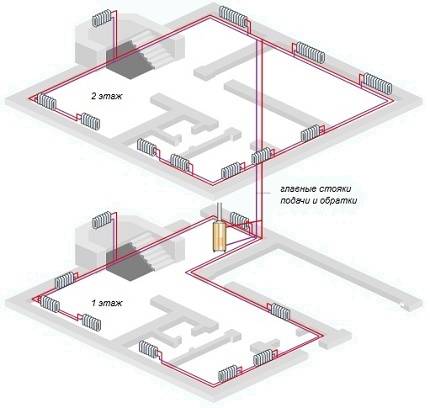
Horizontal risers are usually used in one- and two-story rooms. The arrangement of the system is relevant in panel-frame houses and residential buildings without piers
Tying with polypropylene pipes
Piping of radiators can be carried out using a variety of pipes, but experts recommend using polypropylene. Ball valves for strapping are also bought in polypropylene, they can be straight and angled, this option is the simplest and most inexpensive. Brass fittings are more expensive, and installation is more difficult.
Polypropylene strapping is performed as follows:
- the coupling with the union nut is inserted into the multiflex, which is easily connected to any outlet;
- the pipes themselves are attached to the walls at a convenient height, they should not fit snugly against the surface, it is better to leave a gap of 2-3 cm. The pipes are fixed with special brackets, which are fixed to the wall with nails or self-tapping screws.
Polypropylene strapping to radiators can also be carried out when pipes are laid into the wall, in which case they come to the surface only at the connection points.
Piping of radiators can be carried out using a variety of pipes, but experts recommend using polypropylene.
Fasteners for batteries can be very different, most often it is a pin connection, which is fixed on the wall surface. Corner brackets can also be used, which also allow hanging radiators at the required height. For panel batteries, fasteners are supplied in the kit, for sectional batteries, you need to buy separately. Usually, two brackets or pins are enough for one section.
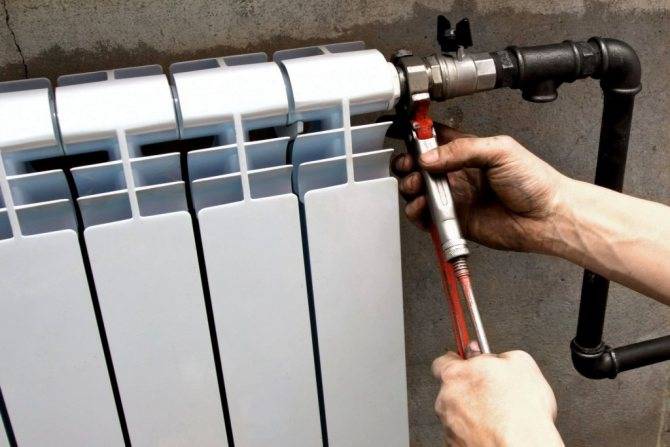
The connection of cranes is carried out in this way:
- the crane is disassembled, a fitting and a union nut are screwed into the radiator;
- the nut is tightly tightened with a special wrench.
As you can see, this process is extremely simple. To perform such work, you only need to purchase a special plumbing key for American women, without which it is unlikely that you can simply install a tap.


The following materials and tools are required for battery installation and piping:
- a set of special keys;
- seals for threaded connections;
- tow and thread paste;
- thread for carving.
Features of connecting radiators
Installation of heating differs in some features:
- It is necessary to observe the distance from the radiator to the window sill of 100 mm. If the gap between the batteries and the bottom of the window sill is different, then the heat flow is disturbed, the effect of the heating system will be low.
- From the floor surface to the battery, the distance should be 120-150 mm, otherwise a sharp temperature drop occurs.
- In order for the heat transfer of the equipment to be correct, the distance from the wall must be at least 20 mm.
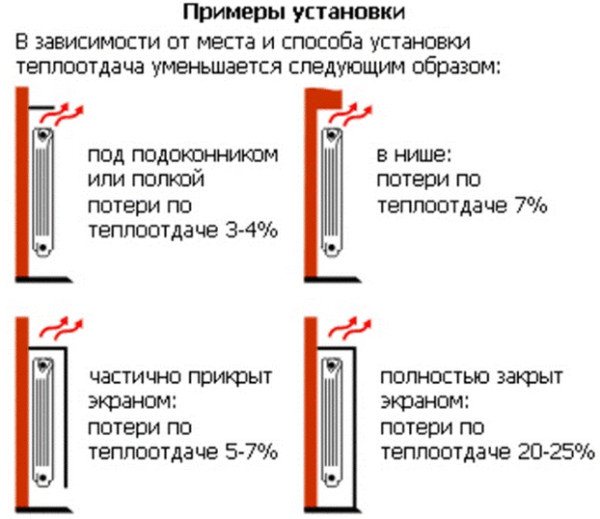
At the same time, we take into account that the installation method and the efficiency of heating radiators are greatly influenced by the installation method: under the window sill in the open form, the efficiency of the heating system is maximum - 96-97%, in a niche in the open form - up to 93%, in a partially closed form - 88-93 %, fully closed - 75-80%.
The heating radiator can be installed using a variety of methods, its piping is carried out with metal, polyethylene, polypropylene pipes
It is important during installation to correctly position not only the pipes, but also the batteries themselves, to connect in accordance with all recommendations and standards. In this case, the heating system will work very efficiently and will not require repairs. Share this helpful article:
Share this helpful article: