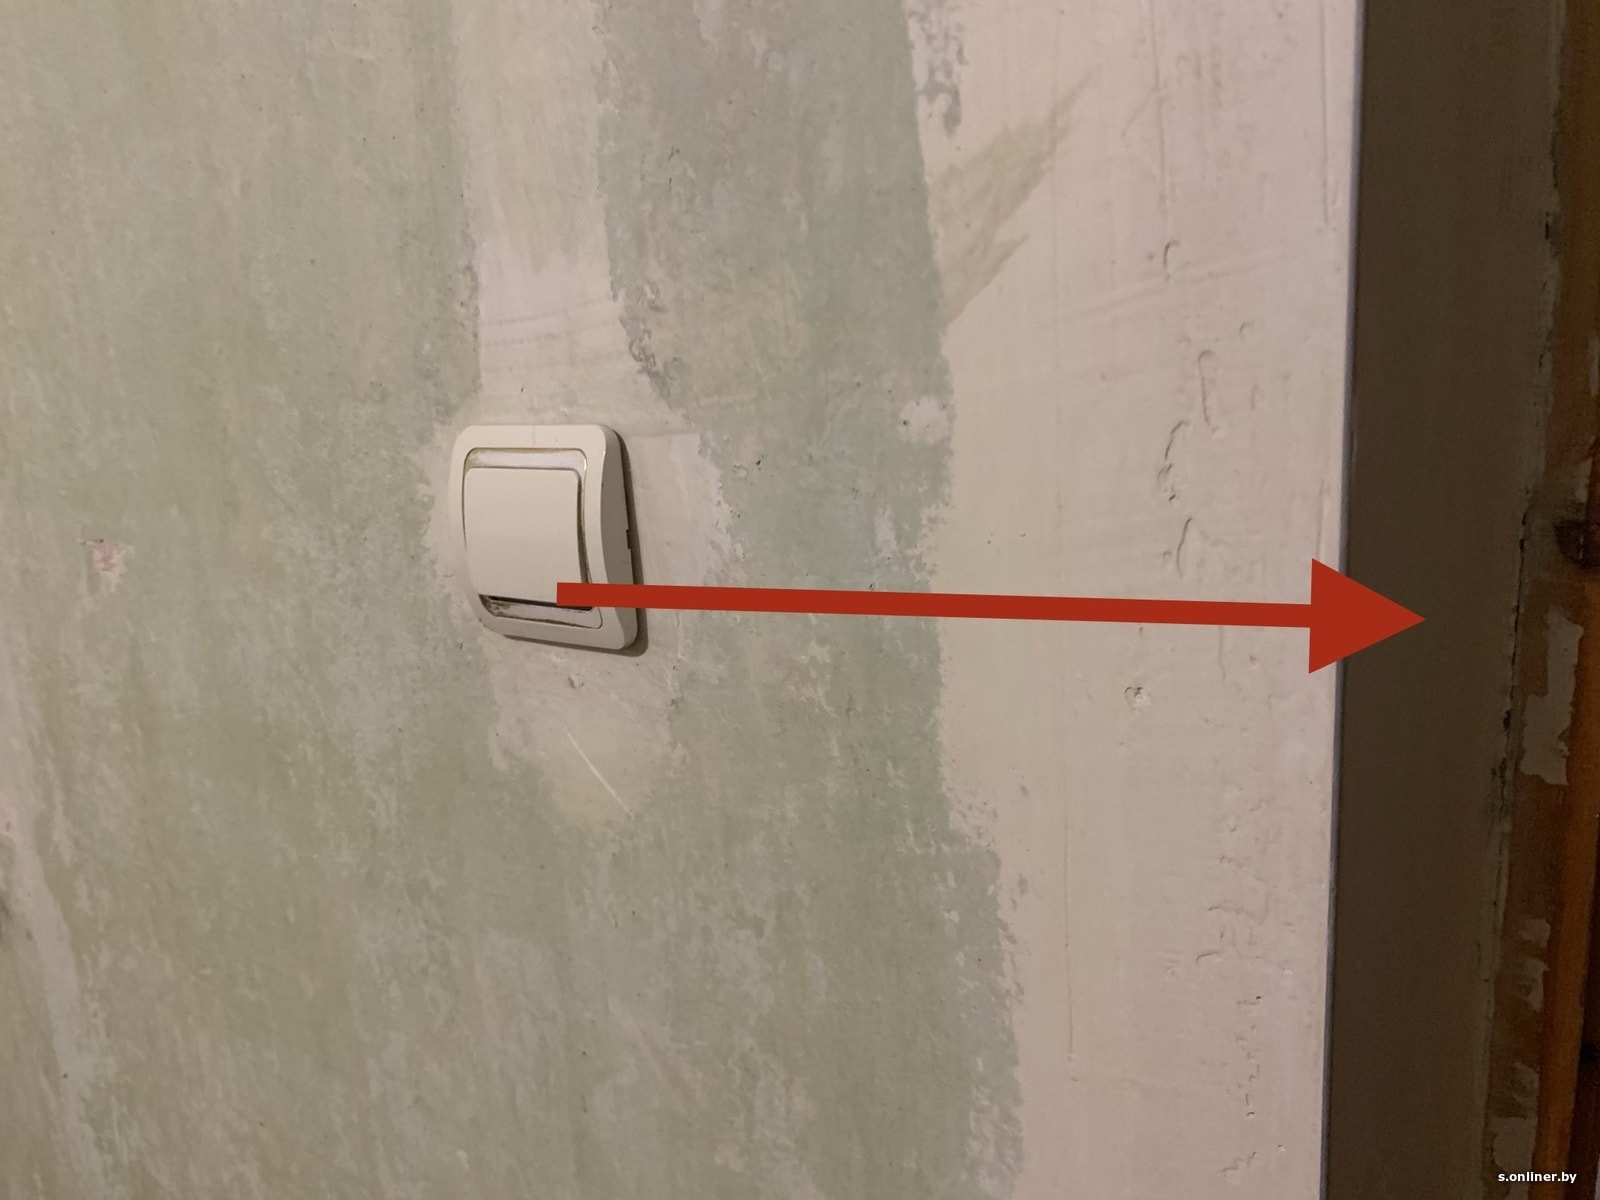
- What to do with the old switch hole
- Work safety
- Pros and cons
- pros
- Minuses
- Reasons for the transfer
- Installation of wires and wall chasing for them
- Transfer methods
- Necessary tools and how to replace the missing ones
- Laying a new line
- Making a niche and installing a socket box
- Connecting a new point
- A few final tips
- Common Methods for Transferring Sockets
- Shortening the wire
- Outlet Offset - Wire Extension
- Daisy chain connection
- Laying a new line
- 3 Ways to Gently Move the Light Switch to a Convenient Location Without Strobes
- Laying wires in the cable channel
- Use of decorative wires
- Installing a remote switch
- Preparatory work
- Switch repair
- Necessary tools and materials
- Contact cleaning
- Other Possible Problems and Solutions
- How to assemble a switch
- Installation of socket boxes in drywall
- Launching a new branch
- Chasing the wall and installing the "glass"
- Cable laying and terminal connection
What to do with the old switch hole
The question remains: what about the old “hole” from the switch? After all, do not hang around her doing nothing.
In principle, two options can be proposed. For example, just apply a decorative cover, which is sold in any hardware store.You will need to make sure that the dimensions of the cover match the dimensions of the socket. As mentioned above, the old socket at the same time will act as a junction box.
However, it will be possible to cover up the hole with alabaster. Which way to go is up to you.
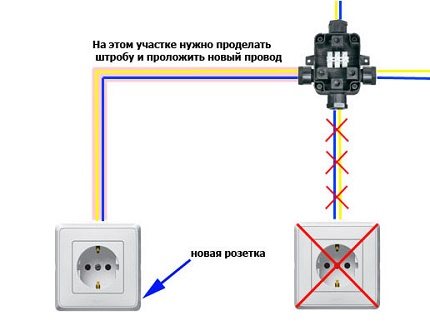
By the way, about the junction box. When choosing a place for a new switch, one must not forget that, according to existing standards, it should not be located more than three meters from the distribution box. Given the small size of urban (and rural too) apartments, it will not be difficult to comply with this requirement.

Seal holes with alabaster - the easiest solution to get rid of holes in the wall.
Work safety
In the end, it remains only to wait until the putty dries, and it will be possible to install the switch
It will be possible to lower the socket to the floor in the same way, the only thing you should pay attention to is the location of the old electrical wiring in the wall. In the case of switches, it will descend to it in the wall from the ceiling, but in sockets it will most often rise from the floor, but sometimes it comes in from the sides, so be careful and use special devices that can “feel” the wires in the wall. It is relatively inexpensive and you will be advised in stores which model is the best.
Pros and cons
So, we have considered the most frequent cases when you need to move the light switch to another place and resort to remote control. Now let's weigh all for and against Is this game worth the candle?
pros
- Extremely easy and fast installation without unnecessary noise and dust.
- The aesthetic appearance of the room is preserved down to the design features.
- The ability to re-arrange the switch when redevelopment.
- Additional features: smooth adjustment of light brightness, timer shutdown, custom scripts, etc.
Minuses
- Requires a one-time investment in equipment.
- The need to change the battery in the remote every 3-5 years.
- The transfer range is limited by the range of the radio channel (about 25-50 m).
Reasons for the transfer
 When changing the interior, people are faced with the need to move the switch
The main reason why you need to transfer is the inconvenience to use when the switch prevents the opening of the closet door or the bed covers access to it. This can happen after a furniture rearrangement or renovation.
Sometimes people are faced with the problem when to turn on the light and the bedroom, you need to walk to the corridor. Such an arrangement is very impractical and inconvenient, so you need to move or purchase a remote one.
With a low placement, there is a risk that a child will play with it. He can disassemble the switch, swallow small parts and get an electric shock.
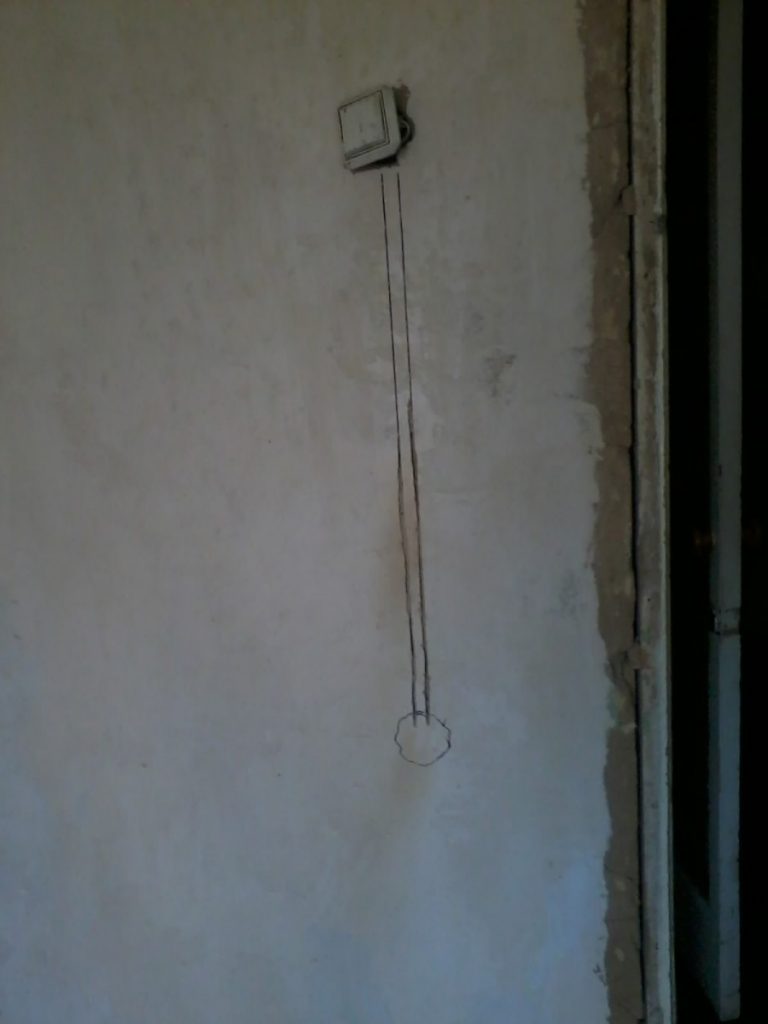
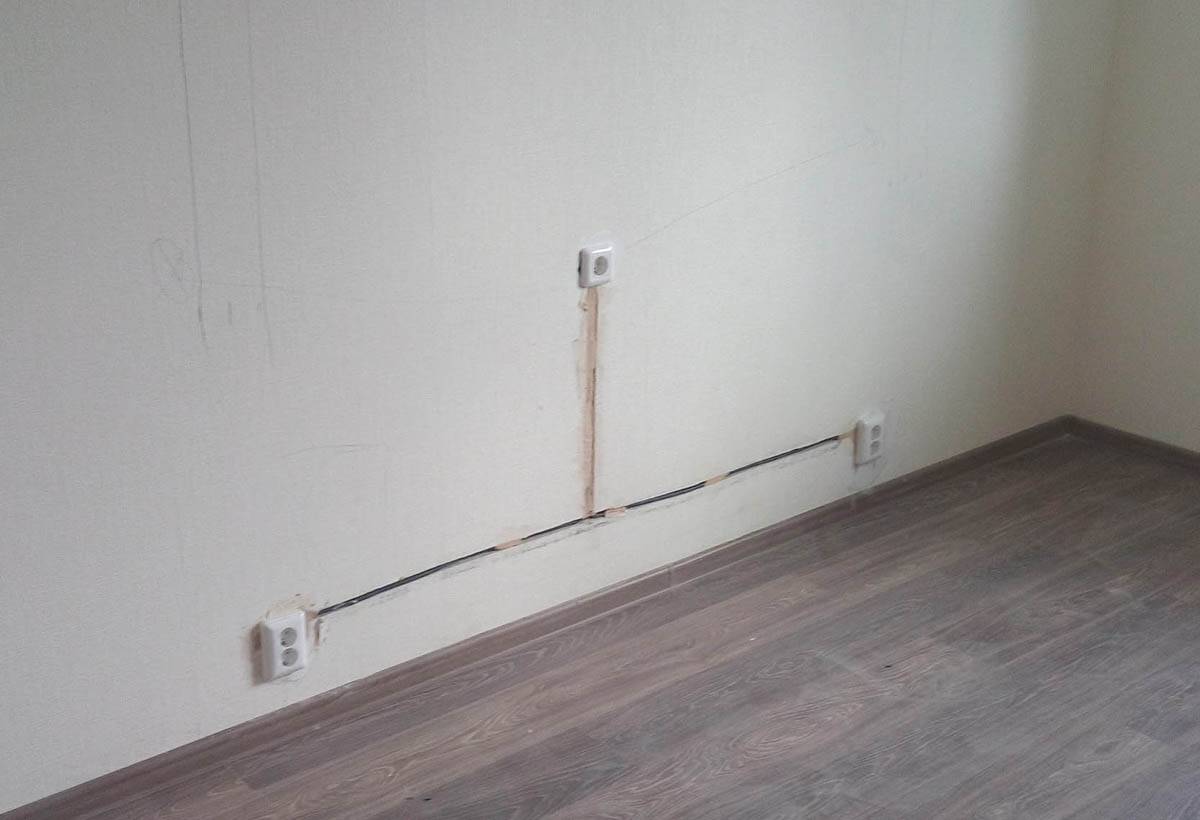
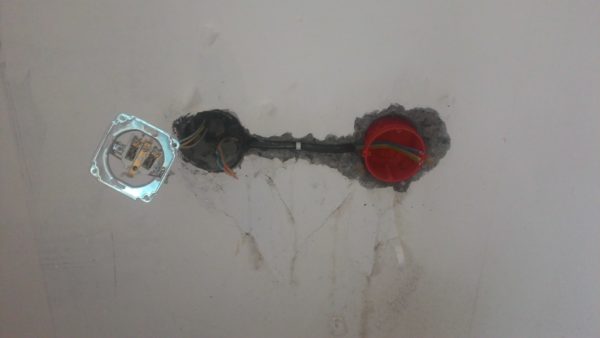
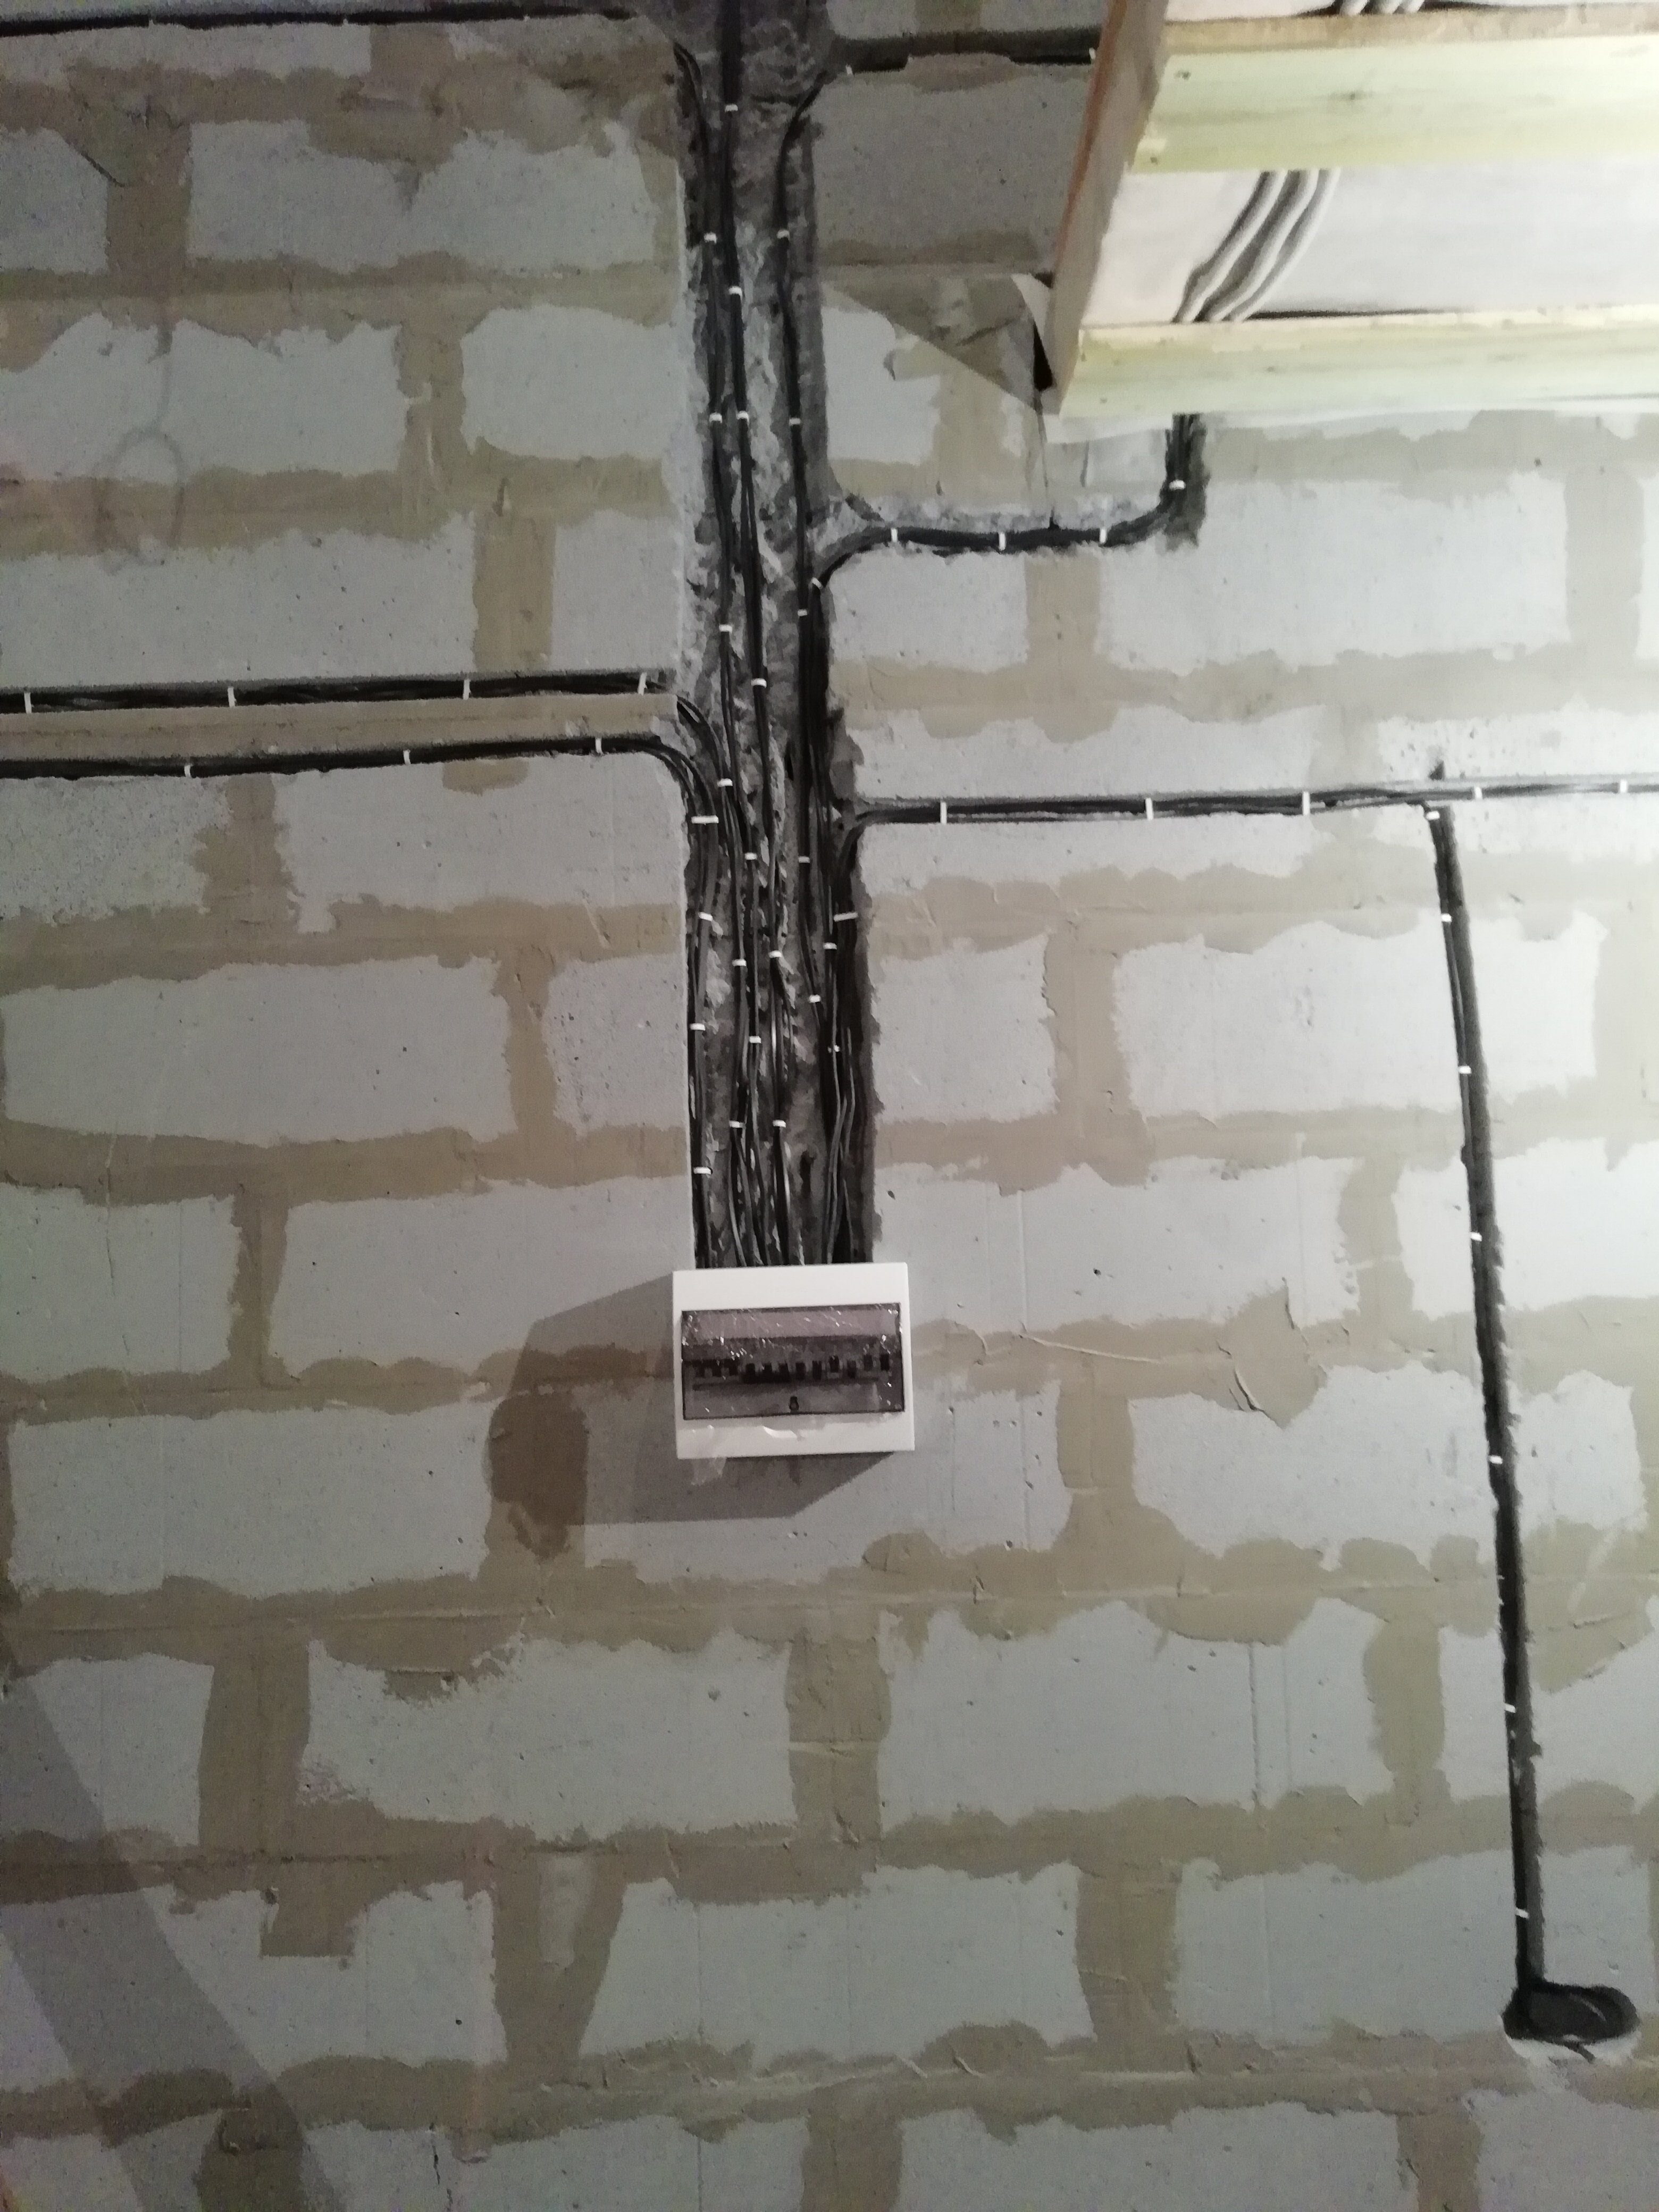
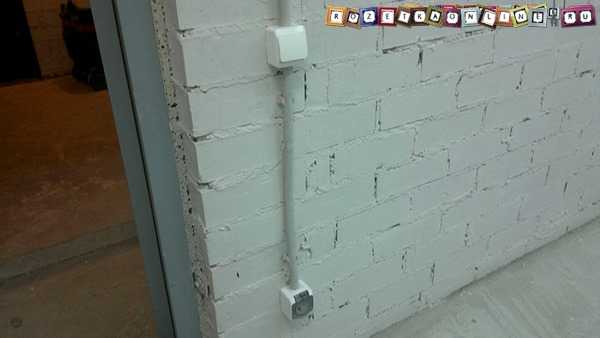
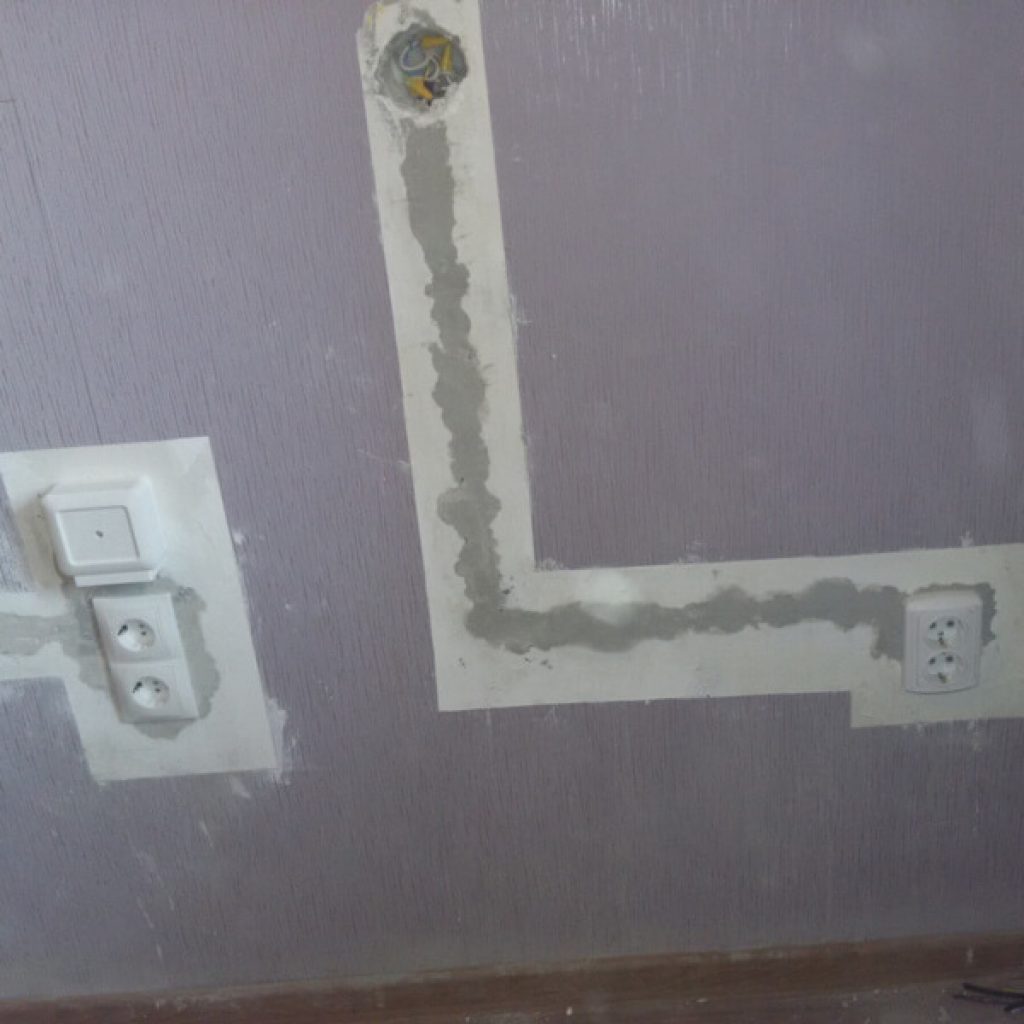
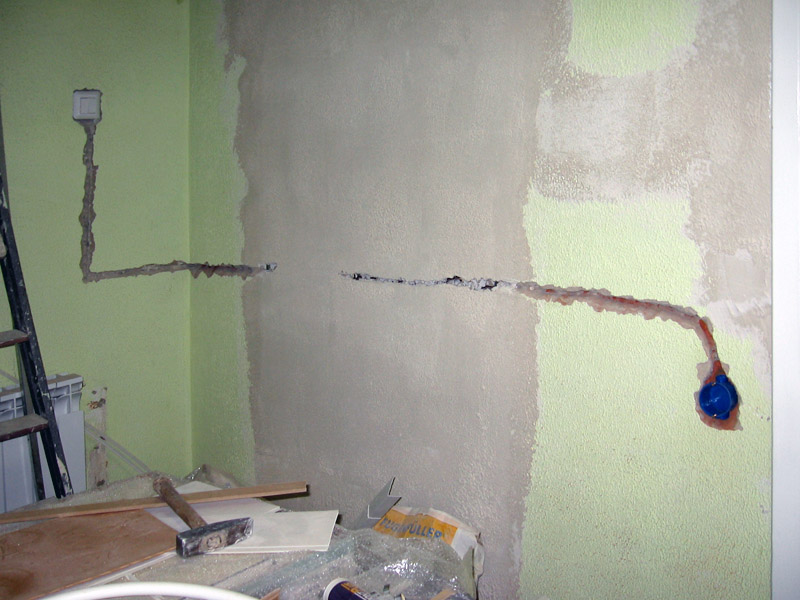
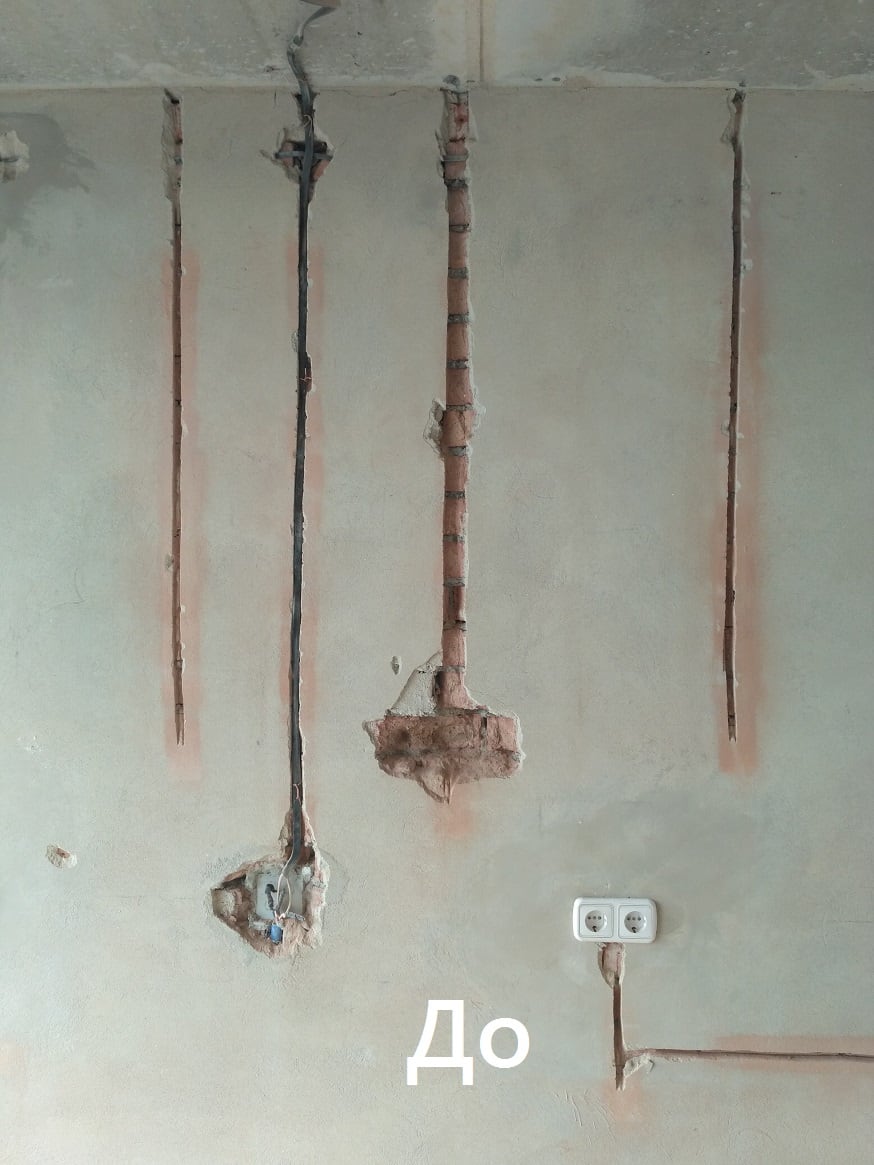
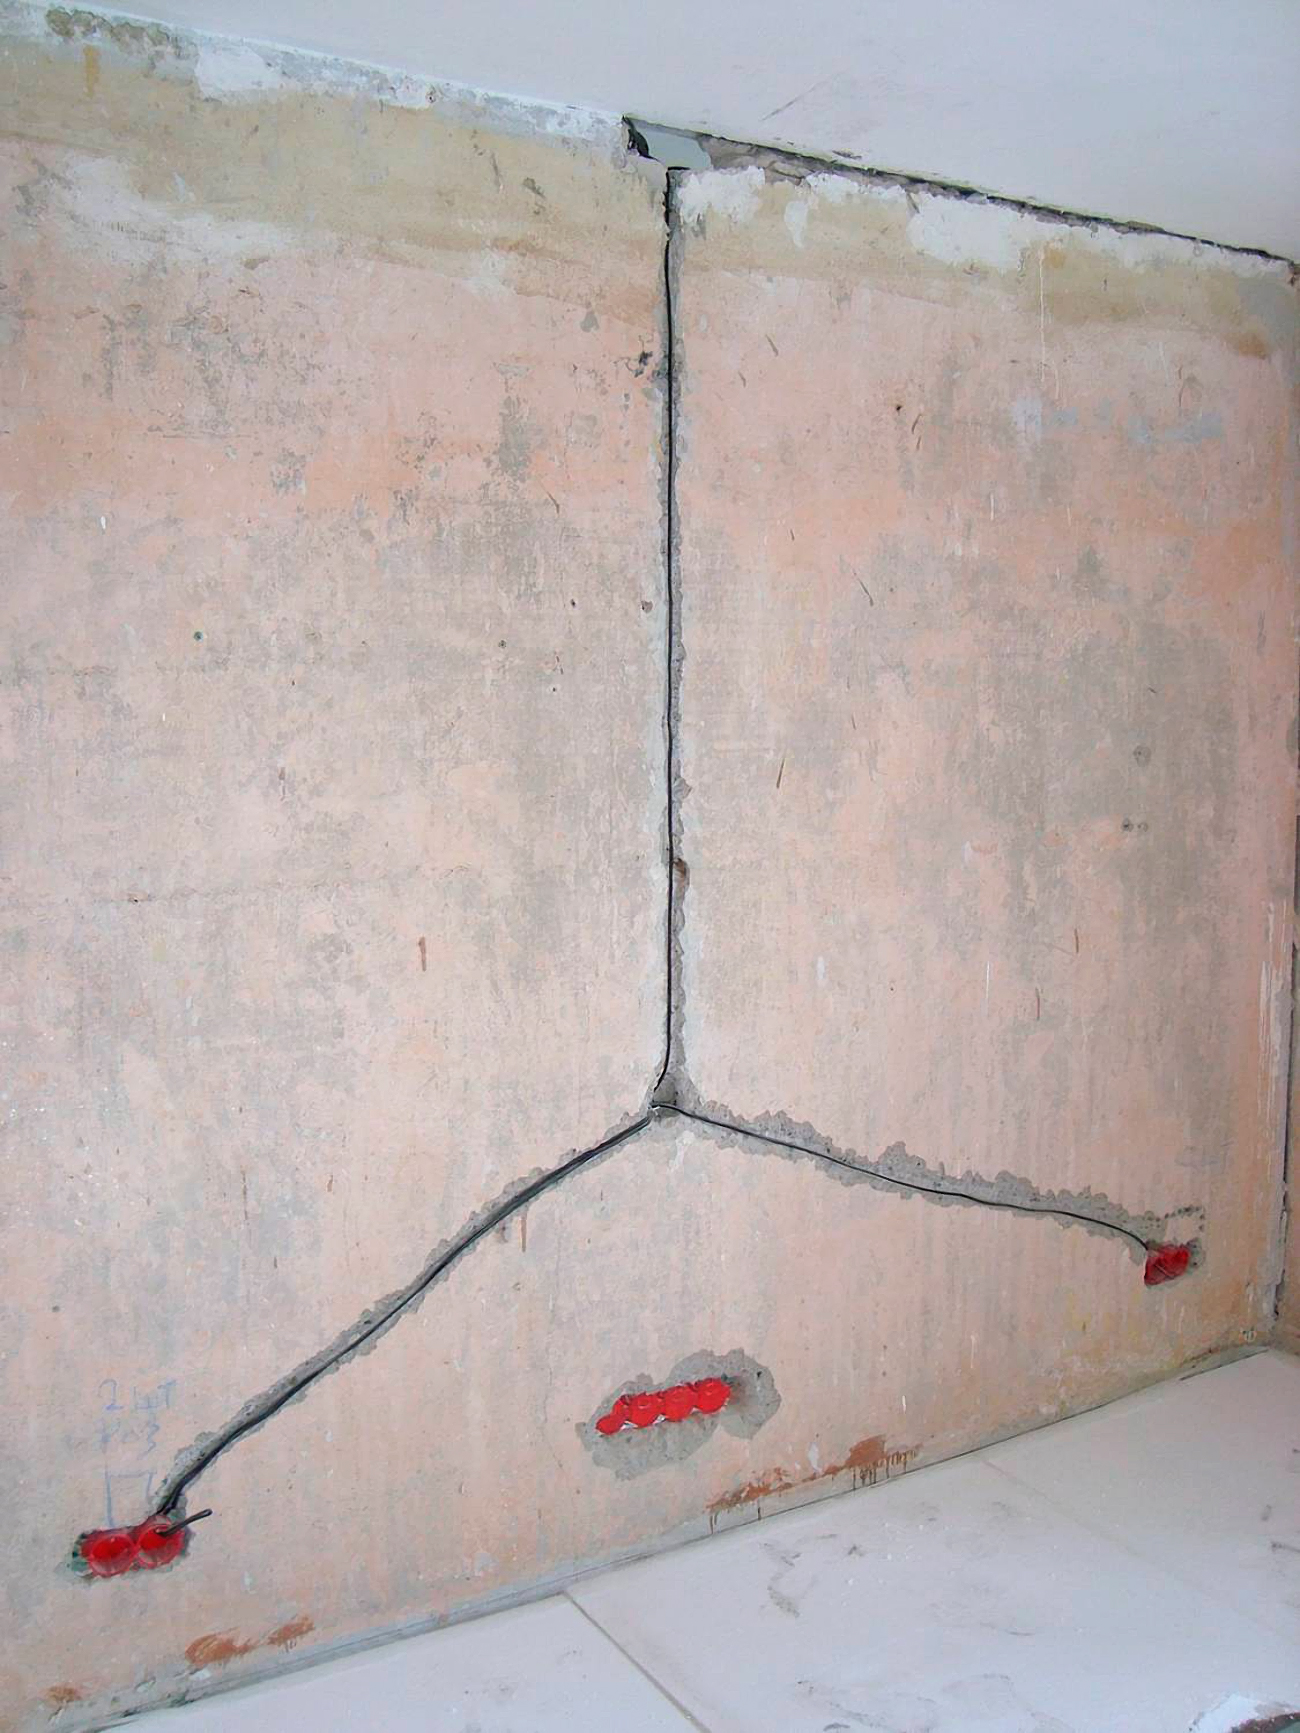
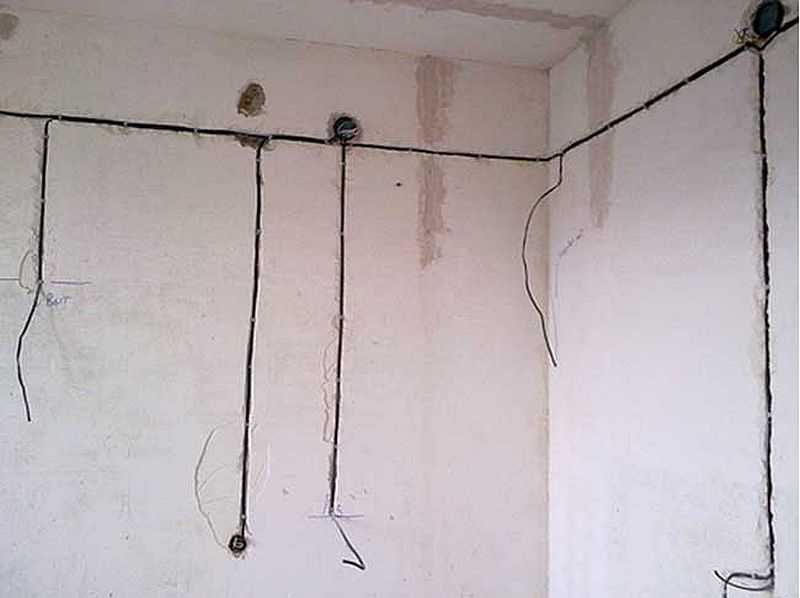
Installation of wires and wall chasing for them
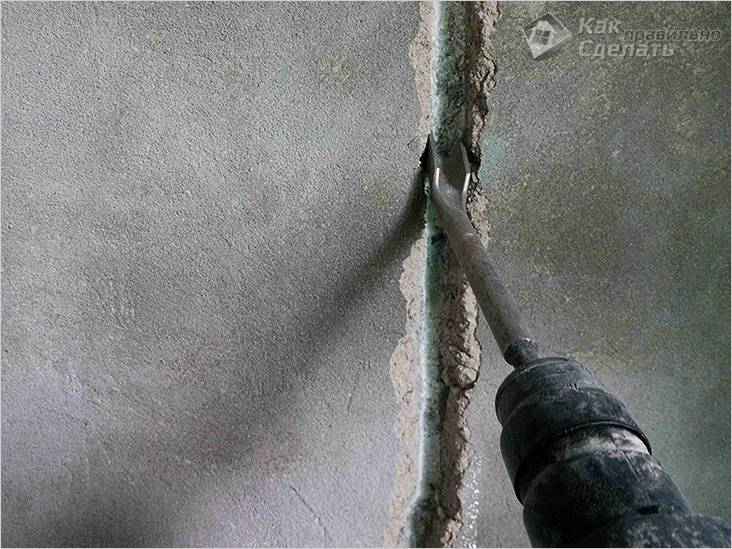
In principle, it is possible to make new wires sticking out of the niche, and use the switch socket as a junction box. But this is only possible if the length of the remnants of the wires is at least 15 centimeters. Now you will need to start drilling a socket for a new switch. This is done with a drill and drill bits for concrete. As a rule, a diameter of 70 mm is enough, but, depending on the model of the switch, this size can be changed. When the nest is drilled to the required depth, it will be necessary to gouge the wall.First you need to make sure that other wires and cables do not pass in the place of gating. To do this, the hammer switches to shock mode. The depth of the gutter usually does not exceed 25 millimeters. As for the width, it should ensure that the cable is completely immersed in the strobe. In addition, the smaller the width and depth of the channel, the less plaster material will be required to seal the strobe. Used for chipping special drill attachment. Goggles or even a respiratory mask will not hurt either: the process is quite dusty.
Before starting gating, an apartment power supply project must be completed, namely a wiring plan with places installation of switches and sockets.
When the cable is laid in the gutter, it can be additionally not fixed: immobility will be ensured through plastering. Then you can begin to cover the mounting box. This is done with the help of pre-diluted alabaster. After the alabaster mixture has dried, you need to make sure that the switch socket is securely held in its nest. If so, then you can proceed with the installation of the core.
Transfer methods
There are several ways to transfer, depending on the method of connection and installation, the following can be distinguished:
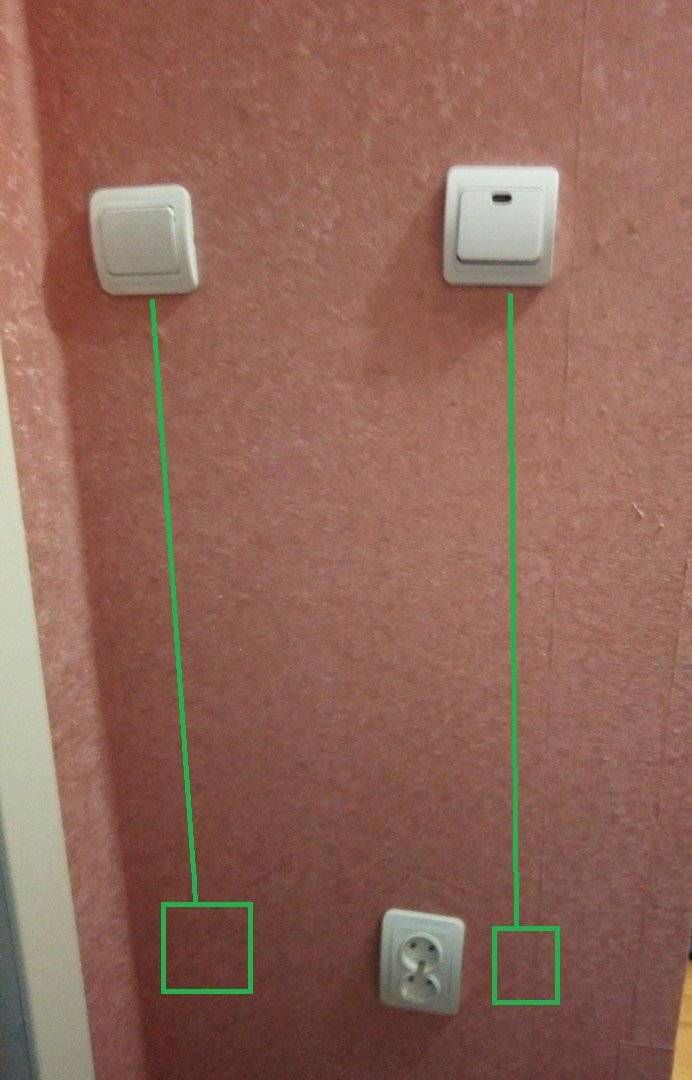
- Application of the loop. This method is the simplest: a jumper is laid from the old switching point to the new one. However, this method has disadvantages:
- the wire is laid horizontally, there is a risk of damage during further work in the wall;
- if the old one breaks, the new switch becomes inoperative.
Note! For correct operation new circuit breaker this method of transfer it is necessary that the second, old switch be in ON mode all the time
- Wire extension. This method is more reliable, but it is more laborious. To move the switch in this way, you need:
- dismantle the old device;
- check the wires for voltage;
- make a gate to the installation site;
- connect wires;
- put a junction box in place of the old one;
- lay the cable, assemble a new switch.
Important! Aluminum wires are often found in old houses, in order to avoid incorrect operation and the occurrence of a short circuit, it is not necessary to attach a copper wire to them. You will either have to change all the wiring, or mount the same aluminum wire
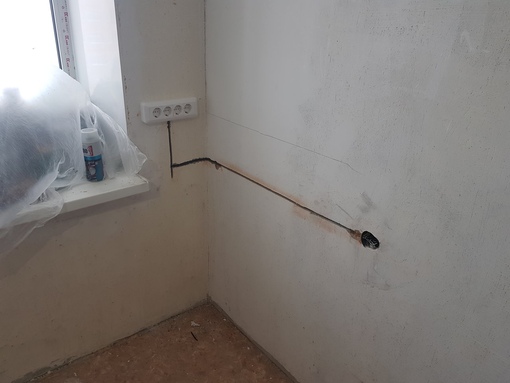
- Launching a new line. This connection method is the most reliable. The process is similar to extending the wire, only the starting point will not be the old switch, but the junction box. You also need to make a strobe in the wall, run and connect the wire to the switch, connect the wires in the box.
- It happens that you need to move the switch without damaging the wall.
The transfer process will take place as described above, but instead of a strobe, the wire is placed in a cable channel or baseboard, where there are holes for wiring. You will also need to purchase an overhead switch (embedded will not work).


Any unfamiliar work at first seems difficult, but if you carefully study the sequence of actions, prepare theoretically, practically, study safety precautions - with work on even a person without special skills can handle electrical installation.
Necessary tools and how to replace the missing ones
A good tool will speed up the work at times. If you wish, you can get by with improvised means, but here you need to look at whether the loss of time is worth the money saved, for which you could rent the necessary tool.
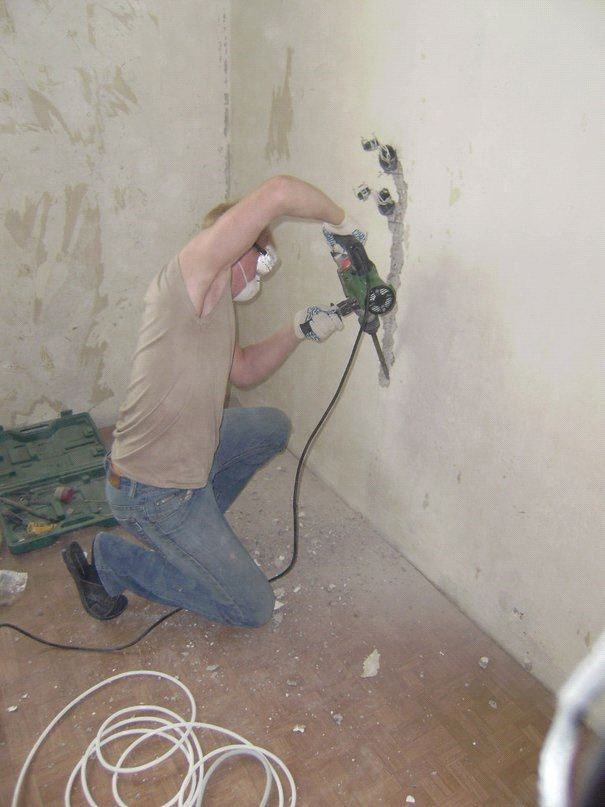
- Wall chaser. It helps to quickly make strobes - it works in tandem with a construction vacuum cleaner and does not leave dust. Your own wall chaser is a rarity, so it can be replaced by a grinder with a disc for concrete or a puncher, but there will be a lot of dust from them.
- Powerful drill with a nozzle for drilling a hole for the socket. It can be replaced with a drill for concrete - drill holes around the perimeter of the circle and knock out the remains of concrete from the inside. You also need to pair it with a wall chaser, if the wall chaser goes along two walls - finish 10-15 cm, which the furrower will not capture near the corner.
In especially severe cases (no electricity), it will be possible to make a furrow in the wall in the old fashioned way - with a chisel and a hammer, but it is difficult to say how long it will take.
Wire clamps - help to make a quality connection. If necessary, you can do without them - you can simply twist the wires with high quality and crimp them with pliers.
The rest is necessary in any case: socket box, socket, wire, pliers, knife, electrical tape, gypsum or cement for mounting socket boxes and covering the strobe.
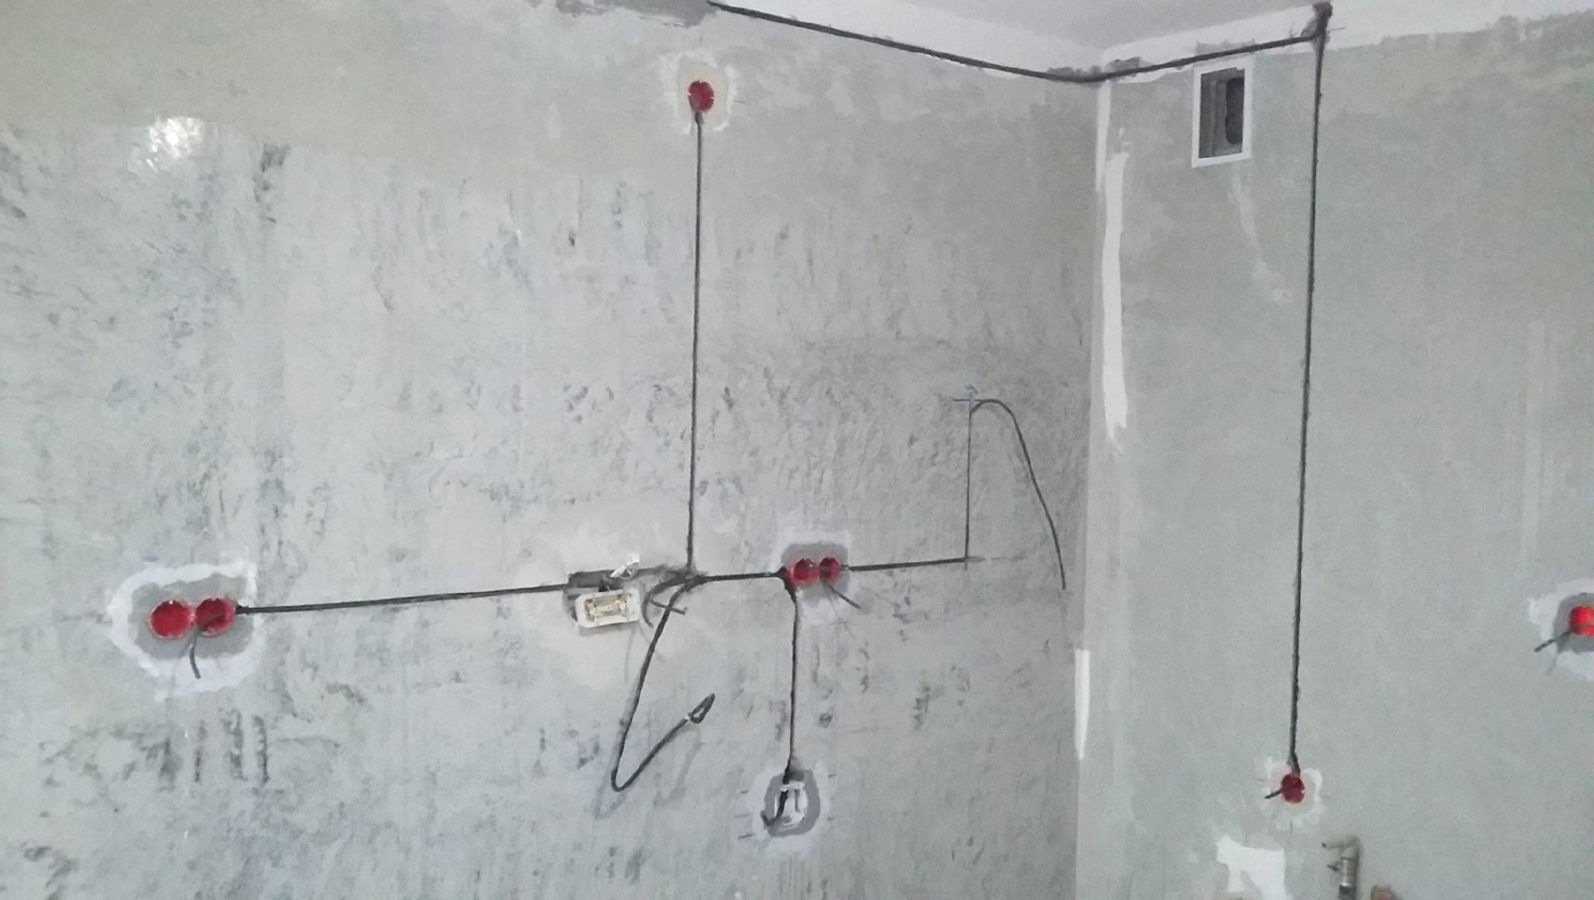
Laying a new line
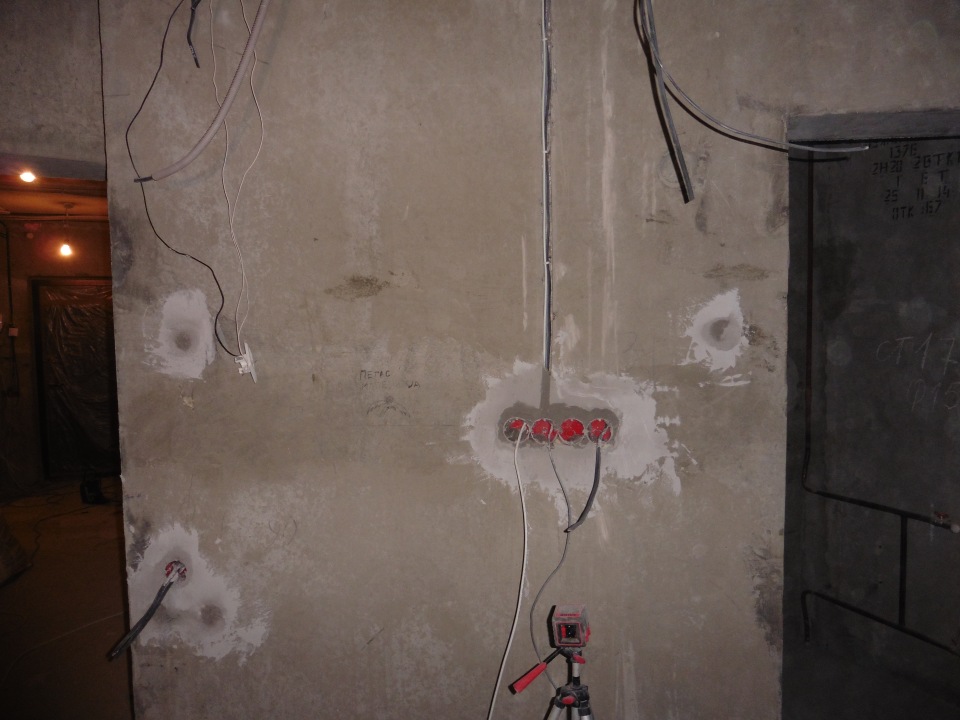
Making a niche and installing a socket box
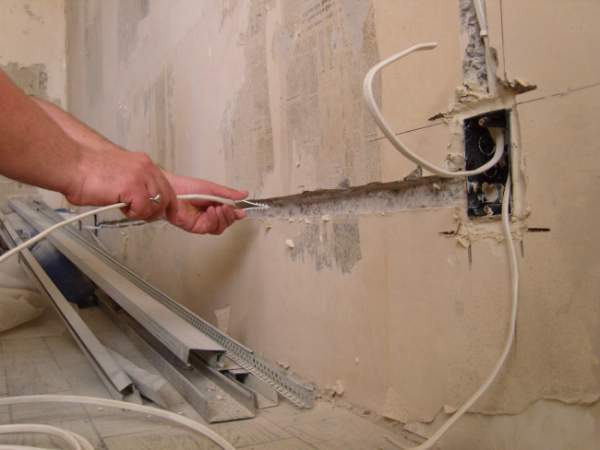
Before moving a hidden outlet to another area, it is necessary to carry out preparatory work. They consist in making strobes for laying the line.
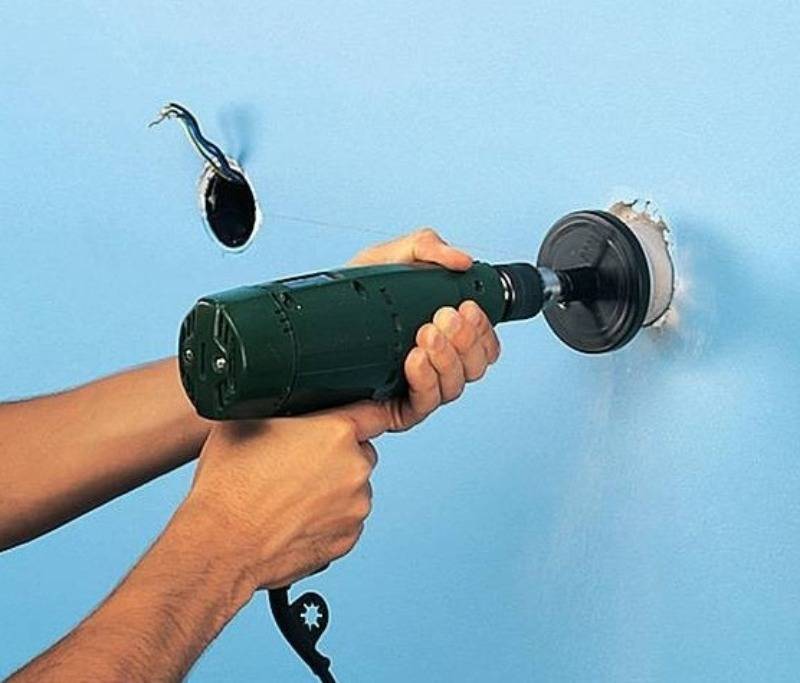
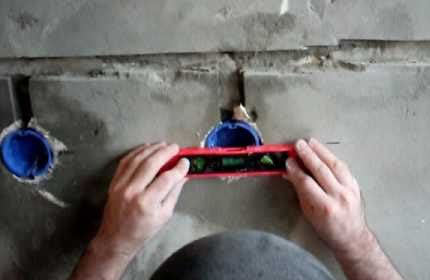
First, the working field is marked, and then a hole is drilled with a crown. If the crown is not available, you can use a hammer drill with a hammer drill or a grinder.After making holes, work with a chisel and hammer to remove excess wall material.
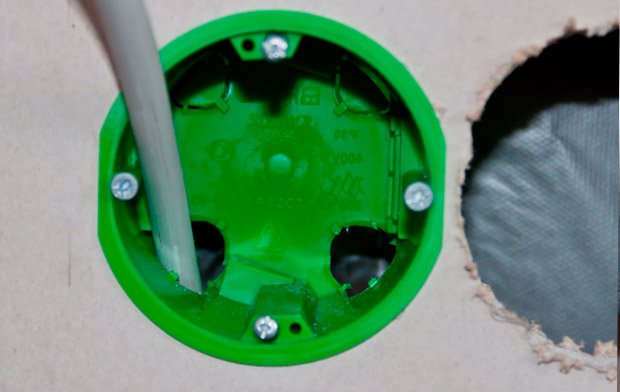
When the niche is ready, a “glass” is placed in it. From the reverse side of the glass, a cable is inserted from the switch box.
The socket box is fixed with a gypsum mortar (if we are talking about a concrete wall). When the mixture sets, the socket is cleaned of gypsum fragments. The inner walls of the device are wiped with pieces of cloth. In the walls of drywall or wood box installed in a pre-made "glass", and then fix the product with side struts (paws).
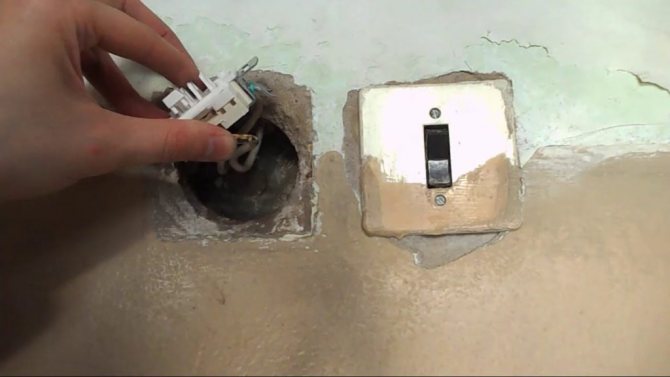
Connecting a new point
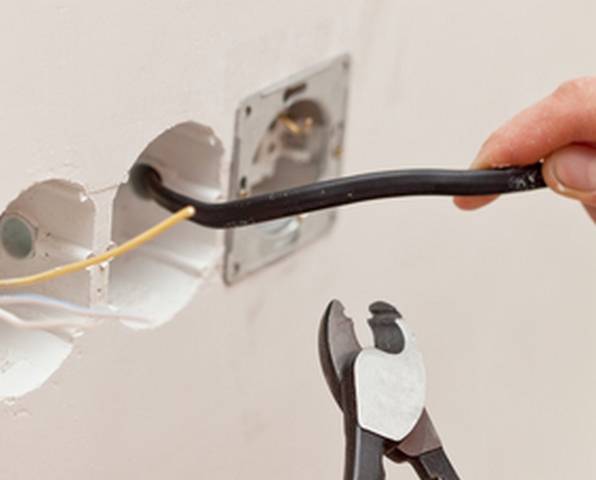
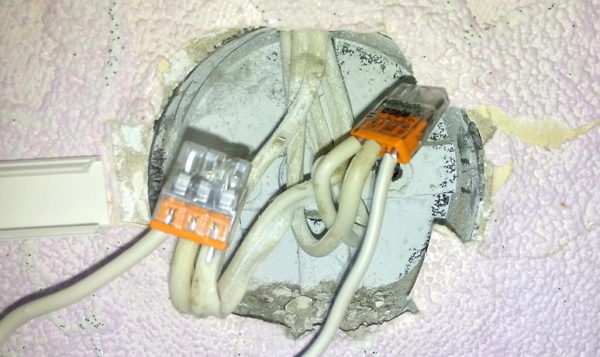
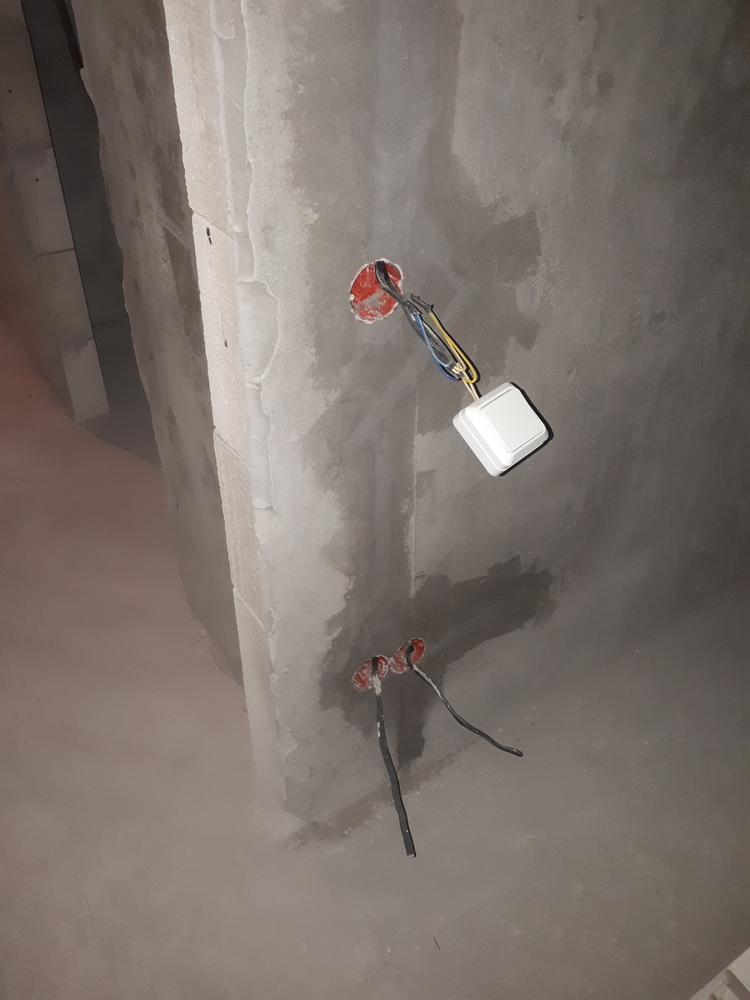
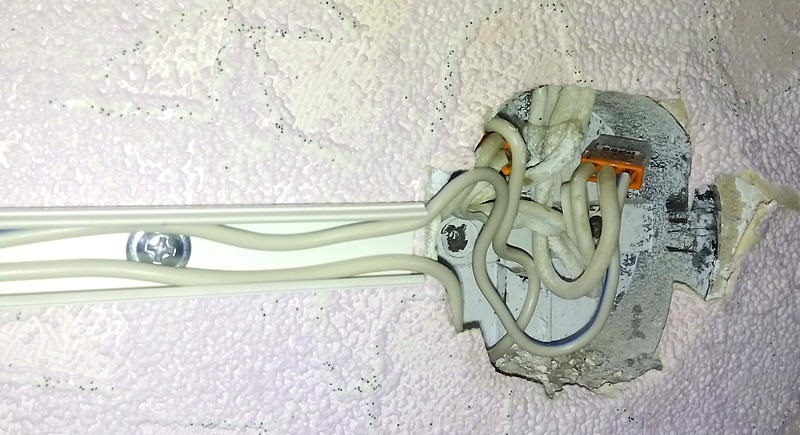
Having selected the cable of the required length to power the new point, one of its ends sent to the terminal blocks of the old outlet. The second end is brought to the contacts of the new point. Zero, phase and ground are connected in parallel directly to the socket contacts.
To avoid a short circuit, each strand of the wire has a separate plastic braid. When connecting, the insulation must be removed. A crossover knife will help in this task, which allows you to remove the insulating layer without damaging the cores.
It is necessary to clean the veins from the braid very carefully. Since if they are damaged, an emergency will soon arise.
When working with a PE conductor, one should take into account the fact that, according to the Electrical Installation Rules, it is necessary to maintain its integrity. This requirement is due to the fact that if the ground electrode is broken at one of the sockets, all other devices in the circuit will also become ungrounded.
When neutral, phase and ground wires are connected, it is necessary to fix the working part of the device in the mounting box. You should also install a decorative panel.


A few final tips
- Chasing walls for wiring is carried out parallel to the ceiling or walls, the angle is strictly 90.
- From corners and windows, it is necessary to indent at least 10 cm, and from the gas pipe - 40 cm or more, from the ceiling - 15 cm.
- The maximum allowable strobe depth is 25 mm.
- It is forbidden to lay a strobe in a load-bearing wall, columns and beams of multi-storey buildings.
- Crossing of wires during their laying is unacceptable.
- If the wiring is planned through the bottom of the walls, and the switches and sockets are low, then you can make strobes in the floor or run an electrical cable through the baseboard.
- Chasing ceilings is prohibited, as it can cause serious damage to the building structure.
Common Methods for Transferring Sockets
To choose the right way to move the outlet correctly, you must have at least basic knowledge of electrical engineering - not always the method used in one room can show itself well in another. Everything rests on the power of the devices that will be switched on at a new point.
Shortening the wire
The easiest way - for example, a wire descends from the ceiling in the wall, while the socket is located 20 cm from the floor, and the new location will be 50 cm.
The procedure is as follows:
- Dismantling the socket and socket.
- Extract the wire from the strobe to the desired height.
- Drilling a hole for a new socket.
- Insertion of wires into the socket and its installation.
- Closing up the old hole for the outlet and strobe.
- Installing an outlet.
Outlet Offset - Wire Extension
If the room is planned to be rearranged and in a new place for TV or there is no outlet for the iron, then the wire from the old one can simply be extended. If the wire is in the wall, then you will have to make a strobe from the old outlet to the new one.
Everything is done in this order:
- The old socket and socket are removed.
- A hole is drilled for a new socket and a strobe is cut to it.
- A socket box is installed in place of the new outlet, and a twist box is installed on the old one.
- The wire is extended and laid to a new outlet.
- Strobes are closed and a socket is installed.
In some cases, the hole for the old outlet is completely covered with cement or gypsum. It is not recommended to do this, because most often it is the places where the wires are connected that deteriorate in the electrical circuit. It is better to make an additional box and open it if necessary than to break the wall.
Daisy chain connection
If a rearrangement was made, this does not mean that after a while another one will not be made, and then a third, and so on ... If the previous method was supposed to transfer the old outlet with your own hands, then a logical thought should arise - leave the outlet in place, and install another one in a new place.
This method of increasing the number of outlets is used quite often, and new points are made open and closed wiring. At the same time, it must be remembered that it is not recommended to connect powerful devices to them - the more twists from the meter to the device, the higher the probability of damage to one of them.
There are few nuances here:
- Most often, the wires are clamped through the socket terminals. You can twist them separately, but it's just a waste of space and time.
- The wire for the new outlet must be selected with the same cross section as for the old one.
- Wires are always laid at right angles. Punching a diagonal strobe is prohibited by the rules of the PUE.In addition, if in the future you need to drill a hole in the wall, it is much easier to imagine where the wire can go.
Laying a new line
It is carried out in two ways - the outlet is laid from the junction box that is already in the room, or a completely new line is made directly from the meter. The first method is used when it is necessary to update the wire - for example, if the old one has been repeatedly overheated, as evidenced by hardened and crumbling insulation. A new line is laid under a powerful device - when a transfer is in progress electric stove sockets, boiler or air conditioner.
Everything is done in a few steps:
- The missing strobes are made from the junction box or electric meter shield to the new outlet. If possible, you can use the old furrows, but you will have to beat the putty out of them.
- An automatic switch is installed in the shield, in case of a short circuit.
- The wire is laid in a strobe and fixed - it is smeared with gypsum or cement.
- The socket is installed and the socket is connected. If a powerful device is connected, then it is recommended to tin the wires.
You can leave the old outlet in its place, or disconnect and cut the wires from the junction box, dismantle the sockets and cover everything with plaster. Of particular difference between carrying powerful outlets in the kitchen, to which a three-phase line can be connected and there are no ordinary household ones for 220 volts. All operations are performed in exactly the same way, only you have to connect more wires.
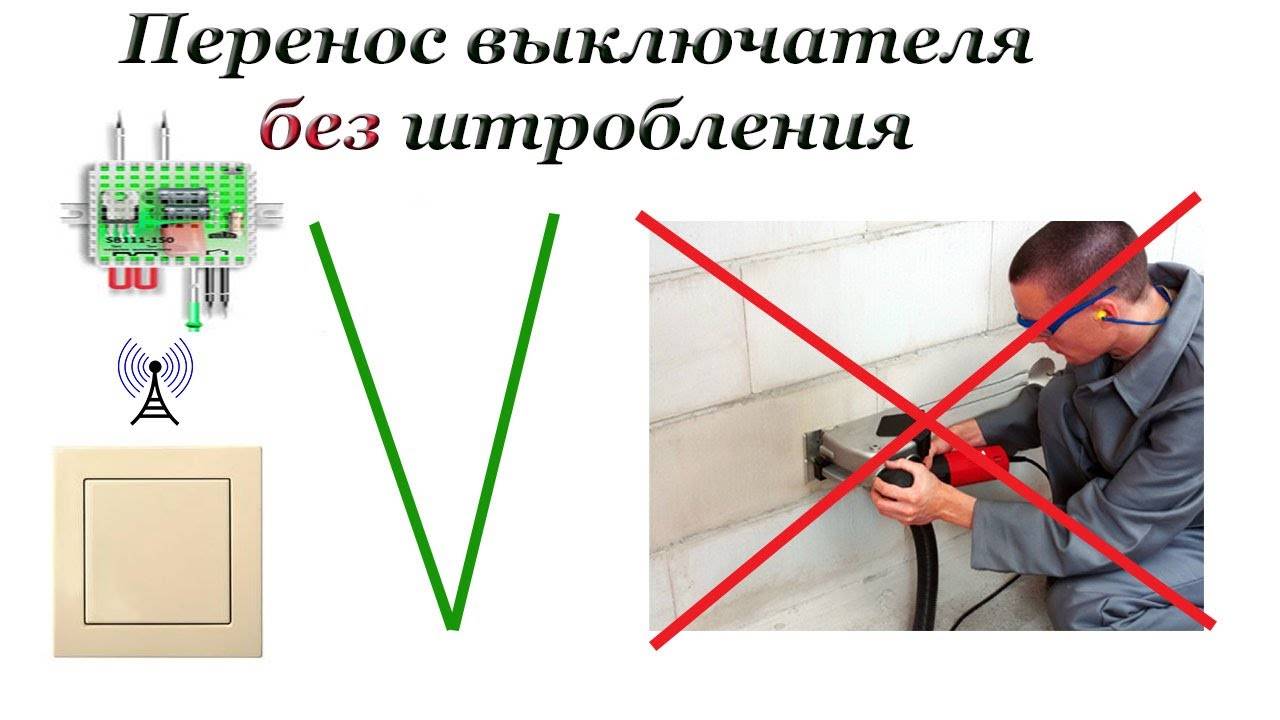
3 Ways to Gently Move the Light Switch to a Convenient Location Without Strobes
Often there are situations when you need to move the light switch to another place. Often, this is done by the new owners of the apartment when moving. But if you decide to simply change the location of the switch without starting repairs, you can do without wall chasing.
Laying wires in the cable channel
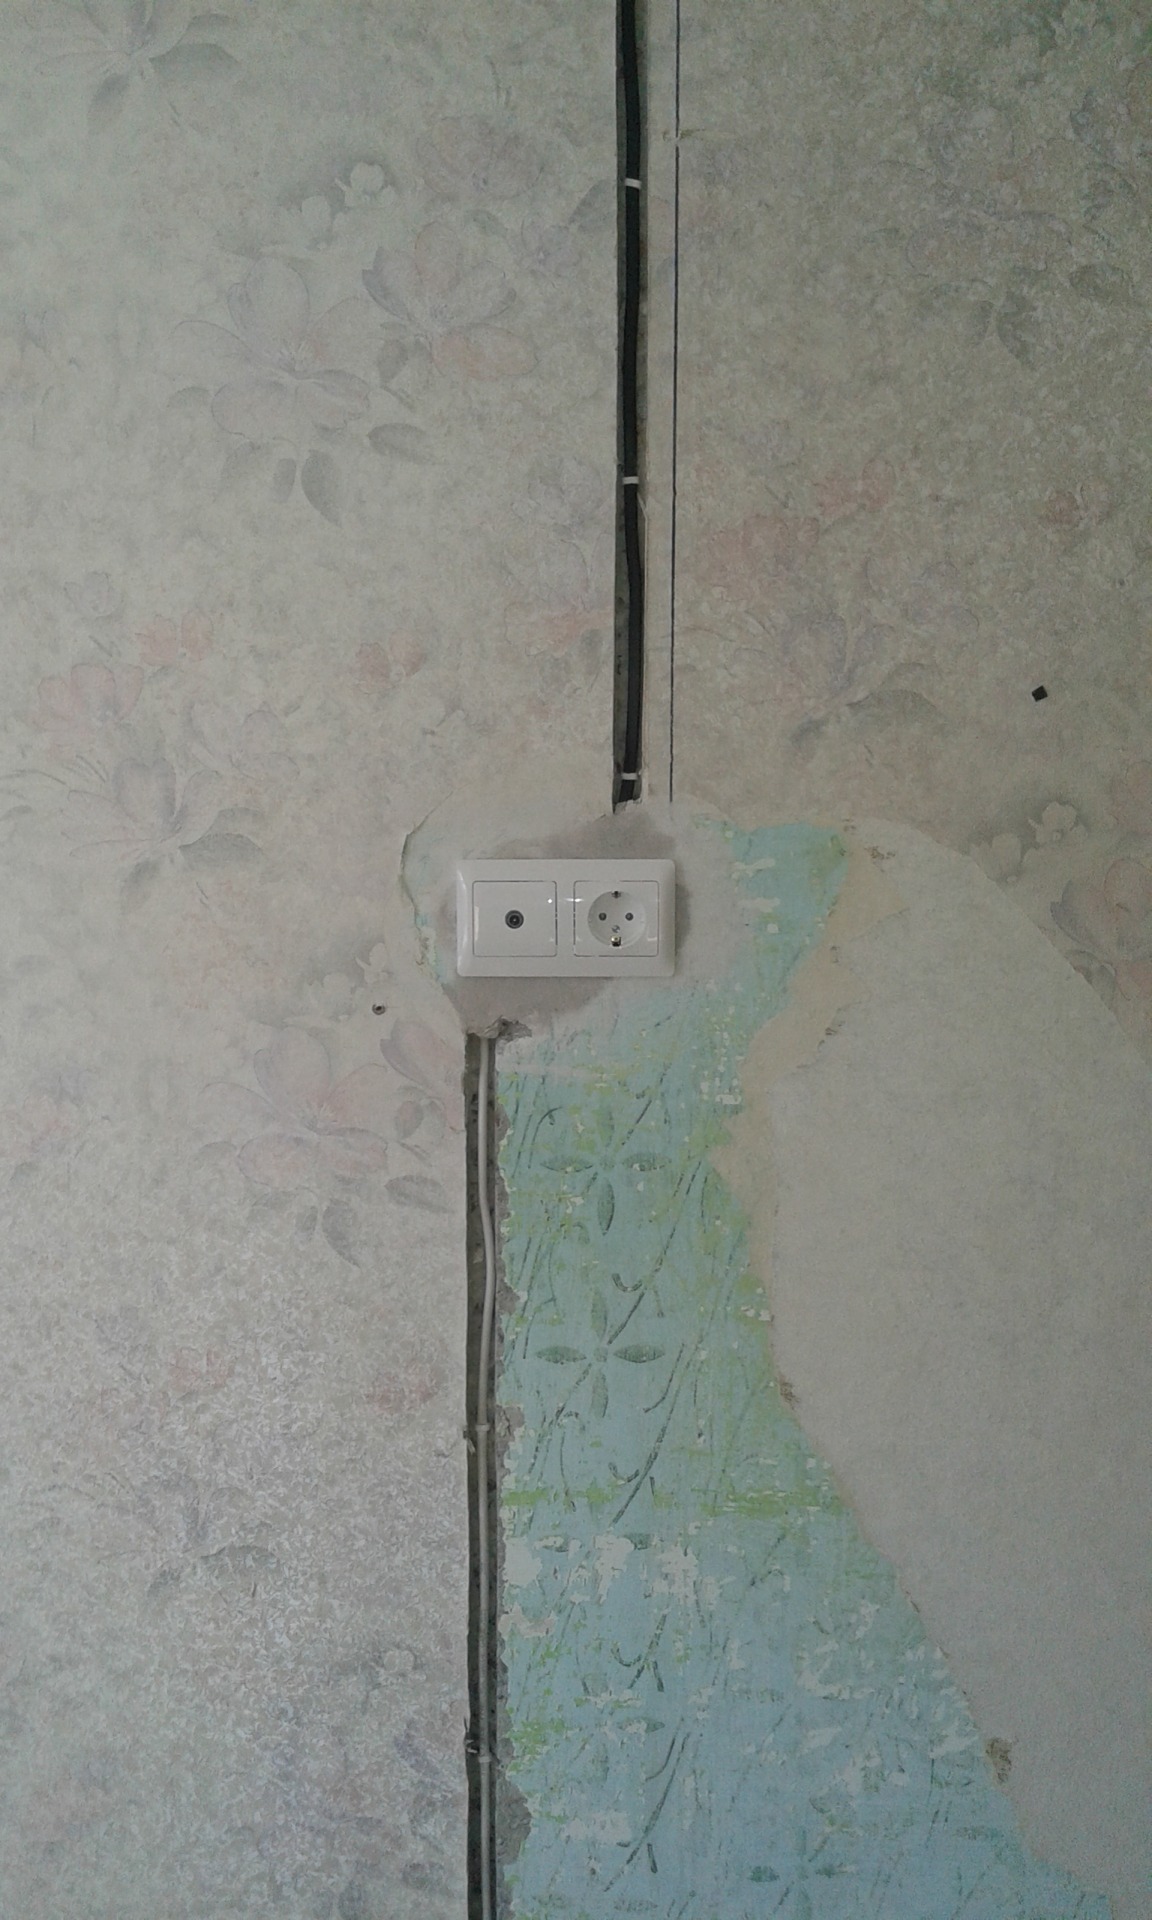
The most obvious way to move the wires is to run them to the switch's new location in the cable duct, a closable plastic box that mounts to the wall. AT stores can be purchased not only cable channels of different sizes, but also different colors and even textures, for example, under a tree. Plastic boxes are fixed on the wall with self-tapping screws, causing minimal damage to wallpaper or paint. Such channels can be stretched anywhere and hide all the wires in them.
Use of decorative wires
Another option for designing wires when moving a switch to a new place - decorate them according to the interior. You can buy colored wires or make them yourself. A very interesting decor option is obtained when the wires are made in the form of tree branches.
To implement this idea, you will need green or brown cables. If you didn’t find suitable ones in stores, paint or glue them with colored tape yourself, after which leaflets cut out of paper or other materials, birds and other elements that your imagination tells you are glued to them. Thus, the converted wires will look advantageous in the interior.
Installing a remote switch
This is just a godsend for a modern designer, because they can be installed anywhere, even in a closet. There is no need to ditch the walls and make repairs.
The remote switch consists of:
- a receiver that is attached as close as possible to the on / off object or inside it, if the design allows;
- switch (transmitter), which can be made in different versions.
The wires only need to be connected to the receiver, the signal to the switch will be transmitted using an infrared pulse or radio waves. Switches are of several types:
- touch - work by touch;
- controlled by wi-fi or using radio waves;
- multi-channel - you can simultaneously connect several transmitters and control several devices;
- with a delay - they turn off the chandelier not immediately, but after some time, so that, for example, a person has time to get to bed.
The distance from the transmitter to the switch varies depending on the type of device and is 20-25 meters.
Light is controlled by:
- touching the touch panel of the switch;
- pressing a button on mechanical devices;
- from the remote control.
Remote switches are perhaps the best solution to the problem of masking wires.
Preparatory work
In preparation, first of all, a diagram is drawn up, the location of sockets or switches is selected, and the location of the cable is also determined. To do this, you need to find out how hidden wiring is laid. If it was made according to standard projects, then you can find the wires using a special device. Then the amount of work is estimated, and the right tool is selected, if work is done by hand:


- perforator;
- crown;
- screwdriver, pliers, hammer, chisel, probe.
The following materials are needed:
- mounting box;
- cable (recommended VVGng);
- socket;
- dowel-clamp, gypsum or alabaster, electrical tape.
When choosing an outlet, you must correctly determine which type is needed. Grounded outlets are currently in use. When transferring them, it is necessary to provide for the laying of a ground wire.
Switch repair
It is far from always necessary to replace the switch if it is not working properly. It is possible that you just need to do a little repair.
The following signs speak of its necessity: it does not turn on or not turn off light when a key is pressed, a crack is heard after turning on, the lamps in the lamp often burn out, the light blinks, the switch heats up.
Necessary tools and materials
To carry out repairs, it is enough to have such a tool:
- screwdrivers (minus and Phillips, different sizes);
- pliers;
- wire cutters;
- tester;
- indicator screwdriver;
- sandpaper;
- file.
Work begins with the disassembly of the switch. The procedure is carried out in the manner previously described.
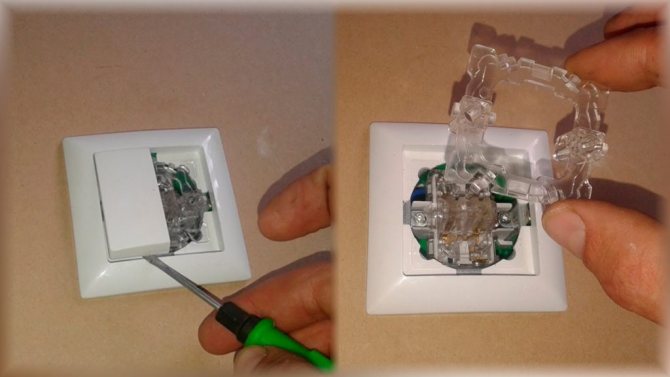
Contact cleaning
The most common cause of a malfunction is the burning of contacts. It is quite possible to clean them yourself. Coarse cleaning is provided with a flat screwdriver and a knife. Fine work will require sanding paper. Everything must be done carefully so as not to damage the spring mechanism and plastic parts.
Other Possible Problems and Solutions
Other causes of problems can be identified:
- Bad contact in the clamp. The ends of the wires are removed from the terminal block and bite off at a distance of 10-15 mm. Then the wires are again stripped and re-securedly fixed.
- Poor quality clamp screws. They do not provide reliable fastening of the wire. Possibly not long enough.You can try to replace the screws or increase the diameter of the wire by bending or tinning it.
How to assemble a switch
In case of breakage of plastic parts and melting of the body, it is not advisable to carry out repairs. It is much easier to replace the old switch with a new one.
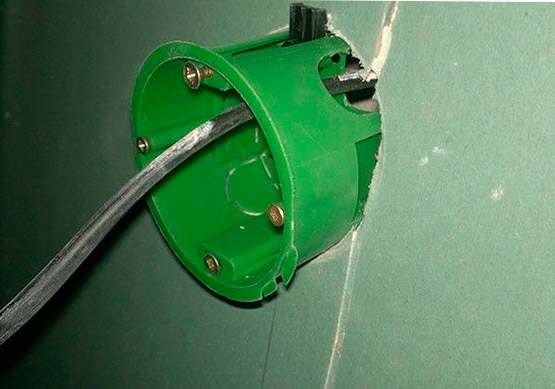
Installation of socket boxes in drywall

When working with drywall, the cable is laid in advance, or pulled through technical holes and broaches. In places of future cable switching (connections), or in those places where there should be a socket, leave a supply of cable, and mark outside where this cable is located. Mark the place of the future hole for the socket in any way convenient for you, for example, screw a self-tapping screw in this place.
The markings for socket boxes are made in the same way as markings on concrete. The distance between the centers of the circle is the same 71mm
It is important to consider that the drilled hole is already impossible to fix (more precisely, nothing is impossible for a good electrician), but before calling an electrician, you need to try to do it yourself
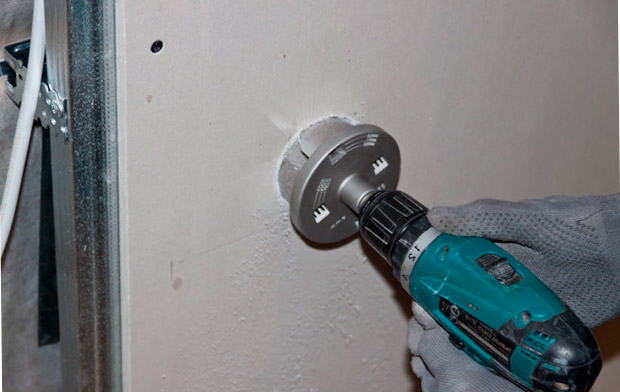
Holes in drywall can be made with a regular wood crown, 68mm in diameter, using a screwdriver or drill.
After drilling the hole, you need to find the right wires, which should be right behind the wall. It happens that they are hidden in a junction box, or hang on a cable, with which the wires can be pulled to the hole. Each master has his own way of pulling wires in hidden cavities, but this is a separate story.


Now the most interesting. The most painful procedure is the correct installation of the socket in drywall. This is due to the fact that different manufacturers drywall sockets (or wood), there are ears for securely fixing the socket box to the wall of the floor (gypsum board, plywood, or whatever you have). In some cases, because of these ears, the socket does not enter the prepared hole, but this problem does not occur on all sockets!
It is best to take care of this in advance when buying socket boxes. See that the ears in the open state do not go beyond the circumference of the socket itself, for example, like here
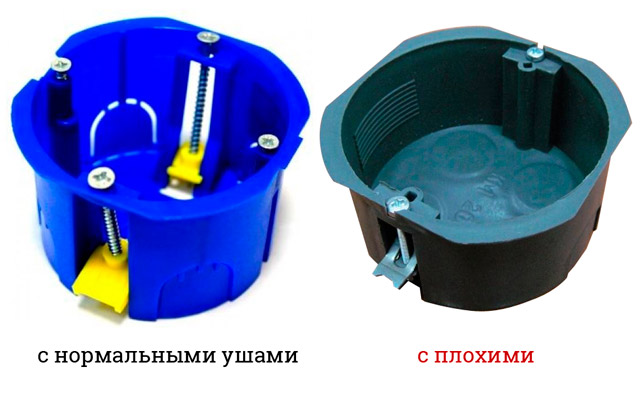
If, nevertheless, you managed to buy the “wrong” socket box, then you can use one little trick: lugs are made in plywood or drywall at a slight angle (it is enough to make them only on one side), after which the socket box can be installed normally. The socket should normally fit into the hole at an angle. The main thing is not to overdo it and not to make a hole of a larger diameter than the outer edges of the socket
Launching a new branch
This method involves spending more time and effort, but allows you to get the safest transfer of an electrical outlet.
A method involving the withdrawal of a new line is often used in panel houses, where the wires are literally walled up in a concrete wall, and therefore remove them does not seem possible. In this situation, they are simply de-energized and left in place, and a separate strobe is laid to power the new outlet.
With the help of the new branch, you will be able to move the connection point not only on the opposite wallbut also in the next room
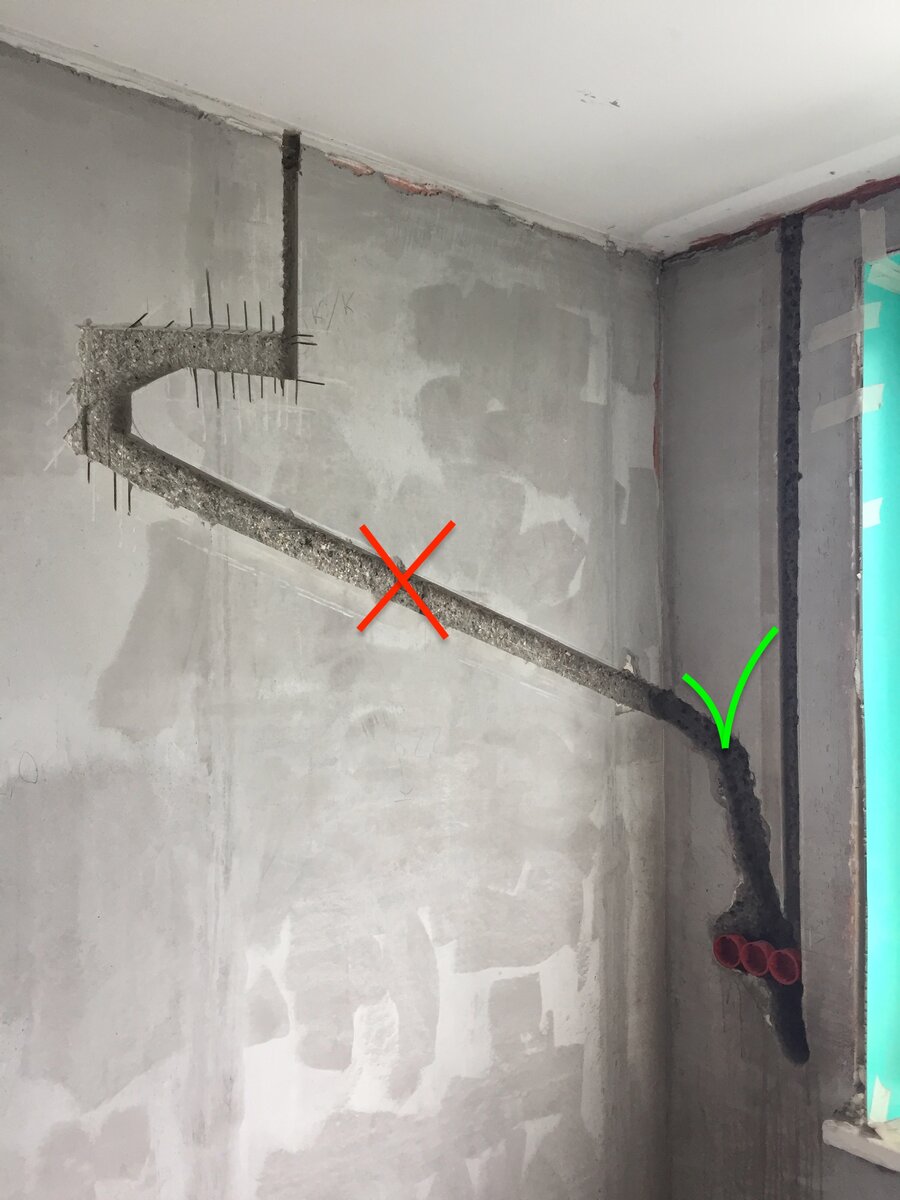
Chasing the wall and installing the "glass"
To bring out a new line, the first thing to do is turn off the electricity in the room where the work will be carried out.On the wall, with the help of a ruler and a pencil, they outline the route along which a new strobe will be laid.
According to the planned route, with the help of a puncher or a grinder, a strobe is cut out in the wall. The depth of the groove is made such that the wire laid in its cavity after installation is completed does not protrude above the surface.
For the installation of a new connection point in the intended place, using a puncher equipped with a crown, a “nest” with a depth of 50 mm is hollowed out. The walls of the niche are carefully cleaned from construction chips and dust.
To fix the plastic "glass", the inner walls of the completed niche are covered with a layer of gypsum mortar, the outer edges of the socket box are treated with the same composition.
The installed "glass" should not protrude above the surface. If the depth of the niche is not enough, you can carefully cut off the back wall of the socket.
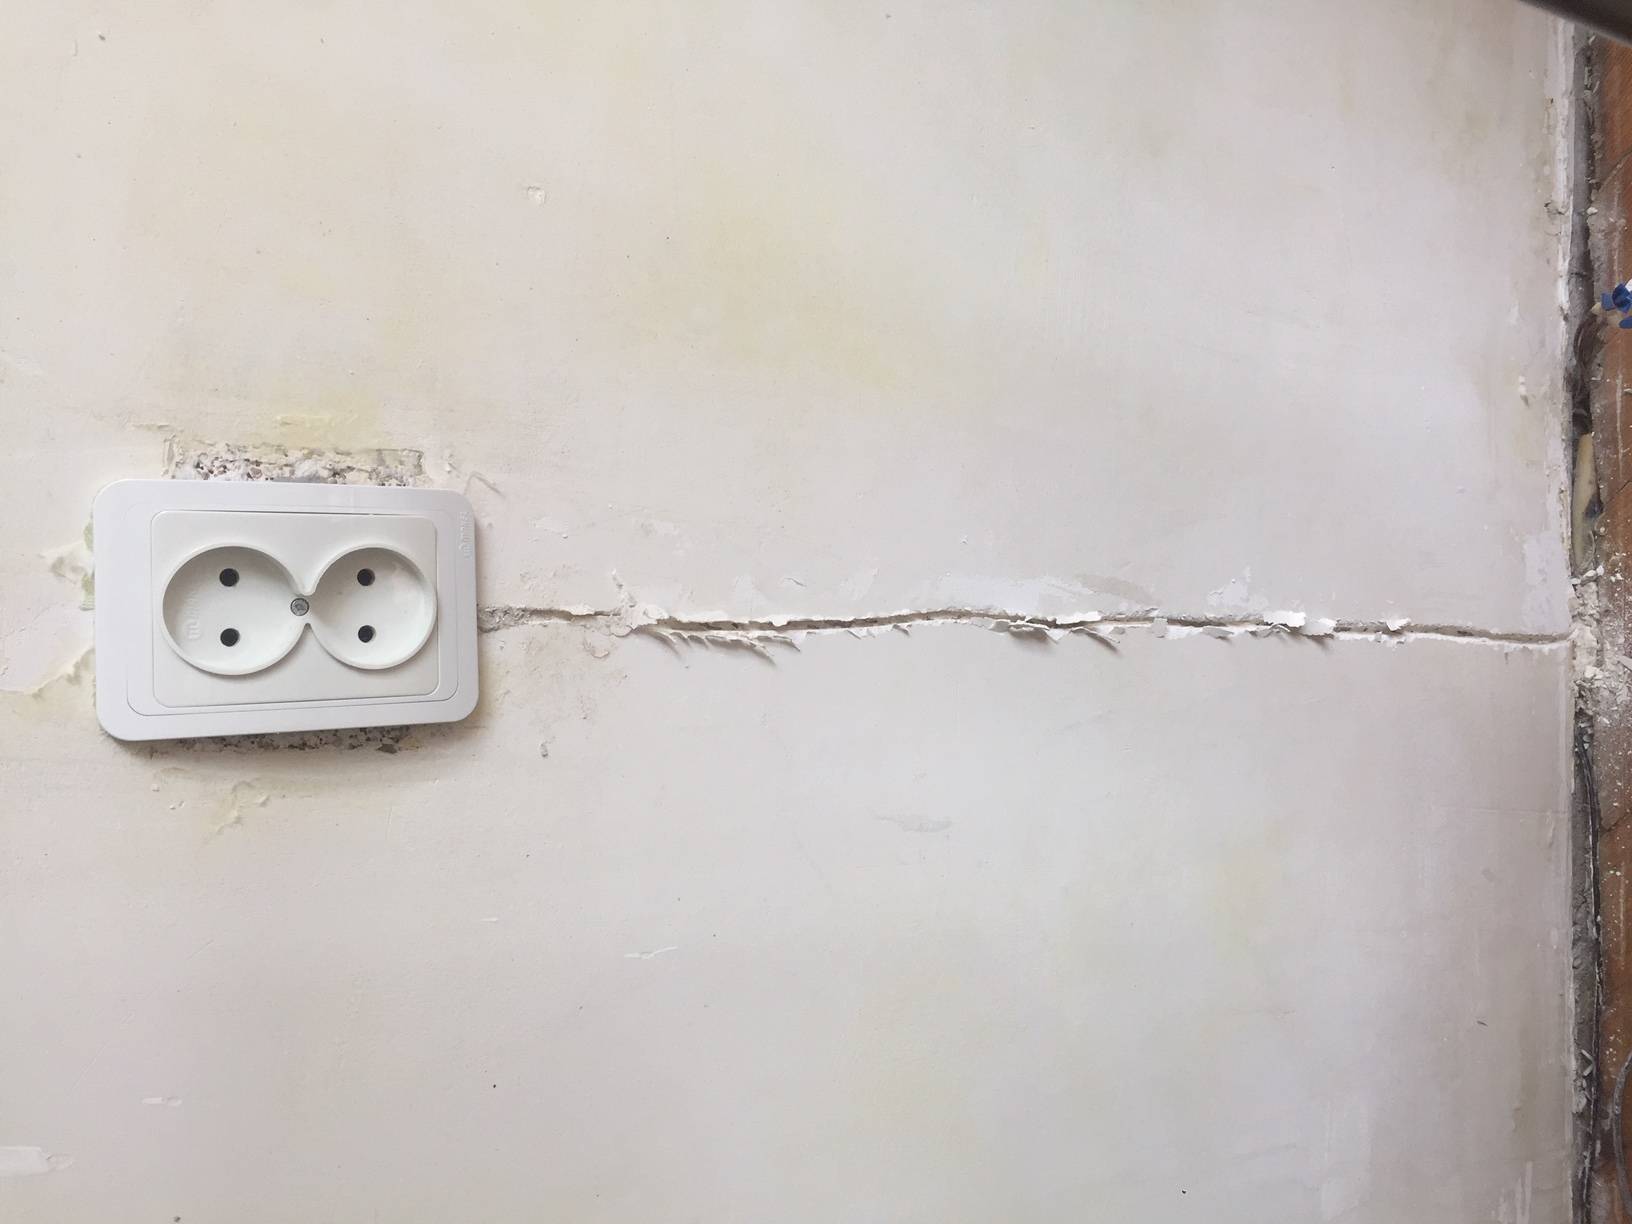
Cable laying and terminal connection
A cable is laid in the created recess, fixing it every 5-7 cm with plastic clamps or alabaster.
Having opened the junction box, from which the “old point” was powered, they find the junction of the output cable with the wire going to the former outlet, and disconnect the wires. After that, the old line is dismantled along with the outlet. If it was possible to open the old strobe, then after removing the wire, it is sealed with gypsum or alabaster mortar.
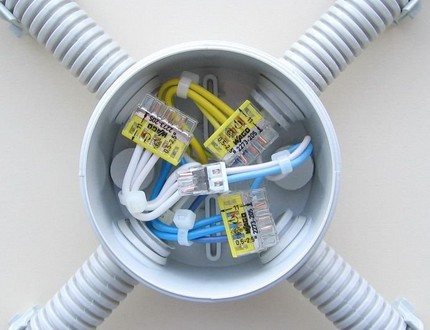
To power a new line, the end of the output cable is connected to a new wire using spring terminals or insulating clamps.
The connected unit is buried in the mounting box and fixed with bolts.
When installing the outlet, it is important to prevent even the slightest backlash. Otherwise, over time, it will fall out of the “nest” along with the plug.
Since it is difficult to ensure a snug fit inside the box, it is advisable to connect the wires not by twisting, but by installing terminal blocks, spring terminals or plastic caps.
When laying a new conductor, you need to ensure that a small margin remains at both ends. It will be required in order to create a high-quality electrical connection.


The free stripped ends of the cores are connected to the socket block of the new “point” through screw or spring terminals. When connecting through the terminals, they are guided by the rule that the phase wire is installed on the left terminal, and the zero wire on the right. The ground conductor is connected to the terminal equipped with "antennae", which is located on the body of the device.
The connected work unit is installed in the socket and fixed with spacer tabs and clamping screws. A decorative panel is mounted on top.


