- Use of solar energy for heat supply
- Collectors from improvised materials
- From metal pipes
- From plastic and metal-plastic pipes
- From a hose
- From cans
- From the fridge
- Where to start
- How to make a heat sink
- Collector manufacturing
- Plastic bottle concentrator
- How to Calculate the Thermal Efficiency of a Solar Air Collector
- Features of the operation of a solar collector made of HDPE
- Features of assembling systems using a solar collector
- Prices for factory appliances
- Solar collector design
- How to make a solar water heater at home?
- Stage 1. Making the box
- Stage 2. Making a radiator
- Stage 3. Mounting the collector
- Final stage. Arrangement and connection of a solar water heater:
- Manufacturing and installation
- Basic information about homemade solar collectors
- Solar Collector DIY Tools
- Is it possible to use a solar collector in winter
- Making a homemade solar collector
- Types of air collectors
- Do-it-yourself winter heating
- Results
Use of solar energy for heat supply

One of the defining principles of building any heating system is expediency. Those.All investments must pay off within a certain period of time. In this regard, heating a house with solar energy is the most effective and financially beneficial investment.
Solar energy is essentially a free source of heat. It can be used in several ways - to equip a heating system or to make an autonomous hot water supply system. If you carefully study the reviews about heating from solar panels, you can identify an interesting relationship. The more professionally the heating is done (factory collectors, additional heating, electronic control) - the higher the efficiency of the heat supply.
How can solar energy be converted into thermal energy?
- Solar heating battery is one of the ways to get electric energy. Radiation acts on a matrix of resistor photocells, resulting in a voltage in the circuit. In the future, this current can be used to connect to electrical heating appliances;
- Modern heating of a private house with solar collectors. In this case, there is a direct transfer of thermal energy from solar radiation to the coolant. The latter is located in a system of pipelines located in a special sealed housing.
The most efficient is heating with solar energy in the last way. In this way, additional energy conversion can be avoided. The sun will directly affect the coolant, increasing its temperature. However, do-it-yourself solar heating using electric batteries is more versatile, as the electricity can be used to run other electrical appliances in the home.The choice is determined by the budget and the required system capacity.
Collectors from improvised materials
It is cheaper and more interesting to assemble a solar collector for heating a house with your own hands, because it can be made from various improvised materials.
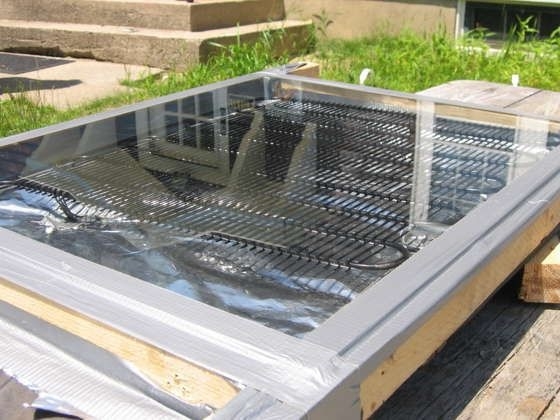
From metal pipes
This assembly option is similar to the Stanilov collector. When assembling a solar collector from copper pipes with your own hands, a radiator is cooked from the pipes and placed in a wooden box, laid with thermal insulation from the inside.
Such a homemade collector should not be too large to be easy to assemble and mount. The diameter of the pipes for solar collectors for welding the radiator must be smaller than the pipes for the inlet and outlet of the coolant.
From plastic and metal-plastic pipes
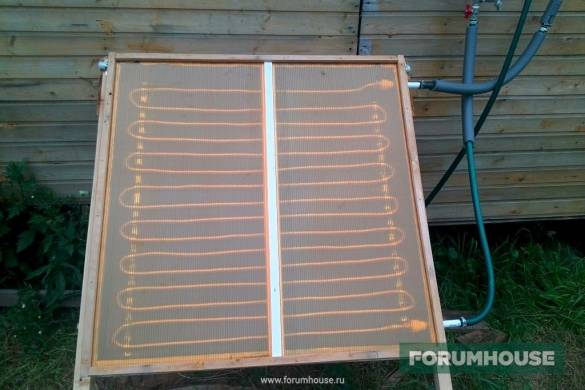
How to make a solar collector with your own hands, having plastic pipes in your home arsenal? They are less effective as a heat accumulator, but they are many times cheaper than copper and do not corrode like steel.
You can experiment with pipe laying. Since the pipes do not bend well, they can be laid not only in a spiral, but also in a zigzag. Among the advantages, plastic pipes are easy and quick to solder.

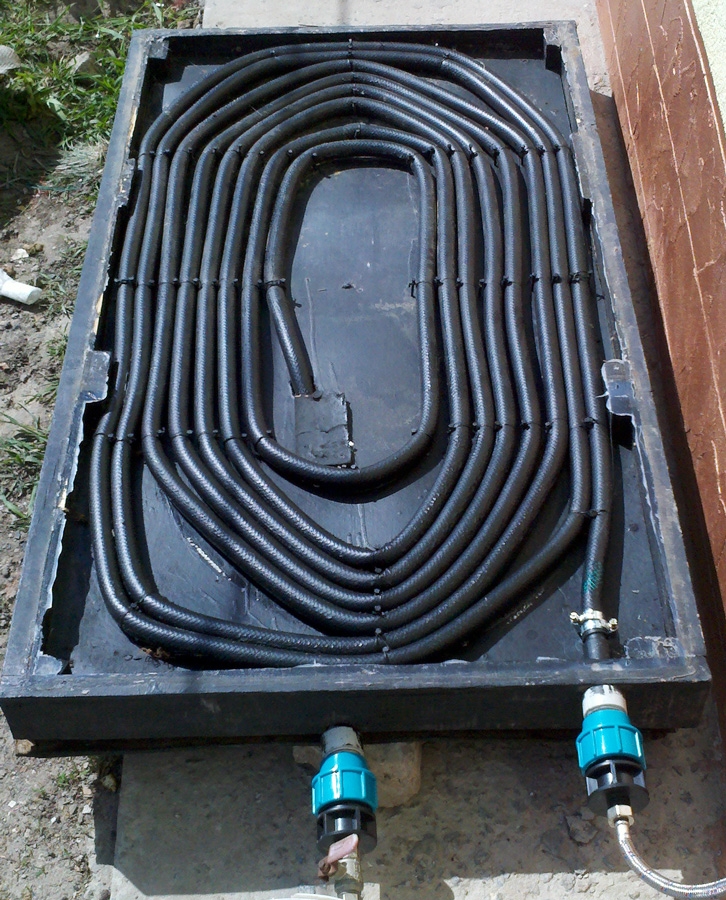
From a hose
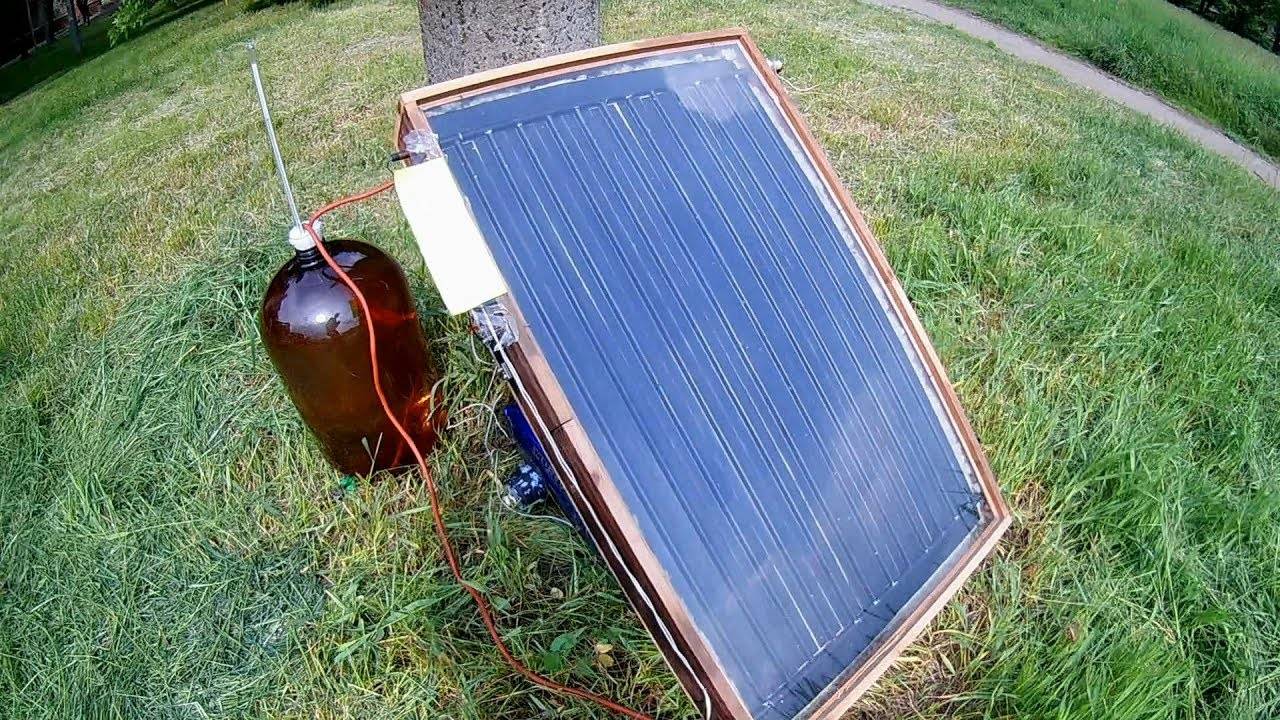
To make a solar collector for the shower with your own hands, you will need a rubber hose. The water in it heats up very quickly, so it can also be used as a heat exchanger. This is the most economical option when making a collector with your own hands. The hose or polyethylene pipe is placed in a box and attached with clamps.
Since the hose is twisted in a spiral, there will be no natural circulation of water in it. To use a water storage tank in this system, it is necessary to equip it with a circulation pump.If this is a summer cottage and a little hot water leaves, then the amount that will flow into the pipe may be enough.
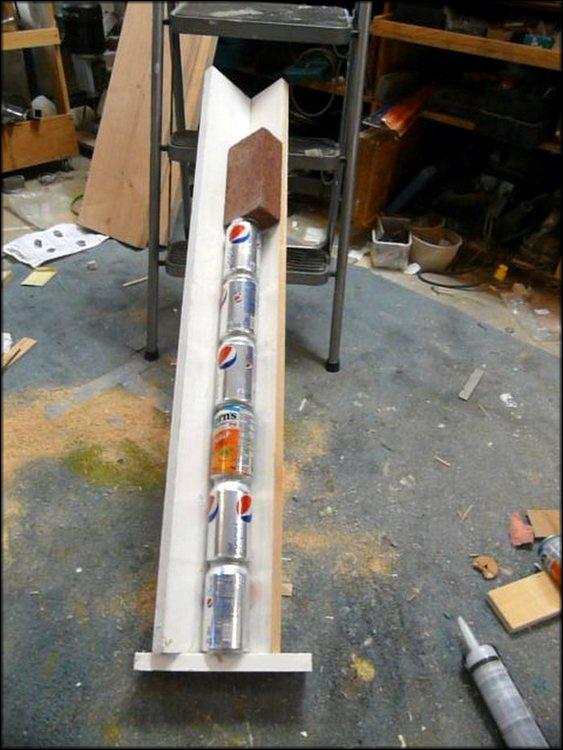
From cans
The coolant of the solar collector from aluminum cans is air. Banks are interconnected, forming a pipe. To make a solar collector from beer cans, you need to cut off the bottom and top of each can, dock them together and glue them with sealant. Finished pipes are placed in a wooden box and covered with glass.
Basically, an air solar collector made from beer cans is used to eliminate dampness in the basement or to heat the greenhouse. As a heat accumulator, you can use not only beer cans, but also plastic bottles.

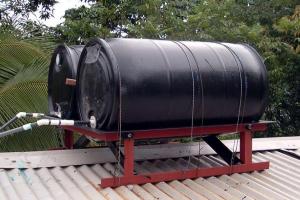
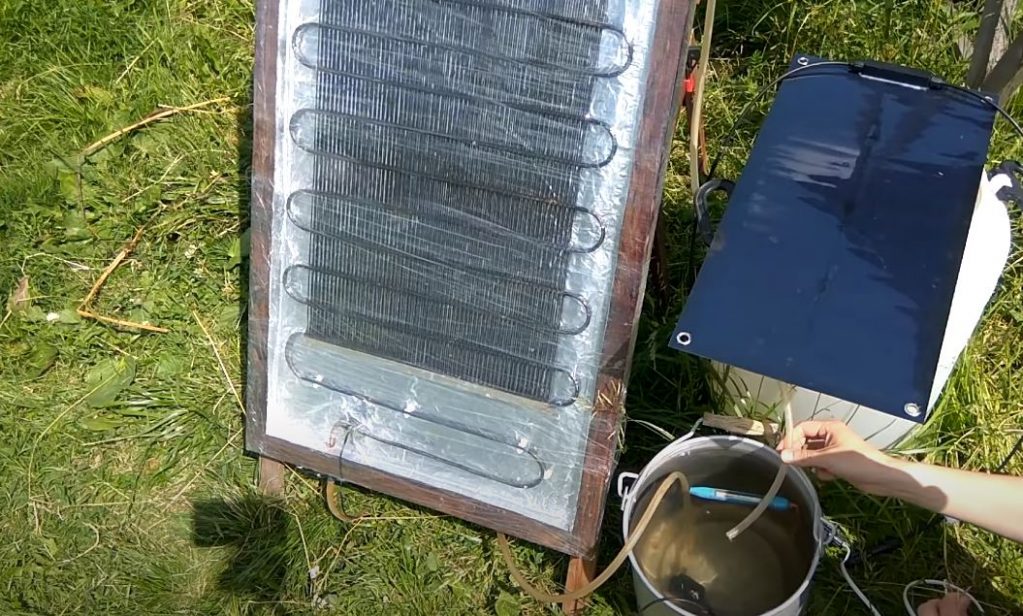
From the fridge
Do-it-yourself solar hot water panels can be built from an unusable refrigerator or an old car radiator. The condenser removed from the refrigerator must be thoroughly rinsed. Hot water obtained in this way is best used only for technical purposes.


Foil and a rubber mat are spread at the bottom of the box, then a capacitor is laid on them and fixed. To do this, you can use belts, clamps, or the mount with which it was attached in the refrigerator. To create pressure in the system, it does not hurt to install a pump or an aqua chamber above the tank.
Where to start
How to make a heat sink
Stages of work:
1. It is better to make a frame and a lattice from an aluminum corner, the perimeter of the cells from the guides should be slightly larger than the perimeter of the mirror plates.
2. The heat exchanger is assembled from copper pipes:
- solder a lattice out of them,
- to prevent heat loss, cuts from pipes close the gaps between them.
 3.The corner joints of the guides are drilled, bolts 70 mm long are inserted into the holes, and they are fixed with nuts.
4. Having chosen the correct location of the heat exchanger (coinciding with the focal point), fix the mirrors on the frame in such a way that each reflects the sun's rays to one point.
5. The first mirror is fixed with two washers so that the reflection of the sun's rays from it is oriented at the focal point.
It will serve as a guide for the next sections.
Since the mounting of mirrors will take enough time, and solar activity changes during the day, periodically, it will be necessary to adjust the position of the frame so that the reflection of the reference mirror is always at the focus point.
6. The second mirror is fixed, and also directed to the focal point.
So that the installed mirrors do not interfere with the installation of subsequent ones, they are shaded.
7. Fastening method from the end of the previous mirror is possible for the first rows of plates.
But, it is better to install the rows of mirrors from the frame, since the rows describing the parabola may not have enough bolts.
8. When the plates are fixed, the rods are installed on which the heat exchanger will be mounted.
A heat exchanger is installed at the focal point, it is filled with water, the temperature is measured.
9. When the sun's rays move, the reflection from the mirrors will shift to the side, and the heat exchanger will stop heating up.
For continuous operation, the installation of a special system with a mechanism that turns the concentrator towards the sun is being considered.
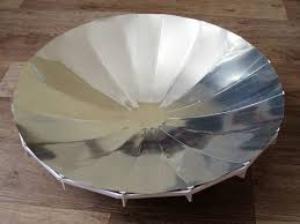
Collector manufacturing
1. It is a simple constructive version of the concentrator. Well suited for heating water up to 100 liters.
With this option, only the water is used (how to find it on the site, read in this article) that is heated in the pipes, and there is no need to install a storage tank.
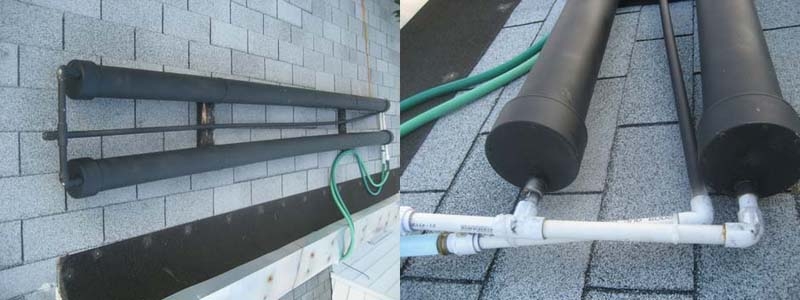
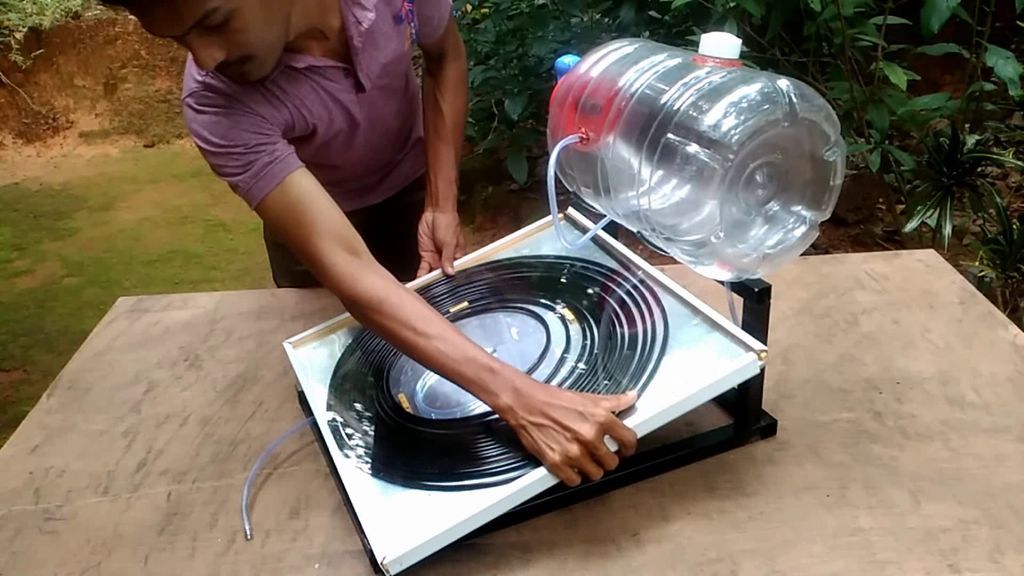
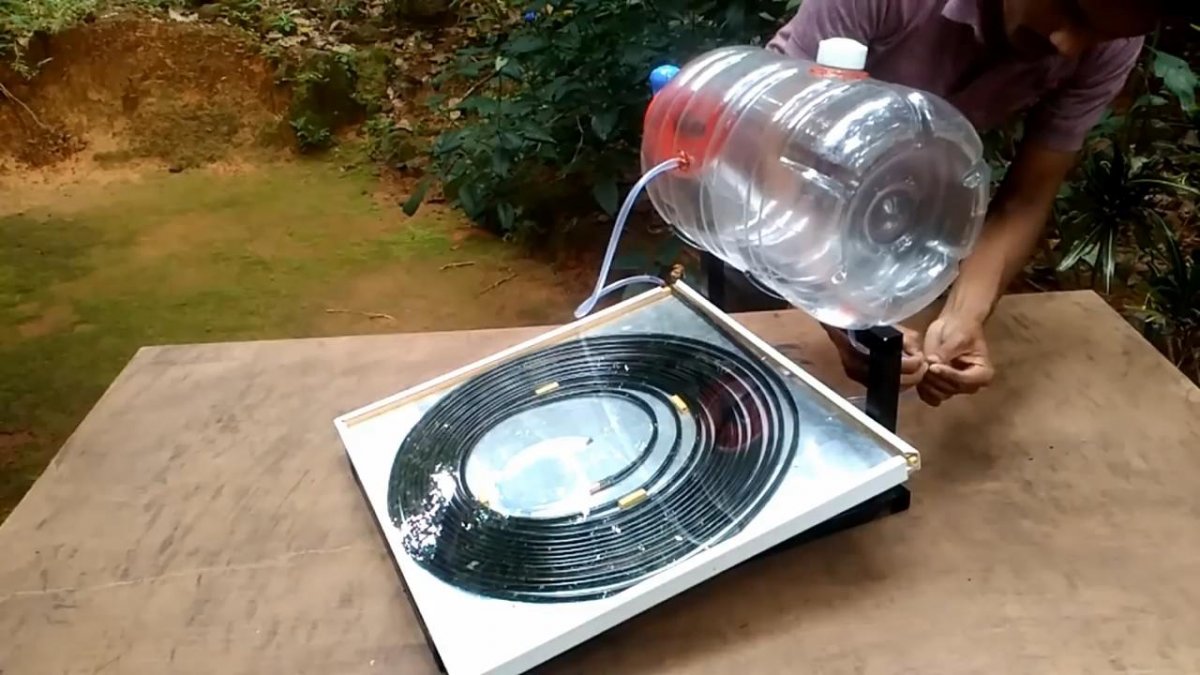
2. Black polyethylene or rubber hoses with a diameter of 20-25 mm are used. They are laid in a spiral on a sloping roof.
In case of too much slope of the roof, the hose spiral is placed in a specially constructed box.
3. So that the pipes do not deform during temperature changes, they are fixed with clamps, plastic or metal.


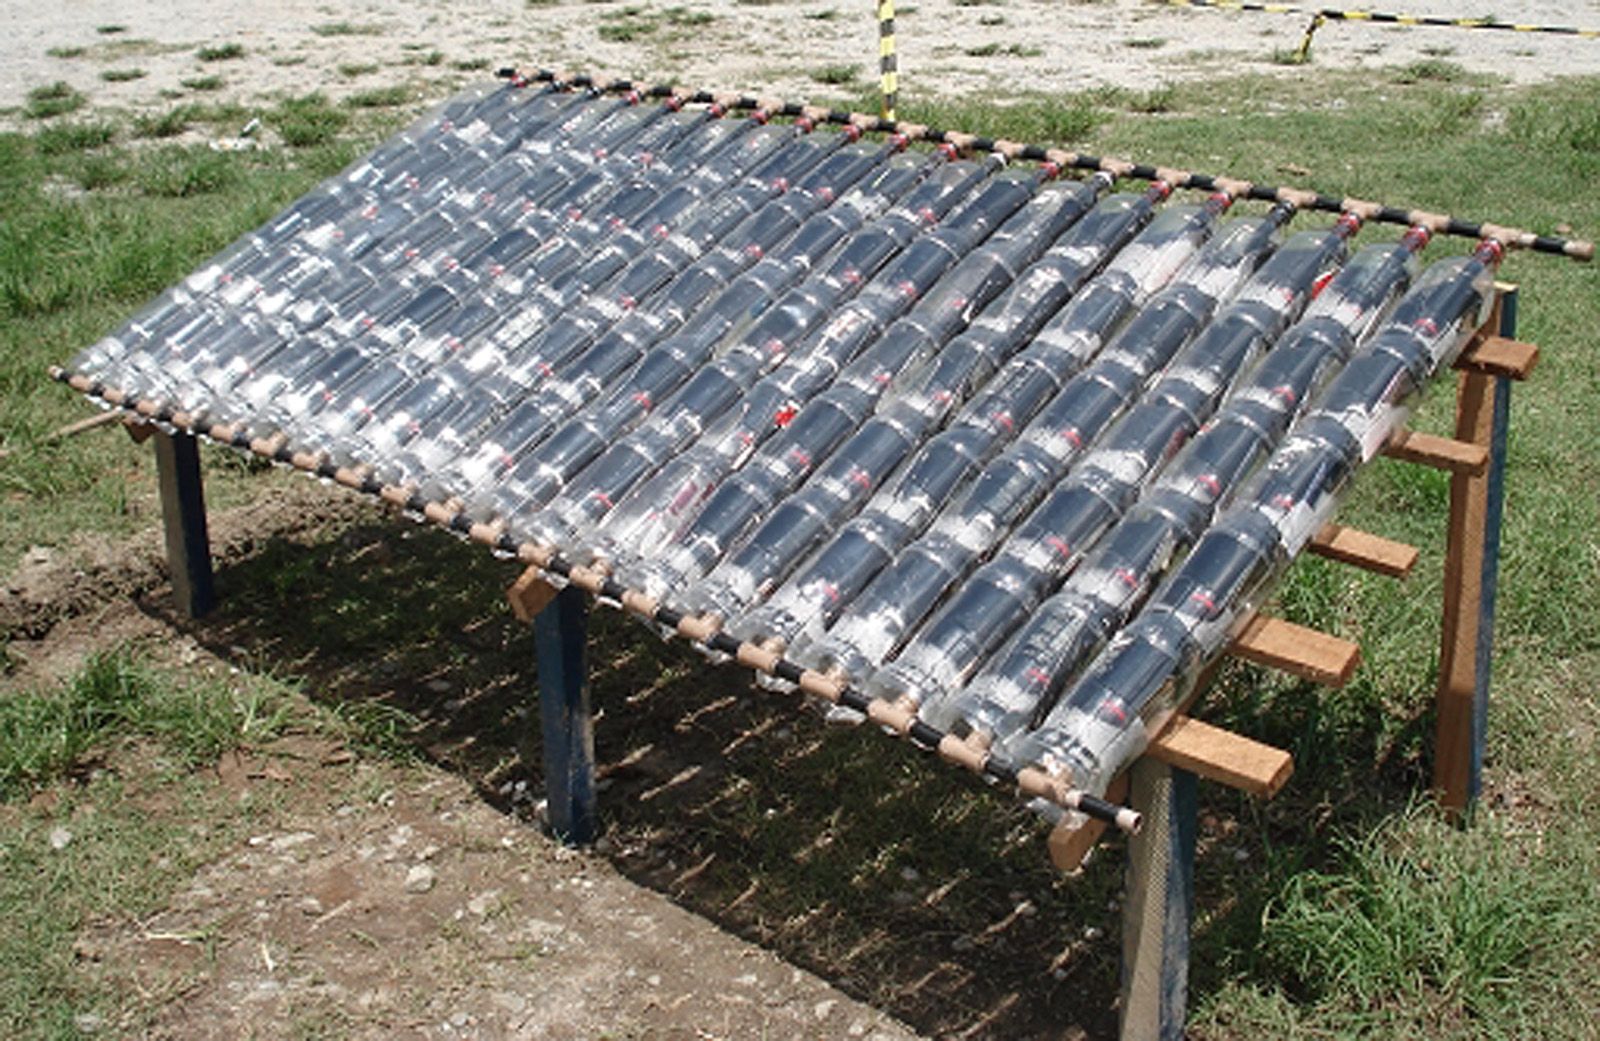
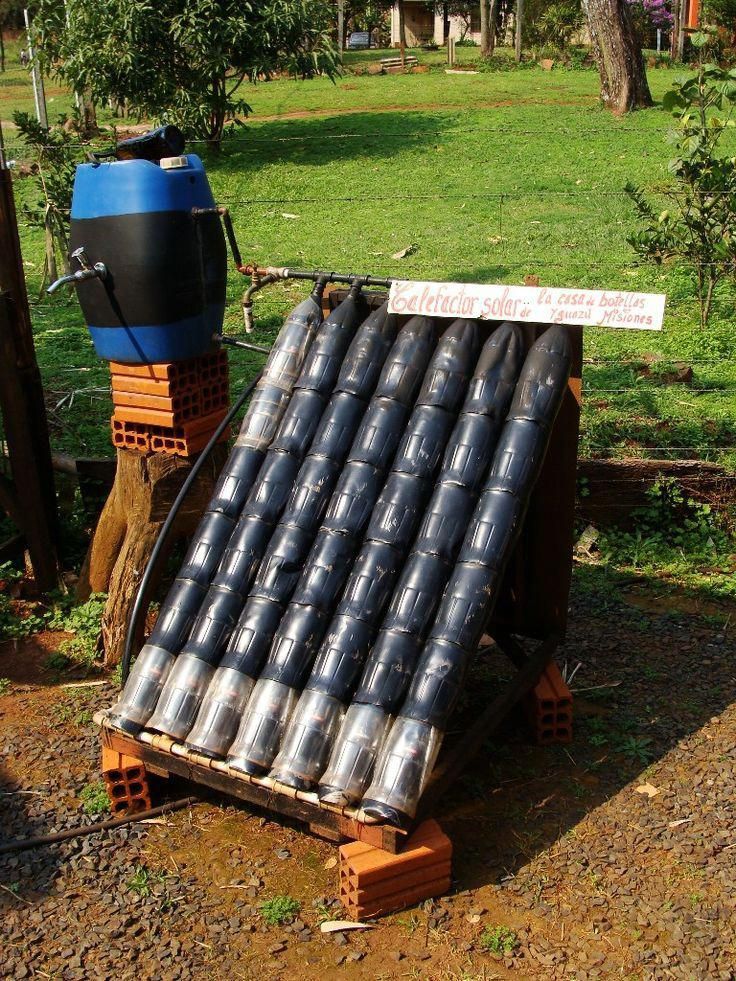
Plastic bottle concentrator
It is a different constructive type - allowing the sun's rays at different times of the day to fall at a right angle.
The surface of the bottles enhances the effect of sunlight, acting as a lens. The transparent plastic surface is more UV resistant than rubber or PVC.
The main material used to make the concentrator does not cost money, so the manufacturing of the equipment will require minimal investment.
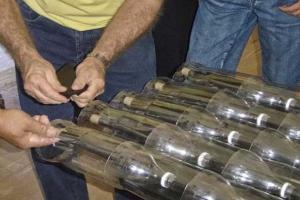 Required materials:
- plastic bottles of the same configuration and size;
- Tetra-packs from juice or milk;
- PVC pipes (outer diameter 20 mm) and tees for hot water supply.
Instead of PVC pipes, copper pipes are also used, but their cost is much higher.
Stages of work:
1. Wash bottles and Tetra Pak bags with detergent, remove labels.
2. Tetrapacks painted black. Using a cardboard template and a clerical knife, cut off the bottom of the bottles along the line.
3. The heat exchanger is assembled from PVC pipes with a diameter of 20 mm. In the upper part, the corners and tees are connected with glue.
four.Pipes on which bottles and absorbers from tetrapacks are strung to absorb solar energy are painted black. After the bottles, absorbers are strung, inserting them all the way.
5. Install the structure on a support made of wood or metal, towards the sun. For mid-latitudes, the southeast direction is chosen.
6. The storage tank is installed above the collector by at least 30 cm.
 At this height, the installation of a pump to create circulation is not necessary.
To keep the water temperature at night, the tank is insulated.
Since plastic bottles lose their light transmission over time, it is recommended to change them every five years.
How to Calculate the Thermal Efficiency of a Solar Air Collector
Obviously, a block of air solar collectors is more compact than solar panels, and is characterized by lower losses that occur when converting one type of energy to another.
This type of "green" energy becomes profitable when the ratio of collected solar energy to that available in the area is maximum.
The total amount of energy is expressed in kWh / (m²×day). It is believed that on a clear sunny day, the average amount of direct solar energy available per 1 m² of area per hour should be at least 1 kW. But the collector is a thin pipe made of metal with high thermal conductivity, so the heat loss in the collector itself is minimal. Therefore, the efficiency of the air manifold will depend on:
- The active area of the collector (the one that is exposed to sunlight).
- The number of header pipes.
- The location of the collectors relative to the main direction of the beams.
- The length and complexity of the heated air transportation route.
In the case of independent arrangement of air collector heating, it is possible to measure the efficiency of the collector only with the help of a high-temperature thermometer. Further (since it is risky to hope for spontaneous displacement of heated air with an increased volume into the premises), a fan is required. Since the system will have an open circuit, the heat collected by the collector per unit will be directly proportional to the temperature difference and the heat capacity of the time air. Multiplying this value by the duration of the collector and neglecting the radiation losses from the sliding action of the rays, we obtain the total value of the heat flux density. Comparing it with the nominal (1 kW), we find out the efficiency of the collector.
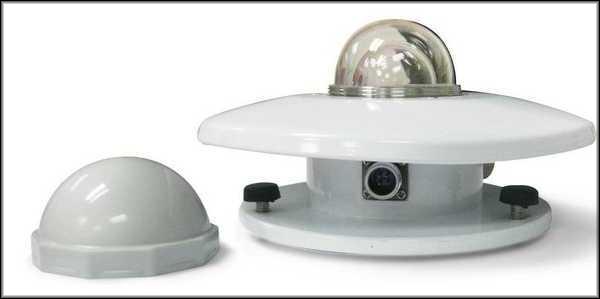
Now all we need is a pyranometer to check the intensity of sunlight. The presence of this device will save you from time-consuming measurements of collector efficiency in various weather conditions. The most convenient pyranometer type ICB200-03, which can be purchased or rented.
Features of the operation of a solar collector made of HDPE
With several sections of the solar collector, you can quickly heat the water in a medium-sized pool. HDPE structures are not only easier to manufacture. Their maintenance is also not difficult. It is enough to prevent overheating of the elements on hot days, protect the module components from mechanical damage, timely tint wood parts, and periodically remove contaminants from the pipe surface. If these simple rules are followed, the solar collector will easily last 20 years or more.


The efficiency of the system depends on many factors. What matters is the intensity of solar radiation, ambient temperature, direction and strength of the wind, the number of modules. To increase the autonomy of the installation, a solar-powered pump can be used with it. If you prepare a unit of the required power, the solar collector will be able to function without being connected to the central electrical network.
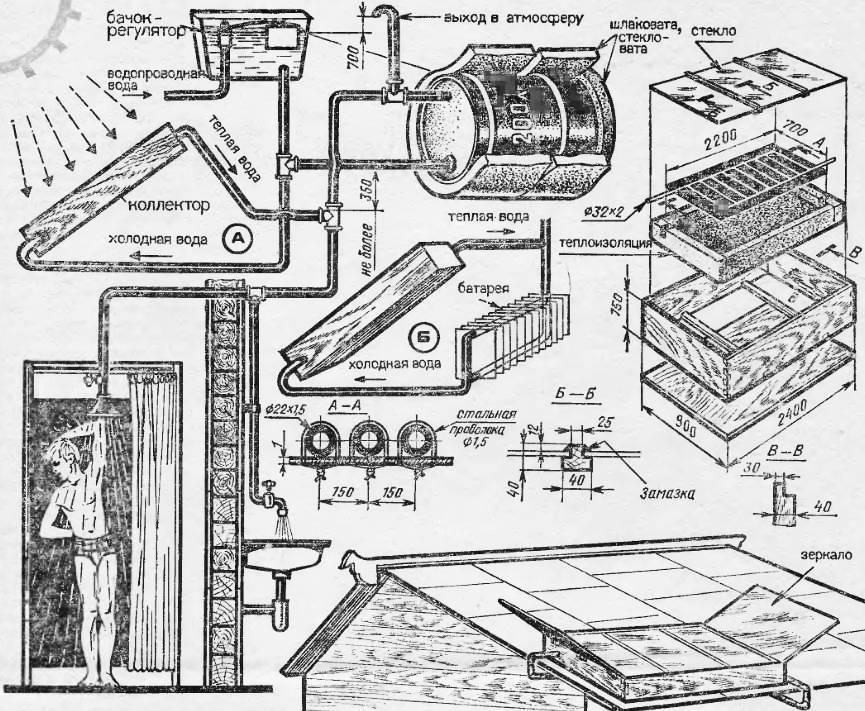
Features of assembling systems using a solar collector
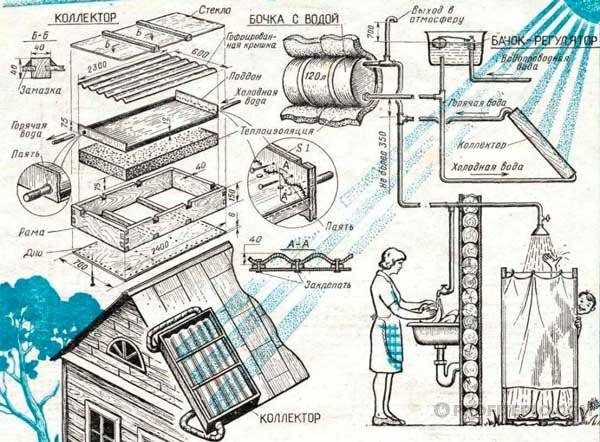
When designing autonomous systems for hot water supply and heating based on solar collectors, one should always provide for the presence of a storage tank that will act as a thermal energy accumulator. This is due to the uneven supply of energy and its consumption.
There are the following proven schemes for connecting to a solar collector system.
-
With natural circulation. In this scheme, the storage tank is located above the level of the solar collector.
- A scheme for heating a house with the participation of a solar collector. The intensity of solar radiation depends on the geographic latitude. In the northern latitudes of Russia, it may not be enough to heat the room in winter conditions. Its most effective operation will be paired with a traditional heat source that runs on solid fuel or gas. In the diagram below, the heating boiler is marked with the number 12.
- A scheme for using a solar plant to simultaneously supply a house with hot water and heating. A distinctive feature of this scheme is the presence of an additional storage tank.Its necessity is caused by the separation of drinking water and technical water, which enters the heating system exclusively.
- Solar collector as a source of water heating in the pool. The solar collector allows you to maintain the optimum temperature in the pool throughout the day.
Prices for factory appliances
The lion's share of the financial costs for the construction of such a system falls on the manufacture of collectors. This is not surprising, even in industrial samples of solar systems, about 60% of the cost falls on this structural element. Financial costs will depend on the choice of a particular material.
It should be noted that such a system is not able to heat the room, it will only help save on costs by helping to heat the water in the heating system. Given the rather high energy costs that are spent on heating water, a solar collector integrated into the heating system significantly reduces such costs.
The solar collector is quite simply integrated into the heating and hot water supply system (+)
For its manufacture, fairly simple and affordable materials are used. In addition, this design is completely non-volatile and does not require maintenance. Maintenance of the system is reduced to periodic inspection and cleaning of the collector glass from contamination.
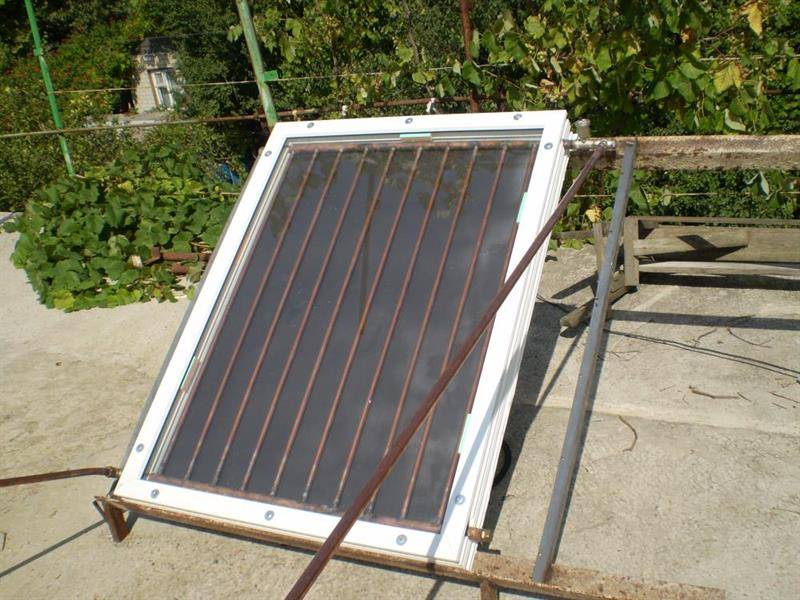
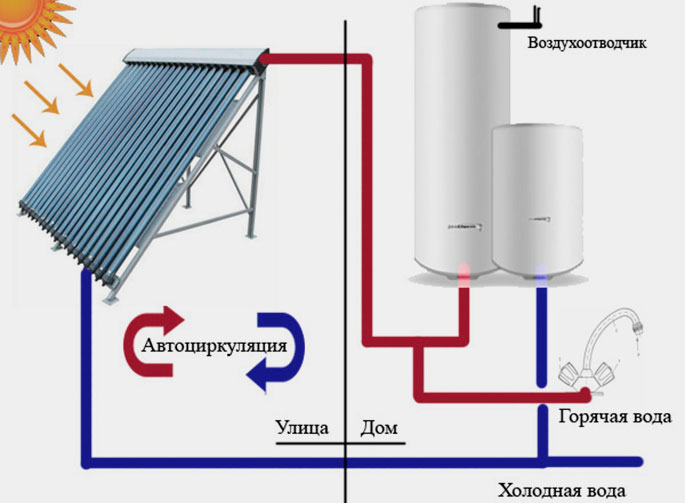
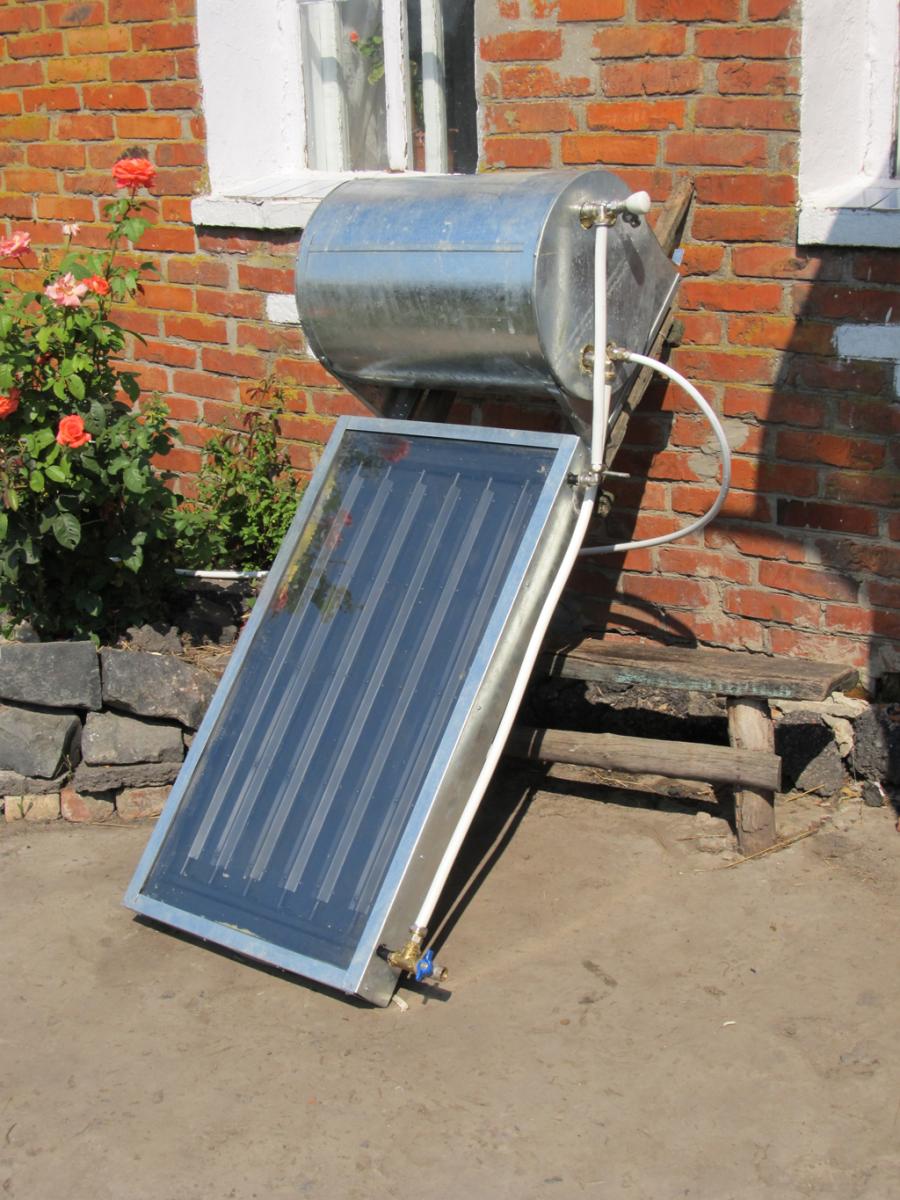
Solar collector design
Solar collector design
The considered units have a fairly simple design. In general, the system includes a pair of collectors, a fore-chamber and a storage tank. The work of the solar collector is carried out according to a simple principle: in the process of passing the sun's rays through the glass, they are converted into heat.The system is organized in such a way that these rays are not able to get out of the closed space.
The plant operates according to the thermosyphon principle. In the process of heating, the warm liquid rushes up, displacing cold water from there and directing it to the heat source. This allows you to refuse even the use of a pump, because. the liquid will circulate by itself. The installation accumulates solar energy and stores it inside the system for a long time.
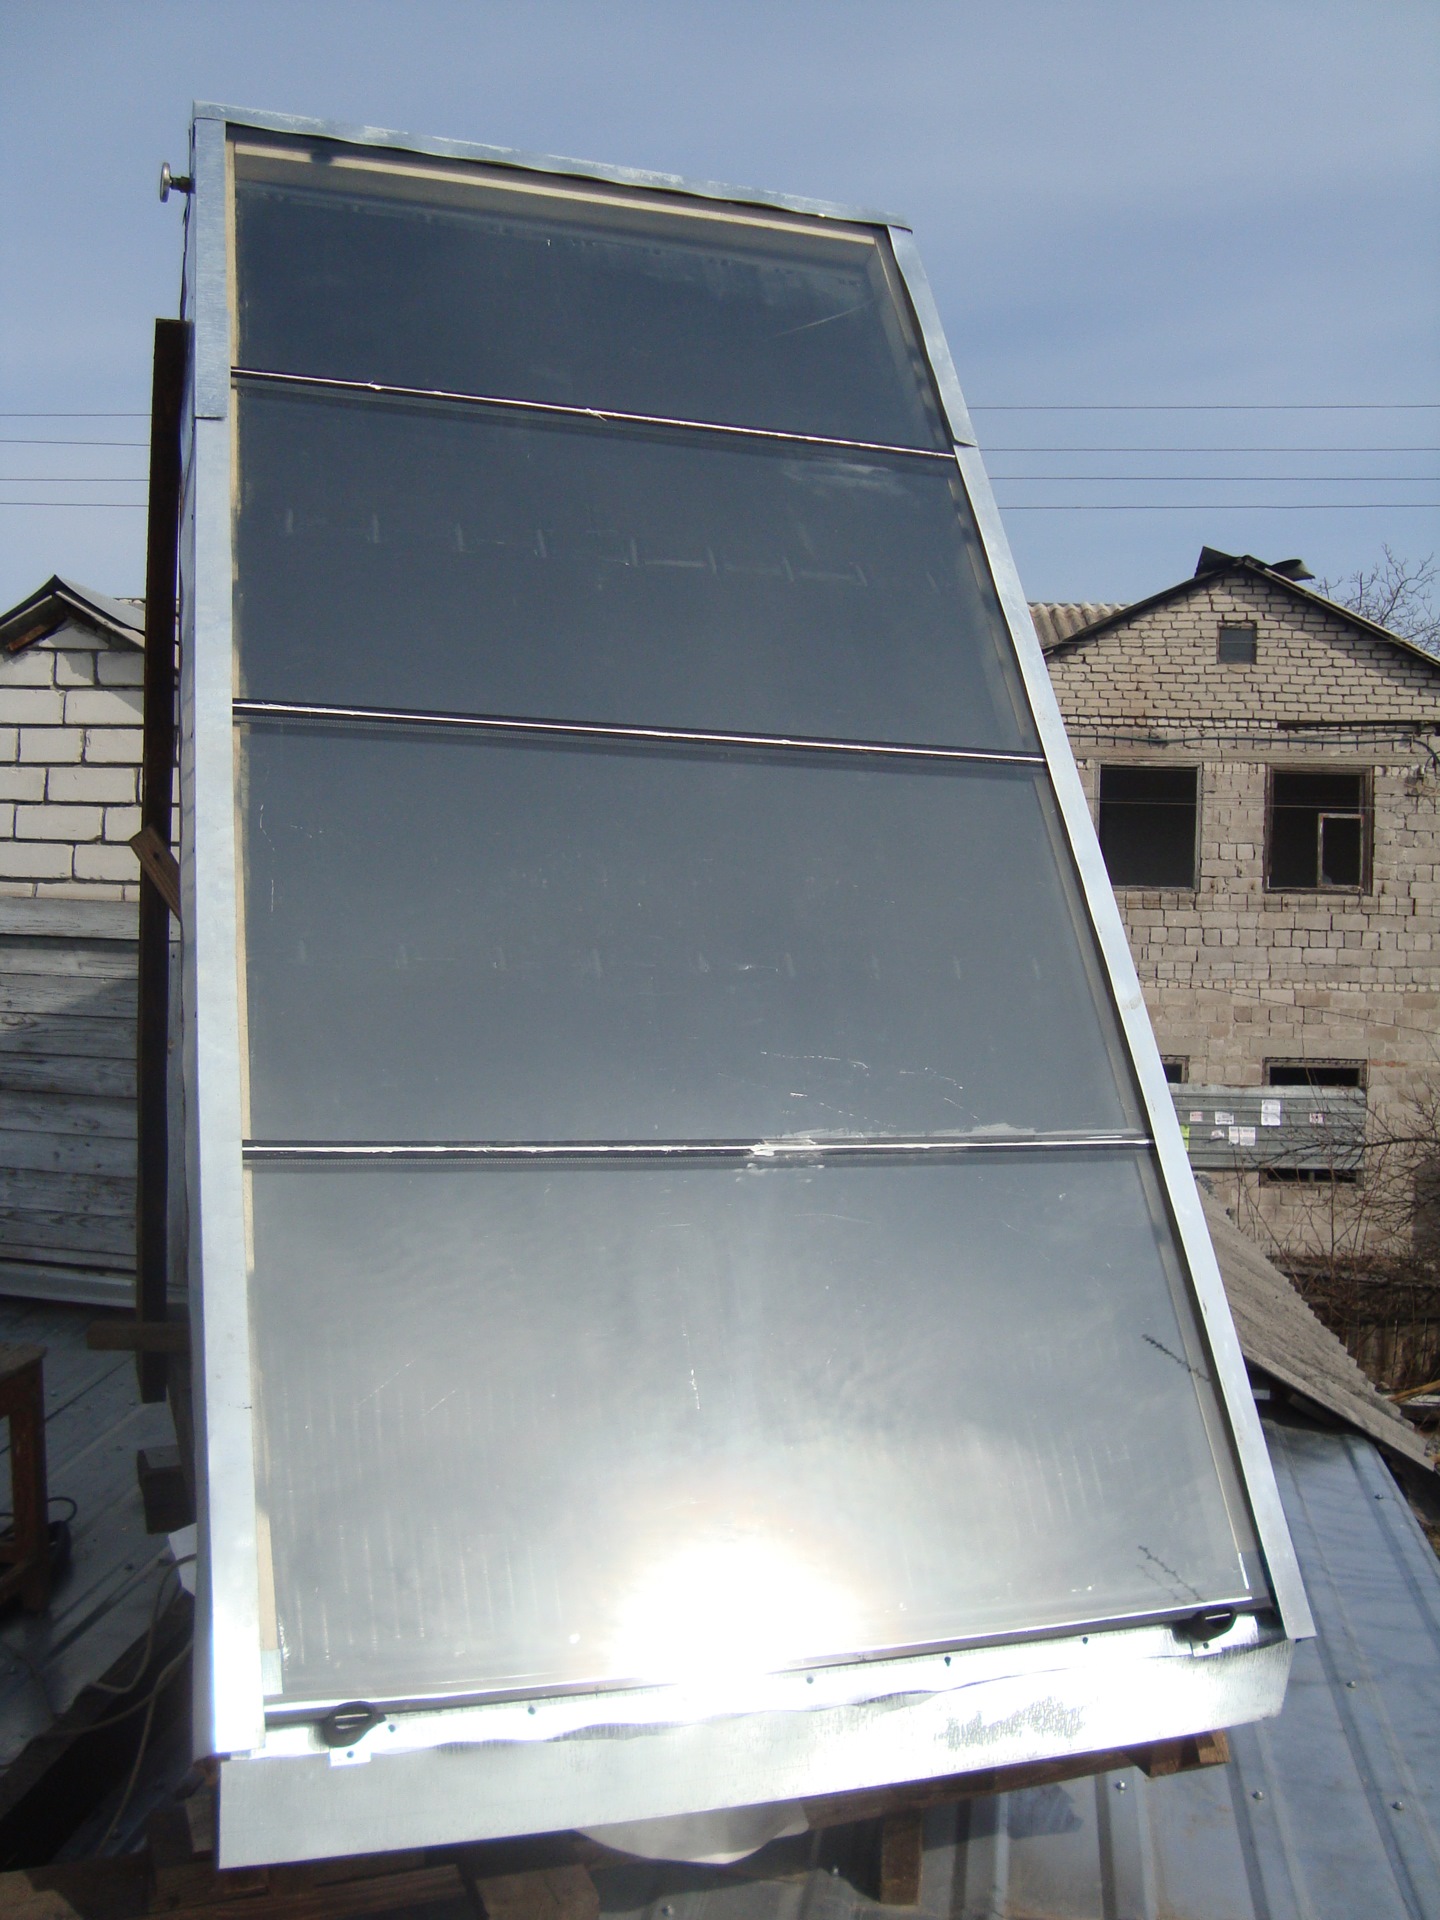
Components for assembling the installation in question are sold in specialized stores. At its core, such a collector is a tubular radiator installed in a special box made of wood, one of the faces of which is made of glass.
For the manufacture of the said radiator, pipes are used. Steel is the preferred pipe material. The inlet and outlet are made from pipes traditionally used in plumbing. ¾ inch pipes are usually used, 1 inch products also work well.
The grate is made from smaller pipes with thinner walls. The recommended diameter is 16 mm, the optimal wall thickness is 1.5 mm. Each radiator grill must include 5 pipes 160 cm long each.
Solar collectors
How to make a solar water heater at home?
We bring to your attention detailed instructions for making a solar boiler with your own hands. The process is quite laborious, but the result is worth it.
First you need to prepare the necessary materials and tools for the job. You will need:
- Glass 3-4 mm thick;
- Wooden slats 20x30 millimeters;
- A bar measuring 50x50 millimeters;
- Boards 20 mm thick and 150 wide;
- Tin strip or fasteners for pipes;
- OSB sheet or plywood 10 mm thick;
- metal corners;
- Furniture hinges;
- Tin strip or fasteners for pipes;
- Insulation with a metallized coating;
- Sheet of galvanized sheet;
- Mineral wool;
- Metal and copper pipes with a diameter of 10-15 millimeters and 50 millimeters.
- Connecting clamps and couplings;
- sealant;
- Black paint;
- Rubber seal for doors and windows;
- Aqua markers;
- Plastic barrel or metal tank with a volume of 200-250 liters.
Once everything you need for work has been prepared, you can proceed directly to the manufacture of a solar water heater. The process itself is divided into four stages, which we will discuss in more detail later.
Stage 1. Making the box
At the beginning of the whole process, you need to make a case for the future water heater. This should be done based on the following sequence of actions:
- From the prepared boards, assemble a box of the size you need.
- Sew up the bottom of the case with a sheet of plywood or OSB.
- Upon completion of the assembly of the box, seal all joints and cracks.
- Cover the inside of the case with a heat reflector. This way you avoid heat loss.
- Cover all surfaces with a layer of mineral wool.
- Close the finished layer of thermal insulation on top with tin sheets and seal all cracks with sealant.
- Paint the inside of the case with black paint.
- Install a glazing frame made of wooden frames. To do this, cut the rails to the sizes you need and connect them using metal corners for this purpose.
- Install glass on both sides of the frame, pre-treating one fourth of the rails with liquid consistency sealing material.
- Attach the frame to the base of the case using furniture hinges.
- Glue rubber seal strips to the ends of the case.
- Prime and paint all exterior surfaces of the water heater body.
That's all, the assembly of the case is completed. Now you can safely move on to the next step.


Stage 2. Making a radiator
You can make a radiator for a solar water heater by following the following course of action:
- Prepare two pieces of pipe with a diameter of 20-25 millimeters and the length you need.
- In a pipe with a large diameter, drill holes with a distance of about 10 centimeters from each other.
- Insert the sections of previously prepared pipes into the holes so that the ends protrude 5 millimeters from the back side.
- Weld or solder connections.
- Diagonally to the ends of pipes with a diameter of 50 millimeters, weld threaded bends for external connections. The rest of the ends need to be muffled.
- Paint the radiator with black heat-resistant paint in several layers.
Stage 3. Mounting the collector
Immediately before installing the radiator in the box, you first need to outline the places in its walls, through which the outlets will pass for connecting the supply and withdrawal pipes. Thereafter:
- Holes of the required diameter are drilled according to these marks.
- Next, install the radiator in the housing close to the bottom and fix it along the entire length of each element. This should be done in 4-5 places using strips of tin or other fasteners intended for this purpose.
- Now the collector housing is covered with a frame and rigidly fixed with self-tapping screws or corners.
- Further, all cracks are sealed.
Final stage. Arrangement and connection of a solar water heater:
- Insert threaded taps into the container that you are going to use as a heat accumulator. One point must be made at the bottom of the container for supplying cold water, and the second must be arranged at the top for the heated liquid.
- After - the container must be insulated using mineral or stone wool for this purpose, as well as other heat-insulating material.
- An aqua chamber complete with a float valve is mounted 0.5-0.8 meters above the tank in order to constantly create a constant low pressure in the system. In addition, half of one pipe should be used to install the pressure pipeline from the water supply to the aqua chamber.
- After the container is completely filled, water will flow from the drainage hole of the aqua chamber. Next, you can turn on the water supply from the water supply and fill the tank.
That's it, your solar water heater is ready!
Manufacturing and installation
Below is a budget option for obtaining a solar heating collector, using a microfan, empty cans of Pepsi-Cola, metal cases of used lighting fixtures (preferably from fluorescent lamps), tempered glass and black paint. You will also need a glass cutter, silicone sealant (with a gun), aluminum tape, a thermometer with a temperature sensor, metal shears, self-tapping screws, an electric drill, a hammer, a screwdriver and a marker. It is necessary to assemble and make knots in protective gloves. It only takes 7 steps:
- Manufacture of the body: the lamp box is cut to a predetermined size and wrapped with aluminum tape.
- Sealing the case: we fasten the corners with self-tapping screws and carefully seal all the cracks, grooves and possible cracks with silicone. The entire structure is painted black.
- We mark with a marker and cut out safety glasses (you can use polymer sheet material of suitable transparency instead of glass).
- We cut and install the cans in the case, connect them together and seal them. We bring out the ends of the pipes outside the sealed housing, while agreeing on the method of connecting the microfan inlets. Paint the jars black.
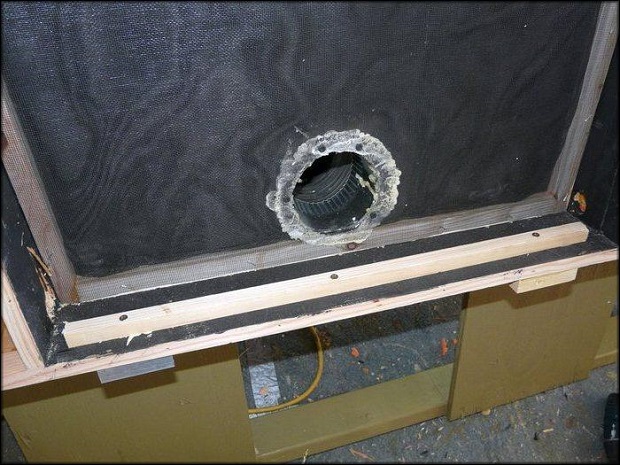
- On the opposite side of the case we get ventilation holes. We provide for the possibility of making additional holes if testing the collector shows a flaw. The location of the holes must take into account the overall dimensions of the fan.
- We seal the gaps between the protective glass and the case.
- We attach the microfan to the rear openings of the case. Before doing this, you need to make sure that the fan connection is correct, and it will work for suction.
- We check the efficiency of the assembled collector. To do this, we place a loose block on a selected section of the wall or on the roof, turn on (after a while) the fan and, using a thermometer, find out the temperature of the air heated by the sun.
Tests are carried out throughout the daylight hours, at regular intervals (in summer, for example, from 9.00 to 17.00, every hour). If the air temperatures recorded by the sensor are from 45 ° C to 70 ° C, then the collector is made correctly, otherwise the number of blocks should be increased.The finished structure is installed near the ventilation openings of the house.
Basic information about homemade solar collectors
Professional units have an efficiency of about 80-85%, but you need to take into account the fact that they are quite expensive, and almost everyone can afford to purchase materials for assembling a home-made collector.
In this regard, everything depends on the design features, which are determined and calculated individually.
Assembly of the unit does not require difficult to use and hard-to-reach tools and expensive materials.
solar collector
Solar Collector DIY Tools
- Perforator.
- Electric drill.
- A hammer.
- Hacksaw.
There are several varieties of the considered design. They differ from each other in efficiency and final cost. Under any circumstances, a home-made unit will cost an order of magnitude cheaper than a factory model with similar characteristics.
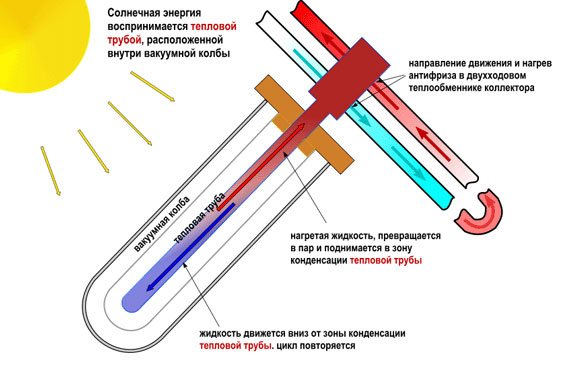
One of the best options is a vacuum solar collector. This is the most budgetary and easiest option in its execution.
Is it possible to use a solar collector in winter
For year-round use of the device, you need to learn more about how the solar collector works in winter. The main difference is the coolant. Since water can freeze in the circuit pipes, it must be replaced with antifreeze. The principle of indirect heating works with the installation of an additional boiler. Next, the diagram is:
- After the antifreeze heats up, it will flow from the battery located outside into the coil of the water tank and heat it up.
- Then warm water will be supplied to the system, cooled back.
- Be sure to install a pressure sensor (pressure gauge), an air vent, an expansion valve to relieve excess pressure.
- As in the summer version, to improve circulation, it is necessary to provide for the presence of a circulation pump.
Solar collector on the roof of the house in winter
Making a homemade solar collector
If you are interested in the question of how to make a solar collector, consider the main stages of the manufacture of flat structures:
- First you need to calculate the dimensions of the future heater, based on the area of \u200b\u200bthe heated room. They will also depend on the level of solar activity in a particular region, the location of the house, the terrain, the materials used and other factors. But the starting point is still the surface area on which it will be installed.
- Consider what the absorber (receiver) will be made of. For these purposes, you can use copper and aluminum tubes, steel flat batteries, rolled rubber hose, etc.
- The receiver must be painted black.
- Then you need to make a collector housing, various materials are suitable for this. The most common is wood, you can use glass. If there are old windows with glazing - ideal.
- Between the bottom of the housing and the absorber, it is necessary to lay a heat-insulating material (mineral wool or foam plastic), which will prevent heat loss.
- Cover the entire area of the heater with a metal sheet (made of aluminum or thin steel), which will enhance the effect.
- Lay the pipes of the coil on top, attach to the metal sheet with construction brackets or in other ways, bring the ends of the coil out.
- From above, thermal solar collectors are covered with a light-transmitting material, most often glass. You can use transparent polycarbonate, which is more practical: resistant to mechanical shocks, unpretentious in care.
- The water tank should be covered with insulating material or painted black to slow down the cooling process of the water.
- Mount the heating element on site and connect it with pipes to the storage tank with water.
- Carry out start-up work, check the wiring along the entire length for leaks due to poor-quality connections.
 Solar Air Collector Sizing and Location Diagram
Types of air collectors
The type of air solar collector depends on where the air comes from. If it enters the room from the outside, and it is heated along the way, then this is a ventilation system. If the air for heating is taken inside the room itself and then simply returned inside, then this is a recirculation option.


And the recycling system has been known to us since ancient times. The simplest example is a fireplace or stove with air ducts for heating. In the modern version, this is a heating boiler built into the ventilation system. But a solar collector will cost much less than the above options, including a water heating system.
Do-it-yourself winter heating
Sometimes it is necessary to organize the heating of a chicken coop or any other outbuilding in the winter. But installing a heating stove is too expensive, the costs will not pay for themselves. Therefore, many choose an air collector to heat the chicken coop, this is an excellent scheme. You can make such a device with your own hands.

Do-it-yourself air solar collector for heating a chicken coop
This is a more expensive and efficient design than, for example, a beer can collector, you have to try hard here.
Such a device is easy to make, there are practically no costs for its maintenance and the collector is very convenient to use. The main thing is to mount it in the wall of the chicken coop, then the efficiency will be much higher, and make a protective coating of polycarbonate.
Of course, the solar collector does not provide heating on gloomy days. But even in winter, the sun often peeps out, and in late autumn and early spring, when the building needs to be heated, there is a lot of sun at all. If necessary, such a collector can maintain a pleasant indoor climate even in sub-zero temperatures.
The scheme of the air collector for the house is simple. From below, you need to make a hole with your own hands through which air will flow from the room for heating. A mesh is made inside the collector, which heats up and gives off heat to the air. Then, through the upper hole, the flow returns to the room again.
Results
In conclusion, I would like to note that the possible design of the collector is limited by the use of a copper coil. There are many different ways, for example, you can assemble a completely efficient, working collector using beer cans and other tin bottles as absorbent elements. There are many options. To do this, it is only worth studying the issue, collecting the required number of beer cans or tin bottles. Next, assemble them into a single design.The main thing is that even if you decide to assemble a collector from beer cans or bottles, remember that all solar collectors work on the same principle. Qualitatively carry out the soldering of the joints of the connection of pipes and cans, create the proper vacuum conditions in the design and you will succeed. Get down to business boldly. As a result, you will receive not only a completely free and autonomous source of hot water. You will also get great psychological satisfaction from knowing that you have had a hand in increasing the share of renewable energy in today's globalized world. By creating a device that works on solar radiation, you will become more independent of the central supply systems for both electricity and gas. You will provide yourself with hot water for household needs. Good luck.
solar collector