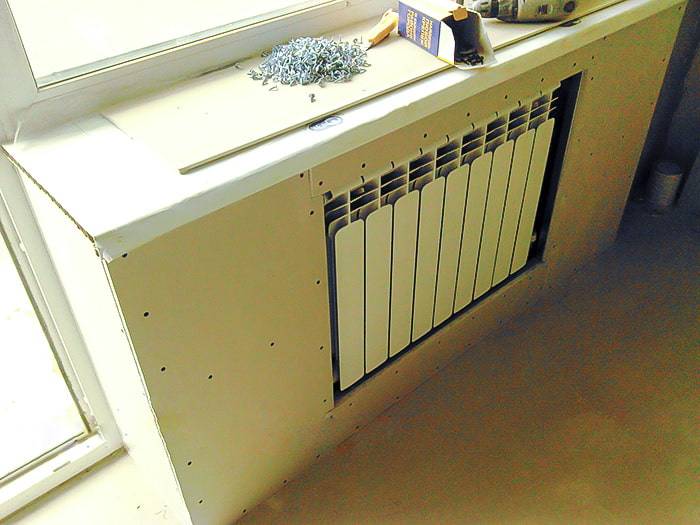
- DIY solar battery from improvised means and materials at home
- From diodes
- From transistors
- From aluminum cans
- Which photovoltaic cells are best suited for a solar panel and where can I find them
- Is it possible to replace photovoltaic plates with something else
- Independent work
- What to consider when choosing photocells?
- Solar energy for the benefit of people
- Why do people start thinking about alternative energy?
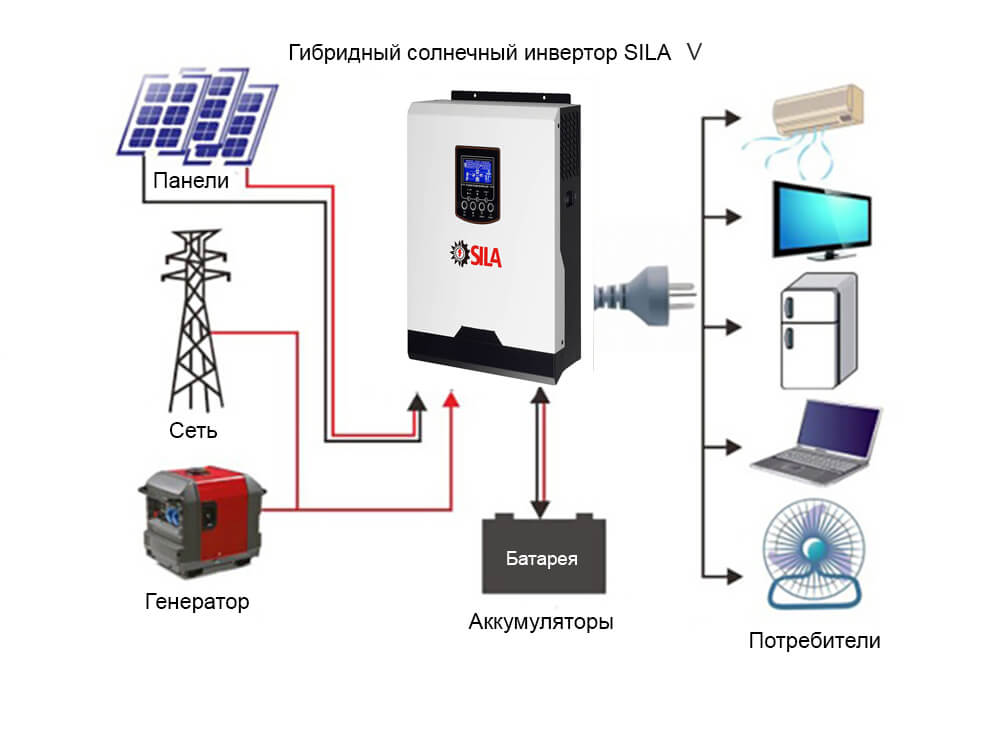
- Device
- System design and site selection
- Installation and connection of the solar battery to consumers
- All about solar cell assembly
- How to use foil
- Solar battery: how it works
- Photocell characteristics
- Circuit breakers
- Step by step build process
- Frame assembly
- Plate soldering
- Panel assembly
- Aluminum cans as a producer of thermal energy
- The feasibility of a homemade solar panel
- Conclusion
DIY solar battery from improvised means and materials at home
Despite the fact that we live in a modern and rapidly developing world, the purchase and installation of solar panels remains the lot of wealthy people. The cost of one panel, which will produce only 100 watts, varies from 6 to 8 thousand rubles.This is not counting the fact that it will be necessary to buy capacitors, batteries, a charge controller, a network inverter, a converter and other things separately. But if you do not have a lot of funds, but want to switch to an environmentally friendly source of energy, then we have something for you. good news - solar panel can be collected at home. And if you follow all the recommendations, its efficiency will be no worse than that of the commercially assembled version. In this part, we will look at the step-by-step assembly
We will also pay attention to the materials from which solar panels can be assembled.
From diodes
This is one of the most budgetary materials. If you are going to make a solar battery for your home from diodes, then remember that with the help of these components only small solar panels are assembled that can power any minor gadgets. Diodes D223B are best suited. These are Soviet-style diodes, which are good because they have a glass case, due to their size they have a high mounting density and have a nice price.
Then we prepare the surface for the future placement of the diodes. It can be a wooden plank or any other surface. It is required to make holes in it throughout its entire area. Between the holes it will be necessary to observe a distance of 2 to 4 mm.
After we take our diodes and insert them with aluminum tails into these holes. After that, the tails need to be bent in relation to each other and soldered so that when they receive solar energy, they distribute electricity into one “system”.
Our primitive glass diode solar cell is ready. At the output, it can provide energy of a couple of volts, which is a good indicator for a handicraft assembly.
From transistors
This option will already be more serious than the diode one, but it is still an example of a harsh manual assembly.
In order to make a solar battery from transistors, you will first need the transistors themselves. Fortunately, they can be bought in almost any market or in electronics stores.
After purchase, you will need to cut off the cover of the transistor. Under the lid hides the most important and necessary element for us - a semiconductor crystal.
Next, we prepare the frame of our solar battery. You can use both wood and plastic. Plastic would certainly be better. We drill holes in it for the outputs of transistors.
Then we insert them into the frame and solder them between each other, observing the norms of “input-output”.
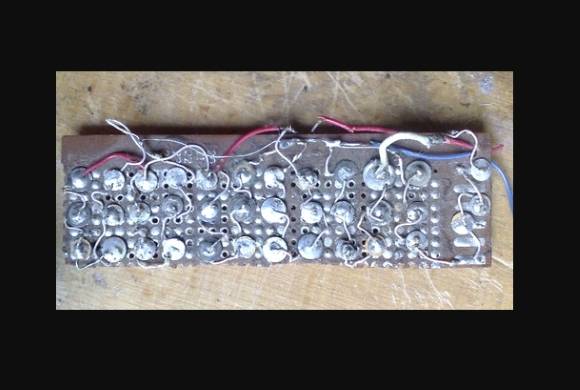
At the output, such a battery can provide enough power to carry out work, for example, a calculator or a small diode light bulb. Again, such a solar panel is assembled purely for fun and does not represent a serious “power supply” element.
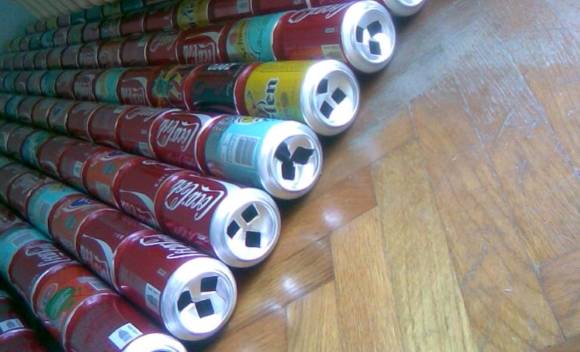
From aluminum cans
This option is already more serious than the first two. This is also an incredibly cheap and efficient way to get energy. The only thing is that at the output it will be much more than in the variants of diodes and transistors, and it will not be electrical, but thermal. All you need is a large number of aluminum cans and a case. Wood body works well. In the case, the front part must be covered with plexiglass. Without it, the battery will not work effectively.
Then, using tools, three holes are punched in the bottom of each jar. At the top, in turn, a star-shaped cut is made.The free ends are bent outward, which is necessary in order for improved turbulence of the heated air to occur.
After these manipulations, the banks are folded into longitudinal lines (pipes) into the body of our battery.
Then a layer of insulation (mineral wool) is laid between the pipes and the walls/rear wall. Then the collector is closed with transparent cellular polycarbonate.
Which photovoltaic cells are best suited for a solar panel and where can I find them
Homemade solar panels will always be one step behind their factory counterparts, and for several reasons. Firstly, well-known manufacturers carefully select photocells, weeding out cells with unstable or reduced parameters. Secondly, in the manufacture of solar batteries, special glass is used with increased light transmission and reduced reflectivity - it is almost impossible to find this on sale. And thirdly, before proceeding to serial production, all parameters of industrial designs are tested using mathematical models. As a result, the effect of cell heating on the battery efficiency is minimized, the heat removal system is improved, the optimal cross section of the connecting busbars is found, ways to reduce the degradation rate of photocells, etc. are studied. It is impossible to solve such problems without an equipped laboratory and appropriate qualifications.
Low cost homemade solar panels allows you to build an installation, allowing you to completely abandon the services of energy companies
Nevertheless, do-it-yourself solar panels show good performance results and are not so far behind industrial counterparts.As for the price, here we have a gain of more than two times, that is, at the same cost, homemade products will give twice as much electricity.
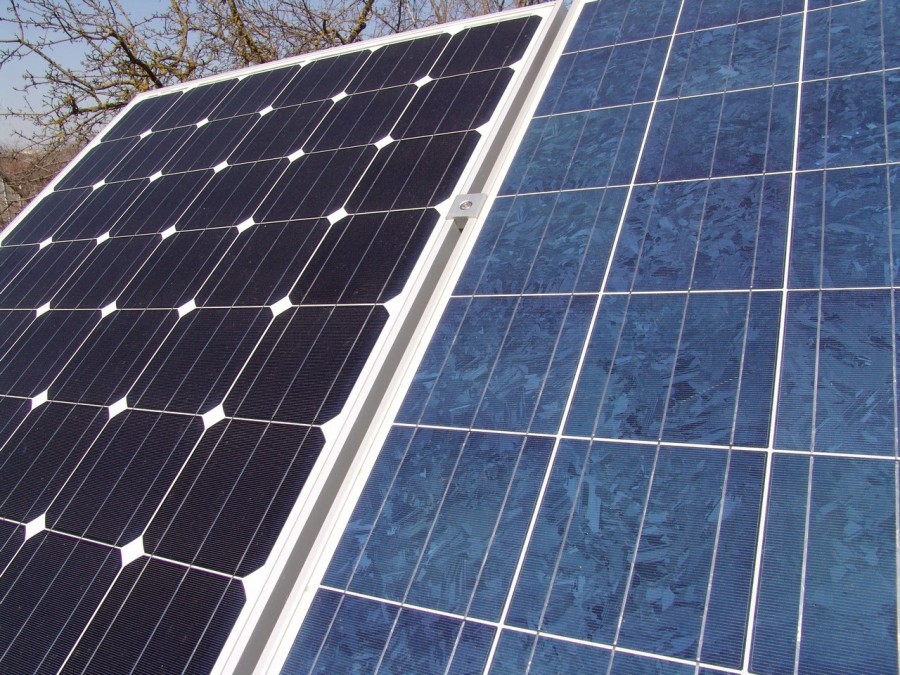
Considering all of the above, a picture emerges of which solar cells are suitable for our conditions. Film ones disappear due to lack of sale, and amorphous ones due to a short service life and low efficiency. Cells of crystalline silicon remain. I must say that in the first home-made device it is better to use cheaper "polycrystals". And only after running the technology and having “filled your hand”, you should switch to single-crystal cells.

Cheap substandard photovoltaic cells are suitable for running in technologies - as well as high-quality devices, they can be bought on foreign trading floors
As for the question of where to get inexpensive solar cells, they can be found on foreign trading platforms such as Taobao, Ebay, Aliexpress, Amazon, etc. There they are sold both in the form of individual photocells of various sizes and performance, and ready-made kits for assembling solar panels any power.


Is it possible to replace photovoltaic plates with something else
It is rare that a home master does not have a treasured box with old radio components. But diodes and transistors from old receivers and TVs are still the same semiconductors with p-n junctions, which, when illuminated by sunlight, generate current. Taking advantage of these properties and connecting several semiconductor devices, you can make a real solar battery.

For the manufacture of a low-power solar battery, you can use the old element base of semiconductor devices
The attentive reader will immediately ask what the catch is.Why pay for factory-made mono- or polycrystalline cells, if you can use what lies literally under your feet. As always, the devil is in the details. The fact is that the most powerful germanium transistors make it possible to obtain a voltage of no more than 0.2 V in the bright sun at a current strength measured in microamps. In order to achieve the parameters that a flat silicon photocell produces, you will need several tens or even hundreds of semiconductors. A battery made from old radio components is only good for charging an LED camping lantern or a small mobile phone battery. For the implementation of larger projects, purchased solar cells are indispensable.
Independent work
how to make a solar battery
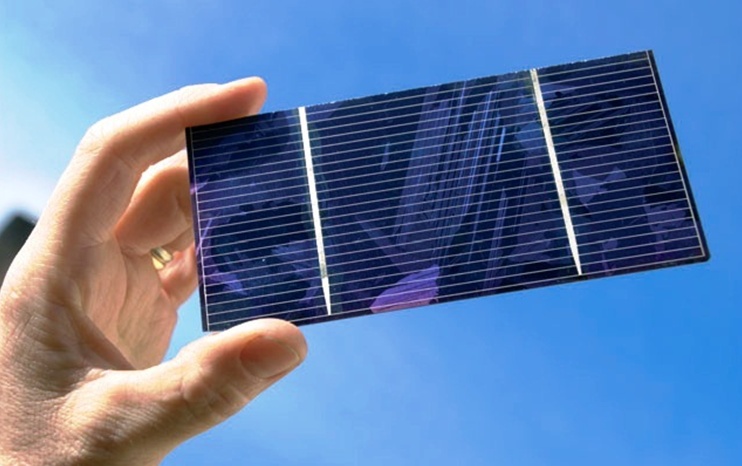
I want to say right away - do not really hope that you can build a device yourself that will fully cover all the expenses of the house and provide the building with electricity of 220 volts. The dimensions of such an installation would be huge, because one plate generates an electric current with a voltage of only 0.5 V. Optimal for homemade products is a nominal voltage of 18 volts. We will focus on this indicator when calculating the required number of photocells for the battery.
For better fastening, we put the sides on the glue and screw them with self-tapping screws. To make it easier to solder the blocks, we divide the box into two parts using a bar fixed in the center of the box.
What to consider when choosing photocells?
For the manufacture of such solar cells, there are two types of solar cells - from polycrystalline silicon and monocrystalline.However, when assembling them at home with your own hands, you need to know that the efficiency of the first design is higher than the second - 17.5% versus 15%.
This will allow you to understand how much you need to buy solar cells and how much space you need to install the batteries. The angle of inclination of the panel is also important, which should be located on the sunniest side of the home.
It is important that the angle of inclination can be changed so that improvised panels are used more efficiently.
The photocells are connected using conductors soldered to them both in series and in parallel, which increases the voltage and current strength, and also allows you to get energy even if one of their elements is damaged.
In solar panels, in addition to conductors, there are semiconductors that protect them from overheating - diodes. Indeed, in the dark, the design actively absorbs the energy accumulated due to the battery, which is a conventional lead battery.
Solar energy for the benefit of people
Hydrocarbon energy carriers dare to run out, and their use does not always occur in clean technological processes. Therefore, we observe constant pollution of the environment in which people live.
The use of alternative sources of electrical energy will save the environment for future generations. The use of solar energy has a number of advantages:
- inexhaustible potential. The luminary is able to satisfy the needs of a person in any amount of clean energy he needs;
- silence energy. The transformation of sunlight into electrical energy takes place in complete silence.This is an important factor that distinguishes this process from other methods of obtaining electrical energy;
- free light. The sun's rays penetrate everywhere and warm every inhabitant for free. Having once invested in the purchase of solar panels, the owner can be guaranteed to operate the module for twenty years.


Why do people start thinking about alternative energy?
Because they want to have a spare source of power supply.
Before you start building a solar battery with your own hands at home, you need to clearly define what the work is being done for. If it is done in order to save money, then you need to understand that the payback of a do-it-yourself construction from improvised means depends on the cost of the materials used. On the other hand, saving on consumables leads to a decrease in service life. So, you need to look for the "golden mean".
In the most budgetary option, you will need:
- aluminum corner;
- glass;
- photocells and conductors;
- diodes and frame material;
- sealant;
- multimeter;
- soldering iron;
- tin;
- flux;
- tires for soldering;
- sealant
- screws;
- paint and braid for cable insulation.
Device
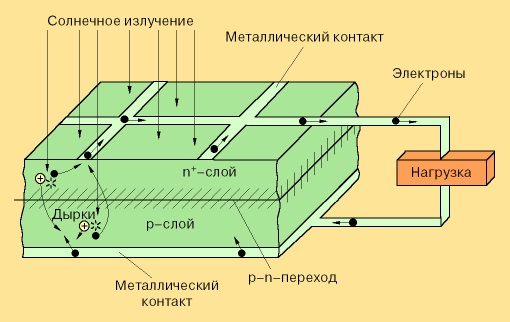
At the core solar battery devices lies the phenomenon of the photoelectric effect, discovered in the twentieth century by A. Einstein. It turned out that in some substances, under the action of sunlight or other substances, charged particles are detached. This discovery led in 1953 to the creation of the first solar module.
The material for the manufacture of elements are semiconductors - combined plates of two materials with different conductivity.Most often, polycrystalline or monocrystalline silicon with various additives is used for their manufacture.
Under the influence of sunlight, an excess of electrons appears in one layer, and their deficiency in the other. "Extra" electrons go into the area with their lack, this process is called p-n transition.
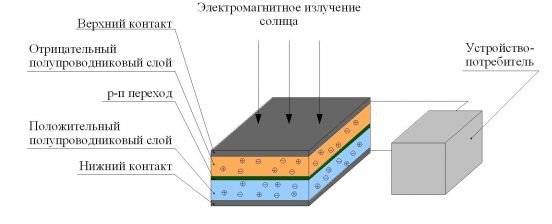
The solar cell consists of two semiconductor layers with different conductivity
Between the materials that form an excess and a shortage of electrons, a barrier layer is placed that prevents the transition. This is necessary so that the current occurs only when there is a source of energy consumption.


Photons of light hitting the surface knock out electrons and supply them with the necessary energy to overcome the barrier layer. Negative electrons pass from the p-conductor to the n-conductor, and positive electrons make the opposite path.
Due to the different conductivity of semiconductor materials, it is possible to create a directed movement of electrons. Thus, an electric current is generated.
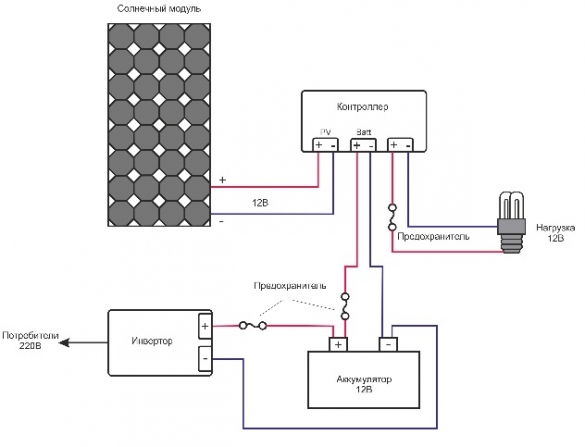
The elements are connected in series with each other, forming a panel of a larger or smaller area, which is called a battery. Such batteries can be directly connected to the source of consumption. But since solar activity changes during the day, and stops altogether at night, batteries are used that accumulate energy during the absence of sunlight.
A necessary component in this case is the controller. It serves to control the charging of the battery and turns off the battery when fully charged.
The current generated by the solar battery is constant, to use it must be converted to alternating current. This is what an inverter is for.
Since all electrical appliances that consume energy are designed for a certain voltage, a stabilizer is needed in the system to provide the desired values.
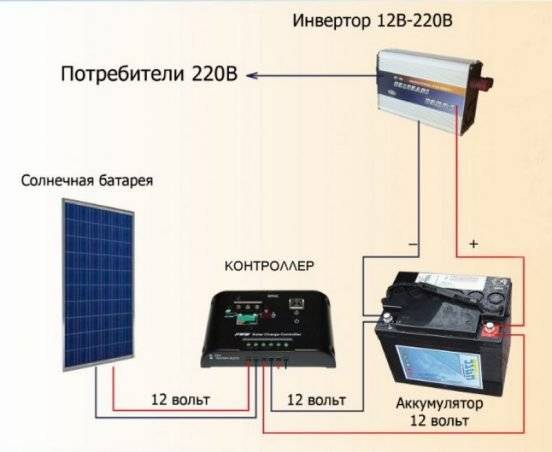
Additional devices are installed between the solar module and the consumer
Only if all these components are present, it is possible to obtain a functional system that supplies energy to consumers and does not threaten to disable them.
System design and site selection
The design of the solar system includes calculations of the required size of the solar plate. As mentioned above, battery size is usually limited by expensive photovoltaic cells.
The solar cell must be installed at a certain angle, which would ensure maximum exposure of the silicon wafers to sunlight. The best option is batteries that can change the angle of inclination.
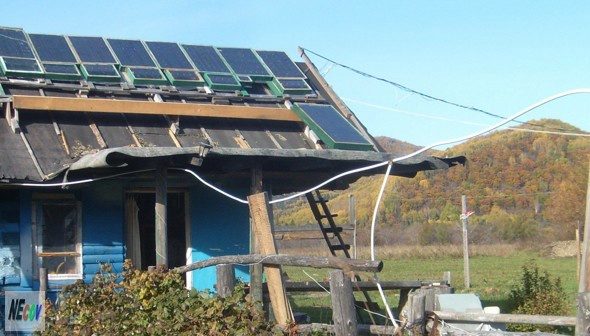
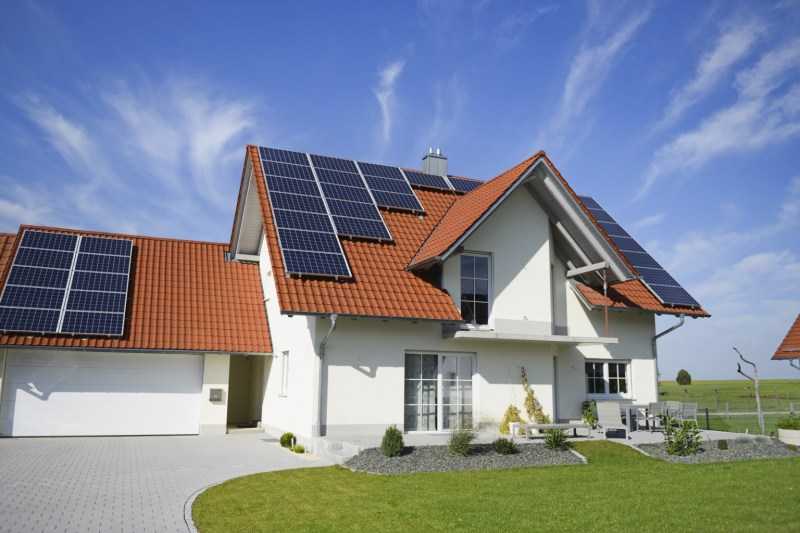
The place of installation of solar plates can be the most diverse: on the ground, on pitched or flat the roof of the house, on the roofs of utility rooms.
The only condition is that the battery must be placed on the sunny side of the site or house, not shaded by the high crown of trees. In this case, the optimal angle of inclination must be calculated by the formula or using a specialized calculator.
The angle of inclination will depend on the location of the house, season and climate. It is desirable that the battery has the ability to change the angle of inclination following the seasonal changes in the height of the sun, because. they work most effectively when the sun's rays fall strictly perpendicular to the surface.
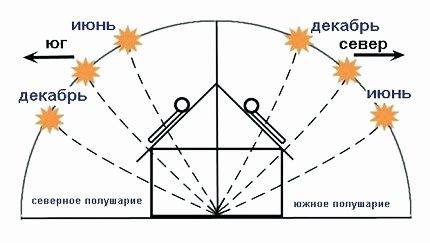 For the European part of the CIS countries, the recommended angle of stationary inclination is 50 - 60 º.If the design provides for a device for changing the angle of inclination, then in winter it is better to place batteries at 70 º to the horizon, in summer at an angle of 30 º
Calculations show that 1 square meter of the solar system makes it possible to obtain 120 watts. Therefore, by calculations, it can be established that in order to provide an average family with electricity in the amount of 300 kW per month, a solar system of at least 20 square meters is required.
It will be problematic to immediately install such a solar system. But even installing a 5-meter battery will help save energy and make a modest contribution to the ecology of our planet. We also recommend that you familiarize yourself with the principle of calculating the required number of solar panels.
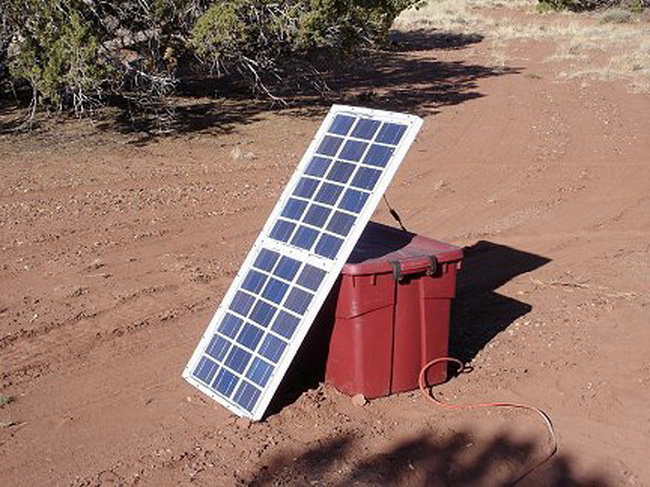
The solar battery can be used as a backup energy source in case of frequent shutdown of the centralized power supply. For automatic switching, it is necessary to provide an uninterruptible power supply system.
Such a system is convenient in that when using a traditional source of electricity, the accumulator of the solar system is simultaneously charged. The equipment serving the solar battery is located inside the house, so it is necessary to provide a special room for it.
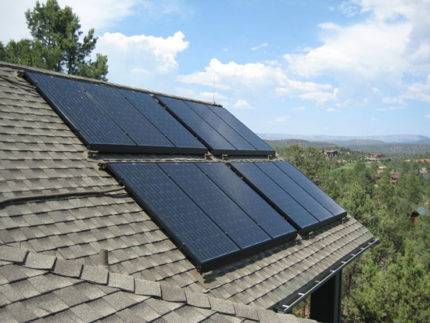 When placing batteries on a sloping roof of the house, do not forget about the angle of the panel, ideal when the battery has a device for changing the angle of the season
Installation and connection of the solar battery to consumers
For a number of reasons homemade solar panel is a rather fragile device, therefore, it requires the arrangement of a reliable supporting frame.The ideal option would be a design that allows you to orient the source of free electricity in both planes, but the complexity of such a system is most often a strong argument in favor of a simple inclined system. It is a movable frame that can be set at any angle to the luminary. One of the options for a frame knocked down from a wooden bar is presented below. You can use metal corners, pipes, tires, etc. for its manufacture - everything that is at hand.
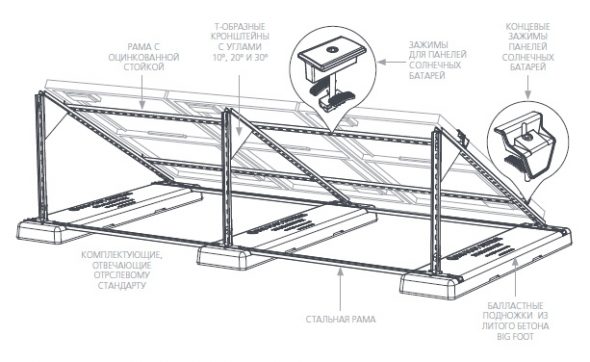
Solar panel frame drawing
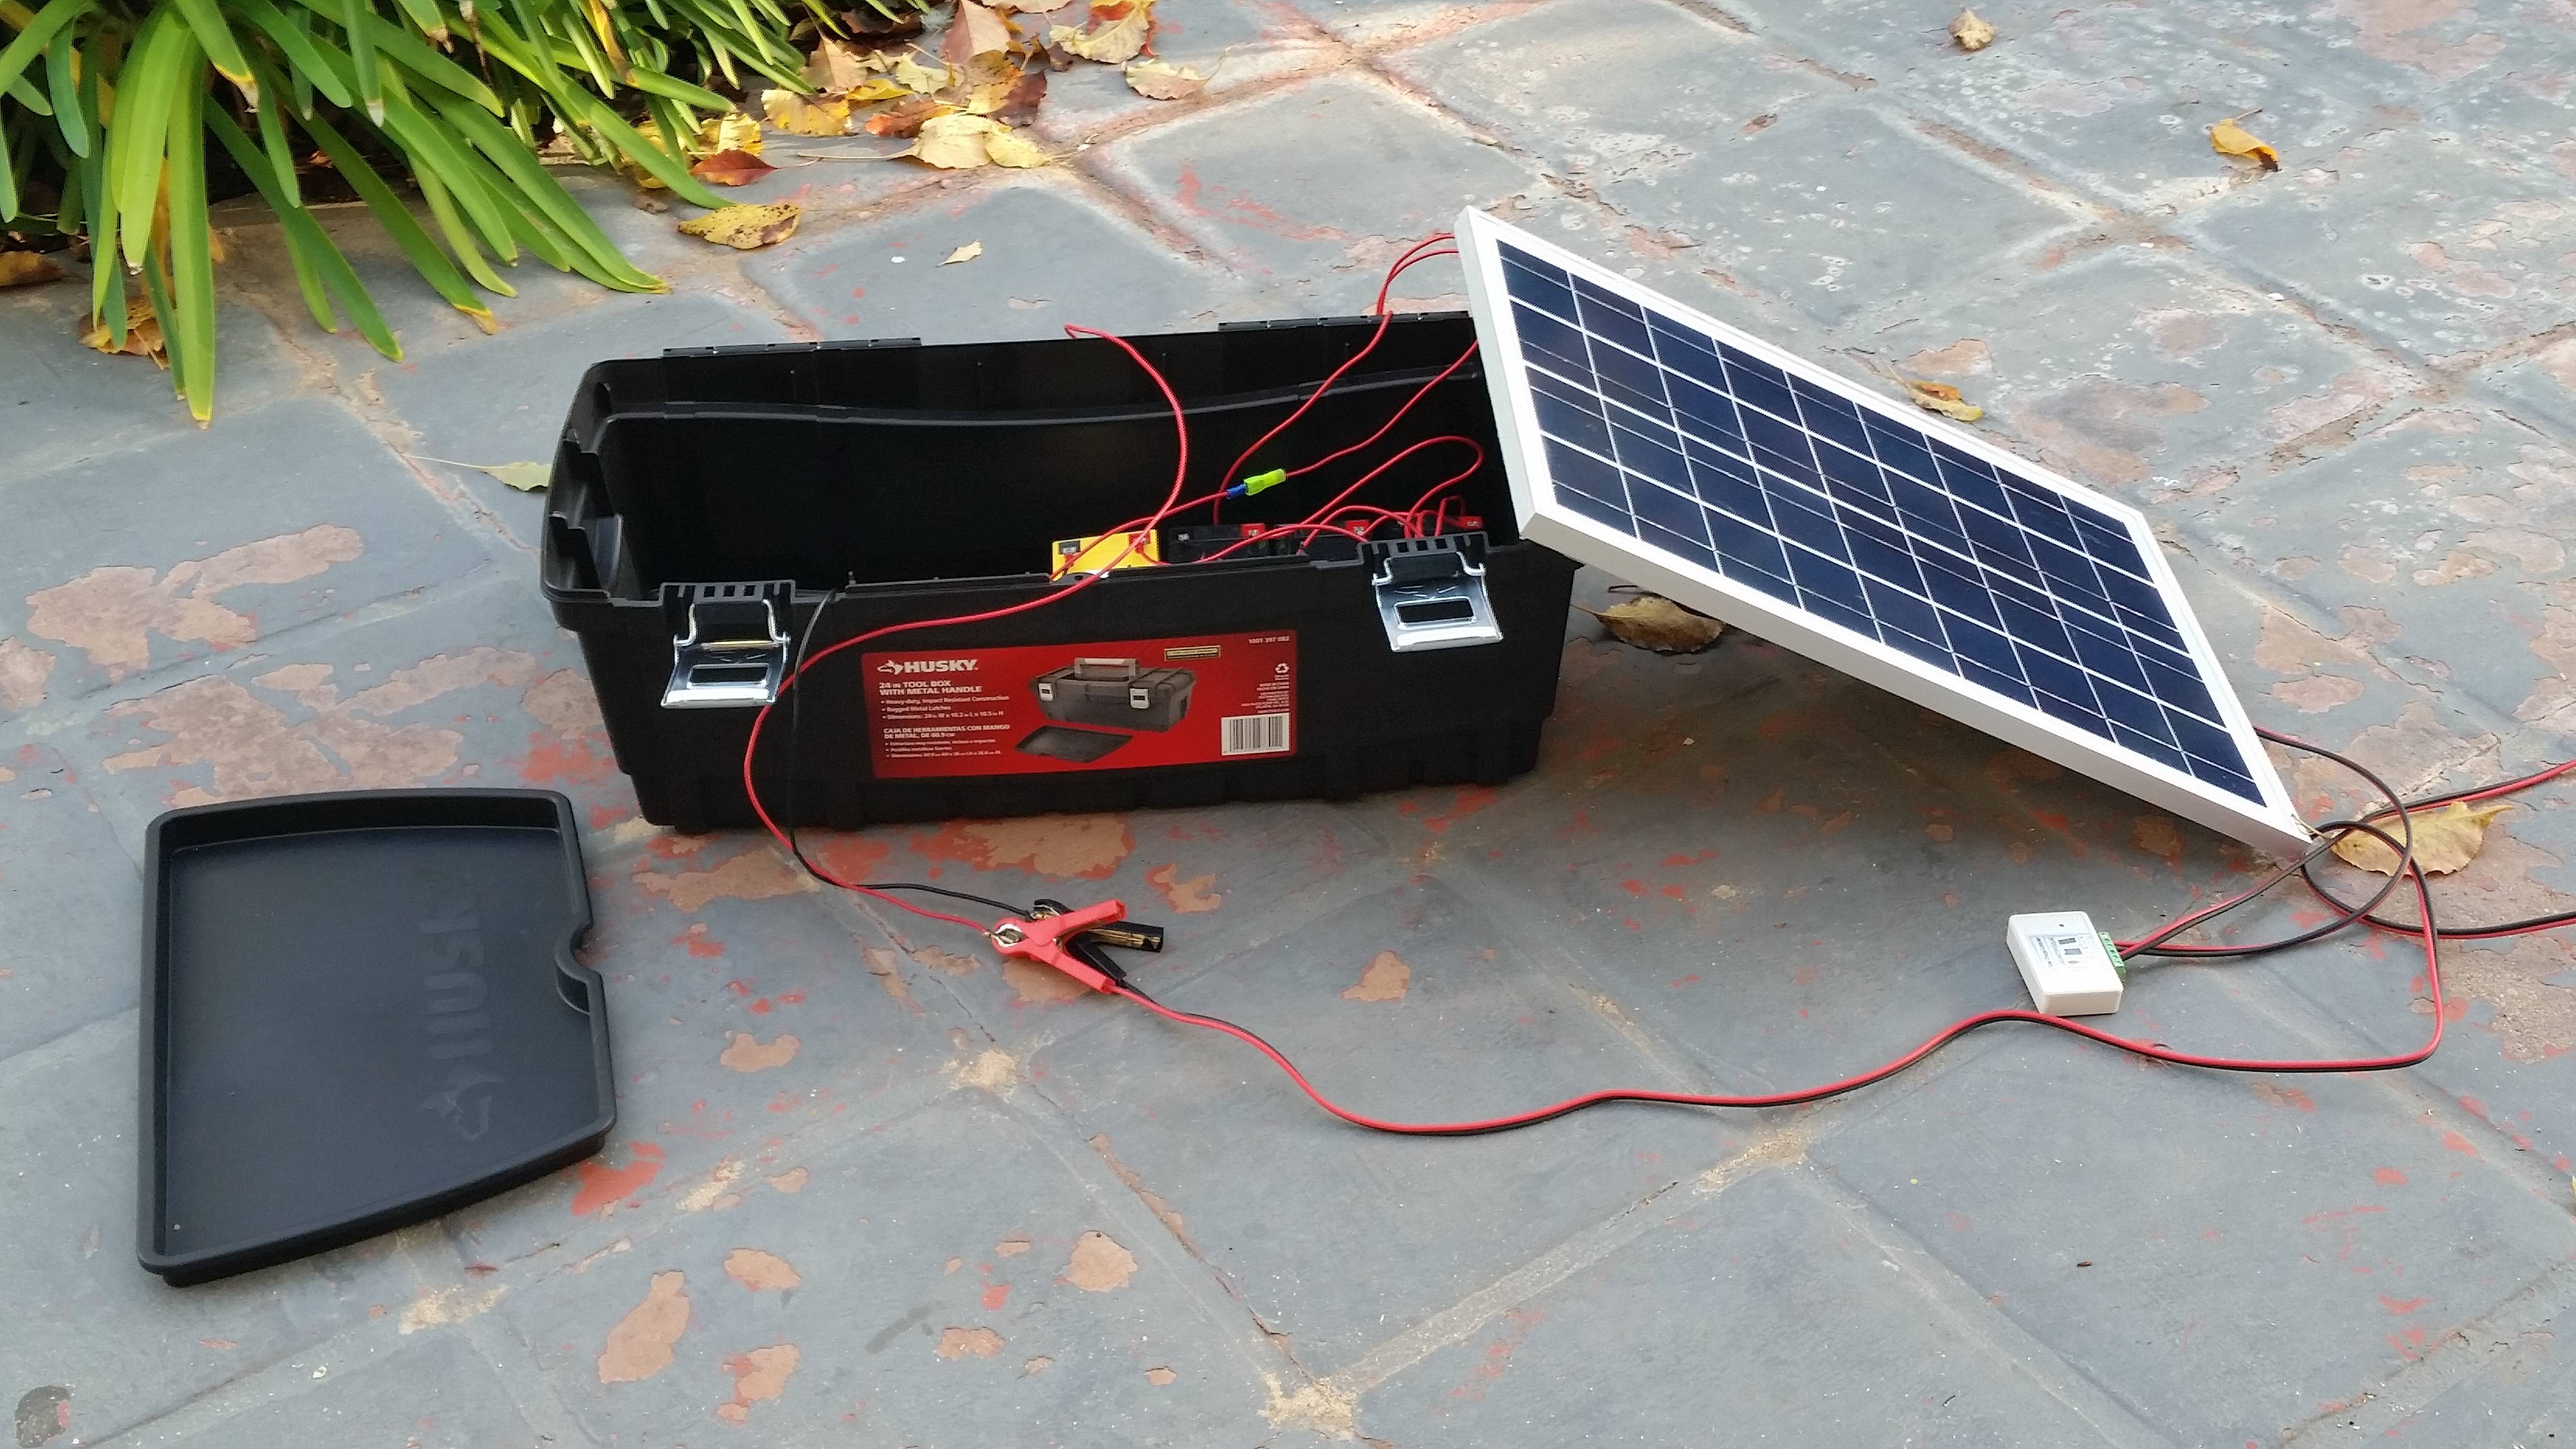
To connect the solar panel to the batteries, you need a charge controller. This device will monitor the degree of charge and discharge of the batteries, control the current output and switch to mains power in case of a significant voltage drop. The device of the required power and the required functionality can be bought at the same outlets where photocells are sold. As for the power supply of household consumers, this will require transforming the low-voltage voltage into 220 V. Another device, the inverter, successfully copes with this. I must say that the domestic industry produces reliable devices with good performance characteristics, so the converter can be bought on the spot - in this case, a “real” guarantee will be a bonus.

One solar battery will not be enough for a full-fledged power supply at home - you will also need batteries, a charge controller and an inverter
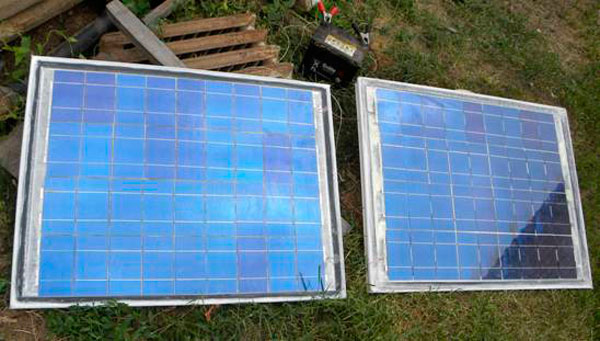
All about solar cell assembly
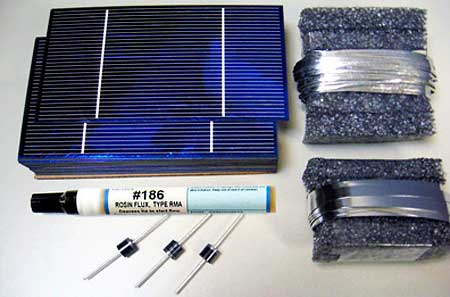
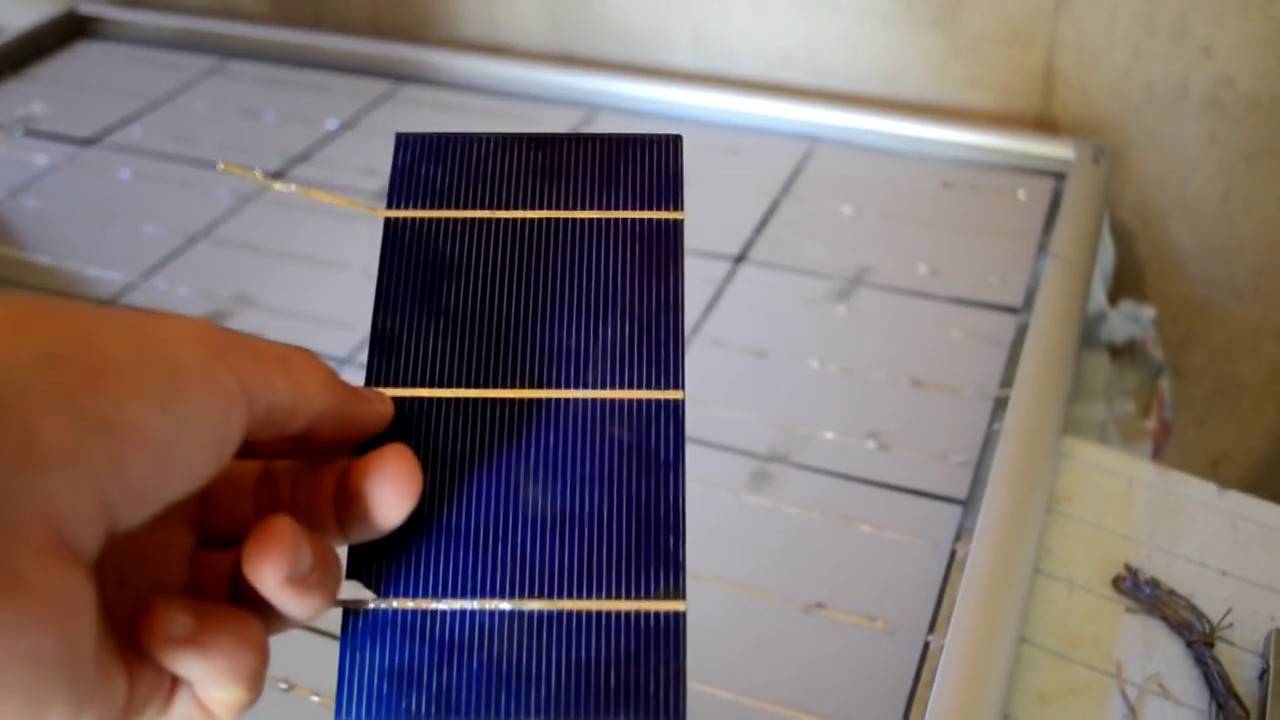
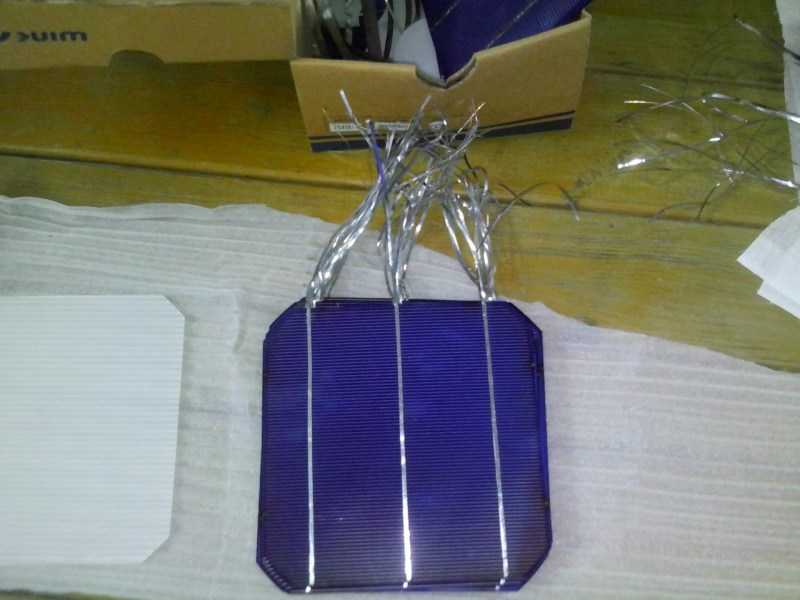
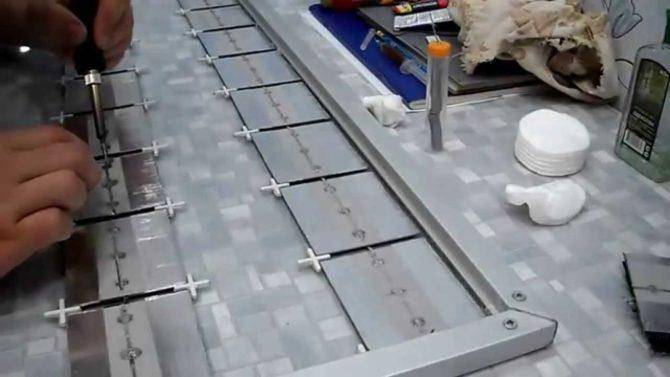
When finished with the frame, begin to assemble the photocells.For beginners, it is advisable to start by creating a small battery, leaving some panels for replacement in case of damage. during soldering. These parts make up 4 rows (12 elements each).


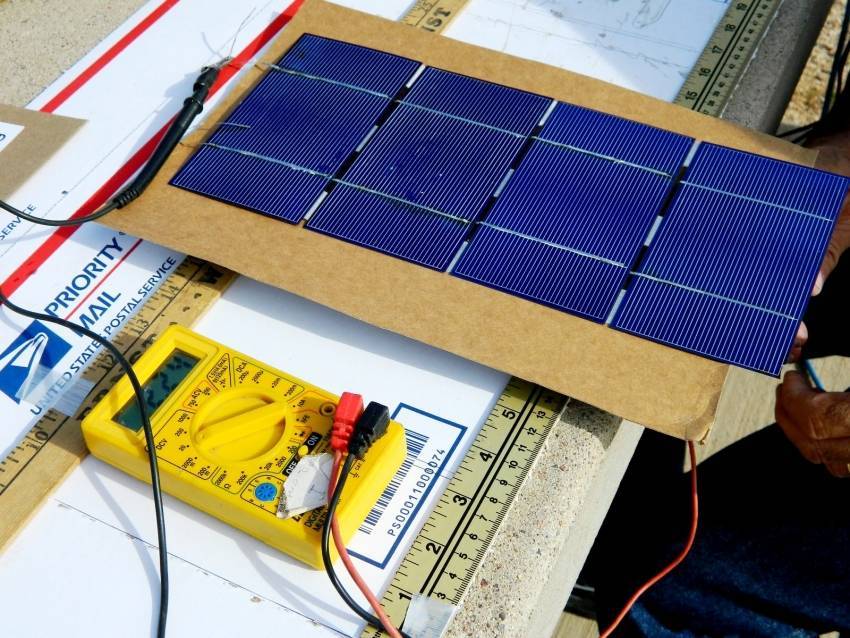


The maximum total power should be about 85 watts:
- if many cells are used for the battery, at the very beginning they need to be sorted by the number of volts produced. Otherwise, the element with the fewest volts will be the resistance;
- the elements are laid on the frame with the reverse side, i.e. down the front surface. Next, prepare a soldering iron, flux, alcohol, cotton swabs;
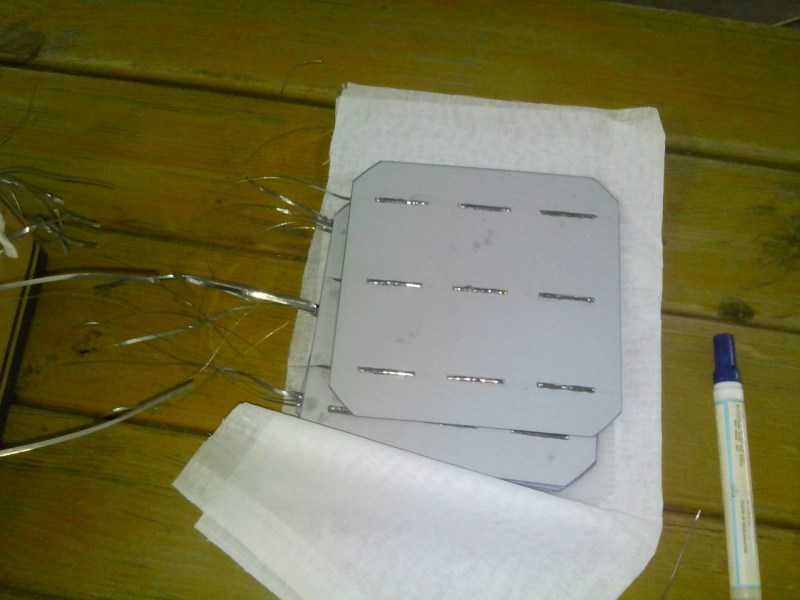
- then proceed to soldering. The soldering process is carried out carefully, since with a strong force the elements can be damaged. the connecting conductors of one element are placed in such a way that they cross the soldering points on the reverse side of the other element;
- at the next stage, they switch to soldering a two-millimeter tire onto the solar cells - the process is simple, but quite routine. The size of the tire is determined based on the width of the two elements and the distance between them (0.5-1 cm). All other tires are measured according to the length of the first.
- Now, having moistened a cotton swab in alcohol, degrease the places where the tire will be soldered. Then these places are drawn with a pencil, which is not required for a tire that is already tinned. Then the tire is carefully soldered with a soldering iron. There is no need to add solder - there is enough solder on the bus for high-quality soldering.
- The main thing is that there are no protrusions that, when laid on glass, can lead to damage to the elements. The soldering points are again wiped with a cotton swab moistened with alcohol to remove the remnants of the solder. Thus, all elements are soldered;
- when all the tires are soldered, we solder the back side of the panels: degrease the place of future soldering, apply flux, solder, remove solder residues. For the connection to be serial, the first bus (on the first element of the first tape) must come out from under it, on the second - be on top, on the third - come out again from below, etc .;
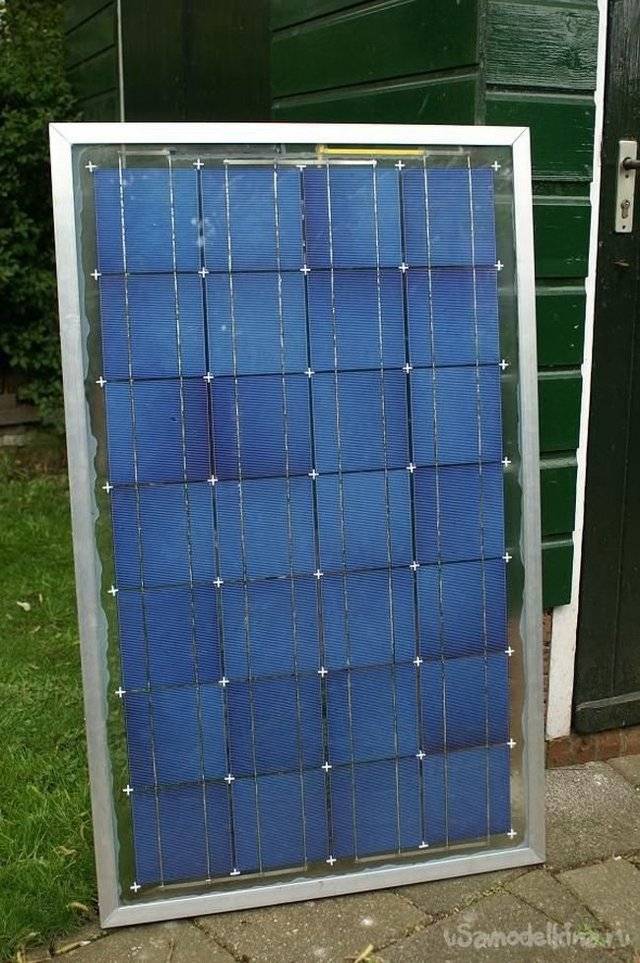
- when all the elements are soldered (assembled into tapes), they proceed to degreasing the glass, on which they are then laid, not forgetting to leave a distance of 0.5 to 1 cm between rows;
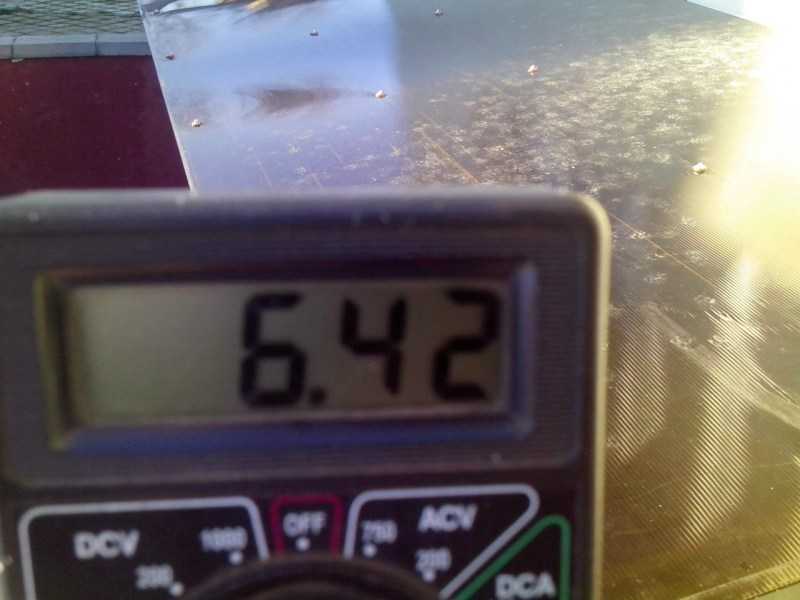
- when all the photocells are soldered, it is the turn to glue them to the frame, for which a drop of silicone sealant is applied to the reverse side of each of the elements, which will ensure reliable gluing. After attaching the elements to the glass, they check the current, as well as overheating panels. If there are any, it is better to replace them;
- after finishing work, it is mandatory to wrap them with a winding for a cable made of copper, which will connect them together. You can glue it with the same sealant;
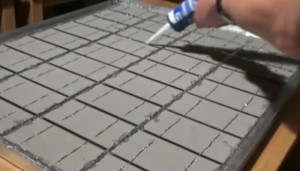
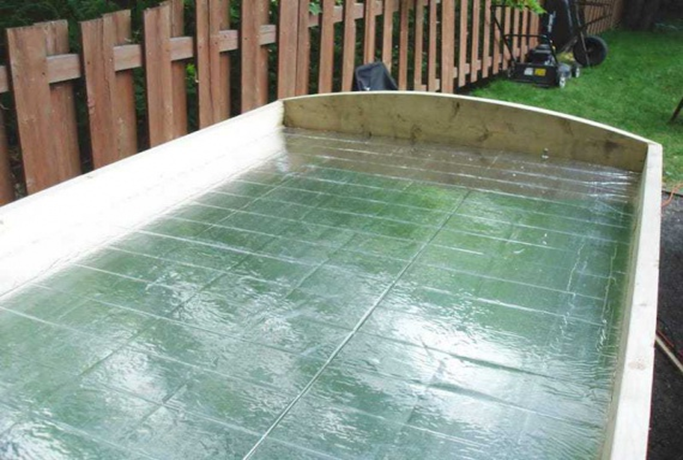
- it remains a little before the end of the work - to seal the elements, for which they are covered with silicone. Enough two cans of 300 milliliters. The difficulty for many arises with its uniform distribution, since the silicone is quite thick. After application, it must pass at least 8 hours;
- it is recommended to test the solar panel before sealing to make sure that the soldering is of high quality. If financial possibilities allow, compounds can be used instead of cheap sealant. First, fixing the system along the edges, then in the middle. Fill the space between the "ribbons" of photocells. Adding acrylic lacquer to the sealant, cover the back side with the mixture.
- Film 751, intended for gluing applications to advertising machines, is also suitable). It is necessary to lay the film evenly, because. nothing can be changed later. If it does not lie flat, the film should not be torn off, because. photocells are broken. Very carefully, gradually removing the layer from the film, it is straightened from the middle to the edges, slightly pressing;
- the plates are attached to the frame with screws located on the rails.
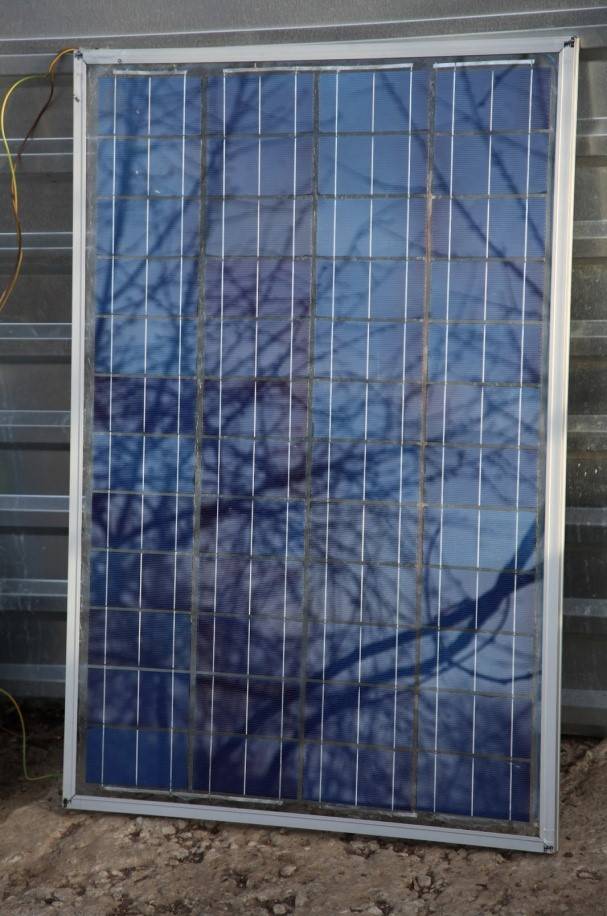
Such a design in sunny weather will be able to produce 70-85 watts per hour.

Filling with silicone
This can be considered finished assembly at home solar battery. With the advent of it in the house, you get environmentally friendly energy, which reduces the consumption of energy from traditional sources that have a negative effect on the environment and are harmful to health.
Video: How to make a solar panel at home
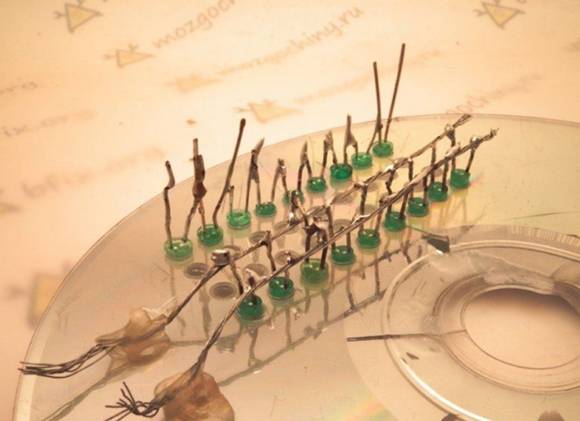
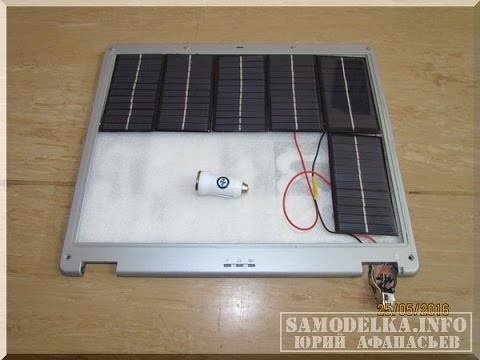
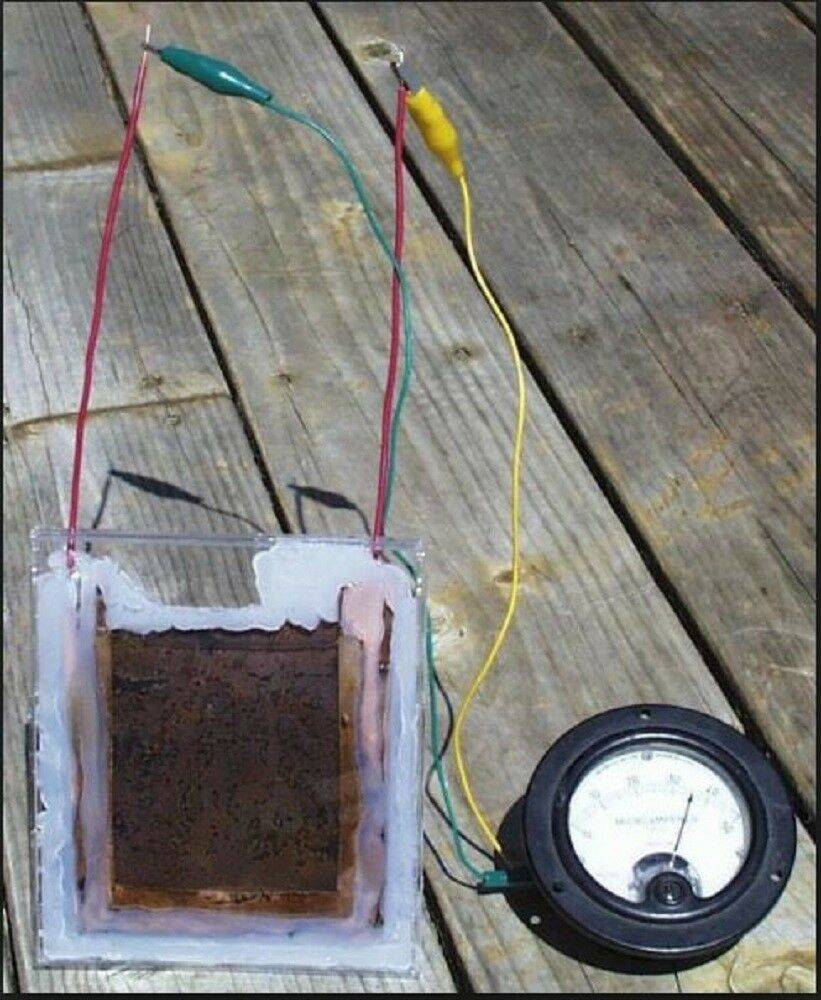
How to use foil
Foil can also be used to create a power source, however, it will provide little energy. Plain foil, 45 square cm in size, is suitable. It must be washed in soapy water to remove any grease. Here is a step by step guide:
- Using the skin, we remove any kind of corrosion.
- We put a sheet of foil on an electric stove with a power of 1.1 kW and heat until orange-red spots appear on it. If heated further, the spots will turn black, which will indicate the formation of copper oxide.
- We continue to heat for another 30 minutes so that the oxide film becomes the desired thickness. Turn off the burner and let the sheet cool down. Slowly cooling, the oxide begins to move away. Under running water, we remove the remaining oxide without bending or damaging the sheet and a thin layer of oxide.
- Again, cut out the same piece of foil - the size of the first.
- We take a plastic bottle, cut off the neck and put both pieces in there, securing them with clamps. They must be positioned so as not to connect. To the piece that we heated, we draw a negative terminal, and to the second - a positive one.
Pour the saline solution into the bottle so that approximately 2.5 cm remains to the edge of the electrodes.
Foil Solar Panel Diagram
The battery for giving is ready.
Of course, such a home-made device is not enough to provide a home, but it can be used to recharge small electrical appliances or as a radio power supply.
Solar battery: how it works
After Einstein described the photoelectric effect, the whole simplicity of such a seemingly complex physical phenomenon was revealed to the world. It is based on a substance whose individual atoms are in an unstable state. When “bombarded” by photons of light, electrons are knocked out of their orbits - these are the current sources.
For almost half a century, the photoelectric effect had no practical application for one simple reason - there was no technology for obtaining materials with an unstable atomic structure. Prospects for further research appeared only with the discovery of semiconductors. The atoms of these materials either have an excess of electrons (n-conductivity) or experience a shortage in them (p-conductivity). When using a two-layer structure with an n-type layer (cathode) and a p-type layer (anode), the “bombardment” of light photons knocks electrons out of the atoms of the n-layer. Leaving their places, they rush to the free orbits of the atoms of the p-layer and then return to their original positions through the connected load.Probably, each of you knows that the movement of electrons in a closed circuit is an electric current. But it is possible to make the electrons move not due to the magnetic field, as in electric generators, but due to the flow of particles of solar radiation.
The solar panel works thanks to the photoelectric effect, which was discovered at the beginning of the 19th century.
The generation of electricity in semiconductors directly depends on the amount of solar energy, so photocells are not only installed outdoors, but they also try to orient their surface perpendicular to the incident rays. And in order to protect the cells from mechanical damage and atmospheric influences, they are mounted on a rigid base and protected with glass from above.
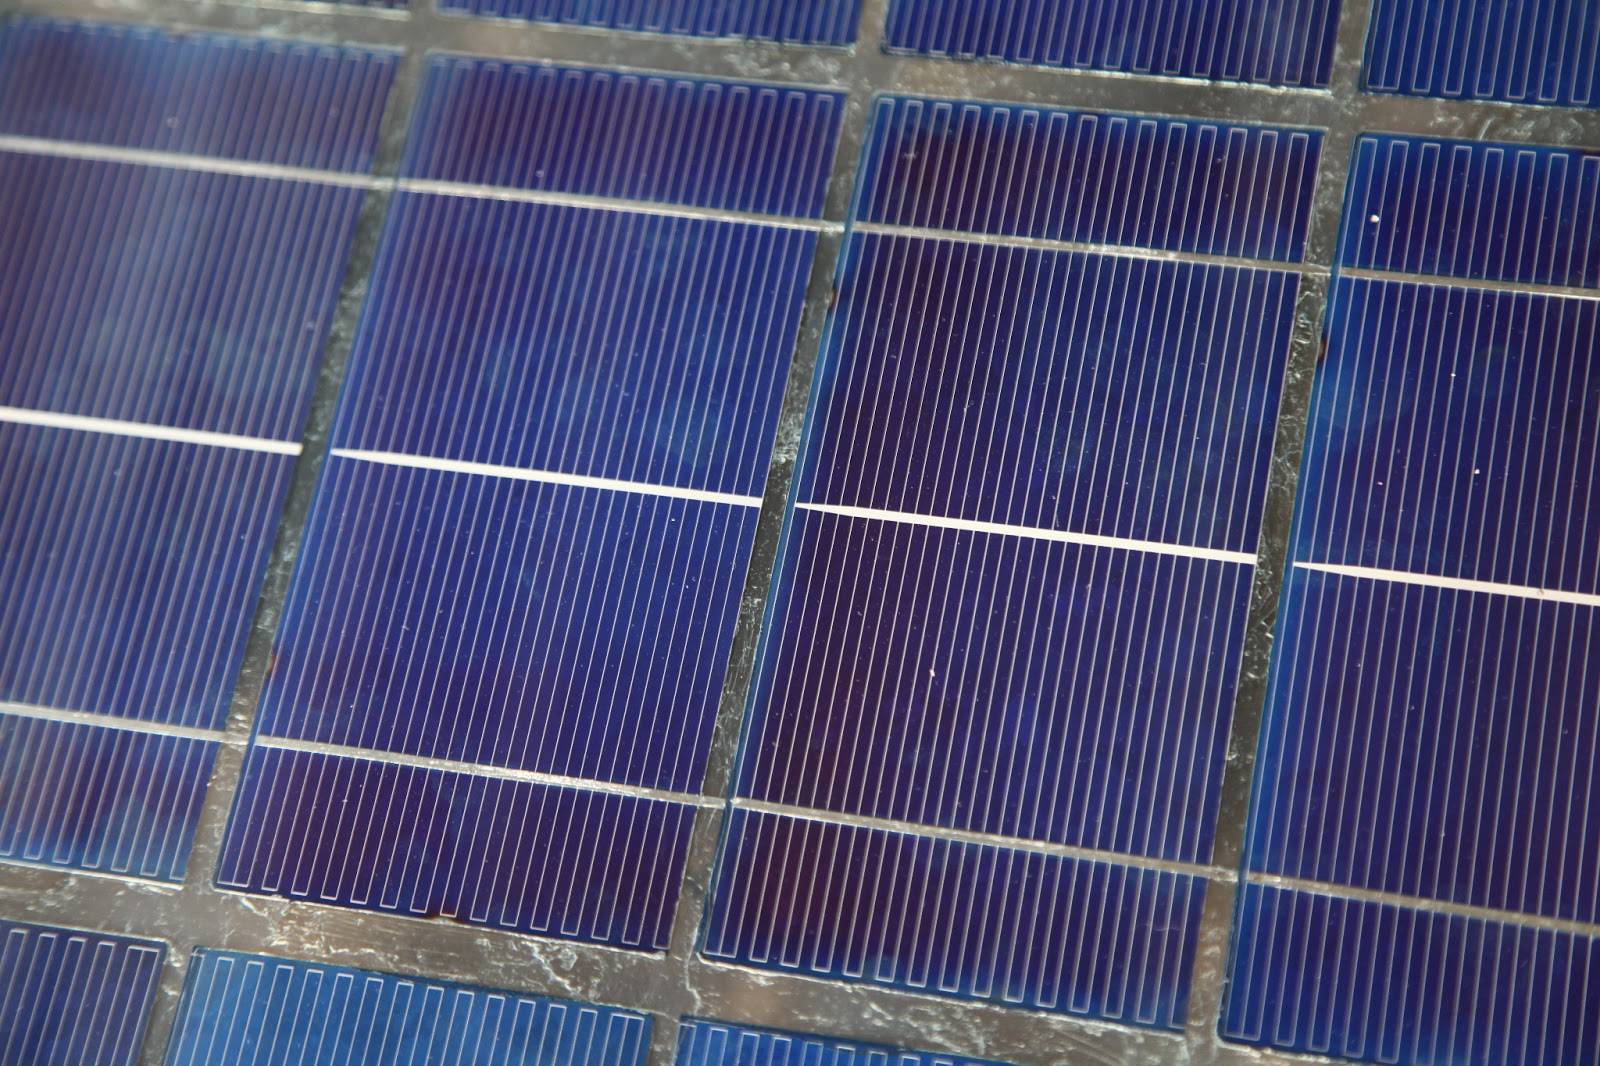
Photocell characteristics
The principle of operation of the generator is based on the properties of some materials under the influence of light to produce electrons. Several types of silicon-containing panels have been developed:

Monocrystalline are the most rigid, heavy, brittle. With a high efficiency, at least 14%, modern analogues are more powerful, the return is up to 35%.

Polycrystalline is stronger than homogeneous, lighter, stronger. In terms of power and properties, they are inferior to single crystals: the efficiency of the panel is not higher than 9%, the service life is 20 years.

On the other hand, differently oriented crystals produce electrons under scattered light:
- in shading conditions;
- medium cloudy;
- twilight.

Amorphous - flexible, thin-film, light. Efficiency up to 100%, service life of at least 15 years.


Dependent on the degree of illumination, an order of magnitude more expensive than monocrystalline. Easy to mount, durable.They are sewn on bags, backpacks, vests, used to recharge gadgets.

For home solar generators, the first and second ones are used, the third ones will pay off for too long. It is better to assemble the transducer from type B panels - these are transducers with small defects: chipped edges, scratches.

They do not affect the quality of the finished generator. Panels marked "B" are 2-3 times cheaper than first-class counterparts.

Circuit breakers
In the circuit of a solar power plant, as in the circuit of any other powerful source of electricity, it is necessary to install protection against short circuits. First of all, automata or fuse-links must protect power cables coming from batteries to the inverter.
Leo2
FORUMHOUSE user
If it closes something in the inverter, then it’s not far from the fire. One of the requirements for battery systems is the presence of a DC circuit breaker or a fusible link on at least one of the wires and as close as possible to the battery terminals.
In addition, protection is placed in the battery and controller circuit. You should also not neglect the protection of individual groups of consumers (consumers of direct current, household appliances, etc.). But this is already a rule for constructing any power supply system.
The machine installed between the battery and the controller must have a large current margin misfires. In other words, the protection should not work accidentally (when the load increases). Reason: if voltage is applied to the controller input (from the SB), then at this moment the battery cannot be disconnected from it. This may result in device failure.
Step by step build process
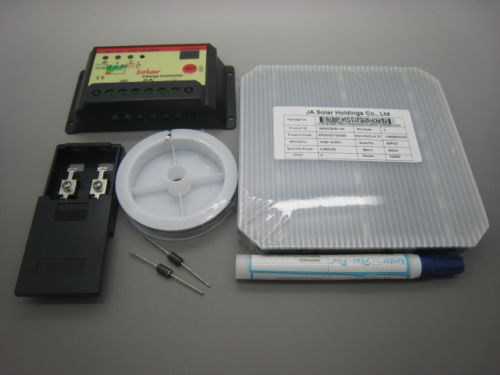
To build a panel you will need:
- Aluminum corners.
- Plywood, fiberboard or chipboard.
- Sealant.
- Transparent protective coating (plexiglass or glass with low iron content, tempered).
- Solar panels.
- Bus for soldering SE (ideally) or a braid from a wire, a wire.
- Cable.
- Screwdriver.
- Self-tapping screws, corners and other hardware.
- Hacksaw for metal.
Frame assembly
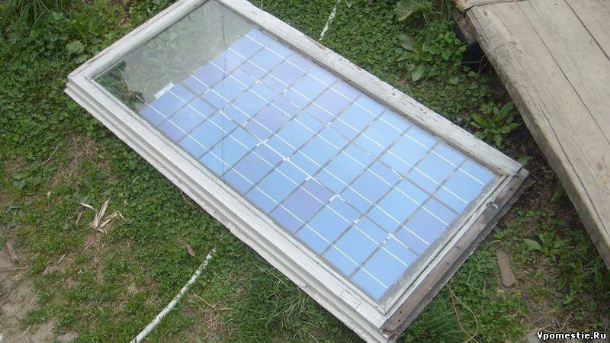
When you have decided what size the panel should be, cut out a template from cardboard, lay out silicon elements on it, leaving a gap between them of 3-5 mm. Silicon is a very brittle material, this gap is needed so that the plates do not crack during heating and cooling. Then cut the template to size and proceed to assemble the aluminum frame. You can overlap or butt the parts, but for the latter you need to cut the material at 45 degrees, for this it is convenient to use a miter box. Don't forget to glue the protective glass before mounting the solar panel.
Plate soldering
On the reverse side of the plates, a silver-colored metal layer is applied. It can be tinned with acid flux. Pre-tin the wire or bus. The bus is a flat conductor. If this is not available, you can use a cable braid or thin wire.
Next, you need to apply the flux to the metal layer on silicon with a brush, smear a drop of solder with quick movements of the soldering iron, when the surface becomes more uniform and shiny - the contact is tinned. Some use a flux pencil. Haven't tried it, but they seem to work well. Solder POS-61 - suitable for soldering. Connecting the plates in series increases the output voltage, connecting groups in parallel increases the output current.
There are two recommendations here:
- Don't overheat! In order not to damage the plate and the contact, you cannot linger for a long time with a soldering iron, for this you need a soldering iron with a power of 30 to 60 W, with a heat-intensive tip (that is, thicker).
- Don't split! The plates are very thin and fragile. During soldering, place the plates on soft thick cardboard, polystyrene foam, penofol, a rag, in the end. This will reduce the likelihood of chipping when pressing with a soldering iron or turning the elements over.
Additionally, you need to install a Schottky diode. If you want to avoid reverse current from the battery at night, then a diode can be installed between the battery and the battery. Manufacturers do not put diodes at all.
Panel assembly
The back cover can be made of plastic, plywood and other sheet materials. Drill holes in its area for air circulation, while all electrical connections must be filled with sealant to avoid corrosion. After assembly, it is necessary to install it on a supporting stationary structure. It is better to provide for the possibility of adjusting the angle of inclination - this will help to achieve optimal power in different seasons, adjusting the position under the sun.

Aluminum cans as a producer of thermal energy
A more serious version of the battery is a system for converting solar energy into thermal energy. It is based on aluminum cans from various drinks. For one installation, approximately 170-240 pieces will be required.
The installation sequence consists of several stages:
- thorough washing of jars;
- trimming the top and bottom;
- connecting modules in the form of pipes with glue;
- painting jars with black paint to better attract solar energy;
- assembling the panel body (wood is ideal);
- laying foil material on the frame substrate (it is better to use with an insulating layer, such as isolon);
- fixation of can pipes with parallel placement;
- laying plexiglass on top of modules, sealing joints.
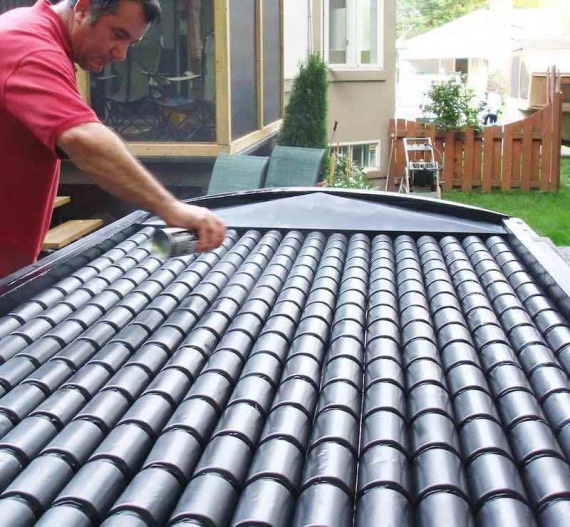
At the final stage, an air-type fan is connected. It provides the movement of the coolant in the system. Such a generator does not produce electricity, but in a warm winter it will significantly reduce the cost of heating the room.


Despite the presence of various subtleties in the technological process, to mount a solar DIY battery from improvised means is available to everyone who is familiar with the basics of physics. The main assistants in this matter are the technical literature and the advice of experts who willingly share their own experience on the forums.
The feasibility of a homemade solar panel
Understanding these physical properties of silicon will help you build your own solar panel. To get started, you need to prepare.
In any case, a backup source of electricity is always in demand. Moreover, the cost of a solar kilowatt is significantly lower than traditional electricity. Of course, many people want to purchase and install factory-made solar panels. The price of the entire set of equipment for a home power plant scares off. Therefore, the question is very relevant - how to assemble a solar panel yourself?
A more competent approach is to calculate the amount of energy generated by one module:
W = k*Pw*E/1000
Where:
- E is the amount of solar insolation for a known period of time;
- k - coefficient forming in summer - 0.5, in winter - 0.7;
- Pw is the power of one device.
Based on the planned total power consumption and calculated data, the total power consumption of electricity is calculated.
Now, if the result is divided by the estimated performance of one photocell, in the final we get the required number of modules.
Conclusion
Homemade products, such as a home solar battery, are a serious task that, in addition to financial and time costs, will also require minimal knowledge of the basics of electrical engineering. But if there is a desire and perseverance, one can be quite sure of the success of the question posed to oneself.
In any case, the use of solar radiation promises great prospects. Statistics tells us that 4.2 kWh of solar energy per day falls on 1 m2 of the earth's surface! And this is equivalent to saving almost one barrel of crude oil per year. So we can say with confidence that the future belongs to alternative energy.