- How to solder copper pipes, step by step instructions
- Connection preparation
- Flux application
- Soldering
- Copper pipes: tips for the installer
- Distance between fasteners
- Connection of copper pipes with push-in and press fittings
- Process steps
- Solder connection
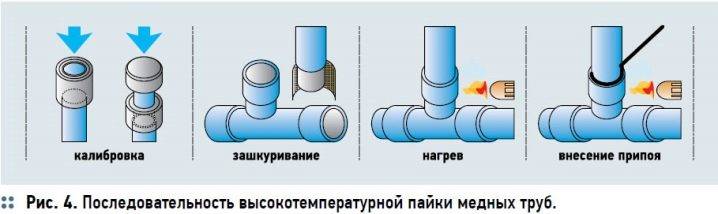
- High temperature soldering
- Repair
- Safety
- Heating from copper pipes installation at an affordable price, varnishing from the manufacturer
- Methods for obtaining permanent connections for the installation of a water supply system: soldering
- Features of different connection methods
- Welded connection of copper pipes
- Capillary connection or soldering
- Using Threaded Fittings
- Crimp fittings
- Features of the use of press fittings
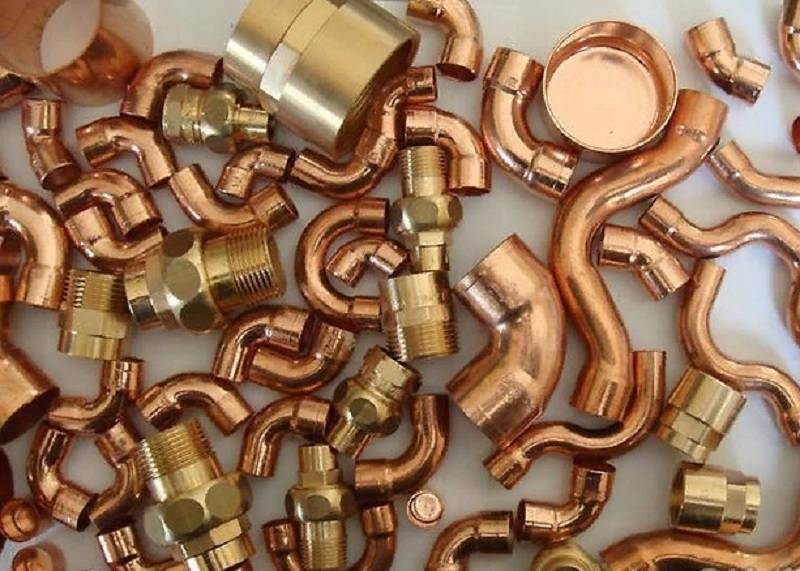
- Advantages of copper fittings
- Now Technology: Nine Steps and Some Tips
How to solder copper pipes, step by step instructions
Step-by-step work allows you to get high-quality connections. When performing the process, you do not need to rush, you must follow all the rules and recommendations.
Connection preparation
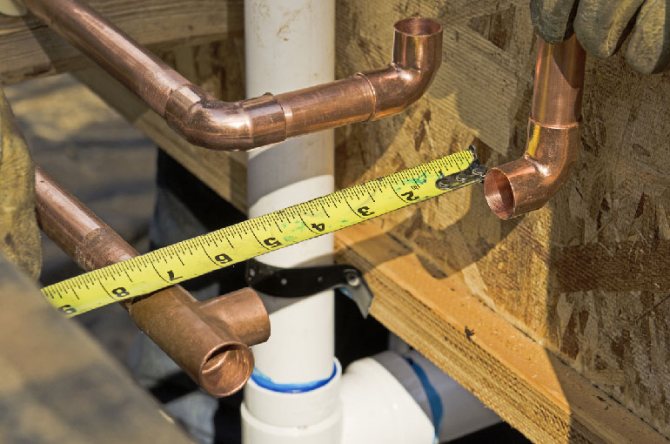
At the first stage, the necessary parts of the required dimensions are prepared. For cutting, a pipe cutter is used, which must be located strictly perpendicular to the pipeline. First, the pipe is clamped in the tool bracket between the blade and the support rollers.
The cutter rotates once or twice around the segment to be cut.
Then the screw mechanism is tightened. After that, the cutting process is repeated. Such actions are carried out until the final cutting of the pipe occurs.
To prepare parts of the required size, you can also use a hacksaw with a metal blade. However, it is not always possible to perform an even cut with such a tool. Moreover, when using a hacksaw, a lot of metal filings are formed.
Therefore, you have to pay great attention so that they do not get into the system. After all, sawdust can cause damage to expensive equipment or congestion in engineering communications.
The pipe cutter allows you to get a straight cut. Then, burrs are removed from the end of the pipe. The inner surface of the product is cleaned and degreased. The same actions are performed with the second segment.
At the next stage, a pipe expander or rolling is used. It allows you to increase the diameter of one of the segments so that the parts can be connected. The gap between them must be 0.02-0.4 mm. At smaller values, the solder will not be able to seep into it, and at larger sizes, there will be no capillary effect.
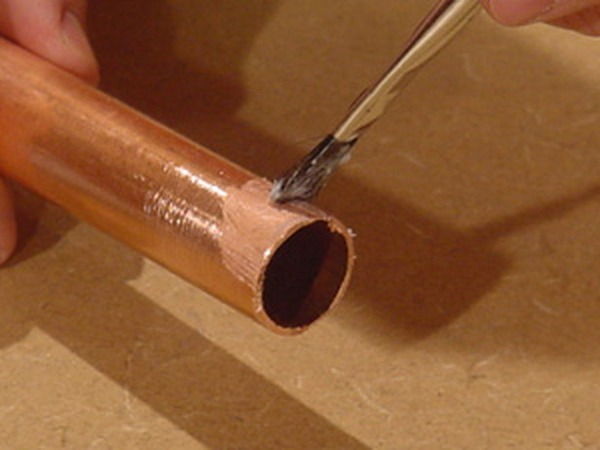
Flux application
The flux is applied in an even layer in a minimum amount on the outer surface of the product that is inserted into the connected segment.
The operation is performed with a brush. It may be included in the reagent kit.
In its absence, a paint brush is used. It is necessary to use a tool that does not leave fibers.
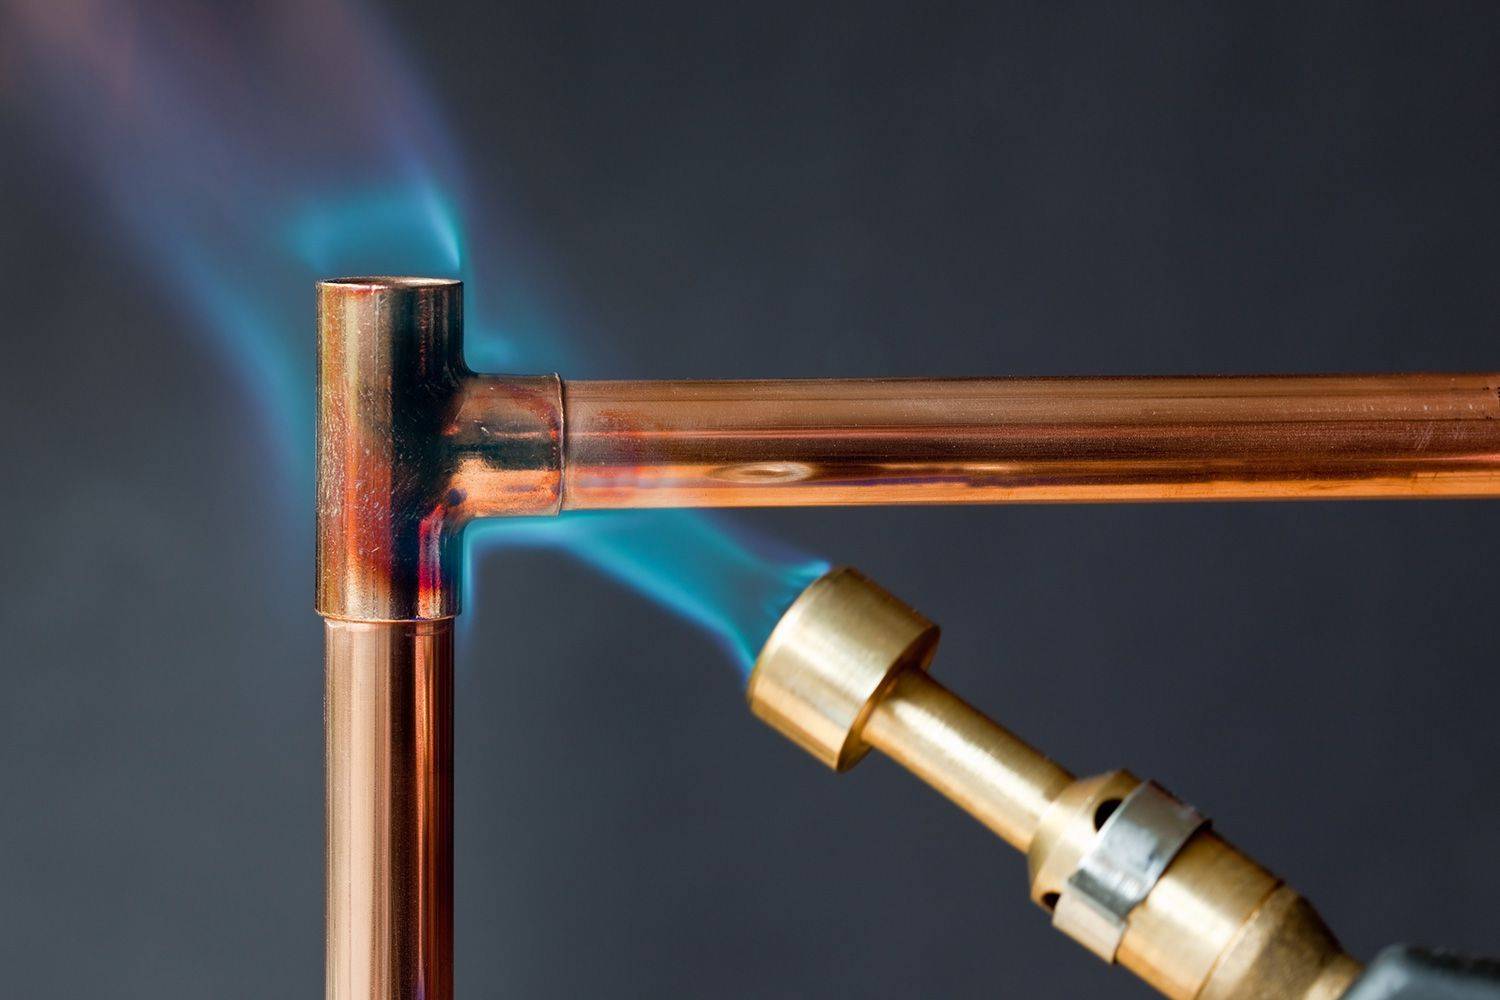
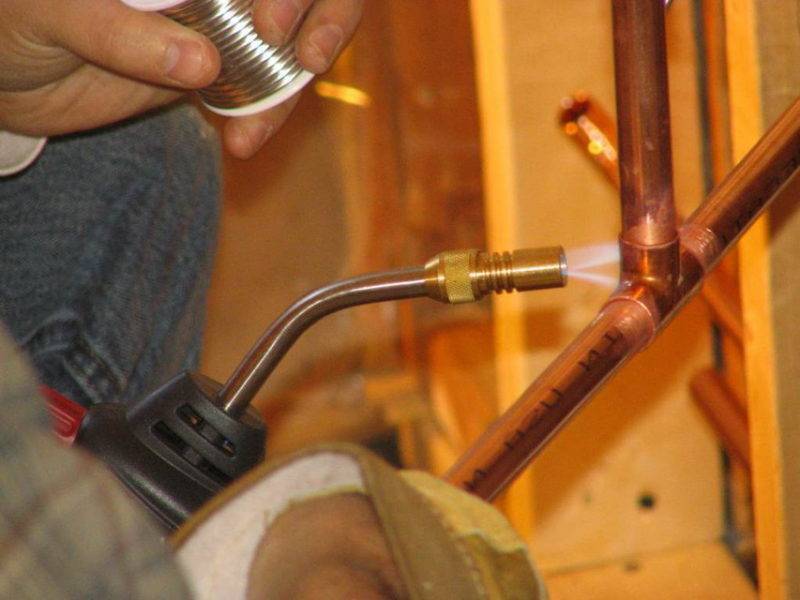
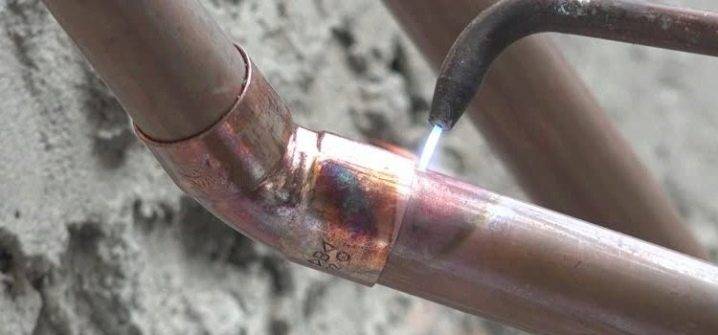
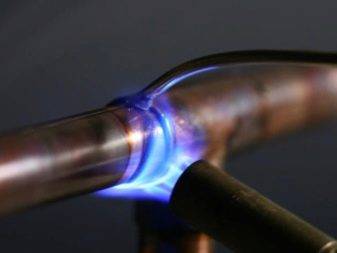
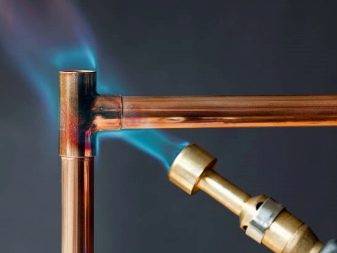
Soldering
The process begins with the connection of pipeline parts. It is performed after using the flux.
There should be no foreign matter on the moistened surface.
When the pipe and fitting are connected, the last element rotates until it is completely put on the pipeline segment. This action also allows the flux to be distributed throughout the area to be joined. If a consumable comes out of the gap between the parts, it is removed with a napkin or cloth, as it is an aggressive composition of chemical origin.
The low-temperature soldering process begins with the burner turning on. Its flame is directed to the place to be joined and constantly moves along the joint for its uniform heating. After heating the parts, solder is applied to the gap between them. The consumable will begin to melt if the junction has been sufficiently heated. At this point, the torch must be removed from the joint because the consumable will fill the gap. Soft solder does not need to be specially heated. The melting of the consumable material occurs under the influence of heat from the heated parts.
Soft soldering of copper pipes
Connections of pipeline elements are made with constant control of copper heating. Metal must not be overheated! If this rule is not followed, the flux will be destroyed. Therefore, oxides are not removed from the parts. As a result, the quality of the seams is reduced.
Hard soldering begins with uniform and rapid heating of the parts to be joined. It is carried out using a flame of bright blue color of moderate intensity.


Solder is applied to the joint when the elements are heated to a temperature of 750°C. It reaches the desired value when the copper becomes a dark cherry color. For better melting of the solder, it can be additionally heated with a torch.
After the seam has cooled, the joint is wiped with a cloth to remove flux residues.Otherwise, the substance may cause the destruction of copper. If solder has formed on the surface of the pipeline, it is removed with sandpaper.
Copper pipes: tips for the installer
Continuing the publication of the work of Brian Curry (Great Britain), a prominent specialist in the field of design and installation of copper pipes, it should be noted that the actual installation work on copper is not difficult and does not require any special skills. In most developed countries, copper pipes in plumbing products have been used for a long time and everywhere: in the United States, in some states, the share of copper pipelines in water supply and heating systems for residential and public buildings exceeds 90%; In the UK, copper pipe is the main material, and in Europe as a whole, the proportion copper piping in plumbing installations is 70%. In these countries, there is an objective striving for perfection: professional installers organize competitions to see who can complete the installation faster, more accurately and more beautifully. In Europe and the USA, the profession of a plumbing installer is highly paid and honorable. Brian Curry's book "Copper Pipes: Tips for the Installer" is designed not only for a beginner, but also for an experienced specialist. It contains, among other things, the nuances of installation, which, perhaps, are unnecessary in mass construction, but are necessary for those who set themselves the task of creating a perfect system and are proud of the results of their work.
Plumbing magazine, together with the European Copper Institute, continues a series of publications on the method of installing copper piping systems.
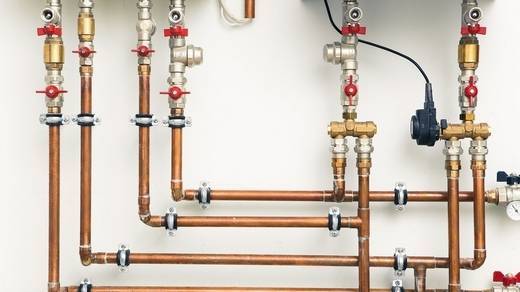
Copper pipelines have stood the test of time in almost all possible applications in water supply and heating.The versatility of copper pipes has led to the fact that a large number of different fastening systems have appeared for various tasks. As a general principle, it should be understood that whatever type of fastener is used, it must perform one main function: to provide reliable fastening during the entire estimated life of the system, i.e. from 50 to 80 years. Various manufacturers offer a variety of fastening designs, only a few of which are shown in fig. 1. In principle, fasteners can be divided into clamps and supports, and supports, in turn, into sliding and fixed ones.
Figure 1. (details)
Common types of clamps and supports
The choice of an appropriate fastener depends on a number of factors related to the purpose of a particular system, the location of the site and other factors. For example, if a pipe needs to be insulated from a heat source or from freezing, then a simple plastic retaining clip will not provide sufficient distance between the pipe jacket and the adjacent surface. In this case, a ring support with a threaded extension (corresponding to the length) with a plate for fixing to the supporting surface is more appropriate.
From an economic point of view, the question of the total number of fasteners is extremely important, since this directly affects the cost of the entire system. In this sense, copper pipes, which have high mechanical strength, and therefore, to some extent, have the property of spatial “self-support”, are in an advantageous position compared to non-metallic pipes.
Distance between fasteners
The recommended spacing between fixing points is given in the table, which shows that when laying vertically, fewer fasteners are required (the distance between fixing points is greater). This is due to the fact that vertically laid pipes do not experience bending forces from their own weight and for other reasons. The impact of bending force, even only under the action of its own weight, is inherent in pipes of any material laid horizontally. If the distance between the recommended fixing points is not observed, then saving on fasteners will inevitably lead to sagging pipes.
When fastening vertical pipes, care must be taken not to allow the dead weight of the vertical pipe and the fluid contained in it to fall on the horizontal pipeline connected to it. In other words, in the lower part, the vertical pipes must be fixed with fixed supports.
It is necessary to choose the right fastening method when fastening pipes of large diameter and / or when fastening to low-strength structural surfaces. The chosen method should ensure the reliability of fastening not only taking into account the weight of the pipe itself and the liquid in it, but also taking into account other forces, the effect of which, if not obvious, is theoretically possible in each specific case.
Figure 2. (details)
The location of fixed supports for the correct organization of compensation for thermal linear expansion
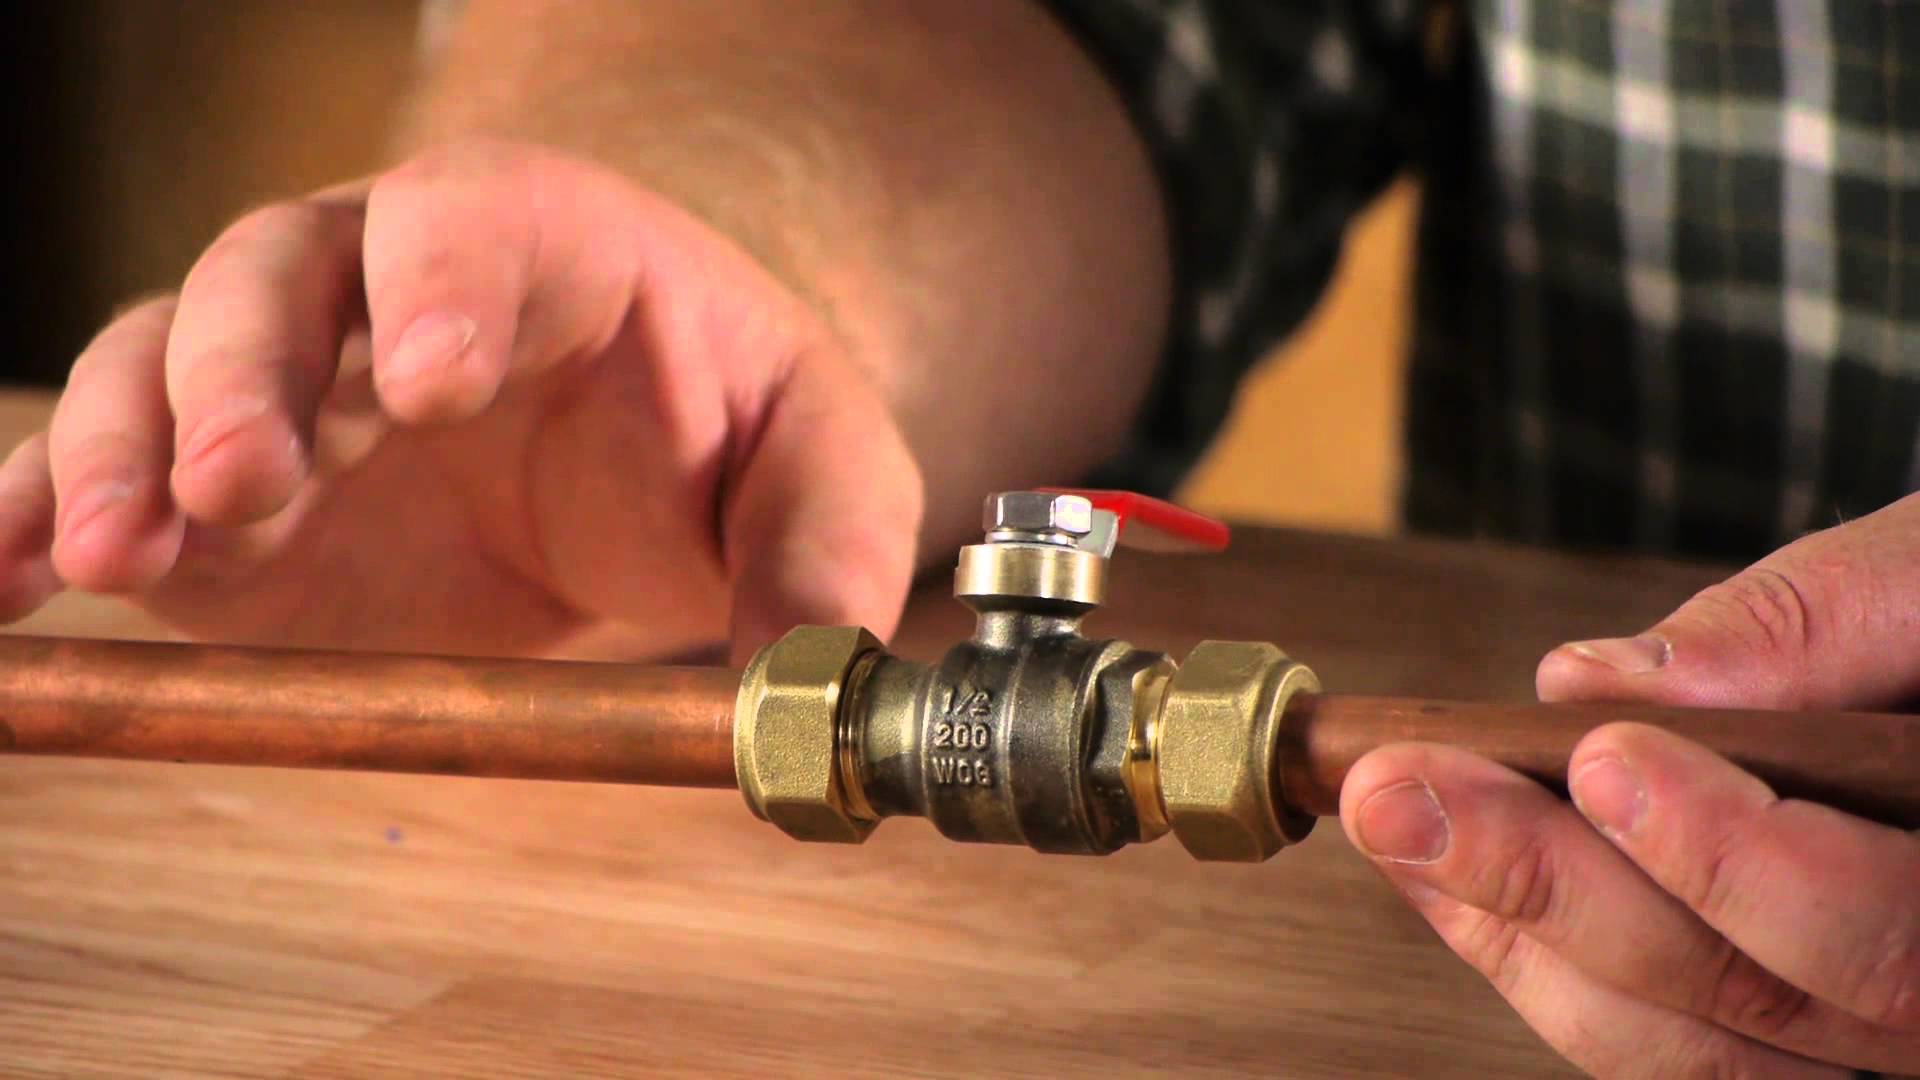
Connection of copper pipes with push-in and press fittings
Rice. 41. Connection of copper pipes with a press fitting
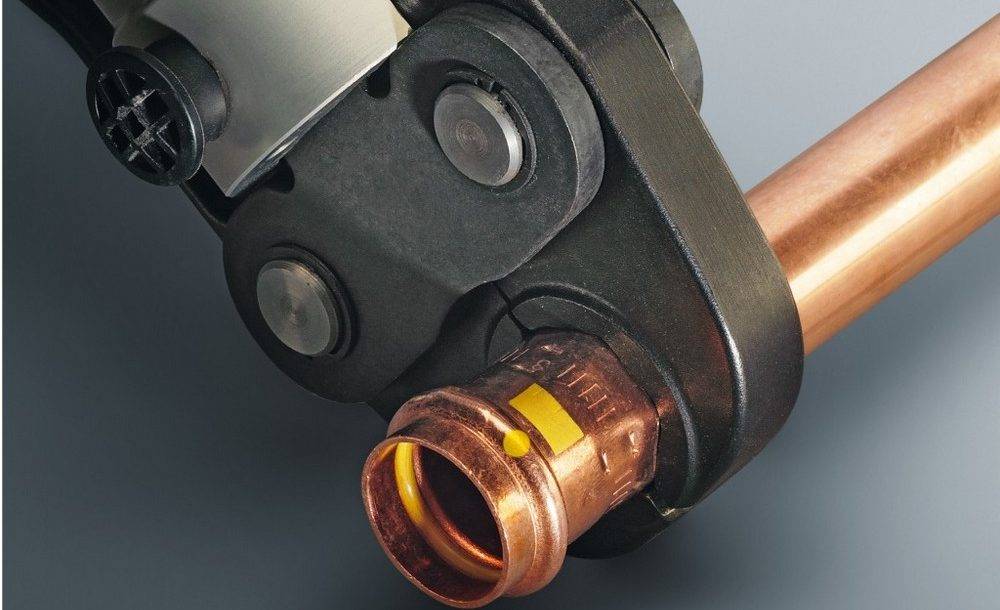
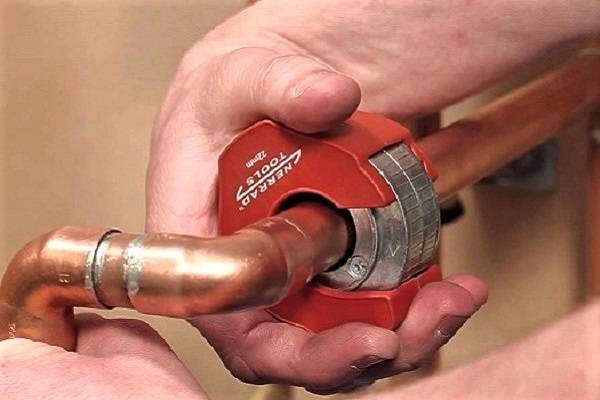
Another type of permanent connection of copper pipes is made on compression press couplings (Fig. 41), by analogy with press fittings for polymer pipes and fittings for soldering copper pipes with solder embedded in them. It is, as it were, a hybrid of two designs: a press fitting and a fitting for capillary soldering. Externally, a press fitting for copper pipes very much resembles a fitting for capillary soldering (Fig. 39), and the technological difference lies in the internal content of the fitting. The solder embedded in the capillary band of the fitting was replaced here with o-rings made of elastic polymers similar to rubber. The technology of connecting copper pipes on press fittings is reduced to simple operations: cut and deburr the pipes, calibrate them, insert them into the press fitting and compress the connection with press tongs (Fig. 42).
Rice. 42. Fixing the fitting with press tongs
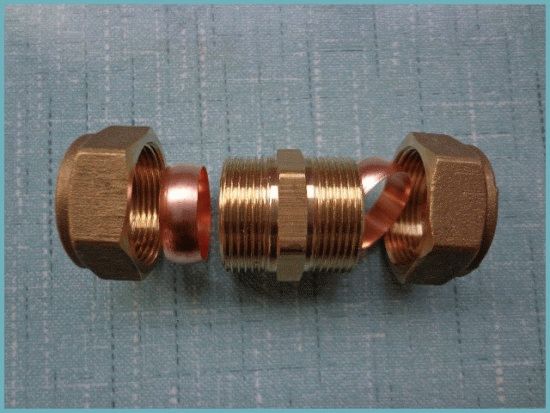
In addition to one-piece, there are also detachable connections of copper pipes on compression (collet) fittings. There are two main types of collets: one for hard and semi-rigid connections and the other for soft and semi-hard pipes.
If we take a closer look at the first type of fittings, we will see that they almost completely repeat the compression fittings for metal-plastic pipes, with the only difference that copper fittings do not have a stem onto which a metal-plastic pipe is mounted. Otherwise, the first type of fittings for copper pipes almost completely repeats the design of fittings for metal-plastic: the same union nuts, the same sealing O-ring, the same tightening method (Fig. 43).


Rice. 43. Connection of copper pipes with compression fittings of the first type
Preparatory operations consist in the selection of a fitting of a suitable dimension.Next, as usual, you should carefully cut the pipe, remove the burr, use a mandrel gauge to check the cut for the absence of ovality and, if necessary, restore the original geometry of the pipe. Then the pipe is inserted into the fitting until it stops. As a rule, the clamping nut is first tightened by hand. After the pipe is clamped by the compression ring to such an extent that it cannot be turned by hand relative to the fitting, the nut is tightened with a wrench 1/3 or 2/3 turn in order to slightly deform the pipe and provide the required clamping force. Theoretically, such a pipe connection can be disassembled and reassembled, in practice it is better not to touch it. If the connection does not flow, then leave it alone, if it leaks, then you need to slightly tighten the nuts.
Compression fittings of the first type were invented for solid copper pipes (Fig. 43), however, they can be used to connect both soft pipes and hard pipes with annealed ends. In order to prevent the pipes from deforming when tightening the nuts, a piece of pipe is placed inside them - a support sleeve. After adding this element, the fitting almost completely repeats the design of the compression fitting for metal-plastic pipes.
Compression connections of the second type are based on the socket union of pipes through sealing cones. In these fittings, by tightening the nut, the cone is pressed against the inner surface of the flared edge of the pipe, and the top of the pipe is clamped with an o-ring. The design of the unit uses the properties of soft copper: under pressure, “grind” to the surface to which it is pressed. The connection is not new, a sufficient number of men who understand the brake system of their car or the power supply system of diesel engines are familiar with it.In the piping of plumbing systems, the connection is slightly modified, but the principle of rallying itself remains the same, on its basis you may also meet other types of fittings.
Rice. 44. Connection of soft copper pipes with compression fittings of the second type
The node assembly technology (Fig. 44) is as simple as all the assemblies described above. After cutting the pipes, removing burrs (burrs) and irregularities, a clamping nut is put on the pipe and the end of the pipe is flared with a mandrel. Next, a pressure cone is inserted into the open part, after which the mounting assembly is assembled. Pre-tightening, as with all compression fittings, is done by hand and then tightened with a wrench, typically one turn.
For copper pipes of large diameters, a flange connection is used. The basic design includes welding of a flange with a pipe socket or high-temperature soldering, much less often, a compression connection.
Process steps
Consider the process in stages for different connection options.
Solder connection
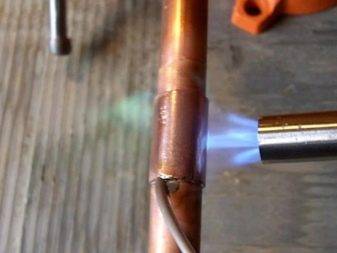
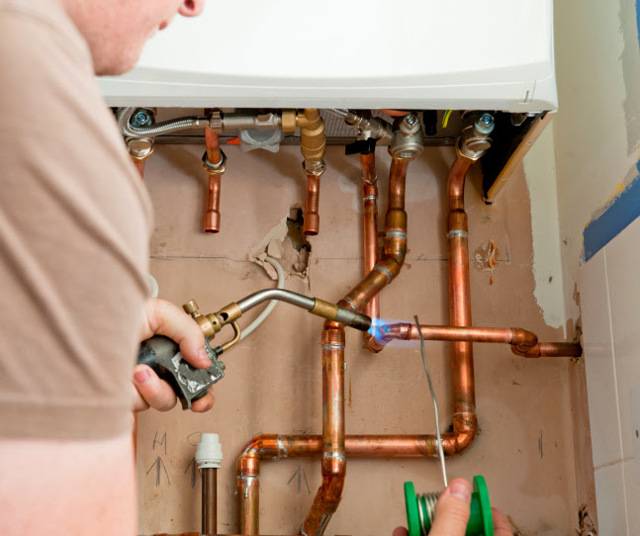
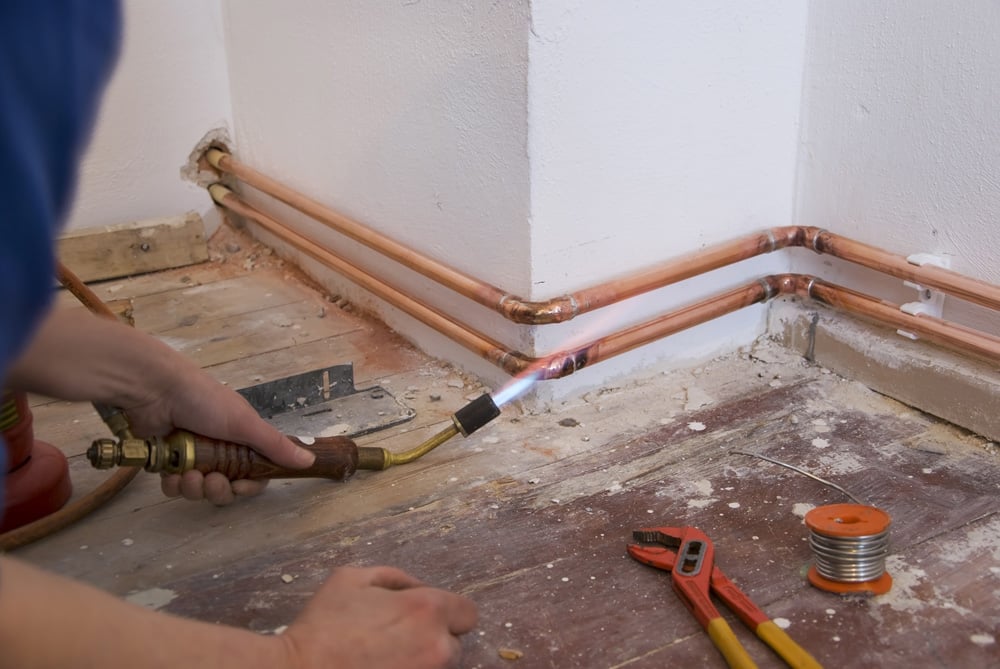
Experts say that for such work it is necessary to purchase low-melting solder and low-temperature flux. The gas burner can be filled with a mixture of propane, air or butane.
The flame must be directed strictly along the pipe seam, moving over the entire joint area. This is done to evenly heat all areas. Do not forget to periodically coat the gap with solder, gradually it will begin to melt. As soon as melting has begun, the burner must be withdrawn, and the substance will fill the capillary gap.When the gap is completely filled, the parts need to cool under normal conditions, without temperature differences. An uncooled connection must not be touched.
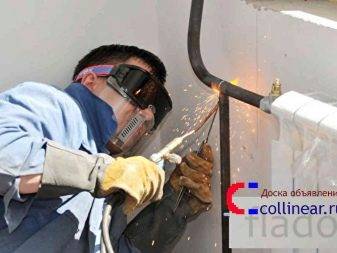
Sometimes it is not recommended to solder any products, in such cases welding is preferred. The process is practically no different from soldering. But before proceeding to the welding process, familiarize yourself with the safety rules and the progress of work. You will need safety glasses.
High temperature soldering
The composition of the gas burner filler is changing, now it is filled with propane with oxygen or acetylene with air. Warming up should not take long, the device should supply a blue flame.
The flame, as in the case of low-temperature soldering, must be applied throughout the joint, changing the position of the burner. When the metal is heated to about 750 degrees, it will turn dark red. At this point, you need to use solder, you can heat it with a burner. However, the solder should ideally heat up from the part.
The product must be given a temperature at which the solder will quickly melt and fill the space between the parts. After full filling, you need to leave the structure to cool.
Repair
With your own hands, you can fix the problems that have arisen in the plumbing or household appliances, for example, a refrigerator or a split system.
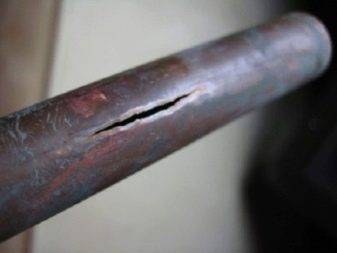
Metal lamination is a common problem. In this case, high-temperature soldering is used, this will significantly extend the life of the system. A common occurrence is the appearance of cracks on pipe bends. Masters recommend using low-temperature welding.


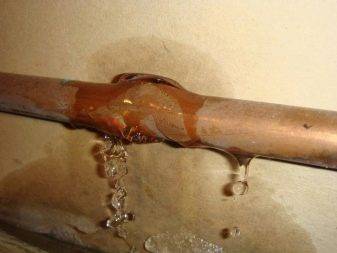
In repairs, it is also necessary to clean the surfaces before starting work, otherwise the structure will quickly fail.If the fitting leaks, you will have to cut this part of the pipe and solder a new one with a new coupling. If a nut or gasket breaks, then it is enough to replace only this part.
Safety
Copper has a high thermal conductivity, so you must wear mittens or gloves on your hands, otherwise a burn cannot be avoided. Elements are taken only with tongs or protective gloves.
Care must be taken to apply the flux, make sure that it does not get on the body. Otherwise there will be a chemical burn.
If, nevertheless, the substance gets on your hands, you need to leave the work and wash the place with plenty of soapy water.

Pay attention to the clothes in which you are going to work. It should not be synthetic, because this material is highly flammable.
It is better to choose clothes made from organic cotton.
Masters advise beginners to practice on pipe cuts before starting work. So, after a couple of workouts, the result will be much better.
Heating from copper pipes installation at an affordable price, varnishing from the manufacturer
Copper piping is becoming more and more popular every year.
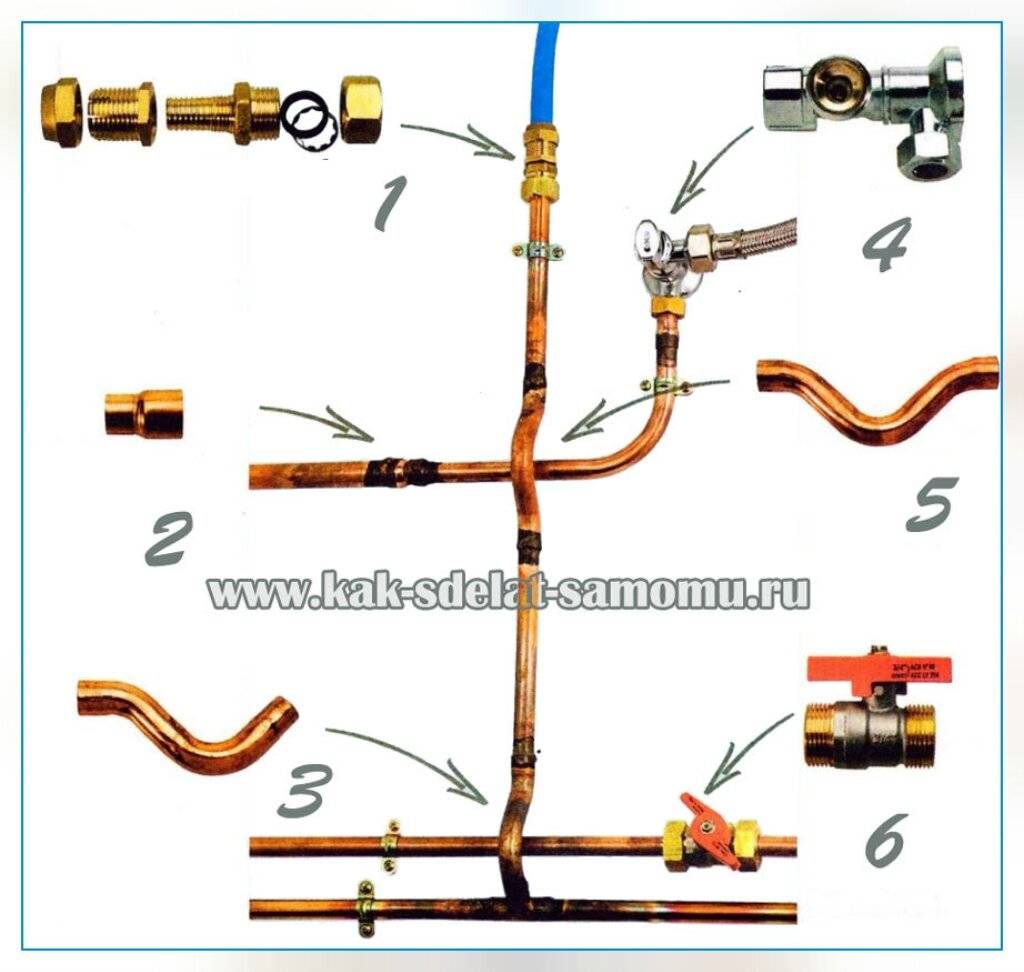
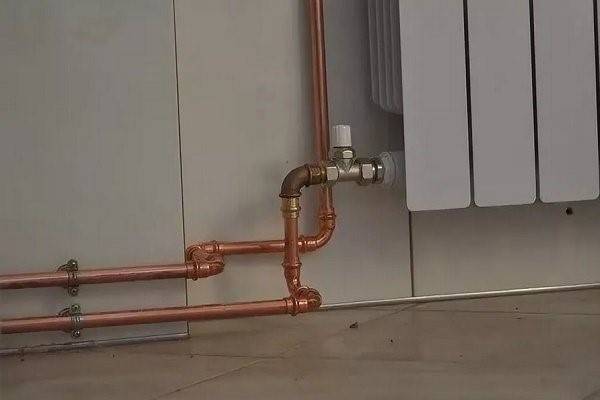
In order to create heating with copper pipes, they study the technology of connecting products. The connection is made by soft soldering. Solder allows you to connect all the elements of the heating system. Sometimes couplings (fittings) are used. Products for heating or water supply are assembled with each other by means of fittings made of the same material. It is possible to use bronze elements.
Heating on copper pipes cannot be created without compression or solder fittings. Items are made from brass. A crimp ring is placed inside to ensure the impermeability of foreign matter into the mount.You will need a wrench to tighten the ring. Crimp fittings are used for low pressure, unlike solder fittings. They should be systematically tweaked and examined.
Combining steel and plastic products with copper is done using compression fittings. To unite the elements, the fitting is disassembled, the nut is put on the pipe, and then the compression ring. A selection, which consists of a ring, a nut and a pipe, is inserted into the fitting. Tighten the nut by the number of turns determined by the data placed in the coupling passport and the pipe diameter.
Methods for obtaining permanent connections for the installation of a water supply system: soldering
Installation required copper heating pipes with a diameter greater than 11 cm and a wall thickness of 0.16 cm?
Use welding
Produced using soft solder soldering copper pipes. This low-temperature technology is applied at temperatures up to 440 degrees. The procedure is performed using fluxes that increase adhesion. Elements are cleaned before soldering.


At extreme temperatures, the metal loses its hardness, so the solder has a lower melting point.
Heating with copper pipes is a popular and long-term option for space heating. Average prices for copper pipes for heating are relatively high and justified. The price tag is formed depending on the diameter and individual indicators. Estimated cost of production:
- unfired product with a diameter of 1 cm is 280 r. per meter;
- an annealed analogue of 18 mm is sold for 400 rubles.
Such products have high performance properties.
Heating from copper pipes will delight for many years if the products are selected correctly. Quality elements of the system are marked and have the value of EN-1057.Products are manufactured according to DIN standards. They are treated with phosphorus to increase resistance to hard water.
WATCH VIDEO
Copper pipes for heating are used more and more often.
Features of different connection methods
Installation of nodes on copper pipelines is carried out in the following ways:
- welded - with heating to a temperature close to the melting point,
- capillary - soldering at a low temperature,
- threaded - twisting on a thread,
- crimp - using compression fittings,
- crimping - using press fittings and press tongs.
Each of the methods has the nuances of the installation work and the features of the resulting nodes. Welding and soldering make it possible to form reliable one-piece assemblies, but welding equipment is necessary for their implementation, and its use is not always possible. The remaining methods can be used for the installation of copper pipelines in rooms where finishing work has been carried out, in close proximity to other communications, including next to gas pipes.
Welded connection of copper pipes
Welding of pipe products made of copper is carried out only butt.
Work is performed in the following order:
- Asbestos-cement sheets are laid under the connected elements to reduce heat loss and accelerate the heating of the pipe and fitting.
- The ends of the fitting and pipe are heated by a gas burner operating at high power.
- The melted sections are joined and pressed tightly against each other, avoiding distortions.
- The cooled seam is forged to reduce the graininess of the resulting burr.
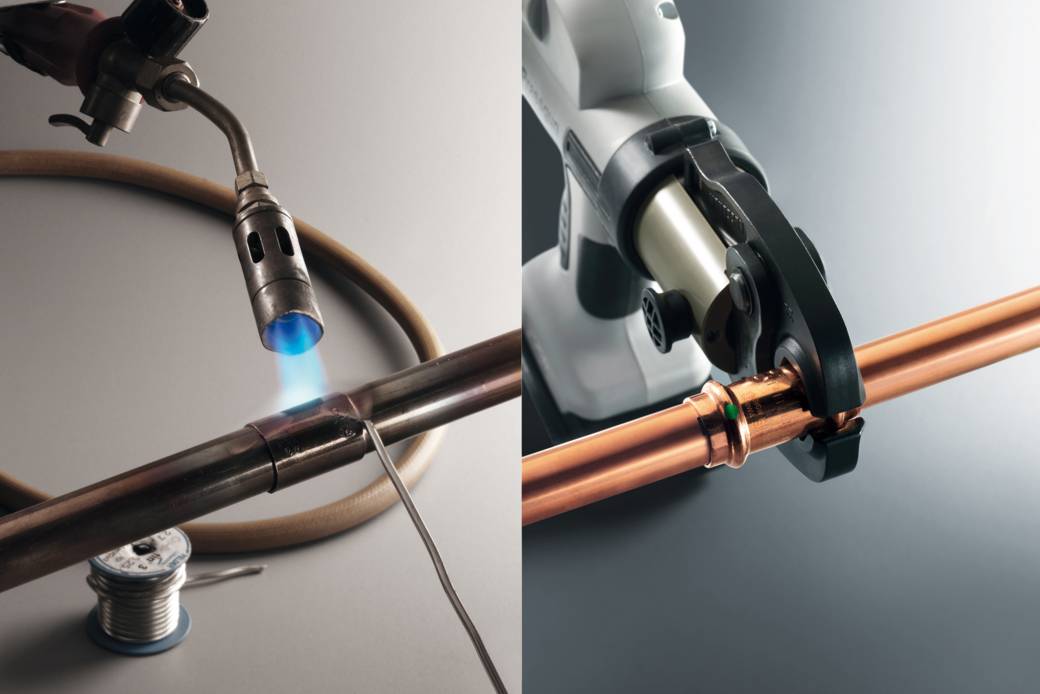
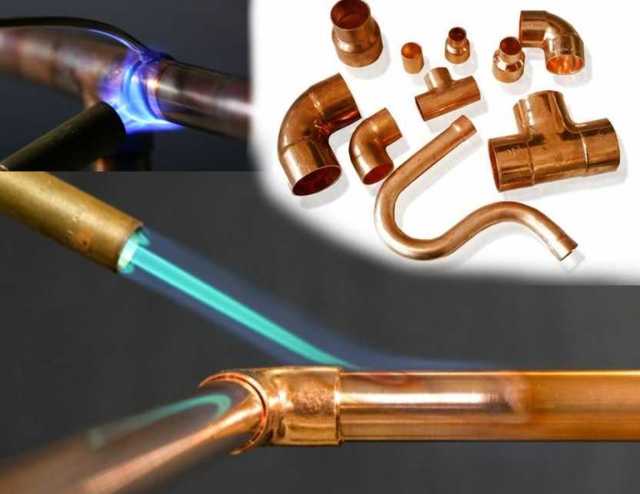
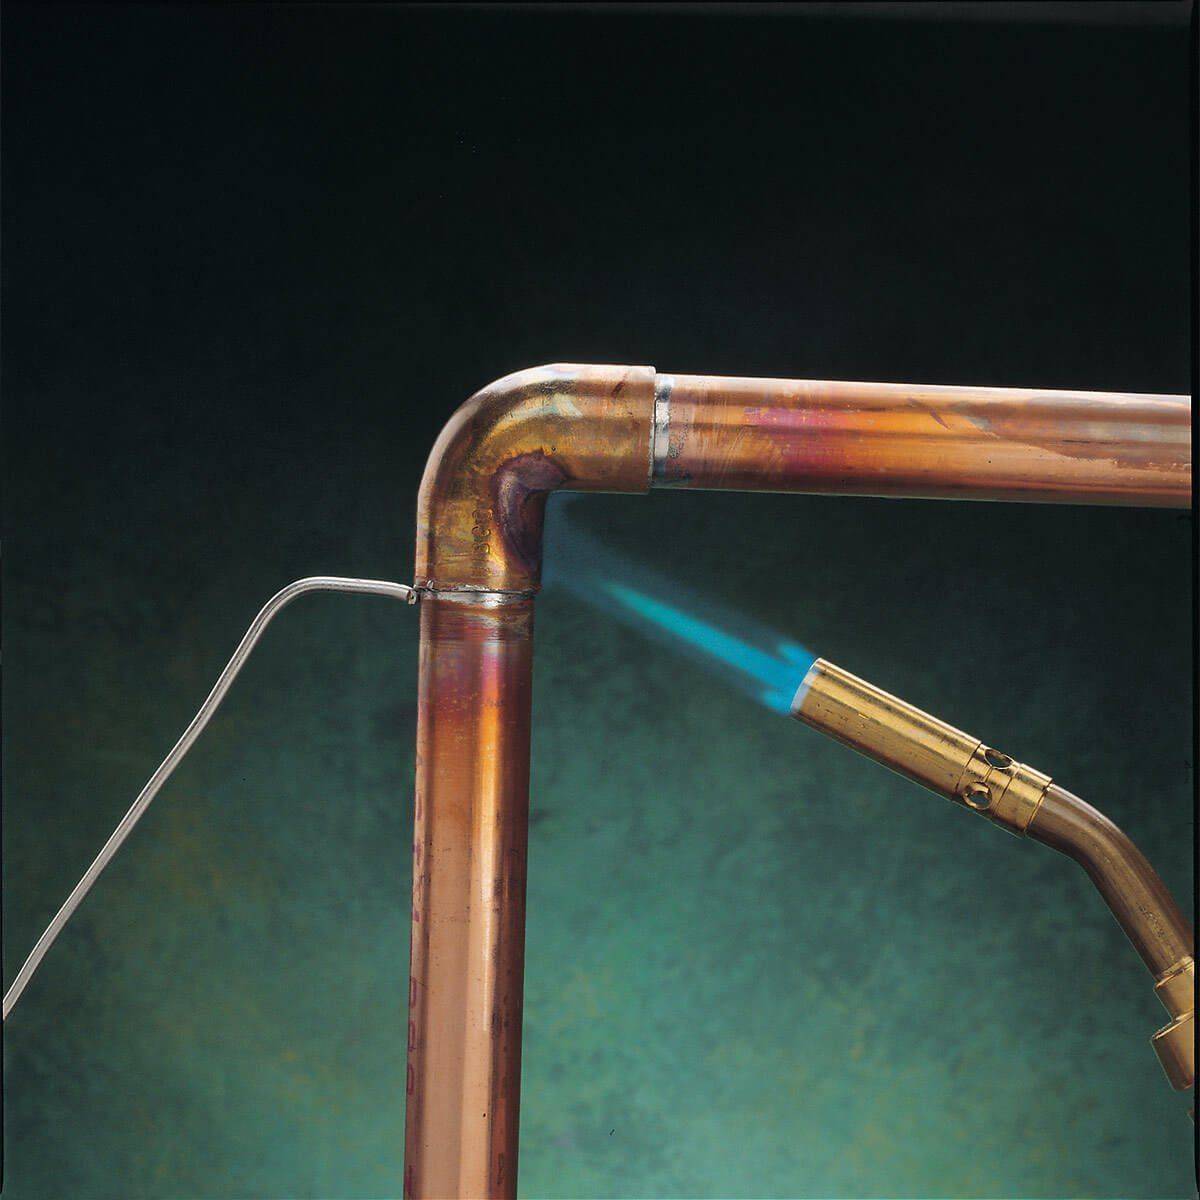
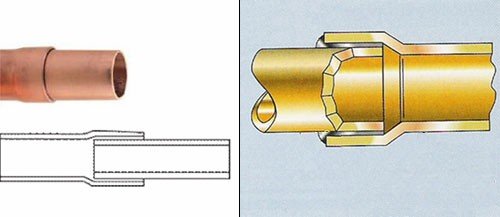
Capillary connection or soldering
More popular than welding, the method of mounting copper assemblies is soldering.Firstly, this method does not require strong heating of the parts to be joined and subsequent forging of the seam. Secondly, there are no restrictions on the time of work, since it is not pipes and fittings that need to be heated, but solder - a thin wire made of technical copper.
The connection is made in several steps:
- Insert the pipe into the socket of the fitting.
- The joint is heated by applying solder to the pipe along the edge of the socket put on it.
- The molten solder rises along the gap between the copper elements, filling it evenly.
- Allow the formed knot to cool.
- After cooling, the outer part of the joint is cleaned of solder residues with a cleaning agent. The inside of the pipeline for the same purpose is washed with water immediately or after the installation of all nodes.
Using Threaded Fittings
The simplest is the threaded connection, performed if you want to form a detachable assembly. Most often, steel and brass fittings are used for this method, which can have an internal or external thread.
Installation is carried out as follows:
- FUM tape is wound on the external thread of the fitting or pipe.
- An element with an external thread is screwed into an element with an internal thread by hand.
- Screw the fitting up to the stop with a wrench.
Crimp fittings
Compression fittings consist of a body with external threads on fittings, a compression nut and one or two ferrules. The essence of the connection method is that the end part of the pipe is clamped between the fitting fitting and the compression nut. This method is convenient in that it is carried out without heating, without special tools - an adjustable wrench is enough, with the same wrench, if necessary, you can dismantle the assembly.At the same time, the reliability of the compression unit is much higher than that of the threaded one. Compression fittings are made from various materials, but only those in which the ferrules are made of copper are used to connect copper pipes.
The connection is made in the following order:
- Remove from the fitting and put a compression nut on the pipe, move it away from the edge.
- Alternately perform the same operations with the ferrules.
- Insert the fitting into the pipe.
- The rings are alternately shifted to the body of the fitting and the nut is screwed on.
- Tighten the compression nut with a wrench.


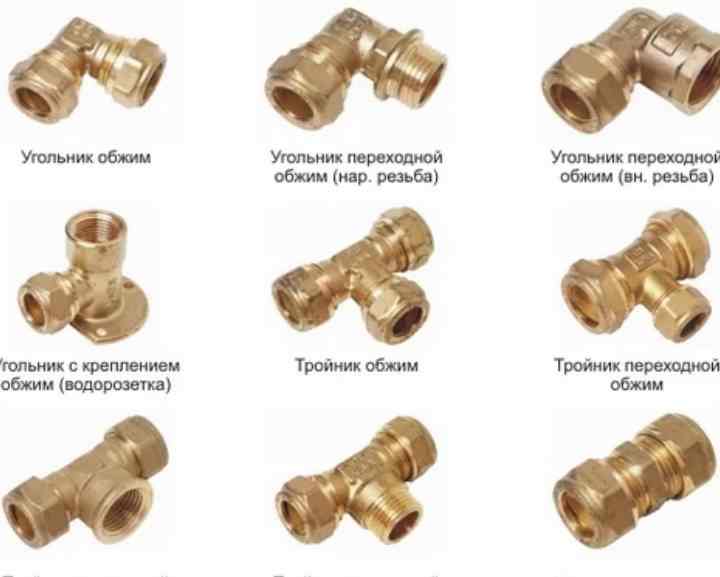


Features of the use of press fittings
Crimping resembles a crimp connection method, but a press fitting and press tongs are required to make a crimping unit.
The pressure fitting consists of a body with a smooth or ribbed fitting, a fixing ring and a press ring.
- A press ring and a fixing ring are put on the pipe, they are shifted away from the cut.
- Install the fitting in the pipe.
- The rings are shifted one by one to the fitting body.
- Tighten the press ring with press tongs.
The resulting connection is non-separable and in terms of reliability is not inferior to welded and capillary.
Advantages of copper fittings
In the event of a leak, copper pipes can always be repaired independently.
Among the advantages of copper fittings are the following:
- High mechanical strength;
- Excellent anti-corrosion properties;
- Resistance to external influences;
- Long (about 100 years) service life;
- Ease of installation;
- Resistance to temperature changes and ultraviolet rays;
- Versatility;
- Possibility of reuse and complete recovery.
All copper fittings are divided into:
- Threaded fittings;
- Solder fittings;
- Compression fittings;
- Press fittings;
- Self-locking fittings.
For plumbing installation own copper pipes You need the following tools by hand:
- Pipe cutter: such a tool will be needed to cut pipes during installation;
- Manual calibrator;
- Torch - this tool is designed specifically for soldering copper pipes;
- Spanners. Mandatory when installing any plumbing with your own hands. If you fasten copper pipes with a threaded connection, then a tool such as a wrench is simply necessary;
- pliers;
- File;
- Fine sandpaper is another tool for removing the oxide film with your own hands.
Now Technology: Nine Steps and Some Tips
The technology of soldering copper pipes is quite simple.
Here are the steps the process can be divided into:
- Cutting and sewing: cut the metal to the desired length with a pipe cutter.
Make the cutting place even, keep the cutter perpendicular to the surface. - Cleaning blanks with a metal brush, removing burrs from the ends.
At this stage, sandpaper should not be used because of the risk of formation of fine sand, which will interfere with the adhesion of the solder. - Expanding the edge of one of the pipes so that the end of the other pipe fits easily into the first with a minimum gap.
- Careful cleaning of the ends with a wire brush after its expansion.
- Applying the flux mixture to the end of the pipe in the most uniform thin layer.
- Insert the ends of the pipes into each other, warm up well until the color of the flux on the pipe becomes silvery.
- Solder is brought to the joint, which immediately melts and fills the joint gap between the pipes.
The process ends when the gap is filled with solder. - After heating, the sealed pipe must be allowed to cool thoroughly - in no case should it be touched at this time.
- Wipe, remove residual flux.
Pipe connection method. Soldering
If suddenly there was a defect in the form of a fistula or damage to the joint, the product can be quickly and easily repaired. To do this, it is enough to heat it up and dismantle it. After removal of defects, reheat and solder again.
Now about bending. Only soft annealed pipes can be bent using a pipe bender. If they are not annealed, brazed copper fittings are used. The angle can be 90° or less.


