- Assembling an open well canopy
- Brick repair work
- What tasks should a house for a well perform?
- Stone cladding
- An example of making a well house with your own hands
- How to make a blind area around the head
- What is needed for construction
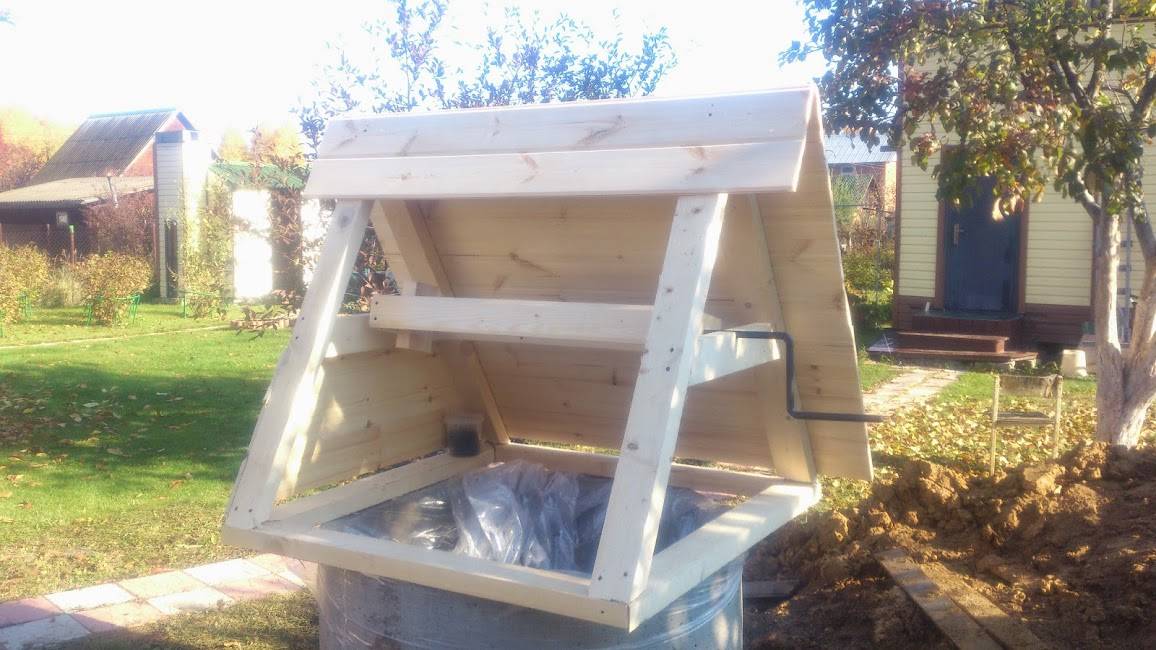
- Canopy for a well with a cover - an open house
- How to make a canopy
- The simplest version of the roof for the well
- Concrete wall cladding
- Types of well houses
- Fully enclosed house with a gable roof: ready-made drawings
- Frame assembly from profiles
- Gate installation
- Door installation
- House sheathing
- Log cabin
- Sheathe with siding and plastic panels
- Independent work
- Choosing the right design
- Assembling an open well canopy
- Conclusions and useful video on the topic
Assembling an open well canopy
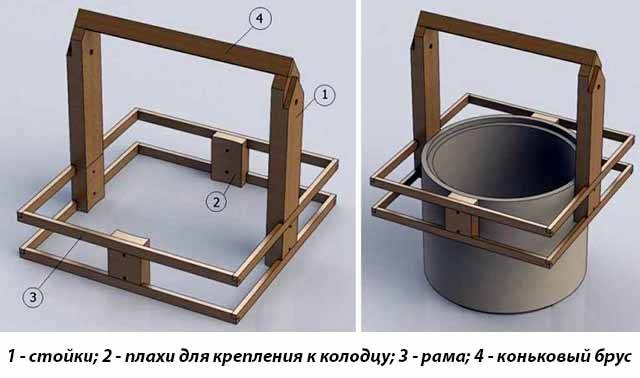
First you need to make a supporting part - a frame with uprights, shown below in the drawing. To fasten the gate, use a beam with a thickness of at least 50 mm or knock down several thin boards. Blocks for side mounting are made of the same lumber, and the frame is made of bars with a section of 4 cm.
Step by step the order of work looks like this:
- Cut the parts to the previously determined dimensions. At the ends of future racks, make cuts at an angle of 45 or 60 ° and 2 holes Ø25-30 mm for the gate shaft.
- Cut grooves across the thick timber, which will include the frame elements.The latter are also filed at the ends to connect into half a tree.
- Assemble the frame with self-tapping screws and nail the side planks to it.
- Attach the racks in the center of the frame, then install the ridge board.
- Carefully treat all wooden parts with an antiseptic compound, and after final assembly, paint.
The structure is attached to the well in any convenient way - through bolts or anchors. The next step is to install the gate from a log Ø20-25 cm, as shown in the diagram. To do this, the tree needs to be sanded, and holes for the shaft should be made on the sides, sticking to the center. Make a collar from a steel bar with a diameter of 25 mm. Then put the drum, attaching the washers to the ends and inserting the shafts on both sides. To prevent the wood on the racks from wearing out, steel sleeves can be hammered into the holes.
To mount the canopy, put together a simple truss system with two beams and braces, as shown in the drawing. The angle of inclination and the length of the rafter legs are arbitrary, but in fact the roof must completely protect the well. And the last stage is the manufacture of flooring from boards nailed to the top of the frame and the installation of doors on ordinary hinges.
Brick repair work
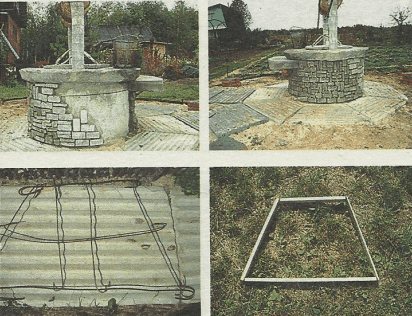
Brick-lined wells are the easiest to repair. The elements of their lining are small and easily replaceable. First of all, the walls must be thoroughly cleaned of dirt, otherwise it is easy not to notice the damage. If through cracks have formed between the bricks, they should be repaired with high quality from the outside of the structure. We are preparing a repair trench. Having reached the defect, we clear it up to 10 cm in depth.
After that, we thoroughly coat the gap with clay, deepening at least 5 cm.Inside the well, the work is reduced to the replacement of deteriorated bricks and the restoration of crumbling plaster. Defective brick or its remains are carefully hollowed out of the wall. We take a new part and insert it in place of the old one, laying it on the cement mortar.
Brick-lined wells are quite easy to repair. The damaged brick is carefully hollowed out and replaced with a new one.
Before plastering, carefully prepare the base. With a steel brush, we clean it from dirt and mucus, otherwise a sinus will form under the solution, in which water can accumulate. And this will lead to the rapid destruction of the new plaster. We carefully tap the old coating and remove all unreliable areas and crumbled fragments. After that, once again we clean the base and proceed to plastering.
What tasks should a house for a well perform?
The main task of this design is to protect the water source from foreign objects and dirt that can appear literally from anywhere: leaves from trees, dust and other debris that can greatly pollute the well. It is unacceptable to get into the water intake of melt and rain water, which may contain animal waste and other organic substances undesirable for humans.
 So that the water in the well does not bloom with microscopic algae, you need to cover it from the sun
And last but not least, the well must be securely protected from animals and children. Shaky lids are the most common cause of many misfortunes, not only with children, but also with adults.
So a strong door and a strong lock are a guarantee of your own safety.
And finally, another practical function of such a house is the arrangement of a lifting mechanism. In modern wells, you rarely see a bucket on a chain. For convenience, there are various devices: from electric to mechanical pumps.
 Those who prefer the traditional way can use a rotating log with a handle for this purpose.
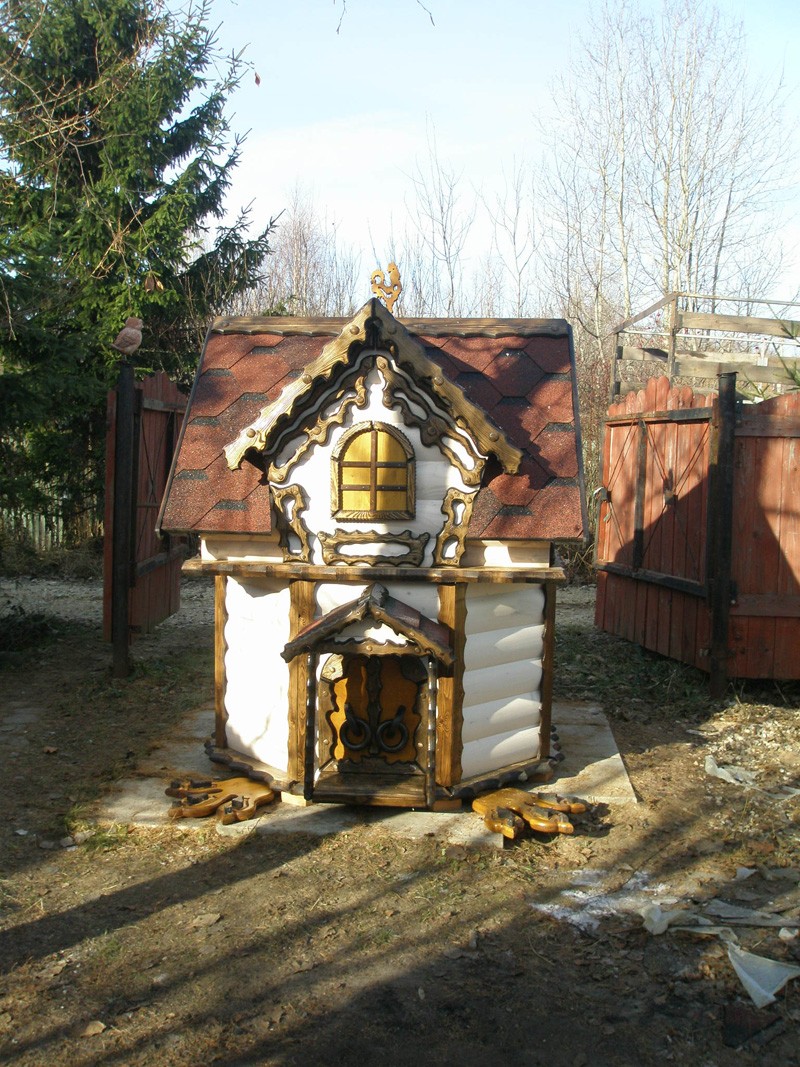
If all these important functions from a practical point of view are collected in one design, and even attractively designed, the well will become a true decoration of the garden.
Stone cladding
Stone is a fairly ancient facing material. It is excellent for exterior and interior cladding. Although decorative stone is often used for these tasks, which has the following advantages:
- High strength.
- Durability.
- Moisture resistance.
- Weather resistance.
- Easy installation.
- Large range of tones.
Finishing the well with a decorative type stone occurs using the following avant-garde:
- Special adhesive mixture or cement composition.
- level.
- Decorative stone.
- tile cutter
- A pair of spatulas of modest parameters.
Installation is carried out only on a flat surface. The material must not deform.
Artificial stone can be acrylic, sand, concrete-sand, synthetic or gypsum. The latter option is completely unsuitable for outdoor decoration. It absorbs moisture and deforms.
For external finishing, we level the surface - we use a concrete composition or drywall that is resistant to moisture.
Work algorithm:
- We mount drywall on the frame. Along the way, we additionally insulate the well with sheet thermal insulation.
- Before installation work, we carefully process the surface of the material. Cover it with primer.
- Installation of stone on a special glue or cement composition. We do not strengthen the structure. After all, this material is not heavy.
- Roof installation.We often use corrugated board. Although the option with tiles is also popular.
Here it is worth mentioning another aspect - there is moist soil around the entire perimeter of the well structure. Therefore, we fill this area with pebbles, gravel, or crushed stone.
Finishing a well with a natural type of stone is somewhat more complicated.
We pre-prepare the surface. Since natural stone can have different shapes and parameters, the method of its use may vary.


The lining of the well from the rings with this material occurs around its entire perimeter.
Required items for work:
- The natural stone itself.
- Ingredients for the composition: cement, sand and water.
- Level.
- A mesh of reinforcing bars with small cells.
- Construction grid.
Work algorithm:
- Surface priming.
- Surface coating with concrete. A construction network is attached to it. Thanks to her, the design acquires integrity.
- This network is covered with another layer of composition. We are already mounting a second grid on it.
Work continues in 5-10 days. During this period, the composition will completely harden.
Then we mount the natural stone on a concrete mixture or on a special adhesive solution.
An example of making a well house with your own hands
Before proceeding directly to the construction of this facility, you need to prepare the site. The most important point is to remove melt water from the well. To do this, it is necessary to fill in all the voids around the upper ring protruding from the ground, which usually remain during the installation of the well. In addition, slopes must be made to divert water as far as possible from the water intake.The simplest option is to concret the area around the well. Concrete work is best done before the construction of the house for one reason: if you have a concrete platform ready, you can support the structure on it, and if there is none, then only the reinforced concrete ring will serve as the foundation, and this limits the builder's capabilities.
 If for some reason you are not satisfied with the concreting of the site, you can paving with tiles, stone or make a wooden blind area
Please note: a paved path should lead from the house to the well, because you will need to go for water in any weather. The path must not be slippery.
Now consider the sequence of work in more detail.
| Illustration | Action Description |
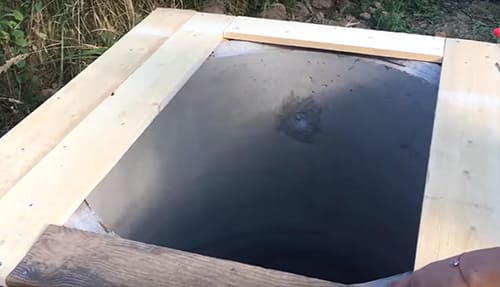
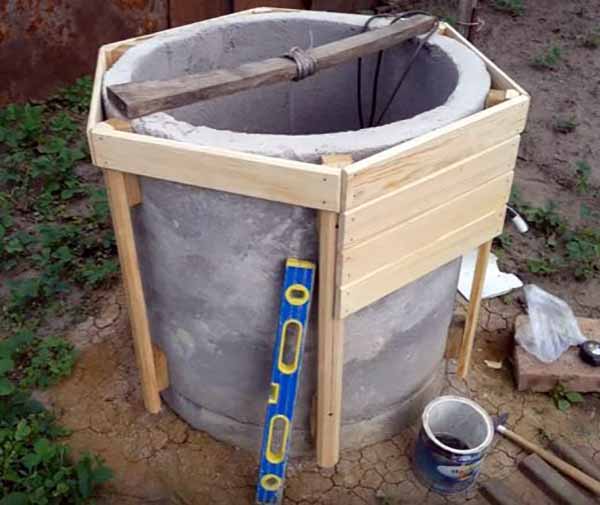
 | Before starting work, carefully measure the concrete base. This is your foundation. |
 | From a bar or thick board, make a frame that should fit snugly on the ring. |
 | Fasten the corners of the frame with metal corners and slopes. |
| Fix the frame to the concrete ring with dowels. You will need to drill a few holes. | |
 | On a fixed frame, make a solid flooring from a wide board. |
 | The next step is the truss system. Fasten it to the flooring with metal corners. |
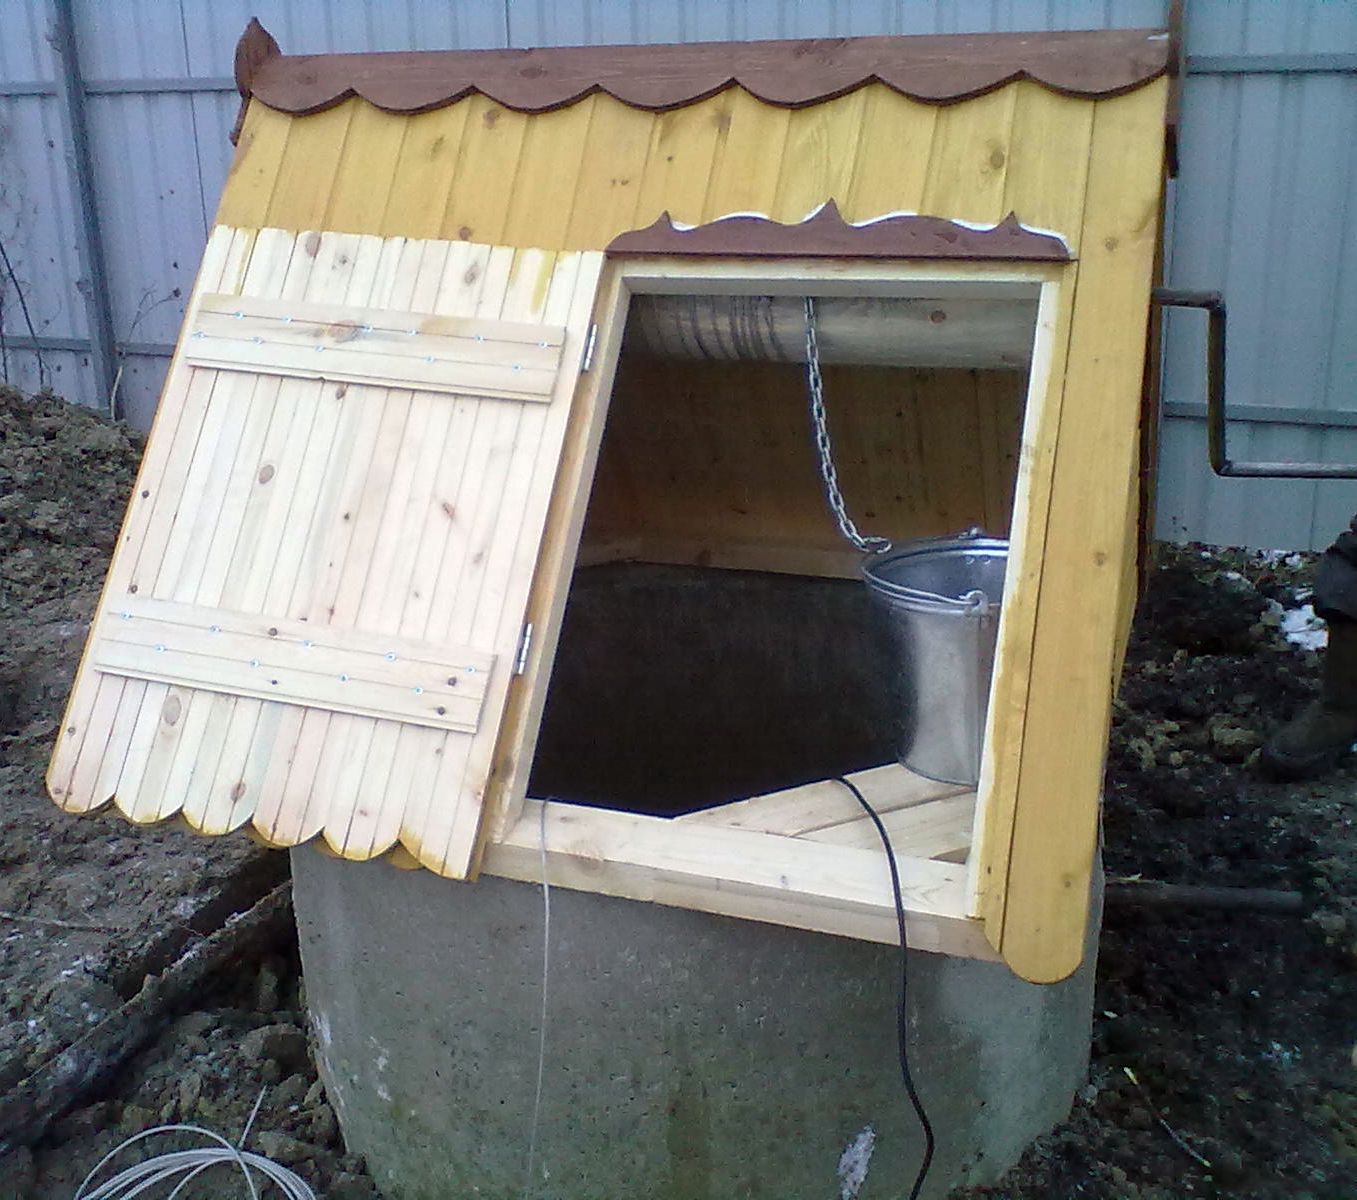
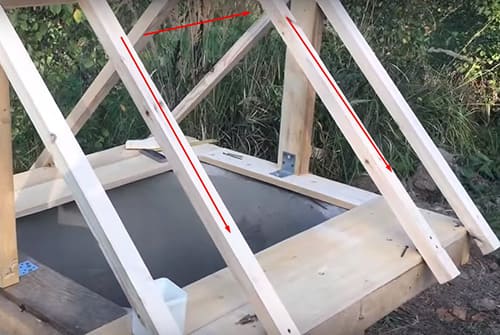 | Be sure to leave a window in it for installing a door wide enough to allow the bucket to be lowered. |
 | For roofing, use plywood or OSB boards. |
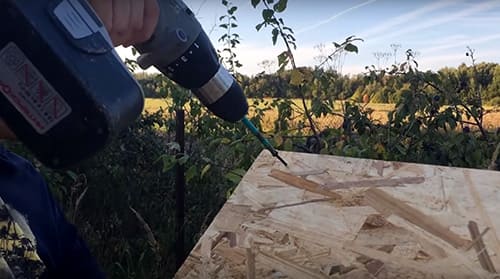 | Fasten the OSB to the rafters with self-tapping screws. |
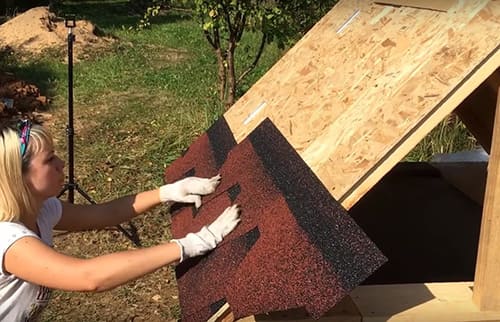 | Cover the roof with a soft roof, pressing every detail. Do this with the lid closed. Later you will cut it along the outline. |
| The side parts of the house can be sewn up with clapboard or use the same OSB. | |
 | The final touch is a convenient handle for the door. |
How to make a blind area around the head
When the clay castle is ready, you can proceed to the blind area. It will protect the structure from gullies, prevent the formation of soil failures. The blind area is made on top of the clay castle. There are several options for its device, it is worth highlighting the following:
- monolithic concrete coating;
- paving slabs;
- asphalt pavement;
- laying around the shaft of natural stone.
If in the future it is planned to build a house over the well, the blind area will serve as a foundation. For the construction of a decorative house, it is better to use wood.
This is interesting: Examples of the design of country wells - we understand carefully
What is needed for construction
The choice of materials for decorating a well house depends on the basic style of all buildings. For construction use:
- calibrated beam;
- a natural stone;
- facing brick;
- roof tiles;
- lining and profile facing board.
You can build a house from building debris. Everything will fit:
- trimming slats, timber and other lumber;
- remnants of a metal profile;
- tile material;
- sand, pebbles, natural stone.
Of the tools you may need:
- Plane.
- Hacksaw for wood and metal.
- Nail puller.
- Screwdriver.
- Building level, tape measure.
- Door hinges and handle.
- Heck or lock.
- Nails, hammer.
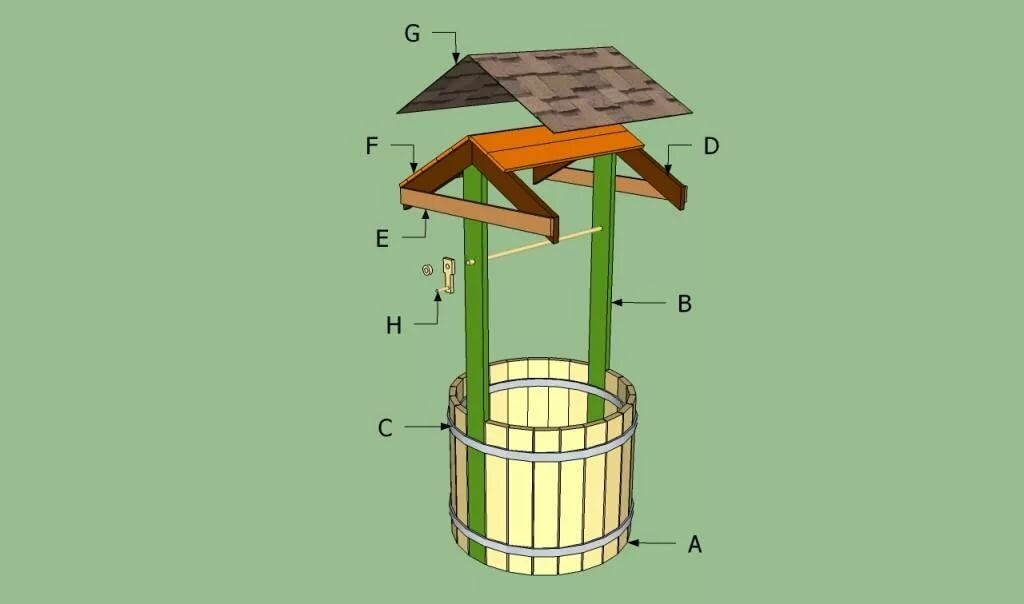
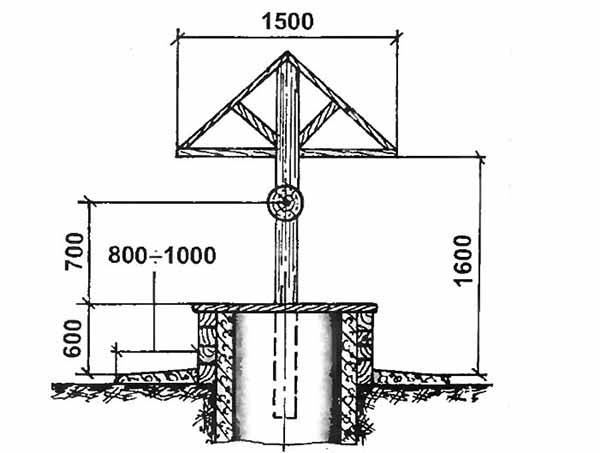
Canopy for a well with a cover - an open house
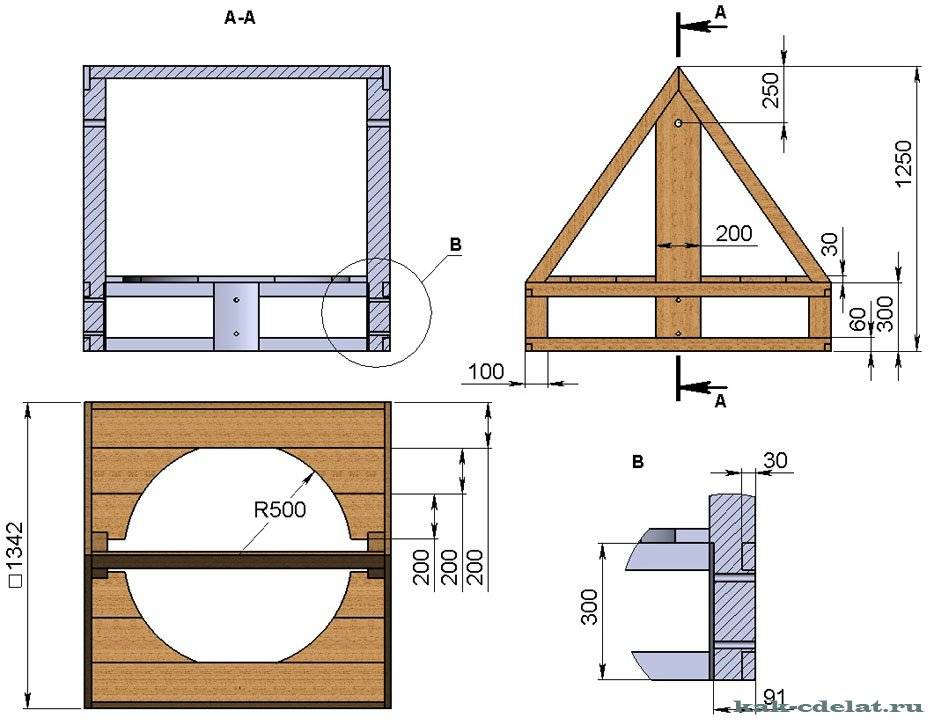
Structurally, the device is simple: there are two racks located one opposite the other. They serve as a support for a canopy, and a gate is attached to them - a device for lifting buckets of water. A drawing of an open house with dimensions, see the photo below.
Drawing of a well canopy with a cover and a gate
Please note that the posts can be dug in after the well ring has been finished. Depending on this, the order of work changes, but the design in any case remains the same.
Racks supporting the canopy can be located inside the lining of the well ring or outside
About the manufacture of paths on the site is written here, you can read about the benches here.
How to make a canopy
First, the canopy is assembled. Make two side triangles according to the required dimensions. In the drawing above, only an approximate spread of the two extreme points is given. More can be done if necessary. The length of the canopy depends on where the racks will stand - close to the well ring or behind the casing. The approximate dimensions of the canopy with a ring diameter of 100 cm are shown in the photo below.


Dimensions of a well canopy for a diameter of 100 cm
It is possible to assemble the structure from a galvanized profile, a metal profile pipe or a wooden beam. To prevent the profile from bending, it is reinforced at the door attachment points - you can put a wooden block or a metal corner inside.
To ensure that rain does not get inside, the expansion must be made much larger than the size of the ring - at least 20 cm on each side.
The roof over the well must be much larger than its diameter.
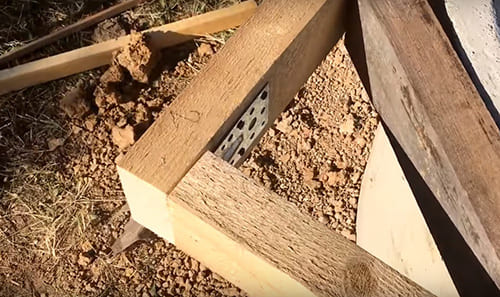
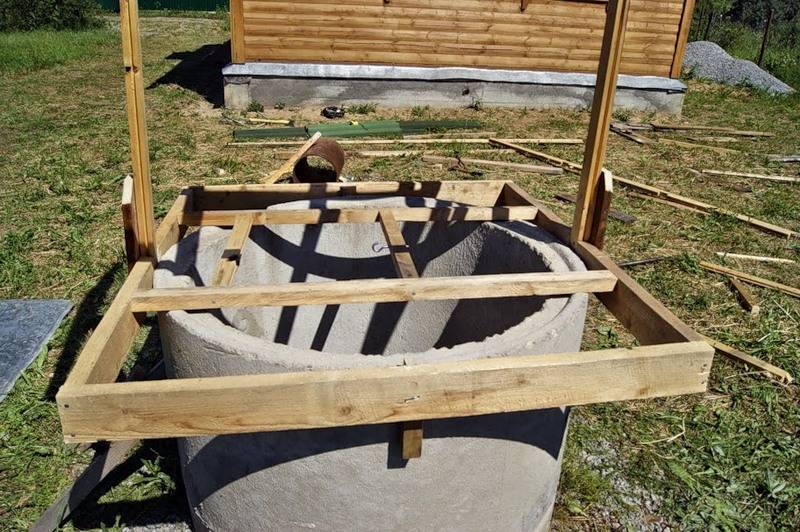
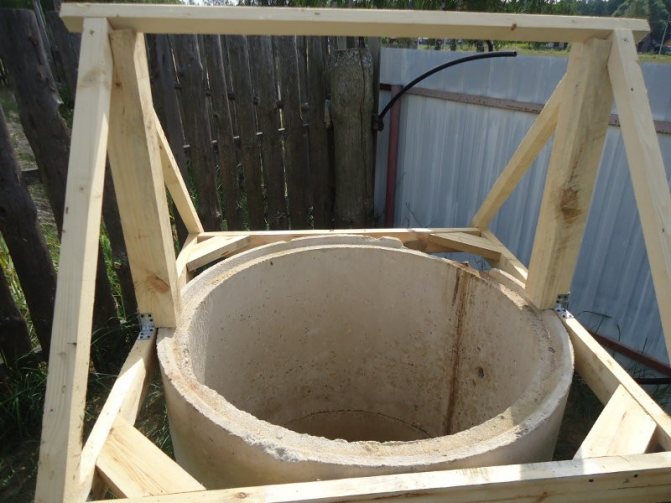
If the racks are attached directly to the concrete ring, the procedure is slightly different. First, a frame is assembled that encloses the ring. In the photo, it is made of a board 30 mm thick. Racks are also made of the same board, the place of attachment to concrete is reinforced with overlays. They also play a decorative role.
If the canopy turned out to be heavy, it is advisable to use a beam of greater thickness, otherwise it will not withstand the load.
Frame for well head
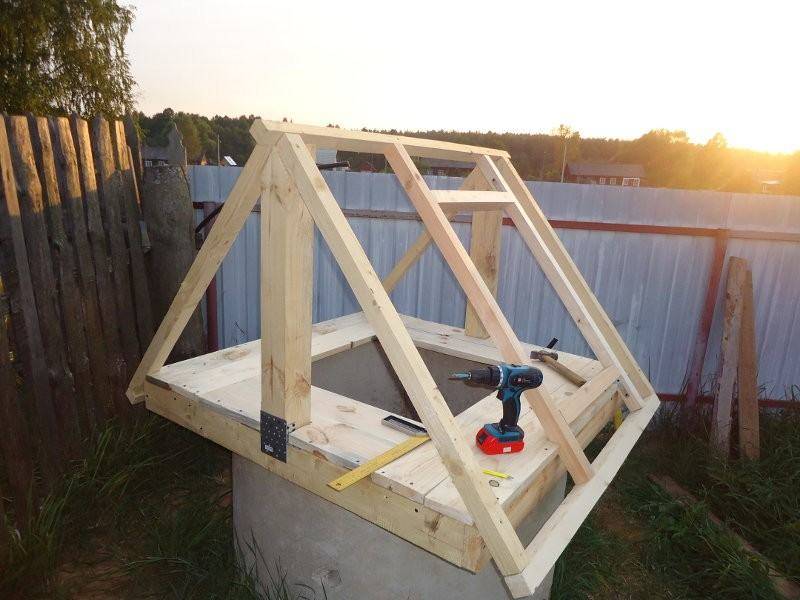
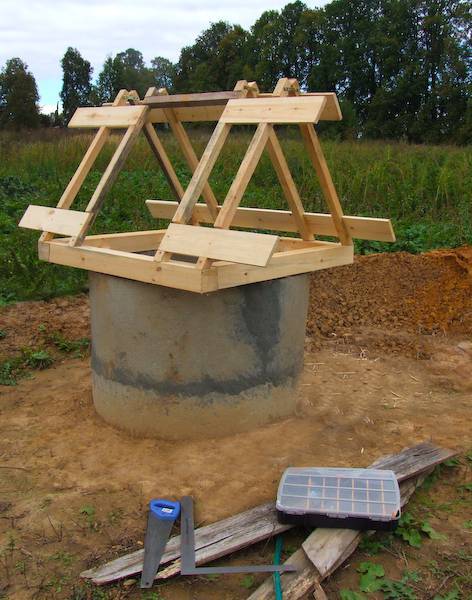
After that, the previously assembled roof is attached to the racks. It is possible to make triangles immediately on the spot, but it is more convenient to prepare them in advance, assemble the truss system, and hoist them on racks in finished form.
Assembled but not finished
Next is the finish. Sew up with a board, clapboard, roofing material. Just keep in mind that the boards, if used raw, will dry out after some time, gaps up to 5 mm thick will form between them. Then there is no question of any hygiene: both rain and dust will fall ... Using a dry board is also not very good - in wet weather it will swell, the flooring will “go in a wave”. In general, if you want to have clean water, build a house with doors - closed. There are more chances to save moisture from pollution.
Do-it-yourself roof for a well: drawings and dimensions
How to build a firewood shed with your own hands, read here.
The simplest version of the roof for the well
Today, most wells are built on a personal courtyard and are designed for a maximum of one or two people, so there is no particular need for arranging a high and wide roof. A home version of a well with a roof is most often made in the form of a small visor fixed on a concrete base of the head.
Initially, you will need to assemble a wooden frame, which will be used as a support on a concrete ring. To do this, you can use a bar or a forty board. A double spacer is installed in the central part of the square frame, with which you can increase the rigidity of the support box and hang a cover that covers the water surface.
Next, you will need to install vertical supports under the roof.If metal tiles, corrugated board, shinglas or bituminous materials are used as roofing material, then relatively light racks made of timber with a section of 50x50 mm can be dispensed with. The frame is assembled according to the "greenhouse" scheme - initially the ridge and support strips are stuffed, on which the rafters and the crate are laid.
It remains to lay the roof and secure the gate.
Concrete wall cladding
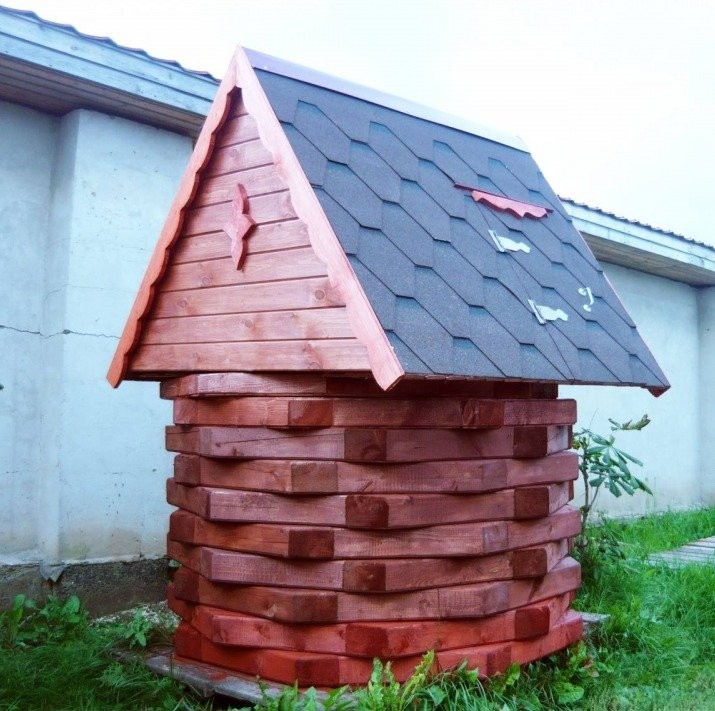
The simplest way to finish the above-ground part of the pool is lining with clapboard on a wooden frame. To determine the attachment points of the boards, you need to measure the outer diameter of the neck and calculate the circumference using the school formula L = 3.14 x D. Then divide the result by 6 and put this arc length on the well wall the same number of times using a tape measure.
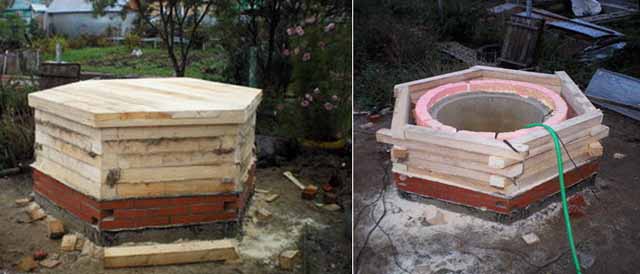
- At the marked points, attach 6 vertical strips to the concrete walls with dowels, after cutting off their corners.
- Nail the lining boards to the frame horizontally so that their ends converge in the center of the planks, as shown in the photo.
- Close the joints of the lining with wooden or metal flashings.
As a result, you will get a nice hexagonal structure that needs to be coated with an antiseptic, primed and double-painted or varnished. See the video for details of the assembly process:
Another popular way of exterior cladding is to build a log house, which will require laying a small foundation around the pool. After all, wood is contraindicated in direct contact with the ground. Logs are sawn and stacked according to traditional technology, after which they are processed and painted in the desired color.


Types of well houses
The type distinguishes between open and closed.
Open:
- a wooden frame is built around the well ring or lined with stone;
- install two supports on which the lifting mechanism is attached;
- rafters are laid on the supports and a roof is placed;
- the log house is closed with a tight-fitting lid.
Such wells can be seen on the village streets.
Closed:
- a frame is built around the well ring;
- dig in vertical supports for fastening the gate;
- build walls, hang a door with a lock;
- rafters are laid on the walls and a roof is erected. The roof can be wooden or metal.
This type is usually built on personal wells made of wood; there is a lock on the door.
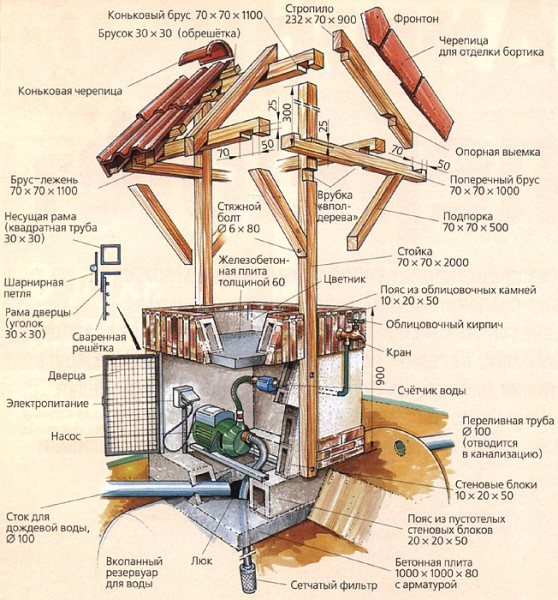
Fully enclosed house with a gable roof: ready-made drawings
A wooden house on a well with a gable roof is a simple and common option. Having created the drawings of the desired design, you can get to work. The first step in construction is the assembly of the frame.
Frame assembly from profiles
The dimensions of the frame must be larger than the ring so that it freely enters the structure of the frame. The height is above the average height of a person, so that you can fearlessly bend down and get a bucket of water.
The profile for the frame is preferable to take a thick one made of galvanized metal. We connect profile racks from below and from above with a guide profile to make a cube - this is the basis for the frame. For a slope at the guide profile, cut the sidewall and attach the rack (the height is equal to the height of the house). To make the slopes even, the rack is attached in the middle.
The incised profile is fixed on the rack, forming a truss system. When the triangles are formed on both sides, their tops are connected by a transverse bar. On the side where the door will be, additional racks are attached.
The resulting structure must be sheathed with roofing material - edged board, plywood or siding. The roof is covered with profiled sheets.
Gate installation
To make it, you need a log with a diameter of at least 20 cm. The larger the diameter, the easier it will be to turn the gate when lifting a bucket of water. The length must be less than the distance between the uprights.
Assembly instructions do-it-yourself gate:
- the log must be cleaned, polished;
- make markings of the desired length, cut;
- so that the log does not deform, its edges are wrapped with wire;
- drill holes with a diameter of 2 cm to a depth of 5 cm exactly in the center on both sides;
- close both cuts with metal, not forgetting to make the same holes in it;
- on the racks at the place where the gate is attached, also drill holes and close with metal;
- put metal tubes in them;
- insert metal rods into the holes, bend the rod on one side to get a handle for rotation;
- combine the rods of the log with the tubes on the racks.
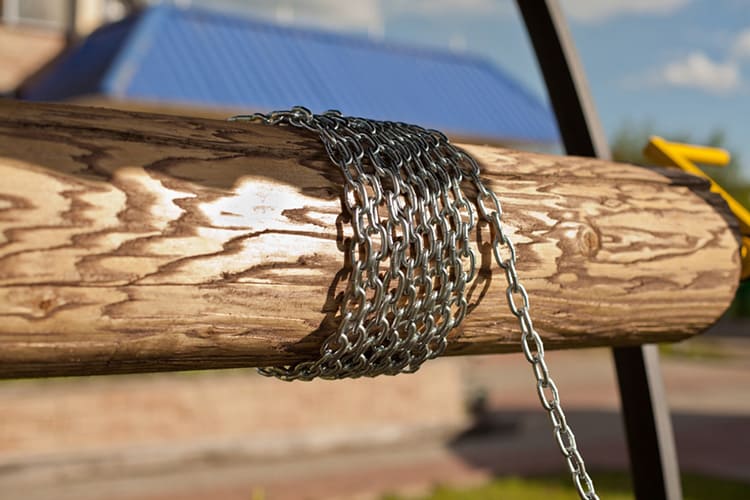
A bucket chain is attached to the collar.
Door installation
It is attached to the frame. Step by step installation instructions:
- fix a frame of three bars on the frame;
- the door is assembled separately and must be smaller than the inner perimeter of the frame;
- attach canopies to the frame and door;
- hang the door on the hinges screwed to the frame;
- screw the handle.
Complete with a latch or shackles for a padlock.
House sheathing
The final stage in construction is the exterior design. If the slopes are large in area, it is necessary to make a wooden crate and already attach the main finishing material to it. If small, the finishing board can be stuffed directly onto the frame. To protect against wind, rain, wind boards can be filled.
Treat all wooden parts with an antiseptic, varnish or paint.
Log cabin
For its manufacture you will need:
- Round logs.
- Roof board.
- Beam for props.
- Roofing material.
From the timber, a log house is formed according to the size of the well. You can tie the logs together in any way. Two massive racks are installed on the sides of the log house; for additional fixation, supports can be made. A roof is installed on top of the supports. The design of the roof and truss base is the same as for other types. The slope of the roof should cover the base of the house for the well.
We advise you to watch 2 parts of the video on how to make a well house with your own hands.


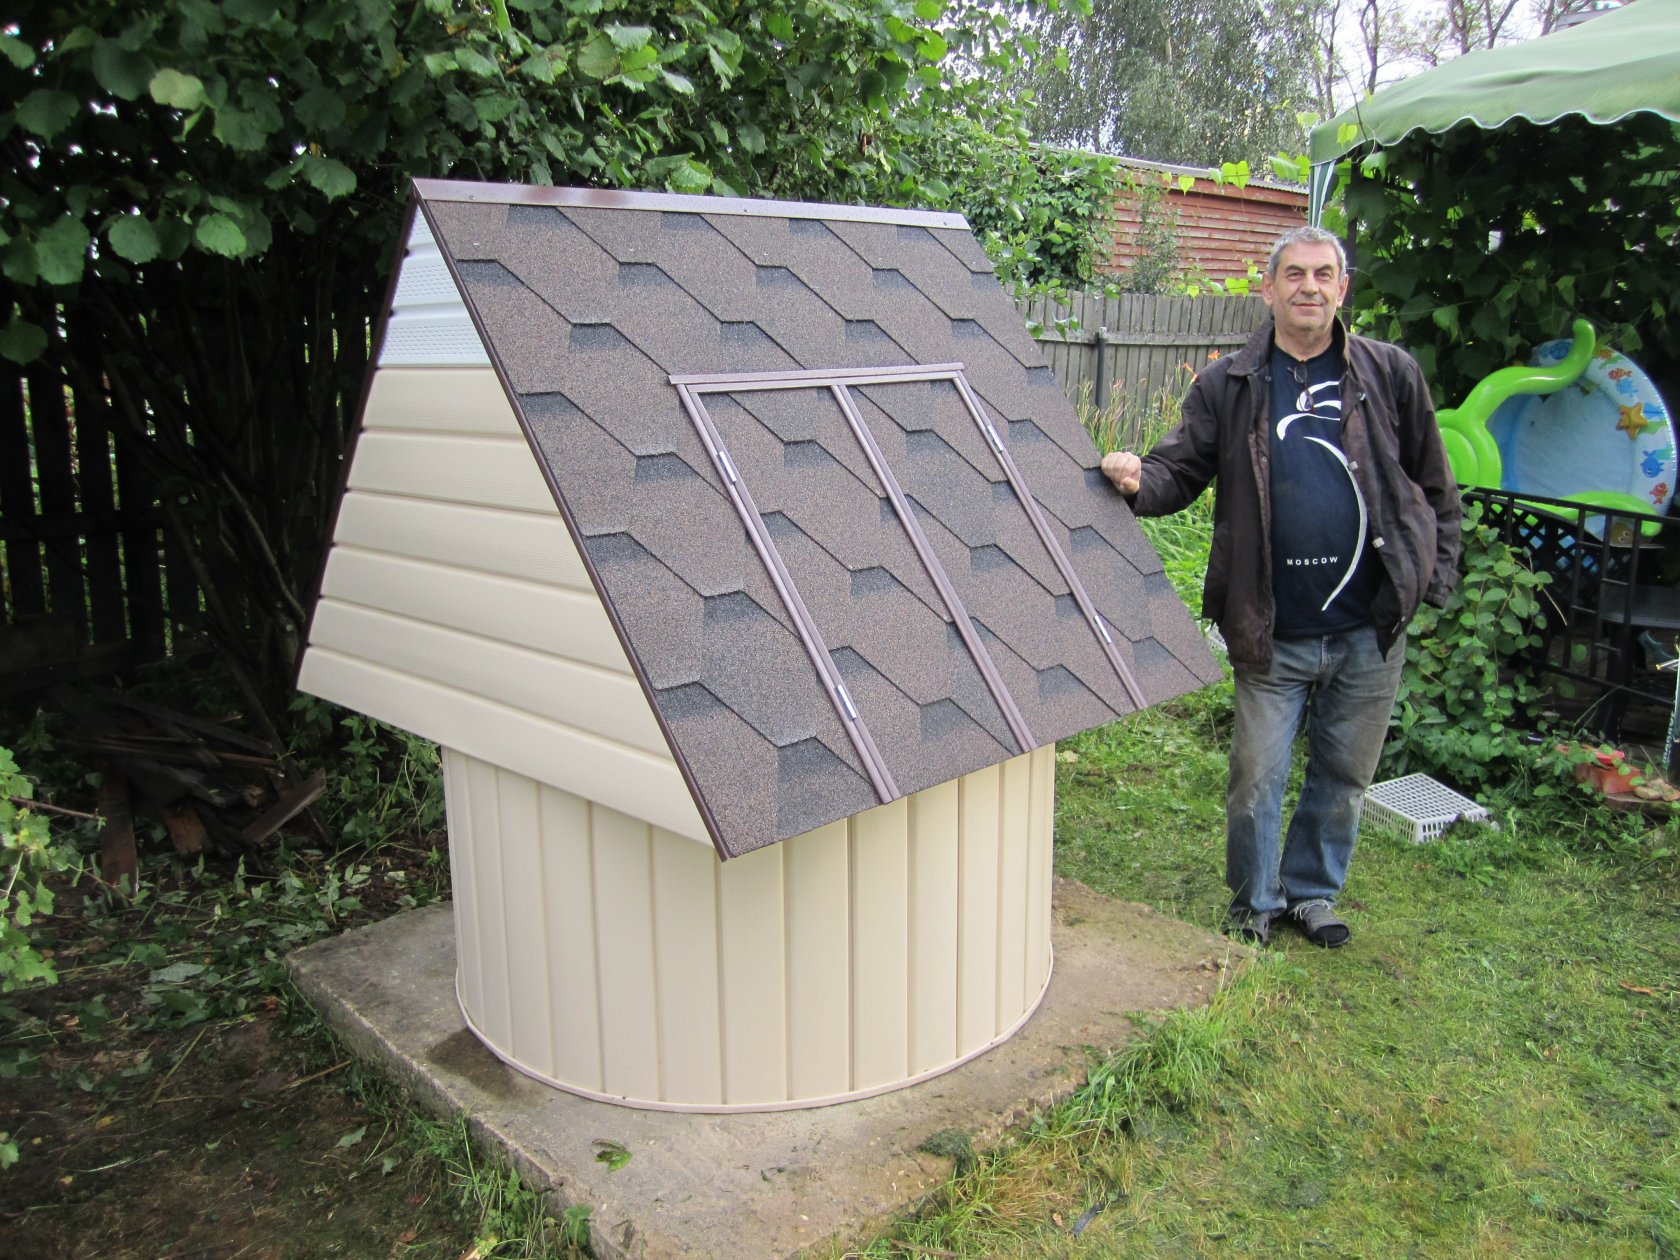


Sheathe with siding and plastic panels
Regardless of the material, the sheathing is done on a wooden frame. At least 6 side faces are provided so as not to bend the plastic. You will need starting and finishing corners, connecting moldings. Installation starts from the top so that the grooves of the locks are directed downwards, otherwise rainwater will flow.
Installation sequence:
- fix the starting corner on top;
- insert a piece of plastic material with the groove down;
- fixed with staples from a stapler;
- install the following items.
A corner is fixed at the bottom. The last section may need to be cut lengthwise. At the ends, connecting moldings are installed, the sheathing of the remaining faces continues.
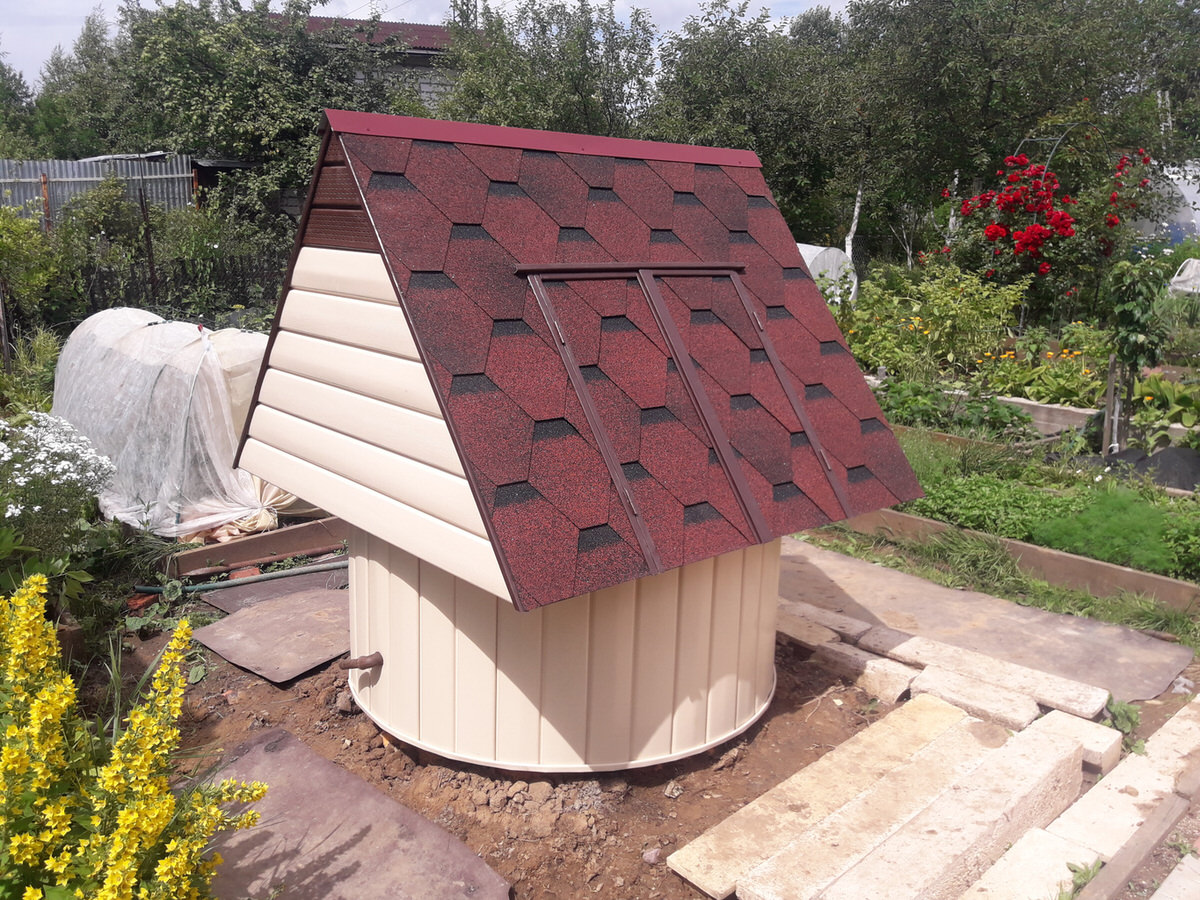
Well sheathed with siding and plastic panels.
Independent work
No less often, the idea of buying or ordering a wooden structure is replaced by a completely reasonable decision to build a house for a well with your own hands.

All that is needed for this is to make a drawing and purchase the necessary tools and materials. The main building material will naturally be wood. It is easy to handle, looks great and will last a long time.
Of the building materials for the house, you will need a certain amount of wooden beams, edged boards, block house or wooden lining. Any of the last two materials can be an excellent finishing element.
The roof can be made of metal tiles, polycarbonate or roofing material. As a coating, many use siding, profiled sheet, euroslate and other types of roofing surfaces.
Among other materials, you will need a log and a metal rod to make a gate. To process wood, you will need to purchase antiseptic compounds, varnishes and paints. Next, you need a door and door hinges to it.
For a tight grip, you will need short metal corners. Additionally, you will need metal bushings made from pipe trim (2 pieces). A metal chain is needed to lift the bucket.

The construction of the house begins with a detailed study of the drawing. Moreover, most of those who are going to build a well on their own find drawings on construction sites. And of course they require detailed study. In the same place on the Internet you can find a detailed technology for performing such work, starting with the installation of the frame and ending with the finishing work.

It's not all that difficult if you approach the matter in good faith. As a result, a wooden miracle will be created with your own hands.

Choosing the right design
Ideally, a well house should perform the following functions:
- protect water from external pollutants - precipitation and debris carried by the wind;
- play a decorative role, ennobling the concrete head sticking out above the ground;
- serve for manual or mechanized lifting of water.
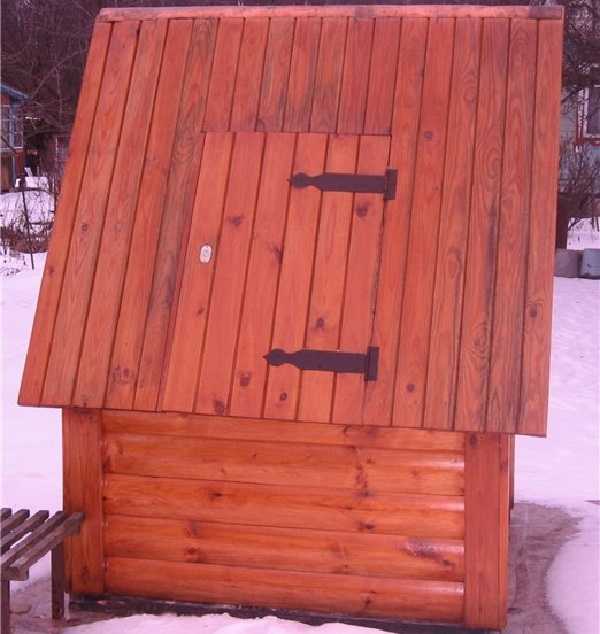
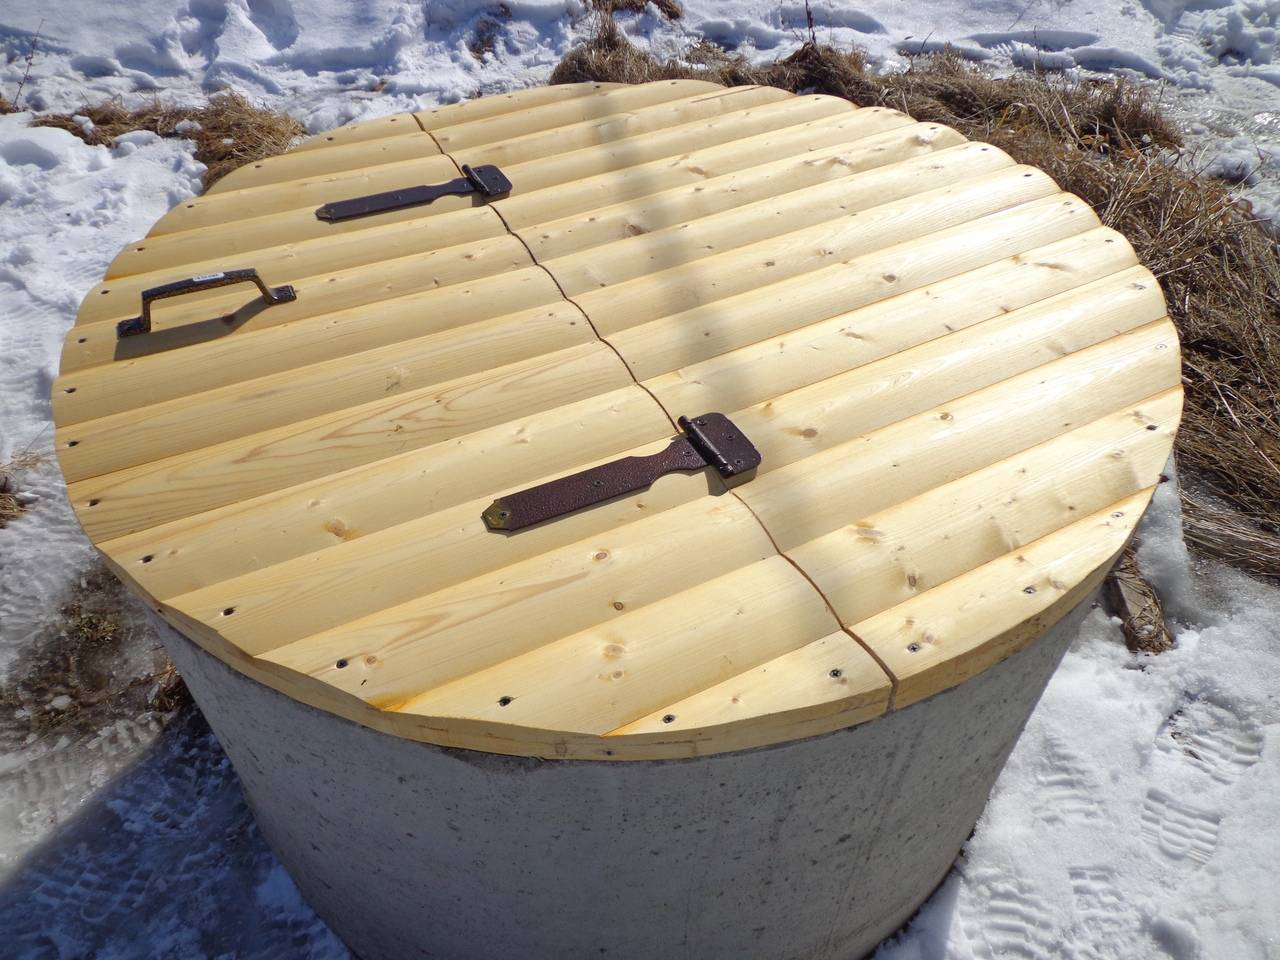
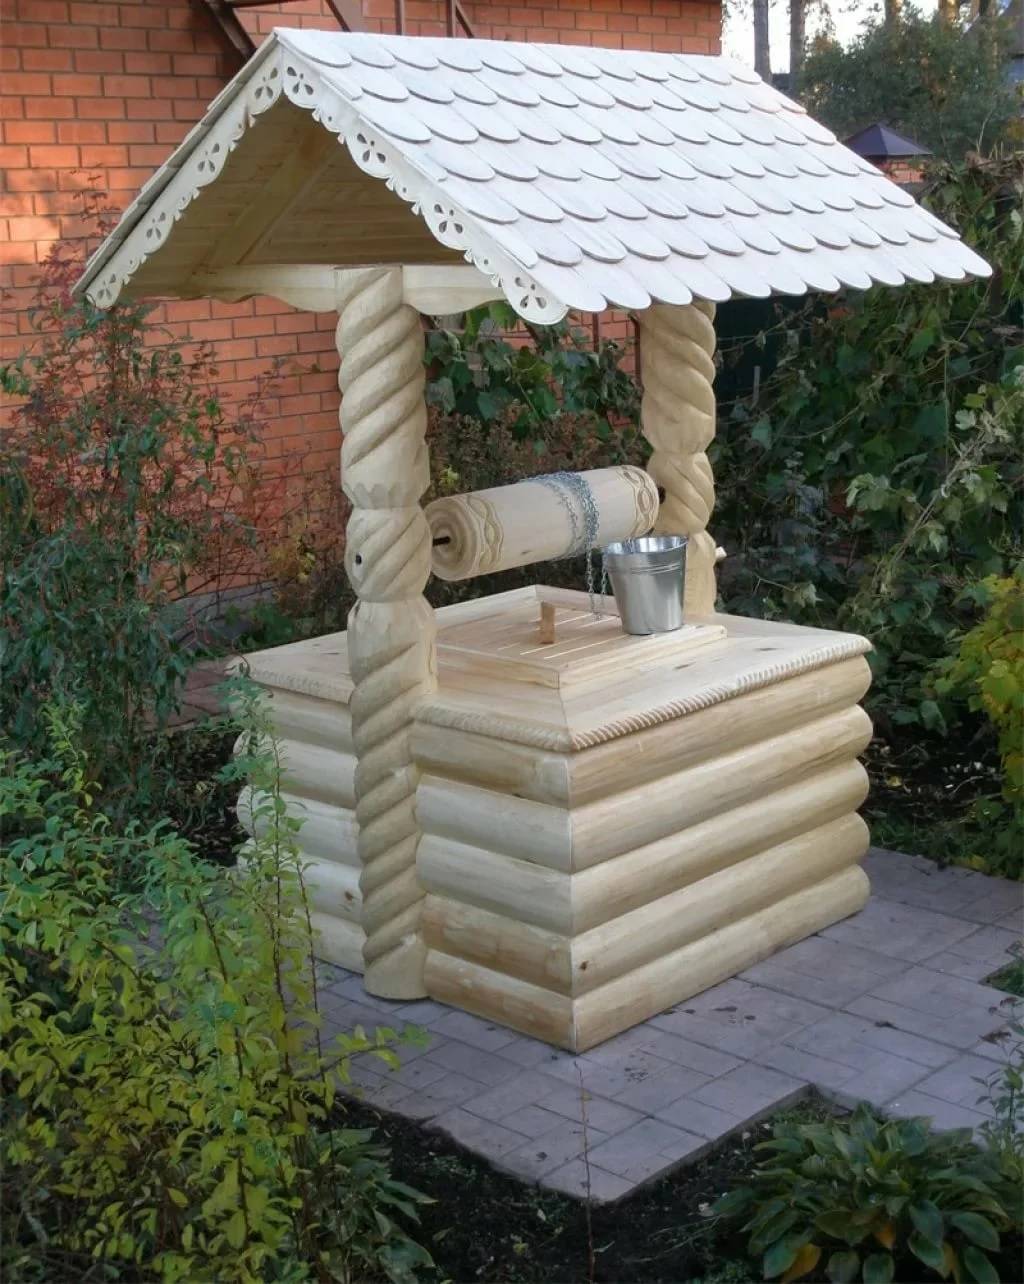
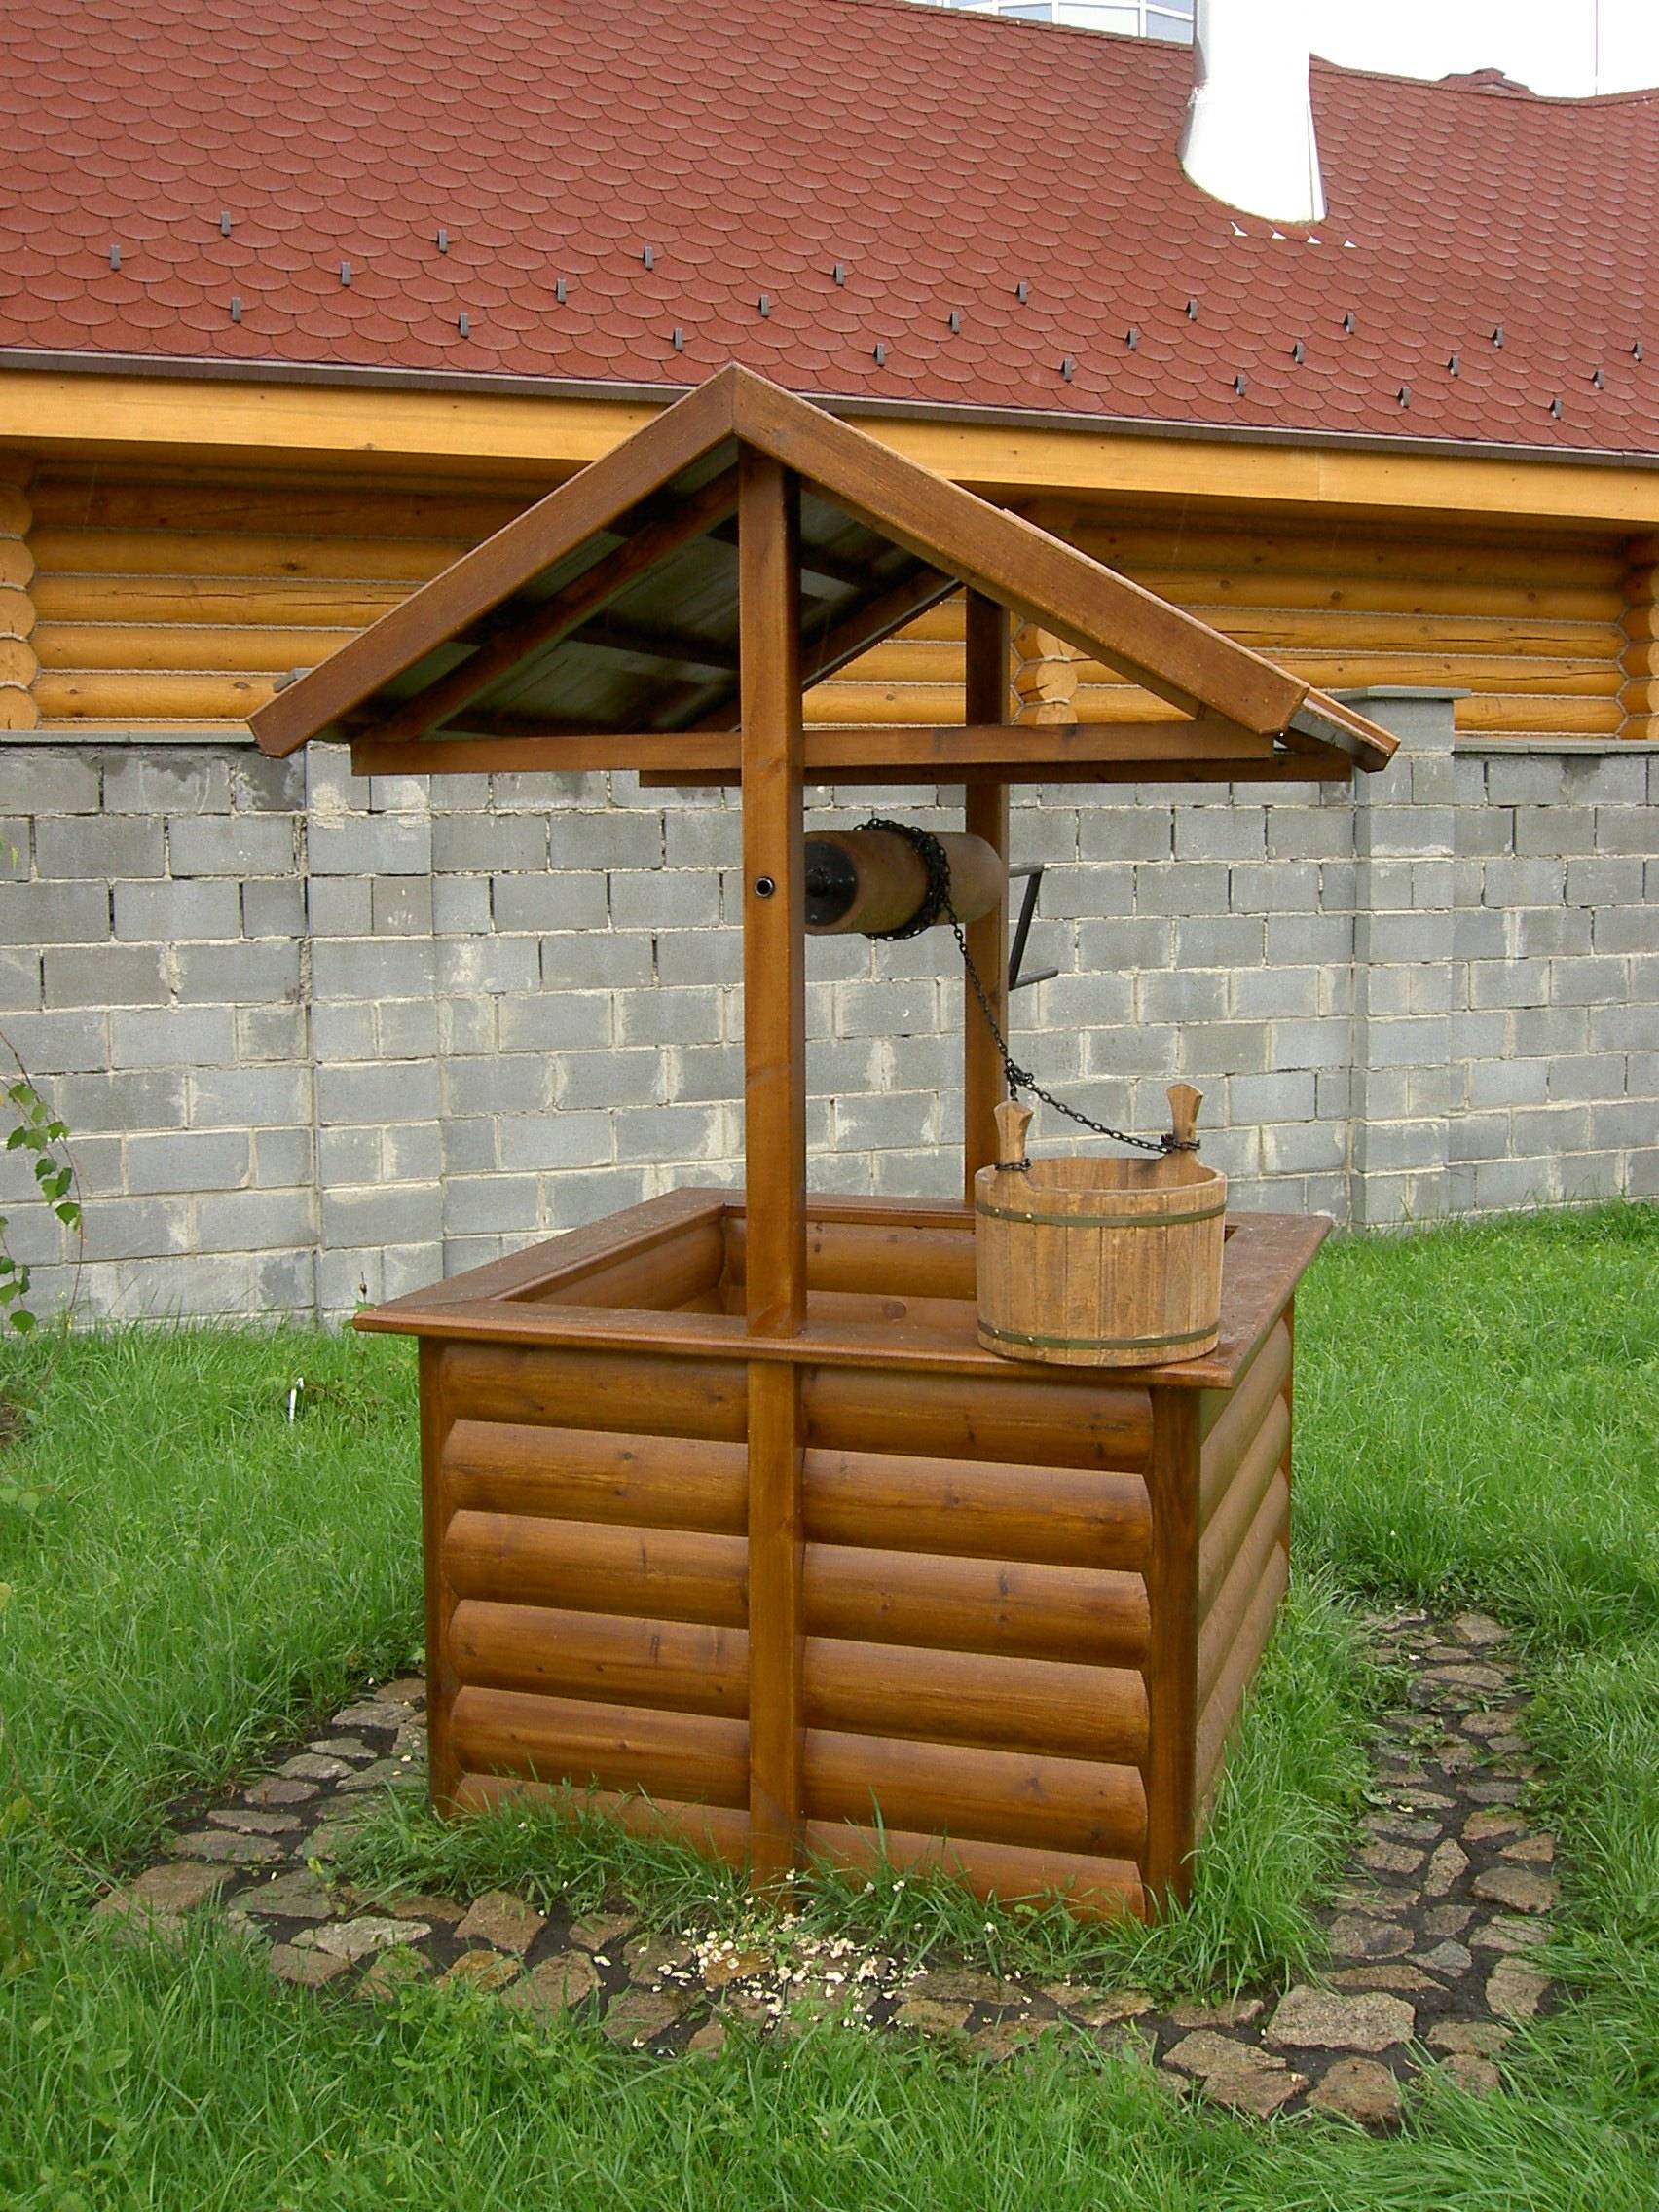
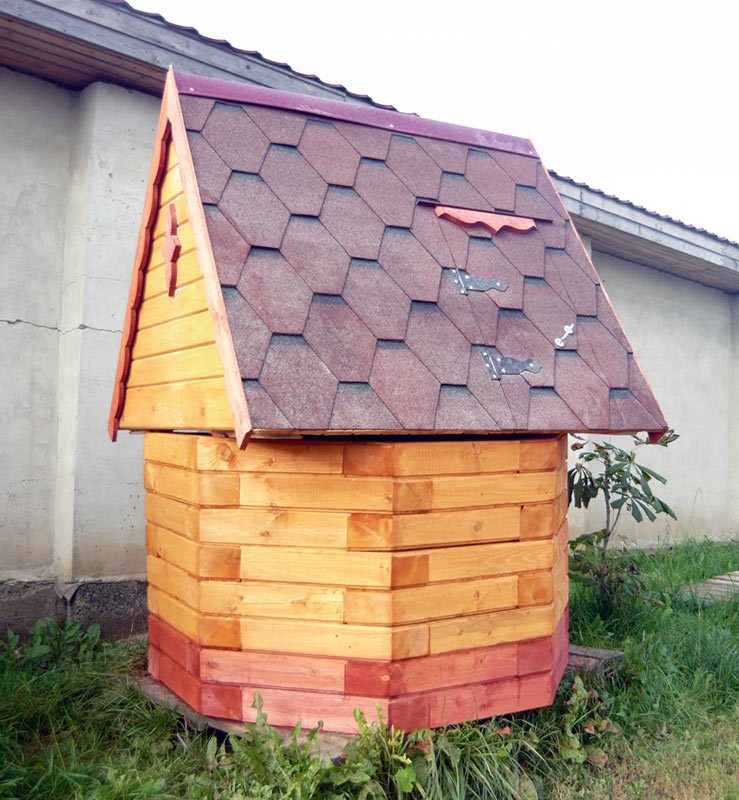
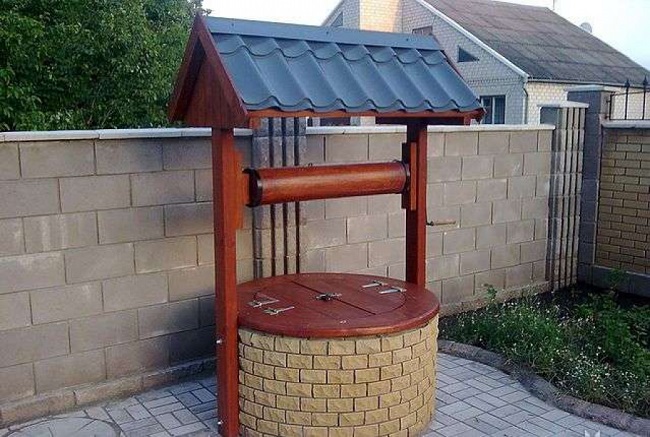
In the vast majority of cases, canopies are made of wood, since metal rusts quite quickly from constant contact with water and its fumes. It is customary to sheathe roofing iron except for the roof of a wooden booth or horizontal doors that close the source of water supply from above. The simplest and at the same time beautiful version with lining and wooden covers is shown above in the photo. It is good for shallow swimming pool in the countrywhen water is simply scooped up with a bucket or pumped over with a pump.
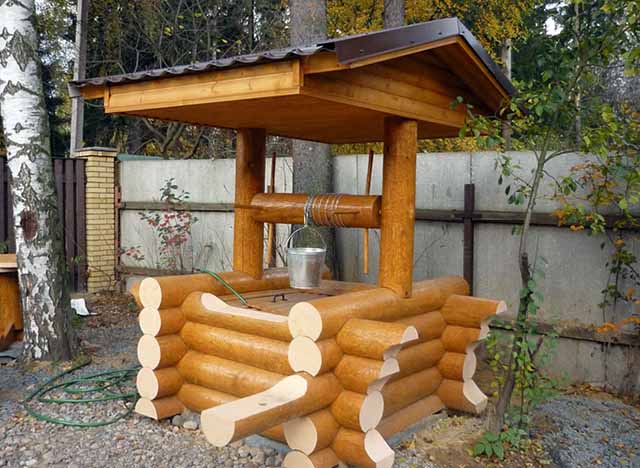
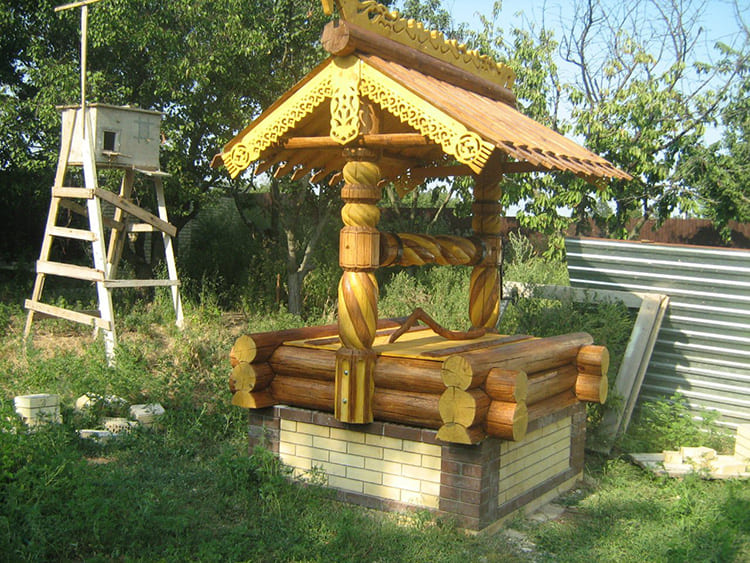
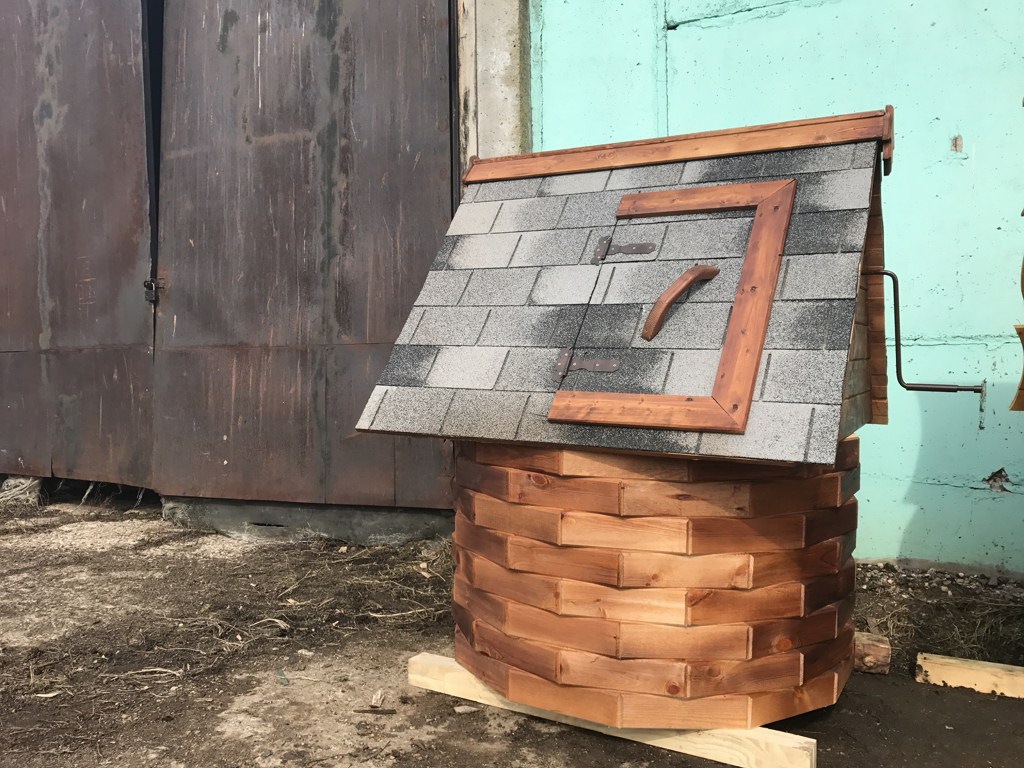
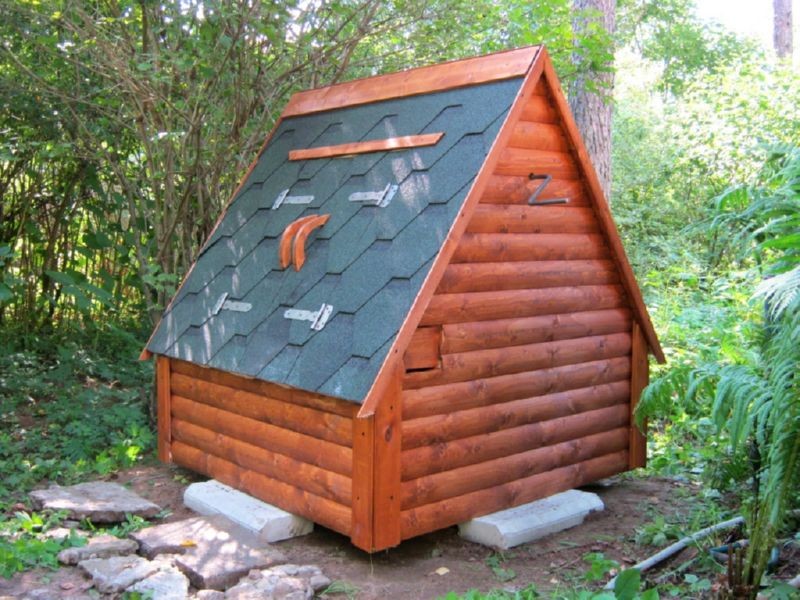
The following photo shows an open well house with a traditional design - a manual gate, a gable canopy and a log lining of the neck. If you still have logs from the construction of a log house or a bath, then this option is perfect. Also, the cylindrical concrete part can be finished with a bar folded in the form of a hexagon, or lined with stone.
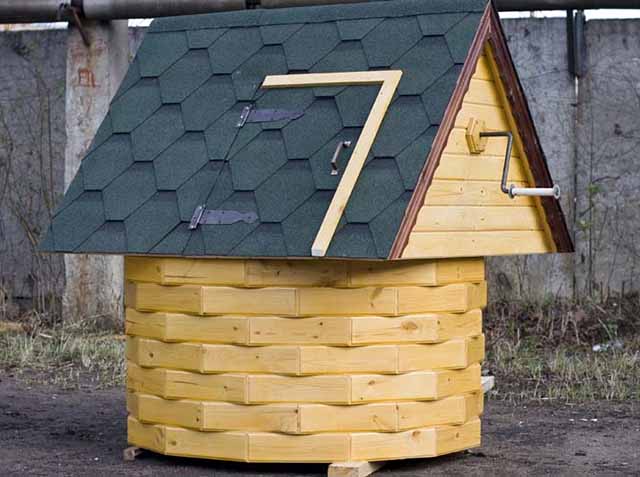
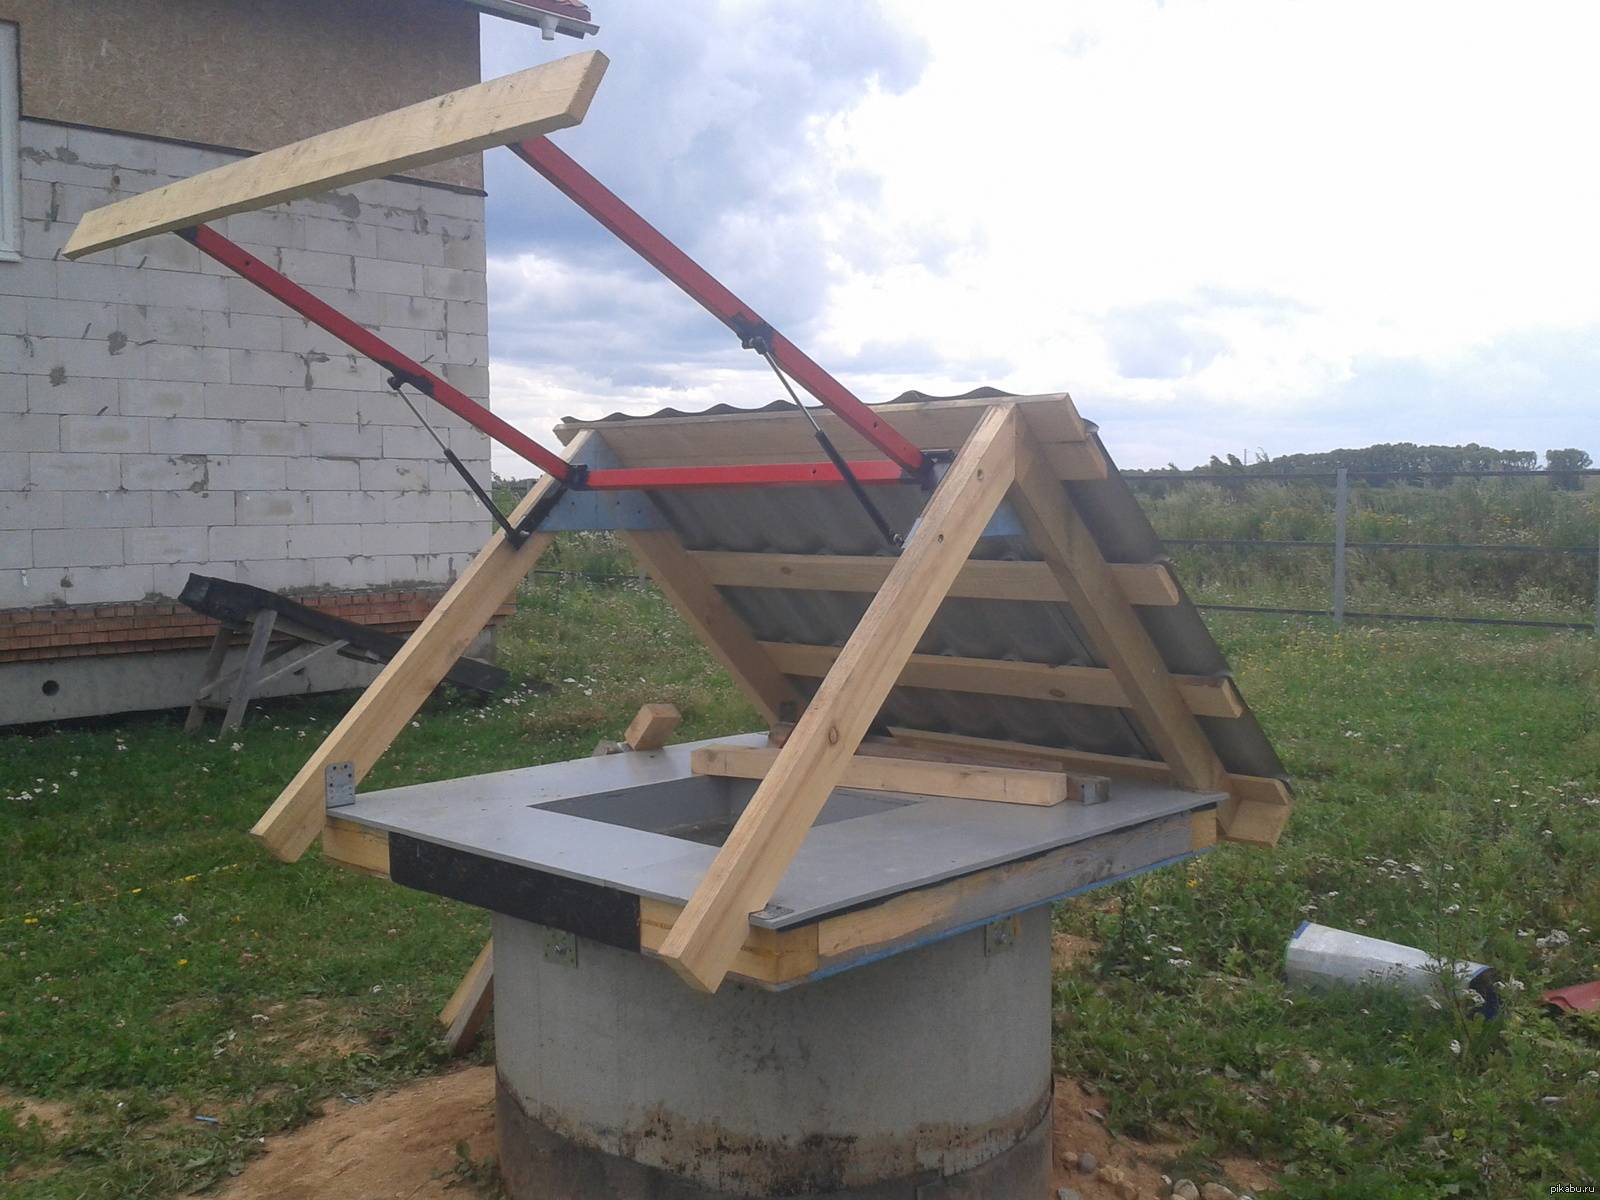
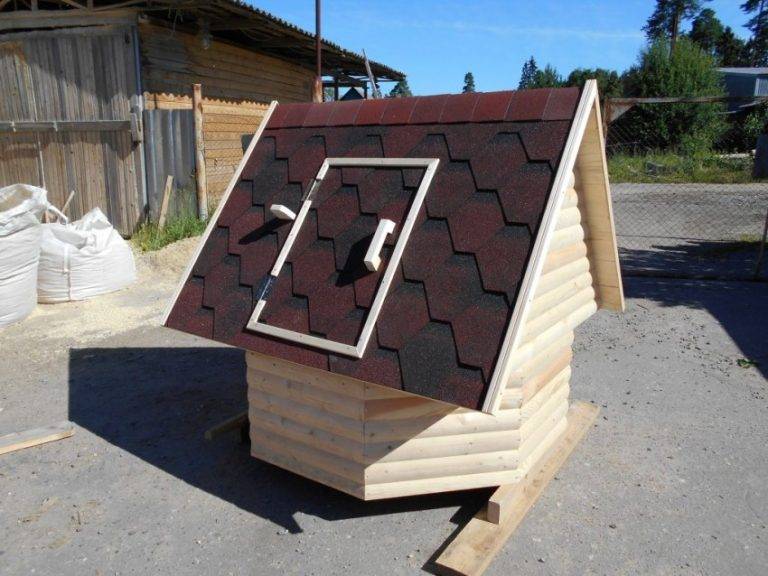
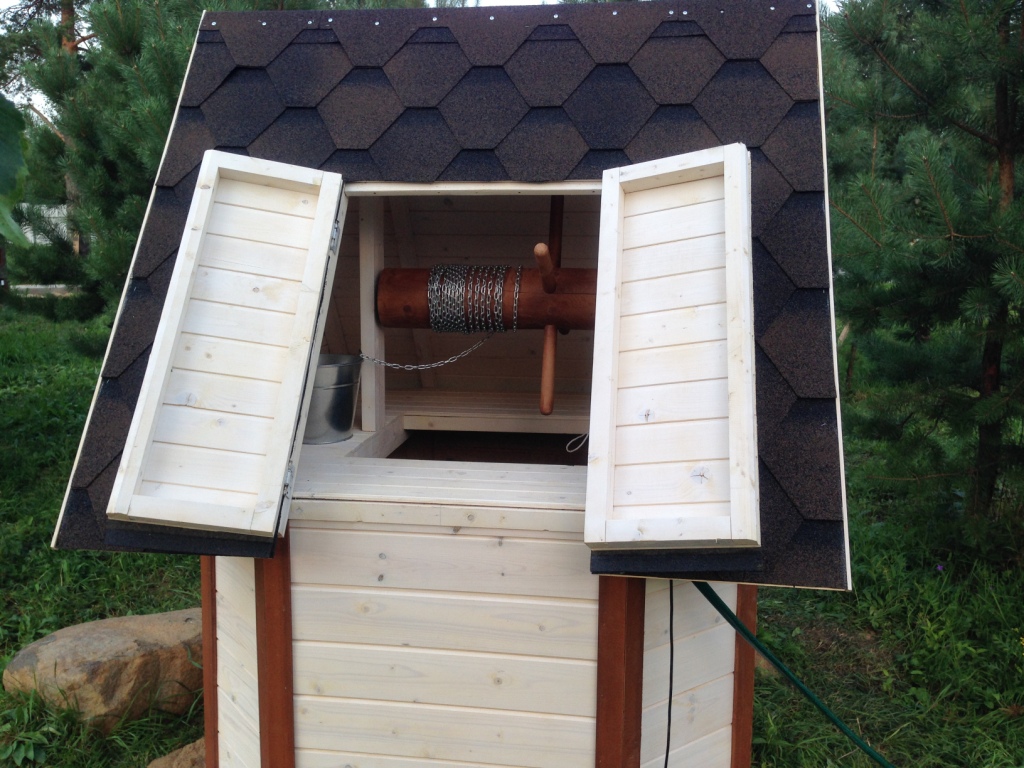
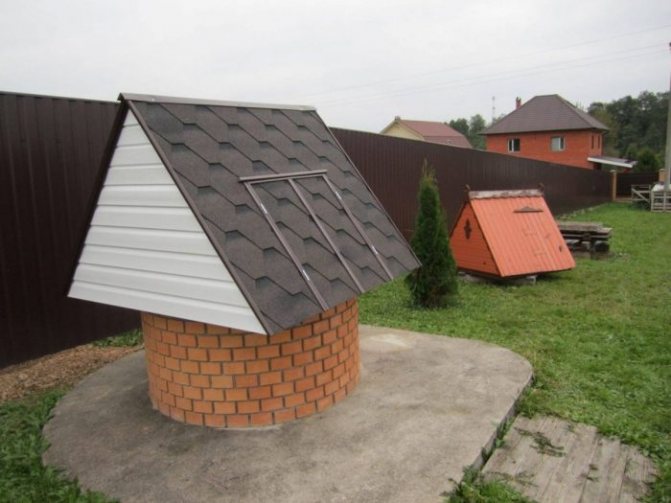
The third variety is a completely closed house with sloping doors built into one of the roof slopes. How to build it yourself, we will consider further. More diverse ideas for decorating country wells are shown in the following video:


Assembling an open well canopy
First you need to make a supporting part - a frame with uprights, shown below in the drawing. To fasten the gate, use a beam with a thickness of at least 50 mm or knock down several thin boards. Blocks for side mounting are made of the same lumber, and the frame is made of bars with a section of 4 cm.
Step by step the order of work looks like this:
- Cut the parts to the previously determined dimensions. At the ends of future racks, make cuts at an angle of 45 or 60 ° and 2 holes Ø25-30 mm for the gate shaft.
- Cut grooves across the thick timber, which will include the frame elements. The latter are also filed at the ends to connect into half a tree.
- Assemble the frame with self-tapping screws and nail the side planks to it.
- Attach the racks in the center of the frame, then install the ridge board.
- Carefully treat all wooden parts with an antiseptic compound, and after final assembly, paint.
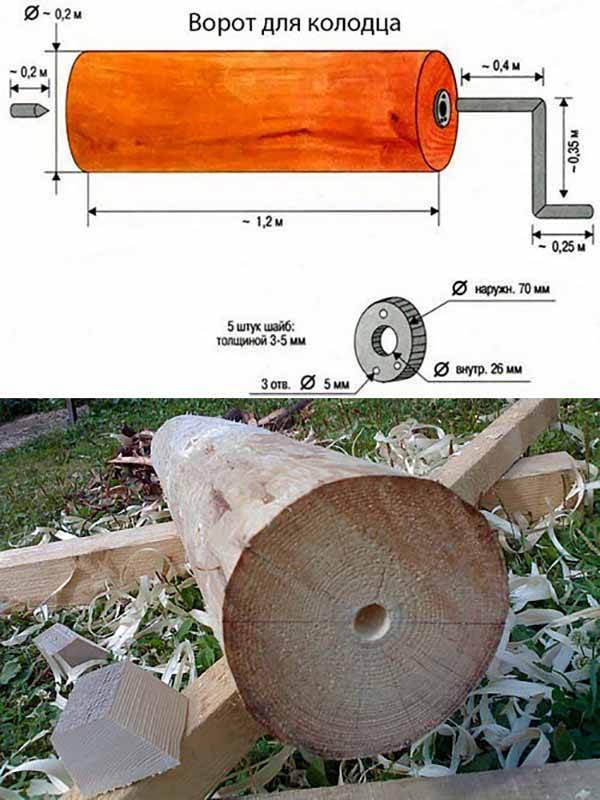
The structure is attached to the well in any convenient way - through bolts or anchors. The next step is to install the gate from a log Ø20-25 cm, as shown in the diagram. To do this, the tree needs to be sanded, and holes for the shaft should be made on the sides, sticking to the center. Make a collar from a steel bar with a diameter of 25 mm. Then put the drum, attaching the washers to the ends and inserting the shafts on both sides. To prevent the wood on the racks from wearing out, steel sleeves can be hammered into the holes.
To mount the canopy, put together a simple truss system with two beams and braces, as shown in the drawing. The angle of inclination and the length of the rafter legs are arbitrary, but in fact the roof must completely protect the well. And the last stage is the manufacture of flooring from boards nailed to the top of the frame and the installation of doors on ordinary hinges.
Conclusions and useful video on the topic
A video on how to build a cute house on a well:
A selection of interesting well design options in this video:
It will also be useful to look at personal experience in making a frame homemade well house.
Part 1:
Part 2:
Having at hand a minimum set of tools and improvised materials (remains after repair), you can build a wooden house on the well on your own. The main thing is to decide in advance on the shape and dimensions, draw up a drawing and you can proceed. If there is a desire to create something unique, you can decorate the finished house in an original way, using natural or artificial stone, tiles, sculptures, flowers, carved elements, and so on.
Do you have any questions about making a house with your own hands? Or want to share your building experience with other users? Write your comments, ask questions, share your experience and original photos of your own made house for a well - the feedback form is located below.


