- How to make indoor drainage around the house with your own hands
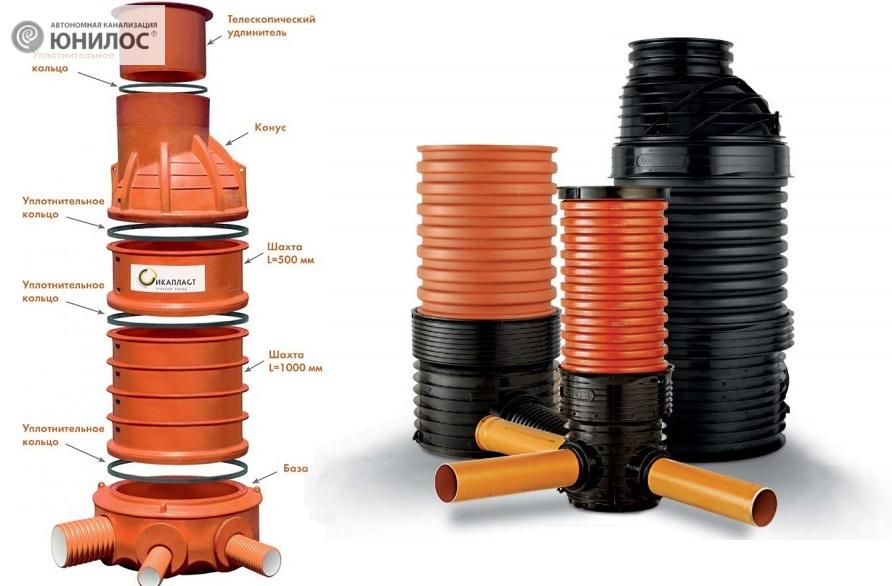
- A few words about the plastic drainage well
- Self-installation of drainage wells
- Installation of a storage well made of plastic
- Installation of a well from concrete rings
- Wall drainage device technology
- Installation requirements
- Materials and tools
- Work order
- Kinds
- The procedure for performing work during the construction of drainage systems
- How to build an open drainage system
- How is the construction of a closed drainage
- Purpose of drainage wells
- Modern drainage systems
- Use of geotextile
- Drainage without pipes
- Drainage with geotextile without crushed stone
- Drainage without gravel – Softrock
- Pumping water from a drainage well
- Video: drainage well with water draining outside the site
- Connecting a drain pipe to a well
- What material is a manhole drain made of?
- Advantages and disadvantages
- What materials are wells made of?
How to make indoor drainage around the house with your own hands
Such a device for protecting the house from water can be done independently even after the construction of the building is completed. First of all, you need to prepare working tools and all the necessary materials:
- shovels of two types (bayonet and shovel);
- spirit level for checking the slope;
- manual type rammer;
- a device for removing excess soil from the site (stretcher or wheelbarrow);
- roulette;
- geotextile;
- backfill for the moisture-collecting layer (granite crushed stone is best suited);
- sand;
- inspection and drainage wells;
- drainage pump;
- drains and fittings for their connection with each other and with wells.
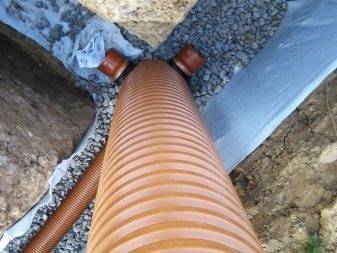
Pipes must be perforated. You can purchase ready-made drains, or make them yourself from an existing orange sewer pipe. Flexible products are not recommended. The diameter of the pipeline can be 70-150 mm.
The material is preferably plastic with high strength and wall resistance to stress. Moreover, the deeper the drains go, the higher this figure should be. You can take asbestos and ceramic products.
Some prefabricated drainage pipes are surrounded by an additional filter material, such as coconut fiber.
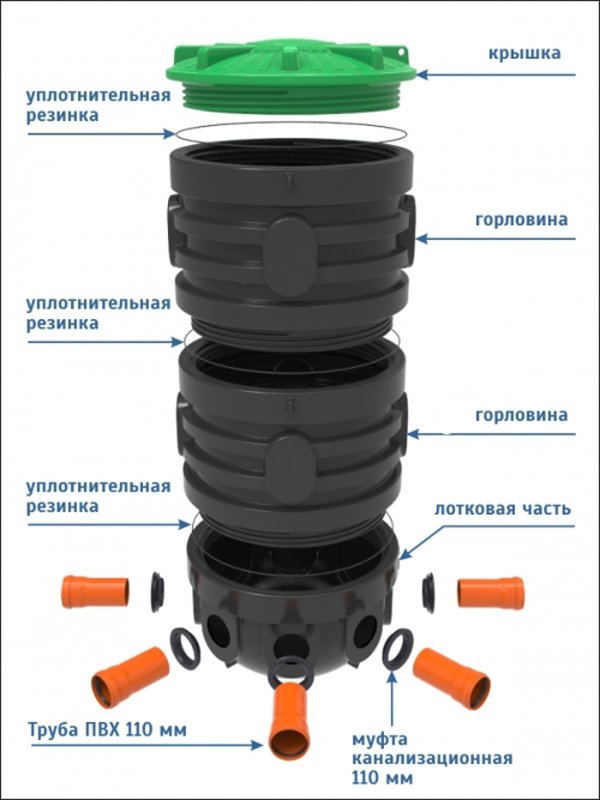
A plastic inspection and drainage well is bought ready-made or made independently from a thick-walled plastic pipe of large diameter. They will need to buy hatches.
After acquiring everything you need, they begin to measure, allowing you to mark the place where the drains and other elements of the drainage system will pass. The site is cleared of debris and the excavation and installation work begins. Let's look at how to properly lay the drainage pipe around the house:
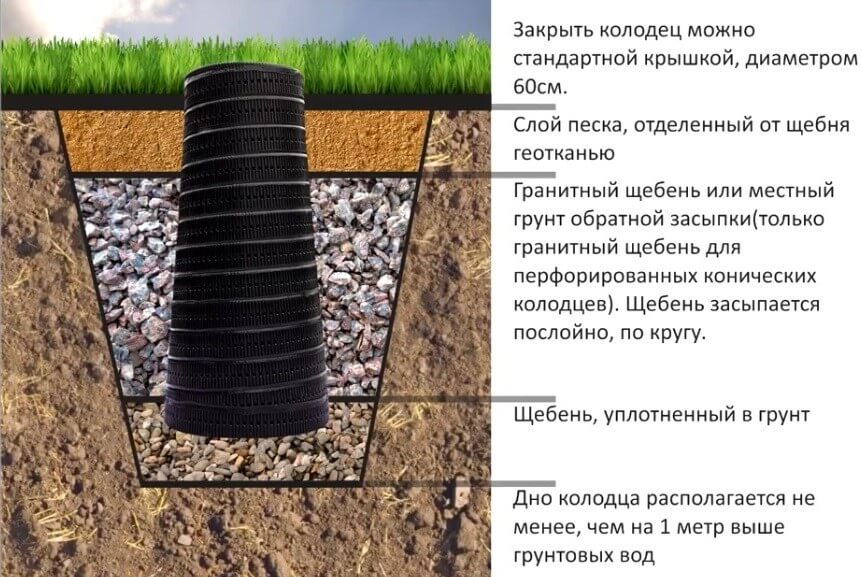
They dig trenches of the required depth, and in the right places pits for wells. Their width must be at least 20 cm larger than the diameter of the pipeline. During excavation, it is necessary to control compliance with the slope using a spirit level.
Prepare trenches and pits for wells. To do this, sand is poured to the bottom and carefully rammed.Don't forget to check slope compliance. The sand cushion should be 0.10 - 0.15 cm high. With a high groundwater level for plastic wells, in order to avoid their ascent, it is recommended to make a concrete base 10 cm thick, to which the container is attached during installation.
Geotextiles are laid in the ditch in such a way that the edges of the material extend beyond the upper boundaries of the trench.
Laying at the bottom of the drainage pipe. Drains are connected to each other. In this case, sockets or special fittings can be used. Pipes are inserted into the inlets of the wells, using rubber sealing rings.
A twenty-centimeter layer of crushed stone or other material is poured onto the drains. Don't forget the slope.
Close drains surrounded by rubble, geotextiles.
Drainage trenches are covered with a layer of sand, 10-20 cm thick
It is carefully rammed, and backfilled with soil from above. If the region is characterized by a large amount of precipitation, then storm system trays are installed above the drains on the sand.
Wells are backfilled and covered with manholes.
The drainage system is ready.
Video on how to make a drainage system around the house with your own hands:
A few words about the plastic drainage well
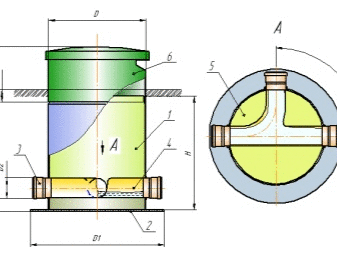
In its simplest form, it can be a container for collecting water. At the junction with the inlet pipeline, a valve must be installed to prevent the reverse flow of water. It is good if the container has a large diameter, for example, 80-100 cm.
From the drainage well, you can lay a non-perforated outlet pipeline to a ravine, filtration well or reservoir. Drainage from the collector can be done by gravity or by a drainage pump. Water from the well can be used for technical needs and irrigation.
Self-installation of drainage wells
Consider how to make a drainage well with your own hands. Depending on the type of well, the methods of its manufacture also differ.
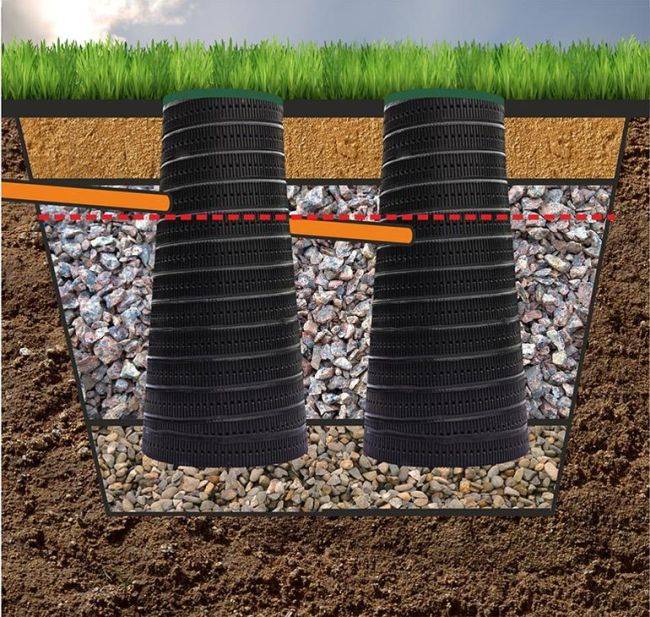
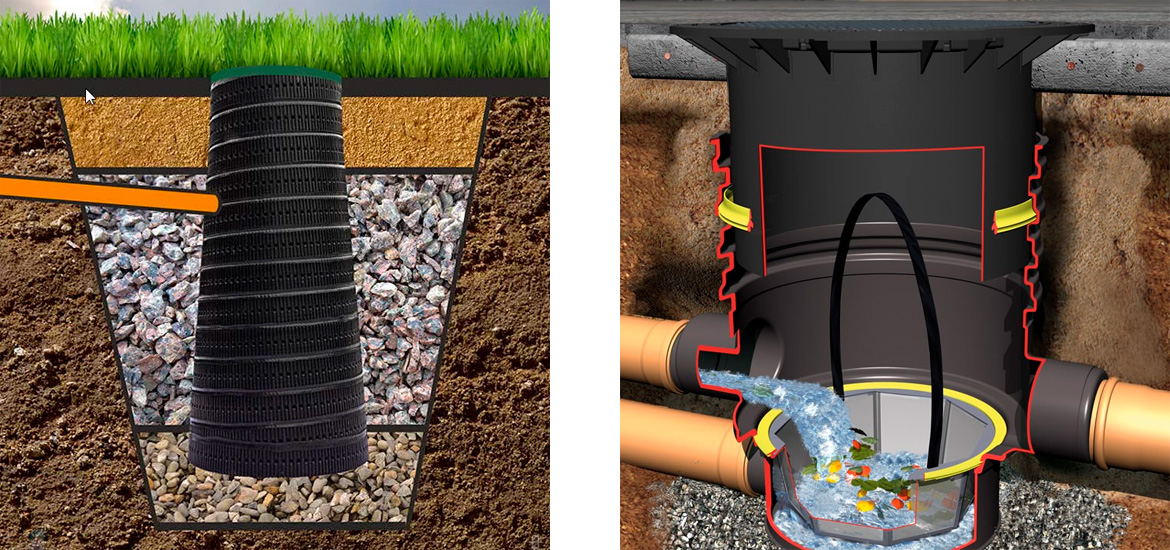
Installation of a storage well made of plastic
The material for the manufacture of such a well can be a corrugated plastic pipe of various sizes.
Important: It is necessary to install wells of this type below all drainage pipelines, ensuring unhindered flow of water to them. 1. A pit is being dug for a future tank
Digging a pit for a future reservoir
1. A pit is dug for the future tank.


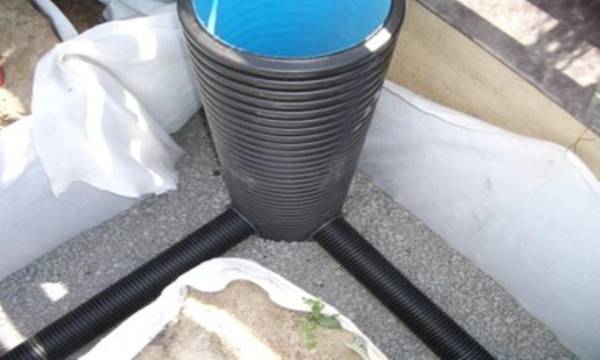

2. The required length of the corrugated pipe is measured, after which it is cut.
3. A sand cushion is poured into the pit or a solid concrete base is created.
4. A prepared container is installed in the prepared pit, which has branches for connecting pipes. Holes for inlet pipes can be made after the container has been installed in a permanent place. Many ready-made wells already have special taps, so connecting them to the drainage system is not difficult.
5. Using bituminous mastic, a plastic bottom is glued to the pipe.
6. Drainage pipes are introduced into the well and the cracks are sealed.
7. The gaps between the walls of the well and the pit are covered with rubble, sand or a mixture of sand and cement.
Tip: It is advisable to immediately place a drainage pump inside the well. through which water will be pumped out. You can also use a submersible pump, which will be lowered into the well manually, as needed, or a surface-type pump.
eight.From above, the storage tank is covered with a lid to prevent its contamination, and on this the installation of the drainage well can be considered completed.
The do-it-yourself inspection-type drainage well is made in a similar way, except for installing a pump. Also, there is no need to place it at the lowest point of the site.
Installation of a well from concrete rings
For the manufacture of concrete wells, it is better to use reinforced rings with a lock. If they are not available, then ordinary concrete products will do. The thicker they are, the longer they will last.
The work is carried out using special loading equipment in the following sequence:
1. A pit of the required size is being prepared.
2. Sand or gravel is poured into the bottom of the pit. If a filter container is made, then the thickness of the pillow must be at least half a meter.
3. The first ring with the bottom is placed on the pillow. If rings without a bottom are used, then a concrete screed is made from the bottom of the first ring.
4. The next rings are stacked on top of the previous ones. When installing concrete rings, the joints between them are sealed with concrete mortar or bituminous mastic.
5. When the last ring is installed, holes are made in it (if not already) for the entry of drainage pipes.
6. Pipes are led into the holes of the ring, after which all joints are carefully sealed.
7. A cover is installed on top of the well. You can use plastic or metal covers, as concrete products are too heavy.
8. The voids between the walls of the pit and concrete rings are filled with sand, gravel or crushed stone.
Arranging a drainage well is not a very difficult task. You can cope with such work yourself, especially when installing plastic products.
Wall drainage device technology
This system is most common in private housing construction. It is required for almost all objects, since it allows you to avoid trouble during heavy rainfall and in the spring, when the topsoil is abundantly moistened. In addition to the above joint venture, when laying it is also necessary to be guided by SNiP 3.07.03-85 * and SNiP 3.05.05-84.
Wall drainage can be done in two ways, the choice between which depends on the type of foundation:
- linear (according to the joint venture, the effective drainage depth is up to 4-5 m) along the perimeter of the blind area for tape bases;
- layered at the level of the sand cushion under the foundation slabs (according to the norms, they should also include a linear type).
The technology for the most common linear editing is discussed below.
Installation requirements
When designing a drainage system, it is necessary to take into account the requirements for its location:
- wall drainage laying depth - 30-50 cm below the base of the foundation;
- slope towards the watershed - 0.02 (for every meter 2 centimeters);
- the maximum distance from the outer edge of the foundation tape is 1 m.
Before laying pipes, determine the upper and lower points of the system. First, they are determined with the collection point (lower), from which water will be drained from the drainage. After determining this point, the top mark is calculated taking into account the length of the pipes and their required slope.


Materials and tools
To do the job you will need the following tools:
- bayonet and shovel;
- pick;
- electric or pneumatic perforator;
- building level and tape measure;
- wheelbarrow or trolley for transporting soil;
- manual rammer or vibrating plate.
To equip the drainage system, you will also need materials:
- pipes;
- crushed stone or gravel;
- sand;
- geotextile;
- polypropylene rope.
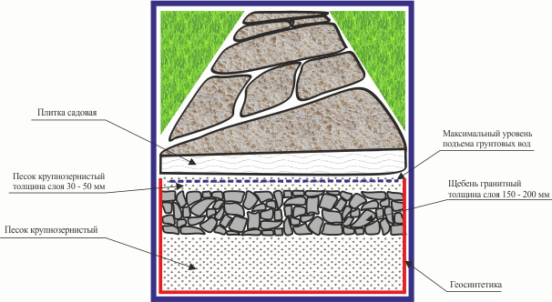
Pipes for carrying out drainage measures according to regulatory documents can be made of asbestos cement, ceramics or plastic. Crushed stone should be selected with a fraction (grain) size of 20-40 mm. Sand is used the same as for backfilling (medium-grained or coarse-grained).
Work order
The arrangement of drainage is carried out in stages:
- Basement wall waterproofing. Most often, bitumen-based mastic is used. It is applied in several layers, if necessary, reinforced with fiberglass. For foundations with a laying depth of up to 3 m, waterproofing with a total thickness of 2 mm is sufficient; for deeper laying, the total thickness of the bitumen layers is increased to 4 mm.
- Excavation of a trench for pipes, taking into account the requirements for the location.
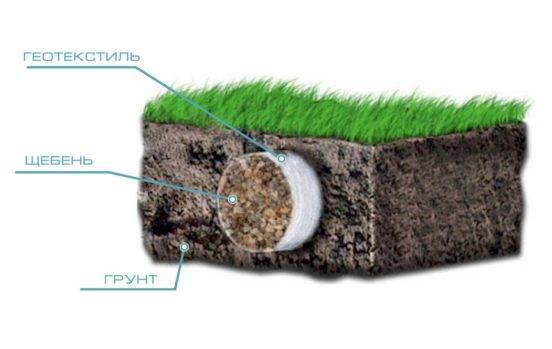
- At the bottom of the trench, a sand cushion is laid, on top of which geotextiles are spread. The width of the web should be such that it is possible to wrap the pipe without gaps.
- A layer of crushed stone 10 cm thick (or gravel) is laid on the geotextile, pipes are laid on top of the crushed stone with the necessary slope for the gravity-fed operation of the system.
- The pipes are connected. At each turn, a vertical pipe section (manhole) with a lid is provided. This is required for checking and flushing pipes.
- Crushed stone or gravel is poured over the pipes, the layer thickness is 15-20 cm. The bulk material is wrapped in geotextile with an overlap.
- Perform backfilling with sand with layer-by-layer tamping.Compaction can be carried out with a vibrating plate or a manual rammer with moisture.
Some Tips
For proper work, it is necessary to take into account:
- drainage holes in pipes must be smaller than the minimum particle size of crushed stone or gravel;
- after wrapping with geotextile, it is additionally fixed with a polypropylene rope, pieces of rope must be laid under the geotextile in advance;
- with a large number of turns, the norms are allowed to provide manholes through one;
- with independent construction, you can not perform hydraulic calculations, and choose the diameter of the drainage pipes in the range of 110-200 mm;
- draining water from a drainage well (collector) can be performed into a storm sewer or into an open area after filtering through a layer of crushed stone (gravel).
With a careful approach to drainage at the construction stage, it will not cause problems during operation and will last for decades.
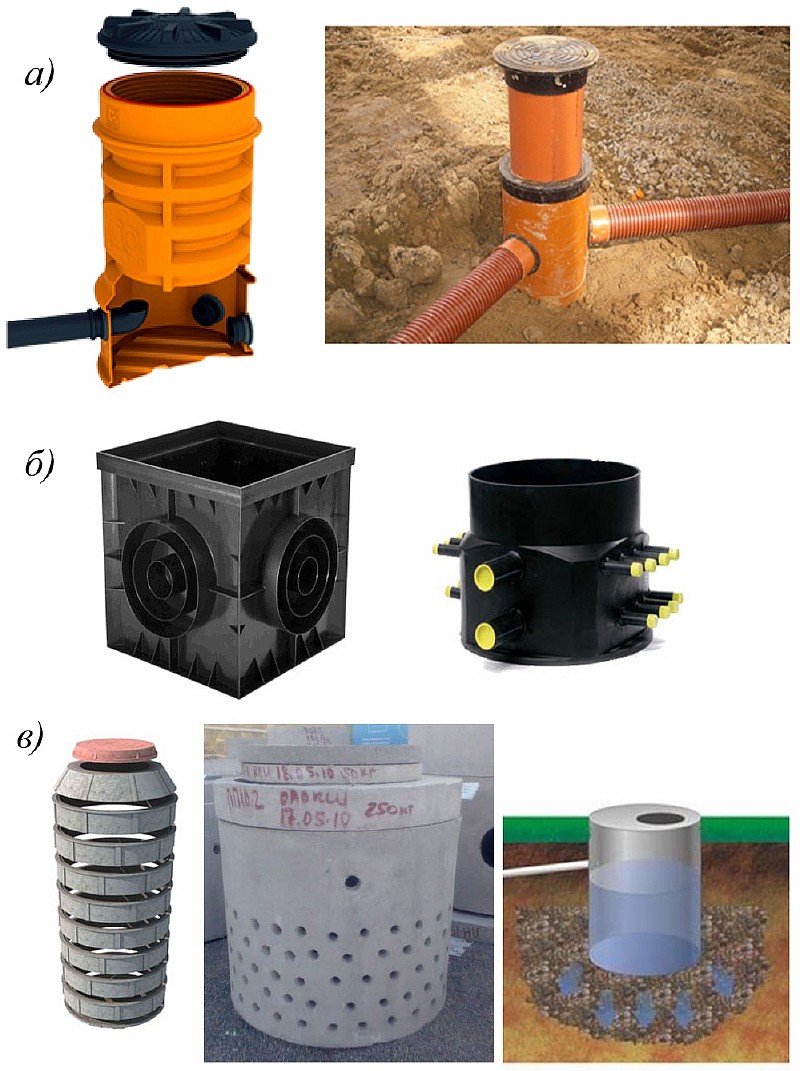
Kinds
The classification of manholes is based on two main features, such as:
- main function and place of installation;
- manufacturing material.
On the basis of the first factor, linear, nodal, rotary and differential types are distinguished, each of which is equally applicable to both household and industrial communication systems, which makes it possible to install any of the selected types on your suburban area. Linear manholes must be organized on rather long sections of the terrain (from 35 to 300 meters). Moreover, according to SNiP, they are necessary, even if there are no prerequisites for the occurrence of accidents on the site.
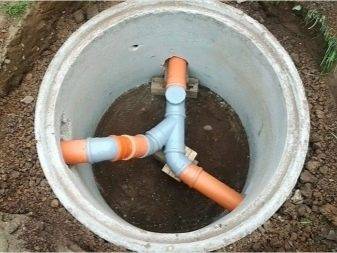
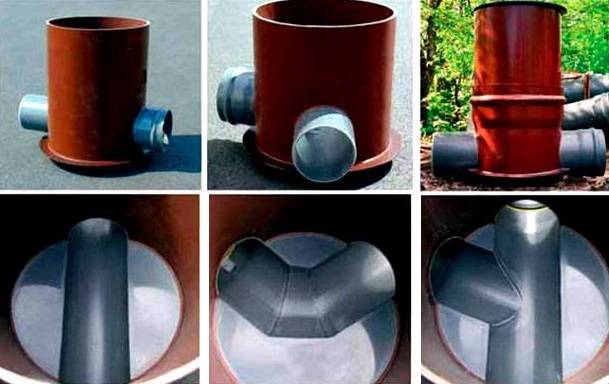
At the intersection of two or more pipelines, it is necessary to install nodal models of wells.Structurally, this type is distinguished by the presence of additional nozzles (holes), which are predominantly at the same level. If you need to increase or decrease the flow, you should use the differential type of manholes, where the nozzles are located at different levels. And also differential wells are used to lower the flow level. Despite the fact that the designs and functionality of wells seem different, all types are very similar. At first, wells were made of stone or brick, but later they came to use practical and lighter concrete analogues, and the most modern variations are made from polymer.
The procedure for performing work during the construction of drainage systems
In order to successfully build drainage in a summer cottage, you need to be guided by the following general considerations:
- The construction of a closed drainage system requires a large amount of earthwork. In this regard, it is necessary to build drainage even before trees are planted on the site, and even better - before the foundation of buildings is laid.
- Before work begins, a detailed system plan must be drawn up. To do this, it is necessary to study the terrain, determine the highest and lowest points on the site, set the value of the required slope.
- When designing a closed system, revision wells should be included in the plan to ensure the possibility of servicing the drainage system.
- When laying a drainage pipeline, the recommended slope is from two to ten millimeters per meter of pipe.
How to build an open drainage system
Building an open drainage system is a much easier task than laying a closed drainage system, as it does not require digging deep trenches. When laying a network of trenches, a plan for their location is first drawn up. Then trenches are dug. Usually, the main ditches are laid along the perimeter of the site, and the auxiliary ditches are laid from the places of the greatest accumulation of water. In this case, the depth of the trench should be from fifty to seventy centimeters, the width should be about half a meter. Auxiliary trenches should slope towards the main ditches, and main trenches should slope towards the catchment. The walls of the trench should not be vertical, but beveled. The angle of inclination in this case should be from twenty-five to thirty degrees.
The further course of work depends on which system is being built, filling or tray. During the construction of the backfill system, the ditch is first covered with rubble - 2-thirds of the depth is large, and then shallow. Sod is laid on top of the gravel. To prevent silting of crushed stone, it is desirable to cover it with geotextile.
The construction of flume drainage includes the following steps:
- Laying trenches subject to the required slope.
- Filling the bottom of the ditches with a ten-centimeter layer of sand, which must then be compacted tightly.
- Installation of trays and sand traps, which are plastic parts that prevent sand and debris from entering the drainage, and thereby protecting the system from silting.
- Closing the ditches from above with gratings that prevent clogging of the trenches with fallen leaves and various debris, and also perform an aesthetic function.
How is the construction of a closed drainage
The construction of a closed-type drainage system consists of the following steps:
- Studying the relief of the territory of the site using a level and a laser rangefinder, and building a plan for the drainage network. If surveying instruments are not available, then you should wait for heavy rain and observe the movement of rainwater flows.
- Laying trenches under the drainage pipeline.
- Backfilling the bottom of the trenches with a layer of sand seven to ten centimeters thick, followed by tamping.
- Laying geotextiles in a trench, while the edges of the fabric should protrude beyond the sides of the ditch.
- Laying a twenty-centimeter layer of gravel on top of the geotextile, which serves as a filter. In this case, limestone gravel should not be used, since this can form a salt marsh.
- Laying pipes on a layer of gravel. In this case, their holes should be directed downwards.
- Filling gravel on top of the pipes and closing it on top with the edges of a geotextile that will filter water from suspended particles, thereby preventing silting of the system.
- Burying ditches with soil, on top of which sod can be laid.
The drainage system should end with a well for collecting water, which must be dug at the lowest point of the site. From this well, water can be discharged into a natural reservoir, into a ravine, or into a general storm drain, if there is one in this settlement.
A properly constructed drainage system will prevent problems associated with excessive dampness, which is why its construction is mandatory in areas with wet soil.
And those owners of summer cottages who are not sure that they can cope with the construction of drainage on their own should contact specialists and pay the required amount, but you should not try to save on such an important functional element of a summer cottage as drainage
Well, that's all guys - I hope I was able to give you an answer to the question: "How to make drainage on the site with your own hands". All success!
Purpose of drainage wells
Small crops, drying of fruit trees, washing away the foundation - this is all an excess of moisture in the soil. The roots of the tree, which have stood in the spring floods in the water, rot, the tree dies. Summer rains do not feed moisture, but oversaturate the fertile layer, which means that there is no need to wait for the harvest. Experts identify three reasons for the oversaturation of the earth with moisture:


- The aquifer is high up. In this case, the drainage system will lower the level, due to which the spring water will go deeper much faster.
- Heavy soils. For example, if there is loam in the composition of the fruitful layer, then water cannot leave quickly, drainage wells will allow you to remove excess moisture from the site, which will ensure health and strength to the root system.
- Intentional or unintentional violation of the water balance by the owners of the site. This happens in case of overload with buildings, playgrounds and recreation areas. The result is that natural runoff can no longer cope with water flows, and freer, undeveloped areas receive much more moisture than they should. Signs: the rise of the roots above the ground, the decaying root system, as it were, is pushed above the surface in order to receive the necessary amount of oxygen.If, after winter frosts, partial death of bushes and trees is observed in spring, this also signals an excess of moisture in the soil and the need for drainage work. For this, drainage wells are used.
Modern drainage systems
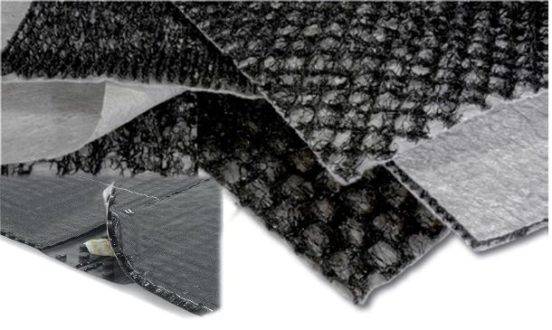
Life does not stand still, and there are things designed to facilitate the creation of drainage. For example, geotextiles of different configurations.
Use of geotextile
Any geotextile will make it possible to do without pipe-drains when installing deep and closed drainage. This design is called "soft drainage".
Drainage without pipes
The name "soft drainage" means that no pipe is used. Trenches are dug, a waterproofing layer is laid on the bottom, then geotextiles, crushed stone is poured on it, which is then closed by the edges of the panel.

Scheme of soft drainage with and without soil and plants
Such drainage is usually done under paved paths and platforms (when using rigid drainage, the load can damage the pipe).
Soft drainage under the walkway is a great landscaping solution; gratings are missing
Although you can pour soil on top and plant plants. But even this type of drainage should be connected either to collectors and a well, or to a reservoir to remove water.
Lawn grass is perfectly planted on soft drainage
You can do without draining gravel.
Drainage with geotextile without crushed stone
For drainage without crushed stone, a three-layer geotextile is used: a three-dimensional mesh between the layers of geotextile, a conditional replacement for draining natural materials - crushed stone and sand. They just turn around the drains.
Drainage geocomposite is an excellent replacement for crushed stone
Drainage without gravel – Softrock
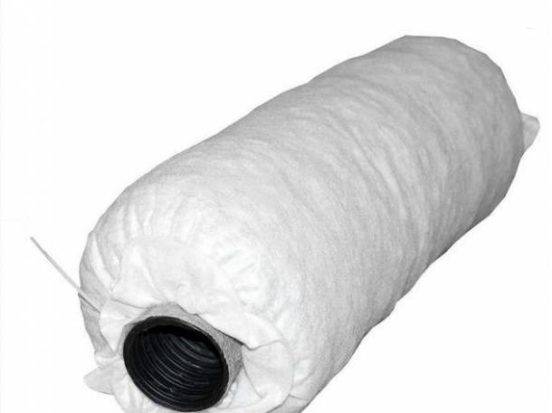
This is a system that includes a flexible corrugated perforated pipe wrapped in geofabric with granules of a synthetic polystyrene foam filter in a cover, the length in the block is 3 meters.
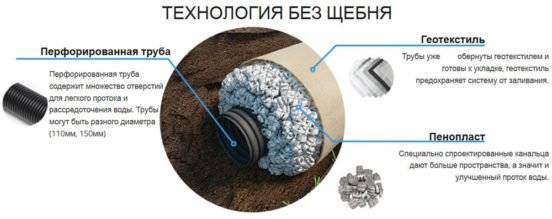
A pipe in a casing made of geotextile and drainage polystyrene foam is a very convenient solution for self-construction of a drainage system
It is light (about 15 kilograms), and one person can handle it. Of course, it is more expensive than a regular perforated pipe. But given that a three-meter piece saves more than a ton of rubble, this is a sound choice. The kit includes couplings, plugs and tees.
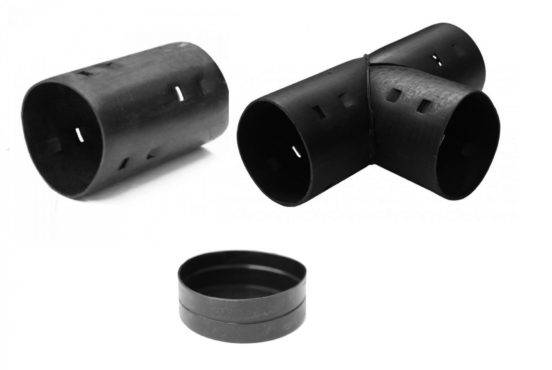
Fittings in the kit for the drainage system: coupling, plug, tee
It is very easy to mount, like a construction kit, fit into trenches, fill it with soil - and your drainage is ready.

Installation of the Softrock system is very easy

Softrock laying method on the advertising picture
Softrock pipe - such a funny-looking system, but it works so well
Pumping water from a drainage well
It is optimal if the drainage well is directly connected to the central sewerage system, but in most cases this cannot be done in summer cottages and suburban areas.
The easiest way to drain water is to bring the sewer pipe outside the site. As the well shaft fills, there will be a natural flow of water into a ravine or reservoir. Before installing the drain, you should contact your local water utility and clarify whether it is possible to mount such a discharge point without the consent of the authorities.


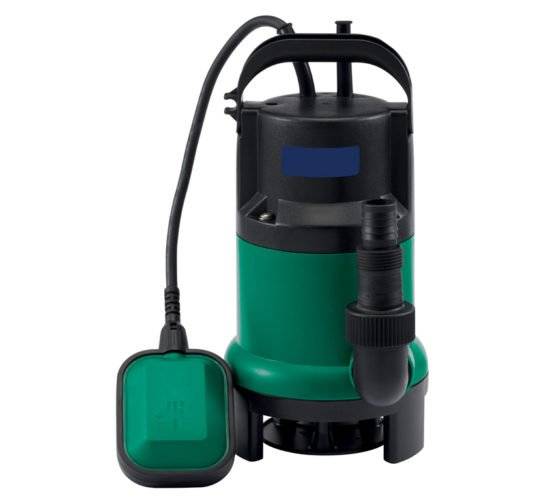
A submersible float pump is used to pump water from storage drainage wells.
A submersible pump is used to force the pumping of water from the well. The unit is connected to the central network, and a special float sensor on a short cable monitors the filling level.
The throughput of the pump depends on its power and the contamination of the wastewater. If the drainage system collects water from storm sewers, large particles of debris up to 50 mm in size may be present in it. This is also taken into account when choosing a pump. To pump out water collected exclusively from the ground, a pump with a permissible solid particle diameter of 5–7 mm is sufficient.
During the operation of the drainage well, the bottom should be washed out with a strong pressure of clean water. As a rule, this is done when the water is completely pumped out of the tank once a month.
Video: drainage well with water draining outside the site
With the proper arrangement of the drainage system, you can not worry about the safety of the materials used for the construction and sheathing of the building, and the crops growing on the site will receive the amount of moisture necessary for their normal functioning.
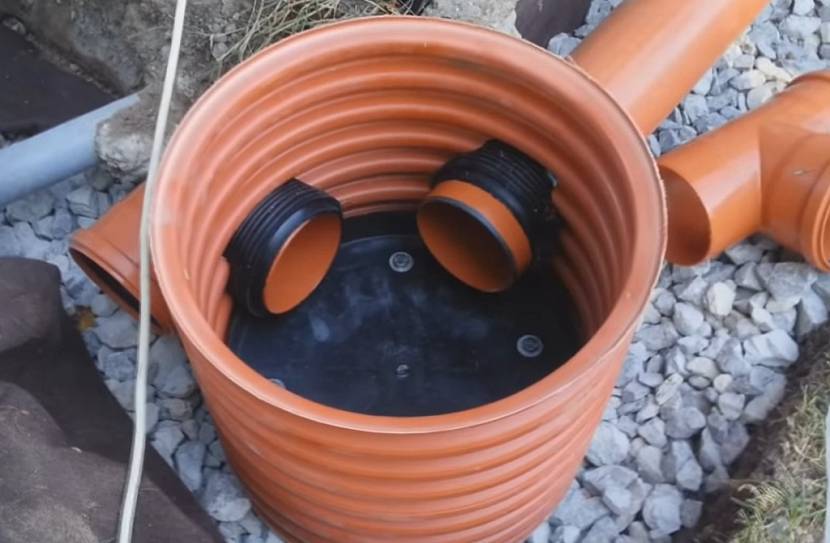
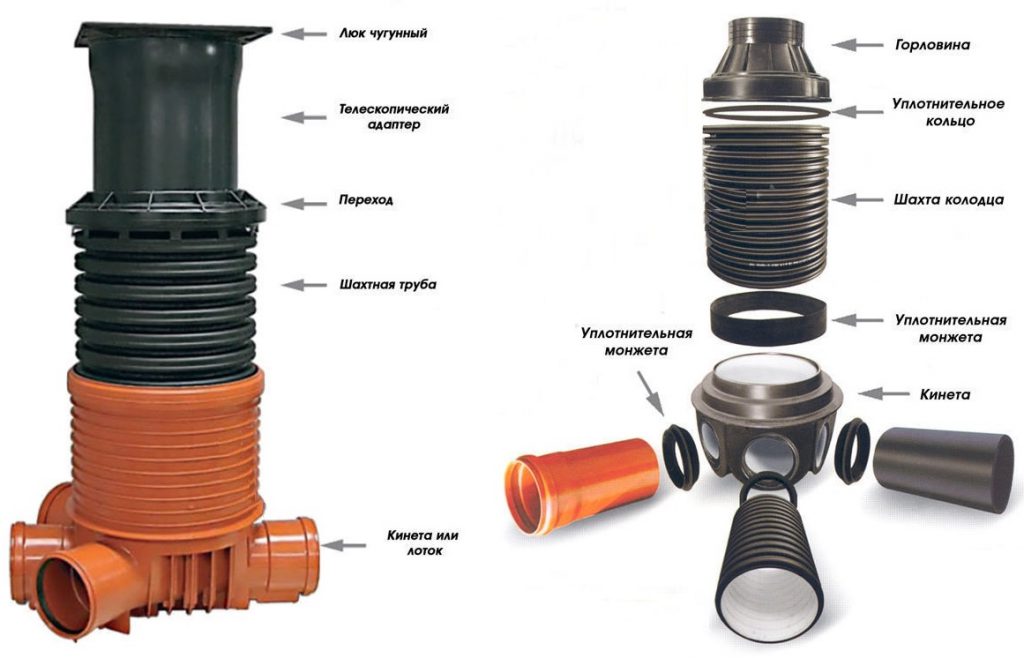
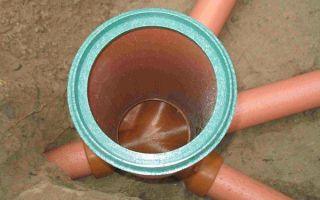
Connecting a drain pipe to a well
The connection of plastic pipes with a drainage well occurs when the drainage route turns, in linear sections longer than 15 m, as well as when the drain is connected to a storage or filtering well.
To connect plastic pipes, sealing cuffs of the appropriate diameter are used. As mentioned above, the modular plastic well is assembled using sealing cuffs and rings.
If necessary, the pipe connection can be made at the bottom of the well anywhere. To do this, you will need to do the following:
- Based on the diameter of the drainage pipe, a sealing sleeve and a plastic sleeve are selected. To cut a hole in the pipe, you will need an electric drill with a crown nozzle of the desired diameter.
-
A rubber sealing sleeve is installed in the hole made. Next, a waterproof sealant is applied to the coupling and a plastic adapter sleeve is installed.
Before docking, the surface of the rubber coupling must be treated with silicone sealant.
- A prepared well with a hole is lowered into a pre-dug shaft. Silicone grease must be applied to the inner surface of the coupling and the pipe must be joined to the prepared hole.
- To backfill the well shaft, quarry sand or previously removed soil is used. Every 15–20 cm, the covered soil is compacted. During installation, the verticality of the housing must be controlled. After backfilling, a plastic cover is put on the top of the well.
What material is a manhole drain made of?
Modern industry offers ready-made options for manholes. They can be made of concrete, polymer or composites. Each has its own advantages and disadvantages.
Concrete structures are relatively inexpensive, they are durable and reliable. More suitable for industrial scale, as they are installed using special equipment.
Composite and polymer options are becoming increasingly popular. This is facilitated by their low weight and a variety of sizes that are suitable for any pipeline system, tightness and ease of installation.
In addition, they have a fairly long service life, which is at least 50 years.At the same time, their main disadvantage is their rather high cost and insufficient stability, especially compared to traditional concrete.
An observation structure to the drainage system can be done independently. The easiest and most affordable option is to build it out of brick. However, this will require quite a lot of strength, knowledge and skills. The main advantage of a brick structure is the ability to independently adjust the required diameter, depending on the circumstances and the pipes laid.
Advantages and disadvantages
The active use of plastic tanks is due to a number of advantages. These include:
- Simplicity and speed of installation. There is no need for special equipment.
- The pliability of the material. If necessary, the pipe can be cut to the desired length with a regular hacksaw.
- Minor weight. You can transfer and install structural elements manually.
- Long period of operation. The material is not afraid of corrosion and destruction.
- Resistant to small rodents and insects.
- Lack of environment for the formation of fungi.
- Resistance to temperature changes.
- Good resistance to chemical and aggressive components. Not afraid of oxidation.
- Sufficiently high resistance to stress.
- Possibility of quick dismantling.
- Budget cost and the possibility of free purchase in the distribution network.
Among the main disadvantages, one can note the lower strength compared to reinforced concrete structures. As a result, there is a need to select a tank for the type of soil on which the plastic structure will be installed.
What materials are wells made of?
Drainage wells can be made from different materials that differ in their properties:
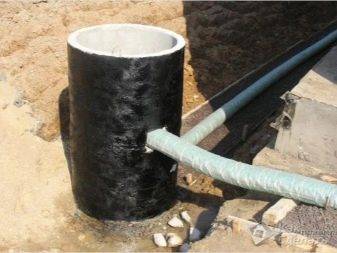
1. Concrete.This is a traditional material for the manufacture of drainage wells. The easiest way is to mount the structure of concrete rings, installed one on top of the other. The walls and bottom can also be filled with concrete, especially if the drainage well is made by hand. To do this, it will be necessary to design the formwork. Concrete is a durable and strong material, but with prolonged contact with water, it begins to gradually crumble and crack.
2. Brick. They lay out the walls of the well, the bottom of which is poured with concrete. Brick is less durable than concrete, but it is convenient to lay it even alone. It is rarely used for the manufacture of drainage systems.
3. Plastic (polymer) wells. They are increasingly replacing other materials used in drainage systems. Plastic containers have several advantages:


- resistance to extreme temperatures. They can be operated in the temperature range of -60 + 50 degrees;
- plastic is a light material, so the installation of such a structure can be carried out independently, without the involvement of construction equipment;
- installing a drainage well made of plastic is quick and easy. If necessary, the material is easily cut to the desired size, which cannot be done with concrete rings;
- inert to various aggressive substances;
- they are not afraid of corrosion and oxidation;
- have strength comparable to metal and concrete;
- perfectly tolerate mechanical and hydraulic loads;
- plastic containers do not rot, are not damaged by rodents and insects;
- plastic containers can be placed at any depth and in soil with any structure;
- The life of a plastic tank is about 50 years.
Most often, corrugated pipes of various diameters made of polyvinyl chloride are used as drainage tanks. A drainage inspection well, or having another purpose, made of such pipes, has sufficient rigidity to resist being pushed out of the ground by groundwater.
If you are looking for the best dry closets for home - prices, reviews and features of their operation are described in our separate material.
And we described the characteristics of the Brook pump here. It can perfectly cope with the pumping of water from storage tanks.


