- Installing a bidet faucet
- Dimensions of fasteners when drilling
- What are bidets and their design features
- Technology for connecting a floor bidet
- Installation of a floor bidet
- Bidet attachment
- Connecting a bidet to the water supply
- Connecting a bidet to the sewer
- Preparatory work
- Options for the location of the bidet in the bathrooms of various layouts in the photo
- Self-installation of a hygienic shower
- Installation height
- wall mount
- Installing a shower on a sink
- Connecting a hybrid with a bidet function
- How to make your own out of the toilet
- Bidet and toilet faucet with the same function
- pros
- Minuses
- Types of bidets combined with a toilet
- According to the method of installation - floor, hinged, corner
- By type of material
- By drain system
- By bowl shape and design
- By control method - electronic bidet toilets and devices with mechanical control
- Detailed characteristics of mixers
- Features of bidet taps
- Design varieties of devices
- Professional skills and features of our masters
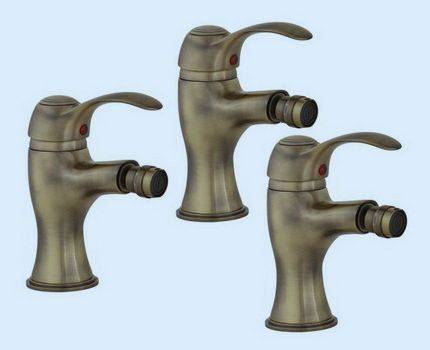
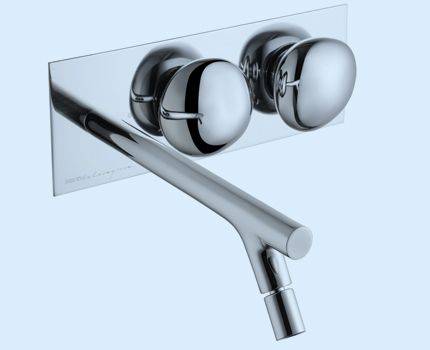
Installing a bidet faucet
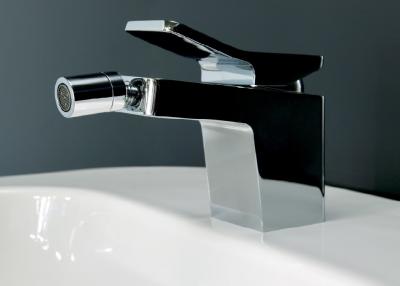
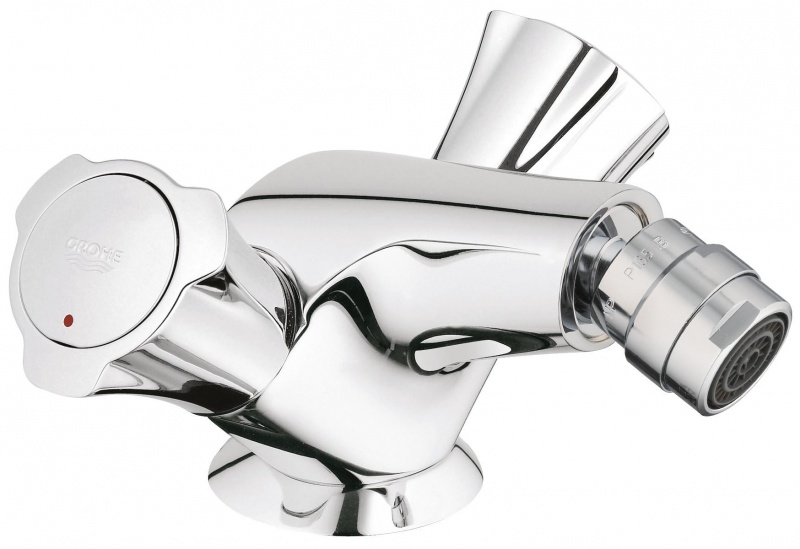
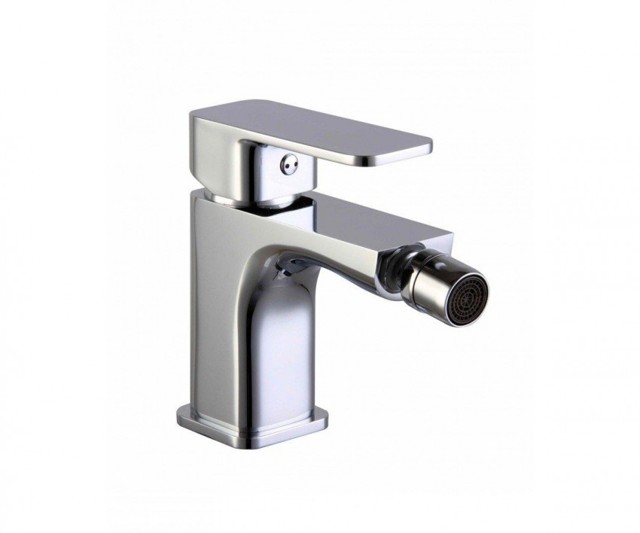
Such a faucet, unlike its analogue for a washbasin, is equipped with a special floating head. The angle of rotation of this part is 360 degrees. It has a lever that opens and closes the drain from the back.
Allocate contactless, mixers with one lever and two-valve. In touch or non-contact models, a photocell is installed. Today, a wide range of high-quality mixers are on sale, which are safe and easy to use.
Bidet mixer
With them, it is easy to adjust the desired water temperature, strength and direction of flow. Step-by-step installation instructions include the following steps:
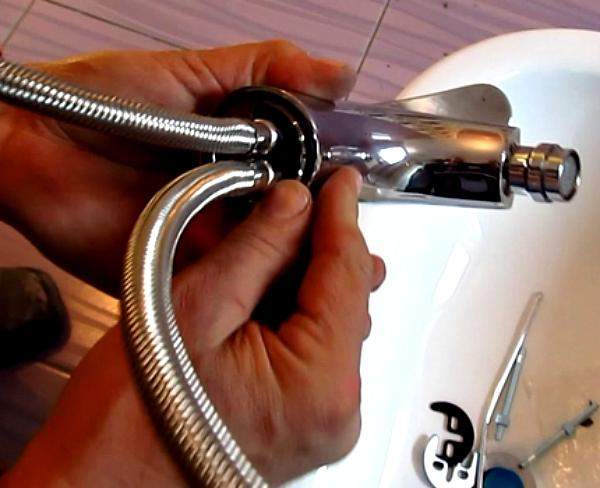
- Collect all the elements of the mixer and install it in the hole of the flexible rubber hose. Tighten the parts should be effortless, because otherwise you can accidentally break the tightness of the fastener, and this, in turn, will lead to leakage.
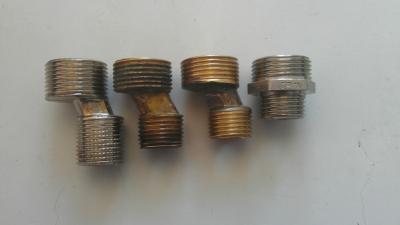
- The faucet is attached to the bidet by hand. In this case, special studs for plumbing products and a flat screwdriver are used.
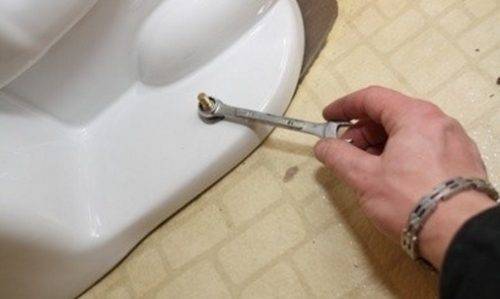
- After that level the position of the mixer. It must be placed strictly in the center and securely fastened with a wrench.
- In conclusion, it is necessary to additionally cover with sealant all areas of the connection of structural elements.
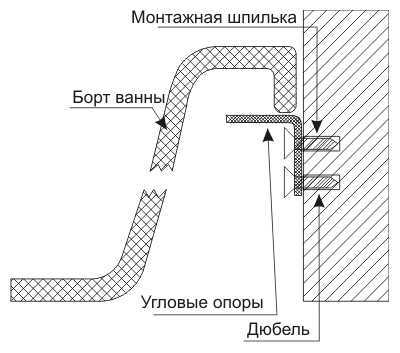
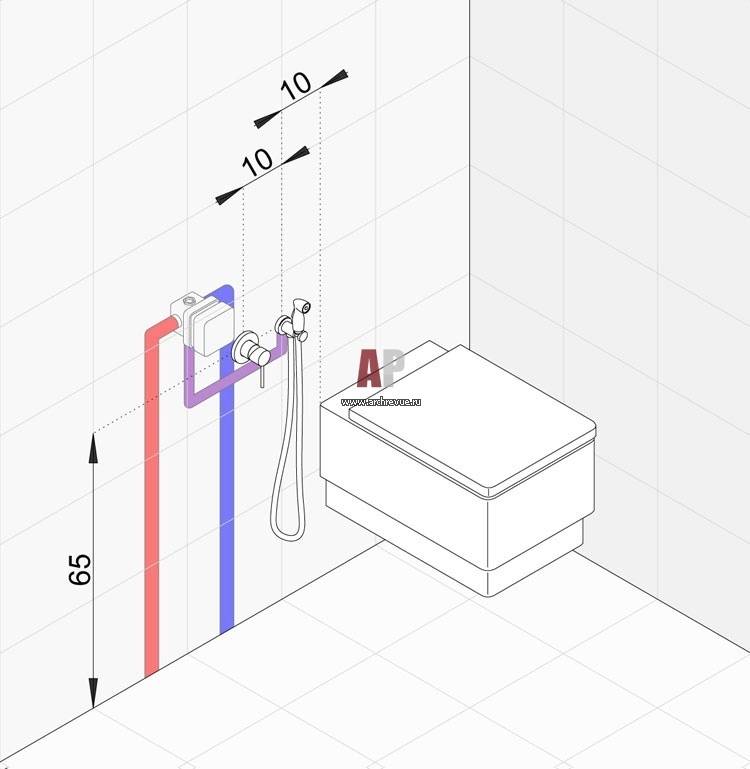
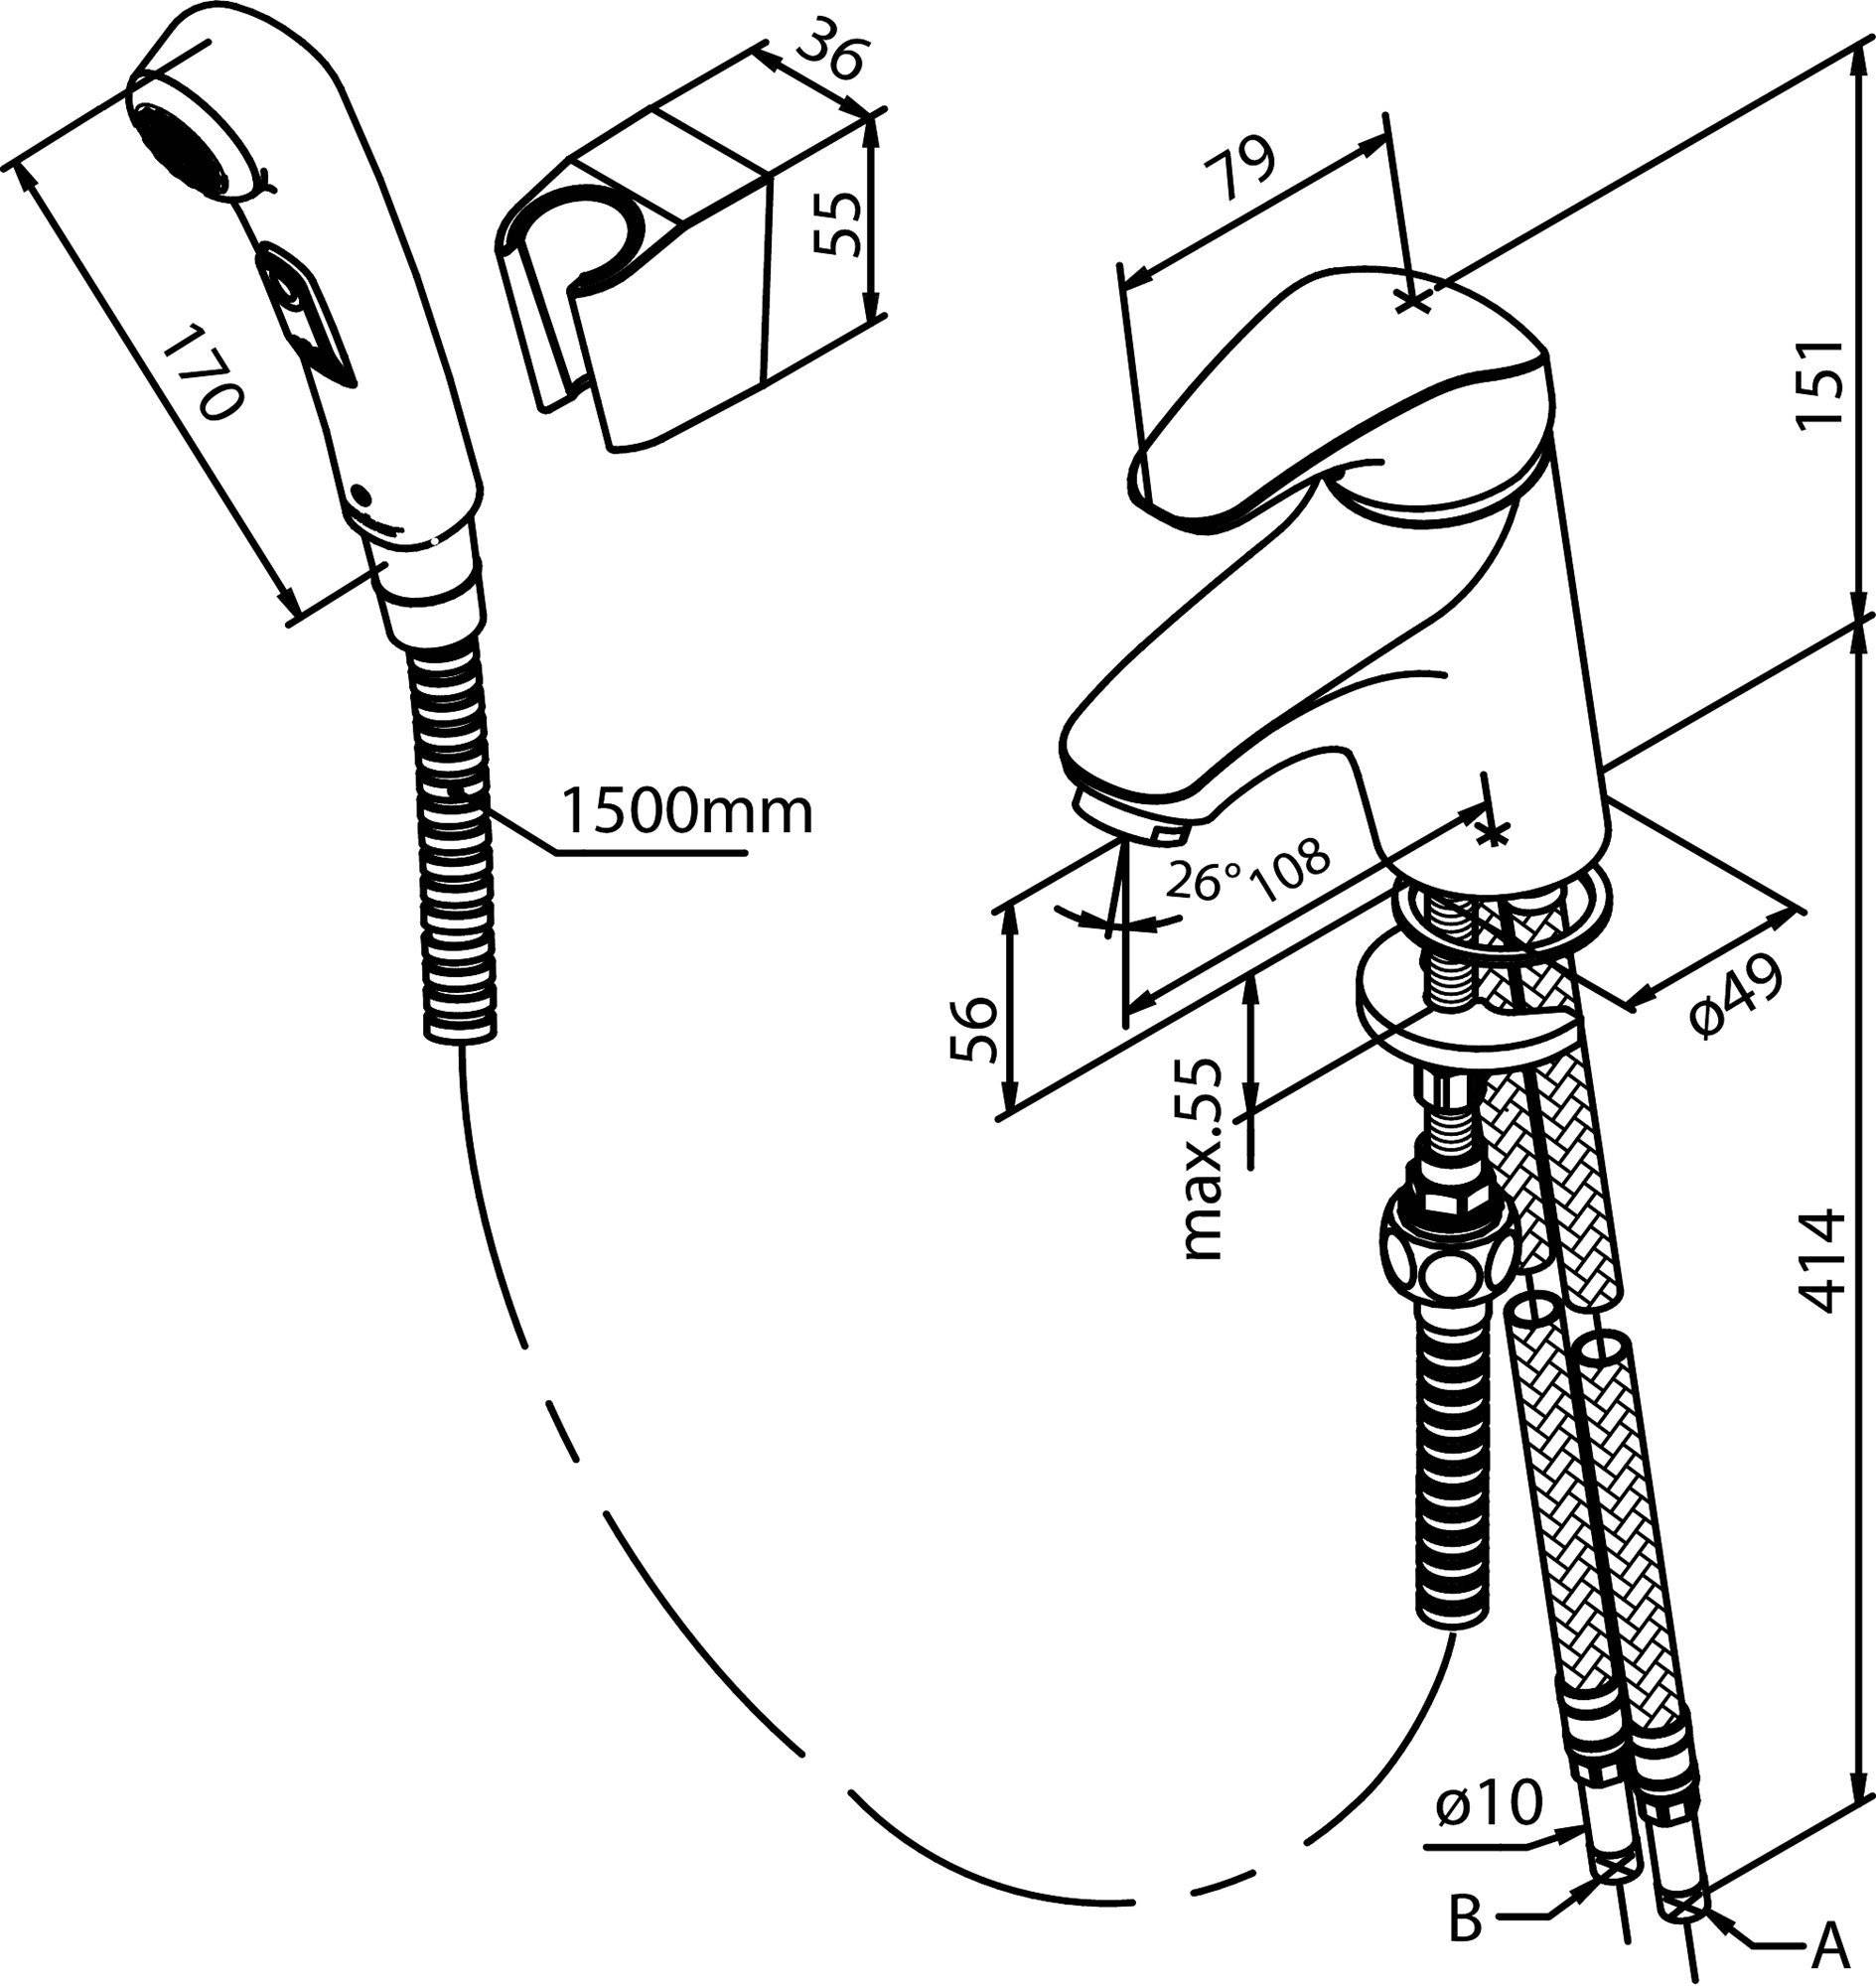
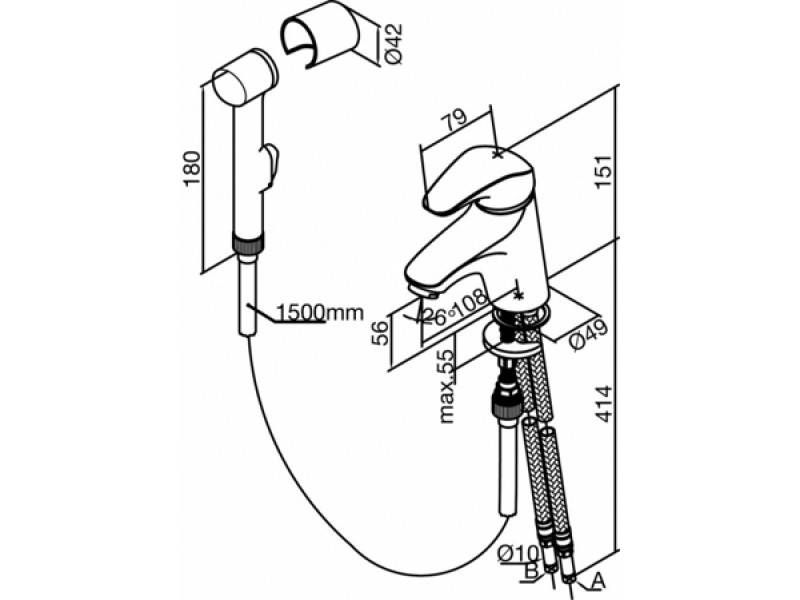
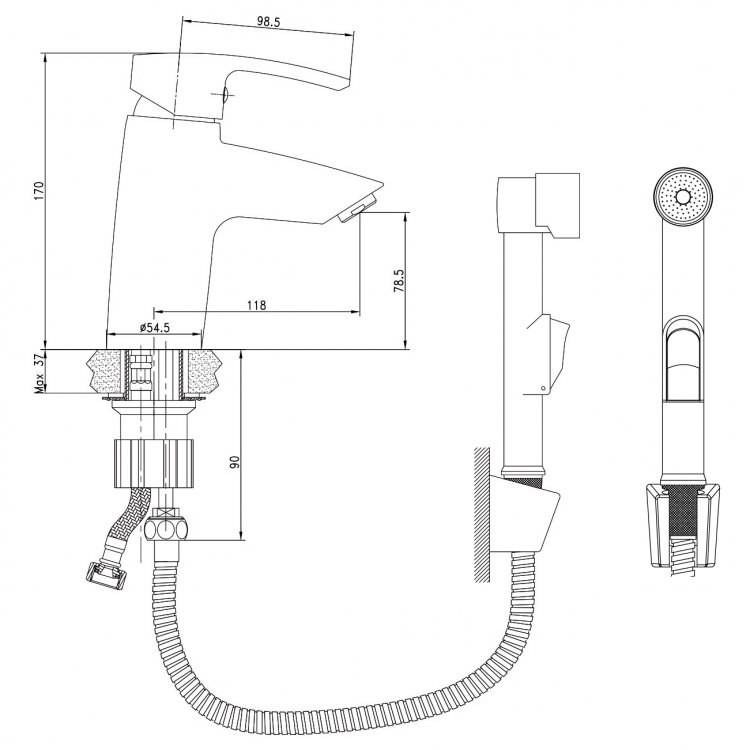
Dimensions of fasteners when drilling
The length of the connection section affects the appearance of the entire mixer.
Its disguise is provided by a decorative cup.
To make it tightly pressed against the surface, the outlet plumbing fitting is recessed into the wall.
The total length of the outer part of the connection is selected within 2-3 cm, which makes it possible to close it with a cup.
When choosing mixers and preparing a place for their installation, it is necessary to take into account all the nuances of installation dimensions. This allows you to provide an attractive appearance with a reliable connection of the elements. In addition, for ease of maintenance, you should choose the right installation height.It is recommended to place them at a height of 16-20 cm from the top of the tub and 65-85 cm from the floor surface.
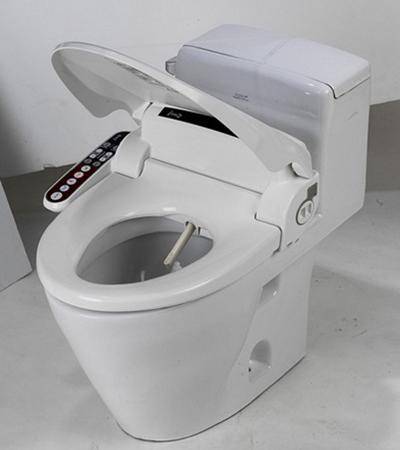
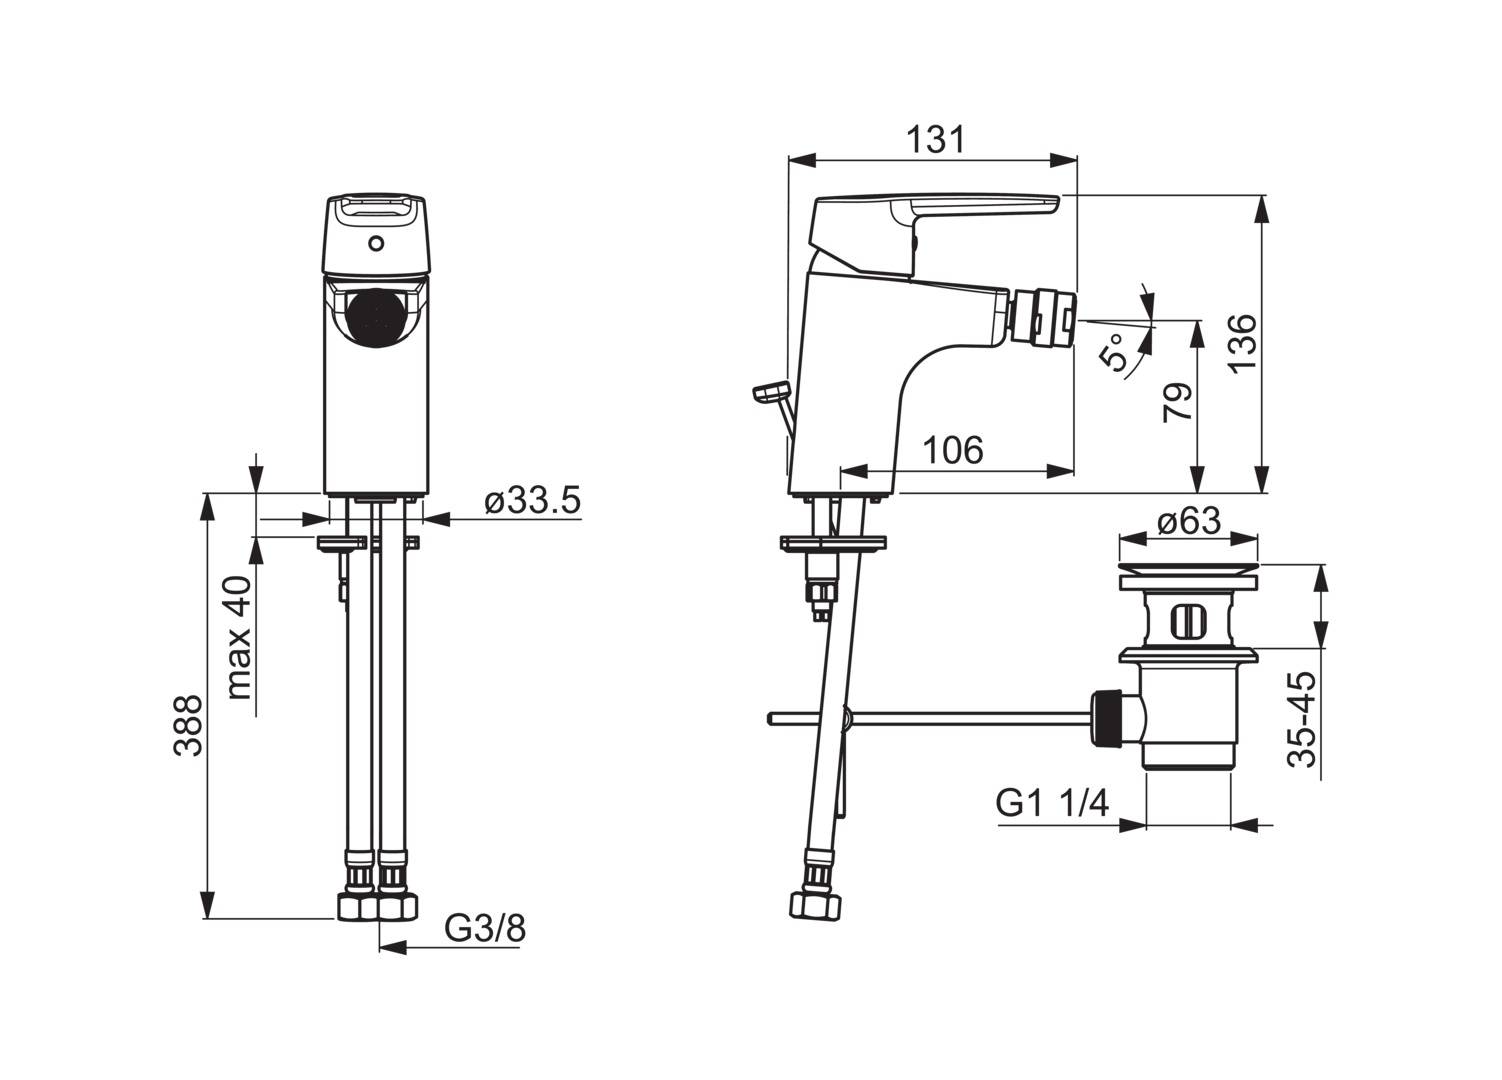
What are bidets and their design features
A classic bidet is a device that looks like a mixture of a sink and a toilet bowl. It is located from the floor level at a height of about 0.4 meters. However, instead of a drain tank in the case of a bidet, a special tap is installed inside the bowl, to which cold and hot water are supplied. You can thus regulate the pressure of water and its temperature.
A bidet is a sanitary and hygienic device for washing the lower part of the body.
As in the case of the toilet, the bidet can be made in the form of:
- Floor mounted design;
- Or hung on the wall - suspended structure.
These features impose their own requirements on the installation process of the bidet. If in its floor version the bidet can simply be installed on the floor, then the suspended one is fixed using an installation specially designed for this. The installation itself, as a rule, comes with the device. It successfully masks all plumbing fixtures that are connected to the wall. In addition, the bidet can also differ in the way the water supply is organized:
- Faucets located like a conventional sink;
- And taps with the so-called upward flow - in other words, a small fountain is formed.
Heated (or cold) water in any case will move from the supply holes to the bypass of the bowl. Bidet faucets can be valve or lever. The choice here is up to the end user - to whom it will be more convenient to use. In addition, updraft bidets can be equipped with a special hygienic shower.
The mixer for greater ease of use can be equipped with a thermostat. So it will be much more convenient for the user to set a constant water temperature. Among the latest constructive innovations of the bidet, one can note such an interesting development as a bidet equipped with special photo sensors. They react to the approach of an object at a distance of about 30 centimeters and automatically turn on the water supply. In a word, there are quite a lot of options for a variety of models in the case of a bidet. Each consumer can choose exactly what he likes the most.
An updraft bidet that looks like a small fountain.
This is interesting: Why you can not sit on the toilet for a long time
Technology for connecting a floor bidet
Connecting a bidet to the sewer is a task of medium complexity. But, strictly adhering to the installation technology, even a novice master who knows only the basic skills of repair work can perform it.
When choosing a place to place a bidet, take into account the availability of free access to pipes
The floor bidet is installed in the immediate vicinity of the toilet. The distance between the devices must be at least 70 cm.
The first thing to do before connecting the bidet to the sewer is to read the instructions attached to it and check the presence of all the components of the structure.
The bowl of the standard model is equipped with three holes: the top one is for installing a mixer, on the side inner board - for overflow, at the bottom - for direct draining into the sewer pipe. The drain valve is independent of the device configuration. It is fully automatic.
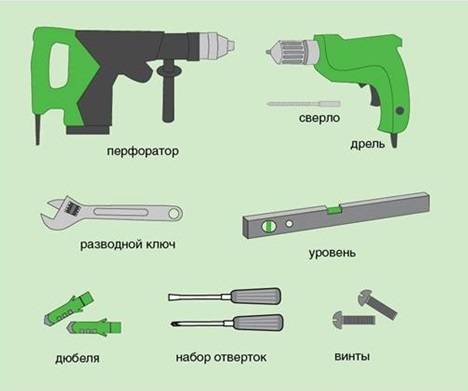
To connect a bidet to the sewer you will need:
- puncher with a set of drills;
- wrenches and wrenches;
- Screwdriver Set;
- mounting tape;
- waterproofing tow;
- silicone sealant;
- marker or pencil.
The connection diagram of the bidet to the sewer, attached to the instructions for the device, must be kept at hand at all stages of installation.
In most models, the faucet is not included with the bidet. It should be purchased in advance at the points of sale of sanitary equipment.


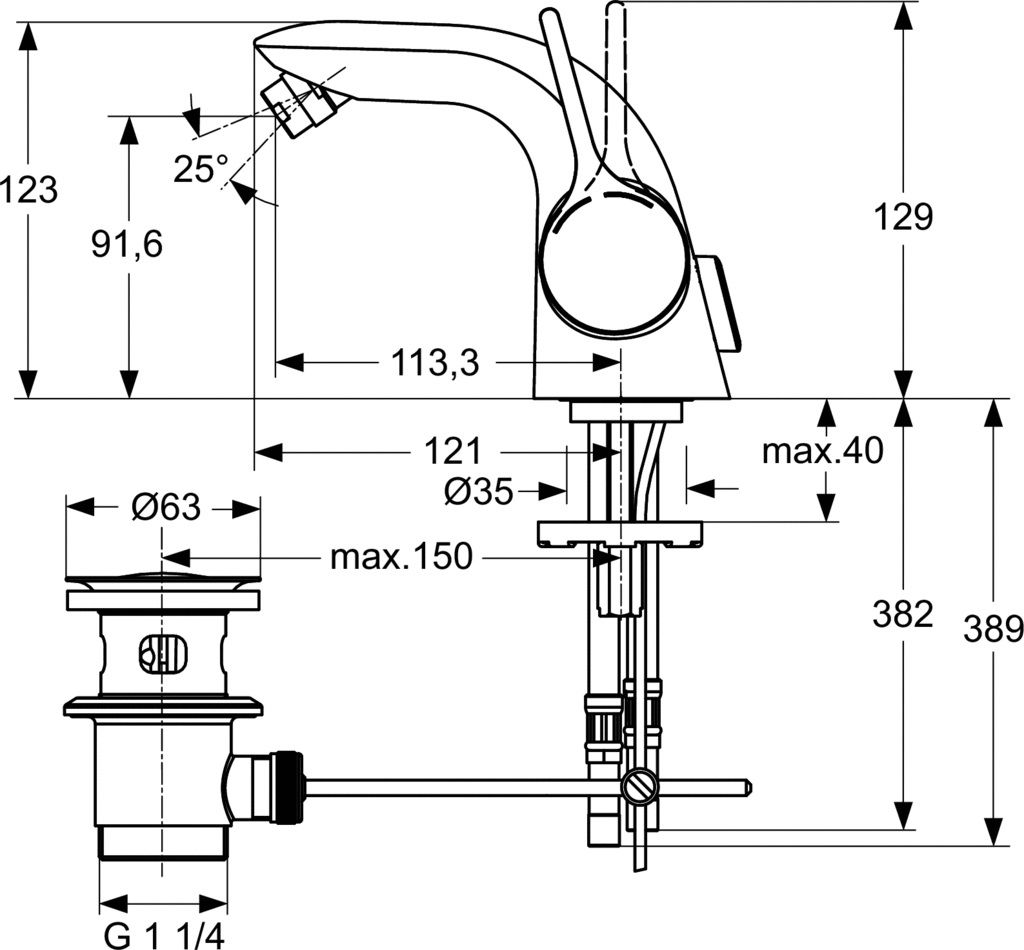
Installation of an external faucet involves fixing the device on the outside of the bidet through a special hole
The installation technology is in many ways similar to the installation procedure for a sink faucet.
The procedure is performed in several stages:
- Flexible hoses are fixed in the threaded sockets of the mixer.
- The mixer is installed on the outside of the bowl, tightening the nut from below.
- In place of the siphon, a drain valve is attached.
- Connect hot and cold water pipes.
- All mating elements are compressed.
When connecting models with internal filling bowls to the sewerage system, it should be taken into account that cold water must be supplied to the spout directly from the storage tank located on the back side. The hot water supply pipe must also be supplied independently.
To connect the bidet to the sewer, masters recommend using rigid hoses. But, to simplify the task, a corrugated pipe can also be brought to the sewer. The layout of sewer pipes is best done in such a way that the attachment points of the hoses are located directly behind the plumbing.
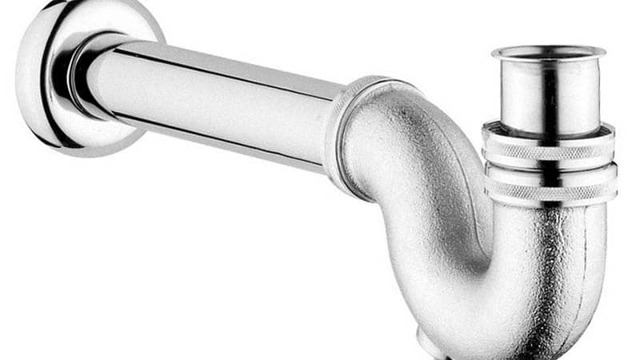
It is impossible to connect to the system without installing a siphon
Bidet siphons differ from their counterparts designed to connect sinks and showers with an extended drain pipe and a smoother bend of the elbow. This solution allows you to create a water seal of a larger volume, ensuring uninterrupted operation of the system.
On sale there are also models equipped with several water seals. They are often used for hidden installation. If you need open installation, you can use siphons of both tubular and bottle type.
The technology for installing an open siphon includes the following steps:
- A drain grate is inserted into the drain hole, baited with a nut.
- On the reverse side of the neck, the receiving part of the siphon is installed, fixing the structure with mounting nuts.
- A siphon outlet is mounted to the overflow hole.
- The outlet end of the siphon, a corrugated pipe, is inserted deeper into the socket of the sewer system.
The diameter of the sewer outlet must be at least 100 mm
To connect equipment with upward water supply, it is better to invite specialists. Sanitaryware with internal filling of the bowl has a more complex configuration. Without knowing the intricacies of installation, it will be difficult for you to connect the bidet to the sewer without making mistakes.
Having completed all the stages of connecting the bidet to the sewer, it remains only to fix the plumbing.
The floor bidet is mounted to the floor, fixing it with special fasteners for the toilet
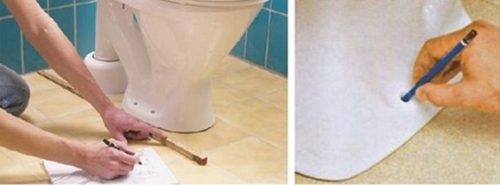
Sequencing:
- Install the device in the intended place, outlining the contour of the sole with a pencil.
- Holes are drilled according to the marks made with a puncher.
- Plugs are inserted into the holes, then the bidet is inserted at a given mark and the fixing screws are tightened, not forgetting to place rubber gaskets under them.
The installation and connection process is described in detail in the video:
Having installed the structure, check the correctness of the connections and start the system. To make a test run, open the valves and observe: if the water pressure is good and there are no leaks, the work is done correctly.
Installation of a floor bidet
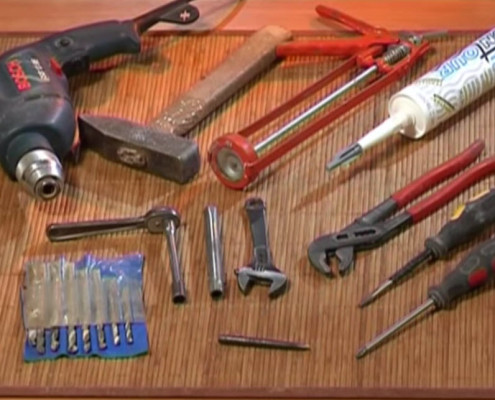
To install a floor bidet with your own hands, you will need the following set of tools:
- drill with hammer function;
- a set of drills for concrete and ceramics;
- adjustable wrench or set of wrenches;
- sealing material (optional: FUM tape, linen thread, and so on);
- silicone sealant for wet areas.
Bidet installation tools
Bidet attachment
Installing a floor bidet produced in several stages:
- drawing markings in the installation area of the device. On the floor it is necessary to mark the location of the fixing bolts;
Determine the location of the bolts
When marking the installation area, it is recommended to take into account the distance required to connect the plumbing to the water supply and sewerage.
- hole preparation. If the bathroom floor is tiled, it is recommended to use a drill bit when drilling. Plastic dowels are inserted into the drilled holes;
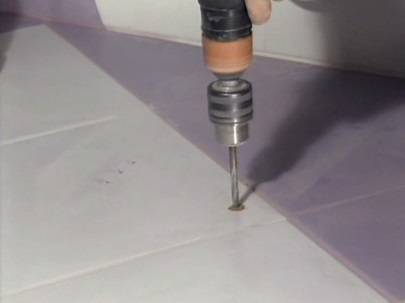
Preparing holes for mounting bolts
- a plumbing device is installed and it is fixed with fixing bolts included in the kit;
Fixing the device to the floor
In order not to damage the surface of the bidet between the bolts and the bowl of the device, it is recommended to install rubber gaskets.
- the joint between the bidet and the floor is treated with silicone sealant.
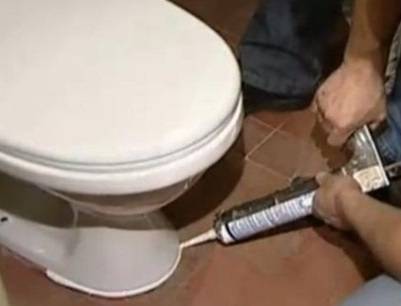
Sealing the joint between bidet and floor
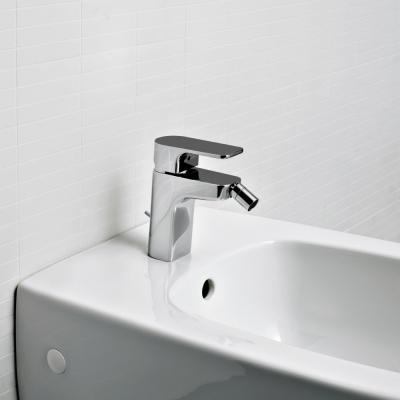
Connecting a bidet to the water supply
The bidet is connected to the water supply using a faucet. The mixer can be:
- ordinary hanging. Such a device is installed on a bidet, like a faucet on a sink;
- built-in. To install the built-in device, wall chasing will be required.
The mixer connection diagram is usually supplied with the device. If there is no such scheme, then proceed as follows:
- the mixer is fixed on the surface of the bidet or wall. Bidet fittings are included.

Installing the faucet on the bidet
- flexible hoses are brought to the mixer and attached;
- the other end of the hoses is connected to a tee mounted on a water pipe. All connections must be additionally sealed.
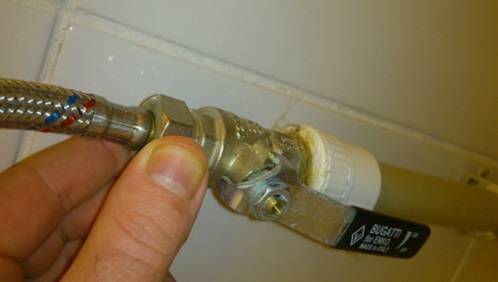
Connection of flexible hose and water pipe
Before connecting the bidet to the water pipes, it is recommended to install separate taps that allow you to independently shut off the water supply of the device for inspection or repair.
Connecting a bidet to the sewer
How to connect a bidet to the sewer system? To set up a connection you will need:
- siphon for bidet;
- corrugation;
- rubber cuff for transition from a siphon to the sewerage.
The connection is made in the following way:
- a siphon is attached to the bidet. Rubber gaskets are installed between the surface of the plumbing and the device;
- a corrugated hose is connected to the siphon;
- the second end of the corrugation is inserted into the sewer inlet. A rubber cuff is used for sealing.

Connecting a plumbing fixture to a sewer pipe
The process of installing a floor bidet is presented in detail in the video.
Preparatory work
If you manage to find a model with satisfactory characteristics and design that matches the interior of your bathroom, all you have to do is buy it and arrange home delivery. In the meantime, you need to prepare the workspace and resources.


To install a bidet with your own hands, you will need the following tool:
- drill with hammer function;
- drills for concrete;
- adjustable or gas key;
- set of wrenches;
- Screwdriver Set.
 Bidet installation tool
A bidet is a plumbing fixture, so for its installation and connection, materials such as:
- silicone sealant;
- mounting tape;
- waterproofing tow.
 Tow and plumbing sealant
The bidet is connected to the water supply and sewerage. To do this, it is necessary to make a tie-in in the pipelines of both systems in the place designated for the installation of equipment.
The next step is fitting, which is as follows:
- Installing the bidet bowl in a position in which it will subsequently be fixed.
- Checking the length and correct location of hoses, pipes and connection points.
- Correction of the location of the equipment in accordance with the actual conditions of installation and operation.
- Marking mounting points.
Options for the location of the bidet in the bathrooms of various layouts in the photo
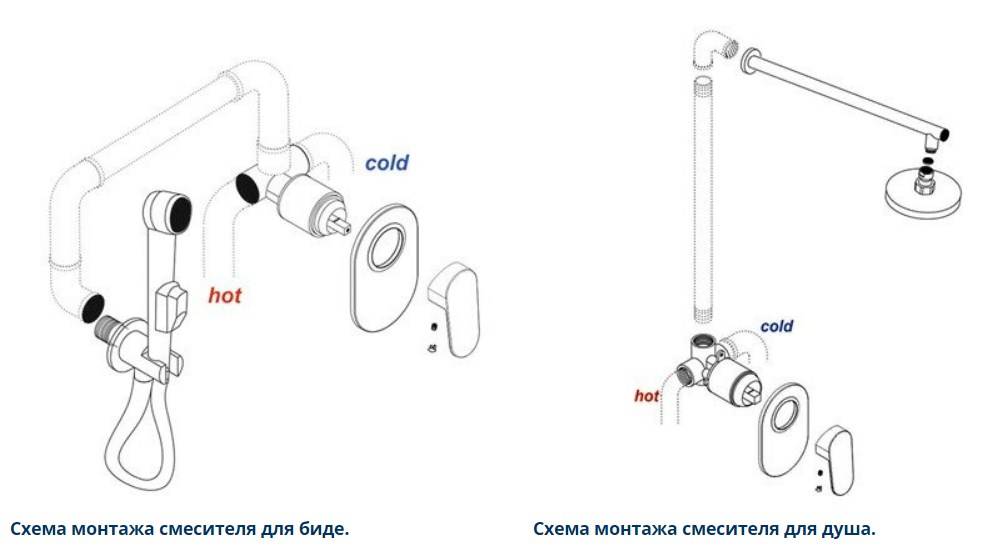
If you are going to install a hanging bidet, you need to take care of the installation. This is the supporting frame, on which, in fact, the equipment rests. It is advisable to install the structure in a niche - this will save the useful area of \u200b\u200bthe bathroom. The frame is attached to both the wall and the floor. A mixer and control devices are mounted on it, after which it is sewn up with drywall.
Self-installation of a hygienic shower
When the model is selected and purchased, you can proceed to the installation. It is not necessary to invite a plumber for this, any man can handle a simple task. Mounting method will depend on the selected model.
If this is a wall-mounted option, it is important to determine the correct location. This is easy to do - you need to sit on the toilet and reach out to the wall
At the most convenient height, a mount for a small watering can is made. There are a few important things to keep in mind before getting started.
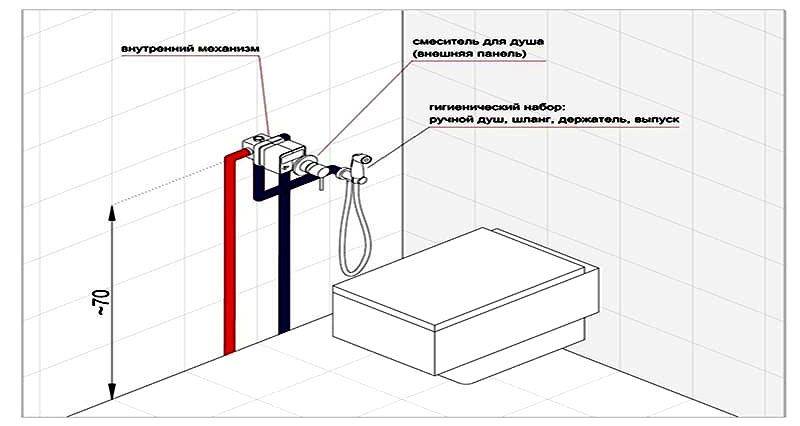
Installation height
The faucet and watering can holder can be mounted on the same wall or on different ones. The main task that affects comfort during use is to choose the right height. There are no specific standards, installation is carried out based on personal preferences.
The product will look aesthetically pleasing if the mixer hose in its free state does not touch the floor, so you should not install structural elements too low. When tiling, it is necessary to choose a place at the junction, without decor and patterns.
When choosing a height for a mixer, it is necessary to take into account the age and health of the household. If one of the relatives has signs of diseases that restrict movement, you can sacrifice aesthetics and place the shower near the floor, in a conspicuous place.
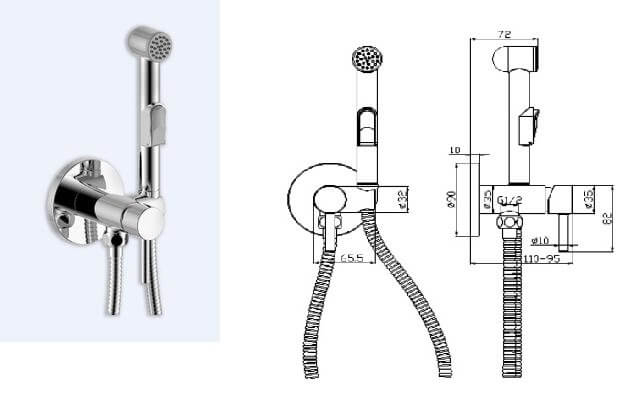
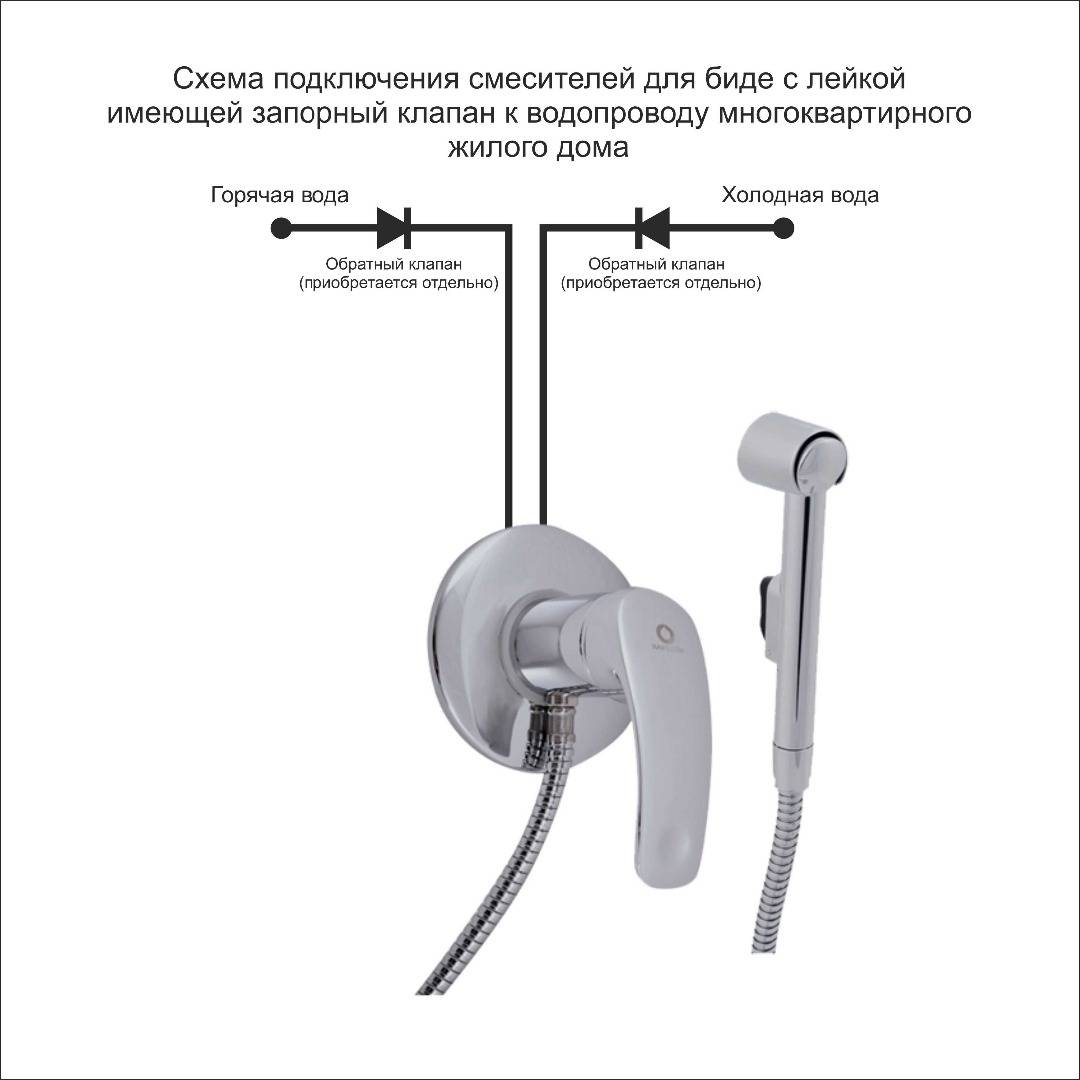
wall mount
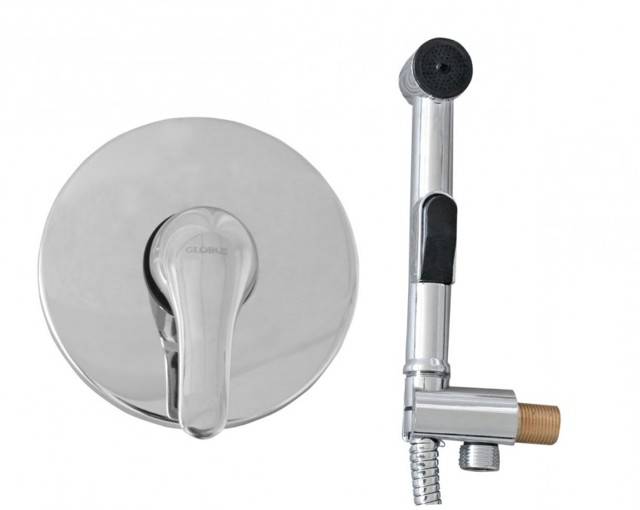
For a wall-mounted product, you should choose an open type of installation. The mixer is mounted on the surface of the wall through which water will be supplied. A watering can holder is installed nearby at a convenient height.
Now you can proceed to the installation of flexible hoses.Between all elements of prefabricated structures, rubber gaskets must be placed. This will help avoid leaks. If seals are not included, they must be purchased separately.
You can also mount the shower to the wall in a hidden way. The option involves organizing a niche, creating a box. Water supply is provided by specially laid pipes, which are also hidden in a niche. Only a platform with a lever, a holder, a watering can remain on the surface. The method is more aesthetic, but not suitable for all rooms. The possibility of installation is affected by the thickness of the walls, the location of the ventilation shafts.
Installing a shower on a sink
Installation is possible with a special model with its own outlet and an additional hole for a tap. This is a great option for a combined bathroom in which the sink is located next to the toilet. The process of installing the device for intimate procedures is very simple. The length of the hose with a watering can should be enough to use the shower in the toilet area without tension.
For greater comfort of use, the mixer must be purchased with a thermostat. This will allow you not to be distracted during hygiene procedures by constantly regulating the water temperature. The device will allow you to set your own temperature and save it automatically.
Connecting a hybrid with a bidet function
There are also hybrid options for toilets combined with a bidet.
Outwardly, such a device does not look much different from a conventional toilet, although it is more enlarged in size: a bowl of a more elongated shape and a larger tank.
In addition, you can find bidet covers that are installed on the most ordinary toilet and perform the same functions as stationary bidets.
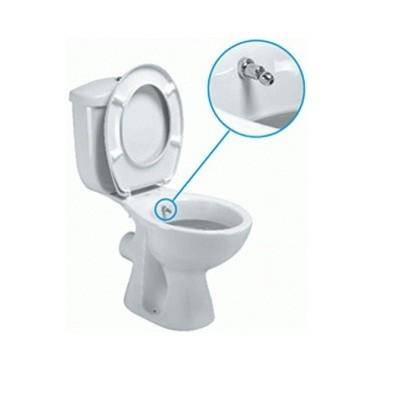
To install such a device, it is better to place the outlet in the toilet in advance. Mounting the cover is quite easy, as follows:
- Unscrew the nuts that hold the old toilet lid and remove it.
- Attach the bidet cover instead.
Attention! Shut off the water supply before connecting the lid to the water supply.
- Unscrew the toilet cistern hose.
- Screw the tee onto the pipe, wind the FUM tape or tow.
- The middle part of the tee must have an internal thread. Make sure that the male taps are installed vertically. Connect the hose from the tank to the top of the tee, the water filter to the bottom and connect the water supply.
- Connect the cover to the mains.
How to make your own out of the toilet
Another budget option is to do it yourself from the toilet.
You will need: a ball valve, a transparent hose for the hydraulic level, as well as two more hoses, a transition to a tube and a tee.
Progress:
- Mount the faucet in a sink cabinet or wall.
- Install a tee to the hot water pipe.
- Route the hose through the tee to the sink faucet, the hose to the bidet faucet.
- From the faucet on the bedside table or wall, lay a transparent tube between the toilet bowl and its bowl, so that the tube comes out under the lid.
Bidet and toilet faucet with the same function
Faucets with a short tap are more like a small washbasin.
The hygienic unit is intended for people with disabilities, the elderly, children, people with certain types of phobias (when a person is pathologically afraid of water or slipping in the bath).
According to the design and type of installation, there are several types of mixer taps:
- Classic variant. Attaches to the edge of a bidet toilet.
- Wall option.Attaches to the wall. It can be used with a regular toilet or bath (most often the design is equipped not with a tap, but with a shower).
But like any other device, a bidet faucet has positive and negative qualities.
pros
- The tap does not need to be held by hand, unlike a conventional hygienic shower, which can slip out of your hands;
- the structure is fixed rigidly and firmly, the crane cannot be accidentally moved or knocked down;
- a bidet with a tap is used not only for its intended purpose, it can be washed, washed feet, bathed children and even washed;
- the mixer with a shower is easy to operate;
- some models are equipped with a movable tap, with which you can change the direction of the water;
- water practically does not spill on the floor, even if you do not turn it off in time;
- it is easier to keep the plumbing of such a model clean than a hygienic shower;
- for a bidet with a tap, you can use various tips-nozzles.
Minuses
- If the design is rigid, it is impossible to control the angle of inclination of the water flow;
- a bidet with a tap is more difficult to install than a hygienic shower;
- the built-in mixer is difficult to repair and change damaged parts.
Types of bidets combined with a toilet
There are several parameters by which devices of the same purpose differ from each other. First of all, the method of fastening, as well as the material, drain system, bowl shape and design. Let's take a closer look at all these criteria.


According to the method of installation - floor, hinged, corner
The mounting method is selected based on the technical capabilities of the premises and the preferences of the customer.
| Illustration | Mount type | Description |
| Floor | Traditional model that is installed directly on the floor, regardless of the type of flooring. The barrel is installed from above. Control can be mechanical, semi-automatic and automatic. | |
| hinged | Mounted on the wall using a special installation system and belongs to the category of modern, practical and multifunctional equipment. It will be an excellent solution for small bathrooms, as it takes up little space, while providing a comfortable process of hygiene procedures and cleaning the premises. All communications are hidden, so the product looks neat and compact. | |
| Angular | This type of fastening is relevant for small rooms or those that have the wrong layout. Can be floor and hinged. Such equipment looks original and allows the most efficient use of free space in a small room. |
By type of material
The material of manufacture largely affects the durability of sanitary equipment and the features of caring for it. Most often on sale you can find faience products. Their cost is low due to the fact that almost half of the material consists of kaolin clay. To reduce the ability of the surface to absorb moisture due to the high concentration of clay in the composition, such products are covered with a protective layer of glaze, which retains its gloss and original color for a long time, does not crack or become cloudy.
Plumbing porcelain contains quartz or other minerals that give it special strength.The surface of the product becomes smooth, impact-resistant, unlike fragile earthenware, it does not absorb unpleasant odors. Special dirt-repellent impregnations facilitate the care of the product.
By drain system
The type of drain system is a very important parameter that must be considered when purchasing a toilet along with a bidet.
So, there are three types of drain systems.
| Illustration | Drain | Description |
| Horizontal | The connection of the bowl and the sewer riser occurs without corner elements. With the help of a corrugated hose, the drain pipe, located in the back of the product, is easily connected to the central communications. | |
| Vertical | A convenient and practical solution that does not require the installation of equipment in a strictly designated place. The outlet sewer pipe is connected directly to the bottom of the equipment. Allows you to save space, the room looks neat, as communications are hidden. | |
| oblique | The outlet is located at an angle of 30−45°. Requires a clear and reliable connection to avoid subsequent leaks. |
By bowl shape and design
The shape of the bowl can be funnel-shaped, visor and plate-shaped.
| Type of bowl | Description |
| Does not spread splashes and drops. However, less hygienic. | |
| The central location of the drain hole causes splashing. | |
| Prevents splashing. Thanks to the offset drain hole, the descent is of high quality and smooth. |
Among other things, modern plumbing equipment is distinguished by design - color and shape.
By control method - electronic bidet toilets and devices with mechanical control
There are several options for controlling the functions of a bidet toilet.
| Mechanical control | Electronic control |
| This control method allows you to adjust the water temperature and the level of pressure of the water jet. Of the positive qualities, one can note the reliability of the system due to its simplicity, long service life, low cost and easy repair. | Most modern products are equipped with electronic control, an impressive set of functions. It can be made in the form of a block or control panel directly on the body of the product, on the wall near the toilet bowl and/or in the form of a control panel. Some models have the function of storing several user-defined parameters in memory. |
Semi-automatic control involves a combination of these two methods.
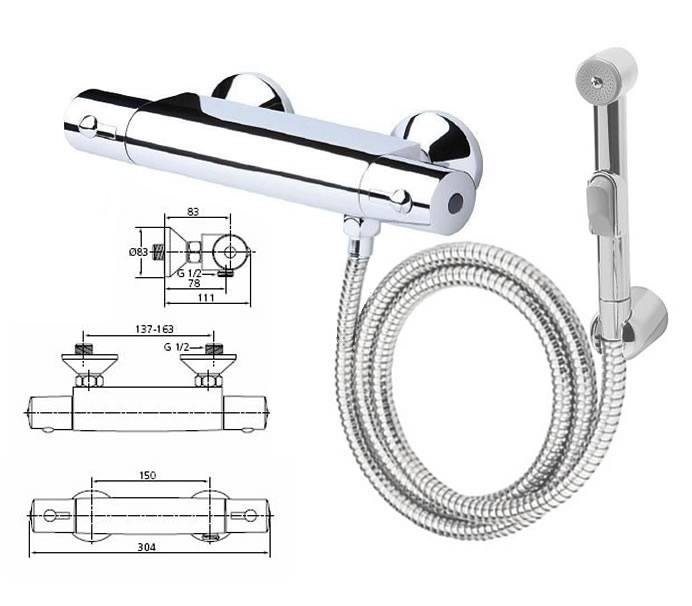
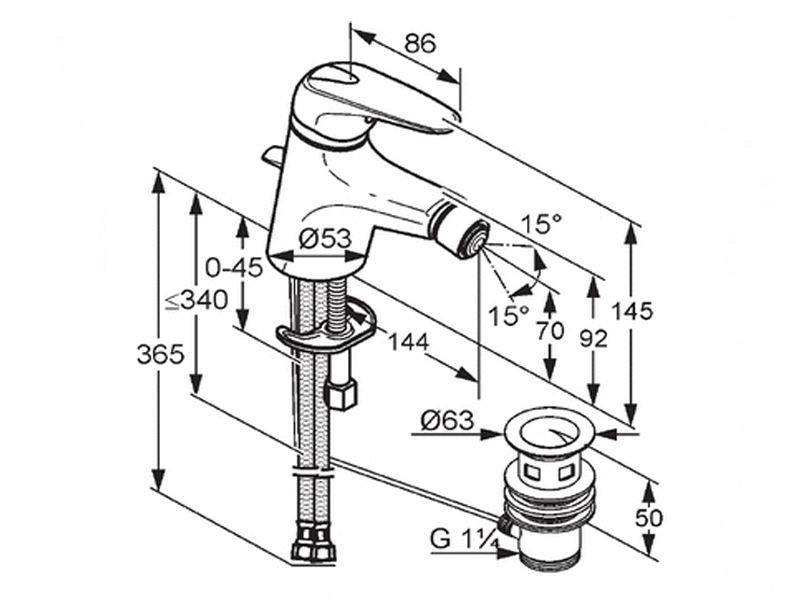
Detailed characteristics of mixers
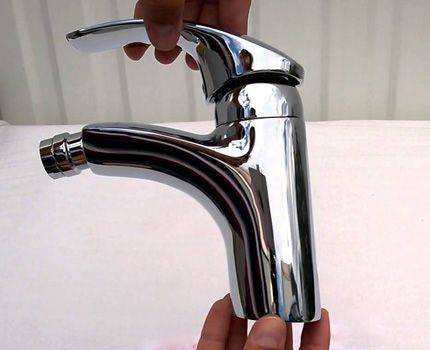
Bidet faucets look very similar to sink fixtures. It is easy for an inexperienced master to get confused among the variety of plumbing fixtures and mistakenly acquire not what is required. To prevent this from happening, you need to consider in more detail the features of these cranes.
Features of bidet taps
Whichever bidet model is purchased, it has a significant drawback - you need to additionally buy a special siphon and mixer. And then these devices are still installed and connected. Doing everything yourself or trusting experienced plumbers - it depends on the wishes of the owner.
Before buying a faucet, you have to get a little closer acquainted with the features and varieties of these plumbing products designed for bidets.
The faucet is slightly different from the usual one installed on the sink or bathtub. Its main differences:
- it is slightly smaller;
- can more accurately regulate the temperature;
- has a special aerator nozzle for high-quality spraying;
- the nozzle is able to rotate in all directions;
- has a thermostat, interchangeable nozzles, additional functions.
This special faucet, which can clearly regulate the jet pressure and temperature, allows you to make the washing procedure as useful and enjoyable as possible.
Design varieties of devices
Faucets designed for installation on a bidet differ in appearance, installation method, principle of operation, material of manufacture, equipment, functions and other characteristics. So, according to the type of control, cranes are:
- valve;
- lever;
- contactless.
The first type of control involves the presence of 2 valves - to regulate the supply of cold and hot water.

Valve models of mixers can be of various types - from modest to frankly chic and very expensive.
The control of the supply and mixing of water in the lever type of mixers occurs through a special mechanism - the lever. This adjustment is smoother and more convenient.
Lever models of bidet taps are produced by many plumbing manufacturers. You can choose the option according to your personal preferences.
Contactless, or they are also called sensory, faucets are also in high demand. Especially when they have a thermostatic element. This is the most acceptable option that allows you to set the desired temperature for the water used for the bidet. Subsequently, you will not have to spend time and energy on adjusting the comfortable temperature - the device will execute the given command.

Touch models of mixers are also used for installation on a bidet. Moreover, it is this option with a built-in thermostat that is the most convenient and profitable.
According to the installation method, there are mixers for open and hidden installation.The former are installed on the side of the bidet or on the wall, and all components, including flexible / rigid piping, are hidden behind the device.


With hidden installation, all elements are built into the wall, from which only a crane looks out, and communications are securely hidden
According to the configuration, mixers are:
- a simple device designed to be installed on a bidet;
- with special additional nozzles;
- with spout for bidet internal filling;
- with a watering can / hygienic shower;
- bidet cover without mixer.
In the latter version, the bidet lid only needs a supply of cold water. It has programmable functions that allow you to set the desired water temperature.
The faucet model with a watering can is often installed on the sink, when the watering can itself is mounted on the wall next to the bidet / regular toilet. Water is supplied by pressing a special button on the watering can itself. This is very convenient - if water is not needed, then one press is enough to turn it off.
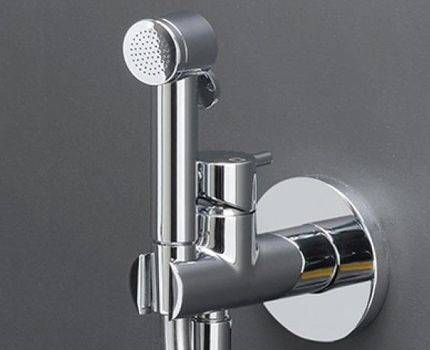
The watering can for hygiene procedures is much smaller in size from its counterparts - watering cans for taking a shower
Professional skills and features of our masters
Knows and observes safety precautions, requirements of GOSTs and SNiPs.
Understands project documentation.
Carries out plumbing work of any complexity at facilities for various purposes.
Understands the structure and principle of operation of the communication systems with which he deals.
Understands the device and the principle of operation of the equipment with which he works.
He knows everything about the properties and characteristics of the materials he uses.
He knows and successfully applies in practice various methods of plumbing installation.
He works diligently, competently and efficiently.
This is interesting: How to use an old bath in the country - a selection of photos


