- Types: pros and cons
- Pipe type
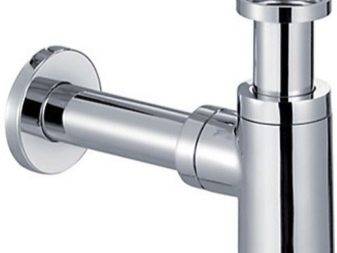
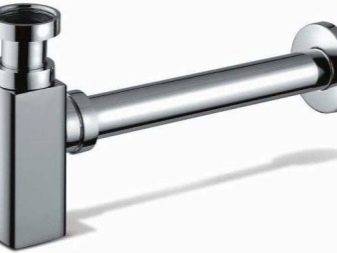
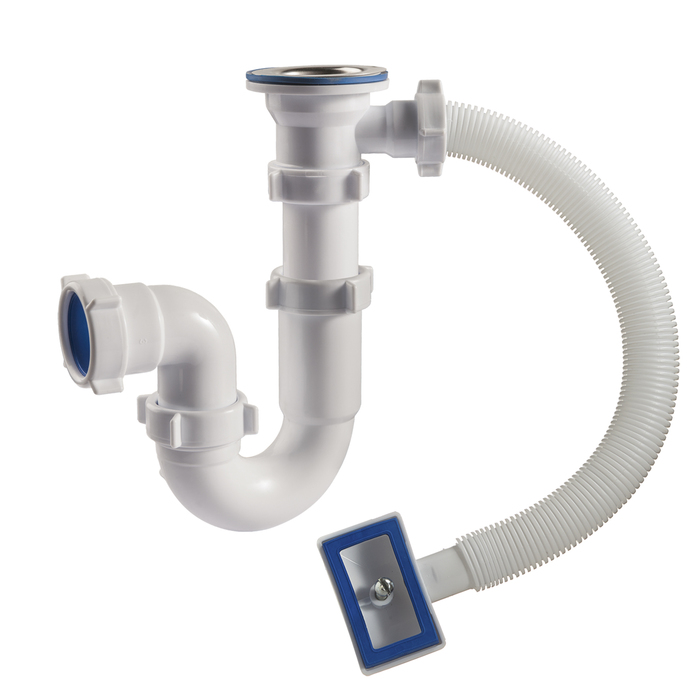
- bottle type
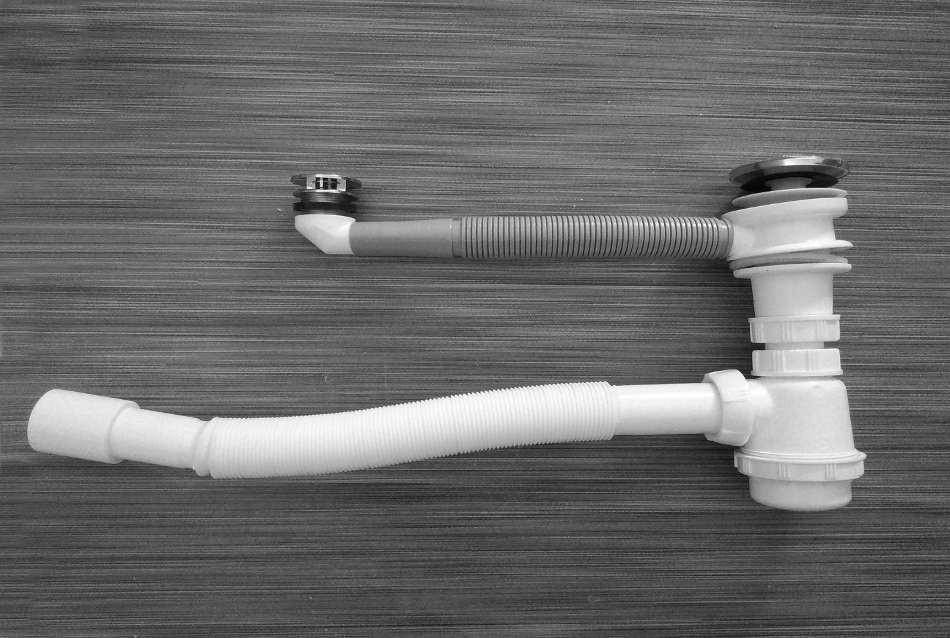
- corrugated type
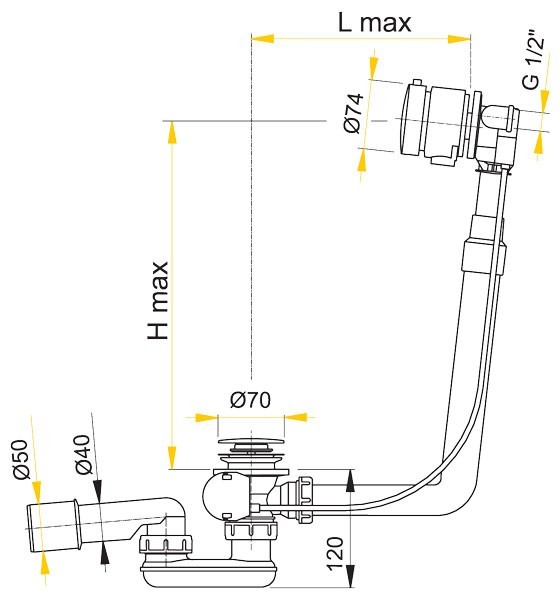
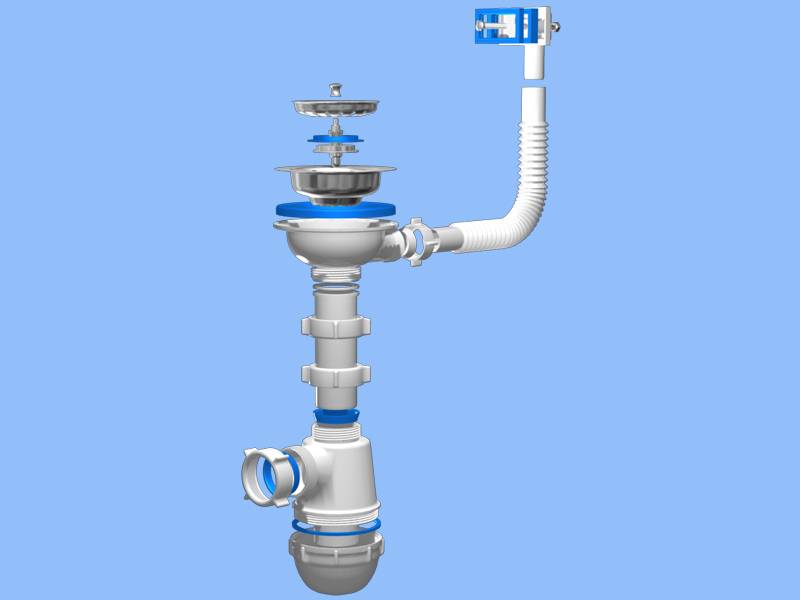
- The structure of the drain-overflow system
- Sewer connection
- Instruction
- Siphons for non-standard equipment
- How to connect a siphon to a sink
- Design
- corrugated model
- Pipe siphons
- bottle siphon
- Other models
- Automatic or semi-automatic siphons
- Siphon selection. Design features
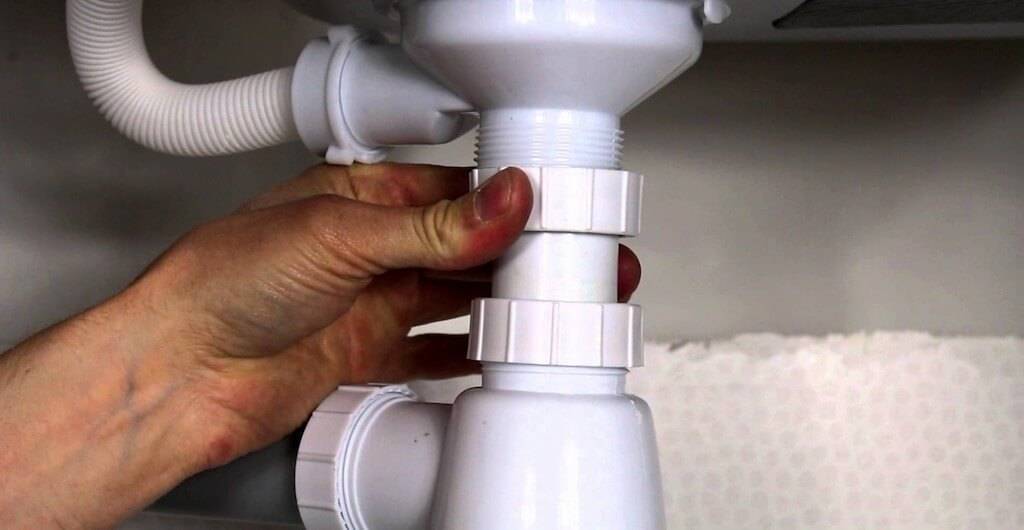
- Siphon assembly and installation
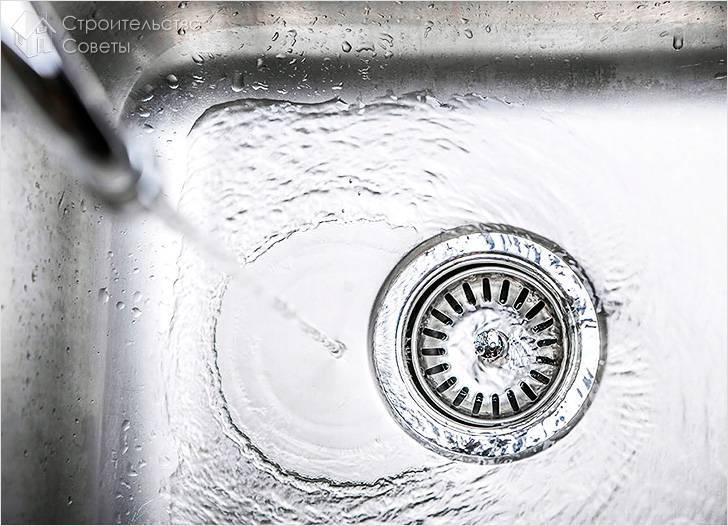
- Drain hole cleaning.
- Varieties and principle of operation of equipment
- Features of mechanical devices
- Characteristic features of semi-automatic devices
- What are the advantages of automatic drains and overflows
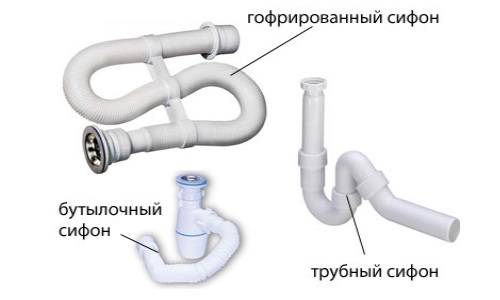
Types: pros and cons
There are several main types of siphons. It is necessary to consider some of their characteristics, disadvantages and advantages.
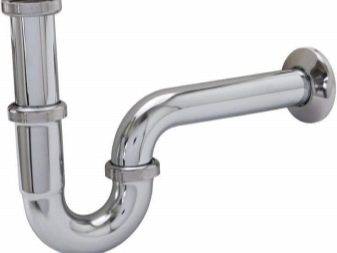
Pipe type
It is a simple device in the form of a rigid pipe, bent in the shape of an English letter U or S. This type can be either solid or collapsible. There are options in which a special hole is provided at the lowest point to extract various solid particles. With a pipe type of siphon, increased accuracy of its assembly is required. The advantage of this type is that it is not necessary to disassemble the entire siphon to clean it, completely remove the lower “knee” from it.The downside is that due to the small hydraulic seal, with infrequent use, unpleasant odors may occur; due to insufficient mobility, it will not be possible to install it as it should.
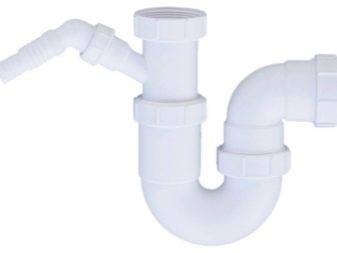
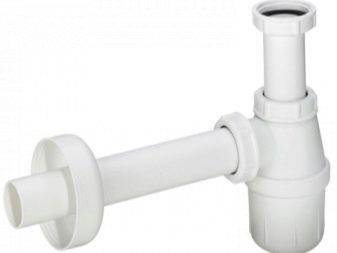
bottle type
It has the greatest distribution compared to others, although it is the most complex design of all. It acquired its name due to the fact that in the area of \u200b\u200bthe water lock it has the shape of a bottle. To his The main advantages are fast and convenient installation, even in a limited space, disassembly is quite easy, cleaning does not take much time, small things that get inside will not go down the drain, but will sink to the bottom of the bottle. Only with its help you can connect a washing machine or dishwasher without inventing an additional sewer outlet for them. A significant disadvantage is that contaminants settle at the junction of the siphon with the sewer pipe and cause it to become clogged.
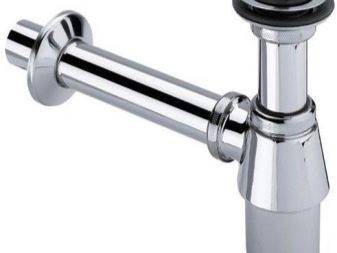
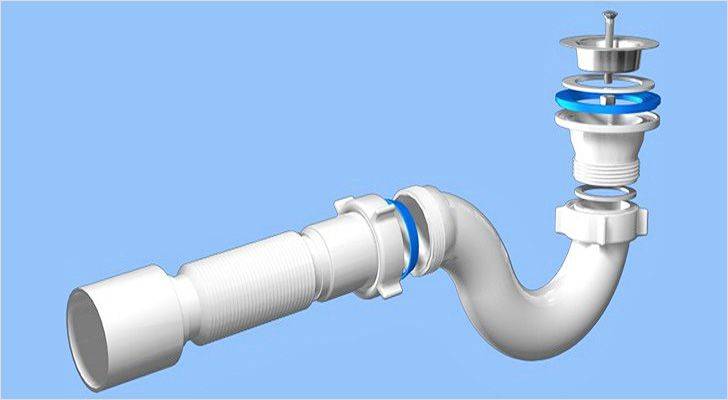
corrugated type
It is a flexible tube that can be bent in any direction. This is one of its main advantages when it can be installed in those places that are inaccessible to the previous two. Its advantages include a relatively low price, and a minimum number of leaks due to one junction. The minus is an uneven surface that collects various mud deposits on itself, they can be removed only when the structure is disassembled. Do not pour hot water into the sewer if the siphon is made of plastic.
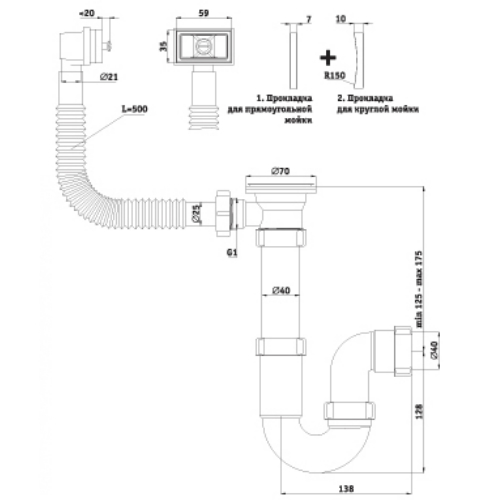
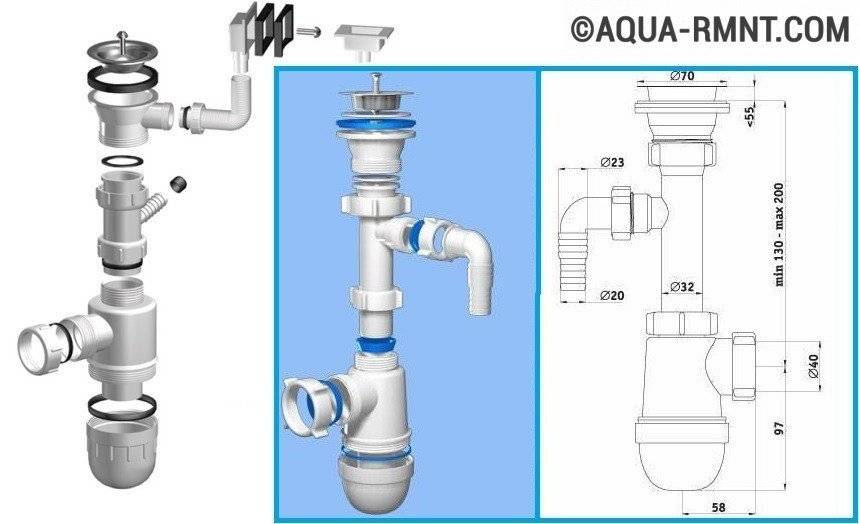
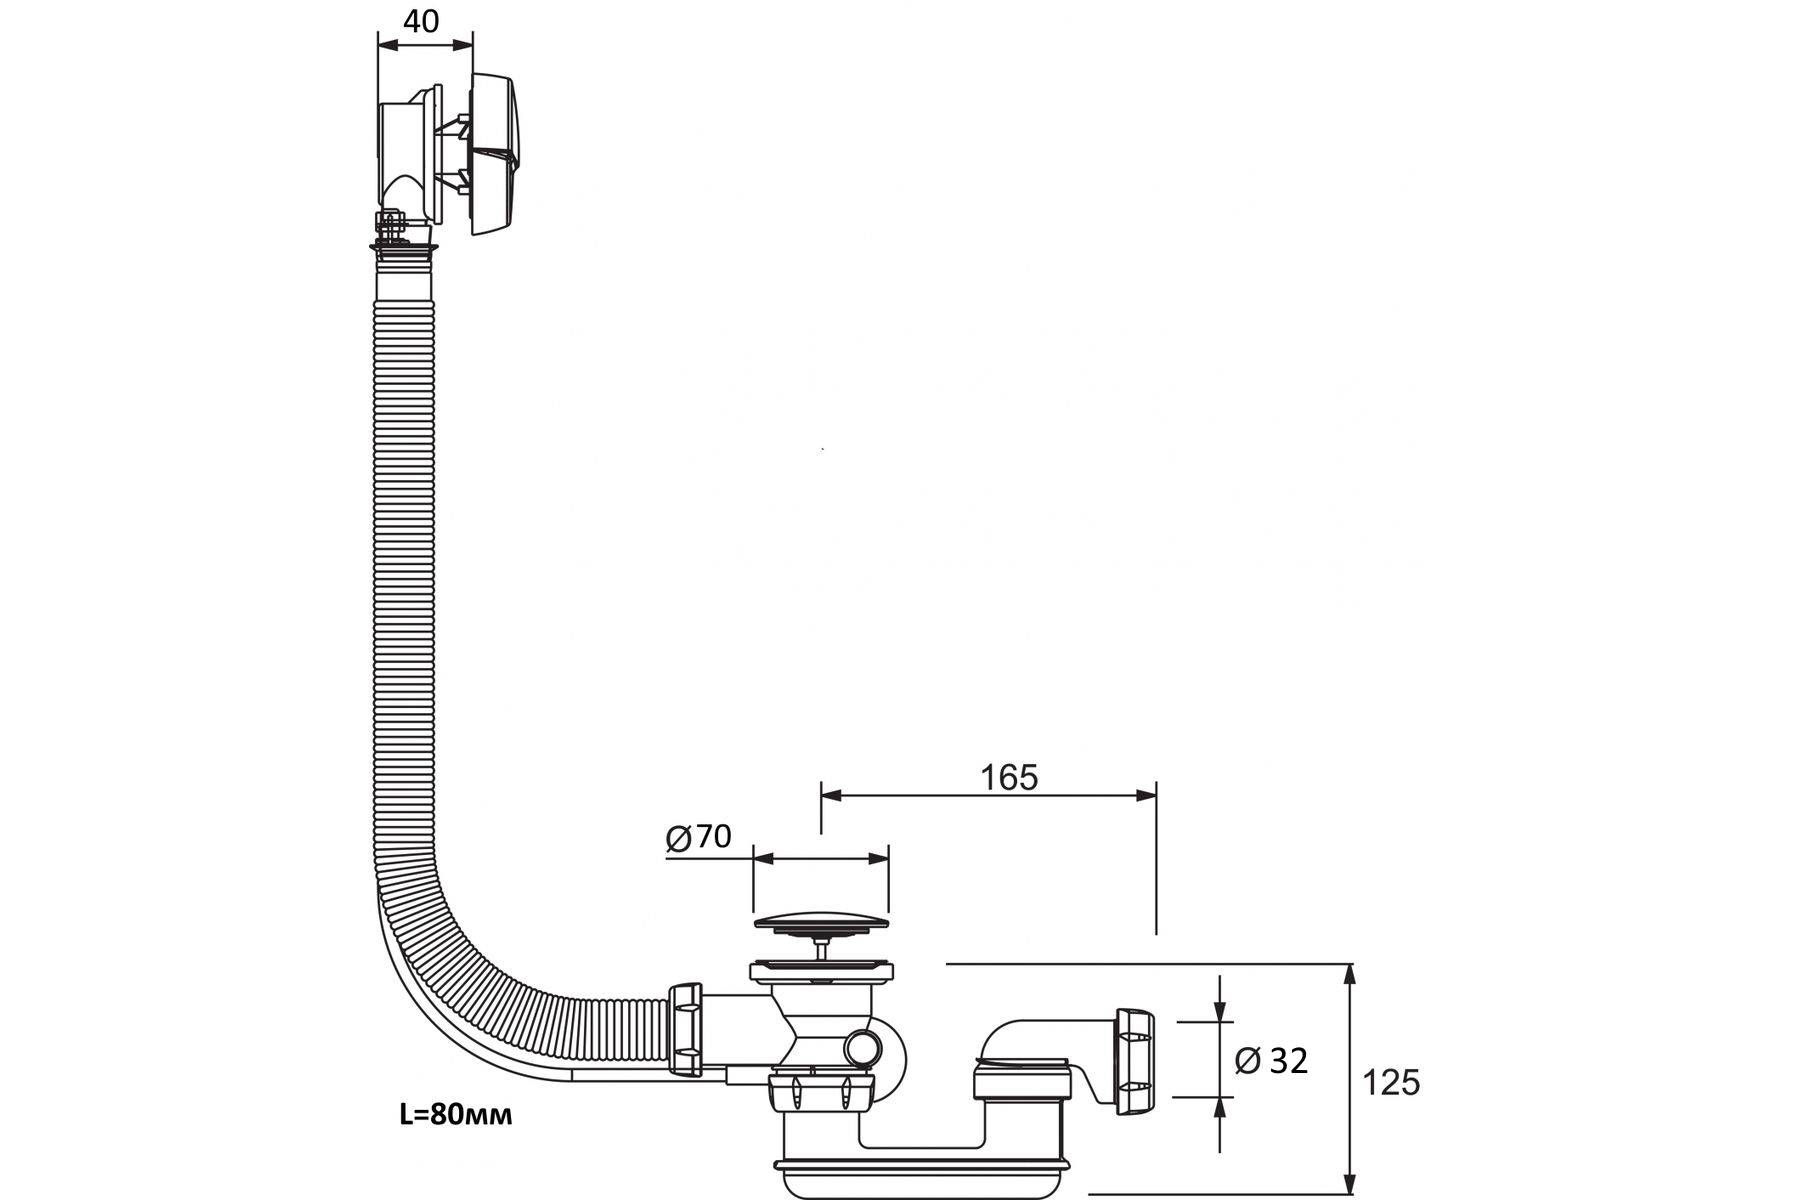
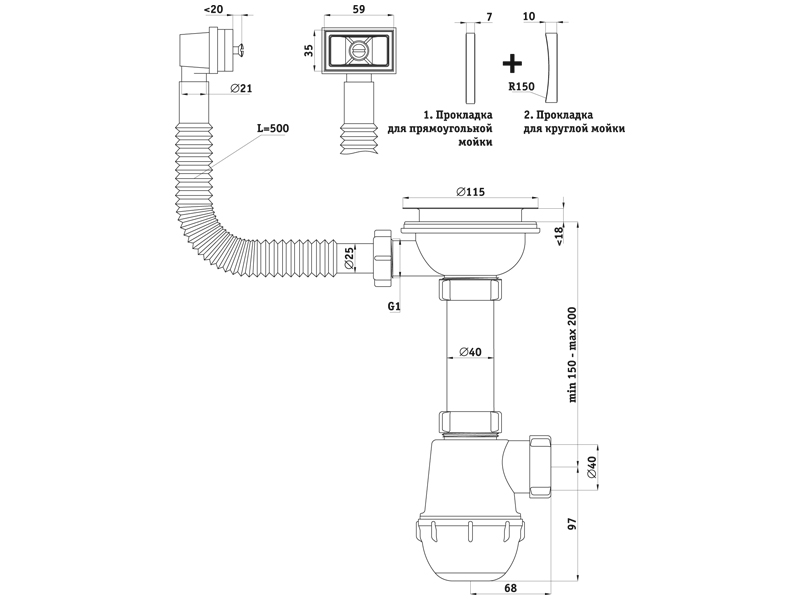
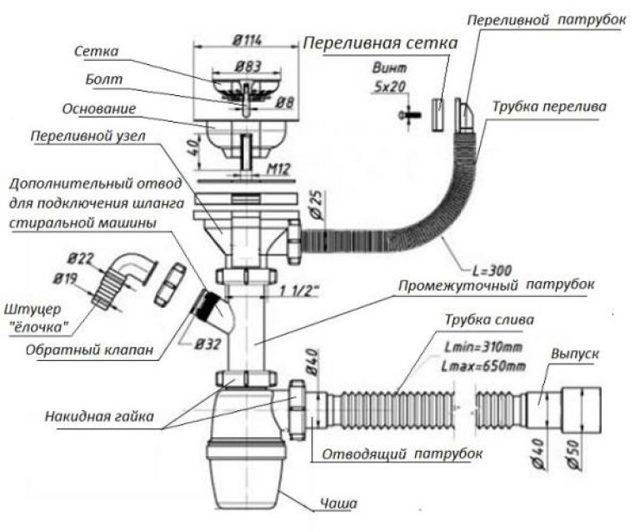
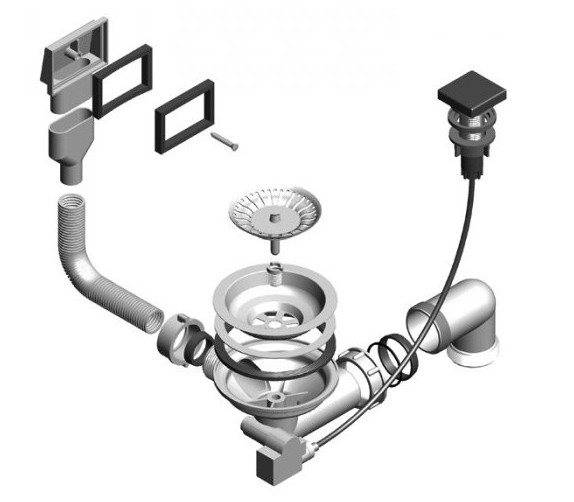
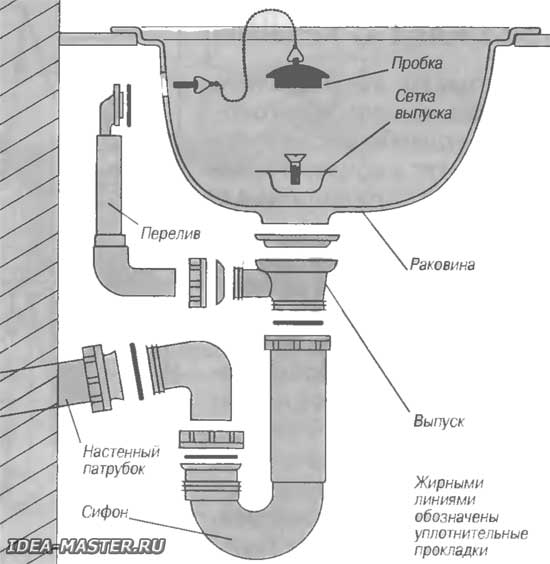
The structure of the drain-overflow system
The drain-overflow system is a hydraulic seal that ensures the flow of waste fluid into the sewer.
The structure includes: an upper overflow hole, a lower drain and a siphon that connects these elements of the system with the drainage pipes.
The siphon plays an important role in the process of installing plumbing, it prevents the pollution of pipes, the appearance of an unpleasant smell from the sewer.
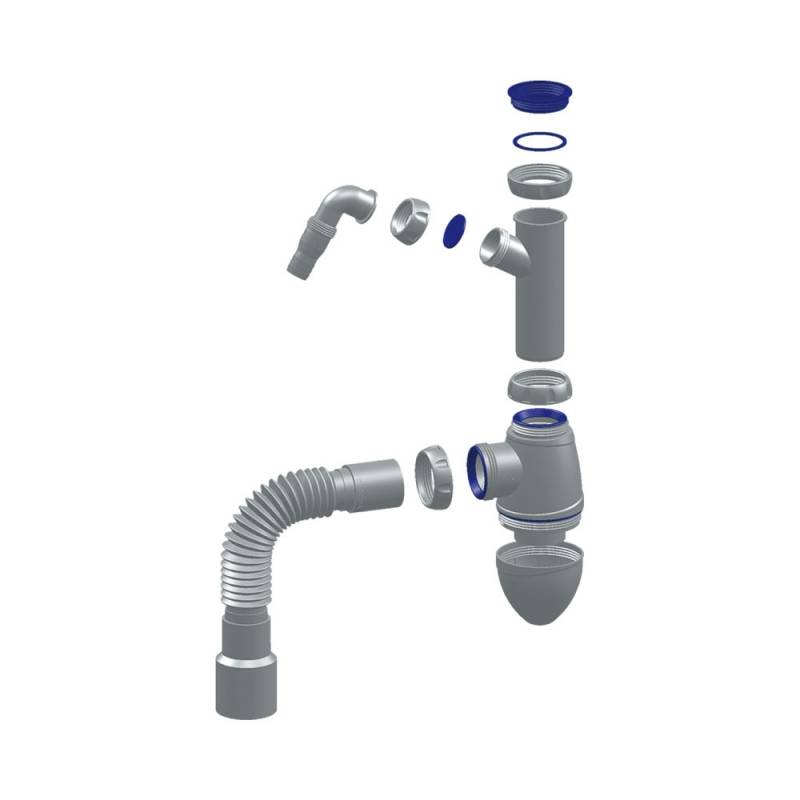
The design of the glass includes:
- main building;
- fixing rubber gasket;
- protective mesh;
- drainage system, the purpose of which is to connect the element to the sewer;
- pipe for water drainage;
- gaskets to ensure the integrity of the cone;
- a screw required to connect individual elements;
- nut for fastening the mechanism;
- plastic adapter;
- protective pads;
- plastic lining.
The siphon of the drain system fully regulates the process of the passage of liquid through the pipes
That is why special attention should be paid to its choice.
First of all, it is important to check the reliability of the constituent elements. At the same time, their technical characteristics depend on the material from which they are made.
As a rule, when choosing a design, it is necessary to take into account the scope of its application. Mechanical, brass, bronze products are well suited for a sink located in a restroom. At the same time, for the kitchen, the best material for the drain system is polyethylene, polypropylene.
The device of the drain-overflow system
Sewer connection
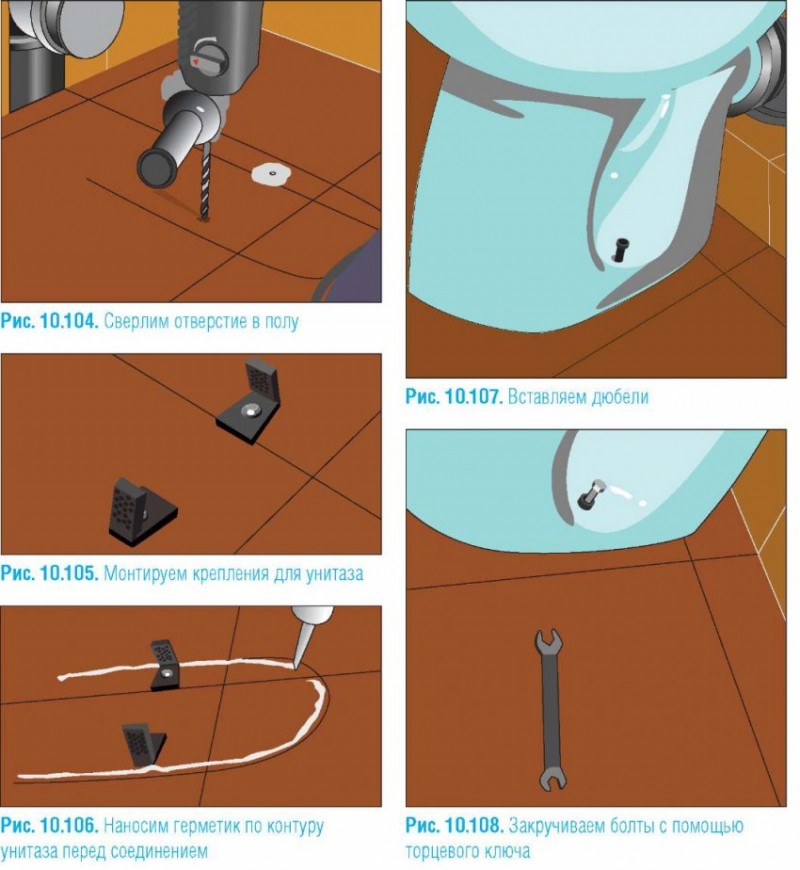
In any bathroom, there is already a drain for sewerage, but in private self-builds this may not be the case. If this is your case, then before installing the bath, you need to drill three holes in the floor - for sewerage, hot and cold water. Further, the corresponding pipes are connected to them. Only after this is the plumbing fixture installed.


Step-by-step instructions on how to connect the bath to the sewer:
A corrugation and a siphon are used to connect the sewer outlet and the bath
Before installing them, it is important to check the level of the bath, the location of the drain pipe and its diameter. Only after that the necessary plumbing details are selected;
Overflows are installed first
There are two of them - through passage (through, central) and shut-off. Through is mounted in the drain of the bath, and locking in the side end. Before installing a through overflow, you need to assemble the siphon;
Assembling a siphon with your own hands is very simple. A black rubber gasket is inserted into the structure itself. A nut is installed in the central overflow, it must be pushed into the hole by 3–4 mm. After you need to press the gasket in the siphon. For this, an overflow is screwed into it.
Please note that plastic threads do not need to be sealed, so FUM tape is not used. Next, the output to the corrugation is set
It is mounted in the upper part of the siphon, above the water lock, a cone gasket must be installed on this pipe. It is pressed with a plastic nut;
There are two corrugations in the bath: drain and sewer. The drain has a small diameter, it is installed on the side overflow. This corrugation is also connected to the siphon with a gasket and a nut. The sewer corrugation is also connected by a threaded method with a nut, and the overflow is similarly fastened;
Each siphon has a cleaning hole, which is closed with a solid nut. The connection must be sealed with a rubber gasket (white or yellowish). This is necessary for urgent repairs when the drain is clogged;
If you have a plastic pipe to exit the sewer, then most likely it already has a gasket. If not, you need to additionally seal the mount. To connect a plastic sewer corrugation from a bathtub to a cast-iron or other pipe, you will need a special adapter;
After completing the collection of the siphon constructor, you need to check how it will be installed. Overflows are installed in the intended places. To do this, a double elastic band is placed in the central hole of the bath, and a single thin one in the side hole. Next, a siphon is installed and tins are attached to the holes. With the help of a bolt, the mesh takes root. A transitional overflow is also attached;
To connect the sewer and corrugations, the side surfaces are lubricated with silicone sealant or soap. This will make it easier to connect the pipes. After they are additionally treated with a sealant. It is desirable to stretch the corrugations without kinks, otherwise water will not pass through them well.
This completes the process of connecting the bath to the sewer. Check the connection points of the siphon and overflows - water should not drip from them. The described method is the simplest and most affordable. Connecting brass structures is done in a similar way, but such siphons are 3 times more expensive than plastic ones.
Video: How to connect a bath to a sewer
Instruction
Siphon assembly diagram.
The siphon itself is a kind of Lego constructor, and at first it is not at all clear how to assemble it. To assemble it, first you need to take the bottom overflow, into which the gasket is inserted. It will be located at the bottom of the drain hole. At the same time, the upper overlay is applied to the hole and baited tightly with a screw.Do not tighten the screw too much - the siphon body (bath) is very fragile, it can crack.
In the same way, the installation of the upper overflow neck is carried out. In order to avoid problems when connecting the pipe (removes an unnecessary part of the water) and the drain neck, it is better to direct the first one a little to the side, and not vertically down.
The corrugated hose is connected to the drain and overflow (instruction included). The gasket must be installed with a thin edge to the drain and overflow necks. It should be remembered that the nut must first be put on the corrugated hose and only then the gasket.
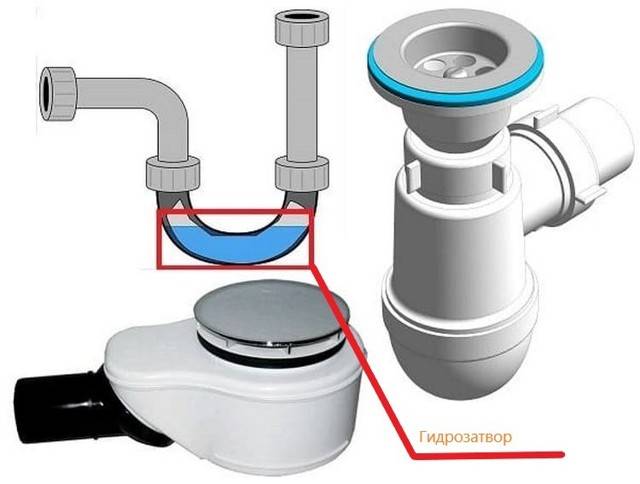
A water seal is attached to the drain hole under the bathtub. As described above, the drain hole should be as clean as possible so that there are no sealing problems.
No matter what model of siphon a person wants to install in the bathroom, the water lock is connected to the neck with a union nut + a flat or cone gasket
Scheme of installation of a siphon for a bath.
The siphon is connected directly to the sewer pipe. For some siphons, a connection is provided directly through the socket of a plastic pipe, but there are models that are connected by a sealing cuff. If the sewer pipes are cast iron, then the cuffs must be mandatory.
After these works, it is necessary to check how high the quality of the bath siphon assembly is. To do this, the bathtub is half filled with water, all joints of the siphon are checked. If there is leakage, then you just need to check how well the nuts are tightened. In some cases, leakage is caused by distortions.When assembling a bathtub siphon, no special effort is required - all the connecting materials of the siphon must be precisely and clearly designed. Places, especially on connections with a sewer pipe, should be treated with sealant. After it dries, check the siphon system for leaks again. With proper installation and assembly, water drops will not leak out. In many cases, after assembling the siphon, even if there is an instruction, the smell may leak from the sewer pipe. This means that the siphon assembly is incorrect. In any case, it is immediately necessary to check the siphon for a leak and for the presence of a smell, only then seal the junction of the corrugation and the sewer.
Some manufacturers provide very detailed assembly instructions for the siphon parts. But, in any case, the main thing in the siphon itself is not only the correct assembly, but also its tightness.
Standard siphons and semi-automatic ones are assembled almost the same according to one instruction.
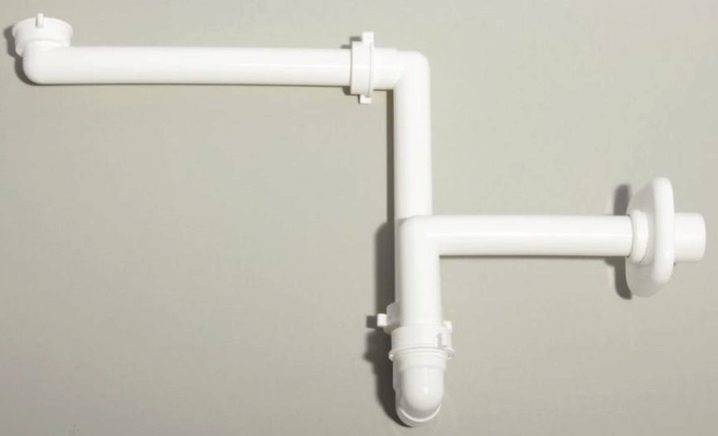
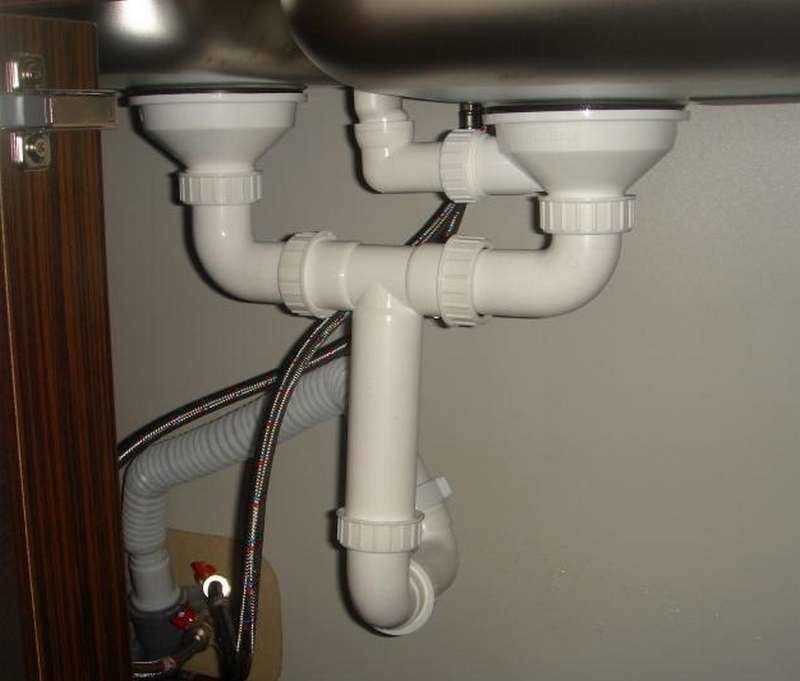
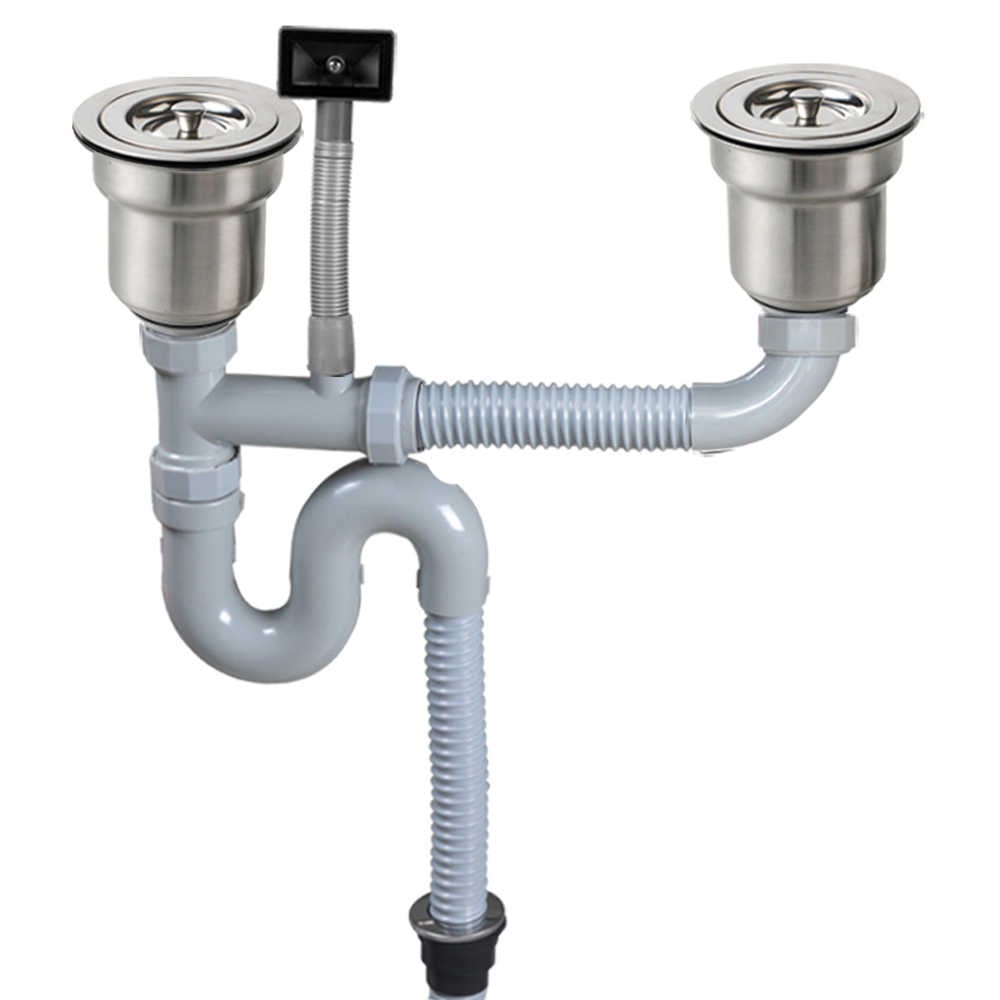
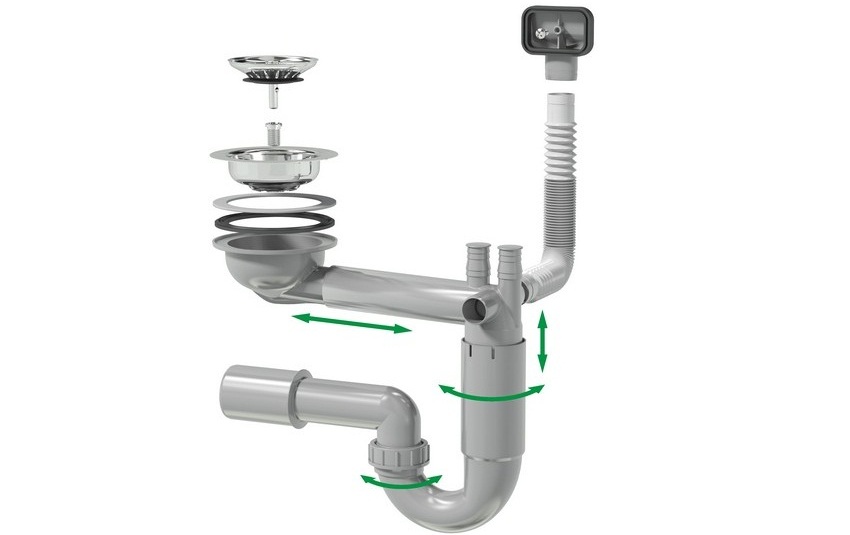
Siphons for non-standard equipment
For non-standard models of double "paired" sinks, siphons equipped with two outlets are used. Such siphon devices are connected to the drains of both sinks, and a little lower along the drain of the waste water, they are combined into a common flask.


As with single models, the design of siphon devices for drain systems with two outlets is pipe or bottle type
In addition to corrugated pipes D32/40/50 mm, you can also find universal products on sale, equipped with a stepped end of the spout, which are conveniently adapted to any size.
It is not difficult to hide the drain systems of such structures in a niche, covering them with a decorative screen.But it is worth remembering that if the bend of the outlet pipe turns out to be too short, there is a high risk of an unpleasant sewer "aroma".
How to connect a siphon to a sink
- Types of siphons
- Bottle and knee designs
- Process details
- Washbasin connection
- Practical recommendations
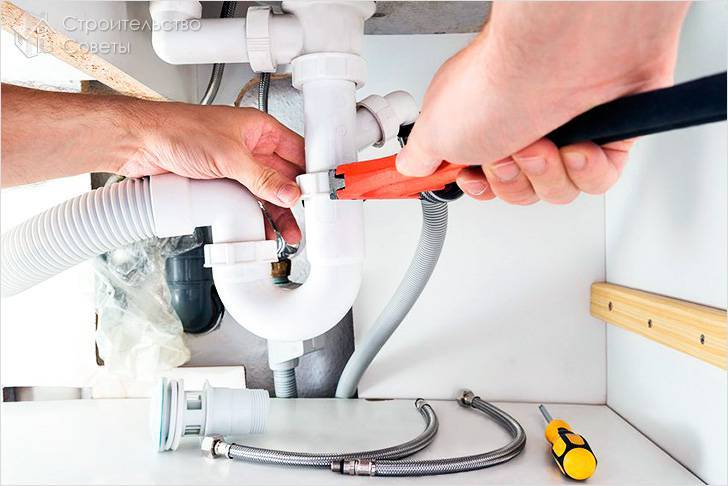
Installation of plumbing equipment both in the kitchen and in the bathroom presupposes connection not only to the water supply, but also to the pipe of the sewer system. Most owners of apartments and houses mistakenly assume that the connection task must be performed by professionals. In fact, the installation of a siphon is not so complicated and the installation does not require any specialized tools and a lot of time. After reading the following, everyone can find the answer to the question of how to connect the siphon to the sink.
Design
According to their design, siphons are divided into corrugated, pipe and bottle.
corrugated model
It is one of the most popular and easy to assemble. Such siphons are a hose that easily bends and takes the required shape. With the help of special clamps, the pipe is fixed in one position. These models can be easily removed and cleaned if necessary.
Pros:
- compactness: the corrugated model takes up little space under the sink;
- ease of assembly and operation;
- the hose can be bent as you like, as well as make it longer or shorter.
Minuses:
- from constant exposure to high temperatures, the corrugated hose can be deformed and lose the necessary shape;
- grease and dirt can accumulate in the folds of the pipe, which can lead to blockages.
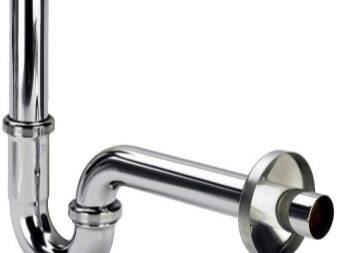
Pipe siphons
They are a pipe of various sections, which, when assembled, have an S-shape. Previously, such models were in great demand, but with the advent of corrugated models, they faded into the background. Nevertheless, tubular models are still popular.
Pros:
- have a clear fixation;
- have high strength;
- clogging resistance.
Minuses:
- if it became necessary to clean this version of the siphon, then the pipe has to be partially disassembled;
- takes up a lot of space under the sink.
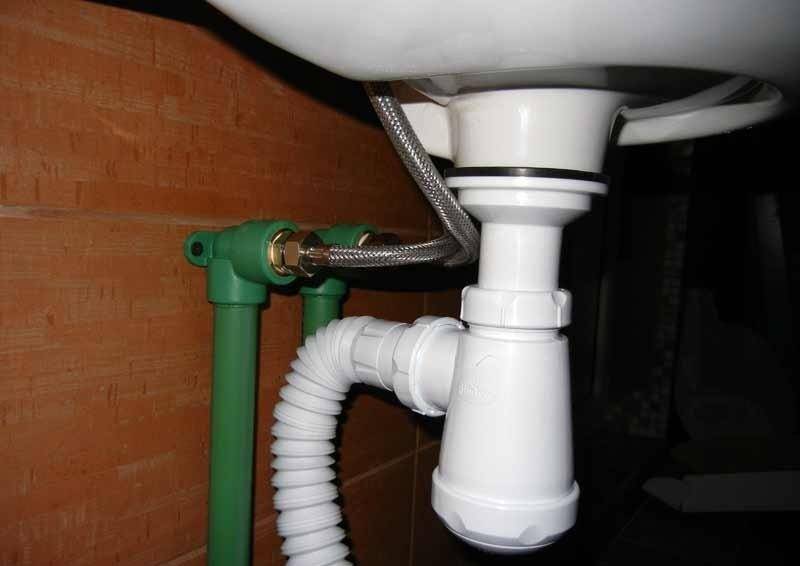
bottle siphon
It differs from the previous options in that it has a special sump. If necessary, the sump can be easily twisted. It is this model that is ideal for the sink in the kitchen. In the modern plumbing market, you can pick up a metal or plastic bottle siphon.
Pros:
- usually such models have two outlets - if necessary, you can connect, for example, a washing machine to the siphon;
- if any object accidentally falls into the sink, it will fall into the bottle part of the device, where it can be easily reached;
- prevents blockages.
Other models
In addition to the above design options, flat and double siphons can be noted. The first ones are usually installed to drain the water from the shower, and the double ones are designed for double sinks.
Siphons with overflow are usually used for kitchen sinks. An overflow is a device by which water does not reach the edges of the sink.
In addition, siphons may differ in the material used to make them.
One of the highest quality siphon options are brass models. Their price is yours, but the service life and reliability exceed other models.Such siphons are coated with a special coating that prevents the metal from oxidizing.


It is worth noting products made of non-ferrous metals or steel. A copper plumbing siphon is usually used exclusively as a design move. Caring for him is quite painstaking. This also includes bronze models, which give an aesthetic appearance, but require maintenance and are not so easy to install.
Steel products have a long service life and a high price. Also, to install such a model, you need to know the exact dimensions of the future pipe, because steel, unlike the corrugation, does not bend.
Cast iron products have been used in the past. The reliability of such siphons is very high, but the assembly is extremely difficult. Many seek to change cast-iron products for plastic ones. With the dismantling of cast iron parts, problems can also arise. For their fastening, a cement mortar was previously used, which must be broken when replacing.
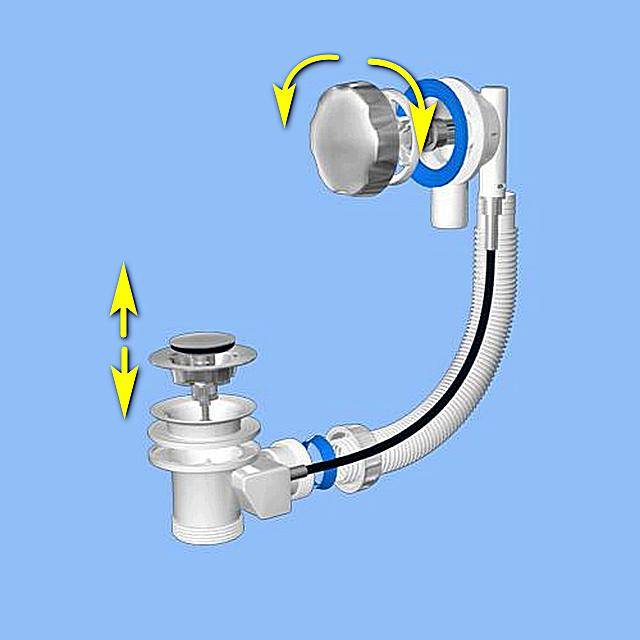
Automatic or semi-automatic siphons
They are a fairly new product on the plumbing market. Such devices are installed in the bathroom or in the shower. On the top of the siphon there is a special cover, which, when pressed, falls and water is collected. In automatic siphons, the lid rises on its own with a large amount of water to prevent flooding. In semi-automatic, this happens when you press it again.
Siphon selection. Design features
Usually the drain-overflow system is included with the sink, it is designed specifically for the selected model.But if it so happened that the product is not equipped with drain fittings or the installed siphon is out of order, you will have to purchase a new one. Among the large selection of drain systems, several main types of fittings can be distinguished based on the design features of each.
- Rigid pipe siphon. It consists only of a set of pipes connected to each other or one solid pipe. The water seal is formed by bending the main part of the system. If the siphon is non-separable, then its lower part is equipped with an inspection hole closed with a stopper. It is necessary to clean the system and remove fatty deposits.
Rigid pipe siphon
Bottle. The main part is made in the form of a bottle, in which a water seal is formed. The outlet pipe can be either rigid or in the form of a corrugated pipe. The main difference compared to the previous type is the possibility of easy disassembly of the siphon body. If a small object has fallen into the drain hole of the sink, it can be easily removed by unscrewing the bottom of the bottle.
Corrugated siphon. The simplest type of drain valve. It is a corrugated pipe. One end is connected to the outlet (the part that is placed in the drain hole), and the other to the sewer pipe. The siphon effect is achieved due to the S-shaped bend of the pipe. The cheapest and easiest to install and assemble, because. has the least number of constituent elements. However, the corrugated pipe very quickly accumulates fat deposits.
Double siphon (triple, etc.). It is used exclusively in cases where the sink has 2 or more bowls. It features a double neck and outlet, which are connected by a common siphon.
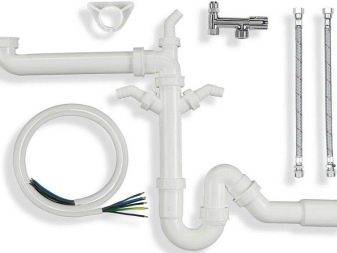
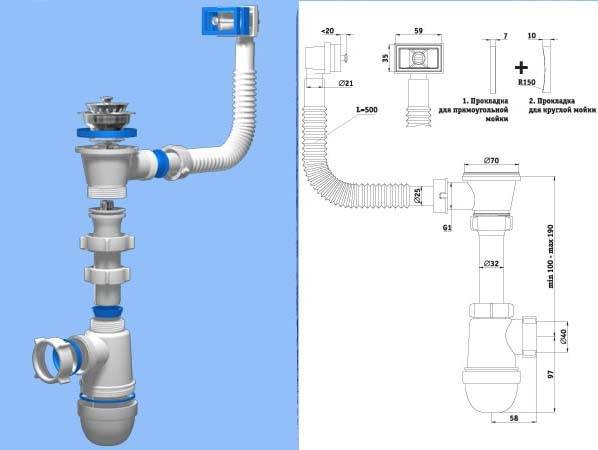
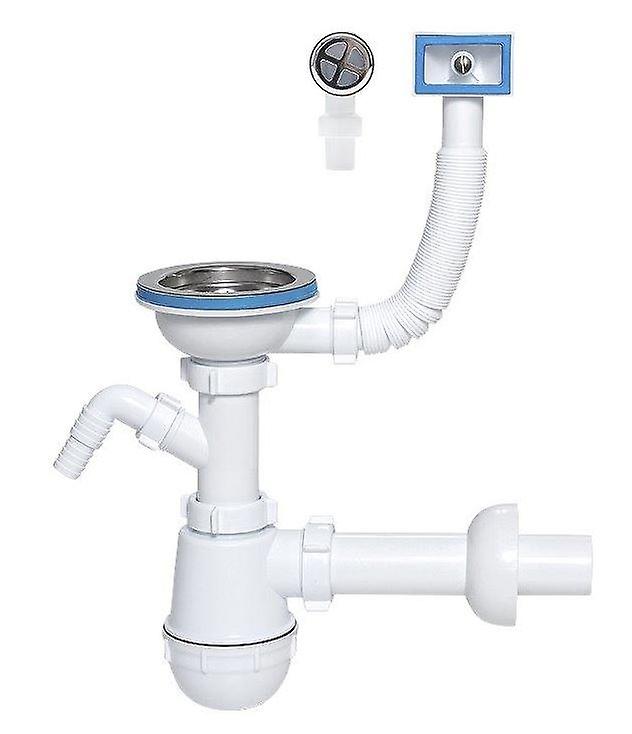
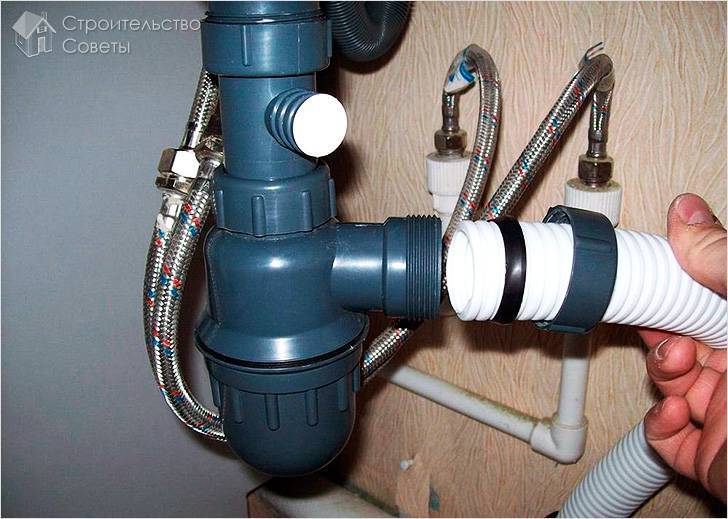
System with an additional outlet. Very handy for washing machine.It is equipped with an additional branch pipe, which is located on the neck - between the outlet and the bottle.
System with additional outlet
Siphon with two additional outlets. Provides connection of the dishwasher in a set to the washing machine.
Siphon with two additional outlets
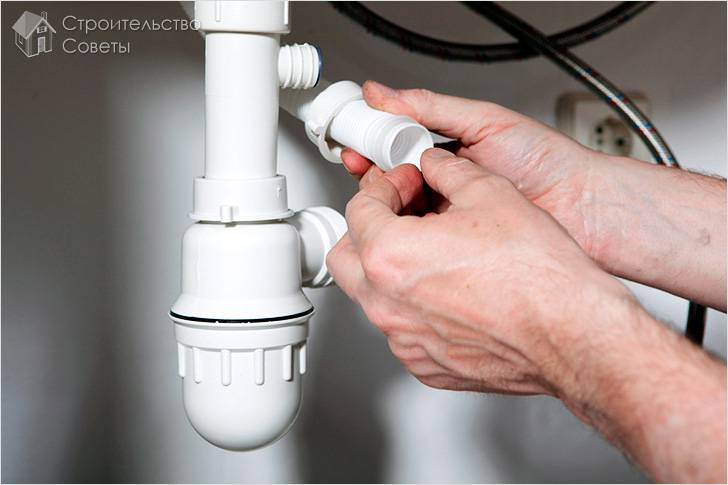
Siphon assembly and installation
The siphon always comes with assembly instructions. This greatly simplifies the process if you are doing this for the first time.
Pay attention to the important nuances, following which you will assemble the siphon with high quality:
Tightness is an important requirement for every connection. Even if you bought an assembled structure, check the presence of sealing gum at each joint
Also make sure all nuts are tight. Regarding the latter, do not overdo it, because the plastic thread is very easy to break.
When installing a siphon, a sealant is often needed. For example, some rubber gaskets can be smeared with clear silicone. This will make the connection even better.
If the design has a screw to fix the protective grille, then make sure that there is a metal nut in the main pipe. When tightening this bolt, you should control the correct location of the sealing gum. Also, do not overtighten the nut, otherwise its threads can be stripped.
The connection of the drain pipe to the sewer pipe must be carried out only through a rubber seal.


The process of assembly and installation of the siphon is carried out simultaneously. Apply a rubber seal to the drain hole in the sink and fix the protective grille. In some types of gratings, the gasket is installed from below. Due to this, the water in the sink will not stand.If the design involves the installation of a gasket from above, then it can not be used, and the docking site should be thoroughly lubricated with sealant.
Attach the intake pipe from below under the sink and fix the drain grate with a screw or a plastic nut (depending on the design of the siphon). Make sure that the flange with the gasket does not scroll. Otherwise, the gasket may move and the connection will not be tight.
Next, you need to assemble the main part of the siphon. Put a nut and a cone gasket on the outlet pipe under the sink. After putting on the upper part of the siphon to the required height and fix it with a plastic nut.
It is necessary to put a flat rubber gasket in the siphon cover and screw the second part of the body.
Now put on the outlet drain pipe, which should also have a nut and a rubber cone gasket. Attach a corrugated hose to it, which you direct into the sewer hole.
Separately, it is worth mentioning the docking of the siphon with the sewer. In most cases, the diameter of the hose mm. If the corrugation has Ø50 mm and the same size of the sewer pipe, then the presence of a sealing gum on the socket is sufficient. If the corrugation size is 40 mm, then you will need to buy a rubber cuff with a transition to Ø50 mm.
So, we learned with you that the installation of the siphon and its assembly can be done independently. Now, if in the kitchen or in the bathroom it will be necessary to replace the siphon, then you can do it on your own.
Drain hole cleaning.
The reasons for the appearance of blockages in the drain hole, in addition to hair falling out naturally, are small litter, spools from clothes, pet hair.Accumulating in the drain hole, they form a lump that prevents water from passing through the sewer pipe. A lump of dirt and debris does not allow water to flow freely from the bathroom, collect further debris on itself, and, as a result, cause a foul-smelling blockage. So, let's act. In order to clean the drain hole in the bathroom, there are several ways. But initially we take the path of least resistance.
remove the drain cap and clean out the debris under it. Initially, before removing the cover, it may seem to you that everything is clean there. But visual inspection is deceiving. A huge amount of hair accumulates under the drain cover. This is especially true for drain holes with a cross plug. There are baths in which plugs are pre-installed. For this type of bath, before cleaning the drain hole in the bath, you need to lift the plug and unscrew the guide plate. Only after that you remove the cork.
To cleanse a deeper blockage of hair, choose any of the following methods:
- wire hook. You can safely use wire hangers (a bent wire hanger). We unwind the shoulders so that you have a hook with a handle. We insert the tip of the hook into the drain and pull out the hair or other objects that caused the blockage. Never try to push hair or other debris down the drain. Pull the hook towards you and pull the clog out, then throw it in the trash can.
- using a sink plunger. This method is suitable for a small blockage that prevents water from draining. The plunger should be selected according to the size of the drain hole. In principle, this is not difficult to do.Most often, the drain holes in both the bathroom and the kitchen sink are the same diameter, so the plunger will become your assistant for any small blockages. We close the drain hole with a cork, lubricate the plunger with petroleum jelly and press it firmly against the drain. We make about a dozen sharp reciprocating movements. If the water does not go away, then we clean the drain hole by adding hot water. To do this, we collect hot water in the bathroom so that it covers half the rubber bowl of the plunger. Then we immerse the plunger into the water at a drain hole at a slight angle, make several movements with it, and then abruptly pull it out of the water. It is impossible to push hair and other rubbish inside with a hook, since you can only aggravate the situation.
- cable. Serious sewer blockages starting from the drain hole are perfectly eliminated by a plumbing cable, which is a twisted wire coiled into a spiral. To make it convenient to rotate the cable, there is a wooden or plastic handle at its end. The length of the sewer pipe, which can be cleaned with such a cable, is from 5 to 9 meters. To start cleaning, insert the end of the cable into the drain hole and begin to slowly rotate the handle, pushing the cable forward with the other hand. The cable, which consists of hundreds of small interlocking hooks, easily grabs hair from the drain and removes accumulated debris. Feeling the tension in the cable, know ahead - a barrier of hair and litter. Therefore, we pull the cable back and forth several times. Then, breaking through the blockage, drain the water and pull the cable.
- scotch. To clean the drain hole, you can use any adhesive tape that is in the house. Cut off a strip 50 cm long.Then we put it in the drain and draw it along the inner surface. This way all the hair will stick to the tape and you will clean the drain. After that, do not forget to turn on the water and wash off the small remaining particles remaining in the drain hole.
- chemicals. At a home improvement store, ask the salesperson for help choosing a chemical that can dissolve wool and hair in the drain. Otherwise, there is no point in buying household chemicals.
Pour or pour the drain and sewer pipe cleaner into the drain hole and leave for the time specified in the instructions, and then rinse with running water
We would like to draw your attention to the fact that it is impossible to leave the product in the drain for less or more than the time indicated in the instructions. In the first case, the action of household chemicals will be ineffective, in the second, there is a danger of deformation of the material from which the pipes are made. Also, when working with chemicals, you should follow the safety rules.
Work with chemicals only with gloves
Also, when working with chemicals, you should follow the safety rules. Work with chemicals should only be done with gloves.
Varieties and principle of operation of equipment
Equipment is needed to drain the used fluid. Thanks to the device, the bath does not overflow with an uncontrolled supply of liquid. The design provides for the presence of 2 holes - in the wall and at the very bottom. Hoses are connected to them, which are also connected to the sewer.
Before choosing a drain-overflow, you need to consider the advantages and disadvantages of all types.
Features of mechanical devices
Mechanical devices are considered the simplest type of construction. They are common, although they began to give way to more advanced models. The peculiarity of mechanical devices is that there are no levers, moving parts. A set of water occurs when the cork is closed, and when opened, the liquid descends.


The advantage of products is reliability. A mechanism of this type rarely breaks, but lasts a long time. The drain hole is closed with a stopper manually. The latter is attached by a chain to the drain grate, which makes it easier to remove it from the hole.
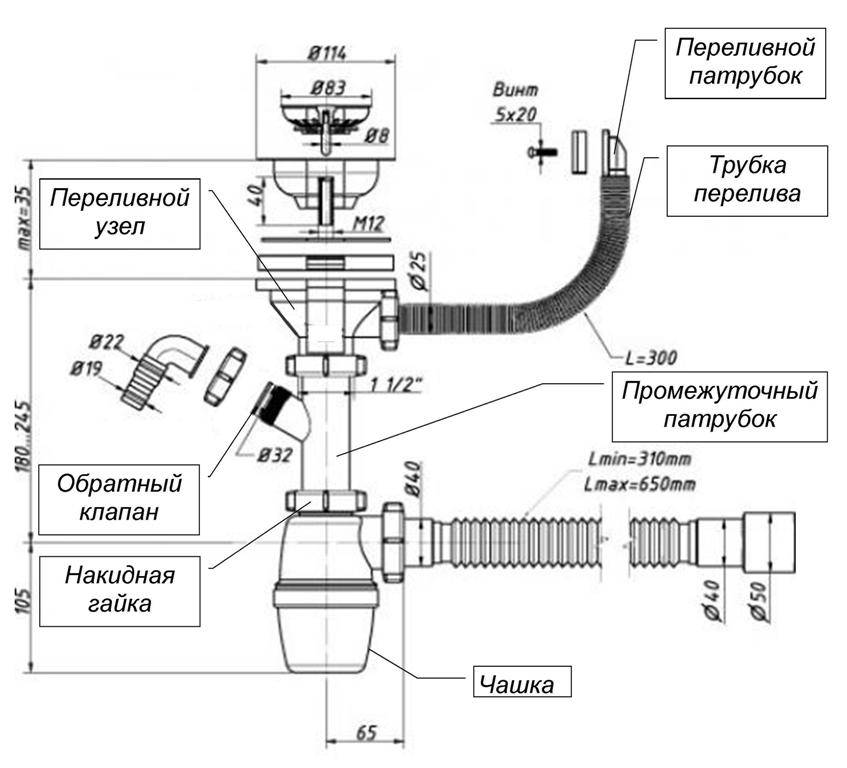
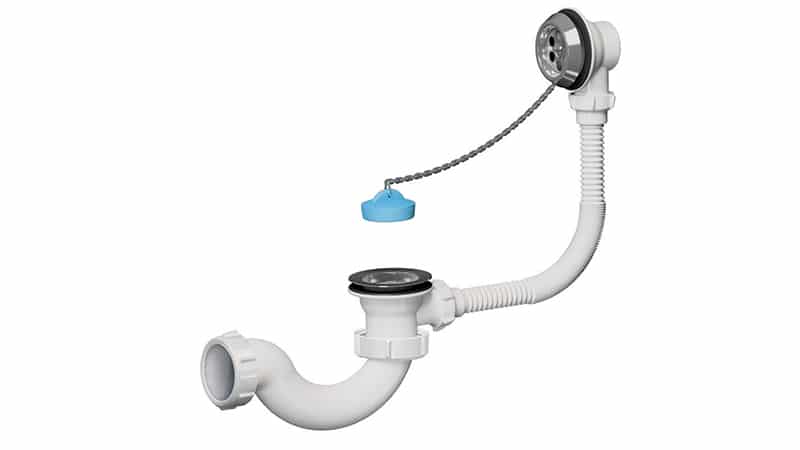
Semi-automatic drain-overflow with chrome-plated control handle, chrome-plated plug and drain grate.
The design of the device is as follows:
- Siphon. This is an arcuate branch pipe of a removable type, which plays the role of a water seal. It is needed so that unpleasant odors from the sewer do not enter the bathroom. It connects all mechanisms with each other, is responsible for connecting to the sewerage system.
- Connecting tube (corrugated). Serves to divert water that enters the overflow to the siphon.
- Additional pipe. It can be both soft and hard. Responsible for draining water.
- Drain neck. It is fixed in a hole located in the bottom. Represents the chromeplated steel funnel helping to detain large particles of pollution. It is mounted on an expanding branch pipe equipped with a built-in nut. Docking of parts is carried out through a reinforced metal screw. The rubber gasket is responsible for the waterproofness of the device.
- Overflow neck. This is the part of the product that is inserted into the wall of the bathroom. The principle of construction is the same as that of the drain, the difference is in the way it is installed.
The kit also includes connecting elements that are needed to increase tightness. For example, flat or cone type gaskets. They are used together with a union nut.
In addition to reliability and durability, the advantages of mechanical systems for the bathroom are low cost, simple assembly. But there are disadvantages, such as rapid wear of the seal.
Characteristic features of semi-automatic devices
The semi-automatic is considered an advanced modification of the mechanical design. The number of elements in this system is much larger. In addition to traditional components, a control unit is provided, which is responsible for raising and lowering the plug. The system is equipped with a cable, a shutter valve. The latter opens or closes depending on the position of the closing rod.
The control unit consists of several parts. It is equipped with a valve, a handle, a rotary ring, a button. To start the system, you need to turn the lever, and in some models, press the element in the form of a button.
Advantages of semi-automatic types:
- attractive design;
- a convenient way to close the drain - no need to bend down, wet your hands;
- user-friendly installation, operation and maintenance.
But such systems are more expensive than mechanical ones.
What are the advantages of automatic drains and overflows
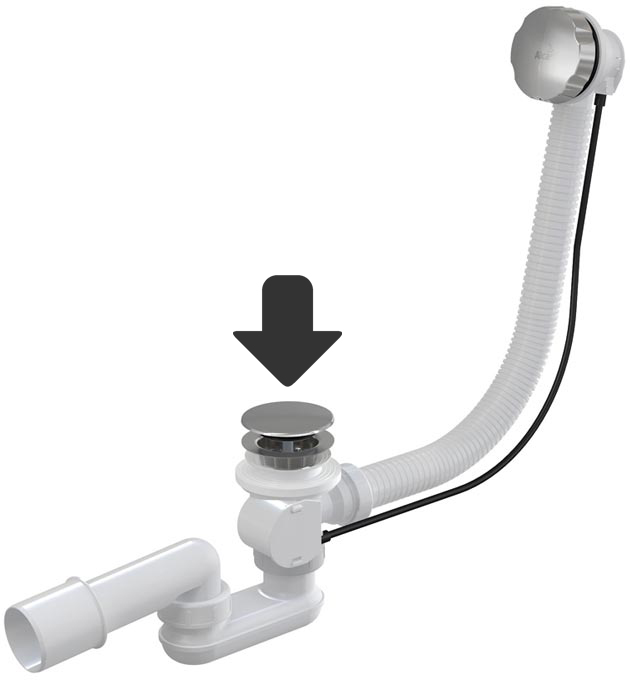
Automatic is an expensive variety. It has a complex structure. There is a button-valve "click-clack", which is equipped with a latch, built-in spring. As in semi-automatic systems, the button is pressed manually. Then the plug falls, the drain hole closes. If you repeat the manipulation, the hole will open.
Buttons of this type are designed in different styles. The most popular option is metal.Nickel or chrome plated brass and copper alloys are often used.
Advantages of machines:
- attractive appearance;
- ergonomics with care for user comfort;
- convenient descent of water;
- compactness.
The main disadvantage is the high cost. In addition, it is difficult to connect such a drain-overflow on your own, here you need the help of specialists. Difficulties may arise when replacing a button. Such systems are characterized by the vulnerability of the valve spring.
Drain-overflow from polypropylene differs in the democratic price, durability and durability of elements.