- Before the purchase
- Cleaning
- Varieties
- Shower cabin in a wooden house and the secrets of its assembly
- What else to look for when choosing a siphon?
- Optimal shower dimensions
- Exploitation
- Exploitation
- Installation and care of the drain
- Installation management
- Drain Care
- Arrangement of a drain for a shower cabin
- Shower channel installation
- Installing a drain
- Siphon installation
- Types of cabins and equipment
- closed models
- open cabins
- Wall and door material
- Choosing the Right Drain
- How to make a podium for a shower enclosure
- Concrete
- Brick
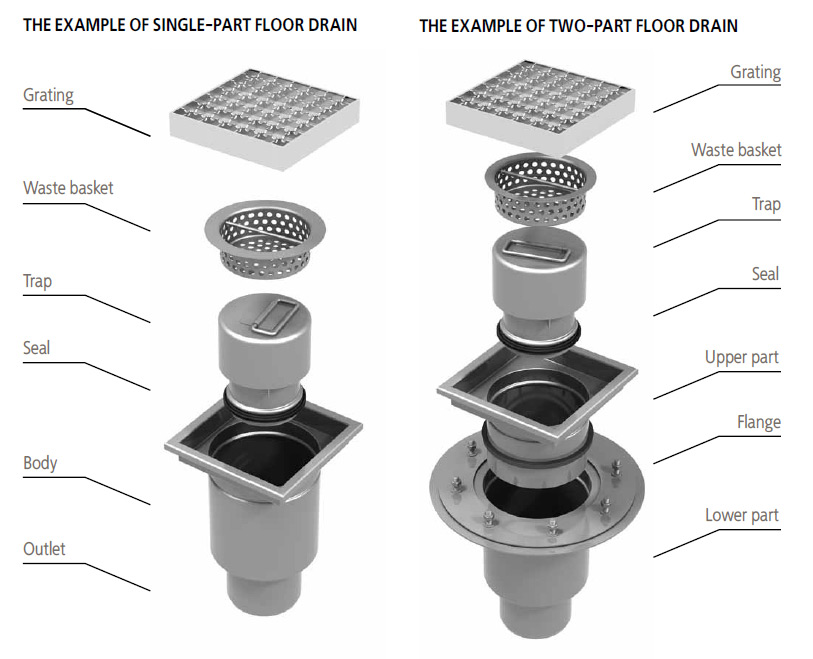
- Types of plums
- Rectangular structures
- Tools and materials for drain installation
Before the purchase
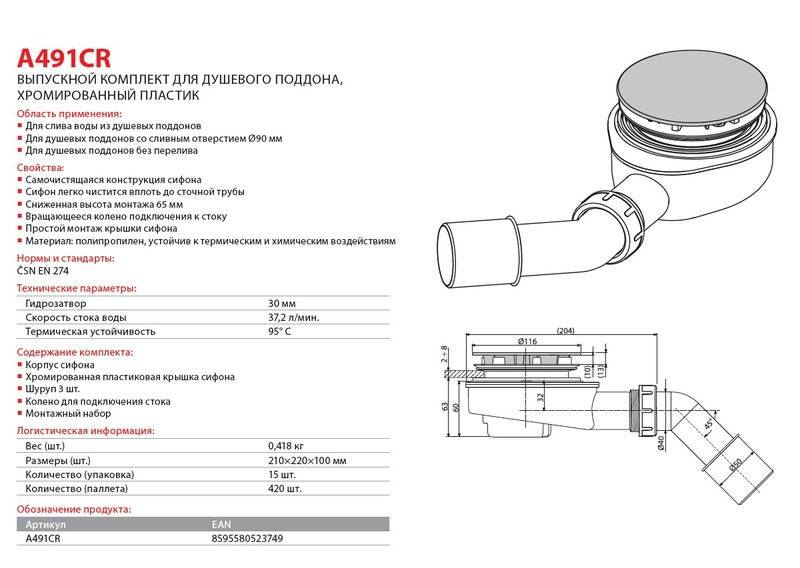
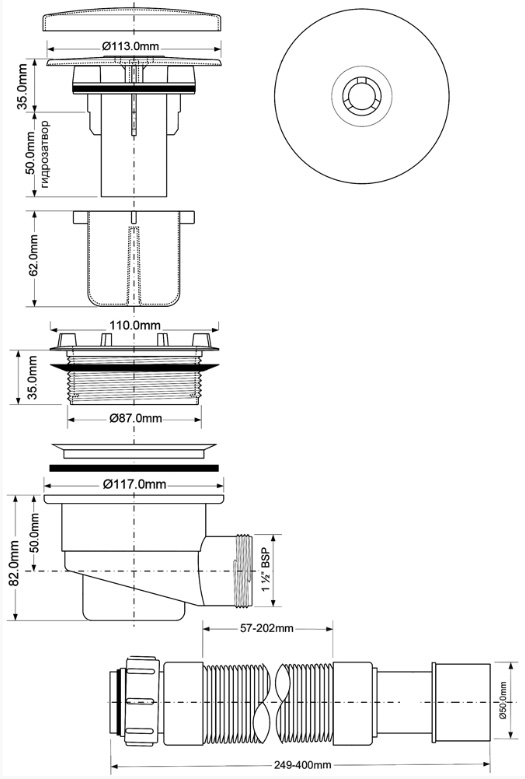
When choosing a shower siphon that is right for you, it is recommended to take into account a number of nuances. Among them, the most important is the diameter of the drain hole. According to European standards, it should be 52, 90 and 62 mm. Most often, modern varieties are produced of just such diameters, but there are cases when a negligent manufacturer does not comply with the technology. To avoid trouble, be sure to measure the diameter of the drain before buying.
The second important characteristic that you should pay attention to is the throughput parameter. It is determined from the calculations of the water layer allowed for the pallet
At a level of not more than 12 centimeters, a shower siphon with a diameter of 52 and 62 mm is used, if the value is higher, then it is better to purchase a design with a neck of 90 millimeters.
Cleaning
Since, in addition to the drain function, shower siphons also perform a protective role, it is occasionally recommended to clean them manually. Over time, a huge amount of mud residues and hair accumulate in the structure. In addition, the advantage of such a device is the ability to return them in case of falling into the drain of small objects.
To clean the siphon (which, by the way, can be done without waiting for blockages, at least for the sake of prevention), you need to unscrew the knee and clean out all the dirt and residues accumulated in it. For particularly stubborn dirt, a coarse brush can be used to remove stubborn dirt. For lazy people, a shower siphon that can self-clean will be a godsend.
Varieties
Based on the mechanism of action, all siphons are classified into three main groups.
Ordinary - the standard and most common option that most consumers are familiar with. The scheme of operation of an ordinary siphon is as follows: when the plug is closed, water collects in the container; when the plug is opened, the water goes into the sewer drain. Accordingly, it is necessary to manage such units completely manually. These siphons are considered completely obsolete, although they are the cheapest, budget ones. Therefore, most often they prefer more modern models with an improved mechanism.
- Automatic - such models are mainly designed for high pallets.In this design, there is a special control handle, thanks to which the user independently opens and closes the drain hole.
- With the Click&Clack design, it is the most modern and convenient option. Instead of a handle, a button is presented here, which is located at the level of the foot. Therefore, if necessary, the owner can open or close the drain by pressing.
More often there are models reaching 8 - 20 cm, therefore, for low containers, a low siphon is accordingly needed.
Shower cabin in a wooden house and the secrets of its assembly
After leveling and fixing all plastic supports, the pallet is turned over, placed on the floor (in any place suitable for mounting the cabin) and checked for stability. After making sure that the floor in the bathroom of a wooden house is in perfect order, they begin to assemble the front fence. It consists of a frame and filling (made of fiberglass or tempered glass). By the number of holes, they find the upper edge of the glass - there are more of them on it. According to the width of the guides - the upper profile - it is thicker.
The selected parts (the upper edge of the glass and the upper profile) are connected - the glass slides all the way into the groove of the guide. True, when sealing the joint, it is lifted from the groove, but only then to pour transparent silicone there (from a syringe) (used at the joints of horizontal elements) and slide it back into place.
The glass returned to the groove is fixed on the upper profile. This is done with a screwdriver and a clamping screw (there are special grooves on the edges of the glass with which it is attached to the frame). Excess silicone is removed with a rag or a well-soaped finger. Moreover, they are removed in a timely manner: a protective film on the sealant is formed 5-30 minutes after it is squeezed out.Similarly form the lower part of the front fence.
Then they go to the "flanks" - the side edges of the front panel - they put vertical racks on them (all the way) and screw them to the guides. Self-tapping screws are used as fasteners. They are screwed on the edges of the posts, which are equipped with their own seal and do not require additional sealing. The silicone sealant is put directly on the glass.
When installed correctly - with a large "petal" inward - there will be no puddles on the floor. When assembled, the front guardrail panels are placed on a pallet. All places of their contact with the bowl are coated with sanitary silicone. Ensure that the gutters remain clean.
The side panels are assembled in the same way. Their installation is somewhat knocked out of the knurled track - in addition to the junction of the pallet with the lower guide, fasteners, washers and vertical joints appear in it. The mating points, as before, are smeared with silicone, and the elements involved in the joints are fastened with self-tapping screws. Excess sealant is removed.
The assembly technology of the rear panel is no different from the installation of the front fence, and its installation is the same as the installation of the side walls on the pallet. Day design is gaining strength. During this time, the doors are prepared for hanging. The upper (adjustable) and lower (pressure) rollers are fixed in standard sockets. Silicone seals are put on the vertical edges of the glass: on the outer edge - with the "petal" outward, and on the inner edge - with the "petal" inward.
When installing the doors, the upper rollers rest on the upper guide, and the lower ones are pressed against the cabin until they are on the skids.Having screwed the bumpers, they begin to adjust the screws on the upper rollers, achieve a balanced operation of the wings: smoothness of their movement, tight closing and reliability of the suspension.
Then they mount the roof - a finished part, on which a rain shower can, an exhaust fan, a speaker (for connecting to a telephone / radio) and a backlight are fixed. All of the above elements are mounted on self-tapping screws, and the edges of the speaker (to avoid rattling) are also silicone. A supply flexible hose is attached to the fitting of the watering can.
Following the installation of the cap panel, they proceed to the installation of the remaining fittings: handles, mirrors and other trifles. Now we can assume that we have already considered how to install a shower cabin in a wooden house, there are formalities left. Then they connect communications and move the cabin to its workplace. They go inside and check the box for stability. Movements in the cabin should not cause crackling, which indicates the instability of the structure.


Usually such a defect is corrected by adjusting the supports. But in some cases, polyethylene foam pads are used to eliminate cod. They are placed between the pallet and the support beams. After fixing the problem and successfully washing, screw the decorative skirt.
What else to look for when choosing a siphon?
The mechanism of action and design are not the only criteria that must be taken into account when choosing a siphon. In order for the sanitary ware to cope with the tasks assigned to it with the highest quality and for a long time, read the information in the following table, and be sure to use the recommendations received when choosing a siphon for your shower cabin
Table. Criteria for choosing a siphon for a shower cabin
Selection criterion
Description
Drain hole diameter
In accordance with current standards, shower trays are equipped with holes having a diameter of 52 mm, 62 mm, and 90 mm. Before you go for a siphon, be sure to measure the drain hole of your shower tray. The information received will help you better navigate and choose the most suitable model of the sanitary ware in question.
Important note! As a rule, siphons for connecting to the sewer initially come with a shower cabin. If the existing device suits you completely, you can connect the pallet using it.
Bandwidth
This indicator is determined by the size of the water layer located above the drain hole
So that the full operation of the equipped system is ensured, the height of the water layer in the case of drains with a diameter of 5.2 and 6.2 cm should be 12 cm, and 15 cm if the diameter of the hole for draining water is 9 cm.
Additional elements
Siphons, no matter how high-quality and functional they are, tend to become clogged. If this moment is not foreseen in advance, cleaning the plumbing element in the future may require the complete dismantling of the system. To avoid such laborious work, it is better to initially buy a siphon that can clean itself, or give preference to a product equipped with a mesh for collecting small debris - it will not allow the drain to quickly and heavily clog.In accordance with current European standards, trays equipped with drains with a diameter of 5.2 cm and 6.2 cm are installed in such a way that, if necessary, unhindered access to the siphon and pipes can be obtained for checking their condition, cleaning, etc. In the case of 9 cm drains, cleaning is carried out through the intake hole. Important! It is forbidden to clean the pipes with compressed air. Because of this, the connections can be depressurized, which will lead to leakage.
Optimal shower dimensions
The dimensions of the shower room depend on two factors: the size of the room in which the cabin will be installed and the height / weight of its visitors.
If the dimensions of the room allow, then the cabin can be fenced off by more than a meter in length and width. There you can mount two shower heads or a shower plus a sink. It all depends on the needs and wishes.
For a large bathroom, you can install a shower cabin with several watering cans.
If the bathroom is small and the cabin is planned to be installed in the place of the former bath, then there is not much choice here, even a glass corner cabin is mounted in order to save space.
Little space is occupied by a standard shower.
In addition, in order to equip the stack, you need to raise the floor in the shower area by at least 10 cm. At the same time, the cabin itself will also rise, which is difficult in apartments with low ceilings.
The height of the cabin can be different - up to the ceiling or covering the head of a person.
The shower cabin does not have to be up to the ceiling.
Exploitation
Sink closures are easy to operate. Care consists in control and timely cleaning (if necessary).To clean the shutter device, the grate is removed, the water seal is removed from the glass, deposits are removed. Basically, mechanical cleaning is rarely resorted to. To prevent siphons from becoming clogged, experts recommend washing the shutter product once every six months for prevention. This is done using household chemicals suitable for plastic structures.
If a blockage occurs, air purge of the hydraulic seal under high pressure is unacceptable. It can lead to rupture of parts of the structure. It is also unacceptable to try to remove debris with sharp objects, as it is possible to damage the walls of the corrugated pipe or other parts of the gate structure.
Exploitation
Sink closures are easy to operate. Care consists in control and timely cleaning (if necessary). To clean the shutter device, the grate is removed, the water seal is removed from the glass, deposits are removed. Basically, mechanical cleaning is rarely resorted to. To prevent siphons from becoming clogged, experts recommend washing the shutter product once every six months for prevention. This is done using household chemicals suitable for plastic structures.
If a blockage occurs, air purge of the hydraulic seal under high pressure is unacceptable. It can lead to rupture of parts of the structure. It is also unacceptable to try to remove debris with sharp objects, as it is possible to damage the walls of the corrugated pipe or other parts of the gate structure.
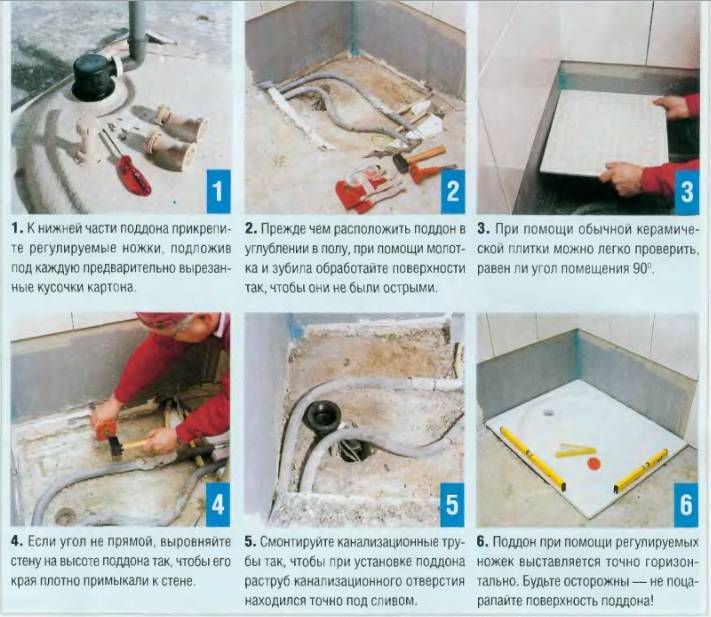
Installation and care of the drain
In principle, installing a pallet and connecting it to the sewer is not particularly difficult.It is necessary to solve 2 tasks - to ensure the horizontality of the pallet itself and compliance with the minimum gaps and slopes when it is connected to the sewer.


Installation management
Installation of a shower cabin drain begins with its fitting and marking on the floor of the design position.
In the future, it is recommended to follow the order of actions:
- the siphon will be connected to the sewer by means of a sewer corrugation (despite the fact that simple plastic pipes can also be used), based on this, knowing the approximate location of the drain hole, it is possible to estimate how long the corrugation will be useful;
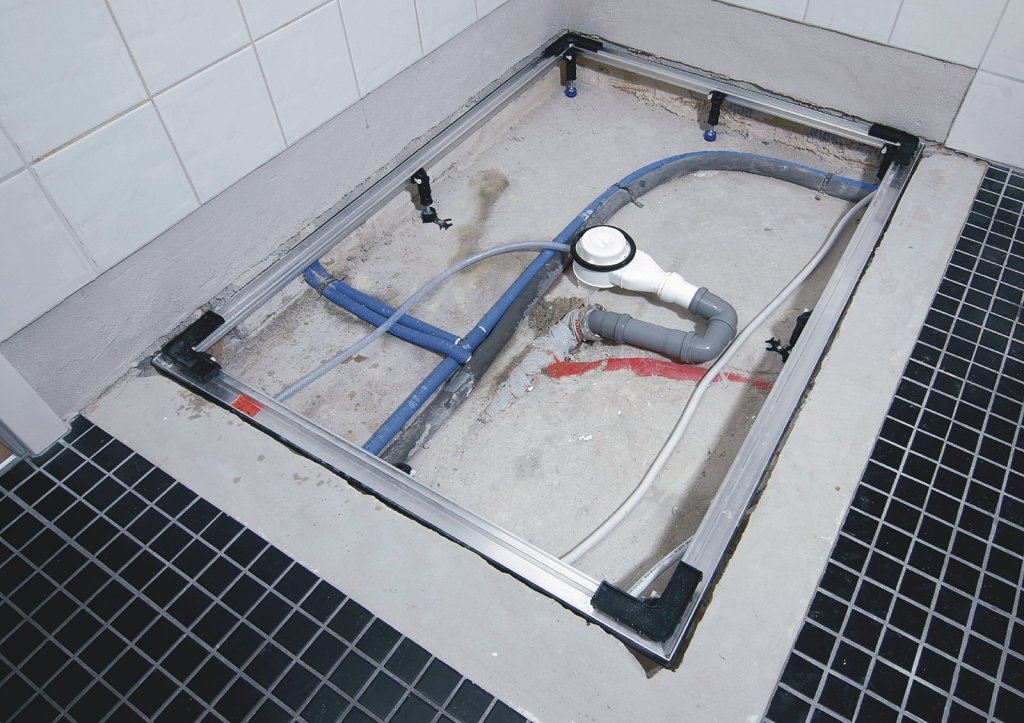
- for ease of assembly at the bottom of the pallet from the wrong side plans a frame made of iron profile;
- a corrugation and a siphon must be connected to the sewer. To connect the siphon and the corrugation, a plastic union nut is used; in addition, the joint can be smeared with sealant for greater reliability;
- after that, the pan is turned over on its side, an iron mesh is inserted into the drain hole (it retains large debris), a ring;
Then the pallet is turned over and installed in place. The legs, in most cases, are made with height adjustment, so that it is easy to achieve a horizontal shower tray. The skew is checked by a simple building level.
The installation instructions allow for additional strengthening of the structure. If the factory frame is not solid enough and the bottom still bends very strongly, then on the basis it is possible to lay a simple brick or make an elevation from a cement-sand mortar so that the pallet rests on it.
Drain Care
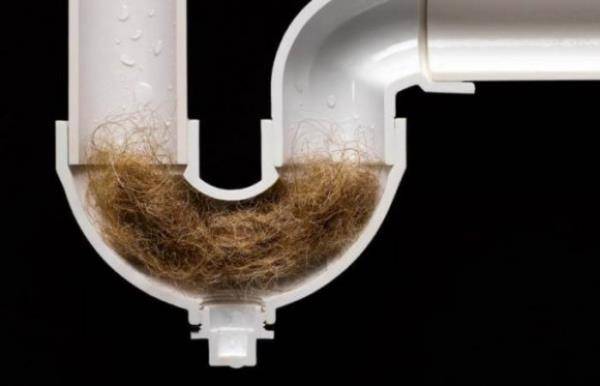
No matter how carefully the installation is carried out, it is still quite often necessary to do shower drain repair. The circumstance of this is simple - blockage and the impossibility of drainage, from this there is stagnation of water in the pan, and an unpleasant smell in the booth.
The main troubles that people face are bad smell and trouble with drain, all this is a consequence of the same trouble. As for the repair, or rather cleaning the pipes, it can be done in several ways, and in the question of how to clean the drain at the shower cabin, a lot depends on the method of connecting the pallet to the sewer.
If not corrugated, but simple plastic pipes were used, then it is possible to distinguish such cleaning options as:
mechanical - a simple plunger or a plumbing cable will be able to cope with a blockage of virtually any complexity;
- different cleaning products will also cope with the blockage. In case you want to know how to clean the shower drain with them, beware of too aggressive substances that plastic can. It is better to give preference to gel products, rather than powders;
- it is possible to try folk remedies, for example, a mixture of soda, vinegar and salt copes well with not strong blockages, it needs to be in the pipe for several hours.
To eliminate the smell in the shower, the drain must work perfectly. But in the case of connecting a drain through a corrugation, it may not be easy to cope with a blockage, a cable is a pipe, a plunger is also unsafe, and aggressive gels will be able to wall the corrugation. From time to time it comes to the fact that the siphon is easier and clean it separately.
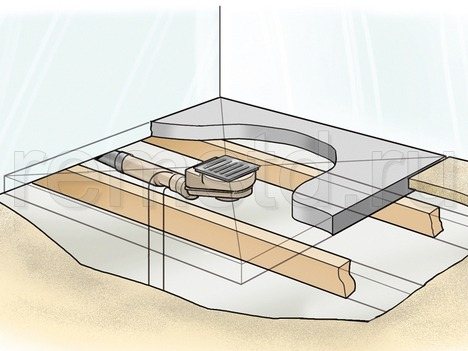
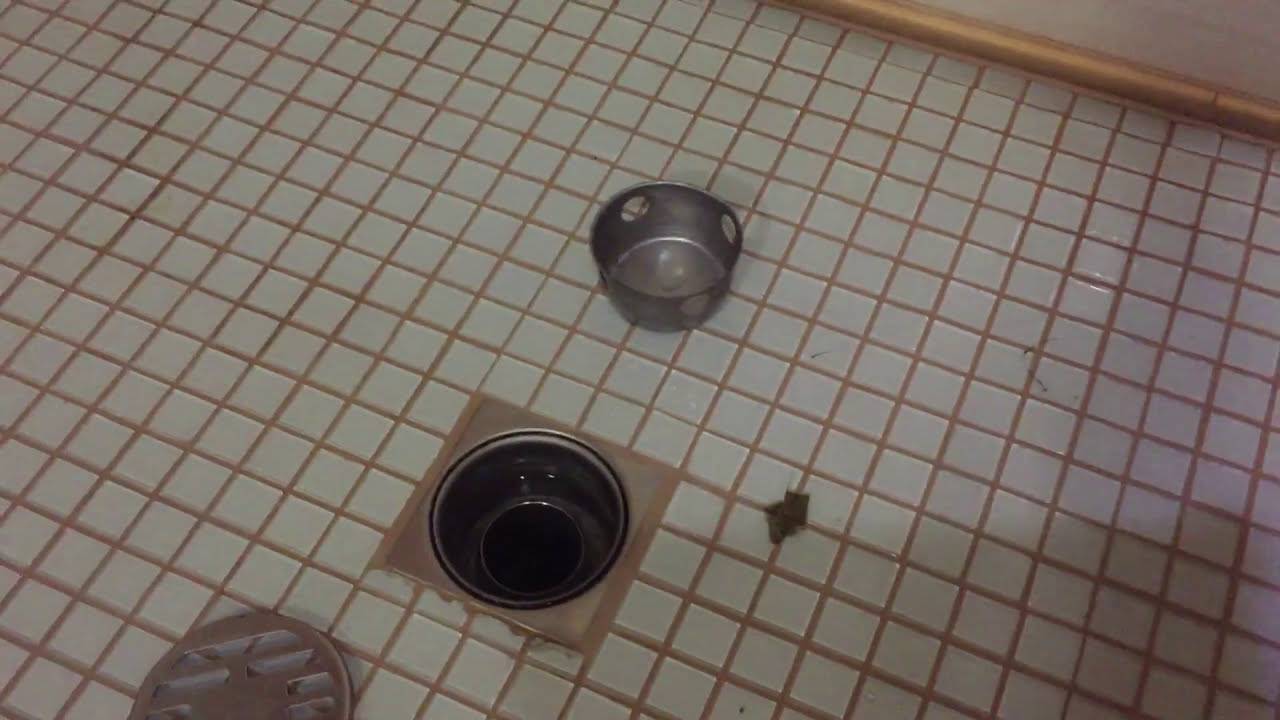
Arrangement of a drain for a shower cabin
The installation process includes several stages, each of which must be carried out in compliance with certain recommendations.An improperly installed drain may leak or emit unpleasant odors into the room.
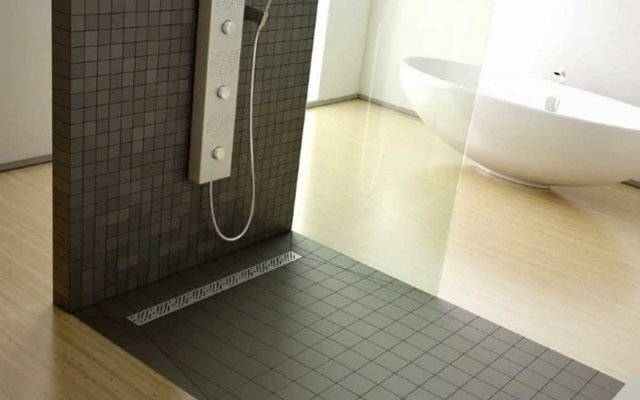
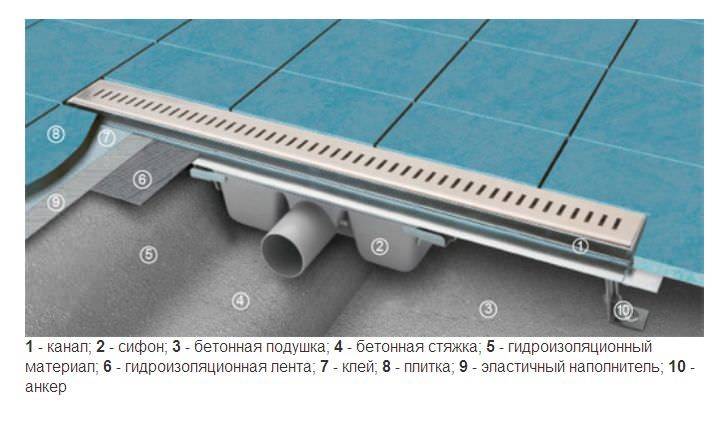
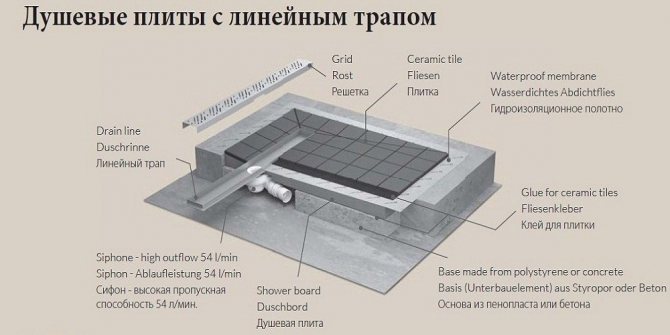
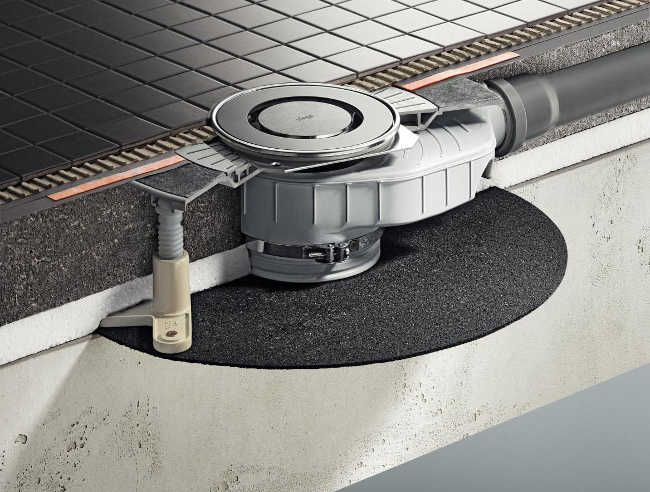
Shower channel installation
Installation of this part of the system is carried out by introducing into the floor. Before starting work, the grate is sealed with masking tape.
The installation process includes the following steps:
- Treatment of the outer walls of the channel. The roughening of the surfaces ensures reliable adhesion to the cement mortar. After stripping, the pipe is degreased.
- Channel fixation. The part is fixed with brackets, the drainage tray is grounded. The drain must be rigidly attached, it will bear the weight of the person taking the shower. One end of the connecting tube is connected to the sewer, the other - to the outlet of the channel. The hose must go all the way into the hole. The channel outlet is recommended to be treated with silicone sealant.
- Connecting the drainage tray. When performing work, you need to use a pipe with smooth inner surfaces.
- Filling the gaps between the channel and the floor. When pouring cement mortar, the thickness of the facing material is taken into account.
- Laying tiles. To prevent water from accumulating near the grate, the height of the cladding must exceed the level of the channel. The tiles begin to be laid from the drainage hole, making a slope of 1-1.5 cm. After completion of the work, the joints of the tiles with the grate are cleaned and sealed with sealant. The drain becomes ready for use.

Shower drain installation diagram.
When performing installation work, observe the following rules:
- A minimum distance is left between the drainage pipe and the sewer pipe.
- Before installation, check the bandwidth of the channel. The tray is fixed on the floor, after which a powerful jet of water is supplied.
- The diameter of the connecting hose must be at least 4 cm.
- If the channel drain is located near the door, a sectional grate must be installed.
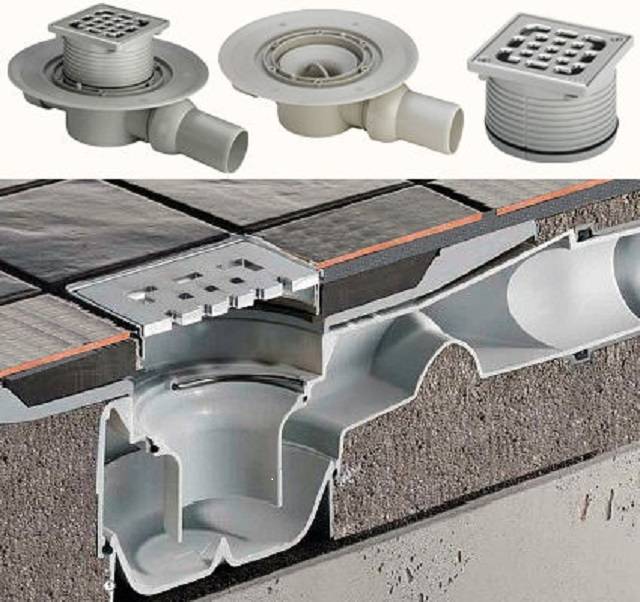
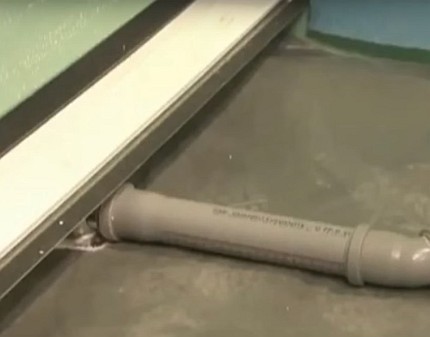
Installing a drain
The procedure for performing work practically does not differ from that in the organization of the channel system. Inexpensive ladders are not equipped with latches, so they are fixed with the help of improvised means - bricks or tiles. You can not use mounting foam, over time the case may fail. The horizontal stability of the ladder is provided by a cement screed. The floor during installation of the system is laid in layers. The installation process of the ladder can be studied in detail by watching the video.
Siphon installation
Installation of a siphon, which has the simplest design, includes the following steps:
- Connection of a drain branch pipe with a water seal. A conical rubber gasket is put on the outlet. The narrow side should remain on the neck. The outer parts of the seal are treated with silicone. The pipe is turned over and inserted into the water seal. The parts are fastened with a nut.
- Plug installation. The part is provided with a gasket and screwed onto the side pipe of the water seal. The plug is not always included with the siphon, so sometimes this step is skipped.
- The connection of the neck and water seal. A rubber seal is left between the parts. Tighten the fixing nut tightly. The seal must not be allowed to move, leading to leakage.
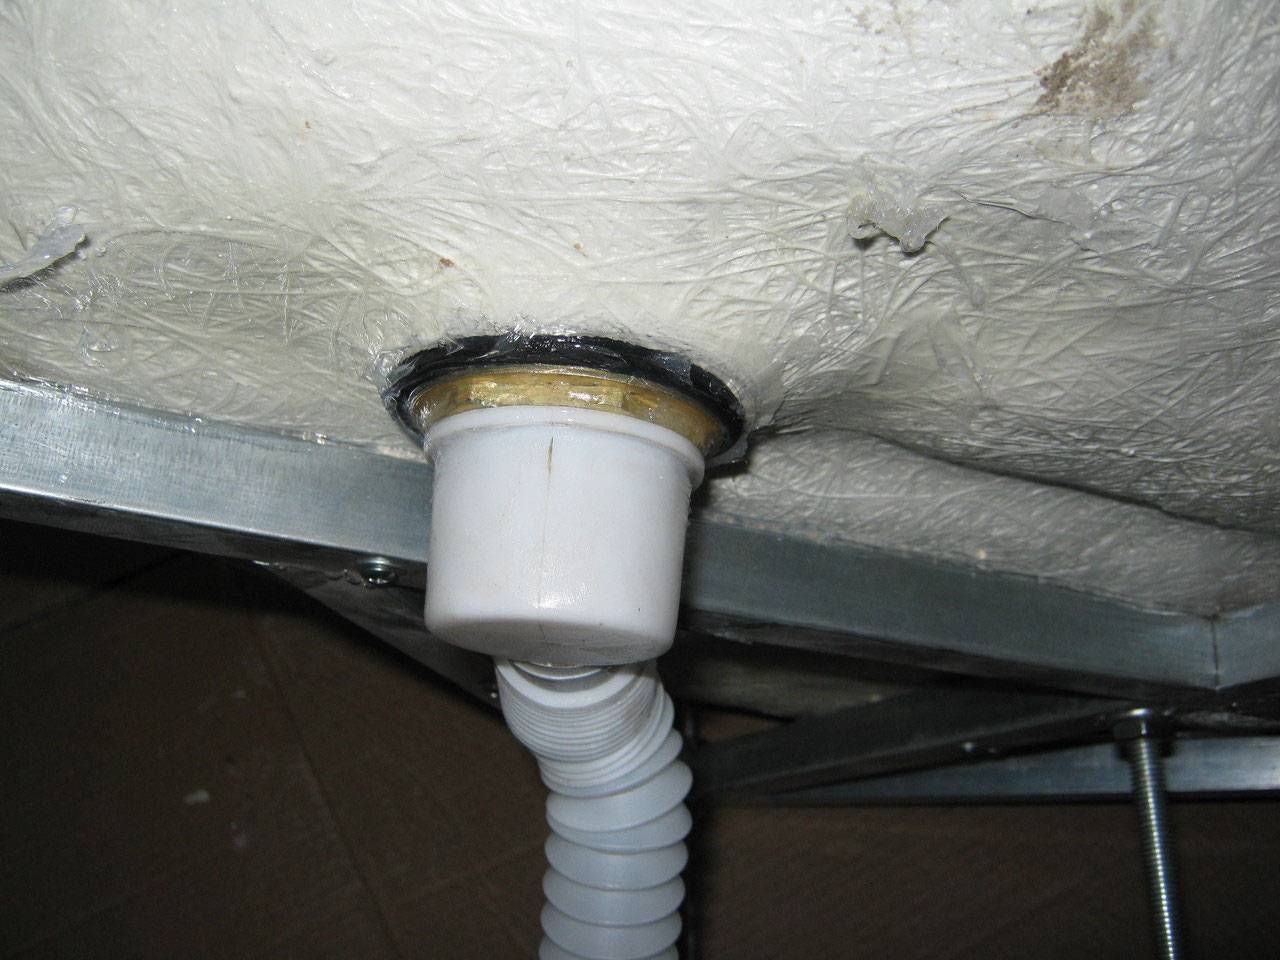
- Siphon installation. The neck is fixed on the opening of the pallet, the drain hose is inserted into the sewer pipe. A sealing gasket is placed under the top of the siphon. The neck is attached to the bottom of the pallet. The top of the siphon is screwed with a bolt.
- Connection of an additional branch pipe to an overflow opening.For this, a flexible hose is used. Drain-overflow systems are equipped only with high pallets. Otherwise, this step is skipped.
Types of cabins and equipment
It should be noted right away that all types of shower cabins differ in shape, materials of manufacture and installation method relative to the bathroom space. Let's analyze each type in more detail:
closed models
They are the most common option. Every second person who prefers shower cabins has exactly this look. It is characterized by closed walls and is a separate small room. The closed shower cabin also has a door, a tray, a roof and a watering can. Inside, additional features are built in that are necessary for a comfortable shower. Optionally, you can install a water heater and even a radio. The main disadvantage of this type of shower cabins is the cost, which is higher than the average on the market.
Much depends on the manufacturer, as well as the material from which the booth is made. One of the main advantages of such models is good sound insulation. Benefits also include additional features, variety of models on the market and fast installation.
open cabins
In this case, the wall will be the wall of the room itself. The complete set of this type of shower cabin includes only a door, a tray on which a person stands, and a shower head. The option is quite simple and does not have any additional features. Mostly these models are installed in the corner of the bathroom. Of course, their main advantage is the cost. This cabin is the most budget among all presented on the market.It is also possible to build a cabin of any area that will be necessary for comfortable use.
Their main drawback is the difficult repair of sewer and water supply units. Open models do not have an upper base, that is, a roof. Thus, a "rain shower" is not possible in this case. A conventional shower head is used, which is connected to the faucet. This type of shower is designed only to simply wash, but not to relax under warm water.
Pallets are needed to collect water, as well as drain it into the sewer. The shape of the pallets are divided into angular and rectangular.


When choosing it, first of all, pay attention to the depth, which is divided into:
- Deep, or high pallets. They are very similar to a small bath, in which it is possible to sit and draw water.
- Medium pallets. They are considered the most versatile and are used much more often than other types.
- Low trays. They are quite compact. Often they are called flat. This is due to the fact that they are almost invisible. Such pallets require a special technique for installing a water drain. Otherwise, problems may arise and water will not go down the drain.
Most often there are pallets that are made of acrylic.
You can also find products from other materials:
- cast iron;
- steel;
- faience;
- from artificial marble;
- natural stone.
As a rule, the most popular and frequently used is the acrylic pallet. It is durable, easy to maintain and inexpensive. The most expensive is a pallet made of natural stone. Its main advantage is fast heating.As a rule, the tray retains heat for a long time, which makes the stay in the shower more comfortable.
The walls are essential components of the shower. Their main function is to protect against the ingress of water, which can go far beyond the cabin. The raw material for the production of doors is plastic, glass or aluminum. Glass doors are the most popular. They are available on the market in two versions: frosted and tinted glass.
The standard equipment of the shower cabin are the following items:
- pallet;
- back panel;
- roof;
- racks.
Wall and door material
There isn't a lot of choice in terms of cabin wall material. It's either glass or plastic.
Priority is glass, which can be frosted, transparent or combined. Also, modern cabin doors can be tinted or any desired color, in accordance with the design of the entire bathroom.
 For the shower cabin, you can choose translucent matte doors.
Glass walls are installed frame and frameless. The frame is made of steel or aluminum, looks stylish and modern.
 The frame shower in gold color looks gorgeous.
Frameless cabins fit perfectly into any bathroom interior. Metal corners look stylish and modern.
Plastic is also not bypassed, it gives an aesthetic appearance, transparency and lightness of construction. In addition, it is easy to operate and maintain, relatively inexpensive and durable.
In addition to the walls, if there is space in the bathroom, fences in the form of a niche are also installed, finishing them with tiles or stone. From the same material and a fence on the floor about 10 cm high.Such podiums with sides are relevant in the bathrooms of apartment buildings, where such a cabin is mounted already in the process of life there. In a private house, a fence may not be required if the floor is sloping for such purposes.
 A good solution would be to make a small side.
As for the doors, they are installed from the same material as the walls of the shower - glass or plastic.
Door types:
- Glass blocks. Allows you to separate the space of the shower cabin in the bathroom.
- PVC curtains. The advantage of them is that they are relatively inexpensive and you can change them periodically depending on wear or mood. They are quite dense and do not let water through. The average size of such a curtain is 90 * 90 cm.
In the absence of fences, you can put a special circular frame and hang a curtain on it, during the procedures everything is tightly closed with it, and after that it simply shifts, leaving one pallet.
 An economical and unusual solution is a circular blind.
There are options without fences at all, but their minus is that during the washing process the entire bathroom will be flooded and everything will be in soapy splashes.
Choosing the Right Drain
Drain for shower tray cabins should be selected both taking into account the flow of water, and taking into account the convenience of operation. On average, for a shower, a normal flow rate can be considered approximately 50 l / min, which allows you to take a shower without restrictions on the flow rate.


In addition, it would be useful to understand the design of the drain, in particular, attention should be paid to what kind of shutter is used. Similar devices are all produced with a shutter, but here is a method to prevent odors from entering the shower from the sewer can vary greatly depending on the model:
Similar devices are all produced with a shutter, but here is a method to prevent odors from entering the shower from the sewer can vary greatly depending on the model:
a water seal is a simple option, in this case, a water plug in the siphon is made an obstacle to the entry of air from the sewer into the room, for its formation an S-shaped bend is attached to the pipe
It is also possible to single out a bottle water seal, but it is more often used in kitchens, where it is fundamentally important to be able to remove the bottom cover at any second and clean it; The price of a drain with a plug is small and fluctuates around 1000 rubles (despite the fact that it is possible to find an option that is easier)
To close the drain, it is enough to press the button with your foot once, to open the drain, you will need to press it again. In such devices, the plug acts as a barrier to the path of smell from the sewer to the room.
The price of a drain with a plug is small and fluctuates around 1000 rubles (despite the fact that it is possible to find an easier option). To close the drain, it is enough to press the button with your foot once, to open the drain, you will need to press it again. In such devices, the plug acts as a barrier to the smell from the sewer into the room.
In addition, even before installing the drain, you need to think about the need for an overflow device. This may just be necessary if you plan to install a shower stall with a high tray. Water can be drawn into the pan and the overflow will be used as insurance against overfilling it and splashing water on the floor.
Overflow does not greatly complicate the design of the drain.From the outside, it looks like an additional hole closer to the upper side of the pallet, through which excess water will be directed to the sewer. This is useful in case a person left the pallet to be recruited and forgot about it.
How to make a podium for a shower enclosure
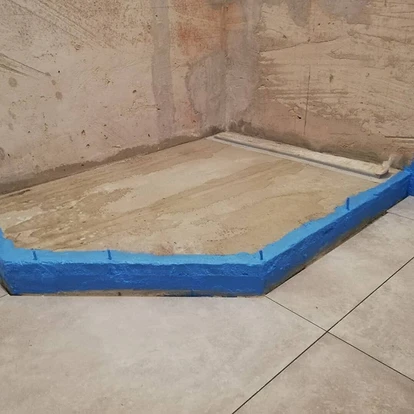
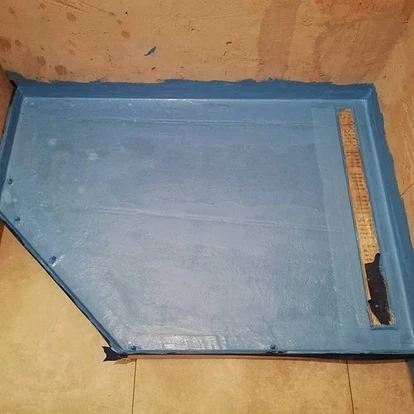
Recall that such a platform will be needed for products that do not have a place for a siphon and for those that need additional reinforcement. For example, for thin-walled acrylic models. The structure must be mounted after all communications are installed, pipes are connected.
Concrete
- Put the product in its place of installation and circle it with dotted lines.
- Add 2-3 cm to the marked lines.
- Remove the floor covering in the designated area, prime the screed under it.
- Cover the surface with a layer of waterproofing: coating, impregnating or gluing.
- Build the formwork of the desired shape and, if necessary, a frame of reinforcement. Separate the drain area with drywall or boards.
- Prepare a solution of cement, sand and water at 30-40°C in a ratio of 1:3. You need the consistency of thick sour cream.
- Pour the mixture into the formwork, leaving room for the cabin and level the surface.
- Spray the prepared area every day if it hardens too quickly.
- Treat the surface again with waterproofing.
After three weeks or a little earlier, you can continue to work. A step is sometimes attached to high platforms with deep bowls. It is also made from concrete. The concrete formwork itself is finished with mosaics, tiles, waterproof plaster or painted with silicone paint.
Article will continue after advertisement
1 of 6
2 of 6
Instagram @art__objects
3 of 6

Instagram @ivanmaslovspb
4 of 6
Instagram @nikolaileshcuk
5 out of 6
Instagram @nikolaileshcuk
6 out of 6
Instagram @konstantinseleverst
Brick
Brick, like concrete, is not afraid of moisture. It is durable and easy to fit. Instead, you can use foam blocks, aerated concrete.
- Circle the cabin installation site with a pencil or marker, adding 2-3 cm.
- Dismantle the flooring in this area, prime and waterproof it with any material.
- Make the formwork of the desired height from bricks. Build stairs if necessary.
- Block off and close the drain so that the fill does not get into it.
- Prepare a cement-sand mortar in a ratio of 1:3 and fill the site.
- Smooth it out and wait for it to dry. Then, remove the drain guard.
- Waterproof the site.
1 of 2
2 of 2
Instagram @svet_a_r_t
The workflow can be simplified by using only bricks or foam concrete blocks. They are laid out around the perimeter, as well as in the middle, so that the acrylic bottom stands on a support and does not bend. Blocks are fixed to the floor with tile adhesive.


Types of plums
The industry produces a huge number of models of shower cabins, depending on the design features, a specific drain system is selected.
Drain type
Description of performance
With bottle siphon
The most common system, a water seal, reliably protects rooms from the penetration of unpleasant odors and does not create much resistance to water flow.
This is very important for showers, they have low sides of the tray, which causes low pressure. In addition, the bottle siphon can trap various contaminants, which prevents serious pollution of the sewer system.
The disadvantage is that there are a lot of connected parts, which increases the risk of leaks at the sealing points.Another problem is that the relatively high height limits the scope.
With knee siphon
The function of a water seal and a sump is performed by a pipe bend. It can be made both from their ordinary smooth plastic and from a corrugated pipe. It has the simplest design, it is elementary connected. Disadvantages - difficulties with cleaning during the revision, a rather large resistance to water flow. Corrugated siphons make installation and maintenance much easier, but they have an individual problem. All contaminants are retained on uneven surfaces, such devices must be cleaned frequently to restore their original throughput.
ladders
The most modern plums are distinguished by a complex design. A siphon is placed inside the body, the principle of operation can be wet, dry or combined. The installation of drains eliminates stagnation of water, it is evenly and quickly removed from the entire surface of the shower tray. The cost of the most expensive plums.
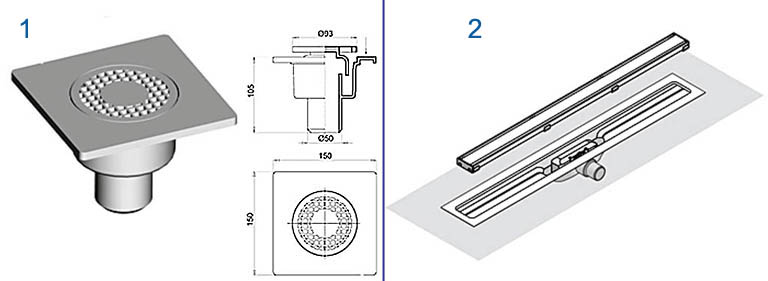
Additionally, all devices can be point or line. Point have small water receivers. Linear dimensions are limited only by the pallet width.
Channel water collection system
Practical tips for choosing a drain model
- Decide on pipe diameters. According to European standards, there are three options: Ø52 mm, Ø62 mm and Ø90 mm. It should be borne in mind that drains with Ø52 mm and Ø62 mm require periodic cleaning. Accordingly, they must be placed in accessible places and provide for the possibility of auditing the technical condition. A drain with a diameter of 90 mm is cleaned from the inside after dismantling the upper elements, it is not accessible from the bottom of the shower cabin.
- The presence of a drain valve.Previously, an ordinary removable rubber or plastic plug was used for this purpose. To improve the comfort of using the cabin, engineers have developed an automatic and semi-automatic design. If you have chosen a drain with an automatic valve, then you will have to mount the drive system, and this requires preparatory work. Much less hassle with the click-clack valve, it opens/closes with the push of a foot.
Shower tray click-clack valve
Rectangular structures
Despite the similar points in the installation rules for all types of cabins, a rectangular shower has its own installation algorithm: first of all, the back panel with equipment is attached. After it - the side walls. Lastly, the front part with doors is attached.
Other features:
- Such a shower does not always require a pallet. The drain can be installed directly into the floor, providing an inclination angle of 2 degrees. For a spectacular appearance, the floor with a built-in drain is decorated with tiles (using a level at each step so as not to change the angle of inclination). It is allowed to use a special drain snake (drainage) around the cabin perimeter instead of a standard siphon.
- The faucet and shower pipe are not mounted on the roof or side panel, but directly into the wall.
- Instead of a metal profile, hinges can be used to fix the walls.
Tools and materials for drain installation
The first step is to make sure that the floor in the shower is sloping, if you want to make the floor yourself, then here is the instruction.
You need to take the tools:
- drill;
- special nozzle for a drill;
- glue with a container;
- Master OK;
- device for cutting tiles;
- rubber mallet;
- paint brush.
Materials that will be useful during installation work:
- waterproofing;
- siphon;
- sewer PVC pipe;
- facing tiles.
First of all, you need to make a recess in the floor, then carefully waterproof the floor, which will protect the floor and neighbors from your leaks. Tiles should be laid at a slight slope. But before starting work, we recommend that you familiarize yourself with the whole process and consult with the master.
Or you will install a ready-made pallet, which is much easier.


