- Filter
- Pump installation rules
- We select pipes
- Well pumps
- The cost of hydraulic drilling
- Tips for those who make a well on their own
- Important Circumstances
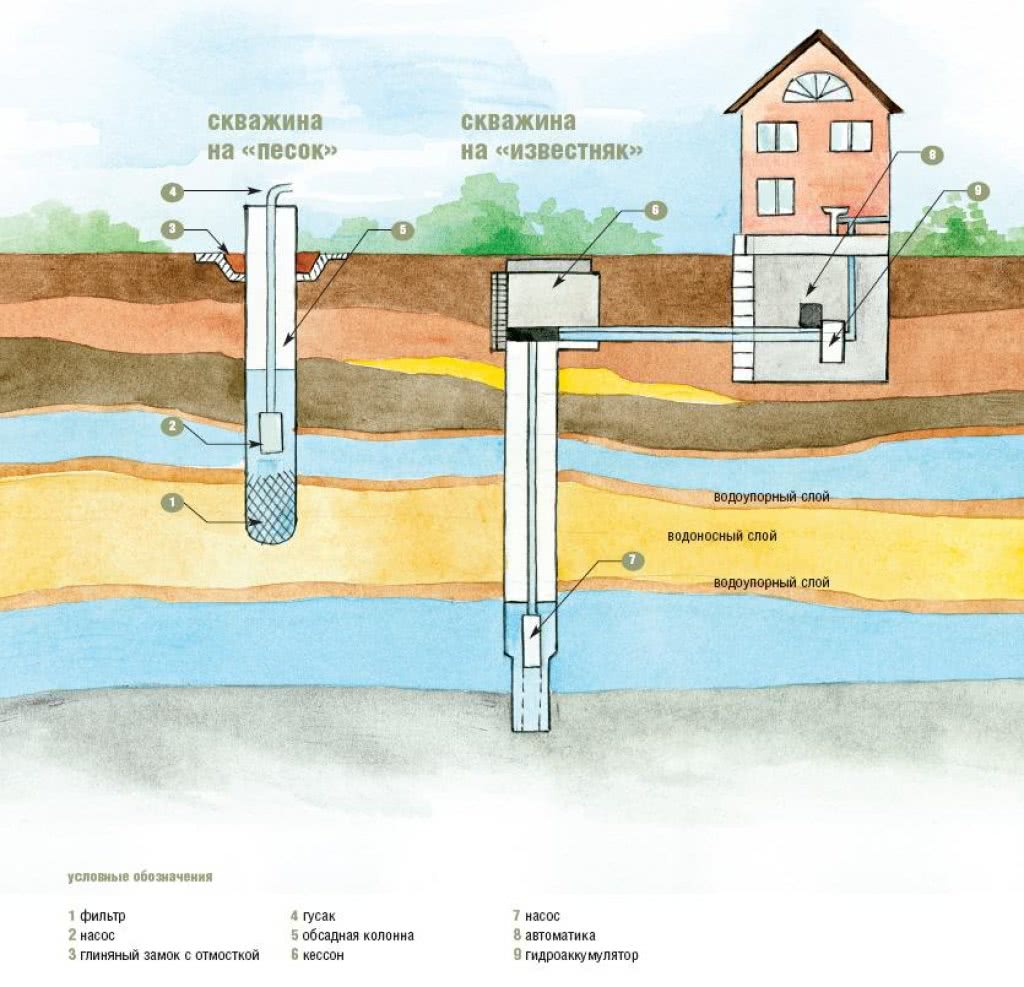
- Well or well?
- Casing installation
- Features of installation of caisson structures during well construction
- Types and features of installation of caissons
- Tips & Tricks
- Methods for self-drilling
- Shock rope
- Auger
- Rotary
- Puncture
- Abyssinian well
- Conclusions and useful video on the topic
Filter
A well filter is the main device that ensures the quality of water from it. And at the same time, its node is the most subject to wear, therefore, the choice of a well filter must be taken with all responsibility.
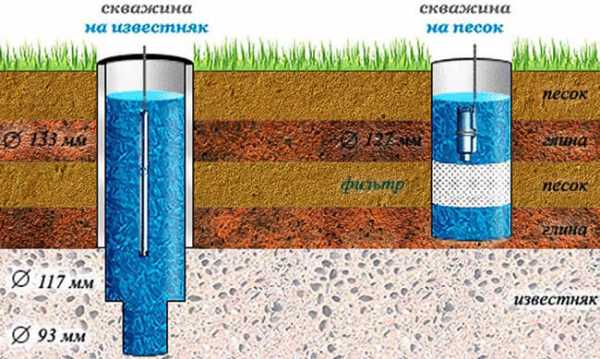
Artesian water is taken without filtration. For a limestone well, a simple screen filter in the form of a perforation on the lower casing bend is most often sufficient; it will also serve as the basis for the well filter on sand. Perforation requirements are as follows:
Hole diameter - 15-20 mm, up to 30 mm depending on the ground.
The duty cycle of the filter (the ratio of the total area of the holes to the area they occupy) is 0.25-0.30, for which the distance between the centers of the holes is taken 2-3 times their diameter.
The location of the holes is in transverse rows in a checkerboard pattern.
The total area of all holes - not less than the cross-sectional area of the casing pipe clearance.
The device of filters of wells on sand
For a sand well, firstly, gravel backfilling is also necessary; in this case, it is she who ensures the long-term quality of water, as in the well. In view of this, downhole filters are commercially available with a layer of gravel included in the design. There is no harm from them, but the wellbore needs a larger diameter, which makes it difficult to drill, and without external backfilling, the well still quickly silts up.
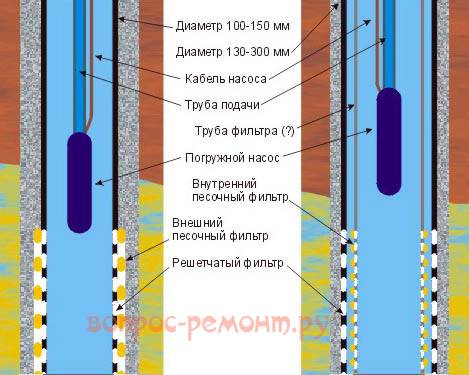
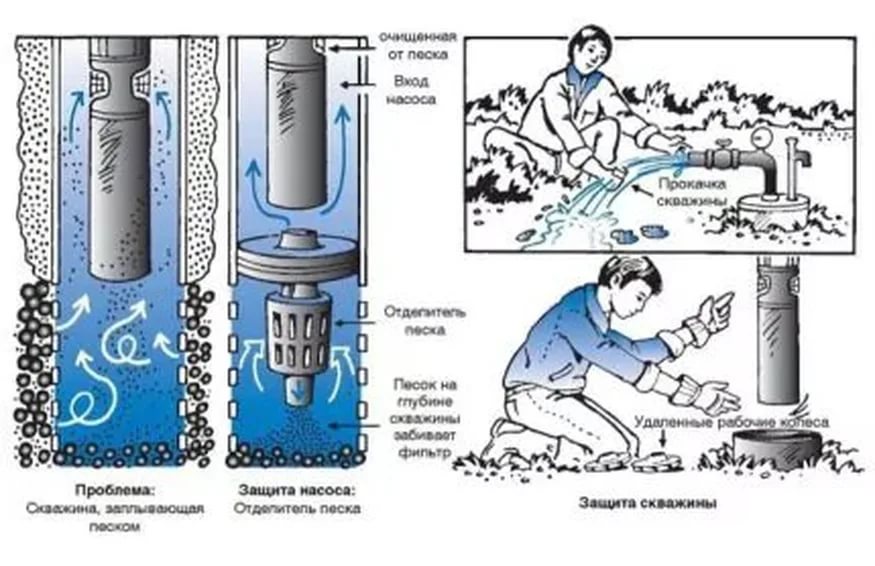
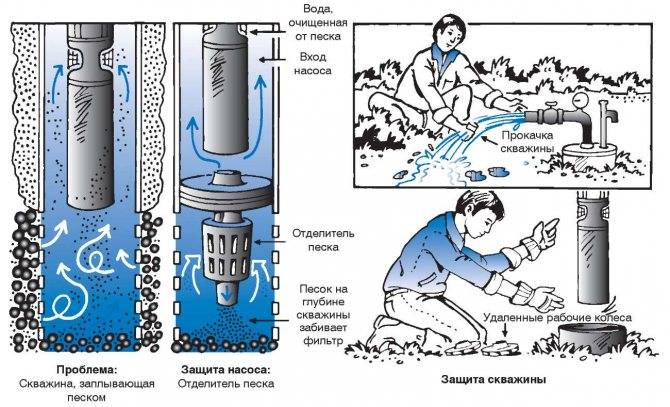
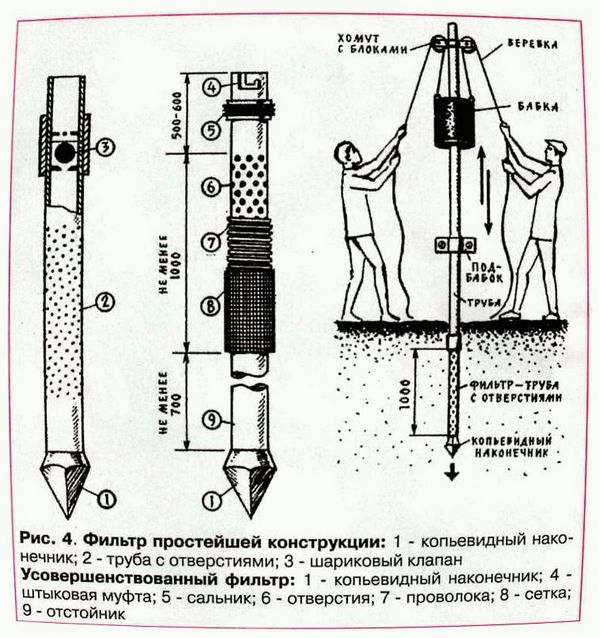
Further, if you follow the flow of water, the same perforated pipe goes, but now it will be a bearing element that perceives the pressure of the rock. So that the sand, which gravel does not hold well, does not spoil the entire waterway, you also need a sand filter. It can be external or external (on the left in the figure) or internal (on the right in the same place). External filters have three advantages: the minimum diameter and siltation of the well and the installation depth of the pump. But they are easily damaged during the installation of the casing, they are not repairable and expensive, because. due to the latter circumstance, they must be made of very high quality materials: alloys for the mesh and wire of external well filters are more expensive than silver.
When installing a pump in a well with an internal filter, its bottom is considered to be its upper edge, so the volume of a single water withdrawal is seriously reduced. The disease of all internal filters is increased silting of the well due to water seepage into the gap between the filter and the casing. Also, as a result, the service life of the filter is reduced, and the wear of the pump increases, because. sand gets into it.Often, therefore, the pump is placed in a separate pipe, mounted on the filter outlet, which again requires an increase in the diameter of the well.
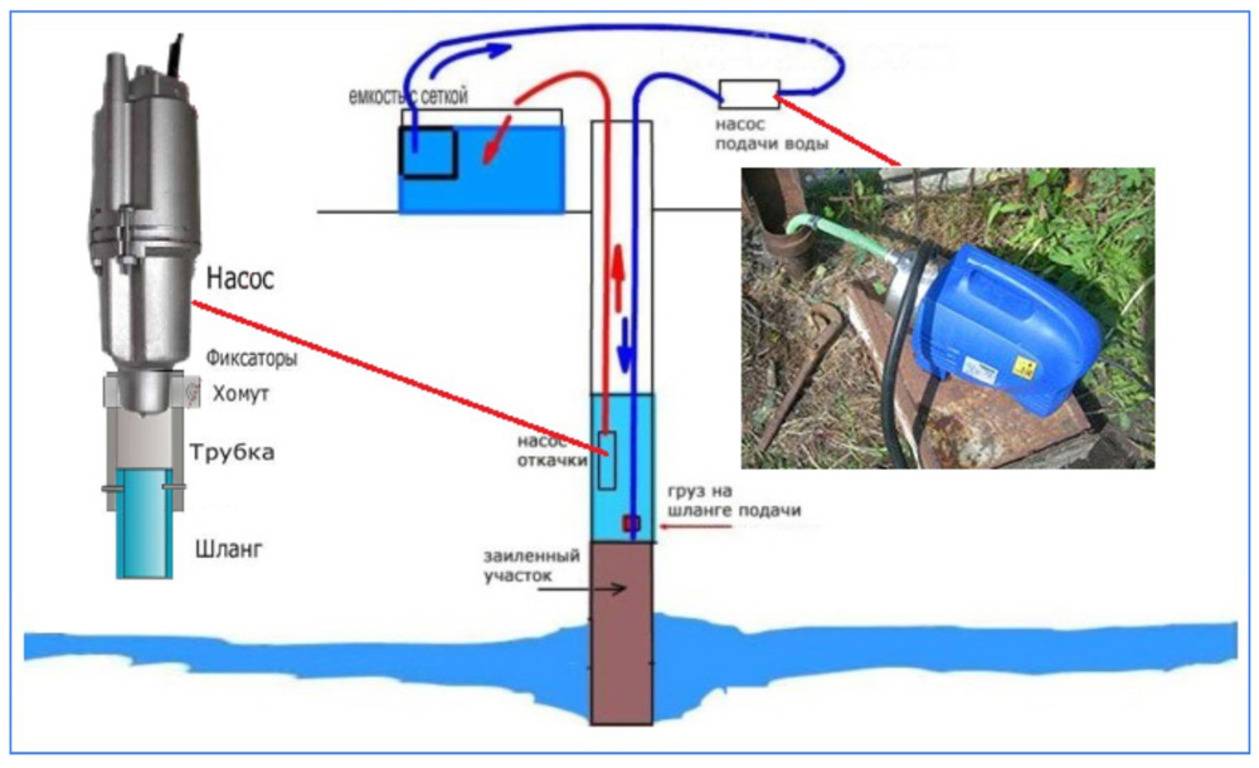
Homemade sand filter
The best option is to connect the pump directly to the filter outlet, then both silting and sanding stop. But this requires suction centrifugal pump on the bottom, which greatly complicates and increases the cost, and the pressure of the vibration is often small for sand wells.
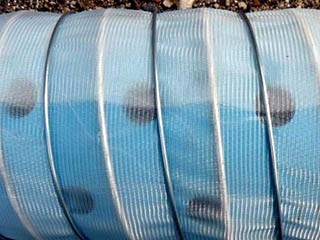
The filter elements of sand filters are sometimes made independently from PVC pipes, stainless springs and a polymer mesh, see fig. on the left, but they filter poorly and do not last long. It is better to take a good purchased filter, the working conditions are too difficult, and taking it out, as they say, is a whole thing. In this case, basically 3 options are possible, see Fig.:

Modern borehole filters
- Polymer stacked-ring filter. Cheaper than others, but it serves less and is prone to silting, but it is maintainable: you can pick it up and sort it out, replacing bad rings. Requires increased borehole diameter;
- Tubular-wire with profiled wire winding. A little more expensive than polymer, but it lasts a long time and does not silt. For repair, a bulkhead is not needed, it is enough to flush at the top. It would be optimal, if not for one “but”: cases of scams by manufacturers, traders, and drillers have been repeatedly noted - how completely stainless filters are supplied, in which the longitudinal rods are made of ordinary galvanized wire. It is impossible to check without breaking the filter, but harmful impurities soon appear in the water, and then the rods completely rust, the winding slips, and the entire filter has to be changed.
- Supportless welded filters, wire and slotted. They would be ideal (the latter also withstand draft into the barrel outside on the pipe), if not for the price: they are made from the same profiled stainless wire that costs about the same as silver.
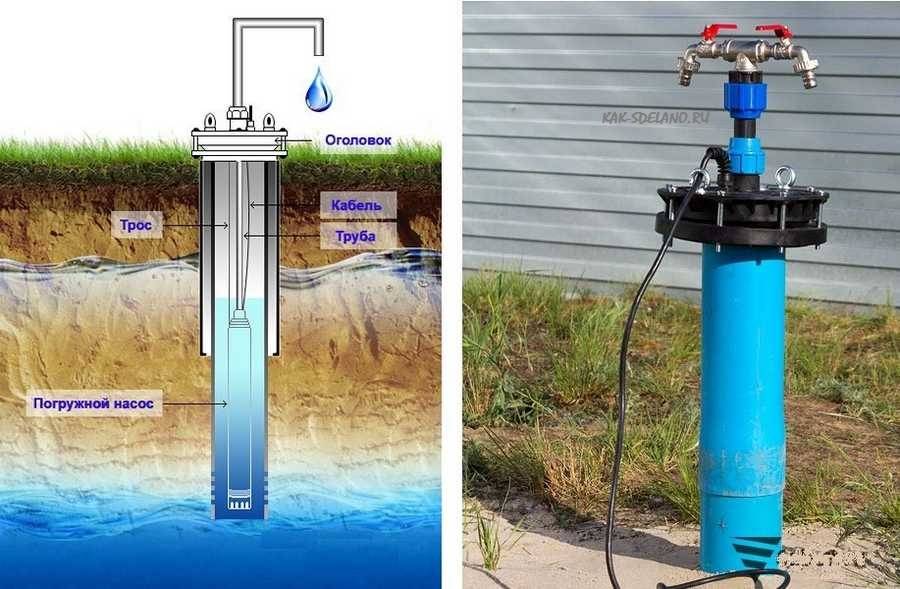
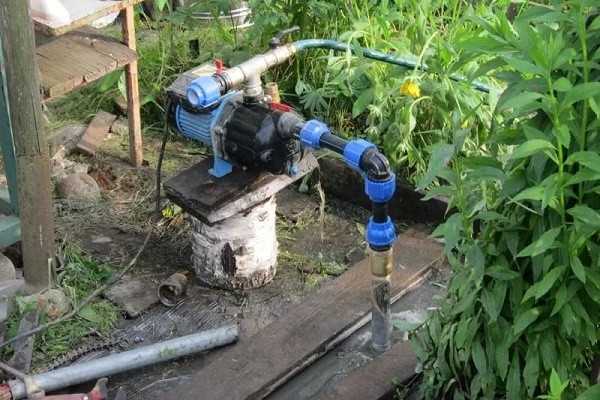
Pump installation rules
Surface type pumps are not suitable for downhole installation. This is due to depth restrictions, which reach up to 8 years. Submersible pumps are better suited for this purpose. They can be vibrating or centrifugal. Each of these subspecies has its own set of advantages. The final choice is based on factors such as the water level in the well, the depth of the pipes, the flow rate of the well, the diameter of the casing, the water pressure, and the cost of the pump.
When all the above stages are completed, the well is put into operation. If the work was carried out with the involvement of third-party assistance, the following documents must be obtained before accepting the project:
- well passport;
- hydrogeological conclusion on the possibility of implementing the project;
- permission of the sanitary and epidemiological station;
- act of work done.
When doing all the work yourself, the only thing that is important to remember is the need to comply with the technology and the key points of the process. It is important to use quality materials
This will ensure the long-term operation of the well.

We select pipes
Here you need to correctly calculate the required amount. Take note of the slope and number of turns.
Having correctly identified, you can take them in the desired manufacture, they differ in the angle of rotation and this will greatly facilitate the work:
The diameter of any pipes made of different materials (steel, polypropylene, metal-plastic) must be from 32 mm.
When choosing pipes, you should pay attention that the material of their manufacture is food grade, not technical.
Check it out for sure;
We need to supply pipes to the premises, the trenches from the well to the foundation of the building must be at least a meter deep
It is important that the level of laying the pipes in the trench is below the freezing ground in your area. It is necessary to provide reliable protection by covering the pipeline with insulation (see How to insulate a well correctly)
For this, mineral wool is used.
Even better, if you still lay a special electric cable for heating, which will provide heating and prevent the pipe from freezing;
An above ground piping option is also available. In this case, measures to insulate the external water supply must be carried out. Pipes are laid directly on the ground, or in a preliminary recess. In parallel, a heating cable is laid, but in this embodiment it should already be mandatory.
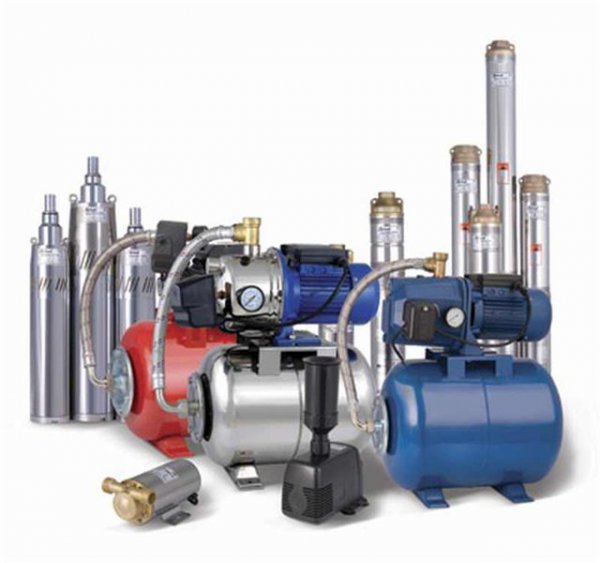
Well pumps
- First, submersible type mechanisms are used.
- Secondly, power selection is carried out based on the depth of the wellbore. Therefore, it is necessary to determine the static water level in the well. Each pump has its own characteristics for pumping water.
- Thirdly, the pressure created by the pump.
- Fourthly, it is necessary to focus on the conditions of its application. Various models are able to work only with liquids, either pure or with an acceptable percentage of impurities.
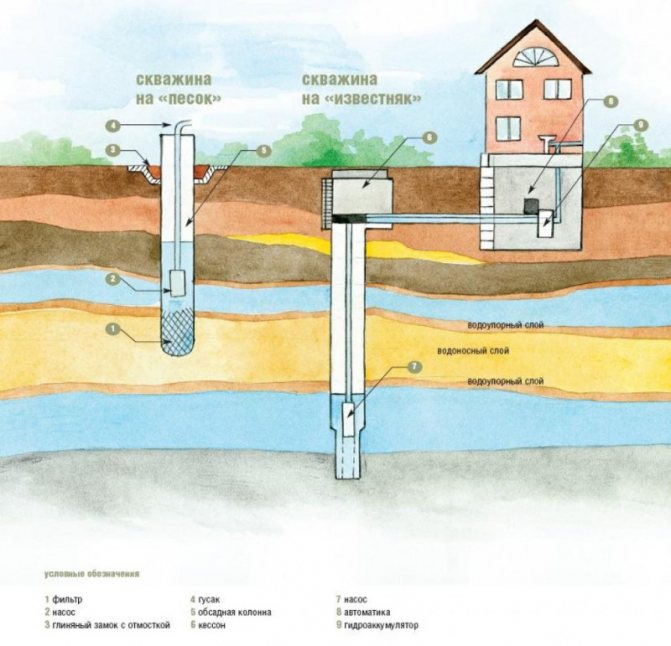
When determining how to make a well for water, it must be borne in mind that the point of its intake should be lower than the source of pollution (drainage well, cesspool, etc.).If the characteristics of the soil do not allow this, then the distance between the sewage treatment element and the pit should be maximum. Even better is to drill an artesian, although such a do-it-yourself water well requires a lot of time and effort.
It is necessary to pay attention to the method of mounting the filter, which is installed in the well under water in front of the pump. It should be easy enough to remove for periodic cleaning during operation.
The cost of hydraulic drilling
The price for drilling 1 linear meter is 2000-3000 rubles, depending on the region. A number of factors will also affect the formation of the price, such as:
- drilling type;
- materials used;
- distance from the contractor to the customer.
If we make a calculation for a small well, 10 meters deep, then experts will make it turnkey for about 20,000-30,000 rubles. This includes the cost of labor and the cost of materials.
- steel pipes - 10 m (if using perforating technique);
- material for the manufacture of tripods;
- headstock, ropes, rollers;
- pump.
In addition, additional materials will be needed - self-tapping screws, stainless steel mesh, sealant for threaded connections. Even a preliminary calculation of the price shows that it is more economical to break through a shallow well and do it yourself.
But if there is a need for a large debit or artesian water, then you will have to turn to specialists, since this can only be done with special equipment!
Tips for those who make a well on their own
Before starting work, it would be good to ask your neighbors about the level of water in your area. If there are wells nearby, look there.
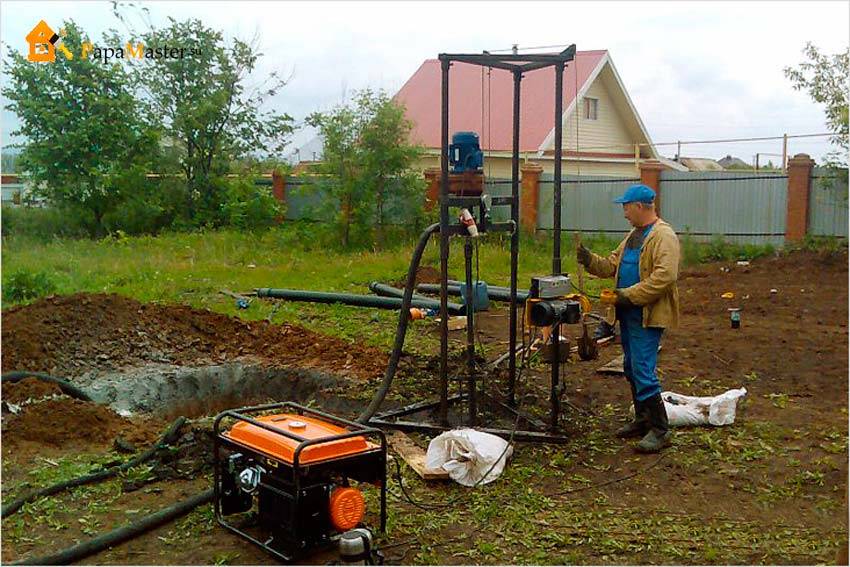
The water level above 5 m is good news, because the only tools needed for drilling are a garden drill.
A small-sized drilling rig or a mechanical drilling device - "handbrake" can be rented. So you get the opportunity to use convenient equipment and not pay a lot of money for it.
Do not lower the water pipe into the well to the very bottom. It should not reach the deepest point of about half a meter. This way the water will flow better.
The pipe leading to the well must have air vents on the surfaceotherwise, without access to air, the water will quickly become stale. It is convenient to equip a hinged cover on the pipe so that there is constant access to the well.
The most convenient for well equipment is a one-piece plastic pipe.
After the well has earned, be sure to give your water for examination. Water is recognized as drinking water if its transparency is at least 30 cm, nitrate content is not more than 10 mg/l, less than 10 Escherichia coli per 1 liter, and the maximum odor and taste score is 3 points.
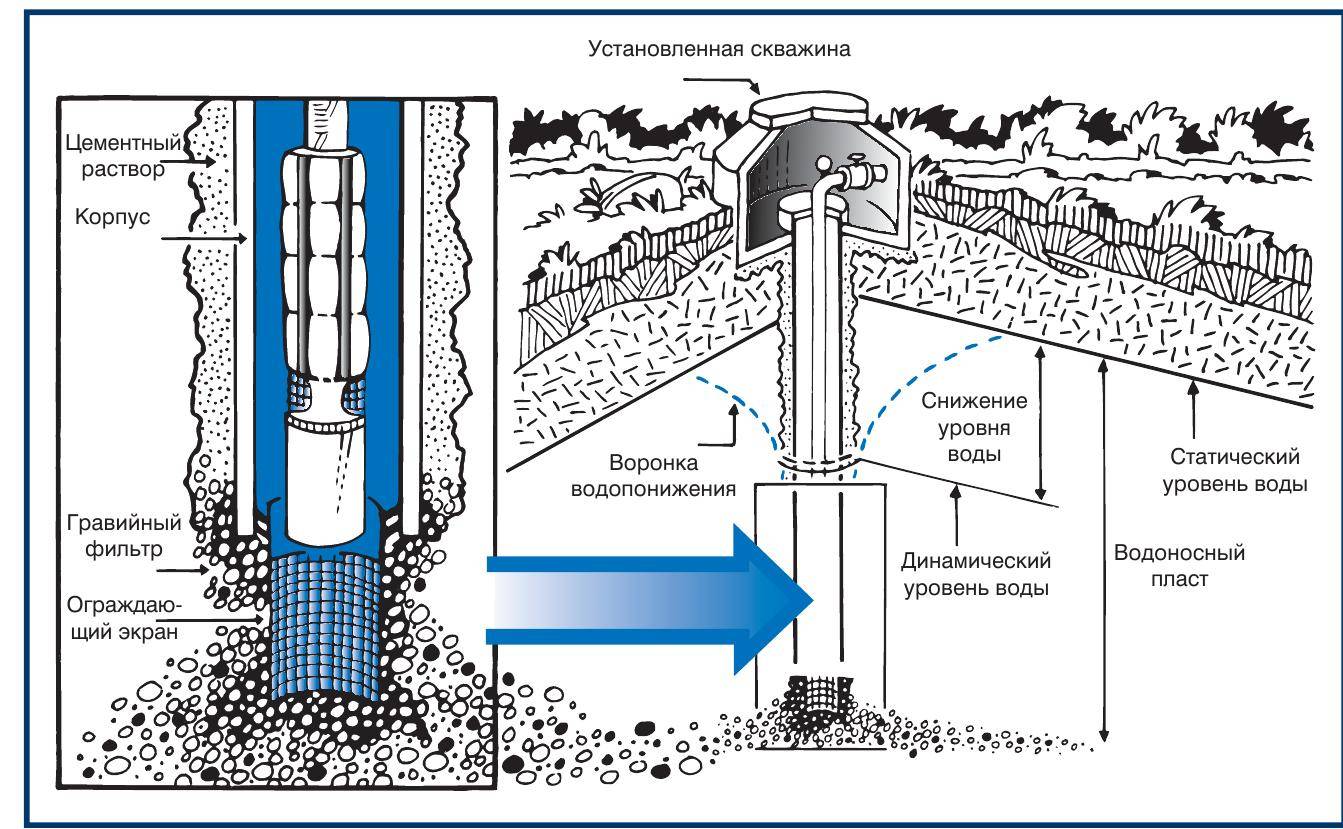
Well construction and completion
Important Circumstances
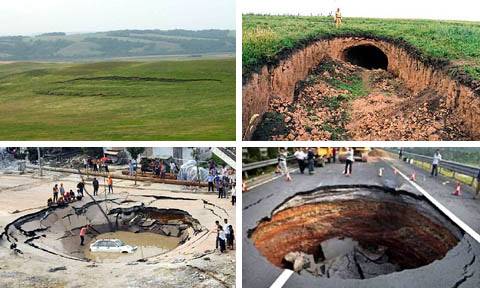
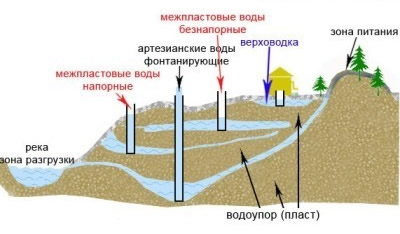
Suffusion subsidence
First: massive uncontrolled intake of non-pressure water can lead to the so-called. soil suffusion, due to which its failures suddenly and unpredictably occur, see fig.
Secondly, the critical depth of self-drilling on flat terrain in the Russian Federation is 20 m. Deeper - the cost of a turnkey custom well is less than the direct and indirect costs of a "self-drill". In addition, the probability of failure approaches 100%
Third: the life of a well depends heavily on the regularity of water intake from it.If you take a little water as you use it, then a sand well will last about 15 years, and up to 50 years or more for limestone. If you periodically pump out everything at once or, conversely, take it episodically, then the well will dry up in 3-7 years. The repair and re-swinging of the well is so complicated and expensive that it is easier to drill a new one. If this circumstance surprises you, keep in mind that they are not repairing a pipe in the ground, but an aquifer.
Based on this, we can already advise: if you find free-flowing water no deeper than 12-15 m, do not rush to rejoice, it is better to drill as far as possible to reach the limestone. And it’s best not to be too lazy and make exploratory drilling with a needle-hole, see below. It is possible to make a well-needle literally over the weekend; complex and expensive equipment is not required. And it can also be a temporary source of water supply, until you decide on time, money, etc. with a permanent one.
Well or well?
Dry drilling, except for impact drilling without casing, is only intermittent, i.e. the drill has to be lowered into the trunk, then removed from it in order to select the rock from the drill. In professional hydro-drilling, the crushed rock is carried out by the used drilling fluid, but the amateur needs to know for sure: it is impossible to go through the trunk to a depth greater than the length of the working part of the tool in 1 drilling cycle. Even if you drill with an auger (see below), you need to lift it and shake out the rock from the coils after a maximum of 1-1.5 m of penetration, otherwise the expensive tool will have to be given to the ground.
Casing installation
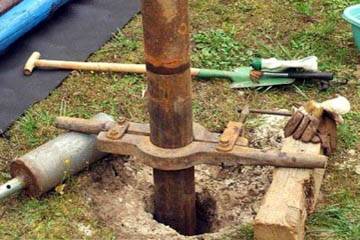
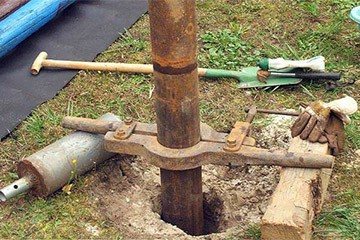
Holding the casing pipe from spontaneous upsetting
An attentive reader may already have a question: how do they put a casing in the barrel? Or, how do they raise / lower the drill, which, in theory, should be wider than it? In professional drilling - in different ways. The oldest is illustrated in Fig. on the right: the axis of rotation of the tool is shifted relative to its longitudinal axis (circled in red), and the cutting part is made asymmetrical. The neck of the drill is made conical. All this, of course, is carefully calculated. Then, in the work, the drill describes a circle that extends beyond the casing, and when lifting, its neck slides along its edge and the drill slips into the pipe. This requires a powerful, precise drive of the drill string and its reliable centering in the casing. As the depth increases, the casing is increased from above. Complex special equipment is not available to amateurs, so they can install casing pipes in the following ways:
- A “bare”, without casing, hole is drilled to the full depth with a drill larger than the casing diameter, and then the casing pipes are lowered into it. So that the whole column does not fall down, they use 2 drilling gates: one is holding the pipe that has already gone into the well, see fig. on the right, and the second is installed on a new one before removing the first. Only then is the column thrown into the trunk, if it itself is no longer moving. This method is often used by amateurs on fairly dense, adhesive (sticky) and cohesive (not loose) soils to a depth of 10 m, but there are no statistics on how many wells collapsed, how many drills and casing were lost.
- The drill is taken with a smaller diameter, and the lower casing pipe is made with divergent sharpened teeth (crown) or equipped with a cutting skirt.Having drilled for 1 cycle, the drill is lifted, and the pipe is forcibly upset; crown or skirt cut off excess soil. This method slows down drilling, because before starting a new cycle, you need to use a bailer (see below) to select the crumbled soil, but more reliably, it facilitates gravel backfilling of the annulus and allows you to use an external sand filter, see below.
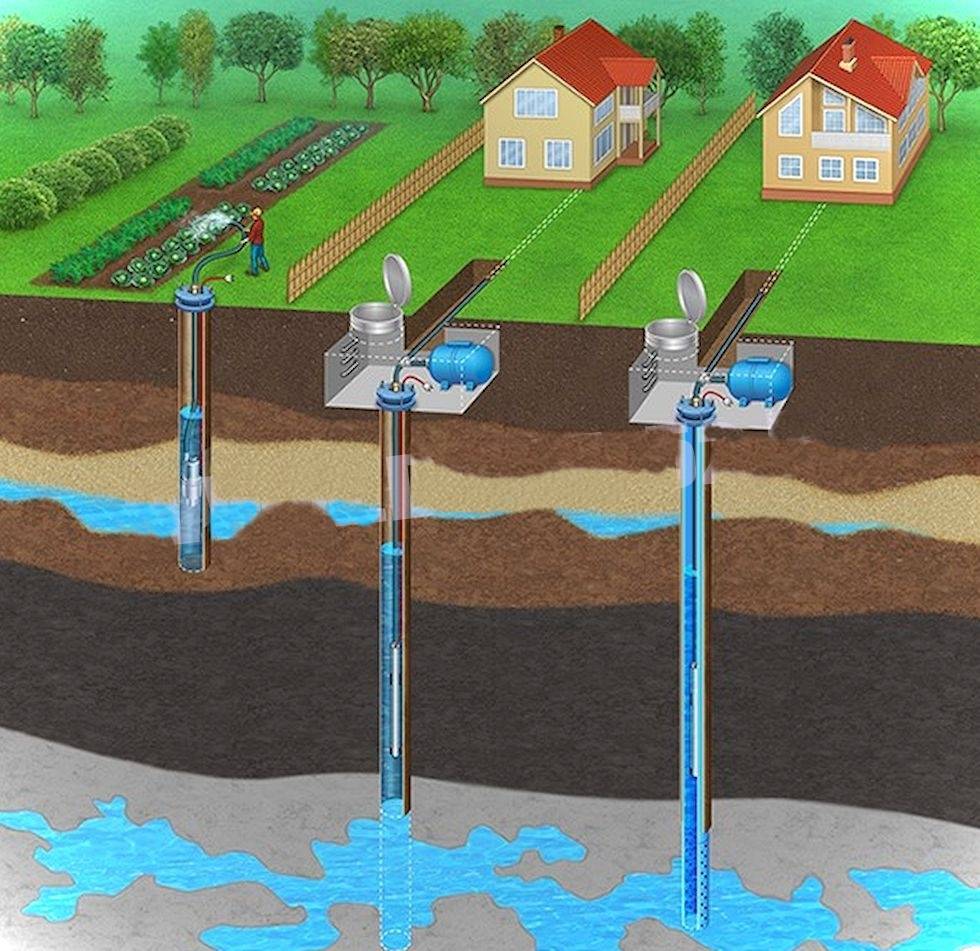
Features of installation of caisson structures during well construction
In most cases, if the well is located in an open area, a caisson will be required. All kinds of service equipment, filters, automation, etc. are located inside the caisson box.
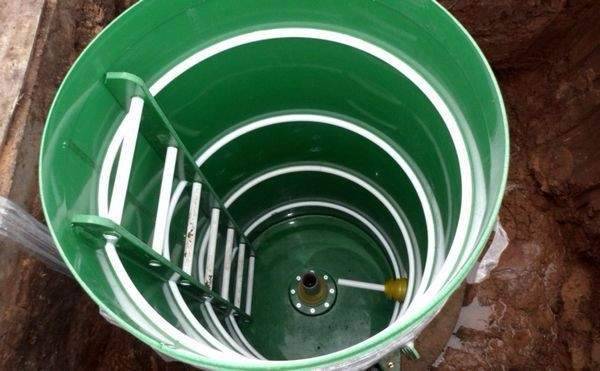
The caisson is a reservoir that isolates the head of the well from groundwater.
As already noted, it can be made of different materials:
- Plastic. It has good performance in terms of thermal insulation, and is also completely resistant to corrosion and fungal infections. In addition, plastic caissons have a small mass, so that they can be installed even without the need to resort to the help of special equipment. Plastic is a relatively inexpensive option. But the unequivocal disadvantages of this option include the low rigidity of the plastic structure. In order to increase this figure, during the installation process, a plastic caisson is poured with concrete around the entire perimeter;
- Metal. The advantages of metal caissons are that you can weld a structure of any size and any shape with your own hands. Such a caisson will be very durable. But at the same time, it will be necessary to carry out its additional protection from moisture - treatment with an anti-corrosion coating.In addition, metal caissons have a large mass. You can either buy a ready-made metal caisson, or weld it to order or do it yourself. The construction is extremely durable and will last for a very long time. But it will also be necessary to carry out thermal insulation measures;
- Concrete, reinforced concrete. Another one of the most popular options. Today, however, they are used less frequently due to the complexity of the arrangement. The concrete caisson is very durable and will reliably protect the well from the most aggressive environmental influences. At the same time, it has a huge mass and can sink in the soil over time if it is not mounted correctly. This, in turn, will cause the pipes in the water supply to be damaged.
As a rule, all stages of the installation of the caisson are similar to each other - regardless of which option was chosen.
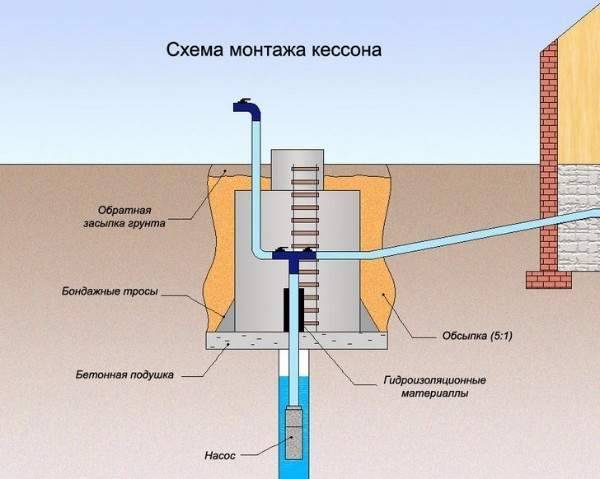
Scheme of installation of the caisson.
First, the preparation of the pit is carried out. It is a hole with a diameter of 30 centimeters larger than the diameter of the caisson itself. The depth of the pit should be calculated in such a way that the upper part of the caisson rises about 20 cm above the ground. This will avoid flooding the well during periods of heavy rainfall or floods.
Then it is necessary to carry out the installation of the sleeve for the casing. To do this, a hole is made in the bottom of the caisson - usually in the center. Now a piece of pipe 15 cm long and with a diameter slightly larger than the diameter of the casing pipe is welded to this hole - so that it fits into the sleeve without problems.
The next step is the installation of nipples for water pipes. They are welded into the wall of the caisson in those places where pipes are supposed to be led out.
Then the caisson tank is directly installed in the pit. First you need to provide a cushion of crushed stone about 20 cm thick at the bottom of the pit. The casing pipe is cut to the level of the soil. Now, a caisson is installed on the pre-harvested bars in such a way that the sleeve can be easily put on the casing. The bars are removed, the caisson is sealed.
It remains to bring the pipes into the nipples - and you can start backfilling the entire structure.
The space between the walls of the sleeve and the pipe, as well as nipples and pipes can be filled with mounting foam.
Types and features of installation of caissons
The uninterrupted operation of the well is designed to provide a caisson, an insulated waterproof container with the necessary equipment inside.
Usually a pump, shut-off valves, measuring instruments, automation, filters, etc. are mounted in it. Buildings are made from different materials. The most common:


Plastic. They are distinguished by excellent thermal insulation, which allows even without additional insulation to maintain the temperature inside the caisson at the level of 5C. Durability, excellent waterproofing characteristics, which makes it possible to avoid additional costs for insulation work, reasonable price, especially in comparison with other options. In addition, the system is quite easy to install due to its low weight. The main disadvantage is low rigidity, which can provoke deformation of the structure and damage to equipment. However, it is easy to deal with it by filling the container around the perimeter with cement mortar with a layer of 80-100 mm.
Plastic caissons have excellent thermal insulation, which allows them to be installed without additional insulation.
Steel. Most often water well construction produced with this design. The material allows you to make a caisson of any desired shape, while not requiring much effort. It will be enough just to weld the parts together and treat the structure from the inside and outside with a special anti-corrosion coating. For a high-quality container, metal 4 mm thick will be quite enough. You can also find ready-made structures on sale, but their purchase will cost much more than self-production.
There are various forms of steel caissons - for various needs
Reinforced concrete. Very strong and durable installations, previously extremely common. Due to their shortcomings, today they are used much less frequently. Their cost is very high, and special equipment is required for installation, which is due to the large weight of the equipment. For the same reason, over time, the concrete caisson sags, deforming the pipelines inside it.
Concrete has insufficient thermal insulation, which can cause water in the pump to freeze in severe frosts, and poor waterproofing, since concrete is hygroscopic
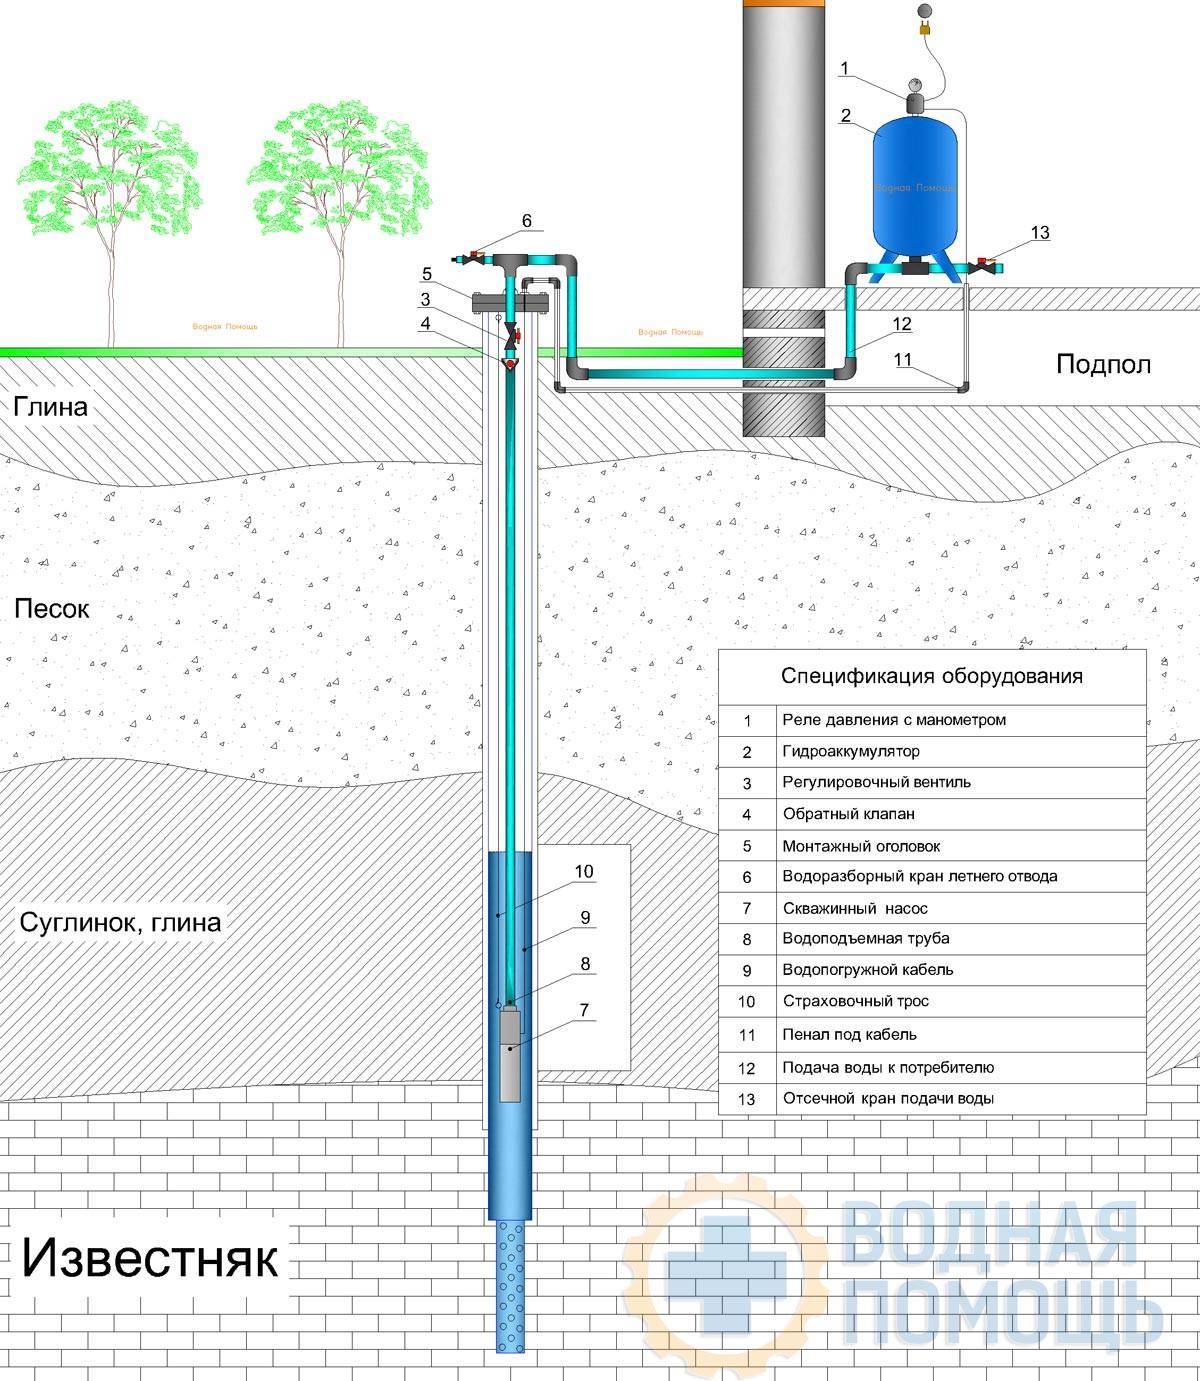
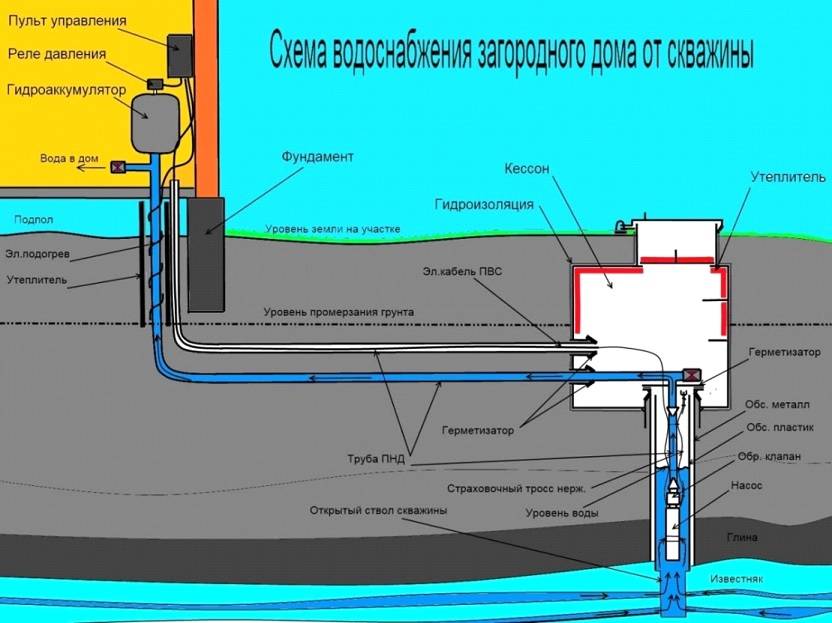
Here is an approximate scheme for installing equipment in a caisson and connecting communications:
Scheme of installation of equipment in the caisson
If you are going to complete the arrangement of the well with your own hands, it is worth getting acquainted with the stages of installing the caisson. They are almost the same for any type of structure, with slight nuances depending on the material of the equipment. Let's consider the stages of installing a steel tank:
Pit preparation. We dig a hole, the diameter of which is 20-30 cm greater than the diameter of the caisson. The depth must be calculated so that the neck of the structure rises about 15 cm above ground level.So it will be possible to avoid flooding the tank during the period of flood and heavy rainfall.
Casing sleeve installation. We make a hole in the bottom of the container. It can be positioned traditionally in the center or shifted as needed for equipment installation. A sleeve 10-15 cm long must be welded to the hole. Its diameter must be greater than the diameter of the casing pipe. Be sure to check that the sleeve can be easily put on the pipe.
Installation of nipples for the withdrawal of water pipes. We weld them into the wall of the container.
Caisson installation. We cut the casing pipe at ground level. We put the container on the bars above the pit so that the sleeve on the bottom of the container “dresses” on the pipe
We check that the axes of the caisson and the casing exactly match, then carefully remove the bars and carefully lower the structure down the casing. We install the container in the pit strictly vertically and fix it with bars. We weld the pipe to the bottom, while sealing the caisson
Through the nipples we start water pipes into the structure
We weld a pipe to the bottom, while sealing the caisson. Through the nipples we start water pipes into the structure.
Backfilling of the building.
The caisson is “put on” on the casing pipe and carefully lowered into the pit
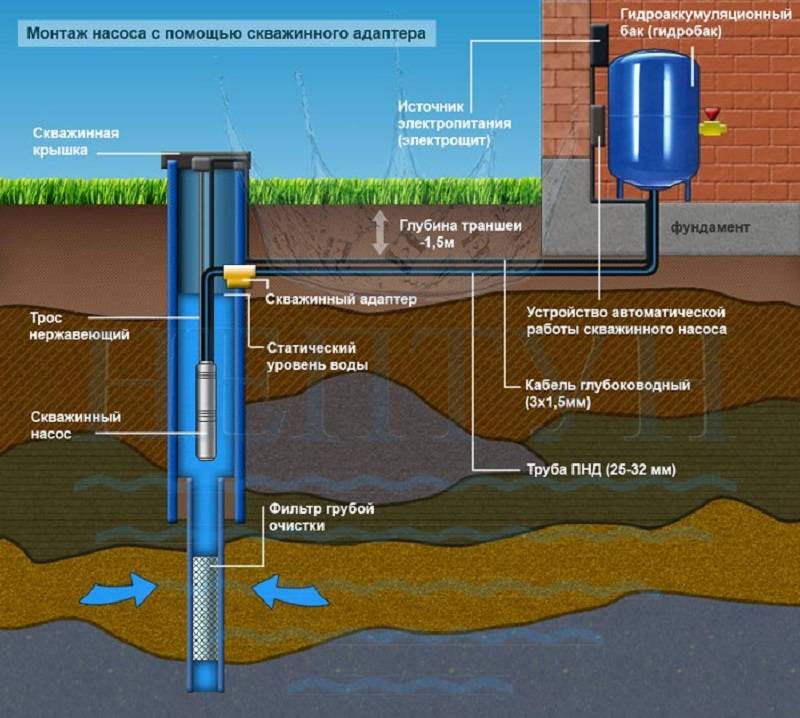
It should be noted that, in principle, it is possible to equip a well without a caisson, but only if a heated building is located near it, in which the equipment is located.
The convenience of such a system is undeniable - all nodes are easily accessible. However, the disadvantages are also significant: it takes up a lot of space in the room and most often makes a lot of noise.


Tips & Tricks
For those who are serious about creating a well on their own, the following tips and tricks will be useful:
- To ensure that the water is always clean and fresh, it is recommended to equip the well in such a way as to ensure air circulation.
- Before using well water for daily needs, it is recommended that it be analyzed. As a rule, when the water quality is poor, it is necessary to select a suitable filter.
- And finally, water should be taken for analysis of the composition and domestic needs no earlier than a few days after completion of the work, otherwise the results may be unreliable.
Before using the well, it is important to equip it with a filter.
Methods for self-drilling
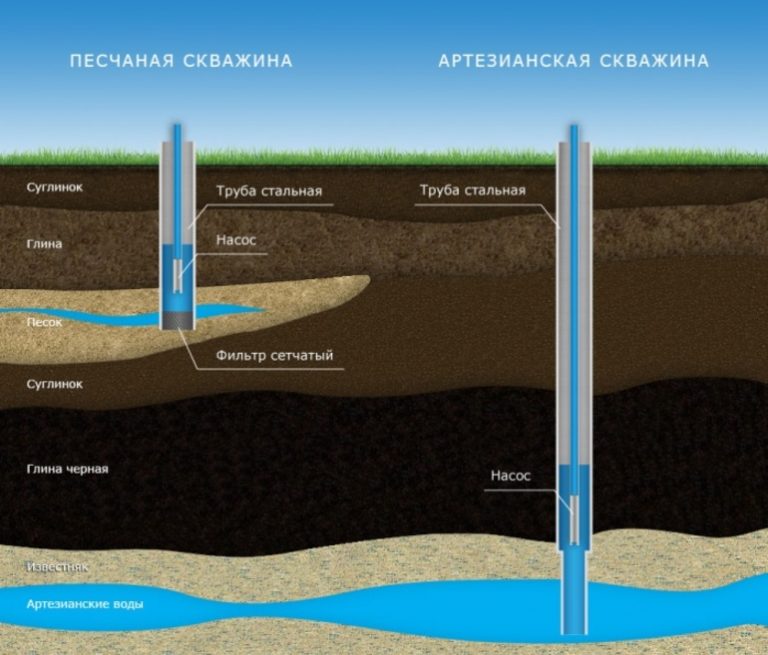
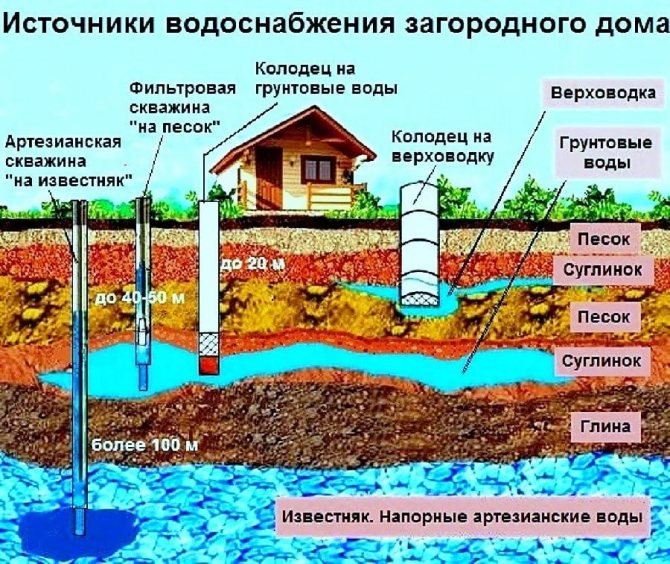
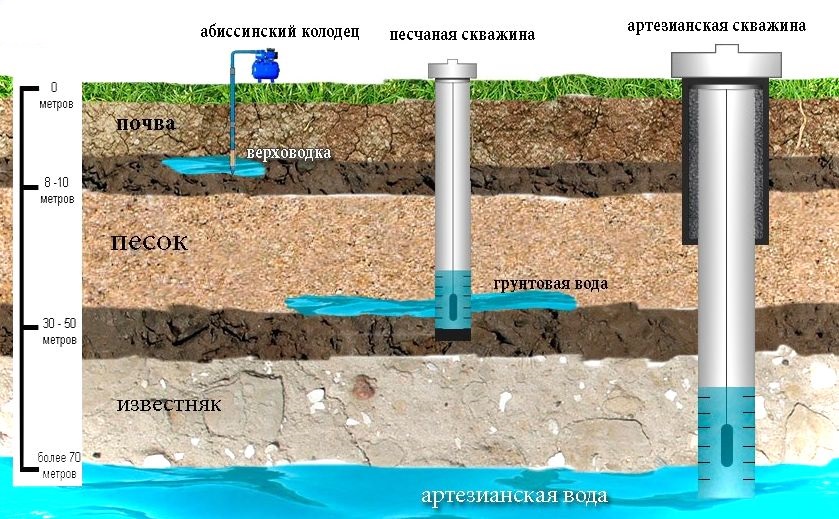
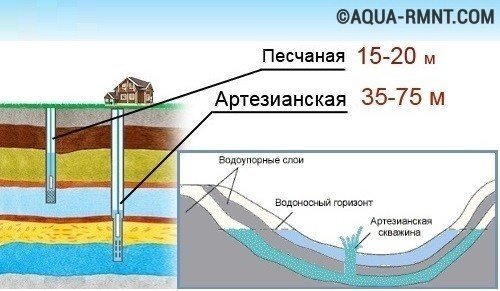
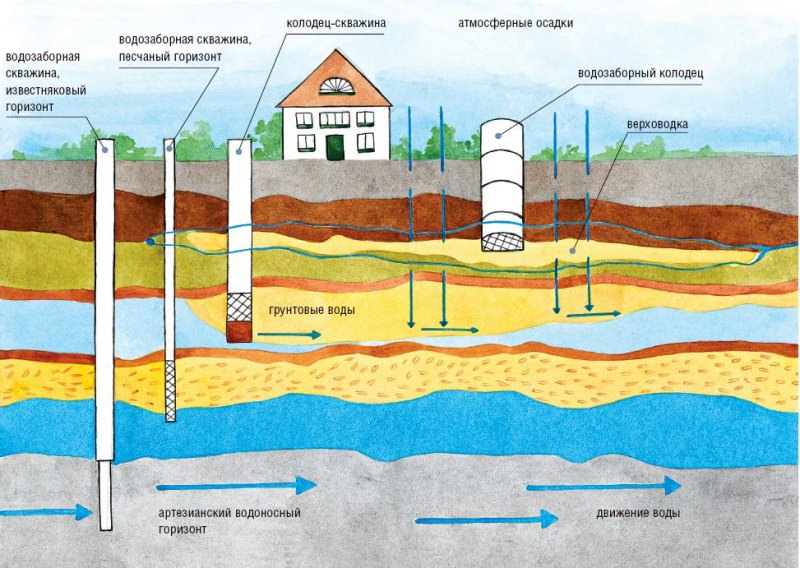
To drill a well for water in a country house, a personal plot, a rural courtyard, it must be taken into account that there are three ranges of depths at which aquifers occur:
- Abyssinian well. Before the water will have to drill from one and a half to 10 meters.
- On the sand. To make a well of this type, you need to pierce the soil to a mark in the range from 12 to 50 m.
- Artesian source. 100-350 meters. The deepest well, but with the purest drinking water.
In this case, each time a separate type of drilling rig is used. The determining factor is the chosen method of drilling operations.
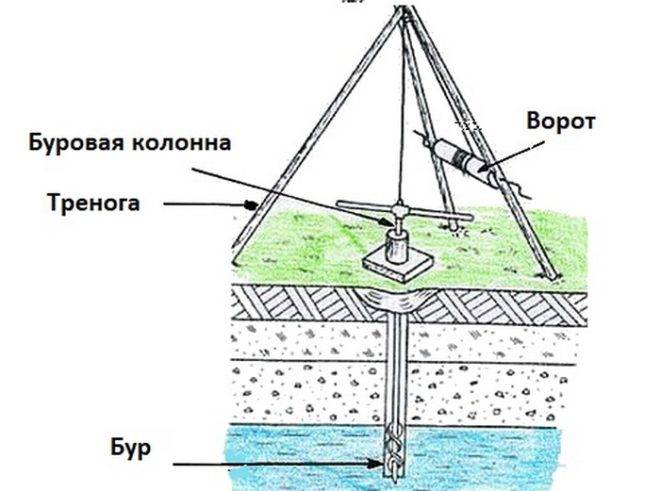
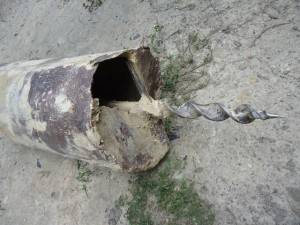
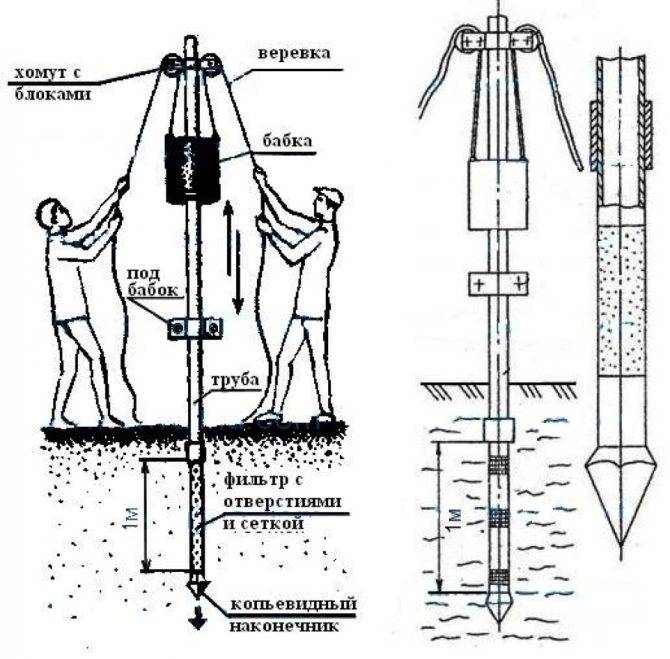
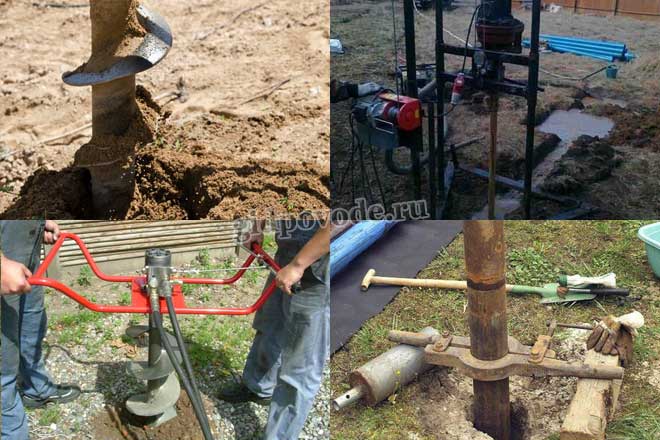
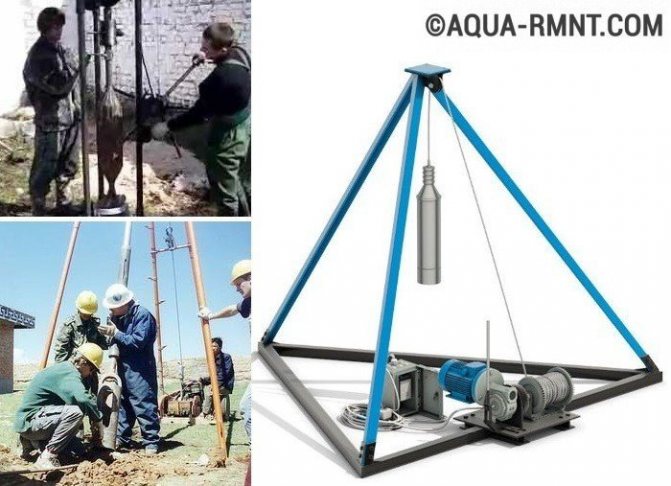
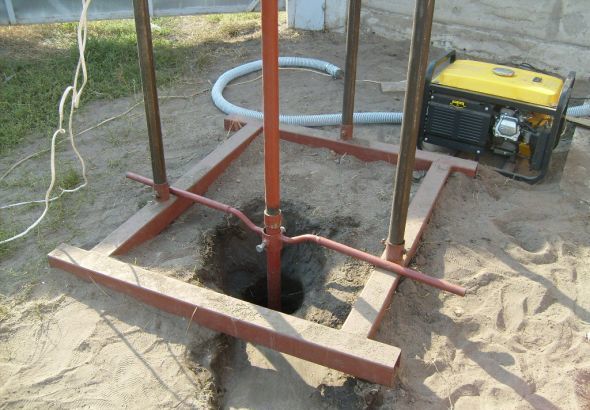
Shock rope
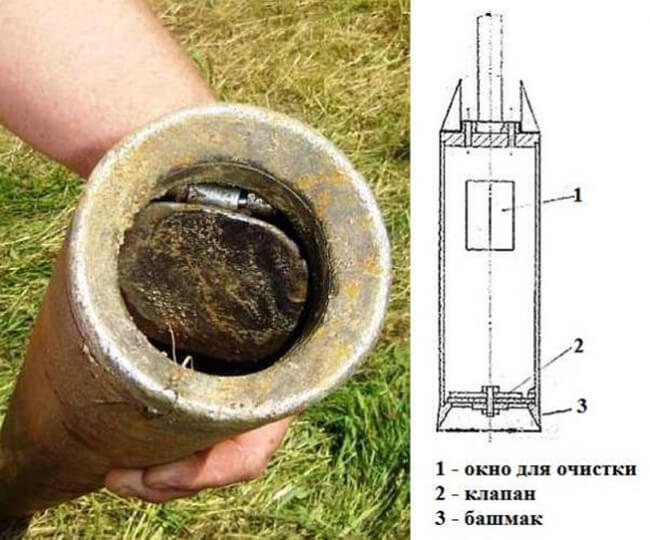
With such drilling of wells for water, the technology of the process involves raising the pipe with three cutters to a height. After that, being weighted with a load, it descends, and crushes the rock under its own weight. Another device necessary for extracting crushed soil is a bailer. All of the above can be bought or made with your own hands.
But before you drill a well with your own hands, you will have to use a garden or fishing drill to make the primary recess. You will also need a metal profile tripod, a cable and a system of blocks. The drummer can be lifted with a manual or automated winch. The use of an electric motor will speed up the process.
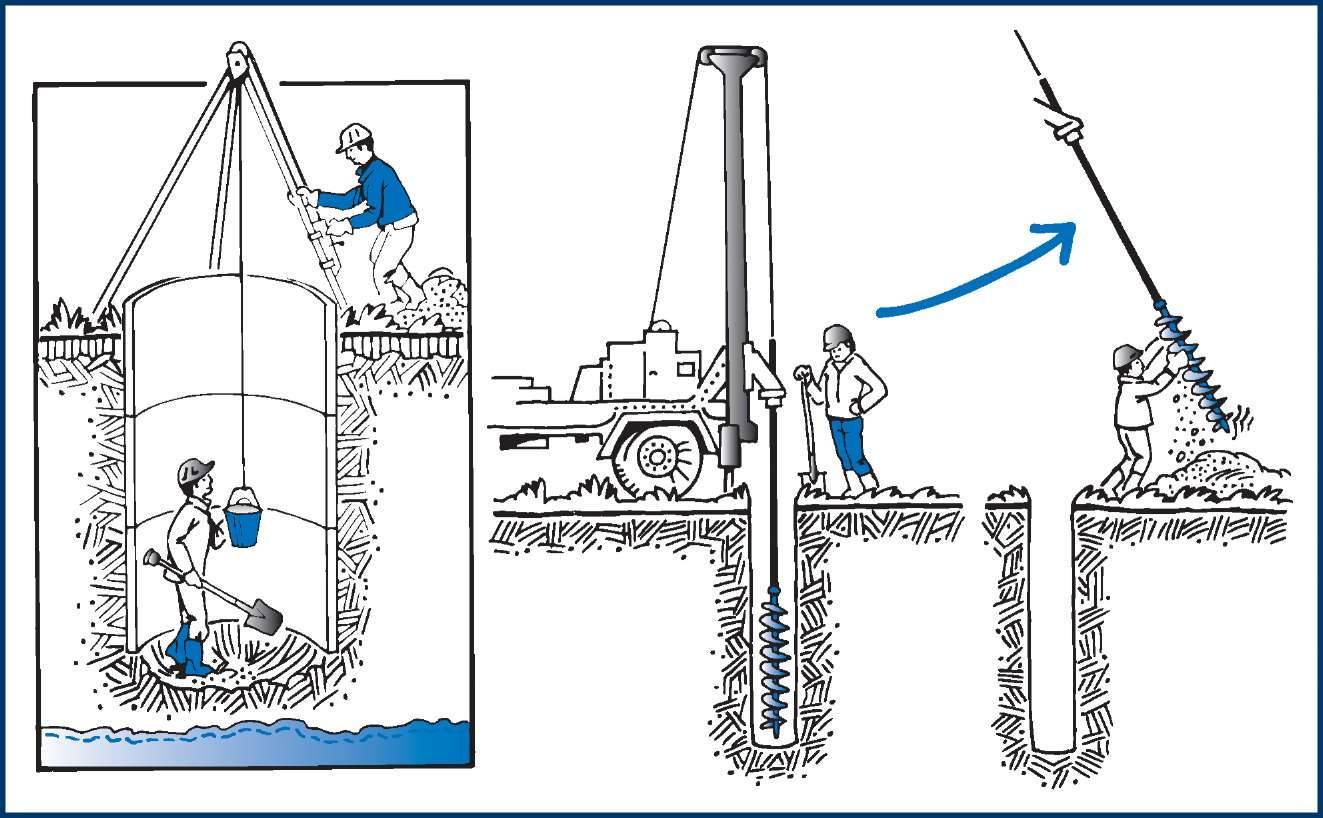
Auger
This technology of drilling wells under water involves the use of a drill, which is a rod with a helical blade. A pipe with a diameter of 10 cm is used as the first element. A blade is welded onto it, the outer edges of which form a diameter of 20 cm. To make one turn, a sheet metal circle is used.
A cut is made from the center along the radius, and a hole equal to the diameter of the pipe is cut along the axis. The design is “divorced” so that a screw is formed that needs to be welded. To drill a well in the country with your own hands using an auger, you need a device that will serve as a drive.
It could be a metal handle. The main thing is that it can be disconnected. As the drill deepens into the ground, it is increased by adding another section. The fastening is welded, reliable, so that the elements do not come apart during the work. After the procedure is completed, the entire structure is removed, and casing pipes are lowered into the shaft.
Rotary
Such drilling of a well in the country is not the cheapest option, but the most effective. The essence of the method is the combination of two technologies (shock and screw). The main element that receives the load is the crown, which is fixed on the pipe. As it sinks into the ground, sections are added.
Before you make a well, you need to take care of the water supply inside the drill.This will soften the ground, which will extend the life of the crown. This method will speed up the drilling process. You will also need a special installation that will rotate, raise and lower the drill with a crown.
Puncture
This is a separate technology that allows you to penetrate the ground horizontally. This is necessary for laying pipelines, cables and other communication systems under roads, buildings, in places where it is impossible to dig a trench. At its core, this is an auger method, but it is used for drilling horizontally.
The pit is dug, the installation is installed, the drilling process begins with periodic sampling of rock from the pit. If water in the country can be obtained from a well separated by an obstacle, a puncture is made, a horizontal casing pipe is laid, and a pipeline is pulled. Everything can be done with your own hands.
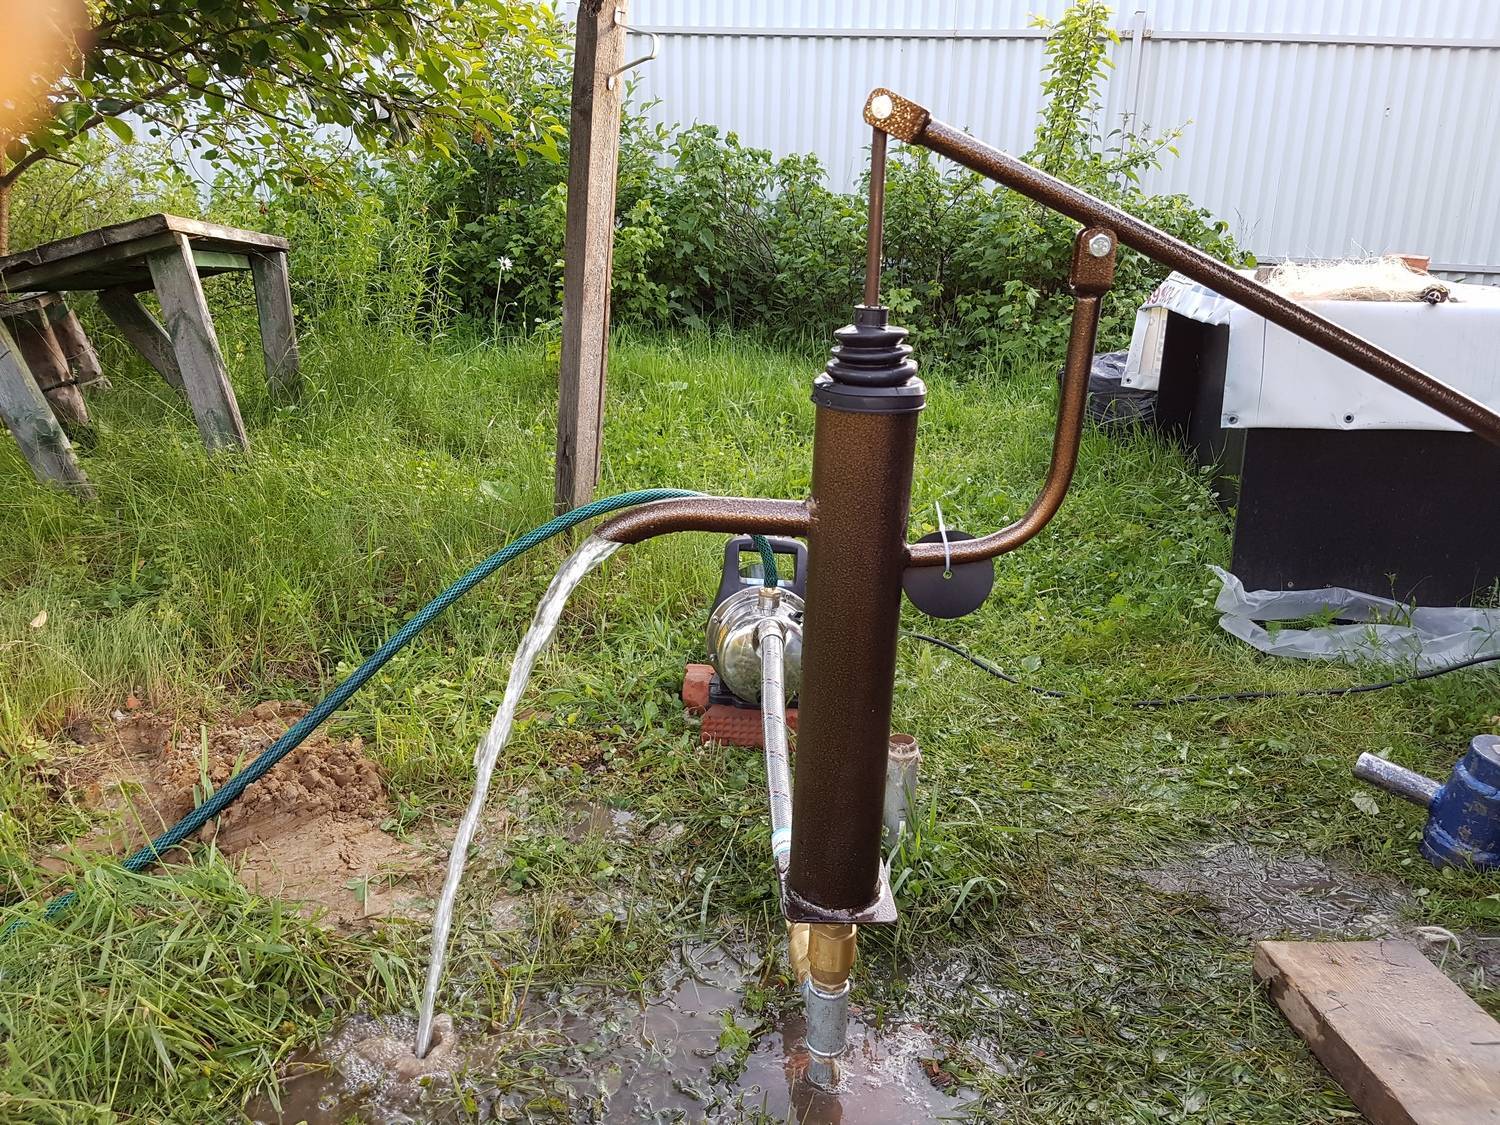
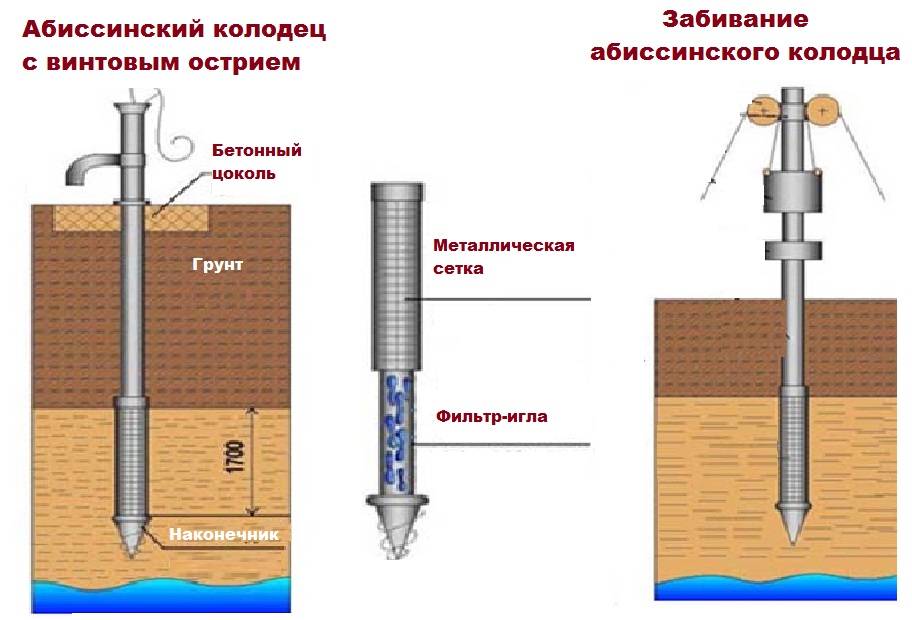
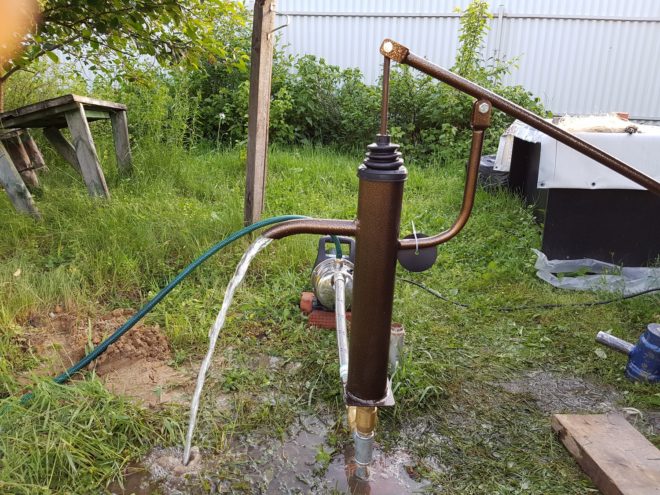
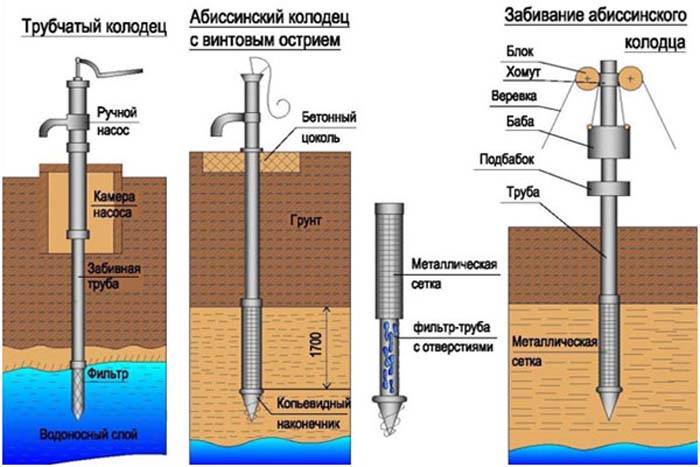
Abyssinian well
Unlike traditional underground channels, the Abyssinian well has a small diameter (no more than 50 mm) and water is pumped out of it by a surface pump, not a submersible one. There is an opinion that due to the rarefaction created, such a well does not silt, and over time, its debit only grows due to the forced washing out of soil capillaries. In fact, such assertions have no serious grounds.
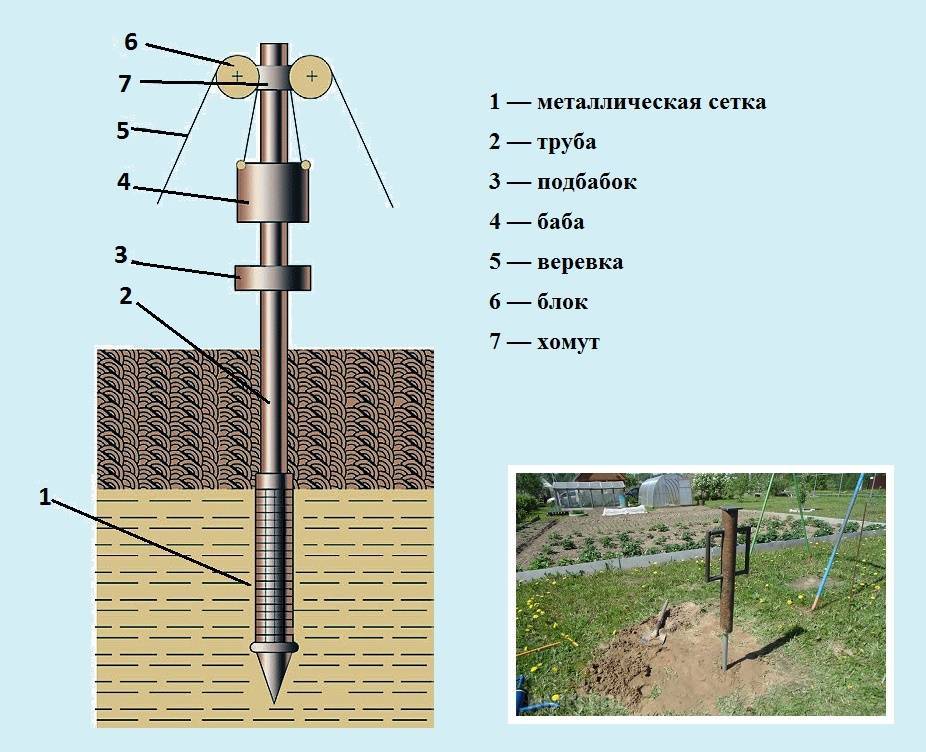
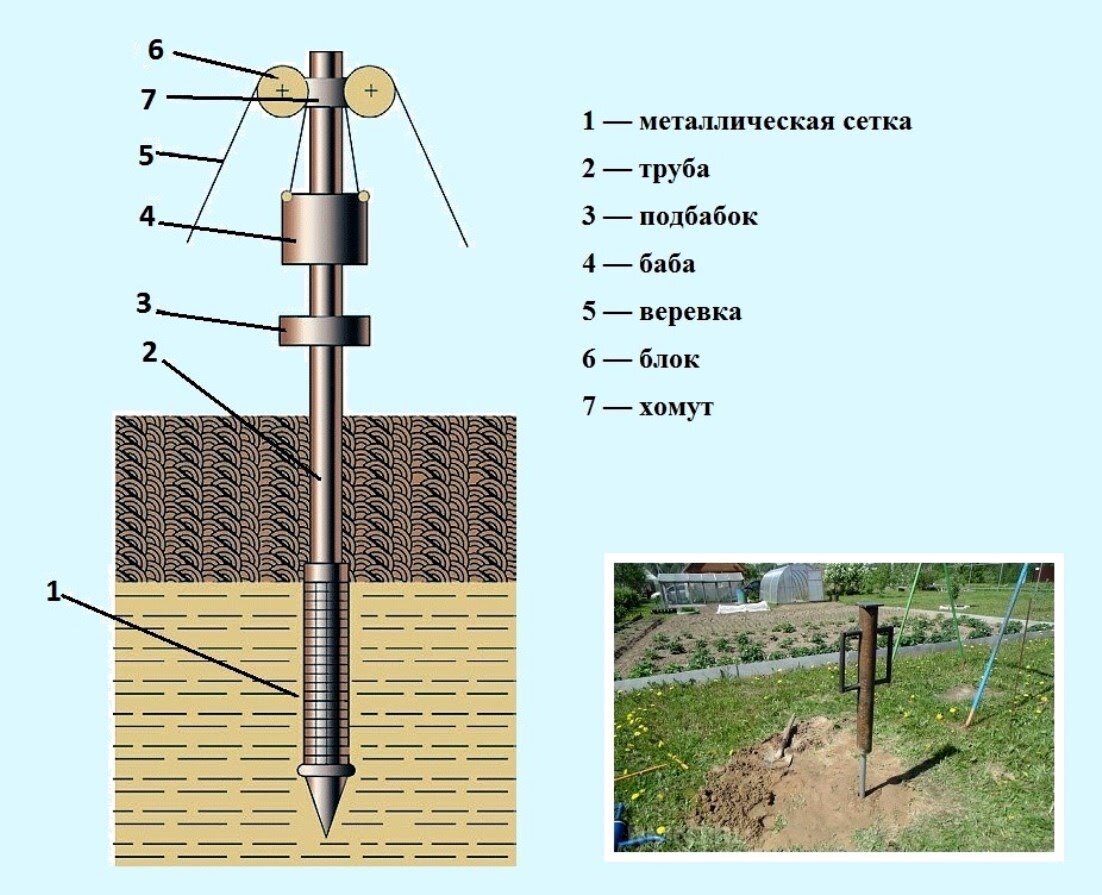
Before making an Abyssinian well, prepare the required number of casing pipes 2–2.5 m long. Since penetration below 15 m is not expected, it is enough to have 6–7 ready-made segments Ø50 mm on hand, plus the first section with a steel cone at the end - a needle. She will play the role of a drilling tool.
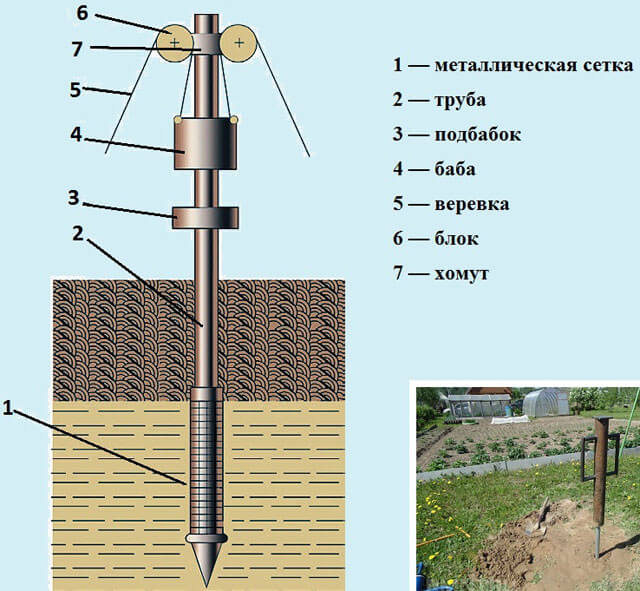

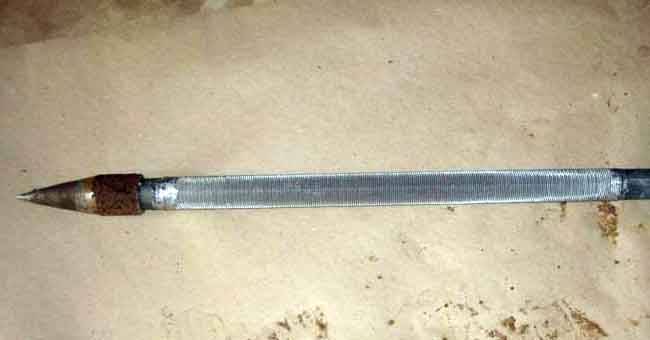
Finished Needle with Mesh
The technology looks like this:
- Make the first section of the casing - the so-called needle.Weld a metal cone to its end, and make holes on the sides and place the mesh, as described in the previous section.
- Dig a small leader hole, insert a needle into it and start driving, keeping to the vertical. To do this, you can use the same tripod with a suspended weight or another device.
- As you sink, weld in new sections and continue to drive in the casing. When approaching the estimated depth, check the appearance of water with a weight on a string.
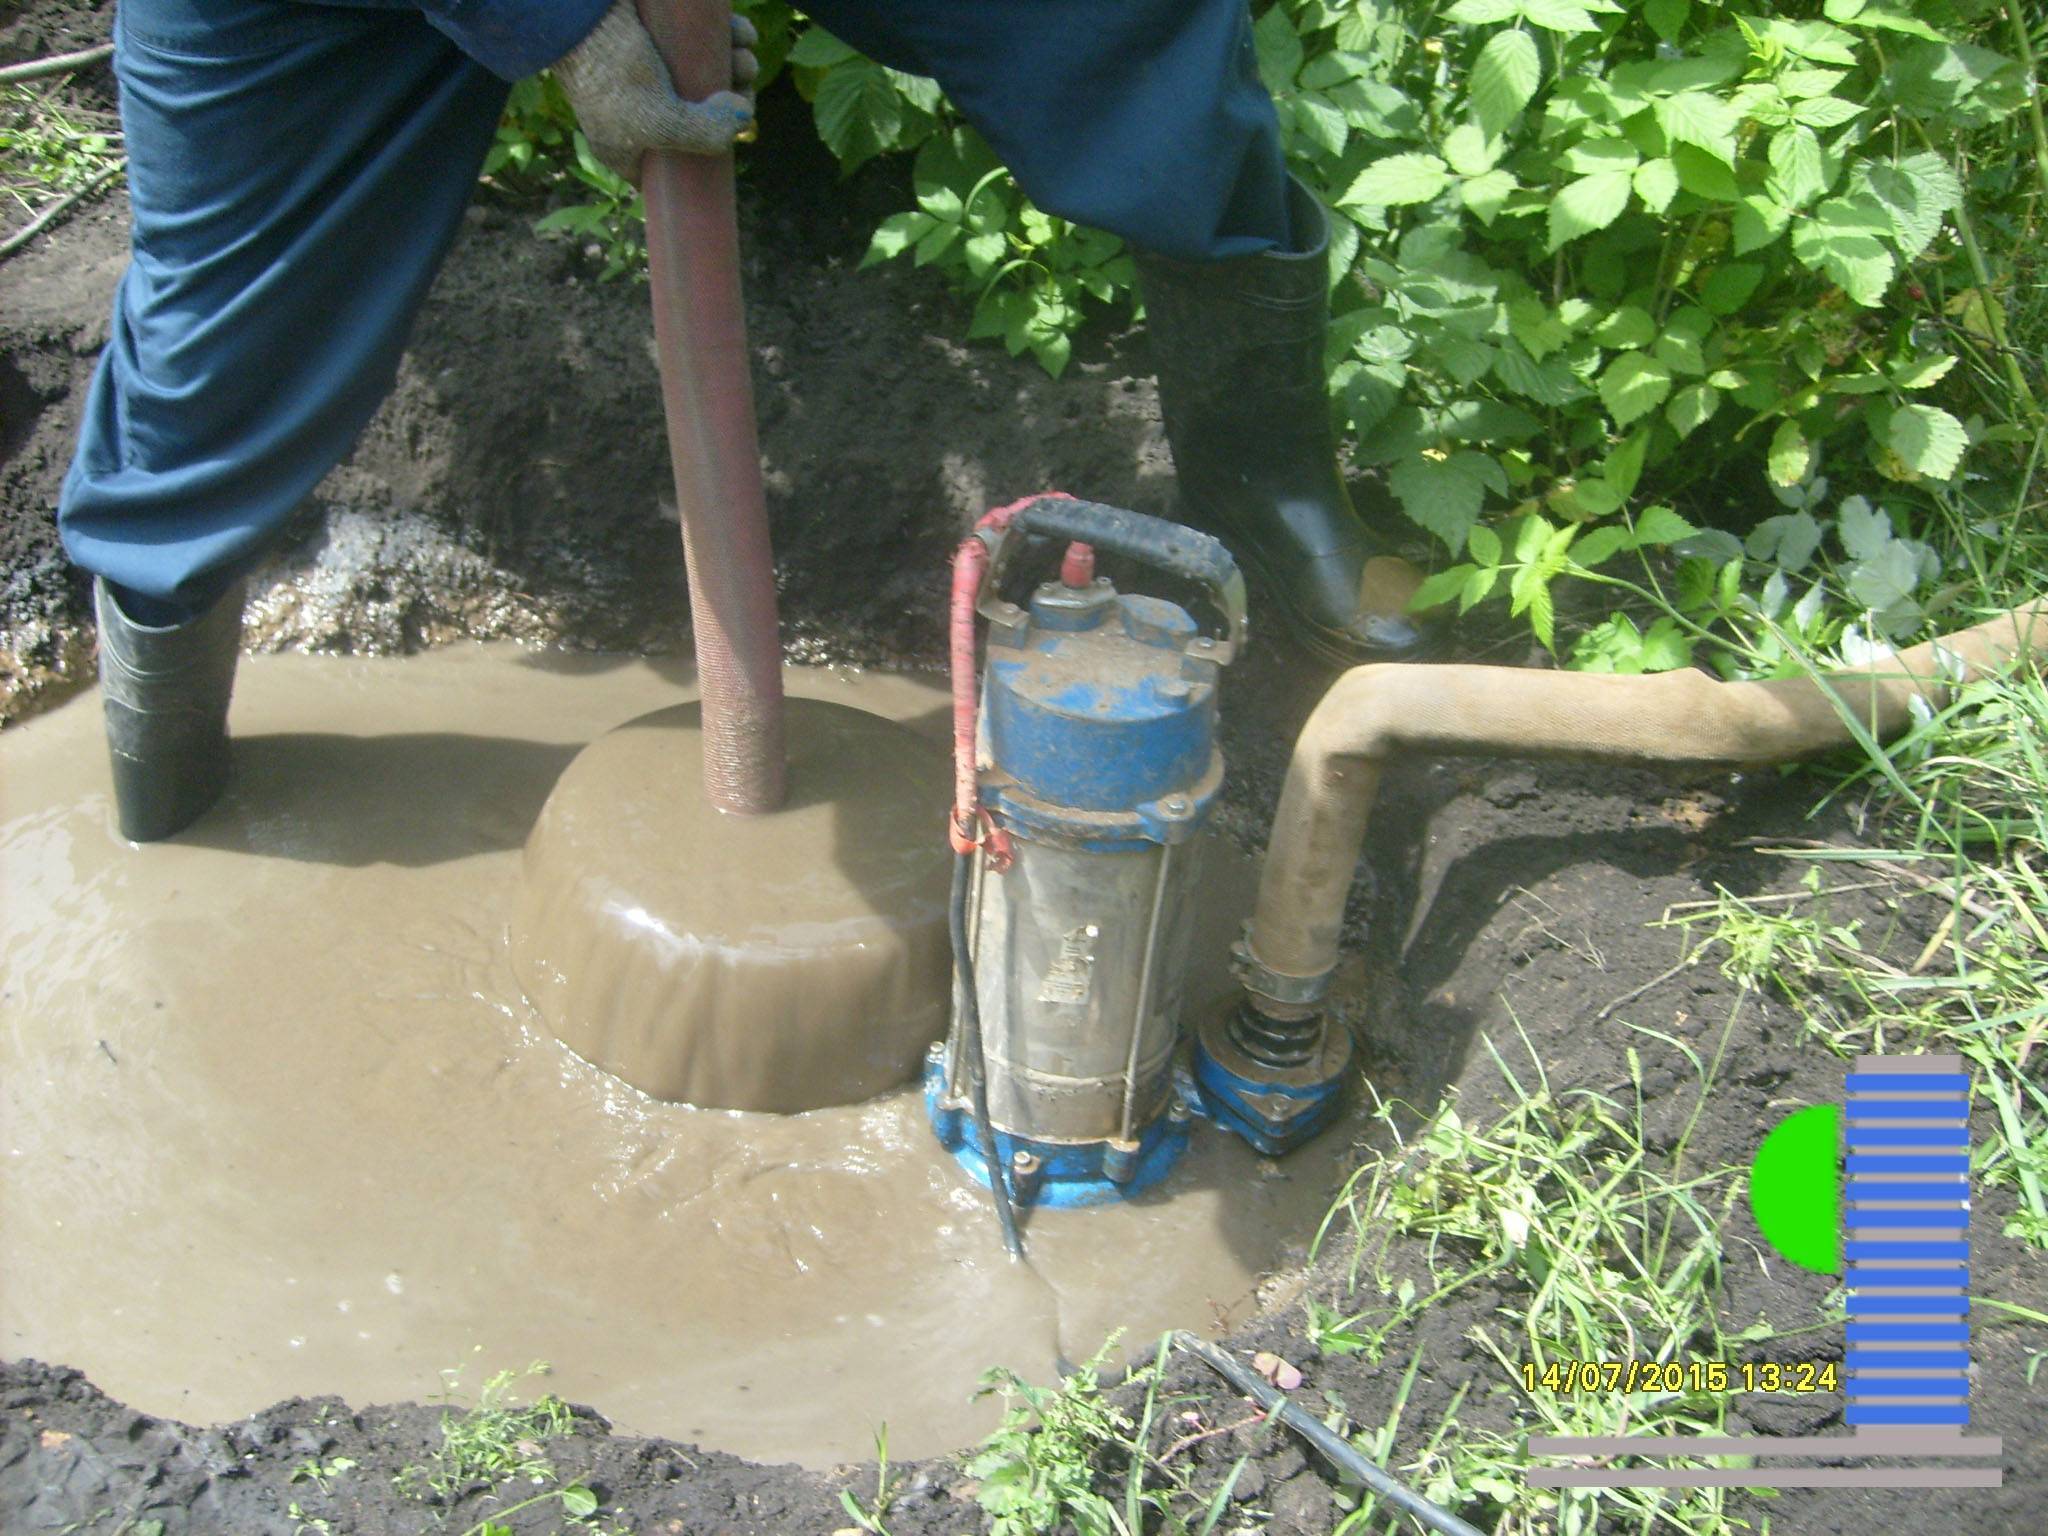
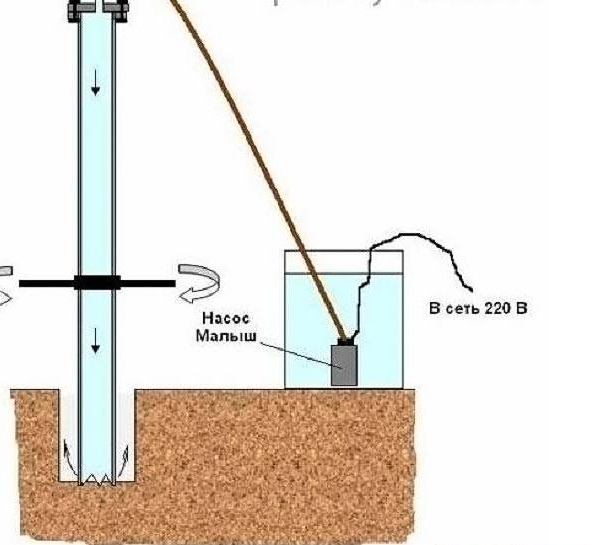
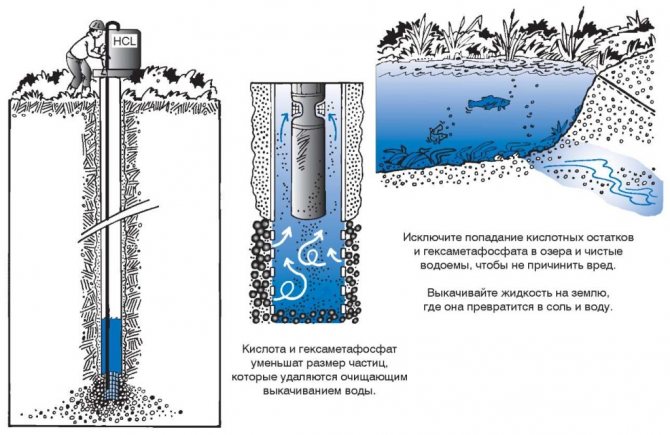
- After passing the aquifer, lower the polymer pipeline connected to the hand column into the well. Fill it with water and pump the source for 30-60 minutes until clean water comes out. Then proceed to the installation of an autonomous water supply.
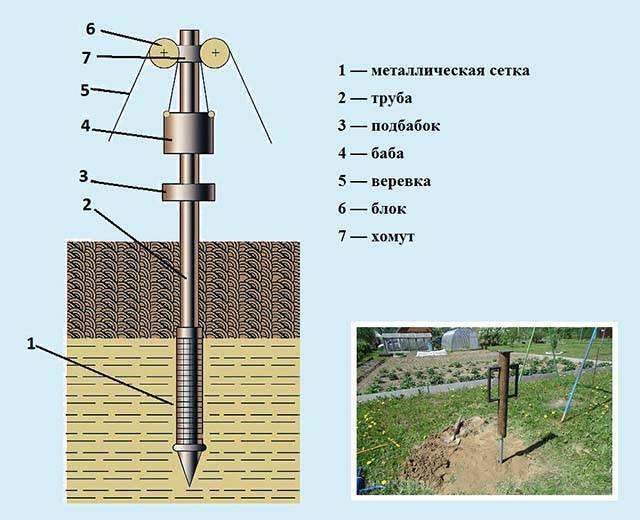
Abyssinian well device
The Abyssinian well has one significant drawback: before drilling it, you need to know for sure that there is groundwater in this place. Otherwise, you run the risk of burying all the pipes in the ground, since it is not always possible to extract them back. The advantages of the source are simplicity in execution and minimal consumption of materials. If you wish, you can punch such a well right in the house, as a team of workers demonstrates in the video:
Conclusions and useful video on the topic
From the foregoing, it is easy to conclude that all work on the development and further operation of the well does not present a problem. It is not necessary to be an engineer or have experience in this field. All recommendations are described in sufficient detail, and in order to always have them at hand, you need to save the page in your browser bookmarks. And the video will be a visual guide.
By choosing the right type of equipment and protective structure, you can provide your family with clean drinking water without spending money on paying for the services of a specialized company. But if the procedure seems complicated, specialists will have to be hired. But this is a guarantee that the system will be operational for many years from the first day the system is put into operation.
HelpfulUseless


