
- Work methodology
- Drilling a well under water
- How to make a drill for a water well
- Production of drilling tools
- Methods for self-drilling
- Shock rope
- Auger
- Rotary
- Puncture
- Important Circumstances
- Well or well?
- Casing installation
- Choose the type of well
- Advantages of homemade wells
- Water supply organization
- Well device
- Plumbing
- Where to drill a well
- Abyssinian well (well)
- We install automation
- Filters
- Scheme of autonomous water supply main elements of the system
Work methodology
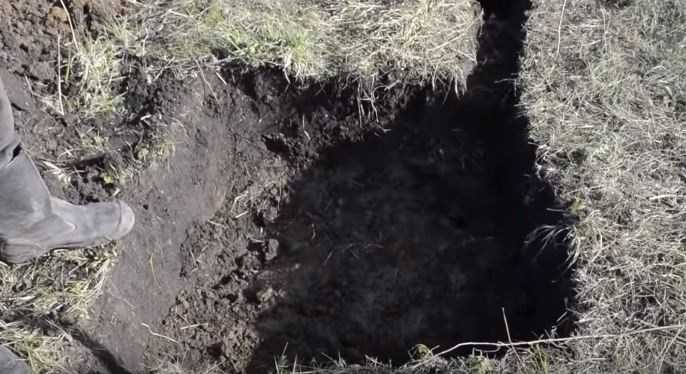
Drilling a well under water
There are several ways, but for a summer cottage it is advisable to use "manual" ones that do not require large financial investments. Water will be taken from the upper layer, if it is suitable for its characteristics. In this case, its consumption can be provided up to 1.5 "cubes".
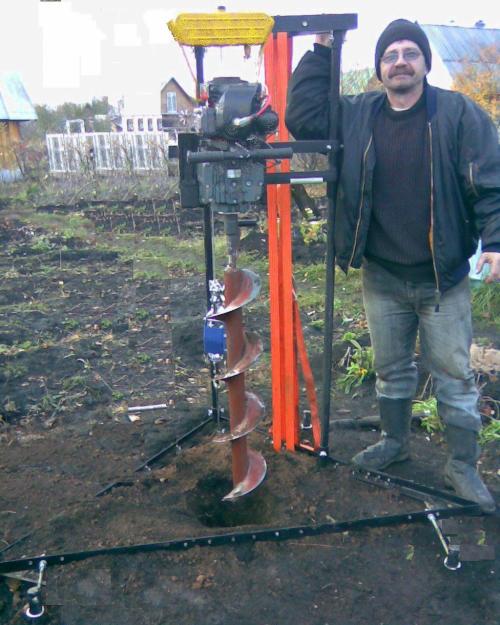
How to make a drill for a water well
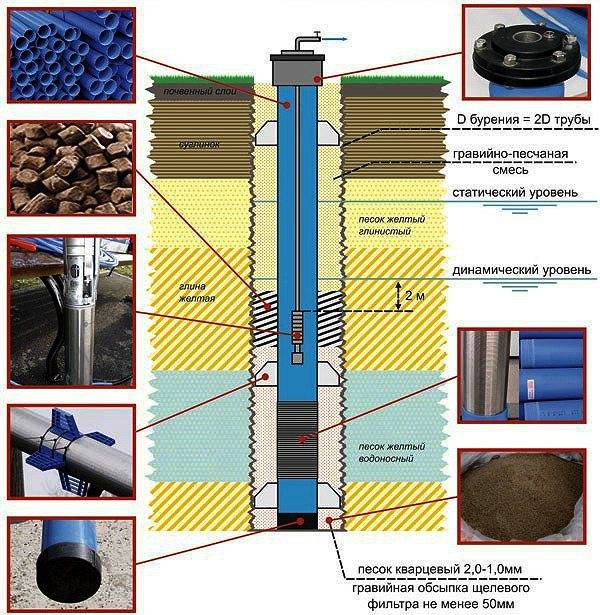
This "tool", depending on the characteristics of the soil, can go up to 25 - 30 m. Water intake can be carried out already from 7 - 10 m, if the aquifer is not deep. Such a well under water is called "sandy".
The drill resembles the one that fishermen use to make holes in the ice in winter.The difference is that the tool consists of a straight rod with a screw end (steel strip welded in a spiral). A piece of metal pipe is welded to the other end. The "shoulder" of the lever is selected based on the convenience of work.
When determining how to drill a well for water, you need to focus on its desired depth. Therefore, you should prepare "knees" - extensions for a rod no longer than 1.2 - 1.5 m (for convenience) each. Their number depends on the depth of penetration. They are also made from pieces of pipe of a suitable diameter. The connection between them is made by the method "one to another".
The knees of the hand drill for the well are fastened with metal fingers, for which radial holes are pre-drilled at the ends, if they coincide (after docking), a “stopper” is placed in them.
Each of the fingers should sit firmly. Therefore, they are also fixed in place with the help of bolts (which are screwed into pre-prepared - threaded - holes at their ends) or powerful studs.
Production of drilling tools
Do-it-yourself wells can be made without special equipment. To make a hand drill, you do not need complex tools or experience. The garden version of the rotator does not need a collapsible rod: you can also make a shallow hole for seedlings or under a pole with a monolithic fixture. When a well is drilled under water, the tool is equipped with sectional rods. The latter are needed to build up the drill as it goes deeper into the ground.
Sections are made of seamless water and gas pipes. Such material transmits torque well from the handle to the working body. The length of the section is 1.2-1.4 m.The main element of a composite rod is a lock, a detail that connects all parts into a single drill rod. Its design should ensure ease of assembly during drilling operations. Lock options:
- Threaded couplings. At the ends of each section, screw threads are made or metal nipples are welded. In the latter case, the alignment of the parts is controlled, otherwise the drill will lead to the side. Sections are screwed together with subsequent fixation to prevent unwinding during operation.
- Screw. A nut is welded to one end of the section, a bolt to the other. This design of the drill is suitable for giving, when the depth of the well does not exceed 10 m. With an extended penetration, the rod will bend and deform.
- Welded couplings. They are made from a pipe of a larger diameter. Couplings are welded from one end of the section, and the other is left free. All elements are sequentially assembled, fixing each joint with a bolt or stud.
For your information! To equip a summer cottage with a water well, the drill is lengthened with welded couplings. Such a connection is easy to assemble, because each ascent is accompanied by a division into its component parts, and the subsequent descent is accompanied by a new articulation and build-up.
In addition to the rod, a working body and a handle are made. The cutting part of the drill is made of a metal pipe and a steel sheet 5 mm thick. Manufacturing sequence:
- A thick drill or a metal spike made from an automobile spring is welded to a pipe with a diameter of 40-50 mm. In the latter case, the shank is shaped like a spear. The pike will set the direction and loosen the soil directly under the drill.
- Screw elements are cut out of sheet metal.To do this, two concentric circles are marked on the surface - the inner circle is the diameter of the pipe, and the outer circle is the size of the well.
- The discs are cut along the radius on one side. They give the blanks a helical shape by twisting them at an angle of 30 °.
- They are put on the pipe in series connecting with each other. A blade is welded to the lower part for loosening the soil. The knife is made of alloy steel, which will work for a long time without sharpening.
- A coupling is welded to the upper part of the drill for connection with the rod.

How to make a potato planter with your own hands: drawings, principle of operation
Methods for self-drilling
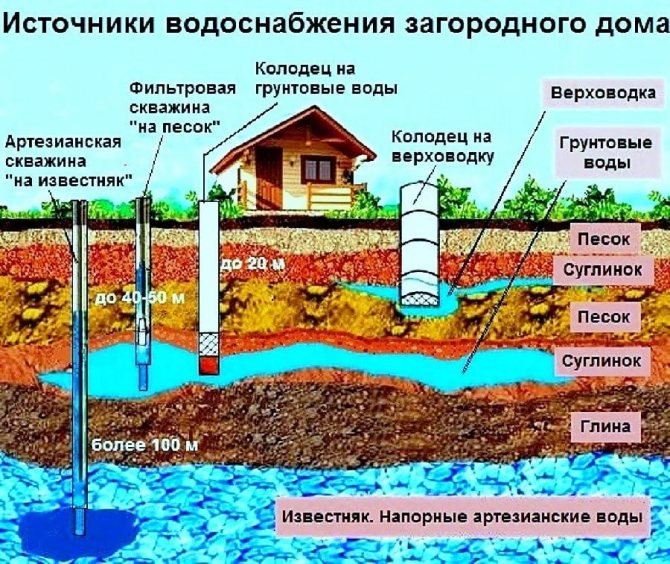
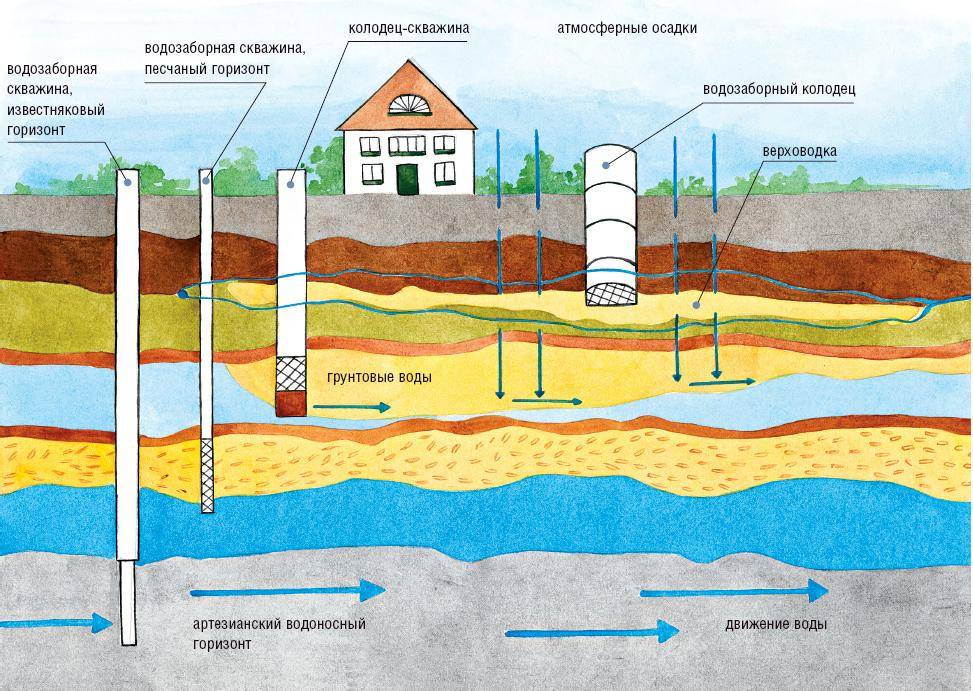
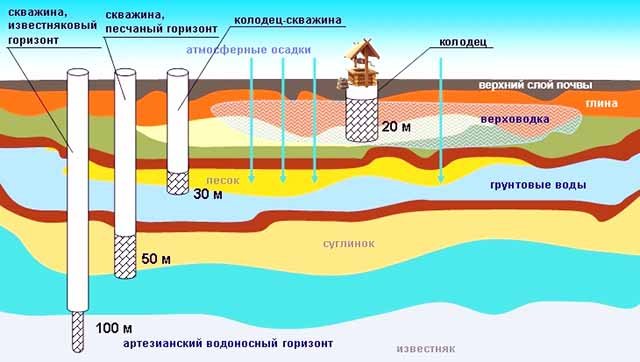
To drill a well for water in a country house, a personal plot, a rural courtyard, it must be taken into account that there are three ranges of depths at which aquifers occur:
- Abyssinian well. Before the water will have to drill from one and a half to 10 meters.
- On the sand. To make a well of this type, you need to pierce the soil to a mark in the range from 12 to 50 m.
- Artesian source. 100-350 meters. The deepest well, but with the purest drinking water.
In this case, each time a separate type of drilling rig is used. The determining factor is the chosen method of drilling operations.
Shock rope
With such drilling of wells for water, the technology of the process involves raising the pipe with three cutters to a height. After that, being weighted with a load, it descends, and crushes the rock under its own weight. Another device necessary for extracting crushed soil is a bailer. All of the above can be bought or made with your own hands.

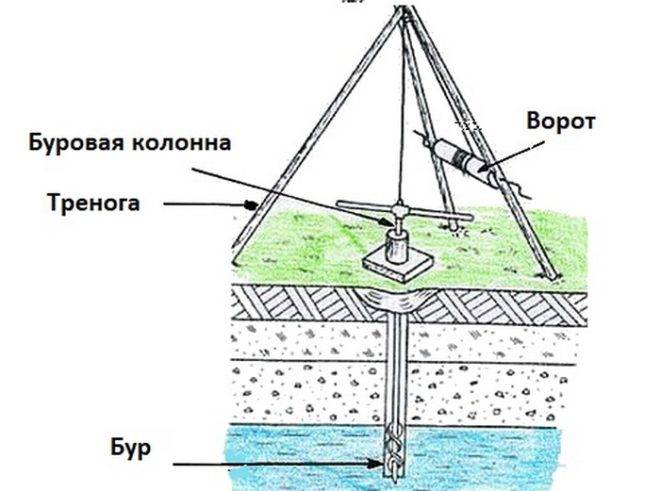


But before you drill a well with your own hands, you will have to use a garden or fishing drill to make the primary recess. You will also need a metal profile tripod, a cable and a system of blocks. The drummer can be lifted with a manual or automated winch. The use of an electric motor will speed up the process.
Auger
This technology of drilling wells under water involves the use of a drill, which is a rod with a helical blade. A pipe with a diameter of 10 cm is used as the first element. A blade is welded onto it, the outer edges of which form a diameter of 20 cm. To make one turn, a sheet metal circle is used.
A cut is made from the center along the radius, and a hole equal to the diameter of the pipe is cut along the axis. The design is “divorced” so that a screw is formed that needs to be welded. To drill a well in the country with your own hands using an auger, you need a device that will serve as a drive.
It could be a metal handle. The main thing is that it can be disconnected. As the drill deepens into the ground, it is increased by adding another section. The fastening is welded, reliable, so that the elements do not come apart during the work. After the procedure is completed, the entire structure is removed, and casing pipes are lowered into the shaft.
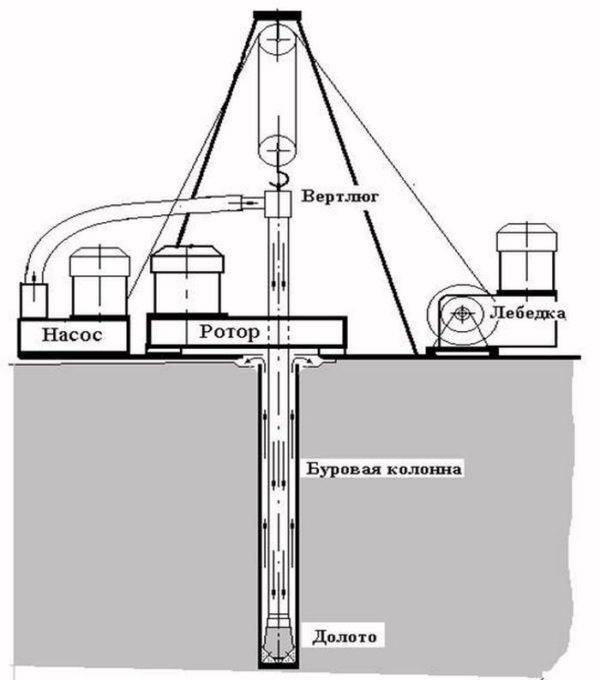
Rotary
Such drilling of a well in the country is not the cheapest option, but the most effective. The essence of the method is the combination of two technologies (shock and screw). The main element that receives the load is the crown, which is fixed on the pipe. As it sinks into the ground, sections are added.
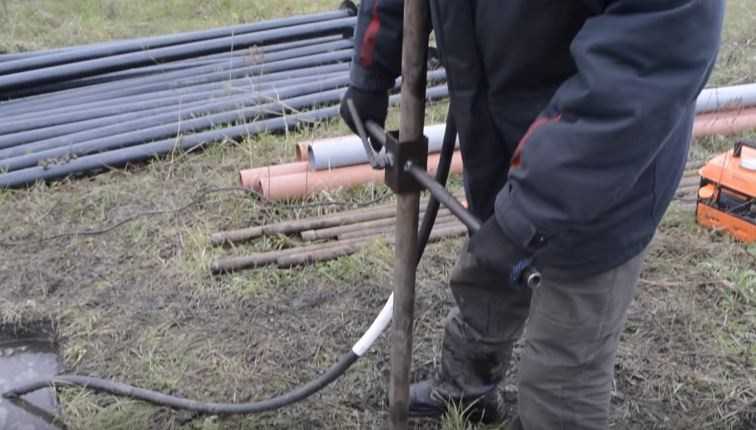
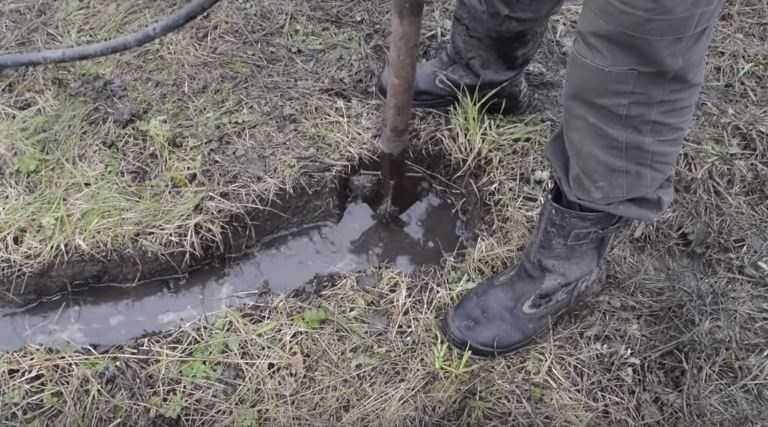
Before you make a well, you need to take care of the water supply inside the drill. This will soften the ground, which will extend the life of the crown. This method will speed up the drilling process. You will also need a special installation that will rotate, raise and lower the drill with a crown.
Puncture
This is a separate technology that allows you to penetrate the ground horizontally. This is necessary for laying pipelines, cables and other communication systems under roads, buildings, in places where it is impossible to dig a trench. At its core, this is an auger method, but it is used for drilling horizontally.
The pit is dug, the installation is installed, the drilling process begins with periodic sampling of rock from the pit. If water in the country can be obtained from a well separated by an obstacle, a puncture is made, a horizontal casing pipe is laid, and a pipeline is pulled. Everything can be done with your own hands.
Important Circumstances
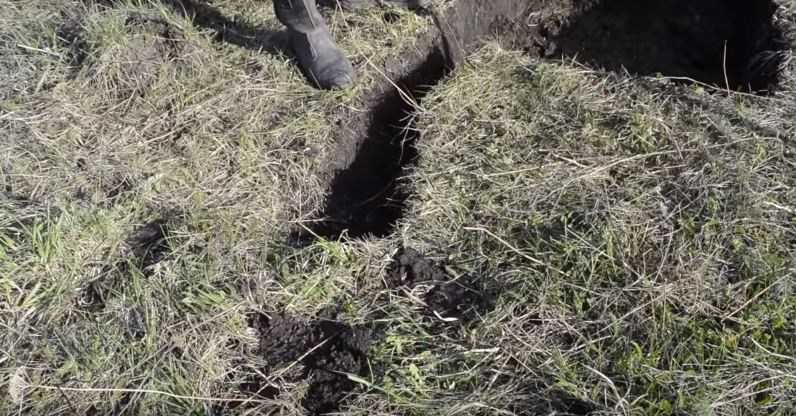
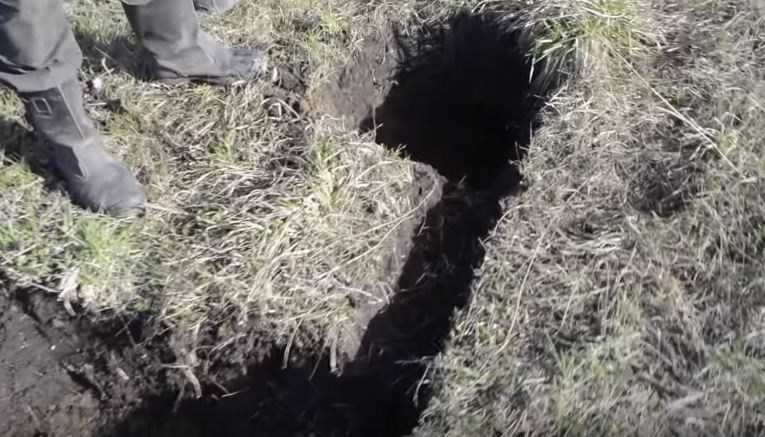
Suffusion subsidence
First: massive uncontrolled intake of non-pressure water can lead to the so-called. soil suffusion, due to which its failures suddenly and unpredictably occur, see fig.
Secondly, the critical depth of self-drilling on flat terrain in the Russian Federation is 20 m. Deeper - the cost of a turnkey custom well is less than the direct and indirect costs of a "self-drill". In addition, the probability of failure approaches 100%
Third: the life of a well depends heavily on the regularity of water intake from it. If you take a little water as you use it, then a sand well will last about 15 years, and up to 50 years or more for limestone.If you periodically pump out everything at once or, conversely, take it episodically, then the well will dry up in 3-7 years. The repair and re-swinging of the well is so complicated and expensive that it is easier to drill a new one. If this circumstance surprises you, keep in mind that they are not repairing a pipe in the ground, but an aquifer.
Based on this, we can already advise: if you find free-flowing water no deeper than 12-15 m, do not rush to rejoice, it is better to drill as far as possible to reach the limestone. And it’s best not to be too lazy and make exploratory drilling with a needle-hole, see below. It is possible to make a well-needle literally over the weekend; complex and expensive equipment is not required. And it can also be a temporary source of water supply, until you decide on time, money, etc. with a permanent one.
Well or well?
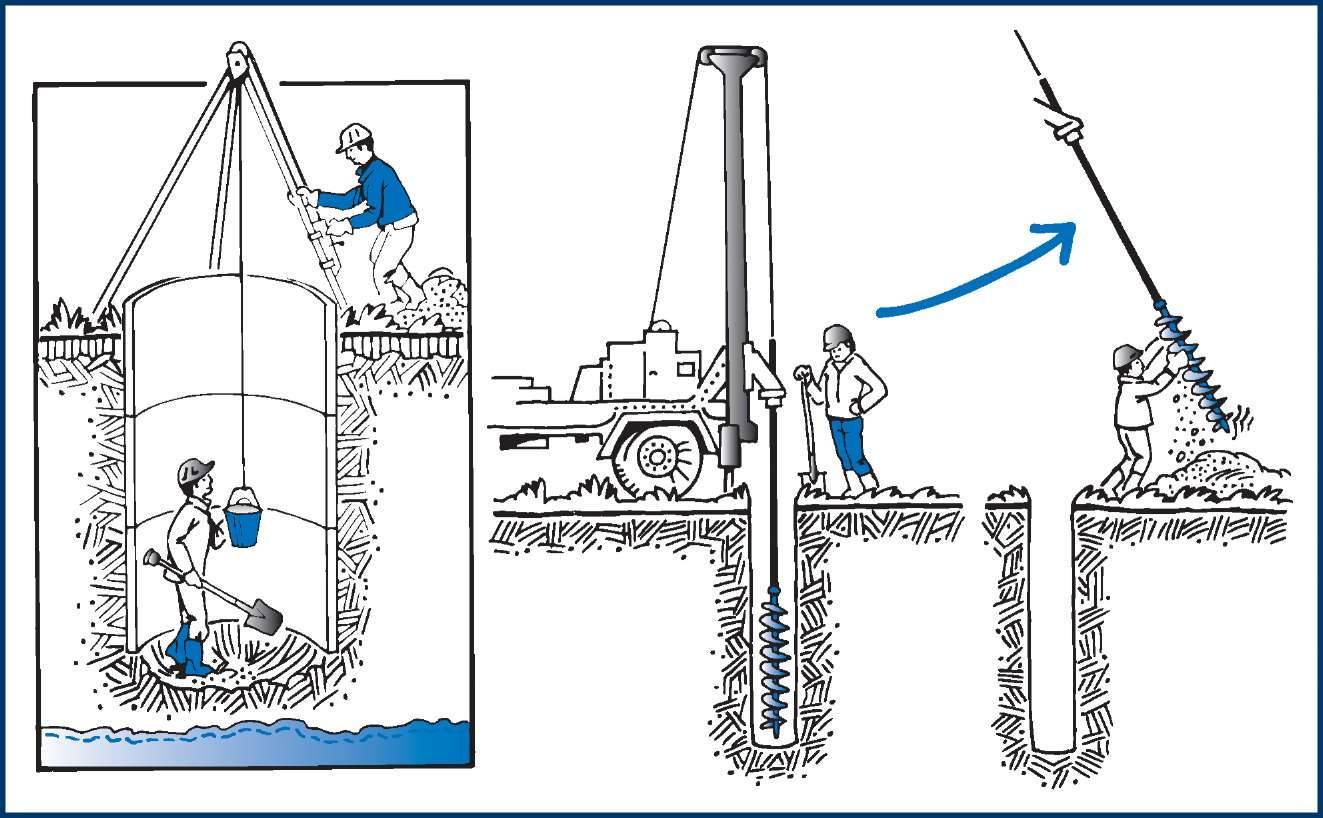
Dry drilling, except for impact drilling without casing, is only intermittent, i.e. the drill has to be lowered into the trunk, then removed from it in order to select the rock from the drill. In professional hydro-drilling, the crushed rock is carried out by the used drilling fluid, but the amateur needs to know for sure: it is impossible to go through the trunk to a depth greater than the length of the working part of the tool in 1 drilling cycle. Even if you drill with an auger (see below), you need to lift it and shake out the rock from the coils after a maximum of 1-1.5 m of penetration, otherwise the expensive tool will have to be given to the ground.
Casing installation
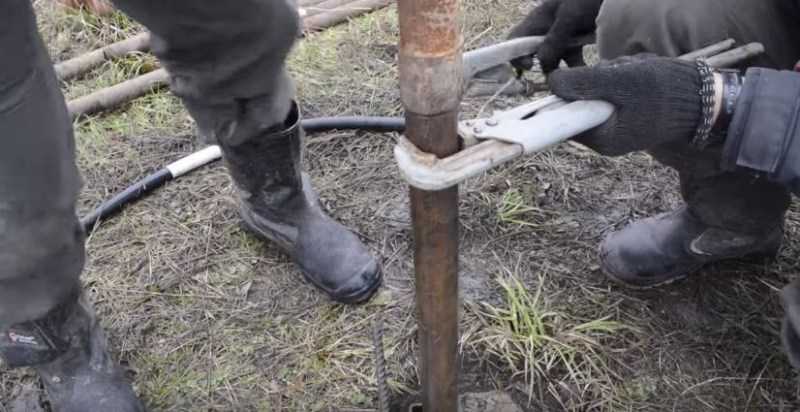
Holding the casing pipe from spontaneous upsetting
An attentive reader may already have a question: how do they put a casing in the barrel? Or, how do they raise / lower the drill, which, in theory, should be wider than it? In professional drilling - in different ways. The oldest is illustrated in Fig.on the right: the axis of rotation of the tool is shifted relative to its longitudinal axis (circled in red), and the cutting part is made asymmetrical. The neck of the drill is made conical. All this, of course, is carefully calculated. Then, in the work, the drill describes a circle that extends beyond the casing, and when lifting, its neck slides along its edge and the drill slips into the pipe. This requires a powerful, precise drive of the drill string and its reliable centering in the casing. As the depth increases, the casing is increased from above. Complex special equipment is not available to amateurs, so they can install casing pipes in the following ways:


- A “bare”, without casing, hole is drilled to the full depth with a drill larger than the casing diameter, and then the casing pipes are lowered into it. So that the whole column does not fall down, they use 2 drilling gates: one is holding the pipe that has already gone into the well, see fig. on the right, and the second is installed on a new one before removing the first. Only then is the column thrown into the trunk, if it itself is no longer moving. This method is often used by amateurs on fairly dense, adhesive (sticky) and cohesive (not loose) soils to a depth of 10 m, but there are no statistics on how many wells collapsed, how many drills and casing were lost.
- The drill is taken with a smaller diameter, and the lower casing pipe is made with divergent sharpened teeth (crown) or equipped with a cutting skirt. Having drilled for 1 cycle, the drill is lifted, and the pipe is forcibly upset; crown or skirt cut off excess soil. This method slows down drilling, because before starting a new cycle, you need a bailer (see.below) to choose crumbled soil, but more reliable, facilitates gravel backfilling of the annulus and allows the use of an external sand filter, see below.
Choose the type of well
When choosing a well, proceed not only from the possibilities, but also from the expediency. Opportunities are of two types: natural resources and finance. In the first case, you need to answer the question - is there water here, in the second - how much does it cost to get it.
The next stage is the definition of the type of well. The cheapness of a well with your own hands consists only in the fact that you do not have to pay for hired labor and the purchase of special equipment. However, in drilling a well, you will have to invest your own labor, time and costs for the partial purchase of a tool. So you still have to think about saving.
If a well is needed only for watering plants and maintaining a small country house, then an Abyssinian well is enough. If the house is intended for year-round living of a large family, then at least a sand well is needed, and preferably an artesian one. You will have to choose the latter option if the water flow should exceed 10 m3 per hour.
Drilling an artesian well will take some sweat, but it can provide water to several homes. For its drilling, arrangement and operation, it makes sense to combine the efforts of several homeowners. Conclude an agreement, form a common budget and use common water.
As for the reserves and depth of water, you can learn about them from special maps and the results of hydrological studies. Data on water resources are usually available from municipal authorities.In addition, it is necessary to assess the degree of soil pollution, and find out the location of sources of harmful emissions. This is not true only for an artesian well - usually pollution does not penetrate to such a depth.
From the point of view of pollution, the water extracted from the Abyssinian well is most at risk. It can become contaminated from the nearest septic tank, it can even get pesticides used in the garden. For this reason, water from the Abyssinian well is most often used for irrigation and other household needs.
After you have decided on the natural possibilities of your land, assessed the scope of work for different types of wells, correlated all this with financial capabilities, you can decide on the type of well and start working.
Advantages of homemade wells
The wells drilled by specialists are made with high quality, to the proper depth and taking into account the condition of the soil. However, the cost of the services of professional drillers can reach exorbitant values.
Homemade wells in the country today, especially given the development of agriculture and landscape design, are becoming more common. They have a number of advantages:
- Even with the use of professional equipment, the cost of drilling and installing pipes, a motor, and watering hoses will be significantly lower.
- A constant flow of water, both for drinking and for technical purposes.
- If you want to use better water, you can install additional filters for subsequent purification.
- For garden and vegetable plantations, it is possible to organize drip or overhead irrigation.
- An outdoor shower is always available, even if there is no tap water supply.
All financial costs for the work and installation of the installation will quickly pay off due to the fact that you will practically not have to pay for water in the house from a well made by yourself.


Water supply organization
Proper organization of the water supply system of a country house includes the following steps:
- drafting a project - in it it is necessary to calculate the required performance, determine the points of consumption and draw up a water supply scheme;
- well drilling;
- laying of water pipes;
- connection of the pump and installation of additional equipment.
Before you start drilling, you need to correctly determine the location of the source. This is influenced by several factors - both geological and operational. You can read more about the rules for choosing a place in the article “How to determine a place well drilling».
For drilling, there are several technologies:
- shock-rope method;
- screw method;
- hydraulic drilling;
- rotary method;
- driving drilling.
The method of how to make a well in the country with your own hands is selected based on the type of source, the chosen location and geological conditions. Details about all existing methods are written in the article "How to drill a well for water".
Well device
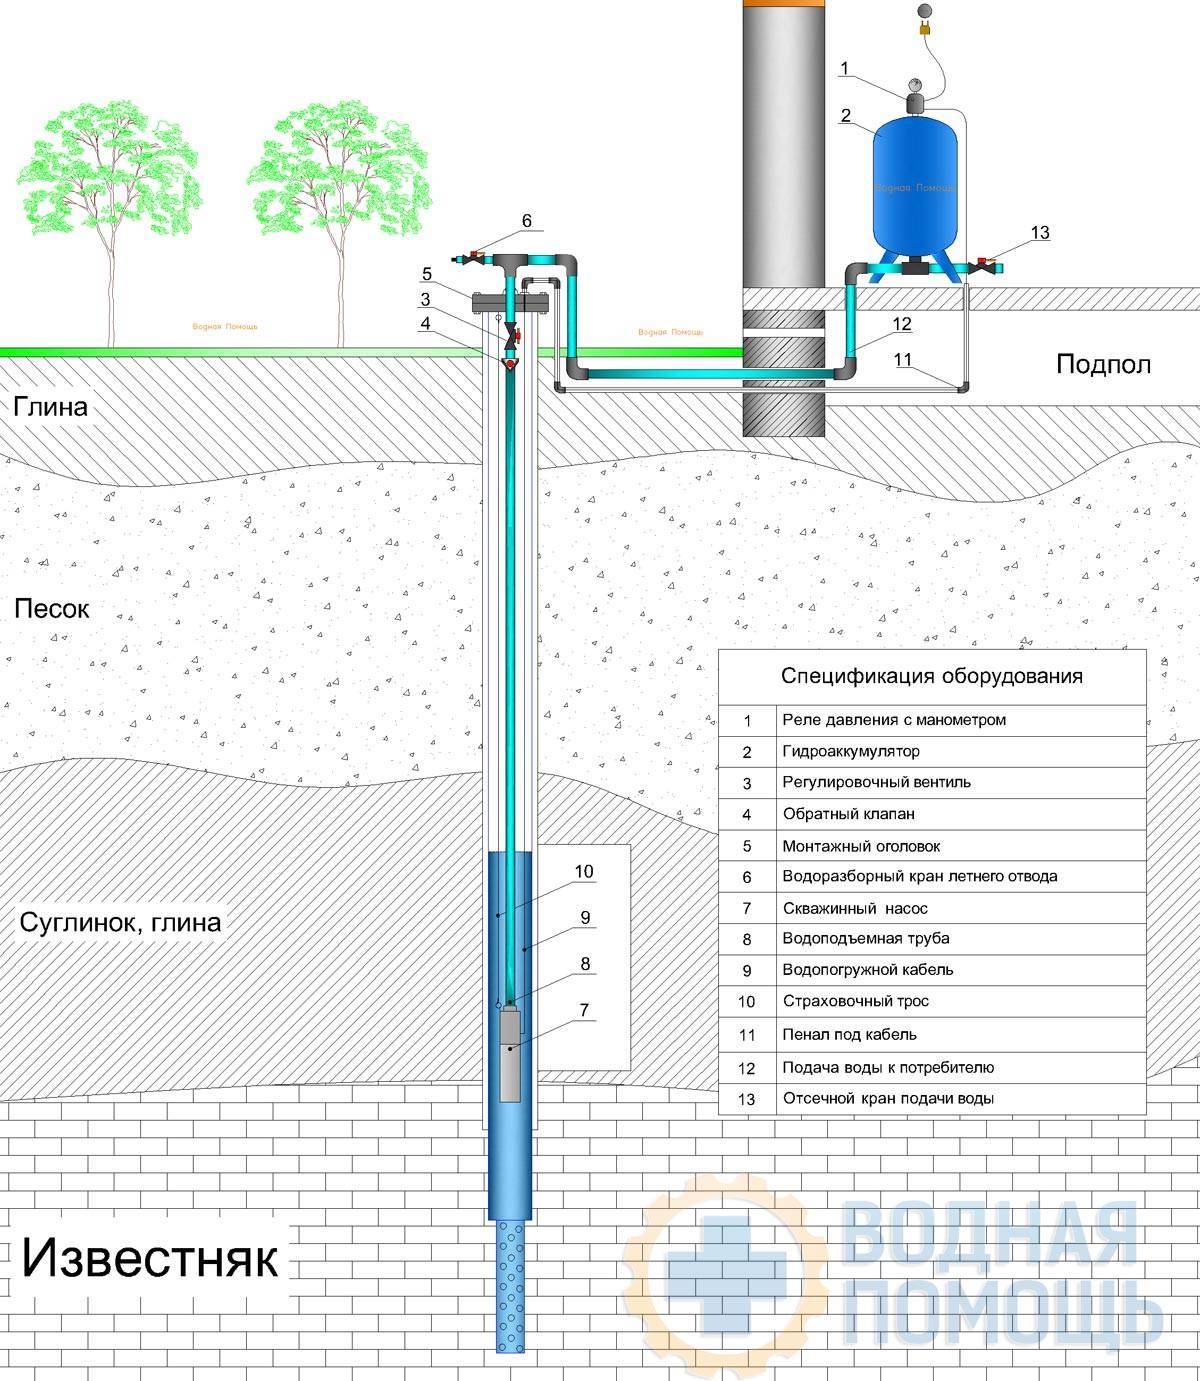
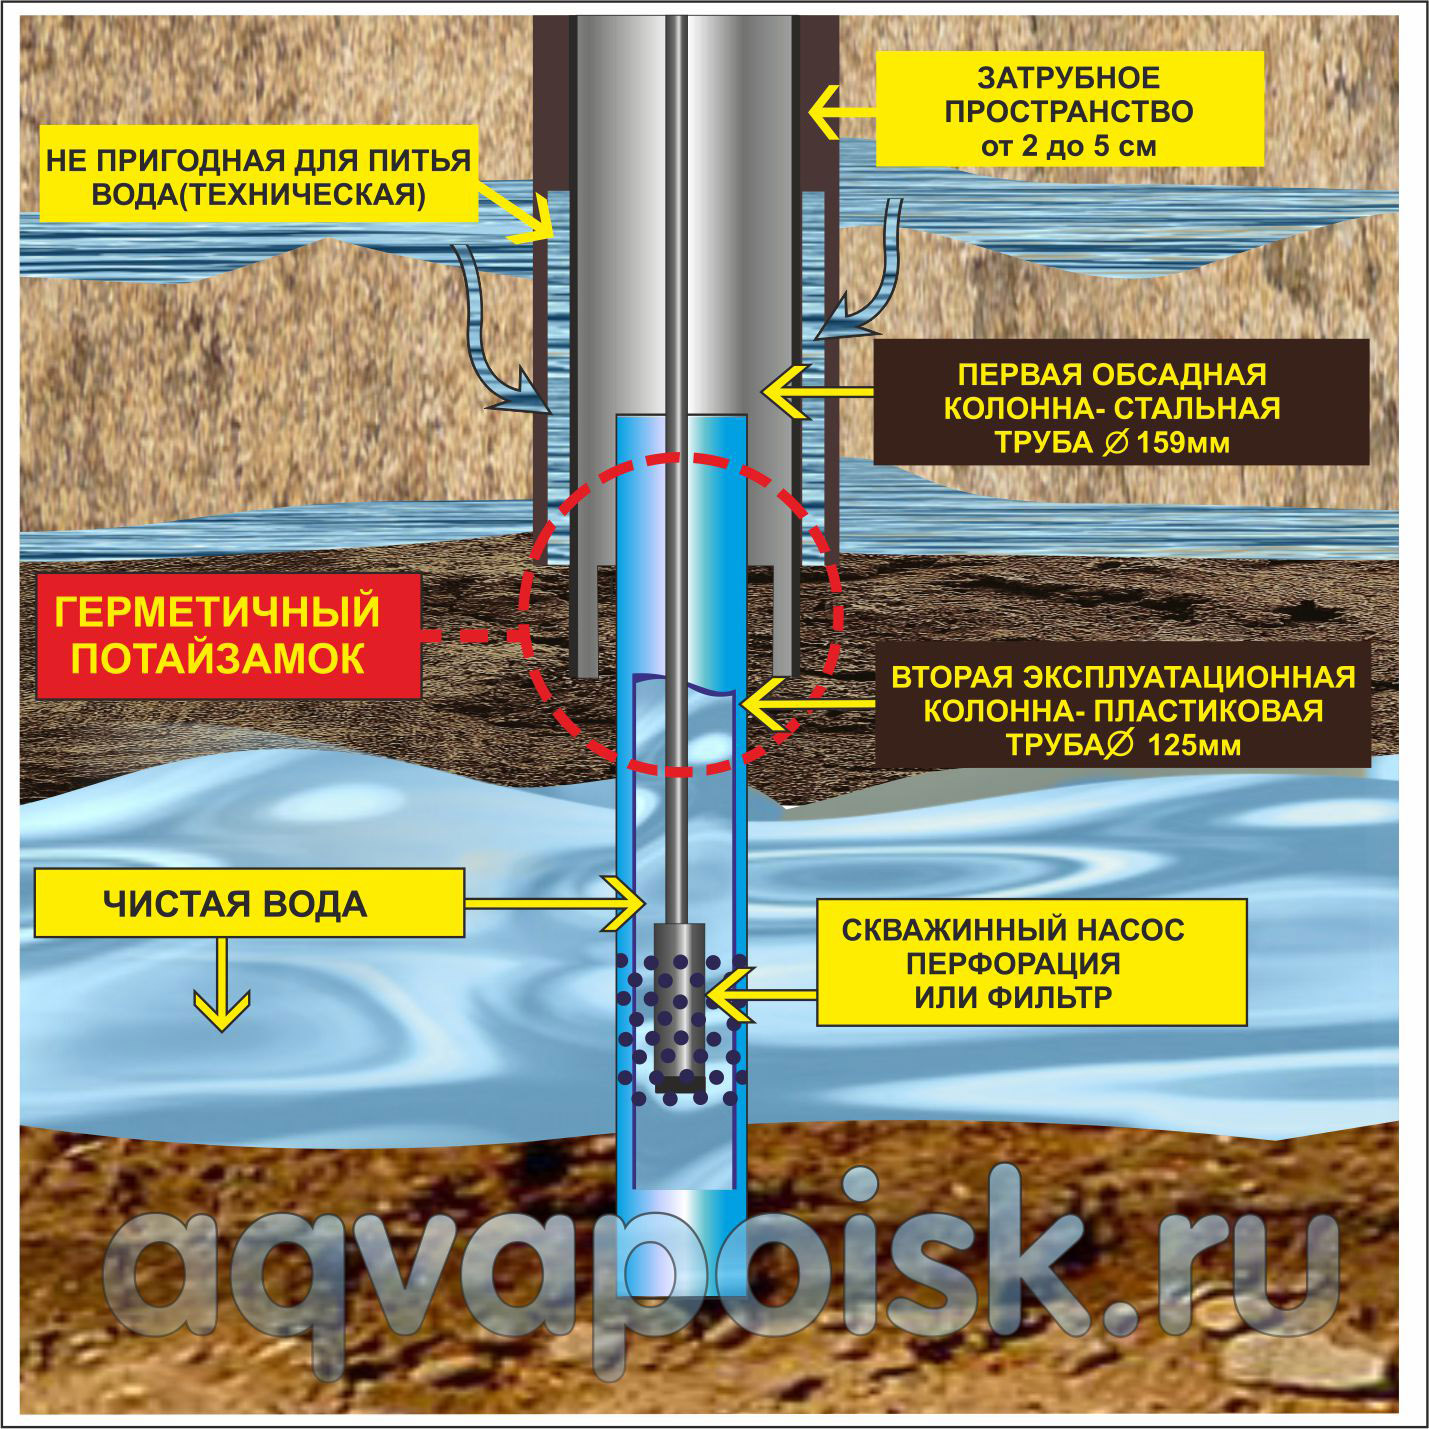
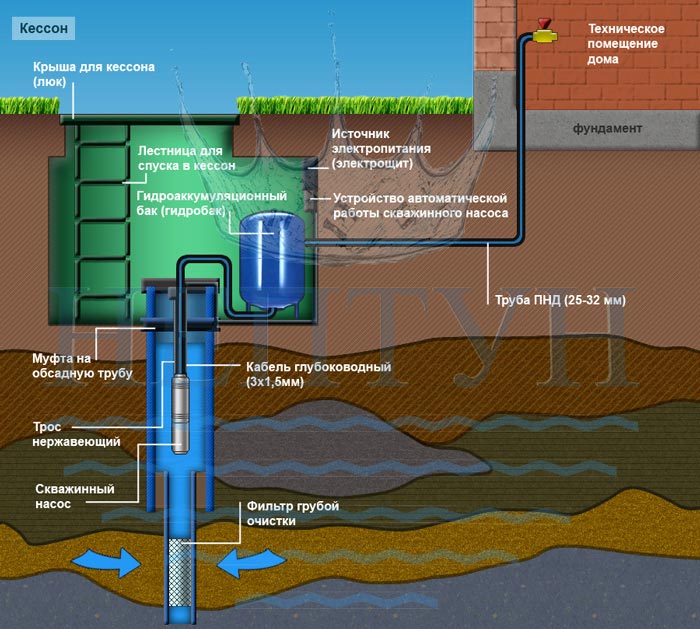
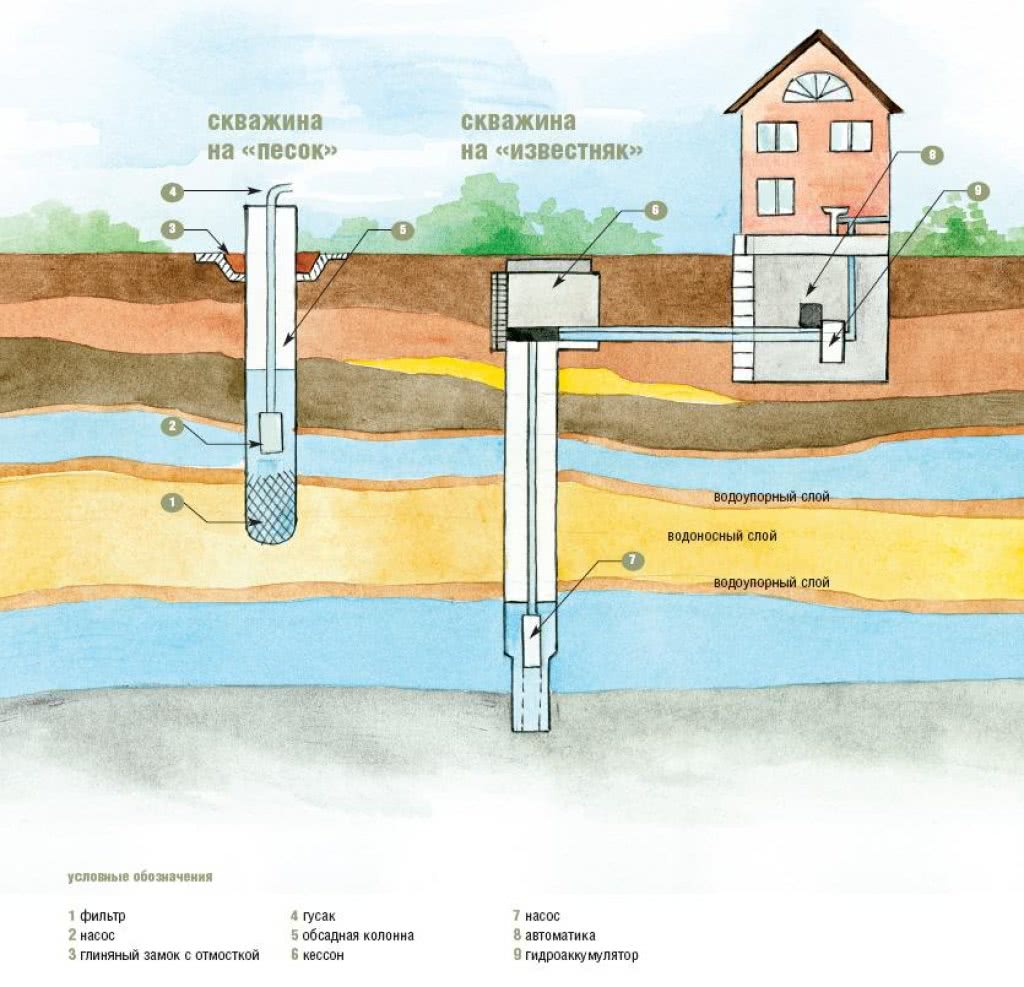
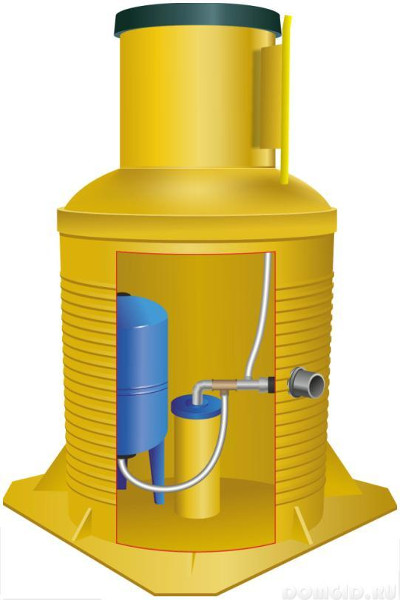
The source for water is not just a hole in the ground. In fact, this is a complex structure that consists of the following elements:
- casing pipe - protects the source from soil collapse and serves as the main line for water supply, more details about the types of casing strings can be found in the article “Pipes for a well”;
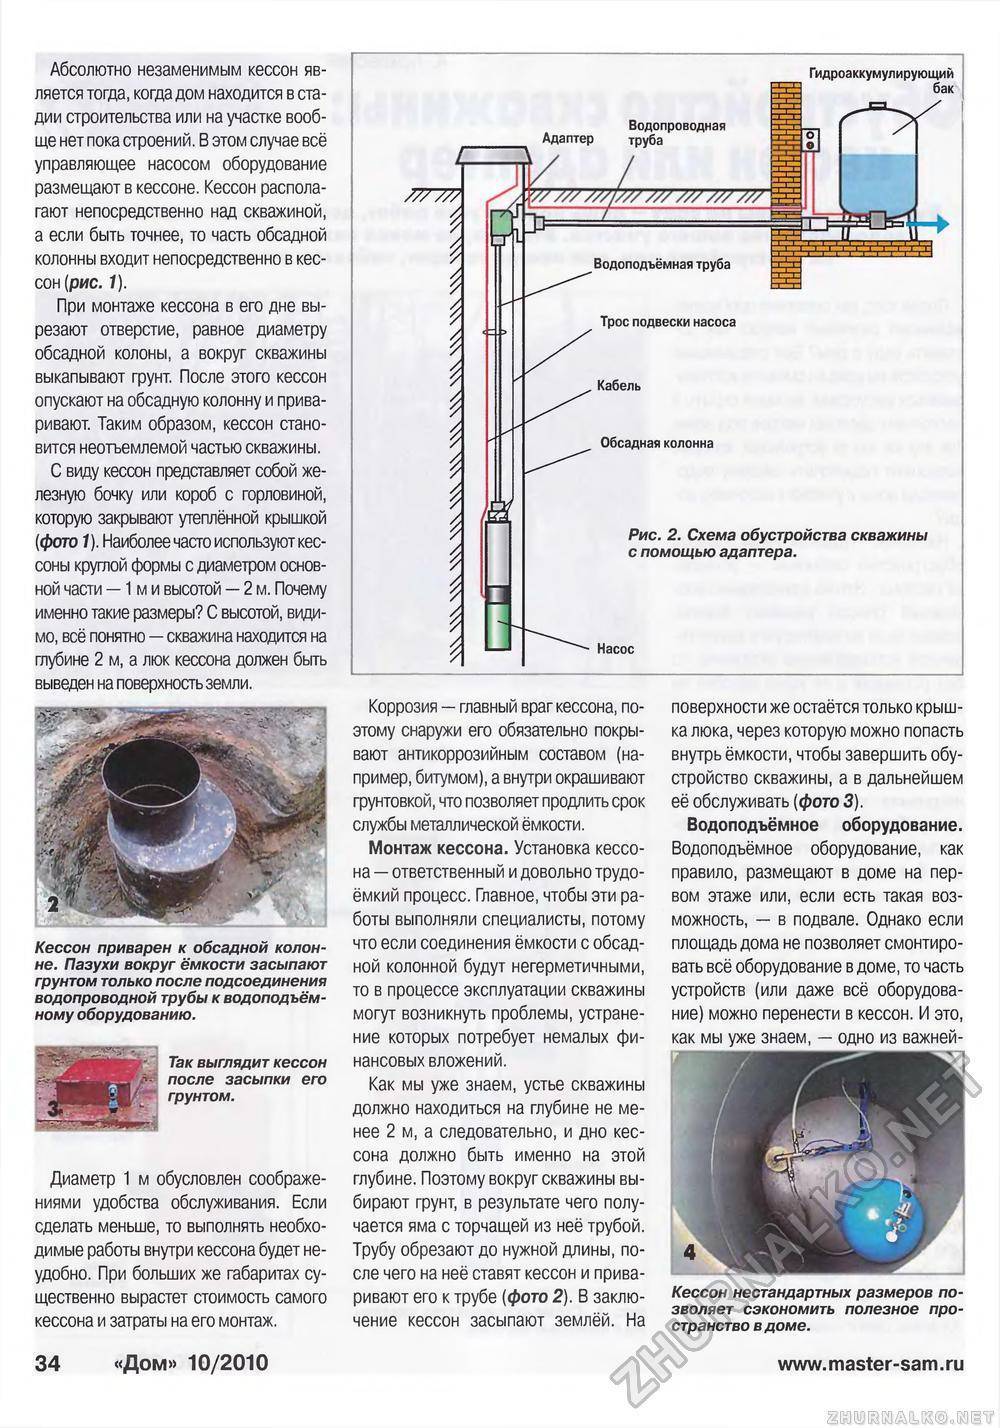
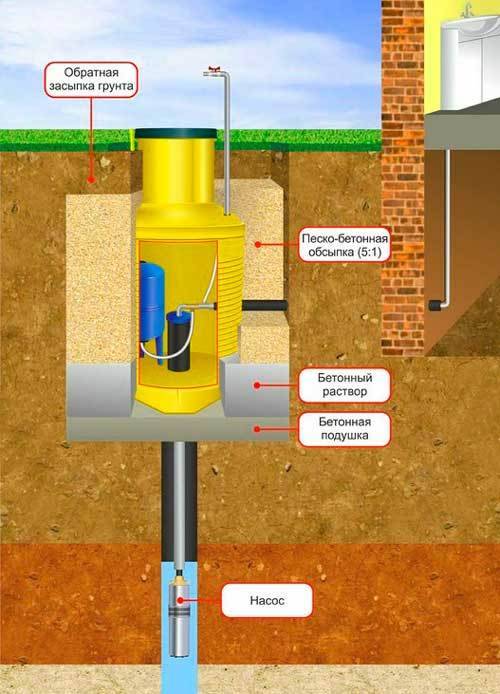
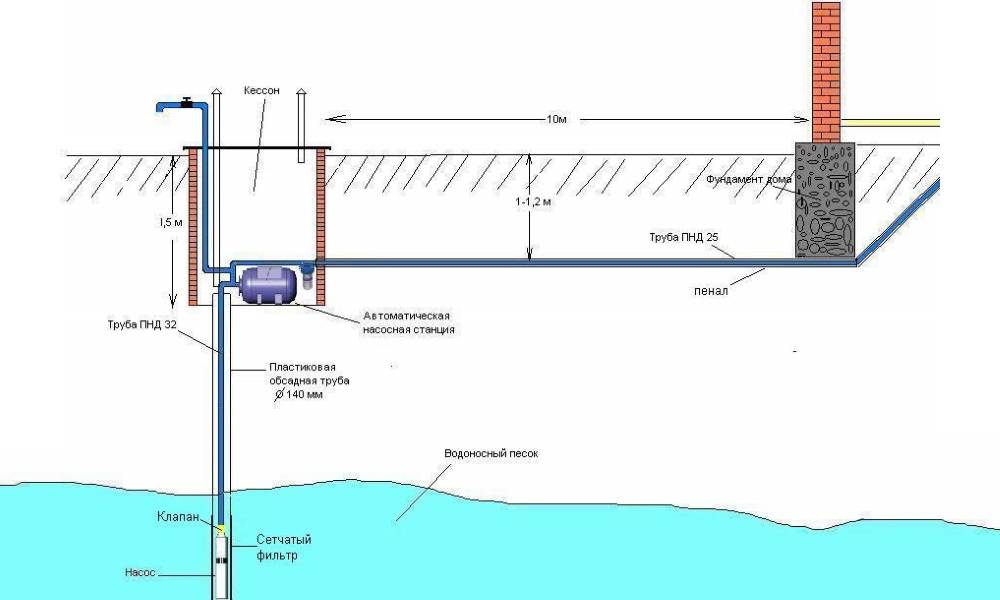
- caisson - is a plastic or metal container that is installed in the upper part of the casing.It protects the source from freezing and serves as a place to install the necessary equipment;
- head - a cover for the casing pipe, a pump is suspended from it, and it also protects the pipe from dirt;
- pump - installed in the casing and pumps water into the plumbing system. The model is selected based on the dimensions of the casing string, you can learn about them from the article " Well dimensions".
Well device for a private house
One of the important stages in the arrangement of the source is the quality of the water. Therefore, immediately after drilling, you need to take a sample for analysis to the laboratory. And based on the results, a water purification system from a well for a private house is selected. This is a very important point in the organization of the water supply, because. For each type of sources, their pollution is characteristic.


Plumbing
If year-round use of the well is planned, the pipes must be laid in trenches with a depth below the freezing level. In this case, their additional insulation will not be superfluous.
The street water supply system can be made from the following materials:
Naturally, it is better to choose plastic pipes - they do not corrode, and deposits do not form on the inner walls. In addition, they are much easier to mount than metal ones.
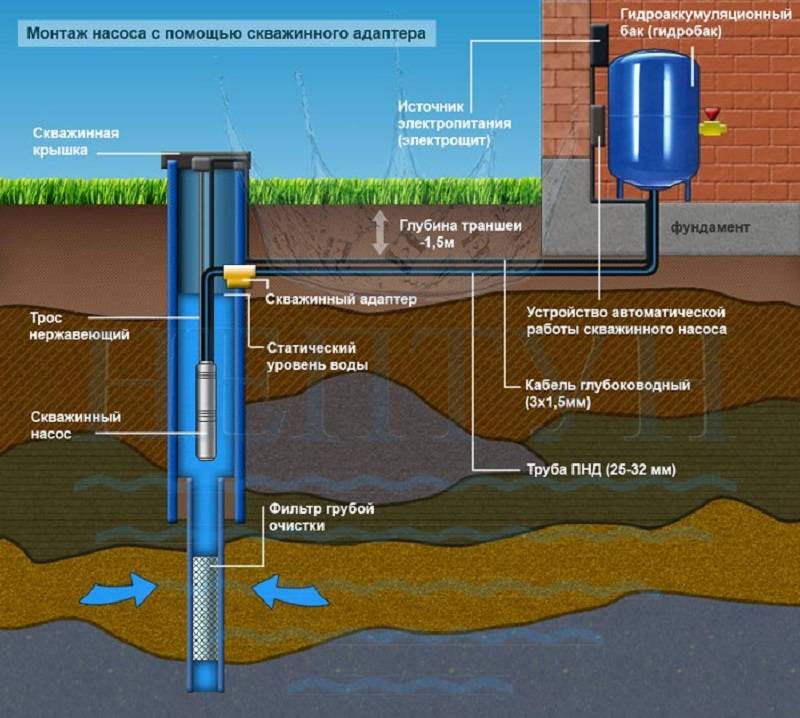
In the house, plumbing is carried through the foundation - this protects it from freezing. And it is connected to the casing pipe either through a caisson or using a downhole adapter.
Also, along with the pipe, an electrical cable is laid to connect the pump. It must be packed in a special corrugation so that there is no contact with the ground.
Entering the water supply into the caisson
Where to drill a well
A drilled well is not transferred anywhere - it is not a house, not a garage, not a tent, not a barbecue. There are three unshakable rules for choosing a well drilling site.
First. To make it convenient for drillers to work. There should be a flat or slightly sloping area of about 4 by 8-10 meters of rectangular shape, on which a three-axle machine is placed, over which there are no wires (the mast is raised 8 meters up), under which there are no communications and which is 3-4 meters away from buildings, building foundations, tree roots, fences.
Second rule. To make it convenient to use the well. It should be drilled as close as possible to the place of water consumption (to the boiler room, bathhouse, kitchen), so that you do not have to dig many meters of stupid trenches throughout the site.
And the third rule. So that the well is drilled in a place suitable for the arrival of equipment on it again for repair work within the warranty period. Any well repair (to deepen, re-casing, flush, pick up fallen objects) is carried out only by a drilling machine, there is nothing to do with your hands. If such an entrance is impossible, no company will be able to fulfill guarantees. If the well is in a caisson, in order for the machine to lower the drilling tool through the caisson, the well cover and wells must be on the same axis.
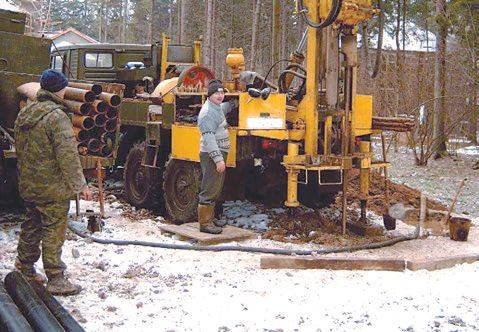
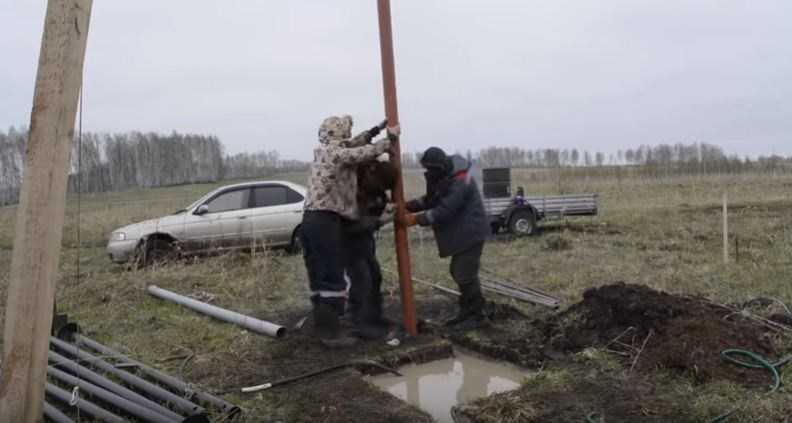
Working platform when drilling with the URB 2A2 rig
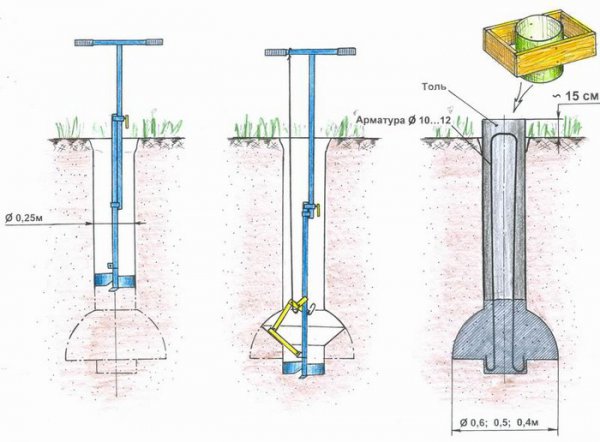
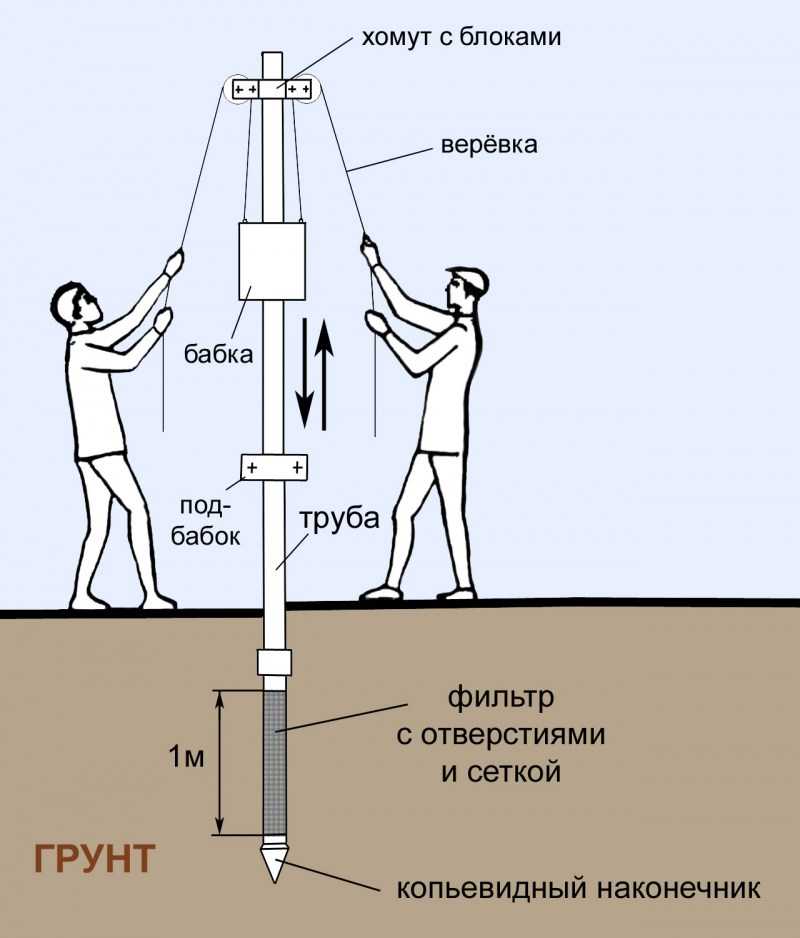
Abyssinian well (well)
This type of catchment device uses the upper groundwater, while cutting off dust, dirt, and typical contaminants of the “top water” polluting the liquid. Thanks to this, the device provides cleaner water than a well.
Important: it is possible to "pierce" a narrow well only on relatively soft, without stony inclusions, soils.
The size of the hole for installing equipment is minimal, the drilling depth is 8 ... 12 m, the diameter is 4 ... 6 cm. In some cases, with an aquifer of coarse-grained or medium-grained sand, a depth of 4 ... 6 m is sufficient. filtration of groundwater and prevention of clogging of the well, it is possible to fill it with marble chips when drilling a hole.


The flow rate is 0.5 ... 3 cubic meters per hour. For small private houses this is enough, for more than 3 ... 5 fence points - too little. Do-it-yourself Abyssinian well is very economical, but it cannot be arranged on rocky soils. The reason is the insufficiency of the penetrating ability of hand-held drilling or low-power drilling equipment.
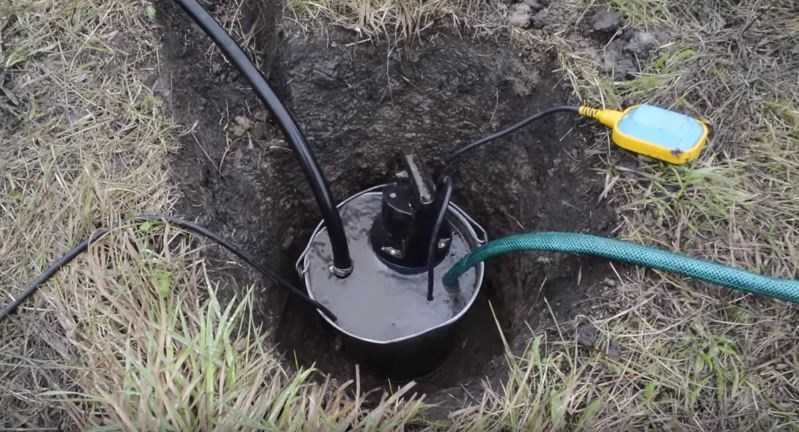
When installing a hand pump on the surface of the earth, this type of well is only suitable for use in the warm season. For year-round operation, installation of an automatic pump in a concrete and heat-insulated pit is required.
To drill water wells with your own hands to a shallow depth, you can do without drilling equipment, using a primitive installation for driving a casing pipe. However, in this case there is a risk of damaging the spear-shaped tip. The best option for construction is the use of a drilling rig with a manual or mechanized drive.
We install automation
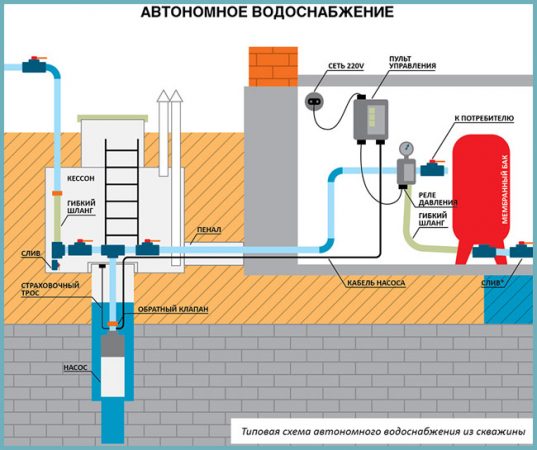
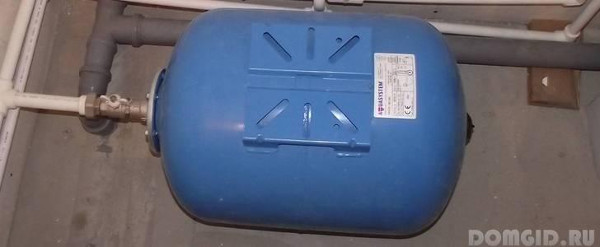
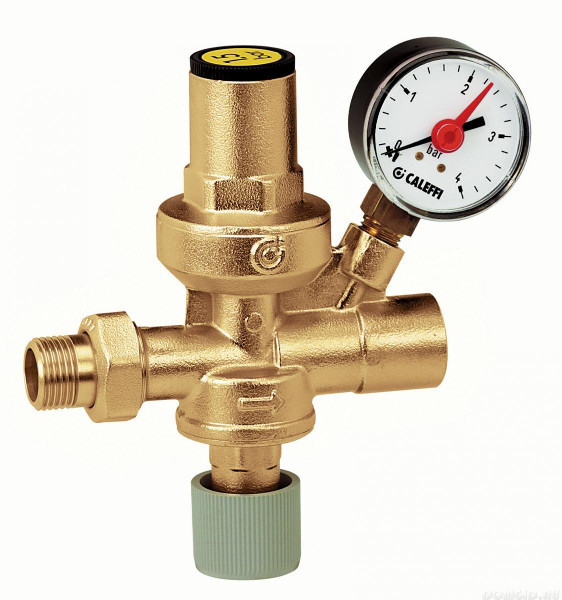
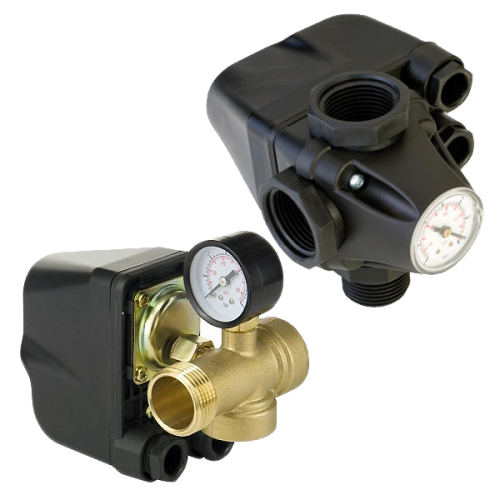
Not a single individual water supply system can do without a whole range of auxiliary automatic devices that are designed to maintain its uninterrupted functioning.These include: a pressure gauge, a pressure level sensor, a relay - thanks to them, the system is started and the main indicators of its operation are regulated. All these devices are connected to a hydraulic accumulator, which, in fact, occupies a central place in the entire complex of auxiliary equipment.
The hydraulic accumulator is designed to provide a constant water pressure, protect the pumping device from water hammer, and also create a water reserve. Outwardly, it is a standard storage tank - it is regularly filled with water under pressure provoked by a pump.
To connect automatic devices to the accumulator, a fitting is used that has five outlets - one each for: a pressure gauge, a pressure level sensor, a relay, a water pipe and a pipe from the pump.
 Autonomous water supply scheme
To control automatic devices, a remote control can be used already during the subsequent operation of the plumbing system - it must be included with the accumulator and connected devices.
So, before you are the main stages of arranging a well for water: drilling, installing a caisson and a pump with filters, as well as connecting automation. After carefully understanding each step and following all the procedures according to the instructions, you will receive an absolutely functional autonomous source that will provide you with water no worse than a centralized water supply system.
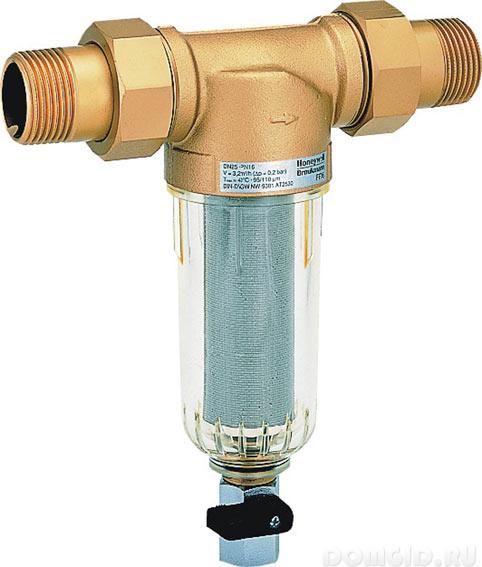
Filters
The quality of water from any well is largely determined by the presence of a special well filter. And this part, more than others included in the well structure, is subject to wear. So, her choice should be approached responsibly.
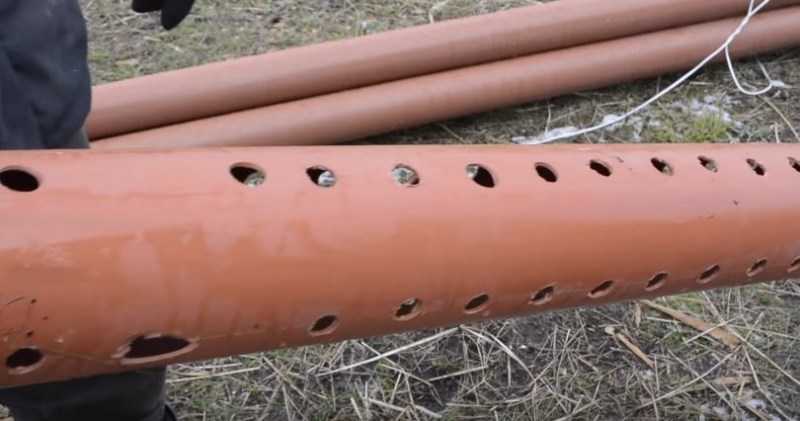
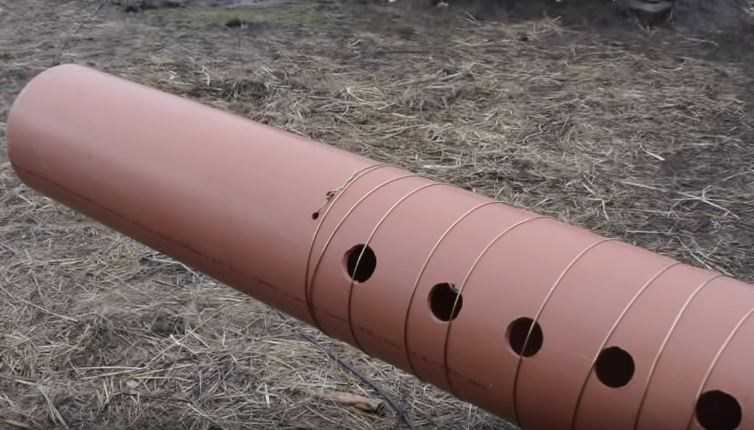
For limestone wells, for example, a simple screen filter will suffice - that is, perforation on the lower casing elbow. It can also become the basis of the well filter "on sand" (in combination with gravel backfill). In this case, the requirements for perforation are as follows:
hole diameter from 15 to 30 mm, depending on the soil;
duty cycle (the ratio of the total area of the holes to the area they occupy) 0.25-0.30;
the arrangement of the holes is transverse, in a checkerboard pattern;
the area (total) of the holes must not be less than the cross-sectional area of the casing pipe (its clearance).
When the pump is placed in a well equipped with an internal filter, its (filter) upper edge is considered to be the bottom of this well. Because of this, the single volume of water intake is significantly reduced. In addition, the filter strongly silts up the well structure, because water seeps into the gap between it and the casing. The service life of the filter itself and the pump are reduced, since sand inevitably gets into the latter. Therefore, the pump is often placed in a separate pipe, which is mounted on the filter outlet. But for this you need to make a well of a larger diameter.
If the drillers have an expensive and structurally complex centrifugal pump at their disposal, everything is simple - it is connected to the filter outlet, and as a result, both silting and sanding stop. But when there is no such equipment, something has to be invented.
Note! Many masters make parts for filters on their own, using PVC pipes, a polymer mesh and springs made of stainless materials. But such designs rarely serve for a long time, and they do not filter water very well.
It is better to spend money, but choose and buy a truly reliable, well-functioning filter. Moreover, there are plenty to choose from:
Scheme of autonomous water supply main elements of the system
Whatever the source of autonomous water supply for a private house, it is necessary to create a diagram indicating all the main elements of the system and the materials used to lay the water supply.
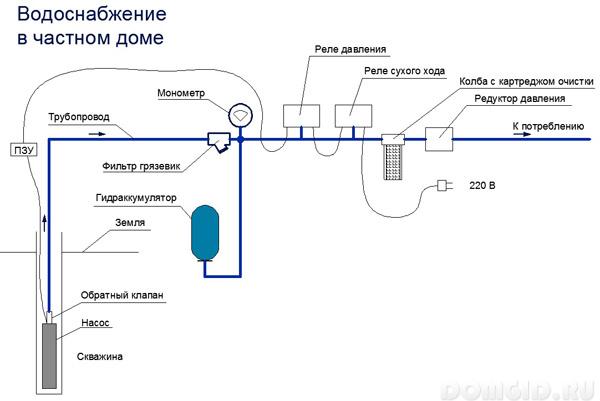
The water supply scheme of a private house includes the following elements.
- A well is a source of water.
- Caisson - an auxiliary room of the well (plastic or metal barrel). Protects the mouth from groundwater, precipitation and ensures a normal temperature in the well.
The plumbing system of a private house can be divided into three blocks:
- Water intake system.
- Courtyard highway.
- Domestic plumbing.


