- Automatic irrigation system for greenhouses "Signor Tomato"
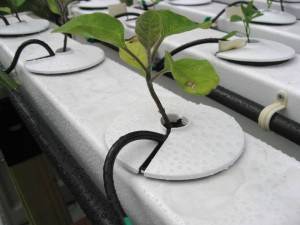
- Plastic bottles for drip irrigation
- Video description
- Summary
- Types of automatic irrigation systems and their device
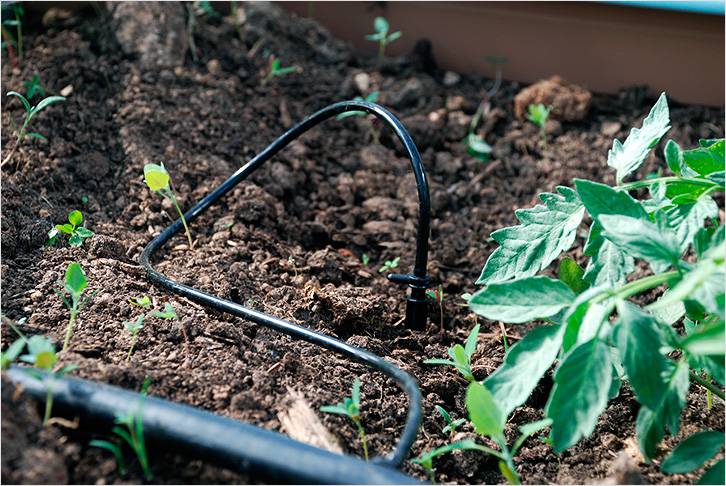
- drip
- Sprinkling
- Underground (subsoil) irrigation
- Do-it-yourself drip irrigation system for a greenhouse
- How to make a homemade drip irrigation system?
- Stage 1 - development of a greenhouse plan
- Stage 2 - calculation of the length of the pipeline
- Stage 3 - filter installation
- Stage 5 - connecting the main pipeline
- Stage 6 - Marking the pipeline and installing a drip tape
- Stage 7 - arrangement of automatic watering
- How to make your own irrigation system
- Where to begin?
- Drip system assembly
- Mounting
- Calculation of the volume of water
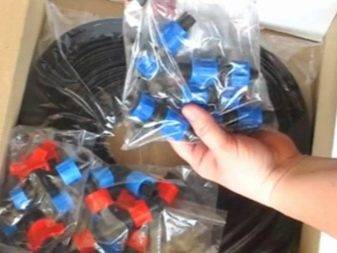
- Necessary materials and tools for installation
Automatic irrigation system for greenhouses "Signor Tomato"
This system is fully automated and powered by a solar battery included in the kit. Thanks to this, such watering is absolutely autonomous, not requiring an electrical network and constant changing of batteries. The device is also equipped with a water-measuring tank, a submersible pump, a controller, a system of flexible hoses that can be located in problem areas, and connecting elements.
 The fully automated Signor Tomato drip irrigation system is powered by a solar battery, which is included in the kit.
Irrigation is controlled using a remote control, through which the necessary parameters are set, including the amount of liquid, the frequency and duration of irrigation during the day. The pump starts to work at the set time and turns off after a certain period of time, which is enough to irrigate the plantations.
Automatic watering system: how to make automatic watering in the country (read more)
The system is designed to supply water to 60 plants. Each requires about 3.5 liters of water per day. You can purchase an additional kit for 20 plants and increase the system. Due to the presence of a pumping unit, there is no need to install a barrel on a hill and make a hole for connecting a crane. The pump supplies the required amount of water to the system and controls the pressure in the network. Buy drip irrigation in a greenhouse possible from 5500 rubles.
Plastic bottles for drip irrigation
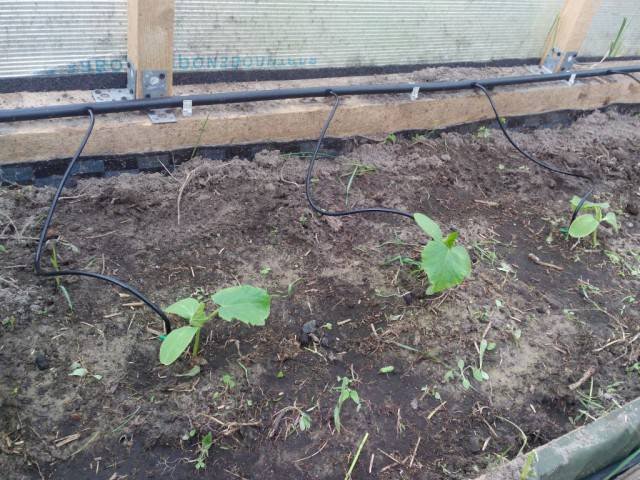
There is another budget way to do drip irrigation in a greenhouse yourself. It is based on the use of empty plastic bottles of different sizes: the larger it is, the less often you have to fill them with water. For example, for watering tomatoes or cucumbers growing in normal soil, a 1.5-liter bottle is enough for 2-3 days, and a 6-liter one will free you for 7-10 days.
Of course, this method is not suitable for large areas, but for greenhouses or small beds it is quite.
There are many ways to organize watering using plastic containers.
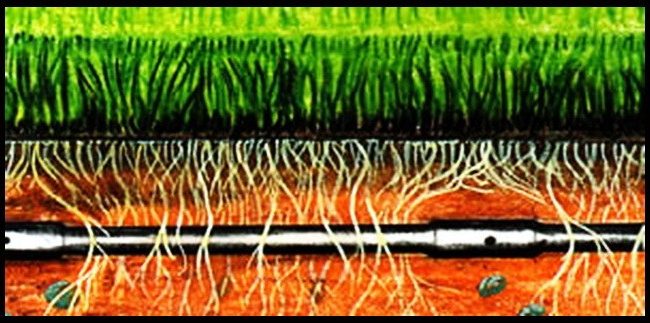
The underground method consists in digging a bottle next to the plant to such a depth that water from pre-made holes poured out to the roots. The number and diameter of the holes are selected in accordance with the type of soil, since water seeps into sandy soil quickly, without lingering at the roots, and in clay soil it stays at the surface for a long time.

The penetration of water into the soil depends on its type.
You can install the bottle upside down or upside down. In the latter case, the bottom is cut off, but not completely, so that a semblance of a cover is formed that protects the cavity from debris. If the neck is turned upwards, then a hole is pierced in it to allow air to enter and prevent the container from flattening as it is emptied.
To prevent the holes from clogging and silting up, a kind of coarse filter made of fine mesh fabric or old nylon tights is put on a plastic container.
Another option for underground drip irrigation is carried out using nozzles in the form of a narrow long funnel that are screwed onto a bottle instead of a cap. But they are produced only for containers up to 2.5 liters.

Such nozzles can be bought in specialized garden stores.
Surface drip irrigation is also very common. One and a half bottles with a cut bottom and a hole made in the lid are hung over the garden bed so that the drops fall under the roots of the plants. The basis of such a suspension system can be two supports dug into the ground, between which a strong wire is stretched.
This homemade design can be improved by inserting an empty ballpoint pen with the head removed or the same medical dropper into the hole.It is desirable to seal the connection with silicone sealant, putty or, at worst, plasticine.
Especially convenient in this version of irrigation is a dropper, which can be directed exactly to the right place and adjust the intensity of the water supply. And hang the bottles higher so that they do not interfere with the plants and warm up better in the sun. If you do this without using droppers, then drops of water can fall on the leaves, causing burns on them.
Video description
Video about the drip irrigation device from bottles:
Any of these methods allows you not only to water the plants, but also to feed them - just add liquid or dissolved fertilizer, herbal infusion, mullein infusion, etc. to the water.


Unfortunately, such a system cannot be called perfect, because you still have to fill the container often and with your own hands. In addition, in extreme heat and in the absence of owners in the country for several days, bottles will not cope with the task of full-fledged watering. And their appearance does not decorate the site.
Summary
Knowing about all the options, you will be able to decide which drip irrigation is best for the greenhouse in each case. Whether it will be a ready-made kit with electronic control, a do-it-yourself system of pipes and hoses, or plastic containers dug into the ground, depends on your financial capabilities and the mode of visiting the site.
Source
Types of automatic irrigation systems and their device
There are three types of automatic watering systems that you can create yourself: subsoil, drip and rain. Any of the options is suitable both for providing moisture to the greenhouse and for irrigating beds in open ground. Each type has its design and operational features, advantages and disadvantages.
drip
This variety is considered the most economical and progressive for growing greenhouse crops. It was invented by agronomists from Israel to achieve a high yield with a shortage of water resources. Such a system can work both on power supply and offline.
The scheme of operation of automatic watering is simple: from the source, moisture is directed through pipelines to tapes with droppers. Small drops of water moisten the root system of each plant. In addition, liquid top dressing is delivered to the plantations along the highways.
The pipeline from the source delivers water to moisten the root system
- low water pressure (saving up to 30% compared to conventional irrigation);
- "Targeted" delivery of moisture and fertilizers to each bush, which prevents weeds from spreading;
- rare loosening due to the absence of a caked crust on the soil.
With a timer and a controller, the system will work completely automatically, and water will be supplied at the right time.
It is not difficult to create such a system with your own hands, and to save money, instead of special dispensers, use medical droppers.
The disadvantages of the drip device include the exactingness of the purity of the water. This is where a filter is required. Otherwise, particles of silt will settle on the walls of the pipes, which will quickly render the irrigation system unusable.
Sprinkling
Typically, such systems are used to irrigate flower beds and lawns, but it is possible to install a similar design in a greenhouse. It is suitable for watering vegetable crops and not too delicate flowers.
The process of supplying moisture resembles artificial rain. Water under pressure gushes out of the sprinkler nozzles, breaks up into drops and falls onto the ground and plant bushes. Sprinklers are at ground level or mounted under the roof of the greenhouse.
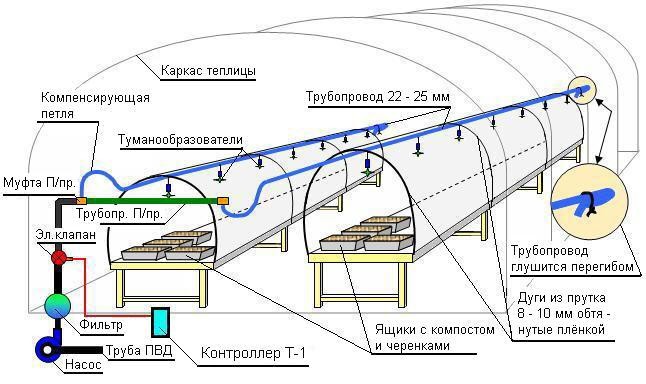
Sprinkler nozzles break up water into drops, simulating rain
Sprinkler system benefits include:
- uniform distribution of water and moisture penetration to the required depth, which does not allow the root system of plants to rot;
- increasing the vital activity of beneficial microorganisms in the soil;
- creation of a microclimate comfortable for greenhouse crops;
- ability to cover large areas.
Sprinkling lowers the temperature in the greenhouse, which prevents moisture from evaporating on hot days.
Sprinkler irrigation also has its drawbacks:
- risk of excessive moisture in the greenhouse;
- sunburn on plant leaves on clear days (especially on delicate flower petals);
- the need to shake off drops of water from each bush;
- inefficient use of water due to evaporation before it reaches the soil;
- the inability to use the device for fertilizing.
Ideally, for greenhouses, a sprinkling system should be used complete with a drip or subsoil system.
The aerosol sprinkler system has fewer disadvantages. In this case, the holes in the nozzles are smaller, which avoids large drops that burn plants in sunny weather. But here you definitely need a powerful engine and high-quality lines, because the pressure of water to push through the tiny holes of the nozzles must be strong. So, the pressure in the pipeline should reach 30–50 bar.
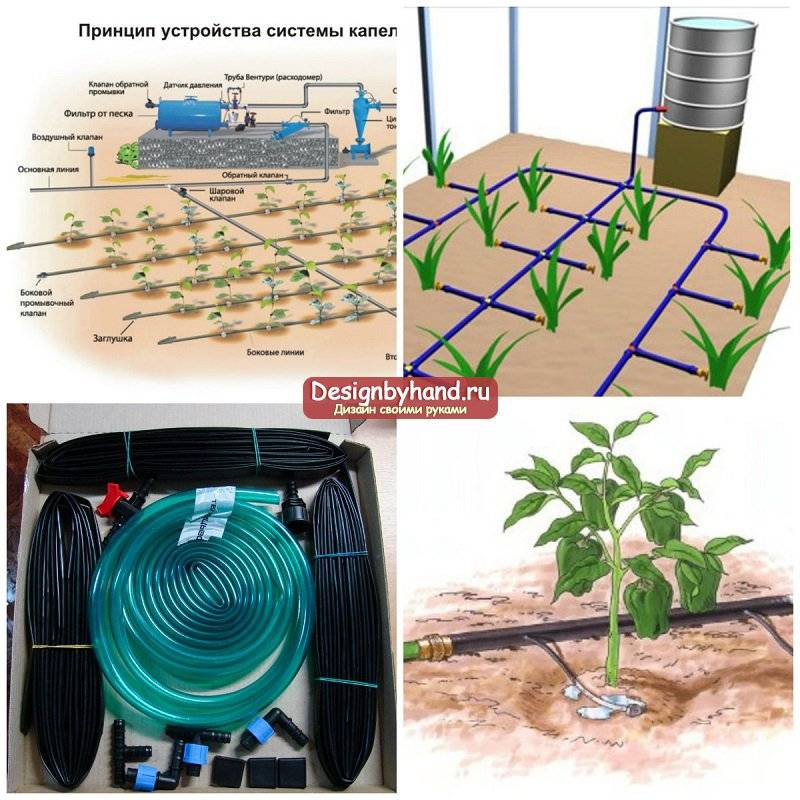


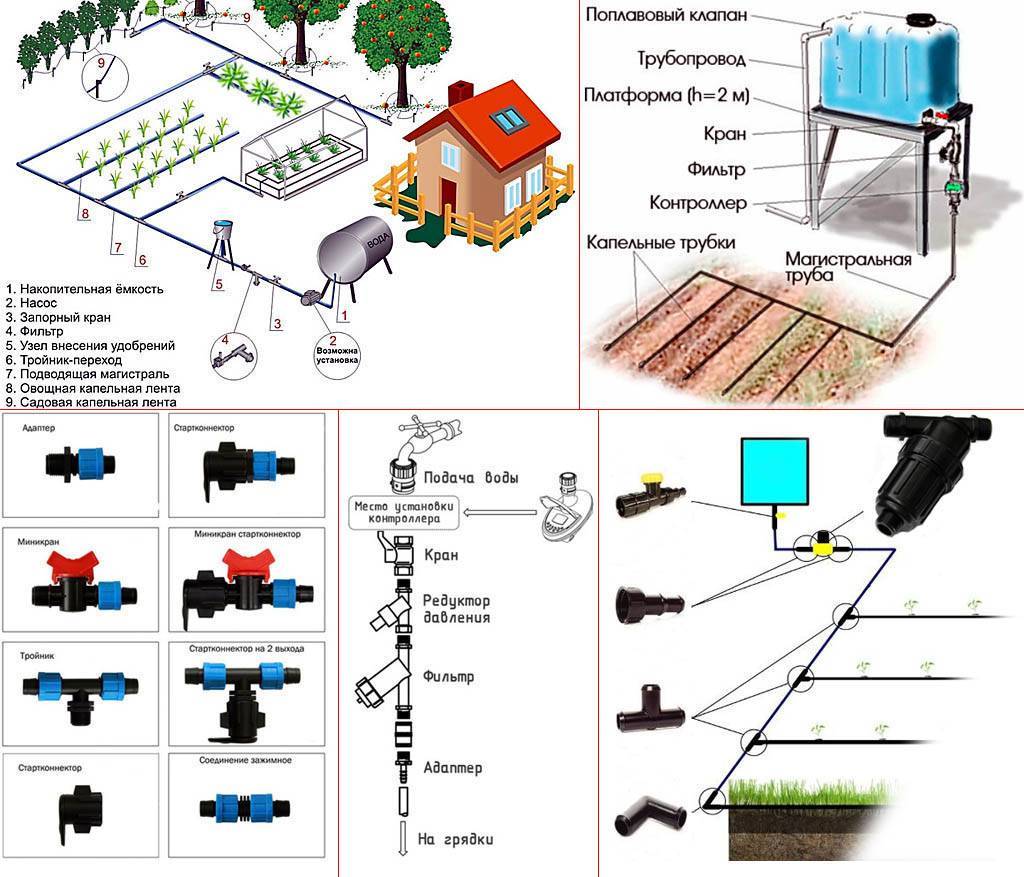


Underground (subsoil) irrigation
The scheme of such a watering device is similar to a drip system. But the highways are laid underground so that the moisture comes to the very roots of the greenhouse "inhabitants". Water from the storage tank or water supply enters the humidifiers - perforated pipes. At home, they are replaced with plastic bottles with holes in the bottom.
Highways of the intrasoil system are laid underground
Such a device allows the effective development of perennial, as well as capricious and sensitive crops.
The benefits of subsoil irrigation do not end there. These include:
- additional aeration of the earth;
- simplicity and low cost of installation;
- low water consumption;
- stable humidity of the greenhouse atmosphere.
The system can be fully automated or operate in semi-automatic mode, when the main tank or even dug-in humidifiers are filled with water manually.
Of the minuses can be noted:
- with improper installation, it is possible to oversaturate the soil with water, leading to rotting of the roots;
- lack of moisture, in which green spaces wither and dry.
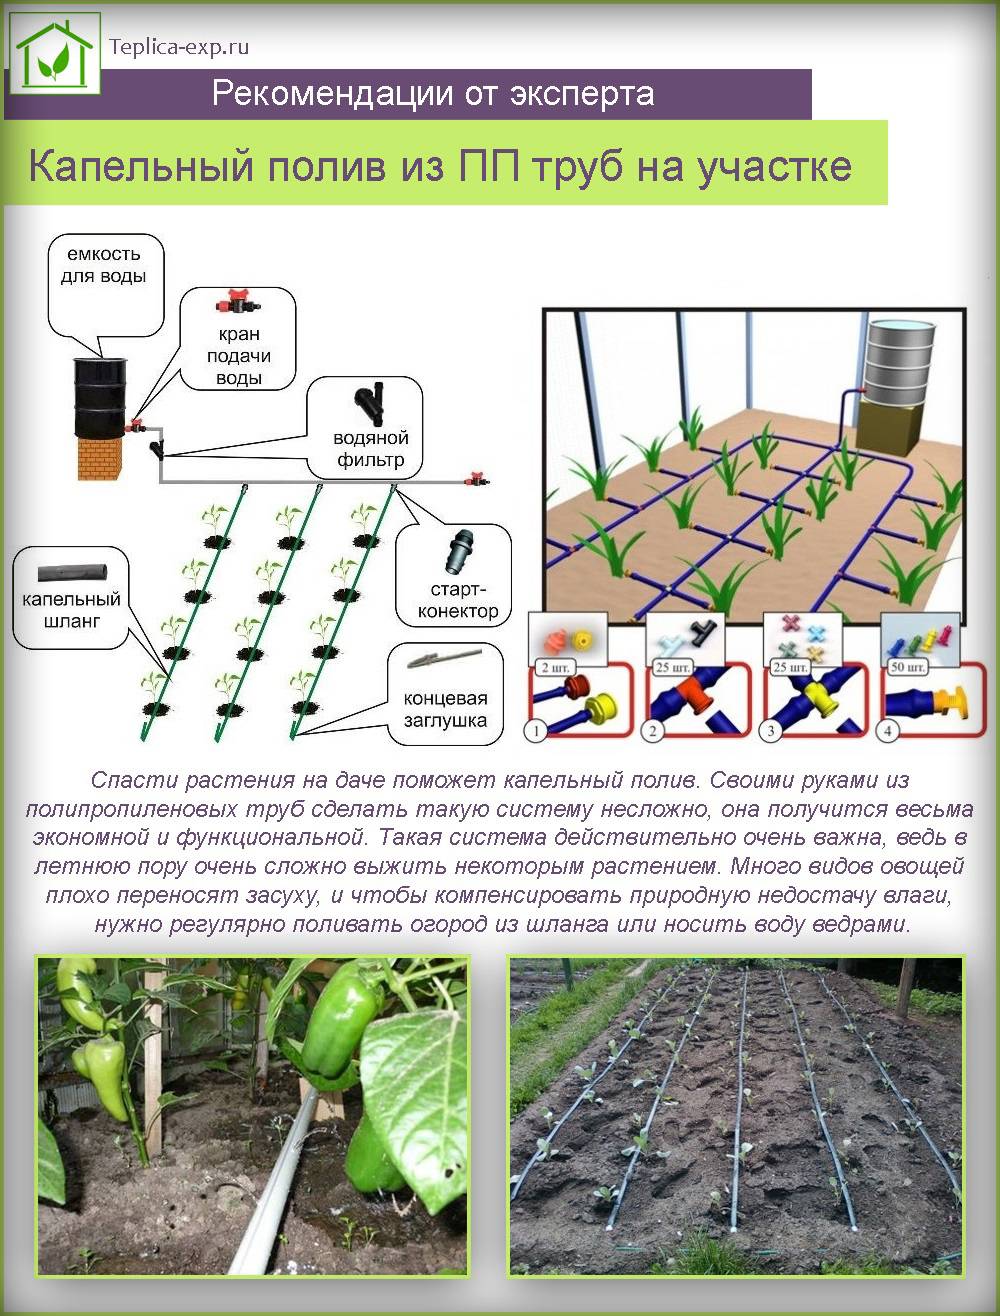
Do-it-yourself drip irrigation system for a greenhouse
How to make a homemade drip irrigation system?
Before proceeding with the construction of a drip irrigation system, it is necessary to prepare all the tools that will be required:
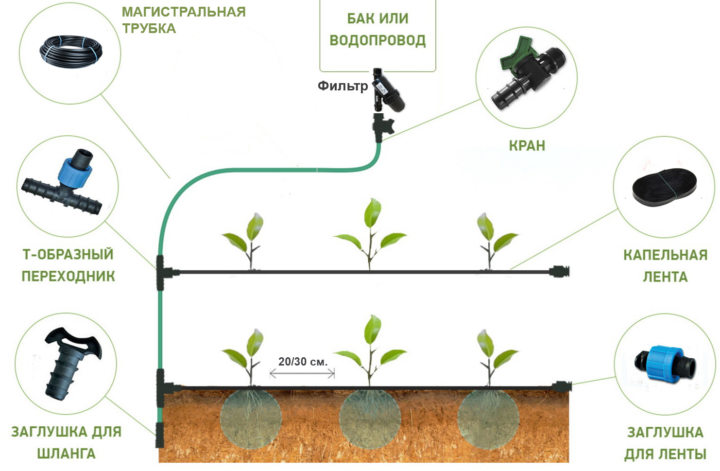
- The main element is a drip tape;
- Connectors that will be required in order to connect hoses and filters to each other;
- Start connectors, with rubber seals and taps;
- Start connectors without rubber seals and taps;
- Repair fittings and splitters.
Advice! Before you start developing an irrigation design plan, you should familiarize yourself with all the nuances and refer to the reviews of those who have already made similar designs. It is also recommended to watch video tips from experienced gardeners at the end of the article.
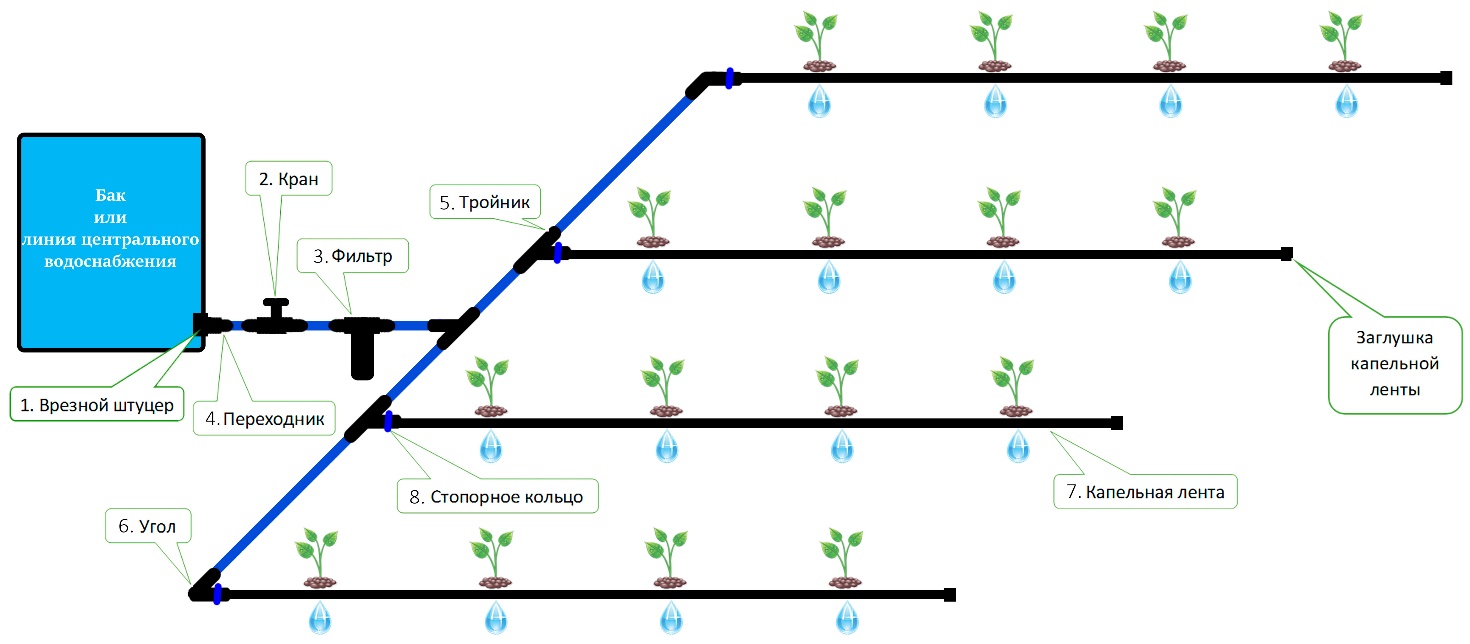
Stage 1 - development of a greenhouse plan
The development of a greenhouse plan is necessary in order to see how the beds are arranged. The stage does not imply complex manipulations. It is enough to arm yourself with a tape measure and make certain measurements. Then display them on the plan, taking into account the required scale.
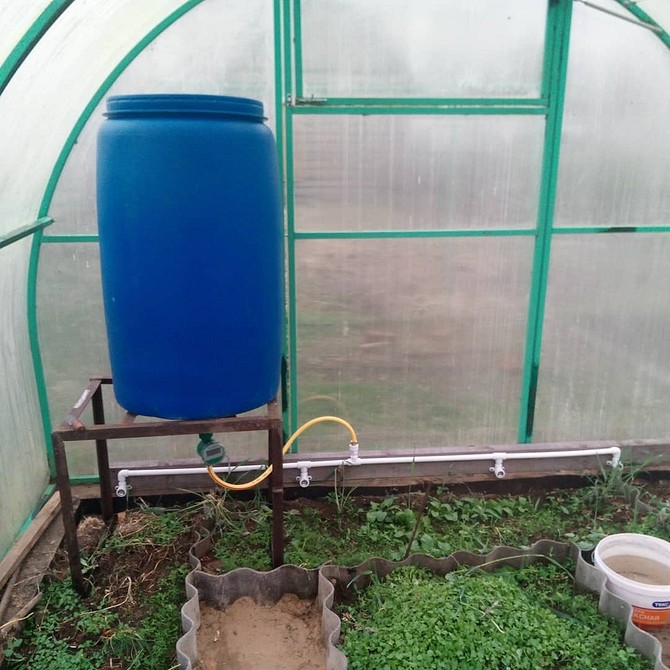
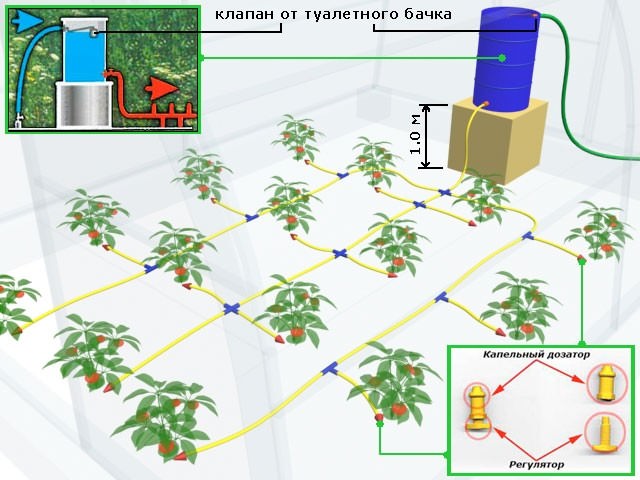
It is also important to indicate on the plan how the source of water is located. Often, for a drip irrigation system, a special container is used for this, to which the pipeline is connected.
The tank is filled with water, which then enters the system itself.
Stage 2 - calculation of the length of the pipeline
In order to install a drip irrigation system, you need to choose the simplest polyethylene pipe for supplying cold water. The pipe must be at least 32 mm in diameter. If these conditions are not observed, then problems may arise with the process of drilling holes on the pipe and fixing the fittings. In order to connect the pipeline to the water supply, you can use a regular garden hose.
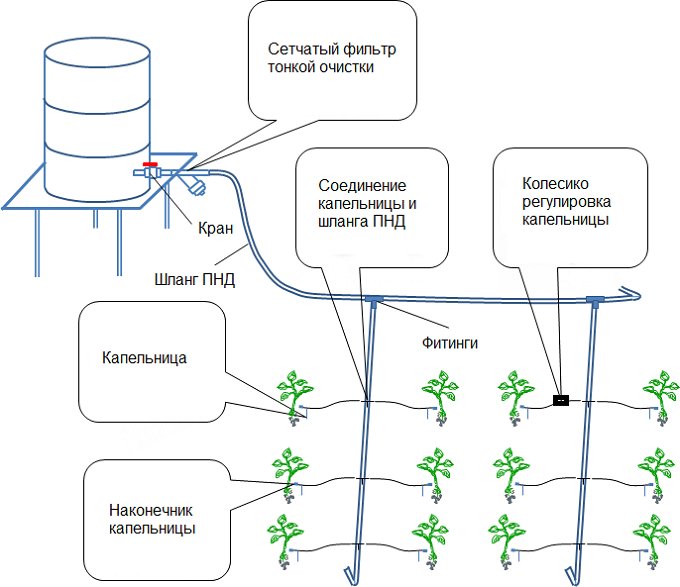
Stage 3 - filter installation
Filter installation. Installation of such an element of the drip system can be carried out anywhere. The main condition is that it must be installed between the source of water supply and the main pipeline.
Filters for drip systems are very different. They must be installed in the supply hoses.
Stage 5 - connecting the main pipeline
Fittings are required to connect the main pipeline and the hose.You can buy fittings in specialized stores.
Stage 6 - Marking the pipeline and installing a drip tape
This stage is common to the entire design of the drip system. The stage involves the installation of a drip tape on the pipeline:
It is necessary to use the plan that was drawn up in the first stage. The plan is necessary in order to carry out a competent marking of the pipeline;
Focusing on the plan, you need to mark the main pipeline using a marker. In addition, all attachments for the drip tape should be marked;
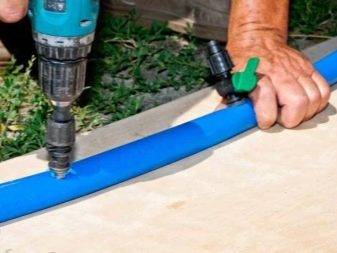
In those places where marks were made, drill holes with a drill
It is important to ensure that the diameter of the holes is suitable for the rubber seals. It is optimal if the seals are inserted with little effort;
After all the holes have been made, rubber seals must be inserted into them;
Then, start-connectors with a tap are inserted into the rubber seals;
In order to secure the start connectors, it will be enough to tighten the nuts;
With the help of such installation features, the irrigation of the greenhouse will acquire an additional property - the ability to turn off a separate bed without turning off the entire irrigation system.
- In many cases, summer residents install taps on beds that require constant watering;
- Then the drip tape is attached using a start connector. Usually, there are no difficulties with this procedure. In order to fix the drip tape, you need to tighten the nuts;
- If the system is with droppers, then at the time of installation it is necessary to ensure that the droppers are not on top;
- After the drip tape is fixed, it must be stretched to the end of the bed and drowned out.To do this, you need to cut it and roll the end, cut off the excess and fix it;
- If the beds in the country house are located in the wrong configuration, for this you should branch the drip tape with the help of splitters. To do this, cut the drip tape and insert a tee to set the correct direction;
- The opposite end of the main pipeline must be plugged using special plugs.
Stage 7 - arrangement of automatic watering
In addition to the equipment, an automatic controller should be used, which opens the water supply to the main pipeline.
Modern controllers can be programmed for certain hours of the day or even weeks. Install the controller immediately after the filter is installed. You can also make a watering system from plastic bottles.


How to make your own irrigation system
To date, there are a very large number of structures of this type. True, the price for them will be quite high.
To save the family budget, you can make a greenhouse at your summer cottage with your own hands. In order for the plants to grow very well, you need to organize high-quality watering in the greenhouse. At the moment, you can irrigate the plants in any way:
- Manual.
- Mechanical.
- Automatic.
A homemade irrigation system for a greenhouse can include any of these irrigation methods.
Where to begin?
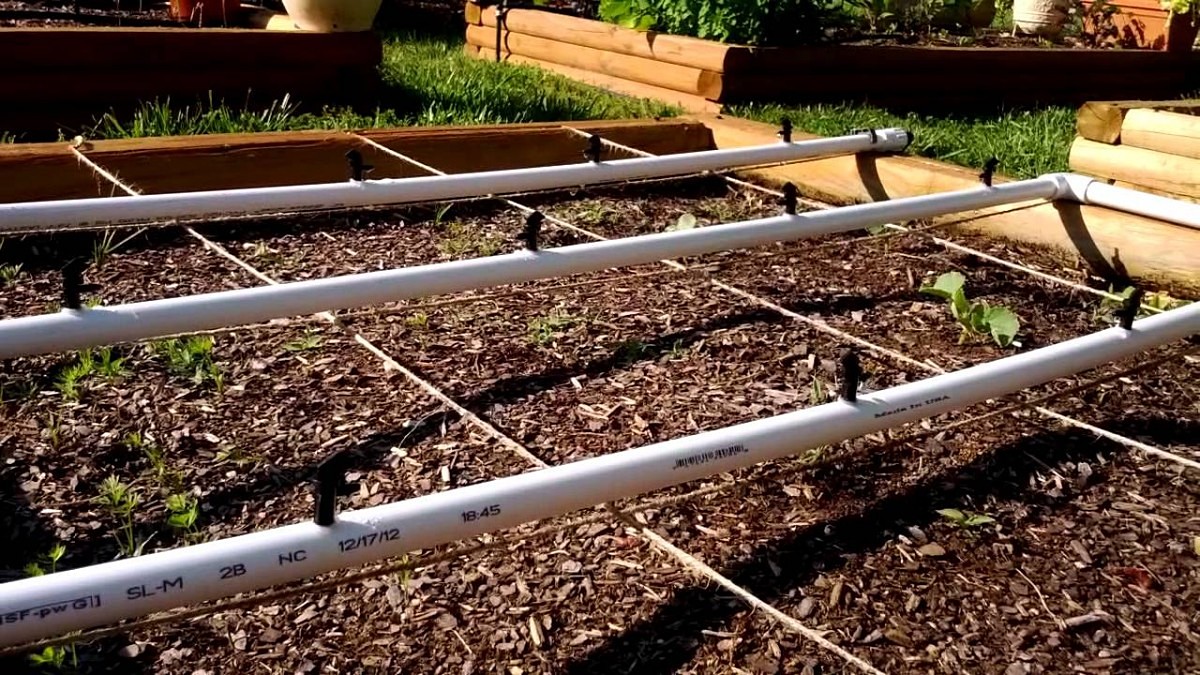
Installation of plastic pipes
In order to organize a home-made irrigation system, you need to choose high-quality pipes for this. There are several types of pipes that are used for these purposes:
- Plastic.
- Polyethylene.
- Metal.
Advantages of plastic pipes:
- Plastic pipes have become very popular today. They are very strong and durable.
Do not forget that plaque will never accumulate inside such a pipe, which, to a large extent, can change the inner diameter of the pipe over time. - Plastic pipes can have a variety of sizes. As a rule, pipes with a diameter of at least 2.5 cm are most often used for an irrigation system in a suburban area in a greenhouse.
- Plastic pipes can withstand high pressure and are not affected by temperature changes. Also, they are not deformed due to changes in weather phenomena.
It is for this reason that they can be used all year round and on the ground surface. - If the plastic pipe is deepened into the ground, then you need to wrap it with cellophane or other material of this type in order to insulate the pipe for the winter period.
Features of polyethylene pipes:
- A home-made greenhouse irrigation system can be organized using polyethylene pipes. They are very soft and practical.
Very often they are used as a hose for manual watering. - It is not recommended to deepen them into the ground, as they can begin to deform under the pressure of the soil. Such pipes can only be used in the warm season, as they can crack under the influence of climatic conditions.
- If a tie-in can be freely made into metal or plastic pipes, then it is impossible to make a polyethylene one, since pipes of this type can be connected using special metal bundles, but they will still leak.
- Metal pipes for organizing an irrigation system in a greenhouse can only be found in industrial structures of this type.In suburban areas, they are used quite rarely.
All this is due to their high cost. - The irrigation pipe should only be made of high-quality metal, since the environmental friendliness of the grown plants will depend on this. Do not use zinc for this.
- These pipes are very easy to connect. For this, welding is used.
- As a rule, such pipes are laid underground. They freely withstand the pressure inside when water is supplied and the pressure of the soil on them.
If plastic pipes are deepened into the ground, then a box will need to be created for them. For this, another pipe made of any durable material is used.
With metal, it will be enough to use a heater so that the water supply system does not freeze in the winter.
Pipe connection with a tee
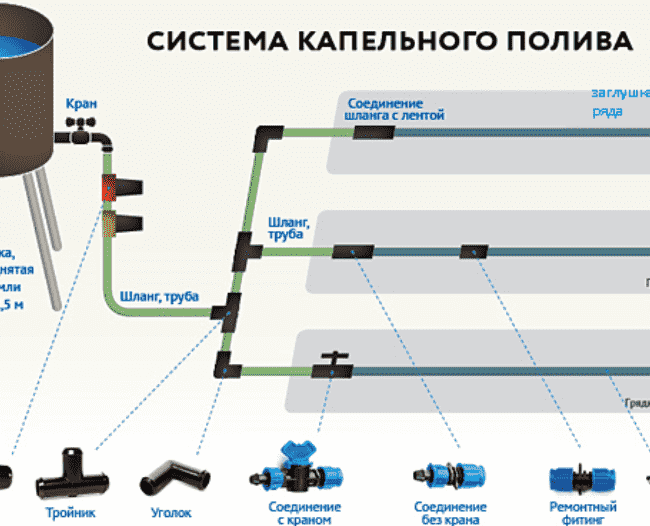
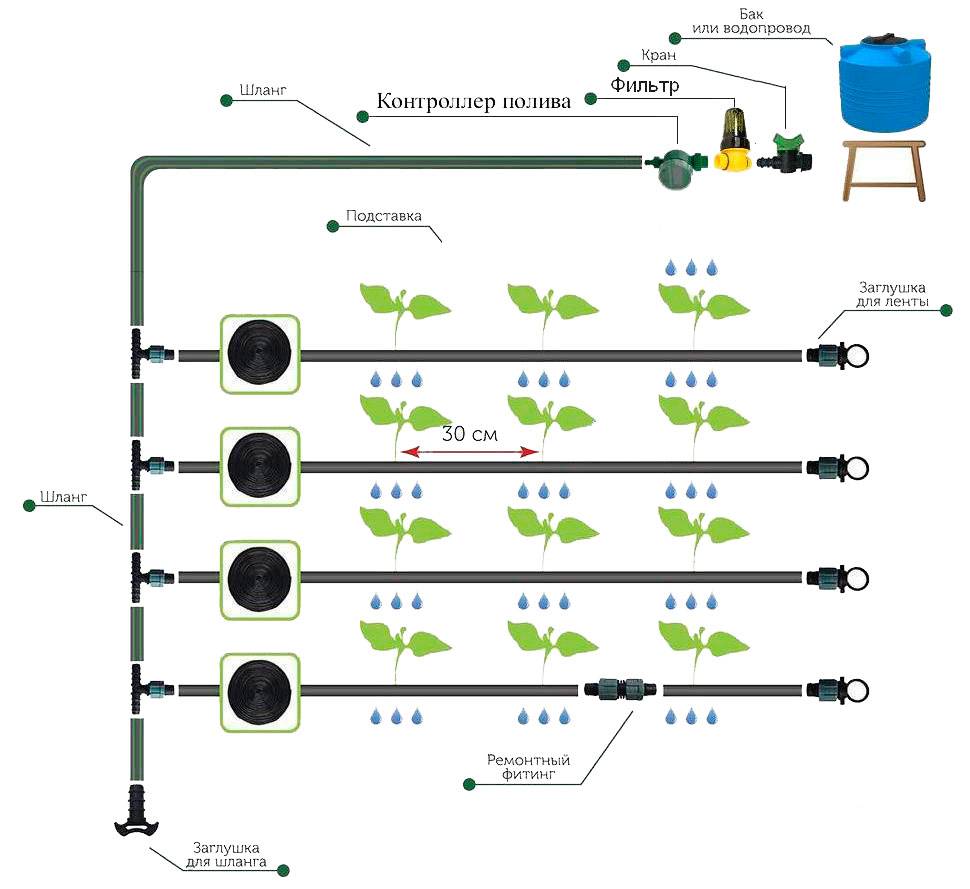
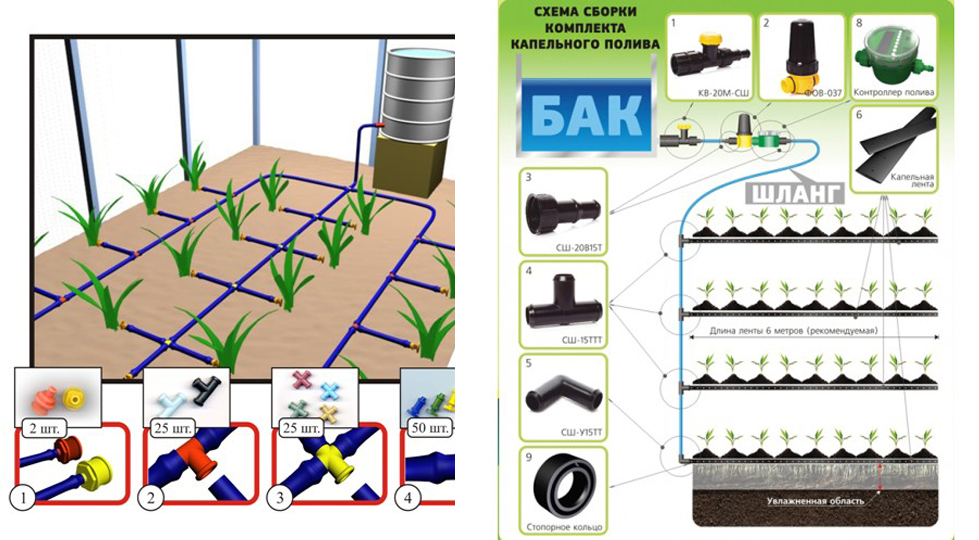
Drip system assembly
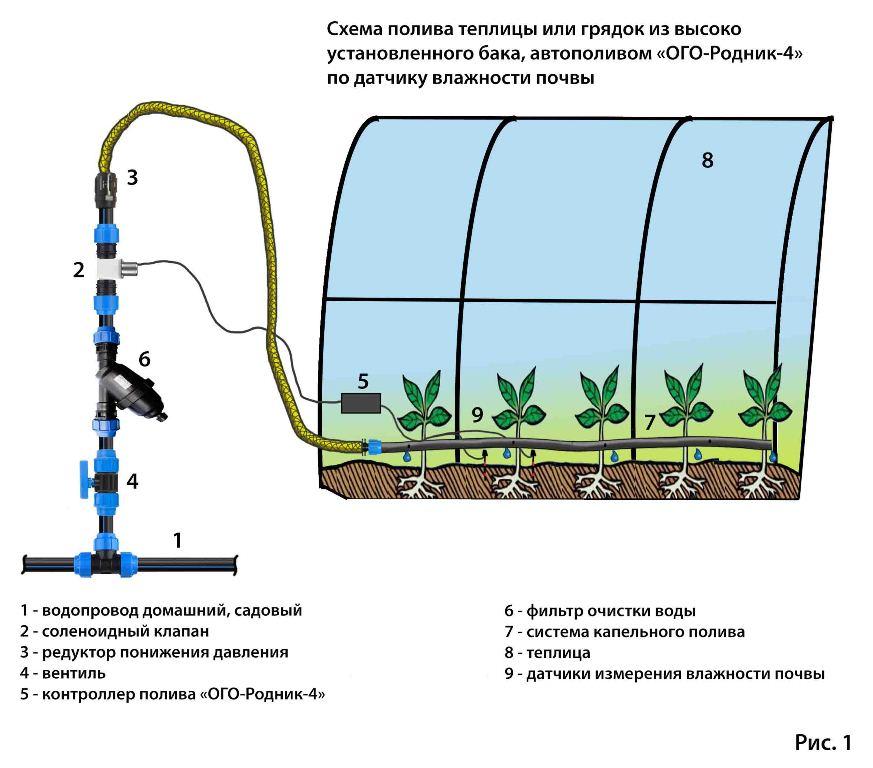
Get an automatic controller, you will program it to turn on at the time of day when you need to water the beds. The device must be installed behind the filter. Choose the right water filtration equipment.
For open sources, gravel-sand systems designed specifically for rough cleaning are suitable. In combination with disc filters designed for fine cleaning, the system gives an excellent result.
If you take water from a well, then buy a regular mesh or disc filter. Water from a water supply or pond must be defended, and then it must be filtered.
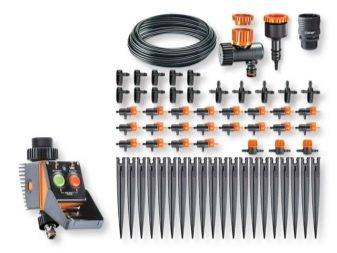
Prepare the tools, buy a self-watering drip system from a specialized company. The standard kit contains the following items:
- water filter;
- ribbon;
- connectors, with their help you connect the filter and hoses;
- start connectors, they are equipped with taps and have special rubber seals;
- start connectors, they are without taps, but with rubber seals;
- a set of fittings for repair and splitters necessary for the correct operation of the installation.
System installation consists of the following steps:
- Make a diagram. To do this, measure the beds with a tape measure, mark it on paper, observing the scale. Indicate the location of the water source on the diagram.
- Specify the number of pipes, their length. For a greenhouse, buy PVC products, the most suitable diameter is from 32 mm.
- Connect the main pipe to the tank, this can easily be done using a regular garden hose.
- Install the filter, during installation, look at the arrows that indicate in which direction the water is moving. Install the filter according to the manufacturer's recommendations.
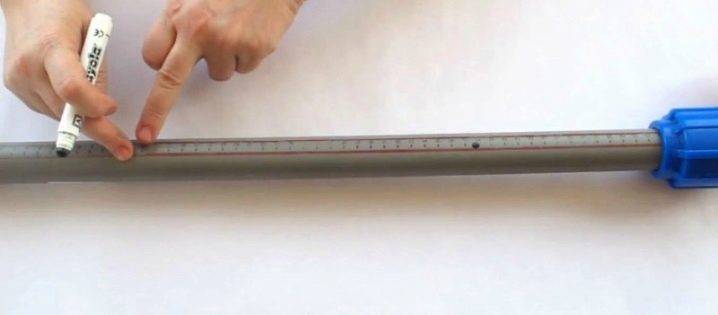
- Take a marker, put strokes on the pipeline. It is in these places that you will begin to mount the tape.
- Drill holes. It should turn out so that the rubber seals enter them with force. After that, put the start connectors.
- Silence the tape. Trim, fold its end and fasten well. Place a plug on the opposite end of the pipeline.
A drip irrigation system, if done correctly, will last you several seasons. You can easily dismantle it in the fall. Clean the tape thoroughly before storing it. If you have used tapes that are designed for one season, then send them for recycling.
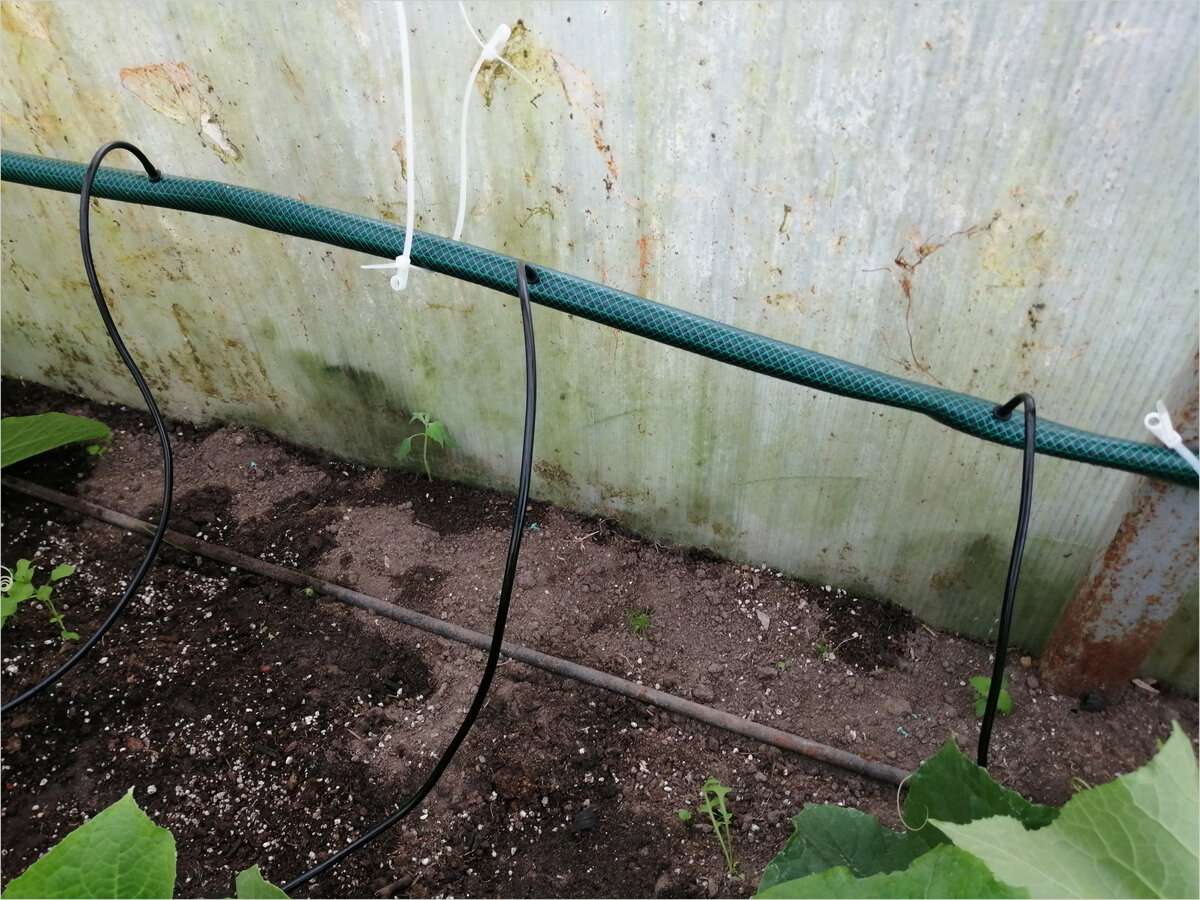
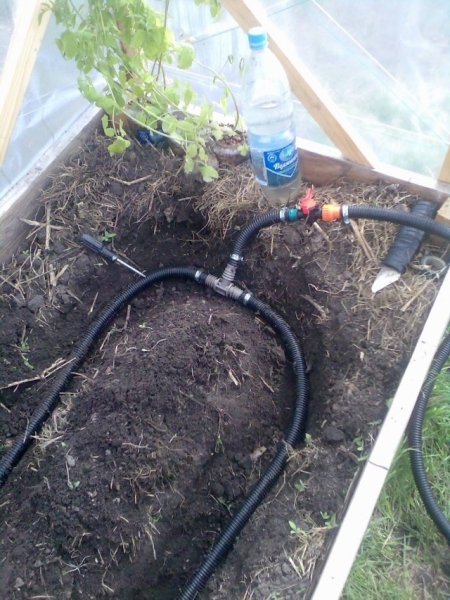
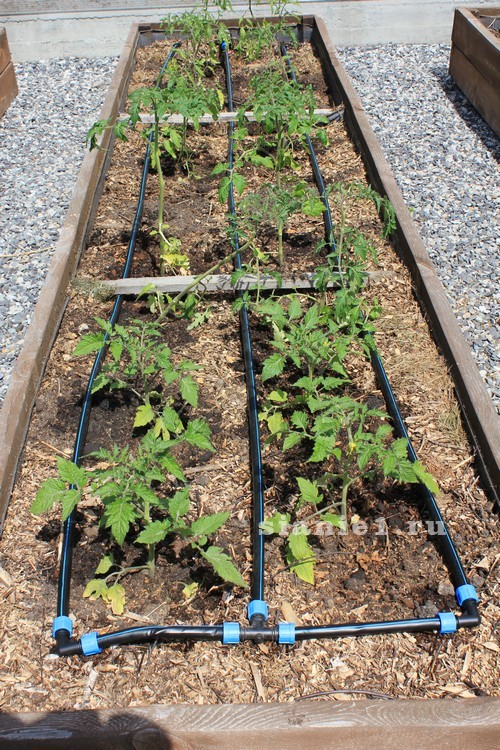
Mounting
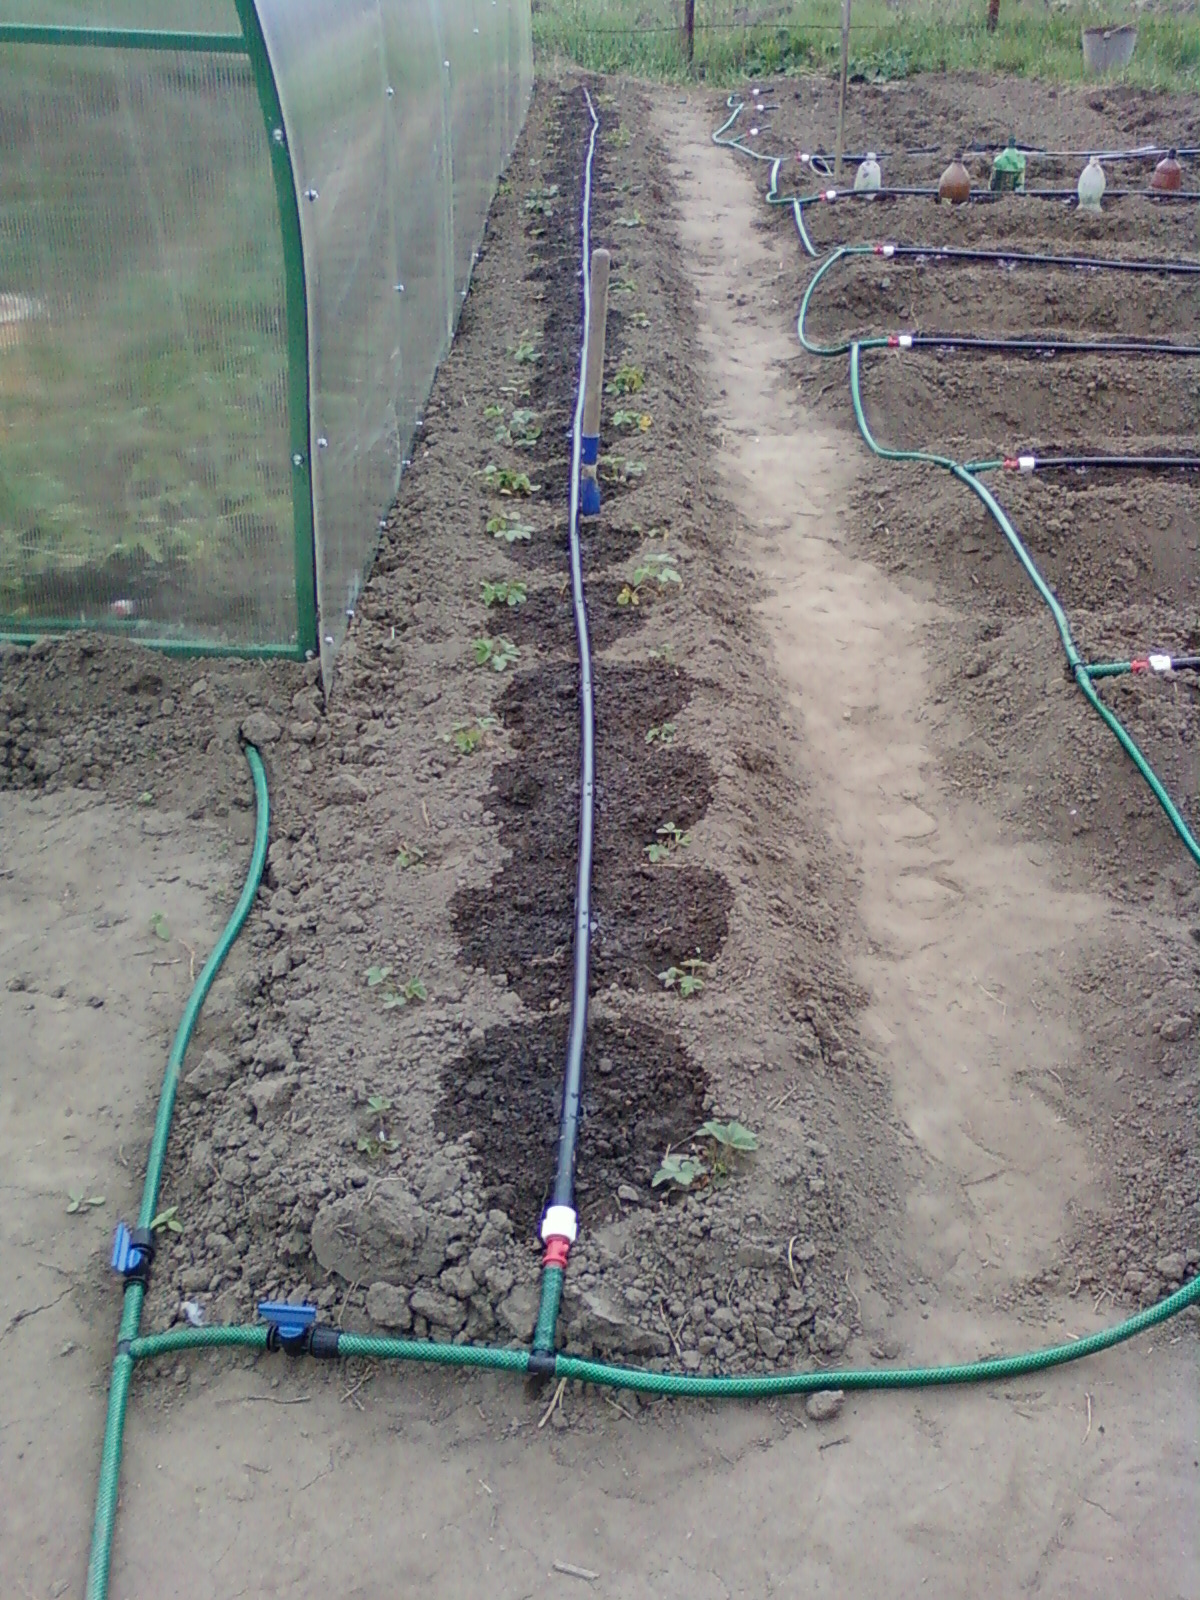
Arrange automatic watering in the greenhouse can be your own hands. Homemade drip irrigation is a profitable investment for cottages and gardens, where it is not possible to come every day.The easiest way to organize self-watering in a greenhouse is the drip type, so let's consider its installation principle.
Next in series in the system is a water filter. Some skip this step, but still, in cases where water is taken from external sources, grains of sand or other particles will enter the system, which can disable the entire system, simply clogging it with debris.
As for the water pressure in the system, when using different sources of water supply, the pressure will be different in each individual case, therefore, in order to level somewhere insufficient, and somewhere excessive pressure, special regulators or reducers are used.
To find out the required pressure of your system, you should pay attention directly to the drip hose or tape, each of which implies its own working pressure. The drip hose can withstand pressure up to 4 bar, the drip tape with a wall thickness of 8 mm can withstand 0.8 - 1 bar
Reducers come in various types, but the most convenient for automatic irrigation systems is flow-through.
Next, a water supply solenoid valve connected to the controller is placed in the system. Its task is simple - when programming the controller, at a certain point in time it sends a signal to the valve, and it, in turn, opens or closes. This node is the whole automation of the automatic watering process. Some solenoid valves are also equipped with a manual opening option. This is an important and very handy feature.


![[instruction] how to organize drip irrigation](https://fix.housecope.com/wp-content/uploads/0/d/c/0dc4911b2169922fc13f6df596cb59fe.jpeg)
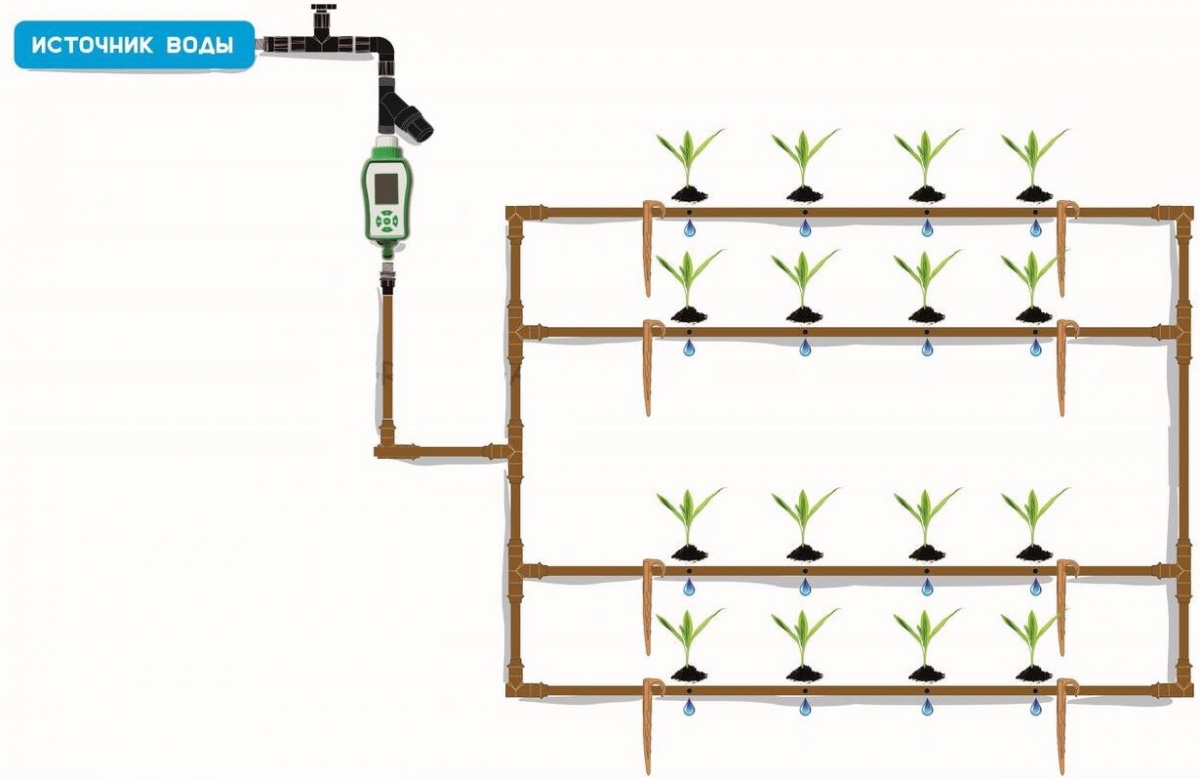


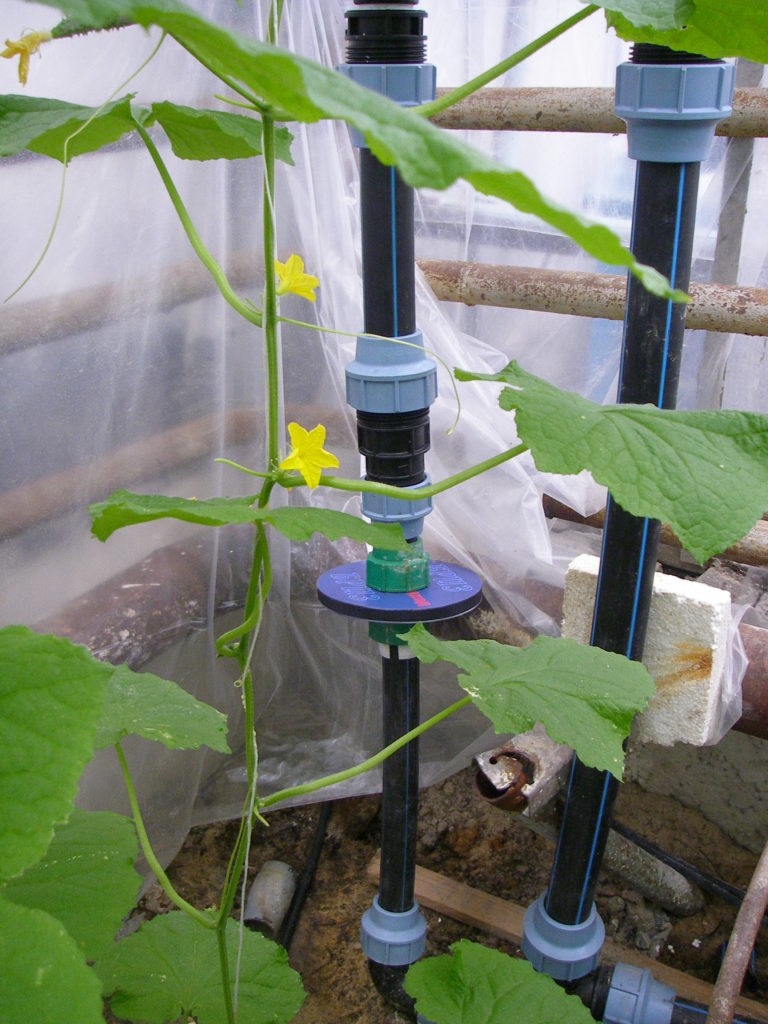

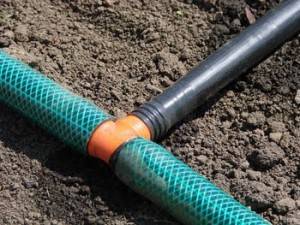
Let's choose a regular garden hose, its optimal diameter should be from 3 to 8 mm (the diameter of the gap is taken into account), it will connect our water supply source: a reservoir, a water pipe or even just a bucket - with a main pipeline that will directly supply water to drip hoses, tapes, or external droppers will be attached to it. The main pipeline is, in fact, a simple polyethylene pipe. The connection between the hose and the pipeline is carried out by means of special fittings, which are easy to purchase at any store.
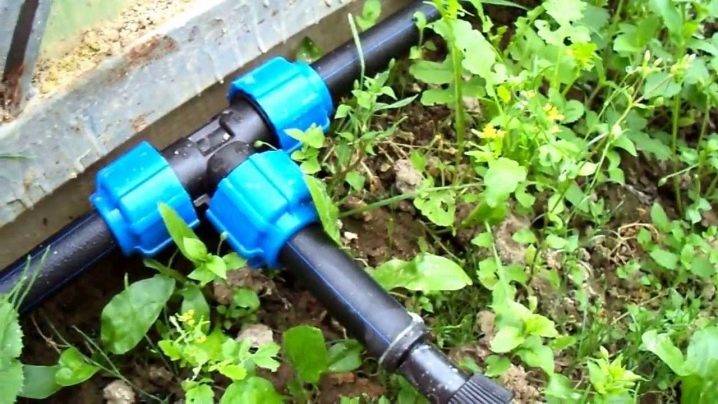
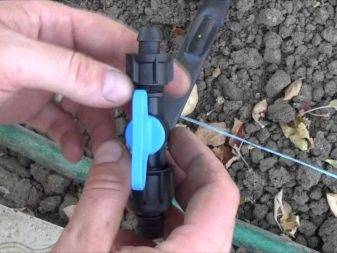
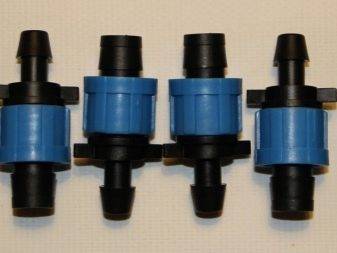
The main pipeline is connected to drip tapes by the so-called start-connectors. A hole of such a size is drilled in the pipeline that the rubber seals that come with the kit would fit tightly there. Next, a start-connector is inserted into this hole and secured by tightening the nut
When buying start connectors, you should pay attention to the presence of a crane, since not all manufacturers complete this equipment with a crane. Thus, it will be possible to regulate the partial watering of the system, turning off one or another bed
A drip tape is already connected to the start connectors, it is also simply tightened with a nut.
At the very end of the installation, do not forget to plug the end of the drip tape or hose.
Arrangement of automatic drip irrigation is completed. As you can see, arranging a comfortable life in a greenhouse is not so difficult.

Calculation of the volume of water
But it is not enough to determine the design features, it is also required to determine how much water will pass through a home-made microdroplet channel. This is necessary to estimate the amount of liquid.Subsequently, such data will determine which source is best, how to use combinations of these sources in different situations.
But there is another nuance that is not taken into account by many people, although it causes a lot of failures. The fact is that in the pursuit of maximum savings in water resources, their consumption is often made unreasonably small, not meeting the needs of plants. It is these errors that give rise to the assertion that drip irrigation is wrong.
Competent calculation involves an analysis of such circumstances as:
- internal air temperature;
- its level of humidity;
- type and variety of culture;
- backlight intensity.
If you turn to the specialized literature, you can simply be afraid of the difficulties. Professional agronomists, describing this technique, freely operate with the “Pennmann equations”, refer to the use of tensiometers and potentiometers. Reputable firms, organizing greenhouse farms, use very sophisticated equipment that allows you to control even fluctuations in the change in the size of the stems during the day. But even experienced specialists do not yet have a methodology that would allow predicting fluid costs in advance. Therefore, trying to reproduce the same level in the private economy is both difficult and expensive, and therefore unjustified.
The way out is the use of data on the need for individual crops in water, which are given in botanical and agrotechnical reference books. However, it will not be possible to limit oneself to such information.
It is very important to consider what is the minimum moisture capacity of the land in which the plants are grown.Depending on the chemical composition and mechanical structure of the soil, this characteristic can be very different, and its exact value can only be established in the laboratory.
The next important calculation parameter is the frequency of drip irrigation. To calculate it, in addition to the minimum moisture capacity, you need to know its limit value, as well as the so-called wilting moisture. The minimum moisture capacity is defined as follows: this is the state of the soil when the capillaries are 100% saturated with water, and air is present in the pores. It is this balance that is considered the best, and it is to it that all farmers should strive. The limiting moisture capacity is a condition when both the pores and capillaries are abundantly moistened.


As for the humidity of wilting, everything is also simple here, despite the apparent scientific nature of the term. This is a situation in which the ground is very dry and the pressure difference does not allow the osmotic flow of water. As a result, any culture quickly loses its tone and even dies. Worst of all, even increasing the intensity of watering or the subsequent addition of moisture does little to correct the situation. For dense clay or heavy sand, the highest moisture capacity almost coincides with the wilting moisture.
The variables for accurately calculating water demand are:
- water consumption by individual plants of a particular variety;
- number of rows;
- landing density;
- duration of daily watering.
Necessary materials and tools for installation
First of all, it is a source of moisture. Therefore, it is necessary to ensure the possibility of connecting to a water supply system, drawing water from an open reservoir or installing a large storage tank with regular replenishment.
Most installations use:
- hoses and polymer pipes;
- irrigation devices (dispensers, sprayers);
- various fittings (connecting elements, taps, valves, plugs).
Solenoid valves can be installed instead of taps. They are regulated by additional devices - a controller and a timer. In this case, the supply and shutdown of water will go automatically, at the time set by the owner of the greenhouse.
Some systems operate autonomously, but most require the pumping equipment to be connected to the mains. The control unit will help to fully automate the system. But it is difficult to make it yourself, you will need to spend money on the purchase.


