- Introduction
- materials
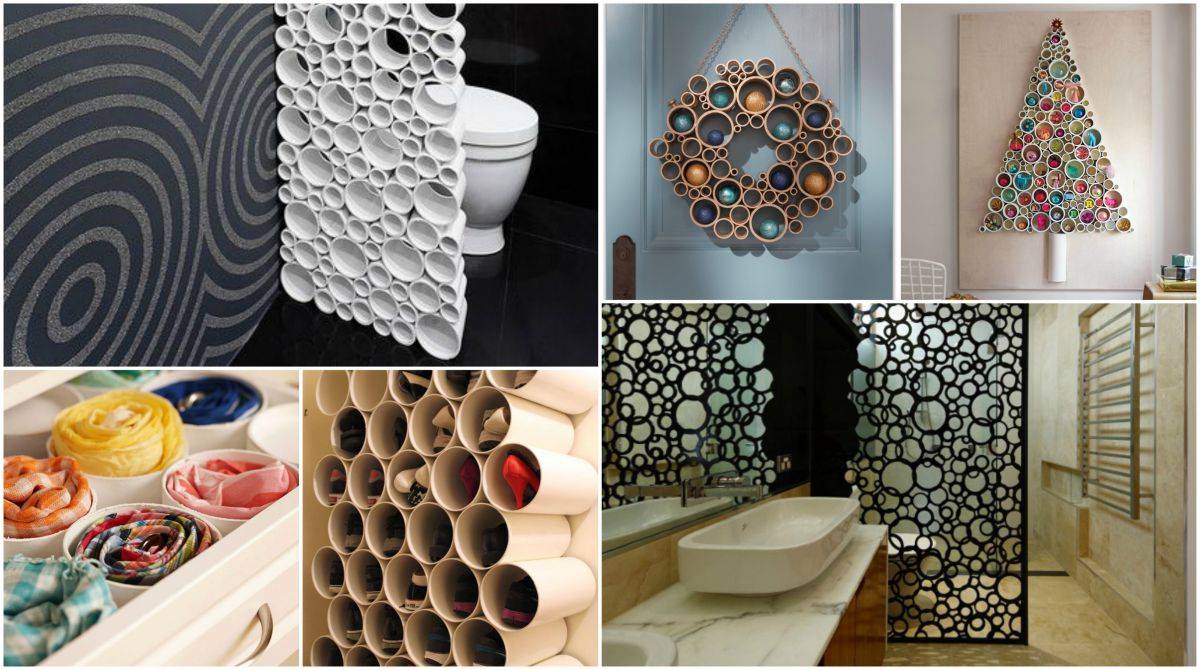
- Decorative interior elements and gifts
- Do-it-yourself screen: 4 manufacturing steps
- DIY closed screen
- What materials can be made from?
- small table
- Types of screens and their purpose
- What are the screens
- Rules for working with material
- Homemade plastic pipes
- Popular homemade plastic pipe
- DIY pipe flower garden
- Greenhouse made of plastic pipes
- Small plastic pipe fence
- Vintage wall for a photo shoot (master class)
- Materials and tools
- Step-by-step instruction
- Use cases
- Master class: a screen made of plastic pipes
- From the choice of design and materials to decoration
- Stage number 1: drawing up a drawing
- Stage number 2: the choice of materials
- Stage number 3: creating a frame
- Stage number 4: decoration
- The use of ventilation pipes in everyday life
- What it is
- Master class on the use of the didactic manual "Multifunctional Screen".
Introduction
In this article, we offer you a small master class - Do-it-yourself Screen. The design of the partition is not complicated and you will spend only a couple of evenings on it.
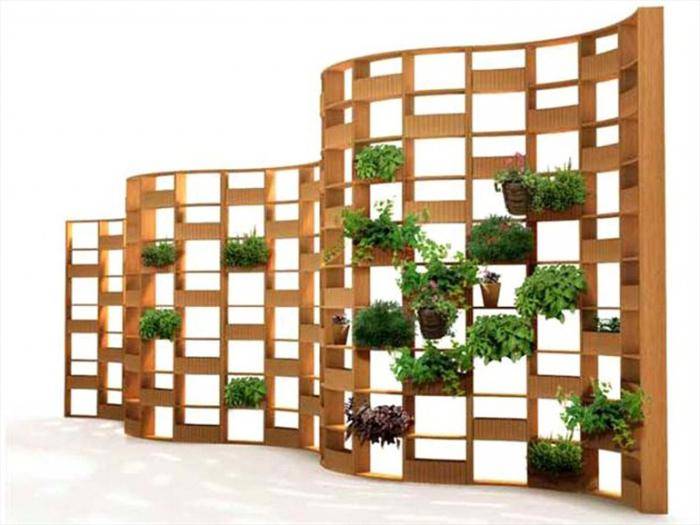
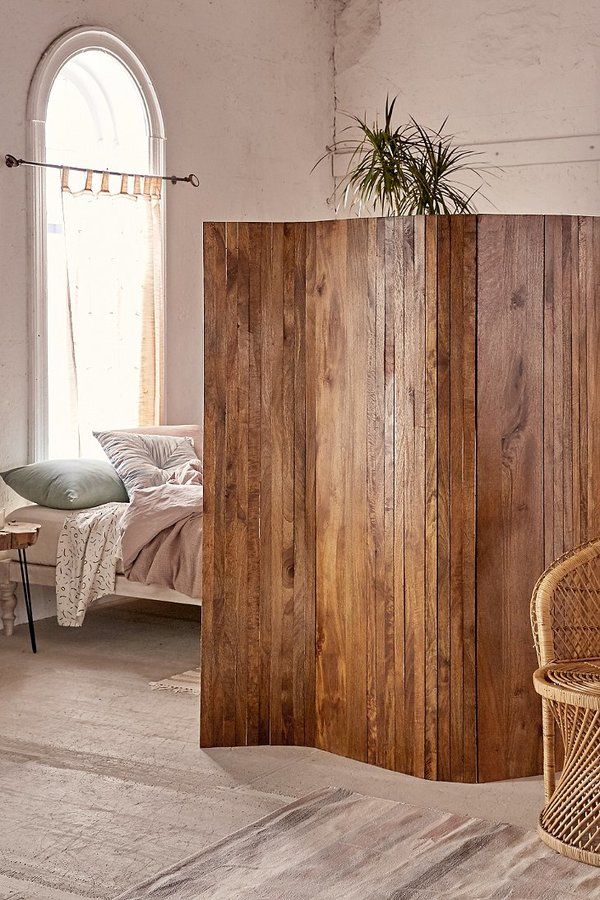
The multifunctional screen is made of cedar boards and thin plywood. This portable folding 3-panel screen easily organizes a new living space in your room.
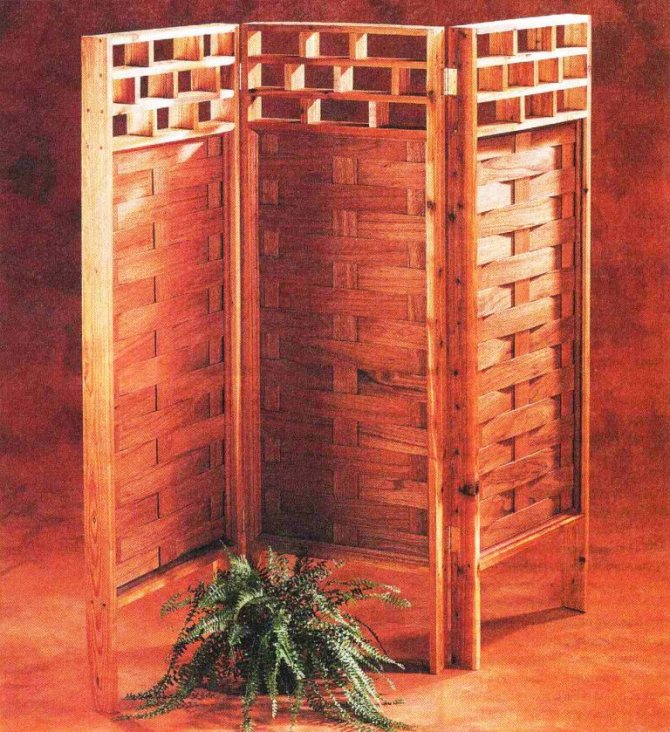
A do-it-yourself screen is made for the room by weaving strips of thin-layer plywood, which will be installed in simple cedar frames.
Fastened together with copper hinges, screen sections can be installed in almost any room. You can make it to highlight a romantic dining area in a large living room. Or place a screen near a sunny window to create a peaceful retreat without adding permanent walls. You can find many uses for this decorative partition - you have room for creativity.
materials
Having decided to make a screen with your own hands, initially decide on a suitable material. Traditionally, a product of this type was made of wood - slats or a solid board. Today, creativity and originality are valued, so a variety of materials are used to make partitions. Common options:
- Wood. A simple smooth board or material with a pattern cut out on it, or a structure made of slats or beams, will do. Differs in simplicity in processing, ease and cheapness plywood. You can even build a partition from old doors, having previously restored their panels and giving them a fresh look.
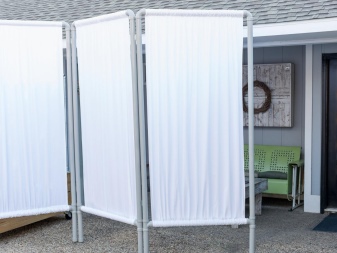
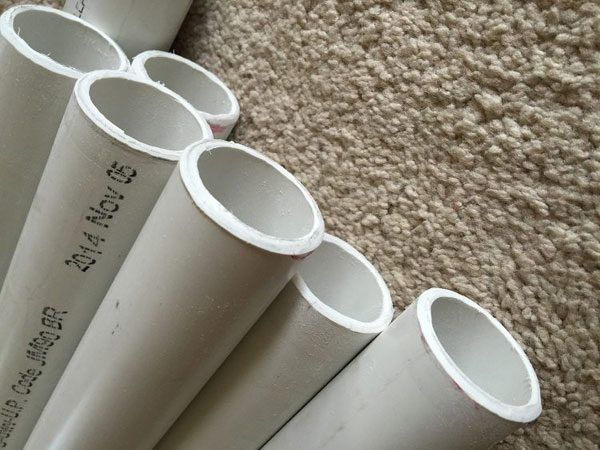
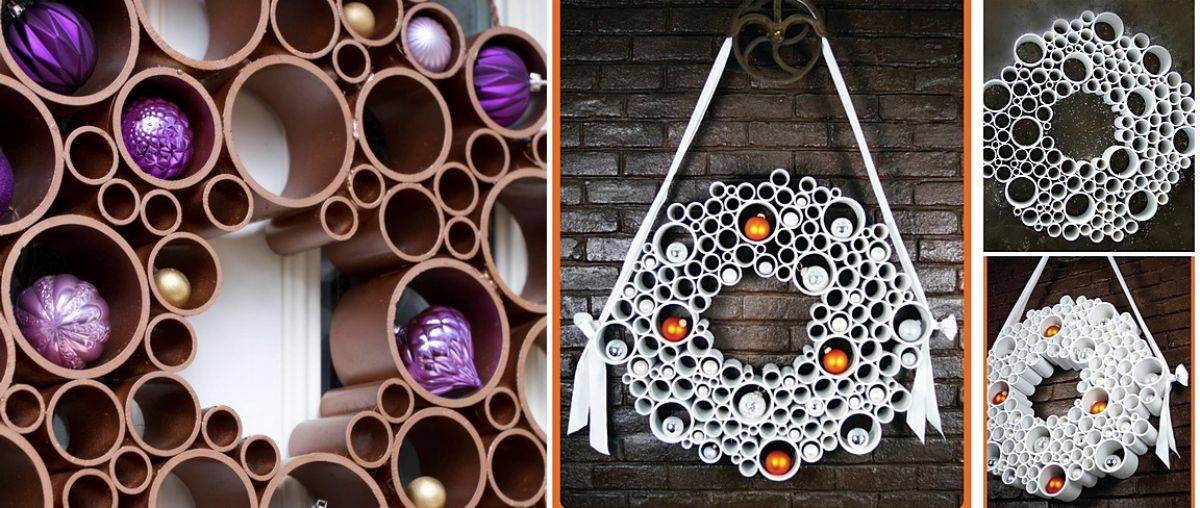
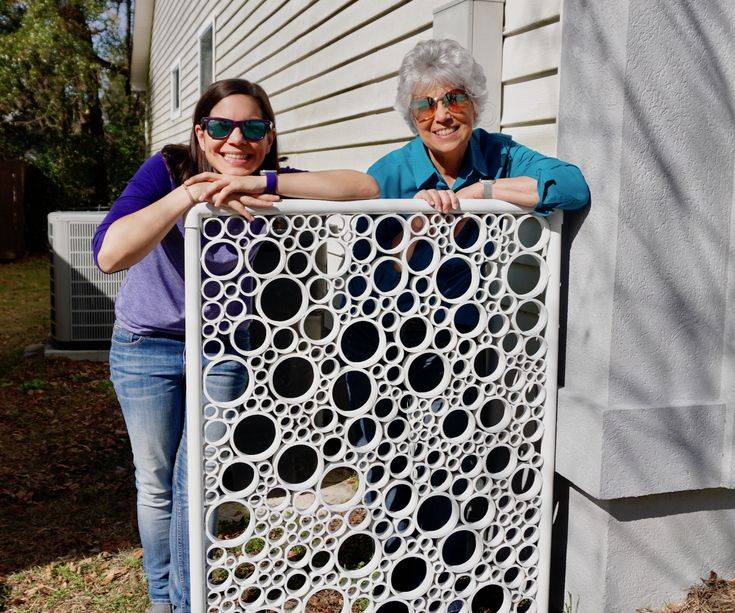
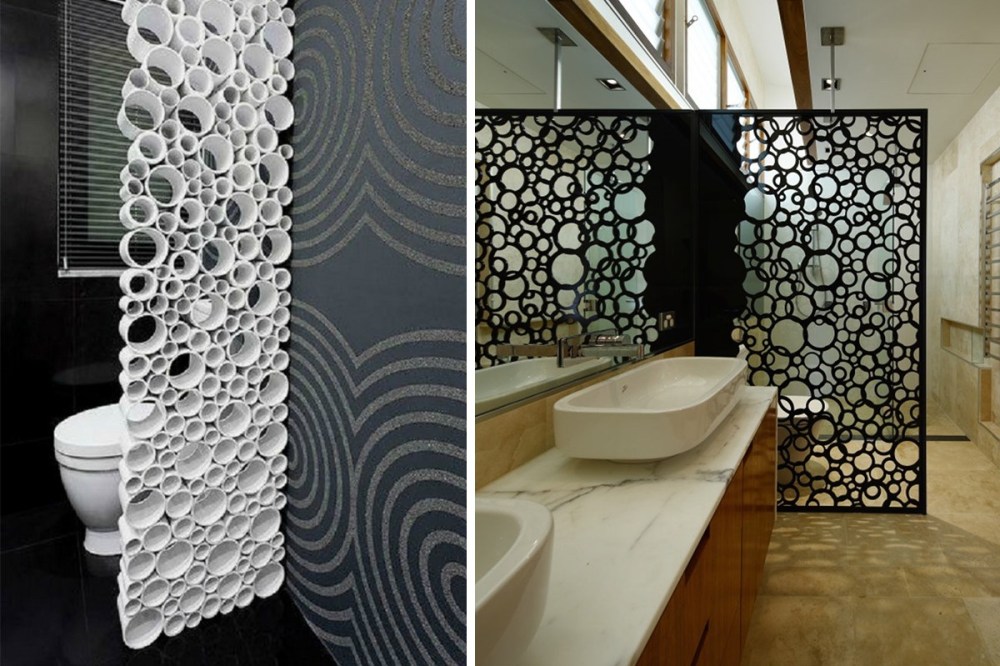
- Plastic. Widely used pipes from this material, which are suitable for creating frames or frames. They are cheaper than metal ones and weigh less. The product made of plastic pipes is easy to assemble and disassemble. Caring for them is simple: you just need to periodically brush off the dust from their surface. An alternative is plastic panels, it is very easy to make a partition out of them. You can pick up several panels that have the same pattern and connect them to each other.The finished partition is well suited for a bathroom, pool or garden shower.
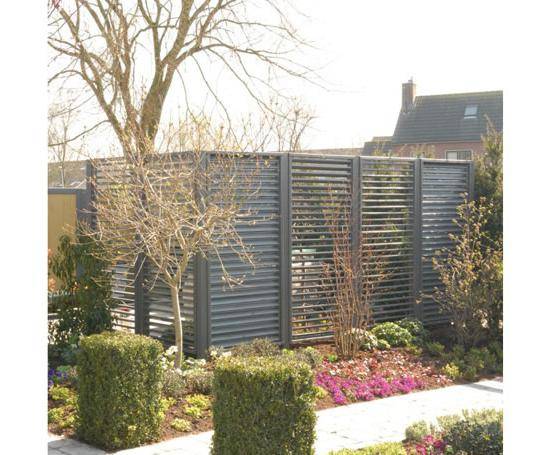
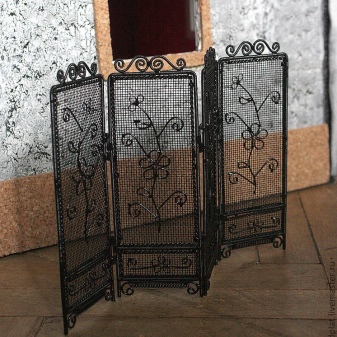
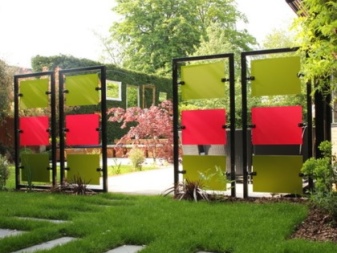
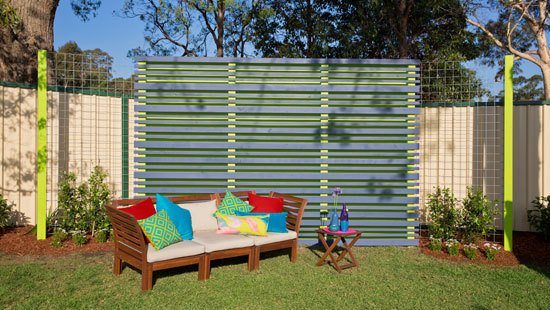
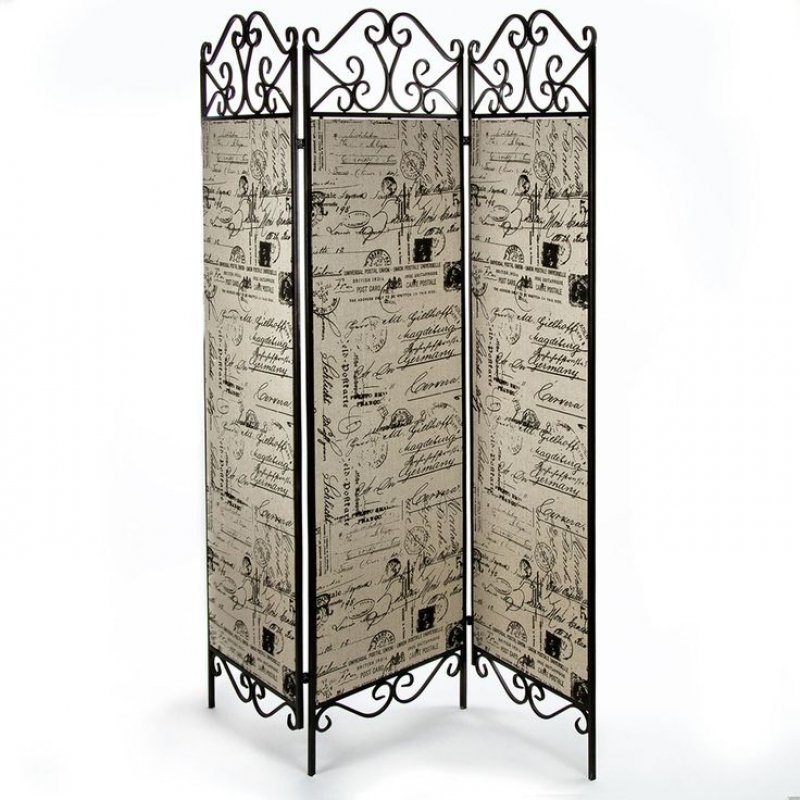
- Metal. Metal frames of a given shape are often used, which can be ordered from the master. Panels made of plastic, glass, wood are inserted into them, or fabric is stretched. Iron sheets look bulky and do not make the room cozy, but an ornament forged from rods will give the partition a spectacular look. Often, metal pipes with a diameter of no more than 5 cm are used to create a frame. A screen of this type will decorate a garden or yard.
- Cardboard. Cheap and affordable material from which you can make a creative, original screen with your own hands. It is very easy to work with him, because. you just need to cut out the parts in accordance with the diagram and fasten them into one canvas. Ready-made partitions are not suitable for the street, because. they quickly deteriorate under the influence of weather factors.
- Branches. This includes reed, wicker, bamboo. Screens from them are mobile, light and visually simple. They go well with various styles in the interior: tropical, classic, empire, eco-style. Their manufacture requires the skills of weaving from a vine from the performer. The finished product will look great in the garden and will not deteriorate from wind, rain and sun, if the material is processed correctly.
- CDs and vinyl records. These parts are interconnected by means of staples or threads. The result is an original openwork canvas that can be hung anywhere in the room in the form of a wave, a semicircle or in a straight line.
Decorative interior elements and gifts
A creative approach will help create truly original things. When making, do not forget to decorate crafts with colored paper or paints.
Working with plastic pipes is not just a pleasure to create. This is the embodiment of the most daring ideas and fantasies. In addition, you do not need a special tool for work, sometimes a simple hacksaw, ruler and felt-tip pen are enough. Crafts can be done by the whole family, involving children in this. It strengthens family relationships and develops creative thinking.
5921
Do-it-yourself screen: 4 manufacturing steps
Do you want to know how to make a screen with your own hands? To do this, just read the corresponding detailed instructions. It also contains many visual illustrations.
DIY closed screen
First of all, two frames of the same size should be built. One is stuffed with rods that act as risers. Thin rods are intertwined through them using the “darning” method. The last rods are nailed to the bar or to the frame itself very carefully. A second frame is applied to the "wattle fence", which is attached to the first. The screen for the garden with your own hands is ready.
An ideal option would be a partition made of stems of swamp vegetation - reeds, cattails or rushes. Good stems for construction are harvested in June or July, in extreme cases - in September. They are cut, dried naturally in the attic or under a canopy.
It is very important that the sun's rays do not fall on the stems, otherwise they may fade or lose color. It is not recommended to store them in plastic bags, as the stems can become covered with black spots.
Before starting work, the vegetation is moistened, you can simply put it in the rain or immerse it in water for 10 minutes. The main thing is that the stems are completely wet.
After that, they are wrapped in a wet blanket for several hours, it is important not to overdo it, otherwise they will lose color and become spotty. They are taken out in several pieces and wiped with a rag to remove excess moisture and displace air.
Weaving begins similarly to weaving a vine. Vertically mounted stems are attached to the frame with adhesive tape. When the screen-partition is made with your own hands, it is placed between wooden frames and fastened beautifully and firmly between them.
What materials can be made from?
A real classic is the wooden screen. It is no longer possible to establish what the very first construction of this kind in history was made of. But there is no doubt that wood is traditional and was used already in hoary antiquity. Along with monolithic boards, partitions in the past were also made of slats. In the second case, various types of fabric were stretched over them - what was at hand and what they liked.
Today, wooden screens are still in demand, and their main types are still the same. But, along with simple slats, timber is often used. Plywood constructions have also gained considerable popularity, since it:
- allows you to save;
- weighs relatively little;
- processed without any problems.
Design developments do not stand still. And recently, more and more screens from louvered doors (and simply from unnecessary wooden doors) have begun to meet. They usually contain still quite solid wood, but the construction itself is morally or technically obsolete.

But some home craftsmen try to use metal (usually stainless steel or aluminum). In this case, you will need a frame of a certain shape.Any experienced welder can make it, although sometimes it is better to contact a metalworking company. Inserted inside the frame:
- wooden panels;
- sheet glass;
- plastic.

Instead of them, medium-sized (up to 5 cm in diameter) pipes are also suitable. Tubular screens are actively used in gardens and courtyards. Regardless of the shape of the frame, it should be covered with elegant fabric or paper with the original image.
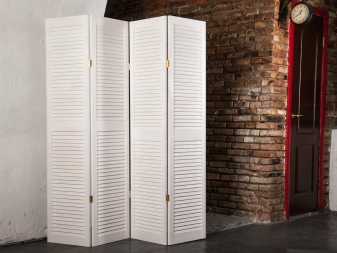
If a high-tech style is chosen, then it is logical to use blinds to frame a steel screen with your own hands. But for those who want to simplify the work as much as possible, it is worth abandoning metal and focusing on PVC. Pipes made of this material are quite light and practical in addition.
You can also use it at work:
- cardboard;
- polymer panels;
- cane;
- willow or bamboo branches;
- CDs or vinyl records.
small table
In every living room, a coffee table is an obligatory element of the interior. On it, if desired, you can place any magazines, documentation, drinks for guests, etc. Such a table, as a rule, is small, goes well with the interior. Making such a craft from polypropylene pipes with your own hands is not as difficult as it seems at first glance.


Initially, you need to decide on the design of the table. It can be classic, represent 4 legs-supports, on which any material will be located. It can also be unique, stylized.


However, the most stable design is the version with 4 support legs.Ideally, if the structure will run over the entire area of the material, in this way it will be possible to achieve a uniform distribution of the load.


Glass is often used as a material that will serve as a table. It looks very advantageous in a small amount of free space.

Types of screens and their purpose
The project of the future partition depends entirely on the functions that it has to perform, and on the time available for the implementation of ideas.
Depending on the purpose of the screen, they can perform the following functions:
decorative - the partition is used to decorate the interior of the room, being an artistically designed object;
division of space - the screen visually divides the room into zones, which is often used by designers in large rooms;
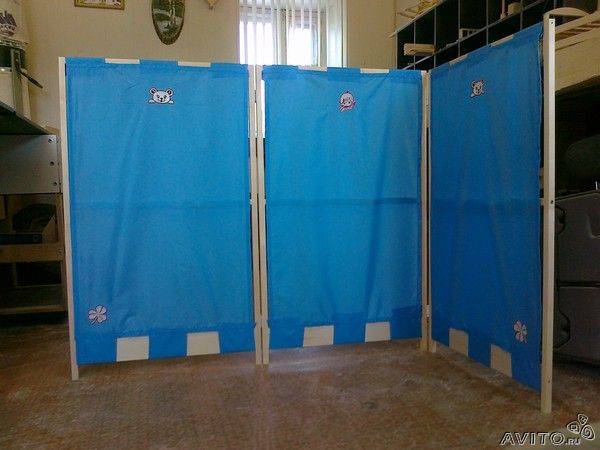
implementation of creative ideas - a small screen of pipes acts as a theatrical inventory when performances are staged at home.
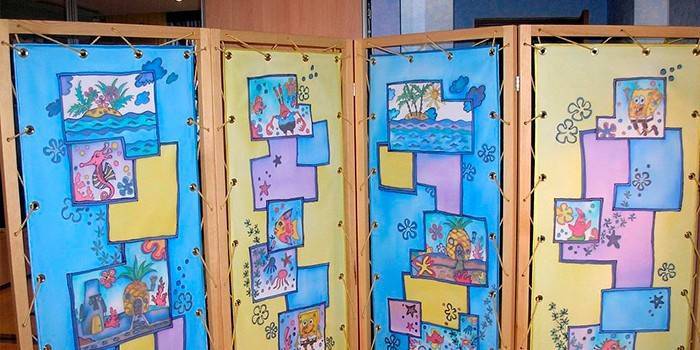
For the project, the size of the future product is also important, so you should immediately decide on its function. Most often, partitions are made of plastic for a kindergarten group, for playing a table puppet theater, for household needs, for zoning a one-room apartment, trying to separate an office from a bedroom or living room.
And also, this is a favorite craft of creative and creative craftswomen who prefer to make an unusual and completely unique thing with their own hands.
In principle, it is not difficult to buy a screen for every taste and size - manufacturers offer a huge range of different purposes from a variety of materials.
Photo from Plastic version - blinds.Light partition, easy to clean, easy to carry to the right place, fits perfectly into modern interiors Forging, apparently, will never go out of fashion. Artistic patterns made of metal, embodied in the design of the screen, will harmoniously fit into the room, which is dominated by natural wood and leather. Wood is a very popular material for partitions. It is easy to work with, and the finished product looks noble, it is light in weight compared to a metal screen. Textiles are no less popular. Moreover, it is often used in combination with a wooden partition wall frame or with plastic pipes. Moreover, they use both ready-made fabrics with a suitable texture and pattern, and draw up a fabric canvas according to their own sketch.
Ready-made solutions offered by art studios do not please with their cost. Therefore, it is much more interesting to build a partition yourself. Moreover, there are always improvised materials at hand that will fit, you just need to show your imagination.
You should immediately think about the design - mobile (on wheels), portable or stationary partition
And it also matters if it folds or not.
All these points must be carefully considered, because the project of the future homemade screen depends on them.
What are the screens
When choosing a screen model, not only the stylistic orientation is important. It is necessary to take into account the space in which the product will be located, its mobility and even functional purpose. Therefore, we turn to the theory and consider what types of screens are.
-
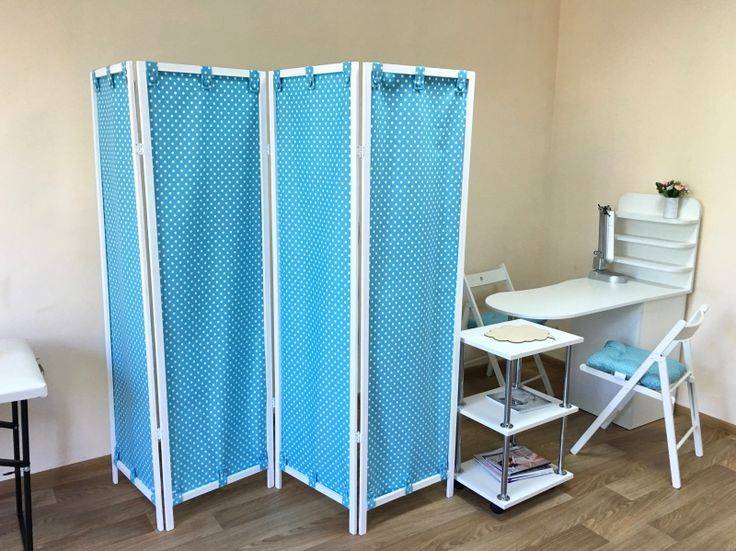
Folding sliding.They consist of several interconnected frames, from 3 to 8 or more. If necessary, they can be folded in the form of an accordion and removed.
-
Single-screen screens consist of one wide sash. It can be a frame made of any material with stretched fabric or paper, a sheet of plywood, chipboard, plastic or glass fixed on a stand. It is desirable to provide such a screen with wheels so that you can roll it to the right place.
- The screen-book consists of two wings of the same width (although asymmetry is allowed). Fold it in the form of a book and rearrange it where there is less space. Depending on the decoration, such a screen can be used for dressing up and even for holiday photo shoots.
-
Flexible screens. They are made from many long thin sections: pipes, plates, rails, connecting to each other. The peculiarity of this screen is that you can put it in a wave, a spiral, or even twist it into a roll and set it aside - it does not take up much space.
- Blind screens can consist of a different number of wings, their distinguishing feature is complete opacity. This can be a solid board (plywood, chipboard, plastic, metal sheet, frosted glass), a dense fabric stretched over the frame, or cardboard inserted into the frame. Such screens are used not only for zoning rooms, but also as a partition for changing clothes.
-
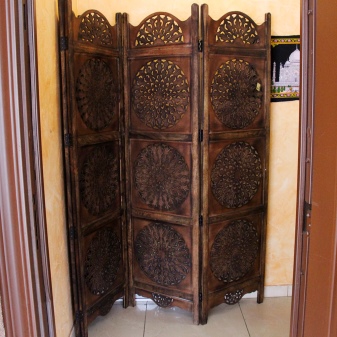
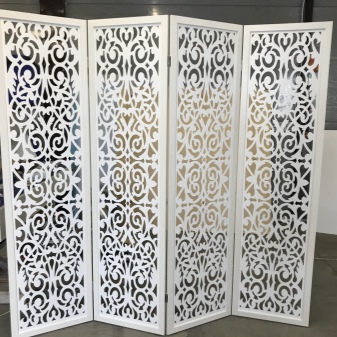
Transparent screens. Most often, this is a transparent fabric stretched over a frame - organza, tulle and even starched gauze; It is very convenient to use a mosquito net. Also popular are metal models made using the air forging technique, or wooden screens with openwork through carving.Such products are decorative in nature, they are often used for wedding and holiday photo shoots or to decorate rooms and gardens.
Rules for working with material
After you have purchased pipes and are ready to build a greenhouse, it is important to study the features of working with this material. There are a number of universal recommendations that are relevant for working with any kind of plastic pipes.
It is better to start work on the installation of the frame in warm weather at a temperature not lower than +17 degrees and not higher than +23 degrees. This temperature is the most comfortable for plastic, it will bend well and, in general, show all its best properties, so that it is as easy as possible for you to bend it into the desired shape.
You should not chase cheapness and take pipes and fittings from different manufacturers and in different stores. Be puzzled by the purchase of these elements in one place so that there are no problems with their installation. The strength and reliability of your future greenhouse depends on the quality of the connections.
If you plan to create a monolithic structure that you will not disassemble for the winter, then it is better to connect the pipes by welding. Some materials hold together only due to a reliable alloy. This unit can be rented on the construction market, but if there are absolutely no options for finding it, then you can use a gas burner as a heating device, the main thing is not to overdo it.

It is also recommended to cut the pipes with a special tool so that there are no burrs. But you can use a sharply sharpened construction knife, and just sand the bumps at the ends.
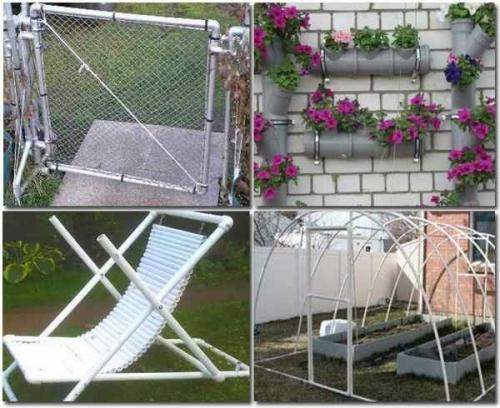
Homemade plastic pipes
- 1. Popular homemade plastic pipe
- 2. DIY pipe flower garden
- 3.Greenhouse made of plastic pipes
- 4. Small plastic pipe fence
You have recently completed repairs and you still have scraps of plastic pipes - do not rush to take them to a landfill. Perhaps, from the remains of the pipe, you will like some useful homemade product that will come in handy in the country or on the balcony.
Most of the homemade plastic pipes that are given in this article will not be difficult to assemble with your own hands. Of the tools, you only need a screwdriver, a hacksaw or a grinder, as well as various hardware (screws, bolts and self-tapping screws). So let's go.
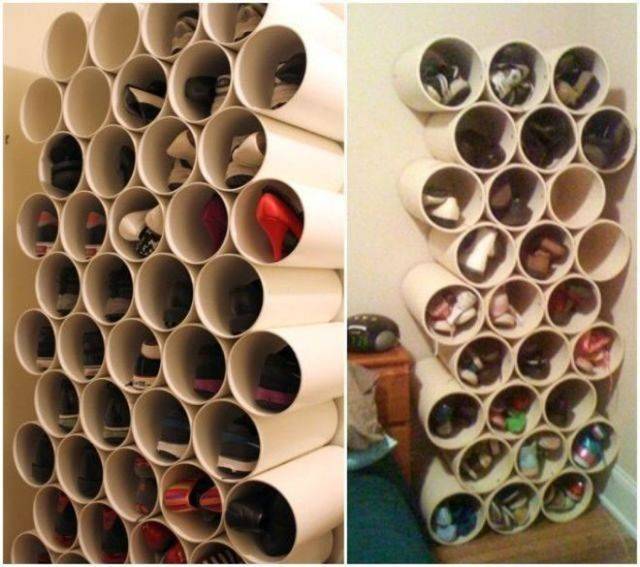
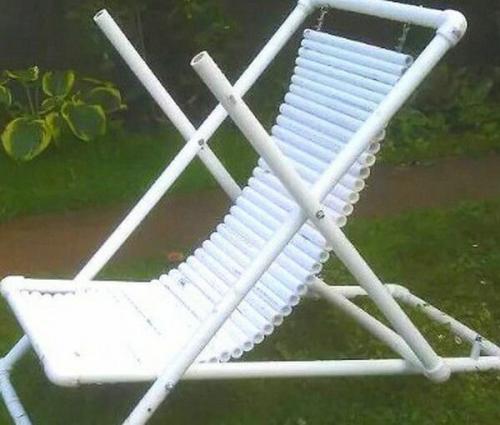
Popular homemade plastic pipe
It is very easy to make a small chair or table with your own hands from scraps of a plastic pipe. True, you need to have a soldering iron for welding pipes and fittings with tees on hand.
The process of making a chair from plastic pipes is quite simple:
1. First, using the corners and the pipe, we solder two frames. The bottom frame, which will be used under the seat, should be slightly smaller than the main support frame.
2. Next, we weld a U-shaped frame from pieces of pipe and corners, which will serve as a backrest holder.
3. We connect the frames at the intersections (as in the picture) with bolts.
4. The seat of a homemade chair deserves special attention; it can be made from dense fabric or from scraps of plastic pipes. In the latter option, you will have to fasten each tube to each other with a strong rope, and then fix the seat to the frame.
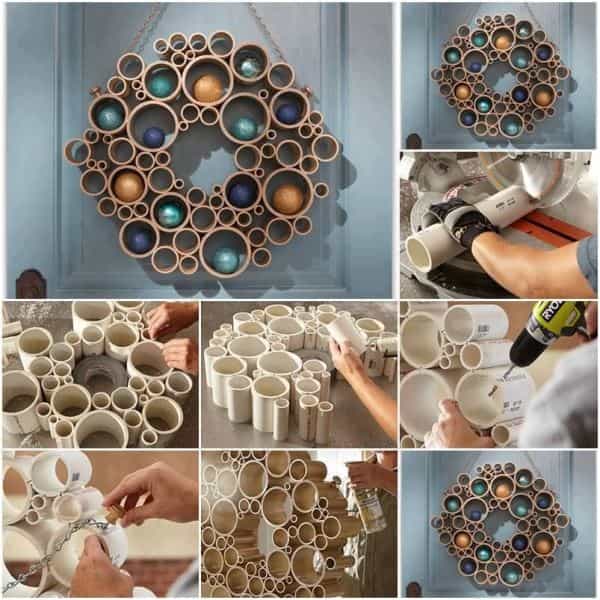
DIY pipe flower garden
To make the next homemade plastic pipe, you will need a 110 sewer pipe, or at least a 50 diameter pipe, tees and bends.If there is one pipe, without fittings, then it does not matter, because it will also fit perfectly for making a flower garden.
We take a pipe and make a preliminary markup where and how the holes for the flowers will be located. Using a small angle grinder (circle 125), we cut out holes in which plants could be planted.
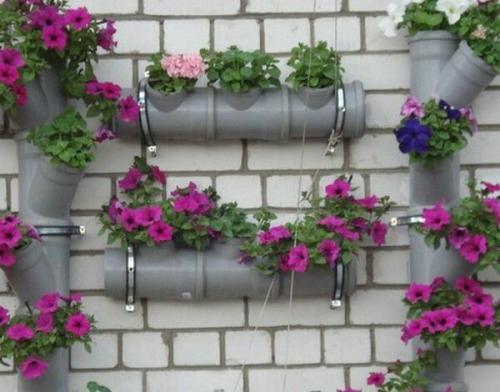
In the case of assembling a flower bed from sewer tees and bends, all work is greatly simplified. For these purposes, you only need to connect one tee to another, and insert 110 corners along the edges of the structure.


If desired, a home-made flower garden made of pipes can be attached with clamps to the wall, and then the original look of the facade of your house is provided.
Greenhouse made of plastic pipes
Who has not dreamed of acquiring a real greenhouse in their own suburban area? In the case of homemade plastic pipes, it is quite possible to make a greenhouse with your own hands. Moreover, in this case, it will be possible to save a considerable amount, because factory greenhouses made of polycarbonate and other materials cost a lot of money.
To make a greenhouse out of pipes, it is better to sketch in advance a simple drawing with the dimensions and diameter of plastic products. As support posts for the greenhouse, it is recommended to use a pipe with a diameter of at least 32-40, while a 25 pipe is quite suitable for lintels.
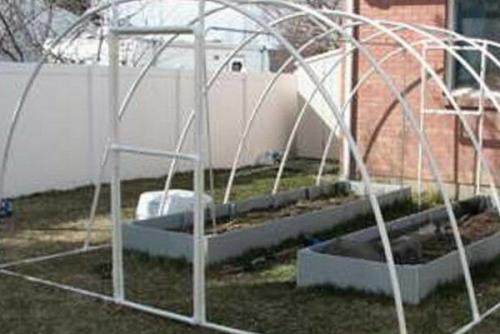
It is best to start assembling a greenhouse from plastic pipes from the base; for this, four pipes are welded together through the corners in the shape of a rectangle. Then, in each pipe, every 0.5 m, a tee is soldered into which vertical greenhouse guides will be installed.
In advance, you should think about strengthening the structure in the place where the door will be provided. After the frame is assembled, it will remain to be covered with a dense plastic film, which, with proper operation of the greenhouse, will last for more than one year.
Small plastic pipe fence
You need a small fence that will become not only an obstacle for stray animals, but also a real decoration of the site - no problem. Given that the plastic does not rot and does not deteriorate under the influence of moisture, such a fence will last for many years.
For the manufacture of a plastic fence, you will need a pipe, corners and tees, into which vertical crossbars will be soldered. The pipe fence has a very simple design in the form of supports (they are made of thick pipes) and crossbars (vertical and horizontal) that are welded to the supports through tees with corners.
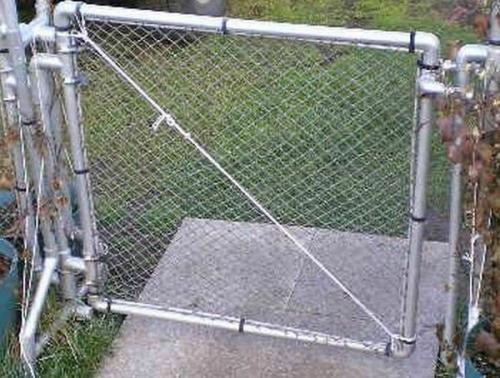
Upon completion of construction, a home-made fence made of plastic pipes can be painted with “silver” or other paint, at your discretion. Such homemade from unnecessary pipes will become a real decoration of any suburban area.
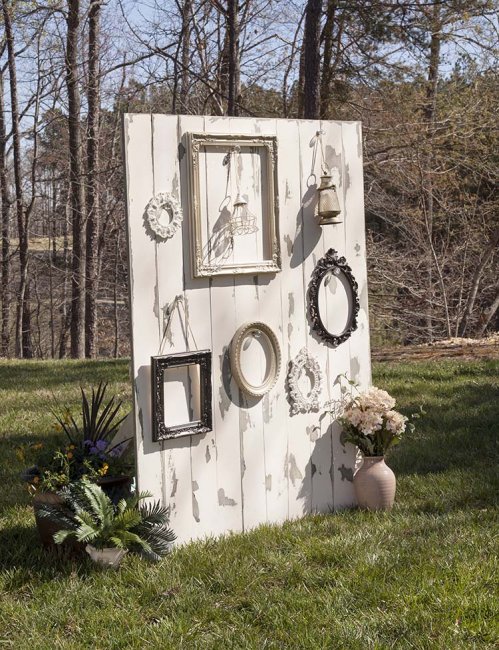
Vintage wall for a photo shoot (master class)
Wanting to leave a piece of the celebration for themselves, the newlyweds create accessories and design elements with their own hands. Background walls are no exception. A rustic photo zone screen is very easy to create.
Materials and tools
- wooden boards (the size depends on the desired size of the screen),
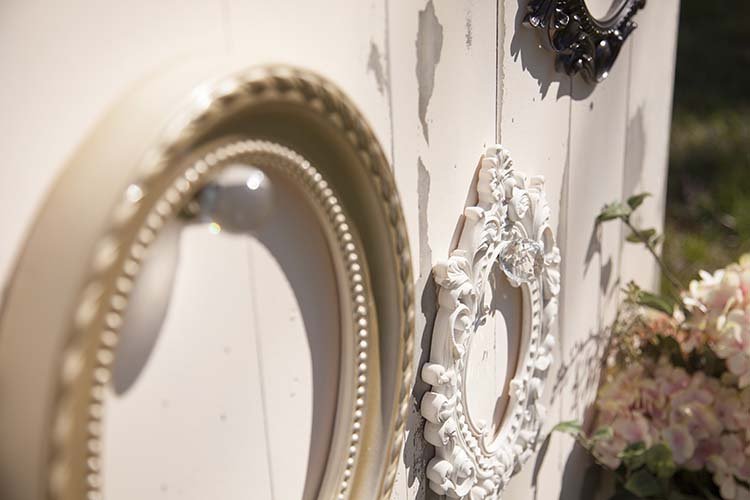
- frames of various sizes
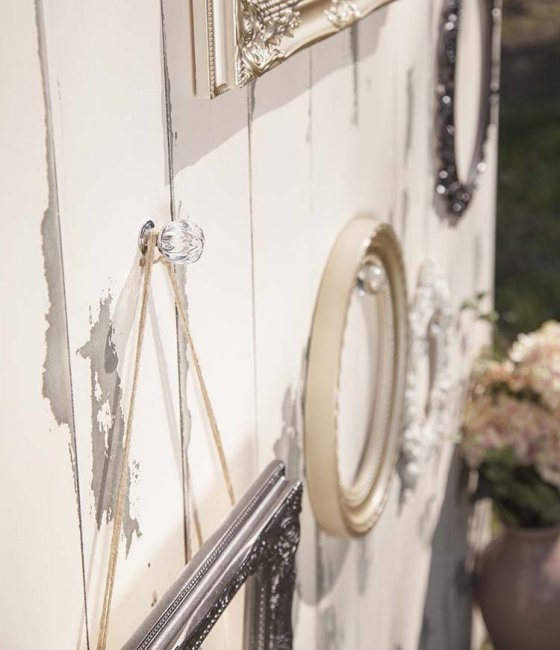
- beautiful hooks or furniture handles,
- water-based impregnation for wood,
- white acrylic paint,
- wood glue,
- wood screws,
- drill or screwdriver
- brush,
- sandpaper or sponge.
Time: 2-3 hours

Step-by-step instruction
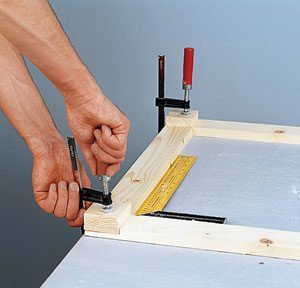
- For the frame, lay out the boards of the appropriate size evenly and close to each other on a horizontal surface. Place 3 stiffeners perpendicular to them at the top, middle and bottom.
- Nail the two extreme boards of the “fence” to the stiffeners with nails to get a frame-like structure. Don't hammer nails all the way.
- Turn the resulting frame over and apply wood glue to the stiffeners. Then glue each board in turn, including the last one, after taking out the nails. Do not know how to make a screen for a wedding with your own hands and not spend a lot of time and effort? - Find an element of the old fence or use a pallet - this will save both time and money. Also read about the design of the wedding arch - with it the celebration will become even more fabulous.
- At a distance of 20 cm from the edge of the middle stiffener, attach the stops of your decorative wall with self-tapping screws and a drill. At the bottom, connect them together with a perch of the same size for stability. The frame is ready!
- If the wood is untreated, clean with fine sandpaper and remove dust. Then apply the impregnation with a brush, or rub it in with a woolen cloth (this way the texture of the wood will look nicer).
- After the impregnation has been absorbed and dried, apply white paint with a brush with artificial bristles.
- After waiting for drying (2-4 hours), take an emery sponge and lightly remove the top layer of white paint, revealing the impregnation. Thus, you will create the effect of an aged tree.
- Prepare the frames, paint them, attach the ropes on which they will hang. Make a markup for attaching them to the frame.
- Attach hooks or other furniture fittings to the marking points. Hang up the frames.Complete the composition by hanging vintage lamps, clocks or flower pots.
- The vintage wedding screen is ready, and no one else will have it, because you made it yourself.
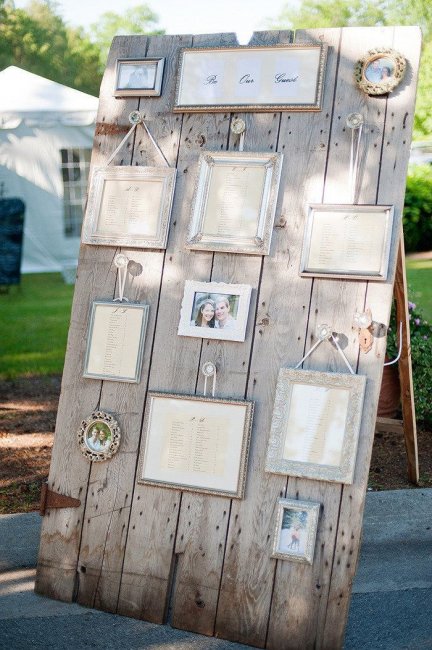
Use cases
In addition to being a great backdrop for a wedding photo shoot, this wall can be used as a guest layout. Attach as many frames as there will be tables. In the center of each place a plate with the number of the table, and around stickers or flags on pins with names.
Take care of the design of the wedding photo zone, and in memory of this day you will have a lot of amazing pictures with family and friends.
- 13758 views
- 29 photos
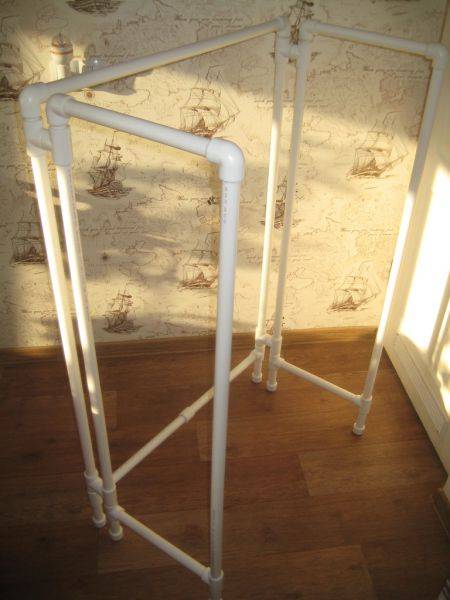
Master class: a screen made of plastic pipes
We introduce you to a master class on making a screen with your own hands from plastic pipes.
What we need for such a design:
- plastic pipes;
- connecting corners (4 pieces for each frame);
- hacksaw;
- soldering iron or glue;
- loops;
- fabric and machine;
- dye.
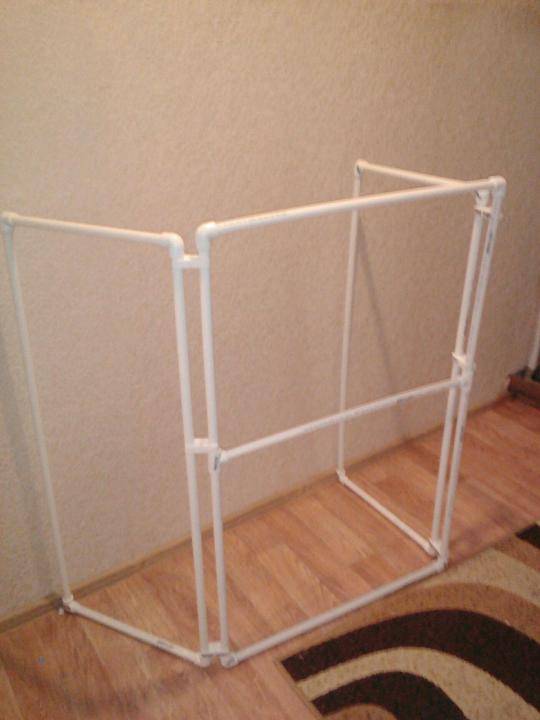
The workflow is as follows:
1. Align the pipes so that they become the same length. If you plan to make three frames, then you will need to make 6 long and 6 short elements.
2. We paint the blanks with acrylic.
3. We connect the elements with a soldering iron or glue.
4. Drape the frames. To do this, we measure the length and width of the valves, and according to these parameters we sew the material. Its edges can be secured with Velcro or buttons.
5. To make the sashes fold, we fasten them with loops.
6. End caps can be attached to the legs to prevent damage to the floor.
From the choice of design and materials to decoration
The instructions for making a screen include the following steps:
- Drafting
; - Material selection
; - Wireframe creation
; - decoration
.
Stage number 1: drawing up a drawing
At this stage, it is enough to decide on a couple of criteria:
- Number of leaves
. The best option is three. This design is quite multifunctional and can be used:
For the room
. Fence off a corner or bed from the rest of the room to create a separate cozy corner in it;
For puppet theatre.
It is enough just to leave a hole on the central sash for the appearance of dolls;

For garden
. Three sections are enough to make a place protected from prying eyes and sunlight in your suburban area;
- Dimensions
. For the room, it should be selected in accordance with its dimensions, large structures will be used more efficiently on the site, but, for example, in a kindergarten, on the contrary, a low partition will be enough.
After you decide on the specified parameters, you can not even draw a diagram from scratch, but find a suitable template on the Internet and insert your own size values:

Stage number 2: the choice of materials
The screen can be made literally from improvised materials. Here are examples of some interesting solutions:
- plastic pipes
. If you have a pipe soldering iron, then there is nothing easier and faster than soldering a frame made of polypropylene pipes. They will make a practical and moisture-resistant design, perfect for use on the street, near the river, in the bathroom or next to the pool;

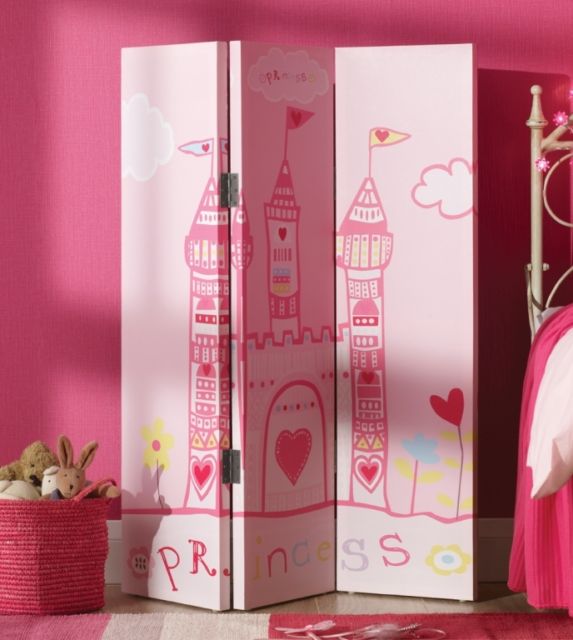
- Cardboard
. The price of this option is the lowest, it is well suited for a children's room;

- Polycarbonate
. Another not very expensive and practical option that can look stylish indoors and withstand all weather conditions outside;

- Wood
. Despite the abundance of different materials, wooden frames covered with fabric and paper are the immortal classics for making screens, which we will also turn to.

Stage number 3: creating a frame
The master class for making frames looks like this:
| A photo | Description |
 | Preparing :
|
 | We apply the markup on all slats, stepping back from the edges of 60 mm. |
 | We make notches according to markup. |
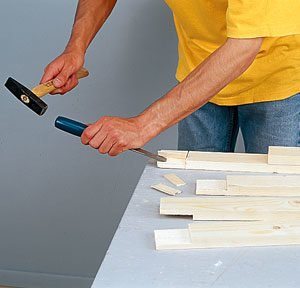 | We carry out with their own hands with a hammer and a chisel cut. |
 |
|
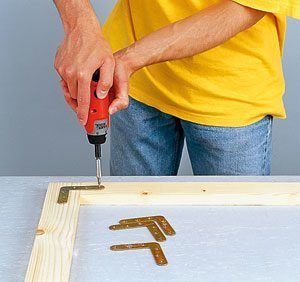 | We fasten corners with screws to strengthen the structure. |
Stage number 4: decoration
It remains only to assemble the frames together and decorate them.
Hi all! Alas, the situation with the provision in our kindergartens is not the best, therefore, a great responsibility rests with the parents. You have to buy, make, collect something. But some dads even enjoy it. A good example of what you can do for your child is a screen made of plastic pipes for kindergarten.


From a financial point of view, this is a low-cost event, since many may have pipes left after repair. And yes, they are pretty cheap. With the search for fabrics for the waist, there should also be no problems.
But to buy ready-made screens, which will differ little from home-made ones, is not a cheap pleasure. Therefore, it is often natural to make a decision to do everything with your own hands. Dads will be able to make a design, and moms will be able to sew the necessary canvases. The result is a wonderful children's screen for many tasks and activities.
The use of ventilation pipes in everyday life
Ventilation pipes with a set of connecting and fastening parts are commonly referred to as air ducts. They are designed to ensure air circulation and are installed in those rooms where there is no access to natural air movement or there is an additional need for ventilation: in kitchens, bathrooms, toilets.
Before the advent of plastic parts on the market, air ducts were made of a zinc-coated alloy, and they are still often found in production workshops or in catering establishments (their introduction is associated with high temperatures).
But for implementation in everyday life, that is, for installing ventilation in apartments and cottages, polymer products are more suitable.
They have the following benefits:
- have the least weight than iron ones, because they are easier to install with your own hands;
- smooth walls have little resistance to air movement;
- tight, as they do not have seams;
- resistant to high humidity, do not rust;
- on sale you can always find a set of fittings suitable for the cross section.
Products that meet GOSTs and have certificates of conformity are allowed for sale, so we can talk about the safety of plastic parts.
What it is
A screen can be called a structure that contains various hidden elements.With its help, you can organize skits, performances, use it for a puppet theater, conduct a master class in a kindergarten, and much more.

Railing handles for furniture: dimensions, installation options, photos in the interior
In addition to the entertainment function, a screen or decorative fence is actively used for the purpose of development, education and upbringing of children. Believe me, any kindergarten teacher will only be happy if something like this appears at her disposal. These are truly multifunctional products, with imagination and experience for which you can find a huge and diverse application. Using covers in a medical theme, you can organize a lesson on health care. Having stretched thematic canvases, it is easy to hold different performances, put on a whole performance.
Officially, such screens are referred to only as a developing object-spatial environment. There is even a state educational standard to which it must comply.
Don't worry, if you have ordinary polypropylene, verified dimensions and the right tool at your disposal, it will be difficult to violate these standards.
But still it is important to remember that we are talking about a product for children, and not for adults. Leaving the kids alone near the screen, the teacher or parents should not have any reason and reason to worry about their safety.
All this is written in the requirements and standards. They are in relation to the screen as follows:
- Safety. We are talking about the stability of the structure and its strength;
- Transformability. The ability of the screen to change its appearance by simple movements;
- Availability. This is not about price, but about the ability of each child to carry out certain actions;
- Variability.That is, the ability to change covers and filling;
- Content and richness. Here, I think, everything is clear;
- Multifunctionality. In fact, the union of all the previous points.
Such a decorative partition has excellent educational functions, it allows you to concentrate and hold the attention of kids, develop their ingenuity, thinking, be smart, learn something new, develop creatively, etc. Another screen becomes a great way to zone the room during quizzes, skits, various events so that children are not distracted by other things
Another screen becomes a great way to zone the room when holding quizzes, skits, various events so that children are not distracted by other things.
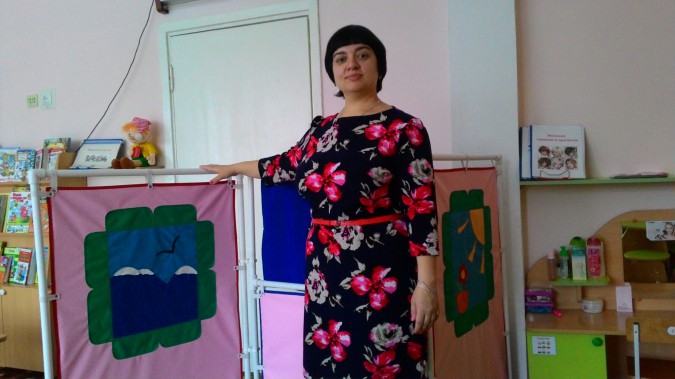
Master class on the use of the didactic manual "Multifunctional Screen".
Maria Bikeeva Master class on the use of the didactic manual "Multifunctional Screen".
In November 2015, in our kindergarten, a seminar was held by the Scientific and Methodological Center of Kemerovo on the topic “Building a developing subject-spatial environment - a condition for the readiness of the transition of a preschool educational institution to the Federal State Educational Standard of Distance Education”. Preparing for the seminar, the teachers of our group brought the developing object-spatial environment (RPPS) in line with the requirements of the Federal State Educational Standard for Preschool Education.
We remember that RPPS should be:
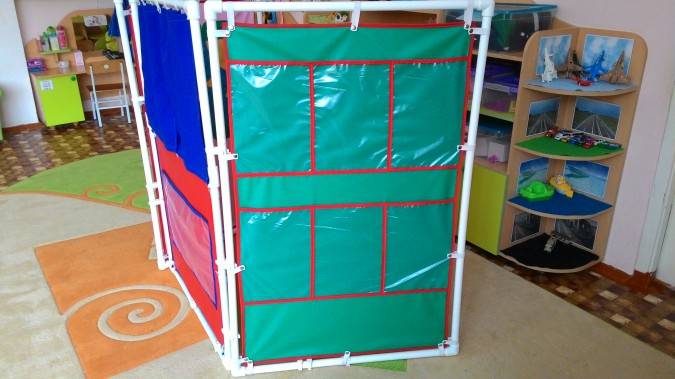
The listed requirements correspond to the “Multifunctional screen”, which was purchased for our group. I suggest you take a closer look at our screen, and then, perhaps, you will have a desire to make the same for your kindergarten. Moreover, the “Multifunctional screen” is made of inexpensive materials and is generally simple to implement.
The purpose of the master class: to show the possibilities of using the didactic aid "Multifunctional Screen" in various types of children's activities.
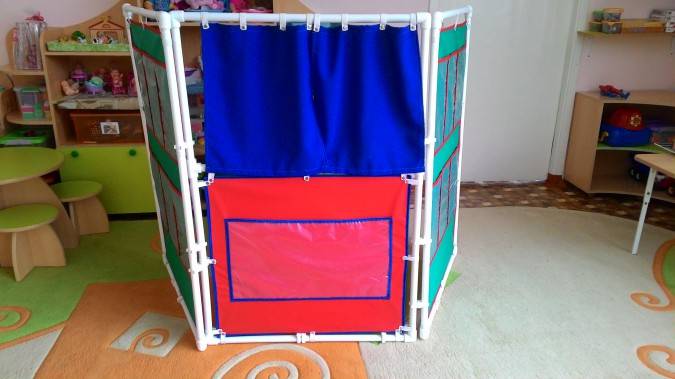
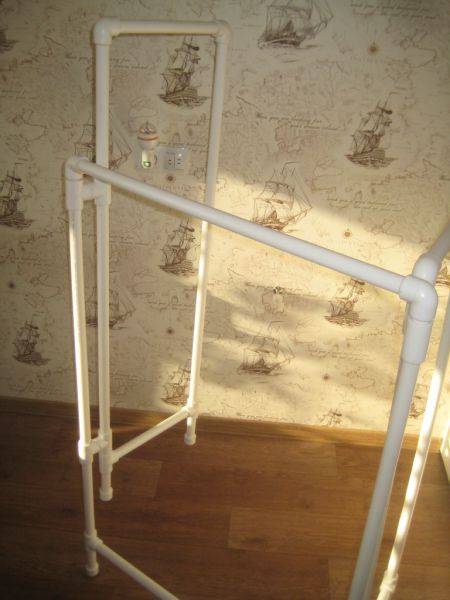
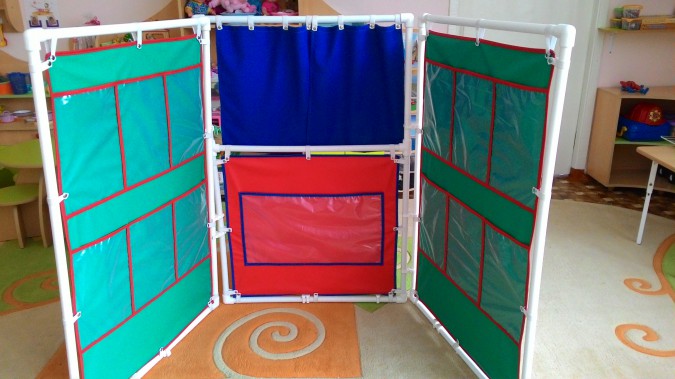
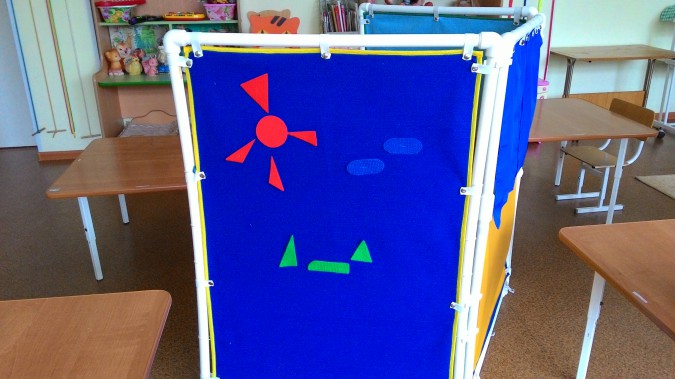
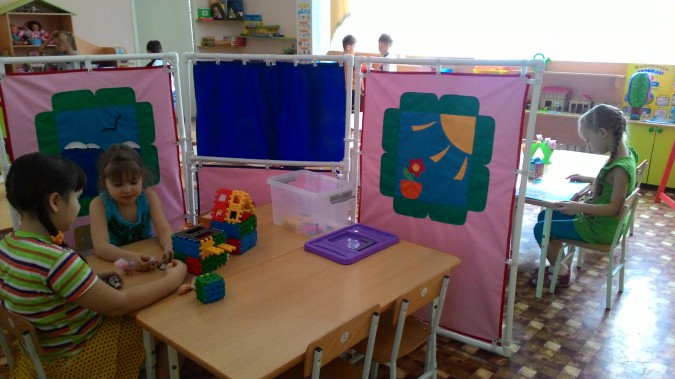
So, for starters, let's look at the screen from all sides. The screen is made up of three parts.
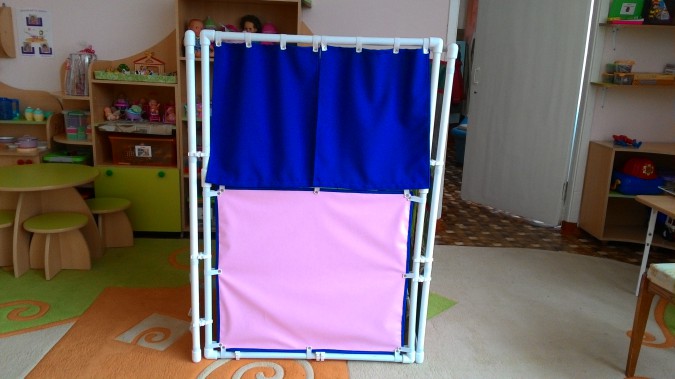
And now all the parts on the other side:


The base of the screen is made of polypropylene pipes (yes, from the same pipes that plumbers use to install water supply in the apartment, polypropylene fittings are used for connection.
Fitting - a connecting part of the pipeline, installed in places of its branches, turns, transitions to a different diameter, as well as, if necessary, frequent assembly and disassembly of pipes.
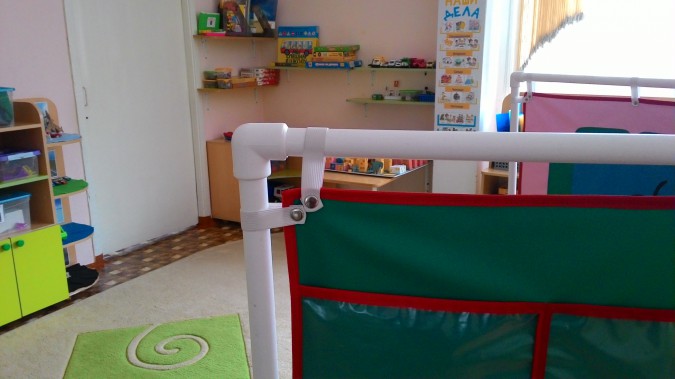
Here a fitting is used.
This fitting connects the frames together.
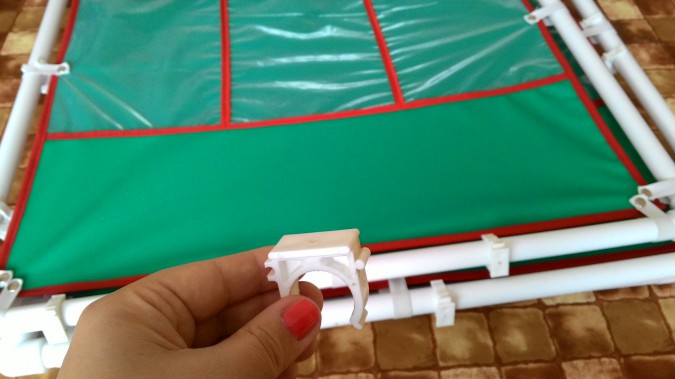
A single support is used as legs.
The diameter of the pipes used to make the screen is approximately 2.5 cm.
Side frame measurements:
width - 79 cm, height - 118 cm.
Center frame measurements:
From the bottom to the middle pipe - 72 cm.
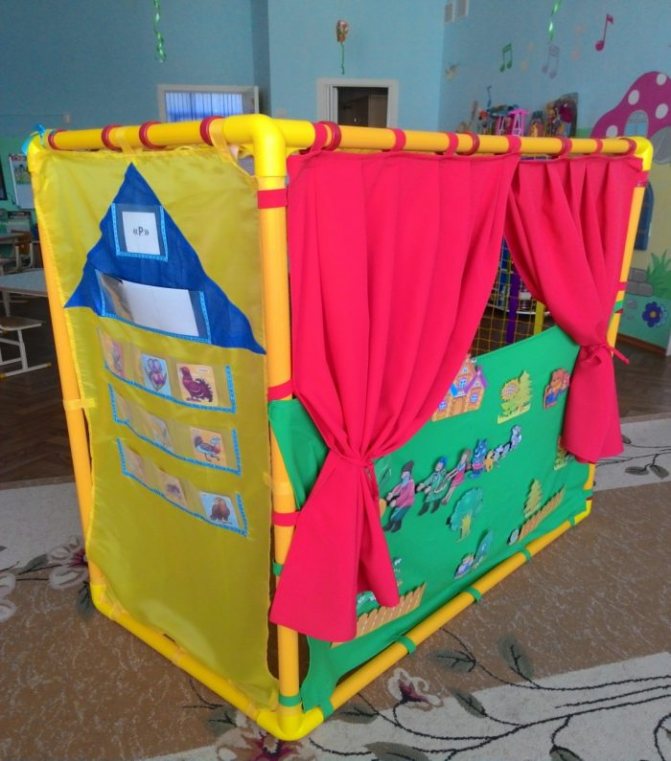
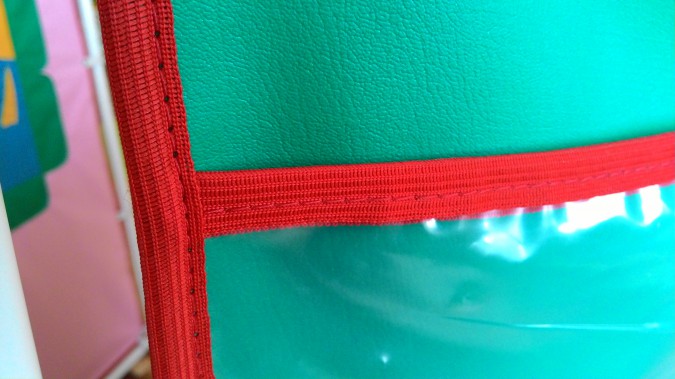
Leatherette panels are attached to the frames, polyester curtains are attached to the upper tube near the central frame.
Measurements of leatherette panels:
side panels - 112 cm by 65 cm.
Measurements of the lower central panel made of leatherette:
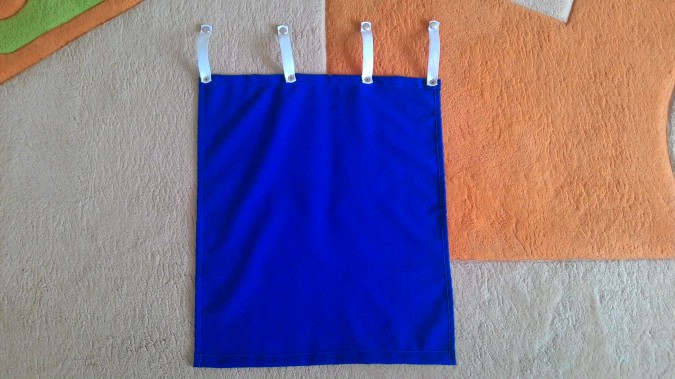
Measurements for one curtain:
length - 48 cm, width - 42 cm.
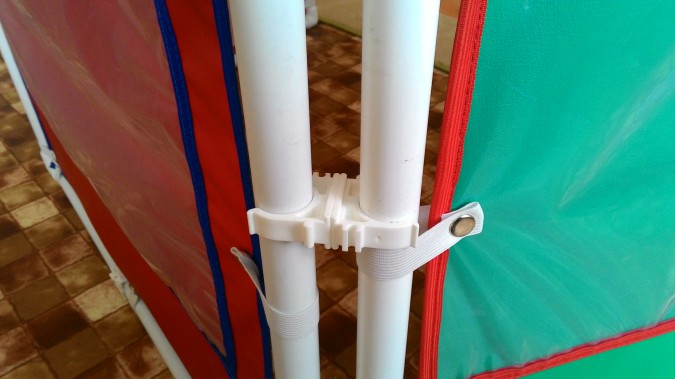
Both leatherette panels and curtains are attached to the frames with a wide elastic band and buttons.
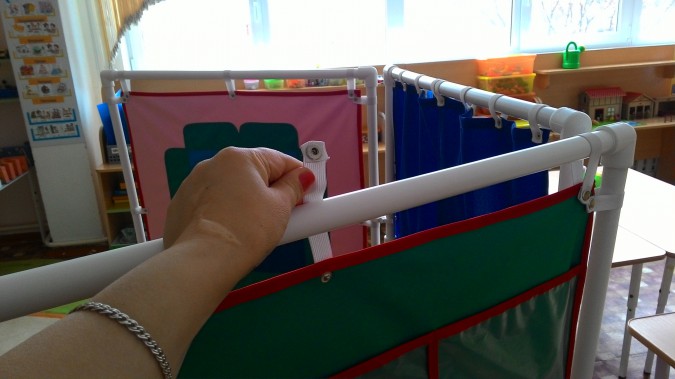
The length of the elastic is 12 cm.
This is what the curtain looks like with fasteners:
The multifunctional screen has transparent pockets where an A4 sheet is placed:
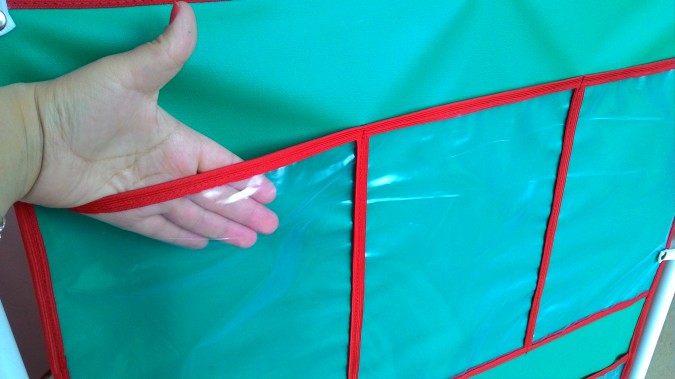
Pockets are stitched to leatherette:
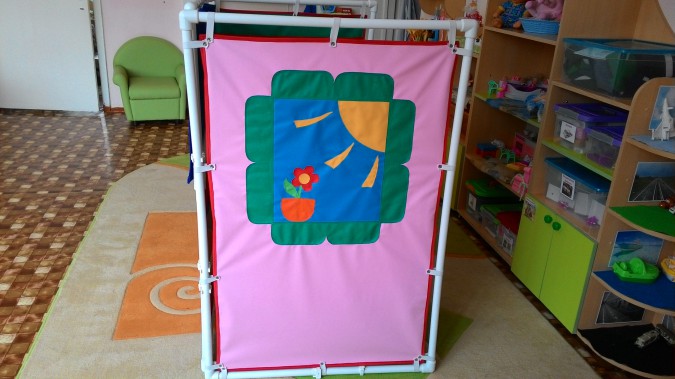
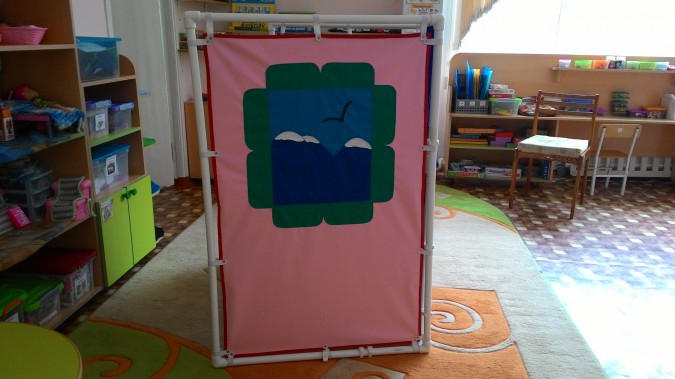
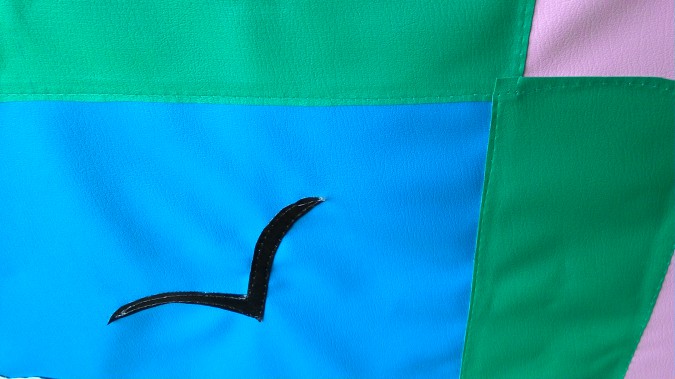
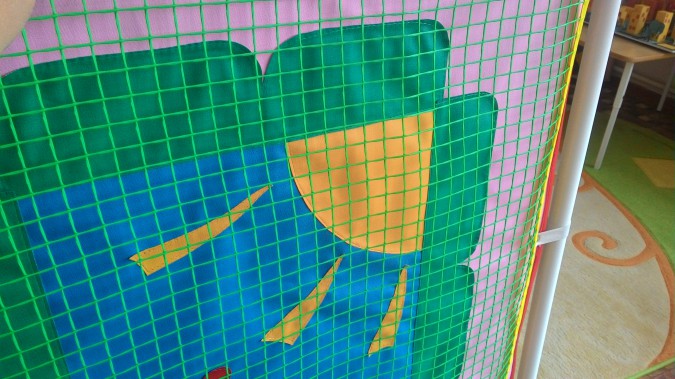
The screen is decorated with a beautiful application also made of leatherette. Application details are attached:
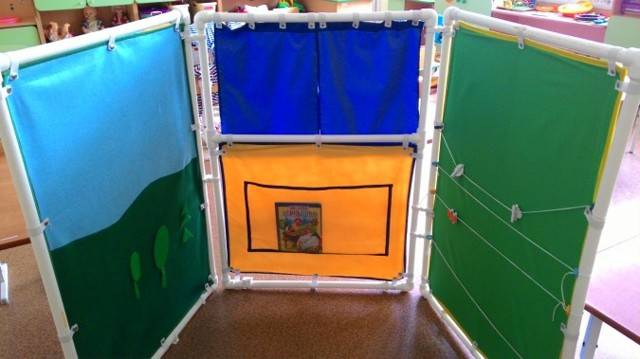
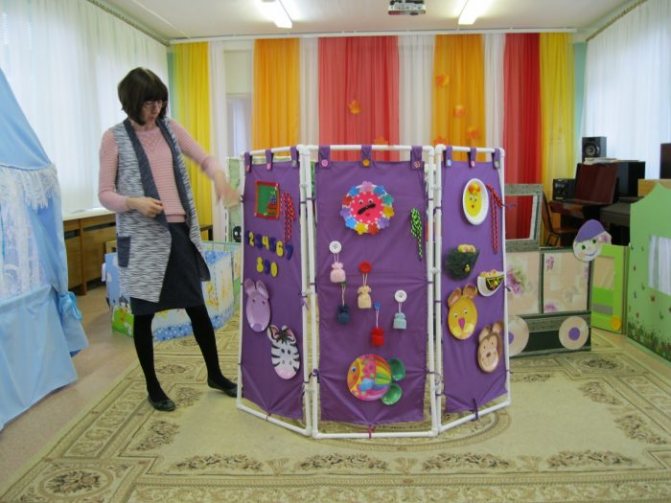
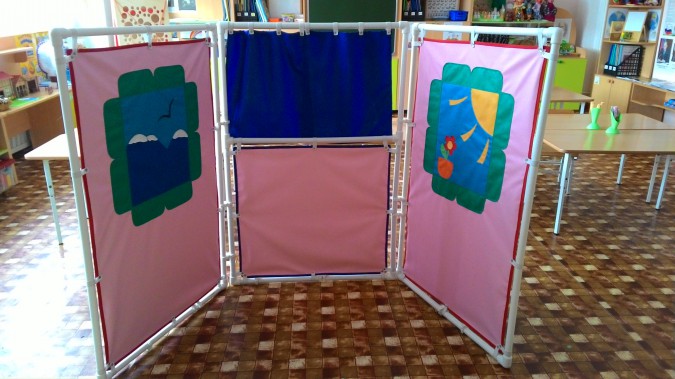
We examined the factory-made screen, and now let's look at the screen that the craftsmen from our kindergarten made. Nothing worse, and even better!

If the sample screen is made of leatherette, then FELT is used here, which makes the screen even more functional. The felt screen is used both as a flannelgraph and as the basis for a soft designer, and much more can be done with it, if the teacher had a fantasy!

They also pulled cords with decorative clothespins.
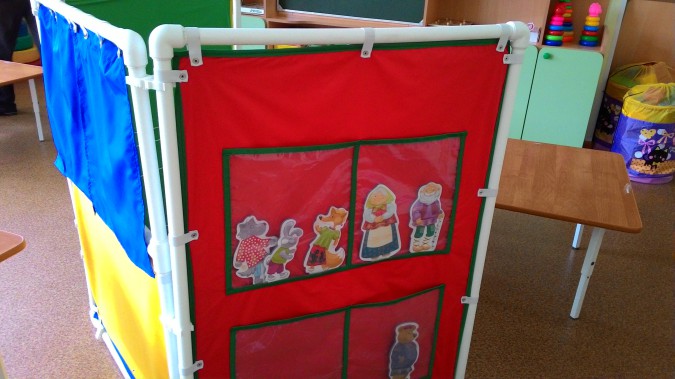
This screen is used in a manger, they made larger pockets for large pictures.
Another interesting “application” to the screen: a rectangle was cut out of the garden mesh and processed with a cloth, which can be fastened with buttons to the screen. With the help of decorative clothespins, you can attach children's work or photographs, or you can tie ribbons, laces. Lots of options.


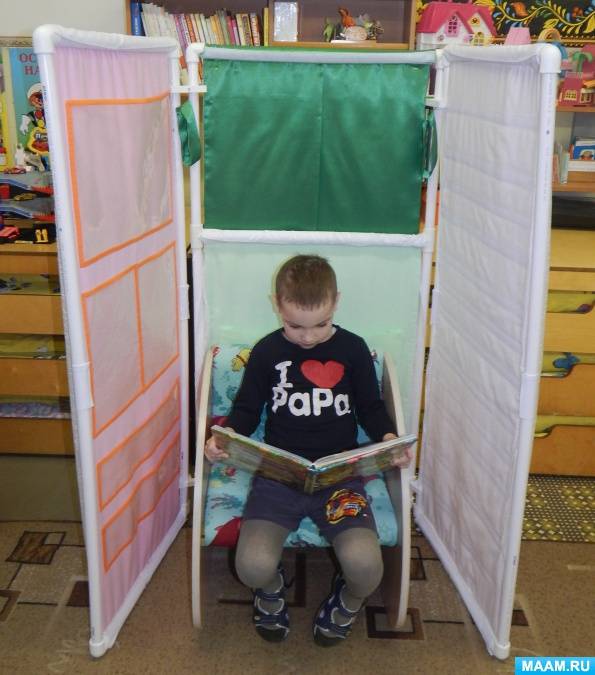
The child has retired completely:
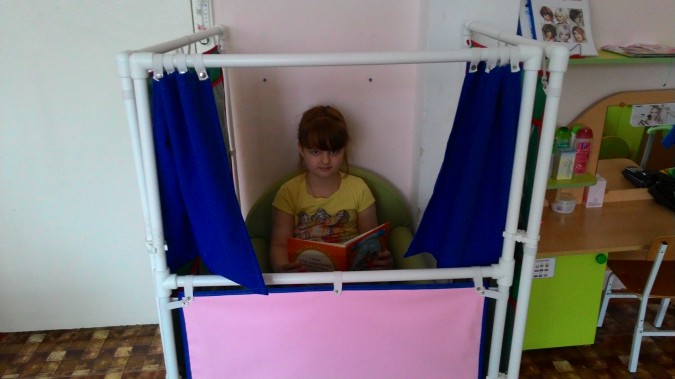
Child secluded partially:
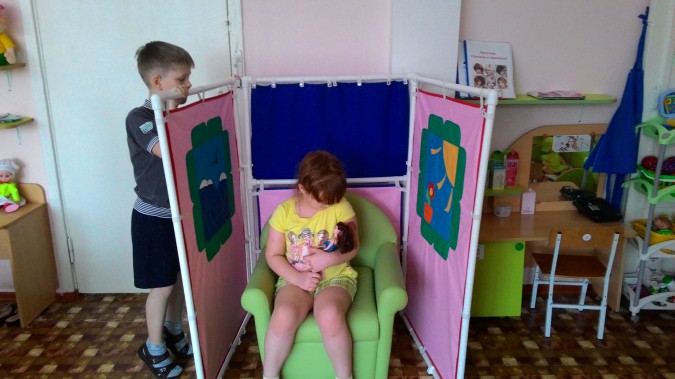
Show puppet theater:

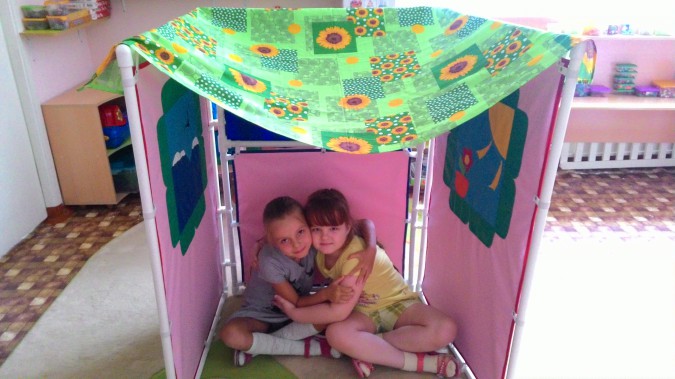
If you cover with a cloth, you get a tent:
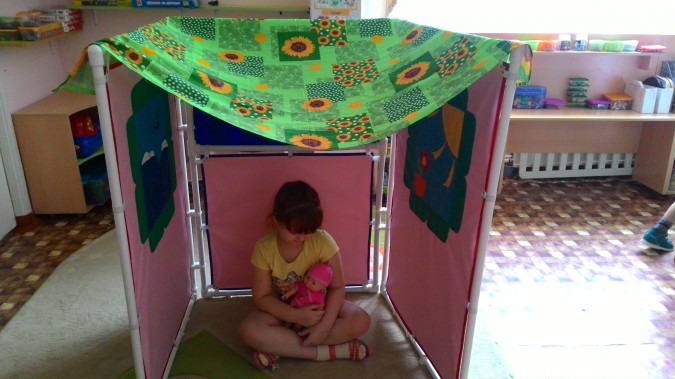
You can sit together:
Can be used as a stand
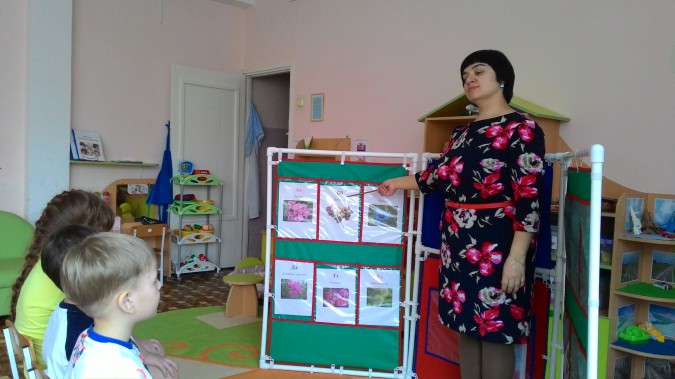
We create a space for the role-playing game “Guests”.
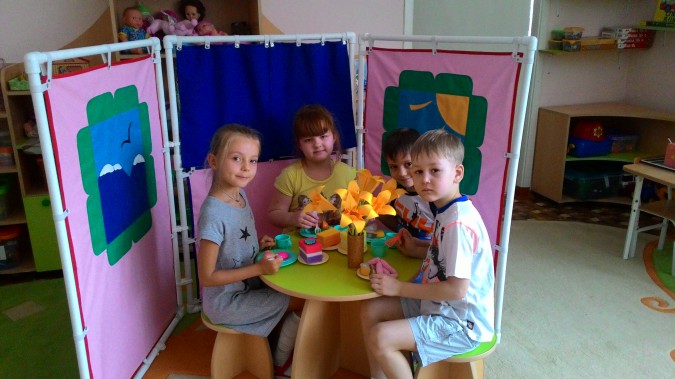
We share space and play according to interests:
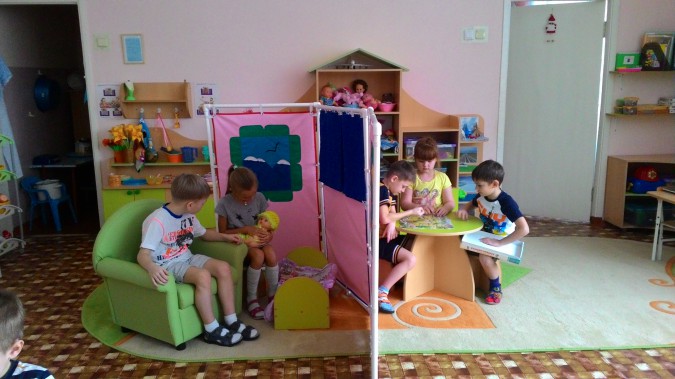
Noisy games do not distract other children from reading, for example.
I hope that my post will be useful, thank you for your attention!
Guidelines for the use of the multifunctional didactic manual "Miracle Tree" Explanatory note The didactic multifunctional manual "Miracle Tree" is intended for the development of children from 2 years old. This benefit is implemented.


